1 | Tojo Files: Collection of Information and Data from the Best Intel Agent of 31A, Tojo Tsukasa | |||||||||||||||||||||||||||||||||||||||||||
|---|---|---|---|---|---|---|---|---|---|---|---|---|---|---|---|---|---|---|---|---|---|---|---|---|---|---|---|---|---|---|---|---|---|---|---|---|---|---|---|---|---|---|---|---|
2 | ||||||||||||||||||||||||||||||||||||||||||||
3 | 2025-02-27 | |||||||||||||||||||||||||||||||||||||||||||
4 | If you're new to Heaven Burns Red, please read the "Directory" tab to find "KozuRadio". | |||||||||||||||||||||||||||||||||||||||||||
5 | Announcements: | |||||||||||||||||||||||||||||||||||||||||||
6 | ||||||||||||||||||||||||||||||||||||||||||||
7 | Updates will become slower as real life obligation increase. JP was added previously as reference in the event of slow updates. Chapter 5.2.2 releases on 2/21. Will most likely not be updating the files until finishing the chapter. | |||||||||||||||||||||||||||||||||||||||||||
8 | ||||||||||||||||||||||||||||||||||||||||||||
9 | ||||||||||||||||||||||||||||||||||||||||||||
10 | ||||||||||||||||||||||||||||||||||||||||||||
11 | Tojo Files has become a little too large of a File and will be cut down in size. Please see "Directory" tab for moved Tabs. | |||||||||||||||||||||||||||||||||||||||||||
12 | ||||||||||||||||||||||||||||||||||||||||||||
13 | Moved Tabs: | |||||||||||||||||||||||||||||||||||||||||||
14 | If you plan to use Tojo Files for the HBR Guide Competitions, please contact me before using. You may use information written here, but please make your own visuals instead of taking screenshots. | |||||||||||||||||||||||||||||||||||||||||||
15 | Game News Game FAQ Newbie Stuff Team Recommendations Personality Parameter | |||||||||||||||||||||||||||||||||||||||||||
16 | ||||||||||||||||||||||||||||||||||||||||||||
17 | ||||||||||||||||||||||||||||||||||||||||||||
18 | ||||||||||||||||||||||||||||||||||||||||||||
19 | ||||||||||||||||||||||||||||||||||||||||||||
20 | ||||||||||||||||||||||||||||||||||||||||||||
21 | What are the Tojo Files? | Who am I? |  | |||||||||||||||||||||||||||||||||||||||||
22 | ||||||||||||||||||||||||||||||||||||||||||||
23 | The Tojo Files is a personal comprehensive tier list (and more) for the game Heaven Burns Red. Like all tier lists, this one is opinion based off of the collected experience of myself and those I have had the pleasure of talking to. I hope you find this document informative and create your own take on how powerful a style is compared to other styles. This project is meant to further your understanding on how to play the game with the styles you have and plan who may want to pick up and why. The largest difficulty in creating such a comprehensive project is the sheer number of combination of skills a character can bring because each SS style will provide an EX skill (exclusive) and a common skill (shared). So the more styles of a character you have, the more skill options you will have for that specific character. Some styles are good without other styles, some will require the common skill of another to be considered good. Due to this, it is confusing to find any accurate information on other sources of who is good and why. I am making this document to make it easier to understand what parts you will need for each style to make full use of them and how powerful a style is, depending on the parts you have, so you can make the best assessment for yourself. | Welcome all to Tojo Files, I am Bakasa (Tsukasa). I am a veteran HBR JP player that has been playing the game since their 1st anniversary. Though I may not know everything, I believe I have a good enough head on my shoulders to create this project to help as many EN players as I can. For the record, I have completed all the game has to offer and experimented with many different teams. I have reached the highest individual score needed for Score Attack and Skirmish Simulation (the rotating end game) on the highest difficulty with meta or off meta teams for the past year. I have talked to a handful of players ranging from Free to Play to decently high spenders to collect data for this project. | ||||||||||||||||||||||||||||||||||||||||||
24 | ||||||||||||||||||||||||||||||||||||||||||||
25 | ||||||||||||||||||||||||||||||||||||||||||||
26 | ||||||||||||||||||||||||||||||||||||||||||||
27 | ||||||||||||||||||||||||||||||||||||||||||||
28 | ||||||||||||||||||||||||||||||||||||||||||||
29 | ||||||||||||||||||||||||||||||||||||||||||||
30 | ||||||||||||||||||||||||||||||||||||||||||||
31 | Important note: | | ||||||||||||||||||||||||||||||||||||||||||
32 | 1 | Terminology is getting changed to EN translations. Some terminology has yet to be changed | ||||||||||||||||||||||||||||||||||||||||||
33 | 2 | Some memoria have gotten buffed since their release and may see low ranking on the EN list, but higher ranking on the JP list. Some SS1 have been buffed through Tower upgrades and other SS have been buffed during the 2.5th and 3rd anniversary buff patch. | ||||||||||||||||||||||||||||||||||||||||||
34 | ||||||||||||||||||||||||||||||||||||||||||||
35 | ||||||||||||||||||||||||||||||||||||||||||||
36 | ||||||||||||||||||||||||||||||||||||||||||||
37 | Directory | Plans to add in the near future | ||||||||||||||||||||||||||||||||||||||||||
38 | ||||||||||||||||||||||||||||||||||||||||||||
39 | Change log | Update log for Tojo Files | Progress | Plan | ||||||||||||||||||||||||||||||||||||||||
40 | Game FAQ | Game information for general | 60% | Format | ||||||||||||||||||||||||||||||||||||||||
41 | Dictionary | Game Terminology EN and JP. What they mean. | 80% | Write up for each style | | |||||||||||||||||||||||||||||||||||||||
42 | Newbie Stuff | Mistakes and tips for newer players. READ AFTER "Game FAQ" | 100% | Creating Baseline tier list | ||||||||||||||||||||||||||||||||||||||||
43 | Memoria Debut List | JP release order. No reprise banners are listed. | 100% | Creating Total tier list | ||||||||||||||||||||||||||||||||||||||||
44 | Tier list (EN) | Tier List for EN in EN meta | 100% | Creating a Limit Break 3 tier list | ||||||||||||||||||||||||||||||||||||||||
45 | Tier list (JP) | Tier List for JP in JP meta | 0% | Creating pulling priority list for Common skills/generalized SS1 EX skill | ||||||||||||||||||||||||||||||||||||||||
46 | Team Rec (EN) | Team Recommendations for those new to the game | 100% | Team Composition suggestions | ||||||||||||||||||||||||||||||||||||||||
47 | Gear | How to farm gear. Gearing priority. | 100% | Initial Banner List. Descriptions will be added at a later date | ||||||||||||||||||||||||||||||||||||||||
48 | Dungeon | Dungeon efficiency and maps | 70% | Gear | ||||||||||||||||||||||||||||||||||||||||
49 | Resources | Other resources people can use | 0% | Tower Upgrades | ||||||||||||||||||||||||||||||||||||||||
50 | Memoria Details | Detailed breakdown for each style | 100% | Dungeon | ||||||||||||||||||||||||||||||||||||||||
51 | Dmg Info | Advanced information for the non-casual | 50% | Advanced information | ||||||||||||||||||||||||||||||||||||||||
52 | Tower Upgrade/buffs | List of Tower upgrades and buffs on old styles | ||||||||||||||||||||||||||||||||||||||||||
53 | Personality Parameter | Areas in story to increase Parameter |  | |||||||||||||||||||||||||||||||||||||||||
54 | ||||||||||||||||||||||||||||||||||||||||||||
55 | ||||||||||||||||||||||||||||||||||||||||||||
56 | Special Thanks: | |||||||||||||||||||||||||||||||||||||||||||
57 | Special thanks to Rem for HBR.quest and assets. Without his help, none of this would be possible. | |||||||||||||||||||||||||||||||||||||||||||
58 | Also thanks to all members of the unofficial EN HBR discord that came together to help me create and update this list. | |||||||||||||||||||||||||||||||||||||||||||
59 | If you would like to add any input or have any additional questions, feel free to contact me. @risolene discord | |||||||||||||||||||||||||||||||||||||||||||
60 | Shivan Dragon, Faust, SithObi1 for edits. | |||||||||||||||||||||||||||||||||||||||||||
61 | ||||||||||||||||||||||||||||||||||||||||||||
62 | I highly appreaciate any donations made as I continue to update the Tojo Files. | |||||||||||||||||||||||||||||||||||||||||||
63 | ||||||||||||||||||||||||||||||||||||||||||||
64 | Special thanks to following Donators: | |||||||||||||||||||||||||||||||||||||||||||
65 | Wavy |  |  |  |  |  |  |  |  |  |  |  | ||||||||||||||||||||||||||||||||
66 | PaeP3nguin | |||||||||||||||||||||||||||||||||||||||||||
67 | TGWither | |||||||||||||||||||||||||||||||||||||||||||
68 | Zethos | |||||||||||||||||||||||||||||||||||||||||||
69 | コロネウス | |||||||||||||||||||||||||||||||||||||||||||
70 | Imago | |||||||||||||||||||||||||||||||||||||||||||
71 | Lily | |||||||||||||||||||||||||||||||||||||||||||
72 | Pseych-man | |||||||||||||||||||||||||||||||||||||||||||
73 | Lily | |||||||||||||||||||||||||||||||||||||||||||
74 | Curtz | |||||||||||||||||||||||||||||||||||||||||||
75 | LCG | |||||||||||||||||||||||||||||||||||||||||||
76 | Del | |||||||||||||||||||||||||||||||||||||||||||
77 | Lithium Snapple | |||||||||||||||||||||||||||||||||||||||||||
1 | ` | ||||||||||||||
|---|---|---|---|---|---|---|---|---|---|---|---|---|---|---|---|
2 | Other Projects: For Fun | ||||||||||||||
3 | |||||||||||||||
4 | KozuRadio EN Server: Game News and a beginner's introduction to the game. | ||||||||||||||
5 | |||||||||||||||
6 | Ruka's Contact List Ruka's connection with the other members. | ||||||||||||||
7 | |||||||||||||||
8 | Nanase Notes Team Building : Still in Construction | ||||||||||||||
9 | |||||||||||||||
10 | |||||||||||||||
11 | |||||||||||||||
12 | Potential Future Projects | ||||||||||||||
13 | |||||||||||||||
14 | Tezuka's Operation Plans Name TBD (Bungo Dairy) | ||||||||||||||
15 | |||||||||||||||
1 | |||||||||||||||
|---|---|---|---|---|---|---|---|---|---|---|---|---|---|---|---|
2 | 2/27/2025 | Added to "Upgrades/Buff" by adding ALL styles that have been buffed in HBR history between EN and JP, including changes | |||||||||||||
3 | 2/15/2025 | Updated "Tier list (JP)" A/S/Mastery | |||||||||||||
4 | 2/9/2025 | Deleted "Tier List (EN)" Will continue to update the Tier list that has EN's future units. This is because Yostar has no set path on when they release what and I don't have the time to work around that. | |||||||||||||
5 | 2/5/2025 | Minor updates on Introjection and Upgrade tabs. Pull recs were also updated with 3rd Anni patch. | |||||||||||||
6 | 1/25/2025 | Updated JP tier list for LB1 | |||||||||||||
7 | 1/13/2025 | Minor updates in multiple tabs | |||||||||||||
8 | 1/3/2025 | Added "Pull Rec" Tab | |||||||||||||
9 | 12/29/2024 | Updated "Dmg " Tab. Added table about how much increase you gain from leveling up a skill. | |||||||||||||
10 | 12/28/2024 | Updated Tier list + Akari 2 patch ; Updated Tier list (EN) | |||||||||||||
11 | 12/22/2024 | Updated Tier list EN | |||||||||||||
12 | 12/19/2024 | Added Attack Types on Tier List tabs. Added to "Memoria Debut List" 2 new JP banners. Look forward to some massive changes in the tier list. | |||||||||||||
13 | 12/15/2024 | Many Minor updates. "Dmg" tab was improved. | |||||||||||||
14 | 12/7/2024 | Added "OD earring" Chart in "dmg tab". Orb part in "Gear" Updated. | |||||||||||||
15 | 12/5/2024 | ||||||||||||||
16 | 12/4/2024 | Shiv: Added brief descriptions for all remaining banners | |||||||||||||
17 | 12/3/2024 | Shiv: Added descriptions for banners past March 8, 2023. | |||||||||||||
18 | 12/2/2024 | Reformat "Game FAQ". Updated "Tear Dungeon". | |||||||||||||
19 | 11/30/2024 | Updated "JP tier list". Reformatted "Dmg Info" To make it more Newbie friendly and not a cluster mess pile. | |||||||||||||
20 | 11/29/2024 | Updated "Game News". Added "Tear Dungeon" Tab. "Gear" Added Ch4.1 booster/chips. | |||||||||||||
21 | 11/28/2024 | Added to "Dmg info". Moved Block of text from "Dmg info" to a new tab "Gameplay" for the time being. | |||||||||||||
22 | 11/27/2024 | Small updates to multiple tabs. Added more to "memoria details" | |||||||||||||
23 | 11/26/2024 | Replace dark dungeon floor 1 map. added more to "newbie stuff" | |||||||||||||
24 | 11/25/2024 | Added Dmg table in "damage" tab. Minor edits to "dungeon" tab due to errors. "Memoria details" replaced "Data sheet" as a temporary template | |||||||||||||
25 | 11/24/2024 | Added: "Personality parameter" tab; Changed "Advanced" tab to "Damage" and updated tab | |||||||||||||
26 | 11/23/2024 | Completed "tower upgrades" tab | |||||||||||||
27 | 11/22/2024 | Added Tier list (JP/WIP) to have tier list for "A/S/Mastery LB1". This list assumes you only own 1 memoria of a character. Added new memorias and adjusted some placements. Added "event shop priority" to "newbie stuff" | |||||||||||||
28 | 11/21/2024 | Fixed wording issues and team issues on "dungeon" tab | |||||||||||||
29 | 11/19/2024 | Added booster/chips to "gear". Made a few edits to the "tier list+6month". Added Gold Hopper section to "dungeon" | |||||||||||||
30 | 11/18/2024 | Moved Common mistakes to "Newbie stuff" | |||||||||||||
31 | 11/17/2024 | Added "Dictionary" tab for terminology. Editting FAQ for better redibility and added "Auto arena use life stone or free time?". NEW RESOURCE A GUIDE BY PSEYCHIE. Added "newbie stuff" and "game news". Updated "Tier list (EN) and Added "tier list+6month (EN). Extended dictionary and added useful links; minor changes to gear, added earrings to gear (Shiv) | |||||||||||||
32 | 11/16/2024 | "Tier list "Viable" moved up to tier 3. |  | ||||||||||||
33 | 11/15/2024 | Major update. Added to "Dungeon". Tojo Files is now public. Updated FAQ with "reroll" & "common mistakes" / updated "gear" tab. | |||||||||||||
34 | 11/14/2024 | Major update. Added "Game FAQ (EN)" tab. Added "Notable S" on EN tier list. Finished "Own all skills (JP)". | |||||||||||||
35 | 11/12/2024 | Updated "Tier list (EN)" and "Intro" | |||||||||||||
36 | 11/8/2024 | Added "Tier list (EN)" tab. Added picture data tab. | |||||||||||||
37 | 11/7/2024 | Added Admiral Aoi and Doctor Seika. Banner Photos Added | |||||||||||||
38 | 11/6/2024 | Added new tab "Banner List"; Added more desciptions of styles. Added category for naming styles to make it easier than reading "SS1/SS2". Added "Gear" Tab. Updated "Tier list" as outdated | |||||||||||||
39 | 11/5/2024 | Added more descriptions of styles | |||||||||||||
40 | 11/1/2024 | Added more descriptions of styles | | ||||||||||||
41 | 10/31/2024 | Changed template to add more information. Continued to add descriptions of styles (30% complete) | |||||||||||||
42 | 10/29/2024 | Started adding descriptions for each style. | |||||||||||||
43 | 10/28/2024 | Changed Tiering System from T0-5 to 10-0 | |||||||||||||
44 | 10/27/2024 | Continuing to fill out basic info. Format for details finalized, until feedback. | |||||||||||||
45 | |||||||||||||||
46 | |||||||||||||||
47 | |||||||||||||||
48 | |  |  | ||||||||||||
49 | |||||||||||||||
50 | |||||||||||||||
51 | |||||||||||||||
52 |
1 | ||||||||||||||||||||||||||||
|---|---|---|---|---|---|---|---|---|---|---|---|---|---|---|---|---|---|---|---|---|---|---|---|---|---|---|---|---|
2 | ||||||||||||||||||||||||||||
3 | Vocab | JP Vocab | Description | |||||||||||||||||||||||||
4 | Memoria | Style | Basically character costumes with 2 skill. This is the gacha | |||||||||||||||||||||||||
5 | Pity/Spark | Pity/Spark | A gacha game term. Performing 150 pulls (on EN) or 200 (JP) on the same banner will grant a choice of one of the rate up unit SS memoria for free (or 10 of that memoria's SS pieces) | Angel Beats will have a 200 pity | ||||||||||||||||||||||||
6 | ||||||||||||||||||||||||||||
7 | ||||||||||||||||||||||||||||
8 | Quartz | Quartz | In game currency used for gacha. Separated into two groups, paid and free. Free quartz can be earned through normal gameplay and from the monthly pass | |||||||||||||||||||||||||
9 | ||||||||||||||||||||||||||||
10 | ||||||||||||||||||||||||||||
11 | Limit Break (LB) | Limit Break (LB) | The dupe system. Each Limit Break will provide Stats and potentially more character levels | |||||||||||||||||||||||||
12 | Reversion | Reincarnation | Raises a stat by 1 (in JP raises all stats by 1). Reduces XP by the same amount it takes to get from 1 to 90 (no XP reduction in JP). At reversion 1/5/10/20 the character, not memoria, will gain 1 extra skill slot. This will be applied to all memoria of a character. | |||||||||||||||||||||||||
13 | ||||||||||||||||||||||||||||
14 | ||||||||||||||||||||||||||||
15 | Introjection | Generalize | The ability to make the EX skill used on other memoria. Currently can only be done to SS1, even on JP. | |||||||||||||||||||||||||
16 | Tears | Hoju | An item from "Oubliette of Tears" that is used to upgrade memoria (last tab). You will need 51 to max out a memoria. | |||||||||||||||||||||||||
17 | Enemy Border | Enemy Border | Enemy Stats | |||||||||||||||||||||||||
18 | Master Skill | A common skill tied to a character and not a memoria. It is unlockable once completing master missions (JP only) | ||||||||||||||||||||||||||
19 | Slash | Slash |  | Slash Dmg type. Not Relavent to elements. Uses a type of sword to deal dmg. More info in "Dmg Info" | ||||||||||||||||||||||||
20 | ||||||||||||||||||||||||||||
21 | Pierce | Pierce |  | Pierce Dmg type. Not Relavent to elements. Uses a gun or bow to deal dmg. More info in "Dmg Info" | ||||||||||||||||||||||||
22 | ||||||||||||||||||||||||||||
23 | Crush | Blunt |  | Crush Dmg type. Not relavent to elements. Uses a blunt object to crush the enemy to deal dmg. More info in "Dmg Info". | ||||||||||||||||||||||||
24 | ||||||||||||||||||||||||||||
25 | ||||||||||||||||||||||||||||
26 | ||||||||||||||||||||||||||||
27 | ||||||||||||||||||||||||||||
28 | Skill Words | |||||||||||||||||||||||||||
29 | ||||||||||||||||||||||||||||
30 | Icon | Vocab | JP Vocab | Description | Zone/Field visual | |||||||||||||||||||||||
31 | Zone | Field | There is no icon. Small field has a 50% mutliplier for that dmg type (including the enemy atk) and is permanent. Large field is 65% multiplier and typically lasts for 8 turns. | >>>> | ||||||||||||||||||||||||
32 | Fire | |||||||||||||||||||||||||||
33 |  | Tactical Vision | Mind eye | A buff that increases skill dmg when hitting weakness (35-50%). | Ice | |||||||||||||||||||||||
34 | Thunder | |||||||||||||||||||||||||||
35 |  | Exposed (Vulnerable) | Fragile | Debuff that increases weakness dmg taken by the cancer (35-50%). Described as "vulnerable" | Light | |||||||||||||||||||||||
36 | Dark | |||||||||||||||||||||||||||
37 | (Excl.) | EX Skill | Exclusive skill or Ultimate skill. They are exclusive to each SS memoria, however SS1 memoria EX skills can be generalized to be used on all other memorias, including A and S. | Rice (JP only) | ||||||||||||||||||||||||
38 | ||||||||||||||||||||||||||||
39 | Hit Count Visual | Funnel (Hit Count) Info | ||||||||||||||||||||||||||
40 | 30% more eff. on HP | 30% HP modifier | A 30% damage modifier when hitting the enemy HP. | |||||||||||||||||||||||||
41 |  | -Funnel buff is consumed by attack NOT SKILL (JP is skill only). -Auto Attacks WILL consume funnel buff. -All Hits from Funnel buff will be applied AFTER the base hits of an attack. -Extra hit counts increase DMG + Overdrive gain + Devastation Rate. | ||||||||||||||||||||||||||
42 |  | Charges up with holy light (enhance skills). [Charge up] | Charge | Charge is a buff that increases skill dmg (20-30%, additive to skill enhance) and 20% crit rate. This is one of the few buffs that can't stack twice. | ||||||||||||||||||||||||
43 | ||||||||||||||||||||||||||||
44 | ||||||||||||||||||||||||||||
45 | ||||||||||||||||||||||||||||
46 |  | Invigorate | Fighting Spirit | Buff that provides +20 to every Parameter. Can't stack twice. | ||||||||||||||||||||||||
47 | ||||||||||||||||||||||||||||
48 |  | Infeeble | Misfortune | Debuff that lowers cancer's Parameter by 20. This debuff does not influence dmg calculation of a critical hit. Can't stack. | ||||||||||||||||||||||||
49 | ||||||||||||||||||||||||||||
50 |  | Hit count | Funnel (hit count) | Increases hit-count for your next dmging attack, including an auto attack. Each additional hitcount has a certain potency for dmg. Each hit count will also apply for OD. EN: Currently does not show up on buff bar. | >>>> | |||||||||||||||||||||||
51 | ||||||||||||||||||||||||||||
52 | Super Break | After hitting an enemy that is broken and is weak to dmg type, increases maximum devastation by 300% | Totem Count Visual | |||||||||||||||||||||||||
53 | ||||||||||||||||||||||||||||
54 |  | Increase Devastation Rate Inflicted | Destruction Rate Up | Increases the Destruction (Devastation rate) applied by a skill. |  | |||||||||||||||||||||||
55 | ||||||||||||||||||||||||||||
56 | ||||||||||||||||||||||||||||
57 | Devastation | Destruction | Applies after breaking cancer DP. The number next to their HP (I.e. 125/300%). This is a multiplier for dmg. [High Devastation] < [Great Devastation] < [Massive Devastation] . More info in "Dmg info" Tab. | |||||||||||||||||||||||||
58 | ||||||||||||||||||||||||||||
59 |  | Totems | Tokens | A buff that can be stacked 10 times. Certain EX skills will have an increased multiplier for each totem present. | > > | > > | > > | > > | > > | |||||||||||||||||||
60 | ||||||||||||||||||||||||||||
61 |  | Draws Focus | Cover | All Attacks will hit the character/enemy. Yes, AoE attacks will only land on this character/enemy. Yes enemies can have this as well. AoE is advised to kill such cancers quickly. | ||||||||||||||||||||||||
62 | ||||||||||||||||||||||||||||
63 |  | Draws Attacks | Provoke | All Single Target Attacks will target this character/enemy. | ||||||||||||||||||||||||
64 | ||||||||||||||||||||||||||||
65 | ||||||||||||||||||||||||||||
66 | ||||||||||||||||||||||||||||
67 | ||||||||||||||||||||||||||||
68 | Stats | |||||||||||||||||||||||||||
69 | ||||||||||||||||||||||||||||
70 | Vocab | JP Vocab | Description | |||||||||||||||||||||||||
71 | STR | Strength | Offensive stat. Generally dmg skills with HP modifiers will scale more with STR. Associated with the attacker role | |||||||||||||||||||||||||
72 | DEX | Dexterity | Offensive stat. Generally dmg skills with DP modifier will scale more with DEX. Asociated with the breaker role | |||||||||||||||||||||||||
73 | VIT | Constitution | Defensive stat that reduces dmg. Physical dmg (usually single target) is more affected by VIT. This is NOT defense. Some memoria, typically defenders, scale damage off of this stat and not STR/DEX. Care should be taken to equip such memoria properly | |||||||||||||||||||||||||
74 | ||||||||||||||||||||||||||||
75 | ||||||||||||||||||||||||||||
76 | SPR | Spirit | Defensive stat that reduces dmg. Special dmg (usually AoE) is more affected by SPR. This is NOT defense. | |||||||||||||||||||||||||
77 | INT | Wisdom | Utility stat. Increases debuff potency, heals, and buff potency. Defense debuffs are more affected by INT. Associated with healers, buffers and debuffers | |||||||||||||||||||||||||
78 | ||||||||||||||||||||||||||||
79 | LCK | Luck | Utility stat. Increases debuff potency and slightly increases crit chance. Exposed debuffs are more affected by LCK. Chance based debuffs. Associated with debuffers and Bungo SS1 | |||||||||||||||||||||||||
80 | ||||||||||||||||||||||||||||
81 | ||||||||||||||||||||||||||||
82 | Game Modes | |||||||||||||||||||||||||||
83 | ||||||||||||||||||||||||||||
84 | Picture | EN Vocab | JP Vocab | Content | ||||||||||||||||||||||||
85 | Score Challenge | Score Attack | 2-3 week long Rotating content. High Score Challenge. Score as high as you can for rewards. Remember to hit 1 million total score by the end of the 2-3 week period. | |||||||||||||||||||||||||
86 | ||||||||||||||||||||||||||||
87 | Anachronies | Divergence | Story Mode bosses but Hard Mode. Expect a slightly harder challenge than the Story mode.... slightly harder. | |||||||||||||||||||||||||
88 | ||||||||||||||||||||||||||||
89 | Dungeon/Ouliette | Dungeon | Reoccurring battles where you walk around like Pokemon, but you're gathering resources while wild Pokemon come try to annoy you. | |||||||||||||||||||||||||
90 | ||||||||||||||||||||||||||||
91 |  | ??? | Arts Battle | Silly Rogue-like "Card game". All characters will start at lvl 1, but will have access to LB passives. Form a deck of cards (with power-up) and get dealt a hand. Pick power-up cards or Cancer enemies. Killing Enemy Cancers will provide XP, increasing stats until lvl cap. Power-up cards will provide power-ups and effects at the cost of turns. At the end of each phase (certain number of turns, a boss will appear). | ||||||||||||||||||||||||
92 | ||||||||||||||||||||||||||||
93 | ||||||||||||||||||||||||||||
94 | Clock Tower (Hell) | Clock Tower (Hell) | ||||||||||||||||||||||||||
95 | ||||||||||||||||||||||||||||
96 | ???? | Seraph Skirmish Simulation | ||||||||||||||||||||||||||
97 | ||||||||||||||||||||||||||||
1 | Banner (Picture) | Rate Up | Description | ||||||
|---|---|---|---|---|---|---|---|---|---|
2 | Date JP | Date EN | Notable Skills | ||||||
3 | February 13, 2022 | Already Released |  | Mari Satsuki | Default | SS1 |  | EX: Small Ice Field | Mari has the only ice field. Her later styles can take advantage of this with generize. |
4 | |||||||||
5 | Tsukasa Tojo | S | |||||||
6 | February 21, 2022 | Already Released | Ivar Bon Yamawaki (Wakki) | Default | SS1 | | Wakki is a decent Ice DPS. | ||
7 | |||||||||
8 | Hisame Ogasahara | S | |||||||
9 | February 27, 2022 | Already Released |  | Megumi Aikawa | Casual | SS2 |  | Monaka uses tokens, so she's pretty strong. This Megu is as bad as her SS1, but her common skill is appreciated by her future styles. | |
10 | Monaka Tsukishiro | Default | SS1 |  | |||||
11 | Charlotta Skopovskaya (Sharo) | S | |||||||
12 | March 7, 2022 | Already Released |  | Sumomo Minase | Default | SS1 |  | Sumomo is weak. | |
13 | Ichigo Minase | Default | SS1 | | |||||
14 | |||||||||
15 | March 17, 2022 | Already Released |  | Tama Kunimi | Magical | SS2 |  | This Tama is a joke, competing for worst SS2. | |
16 | |||||||||
17 | Karen Asakura | S | |||||||
18 | March 30, 2022 | Already Released |  | Misato Nikaido | Default | SS1 | | This Misato is bad. At her JP debut, she was even worse. Probably the worst SS1. EN released her without OD being a true condition | |
19 | |||||||||
20 | Muua Ohshima | S | |||||||
21 | April 14, 2022 | Already Released |  | Yuina Shirakawa | Default | SS1 | | Yuina only has 1 hit, but it's crazy strong. | |
22 | |||||||||
23 | Inori | S | |||||||
24 | April 28, 2022 | Already Released |  | Ruka Kayamori | Dress | SS2 | | Kura is a blaster that only started seeing play recently in JP due to her master skill. Ruka has a lot of hits, but otherwise is weaker than Yuina as a slash light DPS. Good for Dungeon + OD Loops. | |
25 | Satomi Kura | Default | SS1 | | |||||
26 | Miya Kiryu (Myaa) | S | |||||||
27 | May 12, 2022 | Already Released |  | Hisame Ogasahara | Default | SS1 |  | Hisame's style is not great, but your only light and dark def down for a while. | |
28 | |||||||||
29 | Yuki Izumi | S | |||||||
30 | May 30, 2022 | Already Released |  | Mion Yanagi | Default | SS1 | | Maru is not great. | |
31 | Kanata Maruyama | Default | SS1 | | |||||
32 | |||||||||
33 | June 13, 2022 | Already Released |  | Karen Asakura | Red Riding | SS2 | | Koju becomes much more powerful with her Evo skill from the clock tower, but her SS3 makes her shine. Karen is a decent fire blaster, but not necessary to pull for. | |
34 | Kozue Hiiragi | Default | SS1 | | |||||
35 | Seira Sakuraba | S | |||||||
36 | June 29, 2022 | Already Released |  | Adelheid Kanzaki | Default | SS1 | | Adel has a null attack, so isn't great as a DPS. Ichiko is arguably the best fire support style available in EN currently. She buffs fire attack and defense for 2 turns. This makes her decent for buffing and defending at the same time. She also has a not-terrible ST fire skill attack to take advantage of her own buff. | |
37 | Ichiko Ohshima | Default | SS1 | | |||||
38 | Chie Sugawara | S | |||||||
39 | July 14, 2022 | Already Released |  | Isuzu Ohshima | Default | SS1 | | Isuzu is a good fire debuffer, but Megumi's fire style is better at the job. | |
40 | |||||||||
41 | Misato Nikaido | S | |||||||
42 | July 28, 2022 | Already Released |  | Yuki Izumi | Fireworks | SS2 | | Yuki is underwhelming. Aoi is very popular due to her Exclusive skill absorbing all damage for 2 turns (if used correctly, they don't have to be consecutive). | |
43 | Erika Aoi | Default | SS1 | | |||||
44 | Tama Kunimi | S | |||||||
45 | August 9, 2022 | Already Released |  | Tsukasa Tojo | Swimsuit | SS2 | | Both styles are terrible. Tsukasa gets a buff for this style, later, though. | |
46 | Sumomo Minase | Swimsuit | SS2 | | |||||
47 | |||||||||
48 | August 30, 2022 | Already Released |  | Carole Reaper | Default | SS1 | | Irene is the strongest null DPS in EN, due to her self hit-count buff and critical rate up buff. Carole is not great. | |
49 | Irene Redmayne | Default | SS1 | | |||||
50 | |||||||||
51 | September 14, 2022 | Already Released |  | Shiki Hanamura | Default | SS1 | | Shiki is the only dark buffer. Chiroru has a null attack but it's AoE with 10 hits with a self critical-rate up buff, so she can be used for some strategies. | |
52 | Chiroru Matsuoka | Default | SS1 | | |||||
53 | Seika Higuchi | S | |||||||
54 | September 29, 2022 | Already Released |  | Yuina Shirakawa | Dress | SS2 | | Miya creates a light field, but she doesn't debuff with her skill. If you get light tsukasa in the future, she will leave your team. Yuina is a terrific blaster, even when not facing thunder weakness. | |
55 | Miya | Default | SS1 | | |||||
56 | |||||||||
57 | October 13, 2022 | Already Released |  | Risa Murofushi | Default | SS1 | | Risa is a healer. Iroha creates a dark field, but otherwise isn't very useful. | |
58 | Iroha Ishii | Default | SS1 | | |||||
59 | Aina Mizuhara | S | |||||||
60 | October 20, 2022 | Already Released |  | Seika Higuchi | Qipao | SS2 | | Seika reins supreme as critical buffer for a good amount of time. Koju could be used in an ice team, but generally isn't. | |
61 | Kozue Hiiragi | Dress | SS2 | | |||||
62 | |||||||||
63 | November 12, 2022 | Already Released |  | Niina Ohshima | Default | SS1 | | Minori is the only source of mind's eye in EN right now, so is very useful for that. Niina does great at blasting. | |
64 | Minori Ohshima | Default | SS1 | | |||||
65 | Isuzu Ohshima | S | |||||||
66 | November 29, 2022 | November 22, 2024 |  | Inori | Default | SS1 | | Maki is decent for dungeons. Inori has a good dark attack if you buff her correctly. | |
67 | Maki Kurosawa | Default | SS1 | | |||||
68 | |||||||||
69 | December 15, 2022 | December 19, 2024 |  | Ivar Bon Yamawaki (Wakki) | Xmas | SS2 | | These styles never get used by anyone. | |
70 | Yayoi Bungo | Xmas | SS2 | | |||||
71 | Miko Tenne | S | |||||||
72 | December 29, 2022 | December 19, 2024 |  | Tama Kunimi | New Year | SS3 | | Tama is actually a good thunder attacker and buffer. But this style was only ever used until her Suit Style came out for Thunder Teams. | |
73 | |||||||||
74 | |||||||||
75 | January 5, 2023 | Janurary 2, 2024 |  | Seira Sakuraba | New Year | SS2 | | Seira is a good defender and ice buffer. Actually good and nice to have. Not even close to a must pull | |
76 | |||||||||
77 | |||||||||
78 | January 18, 2023 | December 6, 2024 |  | Yingxia Li (Yunyun) | Default | SS1 | | Yunyun is basic human rights. She provides your main dmg with funnel (hit count buff). She will be the only method to provide hit count to your main dmg dealer for 11 months (unless the main dmg dealer can provide it themself). She is still the only one who can provide the buff to anyone regardless of element in JP. She is still prevelent in JP today as she is used in most teams. You will especially need her EX skill so you can generalize it to be used on her other styles. Her other styles are much weaker without her SS1 EX skill. | |
79 | Maria de Angelis | Default | SS1 | | |||||
80 | Carole Reaper | S | |||||||
81 | February 5, 2023 | January 15, 2025 |  | Ruka Kayamori | Suit | SS3 | | These styles both do great damage. Ruka especially has one of her strongest styles here, almost as good as her unison is for fire/dark, but for thunder. If you need a thunder DPS, this is a decent option. | |
82 | Yuki Izumi | Suit | SS3 | | |||||
83 | |||||||||
84 | February 9, 2023 |  | Kanade Tachibana | Default | SS1 | | Limited (Collab): Angel Beats Collab 1 JP was provided 1 copy of Yuri SS1 from log in. Neither are used frequently in JP anymore. Kanade SS1 is still considered the best single target light dmg dealer, but light is the weakest element. Her Self Mind eye makes her good for in Combo with Ruka 5. Yuri SS1 is still considered one of the stronger single target fire dmg dealers, but is rarely used as fire does not have a resistance overwrite/weakness apply yet. | ||
85 | Yuri Nakamura | Default | SS1 | | |||||
86 | |||||||||
87 | March 8, 2023 | Janurary 2, 2024 |  | Yotsuha Ohshima | Default | SS1 | | Muua provides mind eye (extremely rare buff) and was the best healer for 9 months in JP until Suit Tama. Yotsuha is still considered one of, if not the best fire buffer in JP. | |
88 | Muua Ohshima | Default | SS1 | | |||||
89 | |||||||||
90 | March 23, 2023 | Feburary 6, 2025 |  | Chie Sugawara | Doll | SS2 | | Fubuki is a decent debuffer for dark teams due to her skill that provides dark debuff. Her Exclusive skill gives fragile and does decent damage, but it's null and the fragile is only for 1 turn. She is only really usable in dark teams. Later In JP, her upgrade provides def down on her EX and makes all debuffs 2 turn. Really solid. Not needed though. Chie is a great DPS, with a 10-hit CON-based dark attack. It even becomes half cost when she's target is provoked. Combined with her S skill for self-hit count buff, she's a very solid DPS. | |
91 | Fubuki Mikoto | Default | SS1 | | |||||
92 | Ichiko Ohshima | S | |||||||
93 | April 6, 2023 | January 23, 2025 |  | Adelheid Kanzaki | Agent | SS2 | | Adel is still the one of the best ice single target dmg dealer in JP. Recently, with Ruka 5 support, she has fallen out of favor, but she didn't get weaker. Ninja Mari is a premium style for certain content, such as clock tower, due to her Exclusive skill giving a first-use super-buff of mind's eye, doping, criticla damage up and critical rate up. Unfortunately, subsequent uses only give the damage and critical rate buffs. The other downside of her EX skill is that she will only buff 2 real targets, as she can only buff the vanguard (where she also is). This is partially compensated by her SS1 skill, which creates an ice field and does ice damage, also being able to take advantage of these buffs. Still, when suit tama came out, she basically disappeared from all top teams until Simulation Skirmish and Diva Ruka. | |
94 | Mari Satsuki | Agent | SS2 | | |||||
95 | |||||||||
96 | April 27, 2023 |  | Megumi Aikawa | Shrine Maiden | SS3 | | Megumi is the bread and butter of fire teams. She is still the best fire field setter and debuffer in JP. Fire dominates most of end game for about 5 months. | ||
97 | Satomi Kura | Rice Field | SS2 | | |||||
98 | Yuina Shirakawa | S | |||||||
99 | May 4, 2023 | Feburary 6, 2025 |  | Erika Aoi | Maid | SS2 | | Aoi is one of the best thunder single target dmg dealer in JP. Fubuki SS2 has taken her spot though as #1 in Dec 2024. It is highly recommended to have her SS1 to compliment her SS2 kit. Byakko is a decent thunder blaster. | |
100 | Byakko | Emperess | SS2 | | |||||
101 | |||||||||
102 | May 18, 2023 |  | Hisame Ogasahara | Maid | SS2 | | Aina is considered one of the best general supports. Her common skill is important for her SS2, which is currently the meta of JP. Her SS1 was considered the best general debuffer + OD generator before the release of her SS2 | ||
103 | Aina Mizuhara | Default | SS1 | | |||||
104 | Risa Murofushi | S | |||||||
105 | June 1, 2023 |  | Charlotta Skopovskaya (Sharo) | Default | SS1 | | Sharo and Virtikia. Do you need another reason to pull? Are they good? Does it matter? Sharo is decent, her generize skill gives AoE defense down to her broken Thunder overwrite style, in addition to doing dark damage. This style is also important for her SS3, a dark buffer. Vritikia's skill does a bit too much, it builds OD (10 hits), makes the enemy sick for 3 turns, sometimes prevents them from using skills, decreases their attack strength, and does null damaage. Unfortunately, these aren't the kind of debuffs that matter much other than for her central role as a defender. She's definitely usable for survivability if you're sick of keeping Aoi on your team, but still believe defenders should defend. Both can use their exclusive skills at 0 or more SP. | ||
106 | Vritika Balakrishnan | Default | SS1 | | |||||
107 | |||||||||
108 | June 23, 2023 |  | Mari | Bride | SS3 | | The June brides. Ichiko is pretty solid, she has a fire attack that gives fragile (for 2 turns!). Since the fragile lands before the damage, she can be her own debuffer. The attack is Con based, too, so overall it's a great kit, and still one of my go tos for clearing the hardest content that's ST fire or blunt weak. Mari is good, her attack buffs itself if the enemy is above 200% DR, which limits its viability somewhat. SS1 is pretty much a requirement for her, since she uses that skill to break the enemy and set up her burst. She used to not get much play because of her SS2 being paired with other Ice dmg dealers. Mari SS3, before Ruka 5, actually housed one of the highest potencies in the game (3rd highest). But she is a whale unit. | ||
109 | Ichiko Ohshima | Bride | SS2 | | |||||
110 | |||||||||
111 | June 29, 2023 |  | Risa Murofushi | Racer | SS2 | | Miko SS2 is important for ice teams for 14 months. Her Exclusive is fun to use and gets cheaper after the first use, while the enemy has ice defense down. Risa is just another healer. | ||
112 | Miko Tenne | Kitty | SS2 | | |||||
113 | |||||||||
114 | July 13, 2023 |  | Akari Date | Default | SS1 | | Akari is a good dark breaker, but not necessary to pull for. | ||
115 | |||||||||
116 | Iroha Ishii | S | |||||||
117 | August 5, 2023 |  | Yuina Shirakawa | Swimsuit | SS3 | | Yuina SS3 is still the top AoE dark Dmg dealer, but only due to her ability to provide herself with Dark Enhance and Dark Crit Dmg. Tama is a decent healer that gives SP to light styles and multi-turn healing, but if you have Tama SS5, you'll probably prefer using her over her SS4. | ||
118 | Tama Kunimi | Swimsuit | SS4 | | |||||
119 | |||||||||
120 | August 14, 2023 |  | Tsukasa Tojo | Suit | SS3 | | Tsukasa is highly important in light teams, but light in JP is considered the weakest element. At her release light was considered within the top 3 elements. Karen is the premier light DPS in most situations. This is Karen's strongest style. This banner is actually one of the strongest banners, due to having two great styles for their element, outside of that, it is light. | ||
121 | Karen Asakura | Suit | SS3 | | |||||
122 | |||||||||
123 | August 30, 2023 |  | Inori Natsume | Butterfly | SS2 | | Inori SS2 on release was considered the weakest dmg dealer released in 2023. After her buff (10 months later), she is one of the strongest AoE dmg dealers. They basically were forced to buff her due to all the complaints. Somehow this style made it into the most popular style list, so a lot of us got stuck with her from that. Probably a lot of the people voting didn't understand the assignment. (But hey I understand them, she's super cool) | ||
124 | |||||||||
125 | Kanata Maruyama | S | |||||||
126 | September 7, 2023 |  | Mion Yanagi | Biker | SS2 | | Myaa SS2 is one of the best general debuffers currently in JP. This is due to her ability to inflict fragile and def down for 2 turns with 1 skill. This means OD isn't needed to set up. Yanagi has the strongest heal in the game: 150% max DP. But heals alone don't win battles, and space on teams is tight for single role styles. | ||
127 | Miya Kiryu (Myaa) | Fox | SS2 | | |||||
128 | |||||||||
129 | September 21, 2023 |  | Yuki Izumi | Dress | SS4 | | This Yuki style is crap. She's also light. | ||
130 | |||||||||
131 | Karen Asakura | S | |||||||
132 | October 5, 2023 |  | Niina Ohshima | Onsen | SS2 | | Isuzu SS2 is useful for end game players, but more important for spenders than for f2p. If the enemy has lots of DP, Isuzu SS2 really shines as the only DP defense debuffer. This is a rare case. Her Def down though AoE, is still the most potent def down, even beating out ST def downs. Niina is an attacker with conditions she struggles to hit in order to deal high dmg. | ||
133 | Isuzu Ohshima | Onsen | SS2 | | |||||
134 | |||||||||
135 | October 19, 2023 |  | Adelheid Kanzaki | Dirndl | SS3 | | Yunyun SS2 is a staple in thunder teams but requires her SS1. Without it, she isn't that strong. She isn't required for thunder teams, but she is a great addition. Her Thunder Crit Dmg Party buff is unique to her. Adel SS3 is considered the strongest single target dark dmg dealer in JP. | ||
136 | Yingxia Li (Yunyun) | Noble | SS2 | | |||||
137 | Vritika Balakrishnan | S | |||||||
138 | November 2, 2023 |  | Hisame Ogasahara | Nightdress | SS3 | | Hisame is cute. If you can manage to break with her, everyone gets 8 SP. This makes her competitive on very select clock tower floors, and maybe once in a while for score attack. Monaka, as a token user with one of the highest DMG caps in the game. It also isn't too difficult to bring out her full potential due to her passives. | ||
139 | Monaka Tsukishiro | Biker | SS2 | | |||||
140 | |||||||||
141 | November 16, 2023 |  | Charlotta Skopovskaya (Sharo) | Vampire | SS2 | | Sharo SS2 is meta defining and changes the meta forever as the first resist overwrite/weakness apply style (thunder). Basically a must pull if you want to devote yourself to thunder. Maria, as a token user, is the best AoE thunder style, that can also heal and get tokens from doing so. Overall this banner is probably one of the best. You can spark on it and possibly be set for life against most content. | ||
142 | Maria de Angelis | Knight | SS2 | | |||||
143 | |||||||||
144 | November 30, 2023 |  | Akari Date | Xmas | SS2 | | Akari SS2 is for spenders, if you're f2p skip her. You need high limit breaks to get her to work. When she does her job, she is unrivaled. Misato SS2: You will regret not pulling for her when the first 2 target Score Attack arrives. She is still relavent today in JP. Yuina SS4 can make her better. | ||
145 | Misato Nikaido | Xmas | SS2 | | |||||
146 | |||||||||
147 | December 14, 2023 |  | Tama Kunimi | Suit | SS5 | | Tama SS5 is a must pull and still considered one of the best general supports in JP. She ultimately replaces both Seika SS2 and Muua SS1 in your first team. Megu started a trend of eternal debuffs. This sort of character hasn't really had any impact, despite being well received at the time. | ||
148 | Megumi Aikawa | Suit | SS4 | | |||||
149 | |||||||||
150 | December 28, 2023 |  | Erika Aoi | Idol | SS3 | | Ichigo SS2 is considered the strongest AoE fire dmg dealer, but not a requirement to pull. Aoi is underappreciated as an SP source and debuff blocker. I'm not saying she's great, but she's completely playable, just not the star (but she is the idol) of the team. | ||
151 | Ichigo Minase | Idol | SS2 | | |||||
152 | |||||||||
153 | January 4, 2024 |  | Muua Ohshima | Pajama | SS2 | | Yotsuha but for light. These styles are the first to get backline +1 SP each turn at LB1. Skip. | ||
154 | Yotsuha Ohshima | Onsen | SS2 | | |||||
155 | |||||||||
156 | January 20, 2024 |  | Miyuki Irie | Default | SS1 | | Limited (Collab): Angel Beats Collab 1 Reprise with the addition of Irie SS1. Irie SS1 is a side grade to Aoi 1, especially for AoE content. Sadly She has no offensive support capabilities. | ||
157 | Angel Beats 1 | Default | SS1 | ||||||
158 | |||||||||
159 | February 4, 2024 |  | Kanade Tachibana | Dress | SS2 | | Limited (Collab): Angel Beats Collab 2: New debut. Both are terrible at release. If you like angel beats and are a simp, feel free to pull. Kanade SS2 has presence (if you also got SS1) since Ruka 5's release (10 months later). Outside of that, basically requires LB3 to see real use. | ||
160 | Yuri Nakamura | High School | SS2 | | |||||
161 | |||||||||
162 | February 15, 2024 |  | Yuki Izumi | Snow white | SS5 | | Wakki, an AoE thunder attacker, is one of the best styles at LB3 and mediocre Dmg dealer under LB3. Her attack is underwhelming, but she's really meant as a support role. Her exclusive skill is an AoE 10 hits. Combine that with her self-hit count buffs, and she's an OD machine. She can also give a doping buff to another character or 6 SP to another character. Her exclusive skill, on first use, buffs the party's thunder attacks, too. Unfortunately, most of that, and even her AoE skill, is out of reach for F2P, since you need her other SS styles. Yuki was the premier large Dark Fielder. She can also dispell enemy buffs, so she has some use cases. She also comes with a dark AoE attack that can restore her skill usage count, which is interesting. | ||
163 | Ivar Bon Yamawaki (Wakki) | Day Dream | SS3 | | |||||
164 | |||||||||
165 | February 22, 2024 |  | Ruka Kayamori | Unison | SS4 |  | Limited (Unison): First Ever limited banner that isn't a collab. Unison styles are all good and extremely efficient for f2p because they can perform 2 different roles at the same time. Reran: 2024-8-8 | ||
166 | |||||||||
167 | |||||||||
168 | March 7, 2024 |  | Yayoi Bungo | Dango | SS3 | | Light Miko is good because she gets extra turns when she uses her exclusive skill, and it has two debuffs: light def down and fragile. At 20 SP, it can be used twice. With more SP than that, it can also be combined with her SS1 generized skill for regular def down. She makes light a viable choice to bring if you also have Tsukasa SS3. Bungo is the only other style to have buff removal like Snow White Yuki. | ||
169 | Miko Tenne | Wizard | SS3 | | |||||
170 | |||||||||
171 | March 21, 2024 |  | Kozue Hiiragi | (McDonald) Waitress | SS3 | | Koju builds morale and some OD. She's decent for thunder team due to her other styles' skills, but really meant for arts battle and dungeons. This is mainly because she has an infinite use critical buff and morale takes a lot of turns to build up. Paired with her SS1, she is a machine and really good for slow and steady teams. Just be warned, she is very squishy at lower LBs. | ||
172 | |||||||||
173 | Sumomo Minase | S | |||||||
174 | April 4, 2024 |  | Tsukasa Tojo | Bunny | SS4 | | Tsukasa is a dark resistance overwriter. She also gives a hit count buff to frontline dark styles. That's all she does, though. With a simple kit, she works incredibly well with Aina SS2. Yun yun is for those who love Yun yun, but are getting tired of only using her at positive SP. Without SS1, this Yunyun is garbage. | ||
175 | Yingxia Li (Yunyun) | Night Street | SS3 | | |||||
176 | |||||||||
177 | April 25, 2024 |  | Miya Kiryu (Myaa) | Fireworks | SS3 | | Dominatrix Chie is the strongest ice buffer. But that's like being the tallest member of U140. Miya is like suit megumi, an eternal ice debuffer. She starts off kind of mid, but due to her synergies with other ice team members, she becomes highly considered. Chie is kind of a necessity for ice team at this point. This banner is incredibly strong for those looking to build an Ice team, however, otherwise a skip. | ||
178 | Chie Sugawara | Gundam | SS3 | | |||||
179 | |||||||||
180 | May 16, 2024 |  | Kanata Maruyama | Panda | SS2 | | You want OD generation? You got it. Pirate Aina is amazing. Cheaper OD than Aina SS1 + a def down debuff. Maru is kind of a joke. Just pray you get Aina 2. Nevertheless, this is a strong banner. | ||
181 | Aina Mizuhara | Pirate | SS2 | | |||||
182 | Misato Nikaido | S | |||||||
183 | May 30, 2024 |  | Irene Redmayne | Kaito (phantom) | SS2 | | Kaito Irene, the first critical piercing style. Put her on your team and just ignore all the enemy resistences. Unfortunately, since elemental buffs and debuffs don't work like that, the cap on the team strength will be lower, but not low enough to matter at high LBs against any of the daily content. Vritika is just another healer. | ||
184 | Vritika Balakrishnan | Traditional | SS2 | | |||||
185 | |||||||||
186 | June 13, 2024 |  | Seira Sakuraba | Bride | SS3 | | This Sharo is funny, but only necessary for whales or people that like making their own strategies. Seira is underrated, but also hard to use. This style should have been Muua, since it's a masochist's Exclusive skill. | ||
187 | Charlotta Skopovskaya (Sharo) | Bride | SS3 | | |||||
188 | |||||||||
189 | June 27, 2024 |  | Yuina Shirakawa | Unison | SS4 | | Limited (Unison) Yuina gives extra turns to the front line. This enables low-turn count strategies for whales. Really good style for both F2P and whales. | ||
190 | |||||||||
191 | |||||||||
192 | July 4, 2024 |  | Mari | Swimsuit | SS4 | | Great outfits, but the styles are unnecessary to have for any content. Adel is more of a side grade to Yottsun SS1. She can place fire buffs incredibly fast and provide DR, but loses out on a lot of potency. She is the prize within this banner. Mari looks strong on paper, but at lower LB, her potencies feel kind of low. | ||
193 | Adelheid Kanzaki | Swimsuit | SS4 | | |||||
194 | |||||||||
195 | July 20, 2024 |  | Megumi Aikawa | Swimsuit | SS5 | | Great outfits, and Megu's passive ability is great for her to have for her SS3. Still works incredibly well on her SS5. This is the prize of this banner. Karen also gets a cool ability for her other styles. Overall you don't really need to pull this banner, even when both are strong. | ||
196 | Karen Asakura | Swimsuit | SS4 | | |||||
197 | |||||||||
198 | August 22, 2024 |  | Maki Kurosawa | Biker | SS2 | | Dunno, nobody uses these styles. | ||
199 | Chiroru Matsuoka | Casual | SS2 | | |||||
200 | |||||||||
201 | September 5, 2024 |  | Hisame Ogasahara | School Girl | SS4 | | Ice weakness overwrite! Wait, we still care about ice? Inori 3 is actually decent and nice to have, but not even close to a must pull. She can build up DR very fast and uses all her SP to do it. | ||
202 | Inori Natsume | School Girl | SS3 | | |||||
203 | |||||||||
204 | September 19, 2024 |  | Isuzu Ohshima | Magician | SS3 | | Isuzu SS3 provides a nice AoE fragile for her other SS versions. Light is still the weakest element, so there is little to advertise except for the EX animation is cool. Minori SS2 sees use here and there, but honestly hard to use since she puts you in OD debt. | ||
205 | Minori Ohshima | Onsen | SS2 | | |||||
206 | |||||||||
207 | October 3, 2024 |  | Carole Reaper | Date night | SS2 | | Carole gives HC buff, doping and heals to frontline fire styles. It can be useful in some situations, but overall skip. | ||
208 | |||||||||
209 | Charlotta Skopovskaya (Sharo) | S | |||||||
210 | October 10, 2024 |  | Yuki Izumi | Unison | SS6 | | Limited (Unison): Yuki can hack the enemy (lowering stats by 100), and give it fragile. This makes her especially strong when taking on high border enemies, if you treat her as a debuffer. | ||
211 | |||||||||
212 | |||||||||
213 | October 24, 2024 |  | Sumomo Minase | Assassin | SS3 | | Sumomo is amazing at LB3. If you're F2P you're better off sticking with Irene SS2. Ichigo SS3 is just not good. Usable for whales, but for F2P, she is a sorry sight. | ||
214 | Ichigo Minase | Assasin | SS3 | | |||||
215 | |||||||||
216 | November 7, 2024 |  | Erika Aoi | Admiral | SS4 | | Admiral Aoi changes the game. Must have, for now, until we see what the next Admiral brings. Seika is a dark healer/buffer combo that is completely overshadowed by new Aoi, but due to the release of Ruka SS5, she is incredibly strong as a mind eye provider for Dark teams. | ||
217 | Seika Higuchi | Doctor | SS3 | | |||||
218 | Maki Kurosawa | S | |||||||
219 | November 21, 2024 |  | Iroha Ishii | Casual | SS2 | | Two interesting fire styles. Aina is the third eternal debuffer; Common skill makes SS2 better. Skip. Iroha has an interesting Exclusive skill; if there's a field, it's free to cast and gives everyone 5 SP. She can also buff the respective element of the current field with her skill. As you can imagine, this makes Iroha really strong in niche situations, but overall not too important. | ||
220 | Aina Mizuhara | JellyFish | SS3 | | |||||
221 | |||||||||
222 | December 5, 2024 |  | Shiki Hanamura | Conductor | SS2 | | Shiki is light, they hate her and powercrept her in a week. Fubuki SS2 is the strongest Thunder ST nuke in the game, with a massive OD battery. Due to needing core supports to abuse her ability, it is important to have high LB on her and decently high and well build team supporting her. She is more of a whale unit, than a must pull. | ||
223 | Fubuki Mikoto | X-mas | SS2 | | |||||
224 | |||||||||
225 | December 12, 2024 |  | Ruka Kayamori | Diva | SS5 | | Is the powercreep to Yunyun SS1. She is basically a must pull as a general support. | ||
226 | |||||||||
227 | |||||||||
228 | December 26, 2024 |  | Misami Iwasawa | Default | SS1 | | Limited (Collab): It's AB3 Collab. Of course it is limited. Both seem usable and unique, but no "Must pull". Misami has a cool kit that allows her to be a buffer/breaker/blaster all in 1. Yui seem good for 1 Turn ice teams, so basically whale territory by providing +2 SP to everyone if she's in the front, but herself (LB3). Her EX allows everyone to join squad 31X. | ||
229 | Yui Yoshioka | Default | SS1 | | |||||
230 | |||||||||
231 | |||||||||
232 | |||||||||
233 | |||||||||
234 | |||||||||
235 | |||||||||
236 | |||||||||
237 | |||||||||
1 | Names In Red are Unreleased | Limit Break 1 (Own All Memoria) | ||||||||||||||||||||||||||||||||||||||||||||||||||||||||||||||||
|---|---|---|---|---|---|---|---|---|---|---|---|---|---|---|---|---|---|---|---|---|---|---|---|---|---|---|---|---|---|---|---|---|---|---|---|---|---|---|---|---|---|---|---|---|---|---|---|---|---|---|---|---|---|---|---|---|---|---|---|---|---|---|---|---|---|---|
2 | Buffer | Defender | Healer | Debuffer | Utility Support | Main Damage | Notable S | |||||||||||||||||||||||||||||||||||||||||||||||||||||||||||
3 | General | Elemental | Single Target | AoE | Buffer | Debuffer | Healer | |||||||||||||||||||||||||||||||||||||||||||||||||||||||||||
4 | 10 (Best) |  |  |  |  |  |  | |||||||||||||||||||||||||||||||||||||||||||||||||||||||||||
5 | ||||||||||||||||||||||||||||||||||||||||||||||||||||||||||||||||||
6 | ||||||||||||||||||||||||||||||||||||||||||||||||||||||||||||||||||
7 | Yingxia | Seika | Yotsuha | Yingxia | Muua | Yingxia | ||||||||||||||||||||||||||||||||||||||||||||||||||||||||||||
8 | SS1 | SS2 | SS1 | SS2(w/SS1) | SS1 | S (w/ SS1) | ||||||||||||||||||||||||||||||||||||||||||||||||||||||||||||
9 |  |  | ||||||||||||||||||||||||||||||||||||||||||||||||||||||||||||||||
10 | ||||||||||||||||||||||||||||||||||||||||||||||||||||||||||||||||||
11 | ||||||||||||||||||||||||||||||||||||||||||||||||||||||||||||||||||
12 | Charlotta | Erika Aoi | ||||||||||||||||||||||||||||||||||||||||||||||||||||||||||||||||
13 | SS2 | SS2 (w/SS1) | ||||||||||||||||||||||||||||||||||||||||||||||||||||||||||||||||
14 | 9 |  |  |  |  |  |  | |||||||||||||||||||||||||||||||||||||||||||||||||||||||||||
15 | ||||||||||||||||||||||||||||||||||||||||||||||||||||||||||||||||||
16 | ||||||||||||||||||||||||||||||||||||||||||||||||||||||||||||||||||
17 | Erika Aoi | Megumi | Aina | Adel | Adel | Misato | ||||||||||||||||||||||||||||||||||||||||||||||||||||||||||||
18 | SS1 | SS3 | SS1 | SS3 | SS2 | SS2 | ||||||||||||||||||||||||||||||||||||||||||||||||||||||||||||
19 |  |  |  |  | |  |  | | ||||||||||||||||||||||||||||||||||||||||||||||||||||||||||
20 | ||||||||||||||||||||||||||||||||||||||||||||||||||||||||||||||||||
21 | ||||||||||||||||||||||||||||||||||||||||||||||||||||||||||||||||||
22 | Mari | Tsukasa | Akari | Mari | Erika Aoi | Yuina | Monaka | Yingxia | ||||||||||||||||||||||||||||||||||||||||||||||||||||||||||
23 | SS2 | SS3 | SS2 (LB2+) | SS3 (w/SS1) | SS2(w/oSS1) | SS3 | SS2 | S (w/o SS1) | ||||||||||||||||||||||||||||||||||||||||||||||||||||||||||
24 | 8 |  | |  |  |  | ||||||||||||||||||||||||||||||||||||||||||||||||||||||||||||
25 | ||||||||||||||||||||||||||||||||||||||||||||||||||||||||||||||||||
26 | ||||||||||||||||||||||||||||||||||||||||||||||||||||||||||||||||||
27 | Miya | Aina | Chie | Karen | Maria | |||||||||||||||||||||||||||||||||||||||||||||||||||||||||||||
28 | SS2 | SS1 | SS2 | SS3 | SS2 | |||||||||||||||||||||||||||||||||||||||||||||||||||||||||||||
29 |  | |  |  |  | |||||||||||||||||||||||||||||||||||||||||||||||||||||||||||||
30 | ||||||||||||||||||||||||||||||||||||||||||||||||||||||||||||||||||
31 | ||||||||||||||||||||||||||||||||||||||||||||||||||||||||||||||||||
32 | Seika | Yingxia | Ichiko | Isuzu | Ruka | |||||||||||||||||||||||||||||||||||||||||||||||||||||||||||||
33 | SS1 | SS2(w/oSS1) | SS2 | SS2 | SS3 | |||||||||||||||||||||||||||||||||||||||||||||||||||||||||||||
34 | 7 (Strong) |  |  |  |  |  | |  | ||||||||||||||||||||||||||||||||||||||||||||||||||||||||||
35 | ||||||||||||||||||||||||||||||||||||||||||||||||||||||||||||||||||
36 | ||||||||||||||||||||||||||||||||||||||||||||||||||||||||||||||||||
37 | Ichiko | Yuina | Maki | Yuri | Kanade | Ichiko | Ruka | |||||||||||||||||||||||||||||||||||||||||||||||||||||||||||
38 | SS1 | SS2 | SS1 (LB3) | SS1 | SS1 | SS2 | SS2 | |||||||||||||||||||||||||||||||||||||||||||||||||||||||||||
39 |  |  |  |  |  |  |  | |||||||||||||||||||||||||||||||||||||||||||||||||||||||||||
40 | ||||||||||||||||||||||||||||||||||||||||||||||||||||||||||||||||||
41 | ||||||||||||||||||||||||||||||||||||||||||||||||||||||||||||||||||
42 | Seira | Tama | Byakko | Niina | Tama | Maria | Bon Ivar | |||||||||||||||||||||||||||||||||||||||||||||||||||||||||||
43 | SS2 | SS4 | SS2 | SS1 | SS3 | SS1 | SS1 | |||||||||||||||||||||||||||||||||||||||||||||||||||||||||||
44 | 6 |  |  |  |  | | |  |  |  |  | |||||||||||||||||||||||||||||||||||||||||||||||||||||||
45 | ||||||||||||||||||||||||||||||||||||||||||||||||||||||||||||||||||
46 | ||||||||||||||||||||||||||||||||||||||||||||||||||||||||||||||||||
47 | Seira | Mari | Tsukasa | Miko Tennen | Ichiko | Karen | Ruka | Monaka | Niina | Shiki | ||||||||||||||||||||||||||||||||||||||||||||||||||||||||
48 | SS1 | SS1 | SS1 | SS2 | SS2 | SS3 | SS1 | SS1 | SS2 | S | ||||||||||||||||||||||||||||||||||||||||||||||||||||||||
49 |  |  |  |  |  |  |  |  |  |  | ||||||||||||||||||||||||||||||||||||||||||||||||||||||||
50 | ||||||||||||||||||||||||||||||||||||||||||||||||||||||||||||||||||
51 | ||||||||||||||||||||||||||||||||||||||||||||||||||||||||||||||||||
52 | Tsukasa | Mion Yanagi | Tama | Fubuki | Charolotta | Hisame | Inori | Yuki | Aina | Irie | ||||||||||||||||||||||||||||||||||||||||||||||||||||||||
53 | SS2 | SS1 | SS1 | SS1 | SS1 | SS3 | SS1 | SS3 | S | S | ||||||||||||||||||||||||||||||||||||||||||||||||||||||||
54 | 5 |  |  |  |  |  |  | |||||||||||||||||||||||||||||||||||||||||||||||||||||||||||
55 | ||||||||||||||||||||||||||||||||||||||||||||||||||||||||||||||||||
56 | ||||||||||||||||||||||||||||||||||||||||||||||||||||||||||||||||||
57 | Tama | Mion Yanagi | Miya | Chiroru | Akari | Hisame | ||||||||||||||||||||||||||||||||||||||||||||||||||||||||||||
58 | SS2 | SS2 | SS1 | SS1 | SS1 | SS2 | ||||||||||||||||||||||||||||||||||||||||||||||||||||||||||||
59 | |  |  |  |  |  |  |  | ||||||||||||||||||||||||||||||||||||||||||||||||||||||||||
60 | ||||||||||||||||||||||||||||||||||||||||||||||||||||||||||||||||||
61 | ||||||||||||||||||||||||||||||||||||||||||||||||||||||||||||||||||
62 | Tama | Risa | Kozue | Isuzu | Karen | Karen | Kanata | Carole | ||||||||||||||||||||||||||||||||||||||||||||||||||||||||||
63 | SS2 | SS2 | SS2 | SS1 | SS1 | SS2 | SS1 | SS1 | ||||||||||||||||||||||||||||||||||||||||||||||||||||||||||
64 | 4 (Viable) |  | |  | |  |  | | ||||||||||||||||||||||||||||||||||||||||||||||||||||||||||
65 | ||||||||||||||||||||||||||||||||||||||||||||||||||||||||||||||||||
66 | ||||||||||||||||||||||||||||||||||||||||||||||||||||||||||||||||||
67 | Iroha | Tama | Megumi | Maki | Yuina | Ichigo | Karen | |||||||||||||||||||||||||||||||||||||||||||||||||||||||||||
68 | SS1 | SS3 | SS2 | SS1 | SS1 | SS1 | SS2 | |||||||||||||||||||||||||||||||||||||||||||||||||||||||||||
69 |  | | |  |  | |||||||||||||||||||||||||||||||||||||||||||||||||||||||||||||
70 | ||||||||||||||||||||||||||||||||||||||||||||||||||||||||||||||||||
71 | ||||||||||||||||||||||||||||||||||||||||||||||||||||||||||||||||||
72 | Vritika | Maki | Akari | Yayoi Bungo | Sumomo | |||||||||||||||||||||||||||||||||||||||||||||||||||||||||||||
73 | SS1 | SS1 | SS2 (LB1) | SS2 | SS2 | |||||||||||||||||||||||||||||||||||||||||||||||||||||||||||||
74 | 3 |  |  |  | |  |  |  |  |  |  | |||||||||||||||||||||||||||||||||||||||||||||||||||||||
75 | ||||||||||||||||||||||||||||||||||||||||||||||||||||||||||||||||||
76 | ||||||||||||||||||||||||||||||||||||||||||||||||||||||||||||||||||
77 | Bon Ivar | Shiki | Risa | Maria | Miko Tenne | Kozue | Minori | Satomi Kura | Tama | Muua | ||||||||||||||||||||||||||||||||||||||||||||||||||||||||
78 | SS2 | SS1 | SS1 | SS2 | SS1 | SS1 | SS1 | SS2 | S | S | ||||||||||||||||||||||||||||||||||||||||||||||||||||||||
79 | | |  |  |  | | ||||||||||||||||||||||||||||||||||||||||||||||||||||||||||||
80 | ||||||||||||||||||||||||||||||||||||||||||||||||||||||||||||||||||
81 | ||||||||||||||||||||||||||||||||||||||||||||||||||||||||||||||||||
82 | Ichiko | Seira | Hisame | Satomi Kura | Byakko | Yuina | ||||||||||||||||||||||||||||||||||||||||||||||||||||||||||||
83 | SS1 | SS2 | SS1 | SS1 | SS1 | SS2 | ||||||||||||||||||||||||||||||||||||||||||||||||||||||||||||
84 | 2 | | | |  |  |  | |||||||||||||||||||||||||||||||||||||||||||||||||||||||||||
85 | ||||||||||||||||||||||||||||||||||||||||||||||||||||||||||||||||||
86 | ||||||||||||||||||||||||||||||||||||||||||||||||||||||||||||||||||
87 | Tama | Maria | Satomi Kura | Yuki | Yayoi Bungo | Adel | ||||||||||||||||||||||||||||||||||||||||||||||||||||||||||||
88 | SS3 | SS1 | SS2 | SS4 | SS1 | SS1 | ||||||||||||||||||||||||||||||||||||||||||||||||||||||||||||
89 |  | |||||||||||||||||||||||||||||||||||||||||||||||||||||||||||||||||
90 | ||||||||||||||||||||||||||||||||||||||||||||||||||||||||||||||||||
91 | ||||||||||||||||||||||||||||||||||||||||||||||||||||||||||||||||||
92 | Irene | |||||||||||||||||||||||||||||||||||||||||||||||||||||||||||||||||
93 | SS1 | |||||||||||||||||||||||||||||||||||||||||||||||||||||||||||||||||
94 | 1 | | | |  |  |  |  | | |||||||||||||||||||||||||||||||||||||||||||||||||||||||||
95 | ||||||||||||||||||||||||||||||||||||||||||||||||||||||||||||||||||
96 | ||||||||||||||||||||||||||||||||||||||||||||||||||||||||||||||||||
97 | Minori | Chiroru | Seira | Chie | Sumomo | Yuki | Inori | Hisame | ||||||||||||||||||||||||||||||||||||||||||||||||||||||||||
98 | SS1 | SS1 | SS1 | SS1 | SS1 | SS2 | SS2 (Prebuff) | SS1 | ||||||||||||||||||||||||||||||||||||||||||||||||||||||||||
99 | 0 (Fringe) | |  | |  |  | |  | | |||||||||||||||||||||||||||||||||||||||||||||||||||||||||
100 | ||||||||||||||||||||||||||||||||||||||||||||||||||||||||||||||||||
101 | ||||||||||||||||||||||||||||||||||||||||||||||||||||||||||||||||||
102 | Chie | Ruka | Seika | Megumi | Misato | Ruka | Yuki | Bon Ivar | ||||||||||||||||||||||||||||||||||||||||||||||||||||||||||
103 | SS1 | Free SS | SS2 | SS1 | SS1 | Free SS | SS1 | SS2 | ||||||||||||||||||||||||||||||||||||||||||||||||||||||||||
104 | ||||||||||||||||||||||||||||||||||||||||||||||||||||||||||||||||||
105 | ||||||||||||||||||||||||||||||||||||||||||||||||||||||||||||||||||
106 | Note: The A and S styles are mostly present to only provide common skills for their SS styles. Yunyun S and Shiki S are notable S styles that people still use in JP because of their unique Passives. | |||||||||||||||||||||||||||||||||||||||||||||||||||||||||||||||||
107 | ||||||||||||||||||||||||||||||||||||||||||||||||||||||||||||||||||
108 | ||||||||||||||||||||||||||||||||||||||||||||||||||||||||||||||||||
109 |  | 2024/12/28 | Color Legend | Criterias Considered for rating each style | ||||||||||||||||||||||||||||||||||||||||||||||||||||||||||||||
110 | ||||||||||||||||||||||||||||||||||||||||||||||||||||||||||||||||||
111 | Fire | Thunder | 1 | Willingness to bring style for a high scoring Score Attack or Skirmish Simulation | ||||||||||||||||||||||||||||||||||||||||||||||||||||||||||||||
112 | 2 | How easy the style is to use | ||||||||||||||||||||||||||||||||||||||||||||||||||||||||||||||||
113 | Ice | Light | 3 | Impact the style on the team compared to other styles that play the same role (Power) | ||||||||||||||||||||||||||||||||||||||||||||||||||||||||||||||
114 | 4 | Synergy with other styles | ||||||||||||||||||||||||||||||||||||||||||||||||||||||||||||||||
115 | Dark | Null | 5 | Efficiency of the style (SP costs / turns to reach maximum potential) | ||||||||||||||||||||||||||||||||||||||||||||||||||||||||||||||
116 | 6 | Willingness to bring style for general purpose use (Prism/orb/dungeon/etc) | ||||||||||||||||||||||||||||||||||||||||||||||||||||||||||||||||
117 | ||||||||||||||||||||||||||||||||||||||||||||||||||||||||||||||||||
118 | ||||||||||||||||||||||||||||||||||||||||||||||||||||||||||||||||||
119 | Character's Attack Type | |||||||||||||||||||||||||||||||||||||||||||||||||||||||||||||||||
120 | ||||||||||||||||||||||||||||||||||||||||||||||||||||||||||||||||||
121 | ||||||||||||||||||||||||||||||||||||||||||||||||||||||||||||||||||
122 |  |  |  |  |  |  |  |  |  |  |  |  |  |  |  |  |  |  | ||||||||||||||||||||||||||||||||||||||||||||||||
123 | ||||||||||||||||||||||||||||||||||||||||||||||||||||||||||||||||||
124 | ||||||||||||||||||||||||||||||||||||||||||||||||||||||||||||||||||
125 |  |  |  |  |  |  |  |  |  |  |  |  |  |  |  |  |  |  |  |  | ||||||||||||||||||||||||||||||||||||||||||||||
126 | ||||||||||||||||||||||||||||||||||||||||||||||||||||||||||||||||||
127 | ||||||||||||||||||||||||||||||||||||||||||||||||||||||||||||||||||
128 |  |  |  |  |  |  |  |  |  |  |  |  |  |  |  |  |  | |||||||||||||||||||||||||||||||||||||||||||||||||
129 | ||||||||||||||||||||||||||||||||||||||||||||||||||||||||||||||||||
130 | ||||||||||||||||||||||||||||||||||||||||||||||||||||||||||||||||||
1 | Own All Skills: Limit Break 1 | A/S/Mastery: Limit Break 1 (This is the only memoria you own of the character) | Own All Skills: Limit Break 3+ | ||||||||||||||||||||||||||||||||||||||||||||||||||||||||||||||||||||||||||||||||||||||||||||||||||||||||||||||||||||||||||||||||||||||||||||||||||||||||||||||||||||||||||||||||||||
|---|---|---|---|---|---|---|---|---|---|---|---|---|---|---|---|---|---|---|---|---|---|---|---|---|---|---|---|---|---|---|---|---|---|---|---|---|---|---|---|---|---|---|---|---|---|---|---|---|---|---|---|---|---|---|---|---|---|---|---|---|---|---|---|---|---|---|---|---|---|---|---|---|---|---|---|---|---|---|---|---|---|---|---|---|---|---|---|---|---|---|---|---|---|---|---|---|---|---|---|---|---|---|---|---|---|---|---|---|---|---|---|---|---|---|---|---|---|---|---|---|---|---|---|---|---|---|---|---|---|---|---|---|---|---|---|---|---|---|---|---|---|---|---|---|---|---|---|---|---|---|---|---|---|---|---|---|---|---|---|---|---|---|---|---|---|---|---|---|---|---|---|---|---|---|---|---|---|---|---|---|---|---|---|
2 | Buffer | Debuffer | Defender | Healer | Utility Support | Devastation | Admiral | Main Damage | Buffer | Debuffer | Defender | Healer | Utility Support | Devastation | Admiral | Main Damage | Buffer | Debuffer | Defender | Healer | Utility Support | Devastation | Admiral | Main Damage | |||||||||||||||||||||||||||||||||||||||||||||||||||||||||||||||||||||||||||||||||||||||||||||||||||||||||||||||||||||||||||||||||||||||||||||||||||||||||||||||
3 | General | Elemental | General | Elemental | Single Target | AoE | General | Elemental | General | Elemental | Single Target | AoE | General | Elemental | General | Elemental | Single Target | AoE | |||||||||||||||||||||||||||||||||||||||||||||||||||||||||||||||||||||||||||||||||||||||||||||||||||||||||||||||||||||||||||||||||||||||||||||||||||||||||||||||||||||
4 | 10 (best) | L | 10 | L | 10 |  | |||||||||||||||||||||||||||||||||||||||||||||||||||||||||||||||||||||||||||||||||||||||||||||||||||||||||||||||||||||||||||||||||||||||||||||||||||||||||||||||||||||||||||||||||
5 | > | > | |||||||||||||||||||||||||||||||||||||||||||||||||||||||||||||||||||||||||||||||||||||||||||||||||||||||||||||||||||||||||||||||||||||||||||||||||||||||||||||||||||||||||||||||||||||
6 | > | > | |||||||||||||||||||||||||||||||||||||||||||||||||||||||||||||||||||||||||||||||||||||||||||||||||||||||||||||||||||||||||||||||||||||||||||||||||||||||||||||||||||||||||||||||||||||
7 | > | > | Tama | ||||||||||||||||||||||||||||||||||||||||||||||||||||||||||||||||||||||||||||||||||||||||||||||||||||||||||||||||||||||||||||||||||||||||||||||||||||||||||||||||||||||||||||||||||||
8 | I | > | I | > | SS5 | ||||||||||||||||||||||||||||||||||||||||||||||||||||||||||||||||||||||||||||||||||||||||||||||||||||||||||||||||||||||||||||||||||||||||||||||||||||||||||||||||||||||||||||||||||
9 |  |  | > | > |  |  |  |  | |||||||||||||||||||||||||||||||||||||||||||||||||||||||||||||||||||||||||||||||||||||||||||||||||||||||||||||||||||||||||||||||||||||||||||||||||||||||||||||||||||||||||||||||
10 | > | > | |||||||||||||||||||||||||||||||||||||||||||||||||||||||||||||||||||||||||||||||||||||||||||||||||||||||||||||||||||||||||||||||||||||||||||||||||||||||||||||||||||||||||||||||||||||
11 | > | > | |||||||||||||||||||||||||||||||||||||||||||||||||||||||||||||||||||||||||||||||||||||||||||||||||||||||||||||||||||||||||||||||||||||||||||||||||||||||||||||||||||||||||||||||||||||
12 | Ruka | Erika Aoi | M | > | M | > | Aina | Erika Aoi | Irene | Sumomo | |||||||||||||||||||||||||||||||||||||||||||||||||||||||||||||||||||||||||||||||||||||||||||||||||||||||||||||||||||||||||||||||||||||||||||||||||||||||||||||||||||||||||||||
13 | SS5 | SS4 | > | > | SS2 | SS4 | SS2 | SS3 | |||||||||||||||||||||||||||||||||||||||||||||||||||||||||||||||||||||||||||||||||||||||||||||||||||||||||||||||||||||||||||||||||||||||||||||||||||||||||||||||||||||||||||||||
14 | 9 |  | | |  |  |  | | 9 | | | |  | | 9 |  |  |  |  |  |  |  |  |  |  |  | | ||||||||||||||||||||||||||||||||||||||||||||||||||||||||||||||||||||||||||||||||||||||||||||||||||||||||||||||||||||||||||||||||||||||||||||||||||||||||||||
15 | > | > | |||||||||||||||||||||||||||||||||||||||||||||||||||||||||||||||||||||||||||||||||||||||||||||||||||||||||||||||||||||||||||||||||||||||||||||||||||||||||||||||||||||||||||||||||||||
16 | I | > | I | > | |||||||||||||||||||||||||||||||||||||||||||||||||||||||||||||||||||||||||||||||||||||||||||||||||||||||||||||||||||||||||||||||||||||||||||||||||||||||||||||||||||||||||||||||||||
17 | Tama | Fubuki | Charlotta | Tsukasa | Aina | Sumomo | Inori | > | Ruka | Charlotta | Aina | Yuina | Erika Aoi | > | Yingxia | Yingxia | Yotsuha | Miya | Isuzu | Charlotta | Tsukasa | Hisame | Kozue | Yuina | Inori | Yuina | |||||||||||||||||||||||||||||||||||||||||||||||||||||||||||||||||||||||||||||||||||||||||||||||||||||||||||||||||||||||||||||||||||||||||||||||||||||||||||||
18 | SS5 | SS1 | SS2 | SS4 | SS2 | SS3 | SS2 | > | SS5 | SS2 | SS2 | SS5 | SS4 | > | SS3 | SS1 | SS1 | SS2 | SS2 | SS2 | SS4 | SS4 | SS3 | SS4 | SS2 | SS4 | |||||||||||||||||||||||||||||||||||||||||||||||||||||||||||||||||||||||||||||||||||||||||||||||||||||||||||||||||||||||||||||||||||||||||||||||||||||||||||||
19 | | |  | |  | |  |  |  | |  | > | | | | | | |  | | | | | | | > |  |  |  |  |  |  |  |  |  |  |  |  |  | ||||||||||||||||||||||||||||||||||||||||||||||||||||||||||||||||||||||||||||||||||||||||||||||||||||||||||||||||||||||||||||||||||||||||||||||||
20 | T | > | T | > | |||||||||||||||||||||||||||||||||||||||||||||||||||||||||||||||||||||||||||||||||||||||||||||||||||||||||||||||||||||||||||||||||||||||||||||||||||||||||||||||||||||||||||||||||||
21 | > | > | |||||||||||||||||||||||||||||||||||||||||||||||||||||||||||||||||||||||||||||||||||||||||||||||||||||||||||||||||||||||||||||||||||||||||||||||||||||||||||||||||||||||||||||||||||||
22 | Mari | Yotsuha | Adel | Miya | Hisame | Megumi | Risa | Kozue | Irene | Irene | Yuina | > | Tama | Tsukasa | Adel | Yotsuha | Miya | Tsukasa | Hisame | Misato | Risa | Sumomo | Irene | Inori | Irene | Yuina | > | Mari | Yingxia | Yingxia | Iroha | Maki | Megumi | Megumi | Bon Ivar | Aina | Erika Aoi | Adel | Adel | Irene | |||||||||||||||||||||||||||||||||||||||||||||||||||||||||||||||||||||||||||||||||||||||||||||||||||||||||||||||||||||||||||||||||||||||||||||||
23 | SS2 | SS1 | SS4 | SS2 | SS4 | SS3 | SS3 (debuff) | SS3 | SS2 | SS1 | SS4 | > | SS5 | SS5 | SS4 | SS1 | SS2 | SS4 | SS4 | SS3 | SS3 (debuff) | SS3 | SS2 | SS2 | SS1 | SS4 | > | SS2 | S MLB | SS2 | SS2 | SS1 | SS5 | SS3 | SS3 | SS1 | SS2 | SS2 | SS3 | SS1 | |||||||||||||||||||||||||||||||||||||||||||||||||||||||||||||||||||||||||||||||||||||||||||||||||||||||||||||||||||||||||||||||||||||||||||||||
24 | 8 |  | |  | |  | | |  |  |  | | |  | |  |  |  | |  | |  | | | 8 | | | | | | | | | 8 |  |  |  |  | |  |  |  |  |  |  |  |  |  |  |  | |||||||||||||||||||||||||||||||||||||||||||||||||||||||||||||||||||||||||||||||||||||||||||||||||||||||||||||||||||||||||||||||||||||
25 | B | > | > | ||||||||||||||||||||||||||||||||||||||||||||||||||||||||||||||||||||||||||||||||||||||||||||||||||||||||||||||||||||||||||||||||||||||||||||||||||||||||||||||||||||||||||||||||||||
26 | > | B | > | ||||||||||||||||||||||||||||||||||||||||||||||||||||||||||||||||||||||||||||||||||||||||||||||||||||||||||||||||||||||||||||||||||||||||||||||||||||||||||||||||||||||||||||||||||||
27 | Yingxia | Yingxia | Yotsuha | Yingxia | Chie | Maki | Isuzu | Megumi | Miko Tennen | Isuzu | Erika Aoi | Muua | Muua | Yuina | Satomi Kura | Yuki | Ruka | Fubuki | Erika Aoi | Kanade | Monaka | Misato | > | Megumi | Megumi | Muua | Yuina | Satomi Kura | Monaka | Misato | > | Tsukasa | Adel | Chie | Miko Tennen | Erika Aoi | Muua | Muua | Satomi Kura | Akari | Ruka | Yuki | Mari | Ichigo | Monaka | Misato | |||||||||||||||||||||||||||||||||||||||||||||||||||||||||||||||||||||||||||||||||||||||||||||||||||||||||||||||||||||||||||||||||||||||||
28 | SS3 | S MLB | SS2 | SS2 | SS3 | SS1 | SS2 | SS5 | SS3 | SS3 | SS2 | SS1 | SS2 | SS4 | SS1/2 | SS6 | SS5 + 1 | SS2 | SS2 | SS2 | SS2 | SS2 | > | SS5 | SS3 | SS1 | SS4 | SS1/2 | SS2 | SS2 | > | SS3 | SS4 | SS3 | SS3 | SS2 | SS1 | SS2 | SS1/2 | SS2 | SS4 | SS6 | SS3 | SS2 | SS2 | SS2 | |||||||||||||||||||||||||||||||||||||||||||||||||||||||||||||||||||||||||||||||||||||||||||||||||||||||||||||||||||||||||||||||||||||||||
29 | |  | | |  | |  | |  | | | | | | | | | R | > | | | | | | | | | | | | | | | | | | > |  |  |  |  |  |  |  |  |  |  | |  |  | |  | |||||||||||||||||||||||||||||||||||||||||||||||||||||||||||||||||||||||||||||||||||||||||||||||||||||||||||||||||||||||||||||||||||
30 | > | R | > | ||||||||||||||||||||||||||||||||||||||||||||||||||||||||||||||||||||||||||||||||||||||||||||||||||||||||||||||||||||||||||||||||||||||||||||||||||||||||||||||||||||||||||||||||||||
31 | > | > | |||||||||||||||||||||||||||||||||||||||||||||||||||||||||||||||||||||||||||||||||||||||||||||||||||||||||||||||||||||||||||||||||||||||||||||||||||||||||||||||||||||||||||||||||||||
32 | Yingxia | Iroha | Iroha | Erika Aoi | Erika Aoi | Tama | Seika | Fubuki | Bon Ivar | Akari | Mari | Yuina | Kanade | Yuri | Monaka | Bon Ivar | Yuina | > | Mari | Tsukasa | Chie | Maki | Miko Tennen | Isuzu | Erika Aoi | Yuki | Bon Ivar | Kanade | Fubuki | Adel | Yuki | Yuri | Bon Ivar | Yuina | Monaka | > | Yotsuha | Iroha | Seika | Isuzu | Aina | Miya | Erika Aoi | Erika Aoi | Carole | Tama | Yuki | Mari | Karen | Bon Ivar | Yuina | ||||||||||||||||||||||||||||||||||||||||||||||||||||||||||||||||||||||||||||||||||||||||||||||||||||||||||||||||||||||||||||||||||||
33 | SS1 | SS2 | SS1 | SS1 | SS3 | SS3 | SS3 | SS2 | SS3 | SS2 | SS3 | SS4 + 1 | SS1 | SS1 | SS1 | SS3 | SS3 | E | > | SS2 | SS3 | SS3 | SS1 | SS3 | SS3 | SS1 | SS6 | SS3 | SS1 | SS2 | SS3 | SS6 | SS1 | SS3 | SS3 | SS1 | > | SS2 | SS1 | SS2 | SS3 | SS3 | SS3 | SS1 | SS3 | SS2 | SS3 | SS6 | SS4 | SS3 | SS3 | SS3 | |||||||||||||||||||||||||||||||||||||||||||||||||||||||||||||||||||||||||||||||||||||||||||||||||||||||||||||||||||||||||||||||||||
34 | 7 (Strong) | |  | |  |  |  | |  |  | | |  | | | 7 | | | | | | | | | |  | E | 7 |  |  |  |  |  |  |  |  | |||||||||||||||||||||||||||||||||||||||||||||||||||||||||||||||||||||||||||||||||||||||||||||||||||||||||||||||||||||||||||||||||||||||||||||||||||
35 | > | > | |||||||||||||||||||||||||||||||||||||||||||||||||||||||||||||||||||||||||||||||||||||||||||||||||||||||||||||||||||||||||||||||||||||||||||||||||||||||||||||||||||||||||||||||||||||
36 | > | > | |||||||||||||||||||||||||||||||||||||||||||||||||||||||||||||||||||||||||||||||||||||||||||||||||||||||||||||||||||||||||||||||||||||||||||||||||||||||||||||||||||||||||||||||||||||
37 | Tsukasa | Shiki | Tsukasa | Aina | Miya | Megumi | Mion Yanagi | Carole | Akari | Aina | Yuki | Mari | Yuki | Akari | A | > | Yingxia | Fubuki | Isuzu | Miya | Seika | Akari | Akari | Erika Aoi | Mari | Ichigo | > | Tsukasa | Karen | Isuzu | Seika | Mion Yanagi | Ruka | Kanade | Yuri | ||||||||||||||||||||||||||||||||||||||||||||||||||||||||||||||||||||||||||||||||||||||||||||||||||||||||||||||||||||||||||||||||||||||||||||||||||||
38 | SS2 | SS2 | SS3 | SS3 | SS3 | SS4 | SS2 | SS2 | SS3 | SS1 | SS4 | SS4 | SS6 | SS3 | > | SS1 | SS1 | SS2 | SS3 | SS3 | SS2 | SS3 | SS2 | SS3 | SS3 | A | > | SS2 | SS4 | SS1 | SS3 | SS2 | SS1 | SS1 | SS1 | ||||||||||||||||||||||||||||||||||||||||||||||||||||||||||||||||||||||||||||||||||||||||||||||||||||||||||||||||||||||||||||||||||||||||||||||||||||
39 | |  |  | | |  | | |  | |  | | | | | | |  | > | | | | | | | | | | | | | | | > |  |  |  |  |  |  |  |  | |  |  |  |  | ||||||||||||||||||||||||||||||||||||||||||||||||||||||||||||||||||||||||||||||||||||||||||||||||||||||||||||||||||||||||||||||||||||||||
40 | > | > | |||||||||||||||||||||||||||||||||||||||||||||||||||||||||||||||||||||||||||||||||||||||||||||||||||||||||||||||||||||||||||||||||||||||||||||||||||||||||||||||||||||||||||||||||||||
41 | K | > | > | ||||||||||||||||||||||||||||||||||||||||||||||||||||||||||||||||||||||||||||||||||||||||||||||||||||||||||||||||||||||||||||||||||||||||||||||||||||||||||||||||||||||||||||||||||||
42 | Seira | Charlotta | Karen | Isuzu | Miko Tennen | Irie | Ichiko | Mion Yanagi | Yuri | Hisame | Yui | Yuina | Ichiko | Ichigo | Adel | Adel | Maria | Ichigo | > | Shiki | Aina | Irie | Mion Yanagi | Mion Yanagi | Kozue | Yuki | Yuri | Maria | Chie | Adel | Ichigo | Maria | Hisame | K | > | Charlotta | Miko Tennen | Megumi | Irie | Ichiko | Mion Yanagi | Chiroru | Hisame | Ichiko | Chie | Ichigo | Ruka | Monaka | |||||||||||||||||||||||||||||||||||||||||||||||||||||||||||||||||||||||||||||||||||||||||||||||||||||||||||||||||||||||||||||||||||||||
43 | SS1 | SS3 | SS4 | SS1 | SS2 | SS1 | SS2 | SS1 | SS2 | SS3 | SS1 | SS1 | SS2 | SS1 | SS3 | SS2 | SS2 | SS2 | > | SS2 | SS3 | SS1 | SS2 | SS1 | SS3 | SS4 | SS2 | SS1 | SS2 | SS2 | SS2 | SS2 | SS2 | > | SS3 | SS2 | SS4 | SS1 | SS2 | SS1 | SS1 | SS3 | SS2 | SS2 | SS1 | SS2 | SS1 | ||||||||||||||||||||||||||||||||||||||||||||||||||||||||||||||||||||||||||||||||||||||||||||||||||||||||||||||||||||||||||||||||||||||||
44 | 6 | | | | |  | |  |  | | | | | | | | 6 | | | | | | | | | | | | | | | | | | | | | | 6 |  |  |  |  |  |  |  |  |  |  |  |  | ||||||||||||||||||||||||||||||||||||||||||||||||||||||||||||||||||||||||||||||||||||||||||||||||||||||||||||||||||||||||||||||||||||
45 | > | > | |||||||||||||||||||||||||||||||||||||||||||||||||||||||||||||||||||||||||||||||||||||||||||||||||||||||||||||||||||||||||||||||||||||||||||||||||||||||||||||||||||||||||||||||||||||
46 | 1 | > | > | ||||||||||||||||||||||||||||||||||||||||||||||||||||||||||||||||||||||||||||||||||||||||||||||||||||||||||||||||||||||||||||||||||||||||||||||||||||||||||||||||||||||||||||||||||||
47 | Tsukasa | Seika | Ichiko | Seira | Yuki | Yuina | Iwasawa | Inori | Ichigo | Ivar Bon | Maria | Chie | Ruka | Niina | Karen | > | Seika | Yotsuha | Karen | Megumi | Miko Tennen | Isuzu | Ichiko | Seira | Tama | Carole | Yuki | Aina | Hisame | Inori | Niina | Mari | Ichiko | Kanade | Niina | Ruka | Akari | > | Tsukasa | Ichiko | Seira | Yuki | Yuina | Inori | Yuina | Ruka | Inori | Ichigo | Yuki | Maria | |||||||||||||||||||||||||||||||||||||||||||||||||||||||||||||||||||||||||||||||||||||||||||||||||||||||||||||||||||||||||||||||||||||
48 | SS1 | SS2 | SS1 | SS2 | SS5 | SS2 | SS1 | SS3 | SS3 | SS1 | SS1 | SS2 | SS2 | SS2 | SS3 | > | SS2 | SS2 | SS4 | SS4 | SS2 | SS1 | SS1 | SS2 | SS3 | SS2 | SS5 | SS1 | SS3 | SS3 | SS1 | SS4 | SS2 | SS2 | SS2 | SS2 | SS3 | 3 | > | SS1 | SS1 | SS2 | SS5 | SS2 | SS3 | SS1 | SS3 | SS1 | SS3 | SS3 | SS2 | ||||||||||||||||||||||||||||||||||||||||||||||||||||||||||||||||||||||||||||||||||||||||||||||||||||||||||||||||||||||||||||||||||||
49 |  | | | | | |  | | | | | > | | | | | | | | | | | | | | | | > |  |  |  |  | |  |  |  |  |  |  | ||||||||||||||||||||||||||||||||||||||||||||||||||||||||||||||||||||||||||||||||||||||||||||||||||||||||||||||||||||||||||||||||||||||||||||||||
50 | > | > | |||||||||||||||||||||||||||||||||||||||||||||||||||||||||||||||||||||||||||||||||||||||||||||||||||||||||||||||||||||||||||||||||||||||||||||||||||||||||||||||||||||||||||||||||||||
51 | A | > | > | ||||||||||||||||||||||||||||||||||||||||||||||||||||||||||||||||||||||||||||||||||||||||||||||||||||||||||||||||||||||||||||||||||||||||||||||||||||||||||||||||||||||||||||||||||||
52 | Minori | Seika | Chiroru | Ruka | Byakko | Niina | Seira | Inori | Yuki | Hisame | Minori | > | Minori | Charlotta | Iroha | Iroha | Yuina | Ruka | Byakko | Sumomo | Ichigo | Kanata | Akari | Inori | Yuki | Karen | Sumomo | > | Minori | Seika | Fubuki | Maki | Ruka | Byakko | Niina | Ivar Bon | Kanade | Maria | Yayoi Bungo | ||||||||||||||||||||||||||||||||||||||||||||||||||||||||||||||||||||||||||||||||||||||||||||||||||||||||||||||||||||||||||||||||||||||||||||||||
53 | SS2 | SS1 | SS1 | SS2 | SS2 | SS1 | SS3 | SS1 | SS3 | SS2 | SS1 | > | SS2 | SS3 | SS1 | SS2 | SS2 | SS2 | SS2 | SS1 | SS1 | SS1 | SS1 | SS1 | SS3 | SS3 | SS2 | > | SS2 | SS1 | SS1 | SS2 | SS2 | SS2 | SS1 | SS1 | SS2 | SS1 | SS3 | ||||||||||||||||||||||||||||||||||||||||||||||||||||||||||||||||||||||||||||||||||||||||||||||||||||||||||||||||||||||||||||||||||||||||||||||||
54 | 5 (Viable) | |  | | | | |  | | 5 | | | | | | | | | | | |  | O | 5 |  |  |  |  | |  |  |  |  | ||||||||||||||||||||||||||||||||||||||||||||||||||||||||||||||||||||||||||||||||||||||||||||||||||||||||||||||||||||||||||||||||||||||||||||||||||||||
55 | / | > | > | ||||||||||||||||||||||||||||||||||||||||||||||||||||||||||||||||||||||||||||||||||||||||||||||||||||||||||||||||||||||||||||||||||||||||||||||||||||||||||||||||||||||||||||||||||||
56 | > | > | |||||||||||||||||||||||||||||||||||||||||||||||||||||||||||||||||||||||||||||||||||||||||||||||||||||||||||||||||||||||||||||||||||||||||||||||||||||||||||||||||||||||||||||||||||||
57 | Mari | Maki | Seira | Tama | Risa | Tama | Ruka | Yayoi Bungo | > | Tsukasa | Yingxia | Tsukasa | Maki | Seira | Ichiko | Tama | Ivar Bon | Tama | Misato | Ruka | Nanamin | > | Seira | Mari | Seira | Tama | Tama | Akari | Yayoi Bungo | Niina | Hisame | ||||||||||||||||||||||||||||||||||||||||||||||||||||||||||||||||||||||||||||||||||||||||||||||||||||||||||||||||||||||||||||||||||||||||||||||||||||||||
58 | SS1 | SS2 | SS3 | SS2 | SS3(no debuff) | SS3 | SS4 | SS2 | > | SS2 | SS2 | SS1 | SS2 | SS3 | SS2 | SS2 | SS1 | SS3 | SS1 | SS4 | SS1 | W | > | SS1 | SS1 | SS3 | SS2 | SS3 | SS1 | SS2 | SS2 | SS2 | |||||||||||||||||||||||||||||||||||||||||||||||||||||||||||||||||||||||||||||||||||||||||||||||||||||||||||||||||||||||||||||||||||||||||||||||||||||||
59 | | | | | | | | | S | > | | | | | | | | | | | | | | > |  |  |  |  | |  |  | | |||||||||||||||||||||||||||||||||||||||||||||||||||||||||||||||||||||||||||||||||||||||||||||||||||||||||||||||||||||||||||||||||||||||||||||||||||||||
60 | > | > | |||||||||||||||||||||||||||||||||||||||||||||||||||||||||||||||||||||||||||||||||||||||||||||||||||||||||||||||||||||||||||||||||||||||||||||||||||||||||||||||||||||||||||||||||||||
61 | > | > | |||||||||||||||||||||||||||||||||||||||||||||||||||||||||||||||||||||||||||||||||||||||||||||||||||||||||||||||||||||||||||||||||||||||||||||||||||||||||||||||||||||||||||||||||||||
62 | Shiki | Risa | Kozue | Karen | Kanata | Yayoi Bungo | Ruka | Carole | > | Seira | Yingxia | Seika | Nanamin | Risa | Kozue | Chiroru | Karen | Yayoi Bungo | Seira | Yayoi Bungo | Ruka | Minori | N | > | Risa | Kozue | Karen | Karen | Seira | Kanata | Yayoi Bungo | Byakko | |||||||||||||||||||||||||||||||||||||||||||||||||||||||||||||||||||||||||||||||||||||||||||||||||||||||||||||||||||||||||||||||||||||||||||||||||||||||
63 | SS1 | SS2 | SS1 | SS2 | SS1 | SS1 | SS1 | SS1 | / | > | SS1 | S MLB | SS1 | SS1 | SS2 | SS1 | SS1 | SS2 | SS2 | SS3 | SS1 | SS3 | SS1 | > | SS2 | SS1 | SS2 | SS1 | SS3 | SS1 | SS1 | SS2 | |||||||||||||||||||||||||||||||||||||||||||||||||||||||||||||||||||||||||||||||||||||||||||||||||||||||||||||||||||||||||||||||||||||||||||||||||||||||
64 | 4 | | |  | | | | |  | 4 | | | | | | | | | | | | 4 |  |  |  |  |  |  | |||||||||||||||||||||||||||||||||||||||||||||||||||||||||||||||||||||||||||||||||||||||||||||||||||||||||||||||||||||||||||||||||||||||||||||||||||||||||||
65 | > | > | |||||||||||||||||||||||||||||||||||||||||||||||||||||||||||||||||||||||||||||||||||||||||||||||||||||||||||||||||||||||||||||||||||||||||||||||||||||||||||||||||||||||||||||||||||||
66 | > | > | |||||||||||||||||||||||||||||||||||||||||||||||||||||||||||||||||||||||||||||||||||||||||||||||||||||||||||||||||||||||||||||||||||||||||||||||||||||||||||||||||||||||||||||||||||||
67 | Kozue | Tama | Chiroru | Karen | Akari | Byakko | Ruka | Yayoi Bungo | M | > | Shiki | Kozue | Tama | Erika Aoi | Fubuki | Karen | Byakko | Yuina | Ruka | Carole | Yayoi Bungo | > | Shiki | Kozue | Charolotta | Tama | Chiroru | Carole | |||||||||||||||||||||||||||||||||||||||||||||||||||||||||||||||||||||||||||||||||||||||||||||||||||||||||||||||||||||||||||||||||||||||||||||||||||||||||||
68 | SS2 | SS4 | SS2 | SS1 | SS1 | SS2 | SS3 | SS3 | > | SS1 | SS2 | SS4 | SS3 | SS2 | SS1 | SS2 | SS1 | SS1 | SS1 | SS3 | A | > | SS1 | SS2 | SS1 | SS4 | SS2 | SS1 | |||||||||||||||||||||||||||||||||||||||||||||||||||||||||||||||||||||||||||||||||||||||||||||||||||||||||||||||||||||||||||||||||||||||||||||||||||||||||||
69 | | | | | | | | | > | | | | | | | > |  |  |  |  |  |  | |  | |||||||||||||||||||||||||||||||||||||||||||||||||||||||||||||||||||||||||||||||||||||||||||||||||||||||||||||||||||||||||||||||||||||||||||||||||||||||||||||||
70 | > | > | |||||||||||||||||||||||||||||||||||||||||||||||||||||||||||||||||||||||||||||||||||||||||||||||||||||||||||||||||||||||||||||||||||||||||||||||||||||||||||||||||||||||||||||||||||||
71 | A | > | > | ||||||||||||||||||||||||||||||||||||||||||||||||||||||||||||||||||||||||||||||||||||||||||||||||||||||||||||||||||||||||||||||||||||||||||||||||||||||||||||||||||||||||||||||||||||
72 | Miko Tennen | Charolotta | Miya | Tama | Ivar Bon | Adel | Maki | Sumomo | > | Mari | Charolotta | Miya | Chiroru | Adel | Maki | L | > | Miya | Vritika | Tama | Yuri | Ivar Bon | Adel | Maki | Sumomo | ||||||||||||||||||||||||||||||||||||||||||||||||||||||||||||||||||||||||||||||||||||||||||||||||||||||||||||||||||||||||||||||||||||||||||||||||||||||||||||||
73 | SS1 | SS1 | SS1 | SS1 | SS2 | SS1 | SS2 | SS2 | > | SS1 | SS1 | SS1 | SS2 | SS1 | SS2 | > | SS1 | SS1 | SS1 | SS2 | SS2 | SS1 | SS2 | SS2 | |||||||||||||||||||||||||||||||||||||||||||||||||||||||||||||||||||||||||||||||||||||||||||||||||||||||||||||||||||||||||||||||||||||||||||||||||||||||||||||||
74 | 3 | | |  | |  | | | | 3 | | | | | | | | | | 3 |  |  | |  |  |  |  |  | | | |||||||||||||||||||||||||||||||||||||||||||||||||||||||||||||||||||||||||||||||||||||||||||||||||||||||||||||||||||||||||||||||||||||||||||||||||||||||||
75 | S | > | > | ||||||||||||||||||||||||||||||||||||||||||||||||||||||||||||||||||||||||||||||||||||||||||||||||||||||||||||||||||||||||||||||||||||||||||||||||||||||||||||||||||||||||||||||||||||
76 | > | L | > | ||||||||||||||||||||||||||||||||||||||||||||||||||||||||||||||||||||||||||||||||||||||||||||||||||||||||||||||||||||||||||||||||||||||||||||||||||||||||||||||||||||||||||||||||||||
77 | Megumi | Vritika | Vritika | Byakko | Kanata | Sumomo | Bon Ivar | Kanata | > | Megumi | Vritika | Vritika | Tama | Ivar Bon | Byakko | Kanata | Kanata | Bon Ivar | > | Megumi | Vritika | Yayoi Bungo | Yuki | Byakko | Kanata | Sumomo | Minori | Bon Ivar | Kanata | ||||||||||||||||||||||||||||||||||||||||||||||||||||||||||||||||||||||||||||||||||||||||||||||||||||||||||||||||||||||||||||||||||||||||||||||||||||||||||
78 | SS2 | SS1 | SS2 | SS1 | SS2 | SS1 | SS2 | SS2 | > | SS2 | SS1 | SS2 | SS1 | SS2 | SS1 | SS2 | SS2 | SS2 | > | SS2 | SS2 | SS3 | SS4 | SS1 | SS2 | SS1 | SS1 | SS2 | SS2 | ||||||||||||||||||||||||||||||||||||||||||||||||||||||||||||||||||||||||||||||||||||||||||||||||||||||||||||||||||||||||||||||||||||||||||||||||||||||||||
79 | | T | > | | | | > |  | |||||||||||||||||||||||||||||||||||||||||||||||||||||||||||||||||||||||||||||||||||||||||||||||||||||||||||||||||||||||||||||||||||||||||||||||||||||||||||||||||||||||||||||||
80 | > | > | |||||||||||||||||||||||||||||||||||||||||||||||||||||||||||||||||||||||||||||||||||||||||||||||||||||||||||||||||||||||||||||||||||||||||||||||||||||||||||||||||||||||||||||||||||||
81 | > | > | |||||||||||||||||||||||||||||||||||||||||||||||||||||||||||||||||||||||||||||||||||||||||||||||||||||||||||||||||||||||||||||||||||||||||||||||||||||||||||||||||||||||||||||||||||||
82 | Yayoi Bungo | > | Miko Tennen | Yayoi Bungo | Hisame | S | > | Miko Tennen | |||||||||||||||||||||||||||||||||||||||||||||||||||||||||||||||||||||||||||||||||||||||||||||||||||||||||||||||||||||||||||||||||||||||||||||||||||||||||||||||||||||||||||||||
83 | SS3 | E | > | SS1 | SS3 | SS1 | > | SS1 | |||||||||||||||||||||||||||||||||||||||||||||||||||||||||||||||||||||||||||||||||||||||||||||||||||||||||||||||||||||||||||||||||||||||||||||||||||||||||||||||||||||||||||||||
84 | 2 (Weak) | | 2 | | | | | 2 |  | ||||||||||||||||||||||||||||||||||||||||||||||||||||||||||||||||||||||||||||||||||||||||||||||||||||||||||||||||||||||||||||||||||||||||||||||||||||||||||||||||||||||||||||||
85 | > | > | |||||||||||||||||||||||||||||||||||||||||||||||||||||||||||||||||||||||||||||||||||||||||||||||||||||||||||||||||||||||||||||||||||||||||||||||||||||||||||||||||||||||||||||||||||||
86 | > | K | > | ||||||||||||||||||||||||||||||||||||||||||||||||||||||||||||||||||||||||||||||||||||||||||||||||||||||||||||||||||||||||||||||||||||||||||||||||||||||||||||||||||||||||||||||||||||
87 | Hisame | R | > | Yingxia | Hisame | Erika Aoi | Muua | > | Hisame | ||||||||||||||||||||||||||||||||||||||||||||||||||||||||||||||||||||||||||||||||||||||||||||||||||||||||||||||||||||||||||||||||||||||||||||||||||||||||||||||||||||||||||||||
88 | SS1 | > | SS3 | SS1 | SS2 | SS2 | > | SS1 | |||||||||||||||||||||||||||||||||||||||||||||||||||||||||||||||||||||||||||||||||||||||||||||||||||||||||||||||||||||||||||||||||||||||||||||||||||||||||||||||||||||||||||||||
89 | | > | | > |  | ||||||||||||||||||||||||||||||||||||||||||||||||||||||||||||||||||||||||||||||||||||||||||||||||||||||||||||||||||||||||||||||||||||||||||||||||||||||||||||||||||||||||||||||||||
90 | > | I | > | ||||||||||||||||||||||||||||||||||||||||||||||||||||||||||||||||||||||||||||||||||||||||||||||||||||||||||||||||||||||||||||||||||||||||||||||||||||||||||||||||||||||||||||||||||||
91 | Y | > | > | ||||||||||||||||||||||||||||||||||||||||||||||||||||||||||||||||||||||||||||||||||||||||||||||||||||||||||||||||||||||||||||||||||||||||||||||||||||||||||||||||||||||||||||||||||||
92 | Risa | > | Risa | > | Risa | ||||||||||||||||||||||||||||||||||||||||||||||||||||||||||||||||||||||||||||||||||||||||||||||||||||||||||||||||||||||||||||||||||||||||||||||||||||||||||||||||||||||||||||||||||
93 | SS1 | > | SS1 | > | SS1 | ||||||||||||||||||||||||||||||||||||||||||||||||||||||||||||||||||||||||||||||||||||||||||||||||||||||||||||||||||||||||||||||||||||||||||||||||||||||||||||||||||||||||||||||||||
94 | 1 | | | 1 | | L | 1 |  | | ||||||||||||||||||||||||||||||||||||||||||||||||||||||||||||||||||||||||||||||||||||||||||||||||||||||||||||||||||||||||||||||||||||||||||||||||||||||||||||||||||||||||||||||
95 | > | > | |||||||||||||||||||||||||||||||||||||||||||||||||||||||||||||||||||||||||||||||||||||||||||||||||||||||||||||||||||||||||||||||||||||||||||||||||||||||||||||||||||||||||||||||||||||
96 | O | > | > | ||||||||||||||||||||||||||||||||||||||||||||||||||||||||||||||||||||||||||||||||||||||||||||||||||||||||||||||||||||||||||||||||||||||||||||||||||||||||||||||||||||||||||||||||||||
97 | Yuki | Hisame | > | Yuki | > | Yuki | Hisame | ||||||||||||||||||||||||||||||||||||||||||||||||||||||||||||||||||||||||||||||||||||||||||||||||||||||||||||||||||||||||||||||||||||||||||||||||||||||||||||||||||||||||||||||||
98 | SS2 | SS1 | > | SS2 | L | > | SS2 | SS1 | |||||||||||||||||||||||||||||||||||||||||||||||||||||||||||||||||||||||||||||||||||||||||||||||||||||||||||||||||||||||||||||||||||||||||||||||||||||||||||||||||||||||||||||||
99 | > | > | |||||||||||||||||||||||||||||||||||||||||||||||||||||||||||||||||||||||||||||||||||||||||||||||||||||||||||||||||||||||||||||||||||||||||||||||||||||||||||||||||||||||||||||||||||||
100 | N | > | > | ||||||||||||||||||||||||||||||||||||||||||||||||||||||||||||||||||||||||||||||||||||||||||||||||||||||||||||||||||||||||||||||||||||||||||||||||||||||||||||||||||||||||||||||||||||
101 | > | > | |||||||||||||||||||||||||||||||||||||||||||||||||||||||||||||||||||||||||||||||||||||||||||||||||||||||||||||||||||||||||||||||||||||||||||||||||||||||||||||||||||||||||||||||||||||
102 | > | S | > | ||||||||||||||||||||||||||||||||||||||||||||||||||||||||||||||||||||||||||||||||||||||||||||||||||||||||||||||||||||||||||||||||||||||||||||||||||||||||||||||||||||||||||||||||||||
103 | > | > | |||||||||||||||||||||||||||||||||||||||||||||||||||||||||||||||||||||||||||||||||||||||||||||||||||||||||||||||||||||||||||||||||||||||||||||||||||||||||||||||||||||||||||||||||||||
104 | 0 (Fringe) | | | L | 0 | 0 |  |  | |||||||||||||||||||||||||||||||||||||||||||||||||||||||||||||||||||||||||||||||||||||||||||||||||||||||||||||||||||||||||||||||||||||||||||||||||||||||||||||||||||||||||||||||
105 | > | > | |||||||||||||||||||||||||||||||||||||||||||||||||||||||||||||||||||||||||||||||||||||||||||||||||||||||||||||||||||||||||||||||||||||||||||||||||||||||||||||||||||||||||||||||||||||
106 | > | > | |||||||||||||||||||||||||||||||||||||||||||||||||||||||||||||||||||||||||||||||||||||||||||||||||||||||||||||||||||||||||||||||||||||||||||||||||||||||||||||||||||||||||||||||||||||
107 | Megumi | Misato | > | > | Megumi | Misato | |||||||||||||||||||||||||||||||||||||||||||||||||||||||||||||||||||||||||||||||||||||||||||||||||||||||||||||||||||||||||||||||||||||||||||||||||||||||||||||||||||||||||||||||||
108 | SS1 | SS1 | Y | > | > | SS1 | SS1 | ||||||||||||||||||||||||||||||||||||||||||||||||||||||||||||||||||||||||||||||||||||||||||||||||||||||||||||||||||||||||||||||||||||||||||||||||||||||||||||||||||||||||||||||||
109 | | | > | | | | > |  |  | ||||||||||||||||||||||||||||||||||||||||||||||||||||||||||||||||||||||||||||||||||||||||||||||||||||||||||||||||||||||||||||||||||||||||||||||||||||||||||||||||||||||||||||||
110 | > | > | |||||||||||||||||||||||||||||||||||||||||||||||||||||||||||||||||||||||||||||||||||||||||||||||||||||||||||||||||||||||||||||||||||||||||||||||||||||||||||||||||||||||||||||||||||||
111 | > | > | |||||||||||||||||||||||||||||||||||||||||||||||||||||||||||||||||||||||||||||||||||||||||||||||||||||||||||||||||||||||||||||||||||||||||||||||||||||||||||||||||||||||||||||||||||||
112 | Chie | Yuki | > | Chie | Megumi | Yuki | > | Chie | Yuki | ||||||||||||||||||||||||||||||||||||||||||||||||||||||||||||||||||||||||||||||||||||||||||||||||||||||||||||||||||||||||||||||||||||||||||||||||||||||||||||||||||||||||||||||
113 | SS1 | SS1 | > | SS1 | SS1 | SS1 | > | SS1 | SS1 | ||||||||||||||||||||||||||||||||||||||||||||||||||||||||||||||||||||||||||||||||||||||||||||||||||||||||||||||||||||||||||||||||||||||||||||||||||||||||||||||||||||||||||||||
114 | |||||||||||||||||||||||||||||||||||||||||||||||||||||||||||||||||||||||||||||||||||||||||||||||||||||||||||||||||||||||||||||||||||||||||||||||||||||||||||||||||||||||||||||||||||||||
115 | This is the list if you are free to play or low spender | ||||||||||||||||||||||||||||||||||||||||||||||||||||||||||||||||||||||||||||||||||||||||||||||||||||||||||||||||||||||||||||||||||||||||||||||||||||||||||||||||||||||||||||||||||||||
116 | Note: Though the chart is based off of owning every style, the "Main Dmg" chart is based off of using the memoria's own EX skill and not the generalized SS1 EX skill if it is a main dmging skill | ||||||||||||||||||||||||||||||||||||||||||||||||||||||||||||||||||||||||||||||||||||||||||||||||||||||||||||||||||||||||||||||||||||||||||||||||||||||||||||||||||||||||||||||||||||||
117 | 2025/1/26 | ||||||||||||||||||||||||||||||||||||||||||||||||||||||||||||||||||||||||||||||||||||||||||||||||||||||||||||||||||||||||||||||||||||||||||||||||||||||||||||||||||||||||||||||||||||||
118 | 2/15/2025 | OUTDATED | |||||||||||||||||||||||||||||||||||||||||||||||||||||||||||||||||||||||||||||||||||||||||||||||||||||||||||||||||||||||||||||||||||||||||||||||||||||||||||||||||||||||||||||||||||||
119 | |||||||||||||||||||||||||||||||||||||||||||||||||||||||||||||||||||||||||||||||||||||||||||||||||||||||||||||||||||||||||||||||||||||||||||||||||||||||||||||||||||||||||||||||||||||||
120 | |||||||||||||||||||||||||||||||||||||||||||||||||||||||||||||||||||||||||||||||||||||||||||||||||||||||||||||||||||||||||||||||||||||||||||||||||||||||||||||||||||||||||||||||||||||||
121 | |||||||||||||||||||||||||||||||||||||||||||||||||||||||||||||||||||||||||||||||||||||||||||||||||||||||||||||||||||||||||||||||||||||||||||||||||||||||||||||||||||||||||||||||||||||||
122 | |||||||||||||||||||||||||||||||||||||||||||||||||||||||||||||||||||||||||||||||||||||||||||||||||||||||||||||||||||||||||||||||||||||||||||||||||||||||||||||||||||||||||||||||||||||||
123 | |||||||||||||||||||||||||||||||||||||||||||||||||||||||||||||||||||||||||||||||||||||||||||||||||||||||||||||||||||||||||||||||||||||||||||||||||||||||||||||||||||||||||||||||||||||||
124 | |||||||||||||||||||||||||||||||||||||||||||||||||||||||||||||||||||||||||||||||||||||||||||||||||||||||||||||||||||||||||||||||||||||||||||||||||||||||||||||||||||||||||||||||||||||||
125 | |||||||||||||||||||||||||||||||||||||||||||||||||||||||||||||||||||||||||||||||||||||||||||||||||||||||||||||||||||||||||||||||||||||||||||||||||||||||||||||||||||||||||||||||||||||||
126 | |||||||||||||||||||||||||||||||||||||||||||||||||||||||||||||||||||||||||||||||||||||||||||||||||||||||||||||||||||||||||||||||||||||||||||||||||||||||||||||||||||||||||||||||||||||||
127 | Color Legend | Criterias Considered for rating each style | Character's Attack Type | ||||||||||||||||||||||||||||||||||||||||||||||||||||||||||||||||||||||||||||||||||||||||||||||||||||||||||||||||||||||||||||||||||||||||||||||||||||||||||||||||||||||||||||||||||||
128 | |||||||||||||||||||||||||||||||||||||||||||||||||||||||||||||||||||||||||||||||||||||||||||||||||||||||||||||||||||||||||||||||||||||||||||||||||||||||||||||||||||||||||||||||||||||||
129 | Fire | Thunder | 1 | Willingness to bring style for a high scoring Score Attack or Skirmish Simulation | |||||||||||||||||||||||||||||||||||||||||||||||||||||||||||||||||||||||||||||||||||||||||||||||||||||||||||||||||||||||||||||||||||||||||||||||||||||||||||||||||||||||||||||||||||
130 | 2 | How easy the style is to use | | | | | | | | | | | | | | | | | | | |||||||||||||||||||||||||||||||||||||||||||||||||||||||||||||||||||||||||||||||||||||||||||||||||||||||||||||||||||||||||||||||||||||||||||||||||||||||||||||||||||
131 | Ice | Light | 3 | Impact the style on the team compared to other styles that play the same role (Power) | |||||||||||||||||||||||||||||||||||||||||||||||||||||||||||||||||||||||||||||||||||||||||||||||||||||||||||||||||||||||||||||||||||||||||||||||||||||||||||||||||||||||||||||||||||
132 | 4 | Synergy with other styles | |||||||||||||||||||||||||||||||||||||||||||||||||||||||||||||||||||||||||||||||||||||||||||||||||||||||||||||||||||||||||||||||||||||||||||||||||||||||||||||||||||||||||||||||||||||
133 | Dark | Null | 5 | Efficiency of the style (SP costs / turns to reach maximum potential) | | | | | | | | | | | | | | | | | | | | | |||||||||||||||||||||||||||||||||||||||||||||||||||||||||||||||||||||||||||||||||||||||||||||||||||||||||||||||||||||||||||||||||||||||||||||||||||||||||||||||
134 | 6 | Willingness to bring style for general purpose use (Prism/orb/dungeon/etc) | |||||||||||||||||||||||||||||||||||||||||||||||||||||||||||||||||||||||||||||||||||||||||||||||||||||||||||||||||||||||||||||||||||||||||||||||||||||||||||||||||||||||||||||||||||||
135 | |||||||||||||||||||||||||||||||||||||||||||||||||||||||||||||||||||||||||||||||||||||||||||||||||||||||||||||||||||||||||||||||||||||||||||||||||||||||||||||||||||||||||||||||||||||||
136 | | | | | | | | | | | | | | | | | | ||||||||||||||||||||||||||||||||||||||||||||||||||||||||||||||||||||||||||||||||||||||||||||||||||||||||||||||||||||||||||||||||||||||||||||||||||||||||||||||||||||||
137 | |||||||||||||||||||||||||||||||||||||||||||||||||||||||||||||||||||||||||||||||||||||||||||||||||||||||||||||||||||||||||||||||||||||||||||||||||||||||||||||||||||||||||||||||||||||||
138 | |||||||||||||||||||||||||||||||||||||||||||||||||||||||||||||||||||||||||||||||||||||||||||||||||||||||||||||||||||||||||||||||||||||||||||||||||||||||||||||||||||||||||||||||||||||||
1 | Please see HBR.Quest for more details on skills and more. | Memoria Info | Recommended Content | Ratings | Style Unique Role | Common Character Role (Shared Skills) | Description | ||||||
|---|---|---|---|---|---|---|---|---|---|---|---|---|---|
2 | Picture | Basic Information | |||||||||||
3 |  | Ruka Kayamori | Recommended SS4 SS5 | Score Attack | Master Skill | Main DMG (ST) | Main DMG (ST, Fire) DP Recovery (VG) Minds eye (Self) Increase Destruction Rate (ST) | Ruka SS1 was one of the styles from release. It was the strongest Fire ST DMG dealer until the release of Yuri from the Angel Beats Collab. Now in JP, they have given her SS1 a tower upgrade, improving the already strong nuke to be even stronger. Now her EX skill can be Leveled up to 17 and her HP DMG modifier is increased from 30% to 50% if there are 3 or more 31A squad members in the party. Fire teams typically need Megumi SS3 and Tama SS5 so you'll easily have 3 members. At lvl 17 she houses one of the highest bases for Fire ST. Ruka's SS1 isn't used often in JP. However, her SS1 ult is generalized and used on her SS4 Unison. This is the case because Ruka SS4 has better passives for DMG and it provides Ruka SS4 with an additional option of a Fire EX skill. Ruka SS1 EX skill houses more damage potential than Ruka SS4 which also can deal Fire DMG, making her a good pick up for SS4 Ruka. Sadly, even with her high DMG potential, she is requires more set up than Ruka SS4 EX skill, so this EX skill is used less often than SS4 EX skill. | |||||
4 | N/A | Anachronies/ Divergence | Common Skill | ||||||||||
5 | N/A | Arts Battle/ Dungeon | Baseline | ||||||||||
6 | Default | SS1 | Attacker | Clock Tower (Hell) | All Style LB 1 | ||||||||
7 | Slash | Fire | Seraph Skirmish Simulation | All Style LB3 | |||||||||
8 |  | Ruka Kayamori | Recommended SS4 SS5 | Score Attack | Master Skill | Main DMG (AoE) OD Generator (AoE) | Main DMG (ST, Fire) DP Recovery (VG) Minds eye (Self) | Ruka SS2 is a decently strong DMG style (AoE) with a massive hit count of 12. Early in JP's career, she was often seen used in dungeons due to her decently high damage and high amounts of hit count to gain loads of overdrive. The hit count is also amazing for AoE OD Loop Teams that she was originally rose up when Score Attacks introduced 2 Enemy Boss fights. As a Main DMG dealer, she is the only Light Elemental DMG dealer that can be part of the OD Loop team and thus can see use for Light Weakness AoE Score Attacks. | |||||
9 | N/A | Anachronies/ Divergence | Common Skill | ||||||||||
10 | N/A | Arts Battle/ Dungeon | Baseline | ||||||||||
11 | Dress | SS2 | Attacker | Clock Tower (Hell) | All Style LB 1 | ||||||||
12 | Slash | Light | Seraph Skirmish Simulation | All Style LB3 | |||||||||
13 |  | Ruka Kayamori | Recommended SS4 SS5 | Score Attack | Master Skill | Main DMG (ST) Defense Debuff (ST) | Main DMG (ST, Fire) DP Recovery (VG) Minds eye (Self) Increase Destruction Rate (ST) | Ruka SS3 is a strong Thunger ST DMG dealer. She provides set up on her own with a Defense Debuff built into her EX skill. She can easily be brought to Thunder Weak ST bosses, but is held back from her decently high SP cost and low hit count on her EX skill. This can be an issue when other Thunder ST DMG dealers deal more DMG or provide more utility than her. By no means is she a bad style, but there are often better options than her for many fights. | |||||
14 | N/A | Anachronies/ Divergence | Common Skill | ||||||||||
15 | N/A | Arts Battle/ Dungeon | Baseline | ||||||||||
16 | Suit | SS3 | Attacker | Clock Tower (Hell) | All Style LB 1 | ||||||||
17 | Slash | Thunder | Seraph Skirmish Simulation | All Style LB3 | |||||||||
18 |  | Ruka Kayamori | Recommended SS5 | Score Attack | Master Skill | Main DMG (ST) Fire/Dark Defense Debuff (ST) Minds eye (Self) | Main DMG (ST, Fire) DP Recovery (VG) Increase Destruction Rate (ST) | Ruka SS4 is one of the Unison (Limited) Styles. Unison styles are basically 2 styles in 1. In Ruka SS4's case, her EX skill can change between Dark or Fire Element. Ruka SS4 is incredibily powerful and is one of the most powerful, if not most powerful Fire ST DMG dealer if you have her SS1 EX skill generalized. On release, she was already one of the most powerful ST Fire DMG dealer, but during the 2.5th anniversary, she was buffed. For Dark ST DMG dealers, she sadly falls short of Adel SS3 in most situations, but she is still one of the top Dark DMG dealers currently. What makes her so powerful? She brings utility to herself and the team. Her Minds eye buff multiplier is not only more powerful than the Minds eye buff multiplier from a support (like Suit Tama), but it also allows her to function in a team without a Minds eye buffer. Her EX skill provides an Elemental Defense Debuff allowing her to set up her own DMG without taking the turn of a debuffer. She is also the only Main DMG dealer that has a passive that increases the potency of her defense debuffs, meaning that her Debuff values can easily compete with your debuffers without building high Wisdom and Luck. With the addition of SS1 EX skill generalization, she has the choice to either bring elemental defense debuff as utility OR deal even more Fire DMG (ST) (please see SS1 for explanation). | |||||
19 | N/A | Anachronies/ Divergence | Common Skill | ||||||||||
20 | N/A | Arts Battle/ Dungeon | Baseline | ||||||||||
21 | King | SS4 | Attacker | Clock Tower (Hell) | All Style LB 1 | ||||||||
22 | Slash | Dark/Fire | Seraph Skirmish Simulation | All Style LB3 | |||||||||
23 |  | Ruka Kayamori | Required (Main Dmg Dealer) SS1 SS4 | Score Attack | Master Skill | Diva (Party, 30% DP Lifesteal, EX skill no limit unless strict use count) Crit DMG Buffer (100%, 5 turn, Turn-based, VG) Crit Buffer (5 turns, Turn-based, VG) Funnel [If Diva=3 hitx80%] [If no Diva=5 hitx20%] (ST, Cannot stack, 3 turns) | Main DMG (ST, Fire) DP Recovery (VG) Minds eye (Self) Increase Destruction Rate (ST) | ||||||
24 | N/A | Anachronies/ Divergence | Common Skill | ||||||||||
25 | N/A | Arts Battle/ Dungeon | Baseline | ||||||||||
26 | Diva | SS5 | Buffer | Clock Tower (Hell) | All Style LB 1 | ||||||||
27 | Slash | Null (Slash) | Seraph Skirmish Simulation | All Style LB3 | |||||||||
28 |  | Yuki Izumi | Recommended SS6 | Score Attack | Master Skill | Main DMG (AoE) Funnel (3 Hit Count x 40% Potency, Self) | Skill Enhancer (Large, Self) Increase Skill count (Self) Extra Break Turn (+1, Passive) | In current day JP Yukki SS1 is not used. Even after her Tower Upgrade where she got a super strong Funnel, she just cannot find a use. This is mostly due to the fact that most Late game enemies have elemental weakness and no modifiers for null. She also houses very little Hit Count (1 without funnel) or utlity for the team. Sadly, she is also under the "Breaker's Curse". With nothing going for her kit in the current meta, or even the meta after the 1st anniversary, Yukki SS1 has been living in the storage house Hacking our free SS pulls. | |||||
29 | Yukki | Anachronies/ Divergence | Common Skill | ||||||||||
30 | Yukkie | Arts Battle/ Dungeon | Baseline | ||||||||||
31 | Default | SS1 | Breaker | Clock Tower (Hell) | All Style LB 1 | ||||||||
32 | Pierce | Null (Pierce) | Seraph Skirmish Simulation | All Style LB3 | |||||||||
33 |  | Yuki Izumi | Recommended SS6 | Score Attack | Master Skill | Main DMG (ST) | Skill Enhancer (Large, Self) Increase Skill count (Self) Extra Break Turn (+1, Passive) | Yukki SS2 is a ST Fire Breaker. She deals some DMG, but not enough to make her notable. She is also under the "Breaker's Curse" thus is seen living in the storage house Hacking our Free SS pulls. | |||||
34 | Yukki | Anachronies/ Divergence | Common Skill | ||||||||||
35 | Yukkie | Arts Battle/ Dungeon | Baseline | ||||||||||
36 | Fireworks | SS2 | Breaker | Clock Tower (Hell) | All Style LB 1 | ||||||||
37 | Pierce | Fire | Seraph Skirmish Simulation | All Style LB3 | |||||||||
38 |  | Yuki Izumi | Recommended SS6 | Score Attack | Master Skill | Main DMG (AoE) Skill Enhancer (Large, Self) | Skill Enhancer (Large, Self) Increase Skill count (Self) Extra Break Turn (+1, Passive) | Yukki SS3 is an AoE Thunder Breaker with decent damage. Her abiltiy to skill enhance herself with a stronger version of skill enhancement makes her useful for content where you can't fully set up properly, but need AoE DMG, like Dungeons and Arts Battle. Sadly for Score Attacks, her competition is much too strong and so she sees little use, but if you don't have the top picks, she is still a decent replacement. With the Addition of Yukki SS5's common skill to increase her skill uses and SS6's common skill passive for additional break turn, she can probably offer more for dungeon than she did before. | |||||
39 | Yukki | Anachronies/ Divergence | Common Skill | ||||||||||
40 | Yukkie | Arts Battle/ Dungeon | Baseline | ||||||||||
41 | Suit | SS3 | Breaker | Clock Tower (Hell) | All Style LB 1 | ||||||||
42 | Pierce | Thunder | Seraph Skirmish Simulation | All Style LB3 | |||||||||
43 |  | Yuki Izumi | Recommended SS6 | Score Attack | Master Skill | Super Breaker (+300% Maximum Destruction, AoE) | Skill Enhancer (Large, Self) Increase Skill count (Self) Extra Break Turn (+1, Passive) | Yukki SS4 is the first time WFS added "Super Break" as a mechanic. Sadly, "Super Break" is not as amazing as one would have hoped. She deals more damage to DP, but requires her EX skill to hit HP and weakness DMG to apply Super Break. If WFS ever decides to make Super Break apply when you break AND if you hit HP, Super Breakers might be a decent option. Until then, Yukki SS4 sits with her SS1 and 2 under the "Breaker's Curse". At the very least, she is more useful than her SS1 and 2 amd saw some use on release. | |||||
44 | Yukki | Anachronies/ Divergence | Common Skill | ||||||||||
45 | Yukkie | Arts Battle/ Dungeon | Baseline | ||||||||||
46 | Dress | SS4 | Breaker | Clock Tower (Hell) | All Style LB 1 | ||||||||
47 | Pierce | Light | Seraph Skirmish Simulation | All Style LB3 | |||||||||
48 |  | Yuki Izumi | Recommended SS6 | Score Attack | Master Skill | Dark Field Setter (Large) Skill Enhancer (Party, Turn-Based) Increase Skill Count (Self) | Skill Enhancer (Large, Self) Extra Break Turn (+1, Passive) | Yukki SS5 is part of the bread and butter of dark teams. She sets a Large Dark Field and dispells buffs from the enemy. The dispell is very niche, but the Large Dark Field is an amazing support ability. Unfortunately, she is the weakest Large Field Setter, but it doesn't matter much, when all the other parts of Dark provide all other buffs and debuffs needed for maximum DMG. Her common skill is unique to her as she refunds her own skill usage counts as long as she breaks using her common skill. This is abusable for Dungeon and Arts Battle, making her SS3 and SS5 strong for both contents. | |||||
49 | Yukki | Anachronies/ Divergence | Common Skill | ||||||||||
50 | Yukkie | Arts Battle/ Dungeon | Baseline | ||||||||||
51 | Snow White | SS5 | Breaker | Clock Tower (Hell) | All Style LB 1 | ||||||||
52 | Pierce | Dark | Seraph Skirmish Simulation | All Style LB3 | |||||||||
53 |  | Yuki Izumi | Score Attack | Master Skill | Fragile (ST) Misfortune (Large, ST) Extra Break Turn (+1, Passive) | Skill Enhancer (Large, Self) Increase Skill count (Self) Increase DP break down turn | Yukki SS6 is the third Unison (Limited Style). At her debut, she was weak due to a bug. After her bug fix, she is at full power and the strongest version of ALL of the Yuki. She is an amazing dmg dealer and support. Her EX skill provides a ST hit that applies 'hacking' (-100 border) and fragile debuff for 2 turns before damage. Her damage is also incredibly high as she has a 50% DP mod, allowing her to break DP of any fire/dark weak cancers without any set up. With the synergy of her kit, she can easily be built straight DEX and still have enough INT/LCK for fragile due to the decreased stats from 'hacking'. She also allows low limit break debuffers to debuff the enemy at nearly max/if not max potency, even when they are not build INT/LCK. Her main issue is that she overlaps with her SS5 in dark teams. I personally believe that Yukki SS6 is a larger asset to a dark team than her SS5, but if the boss has permanent buffs that can be removed, you may opt for the her SS5. Currently in JP, she is seen in multiple top end meta teams and a central figure at that. Iroha SS1 can save the day and provide field if you use Yukki SS6 over her SS5. Though her field is a small field, if you have Iroha SS2 limit broken 3, she will easily pass Yukki SS5 in usefulness. Currently I wouldn't be surprised to see Yukki SS6 used in teams outside of fire/dark just to utilize her 'hacking' and fragile debuffs. | ||||||
54 | Yukki | Anachronies/ Divergence | Common Skill | ||||||||||
55 | Yukkie | Arts Battle/ Dungeon | Baseline | ||||||||||
56 | Queen | SS6 | Breaker | Clock Tower (Hell) | All Style LB 1 | ||||||||
57 | Pierce | Dark | Seraph Skirmish Simulation | All Style LB3 | |||||||||
58 |  | Megumi Aikawa | Required SS2 | Score Attack | Master Skill | Stunner | Defense Debuff (ST) Fragile Debuff (AoE) Misfortune (ST) Skill Enhancer (Self) | Megumi SS1 is a stunner. WFS never really encouraged this debuff. Due to this, Megumi SS1 never really established herself. Sadly, this makes her one of the weakest debuffers. | |||||
59 | Megumin | Anachronies/ Divergence | Common Skill | ||||||||||
60 | Megumin | Arts Battle/ Dungeon | Baseline | ||||||||||
61 | Default | SS1 | Debuffer | Clock Tower (Hell) | All Style LB 1 | ||||||||
62 | Blunt | Null (Blunt) | Seraph Skirmish Simulation | All Style LB3 | |||||||||
63 |  | Megumi Aikawa | Score Attack | Master Skill | Stunner (AoE) Fragile (AoE) | Defense Debuff (ST) Misfortune (ST) Skill Enhancer (Large, Self) | Megumi SS2 is a weak, out of date style. For JP launch, she was one of the first additions to the roster after release. Though she herself is incredibly outdated and weak, her common skill is not. Megu SS2 is one of the few SS you actually want 1 copy just to use her common skill on ALL of her SS styles. Her common skill applies AoE Fragile, allowing all Megu to defense debuff AND fragile, making her a strong debuffer for her SS3, SS4, and SS5. At least she has an incredible wardrobe of cute outfits. | ||||||
64 | Megumin | Anachronies/ Divergence | Common Skill | ||||||||||
65 | Megumin | Arts Battle/ Dungeon | Baseline | ||||||||||
66 | Casual | SS2 | Debuffer | Clock Tower (Hell) | All Style LB 1 | ||||||||
67 | Blunt | Light | Seraph Skirmish Simulation | All Style LB3 | |||||||||
68 |  | Megumi Aikawa | Required SS2 Highly Recommended SS5 | Score Attack | Master Skill | Fire Field Setter (Large) Fire Defense Debuff (ST) Skill Enhance (Large, Self) | Defense Debuff (ST) Fragile Debuff (AoE) Misfortune (ST) Larger Field (Passive) | Megumi SS3 is as close to a must have as you can get for a Fire team. She's the provider of a large fire field, brings fire defense debuff, and DMG all in 1 EX skill. Megu SS3 is also the only one who can apply Large Fire Field. Since her large field and fire defense debuff is applied before her DMG, Megu SS3 is often seen being a sub-DMG dealer in single target settings by breaking the Boss' DP for SA, so that the main DMG dealer doesn't need to waste their buffs or SP. She can even be used as a Main DMG dealer as well (though not as good as the top fire DMG dealers. I've personally ended up accidentally killing bosses with her when trying to set up the debuffs for my Main DMG dealer in Score Attacks. Her common skill self enhance is rarely used. Megu SS3 is greatly improved with her SS2's common skill and SS5's common passive. Megu SS2 provides a method for Megu SS3 to provide fragile debuff, while SS5 passive increases the potency of Megu's Large Fire Field by 15% (65% -> 80%, it is additive) and permanent. If you have both her SS2 and SS5, Megu SS3 goes from strong to essentially required for any Fire Elemental team. | |||||
69 | Megumin | Anachronies/ Divergence | Common Skill | ||||||||||
70 | Megumin | Arts Battle/ Dungeon | Baseline | ||||||||||
71 | Shrine Maiden | SS3 | Debuffer | Clock Tower (Hell) | All Style LB 1 | ||||||||
72 | Blunt | Fire | Seraph Skirmish Simulation | All Style LB3 | |||||||||
73 |  | Megumi Aikawa | Required SS2 | Score Attack | Master Skill | Defense Debuff (Permanent, ST) Dark Defense Debuff (Permanent, ST) DP Recover Block Debuff (Permanent, ST) Misfortune Debuff (Small, ST) | Defense Debuff (ST) Fragile Debuff (AoE) Skill Enhancer (Large, Self) | Megumi SS4 was the first Style to introduce permanent defense debuff, elemental defense debuff, and DP recovery debuff (100%). These debuffs can stack with the same debuffs that lasts a few turns. To scale the power back, Megu SS4 EX skill could only be used once (even if you level it up) and the defensive debuffs it provided were similar numbers to that of AoE defense debuffs. The only way to increase her EX skill usage is the necklace that increases dark skill count by 1, but that would come at the cost of losing +48 Luck which is needed for debuffing. This makes it extremely important to have extremely high limit breaks on Megu SS4 to reach cap. Megu SS4 is rarely used in any content because she takes a lot of SP to set up (minimum 30 SP). She can bring ST def down and AoE fragile, but their costs are also very steep. With the new changes to Score Attack and the amount of power in an ideal dark team (Tsukasa SS4 + Aina SS2), Megu SS4 is extremely potent for large dmg number teams. She asdly cannot be used for speed teams. If you decide to use her, expect extremely high dmg from your main Dmg Dealer. | |||||
74 | Megumin | Anachronies/ Divergence | Common Skill | ||||||||||
75 | Megumin | Arts Battle/ Dungeon | Baseline | ||||||||||
76 | Suit | SS4 | Debuffer | Clock Tower (Hell) | All Style LB 1 | ||||||||
77 | Blunt | Dark | Seraph Skirmish Simulation | All Style LB3 | |||||||||
78 |  | Megumi Aikawa | Recommended SS2 | Score Attack | Master Skill | Thunder Field Setter (Large) Thunder Defense Debuff (AoE) Larger Field (Passive) | Defense Debuff (ST) Fragile Debuff (AoE) Misfortune (ST) Skill Enhancer (Large, Self) | Picking up Megumi SS5 is not only amazing for a Thunder team, her common skill is a passive that increases her field potency (15% additively) and permanent which could be used on her SS3 to make your fire teams even stronger. As the only large thunder field, she replaced Higuchi SS1's EX skill that set a small thunder field for thunder teams. Her Field alone makes her vital to a thunder team, but the additional support she can provide her team makes her a solid pick up for any thunder team. Her EX skill also comes with a thunder defense debuff (AoE) that matches Sharo SS2's lowering the amount of turns that are required for thunder teams to pull off their full debuff combination. Her damage is also decent in AoE fights due to providing thunder defense debuff and a large thunder field before dealing damage, but not anything incredibily impressive. With a high investment account (own all the styles), Megu SS5, Sharo SS2, and Yunyun SS2, you can easily cover all the debuffs your teams needs in 2 extra turns (OD2). In fact, because Megu's Thunder defense debuff lasts 2 turns, if you prepare the turn before, you could fully debuff a boss with 1 extra turn (OD1), granted you have the SP for it. | |||||
79 | Megumin | Anachronies/ Divergence | Common Skill | ||||||||||
80 | Megumin | Arts Battle/ Dungeon | Baseline | ||||||||||
81 | Swimsuit | SS5 | Debuffer | Clock Tower (Hell) | All Style LB 1 | ||||||||
82 | Blunt | Thunder | Seraph Skirmish Simulation | All Style LB3 | |||||||||
83 |  | Tsukasa Tojo | Required SS2 | Score Attack | Master Skill | Fire Field Setter (Small) Increase Buff Potential Enhancer (Party) | Fire Defense Debuff (AoE) First Turn OD Battery | Tsukasa SS1 is a decent buffer with a small fire field (50%). She is excellent in a fire team, especially before the release of Megumi SS3. After the release of Megumi SS3, she has been put on the side as an overall weaker field setter with high SP costs. Her tower upgrade has given her a resurgence for some niche uses when her EX skill is generalized. This is due to the a new unique buff that increases the party's skill enhancing abilities by 20% and the reduction of SP costs to 10. Though she cannot beat Megumi SS3 as a field setter, she is now decent when her generalized EX skill is used on Tsukasa SS2. A current fun interaction many JP players utilize is using her SS1's EX skill on her SS4 (bunny). This combo is used when running her with Ruka SS4 and Yukki SS6 because both are dark and fire, thus able to use both parts of Tsukasa. | |||||
84 | Tsukasacchi | Anachronies/ Divergence | Common Skill | ||||||||||
85 | Tsukassie | Arts Battle/ Dungeon | Baseline | ||||||||||
86 | Default | SS1 | Buffer | Clock Tower (Hell) | All Style LB 1 | ||||||||
87 | Pierce | Fire | Seraph Skirmish Simulation | All Style LB3 | |||||||||
88 |  | Tsukasa Tojo | Required SS1 | Score Attack | Master Skill | Skill Enhancer (Party) Fire Skill Enhancer (Party, JP) Fire Defense Debuff (AoE) | Increase Buff Potential Enhancer (Party) First Turn OD Battery | Tsukasa SS2 one release was a decently good style, until she became just a Homescreen style. This was because she offered only a large skill enhance for the party on her EX skill and nothing else. Other supports after her would provide more buffs than just large skill enhance, making her a fringe choice. Around the 2.5th anniversary, WFS decided to buff her kit, not enough to make her top tier, but enough to make her usable. Her EX skill now provided a large fire skill enhance for the party and her common skill gained the ability to debuff fire defense (AoE). This made her very versitile as she can now fulfill multiple roles at the same time and her SP costs were incredibly high. If you own her SS1 and generalize the EX skill, Tsukasa SS2 has a solid kit that provides small fire field, an increase to offensive buff potency, a large skill enhance, a large elemental skill enhance, and a fire defense debuff. Her unique SS1 buff would even compliment her SS2's EX skill and buff both part of the buffs. Sadly, this was not enough to improve her over Megu SS3 as a field setter, especially after Megu SS5 provided Megu SS3 with a passive that made her field stronger. | |||||
89 | Tsukasacchi | Anachronies/ Divergence | Common Skill | ||||||||||
90 | Tsukassie | Arts Battle/ Dungeon | Baseline | ||||||||||
91 | Swimsuit | SS2 | Buffer | Clock Tower (Hell) | All Style LB 1 | ||||||||
92 | Pierce | Fire | Seraph Skirmish Simulation | All Style LB3 | |||||||||
93 |  | Tsukasa Tojo | Score Attack | Master Skill | Light Field Setter (Large) Crit Rate (VG) Crit DMG (VG) Light Skill Enhancer (Large, VG) | Increase Buff Potential Enhancer (Party) First Turn OD Battery | Kasa SS3 was the answer that light needed during the 1.5th Anniversary. she provided most of the offensive support light was missing: Large light field, light skill enhance, crit, crit damage. Later, Yottsun SS2 would be released to decrease the burden on Kasa SS3 for buffing. A little after the 2.5th Anniversary, Isuzu SS3 was released as a side grade to Kasa SS3 because she also provides a large light field. In the current state of JP, light is one of if not the weakest element. Within the element, Kasa SS3 or Isuzu SS3 is basically a requirement for a light team. Without either of them, a light team would hit like a wet noodle. Kasa SS3 like Megu SS3 not only deploys a large field, but also other supports (Kasa provides crit and cri dmg to the VG before dmg). This allows Kasa SS3 to act as a sub-DMG that could break the DP of enemies. With her EX skill scaling on Wisdom, it is also incredibly easy to get her to reach maximum dmg potential. Unfortunately, her dmg won't compare to a main dmg dealer, she always give that extra bit of dmg especially to the DP. I personally found her incredibly useful to break DP of bosses so I don't need to waste the buffs, SP, and skill usages on my main dmg dealer. | ||||||
94 | Tsukasacchi | Anachronies/ Divergence | Common Skill | ||||||||||
95 | Tsukassie | Arts Battle/ Dungeon | Baseline | ||||||||||
96 | Suit | SS3 | Buffer | Clock Tower (Hell) | All Style LB 1 | ||||||||
97 | Pierce | Light | Seraph Skirmish Simulation | All Style LB3 | |||||||||
98 |  | Tsukasa Tojo | Recommended SS2 | Score Attack | Master Skill | Dark Resistance Overwrite (AoE) Apply Dark Weakness (AoE) Funnel (5 Hit Count x 10% Potency, VG) Dark Skill Enhancer (Large, VG) | Increase Buff Potential Enhancer (Party) Fire Defense Debuff (AoE) First Turn OD Battery | Kasa SS4 was the start of rise of the Dark element shortly after the 2nd Anniversary. She is the 2nd Resistance overwrite / elemental weakness applier released to date. Her kit, even without the overwrite is impressive as it synergizes with the rest of the dark element and removes the need for Yunyun SS1 in a dark team for a cheap cost of 11 SP. Unfortunately, skill levels mean close to nothing for her EX skill. Kasa's ability to make all enemies weak to dark (unless absorb) makes dark teams thrive in nearly any fight. Her ability to provide up to 15 extra hits (10% potency) not only replaces Yunyun SS1 for dark damage dealers, but also provide up to 10 hits to build up OD (1/4th of the OD bar). This makes it possible for dark teams to not only build up OD incredibly fast, but also potentially OD loop even on single target bosses. Her common skill is a cherry on top as she can enhance dark skills for the VG. Sadly, because she is a debuffer and not a buffer, the potency of her buff is lower than if a buffer provided it (-10% potency). Regardless she is basically a must have in any dark team and a dark team without her is basically a sharp tool that didn't get proper maintenance. There is an interesting syngery with Kasa SS4 and Ruka SS4. As Ruka SS4 is dark and fire, she can still recieve the hit count buffs from Kasa SS4. If Kasa SS4 also has SS1 skill generalized, she can also provide a fire field for Ruka to use the buffs she gains to deal fire dmg. | |||||
99 | Tsukasacchi | Anachronies/ Divergence | Common Skill | ||||||||||
100 | Tsukassie | Arts Battle/ Dungeon | Baseline | ||||||||||
101 | Bunny | SS4 | Debuffer | Clock Tower (Hell) | All Style LB 1 | ||||||||
102 | Pierce | Dark | Seraph Skirmish Simulation | All Style LB3 | |||||||||
103 |  | Karen Asakura | Recommended SS4 | Score Attack | Master Skill | Increase Destruction Rate (ST) Limit Break 3 Passive: Funnel (3 Hit Count x 40% Potency if start battle in VG) | Double EX skill | Karen SS1 is one of the original styles who still does her job well. After her tower upgrade and even her SS4's common skill, she does it even better. Karen is one of the fwe styles that essentially requires her Limit Break 3 to do her job. Karen's LB3 passive provides her with a funnel (3 hit count x 40% potency) at the start of every battle if she's in the front. This makes her amazing for dungeon and arts battles as there are many battles needed to clear both of those content. The most amazing part is that the funnel allows her to hit AoE and kill mobs without the use of her EX skill, something styles without this passive struggle with. Outside of dungeon and arts battles, Karen SS1's use is largely diminished as she isn't a main damage dealer without having an element or having a kit like Irene. It is also kind of uncommon to add a blaster to a team for Score Attack that has no other role. Many players who have a LB3 Karen still use her constantly in dungeon and arts battle in JP. | |||||
104 | Karerin | Anachronies/ Divergence | Common Skill | ||||||||||
105 | Karerin | Arts Battle/ Dungeon | Baseline | ||||||||||
106 | Default | SS1 | Blaster | Clock Tower (Hell) | All Style LB 1 | ||||||||
107 | Slash | Null (Slash) | Seraph Skirmish Simulation | All Style LB3 | |||||||||
108 |  | Karen Asakura | Recommended SS4 | Score Attack | Master Skill | Increase Destruction Rate (AoE) | Double EX skill | Karen SS2 is an AoE blaster with 10 hits, making her good at building up OD in AoE content. Her dmg is somewhat low and her destruction rate is decent, topping at 168% for each enemy when hitting HP. Sadly, if you Yuina SS2 is generally a better choice when choosing for an OD generator that is a blaster for AoE content. Yuina SS2 provides 12 hits and 216% destruction rate on every enemy while dealing more damage. If you are lucky to have Karen SS4, you are able to bring her common skill that provides a buff that allows her to use 2 EX skill on 1 cast of her EX skill, while Yuina would require her SS4 to provide an extra turn for the whole VG line. The few times people use her, is when there is an AoE fire boss and they opt to bring an AoE blaster, otherwise she is usually a fringe choice to bring to a party. | |||||
109 | Karerin | Anachronies/ Divergence | Common Skill | ||||||||||
110 | Karerin | Arts Battle/ Dungeon | Baseline | ||||||||||
111 | Red Riding | SS2 | Blaster | Clock Tower (Hell) | All Style LB 1 | ||||||||
112 | Slash | Fire | Seraph Skirmish Simulation | All Style LB3 | |||||||||
113 |  | Karen Asakura | Recommended SS4 | Score Attack | Master Skill | Main DMG (AoE) Funnel (3 Hit Count x 40% Potency, Self) Increase Destruction Rate | Double EX skill | Karen SS3 is an extremely strong light AoE damage dealer as a blaster. Her EX skill provides her with funnel that provides a total of 120% potency. With the self-funnel and decently high dmg potential for a blaster, Karen SS3 provides high amounts of dmg. She does require the enemy to be weak to light to have an increased destruction rate. What makes Karen SS3 a strong dmg dealer is that she is able to kill enemies from DP due to being a strong blaster. Since each hit increases destruction rate and each hit will calculate damage based off the destruction rate when the hit is made, the final hits of the EX skill will deal high amounts of dmg as the destruction rate ramped up to a high rate. | |||||
114 | Karerin | Anachronies/ Divergence | Common Skill | ||||||||||
115 | Karerin | Arts Battle/ Dungeon | Baseline | ||||||||||
116 | Suit | SS3 | Blaster | Clock Tower (Hell) | All Style LB 1 | ||||||||
117 | Slash | Light | Seraph Skirmish Simulation | All Style LB3 | |||||||||
118 |  | Karen Asakura | Score Attack | Master Skill | Increasing Destruction Rate (AoE) Dark Crit Rate Buffer (Team) Dark Crit DMG Buffer (Team) Increase Destruction Rate (Dark Small) Double EX skill | Karen SS4 is a strong dark support blaster hybrid. Due to the support she provides on her EX skill and being AoE, her destruction rate is lower than most blasters (105.6%). As a support she provides a buff that was once unique to Yuina SS3, dark critical dmg buff. Yuina SS3 only provided this to herself, but now all dark damage dealers can gain this buff through Karen SS4. This makes her a strong pick up for dark teams who have an extra slot for the dark critical dmg buff. Even if you don't want to use Karen SS4, her common skill is also unique and provides a buff to all of her styles that makes Karen use her EX 2 times with 1 cast of the EX (damage buffs are consumed separately between the 2 EX). This skill alone allows All Karens to save on SP to increase destruction rate. | |||||||
119 | Karerin | Anachronies/ Divergence | Common Skill | ||||||||||
120 | Karerin | Arts Battle/ Dungeon | Baseline | ||||||||||
121 | Swimsuit | SS4 | Blaster | Clock Tower (Hell) | All Style LB 1 | ||||||||
122 | Slash | Dark | Seraph Skirmish Simulation | All Style LB3 | |||||||||
123 |  | Tama Kunimi | Recommended SS3 SS5 | Score Attack | Master Skill | DP Recovery (Party) DP Reviver (VG) | Skill Enhancer (Large, RG) HoT (VG) Parameter UP (Party) Remove Virus Effect (Party) | Tama SS1 is a decent pick up to generalize her EX skill to all her other styles. She is 1 of 2 styles that can Revive DP for allies, which can make or break a fight. It is incredibily useful for Score Attacks to keep higher scores as you get bonus score if no one on your team has a broken Deflector Shield. This style, like several other SS1s are not styles you want multiple copies for, as you'll end up just generalizing their EX skill for their later more broken styles. From my experience, I have never needed this skill for any content and it costs a hefty 13 SP, but during 2nd anniversary many of the Score Attack bosses started to hit a lot harder and several players with lower LBs abused this EX to reach 1 million score for Score Attacks. | |||||
124 | Otama | Anachronies/ Divergence | Common Skill | ||||||||||
125 | Cappy | Arts Battle/ Dungeon | Baseline | ||||||||||
126 | Default | SS1 | Healer | Clock Tower (Hell) | All Style LB 1 | ||||||||
127 | Slash | Null (Slash) | Seraph Skirmish Simulation | All Style LB3 | |||||||||
128 |  | Tama Kunimi | Recommended SS1 SS5 | Score Attack | Master Skill | DP Recovery (Party) Skill Enhancer (Small, Party) SP Battery (+3, Fire) Attack Down Debuff | DP Revivor (VG) Skill Enhancer (Large, RG) HoT (VG) Parameter UP (Party) Remove Virus Effect (Party) | From, amazingly strong at release, to forgotten tier even after her buff during 2.5 anniversary, Tama SS2 is a style fallen from grace. This has a lot to do with powercreep as most strong to meta supports will just do her job, but better. Tama SS2 buffed EX heals, provides small skill enhance, and +3 SP battery (new buff) for all fire styles (but self). As Suit Tama is meta, no other Tama is used unless you don't have suit Tama. They both heal, but Suit Tama provides a large skill enhance to the RG. Supports like Yunyun SS1 can also provide large skill enhance which is strictly better than a small skill enhance. The SP battery is shared with Aoi SS3 which provides a strong defensive backbone to the team that makes it not require as much healing. With many options being strictly better, Tama SS2 in JP is a weak pick up. | |||||
129 | Otama | Anachronies/ Divergence | Common Skill | ||||||||||
130 | Cappy | Arts Battle/ Dungeon | Baseline | ||||||||||
131 | Magical | SS2 | Healer | Clock Tower (Hell) | All Style LB 1 | ||||||||
132 | Slash | Fire | Seraph Skirmish Simulation | All Style LB3 | |||||||||
133 |  | Tama Kunimi | Recommended SS5 | Score Attack | Master Skill | Thunder Skill Enhancer (Large, Party) Parameter UP (Party) Sub Role: Main DMG (ST) | DP Revivor (VG) Skill Enhancer (Large, RG) Remove Virus Effect (Party) | Tama SS3 is a sad example of a good style that is overshadowed by herself on a different style. Before Tama SS5 was released, she was a staple in thunder teams and was part of why thunder teams were extremely strong and safe. Her EX skill provides all allies with a large thunder skill enhance and unlike all other large thunder skill enhancers, she can stack the buff twice for the main dmg dealer. For people who don't own any LB3 styles and have Tama SS5, Tama SS3's common skill is useful for debuffers. It is one of the cheapest parameter increases for all allies at 8 SP and can be used on Tama SS5 before debuffers to increases their potentencies. | |||||
134 | Otama | Anachronies/ Divergence | Common Skill | ||||||||||
135 | Cappy | Arts Battle/ Dungeon | Baseline | ||||||||||
136 | New Year | SS3 | Healer | Clock Tower (Hell) | All Style LB 1 | ||||||||
137 | Slash | Thunder | Seraph Skirmish Simulation | All Style LB3 | |||||||||
138 |  | Tama Kunimi | Recommended SS5 | Score Attack | Master Skill | DP Recovery (Party) DP Recovery Over Time (Party) SP Battery (+3, Light) | DP Revivor (VG) Skill Enhancer (Large, RG) Parameter UP (Party) Remove Virus Effect (Party) | Much like her SS2 counterpart, Tama SS4 is rarely used due to Tama SS5 being strictly better. Offensive support is important and Tama SS4 only provides a lot of heals and a SP battery for light styles. With less of a need for heals and more of a need for offensive buffs, Tama SS4 is generally a weak pick up. On release, many people tried to use her and deem her pretty good as Tsukasa SS3 (suit) was released Tsukasa SS3 made light one of the stronger elements at the 1.5th Anniversary. Sadly she didn't last long in the "decent" category and now rarely to never used. | |||||
139 | Otama | Anachronies/ Divergence | Common Skill | ||||||||||
140 | Cappy | Arts Battle/ Dungeon | Baseline | ||||||||||
141 | Swimsuit | SS4 | Healer | Clock Tower (Hell) | All Style LB 1 | ||||||||
142 | Slash | Light | Seraph Skirmish Simulation | All Style LB3 | |||||||||
143 |  | Tama Kunimi | Score Attack | Master Skill | Minds Eye Buffer (ST) Crit Rate Buffer (ST) Crit DMG buffer (50%, ST) Skill Enhancer (Large, RG) | DP Revivor (VG) DP Recovery (Party) Parameter UP (Party) Remove Virus Effect (Party) | If you want to know which style is used on every team it is Tama SS5. Tama SS5 on release replaced two meta supports (Muua SS1 and Higuchi SS2) as she basically did both of their jobs together. Muua brought heals and mind eye, while Higuchi brought crit rate, crit dmg, large skill enhance, and a small heal. Tama SS5 can do all of it. Tama SS5's EX skill is a Single Target mind eye, crit rate, and crit dmg buff, while her common skill is a large skill enhance for the RG. Having her A and S styles gives you access to heals completing both Muua and Higuchi's kits. By owning Tama SS5, you basically open a free slot for another character in your party. As expected, her main 2 weaknesses are that she can only buff 1 dmg dealer with mind eye instead of 3 (Muua buffs the whole RG) and that she must choose between buffing and healing. WFS realized this and didn't want her to have that weakness, but they locked it behind LB3. LB3 provides Tama SS5 with +5 SP at the beginning of each battle as long as she starts in the VG. This ample amount of SP provides Tama with extra SP to heal and buff a little bit faster than not LB3. | ||||||
144 | Otama | Anachronies/ Divergence | Common Skill | ||||||||||
145 | Cappy | Arts Battle/ Dungeon | Baseline | ||||||||||
146 | Suit | SS5 | Buffer | Clock Tower (Hell) | All Style LB 1 | ||||||||
147 | Slash | Null (Slash) | Seraph Skirmish Simulation | All Style LB3 | |||||||||
148 |  | Erika Aoi | Score Attack | Master Skill | AoE cover (Super taunt) Invincibilty (Self) DP Recovery (Self) | Taunt Defense up (Self, Passive) Increase Destruction Rate (AoE, Fire Small) | Aoi SS1 is one of the first largest "power spikes" in HBR that is still relavant today. This is due to how powerful her EX skill is and the fact that it can be generalized to her SS2/3/4, where it is more actively used. Aoi SS1 is an important pick up as one of the strongest defensive support in the game for Single Target Boss fights. This is due to the fact that she can fully block 2 hits of damage and taunts all enemies to only target her including AoEs. Blocking means she will take 0 dmg from the attack, even if she doesn't have any DP, however she will still recieve debuffs. She allows those with low LB to survive large dmg'ing hits without taking any dmg. Due to being the answer for many Score Attacks, she is held in a high regard as being extremely strong even though she provides no offensive support to allies. Currently in JP, shortly after 2.5th anniversary, there is new content released that allows you to pick her up as a selector. | ||||||
149 | Aoi | Anachronies/ Divergence | Common Skill | ||||||||||
150 | Aoi | Arts Battle/ Dungeon | Baseline | ||||||||||
151 | Default | SS1 | Defender | Clock Tower (Hell) | All Style LB 1 | ||||||||
152 | Blunt | Null (Blunt) | Seraph Skirmish Simulation | All Style LB3 | |||||||||
153 |  | Erika Aoi | Highly Recommended SS1 | Score Attack | Master Skill | Main DMG (ST, Token) Taunt | AoE cover (Super taunt) Defense up (Self, Passive) Increase Destruction Rate (AoE, Fire Small) | Aoi SS2 is the premere single target thunder dmg dealer, especially if you have her SS1. Aoi's SS2 is a token dmg dealer meaning she comes with an innate 160% multiplier at maximum token stacks (LB0-2). She gains her tokens when getting hit or when using her common skill that provides her with 2 tokens per use (a taunt). This allows Aoi to fulfill 2 jobs, main dmg dealer and party protector and she does both extremely well. Her SS1 makes her even stronger as you can fully cover for your party using the SS1 EX skill AND gain tokens (1 or 3) due to the boss hitting Aoi. With the synergy between her SS1 EX skill and her already solid skill set, she is an valuable main dmg dealer to have for thunder teams. With the addition to her new passive from the Sumomo event, she can also take more punishment because she will always have an increase of 15% defense. | |||||
154 | Aoi | Anachronies/ Divergence | Common Skill | ||||||||||
155 | Aoi | Arts Battle/ Dungeon | Baseline | ||||||||||
156 | Maid | SS2 | Defender | Clock Tower (Hell) | All Style LB 1 | ||||||||
157 | Blunt | Thunder | Seraph Skirmish Simulation | All Style LB3 | |||||||||
158 |  | Erika Aoi | Required SS1 | Score Attack | Master Skill | Debuff Guard (Party) SP Battery (+5, Fire only) Increase Destruction Rate (AoE, Fire Small) Defense up (Party, Fire, Passive, First 4 turns) | AoE cover (Super taunt) Taunt Defense up (Self, Passive) | Aoi SS3 is a defensive, utility support for fire teams with a bonus as homescreen meta. She is really nice to have, but more niche than meta. She provides fire with the ability to have Aoi SS1's ult on their team, but with added benefits. Aoi SS3 has a unique LB0 passive that provides 4 turns of 50% defense for all fire party members. This allows you to ignore large amounts of damage while setting up in the first 4 turns. Her EX skill is also relatively cheap at 11 SP and provides debuff guard for the party and a huge +5SP battery for fire styles. She easily helps the old fire teams quickly set up, as their main issue was that they are relatively slow. Her common skill is just a bonus as it is a blaster skll if the enemy is weak to fire. The skill doesn't provide insane amounts of Destruction Rate for 8 cost, but it is AoE and decent as a skill. Sadly, her usefullness feels hindered without her SS1 and it is recommended to not use her without it generalized. | |||||
159 | Aoi | Anachronies/ Divergence | Common Skill | ||||||||||
160 | Aoi | Arts Battle/ Dungeon | Baseline | ||||||||||
161 | Idol | SS3 | Defender | Clock Tower (Hell) | All Style LB 1 | ||||||||
162 | Blunt | Fire | Seraph Skirmish Simulation | All Style LB3 | |||||||||
163 |  | Erika Aoi | Required SS1 | Score Attack | Master Skill | DP Revive (Party) OD Generator (100%) Crit Rate Buffer (140%, Party, Passive) Skill Enhancer (Large, ST) Crit Dmg Buffer (30%, ST) Skill and Auto Attack Enhancer (VG, Passive) | AoE cover (Super taunt) Taunt Defense up (Self, Passive) Increase Destruction Rate (AoE, Fire Small) | 100% crit rate for the party as a passive. Reducing all party member's SP costs on skills by 1. An EX skill that provides a 100% OD battery and revives DP. There really isn't anything to complain about. | |||||
164 | Aoi | Anachronies/ Divergence | Common Skill | ||||||||||
165 | Aoi | Arts Battle/ Dungeon | Baseline | ||||||||||
166 | Admiral | SS4 | Admiral | Clock Tower (Hell) | All Style LB 1 | ||||||||
167 | Blunt | Null (Blunt) | Seraph Skirmish Simulation | All Style LB3 | |||||||||
168 |  | Ichigo Minase | Recommended SS2 | Score Attack | Master Skill | Main DMG (ST) | Funnel (5 Hit Count x 10% Potency) Skill enhancer (Self) | Ichigo SS1 is an old single target thunder dmg dealer. Though she is not entirely weak, her 1 hit count EX skill reduces the value of her damage greatly. If Ichigo SS1 were to use her EX skill onto the enemy DP, a lot of dmg would be wasted as overkilling DP would not deal any dmg to the enemy HP. After her tower upgrade, Ichigo is strong, but nothing compared to the top brass. Her tower upgrade provides her with a small thunder enhance before dmg, which is not wasted in a typical meta-based thunder team. This is because the meta thunder team doesn't have the means to buff Thunder enhance 2 times. Her downfall is that she has no means of providing the taunt debuff on the boss and needs it for a higher HP multiplier on her EX upgrade. | |||||
169 | Anachronies/ Divergence | Common Skill | |||||||||||
170 | Ichigo | Arts Battle/ Dungeon | Baseline | ||||||||||
171 | Default | SS1 | Attacker | Clock Tower (Hell) | All Style LB 1 | ||||||||
172 | Pierce | Thunder | Seraph Skirmish Simulation | All Style LB3 | |||||||||
173 |  | Ichigo Minase | Score Attack | Master Skill | Main DMG (AoE) Funnel (5 Hit Count x 10% Potency) Skill enhancer (Self) | Ichigo SS2 is an amazing AoE fire DMG dealer. She is easy to use and also removes Yunyun SS1 from the fire team as she can provide herself with 2 funnels. Her only draw back is that she cannot do an action for 1 turn after using her EX skill. Ichigo SS2 is currently the only main DMG dealer in a fire team that can provide herself with funnel (3 hit count x 40% potency). She also comes with a 50% HP modifier and the strongest LB0 elemental enhance passive out of all styles. Her common skill also provides her with large skill enhance and funnel (5 hit count x 10% potency), the same buffs Yunyun SS1 would have provided, but it only costs 8 SP instead of 11. Having a large funnel, 50% HP modifier and decently high dmg cap for an AoE, she competes as one of the strongest elemental AoE dmg dealers in the game with an extremely reliable kit. | |||||||
174 | Anachronies/ Divergence | Common Skill | |||||||||||
175 | Ichigo | Arts Battle/ Dungeon | Baseline | ||||||||||
176 | Idol | SS2 | Attacker | Clock Tower (Hell) | All Style LB 1 | ||||||||
177 | Pierce | Fire | Seraph Skirmish Simulation | All Style LB3 | |||||||||
178 |  | Ichigo Minase | Recommended SS2 | Score Attack | Master Skill | Main DMG (ST, token) | Funnel (5 Hit Count x 10% Potency) Skill enhancer (Self) | Ichigo SS3 is a token based light Single Target dmg dealer. Though it is true that she competes for the strongest single target light dmg dealer, that is against Kanade SS1, from the 1st Anniversary Angel Beats. In fact, for most fights, Kanade is strictly better than Ichigo SS3. As a token based dmg dealer, Ichigo SS3 requires set up to hit 10 tokens, but at 10 tokens is almost unrivaled in dmg. What holds her back is the method to gain her tokens. Her LB0 passive provides 1 token for each enemy she's hit and her common skill provides 2 tokens and deals AoE dmg. It sounds nice if you hit AoE with the common skill to gain 5 tokens, but her EX skill is ST. This lack of synergy for her kit makes her a lot harder to set up and execute. She can still aquire tokens through auto attacking, but she provides very little support and is extremely fragile. Also while she is in the front, providing her with any funnel or crit would be meaingless. This makes it hard to keep her in the VG. Aoi SS2 actually holds the exact same EX skill as her in terms of dmg and token multiplier, but is just much easier to execute and provides a lot of support for the team. Ichigo SS2's common skill would normally remove the need for Yunyun SS1 or any kind of funnel. Unfortunately the best way to get tokens is using SP for a common skill that provides tokens, this makes it difficult to use her self funnel to buff herself up as she is already tight on SP. | |||||
179 | Anachronies/ Divergence | Common Skill | |||||||||||
180 | Ichigo | Arts Battle/ Dungeon | Baseline | ||||||||||
181 | SS3 | Attacker | Clock Tower (Hell) | All Style LB 1 | |||||||||
182 | Pierce | Light | Seraph Skirmish Simulation | All Style LB3 | |||||||||
183 |  | Sumomo Minase | Score Attack | Master Skill | Main DMG (ST) Thunder Skill Enhancer (Self) | Skill Enhancer (Small, Self) Thunder Enhancer (Large, Self) Taunt Skill use Recovery (Self, Passive) | Sumomo SS1 is one of the early single target thunder dmg dealers. Some say she was never good, and sadly even after her tower upgrade, she is still pretty mediocre. Her tower upgrade provided her with a small thunder skill enhance and a 50% DP modifier vs her original 30%. Unfortunately it required the enemy to be taunted to someone for the modifier increase. At the very least WFS was kind enough to provide Sumomo with a S style to provide a taunt to herself and a thunder skill enhance. Sadly, her only use is using this EX on Sumomo SS3 at LB3. | ||||||
184 | Anachronies/ Divergence | Common Skill | |||||||||||
185 | Sumomo | Arts Battle/ Dungeon | Baseline | ||||||||||
186 | Default | SS1 | Breaker | Clock Tower (Hell) | All Style LB 1 | ||||||||
187 | Slash | Thunder | Seraph Skirmish Simulation | All Style LB3 | |||||||||
188 |  | Sumomo Minase | Score Attack | Master Skill | Main DMG (Aoe) | Skill Enhancer (Small, Self) Thunder Enhancer (Large, Self) Taunt Skill use Recovery (Self, Passive) | Sumomo SS2 comes from the first summer event and was plenty powerful on release because the lack of styles, however she has rarely seen any relevance in JP as she was AoE and until the 2nd Anniversary, all bosses were single target. By the time AoE Score Attacks became normal to see, a much stronger AoE ice dmg dealer was present, Nikaido SS2. Currently, Nikaido SS2 and Yuina SS4 are miles ahead of Sumomo SS2 to consider Sumomo SS2 into an AoE ice comp as a main dmg dealer. | ||||||
189 | Anachronies/ Divergence | Common Skill | |||||||||||
190 | Sumomo | Arts Battle/ Dungeon | Baseline | ||||||||||
191 | Swimsuit | SS2 | Attacker | Clock Tower (Hell) | All Style LB 1 | ||||||||
192 | Slash | Ice | Seraph Skirmish Simulation | All Style LB3 | |||||||||
193 |  | Sumomo Minase | Recommended: SS1 | Score Attack | Master Skill | Main DMG (ST) Skill Enhancer (Small, Self) 400% Weakness DMG Guaranteed Crit Strike Skill use Recovery (Self, Passive) | Skill Enhancer (Small, Self) Thunder Enhancer (Large, Self) Taunt | Sumomo SS3 the 4th dmg dealer addition to the "Irene" element. She competes with Irene SS2 as the strongest single target dmg dealer. As they fulfill the same roles, they are each stronger in certain scenarios. Sumomo SS3 is stronger than Irene when at Limit Break 3 as Sumomo's Limit Break 3 provides her with a strong funnel. Irene in most scenarios under LB3 is stronger than Sumomo SS3 for purposes noted in Irene SS2's description. Sumomo SS3 comes with a passive that allows her replenish a skill use if she kills. This makes Sumomo SS3 amazing for Arts battles and dungeons. At LB3 she even allows poeple to auto on hard mode 31A arts battles. This content is not important, so many may opt to skip her if they had rolled for Irene SS2 and not a spender. | |||||
194 | Anachronies/ Divergence | Common Skill | |||||||||||
195 | Sumomo | Arts Battle/ Dungeon | Baseline | ||||||||||
196 | Doll | SS3 | Attacker | Clock Tower (Hell) | All Style LB 1 | ||||||||
197 | Slash | Null (Slash) | Seraph Skirmish Simulation | All Style LB3 | |||||||||
198 |  | Seika Higuchi | Score Attack | Master Skill | Thunder Field Setter (Small) Attack Debuff (ST) Defense Debuff (ST) Skill Enhancer (Large, VG) | DP Reviver (ST) | Higumin SS1 got a "tower upgrade" but it wasn't from the tower. Sumomo's event provides her with her material to upgrade her. Sadly, her upgrade didn't change her usage, but it did make her more consistant. Previous to the upgrade, her EX skill would provide a defense debuff OR an attack debuff. A 50/50 chance. In early HBR JP days, many would gamble reset fights to reroll for the defense debuff, but now it does both. Before the addition of Megumi SS5, Higumin SS1 EX skill would be generalized and then used on her SS2 to provide a small field for thunder. Her common skill was also widely important in the first 1.5 years of HBR for farming Dungeon. As Seika SS2 and S Yunyun was a common combo used by many players to farm dungeon with 2 AoE dmg dealers and 1 ST and a fill (usually debuffer). Sadly as a stand alone, Higumin SS1 is vastly out performed by most styles, it doesn't stop people from wanting at least 1 copy to use her generalized SS1 EX skill and common skill on Higumin SS2. | ||||||
199 | Higumin | Anachronies/ Divergence | Common Skill | ||||||||||
200 | Higumin | Arts Battle/ Dungeon | Baseline | ||||||||||
201 | Default | SS1 | Buffer | Clock Tower (Hell) | All Style LB 1 | ||||||||
202 | Pierce | Thunder | Seraph Skirmish Simulation | All Style LB3 | |||||||||
203 |  | Seika Higuchi | Required SS1 | Score Attack | Master Skill | Skill Enhancer (Large, ST) Crit Rate Buffer (ST) Crit DMG buffer (30%, ST) DP Recovery (ST) Skill Enhancer (Party) | Thunder Field Setter (Small) Attack Debuff (ST) Defense Debuff (ST) Skill Enhancer (Large, VG) DP Reviver (ST) | Higumin SS2 the 2nd critical rate buffer and THE meta Buffer for a little over a year with Yunyun for all teams, until the release of Tama SS5 at the end of Dec 2023, who powercrept her and Muaa together. Since the release of Tama SS5, another competitor, Hiiragi SS3 was introduced that fulfills a similar role as Higumin SS2. Higumin SS2 proves to be better than Hiiragi SS3 in short prism fights or arena battles. With her SS1 EX skill generalized, she could provide buffs and a small thunder field. Thunder is a strong element and has many strong and unique buffers/debuffers that is it impossible to house all of them in 1 team without making sacrifices somewhere. With the introduction of Megumi SS5 in summer 2024, Higumin SS2 also lost her place as a thunder field setter. Sadly, her SS1 buff did not address the main issues Higumin had to make her a contender in a top thunder team. Overall, Higumin SS2 is still a very strong style that is overshadowed by Tama SS5 in all content, replaced by Megumi SS5 for field, and Hiiragi is most content. Though players with Tama SS5 no longer use her, she is still an amazing general support to this day and would be used on accounts that don't have Tama SS5 or Hiiragi SS3. | |||||
204 | Higumin | Anachronies/ Divergence | Common Skill | ||||||||||
205 | Higumin | Arts Battle/ Dungeon | Baseline | ||||||||||
206 | Qipiao | SS2 | Buffer | Clock Tower (Hell) | All Style LB 1 | ||||||||
207 | Pierce | Null (Pierce) | Seraph Skirmish Simulation | All Style LB3 | |||||||||
208 |  | Seika Higuchi | Recommended SS1 | Score Attack | Master Skill | DP Recovery over Time (Party, 4 turns) Dark Skill Enhancer (Large, Party, Dark Styles Only) Mind Eye (Party, Dark Styles Only) DP Reviver (ST) | Thunder Field Setter (Small) Attack Debuff (ST) Defense Debuff (ST) Skill Enhancer (Large, VG) | Higumin SS3 still a recovery/turn healer with an incredible kit that buffs dark styles. She has the ability to provide dark skill enhance to all dark styles and provide one of the rarest buffs, mind eye. For a cost of 11 SP, she provides the whole party with recovery / turn for 4 turns on top of the buffs. She is an incredibly strong support due to a LB0 passive that also provides 2 stacks of morale for dark styles every time her EX skill is used. This unique buff is also extremely rare, being present only in Hiiragi SS3 to support her allies. Higuchi will be much slower on stacking this buff than her squadmate, but she is incredibly potent for slower fights. Though not important, owning her SS1 would also provide her with the ability to provide large skill enhance to the vanguard, but it will leave her party vulnerable to dmg that turn. On paper, this makes her an extremely strong fit with Ruka SS5. | |||||
209 | Higumin | Anachronies/ Divergence | Common Skill | ||||||||||
210 | Higumin | Arts Battle/ Dungeon | Baseline | ||||||||||
211 | Doctor | SS3 | Healer | Clock Tower (Hell) | All Style LB 1 | ||||||||
212 | Pierce | Dark | Seraph Skirmish Simulation | All Style LB3 | |||||||||
213 |  | Kozue Hiiragi | Score Attack | Master Skill | SP Battery (+5, Party) Skill Enhancer (Small, Party) Increase Debuff Potential Enhancer (Party) Imprison | Crit Rate (ST) Crit DMG (30%, ST) | Hiiragi SS1 is one of the lucky SS1 that got a tower upgrade that made her skill actually amazing. Before her tower upgrade, her EX skill is mediocre at best. Hiiragi SS1 is the first SP battery in the game and provides everyone with a massive +5 SP. She can use this battery to push the party's SP to up to 30 SP. Her tower upgrade would add a small skill enhance and a unique buff that would strengthen debuffs by 20%. This is massive as even limit break 3 passives would only increase defense debuffs by 25-30%. This buff would also effect fragile, making it an extremely strong buff. Currently in JP her SS1 EX skill is generalized and used on her SS3. As a stand alone, sadly Hiiragi SS1 does not perform well. | ||||||
214 | Koju | Anachronies/ Divergence | Common Skill | ||||||||||
215 | Kozu | Arts Battle/ Dungeon | Baseline | ||||||||||
216 | Default | SS1 | Debuffer | Clock Tower (Hell) | All Style LB 1 | ||||||||
217 | Slash | Null (Slash) | Seraph Skirmish Simulation | All Style LB3 | |||||||||
218 |  | Kozue Hiiragi | Recommended SS1 | Score Attack | Master Skill | Fragile (ST) | SP Battery (+5, Party) Skill Enhancer (Small, Party) Increase Debuff Potential Enhancer (Party) Imprison Crit Rate (ST) Crit DMG (30%, ST) | Hiiragi SS2 was one the go to debuffers for thunder teams, but now is a shadow of her former self. Before the 1st Anniversary, she provided fragile and thunder defense debuff (ST) as the best thunder team debuffers. After the introduction of Sharo SS2, Hiiragi SS2 never saw use unless one did not own better options. Her massive SP cost for 1 turn fragile and then a common skill for a ST thunder defense debuff would just cost too many turns without providing enough support to a team compared to her competitors. Even with the upgrade SS1, she is still difficult to use as she wants SP to use her skills, but SS1's Ex skill provides everyone but herself with +5 SP. Due to these many holes in her kit, she is a fringe pick in JP. | |||||
219 | Koju | Anachronies/ Divergence | Common Skill | ||||||||||
220 | Kozu | Arts Battle/ Dungeon | Baseline | ||||||||||
221 | Dress | SS2 | Debuffer | Clock Tower (Hell) | All Style LB 1 | ||||||||
222 | Slash | Ice | Seraph Skirmish Simulation | All Style LB3 | |||||||||
223 |  | Kozue Hiiragi | Recommended SS1 Event S | Score Attack | Master Skill | Parameter increase (Permanent, Team) Crit Rate (ST) Crit DMG (30%, ST) | SP Battery (+5, Party) Skill Enhancer (Small, Party) Increase Debuff Potential Enhancer (Party) Imprison | Hiiragi SS3 one of the top generic buffers and also a strong buffer for Thunder teams. Hiiragi SS3 is the top support for arts battle and arguably also for dungeon. This is because how well her kit works together and abuses how arts battles and dungeons work. Her EX skill fill the OD bar counting for 6 hits (same amount of 2 auto attacks) and provides 2 stacks of morale buff to the whole party. Each stack of morale increases all parameters by 5 and enhances skill dmg by 5%. This buff can stack up to 10 times providing +50 parameter and 50% skill enhance when fulling stacked. Hiiragi would need to use her EX skill 5 times (30 SP total) to fully stack morale for the whole party. To balance this SP issue, WFS gave her a LB0 skill that provides +1 SP if Hiiragi has 6 or more stacks of morale (3 EX uses) while in the VG. This would cause a LB1 Hiiragi SS3 with 6+ stacks of morale to gain 4 SP per turn when in the VG. What makes Hiiragi a force in arts battle/dungeon is that the morale buffs stay, even if you go to the next fight, unlike all other buffs. Her common skill probides a ST buff of crit rate and crit dmg, but unlike other skills providing the same buffs, this skill does not have a skill usage cap. If her SS1 EX skill is generalized, she can use it to become a battery for the whole party after buffing moral to 10 stacks. As a thunder support she has her generic skill from her S style that also provides thunder defense debuff (ST) providing even more support. Her main issue at LB1 is that she is hard to keep alive. Her concentration and spirit stats are generally on the lower end of supports, making her prone to breaks during Score Attacks. | |||||
224 | Koju | Anachronies/ Divergence | Common Skill | ||||||||||
225 | Kozu | Arts Battle/ Dungeon | Baseline | ||||||||||
226 | (McDonalds) Waitress | SS3 | Buffer | Clock Tower (Hell) | All Style LB 1 | ||||||||
227 | Slash | Null (Slash) | Seraph Skirmish Simulation | All Style LB3 | |||||||||
228 |  | Byakko | Score Attack | Master Skill | Increase Destruction Rate | Byakko SS1 is a fringe blaster who sees no use currently in JP. Maybe WFS will be nice and provide her with a well deserved tower buff. | |||||||
229 | Byakko | Anachronies/ Divergence | Common Skill | ||||||||||
230 | Byakko | Arts Battle/ Dungeon | Baseline | ||||||||||
231 | Default | SS1 | Blaster | Clock Tower (Hell) | All Style LB 1 | ||||||||
232 | Pierce | Null (Pierce) | Seraph Skirmish Simulation | All Style LB3 | |||||||||
233 |  | Byakko | Score Attack | Master Skill | Main DMG (ST) Increase Destruction Rate | Byakko SS2 is a powerhouse at higher Limit Breaks, but not because of her LB3 passive. Before the introduction of the "Irene" element, Byakko was the queen of ultra fast clears for hard mode fights. With Sharo SS2 providing all enemies with thunder weakness, Byakko was able to shred through many bosses as a blaster. Thunder lacks ST blasters and Byakko is the queen of Single Target Destruction Rate. If the enemy is weak to thunder, her potency for dmg and destruction rate increases by a large amount. Due to her high destruction rate increase on 1 cast of her EX skill when hitting weakness (270%), she is a powerhouse that can kill bosses from DP. For Score Attack boss fights, she sees little use as there until Ruka SS5. She is still not used as a main dmg source, but Ruka SS5 allows one use of Byakko EX to reach 999% DR if hit from HP. | |||||||
234 | Byakko | Anachronies/ Divergence | Common Skill | ||||||||||
235 | Byakko | Arts Battle/ Dungeon | Baseline | ||||||||||
236 | Empress | SS2 | Blaster | Clock Tower (Hell) | All Style LB 1 | ||||||||
237 | Pierce | Thunder | Seraph Skirmish Simulation | All Style LB3 | |||||||||
238 |  | Bon Ivar Yamawaki | Required S Recommended SS3 | Score Attack | Master Skill | Main DMG (ST) Skill Enhancer (Small, Self) | Defense Buff (Self) Funnel (5 Hit Count x 10% Potency, Self) SP Donator (6 SP) | Wakki SS1 is a decently strong single target ice dmg dealer after her tower upgrade, but she requires 3 members of 31C to change her HP modifier from 30% to 50%. This becomes an issue when the ice support meta may not be able to support 2 31C supports for ice teams. Mari would be used for ice field and Tennen SS2 could be used for ice defense debuff. As newer styles get released, it might be harder and harder to validate a reaon to bring anyone from 31C until they release newer 31C styles that support ice teams. Regardless strong single target ice dmg dealers are not numerous, but her top competition (Adel SS2) is leagues above her. | |||||
239 | Wakki | Anachronies/ Divergence | Common Skill | ||||||||||
240 | Wakkie | Arts Battle/ Dungeon | Baseline | ||||||||||
241 | Default | SS1 | Attacker | Clock Tower (Hell) | All Style LB 1 | ||||||||
242 | Slash | Ice | Seraph Skirmish Simulation | All Style LB3 | |||||||||
243 |  | Bon Ivar Yamawaki | Required S Recommended SS3 | Score Attack | Master Skill | Light Skill Enhancer (Large, Party) Skill Enhancer (Large, ST) | Defense Buff (Self) Funnel (5 Hit Count x 10% Potency, Self) SP Donator (6 SP) | Wakki SS2 is a supportive attacker for light teams. She provides light skill enhance on her EX skill and large skill enhance (ST) on her common skill. The main issue is that she fulfill no other role unlike Tama SS3. Just like Tama SS3, she doesn't get the 10% bonus from hoju for her buffs either, making her mediocre light buffer at best. Due to better options for support and light AoE dmg, Wakki SS2 is not used by those with more recent styles even with decent common skill like funnel (5 hit count x 10% potency) and a 6 SP donator skill. | |||||
244 | Wakki | Anachronies/ Divergence | Common Skill | ||||||||||
245 | Wakkie | Arts Battle/ Dungeon | Baseline | ||||||||||
246 | Xmas | SS2 | Attacker | Clock Tower (Hell) | All Style LB 1 | ||||||||
247 | Slash | Light | Seraph Skirmish Simulation | All Style LB3 | |||||||||
248 |  | Bon Ivar Yamawaki | Required S SS1 (For Dungeon/Arts) | Score Attack | Master Skill | Main DMG (AoE) Thunder Skill Enhancer (Party) Hit Count Buffer (Self, Passive, Fight start) SP Donator (6 SP) | Defense Buff (Self) Funnel (5 Hit Count x 10% Potency, Self) | Wakki SS3 is a supportive thunder AoE main dmg dealer hybrid. As she excels in both, she can easily fit into thunder teams. Her EX skill is AoE and provides 10 hits, while providing the party thunder skill enhance. Sadly she cannot stack this buff like Tama SS3, but she makes up for it in OD generation with her 10 hit count. Coupled with her LB0 funnel passive, she can easily increase OD quickly in the early stages of a fight. This amazing EX also comes with a 50% HP modifier and has a high maximum potency for dmg compared to other AoE attackers. When using her as a support, she has a common skill that donates 6 of her SP to another ally. This is useful to provide SP to party members that have large SP costs, especially because Wakki as a support will not need much SP. She especially excels in dungeon and arts battle with low investment because her LB0 passive provides her with funnel (5 hit count x 10% potency). It isn't as strong as Maki SS1/Karen SS1 LB3 passive, but it certainly gets the job done for killing weaker AoE mob enemies without using her EX skill. Sadly, it requires her SS1 to have an AoE common skill to abuse this passive. Without it, she is only decent in dungeon and arts battle. | |||||
249 | Wakki | Anachronies/ Divergence | Common Skill | ||||||||||
250 | Wakkie | Arts Battle/ Dungeon | Baseline | ||||||||||
251 | Daydream | SS3 | Attacker | Clock Tower (Hell) | All Style LB 1 | ||||||||
252 | Slash | Thunder | Seraph Skirmish Simulation | All Style LB3 | |||||||||
253 |  | Seira Sakuraba | Score Attack | Master Skill | Crit DMG Buffer (30%, Turn-based) Crit Buffer (Turn-based) Taunt | Self Break Guard AoE cover (Super Taunt) | Seira SS1 was the original go to pick on the starter 12 style banner on the release for HBR in JP. As the only one to provide crit, she provided the largest dmg multiplier the game had to offer. Now she is not used by those with "meta" teams, but is still usable due to her tower upgrade. Her tower upgrade provided her EX skill with crit dmg as a turn based buff. This means the buff will stack with normal crit dmg buffs and elemental crit dmg buffs. Sadly, she offers no other offensive support and her defensive support is only decent. The main downside to her EX skill is that it is turn based. Those these buffs stack with normal buffs, turn buffs only last for a certain amount of turns. These turns are not the enemy's turns, but your turns. This means OD and extra turns count. This makes it rough to use as it isn't as flexible on timing for buffing, unlike normal buffs. | ||||||
254 | Saku-chan | Anachronies/ Divergence | Common Skill | ||||||||||
255 | Saku-chan | Arts Battle/ Dungeon | Baseline | ||||||||||
256 | Default | SS1 | Buffer | Clock Tower (Hell) | All Style LB 1 | ||||||||
257 | Blunt | Null (Blunt) | Seraph Skirmish Simulation | All Style LB3 | |||||||||
258 |  | Seira Sakuraba | Recommended SS1 | Score Attack | Master Skill | Ice Skill Enhancer (Large, Party) Defense Buffer (Party) | Crit DMG Buffer (30%, Turn-based) Crit Buffer (Turn-based) Taunt Self Break Guard AoE cover (Super Taunt) | Seira SS2 is a defensive offensive support hybrid. Her SS2 is a good style that is over shadowed by the best ones. Sadly, it didn't help that many of the top ice dmg dealers are self sufficient, meaning that Seira SS2's offensive support isn't required, but instead saves SP for the main dmg dealers. A 1.25 years after her release, Chie SS3 was released, completely overshadowing Seira SS2 in the offensive department. Due to Chie SS3 being prominent in ice teams, it is better to opt for a more defensive focused support if you need the defensive capabilities, like Aoi SS1 or Irie SS1. | |||||
259 | Saku-chan | Anachronies/ Divergence | Common Skill | ||||||||||
260 | Saku-chan | Arts Battle/ Dungeon | Baseline | ||||||||||
261 | New Years | SS2 | Defender | Clock Tower (Hell) | All Style LB 1 | ||||||||
262 | Blunt | Ice | Seraph Skirmish Simulation | All Style LB3 | |||||||||
263 |  | Seira Sakuraba | Score Attack | Master Skill | Main DMG (ST) DP recovery (Self) Self Break Guard AoE cover (Super Taunt) | Crit DMG Buffer (30%, Turn-based) Crit Buffer (Turn-based) Taunt | Seira SS3 is basically bait. Usable, yes. Worth pulling for her? Only for her homescreen or waifu at the time of release. This is because there are already better single target fire dmg dealers than her. She is basically budget Aoi SS2 with generalized Aoi SS1 EX skill on a fire style. She doesn't tank damage as well as Aoi and doesn't deal as much damage as Aoi. Her common skill is a mini Aoi SS1 EX skill, but instead of providing block, she prevents her herself from getting her DP broken for 1 hit. That means, she still takes all the damage up until her DP is 1. Her EX skill deals singe target damage based off of her Concentration (defensive stat), so she is relatively tanky as a dmg dealer and has a multiplier based off of her missing DP. The more DP she is missing, the higher the multiplier. At 1 DP, she her dmg multiplier is incredibly high. After the use of her EX skill, she will recover a lot of DP. This means she will require heavy set up to deal maximum damage. Still, she can be used and will shine on certain bosses if you want to try to make it happen. | ||||||
264 | Saku-chan | Anachronies/ Divergence | Common Skill | ||||||||||
265 | Saku-chan | Arts Battle/ Dungeon | Baseline | ||||||||||
266 | Bride | SS3 | Defender | Clock Tower (Hell) | All Style LB 1 | ||||||||
267 | Blunt | Fire | Seraph Skirmish Simulation | All Style LB3 | |||||||||
268 |  | Miko Tenne | Score Attack | Master Skill | Defense Debuff (AoE) | Defense Debuff (ST) Stun (AoE) DP Recovery (ST) | Miko SS1 is one of the original launch styles. She is waiting for her tower upgrade in hopes it will make her SS1 shine. Miko SS1 is not a SS that is used by most of the playerbase. As one of the original launch styles without a tower upgrade her kit is completely outdated as a support. Her EX skill only provides an AoE defense debuff at the cost of 14 SP, when an Aina S can provide the same effect with only 6 SP on a common skill. The only added benefit a difference of 8 SP provides is a bit of damage and 5 extra hit counts (total 6 hits). This is not enough to propel Miko SS1 to a usable stat. Early game, she is one of the easiest AoE dmg dealers to build as her EX skill scales off of Wisdom, meaning that all you need to do is invest wisdom into her for her to reach maximum dmg potential. Sadly, this skill is still not used often on her other styles as her SS2 and SS3 ar single target debuffers. | ||||||
269 | Tennen | Anachronies/ Divergence | Common Skill | ||||||||||
270 | Witchy | Arts Battle/ Dungeon | Baseline | ||||||||||
271 | Default | SS1 | Debuffer | Clock Tower (Hell) | All Style LB 1 | ||||||||
272 | Pierce | Null (Pierce) | Seraph Skirmish Simulation | All Style LB3 | |||||||||
273 |  | Miko Tenne | Score Attack | Master Skill | Ice Defense Debuff (ST) | Defense Debuff (ST/AoE) Stun (AoE) DP Recovery (ST) | Miko SS2 is a ice debuffer. She excels at ice defense debuff (ST). While no other debuffer does her job as well as she does, she lacks the ability to play multiple roles. This becomes an issue in ice elemental team building after the release of Hisame SS4. Hisame SS4 and Miko SS2 overlap roles. Miko SS2 has a stronger ice defense debuff, but Hisame SS4 comes with a defense debuff and an elemental resist/weakness overwrite. Due to this Miko SS2 was removed from the top ice elemental team, however she is still regarded as a top ice debuffer due to the ice defense debuff. | ||||||
274 | Tennen | Anachronies/ Divergence | Common Skill | ||||||||||
275 | Witchy | Arts Battle/ Dungeon | Baseline | ||||||||||
276 | Kitty | SS2 | Debuffer | Clock Tower (Hell) | All Style LB 1 | ||||||||
277 | Pierce | Ice | Seraph Skirmish Simulation | All Style LB3 | |||||||||
278 |  | Miko Tenne | Score Attack | Master Skill | Light Defense Debuff (ST) Fragile (ST) DP Recovery (ST) | Defense Debuff (ST/AoE) Stun (AoE) | Miko SS3 is a light debuffer that offers 2 debuffs (ST) and a minor single target heal. Due to her EX skill not having damage attached to it, the light defense debuff scales with skill level. Her kit is very well made as her EX skill debuffs light defense and fragile for 2 turns, while providing her with an extra turn. The the small cost of 10SP, she can actually stack the debuff twice without the usage for OD. This makes her an incredibly strong light debuffer with only a single target defense debuff missing from her kit. This can easily be filled in with someone like yunyun or even Myaa SS2. Sadly her SS1 provides AoE defense debuff and costs too much stamina to be used with her SS3, thus is rarely used on her SS3. With the addition of Isuzu SS3 some people argue that she is out performed by Isuzu SS3. This is due to Isuzu SS3 providing defense and light defense debuff on her EX skill and fragile from her common skill. Isuzu SS3 EX skill also doesn't deal damage and light defense debuff also scales with her skill level, however have AoE multipliers which are lower than ST. Miko SS3 is definitely not side lined like her SS3 counter part is and is a solid choice, especially if you choose to use Tsukasa SS3 over Isuzu SS3. | ||||||
279 | Tennen | Anachronies/ Divergence | Common Skill | ||||||||||
280 | Witchy | Arts Battle/ Dungeon | Baseline | ||||||||||
281 | Wizard | SS3 | Debuffer | Clock Tower (Hell) | All Style LB 1 | ||||||||
282 | Pierce | Light | Seraph Skirmish Simulation | All Style LB3 | |||||||||
283 |  | Yayoi Bungo | Recommended Master Skill | Score Attack | Master Skill | Main DMG (ST) | SP Battery (+2, Self) Boss Def Buffer (Yes, buffs the boss) | Bungo SS1 is the bringer of RNG. She may have one of the highest dmg potentials, but she's one you'll only use if you like the gamble. Her EX skill can either deal a lot of dmg or deal 1 damage. The chances depends on her luck. The higher her luck, the higher the chances of not missing (80% max at 100 LCK). Her common skill provides an AoE ice defense debuff. For the most part, Bungo SS1 is a meme Style. She's a strong style, but with a flip of a coin. | |||||
284 | Bun-chan | Anachronies/ Divergence | Common Skill | ||||||||||
285 | Bun-chan | Arts Battle/ Dungeon | Baseline | ||||||||||
286 | Default | SS1 | Breaker | Clock Tower (Hell) | All Style LB 1 | ||||||||
287 | Pierce | Ice | Seraph Skirmish Simulation | All Style LB3 | |||||||||
288 |  | Yayoi Bungo | Recommended Master Skill | Score Attack | Master Skill | Main DMG (ST) Defense Debuffer (Permanent, ST, JP) | SP Battery (+2, Self) Boss Def Buffer (Yes, buffs the boss) | ||||||
289 | Bun-chan | Anachronies/ Divergence | Common Skill | ||||||||||
290 | Bun-chan | Arts Battle/ Dungeon | Baseline | ||||||||||
291 | Xmas | SS2 | Breaker | Clock Tower (Hell) | All Style LB 1 | ||||||||
292 | Pierce | Light | Seraph Skirmish Simulation | All Style LB3 | |||||||||
293 |  | Yayoi Bungo | Recommended Master Skill | Score Attack | Master Skill | Main DMG (AoE) Buff Dispeller SP Battery (+2, Self) Boss Def Buffer (Yes, buffs the boss) | |||||||
294 | Bun-chan | Anachronies/ Divergence | Common Skill | ||||||||||
295 | Bun-chan | Arts Battle/ Dungeon | Baseline | ||||||||||
296 | Dango | SS3 | Breaker | Clock Tower (Hell) | All Style LB 1 | ||||||||
297 | Pierce | Thunder | Seraph Skirmish Simulation | All Style LB3 | |||||||||
298 |  | Adelheid Kanzaki | Required Event S Recommended SS4 | Score Attack | Master Skill | Increase Destruction Rate (AoE) Shadowclone (Dodge and Enhance, Self) | Funnel (3 Hit Count x 40% Potency, Self) Shadowclone (Dodge and Enhance, Self) | Adel SS1 is a decent AoE blaster. After her tower upgrade, she is able to provide herself with shadowclone buff, but it doesn't help her with her main issue of not doing enough. She is still usable in dungeons and smaller scale content, but not even close to best in slot. There have been meme Score Attack runners who use her SS1 common skill with her SS2 common skill on Adel A to hit 600k score back when that was the maximum score. Outside of that, she has seen little to no use. | |||||
299 | Aa-san | Anachronies/ Divergence | Common Skill | ||||||||||
300 | Adel | Arts Battle/ Dungeon | Baseline | ||||||||||
301 | Default | SS1 | Blaster | Clock Tower (Hell) | All Style LB 1 | ||||||||
302 | Slash | Ice | Seraph Skirmish Simulation | All Style LB3 | |||||||||
303 |  | Adelheid Kanzaki | Required Event S Recommended SS4 | Score Attack | Master Skill | Main DMG (ST) Increase Destruction Rate (Ice Small) Ice Skill Enhancer (Self) | Funnel (3 Hit Count x 40% Potency, Self) Shadowclone (Dodge and Enhance, Self) | Adel SS2 is a self-sufficient single target main dmg dealer with a loaded kit. Adel SS2 is one of the few blasters that is often used as a main dmg dealer for single target boss fights because she deals an incredible amount of dmg. This is thanks to WFS providing her with a large funnel (3 hit x 40% potency) on her event S style. With this buff stacked twice, Adel can increase her dmg by 240% (340% total dmg). Adel SS2 provides herself with a common skill that enhances her own ice skills, so she doesn't require an ice skill enhancer on the team. Her EX skill deals a high amount of dmg and provides a large amount of destruction, however she needs to hit weakness in order to get these effects. If she does not hit weakness, her maximum dmg potential (base dmg) is lower and the increase of destruction will be similar to that of an attacker. Her ability to increase a large amount of destruction, she can abuse her hit count buffs to kill enemies from DP without breaking first. This occurs because after breaking DP, each hit of her EX skill will apply destruction increase and effect the following hit. Her last hit of her EX skill will be scaling to whatever destruction rate all the previous hits left the boss at. Due to her extremely powerful funnel, self-sufficient elemental buff, the ability to build destruction on her own, and kill a boss from DP, she is considered top tier in ice single target dmg dealing. Those who want to use ice teams on single target fights (provided enemies are ice weak or you bring Hisame SS4) Adel SS2 is your go to main dmg dealer. | |||||
304 | Aa-san | Anachronies/ Divergence | Common Skill | ||||||||||
305 | Adel | Arts Battle/ Dungeon | Baseline | ||||||||||
306 | Agent | SS2 | Blaster | Clock Tower (Hell) | All Style LB 1 | ||||||||
307 | Slash | Ice | Seraph Skirmish Simulation | All Style LB3 | |||||||||
308 |  | Adelheid Kanzaki | Required Event S Recommended SS4 | Score Attack | Master Skill | Main DMG (ST) Increase Destruction Rate (Dark Small) Dark Skill Enhancer (Self) | Funnel (3 Hit Count x 40% Potency, Self) Shadowclone (Dodge and Enhance, Self) | Adel SS3 follows in her SS2's footsteps. She has access to the same funnel from her S skill and is also a blaster. Outside of being dark instead of ice, her SS3 has a small difference. Adel SS3's common skill does not provide her with dark skill enhance. Her EX skill provides her with a dark skill enhance. Sadly she cannot double stack dark skill enhance, BUT she does something no other damage dealer has the ability to do. The dark skill enhance scales with her skill lvl. All other abilities with dmg attached to it do not have enhances that scale with skill lvl. Though, she can only enhance her dark skills once, she requires less total SP and set up turns than her SS2 counter part while having a higher base dmg. This can be considered worse or better depending on the player. From my experience, Adel SS3 feels more powerful, but a lot of that is most likely due to the fact that dark has stronger supports than ice currently. | |||||
309 | Aa-san | Anachronies/ Divergence | Common Skill | ||||||||||
310 | Adel | Arts Battle/ Dungeon | Baseline | ||||||||||
311 | Dirndl | SS3 | Blaster | Clock Tower (Hell) | All Style LB 1 | ||||||||
312 | Slash | Dark | Seraph Skirmish Simulation | All Style LB3 | |||||||||
313 |  | Adelheid Kanzaki | Required Event S | Score Attack | Master Skill | Fire Crit DMG Buffer (Party) Fire Skill Enhancer (Party) Increases Destruction Rate (ST) Shadowclone (Dodge and Enhance, Self) | Funnel (3 Hit Count x 40% Potency, Self) Shadowclone (Dodge and Enhance, Self) | Adel SS4 is more of supporter than she is a dmg dealer. WFS decided to reduce her highest base dmg potential to an incredibly low amount to reduce her ability to deal dmg. As a blaster, her destruction increase is actually on the lower side, but she provides fire the ability to buff fast and is a relatively safe style due to her shadowclone skill (skill dodging, can also dodge debuffs). The common skill is also nice to have as a back pocket for her SS2 and 3 as a defensive buff. In the buffing department, her main competition is Yottsun SS1. They both overlap in fire skill enhance and fire crit dmg. There are a few differences between the two. I will address Yottsun's benefits on her description. Adel's main perks are that her EX skill provides her fire buffs to ALL allies. She may not provide crit rate, but currently there are many methods to provide your main dmg dealer with crit rate, that this is hardly an issue. Though her ability to increase DR is not as good as others in the same role, she still has the ability to do it which is saying a lot for a fire support. Fire currently struggles in building DR so this bonus is definitely a big one. The most appealing part of her kit is that she can buff her main dmg dealer incredibily fast, as long as she has a shadowclone buff, she reduces her EX skill SP cost in half (to 7 SP). This is huge when competing numbers with Yottsun SS1 (12 SP). Regardless, she is definitely not a fire support to sleep at. | |||||
314 | Aa-san | Anachronies/ Divergence | Common Skill | ||||||||||
315 | Adel | Arts Battle/ Dungeon | Baseline | ||||||||||
316 | Swimsuit | SS4 | Blaster | Clock Tower (Hell) | All Style LB 1 | ||||||||
317 | Slash | Fire | Seraph Skirmish Simulation | All Style LB3 | |||||||||
318 |  | Mari Satsuki | Score Attack | Master Skill | Ice Field Setter (Small) | Shadowclone (Dodge and Enhance, Self) | Mari SS1 is one of the early buffers and field setters. Currently she is the only ice field setter. Her EX skill is generally generalized and used on her SS2 and SS3 as it synergizes incredibly well those styles. Outside of being able to supply the only ice field in the game, she provides little to a team and is outclassed by all those around her. If you plan on using an ice team, you will most likely want at least one copy of her and use it on her SS2 (support) or her SS3 (dmg). | ||||||
319 | Marii | Anachronies/ Divergence | Common Skill | ||||||||||
320 | Merry | Arts Battle/ Dungeon | Baseline | ||||||||||
321 | Default | SS1 | Buffer | Clock Tower (Hell) | All Style LB 1 | ||||||||
322 | Pierce | Ice | Seraph Skirmish Simulation | All Style LB3 | |||||||||
323 |  | Mari Satsuki | Recommended SS1 | Score Attack | Master Skill | Skill Enhancer (Large, VG) Crit Rate Buffer (VG) Crit DMG Buffer (VG, First time only) Minds Eye Buffer (VG, First time only) | Ice Field Setter (Small) Shadowclone (Dodge and Enhance, Self) | Mari SS2 was once a top of the line support, she is still used on ice teams with her SS1 EX skill generalized and occassionally sees use on Challenge tower. Outside of ice teams and challenge tower, she sadly sees little use on accounts that have Tama SS5 as she can do everything Mari SS2 can do (not SS1 EX skill) but better. Mari SS2 is one of the rare supports that can provides minds eye to allies, however she can only provide the buff once as her EX skill is a mega buff only on the first use (large skill enhance, crit rate, crit dmg, minds eye to the whole VG). After the first use, it becomes a decent buffing skill that only provides large skill enhance and crit rate to those in the VG. She is still an incredible support that should be used if you do not own Tama SS5, so don't sleep on her if you randomly got her. | |||||
324 | Marii | Anachronies/ Divergence | Common Skill | ||||||||||
325 | Merry | Arts Battle/ Dungeon | Baseline | ||||||||||
326 | Agent | SS2 | Buffer | Clock Tower (Hell) | All Style LB 1 | ||||||||
327 | Pierce | Null (Pierce) | Seraph Skirmish Simulation | All Style LB3 | |||||||||
328 |  | Mari Satsuki | Required SS1 | Score Attack | Master Skill | Main DMG (ST) Funnel (3 Hit Count x 40% Potency, Self if Cancer 200% DR) | Ice Field Setter (Small) Shadowclone (Dodge and Enhance, Self) | Mari SS3 is a high tier single target ice dmg dealer, but requires her SS1 or another method to break the boss' DP. When used in boss content, she is often used with her SS1's EX skill to break the boss and her SS3's EX skill to finish off the boss. This is due to the condition on her SS3's EX skill. She requires the enemy she hits to have 200% DR in order to buff herself with large funnel (3 hit x 40% potency). This buff would greatly increase her dmg. Though her SS1's EX skill is AoE and deals a lot less dmg, it usually isn't a huge problem because the DP is usually small enough for it to not matter. Bringing her SS1's EX skill will also provide her whole team with an ice field which would boost her EX skill dmg by an additional 50%. With the incredible synergy with her SS1 AND the funnel, she makes herself one of the top ice single target dmg dealers. | |||||
329 | Marii | Anachronies/ Divergence | Common Skill | ||||||||||
330 | Merry | Arts Battle/ Dungeon | Baseline | ||||||||||
331 | Bride | SS3 | Attacker | Clock Tower (Hell) | All Style LB 1 | ||||||||
332 | Pierce | Ice | Seraph Skirmish Simulation | All Style LB3 | |||||||||
333 |  | Mari Satsuki | Score Attack | Master Skill | Main DMG (ST) If Shadowclone: Minds Eye Buffer (Self) Crit Rate Buffer (Self) Crit DMG Buffer (Self) Shadowclone (Dodge and Enhance, Self) | Ice Field Setter (Small) | Mari SS4 is a strong fire single target dmg dealer. Though her EX skill seems to be bloated, she seems to not perform as well as in practice. Her EX skill provides herself with crit rate, crit dmg, and mind eye if she has the shadowclone buff. The self buffs also reduce the amount of turns Mari takes to kill bosses since buffers like Tama SS5 would only need to buff her once. Her common skill is a neat defensive (with slight offensive) ability that can be used by all of her styles and can dodge dmg and debuffs from the enemy. With her incredible synergy with Adel SS4 and the safety her shadowclone provides her, she is a solid and powerful dmg dealer. Though on paper her kit is incredible, my experience (LB1) with her has been slightly disappointing. This shouldn't stop you from using her as her EX skill animation is super cute. | ||||||
334 | Marii | Anachronies/ Divergence | Common Skill | ||||||||||
335 | Merry | Arts Battle/ Dungeon | Baseline | ||||||||||
336 | Swimsuit | SS4 | Attacker | Clock Tower (Hell) | All Style LB 1 | ||||||||
337 | Pierce | Fire | Seraph Skirmish Simulation | All Style LB3 | |||||||||
338 |  | Yuina Shirakawa | Recommended SS4 | Score Attack | Master Skill | Main DMG (ST) | Increase Destruction Rate Extra Turn (Self/VG) Dark Skill Enhancer (Self) | Yuina SS1 is one of 3 single target main dmg dealers. As a style released within the first couple months of the game, she has only 1 hit on her EX skill. This is an issue when she isn't paired up with a support that can provide her funnel (Yunyun SS1). This is an issue because she will be able to break DP, but no hits or dmg will be applied to the enemy's HP. At the very least, funnel buffs will increase her hit counts and solve this issue, but she requires the support of someone who can provide that for her. Like most SS1s, this style is rarely used, but her EX skill can be used on all of her other styles. Though rarely having the time to shine, Yuina SS1's EX skill is seen used on her other styles for score attacks, but most likely only due to higher limit braks on other styles or having access to their other EX skill like SS2's blaster skill. | |||||
339 | Yuina-Paisen | Anachronies/ Divergence | Common Skill | ||||||||||
340 | Yuina-senpai | Arts Battle/ Dungeon | Baseline | ||||||||||
341 | Default | SS1 | Attacker | Clock Tower (Hell) | All Style LB 1 | ||||||||
342 | Slash | Light | Seraph Skirmish Simulation | All Style LB3 | |||||||||
343 |  | Yuina Shirakawa | Recommended SS4 | Score Attack | Master Skill | Increase Destruction Rate (AoE) OD Generator (AoE) | Increase Destruction Rate Extra Turn (Self/VG) Dark Skill Enhancer (Self) | Yuina SS2 is an AoE thunder blaster that provides 12 hits. This hit count is massive as she can easily increase the OD bar when fighting multiple enemies. Even without the OD generating earrings, she can raise the OD bar by more than half with 1 EX skill when there are 2 enemies. In fact, if she wore the OD generation earrings, she can fill up more than 1 bar of OD when there are 3 enemies. With the addition of her SS4's common skill to provide all those in the VG with an extra turn, she is more potent in increasing OD. Her SS4 competes with her though in the OD generation slot. Depending on the situation, it might be better to bring Yuina SS2 over Yuina SS4 in AoE Score Attacks for OD looping. | |||||
344 | Yuina-Paisen | Anachronies/ Divergence | Common Skill | ||||||||||
345 | Yuina-senpai | Arts Battle/ Dungeon | Baseline | ||||||||||
346 | Dress | SS2 | Blaster | Clock Tower (Hell) | All Style LB 1 | ||||||||
347 | Slash | Thunder | Seraph Skirmish Simulation | All Style LB3 | |||||||||
348 |  | Yuina Shirakawa | Recommended SS4 | Score Attack | Master Skill | Main DMG (AoE) Dark Crit DMG Buffer (Self) Extra Turn (Self) Dark Skill Enhancer (Self) | Increase Destruction Rate Extra Turn (VG) | Yuina SS3 is an extremely strong AoE dark main dmg dealer. Like most strong dmg dealers, she is able to buff herself. Yuina SS3 is able to provide herself with dark crit dmg on her EX skill (only Karen SS4 can provide this buff) and dark skill enhance on her common skill. She is incredibly self-sufficient in buffs and holds incredibly high dmg potential. With the recent addition of her SS4, she is able to provide allies with an extra turn. The extra turn is incredibly useful in helping your supports set up Yuina. As Yuina does not have a skill that doesn't attack (that doesn't provide an extra turn), it is importnat to provide her with orb skills so she can use the extra turn skills so that she doesn't consume buffs. | |||||
349 | Yuina-Paisen | Anachronies/ Divergence | Common Skill | ||||||||||
350 | Yuina-senpai | Arts Battle/ Dungeon | Baseline | ||||||||||
351 | Swimsuit | SS3 | Attacker | Clock Tower (Hell) | All Style LB 1 | ||||||||
352 | Slash | Dark | Seraph Skirmish Simulation | All Style LB3 | |||||||||
353 |  | Yuina Shirakawa | Recommended SS3 or SS5 | Score Attack | Master Skill | Main DMG (AoE) Funnel (3 Hit Count x 40% Potency, Self) Increase Destruction Rate OD Generation (AoE) Extra Turn (VG) | Increase Destruction Rate Extra Turn (Self) Dark Skill Enhancer (Self) | Yuina SS4 is the strongest Unison style currently. She provides a lot of utility for the team, while also having the ability to be the main dmg dealer. Her common skill is one of the greatest utility skills. It provides an extra turn to all those in the VG. Though no SP will be gained for the extra turn, you can choose to build up your OD bar or use another skill without spending another turn. Her EX skill has 2 modes: Attacker and Blaster. Both EX skills have bonuses when used during an extra turn (provided by a skill). The attacker version provides her with a large funnel (3 hit x 40% potency), while the blaster version increases the hit count to 10, increases the destruction rate, and has a reduced SP cost (to half). As Yuina SS4 can be her own OD generator or blaster with her EX skill and then shift to an Attacker, she is a top of the line dmg dealer. | |||||
354 | Yuina-Paisen | Anachronies/ Divergence | Common Skill | ||||||||||
355 | Yuina-senpai | Arts Battle/ Dungeon | Baseline | ||||||||||
356 | Unison | SS4 | Attacker | Clock Tower (Hell) | All Style LB 1 | ||||||||
357 | Slash | Ice | Seraph Skirmish Simulation | All Style LB3 | |||||||||
358 |  | Monaka Tsukishiro | Recommended SS2 | Score Attack | Master Skill | Main DMG (AoE, Token) | Extra Turn (Self) Skill Enhancer (Small, Self) | Mona SS1 has one of the highest dmg potentials, with one of the largest drawbacks. As the first token user, WFS had no idea how to balance her. Each token she has increases her EX skill by 16% for a total of 160% multiplier (10 stacks maximum). To gain tokens, Mona SS1 needs to use skills that provide her with tokens. Depending on your stats, each skill will provide 1-2 tokens. The current cheapest method to gain tokens takes 5 SP for 2 tokens. To gain 10 stacks, Mona SS1 will need to use the skill 5 times (25 SP and 5 turns) to set up. Sadly, having Mona SS1 sit in the VG to set up makes it harder to keep her alive and healthy and makes it incredibly difficult to provide her with crit and hit count buffs (they get consumed on auto attacks). What makes her even harder to use is her hit count being 1. That means she can break the enemy's DP, but no dmg will be applied to the HP of the enemy (the DP will consume all the dmg from the hit). Currently in JP Mona SS1's EX skill is usually generalized and used on her SS2 as building up tokens is easier on her SS2 due to the passives the style provides. | |||||
359 | Monanyan | Anachronies/ Divergence | Common Skill | ||||||||||
360 | Mona-nyan | Arts Battle/ Dungeon | Baseline | ||||||||||
361 | Default | SS1 | Attacker | Clock Tower (Hell) | All Style LB 1 | ||||||||
362 | Blunt | Dark | Seraph Skirmish Simulation | All Style LB3 | |||||||||
363 |  | Monaka Tsukishiro | Score Attack | Master Skill | Main DMG (AoE, Token) +1 Token/Enemy Hit (Passive) | Extra Turn (Self) Skill Enhancer (Small, Self) | Mona SS2 is one of the strongest AoE light dmg dealers. She is another token user like her SS1, but with some quality of life. Mona SS2 has the same 160% bonus and an extra 50% HP modifier attached to EX skill. Though her base dmg is lower than Mona SS1's EX skill, the HP modifier makes up for the difference. The quality of life that Mona SS2 presents is her passive ability (LB0) to gain tokens from each enemy she hits. This means if she hits 1 enemy she will gain 1 token (including auto attacks), if she hits 3 enemies she will gain 3 tokens. With this passive, she can quickly gain 10 tokens to reach maximum dmg bonus. This passive is widely abused to use for her SS1's EX skill. The main issue with using SS2 for her SS1's generalized EX skill is that Tsukasa SS4 funnel cannot be applied to Mona because Mona is not considered a dark style. | ||||||
364 | Monanyan | Anachronies/ Divergence | Common Skill | ||||||||||
365 | Mona-nyan | Arts Battle/ Dungeon | Baseline | ||||||||||
366 | Biker | SS2 | Attacker | Clock Tower (Hell) | All Style LB 1 | ||||||||
367 | Blunt | Light | Seraph Skirmish Simulation | All Style LB3 | |||||||||
368 |  | Miya Kiryu | Recommended SS3 | Score Attack | Master Skill | Light Field Setter (Small) Parameter Debuff (Small, AoE) | Fragile (ST/AoE) Special Debuff Effect Buff + Enhance (Self) | Myaa SS1 is sadly an outdated style that has been powercrept twice. Her EX skill provides a small light field and her common skill provides a parameter debuff. The parameter debuff is a rarely used debuff as he costs too much SP. Her field is a small field providing 50% increase in dmg for light skills. Isuzu SS3 and Tsukasa SS3 both provide large light field (65%) and additional buffs/debuffs to benefit the team. Myaa SS1 may get a powerful tower buff, but until then her SS1's EX skill will not be used, even by her SS2 if Isuzu SS3 or Tsukasa SS3 are available. | |||||
369 | Myaa-san | Anachronies/ Divergence | Common Skill | ||||||||||
370 | Mya | Arts Battle/ Dungeon | Baseline | ||||||||||
371 | Default | SS1 | Debuffer | Clock Tower (Hell) | All Style LB 1 | ||||||||
372 | Pierce | Light | Seraph Skirmish Simulation | All Style LB3 | |||||||||
373 |  | Miya Kiryu | Recommended SS3 | Score Attack | Master Skill | Defense Debuff (ST) Fragile Debuff (ST) Parameter Debuff (ST) Extra Turn | Fragile (ST/AoE) Special Debuff Effect Buff + Enhance (Self) | Myaa SS2 is a pivotal debuffer for general use. This is because she provides 2 offensive debuffs that all dmg dealers can take advantage of: defense debuff and fragile. Both debuffs from her EX skill last for 2 turns. Her EX skill also has a discount on SP cost if the enemy is effected by fragile. This allows her to apply both debuffs twice with 21 SP instead of 28 SP. Myaa SS2's common skill provides an extra turn and a parameter debuff. This skill is not important to her kit or any of her other SS, but may see use in future SS if it has a condition of having an extra turn. Myaa SS3 provides her SS2 with a self buff to boost her debuff effects by 20% so having it is a decent option if Myaa has extra SP to use the skill. A common use for Myaa SS2 is to use a common skill that costs 5 SP to apply fragile to gain the discount on her EX skill during OD or extra turn (from Yuina SS4 common skill) to spend less SP to provide her debuffs. She is a widely used support in any elemental team and is seeing a lot of use for single target fights for null crit penetration (IreneSS1+2, Sumomo SS3) teams. | |||||
374 | Myaa-san | Anachronies/ Divergence | Common Skill | ||||||||||
375 | Mya | Arts Battle/ Dungeon | Baseline | ||||||||||
376 | Fox | SS2 | Debuffer | Clock Tower (Hell) | All Style LB 1 | ||||||||
377 | Pierce | Thunder | Seraph Skirmish Simulation | All Style LB3 | |||||||||
378 |  | Miya Kiryu | Score Attack | Master Skill | Ice Defense Debuff (AoE, Permanent) Defense Debuff (AoE, Permanent) DP Recovery Block (AoE, Permanent) Special Debuff Effect Buff + Enhance (Self) | Fragile (ST/AoE) | Myaa SS3 started as an underappreciated style to a staple in an ice team. Her EX skill consists of a permanent AoE ice defense debuff, defense debuff, and DP recovery block. Though the debuff numbers aren't too great, her debuffs can stack twice and are stackable with normal ice defense and defense debuffs. This is important after the release of Hisame SS4. Hisame SS4 provides the team with AoE ice defense debuff and defense debuff. Myaa SS3 complements those debuffs without lowering the effectiveness of Hisame's debuffs. Myaa also complements Hisame SS4 as a debuffer by providing the only offensive debuff not provided by Hisame SS4, fragile. Myaa's common skills consist of both ST and AoE fragiles, which makes her a staple in ice teams. | ||||||
379 | Myaa-san | Anachronies/ Divergence | Common Skill | ||||||||||
380 | Mya | Arts Battle/ Dungeon | Baseline | ||||||||||
381 | Fireworks | SS3 | Debuffer | Clock Tower (Hell) | All Style LB 1 | ||||||||
382 | Pierce | Ice | Seraph Skirmish Simulation | All Style LB3 | |||||||||
383 |  | Chie Sugawara | Score Attack | Master Skill | Taunt Defense Buff (Self) Attack Down (ST) | Taunt DP Recovery (VG/Party) Funnel (3 Hit Count x 40% Potency, Self) Crit Rate Buff (Self) | Chie SS1 is widely known to be close to unusable. Arguablly she is the worst SS style in the game. Her kit consists of a taunt for 3 turns with a self defense buff for 1 turn (Defense buff from tower upgrade). This taunt costs a CRAZY 12 SP. Ichiko has a similar taunt that taunts for 2 turns and provides herself with the same defense buff for 1 turn and only cost 3 SP. Her common skills can be used as DP recovery skills, but there are better healers in the game to use as Chie doesn't have the 10% bonus from Tears. Overall, she is so worthless that she is just homescreen meta at best. Personally, I would bring a S style healer over her, even if she were max limit broken. | ||||||
384 | Sugayan | Anachronies/ Divergence | Common Skill | ||||||||||
385 | Suga | Arts Battle/ Dungeon | Baseline | ||||||||||
386 | Default | SS1 | Defender | Clock Tower (Hell) | All Style LB 1 | ||||||||
387 | Blunt | Null (Blunt) | Seraph Skirmish Simulation | All Style LB3 | |||||||||
388 |  | Chie Sugawara | Required S Style | Score Attack | Master Skill | Main DMG (ST, Conc) Taunt | Taunt DP Recovery (VG/Party) Funnel (3 Hit Count x 40% Potency, Self) Crit Rate Buff (Self) | Chie SS2 is a 180 degree turn from her SS1. Chie SS2 is one of the hardest hitting single target dark dmg dealers. This is because she has access to funnel (3 hit x 40% potency) as a common skill. This allows her to provide two stacks of funnel like Adel. The main issue she comes across are the massive SP costs. Each funnel buff has a minor heal attached to it increasing the SP cost to 7 SP. This requires Chie SS2 to spend 14 SP just to gain 240% potency in dmg (340% total dmg). Her EX skill does come with a nice discount to make up for the massive SP costs to set up when the enemy has a taunt debuff. Her common skill also provides a taunt and only costs 3 SP. The taunt and half cost EX skill requires a total of 10 SP over the normal 14 SP. Though Chie SS2 is extremely strong, she isn't widely used as a main single target dealer because Adel SS3 vastly over performs her. | |||||
389 | Sugayan | Anachronies/ Divergence | Common Skill | ||||||||||
390 | Suga | Arts Battle/ Dungeon | Baseline | ||||||||||
391 | Doll | SS2 | Defender | Clock Tower (Hell) | All Style LB 1 | ||||||||
392 | Blunt | Dark | Seraph Skirmish Simulation | All Style LB3 | |||||||||
393 |  | Chie Sugawara | Score Attack | Master Skill | Ice Skill Enhancer (Large, Party) Ice Crit DMG (45%, Party) Crit Rate Buffer (Self) Extra Turn (Self) | Taunt DP Recovery (VG/Party) Funnel (3 Hit Count x 40% Potency, Self) | Chie SS3 is the top ice elemental buffer. She will increase your ice dmg by a huge amount. Chie SS3 is the only provider of ice crit dmg to her allies. The ice crit dmg she provides increases ice crit dmg by 90% at 2 stacks. She also provides ice skill enhance for the team, making her the strongest ice buffer. Her EX skill provides a 50% discount if she if used during an extra turn (14 SP -> 7SP). Her common skill provides her the ability to provide herself with an extra turn using 5 SP, reducing her EX skill cost by 2 SP. Chie SS3 being and ice support gives her a hidden leg up when Yuina SS4 can also provide her with an extra turn saving 7 SP while also making full use of her ice support skills. | ||||||
394 | Sugayan | Anachronies/ Divergence | Common Skill | ||||||||||
395 | Suga | Arts Battle/ Dungeon | Baseline | ||||||||||
396 | Gundam | SS3 | Buffer | Clock Tower (Hell) | All Style LB 1 | ||||||||
397 | Blunt | Ice | Seraph Skirmish Simulation | All Style LB3 | |||||||||
398 |  | Hisame Ogasahara | Score Attack | Master Skill | Main DMG (AoE) Light Defense Debuff (ST) Dark Defense Debuff (ST) | Charge Buffer (Self) Thunder Skill Enhancer (Self) Ice Defense Debuff (Self) | Hisame SS1 was once oddly the only method to have light defense and dark defense debuff on the team through her common skill (because she's a breaker). Sadly her EX skill did not see use even after her tower upgrade. As her common skill provides dark and light defense debuff, Hisame SS1's common skill is versatile for both elements. Light defense debuffers now vastly overperform her (Isuzu SS3 and Miko SS3) and so do Dark defense debuffers (Fubuki SS1, Aina SS2, and Sharo SS1). Though in JP she is a fringe debuffer, for EN she may see use on light teams for 1.5 years as Miko SS3 released nearly 2 years after Hisame's release. | ||||||
399 | Hisamecchi | Anachronies/ Divergence | Common Skill | ||||||||||
400 | Sami | Arts Battle/ Dungeon | Baseline | ||||||||||
401 | Default | SS1 | Breaker | Clock Tower (Hell) | All Style LB 1 | ||||||||
402 | Pierce | Null (Pierce) | Seraph Skirmish Simulation | All Style LB3 | |||||||||
403 |  | Hisame Ogasahara | Score Attack | Master Skill | Main DMG (AoE) Charge Buffer (Self) Extra Turn (Self) | Thunder Skill Enhancer (Self) Ice Defense Debuff (Self) Light Defense Debuff (ST) Dark Defense Debuff (ST) | Hisame SS2 is an AoE dark main dmg dealer. Though she isn't a top of the line AoE dark dmg dealer, she is still usable. Her main competitor, Yuina SS3, is too self-sufficient in buffs and was released a couple of months after her. Though, Hisame SS2's dmg potential isn't low, she still requires a little bit of set up (5 SP for charge). Her main issue is her heavy reliance on her supports to increase her dmg. For those without Yuina SS3, she is commonly used. | ||||||
404 | Hisamecchi | Anachronies/ Divergence | Common Skill | ||||||||||
405 | Sami | Arts Battle/ Dungeon | Baseline | ||||||||||
406 | Maid | SS2 | Attacker | Clock Tower (Hell) | All Style LB 1 | ||||||||
407 | Pierce | Dark | Seraph Skirmish Simulation | All Style LB3 | |||||||||
408 |  | Hisame Ogasahara | Score Attack | Master Skill | SP Battery (+8 When Character Breaks enemy DP) Thunder Skill Enhance (Large, Self) Extra Turn (Self) | Charge Buffer (Self) Ice Defense Debuff (Self) Light Defense Debuff (ST) Dark Defense Debuff (ST) | Hisame 3 is a utility breaker. Though she can be quite powerful, she needs higher limit breaks to make use of her kit. Her main use is breaking the DP bar with her EX skill. By breaking the cancer's DP, she restores 8 SP to all allies. This is incredibly power as she provides enough SP to supply about 1 skill worths of SP. If she ends up being upable to break the DP, she is worthless to have on your team. It is not rare to see her as a main dmg dealer for score attacks that want to use her 8 SP battery when she is used. She also "holds" a sword in her dreams..... yeah... only in her dreams. | ||||||
409 | Hisamecchi | Anachronies/ Divergence | Common Skill | ||||||||||
410 | Sami | Arts Battle/ Dungeon | Baseline | ||||||||||
411 | Nightdress | SS3 | Breaker | Clock Tower (Hell) | All Style LB 1 | ||||||||
412 | Pierce | Thunder | Seraph Skirmish Simulation | All Style LB3 | |||||||||
413 |  | Hisame Ogasahara | Score Attack | Master Skill | Ice Resistance Overwrite (AoE) Apply Ice Weakness (AoE) Defense Debuff (AoE) Ice Defense Debuff (AoE) Extra Turn (Self) | Charge Buffer (Self) Thunder Skill Enhancer (Self) Light Defense Debuff (ST) Dark Defense Debuff (ST) | Hisame SS4, the ice version of Sharo SS2, the one who overwrites resistance and applies weakness. This time it is for the ice element. She maybe powerful with her overwrite/apply weakness skill, but the rest of her kit pales in comparison to Sharo SS2 (thunder) and Tsukasa SS4 (dark) in strength as a support for her allies in their respective element. Hisame provides AoE ice defense debuff and defense debuff. With potency of defense related debuffs being weaker in AoE (and permanent) than ST, her debuff numbers aren't incredibly impressive. This is is more apparent when all the skills deal dmg as skill level does not affect the potency of debuff. Currently it is best to use her in combination with Myaa SS3. Myaa SS3 will provide fragile and AoE permanent ice defense and defense debuff that can stack seperately with Hisame's debuffs. Miko SS2 can be used with her as a single target ice debuffer, but will not have access to fragile. Overall, Hisame SS4 is the first top tier style. | ||||||
414 | Hisamecchi | Anachronies/ Divergence | Common Skill | ||||||||||
415 | Sami | Arts Battle/ Dungeon | Baseline | ||||||||||
416 | High School | SS4 | Debuffer | Clock Tower (Hell) | All Style LB 1 | ||||||||
417 | Pierce | Ice | Seraph Skirmish Simulation | All Style LB3 | |||||||||
418 |  | Satomi Kura | Required Master Skill | Score Attack | Master Skill | Increase Destruction Rate (ST) Light Skill Enhancer (Small) | Rice Field (Field: 40% Enhance + DP Recovery per turn) Dark Skill Enhancer (Small) | Kura SS1 is one of the few blasters that is effective on any single target boss. Though she maybe effective on any boss, she also isn't the best in slot for any boss. Due to being replacable as a blaster with a lack of team supports, she was rare used until the introduction of master skills. With her master skill, she goes from a low tier style, to a high tier style, often being used as a support blaster for single target bosses for null (piercing crit) teams. Her master skill allows her to deploy a "rice field" to set the field. "Rice field" provides a skill enhance that scales multiplicatively with other damage amplification buffs/debuff (like elemental fields) except any type of dmg dealer can use it. It also provides a small heal every turn. With her new master skill, she makes certain score attacks or bosses easier than without her. | |||||
419 | Kuracchi | Anachronies/ Divergence | Common Skill | ||||||||||
420 | Tomi | Arts Battle/ Dungeon | Baseline | ||||||||||
421 | Default | SS1 | Blaster | Clock Tower (Hell) | All Style LB 1 | ||||||||
422 | Slash | Light | Seraph Skirmish Simulation | All Style LB3 | |||||||||
423 |  | Satomi Kura | Required Master Skill | Score Attack | Master Skill | Incease Destruction Rate (Dark, AoE) Dark Skill Enhancer (Small) | Rice Field (Field: 40% Enhance + DP Recovery per turn) Light Skill Enhancer (Small) | Kura SS2 is like Kura SS1 in that she has access to her master skill "Rice field". She is an AoE dark blaster that increases her ability to increase destruction rate when hitting weakness (slash/dark). Like her SS1, she is incredibily strong as a supportive blaster as her field is the only field usable for a null (piercing crit) team, the strongest "element" in JP. | |||||
424 | Kuracchi | Anachronies/ Divergence | Common Skill | ||||||||||
425 | Tomi | Arts Battle/ Dungeon | Baseline | ||||||||||
426 | Hostress | SS2 | Blaster | Clock Tower (Hell) | All Style LB 1 | ||||||||
427 | Slash | Dark | Seraph Skirmish Simulation | All Style LB3 | |||||||||
428 |  | Misato Nikaido | Score Attack | Master Skill | Main DMG (ST) Dark Skill Enhancer (Self) Attack Debuff (ST) | SP Battery (Self, turn 1) Skill Enhancer (Self) Ice Skill Enhancer (Self) | Nikaido SS1 on release was one of the worst elemental ST dmg dealers. She's gotten her tower upgrade and continues to stay near the bottom. Her tower upgrade did nothing to fix her hit count or dmg and the condition of powering up her EX during OD doesn't feel rewarding as her maximum potential is still lower than other single target dmg dealers. Her SS1 EX skill and common skill are not used on her SS2. It wouldn't be a stretch to say those who have her, will most likely continue to never use her. | ||||||
429 | Misarin | Anachronies/ Divergence | Common Skill | ||||||||||
430 | Misarin | Arts Battle/ Dungeon | Baseline | ||||||||||
431 | Default | SS1 | Attacker | Clock Tower (Hell) | All Style LB 1 | ||||||||
432 | Blunt | Dark | Seraph Skirmish Simulation | All Style LB3 | |||||||||
433 |  | Misato Nikaido | Score Attack | Master Skill | Main DMG (AoE) Funnel (3 Hit Count x 40% Potency during OD, Self) OD generator (AoE) Ice Skill Enhancer (Self) | SP Battery (Self, turn 1) Skill Enhancer (Self) Attack Debuff (ST) | Nikaido SS2 is a complete opposite of her SS1 counterpart. She is one of the top AoE ice dmg dealers, only beaten by Yuina SS4. On release, she wasn't highly praised due to being AoE and Score Attacks only have single target bosses at the time, but became incredibily popular after the 2nd anniversary and the changes made to Score Attacks. This was only 2 months after her release and many were not happy for missing her banner or only pulling for Akari SS2 (on the same banner). Those who were lucky to have her were blessed by the "first" AoE Score Attack. Nikaido SS2 is phenominal as she only relies on having a S style to reach her maximum capacity. She is self-sufficient with her common skill providing herself with large ice skill enhance and her EX skill providing her with strong funnel (3 hits x 40% potency). Her S style provides herself with large skill enhance. In total she can provide herself with strong skill enhance, large ice skill enhance, and strong funnel. | ||||||
434 | Misarin | Anachronies/ Divergence | Common Skill | ||||||||||
435 | Misarin | Arts Battle/ Dungeon | Baseline | ||||||||||
436 | Xmas | SS2 | Attacker | Clock Tower (Hell) | All Style LB 1 | ||||||||
437 | Blunt | Ice | Seraph Skirmish Simulation | All Style LB3 | |||||||||
438 |  | Iroha Ishii | Required SS2 | Score Attack | Master Skill | Dark Field Setter (Small) Skill Enhancer (Small, Party) | Skill Enhancer (Small, VG) | Iroha SS1 EX skill upgrade IS HERE and oh boy is it good. Sadly, she is a 2 parter with her SS2. If you don't have her SS2, you really won't feel the power of her SS1. She originally hit 5 times AoE and left a small dark field. Her EX skill upgrade now reduces the first cast to 6 SP and provides 30% OD. This is massive as you start with 7SP, she is the cheapest field caster (not counting rice field passive). 30% OD is nothing to ignore as that is a solid 12 hits of OD. If you are lucky to also house her SS2, she will be provided with an large skill enhance and crit dmg that changes with the element of the field (ST). This makes her incredibly powerful as she is able to now buff large dark skill enhance and dark crit dmg. At Iroha SS2 limit break 3, her field will become a large field competing with the likes of Yukki SS5. This makes it viable to run Iroha in place of Yukki SS5 for dark field and run Yukki SS6 (which is much better). | |||||
439 | Irocchi | Anachronies/ Divergence | Common Skill | ||||||||||
440 | Irocchi | Arts Battle/ Dungeon | Baseline | ||||||||||
441 | Default | SS1 | Buffer | Clock Tower (Hell) | All Style LB 1 | ||||||||
442 | Pierce | Dark | Seraph Skirmish Simulation | All Style LB3 | |||||||||
443 |  | Iroha Ishii | Required SS1 | Score Attack | Master Skill | Fire Field Setter (Large) SP Batter (+5 SP party) Condition: Field present, Cost 0 SP Skill Enhancer (Large, ST, matches field) Crit dmg (45%, ST, matches field) LB 3 passive: +15% to field + Permanent | Dark Field Setter (Small) Skill Enhancer (Small, Party) Skill Enhancer (Small, VG) | Iroha SS2 is an extremely strong buffer, but is requires her SS1 to work properly. | |||||
444 | Irocchi | Anachronies/ Divergence | Common Skill | ||||||||||
445 | Irocchi | Arts Battle/ Dungeon | Baseline | ||||||||||
446 | Casual | SS2 | Buffer | Clock Tower (Hell) | All Style LB 1 | ||||||||
447 | Pierce | Fire | Seraph Skirmish Simulation | All Style LB3 | |||||||||
448 |  | Fubuki Mikoto | Highly Recommended SS2 | Score Attack | Master Skill | Fragile (ST) Defense Debuff (ST, JP) Parameter Debuff (Small, ST) Dark Defense Debuff (ST) | Defense Debuff (AoE) Stunner (AoE) OD Generator (First Time 75%, 25%, lose 99.99% DP) | Fubuki SS1 is a great dark debuffer. Though she isn't the best in slot for debuffing for a dark element, she is indeed 2nd best. As one of the few that have dark defense debuff, she is incridibly useful to have. What seperates her from the best in slot dark debuffer (Aina SS2) are her SP costs. Fubuki's SP costs are too high on her EX skill to apply fragile as a single target. This leads her to be outclassed as a debuffer. Fubuki SS1 oddly houses high dmg potential, but requires her to use her EX skill during overdrive for the higher dmg potential and the dmg is not elemental. Sadly she is not the best in either dark elemental debuffer or single target dmg dealer. If you are missing Aina SS2, Fubuki SS1 can suffice as you dark defense debuffer. | |||||
449 | Fubukin | Anachronies/ Divergence | Common Skill | ||||||||||
450 | Fubukin | Arts Battle/ Dungeon | Baseline | ||||||||||
451 | Default | SS1 | Debuffer | Clock Tower (Hell) | All Style LB 1 | ||||||||
452 | Slash | Null (Slash) | Seraph Skirmish Simulation | All Style LB3 | |||||||||
453 |  | Fubuki Mikoto | Recommended SS1 | Score Attack | Master Skill | Main DMG (ST) DP recovery (Self) OD Generator (First Time 75%, 25%, lose 99.99% DP) | Fragile (ST) Defense Debuff (ST, JP) Parameter Debuff (Small, ST) Dark Defense Debuff (ST) Defense Debuff (AoE) Stunner (AoE) | ||||||
454 | Fubukin | Anachronies/ Divergence | Common Skill | ||||||||||
455 | Fubukin | Arts Battle/ Dungeon | Baseline | ||||||||||
456 | Xmas | SS2 | Attacker | Clock Tower (Hell) | All Style LB 1 | ||||||||
457 | Slash | Thunder | Seraph Skirmish Simulation | All Style LB3 | |||||||||
458 |  | Risa Murofushi | Score Attack | Master Skill | Parameter UP (Small) DP Recovery (Party) | DP Recovery (ST/VG) | Risa SS1's EX skill doesn't heal, but it provides a parameter buff. Sadly, her EX skill only offer a minor buff for 14 SP cost (a steep cost). Her common skills are the only way to recover the DP of her allies. As a healer without any notable buffs or debuffs, she is not really usable unless you got no other healer. | ||||||
459 | Risa-mama (Mama) | Anachronies/ Divergence | Common Skill | ||||||||||
460 | Momma Risa | Arts Battle/ Dungeon | Baseline | ||||||||||
461 | Default | SS1 | Healer | Clock Tower (Hell) | All Style LB 1 | ||||||||
462 | Pierce | Null (Pierce) | Seraph Skirmish Simulation | All Style LB3 | |||||||||
463 |  | Risa Murofushi | Score Attack | Master Skill | DP Revive (Party) DP Recovery (ST/VG) | Parameter UP (Small) DP Recovery (VG/Party) | Risa SS2 is a slightly better Tama SS1. She also provides a DP revive for the party instead of just the VG. the main difference is that Tama SS1 can be generalized to all of her other styles, while Risa's SS2 EX skill will only be able to be used on her SS2, making her less versitile. Outside of DP recovery and revival, Risa SS2 provides very little to the team. At the very least, she is a strong healer. | ||||||
464 | Risa-mama (Mama) | Anachronies/ Divergence | Common Skill | ||||||||||
465 | Momma Risa | Arts Battle/ Dungeon | Baseline | ||||||||||
466 | Racer | SS2 | Healer | Clock Tower (Hell) | All Style LB 1 | ||||||||
467 | Pierce | Null (Pierce) | Seraph Skirmish Simulation | All Style LB3 | |||||||||
468 |  | Akari Date | Score Attack | Master Skill | Main DMG (ST) Funnel (3 Hit Count x 40% Potency) | Akari SS1 is a strong dark breaker. She may not be the best of the dark single target dmg dealer, but she will rip through boss DP that are weak to dark element (or blunt) like butter. Her main perk is her ability to provide herself with strong buffs: Large funnel on her EX skill with a 50% DP multiplier and a common skill that provides herself with large dark elemental enhance. With self-sufficient power to buff herself and a large funnel, Akari SS1 is quite a power house. The main reason she isn't sitting near the top of the dps single target food chain is that she is not an Attacker that would have a 50% HP modifier on her EX skill. | |||||||
469 | Akarin | Anachronies/ Divergence | Common Skill | ||||||||||
470 | Akarin | Arts Battle/ Dungeon | Baseline | ||||||||||
471 | Default | SS1 | Breaker | Clock Tower (Hell) | All Style LB 1 | ||||||||
472 | Blunt | Dark | Seraph Skirmish Simulation | All Style LB3 | |||||||||
473 |  | Akari Date | Score Attack | Master Skill | DP Breaker OD Generation (If break enemy DP 150%) | Akari SS2 is one of the most notable breakers. This has a lot to do with her unique utility built into her EX skill. Her common skill is basically worthless. Her EX skill provides decent dmg with a 50% DP modifier. Sadly she is not very good at dealing dmg, thus requiring heavy investment (high limit breaks). If her EX skill breaks the enemy DP, you are awarded 150% OD guage. This is further increased with OD increasing earrings, reaching a maximum of 69 ticks to the OD bar (or 173% of the OD bar). Her ability to generate so much OD when she breaks the enemy makes her a highly sought out Style for spenders who want to use her for OD looping, especially in single target bosses in Challenge Tower or Score Attack. | |||||||
474 | Akarin | Anachronies/ Divergence | Common Skill | ||||||||||
475 | Akarin | Arts Battle/ Dungeon | Baseline | ||||||||||
476 | Xmas | SS2 | Breaker | Clock Tower (Hell) | All Style LB 1 | ||||||||
477 | Blunt | Ice | Seraph Skirmish Simulation | All Style LB3 | |||||||||
478 |  | Aina Mizuhara | Score Attack | Master Skill | OD Generation Fragile (AoE) | Fragile (ST) Dark Defense Debuff (AoE) Defense Debuff (AoE) | Aina SS1 is a staple debuffer as a general support with the ability to generate a lot of OD. This is widely important, making her extremely useful in building OD for slow compositions or compositions that use a lot of skills instead of auto attacking. She also provides fragile (AoE and ST) as well as defense debuff (AoE). There is nothing to hate in her kit as her debuffing SP costs are extremely low. On a single target boss fight, she will only need 21 SP to debuff defense and fragile twice. The main downside is that she will require 4 turns (OD3) to apply all of her debuffs as each of her skills only applies 1 debuff and for 1 turn. Currently her SS2 is used over her SS1, but the generalized common skill and EX skill are important to her SS2. | ||||||
479 | Anachronies/ Divergence | Common Skill | |||||||||||
480 | Ai-chin | Arts Battle/ Dungeon | Baseline | ||||||||||
481 | Default | SS1 | Debuffer | Clock Tower (Hell) | All Style LB 1 | ||||||||
482 | Blunt | Null (Blunt) | Seraph Skirmish Simulation | All Style LB3 | |||||||||
483 |  | Aina Mizuhara | Recommended SS1 | Score Attack | Master Skill | OD Generation Defense Debuff (AoE) Dark Defense Debuff (AoE) | Fragile (ST) Defense Debuff (AoE) | Aina SS2 is one of the queens of generalized support. She can increase OD faster than her SS1, while providing the same amount of debuffing potential. Her common skill provides AoE dark defense debuff, making her exceptional in dark teams. Her synergy with Tsukasa SS4 is so high, that two together are staples in dark elemental teams. Tsukasa SS4 buffs funnel to Aina SS2 to gain 5 hit counts, which will further improve her ability to provide OD generation. As the face of OD looping on OD looping teams and having the potential to make normal teams OD loop 1 or 2 times, she is definitely a style that many should aim to pick up. She is actively used in any content that requires low turn counts like Clock Tower Hell. | |||||
484 | Anachronies/ Divergence | Common Skill | |||||||||||
485 | Ai-chin | Arts Battle/ Dungeon | Baseline | ||||||||||
486 | Pirate | SS2 | Debuffer | Clock Tower (Hell) | All Style LB 1 | ||||||||
487 | Blunt | Dark | Seraph Skirmish Simulation | All Style LB3 | |||||||||
488 |  | Aina Mizuhara | Score Attack | Master Skill | |||||||||
489 | Anachronies/ Divergence | Common Skill | |||||||||||
490 | Ai-chin | Arts Battle/ Dungeon | Baseline | ||||||||||
491 | Jellyfish | SS3 | Debuffer | Clock Tower (Hell) | All Style LB 1 | ||||||||
492 | Blunt | Fire | Seraph Skirmish Simulation | All Style LB3 | |||||||||
493 |  | Ichiko Ohshima | Score Attack | Master Skill | Defense Buffer (Party) Fire Skill Enhance (Party) Attack Debuff (ST) | Taunt Defense Buffer (Self) | Ichiko SS1 an offensive and defensive buffer. Though her common skill isn't useful, her EX skill is. Her EX skill provides a large fire skill enhance and 2 turns of defense buffs for the party. The defense buffs are incredibly useful to keeping a fire team safe. A common skill from her A style provides her with a taunt that also provides herself with a defense buff. Though her SS1 is not widely used, her EX is strong enough and complements her SS2 so well that the skill is usually generalized and used with her SS2. Ichiko SS1 is strong for players with lower limit breaks as defense buffs will greatly improve your survivability. Sadly, her large fire skill enhance is not as useful as it once was as her sister Yotsuha SS1 and a few others can provide the same buffs for allies with more offensive buffs. | ||||||
494 | Icchi | Anachronies/ Divergence | Common Skill | ||||||||||
495 | Icchi | Arts Battle/ Dungeon | Baseline | ||||||||||
496 | Default | SS1 | Defender | Clock Tower (Hell) | All Style LB 1 | ||||||||
497 | Blunt | Fire | Seraph Skirmish Simulation | All Style LB3 | |||||||||
498 |  | Ichiko Ohshima | Recommended SS1 | Score Attack | Master Skill | Fragile (ST) Taunt | Taunt Defense Buffer (Self) Attack Debuff (ST) | Ichiko SS2 is a debuffer with the ability to deal an unreasonable amount of dmg for her class and lack of multipliers. Ichiko SS2's EX skill provides 2 turns of fragile with a condition of having taunt on the enemy to discount the SP cost on her EX skill in half (16 SP -> 8SP). Her common skill provides a taunt that increases her concentration for 2 turns, but her common skill from her A style is better in nearly every way. Ichiko SS2 scales with her concentration, making it easy to reach maximum potential and making her incredibly durable for a dmg dealer. Oddly, her maximum potential dmg is incredibily high, though it lacks a multiplier. This allows her to easily become a powerhouse of a dmg dealer. With her SS1 EX skill generalized, she can also provide defense buffs to her party and a strong fire enhance. This synergizes well for her kit as she can easily be your main defender until it is time to change gears to become your main dmg dealer. Even if you don't use her as your main dmg dealer, she can easily break enemy DP due to her high dmg potential as she scales with building like a tank. Her ability to provide fragile is also a giant bonus as it lowers the amount of turns debuffers need to take to stack all debuffs twice. If you do not have high limit breaks and have both Ichiko SS1 and SS2, she would easily fit in as a staple in your fire teams. | |||||
499 | Icchi | Anachronies/ Divergence | Common Skill | ||||||||||
500 | Icchi | Arts Battle/ Dungeon | Baseline | ||||||||||
501 | Bride | SS2 | Defender | Clock Tower (Hell) | All Style LB 1 | ||||||||
502 | Blunt | Fire | Seraph Skirmish Simulation | All Style LB3 | |||||||||
503 |  | Niina Ohshima | Score Attack | Master Skill | Increase Destruction Rate (ST) Destruction Rate Buff (Self) | Destruction Rate Buff (Self) | Niina SS1 is a solid fire ST blaster for increasing Destruction Rate, especially after her tower upgrade. Though she may do an amazing job increasing Destruction Rate, she doesn't support the team in any other way. Her dmg is mediocre, but there are many better options than her. Though she does her job well, it is important for supports to do multiple roles, espcially if they lack buffs or debuffs. | ||||||
504 | Anachronies/ Divergence | Common Skill | |||||||||||
505 | Niina | Arts Battle/ Dungeon | Baseline | ||||||||||
506 | Default | SS1 | Blaster | Clock Tower (Hell) | All Style LB 1 | ||||||||
507 | Slash | Fire | Seraph Skirmish Simulation | All Style LB3 | |||||||||
508 |  | Niina Ohshima | Recommended SS1 | Score Attack | Master Skill | Main DMG (AoE) Light Crit DMG Buffer (Self) | Increase Destruction Rate (ST) Destruction Rate Buff (Self) | Niina SS2 is an AoE light dmg dealer. She is incredibly strong when the stars align. This is due to her EX skill requiring the enemy to have 200% destruction rate for her 50% HP modifier. This is a huge issue as she won't be able to use her HP modifier righter after breaking the enemy's DP. Her SS1 is a blaster, but it is ST. This lack of synergy makes her a little awkward to use as a main dmg dealer. Her EX skill also provides light crit dmg, a rare buff unless you have her sister Yotsuha SS2. Due to others having access to the buff, her ability to provide it for herself is diminished when comparing her to her top contender Monaka SS2. | |||||
509 | Anachronies/ Divergence | Common Skill | |||||||||||
510 | Niina | Arts Battle/ Dungeon | Baseline | ||||||||||
511 | Onsen | SS2 | Attacker | Clock Tower (Hell) | All Style LB 1 | ||||||||
512 | Slash | Light | Seraph Skirmish Simulation | All Style LB3 | |||||||||
513 |  | Minori Ohshima | Score Attack | Master Skill | Main DMG (AoE) Minds Eye Buffer (Party) | SP Donator (6 SP) | Minori SS1 on paper seems like a decent style, even before her tower upgrade. This is because she provides mind eye to her party (VG only before tower upgrade). Unfortunately she provides only mind eye to the team as her dmg as an AoE fire attacker is not very strong. With little dmg and only 1 buff, it is hard to justify using her over any other mind eye provider. Due to this, she is rarely used if ever. | ||||||
514 | Minorin | Anachronies/ Divergence | Common Skill | ||||||||||
515 | Minorin | Arts Battle/ Dungeon | Baseline | ||||||||||
516 | Default | SS1 | Attacker | Clock Tower (Hell) | All Style LB 1 | ||||||||
517 | Blunt | Fire | Seraph Skirmish Simulation | All Style LB3 | |||||||||
518 |  | Minori Ohshima | Score Attack | Master Skill | Crit Rate Buffer (Party) Crit DMG Buffer (50%, Party) OD Reduction (-50%) SP Donator (6 SP) | Minds Eye Buffer (Party) | Minori SS2 is an interesting style, that provides crit rate, 50% crit dmg, and a SP donation skill. Her EX skill costs 0 SP, allowing her to make full use of her SP donation skill. Her EX skill sounds amazing until you realize it consumed 50% of the OD bar (and you can go negative). She is also one of 2 styles that provide 50% crit dmg. In current JP, OD is considered more important than SP, as it provides extra turns. Due to the importance of OD, Minori does not replace the powerhouse of Tama SS5. However, she is still usable and anyone blessed without Tama SS5 will gladly use Minori SS2. | ||||||
519 | Minorin | Anachronies/ Divergence | Common Skill | ||||||||||
520 | Minorin | Arts Battle/ Dungeon | Baseline | ||||||||||
521 | Onsen | SS2 | Buffer | Clock Tower (Hell) | All Style LB 1 | ||||||||
522 | Blunt | Null (Blunt) | Seraph Skirmish Simulation | All Style LB3 | |||||||||
523 |  | Yotsuha Ohshima | Score Attack | Master Skill | Fire Skill Enhancer (Large, RG) Fire Crit Rate (RG) Fire Crit DMG (45%, RG) Skill Enhancer (Large, RG) | Skill Enhancer (Small, VG) | Yotsuha SS1 is considered a staple in fire teams in JP. Though her Yotsuha is now been around for 1.5 years. She is still considered a staple for fire teams. Her only replacement is Adel SS4 (side grade). She provides fire crit rate, fire crit dmg, and large fire skill enhance to the rearguard with her EX skill, while her common skill provides large skill enhance to the rearguard. These are all top tier buffing skills. Her EX skill and common skill also provide more than 1 party member buffs. This allows fire to have their supports used as dmg dealers to help break the DP of the enemies before the main dmg dealer needs to hit the boss. Overall, she is amazing and actively used in nearly every fire team. Her fire crit rate also allows her team to be versitile. This is because it will only be consumed when you crit using fire dmg. This means you can freely auto attack the boss without consuming the crit rate buff. This is important when you need to rotate your VG and RG without having to use non-dmging skills on your main dmg dealer. | ||||||
524 | Yottsun | Anachronies/ Divergence | Common Skill | ||||||||||
525 | Yottsun | Arts Battle/ Dungeon | Baseline | ||||||||||
526 | Default | SS1 | Buffer | Clock Tower (Hell) | All Style LB 1 | ||||||||
527 | Pierce | Fire | Seraph Skirmish Simulation | All Style LB3 | |||||||||
528 |  | Yotsuha Ohshima | Recommended SS1 | Score Attack | Master Skill | Light Skill Enhancer (Large, RG) Light Crit DMG (45%, RG) Funnel (3 Hit Count x 10% Potency, Light only, RG) | Fire Skill Enhancer (Large, RG) Fire Crit Rate (RG) Fire Crit DMG (45%, RG) Skill Enhancer (Large, RG) Skill Enhancer (Small, VG) | Yotsuha SS2 is a strong buffer in light teams, but is also part of the issue on why light is considered one of the weakest elements. Yotsuha SS2 is one of the strongest light buffers, but provides the weakest funnel type buff availalbe by any style (3 hit x 10% potency). Due to the weak funnel, she often feels weak, even if her EX skill provides extremely strong buffs (large light skill enhance and light crit dmg). She also has overlap with Tsukasa SS3 (light skill enhance) which is commonly used in light teams. The overlap reduces the amount of efficiency provided by Yotsuha SS2 and Tsukasa SS3. With the recent addition of her sister Isuzu SS3 to the pool, her overall usefulness has increased due to the lack of overlap from Tsukasa SS3 (who is replaced by Isuzu SS3). Her Limit Break 1 passive is also different from most other styles. Instead of gaining +1 SP while in the VG, she gains +1 SP in the RG. She allows for teams to actively gain more SP per turn with her Limit break 1 passive. If you do not have Yotsuha's SS1 limit break 3, it is not uncommon for players to choose to generalize her SS1 EX skill and use it on her SS2. | |||||
529 | Yottsun | Anachronies/ Divergence | Common Skill | ||||||||||
530 | Yottsun | Arts Battle/ Dungeon | Baseline | ||||||||||
531 | Pajama | SS2 | Buffer | Clock Tower (Hell) | All Style LB 1 | ||||||||
532 | Pierce | Light | Seraph Skirmish Simulation | All Style LB3 | |||||||||
533 |  | Isuzu Ohshima | Required SS3 | Score Attack | Master Skill | Defense Debuff (ST) Fire Defense Debuff (AoE) | Fire Defense Debuff (ST) Fragile (AoE) Confusion (ST/AoE) | Isuzu SS1 is a strong fire debuffer, that only got stronger with her tower upgrade and the addition of her SS3 common skill. Though SS1 is not widely used, her whole kit is usually generalized to be used on her SS2. This is because Isuzu SS2 can provide an extremely potent defense debuff, while SS1 provides fire debuffs. Interestingly enough Isuzu SS1 tower upgrade EX skill can also be used as a main dmg dealer, though not as good as actual main dmg dealers. | |||||
534 | Isuzucchi | Anachronies/ Divergence | Common Skill | ||||||||||
535 | Isuzucchi | Arts Battle/ Dungeon | Baseline | ||||||||||
536 | Default | SS1 | Debuffer | Clock Tower (Hell) | All Style LB 1 | ||||||||
537 | Slash | Fire | Seraph Skirmish Simulation | All Style LB3 | |||||||||
538 |  | Isuzu Ohshima | Required SS3 Recommended SS1 | Score Attack | Master Skill | DP Defense Debuff (AoE) Defense Debuff (Large, AoE) Confusion (ST) | Fire Defense Debuff (ST) Fragile (AoE) Confusion (ST/AoE) | Isuzu SS2 is an extremely strong debuffer for general teams, AoE and ST. She only got better with Isuzu SS3's common skill. Isuzu SS2 EX skill does not deal damage, thus increases potency with skill level (Defense down). Her EX skill provides AoE defense down and DP defense down. DP defense down is defense down that is only applied when the enemy has DP. This debuff can allow anyone to break the enemy's DP. Even though she is AoE, her numbers are higher than that of Single targets defense debuffers. Though she doesn't show up in every meta team, she is an extremely powerful asset for most meta teams and non-meta teams alike. During DP, she has THE highest defense debuffing potential in the game and it is AoE. Having Isuzu SS3 allows her to use fragile, Isuzu SS2 provides AoE fire defense down, and her S skill provides single target fire defense down. With a high amount of versatility by owning all of her other SS, Isuzu continues to bolster her assets..... in more than one way. | |||||
539 | Isuzucchi | Anachronies/ Divergence | Common Skill | ||||||||||
540 | Isuzucchi | Arts Battle/ Dungeon | Baseline | ||||||||||
541 | Onsen | SS2 | Debuffer | Clock Tower (Hell) | All Style LB 1 | ||||||||
542 | Slash | Null (Slash) | Seraph Skirmish Simulation | All Style LB3 | |||||||||
543 |  | Isuzu Ohshima | Score Attack | Master Skill | Light Field Setter (Large) Light Defense Debuff (AoE) Defense Debuff (AoE) Fragile (AoE) Removes party's Restraint debuff effects (Passive) | Fire Defense Debuff (ST) Fragile (AoE) Confusion (ST/AoE) | Isuzu SS3, a side grade to Tsukasa SS3 in terms of large light field, but fills a completely different niche. She is a debuffer for AoE light defense and AoE defense. She also provides an AoE fragile through her common skill. Her fragile common skill is a nice addition for her SS2. Her EX skill, like her SS2, does not deal any damage and increases in potency with level (light defense down). For single target fights, she is outclassed by Miko SS3 in light defense reduction. Though she doesn't particularly have a home in the current light comp, her kit is extremely strong. I believe future light supports may provide a perfect home for her, while knocking out Miko SS3 from the team. | ||||||
544 | Isuzucchi | Anachronies/ Divergence | Common Skill | ||||||||||
545 | Isuzucchi | Arts Battle/ Dungeon | Baseline | ||||||||||
546 | Magician | SS3 | Debuffer | Clock Tower (Hell) | All Style LB 1 | ||||||||
547 | Slash | Light | Seraph Skirmish Simulation | All Style LB3 | |||||||||
548 |  | Muua Ohshima | Score Attack | Master Skill | DP Recovery (Party) DP Overheal (120%, Party) Minds eye (RG) | Remove Virus Effect | Muua SS1 is hands down the best generic healer. Sadly a "healer" has taken her place 9 months after her debut, Tama 5 (a buffer who has access to heals). Without Tama 5, Muua is a staple in any team tackling content with weakness. What makes Muua so powerful is her EX skill. Her heal can go to level 13, which mean it is slightly stronger than your average heal. Heals can be wasted when healing at max HP, but Muua's EX skill allows for 120% overheal, allowing her whole team to have an abnormal amount of extra DP. This reduces the pressure on your team and the likelihood that you break (step aside Tama SS1). Muua's EX skill also comes with a rare buff Mind eye (tactical vision) that is applied to all those in the rearguard. That means your dmg dealer can have a picnic in the rearguard while recieving her buff. Mind eye increase weakness skill dmg to up to 50% per stack (100% with 2 stacks). This makes your dmg dealer extremely potent. Though Muua is completely replaced by Tama 5 in 9 months, she is the queen for those 9 months, increasing your dmg by 100% through Mind eye (tactical vision), being a complete make or break for end game content. With the introduction of Ruka SS5, she has seen a minor resurgance, but is missing a skill enhance that Tama SS5 can provide. | ||||||
549 | Muua | Anachronies/ Divergence | Common Skill | ||||||||||
550 | Muua | Arts Battle/ Dungeon | Baseline | ||||||||||
551 | Default | SS1 | Healer | Clock Tower (Hell) | All Style LB 1 | ||||||||
552 | Pierce | Null (Pierce) | Seraph Skirmish Simulation | All Style LB3 | |||||||||
553 |  | Muua Ohshima | Required SS1 | Score Attack | Master Skill | DP Recovery (ST) Skill Use Recovery (ST) SP Recovery (+3 SP) Remove Virus Effect | DP Recovery (Party) DP Overheal (120%) Minds eye (RG) | Muua SS2 is an idea that wasn't executed properly. WFS wanted to sell their new game mode "arts battle". Sadly Muua SS2 isn't even good there. Her EX skill provides a small heal, +3SP, and refreshes 1 skill use to the target. Her common skill provides very little healing, but cleanses the virus debuff. Overall, she is not good. Muua SS1 is required for her to feel even remotely useful as a healer. Nowadays, her main purpose is her lb1 passive that provides +1 SP while in the rearguard. This allows teams to gain more SP than they should overall per turn. | |||||
554 | Muua | Anachronies/ Divergence | Common Skill | ||||||||||
555 | Muua | Arts Battle/ Dungeon | Baseline | ||||||||||
556 | Onsen | SS2 | Healer | Clock Tower (Hell) | All Style LB 1 | ||||||||
557 | Pierce | Null (Pierce) | Seraph Skirmish Simulation | All Style LB3 | |||||||||
558 |  | Mion Yanagi | Score Attack | Master Skill | DP Recovery (Party) DP Overheal (120%, Party) Charge (Party) | SP Donator (6 SP) | Yanagi SS1 is a strong healer. With the new addition of her S skill in JP she can now act as a SP donator for allies. This kind of hurts her as she cannot use her heals if she is providing SP to allies, but if you are using her as a SP donator, you aren't healing with her anyways. The flexibility of her kit makes her a decently strong healer right now. In EN, she isn't considered great because she heals and only provides the weakest type of buff "charge". This makes her not that much more different than any other healer, including S healers. | ||||||
559 | Yanagin | Anachronies/ Divergence | Common Skill | ||||||||||
560 | Nagi | Arts Battle/ Dungeon | Baseline | ||||||||||
561 | Default | SS1 | Healer | Clock Tower (Hell) | All Style LB 1 | ||||||||
562 | Pierce | Null (Pierce) | Seraph Skirmish Simulation | All Style LB3 | |||||||||
563 |  | Mion Yanagi | Score Attack | Master Skill | DP Recover (Party) DP Overheal (150%, Party) | SP Donator (6 SP) | Yanagi SS2 has extremely potent heals, but that's it. Her S skill in JP allows her to act as a SP donator, which is good as a support ability, but lowers her ability to heal. Her EX skill can overheal by 150%, which is crazy, but unneccessary. I don't even know a use for this skill unless you are desperate for a heal. The SP donation skill is strong, but otherwise, she just look cool on a bike. Also this SS EX skill reminds me of Katekyo hitman reborn. | ||||||
564 | Yanagin | Anachronies/ Divergence | Common Skill | ||||||||||
565 | Nagi | Arts Battle/ Dungeon | Baseline | ||||||||||
566 | Biker | SS2 | Healer | Clock Tower (Hell) | All Style LB 1 | ||||||||
567 | Pierce | Null (Pierce) | Seraph Skirmish Simulation | All Style LB3 | |||||||||
568 |  | Kanata Maruyama | Recommended SS2 | Score Attack | Master Skill | Main DMG (ST) Crit DMG Buffer (30%, Self, Condition Charge) Charge (Self) | An extremely strong breaker, but she's a breaker. Even after her Skill Upgrade, Kanata's dmg didn't really improve as it only slapped on crit dmg before dealing dmg. She will definitely break the Cancer DP like it is butter, but may struggle to see high dmg numbers or kill a boss without top of the line support as a breaker. She is for all sense and purposes, a generic single target dmg dealer. | ||||||
569 | Maru-chan | Anachronies/ Divergence | Common Skill | ||||||||||
570 | Marumaru | Arts Battle/ Dungeon | Baseline | ||||||||||
571 | Default | SS1 | Breaker | Clock Tower (Hell) | All Style LB 1 | ||||||||
572 | Pierce | Dark | Seraph Skirmish Simulation | All Style LB3 | |||||||||
573 |  | Kanata Maruyama | Score Attack | Master Skill | Increase Destruction Rate (AoE) Destruction Rate Buff (VG) Increased SP generation (Passive, Condition Charge) | Main DMG (ST) Crit DMG Buffer (30%, Self, Condition Charge) Charge (Self) | Kanata SS2 is a weird Style. Her Limit Break 1 does not provide her with +1 SP when in the front line, but instead provides her with SP/turn when she has above 100% DP (needs overheal). Her Limit break 0 provides her with SP per turn if she has the charge buff. This increases her total SP per turn to be +2 regardless of being in the front or not. Her EX skill oddly costs a massive 18 SP with extremely poor numbers to show for it as she is an AoE blaster. Her DR is low as well with only 4 hits in her kit. Her destruction up buff on her EX skill will only effect her as most people would not run 2+ blasters in 1 team. Her EX skill is also loaded with a rare debuff, "confusion" which doesn't affect many bosses. Her whole kit is semi confusing and hard to work with. Overall, JP players tend to not use this style at all and when they do, it is because Kanata SS1 EX skill is generalized onto Kanata SS2. | ||||||
574 | Maru-chan | Anachronies/ Divergence | Common Skill | ||||||||||
575 | Marumaru | Arts Battle/ Dungeon | Baseline | ||||||||||
576 | Red Panda | SS2 | Blaster | Clock Tower (Hell) | All Style LB 1 | ||||||||
577 | Pierce | Light | Seraph Skirmish Simulation | All Style LB3 | |||||||||
578 |  | Shiki Hanamura | Score Attack | Master Skill | Dark Skill Enhancer (Large, Party) Charge (Party) | Charge (Party) Skill Enhance (Small, VG) Skill Enhancer (Large, ST) Charge (ST) | Shiki SS1 got a skill upgrade from the tower. The upgrade is good as an upgrade, but did very little for her in terms of current JP meta. Her only hope is her SS2 would utilize her kit like they did with Iroha SS2. Her EX skill provides Dark Skill enhance for the party and she will deal a very small amount of damage (ST). Sadly, they have her EX skill deal dmg, meaning her skill levels will not increase her buff potential..... very sad indeed. Her tower upgrade reduced her skill cost to 9 SP, which is very good and allowed the skill to also provide the whole party with the charge buff. She is a decently strong support, but there are no many other dark supports that can accomplish what she does, but better. To make matters worse, many of the top dark dmg dealers can already buff themselves with dark skill enhance, completely reducing her purpose in a party. | ||||||
579 | Anachronies/ Divergence | Common Skill | |||||||||||
580 | Shikkie | Arts Battle/ Dungeon | Baseline | ||||||||||
581 | Default | SS1 | Buffer | Clock Tower (Hell) | All Style LB 1 | ||||||||
582 | Slash | Dark | Seraph Skirmish Simulation | All Style LB3 | |||||||||
583 |  | Shiki Hanamura | Score Attack | Master Skill | Light Skill Enhancer (Large, ST) Funnel (5 Hit x 10% Potency, ST) Crit Rate Buffer (ST, Conditional: has Charge) Light Crit Dmg (ST, Conditional: has Charge) Skill Enhancer (Large, ST) Charge (ST) | Dark Skill Enhancer (Large, Party) Charge (Party) Charge (Party) Skill Enhance (Small, VG) | This is sad for a Shiki fan. Is her SS2 good, yes. Did she get powercrept by Ruka SS5 in 4 days? Yes. Shiki SS2 is a bit clunky. Her EX skill essentially requires her to have a charge buff to make it good and her common skill provides that charge buff to an ally (ST). She feels too slow and clunky overall that Ruka SS5 as a generic support feels like a better light support than her, which is sad to say. | ||||||
584 | Anachronies/ Divergence | Common Skill | |||||||||||
585 | Shikkie | Arts Battle/ Dungeon | Baseline | ||||||||||
586 | Conductor | SS2 | Buffer | Clock Tower (Hell) | All Style LB 1 | ||||||||
587 | Slash | Light | Seraph Skirmish Simulation | All Style LB3 | |||||||||
588 |  | Chiroru Matsuoka | Score Attack | Master Skill | Main DMG (AoE) Crit Rate Buffer (Self) OD Generator (AoE) Defense UP (Self) | Taunt Defense UP (Self) Funnel (5 Hit count x 10% Potency, Self) Attack Debuff (ST) | Chiroru SS1 is a utility support, more than she is a defender. Her ability to protect the team isn't great, but her high hit count on her EX skill (10) is really nice. Her EX skill is also AoE. Her S skill also provides a nice small funnel (5x10% potency), providing more OD. After her skill upgrade, the first cast of her EX skill costs only 7 SP. This allows her to set up her team to OD on turn 1. After her tower upgrade, she became a staple in OD loop comps. Current JP, she is still important in starting OD loop comps, but being paired with Yuina SS4 (unison), definitely makes her much stronger. | ||||||
589 | Matsuchiro | Anachronies/ Divergence | Common Skill | ||||||||||
590 | Matsuchiro | Arts Battle/ Dungeon | Baseline | ||||||||||
591 | Default | SS1 | Defender | Clock Tower (Hell) | All Style LB 1 | ||||||||
592 | Blunt | Dark | Seraph Skirmish Simulation | All Style LB3 | |||||||||
593 |  | Chiroru Matsuoka | Recommended SS1 | Score Attack | Master Skill | Defense Buffer (Party, Condition Light) DP Recovery Per Turn (Party, Condition Light) Charge (Party) Attack Debuff (ST) | Main DMG (AoE) Crit Rate Buffer (Self) OD Generator (AoE) Defense UP (Self) Taunt Defense UP (Self) Funnel (5 Hit count x 10% Potency, Self) | Chiroru SS2 is a defender with defense buffs and DP recovery/turn for all light allies. Her EX skill also provides charge. She is not very strong as she is tied to only healing and defense buffing light allies only. It doesn't help that light is currently the weakest element currently. A conditional healer with no offensive boost, makes her an unnecessary style that I would fully skip out on. | |||||
594 | Matsuchiro | Anachronies/ Divergence | Common Skill | ||||||||||
595 | Matsuchiro | Arts Battle/ Dungeon | Baseline | ||||||||||
596 | Casual | SS2 | Defender | Clock Tower (Hell) | All Style LB 1 | ||||||||
597 | Blunt | Light | Seraph Skirmish Simulation | All Style LB3 | |||||||||
598 |  | Inori Natsume | Recommended SS2 | Score Attack | Master Skill | Main DMG (ST) Skill Enhancer (Self) | Charge (Self) SP Battery (+5, Self when a 20+ SP) Crit Rate Buffer (Self) | Inori SS1 is a strong single target dark slash dmg dealer. She was strong on her release, and continues to see use in single target dark teams. It is recommended for her to bring the SS2 common skill to allow her to buff her own charge. This isn't required, but it is highly recommended to have as it improves her EX skill. There isn't much to say about Inori as she is straight forward with decent hit count and deals decent dmg. Sadly, the single target dark dmg dealers have high competition (Adel 3 / Chie 2 / Ruka 4), leaving little place to shine. Even if she is outclassed by a good handful of dmg dealers, she will get the job done. | |||||
599 | Inorin | Anachronies/ Divergence | Common Skill | ||||||||||
600 | Inorin | Arts Battle/ Dungeon | Baseline | ||||||||||
601 | Default | SS1 | Attacker | Clock Tower (Hell) | All Style LB 1 | ||||||||
602 | Slash | Dark | Seraph Skirmish Simulation | All Style LB3 | |||||||||
603 |  | Inori Natsume | Score Attack | Master Skill | Main DMG (AoE) Crit DMG Buffer (Self) 400% Weakness DMG Guaranteed Crit Strike Charge (Self) Crit Rate Buffer (Self) | Charge (Self) SP Battery (+5, Self when at 20+SP) | From Zero to Hero, Inori SS2 made it. Her JP release was a laughing stock of late 2023 dmg dealer releases. Her crazy 18 cost SP and non-elemental dmg in an elemental meta made her completely obsolete (thanks null resist). Most people in JP said that her only use was to use her common skill on her SS1. Come 8ish months later, she is now the AoE meta after they provided her with a buff. She now has piercing crit and follows the Irene Meta. As an Attacker, she deal more dmg to HP than Irene SS1 does, but takes longer to wind up. She is still not always used, but most people are low budget and have her, use her on the daily as she is their ticket on reaching 1 million score in Score Attack. Due to her high SP costs, she isn't commonly seen for Simulation Skirmish. | ||||||
604 | Inorin | Anachronies/ Divergence | Common Skill | ||||||||||
605 | Inorin | Arts Battle/ Dungeon | Baseline | ||||||||||
606 | Butterfly | SS2 | Attacker | Clock Tower (Hell) | All Style LB 1 | ||||||||
607 | Slash | Null (Slash) | Seraph Skirmish Simulation | All Style LB3 | |||||||||
608 |  | Inori Natsume | Score Attack | Master Skill | Increase Destruction Rate Charge (Self) SP Battery (+5, Self when at 20+SP) | Charge (Self) Crit Rate Buffer (Self) | Inori SS3 is an interesting style. She consumes all of her SP to hit 8 times and provide a decent amount of DR (ST). Her dmg is somewhat servicable, but the main point is that she can spam her EX multiple turns in a row if she doesn't care about DMG. If she has the charge buff (which she can give herself) she can double her DR rate. After the introduction of Ruka SS5, she does an incredibly good job building OD and DR just by spamming her EX 3 turns in a row with Ruka SS5's funnel ability. | ||||||
609 | Inorin | Anachronies/ Divergence | Common Skill | ||||||||||
610 | Inorin | Arts Battle/ Dungeon | Baseline | ||||||||||
611 | High School | SS3 | Blaster | Clock Tower (Hell) | All Style LB 1 | ||||||||
612 | Slash | Thunder | Seraph Skirmish Simulation | All Style LB3 | |||||||||
613 |  | Maki Kurosawa | Score Attack | Master Skill | Incease Destruction Rate (ST, Condition Charge) Fragile (ST) Defense Debuff (ST) Limit Break 3 Passive: Funnel (3 Hit Count x 40% Potency if start battle in VG) | Charge (Self) Skill Enhance Buffer (Small, Self) | Maki SS1 was and still is the queen of dungeon farming, but she requires limit break 3. With her skill upgrade through the tower, she is now a blaster that is also doubled to be an incredible debuffer. She even debuffs better than some debuffers out there. Before her upgrade her EX skill would only increase DR and provide fragile debuff. After her tower upgrade, she will not only increase DR, she will also debuff fragile AND defense down (ST) for 2 TURNS. This makes her as strong of a debuffer as Myaa SS2. Her main issues are that she is not a debuffer and does not have access to debuff hoju (tears) and that her EX skill costs 14 SP without a method to decrease the cost. For dungeon / arts battle farming, her limit break 3 will provide her with a strong funnel at the start of every battle. Her AoE common skill will blow up any mob allowing you to farm dungeon without spamming EX skills. | ||||||
614 | Makki | Anachronies/ Divergence | Common Skill | ||||||||||
615 | Makkie | Arts Battle/ Dungeon | Baseline | ||||||||||
616 | Default | SS1 | Blaster | Clock Tower (Hell) | All Style LB 1 | ||||||||
617 | Blunt | Dark | Seraph Skirmish Simulation | All Style LB3 | |||||||||
618 |  | Maki Kurosawa | Score Attack | Master Skill | Defense Debuff (ST) DP Defense Debuff (ST) Thunder Defense Debuff (ST) Charge (Self) Skill Enhance Buffer (Small, Self) SP Battery (+1 SP/turn, Self, Condition Charge Buff) | Incease Destruction Rate (ST, Condition Charge) Fragile (ST) Defense Debuff (ST) | Maki SS2 looks good or decent on paper until you find out that her EX skill costs 18 SP and that she is Thunder element. Thunder element already have crazy strong supports, making Maki SS2 not as important. As a breaker, she does her job by breaking due to her high potency and debuffs she provides before dealing dmg, but her set up and costs are much too high. WFS added a +1 SP if she has charge as a LB0 passive, but even with it, she feels incredibly terrible to use compared to meta thunder picks. Her Skill provides def down, Thunder defense down, and DP defense down for 2 turns. This ensures that she will break nearly any enemy she decided to hit. With her SS1 generlized, you can make her act as your breaker and debuffer on paper with a wide variety of choices on combinations of debuffs, but top meta Thunder supports already have those covered. Her main issue are her SP costs, if she were to have normal 13-14 SP costs on her EX skill, I'm sure she would have been a decently valuable asset to have on a team. | ||||||
619 | Makki | Anachronies/ Divergence | Common Skill | ||||||||||
620 | Makkie | Arts Battle/ Dungeon | Baseline | ||||||||||
621 | Biker | SS2 | Breaker | Clock Tower (Hell) | All Style LB 1 | ||||||||
622 | Blunt | Thunder | Seraph Skirmish Simulation | All Style LB3 | |||||||||
623 |  | Carole Reaper | Score Attack | Master Skill | Main DMG (AoE) Skill Enhancer (Small, Self) Thunder Skill Enhancer (Small, Self) | DP Recovery/Turn (VG) | Carole SS1 is a Thunder Aoe Dmg dealer. As a 31X member, she gets the super power of being able to use her EX and go into debt. Her Dmg even after her buffs (not tower upgrade) is still pretty mediocre and her ability to support her team or deal dmg is lacking. | ||||||
624 | Anachronies/ Divergence | Common Skill | |||||||||||
625 | Carole | Arts Battle/ Dungeon | Baseline | ||||||||||
626 | Default | SS1 | Attacker | Clock Tower (Hell) | All Style LB 1 | ||||||||
627 | Slash | Thunder | Seraph Skirmish Simulation | All Style LB3 | |||||||||
628 |  | Carole Reaper | Score Attack | Master Skill | DP Recovery (Party) Skill Enhancer (Large, VG, Condition Fire) Funnel (5 Hit Count x 10% Potency, VG, Condition Fire) DP Recovery/Turn (VG) | Main DMG (AoE) Skill Enhancer (Small, Self) Thunder Skill Enhancer (Small, Self) | Carole SS2 is a healer support for fire teams. She is incredibly strong and maybe one of the top healers in the game. I don't own her, so I cannot report how useful she really is compared to other fire supports. Her EX skill provides a team wide heal and vanguard only large skill enhance and funnel (5x10%) for fire elemental styles. Though her EX skill is bloated with a lot of good effects, her main issue comes from her being innately a healer, meaning her enhance buffs are weaker than a buffer's as well as her ability only working fire styles. Because she can bring funnel, she replaces Yunyun SS1 from fire comps entirely. Her high SP costs are a mild concern because she is a 31X member, meaning that she can go into negative SP. Overall, I believe her kit is strong and with the right fire supports, she can shine. In the current meta, she most likely works better with fast fire comps, like Adel SS4 and Iroha SS2 over the old fire supports. This also means that investment in your fire dmg dealer will need to be high as the buffs are not as potent. | ||||||
629 | Anachronies/ Divergence | Common Skill | |||||||||||
630 | Carole | Arts Battle/ Dungeon | Baseline | ||||||||||
631 | Date Night | SS2 | Healer | Clock Tower (Hell) | All Style LB 1 | ||||||||
632 | Slash | Fire | Seraph Skirmish Simulation | All Style LB3 | |||||||||
633 |  | Yingxia Li | Recommended SS3 | Score Attack | Master Skill | Skill Enhancer (Large, ST) Funnel (5 Hit Count x 10% Potency, ST) Skill Enhancer (Large, VG) | Defense Debuff (ST/AoE) Skill Enhancer (Small, VG) | Yunyun SS1 is the tried and true offensive support of general supports. If you don't have her, you need this massive QoL for gameplay. She provides large skill enhance, funnel (5hit x 10% potency) to a single target on her EX skill. From her S style, she gains the ability to debuff defense (ST) and from her SS3 the defense debuff is AoE. She is the first support that can provide funnel buff to her allies. This ability is still rare on supports in JP. Her main perk lies in her funnel having the ability to be cast on anyone, regardless of element. Currently in JP, each element has 1-2 support who can provide the funnel buff, but they can only provide it to a certain element. Yunyun SS1 and Ruka SS5 are the only ones who can provide this buff to anyone, regardless of element and placement within the party. She allows anyone from being a mediocre dmg dealer to a killer. 1 hit EX skill? No problem, yunyun 1 will allow them to hit HP after breaking DP. Need your blaster to increase DR by a lot? No problem, yunyun is here. Need 2 extra hit count compared to auto attacking to reach next OD and you still got 1 use on Yunyun EX skill? No problem. Without Yunyun SS1 EX skill generalized, all other Yunyun styles will not be as powerful. As a style that came out back in Jan 2023 of JP, she was finally powercrept in Dec 2025 by Ruka SS5 who also provides a funnel, but it is stronger. | |||||
634 | Yunyun | Anachronies/ Divergence | Common Skill | ||||||||||
635 | Ying Ying | Arts Battle/ Dungeon | Baseline | ||||||||||
636 | Default | SS1 | Buffer | Clock Tower (Hell) | All Style LB 1 | ||||||||
637 | Slash | Null (Slash) | Seraph Skirmish Simulation | All Style LB3 | |||||||||
638 |  | Yingxia Li | Highly Recommended SS1 | Score Attack | Master Skill | Thunder Crit Rate Buffer (Party) Thunder Crit DMG Buffer (45%, Party) | Skill Enhancer (Large, ST) Funnel (5 Hit Count x 10% Potency, ST) Skill Enhancer (Large, VG) Defense Debuff (ST/AoE) Skill Enhancer (Small, VG) | Yunyun SS2 is a staple in thunder comps. Unfortunately, she is basically a budget Yotsuha SS1 for thunder teams. Though she can buff all her allies with Thunder Crit rate and Thunder Crit dmg, she does not provide Thunder skill enhance which is very needed for a thunder comp. Without Yunyun SS1, she feels lack luster, and with it, she feels like a beast of a Thunder support. Her main issue ends up being that it costs so much SP to use her. LB1 is a must requirement for the +1 SP in the frontline to make full use of her. What is slightly sad to note is that shecame kind of feel like only a side grade to Yunyun SS1 if Yunyun SS1 is LB3 due to the LB3 passive being so potent, but SS2 is still slightly stronger, but requires way more turns and SP. The neat point of Yunyun SS2 though is that she will provide all party members with Thunder crit chance, so anyone can be used to break the boss and not just the main dmg dealer, which can be important at times. | |||||
639 | Yunyun | Anachronies/ Divergence | Common Skill | ||||||||||
640 | Ying Ying | Arts Battle/ Dungeon | Baseline | ||||||||||
641 | Noble | SS2 | Buffer | Clock Tower (Hell) | All Style LB 1 | ||||||||
642 | Slash | Thunder | Seraph Skirmish Simulation | All Style LB3 | |||||||||
643 |  | Yingxia Li | Required SS1 | Score Attack | Master Skill | HP Ratio DMG (1 mill DMG cap) Defense Debuff (ST, Condition negative SP) Defense Debuff (AoE) | Skill Enhancer (Large, ST) Funnel (5 Hit Count x 10% Potency, ST) Skill Enhancer (Large, VG) Defense Debuff (ST) Skill Enhancer (Small, VG) | Yunyun SS3 is a rarely seen Yunyun, but had her place. When both Yunyun SS1 and SS3 are LB1, it is better to use SS3 due to the passive from lb0. Outside of that, her main use is her EX skill being able to be used when her SP is 0. If your Yunyun SS1 is LB3, you can pretend this one doesn't exist. Though she is better, she is only marginally better. | |||||
644 | Yunyun | Anachronies/ Divergence | Common Skill | ||||||||||
645 | Ying Ying | Arts Battle/ Dungeon | Baseline | ||||||||||
646 | Night Street | SS3 | Debuffer | Clock Tower (Hell) | All Style LB 1 | ||||||||
647 | Slash | Null (Slash) | Seraph Skirmish Simulation | All Style LB3 | |||||||||
648 |  | Irene Redmayne | Score Attack | Master Skill | Main DMG (AoE) 400% Weakness DMG Guaranteed Crit Strike Crit Rate Buffer (Self) Funnel (2 Hit Count x 40% Potency, Self) | Skill Enhancer (Small, Self) Crit DMG Buffer (30%, Self) | The once queen at her release, that dropped off the planet, that had her revenge arc. Irene SS1 is a potent AoE Pierce unit. Will update when I feel like it | ||||||
649 | Anachronies/ Divergence | Common Skill | |||||||||||
650 | Irene | Arts Battle/ Dungeon | Baseline | ||||||||||
651 | Default | SS1 | Breaker | Clock Tower (Hell) | All Style LB 1 | ||||||||
652 | Pierce | Null (Pierce) | Seraph Skirmish Simulation | All Style LB3 | |||||||||
653 |  | Irene Redmayne | Recommended SS1 | Score Attack | Master Skill | Main DMG (ST) Buff Dispeller (ST) 500% Weakness DMG Guaranteed Crit Strike Skill Enhancer (Small, Self) Crit DMG Buffer (30%, Self) | Main DMG (AoE) 400% Weakness DMG Guaranteed Crit Crit Rate Buffer (Self) Funnel (2 Hit Count x 40% Potency, Self) | ||||||
654 | Anachronies/ Divergence | Common Skill | |||||||||||
655 | Irene | Arts Battle/ Dungeon | Baseline | ||||||||||
656 | Kaito (Phantom) | SS2 | Breaker | Clock Tower (Hell) | All Style LB 1 | ||||||||
657 | Pierce | Null (Pierce) | Seraph Skirmish Simulation | All Style LB3 | |||||||||
658 |  | Vritika Balakrishnan | Score Attack | Master Skill | Attack Debuff (ST) Imprison (ST) Parameter Debuff (Small, ST) DP Recovery (Party) Defense Buffer (VG) | Attack Debuff (AoE) Taunt Defense Buffer (Self) | 10 hits is nice, but it is null. Debuffs to prevent skills and misfortune are also nice. Heals and debuffs are nice too, main issue? Her SP costs are WAY too expensive for how little they do. I like Vritika and I really wish they made her viable, but she really isn't and is makes me super sad. | ||||||
659 | Vuri-chan | Anachronies/ Divergence | Common Skill | ||||||||||
660 | V.B. | Arts Battle/ Dungeon | Baseline | ||||||||||
661 | Default | SS1 | Defender | Clock Tower (Hell) | All Style LB 1 | ||||||||
662 | Blunt | Null (Blunt) | Seraph Skirmish Simulation | All Style LB3 | |||||||||
663 |  | Vritika Balakrishnan | Score Attack | Master Skill | DP Recovery (Party) DP Overheal (150%) Debuff Guard (Party) | Attack Debuff (ST/AoE) Imprison (ST) Parameter Debuff (Small, ST) DP Recovery (Party) Defense Buffer (VG/Self) Taunt | Her EX animation is actually pretty good and she's cute, wish they made her good though. Outside of that rambling, it would be nice if she were useful because she only really contributes a debuff guard. | ||||||
664 | Vuri-chan | Anachronies/ Divergence | Common Skill | ||||||||||
665 | V.B. | Arts Battle/ Dungeon | Baseline | ||||||||||
666 | SS2 | Healer | Clock Tower (Hell) | All Style LB 1 | |||||||||
667 | Blunt | Null (Blunt) | Seraph Skirmish Simulation | All Style LB3 | |||||||||
668 |  | Maria de Angelis | Required (If not LB3) SS2 | Score Attack | Master Skill | Main DMG (Token, ST) | DP Recover/turn (VG) | Maria SS1 was the strongest DMG dealer at her release, but that was widely due to her LB3 passive matching with her token system (Start battle with 5 tokens). She was also the first Blunt Single Target Dmg dealer. Unfortunately, at lower Limit Breaks, she is kind of hard to use as it is difficult to increase her token count without endangering her. The other issue with the token system for Maria SS1 is that she takes an extremely long time building up for tokens, unlike future token styles. Maria sees incredibly low amounts of use in JP, but when she is used, her EX skill is typically generalized into her SS2. This is due to her SS2 passive that helps Maria build tokens faster. It still doesn't change her issue of needing high limit breaks for her own survival in the vanguard though. Maria's SS 2 common skill also fixes an issue for Maria as it compliments her passive. For more info please read Maria SS2. At LB3+, Maria can pull off some interesting turn one single target farm fights by having her buffed by Yunyun SS1 and Seika SS2, then firing off her EX skill right away. | |||||
669 | Maririn | Anachronies/ Divergence | Common Skill | ||||||||||
670 | Maririn | Arts Battle/ Dungeon | Baseline | ||||||||||
671 | Default | SS1 | Healer | Clock Tower (Hell) | All Style LB 1 | ||||||||
672 | Blunt | Ice | Seraph Skirmish Simulation | All Style LB3 | |||||||||
673 |  | Maria de Angelis | Score Attack | Master Skill | Main DMG (Token, AoE) Attack Down Cleanse (Party) DP Recover/turn (VG) +1 Token when DP Recovered by Skill (Passive) | Main DMG (Token, ST) | Maria SS2 is a token AoE Thunder DMG dealer. Like Mona 2, they made it much easier to increase her tokens. If your Maria SS1 isn't LB3 yet, you might enjoy using her EX on her SS2. A new passive will allow her to gain tokens every time she heals someone. Her Common skill provides a heal per turn to the VG. This allows Maria to gain many tokens really fast. She isn't actually used often because it is easier to use other options, even if her dmg is one of the higher potencies. Her main niche role is that her EX skill will cleanse the atk down debuff. This makes her the only one in the roster who can remove the debuff. | ||||||
674 | Maririn | Anachronies/ Divergence | Common Skill | ||||||||||
675 | Maririn | Arts Battle/ Dungeon | Baseline | ||||||||||
676 | Fantasy Knight | SS2 | Healer | Clock Tower (Hell) | All Style LB 1 | ||||||||
677 | Blunt | Thunder | Seraph Skirmish Simulation | All Style LB3 | |||||||||
678 |  | Charlotta Skopovskaya | Score Attack | Master Skill | Defense Debuff (AoE) Dark Defense Debuff (AoE) Confusion (ST) | Increase Destruction Rate Thunder Defense Debuff (AoE) Skill Enhance (Small, ST) Dark Skill Enhance (Small, ST) | Sharo SS1 is an AoE debuffer for Def down and Dark Def down. Her dmg numbers are incredibly low and her SS1 has always been very rarely used. Her EX can be generalized to use on SS2 or 3 though and much more commonly seen to be used on her SS3 to make her a solid dark support. | ||||||
679 | Sharo | Anachronies/ Divergence | Common Skill | ||||||||||
680 | Charl | Arts Battle/ Dungeon | Baseline | ||||||||||
681 | Default | SS1 | Debuffer | Clock Tower (Hell) | All Style LB 1 | ||||||||
682 | Pierce | Dark | Seraph Skirmish Simulation | All Style LB3 | |||||||||
683 |  | Charlotta Skopovskaya | Score Attack | Master Skill | Thunder Resistance Overwrite (AoE) Apply Thunder Smallness (AoE) Fragile (AoE) Thunder Defense Debuff (AoE) | Increase Destruction Rate Defense Debuff (AoE) Dark Defense Debuff (AoE) Confusion (ST) | Sharo SS2 is well known as the first resist overwriter / weakness applier. Her kit is solid and probably one of the best version of this. Overwrite / weakness apply with a fragile debuff and a thunder def down? She fills so many boxes a thunder team needs all by herself. Even her S style can provide decent DR after using up all of her SP. This isn't much of an issue as it takes only inital 5 SP when using OD3 to use all of her skills for debuffing. She is incredibly potent and a must have for any thunder team, especially if using her to provide the thunder weakness application. | ||||||
684 | Sharo | Anachronies/ Divergence | Common Skill | ||||||||||
685 | Charl | Arts Battle/ Dungeon | Baseline | ||||||||||
686 | Vampire | SS2 | Debuffer | Clock Tower (Hell) | All Style LB 1 | ||||||||
687 | Pierce | Thunder | Seraph Skirmish Simulation | All Style LB3 | |||||||||
688 |  | Charlotta Skopovskaya | Recommended SS1 | Score Attack | Master Skill | Oath Buffer (Permanent Enhance, Def Up, Shared +1 SP VG bonus) Skill Enhance (Small, ST) Dark Skill Enhance (Small, ST) | Increase Destruction Rate Defense Debuff (AoE) Dark Defense Debuff (AoE) Confusion (ST) | Sharo SS3 is a strong dark support that is right under the meta dark supports. She can do everything but crit related buffs, yet the potency is much too low. Her "Oath" buff is unique providing a mini battery, special enhance, and defense to her and the one she choses to be under "Oath" for her. Her normal skill provides dark and generic enhance to 1 ally, but it is the small version. Overall solid kit, but not amazing. | |||||
689 | Sharo | Anachronies/ Divergence | Common Skill | ||||||||||
690 | Charl | Arts Battle/ Dungeon | Baseline | ||||||||||
691 | Bride | SS3 | Buffer | Clock Tower (Hell) | All Style LB 1 | ||||||||
692 | Pierce | Dark | Seraph Skirmish Simulation | All Style LB3 | |||||||||
693 |  | Kanade Tachibana | Score Attack | Master Skill | Main DMG (ST) Minds eye (Self) | ||||||||
694 | Anachronies/ Divergence | Common Skill | |||||||||||
695 | Arts Battle/ Dungeon | Baseline | |||||||||||
696 | Default | SS1 | Attacker | Clock Tower (Hell) | All Style LB 1 | ||||||||
697 | Slash | Light | Seraph Skirmish Simulation | All Style LB3 | |||||||||
698 |  | Kanade Tachibana | Recommended SS1 | Score Attack | Master Skill | Main DMG (ST) DP recovery (Self) DP Overheal (150% Self) | Minds eye (Self) | ||||||
699 | Anachronies/ Divergence | Common Skill | |||||||||||
700 | Arts Battle/ Dungeon | Baseline | |||||||||||
701 | Dress | SS2 | Attacker | Clock Tower (Hell) | All Style LB 1 | ||||||||
702 | Slash | Ice | Seraph Skirmish Simulation | All Style LB3 | |||||||||
703 |  | Yuri Nakamura | Score Attack | Master Skill | Main DMG (ST) Increase Destruction Rate | ||||||||
704 | Anachronies/ Divergence | Common Skill | |||||||||||
705 | Arts Battle/ Dungeon | Baseline | |||||||||||
706 | Default | SS1 | Blaster | Clock Tower (Hell) | All Style LB 1 | ||||||||
707 | Pierce | Fire | Seraph Skirmish Simulation | All Style LB3 | |||||||||
708 |  | Yuri Nakamura | Score Attack | Master Skill | Super Breaker (Ice) SP Battery (+8, Self when break) | Main DMG (ST) Increase Destruction Rate | |||||||
709 | Anachronies/ Divergence | Common Skill | |||||||||||
710 | Arts Battle/ Dungeon | Baseline | |||||||||||
711 | High School | SS2 | Breaker | Clock Tower (Hell) | All Style LB 1 | ||||||||
712 | Pierce | Ice | Seraph Skirmish Simulation | All Style LB3 | |||||||||
713 |  | Miyuki Irie | Score Attack | Master Skill | DP Recovery (Party) Defense Buffer (Party) | ||||||||
714 | Anachronies/ Divergence | Common Skill | |||||||||||
715 | Arts Battle/ Dungeon | Baseline | |||||||||||
716 | Default | SS1 | Defender | Clock Tower (Hell) | All Style LB 1 | ||||||||
717 | Blunt | Ice | Seraph Skirmish Simulation | All Style LB3 | |||||||||
718 |  | Yui Yoshioka | Score Attack | Master Skill | |||||||||
719 | Anachronies/ Divergence | Common Skill | |||||||||||
720 | Arts Battle/ Dungeon | Baseline | |||||||||||
721 | Default | SS1 | Buffer | Clock Tower (Hell) | All Style LB 1 | ||||||||
722 | Pierce | Ice | Seraph Skirmish Simulation | All Style LB3 | |||||||||
723 |  | Misami Iwasawa | Score Attack | Master Skill | |||||||||
724 | Anachronies/ Divergence | Common Skill | |||||||||||
725 | Arts Battle/ Dungeon | Baseline | |||||||||||
726 | Default | SS1 | Breaker | Clock Tower (Hell) | All Style LB 1 | ||||||||
727 | Slash | Ice | Seraph Skirmish Simulation | All Style LB3 | |||||||||
1 | Gear is an important aspect of HBR, but it is pretty straight forward. Gear provides stats and a mini passive. | ||||||||||||||||||||||||||||||
|---|---|---|---|---|---|---|---|---|---|---|---|---|---|---|---|---|---|---|---|---|---|---|---|---|---|---|---|---|---|---|---|
2 | |||||||||||||||||||||||||||||||
3 | |||||||||||||||||||||||||||||||
4 | Gear | Pic | Description | ||||||||||||||||||||||||||||
5 | |||||||||||||||||||||||||||||||
6 | Ring |  | Rings increase the STR and DEX. These are offensive stats. Those in Tier 6 will provide a small elemental skill enhance boost of 5-10% | ||||||||||||||||||||||||||||
7 | |||||||||||||||||||||||||||||||
8 | Earrings |  | Earrings increase the maximum DP and your INT. Higher maximum DP means higher maximum shield. High INT will increase the power of your heals, defense breaks, and buffing potential. Earrings in Tier 6 have an added passive of increasing some sort of utility. | ||||||||||||||||||||||||||||
9 | |||||||||||||||||||||||||||||||
10 | Bracelet |  | Bracelets increase the VIT and SPR stat. These are defensive stats. Note that VIT and SPR ARE NOT the same as defense. Bracelets in Tier 6 will empower your auto attacks (if in Vanguard) to become a certain element. This can help bypass null resistance. | ||||||||||||||||||||||||||||
11 | |||||||||||||||||||||||||||||||
12 | Necklace |  | Necklaces increase first battle starting SP. SP are points needed to use skills. Those in Tier 6 will provide +1 elemental skill usage or increase LCK. LCK increases the potency of fragile debuff and slightly increases the chance to crit. | ||||||||||||||||||||||||||||
13 | |||||||||||||||||||||||||||||||
14 | Orb |  | Orbs are general skills that can be used by anyone. They are important to fill in holes in your line up, but are generally not cost efficient. There are 2 orbs that are constantly used in JP. | ||||||||||||||||||||||||||||
15 | |||||||||||||||||||||||||||||||
16 | Memento |  | Mementos. Unique equips for SS memorias. They can be collected from the Memory world, event shops, or from the cat shop (Ruka + Angel Beats). | ||||||||||||||||||||||||||||
17 | |||||||||||||||||||||||||||||||
18 | Boosters |  | Modules increase all stats but DP and HP. Each module has 1-4 chip slots. | ||||||||||||||||||||||||||||
19 | |||||||||||||||||||||||||||||||
20 | Chips |  | Chips increase specific stats, allowing for a little bit of customization if needed. | ||||||||||||||||||||||||||||
21 | |||||||||||||||||||||||||||||||
22 | Charms |  | Charms are the final piece of gear that is farmed. They provide stats depending on their color. There are charms for every stat except DP and HP | ||||||||||||||||||||||||||||
23 | |||||||||||||||||||||||||||||||
24 | |||||||||||||||||||||||||||||||
25 | Chapter 1-3 Progression: Boosters, Chips, and Momentos | Burning Questions | |||||||||||||||||||||||||||||
26 | |||||||||||||||||||||||||||||||
27 | |||||||||||||||||||||||||||||||
28 | Which boosters should I buy? | Which chips should I buy? | When Do Priorities of Boosters Change? | ||||||||||||||||||||||||||||
29 | |||||||||||||||||||||||||||||||
30 | Buy the boosters that give the most STR to the attacker class and the most DEX to breaker class. All other boosters should commit to VIT/SPR if you're not over leveled so your girls can survive. Priorities can change after beating chapter 3, but for now following this rule of thumb should help you get through the story (ch1-3) | Buy STR chips for attackers and DEX for your breakers. VIT/SPR should be bought for all your supports. | Priorities change for Debuffers or certain dmg dealers that scale off of INT or VIT (it will note in the EX skill description). For specific dmg dealers, place a booster that will maximize their dmg. As a rule of thumb: Debuffers will continue to commit to a VIT/SPR build until LB2+, ideally LB3+. Otherwise, keep all debuffers VIT/SPR as well. The debuffer needs to at least reach enemy border before committing any resources to INT/LCK. | ||||||||||||||||||||||||||||
31 | |||||||||||||||||||||||||||||||
32 | |||||||||||||||||||||||||||||||
33 | Where do I get Mementos? | ||||||||||||||||||||||||||||||
34 | |||||||||||||||||||||||||||||||
35 | You can get mementos from the memory world by doing memory stories with characters. It costs 20 memory fragments. You can get memory fragments from clearing flashback battles. There are a few you must buy from event stores corresponding to the event shop paired with the memoria. Angel beats and Ruka will be bought from the Cat shop. | ||||||||||||||||||||||||||||||
36 | What Boosters/Chips are in future Chapter? | ||||||||||||||||||||||||||||||
37 | |||||||||||||||||||||||||||||||
38 | Boosters | ||||||||||||||||||||||||||||||
39 | Chips | ||||||||||||||||||||||||||||||
40 | |||||||||||||||||||||||||||||||
41 | Boosters | Stats | Slots | When | Price | Chips | Stats | Where/When | Price | ||||||||||||||||||||||
42 | |||||||||||||||||||||||||||||||
43 | Dreadnaught | STR +40; Other+36 | 4 | Ch.4 Day 1 | 420,000 | DP Atk Chip IV | DEX+6 | Ch.4.1 Day 5 | 7300 | ||||||||||||||||||||||
44 | Wind Rider | DEX +40; Other+36 | 4 | Ch.4 Day 1 | 420,000 | HP Atk Chip IV | STR+6 | Ch.4.1 Day 5 | 7300 | ||||||||||||||||||||||
45 | Stalwart | VIT/SPR +40; Other+35 | 4 | Ch.4 Day 1 | 430,000 | Heal Chip | INT+6 | Ch.4.1 Day 5 | 7300 | ||||||||||||||||||||||
46 | Automaton | INT +42; Other+35 | 4 | Ch.4 Day 1 | 410,000 | Deflector Chip | DP+100 | Ch.4.1 Day 1 | 7100 | ||||||||||||||||||||||
47 | Muramasa | STR +57; Other+19 | 0 | Ch.3 Day 19 | 280,000 | Aid Chip | DP+50; INT+4 | Ch.4.1 Day 1 | 7100 | ||||||||||||||||||||||
48 | Full Bloom | INT +33; Other +29 | 4 | Ch.3 Day 19 | 185,000 | Life Chip | VIT+4/SPR+3 | Ch.4.1 Day 1 | 7100 | ||||||||||||||||||||||
49 | Unbroken | VIT/SPR +31; Other +29 | 4 | Ch.3 Day 19 | 185,000 | Crit IV | Crit rat 0.6% | Ch.3 Day 19 | 1100 | ||||||||||||||||||||||
50 | Spider u | DEX +29; Other +24 | 4 | Ch.3 Day 10 | 125,000 | DP ATK III | DEX+5 | Ch.3 Day 19 | 3000 | ||||||||||||||||||||||
51 | Juggernaut | STR +29; Other +24 | 4 | Ch.3 Day 10 | 125,000 | HP ATK III | STR+5 | Ch.3 Day 19 | 3000 | ||||||||||||||||||||||
52 | Introspection | All stat +24 | 4 | Ch.2 Day 23 | 90,000 | Heal III | INT+5 | Ch.3 Day 10 | 3000 | ||||||||||||||||||||||
53 | Blue Halow | INT +25; Other +21 | 3 | Ch.2 Day 18 | 45,000 | Deflect III | DP+50 | Ch.3 Day 10 | 3000 | ||||||||||||||||||||||
54 | Believe Wand | VIT/SPR +24; Other +21 | 3 | Ch.2 Day 18 | 32,000 | Aid III | DP+30; INT+3 | Ch.3 Day 3 | 2500 | ||||||||||||||||||||||
55 | Butterfly | DEX +21; Other +18 | 3 | Ch.2 Day 11 | 13,000 | Life III | VIT/SPR+3 | Ch.3 Day 3 | 2500 | ||||||||||||||||||||||
56 | Warfang | STR +21; Other +18 | 3 | Ch.2 Day 11 | 13,000 | ATK III | STR/DEX+3 | Ch.3 Day 3 | 2500 | ||||||||||||||||||||||
57 | Trigger box | All stat +16 | 3 | Ch.2 Day 2 | 4,800 | DP ATK II | DEX+4 | Ch.2 Day 18 | 2100 | ||||||||||||||||||||||
58 | Earlier boosters not added. | HP ATK II | STR+4 | Ch.2 Day 18 | 2100 | ||||||||||||||||||||||||||
59 | Deflect II | DP+40 | Ch.2 Day 11 | 1800 | |||||||||||||||||||||||||||
60 | Aid II | DP+40; INT+2 | Ch.2 Day 2 | 1200 | |||||||||||||||||||||||||||
61 | Life II | VIT/SPR+2 | Ch.2 Day 2 | 1200 | |||||||||||||||||||||||||||
62 | ATK II | STR/DEX+1 | Ch.2 Day 2 | 1200 | |||||||||||||||||||||||||||
63 | Earlier chips not added. A few chips might be missing. | ||||||||||||||||||||||||||||||
64 | |||||||||||||||||||||||||||||||
65 | |||||||||||||||||||||||||||||||
66 | |||||||||||||||||||||||||||||||
67 | |||||||||||||||||||||||||||||||
68 | Early Game Progression: Earrings and Bracelets | ||||||||||||||||||||||||||||||
69 | |||||||||||||||||||||||||||||||
70 | |||||||||||||||||||||||||||||||
71 | What gear should I equip? | When do I start farming for 6* elemental rings? | |||||||||||||||||||||||||||||
72 | |||||||||||||||||||||||||||||||
73 | Early in the game, auto place gear. Until Gem Flashbacks open to farm 6* gear (Chapter 3, day 20?), there is little reason to care too much about what gear you are wearing. Earrings, bracelets, and necklaces should be prioritized to anyone who will be in the vanguard the longest. Rings should be prioritized to your main dmg dealer. The stats provided do not matter early in the game. It is advisable to provide everyone with the earring that provides the most amount of DP as there is no other way to increase your DP. | Whenever you can. Elemental rings are in dungeons that take dungeon tickets (or life stones). Rings are the only piece of gear found in dungeons. Rings don't require the same resource as Earrings/bracelets/necklaces. | |||||||||||||||||||||||||||||
74 | |||||||||||||||||||||||||||||||
75 | |||||||||||||||||||||||||||||||
76 | |||||||||||||||||||||||||||||||
77 | |||||||||||||||||||||||||||||||
78 | Where do I farm gear? | ||||||||||||||||||||||||||||||
79 | |||||||||||||||||||||||||||||||
80 | Early game gear farming has been streamlined to be farmable in "Flashback Battles". You will be spending a majority of your early life stones here to early quick character XP, memoria upgrade materials, and early game gear. There is no difference in gear aquired between each of the different "Flashback Battles", however the higher the stage level, the better the gear that drops. Once "Gem Flashback" becomes available, you will be able to farm the gear mats to craft the 6* gear at the cat. Each gear piece will cost gems and GP to craft. The stats and/or the potency of the passive are randomly rolled. | ||||||||||||||||||||||||||||||
81 | |||||||||||||||||||||||||||||||
82 | |||||||||||||||||||||||||||||||
83 | |||||||||||||||||||||||||||||||
84 | |||||||||||||||||||||||||||||||
85 | |||||||||||||||||||||||||||||||
86 | I can now farm Gem Prism Battles, which piece of gear should I focus on first? | How long will it take to craft 6 1200DP earrings? | |||||||||||||||||||||||||||||
87 | |||||||||||||||||||||||||||||||
88 | The first piece of gear that should be crafted are the earrings. DP is everything in HBR, at least our squad's DP that is. This is the primary method to increase maximum DP. Other rare methods only provide minor increases that are generally not worth it. The goal early on is to craft 6 different earring with 1200 DP. The passive and the INT doesn't matter as DP is the most important stat for survival. Once 6 900-1200DP earrings have been crafted it is advisable to start crafting bracelets as they will further bolster your squad's ability to take dmg. Bracelets are advisable to be at least +38VIT/38SPR. Necklaces will be crafted last. The reason necklaces are last priority is that the 5* necklace "Fateful Chain" already provides the most important stat line (+3 SP in first battle) while the 6* necklace only adds a passive or LCK. | This is all luck dependent. There is a 1/9 chance that the earring you craft is 1200DP, that means an average of 54 earring crafts to get 6 of them. Each run of the highest tier of gem flashback provides 1 diamond (5 diamond per earring). For a total of 250+ runs of gem flashbacks. | |||||||||||||||||||||||||||||
89 | |||||||||||||||||||||||||||||||
90 | |||||||||||||||||||||||||||||||
91 | |||||||||||||||||||||||||||||||
92 | |||||||||||||||||||||||||||||||
93 | Why do I only need a set of 6 gear pieces? Don't I have more characters? | ||||||||||||||||||||||||||||||
94 | Does it matter which earring I craft early game? | ||||||||||||||||||||||||||||||
95 | Gear is not tied to a character. It can be moved around for free. Each Squad preset will save the gear on the character on that squad preset only. | ||||||||||||||||||||||||||||||
96 | In the beginning, which earring you craft does not matter because DP is the most important thing for survival. Once you have 6 earrings with 1200 DP it is time to move on to craft Bracelets. | ||||||||||||||||||||||||||||||
97 | |||||||||||||||||||||||||||||||
98 | |||||||||||||||||||||||||||||||
99 | What does +1 to +6 mean? | My gear has these "?" should I open these substats right away? | |||||||||||||||||||||||||||||
100 | |||||||||||||||||||||||||||||||
101 | The number is the gear rating. It actually ranges from 0 to 6. +6 would mean that all stats and passive potency are at the maximum value. +0 would mean that all stats and passive potency are at the lowest or close to the lowest value. You can gauge relatively how good a piece of gear is with the gear rating, but it isn't a good source of measurement. The passive usually plays a huge amount into the gear score, in the early game is widely unimportant. It is more important to make sure you have the raw stats on a given piece of gear. Refer to the table below for how gear rating is added. | I recommend you DO NOT open the substats right away. You should wait for your first 1200 DP earring and open the substat slots on those earrings. There is very little reason to reroll the substats early on. | |||||||||||||||||||||||||||||
102 | |||||||||||||||||||||||||||||||
103 | |||||||||||||||||||||||||||||||
104 | |||||||||||||||||||||||||||||||
105 | |||||||||||||||||||||||||||||||
106 | Do bracelet colors matter? | Which bracelet is better? VIT 38/SPR 45 or 40/40? | |||||||||||||||||||||||||||||
107 | |||||||||||||||||||||||||||||||
108 | Yes. Bracelet colors will change the element type of your auto attacks. Bracelet colors will matter depending on the enemy. This can be important against enemies with resistances. If an enemy cancer is weak to fire, but resistant to slash. A slash user like Ruka can wear a red bracelet to change her auto attack to be fire. If the weakness to fire is strong enough, Ruka will still be able to increase the Overdrive bar every time she hits the enemy. Elemental attacks can also be resisted so be careful. Later in HBR there are buffers that will buff crit rate of a certain element. This can lead to your auto attacks consuming the elemental crit rate buff. For example, a fire crit rate buff will not be consumed if the squad member is using a blue bracelet to deal ice auto attacks. However, if the squad member were to wear a red bracelet to deal fire auto attacks it will consume the fire crit rate buff. This is important because you want to use crit buff on your EX skills and not auto attacks. | The 38/45 bracelet is better. Both VIT and SPR are used in the calculation for dmg taken from every source of dmg taken. Dmg taken depend more heavily on VIT or on SPR. It is rarely, if not ever, equal. If we do assume they are equal (most enemies will use attacks that depend heavily on either or). It is advisable to wear the bracelet that will increase the total defense stats the most. 38/45 bracelet will have 38+45=83 total defensive stats. A 40/40 bracelet will have 40+40=80 total defensive stats. | |||||||||||||||||||||||||||||
109 | |||||||||||||||||||||||||||||||
110 | |||||||||||||||||||||||||||||||
111 | |||||||||||||||||||||||||||||||
112 | |||||||||||||||||||||||||||||||
113 | |||||||||||||||||||||||||||||||
114 | |||||||||||||||||||||||||||||||
115 | Potential Rolls for 6* Accessories | Does the amount of Elemental Enhance of my ring matter? | |||||||||||||||||||||||||||||
116 | |||||||||||||||||||||||||||||||
117 | Rating | Earrings | Bracelet | Ring | Though 6% looks like a big difference. It is actually an extremely small difference. The 6% increase in elemental enhance actually adds additively to normal and elemental enhance buffs. Most of the time, you dmg dealer will be recieving about 120-360% skill enhancement. The 6% will be additive to the 120-360% skill enhancement (~1-2% dmg increase). The increase in dmg is almost negligible for most players. On JP I currently use 6-10% rings for the past 2 years without having any issue clearing all content and recieving max rewards. | ||||||||||||||||||||||||||
118 | Passive Potency | DP | INT | Basic Attack up | VIT | SPR | Rating | STR | DEX | Elemental Enhance | |||||||||||||||||||||
119 | |||||||||||||||||||||||||||||||
120 | +0 | 10% | 400 | 32 | 100% | 29 | 29 | +0 | 37 | 37 | 4% | ||||||||||||||||||||
121 | 450 | 33 | 30 | 30 | +1 | 5% | |||||||||||||||||||||||||
122 | 500 | 34 | 31 | 31 | +2 | 6% | |||||||||||||||||||||||||
123 | 550 | 35 | 32 | 32 | +3 | 8% | |||||||||||||||||||||||||
124 | +1 | 12% | 600 | 37 | 150% | 34 | 34 | +4 | 10% | Where do I get GP? | |||||||||||||||||||||
125 | 700 | 39 | 36 | 36 | There is a lower chance to get stronger rings. | ||||||||||||||||||||||||||
126 | 800 | 41 | 38 | 38 | Go to Auto arena / Hyperbolic time Arena / Gold Skitterer Hive (dungeon). Check Dungeon tab for Gold Skitterer information. | ||||||||||||||||||||||||||
127 | 900 | 43 | 40 | 40 | |||||||||||||||||||||||||||
128 | +2 | 15% | 1200 | 48 | 200% | 45 | 45 | ||||||||||||||||||||||||
129 | Credit to Kamen | For the Nerdy Advanced People | |||||||||||||||||||||||||||||
130 | The chances to get any of the rolls are equal. | Earring Passives | |||||||||||||||||||||||||||||
131 | |||||||||||||||||||||||||||||||
132 | Picture | Gear piece | Description | Role | Hit Count | HP / DP Earring | Devastating (Destruction) | ||||||||||||||||||||||||
133 | |||||||||||||||||||||||||||||||
134 |  | Devastating Earring | Increases Devastation rate (More hits has a bigger effect). This was mistranslated by Yostar. Increases by +10/12/15% based on roll. Also increases DP +400〜1200 / INT +32〜48 based on roll | Any in most circumstances except DPS. Important for blasters when 999% max. | +15% | +12% | +10% | +15% | +12% | +10% | |||||||||||||||||||||
135 | 10+ | 5.00% | 5.00% | 5.00% | 15.00% | 12.00% | 10.00% | ||||||||||||||||||||||||
136 | 9 | 6.11% | 5.78% | 5.56% | 13.89% | 11.22% | 9.45% | ||||||||||||||||||||||||
137 |  | Driving Earring | Increases OD buildup (More hits has a bigger effect). This was mistranslated by Yostar. Increases by +10/12/15% based on roll. Also increases DP +400〜1200 / INT +32〜48 based on roll | Any when OD is more important than raw damage numbers (e.g., for dungeon runs) | 8 | 7.22% | 6.56% | 6.11% | 12.78% | 10.45% | 8.89% | ||||||||||||||||||||
138 | 7 | 8.33% | 7.33% | 6.67% | 11.67% | 9.67% | 8.33% | ||||||||||||||||||||||||
139 | 6 | 9.45% | 8.11% | 7.22% | 10.56% | 8.89% | 7.78% | ||||||||||||||||||||||||
140 |  | Attacking Earring | Increases damage (Fewer hits has a bigger effect) to HP. Increases by +10/12/15% based on roll. Also increases DP +400〜1200 / INT +32〜48 based on roll | Attacker and Breaker (when resources are tight) | 5 | 10.56% | 8.89% | 7.78% | 9.45% | 8.11% | 7.22% | ||||||||||||||||||||
141 | 4 | 11.67% | 9.67% | 8.33% | 8.33% | 7.33% | 6.67% | ||||||||||||||||||||||||
142 | 3 | 12.78% | 10.45% | 8.89% | 7.22% | 6.56% | 6.11% | ||||||||||||||||||||||||
143 |  | Breaking Earring | Increases damage (Fewer hits has a bigger effect) to DP. Generally has the same effect as attack earrings, unless the wearer has a +DP skill. Increases by +10/12/15% based on roll. Also increases DP +400〜1200 / INT +32〜48 based on roll | Breaker | 2 | 13.89% | 11.22% | 9.45% | 6.11% | 5.78% | 5.56% | ||||||||||||||||||||
144 | 1 | 15.00% | 12.00% | 10.00% | 5.00% | 5.00% | 5.00% | ||||||||||||||||||||||||
145 | * Earring passive only affect skills. They do not affect auto attacks. | ||||||||||||||||||||||||||||||
146 | *HP dmg increasing earrings will effect dmg done to HP, regardless of modifier. | ||||||||||||||||||||||||||||||
147 | i.e. Sumomo SS1's "Electro-Triangulation Slash" has a DP modifier, but with HP earring, she will deal 15% more dmg to HP with the skill. | ||||||||||||||||||||||||||||||
148 | Mid Game Progression: Earrings (DR + OD) and Bracelets | ||||||||||||||||||||||||||||||
149 | |||||||||||||||||||||||||||||||
150 | |||||||||||||||||||||||||||||||
151 | I now have 6 1200DP Earrings and 6 38+/38+ Bracelets. What next? | Should I be selling my terrible accessories? | |||||||||||||||||||||||||||||
152 | |||||||||||||||||||||||||||||||
153 | Congrats. You have now entered mid game gear. At this point you will aim to balance between optimizing your Earrings and Optimizing your Bracelets. For earrings you should aim to get 6 Devastating (White) Earrings with 1200 DP. With 1 earring also providing 48 INT. You can nearly never go wrong with the Devastating earrings during boss fights. The Devastating earrings increase the rate of devastation the character can deal from their skills. This doesn't sound very attractive but all the other options provide less for your typical support since they don't deal damage or generate Overdrive. It is also highly advisable to have 6 Driving (pink) earrings as well. These earrings you will also want their passive to be 15% on top of the usual 1200 DP. Ideally you want at least 1 +6 driving earring rolled with x3 +3 INT and 1 +6 earring rolled with 3x +3 LCK. OD earrings will be important for Tear Dungeon and OD looping. It is also now time to start opening up Substat slots on bracelets and rerolling SubStats. | No. There is a method to feed bad gear into slightly better gear to raise their rating by +1. You can only feed the same type of gear to each other (i.e. feed ring to a ring). Each gear you feed with provide gear XP to increase the rating. If you increase a +5 to +6 it will have perfect main stat rolls. This method may take a large sum of GP, so becareful. If you're unlucky, luck will not get in your way. And no there is no "great" or "perfect" success. Sorry. :( | |||||||||||||||||||||||||||||
154 | |||||||||||||||||||||||||||||||
155 | |||||||||||||||||||||||||||||||
156 | |||||||||||||||||||||||||||||||
157 | |||||||||||||||||||||||||||||||
158 | |||||||||||||||||||||||||||||||
159 | Will Upgrading my gear make me lose my substat rolls? | ||||||||||||||||||||||||||||||
160 | |||||||||||||||||||||||||||||||
161 | Picture | Item | Role | Where do I get the unlocker and substat rollers? | Fear not, it will not. If you ended up opening up subslots into a 38/38 bracelet and upgrade the gear from +4 to +5, the subslots will stay the same regardless of the new rolls on the main stats line. | ||||||||||||||||||||||||||
162 |  | Aqua Amber | Unlock Substat | ||||||||||||||||||||||||||||
163 | There are many places to get both of these. Events and Score Attack milestones give a few of these. The main place to farm these are in dungeons. You can collect them in any dungeon. The Aqua Ambers are locked at the very end of most of the dungeons, while sunshines are located scatterred around. Depending on a run, you can get 1 aqua amber and ~25 sunshines from elemental ring dungeons and 2-5 Aqua Amber and 25+ Sunshine per end game Tear Dungeon (floor 40-50). | ||||||||||||||||||||||||||||||
164 |  | Sunshine | Rerolls Substat | ||||||||||||||||||||||||||||
165 | Will Upgrading my gear reroll my main stats? | ||||||||||||||||||||||||||||||
166 | |||||||||||||||||||||||||||||||
167 | No, if the gear already has 1200 DP, it will keep the DP when upgrading. A different stat will increase. | ||||||||||||||||||||||||||||||
168 | |||||||||||||||||||||||||||||||
169 | What are the potential substat rolls? Are the chances equal? | ||||||||||||||||||||||||||||||
170 | Table for XP to upgrade gear | ||||||||||||||||||||||||||||||
171 | Strength, Dexterity, Vitality, Spirit, Intelligence, Luck, HP, DP, and crit strike are all of the potential rolls. Each line can roll +1/+2/+3. HP and DP roll +10/+20/+30. Critical rate roll +0.2%. HP, DP, and crit strike are not good stat lines. All lines and rolls have an equal chance. It typically takes ~100 sunshine to find the stat you want. | ||||||||||||||||||||||||||||||
172 | Rating | Rings | Earrings | Bracelet | Charms | ||||||||||||||||||||||||||
173 | +1 | 1020 | 1150 | 1150 | 1300 | ||||||||||||||||||||||||||
174 | +2 | 2220 | 1750 | 1750 | 3350 | ||||||||||||||||||||||||||
175 | What stats should I be rolling for? | What else to farm? | +3 | 5520 | 2820 | 2820 | 10350 | ||||||||||||||||||||||||
176 | +4 | 16000 | 4750 | 4750 | 40000 | ||||||||||||||||||||||||||
177 | Number of sets | Stat rolls | Priority | Tears from dungeon to upgrade memoria boards. | +5 | 8450 | 8450 | ||||||||||||||||||||||||
178 | +6 | 15800 | 15800 | ||||||||||||||||||||||||||||
179 | 1 | Only +3 STR | High | ||||||||||||||||||||||||||||
180 | 1 | Only +3 DEX | Mid | Amount of XP gear provides | |||||||||||||||||||||||||||
181 | 1 | Only +3 VIT | Mid | ||||||||||||||||||||||||||||
182 | 3 | Only +3 INT | Low | Rating | Rings | Earrings | Bracelet | Orb Brace | Charms | ||||||||||||||||||||||
183 | 2 | Only +3 LCK | Low | +0 | 150 | 150 | 150 | 400 | 150 | ||||||||||||||||||||||
184 | Multiple | Mix of +3 VIT and SPR | Mid | +1 | 300 | 220 | 220 | 450 | 330 | ||||||||||||||||||||||
185 | +2 | 630 | 340 | 340 | 500 | 840 | |||||||||||||||||||||||||
186 | +3 | 1580 | 550 | 550 | 2600 | ||||||||||||||||||||||||||
187 | +4 | 4580 | 920 | 920 | 10000 | ||||||||||||||||||||||||||
188 | +5 | 1630 | 1630 | ||||||||||||||||||||||||||||
189 | Late Game Progression: Charms | +6 | 3070 | 3070 | |||||||||||||||||||||||||||
190 | |||||||||||||||||||||||||||||||
191 | |||||||||||||||||||||||||||||||
192 | Picture | Gear piece | Description | Where to farm Charms? | |||||||||||||||||||||||||||
193 | |||||||||||||||||||||||||||||||
194 | | Strength Charm | Strength charms increase strength by 6/9/12/14/15 | In Gem Flashbacks. Requires gear score of 170 to access. Gear Score is the total of +X on your gear for the whole squad. Boss is null resist, so make sure you bring elemental dmg dealers. | |||||||||||||||||||||||||||
195 | |||||||||||||||||||||||||||||||
196 |  | Dex Charm | Dex Charm increases dexterity by 6/9/12/14/15 | ||||||||||||||||||||||||||||
197 | |||||||||||||||||||||||||||||||
198 |  | Vitality Charm | Vitality Charm increases vitality by 6/9/12/14/15 | Which Charm should I focus on first? | |||||||||||||||||||||||||||
199 | |||||||||||||||||||||||||||||||
200 |  | Spirit Charm | Spirit Charms increases spirit by 6/9/12/14/15 | It is recommend to focus on the Vitality and Spirit charms first. Survival is key for many end game fights. Vitality and Spirit are important to survival. After finishing those two, you should focus on getting 1 14+ Str charm and 1 14+ Dex charm for your main dmg dealer. Lastly, work on INT and LCK charms, | |||||||||||||||||||||||||||
201 | |||||||||||||||||||||||||||||||
202 |  | Int Charm | Int charms increase intelligence by 6/9/12/14/15 | ||||||||||||||||||||||||||||
203 | |||||||||||||||||||||||||||||||
204 |  | Luck Charm | Luck charms increase luck by 6/9/12/14/15 | ||||||||||||||||||||||||||||
205 | |||||||||||||||||||||||||||||||
206 | |||||||||||||||||||||||||||||||
207 | End Game Progression: Orbs | ||||||||||||||||||||||||||||||
208 | |||||||||||||||||||||||||||||||
209 | |||||||||||||||||||||||||||||||
210 | Are orbs important? | Do orbs require a skill slot? | |||||||||||||||||||||||||||||
211 | Picture | Location | Gear piece | Description | Priority | ||||||||||||||||||||||||||
212 | Yes. Orbs provide orbs skills (generic skills) that any character can bring. To use the orb skill, a character must equip it. Orb skill can also be mastered by characters. After mastery, characters can use the skill without equipping the orb. | Yes, each orb skill, obtained or being progressed, require a separate skill slot to equip. | |||||||||||||||||||||||||||||
213 |  | Dormitory | Critical Orb | Critical Thinking: Increase self crit chance (40~70%, 3 use) | Depends | If you have a crit buffer, low priority | |||||||||||||||||||||||||
214 | |||||||||||||||||||||||||||||||
215 |  | Dormitory | Restoration Orb | Repair Ride: DP revive self (1 use) | Low | Orbs Provide Sub-stat slots? | |||||||||||||||||||||||||
216 | |||||||||||||||||||||||||||||||
217 |  | Dormitory | Impetus Orb | Drive gain: 6 SP gain 15% OD gauge (6 ticks, 1 use) | High | Which orbs skills are important? | No. | ||||||||||||||||||||||||
218 | |||||||||||||||||||||||||||||||
219 |  | Dormitory | Safeguard Orb | Protection: Increase self defense 1 turn (20~30%, 2 use) | Mid | The most important orb skill is Point Care (blue orb 2; Academy Building; Twins). All characters will want to eventually learn this skill. Drive gain (yellow orb 1) is the other orb you will most likely want to teach to all character, but it is not as important as Point Care . | How many of each orb can you obtain? | ||||||||||||||||||||||||
220 | |||||||||||||||||||||||||||||||
221 |  | Dormitory | Rage Orb | Attack Raise: Small enhance to self (50~65%, 2 use) | Low | 3 of Each Orb. | |||||||||||||||||||||||||
222 | |||||||||||||||||||||||||||||||
223 |  | Academy Building | Concentration Orb | Concentration: Increase self crit dmg (10~20%, 3 use) | Depends | Low priority if own crit dmg buffer; Potent with Seira 1's EX | |||||||||||||||||||||||||
224 | What is Orb Skill Mastery? | I didn't get Account XP when I cleared an Orb battle. | |||||||||||||||||||||||||||||
225 |  | Academy Building | Skillfullness Orb | Point care. Use 1 SP to gain 3 SP (net gain 2 SP, 1 use). | High | ||||||||||||||||||||||||||
226 | A character will 100% an Orb when mastering an orb skill. After mastering an orb skill, the character can use the orb skill on any of their memoria without the orb equipped. YAY. Now all members in your squad can have point care or drive gain or whatever. | Account XP isn't aquired from clearing orb battle. I'm still not lvl 100 in JP because I farm orb battles a lot. | |||||||||||||||||||||||||||||
227 |  | Academy Building | Aiding Orb | Self aid: Self DP recovery (2 use) | Low | ||||||||||||||||||||||||||
228 | |||||||||||||||||||||||||||||||
229 |  | Academy Building | Rending Orb | Softening: Reduce enemy Def (ST, 30~45%, 1 use) | Mid~High | Can turn any high INT character into a debuffer | |||||||||||||||||||||||||
230 | |||||||||||||||||||||||||||||||
231 |  | Academy Building | Dampening Orb | Weakening: Reduces enemy Atk (ST, 20-30%, 2 use) | Mid | ||||||||||||||||||||||||||
232 | How do you Master an Orb Skill? | How many runs does it take to master a skill orb? | |||||||||||||||||||||||||||||
233 |  | Flavor Street | Firebane Orb | Fire Graviton: Deal 10% of target's current HP if weak to fire. (500k limit) | Trash | ||||||||||||||||||||||||||
234 | Equipping the orb to the memoria while clearing the corrensponding orb battle will aquire mastery XP. 3 characters can work on orb skill mastery at a time (only get 3 max). Example: To teach Ruka Skillfullness Orb skill "Point Care", Ruka will need to equip the orb and be on the squad when killing the Blue orb boss (the twins). | If you are clearing the hardest orb skill (EN stage 3), it takes 28 runs to master a skill without rate up. | |||||||||||||||||||||||||||||
235 |  | Flavor Street | Icebane Orb | Ice Graviton: Deal 10% of target's current HP if weak to ice (500k limit) | Trash | ||||||||||||||||||||||||||
236 | |||||||||||||||||||||||||||||||
237 |  | Flavor Street | Thunderbane Orb | Thunder Graviton: Deal 10% of target's current HP if weak to thunder. (500k limit) | Trash | (*) JP occassionally has events to gain extra 50% more orb xp | |||||||||||||||||||||||||
238 | |||||||||||||||||||||||||||||||
239 |  | Flavor Street | Lightbane Orb | Light Graviton: Deal 10% of target's current HP if weak to light. (500k limit) | Trash | ||||||||||||||||||||||||||
240 | Situations for Orb Skills | ||||||||||||||||||||||||||||||
241 |  | Flavor Street | Dark Bane Orb | Dark Graviton: Deal 10% of target's current HP if weak to dark. (500k limit) | Trash | ||||||||||||||||||||||||||
242 | 1) Point Care: Increases a net +2 SP at the expense of not gaining 7.5% OD. Allows for faster clears for all content. 2) Any Orb Skill: Occassionally Dmg Dealers will need to be in the Vanguard. Orbs skills can be used so that Auto Attacks aren't used to consume Hit Count or Crit Buffs. 3) Critical Thinking: Provides Crit Rate. Important for those without a crit rate buffer or Seira SS1 is your only crit buffer. 3) Drive Gain: Debuffers and Dmg dealers commonly sit at 20 SP in the rearguard. Using 6 SP, 6 hits of OD (15%) can be obtained. Also useful for OD looping and certain strategies. 4) Weakening / Protection: Useful for reducing dmg of a major hit if Aoi SS1 or a defender with def up is not present. 5) Restoration: If 1 breaks in Score Attack (Challenge) and has ample SP, good use to bandage the issue. 6) Amon Skill orbs are not worth your time. There are very few cases for use in Clock Tower Hell mode (1 turning). | ||||||||||||||||||||||||||||||
243 | (*) Seraph Database Orb Numbers. | ||||||||||||||||||||||||||||||
244 | |||||||||||||||||||||||||||||||
245 | Orbs Bosses (SeraphDatabase Search: "<Element>01_0") | ||||||||||||||||||||||||||||||
246 | |||||||||||||||||||||||||||||||
247 | There are curently 3 types of Orb Bosses for each element: | ||||||||||||||||||||||||||||||
248 | Exowatcher - Single Target | ||||||||||||||||||||||||||||||
249 | Lectus Niel + Sinister Niel - 2 Target | ||||||||||||||||||||||||||||||
250 | Amon - Single Target <- All Orb skills are useless | ||||||||||||||||||||||||||||||
251 | |||||||||||||||||||||||||||||||
252 | Orb Boss Tips | ||||||||||||||||||||||||||||||
253 | |||||||||||||||||||||||||||||||
254 | 1) Enemies are Elemental Weak to a specific element. It is highly advisable to bring Elemental Weakness or overwrite/penetrating crit (JP only). 2) Defender Taunts that increase defense (i.e. Ichiko) is very useful here for protecting your squad from Single Target Dmg. | ||||||||||||||||||||||||||||||
255 | |||||||||||||||||||||||||||||||
256 | (*) Later, character mastery is introduced. Mastery XP can be gained through mastery orb skills | ||||||||||||||||||||||||||||||
257 | |||||||||||||||||||||||||||||||
258 | Orb boss lvl | Orb skill mastery per clear | |||||||||||||||||||||||||||||
259 | Important Orb Boss Information | ||||||||||||||||||||||||||||||
260 | EN (2 life/clear) | JP (1 life/clear) | |||||||||||||||||||||||||||||
261 | 1) Bracelets that are dropped for each specific boss are important in tackling the orb bosses. The bracelet may house terrible stats, but it comes with a passive to reduce dmg from the orb boss by 25/50/75%. These bracelets will be essential for all members in the party that will recieve dmg, until the available memoria are powerful enough. Rerolling sub-stats is wasteful, since the bracelets are not useful outside of that specific boss fight. 2) The Orb bosses start the battle with a field that will increase their dmg. If you place a different field, it will GREATLY cut their dmg. 3) When killing the twins, you need to kill both at the same time or else the last one alive will go into Frenzy mode and kill you fast. | 1 | 0.4% / character | 0.4% / character | |||||||||||||||||||||||||||
262 | 2 | 1.2% / character | 0.8% / character | ||||||||||||||||||||||||||||
263 | 3 | 3.6% / character | 2% / character | ||||||||||||||||||||||||||||
264 | 4 | 6% currency | |||||||||||||||||||||||||||||
265 | |||||||||||||||||||||||||||||||
266 | |||||||||||||||||||||||||||||||
267 | |||||||||||||||||||||||||||||||
268 | |||||||||||||||||||||||||||||||
269 | Field Setters | ||||||||||||||||||||||||||||||
270 | |||||||||||||||||||||||||||||||
271 | Fire | Ice | Thunder | Light | Dark | ||||||||||||||||||||||||||
272 |  |  |  |  |  | ||||||||||||||||||||||||||
273 | |||||||||||||||||||||||||||||||
274 | |||||||||||||||||||||||||||||||
275 | Tsukasa | Mari | Seika | Miya | Iroha | ||||||||||||||||||||||||||
276 | SS1 | SS1 | SS1 | SS1 | SS1 | ||||||||||||||||||||||||||
1 | Dungeon pictures gathered from game8.jp | |||||||||||||||||||||||||||||||||||||
|---|---|---|---|---|---|---|---|---|---|---|---|---|---|---|---|---|---|---|---|---|---|---|---|---|---|---|---|---|---|---|---|---|---|---|---|---|---|---|
2 | ||||||||||||||||||||||||||||||||||||||
3 | There are multiple dungeons to clear, so I hope you don't feel overwhelmed. As mentioned in the gear section, it is important to farm dungeons for the unlockers and rerollers, but it is also important to farm for rings and tears. | Table on Contents | ||||||||||||||||||||||||||||||||||||
4 | ||||||||||||||||||||||||||||||||||||||
5 | ||||||||||||||||||||||||||||||||||||||
6 | Please Change These Settings Before Starting Dungeon | |||||||||||||||||||||||||||||||||||||
7 | ||||||||||||||||||||||||||||||||||||||
8 |  | |||||||||||||||||||||||||||||||||||||
9 | This will be vital in Dungeon. Instead of the party positions be what they were at the end of each battle, every battle will start with the positions you organized. This will allow your Yunyun S to be in the front at all time at the start of battle. | |||||||||||||||||||||||||||||||||||||
10 | ||||||||||||||||||||||||||||||||||||||
11 | ||||||||||||||||||||||||||||||||||||||
12 | ||||||||||||||||||||||||||||||||||||||
13 | ||||||||||||||||||||||||||||||||||||||
14 | ||||||||||||||||||||||||||||||||||||||
15 | ||||||||||||||||||||||||||||||||||||||
16 | ||||||||||||||||||||||||||||||||||||||
17 | ||||||||||||||||||||||||||||||||||||||
18 | ||||||||||||||||||||||||||||||||||||||
19 | ||||||||||||||||||||||||||||||||||||||
20 | ||||||||||||||||||||||||||||||||||||||
21 | ||||||||||||||||||||||||||||||||||||||
22 | ||||||||||||||||||||||||||||||||||||||
23 | ||||||||||||||||||||||||||||||||||||||
24 | What are the dungeons? | What are 6* rings? | Burning Questions | |||||||||||||||||||||||||||||||||||
25 | ||||||||||||||||||||||||||||||||||||||
26 | The dungeon is where you will be farming 6* rings and tears. You can also farm GP here, for EN players it seems to be advisable, though this was never a problem in JP. For ring farming there are 5 different dungeons corresponding to each element. Each dungeon has 5 floors with a boss at floor 3 and 5. A ring can be picked up after beating floor 3, while an unlocker can be picked up after defeating boss 5. The Tears dungeon (dunno EN name yet) , is a dungeon that has 50 floors. The dungeon is continous leading you to go from floor 1 to 10 in 1 attempt. At floors with a multiple of 5 (5,10,15,etc) there is a boss and progress will be saved on the following floor. The tears dungeon is where you will be farming tears to upgrade memorias. Each dungeon run takes a decent amount of time (10-30 minutes), but you can stack tickets/life stones to do up to 5 clears with 1 run. | 6* rings are the end game for rings, but mentioned previously on "gear", the difference between then are small. | ||||||||||||||||||||||||||||||||||||
27 | Do I need to 100% the dungeon maps? | |||||||||||||||||||||||||||||||||||||
28 | ||||||||||||||||||||||||||||||||||||||
29 | You don't get anything for 100% any dungeon maps from my knowledge, so unless you love to clear up a whole map, there is little need to do it. | |||||||||||||||||||||||||||||||||||||
30 | What are tears? | |||||||||||||||||||||||||||||||||||||
31 | ||||||||||||||||||||||||||||||||||||||
32 | Tears are upgrade materials for your memorias. Each tear color corresponds with element or dmg type. A large amount of stats and innate potency increases are locked behind tears. Typically the class of a memoria will impact what the tear upgrades will increase (i.e. healer increases healing, defenders increase dmg mitigation). The increase totals to be 10% potency. | |||||||||||||||||||||||||||||||||||||
33 | ||||||||||||||||||||||||||||||||||||||
34 | ||||||||||||||||||||||||||||||||||||||
35 | Dungeon Rules | |||||||||||||||||||||||||||||||||||||
36 | ||||||||||||||||||||||||||||||||||||||
37 | If somehow you got here without doing patrol mission on free times or anything of the sort, then I guess you don't know the rules? Well a mini refresher. There is an energy bar, the moment this hits 0 your squad will take % HP dmg, even if you still got shield. You will start with 100 energy. Every battle you start will consume 2 energy. Every turn you take will consume 3 energy. If you end up in battle and take 1 turn to kill the enemy it will consume 5 energy. If you take 2 turns it will consume 8. If you pick up the "extra turn" power up within the dungeon, the first turn is an extra turn. It will count as part of turn 1. If you kill the turn after "extra turn" it is still considered turn 1, thus only 5 energy is consumed. | |||||||||||||||||||||||||||||||||||||
38 | ||||||||||||||||||||||||||||||||||||||
39 | Picture | Role | ||||||||||||||||||||||||||||||||||||
40 |  | Unlocker | ||||||||||||||||||||||||||||||||||||
41 | ||||||||||||||||||||||||||||||||||||||
42 |  | Reroller | ||||||||||||||||||||||||||||||||||||
43 | ||||||||||||||||||||||||||||||||||||||
44 |  | Tears | ||||||||||||||||||||||||||||||||||||
45 | ||||||||||||||||||||||||||||||||||||||
46 | ||||||||||||||||||||||||||||||||||||||
47 | Fire Dungeon | |||||||||||||||||||||||||||||||||||||
48 | ||||||||||||||||||||||||||||||||||||||
49 | ||||||||||||||||||||||||||||||||||||||
50 | Boss Cancer | Team Composition Recommendations | ||||||||||||||||||||||||||||||||||||
51 | ||||||||||||||||||||||||||||||||||||||
52 | Name | Weakness | Resist | 1 | 2 | 3 | 4 | 5 | 6 | |||||||||||||||||||||||||||||
53 | Abyss Knocker Red | Slash | Ice | Pierce |  |  |  |  |  |  | These comp list is not the bible. | |||||||||||||||||||||||||||
54 |  |  |  | |||||||||||||||||||||||||||||||||||
55 | ||||||||||||||||||||||||||||||||||||||
56 | Seika | Yingxia | Aina | Tama | Mari | Bon Ivar | ||||||||||||||||||||||||||||||||
57 | SS2 | S | S | S | SS1 | SS1 | ||||||||||||||||||||||||||||||||
58 | What about the mob cancers? | | | | |  | | |||||||||||||||||||||||||||||||
59 | ||||||||||||||||||||||||||||||||||||||
60 | The mob cancers have the same weakness as the boss cancer, but they do not have a resistance. Since most mobs come in groups, AoE damage types are recommended. | |||||||||||||||||||||||||||||||||||||
61 | Seika | Yingxia | Aina | Tama | Ruka | Bon Ivar | ||||||||||||||||||||||||||||||||
62 | SS2 | S | S | S | Free SS | SS1 | ||||||||||||||||||||||||||||||||
63 | | | | |  | | ||||||||||||||||||||||||||||||||
64 | ||||||||||||||||||||||||||||||||||||||
65 | ||||||||||||||||||||||||||||||||||||||
66 | Seika | Yingxia | Aina | Tama | Yuina | Ruka | ||||||||||||||||||||||||||||||||
67 | SS2 | S | S | S | SS2 | Free SS | ||||||||||||||||||||||||||||||||
68 | | | | |  | | ||||||||||||||||||||||||||||||||
69 | ||||||||||||||||||||||||||||||||||||||
70 | ||||||||||||||||||||||||||||||||||||||
71 | Mari | Yingxia | Aina | Tama | Ruka | Bon Ivar | ||||||||||||||||||||||||||||||||
72 | SS1 | S | S | S | SS2 | SS1 | ||||||||||||||||||||||||||||||||
73 | Buffer | | AoE debuffer (Fragile/defense) | AoE Healer or AoE Ice/Slash | AoE Ice or Slash | Single Target Ice or Slash (No Pierce) | Team Template. DO NOT bring Pierce Dmg dealers for ST slot. | |||||||||||||||||||||||||||||||
74 | ||||||||||||||||||||||||||||||||||||||
75 | ||||||||||||||||||||||||||||||||||||||
76 | Yingxia | Tama | ||||||||||||||||||||||||||||||||||||
77 | S | S | ||||||||||||||||||||||||||||||||||||
78 | ||||||||||||||||||||||||||||||||||||||
79 | ||||||||||||||||||||||||||||||||||||||
80 | Floor 1 | Label | Power ups | Label | Item | What are those bright diamond shaped signs? | ||||||||||||||||||||||||||||||||
81 | ||||||||||||||||||||||||||||||||||||||
82 | 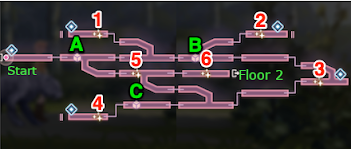 | A | DP recovery and DP revive (1 use) | 1 | Sunshine x1 | The diamond shaped signs are teleportals. If you reach one, you can teleport to them at any time. | ||||||||||||||||||||||||||||||||
83 | B | Rearguard +2 SP / turn | 2 | Sunshine x1 | ||||||||||||||||||||||||||||||||||
84 | C | Vanguard +1 SP / turn | 3 | Sunshine x1 | ||||||||||||||||||||||||||||||||||
85 | 4 | Sunshine x1 | ||||||||||||||||||||||||||||||||||||
86 | 5 | Sunshine x2 | ||||||||||||||||||||||||||||||||||||
87 | 6 | Sunshine x2 | ||||||||||||||||||||||||||||||||||||
88 | ||||||||||||||||||||||||||||||||||||||
89 | ||||||||||||||||||||||||||||||||||||||
90 | ||||||||||||||||||||||||||||||||||||||
91 | Floor 2 | Label | Power ups | Label | Item | |||||||||||||||||||||||||||||||||
92 | ||||||||||||||||||||||||||||||||||||||
93 | 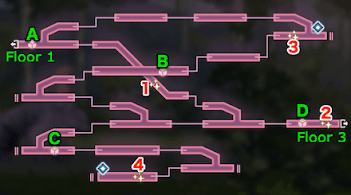 | A | Extra Turn | 1 | Sunshine x2 | |||||||||||||||||||||||||||||||||
94 | B | Start Battle +2 SP | 2 | Sunshine x2 | ||||||||||||||||||||||||||||||||||
95 | C | Vanguard +1 SP / turn | 3 | Sunshine x1 | ||||||||||||||||||||||||||||||||||
96 | D | DP recovery +1000 | 4 | Sunshine x1 | ||||||||||||||||||||||||||||||||||
97 | ||||||||||||||||||||||||||||||||||||||
98 | ||||||||||||||||||||||||||||||||||||||
99 | ||||||||||||||||||||||||||||||||||||||
100 | ||||||||||||||||||||||||||||||||||||||
101 | ||||||||||||||||||||||||||||||||||||||
102 | ||||||||||||||||||||||||||||||||||||||
103 | ||||||||||||||||||||||||||||||||||||||
104 | Floor 3 (Boss Floor) | Label | Item | Boss Cancer | ||||||||||||||||||||||||||||||||||
105 | ||||||||||||||||||||||||||||||||||||||
106 | 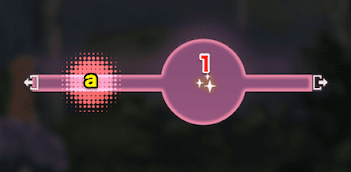 | 1 | Fire Ring x 1 | Name | Weakness | Resist | ||||||||||||||||||||||||||||||||
107 | Abyss Red | Slash | Ice | Pierce | ||||||||||||||||||||||||||||||||||
108 |  |  |  | |||||||||||||||||||||||||||||||||||
109 | ||||||||||||||||||||||||||||||||||||||
110 | -50% | -100% | 50% | |||||||||||||||||||||||||||||||||||
111 | ||||||||||||||||||||||||||||||||||||||
112 | ||||||||||||||||||||||||||||||||||||||
113 | ||||||||||||||||||||||||||||||||||||||
114 | ||||||||||||||||||||||||||||||||||||||
115 | ||||||||||||||||||||||||||||||||||||||
116 | ||||||||||||||||||||||||||||||||||||||
117 | Floor 4 | Label | Power ups | Item | ||||||||||||||||||||||||||||||||||
118 | ||||||||||||||||||||||||||||||||||||||
119 | 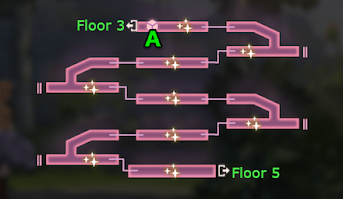 | A | Energy recovery +20 | All sunshine | ||||||||||||||||||||||||||||||||||
120 | ||||||||||||||||||||||||||||||||||||||
121 | ||||||||||||||||||||||||||||||||||||||
122 | ||||||||||||||||||||||||||||||||||||||
123 | ||||||||||||||||||||||||||||||||||||||
124 | ||||||||||||||||||||||||||||||||||||||
125 | ||||||||||||||||||||||||||||||||||||||
126 | ||||||||||||||||||||||||||||||||||||||
127 | ||||||||||||||||||||||||||||||||||||||
128 | ||||||||||||||||||||||||||||||||||||||
129 | ||||||||||||||||||||||||||||||||||||||
130 | Floor 5 (Boss floor) | Label | Item | Boss Cancer | ||||||||||||||||||||||||||||||||||
131 | ||||||||||||||||||||||||||||||||||||||
132 | 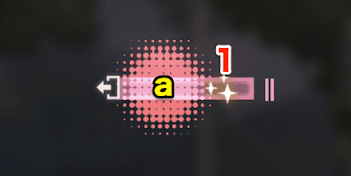 | 1 | Aqua Amber x1 | Name | Weakness | Resist | ||||||||||||||||||||||||||||||||
133 | Abyss Red | Slash | Ice | Pierce | ||||||||||||||||||||||||||||||||||
134 | | | | |||||||||||||||||||||||||||||||||||
135 | ||||||||||||||||||||||||||||||||||||||
136 | -50% | -100% | 50% | |||||||||||||||||||||||||||||||||||
137 | ||||||||||||||||||||||||||||||||||||||
138 | ||||||||||||||||||||||||||||||||||||||
139 | ||||||||||||||||||||||||||||||||||||||
140 | ||||||||||||||||||||||||||||||||||||||
141 | ||||||||||||||||||||||||||||||||||||||
142 | ||||||||||||||||||||||||||||||||||||||
143 | Recommended Route | |||||||||||||||||||||||||||||||||||||
144 | ||||||||||||||||||||||||||||||||||||||
145 | ||||||||||||||||||||||||||||||||||||||
146 | ||||||||||||||||||||||||||||||||||||||
147 | ||||||||||||||||||||||||||||||||||||||
148 | ||||||||||||||||||||||||||||||||||||||
149 | Ice Dungeon | |||||||||||||||||||||||||||||||||||||
150 | ||||||||||||||||||||||||||||||||||||||
151 | ||||||||||||||||||||||||||||||||||||||
152 | Boss Cancer | Team Composition Recommendations | ||||||||||||||||||||||||||||||||||||
153 | ||||||||||||||||||||||||||||||||||||||
154 | Name | Weakness | Resist | 1 | 2 | 3 | 4 | 5 | 6 | |||||||||||||||||||||||||||||
155 | Abyss Knocker Blue | Slash | Thunder | Pierce | | | | | |  | These comp list is not the bible. | |||||||||||||||||||||||||||
156 | |  | | |||||||||||||||||||||||||||||||||||
157 | ||||||||||||||||||||||||||||||||||||||
158 | Seika | Yingxia | Aina | Tama | Yuina | Sumomo | ||||||||||||||||||||||||||||||||
159 | What about the mob cancers? | SS2 | S | S | S | SS2 | SS1 | |||||||||||||||||||||||||||||||
160 | | |  | | |  | Kozue can be used here instead of Aina if you'd like as she provides thunder def down. | |||||||||||||||||||||||||||||||
161 | The mob cancers have the same weakness as the boss cancer, but they do not have a resistance. Since most mobs come in groups, AoE damage types are recommended. | |||||||||||||||||||||||||||||||||||||
162 | ||||||||||||||||||||||||||||||||||||||
163 | Seika | Yingxia | Kozue | Tama | Yuina | Carole | ||||||||||||||||||||||||||||||||
164 | SS2 | S | S | S | SS2 | SS1 | ||||||||||||||||||||||||||||||||
165 |  | | | | | | ||||||||||||||||||||||||||||||||
166 | ||||||||||||||||||||||||||||||||||||||
167 | ||||||||||||||||||||||||||||||||||||||
168 | Seika | Yingxia | Aina | Tama | Yuina | Ruka | ||||||||||||||||||||||||||||||||
169 | SS1 | S | S | S | SS2 | Free SS | ||||||||||||||||||||||||||||||||
170 | | | | | | | ||||||||||||||||||||||||||||||||
171 | ||||||||||||||||||||||||||||||||||||||
172 | ||||||||||||||||||||||||||||||||||||||
173 | Seika | Yingxia | Aina | Tama | Ruka | Bon Ivar | ||||||||||||||||||||||||||||||||
174 | SS1 | S | S | S | Free SS | SS1 | ||||||||||||||||||||||||||||||||
175 | Buffer | | AoE debuffer (Fragile/defense) | AoE Healer or AoE Thunder /Slash | AoE Thunder or Slash | ST Thunder /Slash (No Pierce) | Team Template. DO NOT bring Pierce Dmg dealers for ST slot. | |||||||||||||||||||||||||||||||
176 | ||||||||||||||||||||||||||||||||||||||
177 | ||||||||||||||||||||||||||||||||||||||
178 | Yingxia | Tama | ||||||||||||||||||||||||||||||||||||
179 | S | S | ||||||||||||||||||||||||||||||||||||
180 | ||||||||||||||||||||||||||||||||||||||
181 | ||||||||||||||||||||||||||||||||||||||
182 | Floor 1 | Label | Power ups | Label | Item | |||||||||||||||||||||||||||||||||
183 | ||||||||||||||||||||||||||||||||||||||
184 |  | A | Vanguard DP recovery (10%/turn) | 1 | Sunshine x2 | |||||||||||||||||||||||||||||||||
185 | B | Start Battle of +1 SP | 2 | Sunshine x1 | ||||||||||||||||||||||||||||||||||
186 | C | Rearguard +2 SP / turn | 3 | Sunshine x1 | ||||||||||||||||||||||||||||||||||
187 | 4 | Sunshine x2 | ||||||||||||||||||||||||||||||||||||
188 | ||||||||||||||||||||||||||||||||||||||
189 | ||||||||||||||||||||||||||||||||||||||
190 | ||||||||||||||||||||||||||||||||||||||
191 | ||||||||||||||||||||||||||||||||||||||
192 | ||||||||||||||||||||||||||||||||||||||
193 | ||||||||||||||||||||||||||||||||||||||
194 | ||||||||||||||||||||||||||||||||||||||
195 | ||||||||||||||||||||||||||||||||||||||
196 | Floor 2 | Label | Power ups | Label | Item | |||||||||||||||||||||||||||||||||
197 | ||||||||||||||||||||||||||||||||||||||
198 | 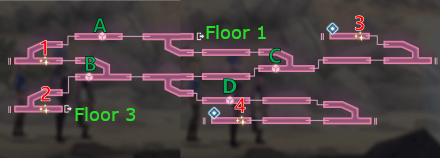 | A | Extra Turn | 1 | Sunshine x2 | |||||||||||||||||||||||||||||||||
199 | B | DP recovery +1000 | 2 | Sunshine x2 | ||||||||||||||||||||||||||||||||||
200 | C | Start Battle of +2 SP | 3 | Sunshine x1 | ||||||||||||||||||||||||||||||||||
201 | D | DP recovery and revive | 4 | Sunshine x1 | ||||||||||||||||||||||||||||||||||
202 | ||||||||||||||||||||||||||||||||||||||
203 | ||||||||||||||||||||||||||||||||||||||
204 | ||||||||||||||||||||||||||||||||||||||
205 | ||||||||||||||||||||||||||||||||||||||
206 | ||||||||||||||||||||||||||||||||||||||
207 | ||||||||||||||||||||||||||||||||||||||
208 | ||||||||||||||||||||||||||||||||||||||
209 | Floor 3 (Boss Floor) | Label | Item | Boss Cancer | ||||||||||||||||||||||||||||||||||
210 | ||||||||||||||||||||||||||||||||||||||
211 | | 1 | Ice Ring x 1 | Name | Weakness | Resist | ||||||||||||||||||||||||||||||||
212 | Abyss Knocker Blue | Slash | Thunder | Pierce | ||||||||||||||||||||||||||||||||||
213 | | | | |||||||||||||||||||||||||||||||||||
214 | ||||||||||||||||||||||||||||||||||||||
215 | -50% | -100% | 50% | |||||||||||||||||||||||||||||||||||
216 | ||||||||||||||||||||||||||||||||||||||
217 | ||||||||||||||||||||||||||||||||||||||
218 | ||||||||||||||||||||||||||||||||||||||
219 | ||||||||||||||||||||||||||||||||||||||
220 | ||||||||||||||||||||||||||||||||||||||
221 | ||||||||||||||||||||||||||||||||||||||
222 | Floor 4 | Label | Power ups | Item | ||||||||||||||||||||||||||||||||||
223 | ||||||||||||||||||||||||||||||||||||||
224 | 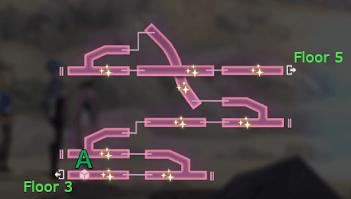 | A | Energy recovery +20 | All Sunshine | ||||||||||||||||||||||||||||||||||
225 | ||||||||||||||||||||||||||||||||||||||
226 | ||||||||||||||||||||||||||||||||||||||
227 | ||||||||||||||||||||||||||||||||||||||
228 | ||||||||||||||||||||||||||||||||||||||
229 | ||||||||||||||||||||||||||||||||||||||
230 | ||||||||||||||||||||||||||||||||||||||
231 | ||||||||||||||||||||||||||||||||||||||
232 | ||||||||||||||||||||||||||||||||||||||
233 | ||||||||||||||||||||||||||||||||||||||
234 | ||||||||||||||||||||||||||||||||||||||
235 | Floor 5 (Boss floor) | Label | Item | Boss Cancer | ||||||||||||||||||||||||||||||||||
236 | ||||||||||||||||||||||||||||||||||||||
237 | | 1 | Aqua Amber x1 | Name | Weakness | Resist | ||||||||||||||||||||||||||||||||
238 | Abyss Knocker Blue | Slash | Thunder | Pierce | ||||||||||||||||||||||||||||||||||
239 | | | | |||||||||||||||||||||||||||||||||||
240 | ||||||||||||||||||||||||||||||||||||||
241 | -50% | -100% | 50% | |||||||||||||||||||||||||||||||||||
242 | ||||||||||||||||||||||||||||||||||||||
243 | ||||||||||||||||||||||||||||||||||||||
244 | ||||||||||||||||||||||||||||||||||||||
245 | ||||||||||||||||||||||||||||||||||||||
246 | ||||||||||||||||||||||||||||||||||||||
247 | Recommended Route | |||||||||||||||||||||||||||||||||||||
248 | ||||||||||||||||||||||||||||||||||||||
249 | ||||||||||||||||||||||||||||||||||||||
250 | ||||||||||||||||||||||||||||||||||||||
251 | ||||||||||||||||||||||||||||||||||||||
252 | Thunder Dungeon | |||||||||||||||||||||||||||||||||||||
253 | ||||||||||||||||||||||||||||||||||||||
254 | ||||||||||||||||||||||||||||||||||||||
255 | Boss Cancer | Team Composition Recommendations | ||||||||||||||||||||||||||||||||||||
256 | ||||||||||||||||||||||||||||||||||||||
257 | Name | Weakness | Resist | 1 | 2 | 3 | 4 | 5 | 6 | |||||||||||||||||||||||||||||
258 | Needle Bird Thunder | Pierce | Fire | Crush | | |  | |  |  | These comp list is not the bible. | |||||||||||||||||||||||||||
259 |  |  |  | |||||||||||||||||||||||||||||||||||
260 | ||||||||||||||||||||||||||||||||||||||
261 | Seika | Yingxia | Isuzu | Tama | Karen | Ruka | ||||||||||||||||||||||||||||||||
262 | SS2 | S | SS1 | S | SS2 | SS1 | ||||||||||||||||||||||||||||||||
263 | What about the mob cancers? | | | | | |  | Ruka will need her summer event S style skill. | ||||||||||||||||||||||||||||||
264 | ||||||||||||||||||||||||||||||||||||||
265 | The mob cancers have the same weakness as the boss cancer, but they do not have a resistance. Since most mobs come in groups, AoE damage types are recommended. | |||||||||||||||||||||||||||||||||||||
266 | Seika | Yingxia | Aina | Tama | Ruka | Kanata | ||||||||||||||||||||||||||||||||
267 | SS2 | S | S | S | Free SS | SS1 | ||||||||||||||||||||||||||||||||
268 | | | | |  | | ||||||||||||||||||||||||||||||||
269 | ||||||||||||||||||||||||||||||||||||||
270 | ||||||||||||||||||||||||||||||||||||||
271 | Seika | Yingxia | Aina | Tama | Tsukasa | Ruka | ||||||||||||||||||||||||||||||||
272 | SS2 | S | S | S | SS1 | SS1 | ||||||||||||||||||||||||||||||||
273 | | | | | |  | Ruka will need her summer event S style skill. | |||||||||||||||||||||||||||||||
274 | ||||||||||||||||||||||||||||||||||||||
275 | ||||||||||||||||||||||||||||||||||||||
276 | Tsukasa | Yingxia | Aina | Tama | Ruka | Irene | ||||||||||||||||||||||||||||||||
277 | SS1 | S | S | S | Free SS | SS1 | ||||||||||||||||||||||||||||||||
278 | Buffer | | AoE debuffer (Vulnerable /defense) | AoE Healer or AoE Fire/Pierce | AoE Fire or Pierce | Single Target Fire or Pierce | Team Template Do NOT bring crush dmg dealers for ST slot. | |||||||||||||||||||||||||||||||
279 | ||||||||||||||||||||||||||||||||||||||
280 | ||||||||||||||||||||||||||||||||||||||
281 | Yingxia | Tama | ||||||||||||||||||||||||||||||||||||
282 | S | S | ||||||||||||||||||||||||||||||||||||
283 | ||||||||||||||||||||||||||||||||||||||
284 | Floor 1 | Label | Power ups | Label | Item | |||||||||||||||||||||||||||||||||
285 | ||||||||||||||||||||||||||||||||||||||
286 | 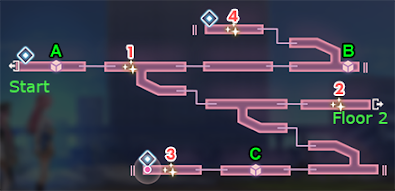 | A | Vanguard DP recovery (10%/turn) | 1 | Sunshine x2 | |||||||||||||||||||||||||||||||||
287 | B | Start Battle of +1 SP | 2 | Sunshine x2 | ||||||||||||||||||||||||||||||||||
288 | C | Vanguard +1 SP / turn | 3 | Sunshine x1 | ||||||||||||||||||||||||||||||||||
289 | 4 | Sunshine x1 | ||||||||||||||||||||||||||||||||||||
290 | ||||||||||||||||||||||||||||||||||||||
291 | ||||||||||||||||||||||||||||||||||||||
292 | ||||||||||||||||||||||||||||||||||||||
293 | ||||||||||||||||||||||||||||||||||||||
294 | ||||||||||||||||||||||||||||||||||||||
295 | ||||||||||||||||||||||||||||||||||||||
296 | ||||||||||||||||||||||||||||||||||||||
297 | ||||||||||||||||||||||||||||||||||||||
298 | Floor 2 | Label | Power ups | Label | Item | |||||||||||||||||||||||||||||||||
299 | ||||||||||||||||||||||||||||||||||||||
300 | 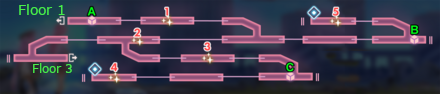 | A | Extra Turn | 1 | Sunshine x2 | |||||||||||||||||||||||||||||||||
301 | B | Start Battle of +1 SP | 2 | Sunshine x2 | ||||||||||||||||||||||||||||||||||
302 | C | Rearguard +2 SP / turn | 3 | Sunshine x1 | ||||||||||||||||||||||||||||||||||
303 | 4 | Sunshine x1 | ||||||||||||||||||||||||||||||||||||
304 | 5 | Sunshine x1 | ||||||||||||||||||||||||||||||||||||
305 | ||||||||||||||||||||||||||||||||||||||
306 | ||||||||||||||||||||||||||||||||||||||
307 | ||||||||||||||||||||||||||||||||||||||
308 | ||||||||||||||||||||||||||||||||||||||
309 | ||||||||||||||||||||||||||||||||||||||
310 | ||||||||||||||||||||||||||||||||||||||
311 | Floor 3 (Boss Floor) | Label | Item | Boss Cancer | ||||||||||||||||||||||||||||||||||
312 | ||||||||||||||||||||||||||||||||||||||
313 | | 1 | Thunder Ring x 1 | Name | Weakness | Resist | ||||||||||||||||||||||||||||||||
314 | Needle Bird Thunder | Pierce | Fire | Crush | ||||||||||||||||||||||||||||||||||
315 | | | | |||||||||||||||||||||||||||||||||||
316 | ||||||||||||||||||||||||||||||||||||||
317 | -50% | -100% | 50% | |||||||||||||||||||||||||||||||||||
318 | ||||||||||||||||||||||||||||||||||||||
319 | ||||||||||||||||||||||||||||||||||||||
320 | ||||||||||||||||||||||||||||||||||||||
321 | ||||||||||||||||||||||||||||||||||||||
322 | ||||||||||||||||||||||||||||||||||||||
323 | ||||||||||||||||||||||||||||||||||||||
324 | Floor 4 | Label | Power ups | Item | ||||||||||||||||||||||||||||||||||
325 | ||||||||||||||||||||||||||||||||||||||
326 |  | A | Energy recovery +20 | All Sunshine | ||||||||||||||||||||||||||||||||||
327 | ||||||||||||||||||||||||||||||||||||||
328 | ||||||||||||||||||||||||||||||||||||||
329 | ||||||||||||||||||||||||||||||||||||||
330 | ||||||||||||||||||||||||||||||||||||||
331 | ||||||||||||||||||||||||||||||||||||||
332 | ||||||||||||||||||||||||||||||||||||||
333 | ||||||||||||||||||||||||||||||||||||||
334 | ||||||||||||||||||||||||||||||||||||||
335 | ||||||||||||||||||||||||||||||||||||||
336 | Floor 5 (Boss floor) | Label | Item | Boss Cancer | ||||||||||||||||||||||||||||||||||
337 | ||||||||||||||||||||||||||||||||||||||
338 | | 1 | Aqua Amber x1 | Name | Weakness | Resist | ||||||||||||||||||||||||||||||||
339 | Needle Bird Thunder | Pierce | Fire | Crush | ||||||||||||||||||||||||||||||||||
340 | | | | |||||||||||||||||||||||||||||||||||
341 | ||||||||||||||||||||||||||||||||||||||
342 | -50% | -100% | 50% | |||||||||||||||||||||||||||||||||||
343 | ||||||||||||||||||||||||||||||||||||||
344 | ||||||||||||||||||||||||||||||||||||||
345 | ||||||||||||||||||||||||||||||||||||||
346 | ||||||||||||||||||||||||||||||||||||||
347 | ||||||||||||||||||||||||||||||||||||||
348 | ||||||||||||||||||||||||||||||||||||||
349 | Recommended Route | |||||||||||||||||||||||||||||||||||||
350 | ||||||||||||||||||||||||||||||||||||||
351 | ||||||||||||||||||||||||||||||||||||||
352 | Light Dungeon | |||||||||||||||||||||||||||||||||||||
353 | ||||||||||||||||||||||||||||||||||||||
354 | ||||||||||||||||||||||||||||||||||||||
355 | Boss Cancer | Team Composition Recommendations | ||||||||||||||||||||||||||||||||||||
356 | ||||||||||||||||||||||||||||||||||||||
357 | Name | Weakness | Resist | 1 | 2 | 3 | 4 | 5 | 6 | |||||||||||||||||||||||||||||
358 | Diamond Eye White | Crush | Dark | Slash | | | | | | | These comp list is not the bible. | |||||||||||||||||||||||||||
359 |  |  | | |||||||||||||||||||||||||||||||||||
360 | ||||||||||||||||||||||||||||||||||||||
361 | Seika | Yingxia | Aina | Tama | Irene | Kanata | ||||||||||||||||||||||||||||||||
362 | What about the mob cancers? | SS2 | S | S | S | SS1 | SS1 | |||||||||||||||||||||||||||||||
363 | | | | |  | | ||||||||||||||||||||||||||||||||
364 | The mob cancers have the same weakness as the boss cancer, but they do not have a resistance. Since most mobs come in groups, AoE damage types are recommended. | |||||||||||||||||||||||||||||||||||||
365 | ||||||||||||||||||||||||||||||||||||||
366 | Seika | Yingxia | Aina | Tama | Megumi | Kanata | ||||||||||||||||||||||||||||||||
367 | SS2 | S | S | S | SS2 | SS1 | ||||||||||||||||||||||||||||||||
368 | Buffer | | AoE debuffer (Vulnerable /defense) | AoE Healer or AoE Dark / Crush | AoE Dark or Crush | ST Dark / Crush | Team Template. DO NOT bring slash Dmg dealers for ST slot. | |||||||||||||||||||||||||||||||
369 | ||||||||||||||||||||||||||||||||||||||
370 | ||||||||||||||||||||||||||||||||||||||
371 | Yingxia | Tama | ||||||||||||||||||||||||||||||||||||
372 | S | S | ||||||||||||||||||||||||||||||||||||
373 | ||||||||||||||||||||||||||||||||||||||
374 | ||||||||||||||||||||||||||||||||||||||
375 | Floor 1 | Label | Power ups | Label | Item | |||||||||||||||||||||||||||||||||
376 | ||||||||||||||||||||||||||||||||||||||
377 | 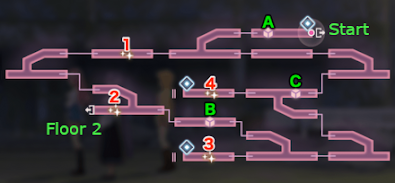 | A | Vanguard DP recovery (10%/turn) | 1 | Sunshine x2 | |||||||||||||||||||||||||||||||||
378 | B | Start Battle of +1 SP | 2 | Sunshine x1 | ||||||||||||||||||||||||||||||||||
379 | C | Start Battle of +1 SP | 3 | Sunshine x1 | ||||||||||||||||||||||||||||||||||
380 | 4 | Sunshine x2 | ||||||||||||||||||||||||||||||||||||
381 | ||||||||||||||||||||||||||||||||||||||
382 | ||||||||||||||||||||||||||||||||||||||
383 | ||||||||||||||||||||||||||||||||||||||
384 | ||||||||||||||||||||||||||||||||||||||
385 | ||||||||||||||||||||||||||||||||||||||
386 | ||||||||||||||||||||||||||||||||||||||
387 | ||||||||||||||||||||||||||||||||||||||
388 | ||||||||||||||||||||||||||||||||||||||
389 | Floor 2 | Label | Power ups | Label | Item | |||||||||||||||||||||||||||||||||
390 | ||||||||||||||||||||||||||||||||||||||
391 |  | A | Extra Turn | 1 | Sunshine x2 | |||||||||||||||||||||||||||||||||
392 | B | DP recovery + Revive | 2 | Sunshine x2 | ||||||||||||||||||||||||||||||||||
393 | C | Rearguard +2 SP / turn | 3 | Sunshine x1 | ||||||||||||||||||||||||||||||||||
394 | 4 | Sunshine x1 | ||||||||||||||||||||||||||||||||||||
395 | ||||||||||||||||||||||||||||||||||||||
396 | ||||||||||||||||||||||||||||||||||||||
397 | ||||||||||||||||||||||||||||||||||||||
398 | ||||||||||||||||||||||||||||||||||||||
399 | ||||||||||||||||||||||||||||||||||||||
400 | ||||||||||||||||||||||||||||||||||||||
401 | ||||||||||||||||||||||||||||||||||||||
402 | ||||||||||||||||||||||||||||||||||||||
403 | Floor 3 (Boss Floor) | Label | Item | Boss Cancer | ||||||||||||||||||||||||||||||||||
404 | ||||||||||||||||||||||||||||||||||||||
405 | | 1 | Light Ring x 1 | Name | Weakness | Resist | ||||||||||||||||||||||||||||||||
406 | Diamond Eye White | Crush | Dark | Slash | ||||||||||||||||||||||||||||||||||
407 | | | | |||||||||||||||||||||||||||||||||||
408 | ||||||||||||||||||||||||||||||||||||||
409 | -50% | -100% | 50% | |||||||||||||||||||||||||||||||||||
410 | ||||||||||||||||||||||||||||||||||||||
411 | ||||||||||||||||||||||||||||||||||||||
412 | ||||||||||||||||||||||||||||||||||||||
413 | ||||||||||||||||||||||||||||||||||||||
414 | ||||||||||||||||||||||||||||||||||||||
415 | ||||||||||||||||||||||||||||||||||||||
416 | Floor 4 | Label | Power ups | Item | ||||||||||||||||||||||||||||||||||
417 | ||||||||||||||||||||||||||||||||||||||
418 | 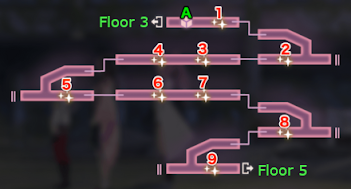 | A | Energy recovery +20 | All Sunshine | ||||||||||||||||||||||||||||||||||
419 | ||||||||||||||||||||||||||||||||||||||
420 | ||||||||||||||||||||||||||||||||||||||
421 | ||||||||||||||||||||||||||||||||||||||
422 | ||||||||||||||||||||||||||||||||||||||
423 | ||||||||||||||||||||||||||||||||||||||
424 | ||||||||||||||||||||||||||||||||||||||
425 | ||||||||||||||||||||||||||||||||||||||
426 | ||||||||||||||||||||||||||||||||||||||
427 | ||||||||||||||||||||||||||||||||||||||
428 | ||||||||||||||||||||||||||||||||||||||
429 | Floor 5 (Boss floor) | Label | Item | Boss Cancer | ||||||||||||||||||||||||||||||||||
430 | ||||||||||||||||||||||||||||||||||||||
431 | | 1 | Aqua Amber x1 | Name | Weakness | Resist | ||||||||||||||||||||||||||||||||
432 | Diamond Eye White | Crush | Dark | Slash | ||||||||||||||||||||||||||||||||||
433 | | | | |||||||||||||||||||||||||||||||||||
434 | ||||||||||||||||||||||||||||||||||||||
435 | -50% | -100% | 50% | |||||||||||||||||||||||||||||||||||
436 | ||||||||||||||||||||||||||||||||||||||
437 | ||||||||||||||||||||||||||||||||||||||
438 | ||||||||||||||||||||||||||||||||||||||
439 | ||||||||||||||||||||||||||||||||||||||
440 | ||||||||||||||||||||||||||||||||||||||
441 | Recommended Route | |||||||||||||||||||||||||||||||||||||
442 | ||||||||||||||||||||||||||||||||||||||
443 | ||||||||||||||||||||||||||||||||||||||
444 | Dark Dungeon | |||||||||||||||||||||||||||||||||||||
445 | ||||||||||||||||||||||||||||||||||||||
446 | ||||||||||||||||||||||||||||||||||||||
447 | Boss Cancer | Team Composition Recommendations | ||||||||||||||||||||||||||||||||||||
448 | ||||||||||||||||||||||||||||||||||||||
449 | Name | Weakness | Resist | 1 | 2 | 3 | 4 | 5 | 6 | |||||||||||||||||||||||||||||
450 | Diamond Eye White | Crush | Light | Slash | | | | |  | | These comp list is not the bible. | |||||||||||||||||||||||||||
451 | |  | | |||||||||||||||||||||||||||||||||||
452 | ||||||||||||||||||||||||||||||||||||||
453 | Seika | Yingxia | Aina | Tama | Ruka | Irene | ||||||||||||||||||||||||||||||||
454 | What about the mob cancers? | SS2 | S | S | S | SS2 | SS1 | |||||||||||||||||||||||||||||||
455 | | | | | | | ||||||||||||||||||||||||||||||||
456 | The mob cancers have the same weakness as the boss cancer, but they do not have a resistance. Since most mobs come in groups, AoE damage types are recommended. | |||||||||||||||||||||||||||||||||||||
457 | ||||||||||||||||||||||||||||||||||||||
458 | Seika | Yingxia | Aina | Tama | Megumi | Kanata | ||||||||||||||||||||||||||||||||
459 | SS2 | S | S | S | SS2 | SS1 | ||||||||||||||||||||||||||||||||
460 | Buffer | | AoE debuffer (Vulnerable /defense) | AoE Healer or AoE Light / Crush | AoE light or crush | ST Light / Crush | Team Template. DO NOT bring slash Dmg dealers for ST slot | |||||||||||||||||||||||||||||||
461 | ||||||||||||||||||||||||||||||||||||||
462 | ||||||||||||||||||||||||||||||||||||||
463 | Yingxia | Tama | ||||||||||||||||||||||||||||||||||||
464 | S | S | ||||||||||||||||||||||||||||||||||||
465 | ||||||||||||||||||||||||||||||||||||||
466 | ||||||||||||||||||||||||||||||||||||||
467 | Floor 1 | Label | Power ups | Label | Item | |||||||||||||||||||||||||||||||||
468 | ||||||||||||||||||||||||||||||||||||||
469 | A | Vanguard DP recovery (10%/turn) | 1 | Sunshine x2 | ||||||||||||||||||||||||||||||||||
470 | B | Start Battle of +1 SP | 2 | Sunshine x2 | ||||||||||||||||||||||||||||||||||
471 | C | Vanguard +1 SP / turn | 3 | Sunshine x1 | ||||||||||||||||||||||||||||||||||
472 | 4 | Sunshine x1 | ||||||||||||||||||||||||||||||||||||
473 | ||||||||||||||||||||||||||||||||||||||
474 | ||||||||||||||||||||||||||||||||||||||
475 | ||||||||||||||||||||||||||||||||||||||
476 | ||||||||||||||||||||||||||||||||||||||
477 | ||||||||||||||||||||||||||||||||||||||
478 | ||||||||||||||||||||||||||||||||||||||
479 | ||||||||||||||||||||||||||||||||||||||
480 | ||||||||||||||||||||||||||||||||||||||
481 | Floor 2 | Label | Power ups | Label | Item | |||||||||||||||||||||||||||||||||
482 | ||||||||||||||||||||||||||||||||||||||
483 | 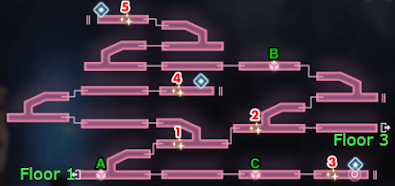 | A | Extra Turn | 1 | Sunshine x2 | |||||||||||||||||||||||||||||||||
484 | B | Start Battle of +1 SP | 2 | Sunshine x2 | ||||||||||||||||||||||||||||||||||
485 | C | Rearguard +2 SP / turn | 3 | Sunshine x1 | ||||||||||||||||||||||||||||||||||
486 | 4 | Sunshine x1 | ||||||||||||||||||||||||||||||||||||
487 | 5 | Sunshine x1 | ||||||||||||||||||||||||||||||||||||
488 | ||||||||||||||||||||||||||||||||||||||
489 | ||||||||||||||||||||||||||||||||||||||
490 | ||||||||||||||||||||||||||||||||||||||
491 | ||||||||||||||||||||||||||||||||||||||
492 | ||||||||||||||||||||||||||||||||||||||
493 | ||||||||||||||||||||||||||||||||||||||
494 | ||||||||||||||||||||||||||||||||||||||
495 | Floor 3 (Boss Floor) | Label | Item | Boss Cancer | ||||||||||||||||||||||||||||||||||
496 | ||||||||||||||||||||||||||||||||||||||
497 | | 1 | Dark Ring x 1 | Name | Weakness | Resist | ||||||||||||||||||||||||||||||||
498 | Diamond Eye White | Crush | Light | Slash | ||||||||||||||||||||||||||||||||||
499 | | | | |||||||||||||||||||||||||||||||||||
500 | ||||||||||||||||||||||||||||||||||||||
501 | -50% | -100% | 50% | |||||||||||||||||||||||||||||||||||
502 | ||||||||||||||||||||||||||||||||||||||
503 | ||||||||||||||||||||||||||||||||||||||
504 | ||||||||||||||||||||||||||||||||||||||
505 | ||||||||||||||||||||||||||||||||||||||
506 | ||||||||||||||||||||||||||||||||||||||
507 | ||||||||||||||||||||||||||||||||||||||
508 | Floor 4 | Label | Power ups | Item | ||||||||||||||||||||||||||||||||||
509 | ||||||||||||||||||||||||||||||||||||||
510 | 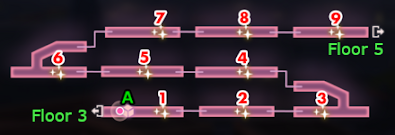 | A | Energy recovery +20 | All Sunshine | ||||||||||||||||||||||||||||||||||
511 | ||||||||||||||||||||||||||||||||||||||
512 | ||||||||||||||||||||||||||||||||||||||
513 | ||||||||||||||||||||||||||||||||||||||
514 | ||||||||||||||||||||||||||||||||||||||
515 | ||||||||||||||||||||||||||||||||||||||
516 | ||||||||||||||||||||||||||||||||||||||
517 | ||||||||||||||||||||||||||||||||||||||
518 | ||||||||||||||||||||||||||||||||||||||
519 | ||||||||||||||||||||||||||||||||||||||
520 | ||||||||||||||||||||||||||||||||||||||
521 | Floor 5 (Boss floor) | Label | Item | Boss Cancer | ||||||||||||||||||||||||||||||||||
522 | ||||||||||||||||||||||||||||||||||||||
523 | | 1 | Aqua Amber x1 | Name | Weakness | Resist | ||||||||||||||||||||||||||||||||
524 | Diamond Eye White | Crush | Light | Slash | ||||||||||||||||||||||||||||||||||
525 | | | | |||||||||||||||||||||||||||||||||||
526 | ||||||||||||||||||||||||||||||||||||||
527 | -50% | -100% | 50% | |||||||||||||||||||||||||||||||||||
528 | ||||||||||||||||||||||||||||||||||||||
529 | ||||||||||||||||||||||||||||||||||||||
530 | ||||||||||||||||||||||||||||||||||||||
531 | ||||||||||||||||||||||||||||||||||||||
532 | ||||||||||||||||||||||||||||||||||||||
533 | Recommended Route | |||||||||||||||||||||||||||||||||||||
534 | ||||||||||||||||||||||||||||||||||||||
535 | ||||||||||||||||||||||||||||||||||||||
536 | Gold Hopper Dungeon | |||||||||||||||||||||||||||||||||||||
537 | ||||||||||||||||||||||||||||||||||||||
538 | ||||||||||||||||||||||||||||||||||||||
539 | Race your way to floor 5 while picking up the teleporters as fast as you can for the "extra turn". Skip all the bosses on your first run, they will lower the amount of attempts for GP drops. | |||||||||||||||||||||||||||||||||||||
540 | Gold is collected from the shinies on the ground. | |||||||||||||||||||||||||||||||||||||
541 | ||||||||||||||||||||||||||||||||||||||
542 | Gold Hoppers are a unique enemy that only takes 1 dmg. They require 18 hits to break and 1 hit to kill. | |||||||||||||||||||||||||||||||||||||
543 | Characters with AoE and 3 hits are very strong here. | |||||||||||||||||||||||||||||||||||||
544 | Cancers can also be stunned or imprison | |||||||||||||||||||||||||||||||||||||
545 | Because gold hoppers may occassionally come in pairs, it is advisable to bring characters that can deal AoE 3+ hit skills. | |||||||||||||||||||||||||||||||||||||
546 | ||||||||||||||||||||||||||||||||||||||
547 | Team Composition Template | |||||||||||||||||||||||||||||||||||||
548 | ||||||||||||||||||||||||||||||||||||||
549 | 1 | 2 | 3 | 4 | 5 | 6 | ||||||||||||||||||||||||||||||||
550 | |  | AoE 3+ hit / AoE stun or imprison | AoE 3+ hit | AoE 3+ hit | AoE 3+ hit | ||||||||||||||||||||||||||||||||
551 | ||||||||||||||||||||||||||||||||||||||
552 | ||||||||||||||||||||||||||||||||||||||
553 | Yingxia | Tama | ||||||||||||||||||||||||||||||||||||
554 | S | SS1 | ||||||||||||||||||||||||||||||||||||
555 | ||||||||||||||||||||||||||||||||||||||
556 | AoE Normal Skills (3+ hit) | AoE EX Skill (4+ hit) | Debuffers (AoE stun/imprison) | |||||||||||||||||||||||||||||||||||
557 | ||||||||||||||||||||||||||||||||||||||
558 |  |  | |  | | |  |  |  | |  |  |  |  | ||||||||||||||||||||||||
559 | ||||||||||||||||||||||||||||||||||||||
560 | ||||||||||||||||||||||||||||||||||||||
561 | Yuki | Karen | Karen | Erika Aoi | Tama | Sumomo | Ruka | Yuina | Chiroru | Karen | Adel | Miko Tenne | Megumi | Kozue | ||||||||||||||||||||||||
562 | A | SS1 | SS2 | SS1 | SS1 | SS1 | SS2 | SS2 | SS1 | SS2 | SS1 | SS1 | SS1 | SS1 | ||||||||||||||||||||||||
563 | 3 | 3 | 3 | 3 | 3 | 3 | 12 | 12 | 10 | 10 | 6 | 6 |  |  | ||||||||||||||||||||||||
564 | | |  |  |  |  |  | | | |  |  | ||||||||||||||||||||||||||
565 | ||||||||||||||||||||||||||||||||||||||
566 | Charlotta | Megumi | ||||||||||||||||||||||||||||||||||||
567 | Bon Ivar | Kozue | Inori | Adel | Yuina | Vritika | Iroha | Megumi | Mari | Carole | Sumomo | Hisame | A | SS2 | ||||||||||||||||||||||||
568 | SS1 | SS1 | S | A | SS1 | A | SS1 | SS2 | SS1 | SS1 | SS2 | SS1 | Will need high LCK. | |||||||||||||||||||||||||
569 | 3 | 3 | 3 | 3 | 3 | 3 | 5 | 5 | 4 | 4 | 4 | 4 | ||||||||||||||||||||||||||
570 |  |  |  |  |  |  | ||||||||||||||||||||||||||||||||
571 | ST EX Skill (high hit count) | |||||||||||||||||||||||||||||||||||||
572 | ||||||||||||||||||||||||||||||||||||||
573 | Satomi Kura | Fubuki | Misato | Niina | Niina | Isuzu | |  |  | | ||||||||||||||||||||||||||||
574 | S | A | A | SS1 | S | SS1 | ||||||||||||||||||||||||||||||||
575 | 3 | 3 | 3 | 3 | 3 | 3 | ||||||||||||||||||||||||||||||||
576 |  |  |  |  |  | Ruka | Karen | Byakko | Niina | |||||||||||||||||||||||||||||
577 | Free SS | SS1 | SS1 | SS1 | ||||||||||||||||||||||||||||||||||
578 | 9 | 10 | 11 | 8 | ||||||||||||||||||||||||||||||||||
579 | Isuzu | Shiki | Kanata | Kanata | Carole | |||||||||||||||||||||||||||||||||
580 | A | SS1 | S | A | A | |||||||||||||||||||||||||||||||||
581 | 3 | 3 | 3 | 3 | 3 | |||||||||||||||||||||||||||||||||
582 | ||||||||||||||||||||||||||||||||||||||
583 | ||||||||||||||||||||||||||||||||||||||
584 | Floor 1 | Label | Power ups | |||||||||||||||||||||||||||||||||||
585 | ||||||||||||||||||||||||||||||||||||||
586 | 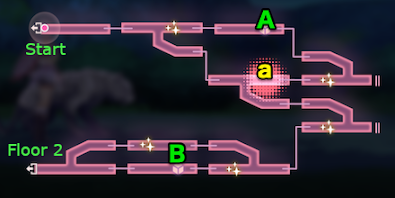 | A | DP recover +500 | |||||||||||||||||||||||||||||||||||
587 | B | Vanguard +1 SP / turn | ||||||||||||||||||||||||||||||||||||
588 | ||||||||||||||||||||||||||||||||||||||
589 | ||||||||||||||||||||||||||||||||||||||
590 | ||||||||||||||||||||||||||||||||||||||
591 | ||||||||||||||||||||||||||||||||||||||
592 | ||||||||||||||||||||||||||||||||||||||
593 | ||||||||||||||||||||||||||||||||||||||
594 | ||||||||||||||||||||||||||||||||||||||
595 | ||||||||||||||||||||||||||||||||||||||
596 | ||||||||||||||||||||||||||||||||||||||
597 | ||||||||||||||||||||||||||||||||||||||
598 | Floor 2 | Label | Power ups | |||||||||||||||||||||||||||||||||||
599 | ||||||||||||||||||||||||||||||||||||||
600 | 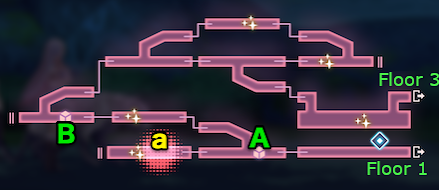 | A | Overdrive Skill Dmg +10% | |||||||||||||||||||||||||||||||||||
601 | B | Start Battle of +1 SP | ||||||||||||||||||||||||||||||||||||
602 | ||||||||||||||||||||||||||||||||||||||
603 | ||||||||||||||||||||||||||||||||||||||
604 | ||||||||||||||||||||||||||||||||||||||
605 | ||||||||||||||||||||||||||||||||||||||
606 | ||||||||||||||||||||||||||||||||||||||
607 | ||||||||||||||||||||||||||||||||||||||
608 | ||||||||||||||||||||||||||||||||||||||
609 | ||||||||||||||||||||||||||||||||||||||
610 | ||||||||||||||||||||||||||||||||||||||
611 | ||||||||||||||||||||||||||||||||||||||
612 | Floor 3 | Label | Power ups | |||||||||||||||||||||||||||||||||||
613 | ||||||||||||||||||||||||||||||||||||||
614 | 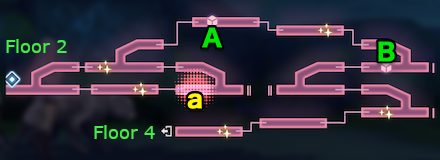 | A | Rearguard +2 SP / turn | |||||||||||||||||||||||||||||||||||
615 | B | Overdrive Skill Dmg +10% | ||||||||||||||||||||||||||||||||||||
616 | ||||||||||||||||||||||||||||||||||||||
617 | ||||||||||||||||||||||||||||||||||||||
618 | ||||||||||||||||||||||||||||||||||||||
619 | ||||||||||||||||||||||||||||||||||||||
620 | ||||||||||||||||||||||||||||||||||||||
621 | ||||||||||||||||||||||||||||||||||||||
622 | ||||||||||||||||||||||||||||||||||||||
623 | ||||||||||||||||||||||||||||||||||||||
624 | ||||||||||||||||||||||||||||||||||||||
625 | Floor 4 | Label | Power ups | |||||||||||||||||||||||||||||||||||
626 | ||||||||||||||||||||||||||||||||||||||
627 | 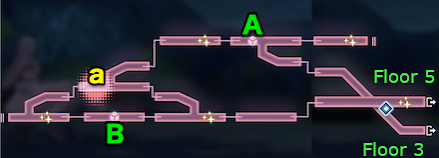 | A | DP revive | |||||||||||||||||||||||||||||||||||
628 | B | Start Battle of +2SP | ||||||||||||||||||||||||||||||||||||
629 | ||||||||||||||||||||||||||||||||||||||
630 | ||||||||||||||||||||||||||||||||||||||
631 | ||||||||||||||||||||||||||||||||||||||
632 | ||||||||||||||||||||||||||||||||||||||
633 | ||||||||||||||||||||||||||||||||||||||
634 | ||||||||||||||||||||||||||||||||||||||
635 | ||||||||||||||||||||||||||||||||||||||
636 | ||||||||||||||||||||||||||||||||||||||
637 | ||||||||||||||||||||||||||||||||||||||
638 | Floor 5 | Label | Power ups | |||||||||||||||||||||||||||||||||||
639 | ||||||||||||||||||||||||||||||||||||||
640 | 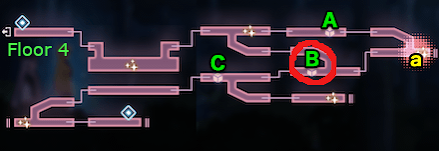 | A | Vanguard +10%DP/turn | |||||||||||||||||||||||||||||||||||
641 | B | Extra turn | ||||||||||||||||||||||||||||||||||||
642 | C | Start Battle of +2SP | ||||||||||||||||||||||||||||||||||||
643 | ||||||||||||||||||||||||||||||||||||||
644 | ||||||||||||||||||||||||||||||||||||||
645 | ||||||||||||||||||||||||||||||||||||||
646 | ||||||||||||||||||||||||||||||||||||||
647 | ||||||||||||||||||||||||||||||||||||||
648 | ||||||||||||||||||||||||||||||||||||||
649 | Route | |||||||||||||||||||||||||||||||||||||
650 | ||||||||||||||||||||||||||||||||||||||
651 | 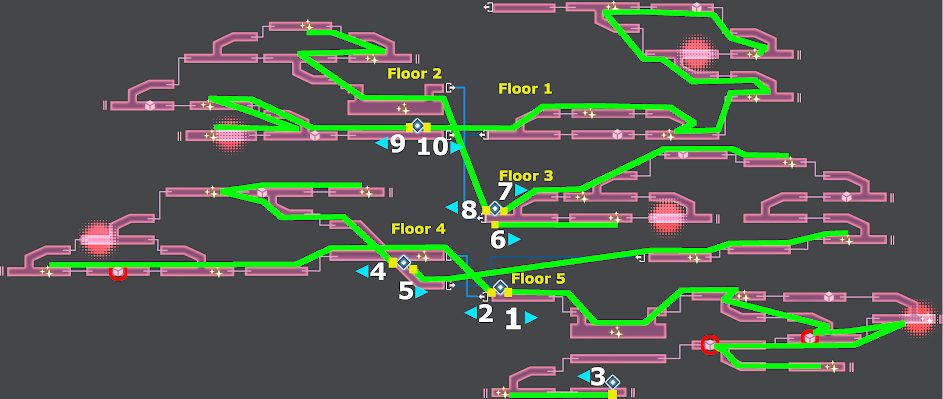 | |||||||||||||||||||||||||||||||||||||
652 | ||||||||||||||||||||||||||||||||||||||
653 | ||||||||||||||||||||||||||||||||||||||
654 | ||||||||||||||||||||||||||||||||||||||
655 | ||||||||||||||||||||||||||||||||||||||
656 | ||||||||||||||||||||||||||||||||||||||
657 | ||||||||||||||||||||||||||||||||||||||
658 | ||||||||||||||||||||||||||||||||||||||
659 | ||||||||||||||||||||||||||||||||||||||
660 | ||||||||||||||||||||||||||||||||||||||
661 | ||||||||||||||||||||||||||||||||||||||
662 | ||||||||||||||||||||||||||||||||||||||
663 | ||||||||||||||||||||||||||||||||||||||
664 | ||||||||||||||||||||||||||||||||||||||
665 | ||||||||||||||||||||||||||||||||||||||
666 | ||||||||||||||||||||||||||||||||||||||
667 | ||||||||||||||||||||||||||||||||||||||
668 | ||||||||||||||||||||||||||||||||||||||
669 | ||||||||||||||||||||||||||||||||||||||
670 | ||||||||||||||||||||||||||||||||||||||
671 | Route by: Linkurn | |||||||||||||||||||||||||||||||||||||
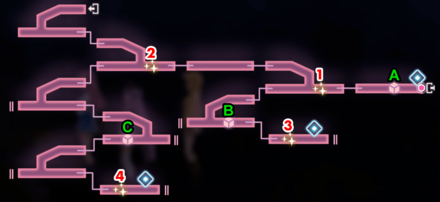
1 | Dungeon pictures gathered from game8.jp | |||||||||||||||||||||||||||||||||||||||||||||||||||||||||||||||||||||||||||||||||||||||||||||||||||||||||||||||||||
|---|---|---|---|---|---|---|---|---|---|---|---|---|---|---|---|---|---|---|---|---|---|---|---|---|---|---|---|---|---|---|---|---|---|---|---|---|---|---|---|---|---|---|---|---|---|---|---|---|---|---|---|---|---|---|---|---|---|---|---|---|---|---|---|---|---|---|---|---|---|---|---|---|---|---|---|---|---|---|---|---|---|---|---|---|---|---|---|---|---|---|---|---|---|---|---|---|---|---|---|---|---|---|---|---|---|---|---|---|---|---|---|---|---|---|---|---|
2 | Ouliette of Tears (Hoju Dungeon) | |||||||||||||||||||||||||||||||||||||||||||||||||||||||||||||||||||||||||||||||||||||||||||||||||||||||||||||||||||
3 | ||||||||||||||||||||||||||||||||||||||||||||||||||||||||||||||||||||||||||||||||||||||||||||||||||||||||||||||||||||
4 | Team Composition Template | Dungeon Queens (Limit Break 3+ Required) | High Potency AoE Damage (2+ hits) | |||||||||||||||||||||||||||||||||||||||||||||||||||||||||||||||||||||||||||||||||||||||||||||||||||||||||||||||||
5 | WARNING: CURRENT EN BUG: Tear Dungeon progress is not saved between PC and Phone clients. | |||||||||||||||||||||||||||||||||||||||||||||||||||||||||||||||||||||||||||||||||||||||||||||||||||||||||||||||||||
6 | 1 | 2 | 3 | 4 | 5 | 6 |  |  |  |  |  |  |  |  | ||||||||||||||||||||||||||||||||||||||||||||||||||||||||||||||||||||||||||||||||||||||||||||||||||||||
7 | Whale Team |  | | |  |  |  | |||||||||||||||||||||||||||||||||||||||||||||||||||||||||||||||||||||||||||||||||||||||||||||||||||||||||||||
8 | Welcome to the Tears dungeon of 50 floors. This is not as daunting as it seems, but make sure you have geared up before you enter. | |||||||||||||||||||||||||||||||||||||||||||||||||||||||||||||||||||||||||||||||||||||||||||||||||||||||||||||||||||
9 | Maki | Karen | Byakko | Ruka | Inori | Sumomo | Kura | Ruka | ||||||||||||||||||||||||||||||||||||||||||||||||||||||||||||||||||||||||||||||||||||||||||||||||||||||||||||
10 | Table of Contents | Step 1: How to Proceed | Yingxia | Maki | Karen | Seika | Ruka | Yuina | SS1 LB3+ ONLY | SS1 LB3+ ONLY + SS2 Common | S skill on SS | S skill on SS | S skill on SS | SS1 | S skill on SS | SS1 | ||||||||||||||||||||||||||||||||||||||||||||||||||||||||||||||||||||||||||||||||||||||||||||||||||||
11 | S (w/ SS1 EX) | SS1 LB3+ ONLY | SS1 LB3+ ONLY + SS2 Common | SS2 + SS1 Common | SS2(w/ SS1 EX) | SS2(w/ SS1 EX) |  |  |  |  |  |  | ||||||||||||||||||||||||||||||||||||||||||||||||||||||||||||||||||||||||||||||||||||||||||||||||||||||||
12 | During first run, ignore all drops and dive as deep as you can. The further you dive, the better the higher the pick up reward amount. Tear Dungeon records when you've achieved floors 1/6/11/16/etc. These floors are after boss floors. | |||||||||||||||||||||||||||||||||||||||||||||||||||||||||||||||||||||||||||||||||||||||||||||||||||||||||||||||||||
13 | Template | | AoE (2+ hit count) | AoE (2+ hit count) | Buffer | AoE (2+ hit count) | Single Target EX w/ AoE Common | AoE EX Skill (6+ hit) | ||||||||||||||||||||||||||||||||||||||||||||||||||||||||||||||||||||||||||||||||||||||||||||||||||||||||||||
14 | Bon Ivar | Yuina | Isuzu | Niina | Kanata | Yuki | ||||||||||||||||||||||||||||||||||||||||||||||||||||||||||||||||||||||||||||||||||||||||||||||||||||||||||||||
15 | Step 2: Farming Routes | | |  |  |  |  | SS1 | SS1 | SS1 | SS1 | S skill on SS | SS3 | |||||||||||||||||||||||||||||||||||||||||||||||||||||||||||||||||||||||||||||||||||||||||||||||||||||||
16 | Yingxia | If S Shiki Place in Vanguard | ||||||||||||||||||||||||||||||||||||||||||||||||||||||||||||||||||||||||||||||||||||||||||||||||||||||||||||||||||
17 | Amount of Tears (Hoju) to max a Memoria | There are 2 major End Game routes: 1) Route 1 (More Tears) = Start Floor 46 -> Grab extra turn -> climb back up while grabbing only Tears -> End Floor 20 to 30, when you run out of Stamina. 2a) Route 2 (Sunshine + Aqua Ambers + Tears) = Start Floor 41 -> Go back to Floor 40 to kill Boss -> Dive deeper to Floor 46 -> Grab the easily accessible Sunshine while diving to Floor 49 -> Floor 49 pick up Aqua Ambers (4/6) -> Floor 50 Boss. 2b) Alternate Route 2 (Lower Tears, shorter run) = Start Floor 46 -> Grab Extra Turn -> Floor 45 boss -> Grab the easily accessible Sunshine while diving to Floor 49 -> Floor 49 pick up 1 or 2 Aqua Ambers -> Floor 50 Boss. | S | Single Target Dmg Dealer | ||||||||||||||||||||||||||||||||||||||||||||||||||||||||||||||||||||||||||||||||||||||||||||||||||||||||||||||||
18 | Ruka | Yuina | Chiroru | Karen | Adel | Miko Tenne | ||||||||||||||||||||||||||||||||||||||||||||||||||||||||||||||||||||||||||||||||||||||||||||||||||||||||||||||
19 | 51 tears of element / dmg type | Buffer | SS2 | SS2 | SS1 | SS2 | SS1 | SS1 | | |  |  |  | |||||||||||||||||||||||||||||||||||||||||||||||||||||||||||||||||||||||||||||||||||||||||||||||||||||||
20 | 12 | 12 | 10 | 10 | 6 | 6 | ||||||||||||||||||||||||||||||||||||||||||||||||||||||||||||||||||||||||||||||||||||||||||||||||||||||||||||||
21 | Nerfed Tear Dungeon | |  |  |  |  |  | |||||||||||||||||||||||||||||||||||||||||||||||||||||||||||||||||||||||||||||||||||||||||||||||||||||||||||||
22 | AoE EX Skill | Ruka | Bon Ivar | Inori | Kanata | Ruka | ||||||||||||||||||||||||||||||||||||||||||||||||||||||||||||||||||||||||||||||||||||||||||||||||||||||||||||||
23 | *Resistances removed on mobs. *Bosses still have resistances. *Enemies appearance rate cut in half. | SS1 | SS1 | SS1 | SS1 | SS3 | ||||||||||||||||||||||||||||||||||||||||||||||||||||||||||||||||||||||||||||||||||||||||||||||||||||||||||||||
24 | Seika | Shiki | Seika | Mari | Tsukasa | Yotsuha | |  |  |  |  |  | ||||||||||||||||||||||||||||||||||||||||||||||||||||||||||||||||||||||||||||||||||||||||||||||||||||||||
25 | SS2 | S | SS1 | SS1 | SS1 | SS1 | ||||||||||||||||||||||||||||||||||||||||||||||||||||||||||||||||||||||||||||||||||||||||||||||||||||||||||||||
26 | (*) Route 2 varies greatly in Sunshine+Aqua Ambers and depends on your efficiency. In JP, I finish with 20-50 Stamina left. | All | All | All | For Ice | For Fire | For Fire | ST Dmg w/ Introjection SS1 Yunyun on S | ||||||||||||||||||||||||||||||||||||||||||||||||||||||||||||||||||||||||||||||||||||||||||||||||||||||||||||
27 | Tip #1 | Yuki | Irene | Carole | Hisame | Sumomo | Megumi | |||||||||||||||||||||||||||||||||||||||||||||||||||||||||||||||||||||||||||||||||||||||||||||||||||||||||||||
28 | Step 3: Advanced Farming Routes | | | |||||||||||||||||||||||||||||||||||||||||||||||||||||||||||||||||||||||||||||||||||||||||||||||||||||||||||||||||
29 | Cannot swap the characters used during dungeon, BUT can swap the Memoria of a character AND change their skills AND gear on Memoria page. Use this to your advantage before tackling Floor 50 or tackling the "Advanced Farming Routes". | |||||||||||||||||||||||||||||||||||||||||||||||||||||||||||||||||||||||||||||||||||||||||||||||||||||||||||||||||||
30 | Farming Routes for those who have a super decked out Tear Dungeon Team and really want to Min-Max. You WILL need to be able to 1 turn ALL mini bosses (42F-49F) without +2 SP and Phase 2 of Death Slug. 1) 46->50->23 for 77 tears 2) 46->50->pick 49-46 drops->35 for 54 tears 38 drops 2 unlocker Super Niche run: 3) 46->48->33 for 5 diamond (reroll gem pick when owns 999 all common gems until diamond appears) 33 drops 2 unlockers | |||||||||||||||||||||||||||||||||||||||||||||||||||||||||||||||||||||||||||||||||||||||||||||||||||||||||||||||||||
31 | Yuina | Sumomo | ||||||||||||||||||||||||||||||||||||||||||||||||||||||||||||||||||||||||||||||||||||||||||||||||||||||||||||||||||
32 | SS1 | SS1 | ||||||||||||||||||||||||||||||||||||||||||||||||||||||||||||||||||||||||||||||||||||||||||||||||||||||||||||||||||
33 | ||||||||||||||||||||||||||||||||||||||||||||||||||||||||||||||||||||||||||||||||||||||||||||||||||||||||||||||||||||
34 | ||||||||||||||||||||||||||||||||||||||||||||||||||||||||||||||||||||||||||||||||||||||||||||||||||||||||||||||||||||
35 | ||||||||||||||||||||||||||||||||||||||||||||||||||||||||||||||||||||||||||||||||||||||||||||||||||||||||||||||||||||
36 | Tip #2 | |||||||||||||||||||||||||||||||||||||||||||||||||||||||||||||||||||||||||||||||||||||||||||||||||||||||||||||||||||
37 | ||||||||||||||||||||||||||||||||||||||||||||||||||||||||||||||||||||||||||||||||||||||||||||||||||||||||||||||||||||
38 | Remove "Extra Turn" buff when energy drops to 0. If you fail to do so, Post-action OD HP loss will proc 2 times. | Seraph Database Keywords: | ||||||||||||||||||||||||||||||||||||||||||||||||||||||||||||||||||||||||||||||||||||||||||||||||||||||||||||||||||
39 | ||||||||||||||||||||||||||||||||||||||||||||||||||||||||||||||||||||||||||||||||||||||||||||||||||||||||||||||||||||
40 | jm02_exp001 change 001 to whatever floor you're on. or use jm02 for the whole dungeon from B1 to B50. | |||||||||||||||||||||||||||||||||||||||||||||||||||||||||||||||||||||||||||||||||||||||||||||||||||||||||||||||||||
41 | ||||||||||||||||||||||||||||||||||||||||||||||||||||||||||||||||||||||||||||||||||||||||||||||||||||||||||||||||||||
42 | Tip #3 | |||||||||||||||||||||||||||||||||||||||||||||||||||||||||||||||||||||||||||||||||||||||||||||||||||||||||||||||||||
43 | Are the Tears Random? | |||||||||||||||||||||||||||||||||||||||||||||||||||||||||||||||||||||||||||||||||||||||||||||||||||||||||||||||||||
44 | Closing the game before the battle ends will restart the fight. | |||||||||||||||||||||||||||||||||||||||||||||||||||||||||||||||||||||||||||||||||||||||||||||||||||||||||||||||||||
45 | Yes | |||||||||||||||||||||||||||||||||||||||||||||||||||||||||||||||||||||||||||||||||||||||||||||||||||||||||||||||||||
46 | ||||||||||||||||||||||||||||||||||||||||||||||||||||||||||||||||||||||||||||||||||||||||||||||||||||||||||||||||||||
47 | Floor 1-10 | Floor 11-20 | Floor 21-30 | Floor 31-40 | Floor 41-50 | |||||||||||||||||||||||||||||||||||||||||||||||||||||||||||||||||||||||||||||||||||||||||||||||||||||||||||||||
48 | ||||||||||||||||||||||||||||||||||||||||||||||||||||||||||||||||||||||||||||||||||||||||||||||||||||||||||||||||||||
49 | ||||||||||||||||||||||||||||||||||||||||||||||||||||||||||||||||||||||||||||||||||||||||||||||||||||||||||||||||||||
50 | ||||||||||||||||||||||||||||||||||||||||||||||||||||||||||||||||||||||||||||||||||||||||||||||||||||||||||||||||||||
51 | Floor 1 | Label | Power ups | Floor 11 | Label | Power ups | Floor 21 | Label | Power ups | Floor 31 | Label | Power ups | Floor 41 | Label | Power ups | |||||||||||||||||||||||||||||||||||||||||||||||||||||||||||||||||||||||||||||||||||||||||||||||||||||
52 | ||||||||||||||||||||||||||||||||||||||||||||||||||||||||||||||||||||||||||||||||||||||||||||||||||||||||||||||||||||
53 | 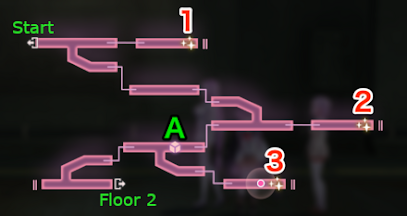 | A | OverDrive Skill Enhance +10% | 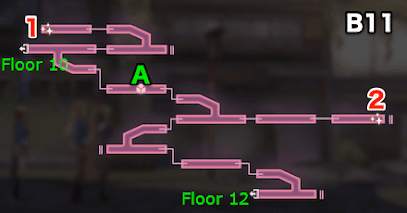 | A | Skill Dmg to DP +10% | 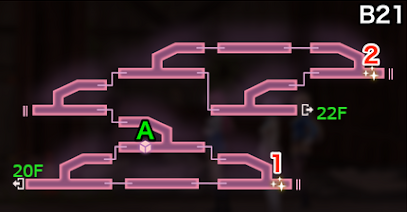 | A | Vanguard DP Regen +10%/turn | 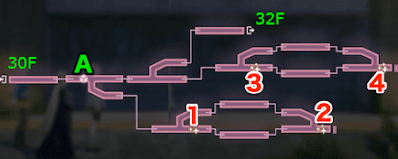 | A | OD gauge +10% | 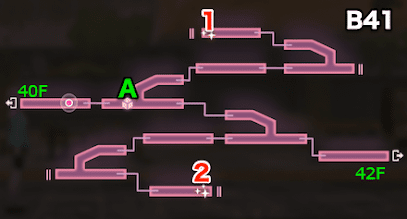 | A | Start of Battle +2 SP | |||||||||||||||||||||||||||||||||||||||||||||||||||||||||||||||||||||||||||||||||||||||||||||||||||||
54 | ||||||||||||||||||||||||||||||||||||||||||||||||||||||||||||||||||||||||||||||||||||||||||||||||||||||||||||||||||||
55 | Label | Drops | Label | Drops | Label | Drops | Label | Drops | Label | Drops | ||||||||||||||||||||||||||||||||||||||||||||||||||||||||||||||||||||||||||||||||||||||||||||||||||||||||||
56 | ||||||||||||||||||||||||||||||||||||||||||||||||||||||||||||||||||||||||||||||||||||||||||||||||||||||||||||||||||||
57 | 1/2/3 | Sunshine | 1 | Sunshine | 1/2 | Sunshine | 1/3 | Sunshine x2 | 1/2 | Sunshine x2 | ||||||||||||||||||||||||||||||||||||||||||||||||||||||||||||||||||||||||||||||||||||||||||||||||||||||||||
58 | 2 | Aqua Amber | 2/4 | Aqua Amber | ||||||||||||||||||||||||||||||||||||||||||||||||||||||||||||||||||||||||||||||||||||||||||||||||||||||||||||||||
59 | ||||||||||||||||||||||||||||||||||||||||||||||||||||||||||||||||||||||||||||||||||||||||||||||||||||||||||||||||||||
60 | ||||||||||||||||||||||||||||||||||||||||||||||||||||||||||||||||||||||||||||||||||||||||||||||||||||||||||||||||||||
61 | ||||||||||||||||||||||||||||||||||||||||||||||||||||||||||||||||||||||||||||||||||||||||||||||||||||||||||||||||||||
62 | ||||||||||||||||||||||||||||||||||||||||||||||||||||||||||||||||||||||||||||||||||||||||||||||||||||||||||||||||||||
63 | ||||||||||||||||||||||||||||||||||||||||||||||||||||||||||||||||||||||||||||||||||||||||||||||||||||||||||||||||||||
64 | ||||||||||||||||||||||||||||||||||||||||||||||||||||||||||||||||||||||||||||||||||||||||||||||||||||||||||||||||||||
65 | Floor 2 | Label | Drops | Floor 12 | Label | Drops | Floor 22 | Label | Drops | Floor 32 | Label | Drops | Floor 42 | Label | Drops | |||||||||||||||||||||||||||||||||||||||||||||||||||||||||||||||||||||||||||||||||||||||||||||||||||||
66 | ||||||||||||||||||||||||||||||||||||||||||||||||||||||||||||||||||||||||||||||||||||||||||||||||||||||||||||||||||||
67 |  | 2/3/4 | Sunshine | 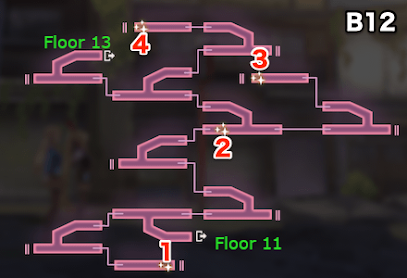 | 1/3/4 | Sunshine |  | 1/3 | Sunshine | 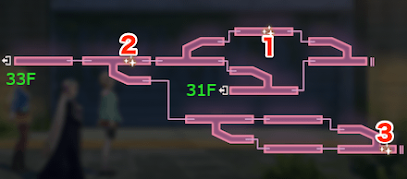 | 1 | Sunshine x2 | 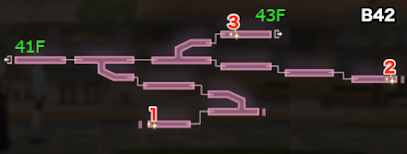 | 1 | Sunshine x2 | |||||||||||||||||||||||||||||||||||||||||||||||||||||||||||||||||||||||||||||||||||||||||||||||||||||
68 | 1 | Tears x1 | 2 | Tears x2 | 2 | Tears x3 | 3 | Aqua Amber | 2 | Aqua Amber | ||||||||||||||||||||||||||||||||||||||||||||||||||||||||||||||||||||||||||||||||||||||||||||||||||||||||||
69 | 2 | Tears x3 | 3 | Tears x4 | ||||||||||||||||||||||||||||||||||||||||||||||||||||||||||||||||||||||||||||||||||||||||||||||||||||||||||||||||
70 | ||||||||||||||||||||||||||||||||||||||||||||||||||||||||||||||||||||||||||||||||||||||||||||||||||||||||||||||||||||
71 | ||||||||||||||||||||||||||||||||||||||||||||||||||||||||||||||||||||||||||||||||||||||||||||||||||||||||||||||||||||
72 | ||||||||||||||||||||||||||||||||||||||||||||||||||||||||||||||||||||||||||||||||||||||||||||||||||||||||||||||||||||
73 | ||||||||||||||||||||||||||||||||||||||||||||||||||||||||||||||||||||||||||||||||||||||||||||||||||||||||||||||||||||
74 | ||||||||||||||||||||||||||||||||||||||||||||||||||||||||||||||||||||||||||||||||||||||||||||||||||||||||||||||||||||
75 | ||||||||||||||||||||||||||||||||||||||||||||||||||||||||||||||||||||||||||||||||||||||||||||||||||||||||||||||||||||
76 | ||||||||||||||||||||||||||||||||||||||||||||||||||||||||||||||||||||||||||||||||||||||||||||||||||||||||||||||||||||
77 | ||||||||||||||||||||||||||||||||||||||||||||||||||||||||||||||||||||||||||||||||||||||||||||||||||||||||||||||||||||
78 | Floor 33 | Label | Power ups | Boss Cancer | ||||||||||||||||||||||||||||||||||||||||||||||||||||||||||||||||||||||||||||||||||||||||||||||||||||||||||||||||
79 | Floor 3 | Label | Power ups | Boss Cancer | Floor 43 | Label | Power ups | Boss Cancer | ||||||||||||||||||||||||||||||||||||||||||||||||||||||||||||||||||||||||||||||||||||||||||||||||||||||||||||
80 | 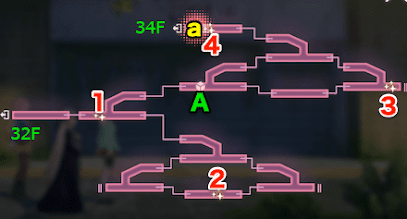 | A | Rearguard DP +10%/turn | Name | Weakness | Resist | Resist | |||||||||||||||||||||||||||||||||||||||||||||||||||||||||||||||||||||||||||||||||||||||||||||||||||||||||||||
81 | 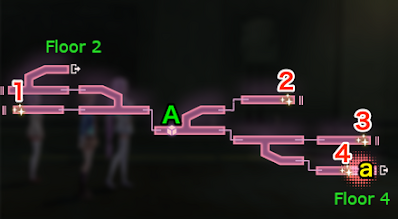 | A | Skill Dmg to DP +10% | Name | Weakness | Resist | Resist | Pile Golem x2 | Crush | Slash | 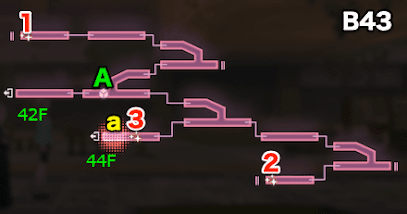 | A | Reaguard +10% DP / turn | Name | Weakness | Resist | Resist | |||||||||||||||||||||||||||||||||||||||||||||||||||||||||||||||||||||||||||||||||||||||||||||||||||
82 | Fire Knocker | Ice | Slash | Fire | Pierce | Floor 13 | Label | Power ups | Boss Cancer | Floor 23 | Label | Power ups | Boss Cancer | Label | Drops |  |  | Barrel Walker | Ice | Null | ||||||||||||||||||||||||||||||||||||||||||||||||||||||||||||||||||||||||||||||||||||||||||||||||
83 | Label | Drops |  |  |  |  | Label | Drops |  |  | ||||||||||||||||||||||||||||||||||||||||||||||||||||||||||||||||||||||||||||||||||||||||||||||||||||||||||
84 | 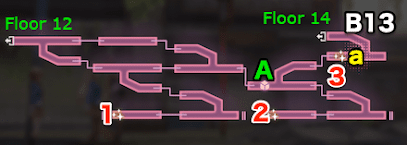 | A | Start of Battle +1SP | Name | Weakness | Resist | Resist |  | A | Skill Dmg to HP +10% | Name | Weakness | Resist | Resist | 2 | Sunshine x2 | -50% | 75% | ||||||||||||||||||||||||||||||||||||||||||||||||||||||||||||||||||||||||||||||||||||||||||||||||||
85 | 1/2/3 | Sunshine | -100% | -50% | 100% | 50% | Wire Red Gamma | Ice | Slash | Pile Golem | Crush | Slash | 3 | Aqua Amber | 1 | Sunshine x2 | -100% | 50% | ||||||||||||||||||||||||||||||||||||||||||||||||||||||||||||||||||||||||||||||||||||||||||||||||||
86 | 4 | Tears x2 | Knocker x2 | Light | Slash | Dark | Pierce | Label | Drops | | | Label | Drops | | | 1 | Gem | 2 | Aqua Amber | |||||||||||||||||||||||||||||||||||||||||||||||||||||||||||||||||||||||||||||||||||||||||||||||||
87 |  | |  | | 4 | Tears x3 | 3 | Tears x4 | ||||||||||||||||||||||||||||||||||||||||||||||||||||||||||||||||||||||||||||||||||||||||||||||||||||||||||||
88 | 1/2 | Sunshine | -100% | -50% | 1/2 | Sunshine | -50% | 75% | ||||||||||||||||||||||||||||||||||||||||||||||||||||||||||||||||||||||||||||||||||||||||||||||||||||||||||||
89 | -100% | -50% | 100% | 50% | 3 | Tears x2 | Blue Gamma | Thunder | Slash | 3 | Aqua Amber | Corolla Knife | ||||||||||||||||||||||||||||||||||||||||||||||||||||||||||||||||||||||||||||||||||||||||||||||||||||||||
90 |  | | 4 | Tears x3 | ||||||||||||||||||||||||||||||||||||||||||||||||||||||||||||||||||||||||||||||||||||||||||||||||||||||||||||||||
91 | ||||||||||||||||||||||||||||||||||||||||||||||||||||||||||||||||||||||||||||||||||||||||||||||||||||||||||||||||||||
92 | -100% | -50% | Floor 34 | Label | Power ups | |||||||||||||||||||||||||||||||||||||||||||||||||||||||||||||||||||||||||||||||||||||||||||||||||||||||||||||||
93 | Floor 4 | Label | Power ups | Floor 14 | Label | Power ups | Floor 44 | Label | Power ups | |||||||||||||||||||||||||||||||||||||||||||||||||||||||||||||||||||||||||||||||||||||||||||||||||||||||||||
94 | 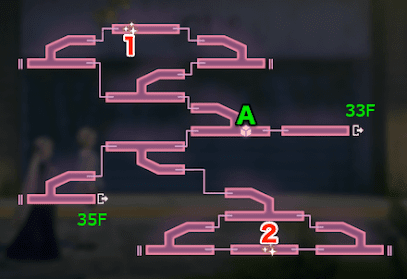 | A | Rearguard +1 SP / turn | |||||||||||||||||||||||||||||||||||||||||||||||||||||||||||||||||||||||||||||||||||||||||||||||||||||||||||||||||
95 | 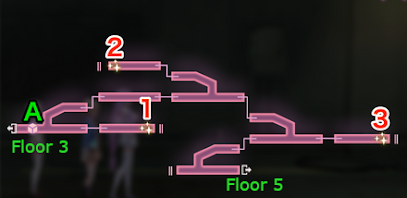 | A | Energy +20 | 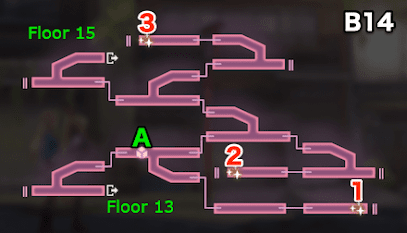 | A | DP Recovery +500 | 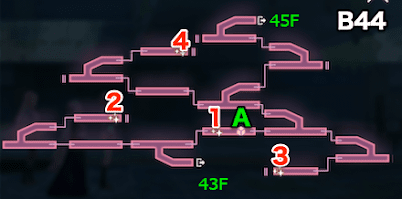 | A | Start of Battle Skill Enhance +20% (1 turn) | |||||||||||||||||||||||||||||||||||||||||||||||||||||||||||||||||||||||||||||||||||||||||||||||||||||||||||
96 | Floor 24 | Label | Power ups | Label | Drops | |||||||||||||||||||||||||||||||||||||||||||||||||||||||||||||||||||||||||||||||||||||||||||||||||||||||||||||||
97 | Label | Drops | Label | Drops | Label | Drops | ||||||||||||||||||||||||||||||||||||||||||||||||||||||||||||||||||||||||||||||||||||||||||||||||||||||||||||||
98 |  | A | Battle Start Crit Rate +10% (3 turn) | 1 | Sunshine x2 | |||||||||||||||||||||||||||||||||||||||||||||||||||||||||||||||||||||||||||||||||||||||||||||||||||||||||||||||
99 | 1/2/3 | Sunshine | 2/3 | Sunshine | 2 | Aqua Amber | 2/3 | Sunshine x2 | ||||||||||||||||||||||||||||||||||||||||||||||||||||||||||||||||||||||||||||||||||||||||||||||||||||||||||||
100 | 1 | Aqua Amber | Label | Drops | 4 | Aqua Amber | ||||||||||||||||||||||||||||||||||||||||||||||||||||||||||||||||||||||||||||||||||||||||||||||||||||||||||||||
101 | 1 | Gem | ||||||||||||||||||||||||||||||||||||||||||||||||||||||||||||||||||||||||||||||||||||||||||||||||||||||||||||||||||
102 | 2 | Sunshine | ||||||||||||||||||||||||||||||||||||||||||||||||||||||||||||||||||||||||||||||||||||||||||||||||||||||||||||||||||
103 | 1 | Aqua Amber | ||||||||||||||||||||||||||||||||||||||||||||||||||||||||||||||||||||||||||||||||||||||||||||||||||||||||||||||||||
104 | ||||||||||||||||||||||||||||||||||||||||||||||||||||||||||||||||||||||||||||||||||||||||||||||||||||||||||||||||||||
105 | ||||||||||||||||||||||||||||||||||||||||||||||||||||||||||||||||||||||||||||||||||||||||||||||||||||||||||||||||||||
106 | Floor 5 | Label | Drops | Boss Cancer | ||||||||||||||||||||||||||||||||||||||||||||||||||||||||||||||||||||||||||||||||||||||||||||||||||||||||||||||||
107 | ||||||||||||||||||||||||||||||||||||||||||||||||||||||||||||||||||||||||||||||||||||||||||||||||||||||||||||||||||||
108 | 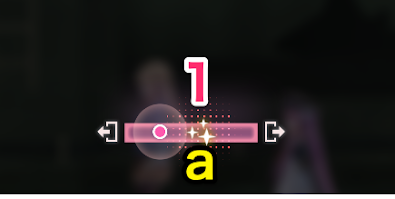 | 1 | Tears x2 | Name | Weakness | Resist | Resist | |||||||||||||||||||||||||||||||||||||||||||||||||||||||||||||||||||||||||||||||||||||||||||||||||||||||||||||
109 | Abyss Red | Ice | Slash | Pierce | Floor 15 | Label | Drops | Boss Cancer | Floor 25 | Label | Drops | Boss Cancer | Floor 35 | Label | Drops | Boss Cancer | Floor 45 | Label | Drops | Boss Cancer | ||||||||||||||||||||||||||||||||||||||||||||||||||||||||||||||||||||||||||||||||||||||||||||||||
110 | | | | |||||||||||||||||||||||||||||||||||||||||||||||||||||||||||||||||||||||||||||||||||||||||||||||||||||||||||||||||
111 | | 1 | Tears x3 | Name | Weakness | Resist | Resist | | 1 | Tears x3 | Name | Weakness | Resist | Resist | | 1 | Tears x4 | Name | Weakness | Resist | Resist | | 1 | Tears x5 | Name | Weakness | Resist | Resist | ||||||||||||||||||||||||||||||||||||||||||||||||||||||||||||||||||||||||||||||||||||||||
112 | -100% | -50% | 50% | Shrimp Crab | Pierce | Slash | Crush | Barrel Walker | Fire | Null | Barrel Walker | Thunder | Null | Barrel Walker | Dark | Null | ||||||||||||||||||||||||||||||||||||||||||||||||||||||||||||||||||||||||||||||||||||||||||||||||||||
113 | | |  |  |  |  | |  | | |||||||||||||||||||||||||||||||||||||||||||||||||||||||||||||||||||||||||||||||||||||||||||||||||||||||||||
114 | ||||||||||||||||||||||||||||||||||||||||||||||||||||||||||||||||||||||||||||||||||||||||||||||||||||||||||||||||||||
115 | -50% | 75% | 75% | -100% | 25% | -100% | 50% | -100% | 50% | |||||||||||||||||||||||||||||||||||||||||||||||||||||||||||||||||||||||||||||||||||||||||||||||||||||||||||
116 | Balb Flee | Dark | ||||||||||||||||||||||||||||||||||||||||||||||||||||||||||||||||||||||||||||||||||||||||||||||||||||||||||||||||||
117 |  | |||||||||||||||||||||||||||||||||||||||||||||||||||||||||||||||||||||||||||||||||||||||||||||||||||||||||||||||||||
118 | ||||||||||||||||||||||||||||||||||||||||||||||||||||||||||||||||||||||||||||||||||||||||||||||||||||||||||||||||||||
119 | Floor 6 | Label | Power ups | -100% | ||||||||||||||||||||||||||||||||||||||||||||||||||||||||||||||||||||||||||||||||||||||||||||||||||||||||||||||||
120 | ||||||||||||||||||||||||||||||||||||||||||||||||||||||||||||||||||||||||||||||||||||||||||||||||||||||||||||||||||||
121 | 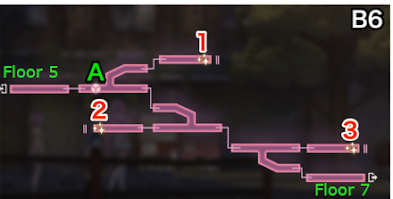 | A | OverDrive Skill Enhance 10% | |||||||||||||||||||||||||||||||||||||||||||||||||||||||||||||||||||||||||||||||||||||||||||||||||||||||||||||||||
122 | Floor 16 | Label | Power ups | Floor 26 | Label | Power ups | Floor 36 | Label | Power ups | Floor 46 | Label | Power ups | ||||||||||||||||||||||||||||||||||||||||||||||||||||||||||||||||||||||||||||||||||||||||||||||||||||||||
123 | Label | Drops | ||||||||||||||||||||||||||||||||||||||||||||||||||||||||||||||||||||||||||||||||||||||||||||||||||||||||||||||||||
124 | 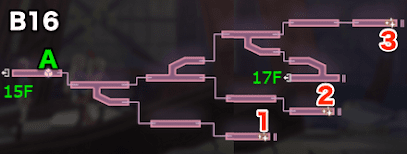 | A | Increase DR +10% |  | A | Vanguard +1 SP / turn | 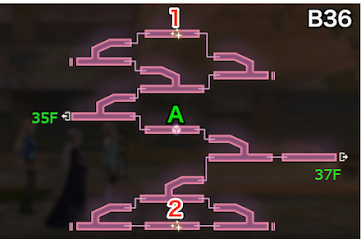 | A | Increase DR +10% | 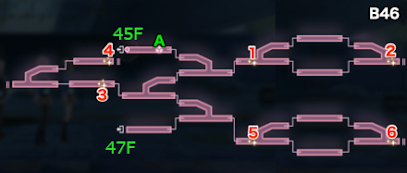 | A | Extra turn | ||||||||||||||||||||||||||||||||||||||||||||||||||||||||||||||||||||||||||||||||||||||||||||||||||||||||
125 | 1/2/3 | Sunshine | ||||||||||||||||||||||||||||||||||||||||||||||||||||||||||||||||||||||||||||||||||||||||||||||||||||||||||||||||||
126 | Label | Drops | Label | Drops | Label | Drops | Label | Drops | ||||||||||||||||||||||||||||||||||||||||||||||||||||||||||||||||||||||||||||||||||||||||||||||||||||||||||||
127 | ||||||||||||||||||||||||||||||||||||||||||||||||||||||||||||||||||||||||||||||||||||||||||||||||||||||||||||||||||||
128 | 1/2/3 | Sunshine | 1/2/3 | Sunshine | 1 | Sunshine x2 | 1/3/4/5 | Sunshine x2 | ||||||||||||||||||||||||||||||||||||||||||||||||||||||||||||||||||||||||||||||||||||||||||||||||||||||||||||
129 | 2 | Aqua Amber | 2/6 | Aqua Amber | ||||||||||||||||||||||||||||||||||||||||||||||||||||||||||||||||||||||||||||||||||||||||||||||||||||||||||||||||
130 | ||||||||||||||||||||||||||||||||||||||||||||||||||||||||||||||||||||||||||||||||||||||||||||||||||||||||||||||||||||
131 | ||||||||||||||||||||||||||||||||||||||||||||||||||||||||||||||||||||||||||||||||||||||||||||||||||||||||||||||||||||
132 | Floor 7 | Label | Drops | |||||||||||||||||||||||||||||||||||||||||||||||||||||||||||||||||||||||||||||||||||||||||||||||||||||||||||||||||
133 | ||||||||||||||||||||||||||||||||||||||||||||||||||||||||||||||||||||||||||||||||||||||||||||||||||||||||||||||||||||
134 | 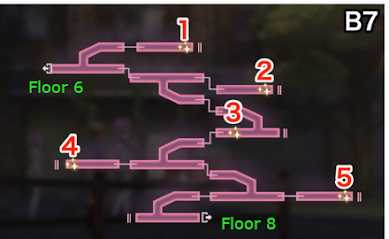 | 1/2/5 | Sunshine | |||||||||||||||||||||||||||||||||||||||||||||||||||||||||||||||||||||||||||||||||||||||||||||||||||||||||||||||||
135 | 4 | Aqua Amber | Floor 17 | Label | Drops | Floor 27 | Label | Drops | Floor 47 | Label | Drops | |||||||||||||||||||||||||||||||||||||||||||||||||||||||||||||||||||||||||||||||||||||||||||||||||||||||||
136 | 3 | Tears x2 | ||||||||||||||||||||||||||||||||||||||||||||||||||||||||||||||||||||||||||||||||||||||||||||||||||||||||||||||||||
137 | 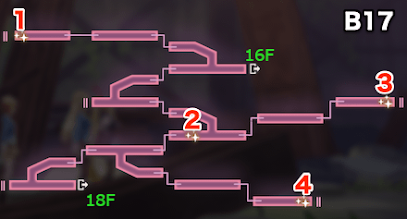 | 1/3/4 | Sunshine | 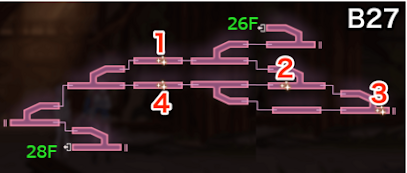 | 2/4 | Sunshine | Floor 37 | Label | Drops | 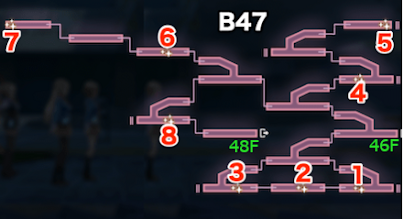 | 1/3/4/5/6 | Sunshine x2 | ||||||||||||||||||||||||||||||||||||||||||||||||||||||||||||||||||||||||||||||||||||||||||||||||||||||||
138 | 2 | Tears x2 | 3 | Aqua Amber | 2/7 | Aqua Amber | ||||||||||||||||||||||||||||||||||||||||||||||||||||||||||||||||||||||||||||||||||||||||||||||||||||||||||||||
139 | 1 | Tears x3 |  | 2/3 | Sunshine x2 | 8 | Tears x5 | |||||||||||||||||||||||||||||||||||||||||||||||||||||||||||||||||||||||||||||||||||||||||||||||||||||||||||||
140 | 1 | Gem | ||||||||||||||||||||||||||||||||||||||||||||||||||||||||||||||||||||||||||||||||||||||||||||||||||||||||||||||||||
141 | 4 | Tears x3 | ||||||||||||||||||||||||||||||||||||||||||||||||||||||||||||||||||||||||||||||||||||||||||||||||||||||||||||||||||
142 | ||||||||||||||||||||||||||||||||||||||||||||||||||||||||||||||||||||||||||||||||||||||||||||||||||||||||||||||||||||
143 | ||||||||||||||||||||||||||||||||||||||||||||||||||||||||||||||||||||||||||||||||||||||||||||||||||||||||||||||||||||
144 | ||||||||||||||||||||||||||||||||||||||||||||||||||||||||||||||||||||||||||||||||||||||||||||||||||||||||||||||||||||
145 | ||||||||||||||||||||||||||||||||||||||||||||||||||||||||||||||||||||||||||||||||||||||||||||||||||||||||||||||||||||
146 | ||||||||||||||||||||||||||||||||||||||||||||||||||||||||||||||||||||||||||||||||||||||||||||||||||||||||||||||||||||
147 | Floor 8 | Label | Power ups | Boss Cancer | ||||||||||||||||||||||||||||||||||||||||||||||||||||||||||||||||||||||||||||||||||||||||||||||||||||||||||||||||
148 | ||||||||||||||||||||||||||||||||||||||||||||||||||||||||||||||||||||||||||||||||||||||||||||||||||||||||||||||||||||
149 | 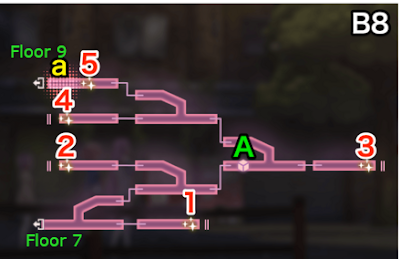 | A | Skill Dmg to HP +10% | Name | Weakness | Resist | Resist | Floor 48 | Label | Power ups | Boss Cancer | |||||||||||||||||||||||||||||||||||||||||||||||||||||||||||||||||||||||||||||||||||||||||||||||||||||||||
150 | Ice Knocker | Thunder | Slash | Floor 18 | Label | Power ups | Boss Cancer | Floor 28 | Label | Power ups | Boss Cancer | Floor 38 | Label | Power ups | Boss Cancer | |||||||||||||||||||||||||||||||||||||||||||||||||||||||||||||||||||||||||||||||||||||||||||||||||||||
151 | Label | Drops | | | 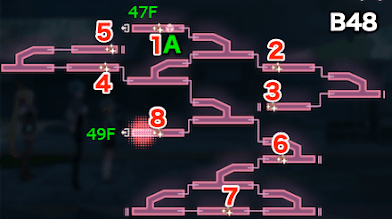 | A | Skill Dmg to DP +10% | Name | Weakness | Resist | Resist | |||||||||||||||||||||||||||||||||||||||||||||||||||||||||||||||||||||||||||||||||||||||||||||||||||||||||
152 | 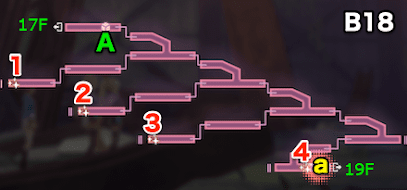 | A | Battle Start Skill Enhance +20% (1 turn) | Name | Weakness | Resist | Resist | 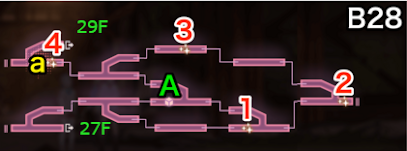 | A | Rearguard DP Regen +10%/turn | Name | Weakness | Resist | Resist | 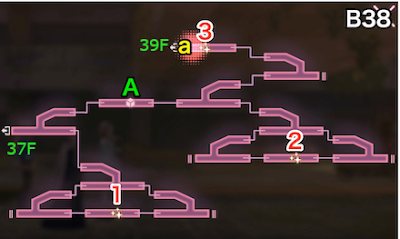 | A | Vanguard +1 SP / turn | Name | Weakness | Resist | Resist | Barrel Walker x2 | Null | |||||||||||||||||||||||||||||||||||||||||||||||||||||||||||||||||||||||||||||||||||||||||||||
153 | 1/2/3/4 | Sunshine | -100% | -50% | Yellow Wire | Fire | Slash | Pile Golem | Crush | Slash | Pile Golem | Crush | Slash | Label | Drops | | ||||||||||||||||||||||||||||||||||||||||||||||||||||||||||||||||||||||||||||||||||||||||||||||||||||
154 | 5 | Tears x2 | Blue Beta x2 | Thunder | Slash | Label | Drops | | | Label | Drops |  | | Label | Drops |  |  | |||||||||||||||||||||||||||||||||||||||||||||||||||||||||||||||||||||||||||||||||||||||||||||||||||
155 | | | 2/4/6/7 | Sunshine x2 | 50% | |||||||||||||||||||||||||||||||||||||||||||||||||||||||||||||||||||||||||||||||||||||||||||||||||||||||||||||||
156 | 1/2/3 | Sunshine | -100% | -50% | 1/3 | Sunshine | -50% | 75% | 1 | Sunshine x2 | -75% | 50% | 3/5 | Aqua Amber | ||||||||||||||||||||||||||||||||||||||||||||||||||||||||||||||||||||||||||||||||||||||||||||||||||||||
157 | -100% | -50% | 4 | Tears x3 | Balb Flee | Light | 2 | Aqua Amber | 2 | Aqua Amber | 1 | Gem | ||||||||||||||||||||||||||||||||||||||||||||||||||||||||||||||||||||||||||||||||||||||||||||||||||||||||
158 |  | 4 | Tears x3 | 3 | Tears x3 | 8 | Tears x5 | |||||||||||||||||||||||||||||||||||||||||||||||||||||||||||||||||||||||||||||||||||||||||||||||||||||||||||||
159 | ||||||||||||||||||||||||||||||||||||||||||||||||||||||||||||||||||||||||||||||||||||||||||||||||||||||||||||||||||||
160 | -100% | |||||||||||||||||||||||||||||||||||||||||||||||||||||||||||||||||||||||||||||||||||||||||||||||||||||||||||||||||||
161 | ||||||||||||||||||||||||||||||||||||||||||||||||||||||||||||||||||||||||||||||||||||||||||||||||||||||||||||||||||||
162 | ||||||||||||||||||||||||||||||||||||||||||||||||||||||||||||||||||||||||||||||||||||||||||||||||||||||||||||||||||||
163 | Floor 9 | Label | Power ups | Floor 29 | Label | Power ups | ||||||||||||||||||||||||||||||||||||||||||||||||||||||||||||||||||||||||||||||||||||||||||||||||||||||||||||||
164 | ||||||||||||||||||||||||||||||||||||||||||||||||||||||||||||||||||||||||||||||||||||||||||||||||||||||||||||||||||||
165 | 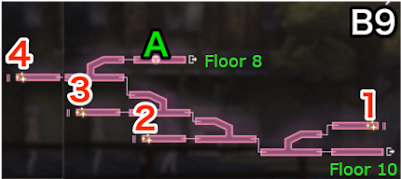 | A | DP Recovery +500 | Floor 19 | Label | Power ups | 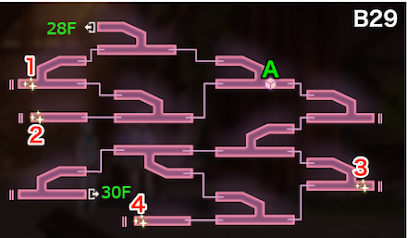 | A | Skill Dmg to DP +10% | Floor 39 | Label | Power ups | Floor 49 | Label | Power ups | |||||||||||||||||||||||||||||||||||||||||||||||||||||||||||||||||||||||||||||||||||||||||||||||||||||
166 | ||||||||||||||||||||||||||||||||||||||||||||||||||||||||||||||||||||||||||||||||||||||||||||||||||||||||||||||||||||
167 | Label | Drops | 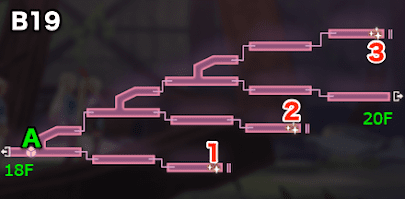 | A | DP Recovery +1000 | Label | Drops | 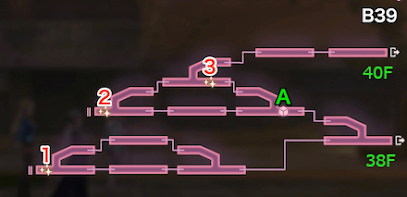 | A | DP Recovery (DP revive) | 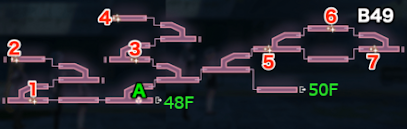 | A | Increase DR +10% | |||||||||||||||||||||||||||||||||||||||||||||||||||||||||||||||||||||||||||||||||||||||||||||||||||||||
168 | ||||||||||||||||||||||||||||||||||||||||||||||||||||||||||||||||||||||||||||||||||||||||||||||||||||||||||||||||||||
169 | 1/3/4 | Sunshine | Label | Drops | 1/3 | Sunshine | Label | Drops | Label | Drops | ||||||||||||||||||||||||||||||||||||||||||||||||||||||||||||||||||||||||||||||||||||||||||||||||||||||||||
170 | 2 | Aqua Amber | 2/4 | Aqua Amber | ||||||||||||||||||||||||||||||||||||||||||||||||||||||||||||||||||||||||||||||||||||||||||||||||||||||||||||||||
171 | 1/3 | Sunshine | 1/2 | Sunshine x2 | 1/2/3/4/5/7 | Sunshine x2 | ||||||||||||||||||||||||||||||||||||||||||||||||||||||||||||||||||||||||||||||||||||||||||||||||||||||||||||||
172 | 2 | Aqua Amber | 3 | Gem | 6 | Aqua Amber | ||||||||||||||||||||||||||||||||||||||||||||||||||||||||||||||||||||||||||||||||||||||||||||||||||||||||||||||
173 | ||||||||||||||||||||||||||||||||||||||||||||||||||||||||||||||||||||||||||||||||||||||||||||||||||||||||||||||||||||
174 | ||||||||||||||||||||||||||||||||||||||||||||||||||||||||||||||||||||||||||||||||||||||||||||||||||||||||||||||||||||
175 | Floor 10 | Label | Drops | Boss Cancer | ||||||||||||||||||||||||||||||||||||||||||||||||||||||||||||||||||||||||||||||||||||||||||||||||||||||||||||||||
176 | ||||||||||||||||||||||||||||||||||||||||||||||||||||||||||||||||||||||||||||||||||||||||||||||||||||||||||||||||||||
177 | | 1 | Tears x2 | Name | Weakness | Resist | Resist | |||||||||||||||||||||||||||||||||||||||||||||||||||||||||||||||||||||||||||||||||||||||||||||||||||||||||||||
178 | Abyss Red | Null | Floor 20 | Label | Drops | Boss Cancer | Floor 30 | Label | Drops | Boss Cancer | Floor 40 | Label | Drops | Boss Cancer | Floor 50 | Label | Drops | Boss Cancer | ||||||||||||||||||||||||||||||||||||||||||||||||||||||||||||||||||||||||||||||||||||||||||||||||||
179 | | |||||||||||||||||||||||||||||||||||||||||||||||||||||||||||||||||||||||||||||||||||||||||||||||||||||||||||||||||||
180 | | 1/3 | Tears x3 | Name | Weakness | Resist | Resist | | 1 | Tears x4 | Name | Weakness | Resist | Resist | | 1 | Tears x4 | Name | Weakness | Resist | Resist |  | 1 | Tears x5 | Name | Weakness | Resist | Resist | ||||||||||||||||||||||||||||||||||||||||||||||||||||||||||||||||||||||||||||||||||||||||
181 | 25% | Barrel Walker | Null | Arachne | Null | Barrel Walker | Light | Null | 2 | Tears x10 | Death Slug Phase 1 | Null | 300k HP | |||||||||||||||||||||||||||||||||||||||||||||||||||||||||||||||||||||||||||||||||||||||||||||||||||||||
182 | | |  | | | |||||||||||||||||||||||||||||||||||||||||||||||||||||||||||||||||||||||||||||||||||||||||||||||||||||||||||||||
183 | ||||||||||||||||||||||||||||||||||||||||||||||||||||||||||||||||||||||||||||||||||||||||||||||||||||||||||||||||||||
184 | 25% | 25% | -100% | 50% | 75% | |||||||||||||||||||||||||||||||||||||||||||||||||||||||||||||||||||||||||||||||||||||||||||||||||||||||||||||||
185 | Phase 2 | |||||||||||||||||||||||||||||||||||||||||||||||||||||||||||||||||||||||||||||||||||||||||||||||||||||||||||||||||||
186 | ||||||||||||||||||||||||||||||||||||||||||||||||||||||||||||||||||||||||||||||||||||||||||||||||||||||||||||||||||||
187 | Death Slug Phase 2 | Null | 1.2 Mill HP | |||||||||||||||||||||||||||||||||||||||||||||||||||||||||||||||||||||||||||||||||||||||||||||||||||||||||||||||||
188 | | |||||||||||||||||||||||||||||||||||||||||||||||||||||||||||||||||||||||||||||||||||||||||||||||||||||||||||||||||||
189 | ||||||||||||||||||||||||||||||||||||||||||||||||||||||||||||||||||||||||||||||||||||||||||||||||||||||||||||||||||||
190 | 75% | |||||||||||||||||||||||||||||||||||||||||||||||||||||||||||||||||||||||||||||||||||||||||||||||||||||||||||||||||||
191 | ||||||||||||||||||||||||||||||||||||||||||||||||||||||||||||||||||||||||||||||||||||||||||||||||||||||||||||||||||||
192 | Final Boss Tips: | |||||||||||||||||||||||||||||||||||||||||||||||||||||||||||||||||||||||||||||||||||||||||||||||||||||||||||||||||||
193 | ||||||||||||||||||||||||||||||||||||||||||||||||||||||||||||||||||||||||||||||||||||||||||||||||||||||||||||||||||||
194 | Any turns during "Phase 1" will not reduce energy. All turns during "Phase 2" will cost energy. Buffs during "Phase 1" will also carry over to "Phase 2". It is advisable to prebuff and build to OD3 during "Phase 1", then kill to enter "Phase 2" with OD3 and full buffs. Kill the boss on turn 1 with OD3. | |||||||||||||||||||||||||||||||||||||||||||||||||||||||||||||||||||||||||||||||||||||||||||||||||||||||||||||||||||
195 | ||||||||||||||||||||||||||||||||||||||||||||||||||||||||||||||||||||||||||||||||||||||||||||||||||||||||||||||||||||
196 | ||||||||||||||||||||||||||||||||||||||||||||||||||||||||||||||||||||||||||||||||||||||||||||||||||||||||||||||||||||
197 | ||||||||||||||||||||||||||||||||||||||||||||||||||||||||||||||||||||||||||||||||||||||||||||||||||||||||||||||||||||
198 | ||||||||||||||||||||||||||||||||||||||||||||||||||||||||||||||||||||||||||||||||||||||||||||||||||||||||||||||||||||
199 | ||||||||||||||||||||||||||||||||||||||||||||||||||||||||||||||||||||||||||||||||||||||||||||||||||||||||||||||||||||
1 | Nothing on this Tab is needed to be known to play the game. This is for those who want to dive super deep into how the game works. | |||||||||||||||||||||||||||||||||||||||||||||||
|---|---|---|---|---|---|---|---|---|---|---|---|---|---|---|---|---|---|---|---|---|---|---|---|---|---|---|---|---|---|---|---|---|---|---|---|---|---|---|---|---|---|---|---|---|---|---|---|---|
2 | ||||||||||||||||||||||||||||||||||||||||||||||||
3 | All info from Kamen (Translated for EN players) | |||||||||||||||||||||||||||||||||||||||||||||||
4 | Visual DMG calculation | |||||||||||||||||||||||||||||||||||||||||||||||
5 | ||||||||||||||||||||||||||||||||||||||||||||||||
6 | ||||||||||||||||||||||||||||||||||||||||||||||||
7 | Skill Dmg Potency | |||||||||||||||||||||||||||||||||||||||||||||||
8 | ||||||||||||||||||||||||||||||||||||||||||||||||
9 | x | (100%+ |  | Skill Enhance | + |  | Elemental Skill Enhance | + |  | Charge | + |  |  | Accessories | + | Passives/Overdrive/ Specific skills | ) | |||||||||||||||||||||||||||||||
10 | ||||||||||||||||||||||||||||||||||||||||||||||||
11 | x | (100%+ |  | Def Down | + |  | Elemental Def Down | + |  | Permanent Def Down | + |  | Permanent Elemental Def Down | + |  | DP Def Down (vs DP only) | + | Passive) | ||||||||||||||||||||||||||||||
12 | ||||||||||||||||||||||||||||||||||||||||||||||||
13 | x | (100%+ |  | Elemental Zone (Field) | ) | (1) |  |  | ||||||||||||||||||||||||||||||||||||||||
14 | ||||||||||||||||||||||||||||||||||||||||||||||||
15 | x | (100%+ | Skill DP/HP Modifier | ) | ||||||||||||||||||||||||||||||||||||||||||||
16 | ||||||||||||||||||||||||||||||||||||||||||||||||
17 | x | (100%+ |  | Totem (Token) | ) | (2) | >>> | |||||||||||||||||||||||||||||||||||||||||
18 | ||||||||||||||||||||||||||||||||||||||||||||||||
19 | x | (100%+ |  | Multihit | + |  | Multihit Passive | ) | (3) | >>> | EN: Buff shows up around character (Pic to the right). There is no buff indicator on the buff bar in EN. It exists in JP. | >>> | ||||||||||||||||||||||||||||||||||||
20 | ||||||||||||||||||||||||||||||||||||||||||||||||
21 | x | (150%+ |  | Critical DMG up | + |  | Elemental Crit DMG up | + | Passives) | (4) | ||||||||||||||||||||||||||||||||||||||
22 | ||||||||||||||||||||||||||||||||||||||||||||||||
23 | x | (100%+ |  | Weapon Resist/ Weakness | ) | x | (100%+ |  | Elemental Resist/ Weakness | + |  | Elemental Resist Down | ) | (5) | ||||||||||||||||||||||||||||||||||
24 | ||||||||||||||||||||||||||||||||||||||||||||||||
25 | x | (100%+ |  | Tactician Vision (Mind eye) | ) | x | (100%+ |  | Expose/Vulnerable (Fragile) | ) | (6) | |||||||||||||||||||||||||||||||||||||
26 | ||||||||||||||||||||||||||||||||||||||||||||||||
27 | x | Devastation Rate (Destruction rate) | (100%~999%; can raise to 1299% with super break, not in EN; Only Applied and built on HP) | |||||||||||||||||||||||||||||||||||||||||||||
28 | ||||||||||||||||||||||||||||||||||||||||||||||||
29 | x | Random (0.9~1.1) | ||||||||||||||||||||||||||||||||||||||||||||||
30 | ||||||||||||||||||||||||||||||||||||||||||||||||
31 | ||||||||||||||||||||||||||||||||||||||||||||||||
32 | Notes: | |||||||||||||||||||||||||||||||||||||||||||||||
33 | ||||||||||||||||||||||||||||||||||||||||||||||||
34 | (1) | Includes Rice Field (JP only) Doesn't Include: Passives | ||||||||||||||||||||||||||||||||||||||||||||||
35 | ||||||||||||||||||||||||||||||||||||||||||||||||
36 | (2) | Each stack contributes 16%. Max stacks 10 (Maximum 160%) | ||||||||||||||||||||||||||||||||||||||||||||||
37 | ||||||||||||||||||||||||||||||||||||||||||||||||
38 | (3) | EN: All stacks of passive multihit are consumed at once. JP: Only 1 stack of passive multihit is consumed at a time. | ||||||||||||||||||||||||||||||||||||||||||||||
39 | ||||||||||||||||||||||||||||||||||||||||||||||||
40 | (4) | Critting ignores 50 Border for calculation. This does not stack with Enfeeble. | ||||||||||||||||||||||||||||||||||||||||||||||
41 | ||||||||||||||||||||||||||||||||||||||||||||||||
42 | (5) | Weakness if > 1 Resist if < 1 | >>> |  | Elemental Resist Overwrite will reset natural resist to 0% | |||||||||||||||||||||||||||||||||||||||||||
43 | ||||||||||||||||||||||||||||||||||||||||||||||||
44 | (6) | Only applies in calculation during Weakness (Even if debuff icon exists). Weakness =When weapon resist x Elemental Resist > 1 | ||||||||||||||||||||||||||||||||||||||||||||||
45 | ||||||||||||||||||||||||||||||||||||||||||||||||
46 | ||||||||||||||||||||||||||||||||||||||||||||||||
47 | ||||||||||||||||||||||||||||||||||||||||||||||||
48 | ||||||||||||||||||||||||||||||||||||||||||||||||
49 | Dmg Summary | Combining Resistance and Weakness | ||||||||||||||||||||||||||||||||||||||||||||||
50 | ||||||||||||||||||||||||||||||||||||||||||||||||
51 | Base effectiveness is 100%. Weapon and Element effectiveness are multiplied together to determine the final effectiveness. At 50% res, you need to hit at least 200% effectiveness (or 100% weakness). If at 75% res (25% effectiveness) you will need 400% effectiveness (or 300% weakness) | |||||||||||||||||||||||||||||||||||||||||||||||
52 | Skill Dmg Potency | Each group is multiplied with each other to calculate dmg. It is better to have a spread of different types of buffs and debuffs to maximize your damage (I.e. Having a mix of enhances, defense down, and Multihit is better than only using enhances and elemental enhances.) More info on Skill Dmg Potency can be found under "Cancer Border Info" Section (scroll down). | ||||||||||||||||||||||||||||||||||||||||||||||
53 | Sum of Skill Enhance | |||||||||||||||||||||||||||||||||||||||||||||||
54 | Sum of Def Down | |||||||||||||||||||||||||||||||||||||||||||||||
55 | Sum of Field | |||||||||||||||||||||||||||||||||||||||||||||||
56 | Skill DP/HP Modifier | |||||||||||||||||||||||||||||||||||||||||||||||
57 | Sum of Token | Hit count (Funnel) Info | ||||||||||||||||||||||||||||||||||||||||||||||
58 | Sum of Multihit | |||||||||||||||||||||||||||||||||||||||||||||||
59 | Sum of Crit Dmg (If crit) | -Hit count is one of the strongest offensive Buffs -Hit count is consumed by attack, NOT ONLY SKILL (JP is skill only, Nov 2024). -Auto Attacks WILL consume Hit count buff. -All Hits from Hit count buff will be applied AFTER the base hits of an attack. -Extra hit counts increase DMG + Overdrive gain + Devastation Rate. | ||||||||||||||||||||||||||||||||||||||||||||||
60 | Sum of Dmg Weakness | Buffs consumed by Auto Attacks | ||||||||||||||||||||||||||||||||||||||||||||||
61 | Sum of Elemental Weakness | |||||||||||||||||||||||||||||||||||||||||||||||
62 | Sum of Tactical Vision | Crit Rate (if there is a chance) / Crit Dmg (if crit) / Elemental Crit and Crit dmg (if bracelet is of element) / Funnel (Hit Count) | ||||||||||||||||||||||||||||||||||||||||||||||
63 | Sum of Expose/Vulnerable | |||||||||||||||||||||||||||||||||||||||||||||||
64 | Sum of Devastation Rate | |||||||||||||||||||||||||||||||||||||||||||||||
65 | x | 0.9~1.1 Random (like Pokemon) | ||||||||||||||||||||||||||||||||||||||||||||||
66 | Total Dmg Dealt | |||||||||||||||||||||||||||||||||||||||||||||||
67 | ||||||||||||||||||||||||||||||||||||||||||||||||
68 | General Breakdown of Stats (Pre-Tears) | |||||||||||||||||||||||||||||||||||||||||||||||
69 | ||||||||||||||||||||||||||||||||||||||||||||||||
70 | ||||||||||||||||||||||||||||||||||||||||||||||||
71 | Skill or Defense Type | Calculated Stat (C.Stat) | Notes/comments | Potency Increases Through Skill Level | ||||||||||||||||||||||||||||||||||||||||||||
72 | ||||||||||||||||||||||||||||||||||||||||||||||||
73 | Damage | HP Modifier [+XX% HP Eff] | (STR x 2 + DEX) / 3 | This score is compared to the enemy border to calculate potency. Main Dmg dealers should prioritize the stat they scale harder off of. If they are "default" STR and DEX focus doesn't matter, the stats are weighed the same. *Only exception: Trick-or-Treat from Yayoi Bungo is (STR + DEX x 2) / 3, even though there is no modifier. | Potency | Minimum Potency | Maximum Potency | |||||||||||||||||||||||||||||||||||||||||
74 | DP Modifier [+XX% DP Eff] | (STR + DEX x 2) / 3 | Skill Lvl | 1 | 2 | 3 | 10 | 13 | 17 | 1 | 2 | 3 | 10 | 13 | 17 | |||||||||||||||||||||||||||||||||
75 | "XXX- based" (INT or VIT) | XXX Stat value | Potency Increase of Damage Skills | 0% | 5% | 10% | 45% | 60% | 80% | 0% | 2% | 4% | 18% | 24% | 32% | |||||||||||||||||||||||||||||||||
76 | Default | (STR + DEX) / 2 | Potency Increase of Non-Damage Skills | 0% | 3% | 6% | 30% | 36% | 48% | 0% | 2% | 4% | 18% | 24% | 32% | |||||||||||||||||||||||||||||||||
77 | Debuff | Defense Down | (INT x 2 + LCK) / 3 | Debuff stats are most important to gain higher maximum damage. Once debuffers have VIT/SPR above the enemy border, increase INT or LCK according to the value that scales harder on the left. | (*) Summary: The lower your stats, the more important skill levels are. Increase in potency is a flat rate. | |||||||||||||||||||||||||||||||||||||||||||
78 | Elemental Defense Down | |||||||||||||||||||||||||||||||||||||||||||||||
79 | Applying Weakness | |||||||||||||||||||||||||||||||||||||||||||||||
80 | Fragile (Exposed/Vulnerable) | (INT + LCK x2) / 3 | ||||||||||||||||||||||||||||||||||||||||||||||
81 | Chance Based Debuffs (i.e. Stun) | |||||||||||||||||||||||||||||||||||||||||||||||
82 | Buffs + DP Recovery/Revive | INT | Buffers and healers should focus on defense. Being max level automatically hits max potency. | |||||||||||||||||||||||||||||||||||||||||||||
83 | Defense | Normal (Usually single target) | (VIT x 2 + SPR) / 3 | Raise VIT and SPR to be higher than enemy border to take less damage. | ||||||||||||||||||||||||||||||||||||||||||||
84 | Special (Usually AoE) | (VIT + SPR x 2) / 3 | For the Nerdy Advanced People | |||||||||||||||||||||||||||||||||||||||||||||
85 | Critical Rate | 1.5% + (LCK - Enemy border) x 0.04% (Lower limit 1.5%, upper limit 10%) | Earring Passives | |||||||||||||||||||||||||||||||||||||||||||||
86 | *Please scroll to the bottom for enemy border info | |||||||||||||||||||||||||||||||||||||||||||||||
87 | Hit Count | HP / DP Earring | Devastating (Destruction) | |||||||||||||||||||||||||||||||||||||||||||||
88 | Dmg/Debuff Skill Potency | *Add term : explain Stat Cap | ||||||||||||||||||||||||||||||||||||||||||||||
89 | +15% | +12% | +10% | +15% | +12% | +10% | ||||||||||||||||||||||||||||||||||||||||||
90 | C.Stat for Dmg Potency/Debuff | Please see the table above for "Damage" / "Debuff" | 10+ | 5.00% | 5.00% | 5.00% | 15.00% | 12.00% | 10.00% | |||||||||||||||||||||||||||||||||||||||
91 | Stat Difference (Stat Diff) | C.Stat - Enemy Border | 9 | 6.11% | 5.78% | 5.56% | 13.89% | 11.22% | 9.45% | |||||||||||||||||||||||||||||||||||||||
92 | If Stat Diff > Stat Cap | MAX | 8 | 7.22% | 6.56% | 6.11% | 12.78% | 10.45% | 8.89% | |||||||||||||||||||||||||||||||||||||||
93 | If 0 ≤ Stat Diff | 7 | 8.33% | 7.33% | 6.67% | 11.67% | 9.67% | 8.33% | ||||||||||||||||||||||||||||||||||||||||
94 | 6 | 9.45% | 8.11% | 7.22% | 10.56% | 8.89% | 7.78% | |||||||||||||||||||||||||||||||||||||||||
95 | 5 | 10.56% | 8.89% | 7.78% | 9.45% | 8.11% | 7.22% | |||||||||||||||||||||||||||||||||||||||||
96 | If 0 > Stat Diff (Dmg only) | 4 | 11.67% | 9.67% | 8.33% | 8.33% | 7.33% | 6.67% | ||||||||||||||||||||||||||||||||||||||||
97 | 3 | 12.78% | 10.45% | 8.89% | 7.22% | 6.56% | 6.11% | |||||||||||||||||||||||||||||||||||||||||
98 | 2 | 13.89% | 11.22% | 9.45% | 6.11% | 5.78% | 5.56% | |||||||||||||||||||||||||||||||||||||||||
99 | If 0 > Stat Diff (Debuff only) | MIN | 1 | 15.00% | 12.00% | 10.00% | 5.00% | 5.00% | 5.00% | |||||||||||||||||||||||||||||||||||||||
100 | (*) If Crit, reduce Enemy Border by 50. | * Earring passive only affect skills. They do not affect auto attacks. | ||||||||||||||||||||||||||||||||||||||||||||||
101 | (*) MAX and MIN are the maximum and minimum potency of a skill (after skill lvl) | *HP dmg increasing earrings will effect dmg done to HP, regardless of modifier. | ||||||||||||||||||||||||||||||||||||||||||||||
102 | (*) It is Extremely important that the C.Stat is higher than the Enemy Border | i.e. Sumomo SS1's "Electro-Triangulation Slash" has a DP modifier, but with HP earring, she will deal 15% more dmg to HP with the skill. | ||||||||||||||||||||||||||||||||||||||||||||||
103 | ||||||||||||||||||||||||||||||||||||||||||||||||
104 | Tear Bonus | |||||||||||||||||||||||||||||||||||||||||||||||
105 | ||||||||||||||||||||||||||||||||||||||||||||||||
106 | (*) All Tear Bonus Calculations are added to the Potencies Calculated above. | |||||||||||||||||||||||||||||||||||||||||||||||
107 | (*) All MIN and MAX used in Tear Adjustments use the skill level 1 MIN and MAX values. | |||||||||||||||||||||||||||||||||||||||||||||||
108 | ||||||||||||||||||||||||||||||||||||||||||||||||
109 | Adjustments to Stat Cap | |||||||||||||||||||||||||||||||||||||||||||||||
110 | ||||||||||||||||||||||||||||||||||||||||||||||||
111 | Dmg/Debuff | Adjusted Stat Cap = Base Stat Cap + (Tear lvl x 20) | ||||||||||||||||||||||||||||||||||||||||||||||
112 | Buff/Heal/Crit buff | Adjusted Stat Cap = Base Stat Cap + (Tear lvl x 60) | ||||||||||||||||||||||||||||||||||||||||||||||
113 | (*) Tear = at max is lvl 5 | |||||||||||||||||||||||||||||||||||||||||||||||
114 | (**) If A.Stat is higher than the Adjusted Stat Cap, then Adjusted Stat Cap value is used for the calculation. | Decrease Dmg taken during Taunt | 6% per Tear lvl | |||||||||||||||||||||||||||||||||||||||||||||
115 | ||||||||||||||||||||||||||||||||||||||||||||||||
116 | Adjustments to Skill Dmg Potency | Adjustments to Debuff Potency | ||||||||||||||||||||||||||||||||||||||||||||||
117 | ||||||||||||||||||||||||||||||||||||||||||||||||
118 | If 0 ≤ Stat Diff | If 0 ≤ Stat Diff | ||||||||||||||||||||||||||||||||||||||||||||||
119 | ||||||||||||||||||||||||||||||||||||||||||||||||
120 | ||||||||||||||||||||||||||||||||||||||||||||||||
121 | If 0 > Stat Diff (Dmg only) | If 0 > StatDiff (Debuff only) | MIN x 2% x Tear lvl | |||||||||||||||||||||||||||||||||||||||||||||
122 | ||||||||||||||||||||||||||||||||||||||||||||||||
123 | ||||||||||||||||||||||||||||||||||||||||||||||||
124 | ||||||||||||||||||||||||||||||||||||||||||||||||
125 | Adjustments to Buffs / Heals / Crit buffs | |||||||||||||||||||||||||||||||||||||||||||||||
126 | ||||||||||||||||||||||||||||||||||||||||||||||||
127 | Buffs | |||||||||||||||||||||||||||||||||||||||||||||||
128 | ||||||||||||||||||||||||||||||||||||||||||||||||
129 | ||||||||||||||||||||||||||||||||||||||||||||||||
130 | Heals | |||||||||||||||||||||||||||||||||||||||||||||||
131 | ||||||||||||||||||||||||||||||||||||||||||||||||
132 | ||||||||||||||||||||||||||||||||||||||||||||||||
133 | Crit Rate | |||||||||||||||||||||||||||||||||||||||||||||||
134 | ||||||||||||||||||||||||||||||||||||||||||||||||
135 | ||||||||||||||||||||||||||||||||||||||||||||||||
136 | (*) All passives and skills increasing potencies of above will be applied to the potency calculated after Tear Adjustments. | |||||||||||||||||||||||||||||||||||||||||||||||
137 | ||||||||||||||||||||||||||||||||||||||||||||||||
138 | Overdrive | OD Charge Gained through 15% OD Earrings | ||||||||||||||||||||||||||||||||||||||||||||||
139 | ||||||||||||||||||||||||||||||||||||||||||||||||
140 | 1 Enemy | 2 Enemies | 3 Enemies | |||||||||||||||||||||||||||||||||||||||||||||
141 | Number of Hits for Each Weapon Type (2.5% OD is gained per hit, 40 hits total for OD) | OD Earrings: Additional notes | Hit Count Buff | 3 | 6 | 5 | 10 | 0 | 3 | 6 | 5 | 10 | 0 | 3 | 6 | 5 | 10 | |||||||||||||||||||||||||||||||
142 | Base Hit Count | OD Hit Equivalent | ||||||||||||||||||||||||||||||||||||||||||||||
143 | Weapon Type | Picture | Dmg Type | Auto attack | Follow up Attack | Single target | AoE Skill | OD earrings only effect skills and not auto attacks. | 1 | 1.048 | 4.192 | 7.336 | 6.288 | 11.528 | 2.096 | 8.384 | 14.672 | 12.576 | 23.056 | 3.144 | 12.576 | 22.008 | 18.864 | 34.584 | ||||||||||||||||||||||||
144 | 2 | 2.120 | 5.300 | 8.480 | 7.420 | 12.720 | 4.240 | 10.600 | 16.960 | 14.840 | 25.440 | 6.360 | 15.900 | 25.440 | 22.260 | 38.160 | ||||||||||||||||||||||||||||||||
145 | Sword/ Scythe |  |  |  | 3 | 4 | 4 | 3 | 3 | 3.216 | 6.432 | 9.648 | 8.576 | 13.936 | 6.432 | 12.864 | 19.296 | 17.152 | 27.872 | 9.648 | 19.296 | 28.944 | 25.728 | 41.808 | ||||||||||||||||||||||||
146 | 4 | 4.320 | 7.560 | 10.800 | 9.720 | 15.120 | 8.640 | 15.120 | 21.600 | 19.440 | 30.240 | 12.960 | 22.680 | 32.400 | 29.160 | 45.360 | ||||||||||||||||||||||||||||||||
147 | Twin Sword (Ruka/Kanade) |  | | 2(*) | 2 | 2 | 2 | 5 | 5.460 | 8.736 | 12.012 | 10.920 | 16.380 | 10.920 | 17.472 | 24.024 | 21.840 | 32.760 | 16.380 | 26.208 | 36.036 | 32.760 | 49.140 | |||||||||||||||||||||||||
148 | 6 | 6.624 | 9.936 | 13.248 | 12.144 | 17.664 | 13.248 | 19.872 | 26.496 | 24.288 | 35.328 | 19.872 | 29.808 | 39.744 | 36.432 | 52.992 | ||||||||||||||||||||||||||||||||
149 | Cannon |  |  | 3 | 3 | 3 | 3 | 7 | 7.812 | 11.160 | 14.508 | 13.392 | 18.972 | 15.624 | 22.320 | 29.016 | 26.784 | 37.944 | 23.436 | 33.480 | 43.524 | 40.176 | 56.916 | |||||||||||||||||||||||||
150 | 8 | 8.992 | 12.364 | 15.736 | 14.612 | 20.232 | 17.984 | 24.728 | 31.472 | 29.224 | 40.464 | 26.976 | 37.092 | 47.208 | 43.836 | 60.696 | ||||||||||||||||||||||||||||||||
151 | Gun |  | | 3 | 1 | 1 | 2 | 9 | 10.224 | 13.632 | 17.040 | 15.904 | 21.584 | 20.448 | 27.264 | 34.080 | 31.808 | 43.168 | 30.672 | 40.896 | 51.120 | 47.712 | 64.752 | |||||||||||||||||||||||||
152 | 10 | 11.480 | 14.924 | 18.368 | 17.220 | 22.960 | 22.960 | 29.848 | 36.736 | 34.440 | 45.920 | 34.440 | 44.772 | 55.104 | 51.660 | 68.880 | ||||||||||||||||||||||||||||||||
153 | Claw |  | | 1(*) | 3 | 5 | 2 | 11 | 12.628 | 16.072 | 19.516 | 18.368 | 24.108 | 25.256 | 32.144 | 39.032 | 36.736 | 48.216 | 37.884 | 48.216 | 58.548 | 55.104 | 72.324 | |||||||||||||||||||||||||
154 | 12 | 13.776 | 17.220 | 20.664 | 19.516 | 25.256 | 27.552 | 34.440 | 41.328 | 39.032 | 50.512 | 41.328 | 51.660 | 61.992 | 58.548 | 75.768 | ||||||||||||||||||||||||||||||||
155 | Shield |  |  | 1(*) | 3 | 3 | 3 | 13 | 14.924 | 18.368 | 21.812 | 20.664 | 26.404 | 29.848 | 36.736 | 43.624 | 41.328 | 52.808 | 44.772 | 55.104 | 65.436 | 61.992 | 79.212 | |||||||||||||||||||||||||
156 | 14 | 16.072 | 19.516 | 22.960 | 21.812 | 27.552 | 32.144 | 39.032 | 45.920 | 43.624 | 55.104 | 48.216 | 58.548 | 68.880 | 65.436 | 82.656 | ||||||||||||||||||||||||||||||||
157 | Large Sword |  | | 1(*) | 2 | 2 | 1 | 15 | 17.220 | 20.664 | 24.108 | 22.960 | 28.700 | 34.440 | 41.328 | 48.216 | 45.920 | 57.400 | 51.660 | 61.992 | 72.324 | 68.880 | 86.100 | |||||||||||||||||||||||||
158 | (*) 40 Hits to fill OD bar. Numbers round down, so 39.99 -> OD0 | |||||||||||||||||||||||||||||||||||||||||||||||
159 | (*) All Auto attacks, regardless of hit count will gain a total of 7.5% OD (or 3 hits worth) | (*) OD earrings only work on Skills | ||||||||||||||||||||||||||||||||||||||||||||||
160 | To be noted that Wakki and Ichigo have skills that are the exception to this rule | OD Charge Gained through 12% OD Earrings | ||||||||||||||||||||||||||||||||||||||||||||||
161 | (*) This is not for EX skills. | |||||||||||||||||||||||||||||||||||||||||||||||
162 | 1 Enemy | 2 Enemies | 3 Enemies | |||||||||||||||||||||||||||||||||||||||||||||
163 | Devastation (Destruction) | Hit Count Buff | 3 | 6 | 5 | 10 | 0 | 3 | 6 | 5 | 10 | 0 | 3 | 6 | 5 | 10 | ||||||||||||||||||||||||||||||||
164 | Base Hit Count | OD Hit Equivalent | ||||||||||||||||||||||||||||||||||||||||||||||
165 | 1 | 1.048 | 4.192 | 7.336 | 6.288 | 11.528 | 2.096 | 8.384 | 14.672 | 12.576 | 23.056 | 3.144 | 12.576 | 22.008 | 18.864 | 34.584 | ||||||||||||||||||||||||||||||||
166 | Skills | DR Earrings: Additional Info | 2 | 2.112 | 5.280 | 8.448 | 7.392 | 12.672 | 4.224 | 10.560 | 16.896 | 14.784 | 25.344 | 6.336 | 15.840 | 25.344 | 22.176 | 38.016 | ||||||||||||||||||||||||||||||
167 | 3 | 3.192 | 6.384 | 9.576 | 8.512 | 13.832 | 6.384 | 12.768 | 19.152 | 17.024 | 27.664 | 9.576 | 19.152 | 28.728 | 25.536 | 41.496 | ||||||||||||||||||||||||||||||||
168 | Target | Attack Type | Calculation of DR Built | Calculation of DR Built Using SeraphDB "Skill DR" | DR earrings only affect skills and not auto attacks. | 4 | 4.288 | 7.504 | 10.720 | 9.648 | 15.008 | 8.576 | 15.008 | 21.440 | 19.296 | 30.016 | 12.864 | 22.512 | 32.160 | 28.944 | 45.024 | |||||||||||||||||||||||||||
169 | 5 | 5.400 | 8.640 | 11.880 | 10.800 | 16.200 | 10.800 | 17.280 | 23.760 | 21.600 | 32.400 | 16.200 | 25.920 | 35.640 | 32.400 | 48.600 | ||||||||||||||||||||||||||||||||
170 | Single Target Skill | Auto Attack | 1 x Enemy Destruction | 1 x Enemy Destruction | DR Breakdown | 6 | 6.528 | 9.792 | 13.056 | 11.968 | 17.408 | 13.056 | 19.584 | 26.112 | 23.936 | 34.816 | 19.584 | 29.376 | 39.168 | 35.904 | 52.224 | |||||||||||||||||||||||||||
171 | Normal skill | SP Cost x 0.25 x Enemy Destruction | Skill DR x Enemy Destruction | 7 | 7.672 | 10.960 | 14.248 | 13.152 | 18.632 | 15.344 | 21.920 | 28.496 | 26.304 | 37.264 | 23.016 | 32.880 | 42.744 | 39.456 | 55.896 | |||||||||||||||||||||||||||||
172 | [High Devastation] | SP Cost x 1.0 x Enemy Destruction | Skill DR x Enemy Destruction | Devastation increased is the same between each of the base hits of the skill. If a skill that deals 3 hits and the dmg is dealt as the following: 0.4 > 0.35 > 0.25, each hit will still remain 33% of the total Devastation the skill is supposed to accumulate. Each Extra hit from Funnel buff (Hit Count) will have the % potency of said skill. e.g. If a skill that is supposed to provide 100 DR was provided with a 5 hit x 10% potency buff, an addition of 50% of 100 DR (50 DR) will be provided by the skill. Each of the hits would provide 10 DR in this case. | 8 | 8.832 | 12.144 | 15.456 | 14.352 | 19.872 | 17.664 | 24.288 | 30.912 | 28.704 | 39.744 | 26.496 | 36.432 | 46.368 | 43.056 | 59.616 | ||||||||||||||||||||||||||||
173 | [Great Devastation] | SP Cost x 1.5 x Enemy Destruction | Skill DR x Enemy Destruction | 9 | 10.008 | 13.344 | 16.680 | 15.568 | 21.128 | 20.016 | 26.688 | 33.360 | 31.136 | 42.256 | 30.024 | 40.032 | 50.040 | 46.704 | 63.384 | |||||||||||||||||||||||||||||
174 | [Massive Devastation] | SP Cost x 2.0 x Enemy Destruction | Skill DR x Enemy Destruction | 10 | 11.200 | 14.560 | 17.920 | 16.800 | 22.400 | 22.400 | 29.120 | 35.840 | 33.600 | 44.800 | 33.600 | 43.680 | 53.760 | 50.400 | 67.200 | |||||||||||||||||||||||||||||
175 | AoE Skill | Normal Skill | SP Cost x 0.2 x Enemy Destruction | Skill DR x Enemy Destruction | 11 | 12.364 | 15.736 | 19.108 | 17.984 | 23.604 | 24.728 | 31.472 | 38.216 | 35.968 | 47.208 | 37.092 | 47.208 | 57.324 | 53.952 | 70.812 | ||||||||||||||||||||||||||||
176 | [High Devastation] | SP Cost x 0.8 x Enemy Destruction | Skill DR x Enemy Destruction | 12 | 13.584 | 16.980 | 20.376 | 19.244 | 24.904 | 27.168 | 33.960 | 40.752 | 38.488 | 49.808 | 40.752 | 50.940 | 61.128 | 57.732 | 74.712 | |||||||||||||||||||||||||||||
177 | [Great Devastation] | SP Cost x 1.2 x Enemy Destruction | Skill DR x Enemy Destruction | 13 | 14.820 | 18.240 | 21.660 | 20.520 | 26.220 | 29.640 | 36.480 | 43.320 | 41.040 | 52.440 | 44.460 | 54.720 | 64.980 | 61.560 | 78.660 | |||||||||||||||||||||||||||||
178 | [Massive Devastation] | SP Cost x 1.6 x Enemy Destruction | Skill DR x Enemy Destruction | 14 | 16.072 | 19.516 | 22.960 | 21.812 | 27.552 | 32.144 | 39.032 | 45.920 | 43.624 | 55.104 | 48.216 | 58.548 | 68.880 | 65.436 | 82.656 | |||||||||||||||||||||||||||||
179 | (*)"Enemy Destruction" is the rate enemies get Destruction. | 15 | 17.220 | 20.664 | 24.108 | 22.960 | 28.700 | 34.440 | 41.328 | 48.216 | 45.920 | 57.400 | 51.660 | 61.992 | 72.324 | 68.880 | 86.100 | |||||||||||||||||||||||||||||||
180 | (*)Scroll down to "Dmg Taken" to see "Enemy Destruction" | |||||||||||||||||||||||||||||||||||||||||||||||
181 | ||||||||||||||||||||||||||||||||||||||||||||||||
182 | Damage Recalculation | OD Earring | ||||||||||||||||||||||||||||||||||||||||||||||
183 | 10% | 12% | 15% | |||||||||||||||||||||||||||||||||||||||||||||
184 | Damage is recalculated inbetween hits. Each hit will provide additional DR, increasing the damage in the next hit. | Base Hit Count | ||||||||||||||||||||||||||||||||||||||||||||||
185 | 1 | 1.048 | 1.048 | 1.048 | ||||||||||||||||||||||||||||||||||||||||||||
186 | 2 | 1.052 | 1.056 | 1.06 | ||||||||||||||||||||||||||||||||||||||||||||
187 | 3 | 1.06 | 1.064 | 1.072 | ||||||||||||||||||||||||||||||||||||||||||||
188 | 4 | 1.064 | 1.072 | 1.08 | ||||||||||||||||||||||||||||||||||||||||||||
189 | 5 | 1.072 | 1.08 | 1.092 | ||||||||||||||||||||||||||||||||||||||||||||
190 | 6 | 1.076 | 1.088 | 1.104 | ||||||||||||||||||||||||||||||||||||||||||||
191 | Cancer Border Info | 7 | 1.08 | 1.096 | 1.116 | |||||||||||||||||||||||||||||||||||||||||||
192 | 8 | 1.088 | 1.104 | 1.124 | ||||||||||||||||||||||||||||||||||||||||||||
193 | 9 | 1.092 | 1.112 | 1.136 | ||||||||||||||||||||||||||||||||||||||||||||
194 | Enemy Border | Location | Enemy skills | 10 | 1.1 | 1.12 | 1.148 | |||||||||||||||||||||||||||||||||||||||||
195 | (*) From Seraph database | (*) Multiplier is maxed at 1.148 | ||||||||||||||||||||||||||||||||||||||||||||||
196 | 430 | Score Attack (140), Clock Tower (20F~: , 29F~: 410 / 38F~: 420 / 47F~: 430 | 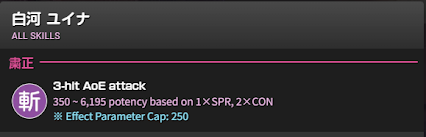 | |||||||||||||||||||||||||||||||||||||||||||||
197 | 400 | Arache Line A (Lvl 16) | ||||||||||||||||||||||||||||||||||||||||||||||
198 | 390 | Clock Tower (10F~), Ch4.2 boss | ||||||||||||||||||||||||||||||||||||||||||||||
199 | 380 | Clock Tower (1 - 9F) / Ch 4.1 boss | ||||||||||||||||||||||||||||||||||||||||||||||
200 | 360 | Tear Dungeon 50F boss; Score Attack (120) | <<< | Minimum and Maximum Potency / VIT or SPR scaling | ||||||||||||||||||||||||||||||||||||||||||||
201 | 350 | Ch 4.2 mobs | <<< | Threshold = Effect Parameter Cap | ||||||||||||||||||||||||||||||||||||||||||||
202 | 340 | Gem Flashback lvl 13 Event XIII Orb V.2 lvl 3 | ||||||||||||||||||||||||||||||||||||||||||||||
203 | ||||||||||||||||||||||||||||||||||||||||||||||||
204 | 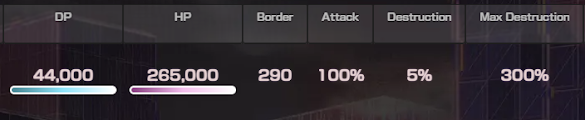 | Terminology | Description | |||||||||||||||||||||||||||||||||||||||||||||
205 | 320 | Gem Flashback lvl10-12 Event SS-XII Orb V.1 lvl 3 Ch 3 boss | Border | Enemy Border | ||||||||||||||||||||||||||||||||||||||||||||
206 | Attack | Enemy Atk Multiplier | ||||||||||||||||||||||||||||||||||||||||||||||
207 | Destruction | Enemy Accumulation Destruction Rate | ||||||||||||||||||||||||||||||||||||||||||||||
208 | ||||||||||||||||||||||||||||||||||||||||||||||||
209 | 310 | Ch 2 mini boss | ||||||||||||||||||||||||||||||||||||||||||||||
210 | 300 | Ch 4.1 mobs | ||||||||||||||||||||||||||||||||||||||||||||||
211 | 290 | Score Attack (100) | ||||||||||||||||||||||||||||||||||||||||||||||
212 | 270 | Ch 2 boss | Damage Taken | |||||||||||||||||||||||||||||||||||||||||||||
213 | 260 | Ch 3 mobs | ||||||||||||||||||||||||||||||||||||||||||||||
214 | *All clock tower info here are for hell mode | C.Stat: Calculated Stat. | C.Stat = (2VIT+1SPR)/3 or (1VIT +2SPR)/3 | >>> | This Varies depending on Enemy skill. | |||||||||||||||||||||||||||||||||||||||||||
215 | (*) Border found here are just general. To find more accurate Borders please look at SeraphDB | If C.Stat is larger than Enemy Border | Dmg taken = (MIN / Threshold * (Enemy Border + Threshold - C.Stat)) * Enemy Atk Multiplier | |||||||||||||||||||||||||||||||||||||||||||||
216 | If C.Stat is less than Enemy Border | Dmg taken = ((MAX - MIN) / Threshold * (Enemy Border - C.stat) + MIN) * Enemy Atk Multiplier | ||||||||||||||||||||||||||||||||||||||||||||||
217 | ||||||||||||||||||||||||||||||||||||||||||||||||
218 | Summary | |||||||||||||||||||||||||||||||||||||||||||||||
219 | ||||||||||||||||||||||||||||||||||||||||||||||||
220 | Make sure the C.Stat for VIT/SPR is always higher than the Enemy Border. Otherwise the enemy will deal a lot of dmg to your girls. | |||||||||||||||||||||||||||||||||||||||||||||||
221 | ||||||||||||||||||||||||||||||||||||||||||||||||
222 | ||||||||||||||||||||||||||||||||||||||||||||||||
223 | ||||||||||||||||||||||||||||||||||||||||||||||||
224 | Misc. | |||||||||||||||||||||||||||||||||||||||||||||||
225 | ||||||||||||||||||||||||||||||||||||||||||||||||
226 | ||||||||||||||||||||||||||||||||||||||||||||||||
227 | ||||||||||||||||||||||||||||||||||||||||||||||||
228 | Follow Up Chances (%) | |||||||||||||||||||||||||||||||||||||||||||||||
229 | ||||||||||||||||||||||||||||||||||||||||||||||||
230 | Damage Type of Skill Used | 5% Chance to Follow up | 3% Chance to Follow up | 2% Chance to Follow up | 1% Chance to Follow up | What do the % stats (from memoria board and limit break) actually effect? | ||||||||||||||||||||||||||||||||||||||||||
231 | ||||||||||||||||||||||||||||||||||||||||||||||||
232 |  | Slash Skill |  | SS Crush (Blunt) | | S Crush (Blunt) | | A Crush (Blunt) | |  | All others | [base stat from level + stat from LB(i.e. LB20 A & LB10 S) + global stat of all memoria + stat from reversion + (stat from accolade rank)] * [LB% + (daphne %)] + everything else | ||||||||||||||||||||||||||||||||||||
233 | ||||||||||||||||||||||||||||||||||||||||||||||||
234 | | Pierce Skill | | SS Slash | | S Slash | | A Slash | | | All others | |||||||||||||||||||||||||||||||||||||
235 | ||||||||||||||||||||||||||||||||||||||||||||||||
236 | | Crush (Blunt) | | SS Pierce | | S Pierce | | A Pierce | | | All others | |||||||||||||||||||||||||||||||||||||
237 | ||||||||||||||||||||||||||||||||||||||||||||||||
238 | (*) Follow up attacks only occur after a damaging skill is used. The skill doesn't need hit count. | |||||||||||||||||||||||||||||||||||||||||||||||
239 | ||||||||||||||||||||||||||||||||||||||||||||||||
240 | ||||||||||||||||||||||||||||||||||||||||||||||||
241 | Misc Info That is 100000000% DO NOT NEED TO KNOW | |||||||||||||||||||||||||||||||||||||||||||||||
242 | ||||||||||||||||||||||||||||||||||||||||||||||||
243 | (*)All this Info is already calculated on the SeraphDatabase: HBR.quest | |||||||||||||||||||||||||||||||||||||||||||||||
244 | ||||||||||||||||||||||||||||||||||||||||||||||||
245 | Base Dmg Potency Calculation | |||||||||||||||||||||||||||||||||||||||||||||||
246 | ||||||||||||||||||||||||||||||||||||||||||||||||
247 | Dmg Type | Equation | ||||||||||||||||||||||||||||||||||||||||||||||
248 | Minimum Potency | Maximum Potency | ||||||||||||||||||||||||||||||||||||||||||||||
249 | Single Target | 162+12*(SPcost^2-1) | 810+60*(SPcost^2-1) | |||||||||||||||||||||||||||||||||||||||||||||
250 | AoE | 159+9*(SPcost^2-1) | 795+45*(SPcost^2-1) | |||||||||||||||||||||||||||||||||||||||||||||
251 | ||||||||||||||||||||||||||||||||||||||||||||||||
252 | Adjustments to Base Dmg Potencies Based off of Conditions | |||||||||||||||||||||||||||||||||||||||||||||||
253 | ||||||||||||||||||||||||||||||||||||||||||||||||
254 | Attachments to Skills | Target | SPcost Adjustments | Notes | Class, if Relevent | |||||||||||||||||||||||||||||||||||||||||||
255 | ||||||||||||||||||||||||||||||||||||||||||||||||
256 | Recoil | Self | +2 | |||||||||||||||||||||||||||||||||||||||||||||
257 | RNG debuffs | +0 | Debuffer | |||||||||||||||||||||||||||||||||||||||||||||
258 | RNG debuffs | -1.5 | Blaster | |||||||||||||||||||||||||||||||||||||||||||||
259 | Imprison | -1 | Blaster | |||||||||||||||||||||||||||||||||||||||||||||
260 | Self Def Down | Self | +1.5 | Dmg dealer | ||||||||||||||||||||||||||||||||||||||||||||
261 | Self Def Down | Self | +2 | Blaster | ||||||||||||||||||||||||||||||||||||||||||||
262 | Provokes | +0 | ||||||||||||||||||||||||||||||||||||||||||||||
263 | Fields | -1 | ||||||||||||||||||||||||||||||||||||||||||||||
264 | SP recovery | Self | +0 | |||||||||||||||||||||||||||||||||||||||||||||
265 | Any Buff | Self | +0 | Post-dmg | ||||||||||||||||||||||||||||||||||||||||||||
266 | Def Down | +0 | Debuffer | |||||||||||||||||||||||||||||||||||||||||||||
267 | Def Down | -1.5 | Attacker | |||||||||||||||||||||||||||||||||||||||||||||
268 | Atk Down | +0 | Defender | |||||||||||||||||||||||||||||||||||||||||||||
269 | Fragile | +0 | Post/Pre-dmg | Debuffer | ||||||||||||||||||||||||||||||||||||||||||||
270 | Fragile | -1 | Pre-dmg | Blaster/defender | ||||||||||||||||||||||||||||||||||||||||||||
271 | Fragile | -0.5 | Pre-dmg | Unison Yukki | ||||||||||||||||||||||||||||||||||||||||||||
272 | Elemental Def Down | +0 | Post-dmg | Debuffer | ||||||||||||||||||||||||||||||||||||||||||||
273 | Elemental Def Down | -.5 | Pre-dmg; 2 turns | Miko 2 | ||||||||||||||||||||||||||||||||||||||||||||
274 | Elemental Def Down | -0.5 | Post; 2 element | Breaker | ||||||||||||||||||||||||||||||||||||||||||||
275 | Elemental Def Down | -1.5 | Pre-dmg / ST | Attacker | ||||||||||||||||||||||||||||||||||||||||||||
276 | Atk up | Self | -0.5 | Pre-dmg | Attacker | |||||||||||||||||||||||||||||||||||||||||||
277 | Elemental Atk Up | Party | -1 | Pre-dmg | ALL | |||||||||||||||||||||||||||||||||||||||||||
278 | Elemental Atk Up | self | -1 | Pre-dmg | attacker | |||||||||||||||||||||||||||||||||||||||||||
279 | Crit rate | Self | -0.5 | Pre-dmg | Defender | |||||||||||||||||||||||||||||||||||||||||||
280 | Crit rate | VG | -0.5 | Pre-dmg | Buffer | |||||||||||||||||||||||||||||||||||||||||||
281 | Crit Dmg | VG | -0.5 | Pre-dmg | Buffer | |||||||||||||||||||||||||||||||||||||||||||
282 | Crit Dmg | Self | -1.5 | Pre-dmg | Attacker | |||||||||||||||||||||||||||||||||||||||||||
283 | Elemental Crit dmg | Self | -1 | Pre-dmg | Attacker | |||||||||||||||||||||||||||||||||||||||||||
284 | Invigorate | Party | +0 | Pre-dmg | Healer | |||||||||||||||||||||||||||||||||||||||||||
285 | Mind eye | Party | -1.5 | Pre-dmg | Attacker | |||||||||||||||||||||||||||||||||||||||||||
286 | Conditional (Charge) | +1.5 | If potency increases + ST | Attacker | ||||||||||||||||||||||||||||||||||||||||||||
287 | Conditional (charge) | +1 | If potency increases + AoE | Attacker | ||||||||||||||||||||||||||||||||||||||||||||
288 | Conditional (DR) | +1.5 | Modifier 30 ->50 | |||||||||||||||||||||||||||||||||||||||||||||
289 | Conditional (DR) | +1 | Modifier | |||||||||||||||||||||||||||||||||||||||||||||
290 | Conditional (Extra Turn) | +1.5 | Modifier | Yuina | ||||||||||||||||||||||||||||||||||||||||||||
291 | Conditional (Extra Turn) | +1 | Modifier | Mona | ||||||||||||||||||||||||||||||||||||||||||||
292 | Conditional (OD) | -0.5 | Condition not met | Misato 2 | ||||||||||||||||||||||||||||||||||||||||||||
293 | +1.0 | Condition met; Add Funnel | ||||||||||||||||||||||||||||||||||||||||||||||
294 | Conditional (1st use) | +0.5 | Wakki 4 | |||||||||||||||||||||||||||||||||||||||||||||
295 | Conditional (1st use) | +1.5 | 30 -> 50 | Bungo 3 | ||||||||||||||||||||||||||||||||||||||||||||
296 | Conditional (Shadowclone) | -0.5 | Add 3 buffs | |||||||||||||||||||||||||||||||||||||||||||||
297 | Elemental Conditional (If Met) | +2.0 | Ruka SS4 | |||||||||||||||||||||||||||||||||||||||||||||
298 | Elemental Conditional (If Met) | ST | +1.0 | Potency increase + DR | blaster | |||||||||||||||||||||||||||||||||||||||||||
299 | Elemental Conditional (If Met) | +1.5 | Potency increase + DR | Adel 2+3 | ||||||||||||||||||||||||||||||||||||||||||||
300 | Elemental Conditional (If Met) | AoE | +1.5 | High DR ; Blaster | blaster | |||||||||||||||||||||||||||||||||||||||||||
301 | Decrease DP | Self | +1.5 | |||||||||||||||||||||||||||||||||||||||||||||
302 | Token/Totem | -.5 | ST | |||||||||||||||||||||||||||||||||||||||||||||
303 | Token/Totem | -1 | AoE | |||||||||||||||||||||||||||||||||||||||||||||
304 | No DP/HP Modifier + token | +1.0 | AoE | Attacker/Breaker | ||||||||||||||||||||||||||||||||||||||||||||
305 | No DP/HP Modifier + token | +0.5 | ST | Attacker/Breaker | ||||||||||||||||||||||||||||||||||||||||||||
306 | Con/VIT based | +.5 | ||||||||||||||||||||||||||||||||||||||||||||||
307 | Increase 50% OD | -2 | ||||||||||||||||||||||||||||||||||||||||||||||
308 | Increase 150% OD | -0.5 | -2 use | Breaker | ||||||||||||||||||||||||||||||||||||||||||||
309 | Permanent Def Down Combo | -2.0 | ||||||||||||||||||||||||||||||||||||||||||||||
310 | Overwrite/apply + Def down | -2.5 | Debuffer | |||||||||||||||||||||||||||||||||||||||||||||
311 | Overwrite/apply + Fragile | -3.0 | Debuffer | |||||||||||||||||||||||||||||||||||||||||||||
312 | Funnel | Self | -1.5 | ST EX | Breaker | |||||||||||||||||||||||||||||||||||||||||||
313 | Funnel | Self | -2.0 | AoE EX | ||||||||||||||||||||||||||||||||||||||||||||
314 | Funnel | Self | -1.5 | AoE EX | Blaster | |||||||||||||||||||||||||||||||||||||||||||
315 | Self Attack down | Self | +0.5 | Breaker; 3 turns | ||||||||||||||||||||||||||||||||||||||||||||
316 | Status Recovery | Party | -1 | Healer | ||||||||||||||||||||||||||||||||||||||||||||
317 | Super Break | -0.5 | ST | Breaker | ||||||||||||||||||||||||||||||||||||||||||||
318 | Super Break | -1.0 | AoE | Breaker | ||||||||||||||||||||||||||||||||||||||||||||
319 | Dispel | -1 | AoE | Breaker | ||||||||||||||||||||||||||||||||||||||||||||
320 | Dispel | -0.5 | ST | Breaker | ||||||||||||||||||||||||||||||||||||||||||||
321 | 3 debuff: Imprison/weak/atk down | -2.5 | Defender | |||||||||||||||||||||||||||||||||||||||||||||
322 | 2 debuff | -1.5 | Debuffer | |||||||||||||||||||||||||||||||||||||||||||||
323 | 3 def debuff | -2.0 | Breaker | |||||||||||||||||||||||||||||||||||||||||||||
324 | 2 elemental buff | Party | -3.5 | |||||||||||||||||||||||||||||||||||||||||||||
325 | 2 buff (elemental buff + crit rate) | Party | -3.0 | |||||||||||||||||||||||||||||||||||||||||||||
326 | Destruction Increase buff | -1.5 | ||||||||||||||||||||||||||||||||||||||||||||||
327 | Irene meta buff | -1 | ||||||||||||||||||||||||||||||||||||||||||||||
328 | Being Unison | Random changes | ||||||||||||||||||||||||||||||||||||||||||||||
329 | Exceptions: Aina 3 common / Aoi 3 common / Bungo 3 EX / Yukki 3 EX. All are better than they should be. | |||||||||||||||||||||||||||||||||||||||||||||||
330 | *I am 100% missing some conditions, but I wanted to add this for fun. | |||||||||||||||||||||||||||||||||||||||||||||||
331 | *Any Memoria that recieved and upgrade/buff do not follow table. | |||||||||||||||||||||||||||||||||||||||||||||||


1 | ||||||||||||||||||||||||||||||||||||||||||
|---|---|---|---|---|---|---|---|---|---|---|---|---|---|---|---|---|---|---|---|---|---|---|---|---|---|---|---|---|---|---|---|---|---|---|---|---|---|---|---|---|---|---|
2 | ||||||||||||||||||||||||||||||||||||||||||
3 | "Irene Meta" | Fire Meta | Ice Meta | Thunder Meta | Light Meta | Dark Meta | General Supports Meta | |||||||||||||||||||||||||||||||||||
4 | ||||||||||||||||||||||||||||||||||||||||||
5 | "Irene Meta" seems to be misunderstood. "Irene Meta" is not the most powerful DMG type, but rather the most versatile. The DMG dealers on the tier list are only high because they play 2 roles (Dmg dealer and Weakness apply for self). This makes them potent in any content. However, do not be mislead by the 400-500% multiplier. It is a lot smaller than you think. "Irene Meta" trades being universally good for all content with lower Maximum potential DMG. There is no specific Null-specific buffers or debuffers nor Field for Null (Rice Field technically but it's just a general buff) while there are for elemental ones. | Fire Meta is incredibly strong, housing one of the best debuffers and buffers in the game. In JP, more fire options have been released recently, making fire incredibly versitile with multiple methods of play. Previously this was impossible with the "old guard" (Yotsuha1+Megu3). With the introduction of Diva and Misato 3, fire is now the strongest element in JP again. For a long time Fire support Packed the highest fire power, while lacking damage dealers that provide self with a large funnel (hitcount). Fire is still the easiest to build out of all the other teams as you get a free Fire DPS (Yuri) and there are already many Memorias for Fire | The Ice Meta is a weird topic. The meta relies heavily on Adel 2/Mari 3/Misato 2 being the dmg dealer. Recently Kanade 2 has been added to this list due to the addition of Diva Ruka. This is largely because they are self-sufficient. Currently in JP, ice is the only element without a large ice field. Ice also houses a lot of unique supports (Akari 2/Yuina4), but most of their supports are mediocre compared to other elements. The main bonus Ice holds are that their supports don't overlap roles very much, but ice team struggle having all the buffs and debuffs on 1 team. | With Aoi 2, Thunder is incredibly strong and safe. Sharo 2 being the first overwriter and the best one at that makes thunder incredibly powerful. Wakki 3 and newly debuted Fubuki 2 allows Thunder to play faster. Unless you're running Fubuki SS2, you will notice Thunder's main issue. Thunder is a bit slow (and boring, very boring). But hey, it is super safe and reliable. | Light has always been in a rough spot. Light's main issue used to be the lack of good supports (current EN), but with Yuina 5 support, Light has sky rocketed as one of the strongest elements currently. Though the last for overwrite, they are incredibly potent in current JP, but EN will not see this for at least 1 year, even on the accelerated schedule. | Dark Meta in JP is one of the hardest hitting metas, shortly behind fire. They house easy fast clears with massive amounts of damage. The Dark element is notorious for lacking defensive options, but make it up with their offensive prowess. Sadly in EN, Dark is weak as their main elemental debuffer is Hisame SS1, a breaker. | General Supports are Basic Human Rights. They have always been the backbone to every account. It is essential to have them to ensure that your journey on killing cancer is smooth and enjoyable. It is always fun to be able to use your Waifu and general supports will help you do that. | |||||||||||||||||||||||||||||||||||
6 | ||||||||||||||||||||||||||||||||||||||||||
7 | ||||||||||||||||||||||||||||||||||||||||||
8 | ||||||||||||||||||||||||||||||||||||||||||
9 | ||||||||||||||||||||||||||||||||||||||||||
10 | ||||||||||||||||||||||||||||||||||||||||||
11 | ||||||||||||||||||||||||||||||||||||||||||
12 | History | History | ||||||||||||||||||||||||||||||||||||||||
13 | ||||||||||||||||||||||||||||||||||||||||||
14 | History | History | Dark has a rough start. Dark was purely carried by their dmg dealers (Chie 2 / Yuina 3 / Adel 3) for a long time. This was because they were self-sufficient and provided high amounts of buffs to themselves. General supports were enough to make all 3 shine. After the release of Ch 5.1, Dark finally saw the 'light'. Tsukasa SS4 and Aina SS2 had their debut pretty much back to back. These two alone were the supports that Dark Dmg dealers were looking for. Making them the highest overall dmg multiplier as an overall meta. Currently in JP, Dark and Fire compete for highest overall dmg (when weak), but Aoi2 / Kanade 2 / Mari 3 beat out both of these elements. With the addition of Diva Ruka, Seika SS3 has become important for dark teams. In JP, Mona SS1 houses the highest potential dmg. | For EN launch, Seika SS2 is the best General offensive support with Seira SS1 shortly behind her. This is due to their ability to provide your dmg dealer with a crit buff. Crit buffs are important for any dmg dealer as it allows them to ignore a flat 50 enemy stats (border). For defensive supports, Aoi 1 takes the cake and continues to do so, even in JP, except for her other SS. Yunyun SS1 complimented Seika SS2 on her debut and is still a staple in many JP teams due to her ability to provide hit count buffs to DMG dealers. Muua SS1 takes over as the best healer as she provides Mind eye (Tactical Vision) and will continue to be the only solid support to provide 2 stacks of the buff for 9 JP months until Tama SS5. She was also the first healer that could overheal and increase your DP by 20% over the cap. It is still advisable to pick her up as future content may require morethan 1 team. Aina SS1 and Myaa SS2 fill up the holes for Debuffers and Utility (Od generation). Though replacable for their debuffing roles, the power of their debuffs and in Aina's case, OD generation is top notch. Tama SS5 became the golden child of General Supports, powercreeping Seika SS2 and Muua SS1 as offensive buffers with heals. Aina SS2 powercrept her own SS1 in OD generation. She could be used for Dark Teams, but her power in supporting general teams is just as insane. Fubuki SS1 and Maki SS1 also got solid tower upgrades, making them top tier general debuffers. Aoi 4 has cemented herself as the queen of general supports with Tama SS5. She is a buffer than can pump out a whole OD, DP revive, provide Crit/Crit dmg/large Skill enhance. She is Basic Human Rights in JP. Ruka SS5 (Diva) has become the center point to replace Yunyun in most teams as she provides a stronger funnel than Yunyun. She created a major shift in team comps and brought out certain styles from obsolete to potentially good, if not solid in team comps. | ||||||||||||||||||||||||||||||||||||||
15 | ||||||||||||||||||||||||||||||||||||||||||
16 | The Thunder meta was always strong and continues to be strong. With the introduction of Tama 3, Thunder became the 2nd best element as Tama 3 could be your healer / dmg dealer / Thunder support all in 1. Seika 1 provided thunder field, making the introduction of Seika 2 a large boost for thunder. It could be arguable that Thunder became the strongest element when Tama 3 was released. Fire quickly overcame Thunder with the introduction of Yotsuha 1 and Megumi 3, but Thunder got their Token (in more than 1 way) Single target damage dealer, Aoi 2. Aoi 2 took what thunder had and made it incredibly powerful. Though Thunder didn't see much of the rest of the year, Sharo SS2 was released, changing the game forever. As the first overwriter, she made it possible to run Thunder comps for all fights (except amon orb). Recently in JP, Thunder has fallen off and is rarely used, except by old players who only built thunder after Sharo SS2 release. This is because Thunder ended up having a bit too much overlap in their support line to house the top damage. | Hello this is Tojo, Editting for later. With Yuina 5 Light is incredibily strong. | ||||||||||||||||||||||||||||||||||||||||
17 | History | |||||||||||||||||||||||||||||||||||||||||
18 | ||||||||||||||||||||||||||||||||||||||||||
19 | History | The Ice Meta was always relevent after Mari 1's release. But Ice did not ever see the light of "best meta". Ice Meta has always had extremely fun dmg dealers and in late 2023 in JP started introducing interesting Supports. The power of ice was always housed in their self-sufficient dmg dealers and to this day are still this way. In early 2024 for JP, WFS attempted to revive ice by pumping a large amount of ice styles into the pool, but none of them were powerful enough to stick the landing until Chie 3 and Myaa 3. Even then, from elemental buffers point of view, these two supports are pretty mediocre. Regardless. Ice became relavent with the introduction of their own Sharo 2, Hisame 4. She sadly is the weakest Sharo 2 variant on the market. Ice is still good, but heavily relies on owning their top brass dmg dealers. | ||||||||||||||||||||||||||||||||||||||||
20 | ||||||||||||||||||||||||||||||||||||||||||
21 | History | The Fire meta is the strongest meta at launch. It only gets stronger with Yotsuha 1 and Megumi 3. Fire ends up being so strong that WFS only released 2 relavent Fire styles in a span of 12 months after Megumi 3. Currently in JP, Fire is still houses one the highest fire powers, but they lack a Resistance overwrite. When an enemy is fire weak, you should expect unbelievable levels of dmg. Most of fire's power comes from their supports. WFS dipped double into this when releasing many later 2024 fire styles. Most of them are supports and change the playstyle of Fire to be much faster. Most of their dmg dealers are pretty mediocre, but their supports are out of this world. The only real notable Dmg dealers in Fire are Unison Ruka / Diva Ruka (w/ SS1&4) / Unison Yukki / Ichigo 2 for most end game content (not CT). | ||||||||||||||||||||||||||||||||||||||||
22 | ||||||||||||||||||||||||||||||||||||||||||
23 | "Irene Meta" Was introduced with Irene 2's debut in JP. Irene 1 tower upgrade was introduced 1 month later and was strictly better than SS2 for even single target. WFS promised to buff Irene 2 at a later date and buffed both Irene 2 and Inori 2 over the summer of 2024. These events occurred after the 2nd anniversary and the release of Ch. 5.1. At first everyone overreacted to the 400% multiplier and automatically hitting weakness. After numbers were crunched, it was found that the dmg ceiling of the "Irene meta" was significantly low. "Irene meta" is still considered the best strategy in JP because it can approach any enemy, clear any end game content, is incredibly cheap, and extremely fast. However, for extremely hard content, she is rarely a fit as a DPS unless you have an insane setup behind it. | |||||||||||||||||||||||||||||||||||||||||
24 | ||||||||||||||||||||||||||||||||||||||||||
25 | ||||||||||||||||||||||||||||||||||||||||||
26 | ||||||||||||||||||||||||||||||||||||||||||
27 | ||||||||||||||||||||||||||||||||||||||||||
28 | ||||||||||||||||||||||||||||||||||||||||||
29 | ||||||||||||||||||||||||||||||||||||||||||
30 | ||||||||||||||||||||||||||||||||||||||||||
31 | ||||||||||||||||||||||||||||||||||||||||||
32 | ||||||||||||||||||||||||||||||||||||||||||
33 | ||||||||||||||||||||||||||||||||||||||||||
34 | ||||||||||||||||||||||||||||||||||||||||||
35 | ||||||||||||||||||||||||||||||||||||||||||
36 | ||||||||||||||||||||||||||||||||||||||||||
37 | ||||||||||||||||||||||||||||||||||||||||||
38 | ||||||||||||||||||||||||||||||||||||||||||
39 | ||||||||||||||||||||||||||||||||||||||||||
40 | ||||||||||||||||||||||||||||||||||||||||||
41 | ||||||||||||||||||||||||||||||||||||||||||
42 | ||||||||||||||||||||||||||||||||||||||||||
43 | ||||||||||||||||||||||||||||||||||||||||||
44 | (*) For those asking why Irene falls off in 6 Months. | Elemental Examples | ||||||||||||||||||||||||||||||||||||||||
45 | Multipliers in a Vacuum (EN + 6 Months) | Why is Irene Low Tier? | ||||||||||||||||||||||||||||||||||||||||
46 | Minimum Elemental Multipliers | Fire | Thunder | Ice (Weak) | ||||||||||||||||||||||||||||||||||||||
47 | Multiplier Category | Base | General Buffs | Elemental Buffs only | Total Multiplier for General Buffs (weak) | Irene | Not Weakness | Hit Weakness | Not Weak | Hit Weak | Aoi 2 | w/ Adel 2 | w/ Maria1 | |||||||||||||||||||||||||||||
48 | No Weak | Hit Weak | Not Weak | Weak | ||||||||||||||||||||||||||||||||||||||
49 | Sum of Skill Enhance | 1 | 2.2 | 1.6 | 3.2 | 3.2 | 3.2 | 3.2 | 3.2 | 4.8 | 4.8 | 4.8 | 4.8 | 4.8 | 4.8 | |||||||||||||||||||||||||||
50 | Sum of Def Down | 1 | 0.6 | 0.9 | 1.6 | 1.6 | 1.6 | 1.6 | 1.6 | 2.5 | 2.1 | 2.5 | 2.1 | 1.6 | 1.6 | |||||||||||||||||||||||||||
51 | Sum of Field | 1 | 0.0 | 0.5 | 1.0 | 1.0 | 1.0 | 1.50 | 1.50 | 1.65 | 1.65 | 1.50 | 1.50 | 1.50 | 1.50 | |||||||||||||||||||||||||||
52 | Skill HP Modifier | 1 | 0.0 | 0.0 | 1.0 | 1.0 | 1.0 | 1.3 | 1.3 | 1.3 | 1.3 | 1.0 | 1.0 | 1 | 1 | |||||||||||||||||||||||||||
53 | Sum of Token | 1 | 0.0 | 0.0 | 1.0 | 1.0 | 1.0 | 1.0 | 1.0 | 1.0 | 1.0 | 2.6 | 2.6 | 1 | 2.6 | |||||||||||||||||||||||||||
54 | Sum of Multihit | 1 | 1.0 | 0.0 | 2.0 | 2.6 | 2.6 | 2.0 | 2.0 | 2.0 | 2.0 | 2.0 | 2.0 | 3.4 | 2.0 | |||||||||||||||||||||||||||
55 | Sum of Crit Dmg (If crit) | 1.5 | 0.6 | 0.0 | 2.1 | 2.1 | 2.1 | 2.1 | 2.1 | 3.0 | 3.0 | 2.1 | 2.1 | 2.1 | 2.1 | |||||||||||||||||||||||||||
56 | Sum of Weakness | 1 | 0.0 | 1.5 | 1.0 | 1.0 | 1.5 | 1.0 | 2.0 | 1 | 2 | 1.0 | 2 | 2 | 2 | |||||||||||||||||||||||||||
57 | Sum of Tactical Vision | 1 | 1.0 | 0.0 | 2.0 | 1.0 | 2.0 | 1.0 | 2.0 | 1 | 2.0 | 1 | 2 | 2.0 | 2.0 | |||||||||||||||||||||||||||
58 | Sum of Expose/Vulnerable | 1 | 0.7 | 0.0 | 1.7 | 1.0 | 1.7 | 1.0 | 1.7 | 1 | 1.7 | 1 | 1.7 | 1.7 | 1.7 | |||||||||||||||||||||||||||
59 | Total Multiplier | 1.5 | N/A | N/A | 74 | 28 | 144 | 42 | 288 | 155 | 867 | 198 | 1103 | 563 | 861 | |||||||||||||||||||||||||||
60 | Comments | N/A | The best of the best for Irene. Faster clears, but less overall dmg. | The calculation will not include elemental def down and elemental enhancer, but what is reasonable to have in a full elemental team if you have all their parts. | The Power of Yotsuha1 + Megumi3 (Need Megu2). | Assuming Tama 3 and Koju 2 are used. | Adel 2 = has high DR, so can kill from DP. Maria 1 has high multipliers, but hard to use. | |||||||||||||||||||||||||||||||||||
61 | ||||||||||||||||||||||||||||||||||||||||||
62 | ||||||||||||||||||||||||||||||||||||||||||
63 | ||||||||||||||||||||||||||||||||||||||||||
64 | ||||||||||||||||||||||||||||||||||||||||||
65 | ||||||||||||||||||||||||||||||||||||||||||
66 | Elemental Examples | |||||||||||||||||||||||||||||||||||||||||
67 | Multipliers in a Vacuum (JP) | |||||||||||||||||||||||||||||||||||||||||
68 | "Irene Meta" | Minimum Elemental Multipliers | Dark | Thunder | ||||||||||||||||||||||||||||||||||||||
69 | Multiplier Category | Base | General Buffs | Elemental Buffs only | Total Multiplier for General Buffs | AoE | Single Target | Natural Weakness | Weakness Apply | w/o Megumi SS4 | w/ Megumi SS4 | w/ Thunder Max (Aoi 2) | w/ Thunder Max | |||||||||||||||||||||||||||||
70 | Irene 1 | Inori 2 | Irene 2 | Sumomo 3 | ||||||||||||||||||||||||||||||||||||||
71 | Sum of Skill Enhance | 1 | 2.2 | 1.6 | 3.2 | 3.2 | 3.2 | 3.2 | 3.2 | 4.8 | 4.8 | 4.8 | 4.8 | 4.0 | 4.0 | |||||||||||||||||||||||||||
72 | Sum of Def Down | 1 | 0.6 | 0.9 | 1.6 | 1.6 | 1.6 | 1.6 | 1.6 | 2.5 | 2.5 | 2.5 | 3.5 | 2.5 | 2.5 | |||||||||||||||||||||||||||
73 | Sum of Field | 1 | 0.4 | 0.5 | 1.4 | 1.4 | 1.4 | 1.4 | 1.4 | 1.5 | 1.5 | 2.1 | 2.1 | 2.1 | 2.1 | |||||||||||||||||||||||||||
74 | Skill HP Modifier | 1 | 0.0 | 0.0 | 1.0 | 1.0 | 1.5 | 1.0 | 1.3 | 1.3 | 1.3 | 1.3 | 1.3 | 1.0 | 1.3 | |||||||||||||||||||||||||||
75 | Sum of Token | 1 | 0.0 | 0.0 | 1.0 | 1.0 | 1.0 | 1.0 | 1.0 | 1.0 | 1.0 | 1.0 | 1.0 | 2.6 | 1.0 | |||||||||||||||||||||||||||
76 | Sum of Multihit | 1 | 1.0 | 0.0 | 2.0 | 2.6 | 2.0 | 2.6 | 3.2 | 2.0 | 2.0 | 2.0 | 2.0 | 2.0 | 2.0 | |||||||||||||||||||||||||||
77 | Sum of Crit Dmg (If crit) | 1.5 | 1.0 | 0.9 | 2.5 | 2.5 | 2.8 | 2.8 | 2.5 | 3.4 | 3.4 | 3.4 | 3.4 | 3.4 | 3.4 | |||||||||||||||||||||||||||
78 | Sum of Weakness | 1 | 0.0 | 1.5 | 1.0 | 5.0 | 5.0 | 6.0 | 5.0 | 2.5 | 1.9 | 3.4 | 3.4 | 3.4 | 3.4 | |||||||||||||||||||||||||||
79 | Sum of Tactical Vision | 1 | 1.0 | 0.0 | 2.0 | 2.0 | 2.0 | 2.0 | 2.0 | 2.0 | 2.0 | 2.0 | 2.0 | 2.0 | 2.0 | |||||||||||||||||||||||||||
80 | Sum of Expose/Vulnerable | 1 | 0.7 | 0.0 | 1.7 | 1.7 | 1.7 | 1.7 | 1.7 | 1.7 | 1.7 | 1.7 | 1.7 | 1.7 | 1.7 | |||||||||||||||||||||||||||
81 | Total Multiplier | 1.5 | N/A | N/A | 123 | 800 | 1034 | 1075 | 1280 | 1362 | 1035 | 2531 | 3543 | 4223 | 2112 | |||||||||||||||||||||||||||
82 | Comments | N/A | All "Irene Meta" assumed to be LB3+. Sumomo 3 LB3 will only hold 3.2 Hit Count multiplier on first EX use. | Under Assumption elemental supports owned. | Under Assumption Tsukasa SS4 exists. | Under Assumption Sharo SS2 exists. | ||||||||||||||||||||||||||||||||||||
83 | ||||||||||||||||||||||||||||||||||||||||||
84 | ||||||||||||||||||||||||||||||||||||||||||
85 | (*) The higher the multiplier the higher their dmg cap. | |||||||||||||||||||||||||||||||||||||||||
86 | (*) If you have a proper elemental team a LB1 elemental dmg dealer will out dmg a LB3 Irene. | |||||||||||||||||||||||||||||||||||||||||
87 | ||||||||||||||||||||||||||||||||||||||||||
88 | Assumptions: | |||||||||||||||||||||||||||||||||||||||||
89 | Yunyun Skill Enhance | |||||||||||||||||||||||||||||||||||||||||
90 | All Buffers hit maximum | |||||||||||||||||||||||||||||||||||||||||
91 | All Debuffers hit minimum | |||||||||||||||||||||||||||||||||||||||||
92 | All buffs and debuffs are expected to stack twice (unless impossible for element) | |||||||||||||||||||||||||||||||||||||||||
93 | No special debuffs like hacking | |||||||||||||||||||||||||||||||||||||||||
94 | All Skills are max lvl | |||||||||||||||||||||||||||||||||||||||||
1 | DO NOT INTROJECT IF YOU DON'T OWN SS2/3/ETC OF A MEMORIA. Do not Use "Introjection" Until you know, for sure, you will need it. 2-3 Weeks will be required to introject 1 Skill after Anachronies. | ||||||||||||||||||||||||||||||
|---|---|---|---|---|---|---|---|---|---|---|---|---|---|---|---|---|---|---|---|---|---|---|---|---|---|---|---|---|---|---|---|
2 | Introjection Priority List | EN Server | JP Server ONLY | Description | |||||||||||||||||||||||||||
3 | S/SS Owned EN | EN Priority | S/SS Owned JP | JP Priority | Memoria Combination | Lowest Reversion Rec. | |||||||||||||||||||||||||
4 | Character | ||||||||||||||||||||||||||||||
5 |  | DON'T DO IT | DON'T DO IT | ||||||||||||||||||||||||||||
6 | |||||||||||||||||||||||||||||||
7 | |||||||||||||||||||||||||||||||
8 | Ruka | ||||||||||||||||||||||||||||||
9 | Free SS | ||||||||||||||||||||||||||||||
10 |  | SS 2 | Mid | SS 2/3/4 SS5 | Mid | SS 5+1+2+4 | +10 | ||||||||||||||||||||||||
11 | |||||||||||||||||||||||||||||||
12 | |||||||||||||||||||||||||||||||
13 | Ruka | High | |||||||||||||||||||||||||||||
14 | SS1 | ||||||||||||||||||||||||||||||
15 |  | DON'T DO IT | DON'T DO IT | +1 | |||||||||||||||||||||||||||
16 | |||||||||||||||||||||||||||||||
17 | |||||||||||||||||||||||||||||||
18 | Yuki | ||||||||||||||||||||||||||||||
19 | SS1 | ||||||||||||||||||||||||||||||
20 |  | DON'T DO IT | DON'T DO IT | +1 | |||||||||||||||||||||||||||
21 | |||||||||||||||||||||||||||||||
22 | |||||||||||||||||||||||||||||||
23 | Megumi | ||||||||||||||||||||||||||||||
24 | SS1 | ||||||||||||||||||||||||||||||
25 |  | SS 2 | Mid | SS 2/4 | High | SS2+1 SS4+1 | +1 | ||||||||||||||||||||||||
26 | |||||||||||||||||||||||||||||||
27 | |||||||||||||||||||||||||||||||
28 | Tsukasa | ||||||||||||||||||||||||||||||
29 | SS1 | ||||||||||||||||||||||||||||||
30 |  | DON'T DO IT | Low | SS 4 | +1 | ||||||||||||||||||||||||||
31 | |||||||||||||||||||||||||||||||
32 | |||||||||||||||||||||||||||||||
33 | Karen | ||||||||||||||||||||||||||||||
34 | SS1 | ||||||||||||||||||||||||||||||
35 |  | SS 2/3 | Mid | SS ALL | Mid | +1 | |||||||||||||||||||||||||
36 | |||||||||||||||||||||||||||||||
37 | |||||||||||||||||||||||||||||||
38 | Tama | ||||||||||||||||||||||||||||||
39 | SS1 | ||||||||||||||||||||||||||||||
40 |  | SS 2 | High | SS 2/3/4 | High | SS 2+3+4 | +5 | ||||||||||||||||||||||||
41 | |||||||||||||||||||||||||||||||
42 | |||||||||||||||||||||||||||||||
43 | Erika Aoi | ||||||||||||||||||||||||||||||
44 | SS1 | ||||||||||||||||||||||||||||||
45 |  | DON'T DO IT | DON'T DO IT | SS 2 | +1 | ||||||||||||||||||||||||||
46 | |||||||||||||||||||||||||||||||
47 | |||||||||||||||||||||||||||||||
48 | Ichigo | ||||||||||||||||||||||||||||||
49 | SS1 | ||||||||||||||||||||||||||||||
50 |  | SS 2 | Low | SS 2 | Low | SS 3(LB3)+1 | +1 | ||||||||||||||||||||||||
51 | |||||||||||||||||||||||||||||||
52 | |||||||||||||||||||||||||||||||
53 | Sumomo | ||||||||||||||||||||||||||||||
54 | SS1 | ||||||||||||||||||||||||||||||
55 |  | SS 2 (If Thunder team) | Mid | High | SS 2 (If Thunder team) | Mid | High | SS 2+1 | +1 | ||||||||||||||||||||||
56 | |||||||||||||||||||||||||||||||
57 | |||||||||||||||||||||||||||||||
58 | Seika | ||||||||||||||||||||||||||||||
59 | SS1 | ||||||||||||||||||||||||||||||
60 |  | SS 2 | Low | SS 3 | High | SS 3+1 | +5 | ||||||||||||||||||||||||
61 | |||||||||||||||||||||||||||||||
62 | |||||||||||||||||||||||||||||||
63 | Kozue | ||||||||||||||||||||||||||||||
64 | SS1 | ||||||||||||||||||||||||||||||
65 |  | DON'T DO IT | DON'T DO IT | DON'T DO IT | |||||||||||||||||||||||||||
66 | |||||||||||||||||||||||||||||||
67 | |||||||||||||||||||||||||||||||
68 | Byakko | ||||||||||||||||||||||||||||||
69 | SS1 | ||||||||||||||||||||||||||||||
70 |  | For Tower upgrade | Low | Low | SS 3+1 | +5 | |||||||||||||||||||||||||
71 | |||||||||||||||||||||||||||||||
72 | |||||||||||||||||||||||||||||||
73 | Bon Ivar | ||||||||||||||||||||||||||||||
74 | SS1 | ||||||||||||||||||||||||||||||
75 |  | SS 2 | Mid | SS 2 | Mid | SS 2+1 SS 3+1 | +1 | ||||||||||||||||||||||||
76 | |||||||||||||||||||||||||||||||
77 | |||||||||||||||||||||||||||||||
78 | Seira | ||||||||||||||||||||||||||||||
79 | SS1 | ||||||||||||||||||||||||||||||
80 |  | DON'T DO IT | SS 3 | High | SS 2+1 SS 3+1 | +1 | |||||||||||||||||||||||||
81 | |||||||||||||||||||||||||||||||
82 | |||||||||||||||||||||||||||||||
83 | Miko Tenne | ||||||||||||||||||||||||||||||
84 | SS1 | ||||||||||||||||||||||||||||||
85 |  | DON'T DO IT | SS 2 For Better Stats | Low | Master Skill | +0 | |||||||||||||||||||||||||
86 | |||||||||||||||||||||||||||||||
87 | |||||||||||||||||||||||||||||||
88 | Yayoi Bungo | ||||||||||||||||||||||||||||||
89 | SS1 | ||||||||||||||||||||||||||||||
90 |  | DON'T DO IT | DON'T DO IT | S + SS 2 S + SS 3 | +1 | ||||||||||||||||||||||||||
91 | |||||||||||||||||||||||||||||||
92 | |||||||||||||||||||||||||||||||
93 | Adel | ||||||||||||||||||||||||||||||
94 | SS1 | ||||||||||||||||||||||||||||||
95 |  | SS 2 | High | SS 2/3 | High | SS 2+1 SS 3+1 | +1 | ||||||||||||||||||||||||
96 | |||||||||||||||||||||||||||||||
97 | |||||||||||||||||||||||||||||||
98 | Mari | ||||||||||||||||||||||||||||||
99 | SS1 | ||||||||||||||||||||||||||||||
100 |  | SS 2 | Mid | SS 2/4/5 | High | SS 4+1 SS 5+1 | +1 | ||||||||||||||||||||||||
101 | |||||||||||||||||||||||||||||||
102 | |||||||||||||||||||||||||||||||
103 | Yuina | ||||||||||||||||||||||||||||||
104 | SS1 | ||||||||||||||||||||||||||||||
105 |  | DON'T DO IT | SS 2 | Mid | SS 2+1 | +1 | |||||||||||||||||||||||||
106 | |||||||||||||||||||||||||||||||
107 | |||||||||||||||||||||||||||||||
108 | Monaka | ||||||||||||||||||||||||||||||
109 | SS1 | ||||||||||||||||||||||||||||||
110 |  | DON'T DO IT | Low | +1 | |||||||||||||||||||||||||||
111 | |||||||||||||||||||||||||||||||
112 | |||||||||||||||||||||||||||||||
113 | Miya | ||||||||||||||||||||||||||||||
114 | SS1 | ||||||||||||||||||||||||||||||
115 |  | DON'T DO IT | DON'T DO IT | S + SS 2 S + SS 3 | +1 | ||||||||||||||||||||||||||
116 | |||||||||||||||||||||||||||||||
117 | |||||||||||||||||||||||||||||||
118 | Chie | ||||||||||||||||||||||||||||||
119 | SS1 | ||||||||||||||||||||||||||||||
120 |  | DON'T DO IT | DON'T DO IT | +0 | |||||||||||||||||||||||||||
121 | |||||||||||||||||||||||||||||||
122 | |||||||||||||||||||||||||||||||
123 | Hisame | ||||||||||||||||||||||||||||||
124 | SS1 | ||||||||||||||||||||||||||||||
125 |  | DON'T DO IT | SS 2 | Low | +0 | ||||||||||||||||||||||||||
126 | |||||||||||||||||||||||||||||||
127 | |||||||||||||||||||||||||||||||
128 | Satomi Kura | ||||||||||||||||||||||||||||||
129 | SS1 | ||||||||||||||||||||||||||||||
130 |  | DON'T DO IT | DON'T DO IT | S + SS 2 | +1 | ||||||||||||||||||||||||||
131 | |||||||||||||||||||||||||||||||
132 | |||||||||||||||||||||||||||||||
133 | Misato | ||||||||||||||||||||||||||||||
134 | SS1 | ||||||||||||||||||||||||||||||
135 |  | DON'T DO IT | SS2 | High | SS 1+2 SS 2+1 | +5 | |||||||||||||||||||||||||
136 | |||||||||||||||||||||||||||||||
137 | |||||||||||||||||||||||||||||||
138 | Iroha | ||||||||||||||||||||||||||||||
139 | SS1 | ||||||||||||||||||||||||||||||
140 |  | DON'T DO IT | Mid | SS 1+2 SS 2+1 | +5 | ||||||||||||||||||||||||||
141 | |||||||||||||||||||||||||||||||
142 | |||||||||||||||||||||||||||||||
143 | Fubuki | ||||||||||||||||||||||||||||||
144 | SS1 | ||||||||||||||||||||||||||||||
145 |  | DON'T DO IT | Low | +0 | |||||||||||||||||||||||||||
146 | |||||||||||||||||||||||||||||||
147 | |||||||||||||||||||||||||||||||
148 | Risa | ||||||||||||||||||||||||||||||
149 | SS1 | ||||||||||||||||||||||||||||||
150 |  | DON'T DO IT | Low | DON'T DO IT | |||||||||||||||||||||||||||
151 | |||||||||||||||||||||||||||||||
152 | |||||||||||||||||||||||||||||||
153 | Akari | ||||||||||||||||||||||||||||||
154 | SS1 | ||||||||||||||||||||||||||||||
155 |  | DON'T DO IT | SS 2 | Mid | SS 2+1 SS 3+1 | +5 | |||||||||||||||||||||||||
156 | |||||||||||||||||||||||||||||||
157 | |||||||||||||||||||||||||||||||
158 | Aina | ||||||||||||||||||||||||||||||
159 | SS1 | ||||||||||||||||||||||||||||||
160 |  | DON'T DO IT | SS 2 | Mid | SS 2+1 | +1 | |||||||||||||||||||||||||
161 | |||||||||||||||||||||||||||||||
162 | |||||||||||||||||||||||||||||||
163 | Ichiko | ||||||||||||||||||||||||||||||
164 | SS1 | ||||||||||||||||||||||||||||||
165 |  | DON'T DO IT | |||||||||||||||||||||||||||||
166 | |||||||||||||||||||||||||||||||
167 | |||||||||||||||||||||||||||||||
168 | Niina | ||||||||||||||||||||||||||||||
169 | SS1 | ||||||||||||||||||||||||||||||
170 |  | DON'T DO IT | SS 2 | High | SS 2+1 | +1 | |||||||||||||||||||||||||
171 | |||||||||||||||||||||||||||||||
172 | |||||||||||||||||||||||||||||||
173 | Minori | ||||||||||||||||||||||||||||||
174 | SS1 | ||||||||||||||||||||||||||||||
175 |  | DON'T DO IT | SS 2 | Low | SS 2+1 None | +0 | |||||||||||||||||||||||||
176 | |||||||||||||||||||||||||||||||
177 | |||||||||||||||||||||||||||||||
178 | Yotsuha | ||||||||||||||||||||||||||||||
179 | SS1 | ||||||||||||||||||||||||||||||
180 |  | DON'T DO IT | Low | S + SS 1+2+3 | +5 | ||||||||||||||||||||||||||
181 | |||||||||||||||||||||||||||||||
182 | |||||||||||||||||||||||||||||||
183 | Isuzu | ||||||||||||||||||||||||||||||
184 | SS1 | ||||||||||||||||||||||||||||||
185 |  | DON'T DO IT | SS 2 | Mid | SS 2+1 | +0 | |||||||||||||||||||||||||
186 | |||||||||||||||||||||||||||||||
187 | |||||||||||||||||||||||||||||||
188 | Muua | ||||||||||||||||||||||||||||||
189 | SS1 | ||||||||||||||||||||||||||||||
190 |  | DON'T DO IT | Low | S + SS2+1 | +1 | ||||||||||||||||||||||||||
191 | |||||||||||||||||||||||||||||||
192 | |||||||||||||||||||||||||||||||
193 | Mion Yanagi | ||||||||||||||||||||||||||||||
194 | SS1 | ||||||||||||||||||||||||||||||
195 |  | DON'T DO IT | Low | SS 2+1 | |||||||||||||||||||||||||||
196 | |||||||||||||||||||||||||||||||
197 | |||||||||||||||||||||||||||||||
198 | Kanata | ||||||||||||||||||||||||||||||
199 | SS1 | ||||||||||||||||||||||||||||||
200 |  | DON'T DO IT | Low | ||||||||||||||||||||||||||||
201 | |||||||||||||||||||||||||||||||
202 | |||||||||||||||||||||||||||||||
203 | Shiki | ||||||||||||||||||||||||||||||
204 | SS1 | ||||||||||||||||||||||||||||||
205 |  | DON'T DO IT | SS 2 | Mid | S + SS2+1 | +0 | |||||||||||||||||||||||||
206 | |||||||||||||||||||||||||||||||
207 | |||||||||||||||||||||||||||||||
208 | Chiroru | ||||||||||||||||||||||||||||||
209 | SS1 | ||||||||||||||||||||||||||||||
210 |  | DON'T DO IT | Low | ||||||||||||||||||||||||||||
211 | |||||||||||||||||||||||||||||||
212 | |||||||||||||||||||||||||||||||
213 | Inori | ||||||||||||||||||||||||||||||
214 | SS1 | ||||||||||||||||||||||||||||||
215 |  | DON'T DO IT | SS 2 | Low | SS2+1 | +0 | |||||||||||||||||||||||||
216 | |||||||||||||||||||||||||||||||
217 | |||||||||||||||||||||||||||||||
218 | Maki | ||||||||||||||||||||||||||||||
219 | SS1 | ||||||||||||||||||||||||||||||
220 |  | DON'T DO IT | Low | ||||||||||||||||||||||||||||
221 | |||||||||||||||||||||||||||||||
222 | |||||||||||||||||||||||||||||||
223 | Carole | ||||||||||||||||||||||||||||||
224 | SS1 | ||||||||||||||||||||||||||||||
225 |  | S | Top | S SS2 SS3 | High | S + SS2+1 S + SS3+1 | +5 | ||||||||||||||||||||||||
226 | |||||||||||||||||||||||||||||||
227 | |||||||||||||||||||||||||||||||
228 | Yingxia | ||||||||||||||||||||||||||||||
229 | SS1 | ||||||||||||||||||||||||||||||
230 |  | DON'T DO IT | SS2 | Top | SS2+1 | +1 | |||||||||||||||||||||||||
231 | |||||||||||||||||||||||||||||||
232 | |||||||||||||||||||||||||||||||
233 | Irene | ||||||||||||||||||||||||||||||
234 | SS1 | ||||||||||||||||||||||||||||||
235 |  | DON'T DO IT | Low | SS2+1 | +1 | ||||||||||||||||||||||||||
236 | |||||||||||||||||||||||||||||||
237 | |||||||||||||||||||||||||||||||
238 | Vritika | ||||||||||||||||||||||||||||||
239 | SS1 | ||||||||||||||||||||||||||||||
240 |  | DON'T DO IT | SS2 | Low | SS2+1 | +1 | |||||||||||||||||||||||||
241 | |||||||||||||||||||||||||||||||
242 | |||||||||||||||||||||||||||||||
243 | Maria | ||||||||||||||||||||||||||||||
244 | SS1 | ||||||||||||||||||||||||||||||
245 |  | DON'T DO IT | SS 2/3 | Mid | SS2+1 SS3+1 | +1 | |||||||||||||||||||||||||
246 | |||||||||||||||||||||||||||||||
247 | |||||||||||||||||||||||||||||||
248 | Charolotta | ||||||||||||||||||||||||||||||
249 | SS1 | ||||||||||||||||||||||||||||||
1 | EX Upgrades | Straight buffs | ||||||||||||||||||||||||||||||||||||
|---|---|---|---|---|---|---|---|---|---|---|---|---|---|---|---|---|---|---|---|---|---|---|---|---|---|---|---|---|---|---|---|---|---|---|---|---|---|---|
2 | Character | Priority | Description | Character | Changes | |||||||||||||||||||||||||||||||||
3 |  | Low | Wow, she got a large funnel (3x40%) on a null element skill that doesn't deal dmg. This is a hard pass. She didn't do dmg before. She still doesn't deal dmg. At least she goes from 1 hit to 4 hit. | Wave 1 (2.5 Anni :: Megu 5 / Karen 4 Patch) | ||||||||||||||||||||||||||||||||||
4 |  | EX (Changed) = DP mod changed from +30% -> 50% :: Now reduces enemy def (Perma) LB0 (NEW) = +10% party light dmg | ||||||||||||||||||||||||||||||||||||
5 | ||||||||||||||||||||||||||||||||||||||
6 | Yuki | |||||||||||||||||||||||||||||||||||||
7 | SS1 | Bungo | ||||||||||||||||||||||||||||||||||||
8 |  | Low | When they first released Hisame she was supposed to have the meme that she starts spitting out blood after 3 minutes from her lore. After her upgrade, WOW they broke the lore, she doesn't get tired anymore. She also gains a large skill enhance, but you should be buffing her if she is supposed to be dealing dmg anyways. Started off really bad. Now she's just bad. | SS2 | ||||||||||||||||||||||||||||||||||
9 |  | EX (Added) = Now also provides Large Fire Enhance to all allies Common (Added) = Now applies fire def down (AoE) LB0 (NEW) = +10% party fire dmg | ||||||||||||||||||||||||||||||||||||
10 | ||||||||||||||||||||||||||||||||||||||
11 | Hisame | |||||||||||||||||||||||||||||||||||||
12 | SS1 | Tsukasa | ||||||||||||||||||||||||||||||||||||
13 |  | Mid | Gets a major increase in destruction rate on her EX skill. She isn't used much in JP. On EN, she is an extremely nice blaster to have. | SS2 | ||||||||||||||||||||||||||||||||||
14 |  | EX (Added) = Now additionally provides ALL OTHER fire styles +3 SP Common (Added) = Now also applies atk down LB0 (NEW) = +10% party fire dmg | ||||||||||||||||||||||||||||||||||||
15 | ||||||||||||||||||||||||||||||||||||||
16 | Niina | |||||||||||||||||||||||||||||||||||||
17 | SS1 | Tama | ||||||||||||||||||||||||||||||||||||
18 |  | Low | The only thing the upgrade did (outside of more dmg) was add a defense buff to ther EX skill for 1 turn. Ichiko can do her job better (since her dmg is mostly obsolete) as a taunter. Best not to waste 50 diamonds for this. | SS2 | ||||||||||||||||||||||||||||||||||
19 |  | EX (Added) = Grants self large skill enhance Common (Changed) = Can now be used at 0SP (go into debt) LB0 (NEW) = +10% party Thunder dmg | ||||||||||||||||||||||||||||||||||||
20 | ||||||||||||||||||||||||||||||||||||||
21 | Chie | |||||||||||||||||||||||||||||||||||||
22 | SS1 | Carole | ||||||||||||||||||||||||||||||||||||
23 |  | Low | Now she gains dark skill enhance, but her base dmg is still way too low. Not worth 50 diamonds. | SS1 | ||||||||||||||||||||||||||||||||||
24 |  | EX (Changed) = +50% HP modifier no longer has condition ::: +300% pierce crit when having charge Common (Changed) = Lowered SP cost 7SP -> 6SP LB0 (NEW) = If frontline at start of battle +2 SP | ||||||||||||||||||||||||||||||||||||
25 | ||||||||||||||||||||||||||||||||||||||
26 | Misato | |||||||||||||||||||||||||||||||||||||
27 | SS1 | Inori | ||||||||||||||||||||||||||||||||||||
28 |  | Mid | The upgrade cut the SP cost in half for the first use of the skill. This allows Chiroru to be a part of the OD looping team in JP. As her starting SP cost is 7. She can pop this off immeadiately. This priority is mid IF you randomly have all the parts for an OD looping team, otherwise, she's a pass as well. | SS2 | ||||||||||||||||||||||||||||||||||
29 |  | EX (Changed) = Added +30% DP modifier. Changed scaling from x1 STR : x1 DEX to x1 STR : x2 Dex ::: Increase pierce crit 300%->400% (on SeraphDB it is noted as 500% due to adding 100% from base effectiveness) | ||||||||||||||||||||||||||||||||||||
30 | ||||||||||||||||||||||||||||||||||||||
31 | Chiroru | |||||||||||||||||||||||||||||||||||||
32 | SS1 | Irene | ||||||||||||||||||||||||||||||||||||
33 |  | Low | Her EX skill SP cost is cut in half if there are 3+ 31A members...... but it is bad in the first place. | SS2 | ||||||||||||||||||||||||||||||||||
34 |  | LB0 (NEW) = When in frontline with mindeye buff, increase def down applied by self +25% | ||||||||||||||||||||||||||||||||||||
35 | ||||||||||||||||||||||||||||||||||||||
36 | Megumi | |||||||||||||||||||||||||||||||||||||
37 | SS1 | Ruka | ||||||||||||||||||||||||||||||||||||
38 |  | Low | Increases her HP modifier from 30% to 50% if the enemy is provoked... That probably means you're using Aoi 2....She should be your dmg dealer not Ichigo. She also gains a small thunder skill enhance on her EX skill, which is a good thing. Thunder teams currently struggle at double buffing thunder skill enhance anyways. She still only has 1 hit. | SS4 | ||||||||||||||||||||||||||||||||||
39 | Wave 2 (Diva patch) | |||||||||||||||||||||||||||||||||||||
40 |  | LB0 and LB3 (Buffed) = Increased skill dmg buff from 30% -> 60% | ||||||||||||||||||||||||||||||||||||
41 | Ichigo | |||||||||||||||||||||||||||||||||||||
42 | SS1 | |||||||||||||||||||||||||||||||||||||
43 |  | Low | Like her sister, but increases her DP modifier from 30% to 50% if the enemy is provoked, except she can actually provoke the enemy. That would be a terrible idea honestly. Also like her sister, she gains a small thunder skill enhance on her EX skill. There are way better options than her for thunder dmg. She still only has 1 hit. In recent JP, if you have her SS3 LB3, you can use her EX on her SS3 and it is incredibly potent, but you'll want to Limit Break 3 her SS3. | Yuki | ||||||||||||||||||||||||||||||||||
44 | SS5 | |||||||||||||||||||||||||||||||||||||
45 |  | EX (Changed) = Reduced SP cost to 9 SP :: Skill no longer has use limit :: Changed buff to 100% crit rate and 60% crit dmg for 5 turns to the whole team (single activation / unstackable) | ||||||||||||||||||||||||||||||||||||
46 | Sumomo | |||||||||||||||||||||||||||||||||||||
47 | SS1 | |||||||||||||||||||||||||||||||||||||
48 |  | Mid | Gets an increase HP modifier from 30% to 50% if there are 3 or more 31C members. Many 31C members are ice supports, but they aren't the full meta in JP. If you got them, this is a nice upgrade to pick up. The large skill enhance that is added is also pretty decent, but if you're using seika 2 or yunyun 1, this buff is negligible. | Seira | ||||||||||||||||||||||||||||||||||
49 | SS1 | |||||||||||||||||||||||||||||||||||||
50 | Wave 3 (3rd Anni :: Misato 3 / Yuina 5 patch) | |||||||||||||||||||||||||||||||||||||
51 | Bon Ivar | | EX (Changed) = +50% HP modifer no longer has condition :: Now grants +5 SP to all party members (but self) when used during OD. | |||||||||||||||||||||||||||||||||||
52 | SS1 | |||||||||||||||||||||||||||||||||||||
53 |  | Mid | Gets an increase HP modifier from 30% to 50% if there are 3 or more 31A members. Many of the best fire supports are 31A members. This skill evo is extremely good as it places Ruka SS1 as one of the highest potencies for single target fire. | |||||||||||||||||||||||||||||||||||
54 | Misato | |||||||||||||||||||||||||||||||||||||
55 | SS1 | |||||||||||||||||||||||||||||||||||||
56 | Ruka |  | EX (Changed) = Now Dispells 3 buffs :: +50% DP no longer has condition :: now grants crit rate and crit dmg when charged :: dmg increase from charge remains untouched. | |||||||||||||||||||||||||||||||||||
57 | SS1 | |||||||||||||||||||||||||||||||||||||
58 | Below are out in JP and not Available in EN. | |||||||||||||||||||||||||||||||||||||
59 | Kanata | |||||||||||||||||||||||||||||||||||||
60 |  | Low | High | SS1 | ||||||||||||||||||||||||||||||||||
61 | | EX (Changed) = Reduce SP cost to 8 SP. Grants piercing Crit. Common (Changed) = Reduce SP cost to 7 SP. | ||||||||||||||||||||||||||||||||||||
62 | ||||||||||||||||||||||||||||||||||||||
63 | Kozue | |||||||||||||||||||||||||||||||||||||
64 | SS1 | Hisame | ||||||||||||||||||||||||||||||||||||
65 |  | High | SS1 | |||||||||||||||||||||||||||||||||||
66 |  | EX (Changed) = +50% HP modifier no longer has condition :: Extra turn, half SP cost LB0 (NEW) = If frontline at start of battle +2 SP. | ||||||||||||||||||||||||||||||||||||
67 | ||||||||||||||||||||||||||||||||||||||
68 | Tsukasa | |||||||||||||||||||||||||||||||||||||
69 | SS1 | Hisame | ||||||||||||||||||||||||||||||||||||
70 | | Low | SS2 | |||||||||||||||||||||||||||||||||||
71 | | EX (Changed) = 50% DP no longer has condition :: If enemy is taunted, half SP cost Common (Added) = Grants 2 Stacks of Dodge on self on FIRST USE ONLY. | ||||||||||||||||||||||||||||||||||||
72 | ||||||||||||||||||||||||||||||||||||||
73 | Kanata | |||||||||||||||||||||||||||||||||||||
74 | SS1 | Sumomo | ||||||||||||||||||||||||||||||||||||
75 |  | Mid | SS1 | |||||||||||||||||||||||||||||||||||
76 |  | EX (Changed) = Cost 14 SP :: with dodge active 1/2 SP cost Common (Added) = Provides Def down LB0 (NEW) = 2 Stacks of Dodge at the start of battle LB3 (Changed) = 1 turn of Small funnel (5 x 10%) if frontline at start of action and has dodge buff | ||||||||||||||||||||||||||||||||||||
77 | ||||||||||||||||||||||||||||||||||||||
78 | Mion Yanagi | |||||||||||||||||||||||||||||||||||||
79 | SS1 | Sumomo | ||||||||||||||||||||||||||||||||||||
80 |  | Top | SS2 | |||||||||||||||||||||||||||||||||||
81 | | EX (Added) = Half cost if >=3 31E members Common (Added) = Large Funnel (3 x 40%) before skill use | ||||||||||||||||||||||||||||||||||||
82 | ||||||||||||||||||||||||||||||||||||||
83 | Irene | |||||||||||||||||||||||||||||||||||||
84 | SS1 | Niina | ||||||||||||||||||||||||||||||||||||
85 | | High | SS1 | |||||||||||||||||||||||||||||||||||
86 |  | EX (Added) = 30% DP modifier Common (Added) = 30% DP modifier LB0 (NEW) = Frontline at start of battle grants self small funnel (5 x 10%) LB3 (Changed) = +100% Crit Rate | ||||||||||||||||||||||||||||||||||||
87 | ||||||||||||||||||||||||||||||||||||||
88 | Seira | |||||||||||||||||||||||||||||||||||||
89 | SS1 | Karen | ||||||||||||||||||||||||||||||||||||
90 | Event |  | Low | SS2 | ||||||||||||||||||||||||||||||||||
91 | ||||||||||||||||||||||||||||||||||||||
92 | ||||||||||||||||||||||||||||||||||||||
93 | Adel | |||||||||||||||||||||||||||||||||||||
94 | SS1 | |||||||||||||||||||||||||||||||||||||
95 |  | Mid | ||||||||||||||||||||||||||||||||||||
96 | ||||||||||||||||||||||||||||||||||||||
97 | ||||||||||||||||||||||||||||||||||||||
98 | Karen | |||||||||||||||||||||||||||||||||||||
99 | SS1 | |||||||||||||||||||||||||||||||||||||
100 |  | High | ||||||||||||||||||||||||||||||||||||
101 | ||||||||||||||||||||||||||||||||||||||
102 | ||||||||||||||||||||||||||||||||||||||
103 | Maki | |||||||||||||||||||||||||||||||||||||
104 | SS1 | |||||||||||||||||||||||||||||||||||||
105 |  | Low | ||||||||||||||||||||||||||||||||||||
106 | ||||||||||||||||||||||||||||||||||||||
107 | ||||||||||||||||||||||||||||||||||||||
108 | Shiki | |||||||||||||||||||||||||||||||||||||
109 | SS1 | |||||||||||||||||||||||||||||||||||||
110 | Event |  | Mid | |||||||||||||||||||||||||||||||||||
111 | ||||||||||||||||||||||||||||||||||||||
112 | ||||||||||||||||||||||||||||||||||||||
113 | Isuzu | |||||||||||||||||||||||||||||||||||||
114 | SS1 | |||||||||||||||||||||||||||||||||||||
115 |  | Low | Mid | |||||||||||||||||||||||||||||||||||
116 | ||||||||||||||||||||||||||||||||||||||
117 | ||||||||||||||||||||||||||||||||||||||
118 | Minori | |||||||||||||||||||||||||||||||||||||
119 | SS1 | |||||||||||||||||||||||||||||||||||||
120 |  | Low | ||||||||||||||||||||||||||||||||||||
121 | ||||||||||||||||||||||||||||||||||||||
122 | ||||||||||||||||||||||||||||||||||||||
123 | Seika | |||||||||||||||||||||||||||||||||||||
124 | SS1 | |||||||||||||||||||||||||||||||||||||
125 | Event |  | High | |||||||||||||||||||||||||||||||||||
126 | ||||||||||||||||||||||||||||||||||||||
127 | ||||||||||||||||||||||||||||||||||||||
128 | Iroha | |||||||||||||||||||||||||||||||||||||
129 | SS1 | |||||||||||||||||||||||||||||||||||||
130 |  | High | ||||||||||||||||||||||||||||||||||||
131 | ||||||||||||||||||||||||||||||||||||||
132 | ||||||||||||||||||||||||||||||||||||||
133 | Fubuki | |||||||||||||||||||||||||||||||||||||
134 | SS1 | |||||||||||||||||||||||||||||||||||||
135 |  | Low | ||||||||||||||||||||||||||||||||||||
136 | ||||||||||||||||||||||||||||||||||||||
137 | ||||||||||||||||||||||||||||||||||||||
138 | Miko Tennen | |||||||||||||||||||||||||||||||||||||
139 | SS1 | |||||||||||||||||||||||||||||||||||||
140 |  | Low | ||||||||||||||||||||||||||||||||||||
141 | ||||||||||||||||||||||||||||||||||||||
142 | ||||||||||||||||||||||||||||||||||||||
143 | Miya | |||||||||||||||||||||||||||||||||||||
144 | SS1 | |||||||||||||||||||||||||||||||||||||
1 | Pull Priorities sorted by elements and stuff. | Pick Your Poison | ||||||||||||||||||||||||||||||||||||||||||||||
|---|---|---|---|---|---|---|---|---|---|---|---|---|---|---|---|---|---|---|---|---|---|---|---|---|---|---|---|---|---|---|---|---|---|---|---|---|---|---|---|---|---|---|---|---|---|---|---|---|
2 | ||||||||||||||||||||||||||||||||||||||||||||||||
3 | This was made to help people understand how much investment is needed to make a character/element work. | Memorias are in priority pull order (Top to Bottom). | ||||||||||||||||||||||||||||||||||||||||||||||
4 | Red parts are required to feel the full extent of the power they hold. Without it, expect terrible results. Some are unusable | Just remember that which supports are better typically change depending on your dmg dealer. | ||||||||||||||||||||||||||||||||||||||||||||||
5 | Black Parts aren't required. But honestly you'll notice the difference when you have them. | |||||||||||||||||||||||||||||||||||||||||||||||
6 | Not recommended to pull for LB3 for low spenders. But if you get lucky, you'll feel it. | Pick one from each Category below and call it a day. | ||||||||||||||||||||||||||||||||||||||||||||||
7 | General Supports | Overwrite / Apply. Essential for the comp. | ||||||||||||||||||||||||||||||||||||||||||||||
8 | Get all that are here. Honestly you'll be sad if you don't. "Just trust me bro" | |||||||||||||||||||||||||||||||||||||||||||||||
9 | Thunder | Fire | Ice | Light | Dark | Irene | ||||||||||||||||||||||||||||||||||||||||||
10 | ||||||||||||||||||||||||||||||||||||||||||||||||
11 |  | SS2 |  | SS1 |  | LB3 |  |  |  |  | *SS1 |  | LB3 |  | LB3 |  | | |||||||||||||||||||||||||||||||
12 | LB3 | LB1 | ||||||||||||||||||||||||||||||||||||||||||||||
13 | LB3 | |||||||||||||||||||||||||||||||||||||||||||||||
14 | Ruka | Erika Aoi | Yuina | Charlotta | Misato | Hisame | Tsukasa | Irene | Sumomo | Inori | Irene | |||||||||||||||||||||||||||||||||||||
15 | SS5 | SS4 | SS4 | SS2 | SS3 | SS4 | SS4 | SS2 | SS3 | SS2 | SS1 | |||||||||||||||||||||||||||||||||||||
16 | ||||||||||||||||||||||||||||||||||||||||||||||||
17 | ||||||||||||||||||||||||||||||||||||||||||||||||
18 | These are solid pick ups as you'll want them as well. | Fielders that matter. | ||||||||||||||||||||||||||||||||||||||||||||||
19 | ||||||||||||||||||||||||||||||||||||||||||||||||
20 |  | LB3 | | SS2 |  | SS1 |  | SS2 |  | SS5 | SS1 |  | | SS2 |  |  | Mastery | |||||||||||||||||||||||||||||||
21 | SS3 | SS2 | LB3 with | |||||||||||||||||||||||||||||||||||||||||||||
22 | SP donate | |||||||||||||||||||||||||||||||||||||||||||||||
23 | Tama | Fubuki | Aina | Megumi | Megumi | Tsukasa | Tsukasa | Iroha | Satomi Kura | |||||||||||||||||||||||||||||||||||||||
24 | SS5 | SS1 | SS2 | SS5 | SS3 | SS5 | SS3 | SS1 | SS1/2 | |||||||||||||||||||||||||||||||||||||||
25 | Meh for a long time. | |||||||||||||||||||||||||||||||||||||||||||||||
26 | With SS2 welcomes this spot |  | SS1 |  | | SS1 | ||||||||||||||||||||||||||||||||||||||||||
27 | Need tower upgrade | LB3 | LB3 | |||||||||||||||||||||||||||||||||||||||||||||
28 | When useful can be the SS1 select | |||||||||||||||||||||||||||||||||||||||||||||||
29 | that JP 3rd Anni got. | Iroha | Isuzu | Iroha | ||||||||||||||||||||||||||||||||||||||||||||
30 | SS2 | SS3 | SS2 | |||||||||||||||||||||||||||||||||||||||||||||
31 | ||||||||||||||||||||||||||||||||||||||||||||||||
32 | ||||||||||||||||||||||||||||||||||||||||||||||||
33 | ||||||||||||||||||||||||||||||||||||||||||||||||
34 | All the general debuffers you will need. They do more than just general debuff. | The randomly OP category that doesn't fit in the other categories. | ||||||||||||||||||||||||||||||||||||||||||||||
35 | ||||||||||||||||||||||||||||||||||||||||||||||||
36 |  | SS3 |  |  | | SS1 | ||||||||||||||||||||||||||||||||||||||||||
37 | LB3 | SS3 | ||||||||||||||||||||||||||||||||||||||||||||||
38 | ||||||||||||||||||||||||||||||||||||||||||||||||
39 | Isuzu | Miya | Yuina | Aina | ||||||||||||||||||||||||||||||||||||||||||||
40 | SS2 | SS2 | SS5 | SS2 | ||||||||||||||||||||||||||||||||||||||||||||
41 | ||||||||||||||||||||||||||||||||||||||||||||||||
42 | ||||||||||||||||||||||||||||||||||||||||||||||||
43 | ||||||||||||||||||||||||||||||||||||||||||||||||
44 | ||||||||||||||||||||||||||||||||||||||||||||||||
45 | ||||||||||||||||||||||||||||||||||||||||||||||||
46 | Nice Pick ups. | Elemental Enhance + more | ||||||||||||||||||||||||||||||||||||||||||||||
47 | ||||||||||||||||||||||||||||||||||||||||||||||||
48 | | LB3 |  | SS1 |  |  | LB3 | | SS1 | |  | |||||||||||||||||||||||||||||||||||||
49 | LB3 | LB3 with | ||||||||||||||||||||||||||||||||||||||||||||||
50 | SP donate | |||||||||||||||||||||||||||||||||||||||||||||||
51 | Maki | Kozue | Risa | Bon Ivar | Yotsuha | Tsukasa | Tsukasa | Seika | ||||||||||||||||||||||||||||||||||||||||
52 | SS1 | SS3 | SS3 | SS3 | SS1 | SS5 | SS3 | SS3 | ||||||||||||||||||||||||||||||||||||||||
53 | Need tower upgrade | |||||||||||||||||||||||||||||||||||||||||||||||
54 |  |  | ||||||||||||||||||||||||||||||||||||||||||||||
55 | ||||||||||||||||||||||||||||||||||||||||||||||||
56 | ||||||||||||||||||||||||||||||||||||||||||||||||
57 | Adel | Shiki | ||||||||||||||||||||||||||||||||||||||||||||||
58 | SS4 | SS2 | ||||||||||||||||||||||||||||||||||||||||||||||
59 | ||||||||||||||||||||||||||||||||||||||||||||||||
60 | ||||||||||||||||||||||||||||||||||||||||||||||||
61 | "Old Guard": These girls are very strong and were once the meta, but now powercrept. They are nice to have, but if you have all the pieces of meta, they feel lack luster most of the time. If anything they are solid replacements for anyone who has the same role as them but above. | |||||||||||||||||||||||||||||||||||||||||||||||
62 | ||||||||||||||||||||||||||||||||||||||||||||||||
63 | |  | | LB3 |  |  | SS1 |  |  |  | ||||||||||||||||||||||||||||||||||||||
64 | ||||||||||||||||||||||||||||||||||||||||||||||||
65 | ||||||||||||||||||||||||||||||||||||||||||||||||
66 | Muua | Seika | Yingxia | Tama | Tsukasa | Miko Tennen | Yotsuha | Yuki | ||||||||||||||||||||||||||||||||||||||||
67 | SS1 | SS2 | SS1 | SS3 | SS2 | SS2 | SS2 | SS5 | ||||||||||||||||||||||||||||||||||||||||
68 | In the event you don't | |||||||||||||||||||||||||||||||||||||||||||||||
69 | have Diva Ruka | | SS1 |  | SS1 | |||||||||||||||||||||||||||||||||||||||||||
70 | ||||||||||||||||||||||||||||||||||||||||||||||||
71 | ||||||||||||||||||||||||||||||||||||||||||||||||
72 | Seika | Mari | ||||||||||||||||||||||||||||||||||||||||||||||
73 | SS2 | SS2 | ||||||||||||||||||||||||||||||||||||||||||||||
74 | ||||||||||||||||||||||||||||||||||||||||||||||||
75 |  | SS1 |  | |||||||||||||||||||||||||||||||||||||||||||||
76 | ||||||||||||||||||||||||||||||||||||||||||||||||
77 | ||||||||||||||||||||||||||||||||||||||||||||||||
78 | Yingxia | Chie | ||||||||||||||||||||||||||||||||||||||||||||||
79 | SS2 | SS3 | ||||||||||||||||||||||||||||||||||||||||||||||
80 | ||||||||||||||||||||||||||||||||||||||||||||||||
81 | ||||||||||||||||||||||||||||||||||||||||||||||||
82 | ||||||||||||||||||||||||||||||||||||||||||||||||
83 | ||||||||||||||||||||||||||||||||||||||||||||||||
84 | ||||||||||||||||||||||||||||||||||||||||||||||||
85 | ||||||||||||||||||||||||||||||||||||||||||||||||
86 | ||||||||||||||||||||||||||||||||||||||||||||||||
87 | Optional | DMG dealers to look out for (Due to power and how easy they are to use). | ||||||||||||||||||||||||||||||||||||||||||||||
88 | The best dmg dealers you'll ever need. The rest aren't as good as these girls, but honestly they also get the job done. | |||||||||||||||||||||||||||||||||||||||||||||||
89 | ||||||||||||||||||||||||||||||||||||||||||||||||
90 |  | SS1 |  |  | SS1 | | SS1 |  | SS1 if no Kasa5 |  |  | SS4 | ||||||||||||||||||||||||||||||||||||
91 | High LB | SS2 | LB1 | |||||||||||||||||||||||||||||||||||||||||||||
92 | SS4 | |||||||||||||||||||||||||||||||||||||||||||||||
93 | Minori | Yuki | Fubuki | Ruka | LB3 | Mari | Monaka | Yuina | ||||||||||||||||||||||||||||||||||||||||
94 | SS2 | SS6 | SS2 | SS5 | SS3 | SS2 | SS3 | |||||||||||||||||||||||||||||||||||||||||
95 | ||||||||||||||||||||||||||||||||||||||||||||||||
96 |  | SS1 |  | LB3 |  | SS1 | | SS1 |  | |||||||||||||||||||||||||||||||||||||||
97 | ||||||||||||||||||||||||||||||||||||||||||||||||
98 | ||||||||||||||||||||||||||||||||||||||||||||||||
99 | Erika Aoi | Mari | Kanade | Yuina | Adel | |||||||||||||||||||||||||||||||||||||||||||
100 | SS2 | SS4 | SS2 | SS5 | SS3 | |||||||||||||||||||||||||||||||||||||||||||
101 | ||||||||||||||||||||||||||||||||||||||||||||||||
102 | | SS1 | | |  | | ||||||||||||||||||||||||||||||||||||||||||
103 | LB3 | |||||||||||||||||||||||||||||||||||||||||||||||
104 | ||||||||||||||||||||||||||||||||||||||||||||||||
105 | Sumomo | Yuki | Yuina | Kanade | Monaka | |||||||||||||||||||||||||||||||||||||||||||
106 | SS3 | SS6 | SS4 | SS1 | SS1 | |||||||||||||||||||||||||||||||||||||||||||
107 | ||||||||||||||||||||||||||||||||||||||||||||||||
108 | | LB3 |  |  | | SS1 | | |||||||||||||||||||||||||||||||||||||||||
109 | ||||||||||||||||||||||||||||||||||||||||||||||||
110 | ||||||||||||||||||||||||||||||||||||||||||||||||
111 | Bon Ivar | Ichigo | Misato | Yuina | Yuki | |||||||||||||||||||||||||||||||||||||||||||
112 | SS3 | SS2 | SS2 | SS4 | SS6 | |||||||||||||||||||||||||||||||||||||||||||
113 | ||||||||||||||||||||||||||||||||||||||||||||||||
114 |  | | SS1 | |||||||||||||||||||||||||||||||||||||||||||||
115 | ||||||||||||||||||||||||||||||||||||||||||||||||
116 | ||||||||||||||||||||||||||||||||||||||||||||||||
117 | Maria | Minori | Bon Ivar | |||||||||||||||||||||||||||||||||||||||||||||
118 | SS2 | SS1 | SS4 | |||||||||||||||||||||||||||||||||||||||||||||
119 | ||||||||||||||||||||||||||||||||||||||||||||||||
120 | | LB3 | ||||||||||||||||||||||||||||||||||||||||||||||
121 | ||||||||||||||||||||||||||||||||||||||||||||||||
122 | ||||||||||||||||||||||||||||||||||||||||||||||||
123 | Maria | |||||||||||||||||||||||||||||||||||||||||||||||
124 | SS1 | |||||||||||||||||||||||||||||||||||||||||||||||
125 | ||||||||||||||||||||||||||||||||||||||||||||||||
126 |  | Master Skill | ||||||||||||||||||||||||||||||||||||||||||||||
127 | SS4 | |||||||||||||||||||||||||||||||||||||||||||||||
128 | SS1 | |||||||||||||||||||||||||||||||||||||||||||||||
129 | Adel | |||||||||||||||||||||||||||||||||||||||||||||||
130 | SS2 | |||||||||||||||||||||||||||||||||||||||||||||||
131 | ||||||||||||||||||||||||||||||||||||||||||||||||
132 | ||||||||||||||||||||||||||||||||||||||||||||||||
133 | ||||||||||||||||||||||||||||||||||||||||||||||||
134 | The Extra Crew | |||||||||||||||||||||||||||||||||||||||||||||||
135 | Not as optional as minori | May RNGus Bless you with the girls below through GSS tickets. | ||||||||||||||||||||||||||||||||||||||||||||||
136 | This is in no particular order. Some that are here are part of the top meta in their element. | |||||||||||||||||||||||||||||||||||||||||||||||
137 | The extra crew are the best of the leftovers, but you can basically mix and match depending on the damage dealer you have above | |||||||||||||||||||||||||||||||||||||||||||||||
138 | ||||||||||||||||||||||||||||||||||||||||||||||||
139 | |  | SS2 | | SS1 |  | SS2 |  | SS6 |  | SS2 | |||||||||||||||||||||||||||||||||||||
140 | SS3 | |||||||||||||||||||||||||||||||||||||||||||||||
141 | ||||||||||||||||||||||||||||||||||||||||||||||||
142 | Aina | Inori | Isuzu | Miya | Yuki | Megumi | ||||||||||||||||||||||||||||||||||||||||||
143 | SS1 | SS3 | SS2 | SS3 | SS4 | SS4 | ||||||||||||||||||||||||||||||||||||||||||
144 | ||||||||||||||||||||||||||||||||||||||||||||||||
145 |  |  | SS1 |  | LB2+ if |  | SS1 | | SS2 | |||||||||||||||||||||||||||||||||||||||
146 | no RukaSS5 | |||||||||||||||||||||||||||||||||||||||||||||||
147 | ||||||||||||||||||||||||||||||||||||||||||||||||
148 | Byakko | Aina | Akari | Miko Tennen | Fubuki | |||||||||||||||||||||||||||||||||||||||||||
149 | SS2 | SS3 | SS2 | SS3 | SS1 | |||||||||||||||||||||||||||||||||||||||||||
150 | ||||||||||||||||||||||||||||||||||||||||||||||||
151 | | SS1 |  | SS1 |  |  | ||||||||||||||||||||||||||||||||||||||||||
152 | LB3 | |||||||||||||||||||||||||||||||||||||||||||||||
153 | ||||||||||||||||||||||||||||||||||||||||||||||||
154 | Kozue | Akari | Yuri | Karen | ||||||||||||||||||||||||||||||||||||||||||||
155 | SS3 | SS3 | SS2 | SS4 | ||||||||||||||||||||||||||||||||||||||||||||
156 | ||||||||||||||||||||||||||||||||||||||||||||||||
157 |  | |||||||||||||||||||||||||||||||||||||||||||||||
158 | ||||||||||||||||||||||||||||||||||||||||||||||||
159 | ||||||||||||||||||||||||||||||||||||||||||||||||
160 | Nanamin | |||||||||||||||||||||||||||||||||||||||||||||||
161 | SS1 | |||||||||||||||||||||||||||||||||||||||||||||||
162 | ||||||||||||||||||||||||||||||||||||||||||||||||
163 | ||||||||||||||||||||||||||||||||||||||||||||||||
164 | ||||||||||||||||||||||||||||||||||||||||||||||||
165 | ||||||||||||||||||||||||||||||||||||||||||||||||
166 | ||||||||||||||||||||||||||||||||||||||||||||||||
167 | ||||||||||||||||||||||||||||||||||||||||||||||||
168 | ||||||||||||||||||||||||||||||||||||||||||||||||
169 | ||||||||||||||||||||||||||||||||||||||||||||||||
170 | ||||||||||||||||||||||||||||||||||||||||||||||||
171 | ||||||||||||||||||||||||||||||||||||||||||||||||
172 | ||||||||||||||||||||||||||||||||||||||||||||||||
1 | Resource Links | ||||||||||||||||||
|---|---|---|---|---|---|---|---|---|---|---|---|---|---|---|---|---|---|---|---|
2 | How To Use Seraph Database | Seraph Database | Data base created by my friend Rem. Most ingame information can be found here. Including the stats of the enemy and their attack pattern. | ||||||||||||||||
3 | |||||||||||||||||||
4 | Hawky SoC | Hawky SoC's Youtube guide on how to reroll in HBR EN | |||||||||||||||||
5 | Changing Language and Region | Pseychie basics guide | Basic overview of the game. Part 1. | ||||||||||||||||
6 | Strategic Information Collection | Up-to-date Japanese cheat sheets. Good luck! | |||||||||||||||||
7 | HBR Tool | Japanese Damage calculator and account tracking features | |||||||||||||||||
8 | On the Left bar there is a gear. Click it for the options below. | Account style chart | Convenient and condensed presentation of account memoria | ||||||||||||||||
9 | 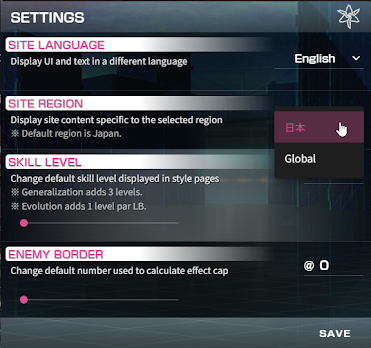 | ||||||||||||||||||
10 | |||||||||||||||||||
11 | |||||||||||||||||||
12 | |||||||||||||||||||
13 | |||||||||||||||||||
14 | |||||||||||||||||||
15 | |||||||||||||||||||
16 | |||||||||||||||||||
17 | |||||||||||||||||||
18 | |||||||||||||||||||
19 | |||||||||||||||||||
20 | |||||||||||||||||||
21 | |||||||||||||||||||
22 | |||||||||||||||||||
23 | |||||||||||||||||||
24 | |||||||||||||||||||
25 | |||||||||||||||||||
26 | |||||||||||||||||||
27 | |||||||||||||||||||
28 | Skill Potencies and Skill Levels | 1) Click "Character Section" | |||||||||||||||||
29 | 2) Click "Memoria (Style) List" | ||||||||||||||||||
30 | 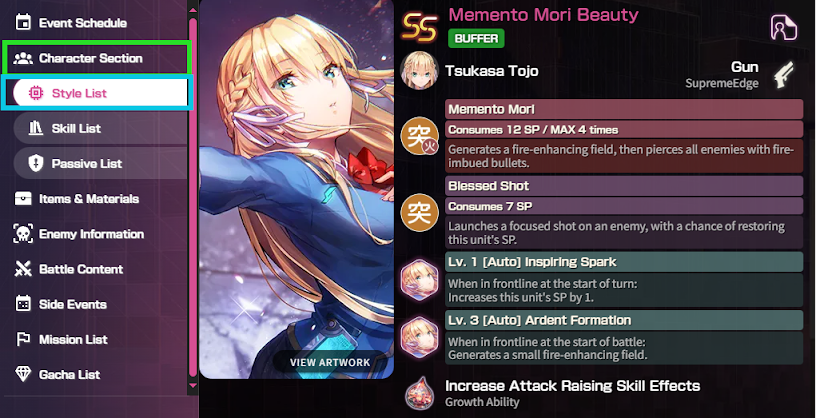 | <<< | Name of Memoria and Rarity | ||||||||||||||||
31 | <<< | Memoria's Ingame Class | |||||||||||||||||
32 | |||||||||||||||||||
33 | <<< | Basic Info: Name, Weapon Type, and Weapon Name | |||||||||||||||||
34 | |||||||||||||||||||
35 | <<< | Exclusive Skill (Click it for more details) | |||||||||||||||||
36 | |||||||||||||||||||
37 | |||||||||||||||||||
38 | |||||||||||||||||||
39 | <<< | Common Skill (Click it for more details) | |||||||||||||||||
40 | |||||||||||||||||||
41 | |||||||||||||||||||
42 | |||||||||||||||||||
43 | <<< | Limit Break 1 passive | |||||||||||||||||
44 | |||||||||||||||||||
45 | |||||||||||||||||||
46 | <<< | Limit Break 3 passive | |||||||||||||||||
47 | |||||||||||||||||||
48 | |||||||||||||||||||
49 | <<< | Tear Memoria upgrade (Total): | |||||||||||||||||
50 | Dmg / Debuffs = +10% Buffs = +20% Heals = +30% | ||||||||||||||||||
51 | |||||||||||||||||||
52 | |||||||||||||||||||
53 | |||||||||||||||||||
54 | 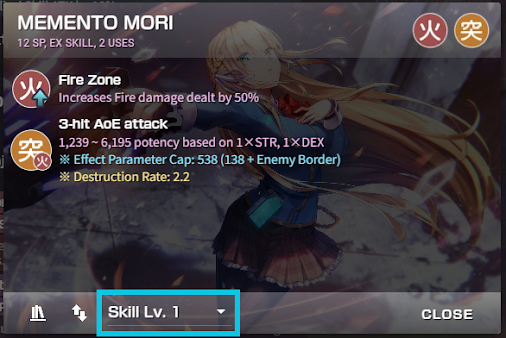 | ||||||||||||||||||
55 | Skill name, SP cost | >>> | <<< | Skill Element and Dmg Type | |||||||||||||||
56 | Number of skill use (Skill use may increase with level) | ||||||||||||||||||
57 | |||||||||||||||||||
58 | Effect before Dmg | >>> | |||||||||||||||||
59 | |||||||||||||||||||
60 | Hit Count. Each Hit=same Dmg or click the "Hit Count" | >>> | |||||||||||||||||
61 | Skill Dmg / Hit Count / ST vs AoE | >>> | |||||||||||||||||
62 | Amount of Parameter needed to hit cap | ||||||||||||||||||
63 | (See "Dmg info" Tab) | ||||||||||||||||||
64 | |||||||||||||||||||
65 | Effect After Dmg (None in Example) | >>> | |||||||||||||||||
66 | |||||||||||||||||||
67 | |||||||||||||||||||
68 | |||||||||||||||||||
69 | Click to Select Skill level | >>> | |||||||||||||||||
70 | |||||||||||||||||||
71 | |||||||||||||||||||
72 | |||||||||||||||||||
73 | |||||||||||||||||||
74 | Score Attack Skill Pattern | ||||||||||||||||||
75 | |||||||||||||||||||
76 | 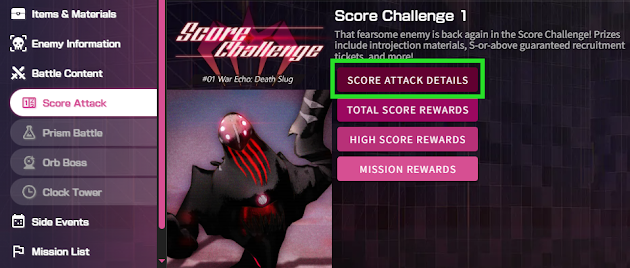 | ||||||||||||||||||
77 | |||||||||||||||||||
78 | |||||||||||||||||||
79 | |||||||||||||||||||
80 | 1) Click "Battle Content" | >>> | |||||||||||||||||
81 | 2) Click "Score Attack" | >>> | |||||||||||||||||
82 | |||||||||||||||||||
83 | 3) Click "Score Atk Details" | ||||||||||||||||||
84 | |||||||||||||||||||
85 | |||||||||||||||||||
86 | |||||||||||||||||||
87 | |||||||||||||||||||
88 | |||||||||||||||||||
89 | |||||||||||||||||||
90 | |||||||||||||||||||
91 | 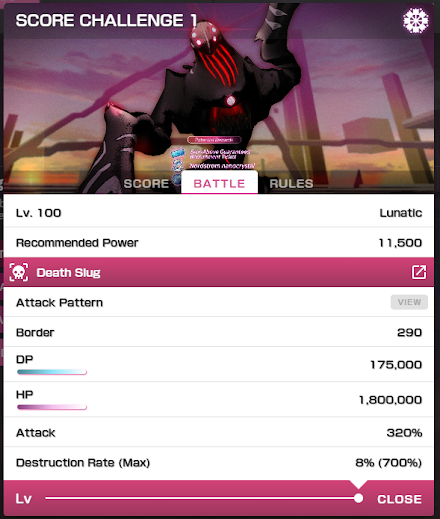 | ||||||||||||||||||
92 | |||||||||||||||||||
93 | |||||||||||||||||||
94 | |||||||||||||||||||
95 | |||||||||||||||||||
96 | |||||||||||||||||||
97 | |||||||||||||||||||
98 | |||||||||||||||||||
99 | <<< | Click between "Score"/"Battle"/"Rules" | |||||||||||||||||
100 | |||||||||||||||||||
101 | |||||||||||||||||||
102 | |||||||||||||||||||
103 | |||||||||||||||||||
104 | <<< | Under "Battle", click the Enemy name to see Attack Patterns. | |||||||||||||||||
105 | |||||||||||||||||||
106 | |||||||||||||||||||
107 | |||||||||||||||||||
108 | |||||||||||||||||||
109 | |||||||||||||||||||
110 | |||||||||||||||||||
111 | |||||||||||||||||||
112 | |||||||||||||||||||
113 | |||||||||||||||||||
114 | |||||||||||||||||||
115 | <<< | Use Slider to change Score Attack Level | |||||||||||||||||
116 | |||||||||||||||||||
117 | |||||||||||||||||||
118 | |||||||||||||||||||
119 | 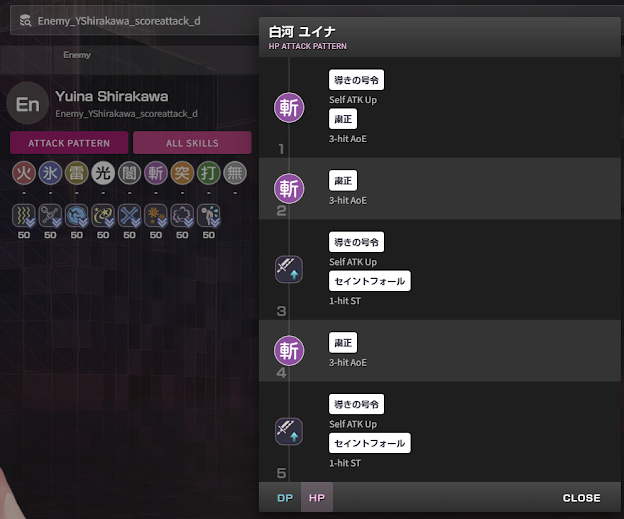 | ||||||||||||||||||
120 | |||||||||||||||||||
121 | |||||||||||||||||||
122 | |||||||||||||||||||
123 | |||||||||||||||||||
124 | |||||||||||||||||||
125 | |||||||||||||||||||
126 | 1) Click "Attack Pattern" | >>> | |||||||||||||||||
127 | |||||||||||||||||||
128 | Elemental/Dmg Type Weakness and Resist. | >>> | |||||||||||||||||
129 | |||||||||||||||||||
130 | Weakness = Negative | ||||||||||||||||||
131 | Resistance = Postive | ||||||||||||||||||
132 | |||||||||||||||||||
133 | |||||||||||||||||||
134 | |||||||||||||||||||
135 | |||||||||||||||||||
136 | |||||||||||||||||||
137 | |||||||||||||||||||
138 | |||||||||||||||||||
139 | |||||||||||||||||||
140 | |||||||||||||||||||
141 | |||||||||||||||||||
142 | |||||||||||||||||||
143 | |||||||||||||||||||
144 | |||||||||||||||||||