Proctoring with Zoom Using Breakout Rooms to View Student Computer Screens
Instructor Guide
Zoom can be used as an effective and free option for proctoring exams, quizzes, or other course activities that need to be monitored. This guide provides step-by-step guidance on how to set up a proctored activity using Zoom. It is important to note that class size and the availability of qualified proctors are critical to successful implementation.
Setting Up a Zoom Room
Go to Zoom at Penn State and sign in with your PSU Access Account.

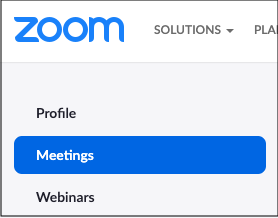
Click Meetings in the left-hand menu and then click Schedule a Meeting.

Recommended Settings:
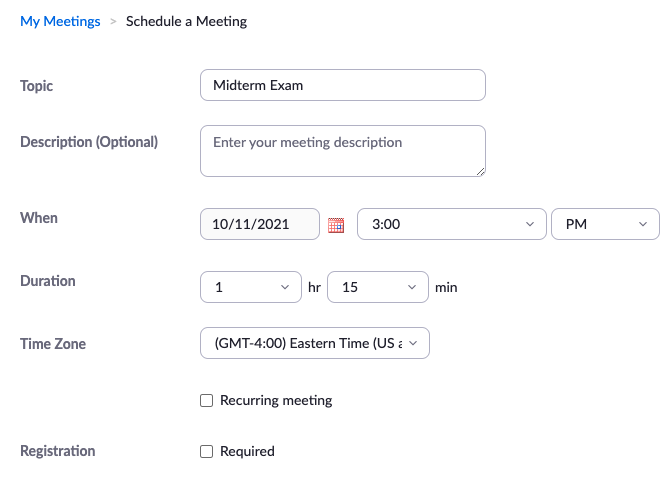
- Enter a title (Topic)
- Set date/time, duration, and time zone
- NOT a recurring meeting
- Registration (optional): If you use registration, you can get a student report of when students joined and exited, but it is an extra step for the students to join the meeting.
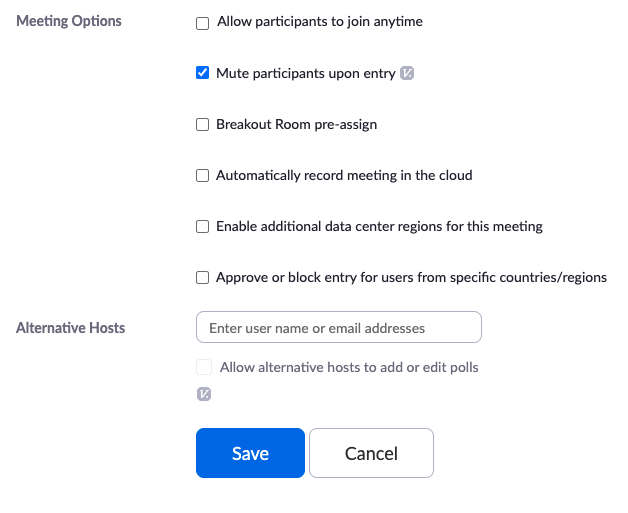
Recommended Settings (cont’d):
- Meeting ID: Generate Automatically
- Security: Require authentication to join
- Video: Video off (just to start)
- Audio: Telephone and Computer Audio

Recommended Settings (cont’d):
- Enable join before host: Off
- Mute participants upon entry: On
- Remaining options: Off
Alternative Host: Add TAs or other individuals who will serve as proctors.
Click Save.
In Zoom Settings, and from the Meeting menu, choose In Meeting (Basic):

Turn on Nonverbal feedback and Join different meetings simultaneously on desktop.
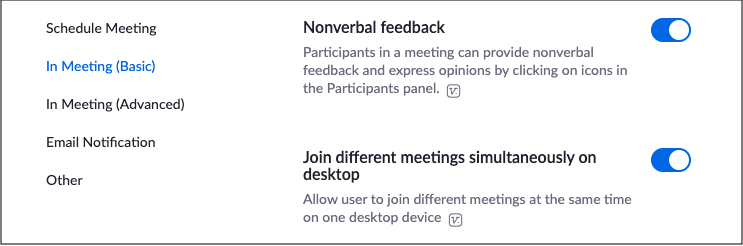
These settings are saved automatically.
Inviting Students
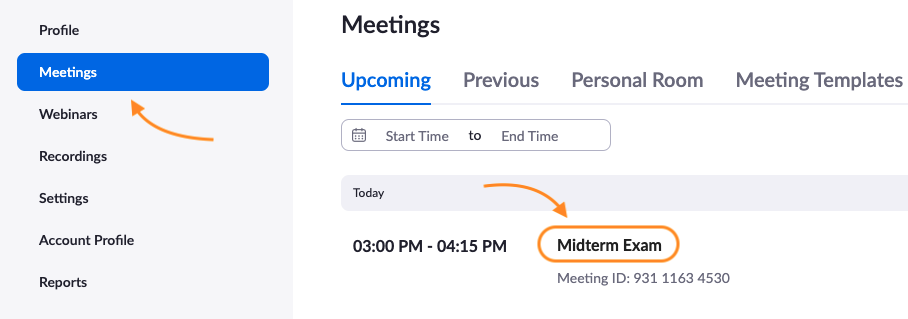
Go to Meetings and click on the title of the meeting you created.
Halfway down the page, you’ll see Invite Link. Click Copy Invitation.

Open an email or announcement for the class and paste in the invitation.
Starting the Proctored Exam
Start meeting 20 minutes early:
- Go to: Zoom at Penn State
- Sign in with PSU Access Account
- Go to Meetings
Find your meeting and click on Start.

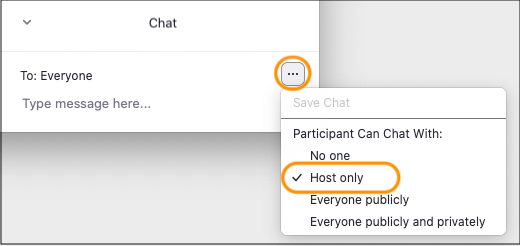
Click on Manage Participants and Chat. These will open in separate panels on the right of the screen.

IMPORTANT: In the Chat window, open settings and check: Participant can chat with: Host and co-hosts. This will prevent students from privately chatting with each other about the exam.
In the Participants window, you can click on Invite and Copy Invitation to paste it into an email/announcement for any students who may have misplaced the first invite.
Hang out in the meeting room while students filter in. Feel free to talk or type in Chat.
At the scheduled time, discuss the exam rules with the students.
Don’t forget to turn on your microphone and camera.

Breakout Rooms
Roman Engel-Herbert teaches MatSE 413. He was challenged with finding a proctoring solution for his course just after spring break. Through explorations and testing, he crafted a proctored exam experience that allowed him to provide 1-1 support to his students when they needed help while creating a mostly secure testing environment through the use of individual breakout rooms. His approach is outlined below. First, Zoom has a maximum of 50 breakout rooms, therefore if your class enrollments surpass this number, you will need to set up two or more separate Zoom sessions. To do this, divide the roster and assign each set of students to a TA. (If you intend to have the instructor ‘floating’ to each of the rooms, do not have the instructor set up a zoom session, but include them as a co-host for each session. Have each TA set up a Zoom session and send the link to their assigned set of students. *Please Note: You can also set-up and assign breakout rooms using a CSV file when setting up the initial meeting. Additional information on this can be found on the Zoom Help Center. You can also download a sample CSV template from the Zoom Help Center. Second, to ensure that the faculty member can access each Zoom session to address student questions, set up an Office 365 chat in Teams and have this running in the background. TA’s can notify the instructor when a student requests help and can post the direct link to the Zoom session for quick access. Lastly, in order to ensure the faculty and TAs can effectively implement this strategy, it is strongly recommended they run a practice scenario. It should be conducted as though it is a live session with each aspect of the communication and navigation occurring as closely to the anticipated live session as possible. (TA should practice opening breakout rooms, sending students to breakout rooms, notifying the instructor when a student needs support, adding the instructor to breakout rooms, etc.) |
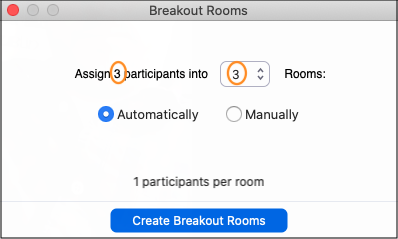
When you’re ready to start, click on Breakout Rooms.

The Breakout Rooms window will open showing the number of students to be assigned to breakout rooms. Increase the number of breakout rooms to match the number of students, so that there is 1 participant per room.
Choose Automatically (If you have not opted to set up the roster using the CSV file).
Click Create Breakout Rooms.
*There should only be one student per breakout room.
A window with your Breakout Rooms will open. To begin, Click Open All Rooms (students are placed in breakout rooms).
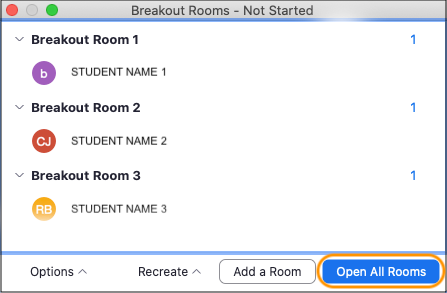
When the breakout rooms are opened, the window changes to include Broadcast a message to all, and Close all rooms.
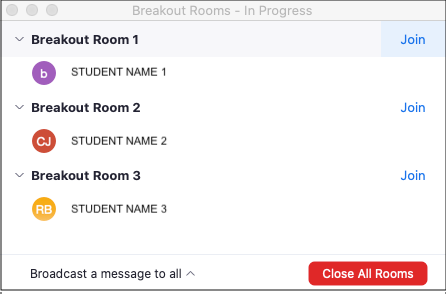
To send a text pop-up to all participants in their individual breakout rooms, click on Broadcast a message to all.
To enter a specific breakout room, click on Join to the right of the student’s name.
When you want to exit a breakout room to go back to the main meeting area, click Leave Breakout Room on the bottom of the screen.

Or, if there is a screen share in progress, it will be located in the top menu (hover mouse over top of screen).
*If the instructor or TA is in the general meeting room (not the breakout room) they will not be able to see a student’s screen. If you enter the breakout room, the student will immediately know you are there.

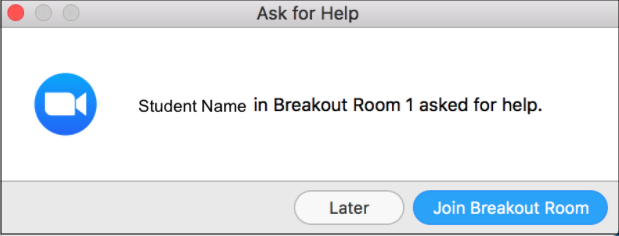
A student can ask you for help from their breakout room. When this happens, you’ll get a pop-up message in the main meeting area.
*To replicate the experience created for MatSE 413 - The instructor should be listed as a co-host for all Zoom sessions. When a student asks for help, the TA notifies the instructor via a chat in Teams. The instructor can then switch over to the appropriate Zoom room and Join the Breakout Room to assist the student. (Because the instructor has multiple Zoom sessions running at the same time, they will receive the same notification indicating that a student has asked for help. The TA’s role is to guide the instructor to the appropriate zoom room when a request for help has been placed.)
When the exam is complete, and you are ready to leave, don’t forget to click End Meeting. When prompted, choose End meeting for all.

Important Resources:
Zoom Tutorials: Join Multiple Meetings Simultaneously on Desktop
Zoom Tutorials: Managing Breakout Rooms
Zoom Tutorials: Student Guide: Participating in Breakout Rooms
Student Directions:
If you are unfamiliar with Zoom, please review the basics of joining a meeting at Zoom Tutorials: Joining a Meeting.
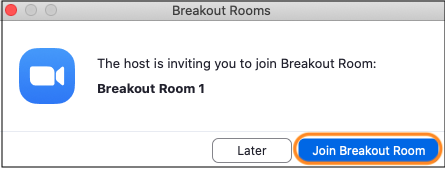
Once you are in the Zoom meeting and it’s time to start the exam, the instructor or proctor will invite you to join a breakout room. Click Join Breakout Room.
Once you are in your breakout room, you will share your screen. Click Share Screen.

A share window will open. Select Desktop 1 and click Share.

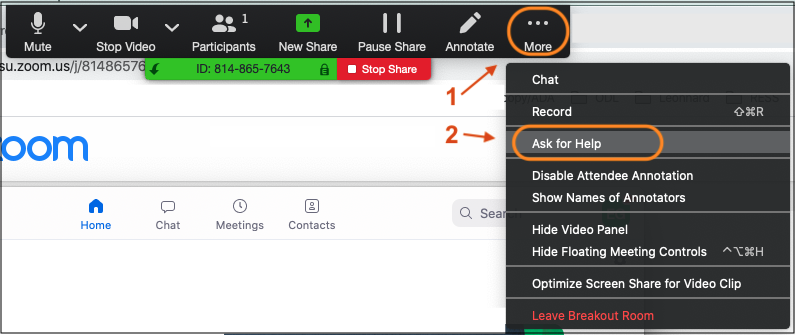
To ask the instructor or proctor for help during the exam, click Ask for Help on the bottom of the screen.

Or, if you are sharing your screen it will be located in the top menu under More (hover mouse over top of screen).
For more information, see Zoom Tutorials: Participating in Breakout Rooms.