Jackrabbit Mobile
Playbook

Hi, and welcome to our Playbook!
At Jackrabbit, we build awesome tech with awesome people. This Playbook explains the step-by-step of how and why we do what we do to design and develop web & mobile software products that people love.
We’ve helped to launch a wide range of products, from healthcare tools to entertainment media apps that scale from rapid MVPs to enterprise systems. We love what we do and who we work with.
Our amazing team helped to put this Playbook together for our colleagues, clients, future teammates, and friends. We’re very excited to share it with you.
If you’d like to build some awesome technology with us, we’d love to hear from you at hello@jackrabbitmobile.com
Table of Contents
Product Strategy
Strategy Sprints
Product Strategy the first step in defining an incredible product.
Product design sprints let us dig into critical business questions through design, prototyping, and testing ideas with customers. Inspired by the work of the team at Google Ventures and tailored to the needs of our clients, this phase of the process gives us a high-payoff, low waste way of digging into an idea and better understanding the market.
Design sprints can be 1-2 weeks and focus on digging deeper into an app idea and finding out more about what the core value will provide to customers. The key here is to cut down on time debating over the details of any one implementation, and instead put it as quickly as possible in front of who matters most - the user.
During Sprint 1 the team will test the project’s biggest assumption or biggest risk. Based on what is discovered in Sprint 1, the team will take one of two courses in the second sprint. If the data shows the product has a solid foundation and has a foothold with users, we will spend the second sprint refining the previous sprint’s prototype and testing smaller assumptions.
If the sprint illuminates a new piece to the puzzle we hadn’t thought about before or a user need that is more pressing than the one we initially set out to research, we will pivot and test a new prototype in the second cycle.
This is the stage of app development that offers the highest return on investment, more than any other stage in the process. Two to three weeks of product design sprints will allow validation of whether the product in question will be a hit with users, and here can determine that in 80 hours of strategy as opposed to 800 hours of development. This “hack” avoids building two to three full-fledged apps (something that would likely take a good portion of a year) and shipping them to your entire user base and instead ships two to three prototypes to a small, representative set of users in less than a month.
These are some of the most common and valuable exercises of Product Strategy:
- Understanding business goals, user outcomes, and personas
- Selecting metrics and success criteria
- Market research
- Competitor analysis
- Challenging assumptions
- User research & testing
- Creating prototypes
- Performing user interviews
- Identifying pain points and opportunities
- Finding product-market fit
- Determining the most valuable features to build first
- Solidifying the vision and project plan
Build - Measure - Learn
Product Strategy Sprints, like agile methodology, are an iterative process that we call Build - Measure - Learn.
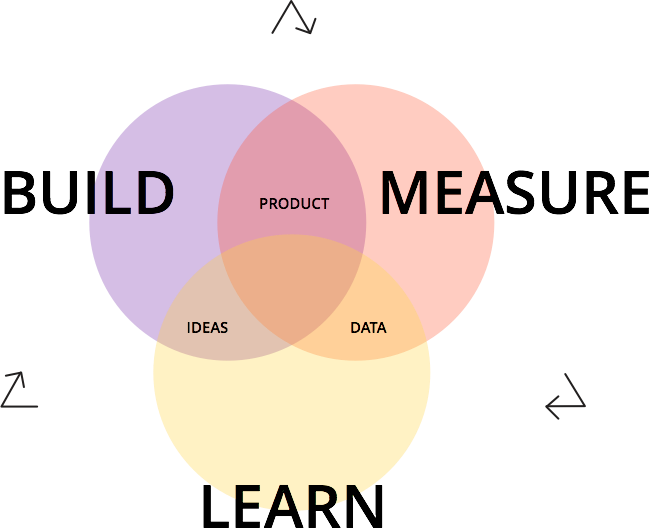
Learn
In the initial state of product strategy the team will focus on learning as much as possible from our customers and their teams about the target market. At this stage it’s important to focus on the problem the technology is solving.
We will discuss your business objectives and key performance indicators, dig into relevant market trends, and be curious to hear about the marketing and launch plan. As we hone in on the biggest opportunities and risks, as a team we’ll begin to prioritize for our upcoming experiment with users.
The initial Learn phase will conclude when the team has decided on the most important part of the product to test and solidified a testing schedule.
Establishing a testing schedule before the details of the test have been worked out helps keep the sprint timeboxed and force creative solutions and low-waste tests with low production costs.
This discussion will help lead our team to get a better understanding of the underlying technical architecture required to build your application. The amount of back end support, integrations, and organization of information will start to come into a bit better picture in this phase.
Build
Once we understand the target market and the users, then it’s time to build!
We design an experiment so that the results will teach us what we want to learn, based on what was prioritized. This is the idea creation process based on success metrics and criteria that we first discussed.
We may build a digital prototype with Sketch and Marvel. We may draw a physical prototype on paper, or better yet, construct a physical representation of the product.
The prototypes might be focused on a few specific assumptions or risks, such as if users are willing to pay for a service, or a few specific features, which may decide if an app’s ability to broadcast to social media versus share directly via text and email is more important to users.
This method of rapid prototyping is meant to simulate the core user journey of a product at the lowest possible fidelity, cost, and time investment. The goal is to create something that is testable and will enable us learn what we need to.
Measure
We have our hypotheses and we have our experiment, now the magic happens. As we execute, we keep track of the results, the user responses. We record quotes, questions from users, and actions taken.
As we collect all of the data the team will analyze their research findings and begin to draw connections between the different types of users that were tested and the results that were found.
These insights are distilled into pain points and opportunities, which are translated into product features and requirements, and are prioritized by importance. This builds our product backlog, influences the technical architecture, and prepares us for development.
At this point, there will be two directions the product team can take. The first one is to rinse and repeat based on what was learned in the first sprint. The second direction is to move to the next phase of development.
In the case that the team learns something that fundamentally shifts the idea of what may be the right product to build (or who the right market is), performing another strategy sprint is likely a recommended choice.
The key here is that your team is open and ready to react based on what we learn in testing.
Even findings that are unexpectedly negative end up as positives in this phase since the team is so readily adaptable.
This decision will be made by both of our teams together, so that we can make sure the direction we decide on is still in line with the business vision.
The other thing to realize here that these two options aren’t mutually exclusive - in fact, we often encourage folks to move forward in both directions - starting development, and continuing strategy sprints concurrently.
Project Operations
Our project management processes allow our teams to produce great software at high efficiency. Creating beautiful, easy to use products and growing a dedicated group of fans is what gets us excited. Focusing on the ‘why’ and adapting on the fly enable us to do so.
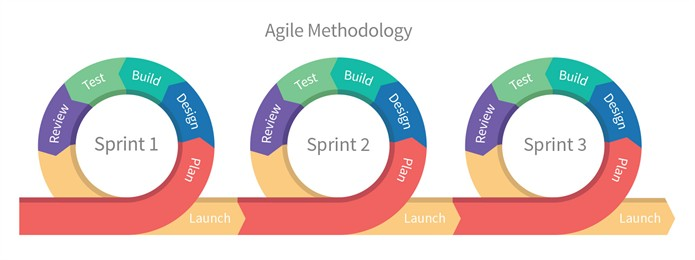
We follow lean thinking and agile methodology. Having a strong vision is crucial from the beginning, but having a full spec document often isn’t.
A product evolves the fastest when you talk to customers, gather feedback, iterate, and actually start building. Therefore it’s best to focus on those processes instead of detailing out a master plan, which will likely change on day one.
The agile manifesto is the set of software commandments, but basically we prefer to do what works over rigid process. We prefer software that actually works over superfluous documentation. We prefer cross-functional team collaboration and iteratively adapting to change.
Our Process
Projects are divided into sprints. A sprint is typically a one or two-week period that focuses on an agreed amount of work, the highest priority items selected from the product backlog.
Focusing on these selected items keeps the team from being distracted by the many other ideas we’ll be discussing throughout a project. At the end of the sprint we can evaluate what’s the next highest priority. This allows us to focus and adapt iteratively.
Here’s what a sprint looks like:
WEEK 1 | Mon | Tue | Wed | Thur | Fri |
Backlog Grooming 30 min | Scrum Standup 15 min | Scrum Standup 15 min | Scrum Standup 15 min | Scrum Standup 15 min | |
Sprint Planning 1-3 hrs | |||||
WEEK 2 | Mon | Tue | Wed | Thur | Fri |
Scrum Standup 15 min | Scrum Standup 15 min | Scrum Standup 15 min | Scrum Standup 15 min | Sprint Review 30 min | |
Sprint Retrospective 90 min |
Project Planning
We forecast our projects and our teams with our Team Utilization tool. This shows who’s working on which teams and how much time is allocated. Since we work with many different customers, projects, and Labs, we need to make sure people and time are properly forecasted. Projects are forecasted right before a Statement of Work is drafted for a customer, to ensure that the team will be ready.
Project Kickoff
Project Kickoff is always an exciting time. New ideas and lots of opportunity lay ahead. Here, the most important thing is for us to understand and agree on the primary business motivations for this project. The who, what, where, when, and why of the project. Our project charter will encapsulate all of that information so we can use it as our guide throughout the project, such as business objectives, success criteria, stakeholders, milestones, and risks.
Backlog Grooming
The first step in any work is to define what needs to be done. That’s what the backlog grooming step is for. In product strategy and charter we decided on our business goals with a validated set of hypotheses that would achieve those goals. The next step is to break down our hypotheses into specific, implementable items, called user stories.
User stories are a structure to define who needs to be able to complete what action, for some goal. They’re usually written in the format, “As a <User>, I want to <perform some action>, so that <I can complete some goal>”
The product owner is responsible for keeping the backlog full of work to be done and prioritized in order of importance.
Sets of user stories around a similar function will be grouped into Epics.
Sprint Planning
At the start of each sprint, the team meets to discuss the next round of work to be undertaken. They pull in items from the groomed backlog and estimate the effort required, with a process such as planning poker. The team will then make a sprint forecast outlining how much work the team can complete from the product backlog. That body of work then becomes the sprint backlog. This meeting should also flesh out the details of the work that needs to get done, by setting acceptance criteria and clarifying any questions that arise.
To decide how complex a feature will be to develop, we use the fibonacci sequence. The sequence looks like this: 1, 2, 3, 5, 8, …. The main benefit of the Fibonacci scale is that enough separation exists between the numbers to prevent the team from squabbling over slight differences. For example, if the scale was 1, 2, 3, 4, 5, 6, 7, 8, 9, 10, team members might debate whether a feature was a 7 or an 8. It’s easier for team members to reach agreement if the scale jumps from 5 to 8.
Daily Standups
Typical daily standups occur everyday of the sprint. Most typically these standups are early in the day, last no longer than 15 minutes and consists of three questions:
- What was done since last time?
- What will be done next?
- Are there any blockers?
Commonly there will be questions, comments, or blockers to discuss, and then we can take those offline to solve.
Scrum meetings are designed to be quick and efficient, so we can maximize the amount of time spent doing the work while also keeping communication open.
Sprint Review
At the end of the sprint it’s time to show off the amazing work that was done. The team will take turns demonstrating workable product to the rest of the team and stakeholders, and get immediate feedback from all. That feedback can be used to answer questions or may be turned into tasks for the next sprint.
Sprint Retrospective
Retrospectives are a magical part of the agile process. At the end of each sprint, the team gets together to discuss what went well, and what didn’t go well. The team will then brainstorm how to solve any issues that are identified, and make sure to keep up the things that were good. Every product, team, and scenario is different, and therefore each project will have it’s own unique set of constraints. Through retrospectives, future sprints are tailored to the most efficient and enjoyable process for everyone.
Project Retrospective
At the end of a project, we sit down to pat each other on the back and reminisce. It’s an opportunity to look at the big picture of a project and identify what we learned. Did we try something new that worked really well? Let’s consider doing it for every project. Was there a specific difficulty that we had trouble with? Let’s be prepared for it next time. We collect feedback from our customers, and write about what we learn.
Agile Terminology
User Stories
Short, simple descriptions of a feature told from the perspective of the person who desires the new capability. This is usually the person who will be the one using your app once it’s on the App Store. They typically follow a simple template:
As a <type of user>, I want <some goal> so that <some reason>.
Example 1: As an (instructor) I want (to be able to markup videos using free draw to show problem areas in the swing,) so the (student will know what areas of their swing to work on.)
Example 2:
As a (developer) I want (to research if we can associate multiple email addresses to one user without knowing their UID) so (we can have better analytical accuracy)
Definition of Done
Although a seemingly small aspect, Definition of Done is a crucial factor for successful agile teams. It ensures quality upon completion and sets a clear standard for the team to follow up to delivery. Agreeing on a definition of done is important for the product team due to the inevitable complexity of the software development process. New requirements and possible paths forward are constantly presenting themselves. By agreeing on a Definition of Done each sprint the team is able to focus on a point that isn’t moving. If requirements emerge over the course of the sprint that are outside of the scope of the original Definition of Done, these are added to the product backlog.
Definitions of Done | ||
Process Level | Code Status | Testing Completed |
Testing | - Code complete - Pull request verified | - Peer review - QA testing - Client review |
Story points
Story points are helpful because they allow team members who perform at different speeds to communicate and estimate collaboratively.
One developer may be highly proficient in backend work and think that a story takes 5 hours. While another developer, that is not as familiar with the work, is thinking 8 hours. When the story in question is compared to another story, they can both agree that it is twice as much work to complete.
This is where story points come in. The abstracted story points allows them to collaboratively agree that the backend story is twice as much work as the other story, devoid of the difference in time it may take each individual developer to complete.
So, when asked to estimate, the developers compare the new backend story to the already estimated story (let’s say it was estimated as 1 point) and agree it is 2 points.
In this way, story points are still about time (effort), but the amount of time per point is not pegged to the same amount for all team members. We can effectively cut out any back and forth that can occur when striving to negotiate hours or days between team members and allow them to collaboratively estimate without bias.
Acceptance Criteria
Good acceptance criteria should define the point when a story or piece of work is completed and working as expected. The language used should be expresses clearly without ambiguity. It’s good practice to write as if you are in your customer's shoes, using their vernacular.
Think what. Not how. Acceptance Criteria should state intent, but not a solution (i.e., “A user can approve or reject the application to use their phone’s camera” rather than “A user can click a checkbox to approve the application to use his phone’s camera”). The criteria should be independent of the implementation, and discuss what is expected, and not how the functionality will be implemented.
MVP
Minimum Viable Product (MVP) stems from the lean methodology. It is considered to be the simplest, functional product that can be released and distributed to consumers. That alone can sound like a risky exercise so here are some of the specific criteria our MVPs must adhere to prior to release:
- The product must have enough value that people will use or buy it initially.
- The product must have future potential that it can retain and enable continued use from early adopters.
- The product must provide a feedback loop to guide developers through future versions.
We benefit from this approach because it lets us build products that will adapt to the users needs and that can shift rapidly without development upheaval.
For instance, we could build a product that was feature rich and had what we thought to be everything, in the hopes that would maximize our clients success. The problem is we wouldn't get a lick of feedback until we had spent a lot of our time and our clients money to build all those features. We won’t begin to get feedback until we have shipped and only then would we know if we were on the right track. Now let’s be honest, by that time it is way too late!
How we do project scoping?
Our goal is to work within your budget to get you as quickly as possible to the point where you find that your product is the right fit for the market. This idea is often referred to as building an minimum viable product and has been popularized by the lean startup movement.
One important part of the idea of building a minimum viable product is to separate features from end user goals. End goals are the lifeblood of the birth of a good app -- features come later.
In the early part of the process it helps the development team work quickest if you focus on what users need to be able to do with your product and why they would want to do those things.
Once we’ve hashed out those basics, our team will help you work towards building an app that will accomplish those goals.
What is a Bug?
We see a bug as a problem causing a functionality to crash, produce invalid outputs, no output or unexpected functionality.
Bug Severity Levels
A bug is considered a Blocker if...
- A bug is a blocker if it causes the app to...
- Crash
- No longer respond
- Leaves critical functions inaccessible
- There is no workaround
A bug is considered Critical if...
- Defect prevents a key feature from working as designed or meeting functional requirements.
- Testing/experience can continue with workarounds.
- May block minor features and severely hampers user experience.
A bug is considered Minor if...
- Defect leaves Product fully functional.
- Issue can be easily worked around.
- Does not follow intended design and is an annoyance to user experience.
A bug is considered Trivial if...
- Defect leaves Product fully functional with no need to work around
- Does not follow intended visual design and is an aesthetic annoyance to user experience.
- Some examples include, but not limited to:
- Grammar
- Spelling
- Aesthetics
- Cosmetic
- Animation
- Formatting
- Alignment
- Keyboard behavior
- Minor usability annoyances
QA & Testing
The primary developer working on the feature will test its implementation and functionality as the sprint progresses on their own. Once he or she is finished, the user story will be passed off to another developer to peer-review the implementation approach and make code quality suggestions. The initial developer will then go back and make any changes suggested by the second developer, after some discussion. The primary developer will then send out a beta build to the team, and have a non-developer review the functionality of the feature and confirm that it meets the Acceptance Criteria.
At Sprint Review, the client will have the final say as to whether feature meets our mutually agreed upon Definition of Done.
Client QA
After sprint review, provide the client with a spreadsheet that includes the features or UX you would like them to test. They should then test each feature and add any notes they have in a comment next to the feature in the spreadsheet.
Design
Typical Design Projects
- Product Strategy Sprints
- Updating an outdated interface to modern standards, such as flat or material design.
- Testing business assumptions or designs with a user session
- Translating an interface from iOS to Android
- Crafting the user onboarding experience
- Performing a competitive analysis
- Wireframes and mockups
Usability Design
Usability is an attribute that determines a product’s ease of use. It is defined by five quality components as explained by Jakob Nielson :
- Learnability: How easy is it for users to accomplish basic tasks the first time they encounter the design?
- Efficiency: Once users have learned the design, how quickly can they perform tasks?
- Memorability: When users return to the design after a period of not using it, how easily can they reestablish proficiency?
- Errors: How many errors do users make, how severe are these errors, and how easily can they recover from the errors?
- Satisfaction: How pleasant is it to use the design
Although usability affects the user experience, they are not the same thing. User experience is about emotional connections to a product while usability is about removing roadblocks in order to make a product intuitive and easy to use. This is important because when users encounter a difficulty in your website or app, they tend to leave and possibly find an alternative to your product and service. On average, it’s been found that if you spend 10% of your product’s budget on usability, the desired quality metrics tend to double. This includes conversion rates, traffic numbers, user performance, and target feature usage.
So how do you improve usability? At Jackrabbit, we find that the most useful method is user testing. This involves bringing in representative users, asking them to execute certain product based tasks with your design, and observing their successes and failures with the user interface. Letting them think aloud while performing these tasks is crucial to getting productive feedback. For a more in depth look at how we conduct these tests, read our user testing section.
It is recommended that you focus on usability through every step of the design process. Start with low fidelity prototypes and keep iterating after each group of testing. Don’t put off user testing until you have a finished and fully implemented design. Doing so will limit how many usability problems you can fix before launch so start as early as you can. In fact, testing a competitor’s product before you begin designing can prove to be beneficial as it will help you understand what other products do right or wrong. This will prevent you from making any of the mistakes that competitors have made, resulting in saved time and money.
User Research
User research has two parts: gathering data, and synthesizing that data in order to improve usability. The data being collected varies from each project and can include something as simple as “is this button’s action clear to the users”, to more complicated as “does this features entire flow make sense to the user”. At the start of the project, design research is focused on learning about project requirements from stakeholders, and learning about the needs and goals of the end users.
We do user research because we care about not only creating apps that are visually stunning, but that are also functional and appropriately meet all of the users’ needs. Building an app is just the beginning, but in order for it to be 100% successful you actually have to test what you made and validate its features. Research is needed to analyze where your users are having difficulties and uncover new opportunities for features and conversions. This helps to ensure that we have created a product that users are actually going to want to use and that we have it designed in a way that makes them want to use it. Ultimately, doing research will save your organization valuable time and money. It removes assumptions and allows for mistakes to be caught early on. The later you discover that your assumptions are wrong, the more money it will cost you to fix it.
User Testing
Our user testing process consists of 6 steps:
1. Planning what we’re going to test, during which we are trying to:
Define the Target Audience which are the assumed potential users and our key demographic.
Define Key Points or main use flows for us to test, by:
- Collecting issues and presenting them as goals
- Prioritizing the goals
- Rewriting the goals as user-specific questions to be answered or information to be gathered
2. Recruiting individuals to come and participate in the study through various ways:
Craigslist Ad when our target audience is broad enough that we can pull participants from the general public, we post an ad on Craigslist that contains a survey to be completed. The survey contains a few open ended questions that are geared towards what we are testing.
Social Media, Google, and Lists of Pre-Qualified Users are used when the target audience is much more specific and pulling from the general public wouldn’t provide the necessary results.
3. Screening Participants for the study based on the results from the survey.
The goal during the screening process is to select 5 individuals who best fit the study’s needs. The reasoning behind selecting only 5 is that it has been shown that feedback from 5 individuals will provide a range of answers that are still narrow enough for commonalities to be found, as well as being time sensitive. For more information, visit here.
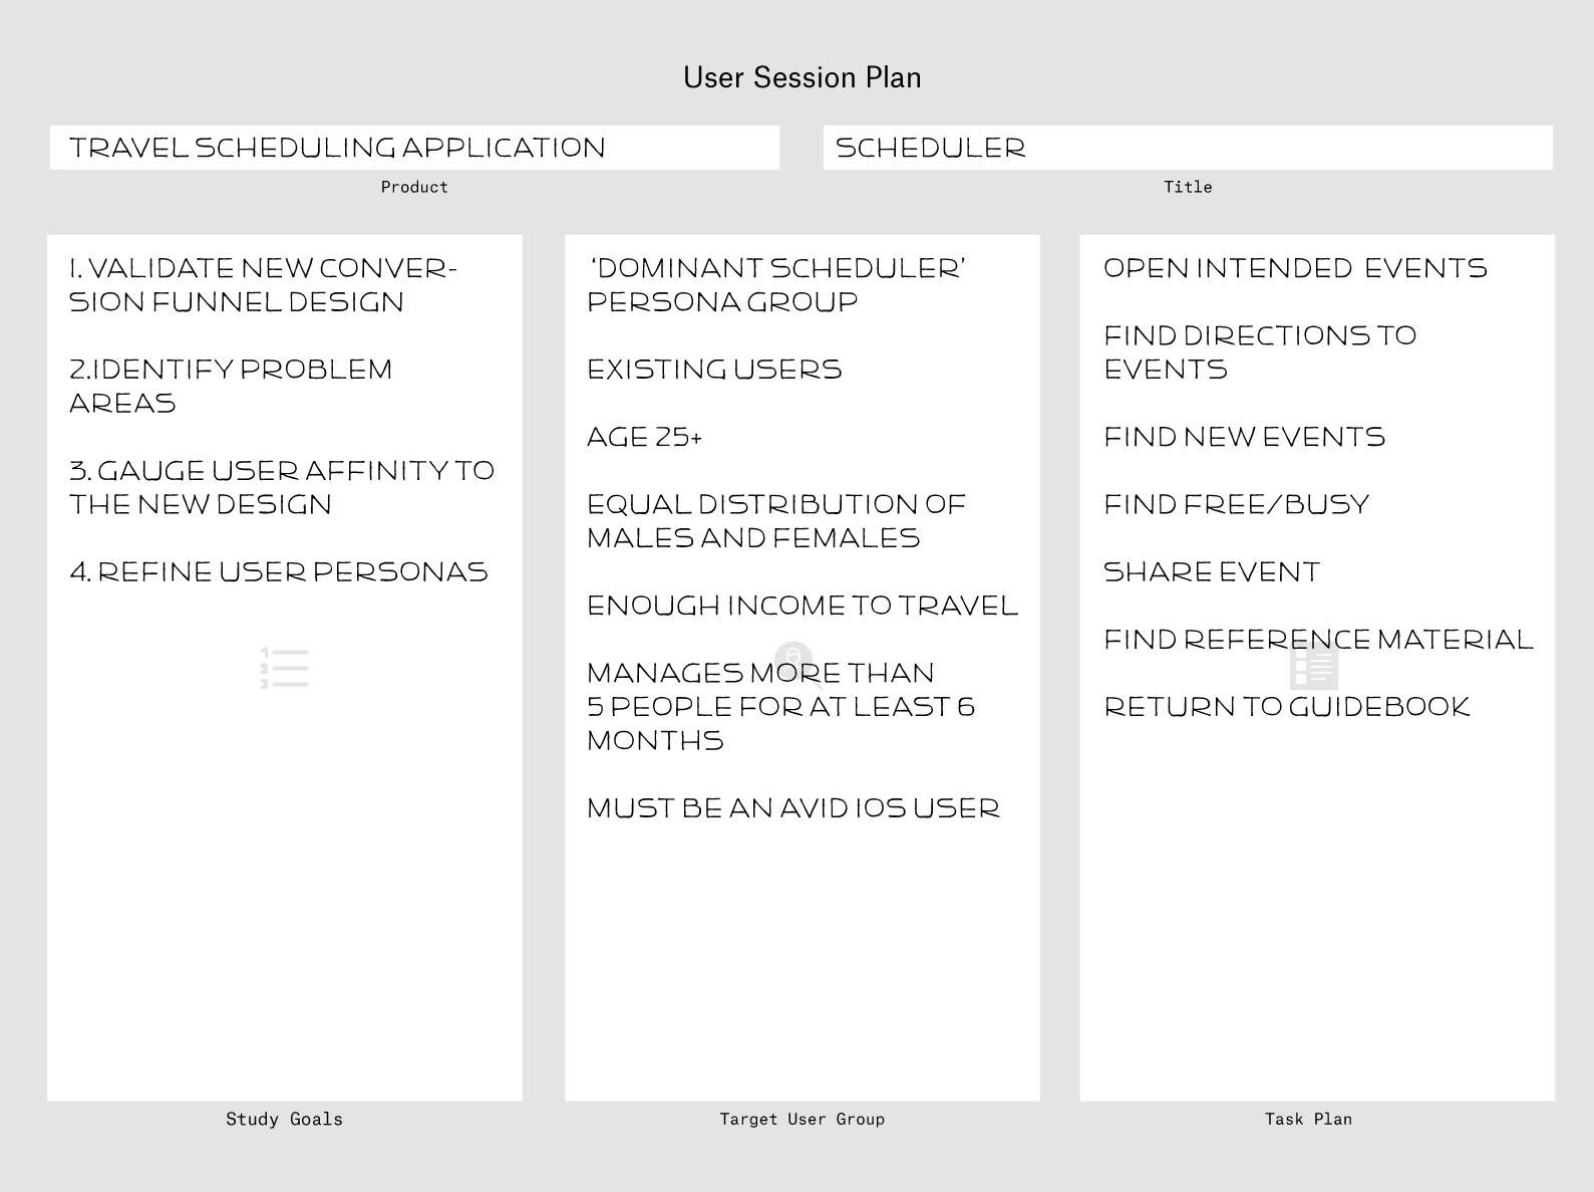
4. Scheduling User Sessions
User sessions are usually scheduled to all be conducted in a day and typically last 30 minutes each. Client participation is highly recommended. It cuts back on any disconnect during the presentation of findings and it keeps everyone in the loop of what is going on and what is being said by potential users.
5. Running a User Session and performing the interview has numerous components to it:
The agenda may vary depending on what is being tested during, but generally consists of introduction and getting to know our participant. Then we ask a series of questions which reflect our key points and typically have the participant interact with a prototype of what we are testing.
We’ll likely record either a video, audio, or screen recording of the interview so that we can focus on performing the interview and have the data to review afterwards.
We have a Non Disclosure Agreement (NDA) to ensure that whatever is discussed during the session will be kept confidential. We write a script in advance and it contains a series of open ended questions that were curated by the team to address the key points established during the planning phase.
Our typical roles are Moderator, Transcriber and Observer/Equipment facilitator. The moderator is in charge of conducting the interview by asking all of the questions and will be the main person engaging with the user. The transcriber is in charge of recording all of the user’s answers during the session. And the Observer/Equipment Facilitator ensure equipment is set up and running correctly and observing quietly during the session.
“Hallway” Testing is an alternative option to having in-office user sessions that bypasses recruiting and scheduling appointments with users. Typically these forms of user sessions take place out in the field at public places like coffee shops, libraries, campuses, etc.

6. Analyzing Data and Presenting Findings through various approaches:
Lean Analysis the team will briefly discuss and break down the key points that came up while testing (new opportunities, unexpected pains, confirmed predictions, etc.).
Data Analysis the quotes gathered during the interviews are broken down and coded according to specific points:
- Doing - behaviors and actions performed
- Feeling - emotional reactions and attitudes
- Thinking - describes the mindset and considerations/thoughts
- Pain - decision points with negative outcomes or hindrances for product
- Opportunity - decision points with positive outcomes or possibilities for product
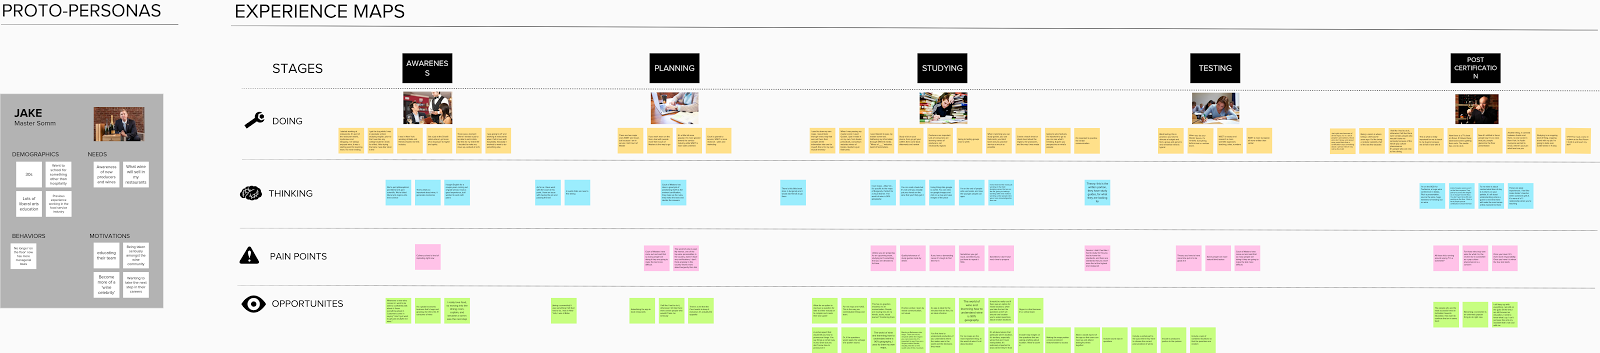
Experience Map using mural.ly, this involves taking the breakdown from the data analysis and grouping together quotes that fit within a similar theme to form a potential user flow.
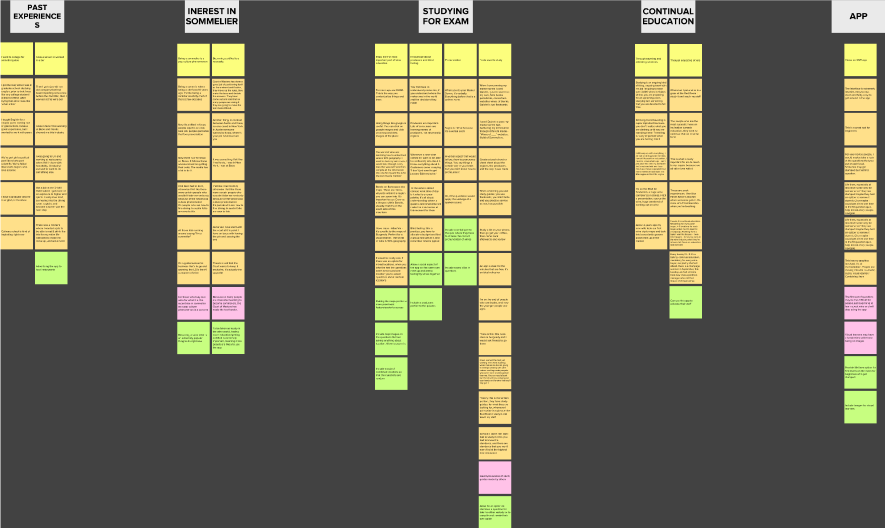
Journey Map is used to present the findings through a narrative story of a persona created to reflect a potential user and their journey based on the data collected from the testings.
Prototyping
Prototyping is a valuable tool we use to help communicate and test ideas. One of the benefits of testing with prototypes is that users can be more engaged when talking about the concept we are testing. As the value proposition is further understood through the design process, we are able to refine prototypes through fast iterations in order to avoid developing the wrong solutions early on. Learning from failures can be a valuable thing, but failing on a large scale can ultimately result in the death of your product. Prototyping enables us to learn at earlier stages to prevent large scale failure, ensuring that we build the best product from the get go.
A prototype is any simulation of the final product. It is important to keep in mind that a prototype will not always be high fidelity or look like the final product. It may be a series of paper sketches, a click-through of a series of mockups, or in some cases even a physical artifact.
Paper
Paper prototyping is a quick and easy method to test your initial ideas. It involves sketching your product with a pencil on paper. These sketches may display various screen states. Paper prototyping allows you to iterate at a fast rate. Based on users’ feedback and expectations, you can erase and make changes accordingly during the testing process. Paper prototyping is the most flexible way of testing ideas quickly but there is a downside. It is not as immersive as other prototypes, leaving a lot up to the users’ imaginations.
Click-through
Click-through prototypes are our favorite artifacts to test with. These are usually a series of static screens linked together with clickable hotspots. These are more immersive and closer to the final product than paper prototypes. Our favorite workflow for creating these involves designing mockups for each screen and/or screen state in sketch, exporting those, and uploading them to marvelapp.
Physical Artifact
Certain projects can sometimes call for using different methods of prototyping. Sometimes we design products that aren’t exclusive to a digital medium and we need to test how an app may affect a physical object or vice versa.
Visual Design
Visual design is the strategic use of imagery, color, shapes, typography, and form to improve user engagement and brand trust. Successful visual design isn’t just about making things look pretty, it’s about communicating the purpose of the product and the utility of its interface. Visual design plays an important role in boosting user confidence and satisfaction by helping them get their jobs done quickly. For example, if an interface is over styled, a lot of important information and CTA’s can become obscured. The most important aspects of visual design are those that help a user quickly scan information, take the correct actions, and know where they are in the product.
For a quick crash course on some basic visual design principles check these out:
- http://learndesignprinciples.com/index.html
- https://www.smashingmagazine.com/2014/03/design-principles-visual-perception-and-the-principles-of-gestalt/
Visual design is also about first impressions. The tone of what the product is and represents in the eyes of a user should be informed by user and market research. Once you have more insight into who your target users are, moodboards can be an effective tool of honing in on a visual design language. A moodboard is a collection of visual inspirations that you think are effective in communicating similar tones and themes that you are trying to. This compilation of visuals can help spark discussions on how other designers have both succeeded and failed in communicating similar themes.
Engineering
Jackrabbit’s approach to software engineering
Jackrabbit builds and releases native iOS and Android apps. Each app is frequently updated with new features. We plan each feature by splitting it up into functionality statements called user stories. Each project team implements a handful of user stories each week. We define the required changes and acceptance criteria for the changes at the beginning of the week and we demo the completed changes to all stakeholders at the end of the week. This process follows the principles of agile development.
Each team member is placed on the project team they feel most fit and interested in working on. This leads to highly productive teams that exceed stakeholder’s expectations most weeks. Sometimes we do run into problems that prevent features from being ready by the expected deadline. When this happens we can reprioritize remaining features, add developers or slightly push a release date. In any case we don’t rush if a feature takes longer than expected because cutting corners will lead to subpar results.
The following chapters outline the best approach we know to developing mobile-first applications for our set of clients ranging from funded startups to larger enterprise and the variety of projects we’ve delivered, from healthcare to dating apps.
Architecture patterns
Client side architecture
Our client-side architecture, regardless of platform, always follows object oriented programming principles and the Model-View-Controller, or MVC, software architecture pattern. This pattern divides the code up cleanly between the model (which holds the app’s data and business logic), the view (the user interface to show and modify the data), and the controller (an intermediary between the model and the view). This separation of responsibilities helps our developers focus on one aspect of the app at a time, as well as allowing multiple developers to work on different pieces of the code in parallel.

Image Source: https://www.objc.io/issues/13-architecture/mvvm/
We take the MVC pattern one step further with MVVM, or Model-View-ViewModel. In practice we find that, in MVC applications, the controller can grow to be very large and begin to have too much responsibility as it is so closely connected to the view it is controlling. MVVM formalizes this connection by combining the view and controller into the View, while the ViewModel now takes responsibility of the view presentation logic and interaction with the Model data out of the controller. This helps to make our apps have lighter and more testable views and controllers than what we tend to experience with traditional MVC.
Backend services
When we build a client-side app that requires interaction with backend services, such as a database or file storage, we strongly believe in using RESTful principles to guide the app’s interaction with a backend API. REST leverages existing HTTP functionality and helps separate the API endpoints into logical resources for easy consumption by client apps.
These resources should be divided into the correct GET, POST, PUT, PATCH, and DELETE actions. The resource names are plural nouns and the services should return sensible HTTP status codes. Other practices should also be followed, such as: putting the API version in the URL, filtering and sorting actions passed as parameters, and cursor-based pagination.
Likewise, we strongly prefer working with backends that serve JSON-only responses as opposed to the more verbose, difficult to parse, and less compatible XML. Whether we are building the backend ourselves or integrating with a client’s, RESTful practices, JSON responses, and a well-documented API help us to easily integrate and interact with backend services.
Lastly, we are proponents of SSL Everywhere and believe all traffic coming to and from our apps should be securely encrypted, so we also demand these expectations for our backend. Apple is pushing its mobile developers to embrace SSL/TLS (and encryption in general) with their App Transport Security introduced in iOS 9, and is likely to require it in a future version of iOS. When dealing with authentication, it should be established through an /Auth endpoint and maintained through an auth-token header field.
Code re-use
Throughout the course of working on many projects, we have found that many apps we build use similar architectures and coding patterns to get them up and running; especially related to commonly used pieces like networking, databases, view management, and more. When we notice a particular theme where we are writing the same code over and over for different projects, we will usually try to generalize it and turn it into a shared library that can be used on any of the apps we build going forward. For example, see our JRMSimpleGeofenceManager library
This helps us to more quickly get new projects up and running as well as prevent a lot of duplicate work on basic features we’ve already built before. Features only built once for one app are generally not something we will do this with, as they are usually specific to solving the problems for that app.
Documentation
Project documentation
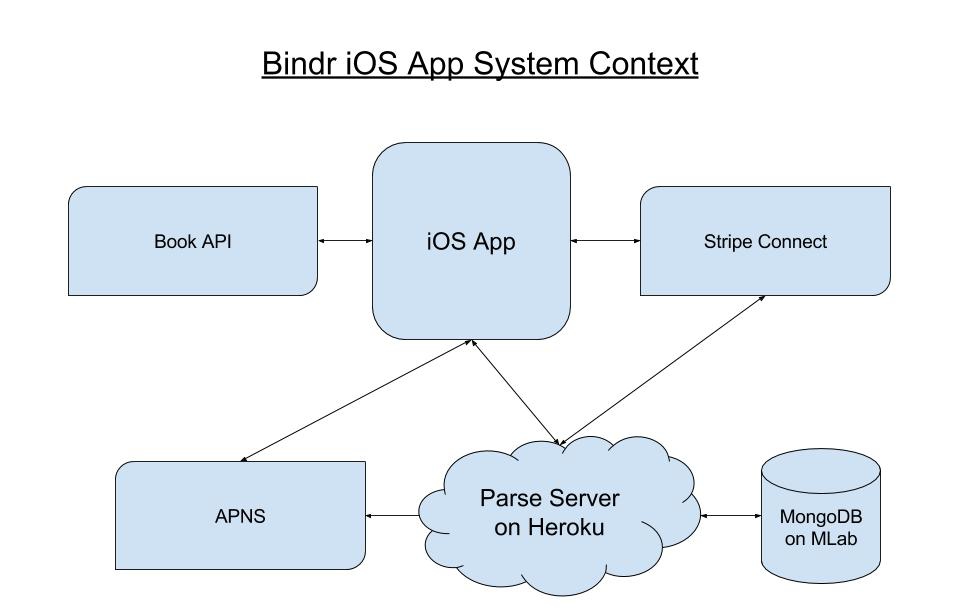
The bulk of project documentation is created during the Project Discovery and Strategy phases. Project documentation answers all the common questions that are required for planning and implementing a mobile app. Project documentation includes an initial list of use cases and user stories, a system diagram and a data model. It is also often useful to define the REST contract in the project documentation so that the backend team knows how their code will interface with the front end.
Code base documentation
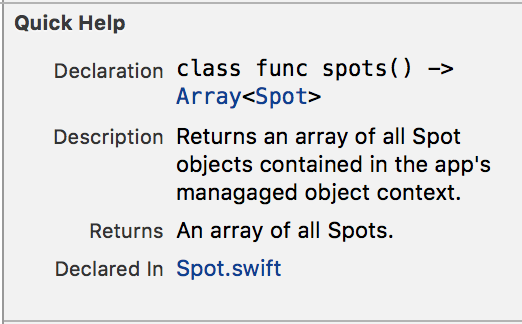
Code base documentation is a combination of reference documentation auto-generated from javadoc formatted comments in the source code and a summary of the app architecture. The tools we use to auto-generate reference documentation are explained in Chapter 4: Developer Tools. The app architecture is the tech lead’s blueprint for how all the different app components fit together to create a piece of software that fulfils the required use cases. It lists all the major components of the app and explains how the components are implemented. As such it’s a very useful thing to have when the project is moved to a new team or when a new member joins the project team.
The app architecture lists all major objects such as the network manager, push manager or routing manager. It lists deep links the app can handle (iOS) and intents it can handle (Android). It lists the models used by the app, including the names of model classes and the business logic responsibilities of each model. It explains how information is shared among the app’s objects (e.g. with parcelables for Android and through managed object contexts for iOS). It lists any architecture patterns being used such as MVC or MVP for Android and MVVM for iOS. It summarizes how the layouts are organized and how they are instantiated including fragments on Android and custom UIView subclasses on iOS.
The app architecture also lists all the app’s library dependencies and 3rd-party SDKs used. It explains any complex implementations that don’t follow standard patterns. On iOS it lists additional project specific configurations such as those in the Info.plist, whether it is using CocoaPods, and if it is using class extensions or precompile headers. On Android it lists additional project specific configurations such as those in the app manifest or build scripts.
Developer tools
Development Tools
Each app we build has a single codebase. We edit this codebase in the current release of Xcode for iOS and in the Dev Channel release of Android Studio for Android. Each codebase supports the latest versions of each operating system as well as some of the previous versions. We aim to support the operating system in use on 90+% of devices. As of early 2016 this level of operating system support requires supporting iOS 8.1 and later and Android API 16 and later. We write our Android code in Java and our iOS code in Objective-C or Swift.
Libraries and Frameworks
We make extensive use of well documented and maintained libraries and frameworks because they reduce development time by reusing code that’s already been written, while simultaneously reducing the number of potential defects that may appear because they’ve usually already been addressed by the library maintainers. Libraries and frameworks also decouple modules of functionality so that our code can focus on the app’s business logic without reimplementing common features that already exist.
Android and iOS both have very active open source communities. We use libraries shared by people in these communities and contribute back to the libraries any improvements we make. For example, some of our most used iOS libraries are AFNetworking which simplifies creating web service requests and parsing their responses, TLIndexPathTools which simplifies managing a presentation data model for tables and collection views, and SVProgressHUD which is used for showing customizable modal alerts which dismiss themselves. On Android our most used libraries are Picasso for downloading and caching images, Retrofit for networking, and Dagger for dependency injection.
We’ve also got some private libraries that we commonly use. We have JRMPushManager which can acquire and upload device tokens and show in-app alerts for received push notifications. We have JRMRestBase for querying RESTful APIs and parsing JSON responses into managed objects, and we have JRMAuthManager for maintaining client side user sessions with a username stored to the system defaults and a password stored in the Keychain.
We also commonly integrate with 3rd party services using their native SDK frameworks. These 3rd party services do the heavy lifting required for things like payment processing and crash reporting. We use Crashlytics to upload crash reports from end user’s devices so that we can see the affected device types, OS versions and even the line numbers where crashes occur. We use Stripe Checkout for accepting credit card payments without having to worry about maintaining a merchant account or PCI compliance rules. We use Parse for channeling user and app data from native iOS and Android clients to a shared database server. Almost every project gets its own set of additional 3rd party integration such as Salesforce integration for CRM data and AdMob integration for advertising.
Each library or framework must be configured to correctly integrate with our projects and reintegrated whenever the library or framework maintainers release a new version. We use dependency managers to automate these integrations and reintegrations. We use CocoaPods for iOS projects and Gradle for Android projects. Both tools make it quick and simple to pull in open source or private code repositories straight into Xcode or Android Studio while keeping the dependency files isolated from the project specific files. Dependency files are pulled into a Pods subdirectory when using CocoaPods and cached in the ~/.gradle directory when using Gradle. We don’t want dependency code in our git repository so we add the Pods directory to each project’s .gitignore when using CocoaPods for dependency management.
Open Source Licenses
It’s always important to understand the licenses under which you can use each of your dependencies. We prefer using libraries that are available under permissive licenses that don’t require our derivate work to be open source or non-commercial. For iOS this is usually the MIT license and for Android it’s the Apache License v2.0.
Frequently used tools
There aren’t many tools necessary for native app development aside from Xcode and Android Studio. However we do use a handful of tools for debugging and finding ways to tune the performance of our apps. We use the iOS simulator and the Android Genymotion emulator to run builds of our app as we are developing. We use Quicktime and Vysor to mirror real devices to our Macs so that they can be recorded and shared. We use Charles Proxy to record the network activity of our apps. On iOS we use Chisel for advanced UI debugging beyond what’s built into LLDB. We use a command line tool called HTTPie to run HTTP requests and understand server responses and we use the canned-response-server node module to stub out arbitrary JSON responses to any server request to quickly test how our apps behave when the server returns a different set of responses for a given set of requests. We also use Leaky Canary and Xcode Instruments to diagnose memory leaks and performance bottlenecks in our code.
Project organization guidelines
Coding style patterns are the rules of formatting and code organization we expect of all code that is checked into version control. We use a single set of coding style patterns for writing native mobile apps in Objective-C, Swift and Java. This sounds like it wouldn’t be possible but it is because we allow the style patterns to defer to the language's’ own patterns where necessary and we allow for consistency of style patterns within a project to override the “correctness” of the style patterns used.
Our coding style patterns
We use the IDE’s default indentation style for indenting nested levels of code. In Xcode this is a single tab for each level of indentation and in Android Studio it’s four spaces. We place the opening brace for methods on the same line as the method declaration and the closing brace on a line all by itself. In Objective-C, we include a single space at the beginning of method declaration between the - or + and the return type. This rule doesn’t apply to Java or Swift because these don’t use a - or + in method declarations. We list public methods before private methods, implementation methods before class methods and group methods involved in the same responsibility, such as presentation or networking, together. On iOS we label grouped methods using #pragma mark notation.
We document any nontrivial methods with a one sentence comment explaining the purpose of the method. These comments are later used to automatically generated documentation for the project. We use the Javadoc format to write these documentation comments on both iOS and Android. The Javadoc format places the one sentence explanation of the method within a set of multi-line comment tags (/* */) and optionally includes a description of the method’s parameters, returns and throws. We don’t use comments in many other places. Our code is written to be readable and self explanatory so we only include inline comments as a last resort when the code can’t be made self explanatory.
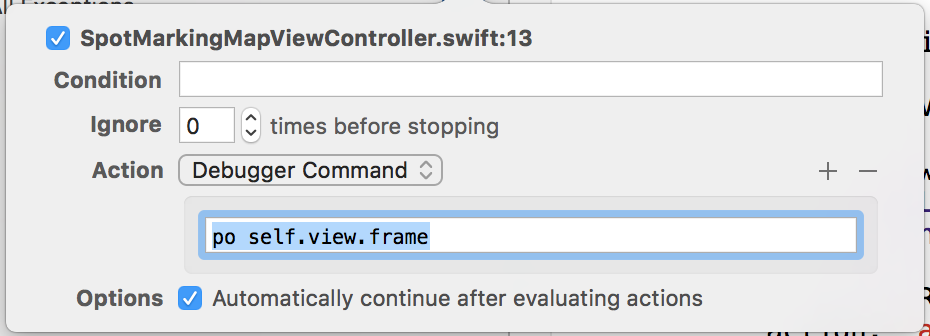
We encourage logging any errors that occur at runtime but we don’t recommend committing developmental or debug logging to the project as it needlessly clutters up the console output. Instead, we put debug logging in breakpoints so that it’s easy to enable and disable and is kept in the IDE instead of in the source code. We write variable, property and method names in CamelCase with only the first letter of each word being capitalized. This even applies to acronyms. We prefer including a LICENSE.md in the project over including a copyright notice in every file because starting every file with a copyright notice wastes screen space and gets in the way of the code. We prefix project specific classes with the project’s initials but use the prefix JRM for classes that are used in multiple projects.
XML layouts and image assets
We keep XML layout files and image assets in our project repositories right next to the source code. On iOS these XML layout files are called Storyboards and they contain a Scene for each screen. Scenes are connected to each other by segues and sometimes embedded in other Scenes. We use Interface Builder to add elements to Scenes and to modify the AutoLayout constraints on elements which determine their size and position. On iOS we only edit the raw XML if there is a merge conflict that Interface Builder can’t solve. XML layouts are a lot simpler on Android because they only represent a single activity or fragment in each file and use syntax which is concise and human readable. Android XML layouts can be edited using a visual “Design view” or a XML “Text view.”
iOS and Android apps are commonly deployed to devices with a wide variety of display pixel densities usually ranging from 160 dpi to 480 dpi. Presenting sharp graphics on the many device displays that exist in this range requires exporting image assets in three different pixel densities. The lower density called Non-Retina on iOS and mdpi on Android is about 160dpi. The middle density called Retina on iOS and xhdpi on Android is about 320dpi and the higher density called Retina HD on iOS and xxhdpi on Android is about 480dpi.
Assets exported at the middle pixel density have dimensions twice as large as the lower density and assets exported at the higher density have dimensions three times as large as the lower density. We use density independent dimensions in code to abstract away the pixel density of the specific device display and let the iOS and Android operating systems use the asset corresponding to the device’s display density. These density independent dimensions are called points on iOS and dp on Android.
These simple few coding style patterns and layout and asset guidelines lead us to create easy to read code, easy to reference documentation, highly adaptive UI layouts and sharp graphics.
Version control
Version control is a critical piece of developing code here at Jackrabbit. Due to the variability of clients, our version control protocols remain flexible in order to accommodate the level of involvement of our product owners. In general, we use a Gitflow workflow, a branching strategy for Git repositories that is defined by a dev or develop branch that serves as an integration branch for new features. The master branch serves as the current release branch. This allows the team to finalize and fine-tune the current release branch without conflicting with development of features for the next release.
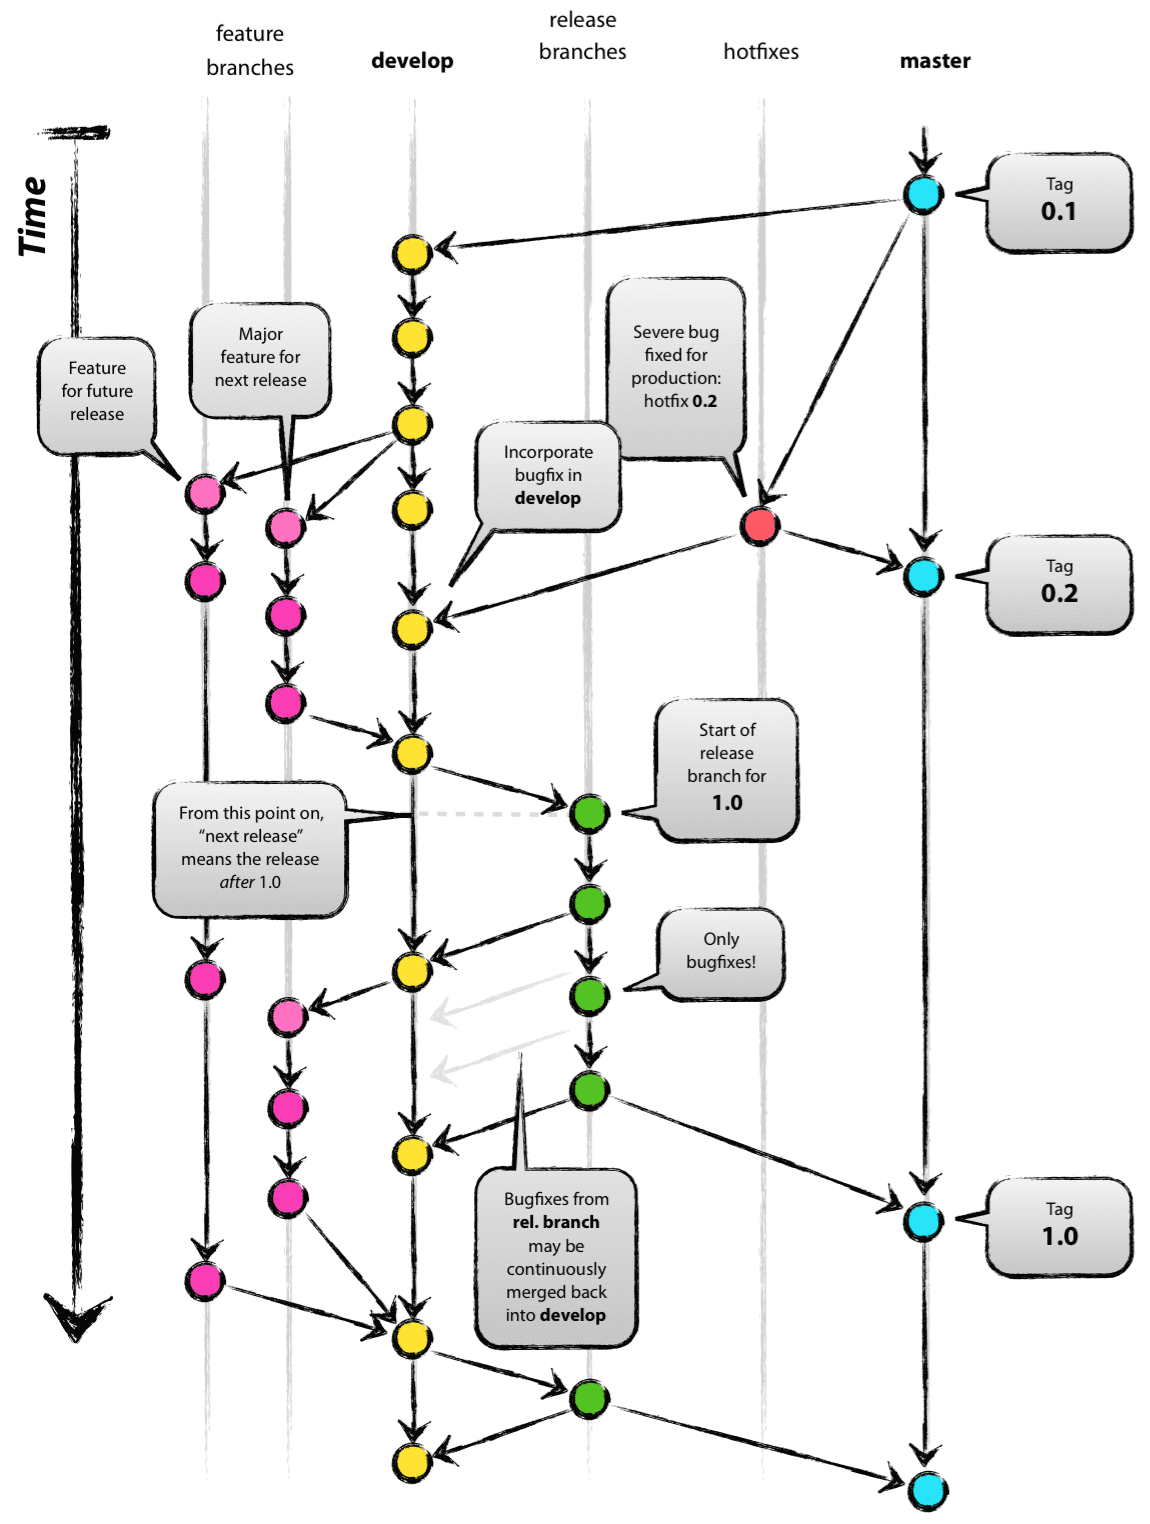
When starting a new feature, a developer will branch off the current dev branch, and name it under the protocols defined at the beginning of the project, often feature/<short description> or JRM /or/ <project initials>-<ticket number> (which correlates with a ticket in our agile roadmap or this weeks’ sprint). After it is completed, the feature will enter the peer review stage. Peer review is done in one of two ways:
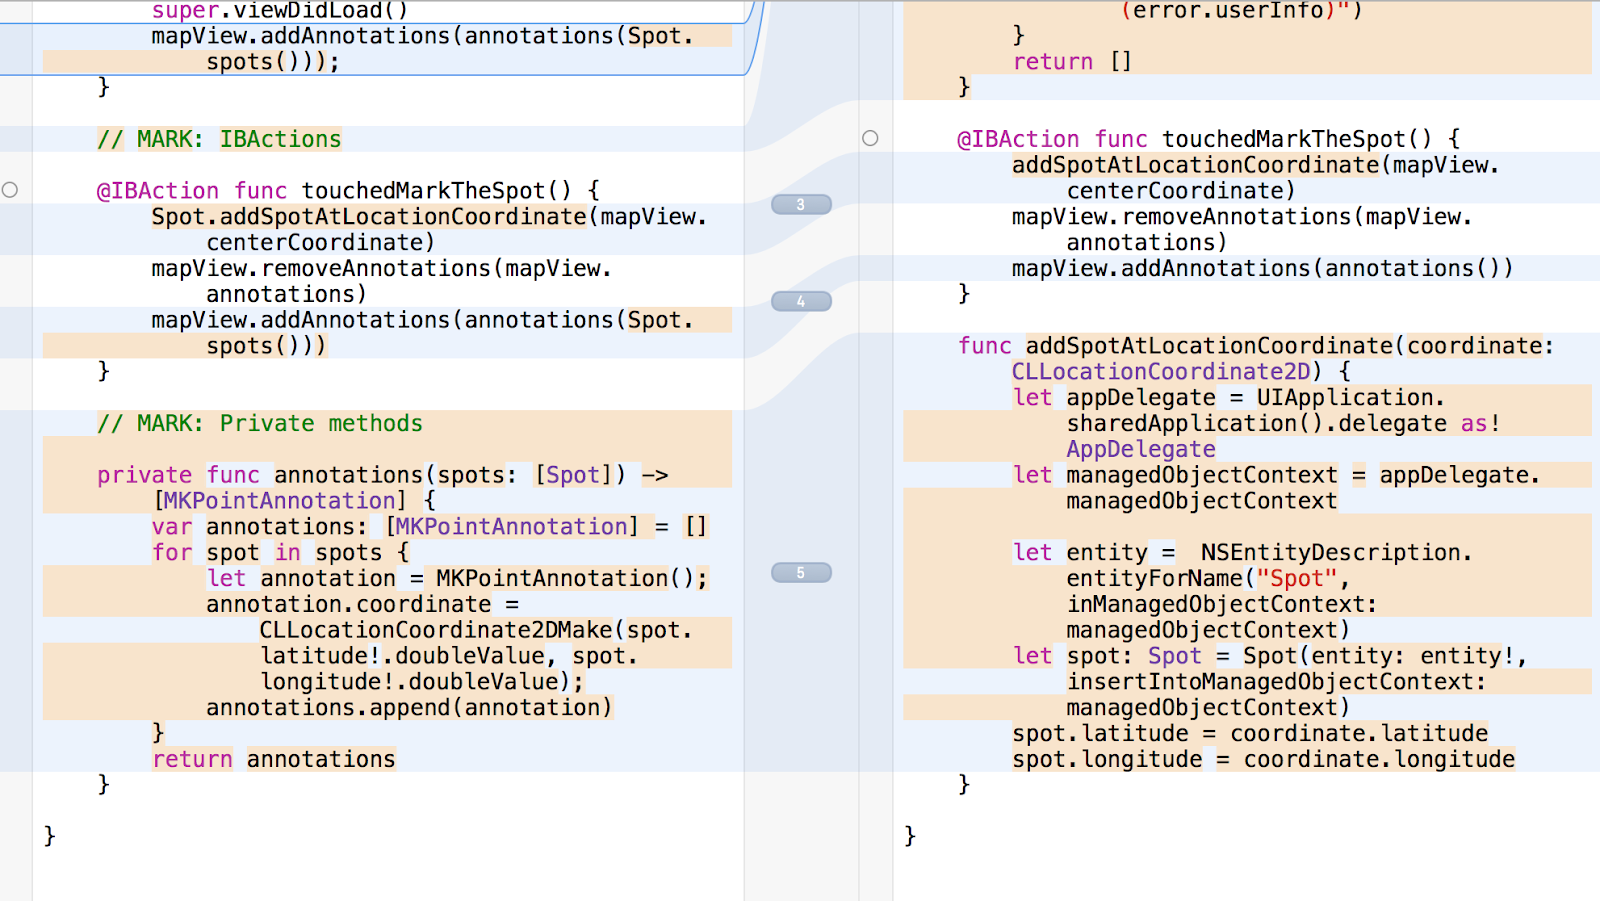
- A pull request is created to alert team members that the feature is ready for review. A team member will then review the code, make comments directly on the pull request (in Github or Bitbucket) if needed, and then merge the branch to develop when it is ready.
- The developer will alert the team it is ready for peer review inside the agile tool (Trello or Jira) by unassigning it to themselves and putting it in the peer review column. The reviewer will make comments directly in the Git repository hosting service or in the agile tool. When ready, the reviewer will assign the ticket back to the original developer, after which they will make a pull request where the project owner can review.
If the reviewer recommends changes to the feature they will assign the ticket back to the original developer, which will make the necessary changes and restart the peer review process. In the case where there are multiple developers and features being worked on concurrently, the developer may wish to merge dev into their feature before making a pull request to handle conflicts themselves. After the desired features are merged into dev and thoroughly tested, the branch can then be merged into master and released.
Code review and pair programming
Code Review
Code review is the process of examining written source code with the intention of finding possible mistakes the original author might have overlooked in order to improve the quality of the software. Code review is usually performed on a different developer’s code.
Engineers at Jackrabbit always review our teammates’ code to ensure the changes meet the acceptance criteria and that the code maintains readability and correctness. Code reviews are also the best way to share programming approaches and to learn from each other’s work. Our code reviews consist of the following steps:
- Verify that the implementation meets the documented requirements.
- Run all automated tests to ensure they still pass.
- Review code quality. Verify that code meets our coding style guidelines, check for bugs, check for unnecessary logging, check that complex code has been refactored, check that method headers are documented with parameter and return descriptions.
- Review code architecture. Check that the code exposes as little as possible in public interfaces, reduces the scope of variables and declares methods as class methods if their implementation doesn’t depend on instance state.
Pair programming
Pair programming is an approach to development and debugging that consists of two engineers discussing the functionality of a code base while both parties are looking at the same screen. Pair programing sometimes speeds up the process of code review by allowing real time feedback and discussions between engineers. It can also enable an engineer to solve their own issue just by vocalizing their assumptions and understanding of the issue.
The way we do peer programming at Jackrabbit Mobile is simply pulling in another engineer whenever we face a problem or when we are stuck on a piece of code. When teammates aren’t in the room we use Screenhero which allows us to see and interact with each other’s screen remotely.
Automated and manual testing
Unit and UI Testing on Android
We use separate modules in our code structure on Android to store our unit and UI tests. This allows us to mirror our package structure in the test modules and keep all of our test specific classes separated from the main application code.
We use the 3rd party Robolectric library to help us unit test our code on Android. Robolectric is a unit test framework that allows us to access the Android SDK without running our tests on a phone or emulator. Robolectric handles inflation of views, resource loading, and other necessary actions that are implemented in native C code on Android devices. Tests can also run on Continuous Integration environments on a regular JVM without an emulator.
Google provides the Espresso library to help create automated UI tests on Android. With Espresso we focus on writing concise, reliable Android UI tests that mimic how a user would interact with our apps. We focus on testing state expectations, interactions, and assertions clearly without the distraction of boilerplate content or custom infrastructure. Espresso does require an emulator or device to run its tests.
Unit and UI Testing on iOS
The premise of unit testing is to create environments that exercise different types of behavior in the app. For iOS we use Xcode’s XCTests. A unit of code should represent a minimally testable component of code to ensure that there are no regressions as the project changes. Tests should run quickly, consume no resources, and use mock objects or responses (using OHHTTP). We ensure that all network calls, data controllers, and view models have unit tests and use Xcode’s computation to ensure we reach at least 75% coverage of a class. If it is difficult to reach that goal, we consider rewriting the class to ensure better maintainability. Testing view controllers is avoided. If something in a view controller needs to be tested, the developer should consider refactoring the code. We group our tests by file to represent the view controller that a data controller and view model target. We may also use performance testing to measure execution time for appropriate projects.
UI testing is different from functional and performance tests in that it ensures the look of the app behaves and changes how you expect it to as a user interacts with it. We use Xcode’s built in UI testing API. With Xcode 7, you can write most of the testing code by “recording” your interaction with the app. We can then edit the generated code by inserting XCTAsserts like normal unit testing to verify the app looks how you expect it to. Just like unit testing, tests should be simple, deterministic, and fail or pass consistently. They should be written as if the user is interacting with the app. Presenting and dismissing view controllers is vital to UI testing, however, the speed at which a test runner does so can often result in error messages. You can get around these errors by presenting each view controller in its own window.
Test Coverage
We believe that the majority of our code should be covered by tests. We do not look to hit a certain percentage level of our code to be tested, but want to make sure every area of the codebase is equally represented in our tests.
Manual Acceptance and Regression Testing
At Jackrabbit we believe our code should constantly be manually tested and looked at by human eyes. Each ticket requires a functional test by someone who did not work on the code. Within 24 hours of code review there will always be a functional or manual test before each ticket can be marked as done. That is typically completed by a project manager, product owner, or dedicated QA.
Platforms, distribution and continuous integration
Client-side Platforms
We develop native mobile applications for a large range of platforms including Android for smartphones and tablets, iOS for iPhone, iPod and iPad, tvOS and watchOS for Apple TV and Apple Watch and AngularJS for web apps.
Server and Database solutions
We also develop server side solutions and work with our clients’ existing servers and databases.
For clients who want to develop an app that requires popular standard backend functionality (database, push notifications, authentication etc.) but lack a server solution of their own, we most commonly use Parse Server. Parse Server simplifies many aspects of developing a backend for mobile apps, including the API server, push notifications and event driven business logic. We host our Parser Server instances on Heroku Dynos, and use S3 buckets for file storage and distribution.
Unlike AWS, Heroku is free for the first dyno (512MB RAM, 1GB swap space, 100MB storage space, and comparable computing power to an AWS micro/small EC2 instance). However, dynos are strictly for application purposes--many of the add-ons and third party services used to support databases and background works may require an extra cost. For larger applications AWS is less expensive in the long-run. For smaller applications, Heroku is cheaper and simpler to get up and running.
Distribution and Continuous Integration
We often set up a continuous integration server to automatically run automated UI and unit tests as well as automated checks at the pull request stage. We can also setup additional automations to upload test builds to HockeyApp for testing, handle code signing, take and upload screenshots and submit releases. We use Bitrise to run continuous integration in the cloud and Jenkins to run it in house. We use HockeyApp or Fabric for distribution as these allow us to distribution Android and iOS builds without any approval wait time.
Labs
Mission
As a company, investing time and resources into real innovation is a core value. Jackrabbit Labs strives to help enable personal and team growth, drive a culture of innovation and creativity, and to empower us to work with new technologies and spaces that we as individuals and as a company are passionate about.
Anyone can contribute to a Labs project. Some Labs projects are scheduled but it’s also a great way to use down time between Services projects.
What have we done in Labs? Here are some examples!
- How Jackrabbit Mobile is bringing 'dumb toys' to life
- Jackrabbit experiments with interactive toys and beacons at TedX Youth Austin
- Apple Watch & Parrot Dones
Ideation
Ideas can either start from an individual, by simply sharing, pitching or pushing the team into new directions, or from internal ideation sessions. We use a brainstorming and ideation process similar to our design sprint workshops.
Innovation, experimentation and prototyping is what we’re focused on, not products. There’s a lot of things we could design and build, but first we start by asking ourselves why. Why is this interesting, who would it help, what problem would it solve, who would read about it, and what can we learn?
The Process
Since we focus on new ideas and technologies, our starting point involves research into this new space we plan to focus on. This involves exploring what types of technology to use and proving feasibility, which usually lasts 2 weeks. Once we’re ready to move, we we’ll plan a project road map. We then start the build, measure and learn loop which can last between 2-6 weeks.
Testing Viability
The way that we decide continue Labs is by taking our experiments and innovations and getting them out there in front of future client partners and potential future candidates.
Outcomes
A successful Labs project is one that we learn from. Depending on the project, there’s a variety of different outcomes we may produce. Some may evolve into a presentation or blog post, some may be published or open sourced, some may be used in a future project or to help tech and client partners.
Here are some more examples of outcomes:
- Technical Analysis
- Case Study
- Infographic
- Meetup Presentation
- Blog Post
- Networking
- Social Media
- Partnership
Hiring
Recruiting
We’re always recruiting and keeping an eye out for who we’d like to have join our team because we’re constantly meeting new people and frequently starting new projects that require an evolving set of skills. We feel that the best candidates are the ones we really get to know, so our interview process focuses on learning about each other.
We have a our jobs page here and applications can be submitted to us via AngelList.
Skillsets that we most commonly recruit:
- Mobile Developers
- UI/UX Designers
- Project Managers
- Web Developers
- Backend Developers
Our hiring process is based on Topgrading and we manage it using AngelList Track.
Interview Process
Initial Screen
We receive a lot of applications from a wide range of people. The first step is to verify that we’re a potential fit to work together by understanding the candidate's experience, skills, and goals. A potential fit is someone that has the technical skills to be successful, has experience applying them in a similar environment, and someone who would benefit and grow from working at Jackrabbit.
We first evaluate that fit with a few questions about a candidate's experience and goals, and exercises to illustrate their abilities.
Intro Call
The second step is to have an intro call to get to know each other. This will be a 10 to 20-minute Google Hangout with someone at Jackrabbit where we’ll get to share more about Jackrabbit’s history and mission, and are excited to learn more about their experience and goals.
We find that video conferencing helps to get to know each other, especially if we haven’t met in-person before.
Here we’re looking to follow up and dive deeper into the initial questions we asked. We’re feeling out each other and it’s important that both parties evaluate if we could see ourselves working together.
References and Work Samples
Before the technical interview we’ll ask to see some more of the candidate's previous work. For developers we like to see GitHub repositories, for designers we like to see portfolios, and for project managers we like to see case studies. Live material is the best, such as links to apps on the App Store, open source projects, or active production webapps.
Technical Interview
The next step is a technical interview with someone on our team. If the candidate is an iOS developer then we’ll have them sit down with one of our iOS developers to talk through the technical details of their experience, strengths, and preferences. We’ll ask technical questions to gauge familiarity with the tools, techniques, and processes we follow. We’ll also work through a short exercise together, typically either a coding problem for developers, a creative session for designers, or an agile exercise for project managers.
Culture Interview
The last step is to have a culture interview on-site with a few members of our team. We may include managers and people from different teams, who’ll will be given a short brief, but we want them to form their own opinions about the candidate. We want the candidate to get a feel for what it would be like to work at our company as much as we want our team to to get a feel for what it would be like to work with them.
Offer
Contract-to-hire period
Hiring starts with a three month contract-to-hire relationship. We typically like to have a specific project in mind that we’ll start working on together. This lets us both test out the relationship over an extended period of time to verify that it is a good fit and that we both enjoy working together. We have a Contractor Agreement that outlines the terms and responsibilities that we’ll sign together and get started.
During this time it’s important to join team meetings and team events, ask a lot of questions, get settled in with our tools and processes, and understand how we operate. We’ll have a monthly check-in along the way.
Employment
We’ll send you an offer letter, which formalizes the details of the offer and the position, and sign an employment agreement, which covers the terms and policies of working with Jackrabbit and our customers.
Onboarding
First day
Welcome! First day means breakfast tacos and introductions! You’ll typically start on a Monday or Thursday morning so that you can meet everyone at Team Meeting.
Then you’ll sit down with the Partners and your team lead for an onboarding meeting. You already know us pretty well by now, but we’ll go over some history about the company, our values, and our plans for the future. We’ll talk through day-to-day responsibilities and operations, and have lots of time for questions.
We’ll create all of your accounts, starting with your Jackrabbit email address, and help you get set up with all of the tools you’ll need, such as Slack, Harvest, Trello, and more.
First month
We’ll schedule a 1-month check-in to formally sit down and review how everything is going.
The first month starts with getting familiar with everyone on the team, projects and Labs that we’re working on, and comfortable with the tools and working environment. We find that’s best done by shadowing projects, all the departments at Jackrabbit, from Sales to Design, and working 1-1 with a senior member of the team.
Quarterly Reviews
Every quarter you’ll have a one-on-one review meeting with one of the Partners or team leads. This is a time to sit down and evaluate the past quarter, progress towards goals, and be aligned for the future. We’ll provide feedback on strengths and weaknesses, but we believe it’s even more important to hear your thoughts on your self-evaluation, so we can goal set together.
We want to make sure you’re working on what you want to work on, and growing in the direction you want to grow, so that we all enjoy what we’re doing, and do our best work together
Operations, Administration, HR
We strive to find an effective balance between process and practicality. We strive to eliminate bureaucracy, politics, red tape, and redundancy. When in doubt: keep things simple, do what works, and talk to others.
Remote Meetings
Remote meetings are usually held over Google Hangouts, where we can video conference with multiple people, chat, and screen share when needed.
You can create a new Google Hangout in a Slack channel or message by typing “/hangout”. On a Google calendar invite, you can select to include a link for a Google Hangout. Hangout links can also be shared by URL.
Phone meetings are usually held with Uberconference. It creates a dedicated conference line for your account. It also integrates with Google Hangouts, and you can create a conference number for others to call into a Hangout.
Chat
We use Slack for company chat.
We use Gmail for company email.
Wiki
We have an internal Wiki for company information.
Documents
We use Google Docs for our documents, spreadsheets, presentations, and more.
They are great for real-time collaboration with others on a document. They have comments and suggestions features, manage edits and revision history, and automatically save. They are easy to share by URL. They can be exported and downloaded into different formats, such as PDF or Microsoft Office formats. Those formats can also be uploaded to Google Drive and converted to Google Doc format.
We store everything in Google Drive.
Calendars, Scheduling, and Meetings
We use Google Calendar for company calendars. The “Find a Time” feature is handy for finding a common available time.
Team members have access to coworkers calendars by default. There are also Jackrabbit calendars for Vacation Days and Holidays.
Team members are generally available between 9am-5pm, but we allow flexible schedules that enable our people to choose the times that they do their best work. Set your normal working hours in Google Calendar. Mondays and Thursdays are typically meeting days, while Tuesdays, Wednesdays, and Fridays are typically workdays (also known as maker days). If a time slot is available, it is safe to assume that the person is free and available for a meeting, although be very respectful of each other’s time.
We don’t hold meetings for the sake of holding meetings, and most work can happen remotely and asynchronously. We encourage few meetings in favor of better work.
Each conference room has an associated calendar for reserving it. The way to reserve them is explained on the Office page.
Holidays
Jackrabbit observes the following holidays every year. If a holiday lands on a weekend, then we will be closed on the next closest day. For example, if on a Saturday we will be closed Friday, and if on a Sunday we will be closed Monday.
- Good Friday
- Memorial Day
- Independence Day
- Labor Day
- Thanksgiving Day
- Day after Thanksgiving
- Christmas Day
- New Year's Eve
- New Year's Day
The Jackrabbit Office is also closed for SXSW! We’ll be running around downtown Austin, presenting and attending awesome conference sessions with thought leaders, learning about cutting edge trends in the industry, meeting incredible people from all around the world, and having an amazing time!
All-Hands Meetings
All-Hands meetings are informative meetings held twice per week on Mondays and Thursday, from 10-11am and attended by everyone in the company. The agenda is found in the Team Meeting Agenda in Asana and there is a Google Hangout link in the Calendar Invite. On Mondays team members demo work to the rest of the company, such as a new feature or design that was implemented, and on Thursdays we share status updates and company reports, such as sales and recruiting.
Time Tracking
We track our time in Harvest.
All work time should be tracked in a Harvest category. Customer work should be tagged to that customer. Non-customer work should be tagged to Jackrabbit Internal. Jackrabbit Extracurricular is used to tag time that is not part of your core responsibilities, but contributes to your growth and expertise in the industry, such as organizing our Austin iOS Developer or Austin Android Developer Meetups.
Project managers are responsible for creating, managing, and monitoring the Harvest projects. They will set the appropriate project settings according to the terms of the Statement of Work, such as dates, budget, and invoicing schedule.
It’s very important to keep accurate track of time, including all billable and nonbillable, internal and external. These are used to track company operations and forecast future plans. Time records are used in legal and financial reporting.
Weekly timesheets should be submitted by Monday at Noon for the previous week. Project Managers should approve, deny, or respond to submitted timesheets for their projects by Monday end of day.
Finances
We have a bookkeeper and CPA that manages our finances and accounting, who can be reached at our finance email address.
We manage our finances with QuickBooks, including financial reports, invoicing customers, and paying bills. We use Harvest for project and time tracking.
Invoicing
We invoice our customers every sprint for the work completed over the past sprint.
Our invoicing terms are Net-21. Late payments are subject to a late fee.
Invoices can be paid via Bank Transfer or Check for no fee, or through Credit Card or PayPal for a processing fee.
Invoice reminders are automatically sent to customers one week, and one day, before the due date.
Payments
Vendors and contractors should email invoices to Finance. Invoices should be formatted and include an invoice number, date range, work details, rate, and total. Here’s an invoice template PDF.
We process bills and payments twice per month, on the 1st and 15th. Payments can be sent through PayPal (for a processing fee), Paychex Direct Deposit (our preferred method), or Chase Bill Pay mailed check.
Direct deposit can be set up by completing the Paychex Enrollment form found on this page and submitting to Finance. A voided check, deposit slip, or bank specification form is required.
Payroll is processed on the 1st of each month for the previous month and is deposited within 2-3 business days.
Employees can access their pay stubs and reports through Paychex Flex.
Direct Deposit
Expenses
Company expenses should be pre-approved by a Partner. Project expenses should be pre-approved by a project manager. Receipts should be submitted to Finance and will be reimbursed on the next payment or payroll.
Office
The Jackrabbit Office is located at 1214 W 6th St #208, Austin, TX 78703.
Street parking on the neighboring streets is free and generally easy to find a spot.
Community
Community involvement is one of our values, and part of our mission of building awesome tech with awesome people is connecting with those people. It’s fun, it’s rewarding, and it’s something that we’d each be doing even if we weren’t working at Jackrabbit.

Communities and events that we’re involved with:
- Austin iOS Developer Meetup, Organizer
- Austin Android Developer Meetup, Organizer
- Capital Factory, Member/Mentor
- Austin Technology Council, Member
- 3 Day Startup, Mentor
- Austin Chamber of Commerce, Member
- ProductCamp Austin, Past Sponsor & Participant
Thanks!
We really hope you enjoyed this Playbook.
If you’d like to build some awesome technology with us, or have a question or comment, we’d love to hear from you at hello@jackrabbitmobile.com
- The Jackrabbit Mobile Team
Backlog
Our Company
Guiding Principles
About Us
- Jackrabbit Mobile was formed in 2012, driven by the excitement for new mobile technology, apps. As engineers and designers ourselves, we started developing our own apps, because we thought it was interesting and fun, and soon enough everyone was asking for our help.
- We started learning everything we could about the new paradigms, talking to everyone about new tips and tricks, attending iPhone Meetups, sharing code, and teaching others how to build apps.
- Our projects got bigger and more complex, and we reinvested any money we made to bring in other talented engineers to work with us. As mobile matured we hired designers to manage the complexity of data and features. And as our team grew we brought in project managers to help keep everyone most efficient.
- Jackrabbit is completely bootstrapped and self-funded, and we’ve continued to reinvest in our company, our people, and our growth. We’ve expanded our skillsets and streamlined our process to deliver the highest quality software products to our customers. We’ve produced products that range from healthcare to dating apps, and virtual reality to Internet of things. Our customers are large enterprise companies down to funded startups, so we can either accelerate “your move fast and break things” sprint or leverage industry standards and thorough QA.
- Our mission is to build awesome tech with awesome people. Our focus is high quality mobile-first applications.
- <<More about our why>>
Values
- Lean & Agile
- Transparency
- Trusted Advisor
- Modern & Innovative
- Community & Team Investment
- Company & Personal Growth
- We work really hard.
- We have a lot of fun.
Mission
- To build awesome tech with awesome people.
Culture
Jackrabbit Facts That Matter
- Jackrabbit is bootstrapped and self-funded. We have never brought in outside financing. Since our earliest days this has been incredibly important to us to have the freedom to shape the company and its business practices.
- We don’t offer team augmentation.
Project Roles
- Product Owner
- Typically the client - we need their input
- Scrum Master
- The Scrum Master is a servant-leader acting as a guardian or gate-keeper to the team.
- The Scrum Master removes blockers from the team’s work.
- They protect the team from over commitment each sprint, as well as complacency.
- They uphold the scrum process and advocate for it’s best practices.
- At Jackrabbit this is a hat that our project managers typically wear.
- Scrum Team Member - scrum team members are the people doing the work over the course of the sprint.
- Designers
- QA
- Developers
- Researchers
Post-Production Phase
Introduction & Objective
Build Distribution
App Store Management
Google Play Management
Maintenance & Support
Analytics
- Google Mobile Analytics
Crash Reporting
- Crashlytics
Compensation
- Salary
- Our mission is to build awesome tech with awesome people, and long-term viability of the company is critical as we continue to build that awesome environment. That includes charging a fair rate for our work, and offering a fair rate to our team. As a young, fast-paced, and quickly growing company, we know there’s a lot of intangible benefits in the experience and exposure that we offer. Startup L Jackson has some good thoughts on this.
- That said, salary is a very important part of the package. We calculate our salaries based on the market rate of each position. To do that we look at AngelList salaries, BuiltInAustin’s salary report, and talk to other companies that are similar to us.
- Healthcare reimbursement
- We have a 50% health care reimbursement program through Zanebenefits. Instead of requiring you to get on a new program, we allow you to continue your existing program. Through our research and comparisons, we’ve found that individual plans are typically cheaper, offer more in each plan, and we can choose what’s best for us. Submit a receipt for your premiums once a month in Zanebenefits and the reimbursement will be added to your next paycheck.
- Unlimited vacation
- We have an unlimited vacation policy. We typically ask for 2-weeks notice and clearing it with any projects or labs teams that you’re on. It’s best to make sure that there’s no important milestones or meetings that you’ll be required for. And if the calendar suddenly happens to be open for a day due to a rescheduled meeting, or if there’s downtime between projects, that’s a great time to take a vacation day!
- Block the time off your calendar and the team bandwidth tool, so that a meeting doesn’t pop up.
Office Hours
- Partners and team leads designate certain time blocks every week that are reserved for team members to schedule office hours. These can be used when you’re looking for one-on-one time. Use these when items come up in-between performance reviews, when you’d like to check-in for feedback, or just whenever you’d like to chat.
- These can be more or less formal and sometimes we take a walk or go grab coffee together.
Newsletters
We send newsletters with MailChimp. Visitors can sign up on our website, or at this link: http://www.jackrabbitmobile.com/newsletter-signup/. Every month we share updates on exciting work we’ve done, content we’ve published, new team members, and upcoming events, such as our Meetups.
Legal
- Our law firm is KHRG, Kastner + Huggins + Reddien + Gravelle. They assist with the reviewing of contracts, legal, employment, and company questions.
Time Tracking
For every time submission, leave a short comment indicating what that is for. Examples are “Sprint Planning meeting”, “JRM-145 Virtual Reality calibration”, or “IoT Security blogging”. (To leave a note, you must be in the Harvest web app’s day view, or Harvest desktop app’s, see the screenshots)


Product Strategy > Growth Strategy
- For after your app has found product market fit
- Analytics implementation
- KPI identification and tracking
- Hypothesis & test prioritization
- 3+ experiments launched/week
- ICE ranking
- Weekly user interviews
- Extensive idea generation
- Quantitative ROI based product phase

Playbook Process
- Meet with departments
- Brainstorm outline
- Assign who’ll complete what sections
- Draft sections
- Team review sections
- Approve
- Publish
** Map out completion calendar
Playbook Examples
- https://playbook.thoughtbot.com ** We are going to model this playbook framework.
- JRM Engineering, read and be responsible for Developing and Production -like sections
- JRM Design, read and be responsible for Product Design Sprint and Designing -like sections
- JRM Project Management, read and be responsible for Planning
- More examples:
- http://www.bigspaceship.com/bsscom2013/wp-content/themes/bss/assets/pdf/BigSpaceship_OurManual_Digital.pdf
- http://www.valvesoftware.com/company/Valve_Handbook_LowRes.pdf
- https://github.com/clef/handbook
- https://kotikan.com/what-we-do
- http://www.creativebusiness.com/pdf_guidebook/CBemphandbk.pdf
- http://www.slideshare.net/whatidiscover/crispin-porter-bogusky-employee-handbook
- https://engineering.vokal.io/
Playbook Instructions & Goals
- Goals
- Standardize Jackrabbit operations and have everyone follow the same process.
- Identify best practices
- Identify tools and processes
- Document what we do
- For (new) employees -- what they need to know
- For customers -- what to expect
- Centralize assets/templates and remove internal bottlenecks and dependencies.
- Primary audience is clients/prospects
- Instructions
- Write the playbook you wish you had on your first day.
- Write the playbook you’d want to educate the next member of our team.
- Identify and answer the most frequent and common questions that you have, and that you’re asked.
- Narratively explain each section as if you were describing it to a team member over Slack
- Link to frequently used resources and those that require more in-depth descriptions (such as Gitflow)
Playbook Ideas
- Draft / source control on GitHub?
- automate pushing/updating to other sources (Medium, JRM site, …)?
- Publish on Medium
- Publish on Jackrabbit site
- Acknowledgements + recognition
- Jackrabbit team
- IDEO, thoughtbot, ....