
RICK AND MORTY PINBALL INSTRUCTION, RULES, & SERVICE MANUAL
Manual Revision June 2021, covering R&M Machine Code date 2021.5.18

Table of Contents
1) Introduction 3
2) Game Assembly and Setup 4
2.1 Unboxing and parts inspection 4
2.2 Leg installation and backbox assembly 5
2.3 Pitch & Level adjustments 6
2.4 Ball installation 7
2.5 Tilt installation and adjustments 7
2.6 Volume and Amplifier adjustments 7
2.7 Power-up and first impressions 7
3) Game Rules and Features 9
Game Layout & Playfield Features 9
Skill Shots 11
Multiball 11
Add-A-Ball 12
Lock Stealing 12
Adventures 13
Dimensions 17
Megaseeds 18
Meeseeks 19
Meeseeks Mania 19
Mystery Awards 20
Slam Save 20
End of Ball Bonus 20
4) Menu System 21
4.1 Basic Menu functions 21
4.2 Settings 22
Machine Standard 22
Machine Coils 26
Machine Pricing 30
Sound 31
Rick & Morty Feature 32
4.3 Tests 39
4.4 Statistics
4.5 Utilities 40
4.6 Software Info 41
5) Troubleshooting and Other Tips 42
6) Component & Part Layouts
6.1 Coil Layout
6.2 Switch Layout
6.3 RGB Layout
6.4 Rubber Size and Layout
1) Introduction
Scott Danesi’s second game for Spooky Pinball takes players into a world where anything and everything can happen, and the only two people who have a clue about their environment are a drunken asshole inventor and his grandson. Rick & Morty offers several ways to tackle scoring courtesy of a complex rule set designed with Bowen Kerins’ input, featuring adventures for the Morty Adventure Card while traversing through “alternate dimensions” to find Megaseeds which increase scoring potential. Multiball modes may be achieved through the unique Danesi-Lock 2.0, or “Meeseeks Mania”. The game is widely regarded as “not easy”, but its challenge is met with addictive gameplay, immersive theme integration, and a spectacular light and sound show. The random blend of adventure and “alternate dimension” features makes the game anything but linear, and you’ll rarely get the same game mix twice in a row.
- Game Design: Scott Danesi
- Programmer: Eric Priepke
- Animations & Sound Effects: David “Bunyip” van Es (with assets from the Rick & Morty TV show)
- Music: Scott Danesi
- Artwork: Josh Freekys
- Toy Sculpts: Matt / Back Alley Creations
A total production run of 750 Rick & Morty Pinball games was announced and sold in December 2019. Construction and delivery occurred from January 2020 through June 2021 in Benton, WI. Most games were the “Bloodsucker Edition” featuring “Kalaxian Krystal” purple powdercoated legs, cabinet side rails, habitrails, and media panel, plus a numbered plaque. Just 35 were the “Standard Edition” with powdercoated black replacing the purple features. All gameplay features are identical for both editions.
For technical service please contact: service@SpookyPinball.com
For other Spooky Pinball games please visit SpookyPinball.com
2) Game Assembly and Setup
Thank you for purchasing a game from the smallest, happiest, goofiest little pinball company on the planet! Your support means everything to our family and business. Here are a few notes to help you set up your new game.
Tools required for initial machine assembly:
- Utility knife or razor blade
- Ratchet with ⅝” socket or ⅝” wrench
- Small bubble level (side to side and incline)
- Wire cutters
- An assistant - because these games are heavy!
2.1 Unboxing and parts inspection
List of Included Parts (in box with legs and/or in bag stapled to cabinet inside coin door):
- 1 Set of coin door keys
- 1 Tilt plumb bob
- 1 Backbox (head) bolt and washer
- 4 Pinball legs
- 4 Pinball leg levelers with nut
- 8 ⅝” thread acorn head pinball leg bolts
- 4 Pinballs
- 1 Power cable (line cord) for your country’s electrical system
The Keys: Your coin door keys are located inside the leg box. All the pinballs, a power cord, legs, leg bolts, and head bolt & washer, are in the same package. Your backbox key is inside the coin door. Please take a minute to inspect to make sure you have all the parts and that they are not damaged.
Removing the box: If your game came in a box then there are a couple of ways to begin. (If your game did not come in a box, then you may skip to step 2.2). Begin by opening the flaps on the top of the box. Be mindful to make sure you remove the staples from the flaps so you don’t get scratched or misplace any of them. DO NOT CUT THE PLASTIC STRAP YET!
A) With some assistance, lay the machine flat on the floor on the side that is marked “Truck this side only.” Grab the plastic strap and pull the game from the box. Once the game has been removed from the box (and with the assistance of a
helper), stand the game back upright on its back.
OR
B) Using your utility knife, carefully cut down the sides of the box that are labeled “Truck this side only,” making sure that your knife DOES NOT come in contact with the game cabinet itself. Once both sides are cut you will be able to
access the pinball cabinet itself.
2.2 Leg installation and backbox assembly
Installing the Leg Levelers: Thread a leg leveler nut onto each of the levelers. Then thread a leg leveler into the bottom of each of the pinball legs. Let’s begin with all of the levelers adjusted to their lowest positions (threaded all the way in).
Installing the legs: Start with either of the front legs. Using 2 of the ⅝” headed pinball legs bolts per leg, thread the leg bolts into the corresponding holes in the leg and fasten the legs to the corners of the front of the cabinet. Using your ratchet or wrench, tighten adequately to make sure the legs are securely attached to the machine. With the assistance of a friend or helper, slowly tip the game forward until the two front legs are resting on the floor. Now, as a team, pick up the rear of the cabinet and attach the back two legs in the same fashion as the front. You may want to find a stool or other sturdy support system to rest the game on while attempting this. Once the rear legs are secured to the cabinet, you can set the game down on all four legs.
Setting the Backbox Up: Using your wire cutters, cut the plastic strap that runs the length of the game. ATTENTION! Be careful as there is some tension on this strap and it may release with some force. Once the strap is free, now you can lift the backbox into position.
Be mindful to make sure none of the wiring gets pinched while lifting the backbox. Use the clasp on the backbox and the cabinet to temporarily hold the backbox upright (this should not be used as a permanent fastener)! Using the keys from the parts box, open the coin door and retrieve the backbox keys. With these keys, unlock the lock over the LCD display panel, and pivot the panel downward. Now, using the head bolt and washer provided, secure the backbox to the base cabinet. It is not necessary to remove the backglass but if you wish to do so, carefully lift the bottom of it and pull it forward gently.
WARNING: The backglass is REAL GLASS - HANDLE WITH CARE!
At this time thoroughly check for any loose or disconnected connection(s) in your backbox. When you are done, reinstall the backglass, then return the display panel to its raised position and engage the lock. Place the backbox key back on the hook in the coin door.
2.3 Pitch and Level Adjustments
Removing the playfield glass: The glass is secured to the cabinet by the lockdown bar at the front. You need to open the coin door to access the lockdown release mechanism. Your game may have one of two types:
- Grasp the lever located at the top right of the coin door frame and pull it to the left. This will release the mechanism that holds the lockdown bar in place.
OR
- Look for a clasp on the left inside, and the right inside, of the coin door opening. Flip both clasps to release them.
Lift the lockdown bar off the cabinet and set it aside. Now close your coin door to keep it out of the way of the playfield glass. To remove the playfield glass, simply slide the glass down toward the front of the machine.
CAUTION: playfield glass is tempered, so take care not to strike its edges with or on anything as it may SHATTER!
Leveling the Game: With the glass safely removed, we are ready to level the machine. With your small bubble level you can correctly set the side to side action of your game. Placing the level on the playfield itself will give you the most accurate results. First level the back of the game. With your friend or helper watching the level, crawl under the machine and rotate the leg leveler clockwise (loosen) to extend the leveler to make the leg longer. Do this until your bubble is between the two lines on your level. Repeat this process for the bottom (front) of the playfield. Once that is done, you can use your pitch level to adjust the pitch of the game. The steeper the pitch, the faster the game will play. We recommend a pitch of 6.5°. The pitch can be increased by raising the back of the game. This is accomplished by making the leg levelers on the back legs longer since for most players, the front legs should be lowered as short as possible. Once the proper pitch is established, recheck the side-to-side level of the playfield.
NOTE: if the game is not leveled properly, the cabinet may not be “square” and so the glass and/or lockbar might become difficult to install. If this happens to you, adjust your level settings as required.
2.4 Install the Balls
Remove the 5 pinballs from their package. Take a minute to inspect them for any nicks or scratches, and wipe them off before installing them into the game. Once you are satisfied they are acceptable, place 4 balls between the flippers on the lower playfield and let them naturally fall into the trough. Put one ball in the garage trough (through the kickout near the pop bumper, above the “L” inlane). All 5 balls must be installed for the game to operate correctly.
2.5 Tilt Setup
The tilt plumb bob is a metal cone on a free-swinging rod. If the cone makes contact with the ring surrounding it (caused by shaking the machine), the game issues a “Tilt Warning”. After repeated warnings the machine will TILT, its coils will shut down, and the player will lose their current ball.
To install the tilt plumb bob (hereafter referred to as simply tilt bob) open the coin door on the front of the game. At the left inside of the cabinet you will find a long metal rod inside a metal hoop. Insert the narrow end of the tilt bob onto the metal rod and then tighten the nut on the side of the tilt bob. To make the machine more sensitive (less movement needed to “tilt”), place the bob farther up the metal rod. Lower the bob to make it less sensitive. A medium setting is recommended but as this setting is adjustable, you may configure it to your liking. A sensitive tilt discourages rough players, but some allowance for nudging is usually preferred (and arguably required on this title).
2.6 Volume and Amp Adjustments
The volume for Rick and Morty is controlled by the two black buttons mounted to the inside of the coin door. You may adjust these to suit your preference.
The amplifier at the bottom of the cabinet has been factory set for optimum performance. PLEASE DO NOT ADJUST THE AMPLIFIER DIRECTLY.
2.7 Power up and First Impressions
IMPORTANT! This game auto ranges from 50 to 60 Hz; the 110v / 220v line switch is on the back of the 48v power supply. DO NOT ADD A CONVERTER / TRANSFORMER!
Using the line cord from your parts box, plug the female end into the receptacle on the back of the base cabinet and the male end into your wall socket. Turn the switch on (under the bottom of the cabinet, right front side). The game will take a minute or so to boot up.
Please take a moment to check for proper function of the basics of the machine. If the machine does not seem to function properly see the troubleshooting guide at the end of this manual or contact Service@SpookyPinball.com
Your game is factory set to free-play... HAVE FUN! :-)
For more information, printable apron cards, links to even more technical info, and parts, go to: SpookyPinball.com/game-support
FOR TECHNICAL HELP, PLEASE EMAIL: Service@SpookyPinball.com
FOR SALES HELP, PLEASE EMAIL: Squirrel@SpookyPinball.com
You will get a prompt reply. Thanks from the Entire Spooky Pinball family!
SPOOKY PINBALL LLC
50 Easy St
Benton, WI 53803
spookypinball.com
3) Game Rules and Features
Here are some overviews and walkthroughs from the wonderful pinball community
Tilt Pinball Forum http://tiltforums.com/t/rick-morty-rulesheet/6391
GAME LAYOUT & PLAYFIELD FEATURES
From left to right across the playfield, these are the main interactive features of Rick & Morty Pinball:
● Left outlane - Contains the S in “SLAM”. A ball rebounding around the left target bank or a misfire from the upper flipper can often wind up in this area, so be careful.
● Left inlane - Contains the L in “SLAM”. Also fed by the portal kickout (see below).
● Portal kickout - This scoop is where balls shot into the Garage portal are sent out, so be on guard! The scoop sends the ball flying towards the left flipper at a fast speed; the light show just before this happens will give you a warning.
● Slam bumper - Replacing the traditional left slingshot, a single pop bumper sends the ball even more out of control than usual, risking quick drains. Completing S-L-A-M at the bottom lanes will activate the Slam Save to prevent such unfortunate incidents.
● Left target bank - Contains three standup targets labeled “BETH”, “SUMMER”, and “JERRY”. Once all three targets are hit, they qualify the Mystery Award at the Center Scoop. There is also a Rick target just above the left 3-bank; hitting it causes the Kalaxian Crystal to flash and Rick will shout one of his many catch phrases (a scoreboard award highlights “The Most Rick” for spouting the most).
● Left garage entrance - This entrance to the Garage can only be made using the upper flipper, and it’s a pretty late shot from up there. This is also where the Super Skill Shot is collected at the start of a ball. When available, this shot also starts “Pickle Rick” (the
arrows on this shot and the far right orbit shot will light purple and Rick will tell you over and over to “come to the garage” like in the episode). This shot and the right orbit are also used to change dimensions once the garage is lit by charging the portal gun.
● Left ramp - This steep ramp heads behind the back panel of the game and feeds the upper flipper, similarly to the left ramp in Black Rose. A shot to the left ramp will qualify the scoop to start an Adventure, indicated by its insert.
● Noob Noob standup - This single target is located between the left garage entrance and the side loop, and scores the skill shot at the start of the ball but doesn’t do much else (with one exception: read the Total Rickall section for more info). It’s a gimme, so why would it score much anyway?
● Side loop - This shot can be made from the upper flipper and sends the ball right back to the upper flipper for more sequential shots. Typically, you can make this loop off of an early upper flipper shot. A diverter near this shot can force right orbit shots to exit out of the entrance to this shot. There is a spinner in front of this loop. Collects Extra Ball when available.
● Spinner - A satisfying spinner is located in front of the side loop, and collecting enough spins to fully power up the portal gun will light both garage entrances to activate a portal to another dimension.
● Left lock - This part of the Danesi Lock 2.0 is easier to make as a backhand from the left flipper and has a drop target with Rick’s face on it on the front. Locks a ball when lit, and also used during modes.
● Scoop - Located in between the Danesi Lock 2.0 is a scoop that can easily be made from either flipper. Shooting the scoop when lit will collect Mystery, start an Adventure after the left and/or right ramp has been shot (see Adventure Qualification), or start Multiball when two balls are locked.
● Rick’s Ship - This replica of Rick’s spaceship sits above the scoop and shakes at certain times during play. It also bobbles around when balls are locked. There are some nice light show effects here.
● Diverter - This mechanism is hidden “inside the house”, behind the scoop and ship. It opens when the Right Orbit/Garage Shot is qualified, to allow that shot to send the ball to the garage. Otherwise, the diverter is closed to send balls entering the right orbit shot out through the left orbit.
● Right lock - This part of the Danesi Lock 2.0 is easier to make as a backhand from the right flipper and has a drop target with Morty’s face on it on the front. Locks a ball when lit and also used during modes.
● Flooble Crank - This unique target takes the form of a metal rod that runs back underneath the right ramp to a hidden captive ball. Shots to the Flooble Crank transfer force through the rod into the captive ball, qualifying the locks and adding power to the anti-gravity battery, shown as a meter near the right outlane.
● Right ramp - This ramp is generally less steep than the left ramp and although it’s easiest to make with the left flipper, it can be backhanded from the right flipper on a strong shot. Making this shot will light the scoop to start an Adventure.
● Right lane - This is a curvy, tight lane that feeds the upper flipper. Depending on your position it might be a better idea to try this shot rather than the steep left ramp, but its narrow entrance makes it a challenging shot. Also used during modes.
● Right orbit / garage entrance - This pseudo-orbit is another way to enter the garage that tends to be easier than the upper flipper shot, but the ball won’t enter the garage unless the hidden diverter is open and the shot is strong enough. Otherwise, it will just exit at the (left) side loop. Starts Pickle Rick if available and also changes dimensions once the portal gun is ready, just like the left garage entrance.
● Meeseeks Box - This target located to the far right of the game will spawn a Meeseeks at a random shot. Shoot the lit shot to move Meeseeks to the display and apply enhanced (or divided!) scoring to that shot. See the “Meeseeks Multipliers and
Meeseeks Mania Multiball” section below for a detailed explanation on Meeseeks.
● Anti-gravity Battery - A return of the classic Williams-style Magna-Save! Use the extra “flipper button” on the right side of the game to attempt to send a ball headed for the right outlane back into play. The magnet itself is located directly underneath the “A” in the right inlane. The goal is to skillfully feather the magnet on and off to guide balls back into play. Balls can be saved from the right outlane with very little battery usage if timed correctly. Whenever the magna-save button is used, the battery meter will drain to indicate how much charge is left. If you have enough charge and hold the button the ball may eventually settle into place for an easy drop into the right inlane, but this will eat up all of your charge...
● Right inlane - Contains the A in “SLAM”. Fed directly by the right ramp.
● Right outlane - Contains the M in “SLAM”. Keep an eye on your anti-gravity battery! Otherwise, you’re boned.
● Plunger - The plunger on this game is designed to send the ball directly to the upper flipper for the skill shot. However, it has been reported to go around the right lane on some games, which isn’t intentional. If that happens regularly, adjustments to the habitrail and/or the shooter (auto-plunger) coil power may be worthwhile.
SKILL SHOTS
At the start of a ball, the auto-plunger will fire the ball directly towards the upper flipper for a skill shot opportunity. The Noob Noob target will be lit for 200k while the Garage will be lit for 400k. The value increments on successful skill shots - e.g., the 2nd successful is 300k / 600k. A full shot around the side loop will multiply the skill shot values (yes, you can do this multiple times - good luck)!.
GROMFLOMITE BATTLE MULTIBALL
Hitting the Flooble Crank once will qualify either side of the Danesi Lock 2.0 for a lock. Once a ball is locked another Flooble Crank hit will light the remaining open side for a lock. The center scoop will begin flashing the green multiball light once two balls have been locked. Shooting the center scoop will begin Gromflomite Battle MB. Collecting any Jackpot will light the first Super Jackpot at the garage, which can be collected from either the left orbit to the garage or the right orbit. Only the first Super Jackpot can be collected via the right orbit, all subsequent Super Jackpots must be collected at the left orbit to garage shot. During multiball the screen will display how many jackpots you have to collect to light the next super jackpot (increases by one for each subsequent attempt).
Stacking an Adventure start on the Multiball start, along with making it quite a bit easier to make progress in the Adventure, will actually combine the two ball saver times. You are also able to hit the left and right ramps to qualify your next mode if you aren’t in one during multiball or if you complete a mode during multiball. You cannot start the next mode but you can at least qualify it to be ready when you exit multiball.
After the first multiball, lit locks will slowly fade and timeout. With each successive multiball, the fade time gets faster until the 6th multiball, where it hits the lowest timer and stays constant.
ADD-A-BALL!
Hit the Flooble Crank three times during Multiball, to add another ball. The first two hits will light a solid green light below the Flooble Crank, and the third will add a ball into play and give a 10 second additional ball saver. You can only collect 1 add-a-ball per continuous multiball – for example: if you start GMB and collect the add-a-ball and then bring in Meeseeks Mania, you can not add another ball. Once you have earned the add-a-ball in any multiball, following multiballs will require 4 shots for the add-a-ball.
LOCK STEALING
Similar to Total Nuclear Annihilation (aka TNA: the Scott Danesi & Spooky Pinball game previous to Rick & Morty), one player can steal another player’s multiball… but this time there are some smart design changes to how it can be stolen. Here’s an example using a two player game for simplicity’s sake:
● Player 1 locks one or two balls into the Danesi Lock 2.0, then drains.
● Player 2’s horseshoe will be lit orange on any side with locked balls to indicate that the locks are shielded. Additional Flooble Crank hits will be required for each ball that is locked:
○ One ball locked: 2 hits to the Flooble Crank to light the 2nd lock then multiball will be ready.
○ Two balls locked: 3 hits to the Flooble Crank to light a multiball.
The additional Flooble Crank hits in these sequences will award a virtual lock on screen.
● However, this only applies if the player trying to steal has no locks of their own lit. If player 1 locks a ball and player 2 already had a lock lit but not collected, that lock will also belong to player 2 on their ball and progression towards multiball will continue normally. The game will also remember each player’s locks so if a player’s locks or multiball are stolen, then their locks will remain lit and available for them until they have collected the stolen lock or started multiball.
Overall, this is a great balance change from TNA as you aren’t guaranteed an essentially free MB on one shot after a player has locked two balls.
ADVENTURES
The main modes in this game take the form of adventures that Rick forces his grandson Morty (aka YOU) to endure. Started and Completed adventures are shown on both the main display, and the Morty Adventure Card directly above the flippers.
Adventure Qualification: Qualify an Adventure by shooting either the left or right ramp at the start of the game. The ramps will have their Start Adventure lights lit purple when available to qualify an Adventure. On default game settings, only one of these ramps is needed to qualify the first Adventure at the center scoop. All subsequent Adventures require both the left and right ramp to be completed. On default settings the scoop will be automatically lit for Adventure on ball 3 if it hasn’t been lit yet. All Adventures start at the center scoop except for Pickle Rick (which is started at either garage entrance).
Scoop Timer: The Scoop Timer is the two-digit display on the playfield directly below the scoop. It is used during most modes for various objectives. All Adventures award a 10 second ball saver when started. This ball saver timer will also freeze after a lock until the ball is back in the playfield, so there can be strategy regarding when to start your mode to activate your ball saver.
Adventure Stamps: Adventure Stamps are awarded regardless of whether or not an Adventure was successfully completed. If you drain or time-out during an Adventure, you receive a WHITE stamp. If you successfully complete an adventure you’re awarded a GREEN stamp. Free stamps obtained from a Mystery Award are marked with a YELLOW stamp. There are currently 11 different adventures available and possibly more on the way. Default settings start the card with 4 free stamps, 2 of which are green. The number of green stamps on a filled card determines the multiplier for Morty’s Choice (see below).
Adventure Selector, AKA Morty’s Choice: As part of an agreement with Rick, Morty gets to choose 1 of every 10 adventures, so when you have completed 9, the 10th adventure’s start will bring up the Adventure Selector and you can choose which adventure you’ll experience. All game adventures are available to choose from, but Rick Potion No.9 is only available through the adventure selector. Any adventure you haven’t previously “completed” will be available with multiplied scoring. The multiplier is based on the number of green stamps you have on your card.
Adventure Summaries:
● The Blood Dome: Attempting to create a diversion, Rick injected Morty with the muscle memory of a fallen death stalker. Now that arm has taken control and has issues to work out. Four shots on the right side of the playfield are lit; the first shot to any of the four increases the shot value, and each shot will only work three times. It takes a total of 7 shots made to light the scoop to complete the adventure. This adventure has a limit of 25 uses of the left flipper and if that count reaches zero, the mode ends early. If you make all seven shots with left flips remaining, you’ll get a bonus when you make the final scoop shot.
○ Scoop Timer: Number of left-flips remaining
○ Completion Condition: Make all 7 shots before you run out of left flips, and hit the scoop.
● Get Schwifty: Earth has been chosen to compete on the hit Cromulon reality show Planet Music. Rick and Morty will perform Get Schwifty and it’s your job to sway the Cromulons to vote in the positive with your impressive pinball skills. The shots in this mode are groups: Targets, Loops, Ramps. They light in sequence, one at a time. Hitting any lit shot will improve the Cromulons sentiment. As time passes without hitting shots, their opinion of the performance will sour. If you spend a while not hitting anything, all shots will light for a single shot to get you back on track. Points are earned per second you’re in the positive, and for each successful shot. Max out the meter for big points! Be in the positive on the vote meter at the end of the song to win the mode and get a Cromulon vote bonus.
○ Completion Condition: Finish the song in the positive on the vote meter.
● Goodbye Moonmen:
● Look Who’s Purging Now: On the purge planet, purges happen… well, a lot - and Rick unknowingly traps his grandson there on an adventure. Buy time for Rick to build the communicator and save both of their lives by fending off the planet’s fierce locals, represented by purple arrows moving from left to right across the playfield towards Morty. Locals are killed by hitting the shot they are currently on. You can also kill the rightmost local by lobbing a defraculation grenade if you have one, which is done by shooting the inner loop. The longer the mode lasts, the closer together the locals spawn, and the farther to the right they are when you kill them their value increases. Morty is located at the right garage entrance, and if a local reaches him, you’ll only have a few seconds to make the shot and save him before the mode ends. Holding off the locals for a long enough time (killing 5 locals) will light the Summer target on the left target bank; hit it with a precise shot to summon the armored suits, and then stay alive for 20 seconds. Shoot the scoop afterwards for hot purging action and successful completion of the mode. Good luck!
○ Completion Condition: Make the scoop shot to put on the armor suits.
● Extra note for this mode: If you hold a ball on a flipper, the locals will speed up as you do so.
● Pickle Rick: This mode is unique among the implemented modes so far because unlike the other Adventures, it can only be started at the garage. Both shots that lead to the garage will begin flashing purple when this mode is qualified instead of the center scoop and Rick will begin telling you to come to the Garage. Landing the shot in the Garage to start the mode will actually hold the ball (instead of the usual instant left inlane scoop eject) so you can relax and watch the intro, where out of pure incompetence and a desire to brag, Rick turned himself into a pickle, Morty! He’s Pickle Rick!
Advance through the life cycle of this scientific monstrosity by first hitting the bumper or slingshot enough times to get off the ground, then shoot the scoop. You’ll then be tasked to shoot targets to kill rats with your upgraded weapons and armor. Killing enough rats will then light the scoop to start the final timed phase, where shooting ramps and loops will kill goons at the consulate. Killing enough of the goons will light the scoop for one last shot to finish the mode. This is very difficult to accomplish... good luck!
○ Completion Condition: Make it to the 3rd Phase in the Consulate
● Pirates of the Pancreas: Welcome to Anatomy Park! Power on their Pirates of the Pancreas ride by shooting either the left or right ramp to spell the name of the ride (yup, 20 shots!)! Each ramp shot also adds 3 seconds to the timer for the mode; if enough time goes by without making any shots, all of the major shots will light up to add letters to the name of the ride, but only the ramps will add time properly (because Ruben’s about to blow). Shortly after this Rick will get fed up with you and tell you to just shoot 3 more shots and a scoop to end the mode, you can’t collect letters or extend the timer anymore during this phase and the timer stops running as well.
○ Scoop Timer: Time remaining in the spelling bee
○ Completion Condition: Spell at least “PIRATES” before escaping.
● Roy: A Life Well Lived: Roy is a 5-decision deep branching VR narrative. If you progress through all 5 choices, Roy’s life completes and you’ll have won the mode. If you drain early, well, that’s a tragedy. Make green shots to make ‘positive’ life choices or make red shots to make ‘negative’ life choices. Positive choices advance the age shown on the digit display a bit more than negative choices; if you make it through the entire mode, you’ll score a bonus dependent on Roy’s age. Consecutive similar decisions (ie. shots of the same color) are multiplied based on the length of the string. There also seems to be a secret “Rick option” hidden behind one of the arrows at each choice which awards a fairly insane choice and gives a lot more points.
○ Scoop Timer: Roy’s age.
○ Completion Condition: Make all 5 decisions.
● Scary Terry: Rick and Morty have descended into a dreamworld with real consequences. They’re being chased by Scary Terry (a “legally safe knockoff” of Freddy Krueger) who insists that they can run but cannot hide. Shoot purple shots to run away, and hit the scoop to finish running and start hiding. While hiding, shoot the scoop to hide for 1 dream hour, the right orbit to hide for 2 hours, and the left garage shot for 3 dream hours. When you’ve hidden long enough, Scary Terry himself will get tired, allowing you to escape through the center scoop!
○ Scoop Timer: The total number of dream hours hidden.
○ Completion Condition: Hide for at least 6 dream hours, and hit the scoop.
● Total Rickall: Parasites from other dimensions have invaded the Smith home, and you need to kill them all! Kill 20 parasites by shooting both drop targets, Beth, and Summer three times each to win (some hits award more than one parasite kill). The value of each parasite increases for a short time when one is killed, but slowly decreases afterwards, so try and kill parasites as consistently and as quickly as you can. Hit the Noob Noob target shortly after killing all the parasites for a little secret bonus.
○ Scoop Timer: Number of Parasites remaining
○ Completion Condition: Kill all parasites.
● Whirly Dirly: Battle Risotto and his henchman on a crazy roller coaster inside an immortality field. Advance towards the edge of the immortality field by making two orbit shots (either the right lane, side loop, or unlit lock can count towards this), which will then cause the right ramp to light briefly for a kill shot. If you miss this shot, you’ll have to keep looping until you qualify it again, and you only have three opportunities to make this shot. Making the kill shot twice (to kill both Risotto and his henchman) and hitting the scoop will finish the mode.
○ Completion Condition: Make both ‘kills’ on the ramp AND the final scoop shot.
● Rick Potion No.9: Rick brews up some love potion, which Morty uses to make Jessica fall in love with him. But some love potion particles latch onto Jessica’s flu virus and go airborne. Soon, everyone not directly related to Morty falls aggressively in love with him. Shoot for Morty to apply the potion. Next, shoot purple shots to spread the virus. Then shoot for Rick or Morty to escape the school. Shoot the scoop. Shoot Rick or Morty to hash things out…
This adventure is only available from Morty’s Choice on a full card! As such, it may be considered a “Wizard Mode”...
DIMENSIONS
You venture to alternate dimensions by first charging the portal gun with enough hits to the spinner (and other regular shots), and then making either garage entrance to shift into an alternate dimension. Visiting 3 dimensions lights for an Extra Ball, which can be collected at the spinner loop.
While you’re in a dimension Rick’s portal gun charge will deplete on the playfield, and once it empties you’ll be forced back into your normal home dimension, C-137. It’s possible to recharge Rick’s portal gun while in a dimension with additional shots, and/or collecting all of a dimension’s Megaseeds: this will light another dimension so that you can immediately jump again. When you jump from one dimension to another without going back to C-137, you get an extra Megaseed!
(Fun detail: There are 3 versions of the main gameplay loop; the game shifts between them as you change dimensions if there’s no other music playing).
There are three main types of dimensions:
● Feature Dimensions change the playfield lighting / music / sounds. Features are not implicitly “positive” or “negative”, but they might interact with certain adventures in “unintended” ways...
● Positive Dimensions add positive score modifiers on shots
● Negative Dimensions adversely modify the game’s mechanical behavior or reduce points on shots
Currently known dimensions are:
Dimension Name Effects Type
13u-TT Just passing through … Feature
b1-ind GI Lighting Strobes Feature
BLK-0p Night Vision Engaged! Feature
gR-w0of Where are they, Summer? Feature
N0-ramp5 TNA Light & Sound (also Ramps = 0 pts) Feature
r5h-0ur Expressions of frustration. Feature
sp-0ng3 Underwater dimension Feature
sp-0tz It’s like a Hollywood premiere in here. Feature
sw-4mpy Watch out for them gators! Feature
TW-z0n3 Removes all color from LEDs Feature
W1L-HM All targets / slings play the ‘Wilhelm Scream’ Feature
17-R4MP5 3x Ramp Scoring! Positive
BW00-P 3x Spinner Scoring! Positive
CMB-0 3x Combo scoring! Positive
g0tu-Fam 3x Family Target Scoring! Positive
H4-+ch 3x Scoop Scoring! Positive
Hv3-LT 3x Scoring on the LEFT half! Positive
Hv3-RT 3x Scoring on the RIGHT half! Positive
L4ne-3 10x In/Out Lane Scoring! Positive
mega-sl4m 5x Slam Ring Scoring! Positive
Ye-Zu5 1000x RICK TARGET SCORING! Positive
d3d-BMP SLAM RING is disabled! Negative
d3d-BOx Meeseeks Box is disabled! Negative
d3d-CRnk Flooble-crank is disabled! Negative
d3d-F4m Family targets disabled! Negative
d3d-SLi Slingshot is disabled! Negative
d3d-SPn Spinner is disabled! Negative
FL-33p Activates all flippers together. Yells “FLEEP!” Negative
FL-2p Upper flipper activates with left flipper button Negative
W3k-LT 1/2 Scoring on the LEFT half! Negative
W3k-RT 1/2 Scoring on the RIGHT half! Negative
MEGASEEDS
Megaseeds can only be collected in alternate dimensions, and light up as orange inserts on random shots each time a new dimension is discovered. Change dimensions via the left garage shot for 5 lit megaseeds; the right orbit shoot only lights 3. Each Megaseed adds 5% to the end of ball bonus, which on this game, is determined by what you scored during the course of your ball. For example, collecting 10 seeds on ball 1 and clearing several modes will result in a huge bonus, while draining immediately on ball 2 with those 10 seeds will result in almost no bonus. Don’t tilt!
Megaseeds are cumulative throughout the game, meaning you still carry and earn 5% per seed from ball to ball, even after a drain.
MEESEEKS (Multipliers)
Shots to the Meeseeks Box will spawn a Meeseeks on a random shot, which will be lit blue. A Meeseeks will also spawn on the screen. Shooting the lit shot will collect the Meeseeks; the Meeseeks on screen will vanish along with an audio callout when the shot is made. You can only have 3 Meeseeks on the playfield at any given time; each one will multiply all Meeseeks shots from 2x-3x-4x. A shot is only multiplied once; when you shoot a lit Meeseeks shot, any other Meeseeks shots remain lit but the multiplier decreases accordingly.
if you wait too long, however, the Meeseeks on the screen will change to appear in pretty bad shape and their corresponding blue light will change to purple (you’ll also get a corresponding audio callout for this). This will now divide the shot instead in the same manner; for example, if you allowed all 3 Meeseeks on the playfield to switch to purple before collecting them, they would divide your lit shot by 4x-3x-2x as you collect them. The multiplier in the center of the playfield will indicate this via purple/blue lights. The Meeseeks generally favor the “best” shots to spawn on when you spawn them. All Meeseeks operate on their own individual timers so it is possible to have both purple and blue Meeseeks on the playfield multiplying and dividing different shots. You’d think the rules maven for this was some kind of math whiz…
Using enough Meeseeks, good or bad, will start Meeseeks Mania. Total needed is displayed in the upper right of the score display.
MEESEEKS MANIA!
Meeseeks Mania is a 2 ball multiball. Meeseeks appear on every shot. Collecting one awards a meeseeks jackpot and increases the multiplier for a short time. If any meeseeks goes bad, the multiplier becomes a divisor and can’t go back into the positive until all bad meeseeks are cleared. Hitting the Meeseeks box during Mania will add 1, 2 or 3 meeseeks at random (based on available slots) as well as RESET ANY BAD MEESEEKS that exist. If you go for a period of time with no meeseeks, bad messeeks will start to be added in open spots until you hit the Meeseeks Box target. After you drain down to one ball, Jerry will light for a hurry-up bonus based on the total you earned during Mania. If you hit Beth or Summer, the hurry-up ends immediately.
MYSTERY AWARDS
Light Mystery at the scoop by completing the three left Smith Family standup targets, then shoot the scoop to collect a Mystery award. The two small lights flanking the Scoop Timer will light blue to indicate a Mystery is available. Along with several joke awards like “13 Balls” and references to episodes of the show like “Real Fake Door”, there are some actual awards you can obtain here:
● Activate Super Spinner (increased spinner scoring)
● Add 1 Meeseeks (spawns a Meeseeks, does not collect one)
● Add 1 Megaseed (immediately awards a Megaseed)
● Add 1 Tilt Warning
● Charge Portal Gun
● Charge Anti-Gravity
● Light Lock
Additionally, some (many?) adventures have custom awards that you can obtain via the first mystery you collect during that adventure, such as a free Defraculation grenade in Purge. Additionally, if the garage is lit to start Pickle Rick, and you collect a mystery award, Pickle Rick will start without having to hit the garage.
SLAM SAVES
Qualify the Slam Save by completing SLAM at the return lanes. Additionally, completing the SLAM lanes will light the SLAM RING for a ‘bonus’ hit worth more points. If you complete the lanes again, the value goes up. There are FIVE levels of bonus value. They are exponential and indicated by color. With the Slam Save lit, the next time a ball drains off of a pop bumper hit, it will be sent back into play and a bonus will be scored dependent on how many times SLAM was completed before using it. The Slam Save has a very short timer, so if the ball isn’t slammed directly into the drain (if it rolls up the apron before rolling back to the drain for example), it is unlikely to award the save. Slam Save is disabled during multiballs. Points are awarded based on the highest SLAM RING bonus value for the slam save, and can be collected while the immortality field is on (Slam-mortality)
END-OF-BALL BONUS
Bonus on this game is calculated in a unique fashion: at the end of the ball, each Megaseed awards 5% of your total score for the ball. If you don’t have any Megaseeds, then no bonus for you, sorry. Bonus on this game can be huge if you have long balls actively hopping through dimensions and collecting Megaseeds (20 Megaseeds would essentially double your score), so don’t tilt!
4) Menu System
4.1 Basic Menu Functions
All settings to the game are done via the menu system. Navigate the menu system using the four round buttons inside the coin door. From left to right those buttons are:
Red - Cancel / Back up | Black (left) - navigate up/left | Black (right) - navigate down/right | Green - Confirm / Proceed
● Home
○ Settings
■ Gameplay (Features)
■ Machine (Coils)
■ Machine (Pricing)
■ Machine (Replay)
■ Machine (Standard)
■ Sound
○ Tests
■ Switch Test
■ Led Test (Single)
■ Coil Test
■ Music
■ Shaker
○ Statistics
■ Audits
■ Coin Op Audits
■ Last Score Data
■ Reactor Audits
○ Utilities
■ Servo Settings
■ Clear Credits
■ Reset Audits
■ Factory Settings
■ Set Date/Time
○ Software Info
4.2 Settings Menu
Machine (Standard):
'Attract Mode Sounds':
options: ['On','Off']
default: 'On'
desc: 'Allow sounds to play from flipper presses during attract mode.'
'Attract Mode Music':
options: ['On','Off']
default: 'Off'
desc: 'Allows for music to play during the attract mode.'
'Auto-Launch Ball Time':
options: ['Off', 5, 10, 15, 20, 25, 30, 35, 40, 45, 50, 55, 60]
default: 'Off'
desc: 'Auto-Launch the ball after this many seconds.'
'Backbox LED':
options: ['On', 'Off']
default: 'On'
desc: 'Enable or disable the backbox LED'
'Balls Per Game':
options: [1,10]
increments: 1
default: 3
desc: 'Number of balls each player gets per game.'
'Extra Ball Limit':
options: ["OFF",1,2,3,4,5,6,7,8,9,10]
default: 4
desc: 'Max total Extra Balls per game'
'Extra Ball Carry-over':
options: ["ENABLED", "DISABLED"]
default: "ENABLED"
desc: 'If Enabled, uncollected extra balls remain lit on the next ball.'
'Extra Ball Knocker':
options: ["ENABLED", "DISABLED"]
default: "DISABLED"
desc: 'If Enabled, knocker will fire on collect extra ball (if installed).'
'Credit Dot Enabled':
options: ['Yes','No']
default: 'Yes'
desc: 'If enabled a dot appears after the credits when errors are detected.'
'Knocker Enabled':
options: ['Yes', 'No']
default: 'Yes'
desc: 'If enabled, hardware knocker is used for certain awards.'
'Match Enabled':
options: ['Yes','No']
default: 'Yes'
desc: 'If enabled, the match feature for a chance at winning free games is used.'
'Music Ducking Effect':
options: [0.1, 0.2, 0.3, 0.4, 0.5, 0.6, 0.7, 0.8, 0.9, 1.0]
default: 0.5
desc: 'Ducking makes the music quiet during callouts - Smaller number is quieter.'
'Replay Award':
options: ['Credit','Extra Ball']
default: 'Credit'
desc: 'Award given for achieving the replay score.'
'Replay Backdown Amount':
options: [100000,5000000]
increments: 50000
default: 250000
desc: 'Amount replay score auto steps down if not achieved.'
'Replay Increase Amount':
options: [500000,5000000]
increments: 50000
default: 500000
desc: 'Amount replay score increases after replay is achieved.'
'Replay Losing Streak Thresh.':
options: [0,30]
increments: 1
default: 3
desc: 'Amount of consecutive losses to force a score reduction.'
'Replay Minimum Score':
options: [500000,50000000]
increments: 50000
default: 5000000
desc: 'Minimum score the replay can lower to if not achieved.'
'Replay Score':
options: [3000000,99000000]
increments: 50000
default: 8000000
desc: 'Default replay starting score'
'Replay Score Enabled':
options: ['Yes','No']
default: 'Yes'
desc: 'If disabled, replays are not awarded at all.'
'Replay Type':
options: ['Fixed','Auto-Adjust']
default: 'Auto-Adjust'
desc: 'Auto-Adjust replay score will go up and down based on player scores.'
'Service Menu LED State':
options: ['ALL OFF', 'GI ONLY', 'ALL ON']
default: 'GI ONLY'
desc: 'State of the playfield LEDs while in service menu.'
'Shaker Intensity':
options: ['Very Low', 'Low', 'Normal', 'High']
default: 'Normal'
desc: 'Adjusts how violently the shaker does the shaking.'
'Shaker Motor':
options: ['On','Off']
default: 'On'
desc: 'If set to off, the shaker motor will do nothing. No shakes!'
'Start Button Reset':
options: ['ENABLED', 'DISABLED']
default: 'ENABLED'
desc: 'If enabled, holding start button after ball 1 will reset the game.'
'Target Free Game Percent':
options: [0,50]
increments: 1
default: 8
desc: 'Default target percentage of free games versus paid games'
'Tilt Allowed In Shooter Lane':
options: ['Yes','No']
default: 'No'
desc: 'Option to completely disable tilt when ball is in the shooter lane.'
'Tilt Warnings':
options: [0,10]
increments: 1
default: 2
desc: 'How many tilt warnings to give before actually tilting.'
'Tilt Bob Settle Time ms':
options: [1000,10000]
increments: 500
default: 1500
desc: 'Time in milliseconds for the tilt bob to delay before registering again.'
'Tilt Switch Sensitivity ms':
options: [0,30]
increments: 1
default: 5
desc: 'Time in milliseconds that the tilt must be closed before activation happens.'
'Tournament Rules':
options: ['ENABLED', 'DISABLED']
default: 'DISABLED'
desc: 'Tournament mode, if enabled, alters variable gameplay elements'
Machine (Coils):
'Cabinet Knocker':
options: [5, 30]
increments: 1
default: 10
desc: 'Cabinet knocker pulse time in milliseconds.'
'Diverter Initial Power':
options: [10, 30]
increments: 1
default: 20
desc: 'Diverter initial movement force.'
'Drop Target - Left Knockdown':
options: [10,50]
increments: 1
default: 20
desc: 'Left drop target knockdown pulse time in milliseconds.'
'Drop Target - Left Reset':
options: [10,50]
increments: 1
default: 20
desc: 'Left drop target reset pulse time in milliseconds.'
'Drop Target - Right Knockdown':
options: [10,50]
increments: 1
default: 20
desc: 'Right drop target knockdown pulse time in milliseconds.'
'Drop Target - Right Reset':
options: [10,50]
increments: 1
default: 20
desc: 'Right drop target reset pulse time in milliseconds.'
'Flipper - Lower Right':
options: [10,50]
increments: 1
default: 30
desc: 'Flipper power pulse time in milliseconds.'
'Flipper - Lower Right Hold':
options: ["LOW", "MEDIUM", "HIGH"]
default: "MEDIUM"
desc: 'Flipper hold power strength'
'Flipper - Lower Left':
options: [10,50]
increments: 1
default: 30
desc: 'Flipper power pulse time in milliseconds.'
'Flipper - Lower Left Hold':
options: ["LOW", "MEDIUM", "HIGH"]
default: "MEDIUM"
desc: 'Flipper hold power strength'
'Flipper - Upper Right':
options: [10,50]
increments: 1
default: 20
desc: 'Flipper power pulse time in milliseconds.'
'Flipper - Upper Right Hold':
options: ["LOW", "MEDIUM", "HIGH"]
default: "LOW"
desc: 'Flipper hold power strength'
'Pop Bumper':
options: [10,40]
increments: 1
default: 30
desc: 'Pop Bumper pulse time in milliseconds.'
'Scoop Eject':
options: [10,40]
increments: 1
default: 20
desc: 'Scoop Eject pulse time in milliseconds.'
'Ship Post Initial Power':
options: [10, 35]
increments: 1
default: 20
desc: 'Pulse time for the ship post initial kick.'
'Shooter Lane Launch':
options: [10,30]
increments: 1
default: 12
desc: 'Shooter lane launcher pulse time in milliseconds.'
'Shooter Lane Max':
options: [10,30]
increments: 1
default: 17
desc: 'Maximum strength the shooter lane launch ramps up to.'
'Sling - Right':
options: [10, 50]
increments: 1
default: 30
desc: 'Sling pulse time in milliseconds.'
'Trough Eject - Main':
options: [10,50]
increments: 1
default: 20
desc: 'Main trough eject pulse time in milliseconds.'
'Trough Eject - Portal':
options: [10,50]
increments: 1
default: 20
desc: 'Portal trough eject pulse time in milliseconds.'
Machine (Pricing):
'Bonus Credit After':
options: [0,10]
increments: 1
default: 0
desc: 'Bonus credits given after this many paid credits.'
'Number of Bonus Credits':
options: [0, 10]
increments: 1
default: 1
desc: 'Number of Bonus credits to give on Bonus Credit action.'
'Bonus Coin After':
options: [0,10]
increments: 1
default: 0
desc: 'Bonus coins given after this many paid coins'
'Number of Bonus Coins':
options: [0, 10]
increments: 1
default: 0
desc: 'Number of Bonus coins to give on Bonus coin action.'
'Coins Per Credit':
options: [1,2,3,4,5,6,7,8,9]
default: 1
desc: 'Coins required per paid credit.'
'Free Play':
options: ['Yes','No']
default: 'Yes'
desc: 'Free play allows continuous play without credits.'
'Left Coin Value':
options: [1,2,3,4,5,6,7,8,9]
default: 1
desc: 'Number of coin entries given for a single coin in the left slot.'
'Right Coin Value':
options: [1,2,3,4,5,6,7,8,9]
default: 1
desc: 'Number of coin entries given for a single coin in the right slot.'
Sound:
'Main volume':
options: [0,20]
increments: 1
default: 3
desc: 'Base volume setting for the game audio.'
'Volume percentage: Music':
options: [0, 5, 10, 15, 20, 25, 30, 35, 40, 45, 50, 55, 60, 65, 70, 75, 80, 85,
90, 95, 100]
default: 100
desc: 'Music volume is this percentage of Main volume. Lower is quieter.'
'Volume percentage: Voice':
options: [0, 5, 10, 15, 20, 25, 30, 35, 40, 45, 50, 55, 60, 65, 70, 75, 80, 85,
90, 95, 100]
default: 100
desc: 'Voice volume is this percentage of Main volume. Lower is quieter.'
'Volume percentage: SFX':
options: [0, 5, 10, 15, 20, 25, 30, 35, 40, 45, 50, 55, 60, 65, 70, 75, 80, 85,
90, 95, 100]
default: 100
desc: 'Effects volume is this percentage of Main volume. Lower is quieter.'
Rick & Morty (Feature):
'Add-A-Ball Starting Difficulty':
options: ['EASY', 'DEFAULT', 'HARD']
default: 'DEFAULT'
desc: 'Setting for how easy add-a-ball starts out in multiball.'
'Adventure Card Lit at Start':
options: [0,1,2,3,4,5,6,7,8]
default: 4
desc: 'Number of adventure card punches at start.'
'Adventure Auto-Light on Ball Number':
options: ['DISABLED', 1, 2, 3, 4, 5]
default: 1
desc: 'Light adventure if player has 0 played adventures.'
'Adventure - Auto-Light On Last Stamp':
options: ['ENABLED', 'DISABLED']
default: 'ENABLED'
desc: 'If enabled, the 10th stamp adventure is immediately available after 9th.'
'Adventure Easy Qualify Count':
options: [0, 1, 2, 3, 4, 5]
default: 2
desc: 'Number of adventures that only require 1 ramp to light.'
'AntiGravity Power Drain Speed':
options: ['LAME', 'EASY', 'DEFAULT', 'HARD', 'BRUTAL']
default: 'DEFAULT'
desc: 'How quickly the Antigravity Battery Drains when held.'
'AntiGravity Power Charge Speed':
options: ['LAME', 'EASY', 'DEFAULT', 'HARD', 'BRUTAL']
default: 'DEFAULT'
desc: 'How quickly the Antigravity Battery charges per hit.'
'AntiGravity Initial Power Level':
options: [0,10]
increments: 1
default: 2
desc: 'Amount of battery power at the start of the game.'
'AntiGravity Battery Drain':
options: ['ENABLED', 'DISABLED']
default: 'ENABLED'
desc: "If enabled, Antigravity battery drains over time if not used."
'Attract Mode Cable Clips':
options: ['On', 'Off']
default: 'Off'
desc: 'Allows for interdimensional cable clips in attract mode.'
'Attract Mode Cable Clip Loops':
options: [1,20]
increments: 1
default: 5
desc: 'Loops through the attract mode before the next clip plays.'
'Attract Mode Cable Clip Volume':
options: [0,10]
increments: 1
default: 3
desc: 'Volume for Attract Mode Cable Clips.'
'Attract Mode Topper':
options: ['ENABLED', 'DISABLED']
default: 'ENABLED'
desc: 'If enabled, the topper will run along with the portal lightshow.'
'Ball Save Timer':
options: [0,20]
increments: 1
default: 10
desc: 'Time in seconds that the basic ball saver will last.'
'Ball Save Timer for Add-a-Ball':
Options: ['OFF',5,6,7,8,9,10,11,12,13,14,15,16,17,18,19,20,21,22,23,24,25,26,27,28,29,30,31,32,33,34, 35,36,37,38,39, 40,41,42,43,44,45]
default: 10
desc: 'Ball Save Duration When Add-a-ball is earned'
'Ball Save Timer for Gromflomite Battle':
options: ['OFF',5,6,7,8,9,10,11,12,13,14,15,16,17,18,19,20,21,22,23,24,25,26,27,28,29,30,31,32,33,34, 35,36,37,38,39,40,41,42,43,44,45]
default: 10
desc: 'Ball Save Duration at start of Gromflomite Battle'
'Ball Save Timer for Meeseeks Mania':
options: ['OFF',5,6,7,8,9,10,11,12,13,14,15,16,17,18,19,20,21,22,23,24,25,26,27,28,29,30,31,32,33,34, 35,36,37,38,39,40,41,42,43,44,45]
default: 10
desc: 'Ball Save Duration at start of Meeseeks Mania'
'Ball Save Timer for Adventure Start':
options: ['OFF',5,6,7,8,9,10,11,12,13,14,15,16,17,18,19,20,21,22,23,24,25,26,27,28,29,30,31,32,33,34, 35,36,37,38,39,40,41,42,43,44,45]
default: 10
desc: 'Ball Save Duration at start of Adventures'
'Ball Saver for Portal Eject':
options: ['ENABLED', 'DISABLED']
default: 'DISABLED'
desc: 'Optional Short Ball Save after a Portal Eject.'
'Ball Saver for U-Turn':
options: ['ENABLED', 'DISABLED']
default: 'DISABLED'
desc: 'Optional Short Ball Save When Horseshoe is lit for a u-turn.'
'Ball Saver for Scoop Eject':
options: ['ENABLED', 'DISABLED']
default: 'DISABLED'
desc: 'Optional Short Ball Save after Scoop Eject.'
'Blood Dome Left Flip Count':
options: [10,35]
increments: 5
default: 25
desc: 'Counter for how many left arm flips allowed in Blood Dome.'
'Dimension Change Charge Speed':
options: ['LAME', 'EASY', 'DEFAULT', 'HARD', 'BRUTAL']
default: 'DEFAULT'
desc: 'How quickly the portal meter charges with spinner hits.'
'Dimensions: Easy Starts':
options: ['OFF',1,2,3,4,5,6,7,8,9,10,11,12,13,14,15,16,17,18,19,20]
default: 6
desc: 'Dimension changes allowed before right orbit is removed.'
'Dimension changes to light Extra Ball':
options: ['OFF',1,2,3,4,5,6,7,8,9,10]
default: 3
desc: 'Number of dimension changes needed to light extra ball.'
'Dimension Difficulty Restrictions':
options: ['ON', 'OFF']
default: 'ON'
desc: 'Dimensions that make gameplay significantly harder will not appear early.'
'Diverter Assist Inner Loop':
options: ['ENABLED', 'DISABLED']
default: 'DISABLED'
desc: 'Closes the diverter on inner loop shots to smooth the transition.'
'Family Targets - Easy Completions':
options: [0, 1, 2, 3, 4, 5, 6, 7, 8, 9, 10]
default: 2
desc: 'Number of completions that will spot targets for any target hit.'
'Flooblecrank Debounce Time':
options: [10, 150]
increments: 10
default: 50
desc: 'Delay in milliseconds before processing flooblecrank hits; prevents misfires.'
'Lane Carry-over':
options: ['ENABLED', 'DISABLED']
default: 'DISABLED'
desc: 'If enabled, lit lanes carry over ball to ball, per player.'
'Left Ramp - Difficulty Compensation':
options: ['ENABLED', 'DISABLED']
default: 'ENABLED'
desc: 'If enabled, after 3 half-shots, lit ramp moves to the right ramp.'
'Meeseeks for first Mania':
options: [2,6]
increments: 1
default: 3
desc: 'Number of Meeseeks to collect for first Mania.'
'Meeseeks for second Mania':
options: [8,12]
increments: 1
default: 10
desc: 'Number of Meeseeks to collect for second Mania.'
'Meeseeks gap between Manias':
options: [8,15]
increments: 1
default: 10
desc: 'Number of Meeseeks to collect between additional Manias.'
'Meeseeks Time to go Bad':
options: [30, 35, 40, 45, 50, 55, 60, 65, 70, 75, 80, 85, 90]
default: 60
desc: 'Time in seconds before Meeseeks will go bad in normal play.'
'Mystery Tilt Warning Award':
options: ["OFF", "1 PER GAME", "1 PER BALL"]
default: "1 PER GAME"
desc: 'If on 2 tilt warnings, mystery award can add extra warning.'
'Portal Auto-Open on Ball Number':
options: ['DISABLED', 1, 2, 3, 4, 5]
default: 2
desc: 'Open portal if player has visited 0 dimensions.'
'Portal Charge Carry-over':
options: ['ENABLED', 'DISABLED']
default: 'ENABLED'
desc: 'If enabled, meter charge carries over ball to ball, per player.'
'Purge Grenades at Start':
options: [0,10]
increments: 1
default: 1
desc: 'Number of grenades available when The Purge starts.'
'Skillshot Emphasis via Lighting':
options: ['ENABLED', 'DISABLED']
default: 'DISABLED'
desc: 'Turns off other inserts around the skillshot leds during skillshot.'
'SLAM Save Time':
options: [1.5, 1.6, 1.7, 1.8, 1.9, 2.0, 2.1, 2.2, 2.3, 2.4, 2.5]
default: 2.0
desc: 'Time in seconds between SLAM and DRAIN that will be save if available.'
'Starter Megaseed':
options: ['ENABLED', 'DISABLED']
default: 'ENABLED'
desc: 'If enabled, a megaseed is lit on the pop bumper at game start.'
'Swearing Frequency':
options: ['NEVER', '1', '5', '10', '15', '20', '25', '30', '35', '40', '45', '50', '55', '60', '65', '69', '75', '80', '85', '90', '95', '99', 'ALWAYS']
default: 'NEVER'
desc: 'Setting for % chance of cursing in game speech instead of bleeps.'
'Swearing Override':
options: ['ENABLED', 'DISABLED']
default: 'DISABLED'
desc: 'If enabled, swearing is forced to NEVER. Used for quick toggle.'
'Swearing Time Based Override':
options: ['ENABLED', 'DISABLED']
default: 'DISABLED'
desc: 'If enabled, the override utility sets start/end of auto override.'
4.3 Tests
4.3.1 Switch Test
The switch test will show switch activity on the game. Each switch event will be accompanied by a sound and an indicator at the end of the switch name. The indicator (A) stands for the switch becoming active and the indicator (I) shows when the switch becomes inactive.
4.3.2 LED Test (single)
The single LED test will cycle through each LED in the system and display its associated name and LED number. This test is useful for identifying any miss-mapped LEDs in case they were plugged back into the wrong LED harness position.
4.3.3 LED Test (All)
This LED test will cycle all LEDs in a Red-Green-Blue-Whitish pattern. This test is useful to see if any LEDs are out or any channels on your LEDs are out.
4.3.4 Coil Test
This is a pretty standard coil test mode used to check the functionality of the game coils. The coil pulses can be started and stopped by pressing the start button or the enter button on the coin door. A coil will continue to pulse until the test is existed or the start/enter button is pressed to stop the cycle.
4.3.5 Music Test
The music test will play game music and is useful for testing and tuning the audio system. The music can be changed by pressing the start button or the enter button on the coin door. The volume can also be adjusted during this mode by using the volume up and volume down buttons on the coin door.
4.3.6 Shaker Test
The shaker test will cycle through a few different shaker intensities. This is just used to test the proper functionality of the shaker outside of the coil test. This works better.
4.3.7 Burn-In
The burn-in is used by the Spooky Pinball LLC. Factory to make sure the entire game is physically functioning properly. It will cycle through all the coils, play music, play animations, turn on the backglass LEDs, and make all the LEDs on the playfield whitish.
4.4 Statistics
The statistics pages are set up to give you important data about your machine. From audits to last score, there is a lot of information available to those that want it.
4.4.1 Audits
The audits screen gives you data on many features of the game, from average ball time, to how many drains down each side, to how many modes have been completed versus started, etc. Use this to determine if your game is set up too easy, difficult, off-level, etc.
4.4.2 Coin-Op Audits
The coin-op audits screens show information for the operators of the game. This is mainly designed for the coin door use and shows coin count (for each coin slot), service credits, current credits, etc.
4.4.3 Error Report
If the machine has detected a malfunction, it will display a “dot” on the display, traditionally referred to as a “credit dot”. If you see this discreet indicator, this is the report that will explain what is going on.
4.4.4 Last Score Data
The last score data (last scoredata) screen will show you the previous games scores for all 4 players. This is useful for tournaments and casual play alike.
4.5 Utilities
This section is for the utility functions of the game. Clear Credits, Reset Audits, Factory Settings and Set Date/Time.
4.5.1 Clear Credits
If your game is set to coin play, then this is the menu that you would use to clear any remaining credits on the machine.
4.5.2 Reset Audits
Before taking your game to a show, having a party, setting it up for a coin-op location, etc., you may wish to clear the audits to obtain more accurate readings for such events. This is where to do so.
4.5.3 Factory Reset
A factory reset can be useful if you have changed a lot of settings and would like to start fresh, or if you purchased a used game and would like to get back to the way the game shipped.
4.5.4 Set Date/Time
Your pinball machine has an internal clock. This is used for event logs, errors, etc. You can set the accurate date and time in this submenu.
4.6 Software Info
This is the screen used to give you an up to date display of what version of software you are running. Always check to make sure you are running the latest recommended version in order to have the best experience with latest features, improvements, and bugfixes.
5. Troubleshooting
Here are links to videos if you run into common issues. If you need more assistance please contact us at Service@SpookyPinball.com
Basic Spooky Pinball Tips (spans more than one game):
Code updates: https://www.youtube.com/watch?v=e7llE4hbQJQ
Pinball Glass Removal: https://www.youtube.com/watch?v=UJjq6_SpIGg
Playfield Slide Rail Bump: https://www.youtube.com/watch?v=qzrrqX7lleU
Coil Adjustments: https://www.youtube.com/watch?v=OltW0IjTo-
IMPORTANT NOTE: The playfield on your Rick & Morty game has an exceptionally durable, high-quality smooth finish, but is slightly thinner than traditional playfields. USE CAUTION WHEN REPLACING FASTENERS - CHECK THEIR LENGTH TO ENSURE THEY DO NOT PIERCE THRU THE PLAYFIELD!
-Ball launch Wireform / Habitrail
The launch habitrail should allow the ball to drop just above the upper flipper, allowing the ball to roll down and build some momentum before it reaches that flipper. The ball should roll smoothly along the rail. If the ball cannot make it all the way up the habitrail on default coil power, hangs, or is deflected away from the rail, some slight adjustments to the habitrail may be necessary. Also check your game’s pitch and level
-Flippers
For the best experience with game action and flipper performance, flippers should generally be aligned so that their top (striking rubber) surface is level in-line with a straightedge placed along the inlane guides.
The flippers should be 1/16” above the playfield. However, the proper bushings to provide this gap were not available until June 2021. As a result, all Rick & Morty games were originally built with flippers that are higher over the playfield than typical, which may cause unsatisfactory performance for some players. Before the proper bushing were available, some owners were known to shim the flipper baseplates (to “lower” the original standard bushings) instead. Whatever route you pursue, please be mindful of the IMPORTANT NOTE above regarding playfield thickness and fastener size! Spooky Pinball recommends the bushings be replaced with the proper custom size released in June 2021, and will provide them free of charge to original owners.
-Ramps
The Left Ramp and the Right Ramp are each secured to the playfield with two screws on the entrance flap. The Right ramp is also secured by an additional screw in the “Megaseed Tree Post” near inlane return. To remove the ramps for servicing, simply remove the screws first. NOTE: Of the two screws used to secure the left ramp, the left screw is a unique, shorter length. This single screw is shorter so as not to interfere with a ball rolling in the portal subway directly beneath. Make sure to replace this shorter screw in the left hole!
-Diverter
For the smoothest possible ball action around the horseshoe / spinner loop and the diverter path, the alignment of the guides and diverter post is key
-Lamps / Lights / Displays
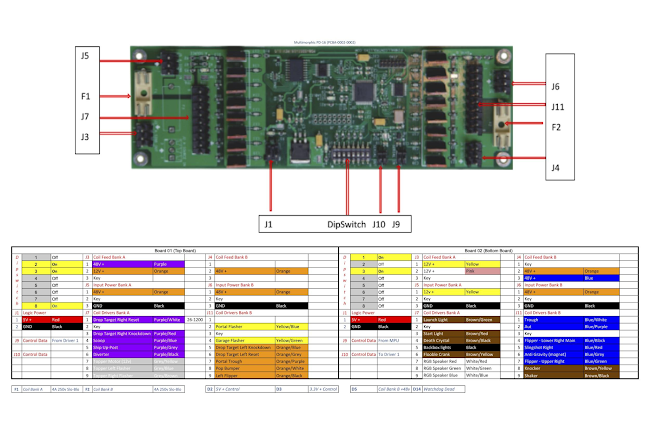
6. Component Part Layouts
6.1 Solenoid Coil Control Boards
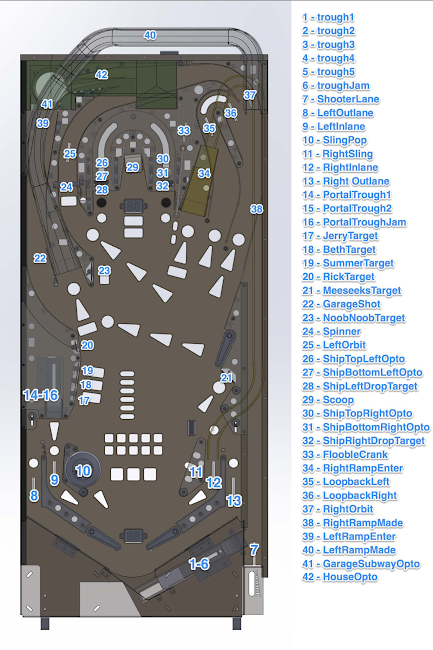
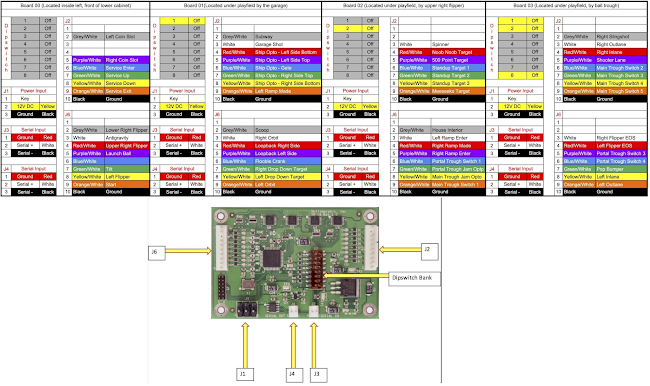
6.2 Switch Locations
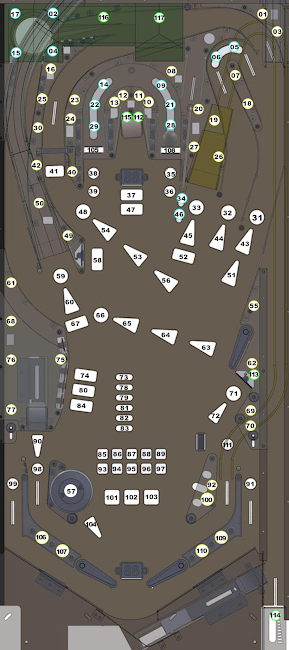
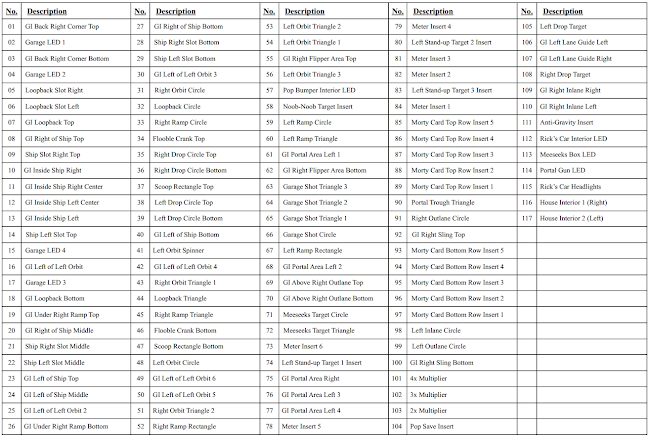
6.3 Lighting (RGB) & Lamp layout
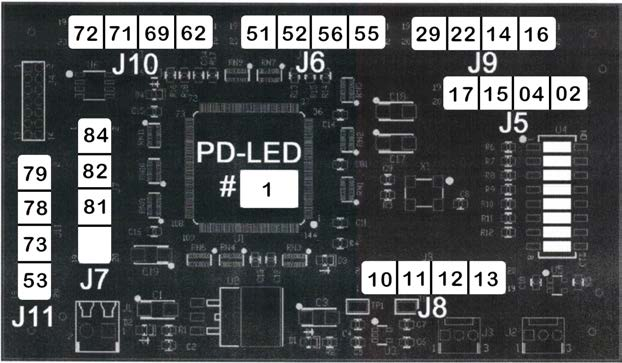


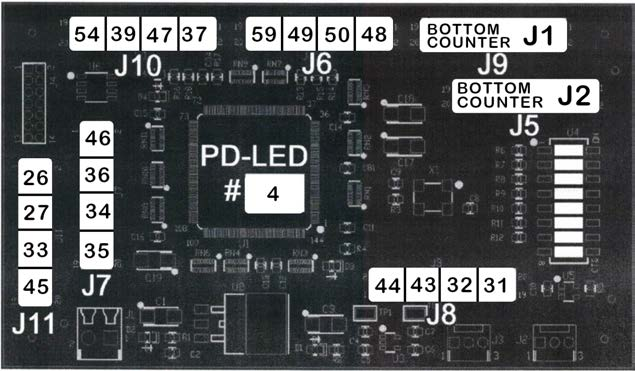
Control Boards: Note board number in center, and controlled lamp numbers as indicated

6.4 Rubber Ring Size and Layout
This manual was created by the pinball community in collaboration with Spooky Pinball
PEACE AMONG WORLDS