Public link: https://goo.gl/242F35
What is this guide? Who are you?
Where can I watch YouTube in HDR?
How do I search for videos to watch that are available in HDR?
Enough words. How do I capture in HDR?
You can shoot with HDR in mind, but don’t shoot into PQ directly
HDR-compatible shooting formats
Cameras that have worked well in my experience
Expose like you would normally
Consider any source of light in frame carefully (practicals, sky, background lights)
Cheapest option if you don’t have any HDR gear
Cheapest option if you have an HDR TV already
Most versatile configuration still on a budget
After Effects + Resolve: simple edits, straightforward HDR grading
Work in standard gamma, take care with highlights, grade in Resolve
After Effects: heavy composites, simple grades
Work in Dolby PQ, grade in After Effects
After Effects + Resolve: heavy composites, heavy grades
Work in Dolby PQ, pull content back into Resolve to grade
Challenge yourself to not peak every scene
Controlling YouTube’s SDR downconversion
Generating an SDR downconversion LUT
Atomos: fix HDR metadata signaling
After Effects: Turn off “Display Color Management” for Mercury Transmit
YouTube: use HDR10+ (SMPTE ST 2094-40) dynamic metadata for HDR downconversion
The basics
What is this guide? Who are you?
Hey there! I’m Steve Robertson, an engineer at YouTube who works on HDR, and this is a guide on how to make HDR content and publish it on YouTube.
This guide is an alpha version of what will likely become a YouTube Developers blog post. However, at this time, this is not official YouTube documentation. Also, any products or services mentioned here do not represent an official YouTube endorsement.
This guide isn’t about what HDR is, or why you should care - for that, I’ll redirect you to places like CNET for a high-level overview, or Part 1 of MysteryBox's series for something more in depth. In fact, MysteryBox’s whole series is great, and I’m going to reference it a few times below.
Questions? Feedback?
We’ve set up a list where all the YouTube HDR contributors can see your response to this guide - just shoot an email at yt-hdr-guide@google.com. Send us an email if you’ve got questions, corrections to the guide, or anything, really.
Where can I watch YouTube in HDR?
Living Room devices
All TVs which are marketed as HDR TVs and which are first sold in 2017 - like the LG C7 and Samsung Q9F - should support YouTube. (Basically, TV manufacturers make plans two years in advance, so this is the result of us starting to work on HDR in early 2015.) Some TVs got settled earlier - specifically, Samsung TVs that start with KS and the LG G6 (not the B6..E6) are 2016 TVs that support YouTube HDR playback.
It’s OK if you bought a 2016 HDR TV that doesn’t natively support YT HDR, like the LG C6, because the Chromecast Ultra supports HDR decode and output for YouTube. So do a lot of 2017 Blu-Ray players and streaming boxes.
The PS4 Pro and Xbox One S don’t yet support HDR. Neither does Android TV. Stay tuned for announcements on that front.
Mobile devices
YouTube is available on a number of Android phones, and we are working hard to expand to as many devices as possible.
Right now, on Android phones, we’re doing VP9 Profile 2 decode in software, then using the a priori known characteristics of the displays of modern flagships and high-quality dithering to simulate a 10-bit output pipeline with full contrast and color. Android devices, by and large, are not color managed, so we get access to the full P3 range of the OLED screens we run on just by pumping pixels. (On newer Android devices like the Pixel 2 and 2XL, they are color managed, so we get to leave at least some of the work to the compositor.)
Because this is running in software, we have to run it at reduced resolutions for now - 720p by default, with the option to upgrade to 1080p manually (but it’ll eat your battery and probably thermal throttle halfway through a video).
It’s worth noting that the A11 processor in the iPhone X slaughters the Android competition, and that device has an HDR screen and a color-managed 10-bit pipeline accessible to applications, so there’s no reason this solution couldn’t be implemented on that device.
In the near future, most flagships will implement VP9 Profile 2 and HDR in hardware. The Mediatek Helio X30 already does. These phones will do HDR without melting.
Desktop
Update: Microsoft may have raised their HDR output level above 80 nits in the Fall Creators Update; I need to get out my scopes and verify this.
Windows Creators Update supports HDR. Sorta. There are still a lot of problematic corner cases, and Microsoft made a very… technically correct choice: they paint SDR white in HDR mode at 80 nits. Most displays, when driven in SDR mode, put SDR content at around 250-300 nits (a fact that Microsoft actually acknowledges in their own whitepaper, linked above). This is true even of HDR displays for the most part. But when you kick over to Windows’ HDR mode, it takes any SDR app or surface and paints it at 80 nits. This is very dark, relatively speaking; it works in a theater but not in an office. I can attest to the fact that you do get used to it if you use your computer in a dark room, but it leaves very little wiggle room. With that in mind, unless an adjustment is made possible, I’m concerned about the adoption rate of HDR.
Anyway! Regardless of whether you agree with this decision, here’s how you can view YouTube content in HDR on the desktop:
- Update Windows as far as it’ll update.
- Get an HDR GPU. The GTX 900 and GTX 10 series from Big Green work, as do the 400 and 500 series from Team Red.
- Update to the latest drivers for that GPU.
- Get an HDR display. HDR TVs work, but they can be a bit fussy about their HDMI settings. HDR monitors are probably more reliable. Probably! I haven’t tried one yet - we have to keep so many TVs around for certification that I've just stuck with whatever we've got lying around the office.
- Enable “HDR and advanced color” in the Display page of the Settings app.
- Install Chrome Canary. The HDR feature is only available in Chrome 59 and up, and that’s Canary right now.
- In Chrome Canary, type in chrome://flags#enable-hdr to the address bar to pull up the HDR setting, and click “Enable”. A “restart Chrome” option shows up at the bottom of the page; do that.
- Watch an HDR video on the Tubes.
- Right-click, choose “Stats for Nerds”, and look for the HDR information in the gear menu. TODO: post an SFN screencap.

The “HDR and advanced color” switch is in Windows’ Display Settings.

One of the many shelves filled with old TVs that we keep around to verify firmware updates and reproduce problems in case of emergency.
What HDR TV should I get?
Remember: this doc is not an official YouTube doc and doesn’t reflect any product endorsement from YT.
CNET is pretty clear on which TVs they think have the best picture quality. They are not alone.
If you get a TV with good picture quality and calibration options, it’s totally reasonable to use it as your mastering display - so, you know, write it off as a business expense or whatever. If you’re going this route, we would advise you to get a display that has celebrated picture quality and accuracy, which does narrow down the options.
We’ll go over how to incorporate an HDR TV into grading below.
How do I search for videos to watch that are available in HDR?
Android will soon have an option in search filters. Search for an item, click the settings-looking button there, tap HDR, and it’ll filter to just verified HDR files on YT.
Tell me some new funny words to talk about HDR with.
MysteryBox again does us a solid with a post explaining a lot of the core terms in detail. It’s a lot of words! I mean, you should read them, for sure. But I’m going to try to get away with as few as I can.
Also, fun warning: most things have, like, three names! Yuck. When listed with slashes, they mean exactly the same thing.
"Nits" / "Cd/m^2"
- A way to measure how bright screens are
- Most SDR screens are like 250 nits peak
- HDR screens “start” at 600 nits peak, some go all the way to 1500
Dolby PQ / SMPTE ST 2084 / Rec. 2100 PQ / Rec. 2100 ST2084
- It’s Like A Weird Log Curve, But For DeliverablesTM
- Because of some complicated choices, PQ is intended to be absolute - a luma value of 500 means “82 nits”, whereas on most curves would mean “1/12 of your display’s peak brightness”
- This is mostly a lie and we’ll get into why
- It’s the choice of curve for Cinema Folks, who are embarrassed for you that you would stoop to watching videos on your phone
- This leads to consumer blowback, when users turn out to not all be sitting in movie theatres when they watch their videos
HLG / Hybrid Log-Gamma / ARIB-STD-B67 / Rec. 2100 HLG
- It’s Like Somebody Duct-Taped Their Way To HDRTM
- It concedes that there are other display devices and viewing environments outside of a cinemahouse, and even includes a recipe for how to adapt content in the spec
- This doesn’t give the illusion of control that PQ has, but it’s more honest this way
- It’s a practical choice for internal workflow steps, and we’ll talk about why
DCI P3
- It’s Not A Real ColorspaceTM
- It describes how big the “safe zone” is for cinema projectors, and is not a real colorspace
- OLED primaries are currently pretty close to DCI P3, so it’s a practical safe zone for consumer delivery as well, but because colors outside of P3 are so friggin’ saturated anyway, you don’t really need much beyond good taste to avoid going that far
- Never master in DCI P3 for delivery. It’s not a real colorspace so we can’t deliver with it.
Rec. 709
- Plain Old HD SDRTM
Rec. 2020
- “Wide Color Gamut”
- The spec predates HDR, so HDR delivery includes Rec. 2020 for color but Rec. 2020 gamma is actually the same as old Rec. 709 gamma
- Rec. 2020 color is used with HLG or PQ to achieve HDR+WCG
- Rec. 2020 can hold colors that are way more saturated than you should ever use. If you’re fully saturated at Rec. 2020, you literally need friggin’ lasers to reproduce that color.
- For a lot of fun science reasons, don’t hope for devices that do full Rec. 2020. A device that supports Rec. 2020 as a container of color almost always maps it to a smaller internal volume of color.
- Yes, this is different from other specs; Rec. 709 is a realistic target for devices, but Rec. 2020 is not.
Rec. 2100
- Includes Rec. 2020, ST 2084, and ARIB-STD-B67
- So you can say Rec. 2100 PQ which means Rec. 2020 color, ST 2084 gamma
- Adds a bunch of super helpful, if rather technical, thoughts about system gamma
- Has caused pretty much everything to have to include duplicate names for the old specs
- Maybe one day will be the only spec we need to refer to?
- Is freely available to download and read, and honestly you should
Gamma / tone response / tone curve / transfer function / transfer characteristics
- For your purposes, these are all just names for “gamma curve”
- HDR gamma curves are not actually “gamma” in shape, but who cares
EOTF
- Basically gamma as above, although there’s some boring nuance around system gamma that we’ll ignore for now
Capturing footage
Enough words. How do I capture in HDR?
Aha, you don’t! Or maybe better put, you might have been already.
You can shoot with HDR in mind, but don’t shoot into PQ directly
More so than classic SDR, you generally do not want to use HDR straight out of camera. The comparative difference is mostly I think because we’re not used to it? I mean, a super experienced, super talented DP might get a shot that looks perfect right out of camera in SDR, and once we all figure out what we want from HDR that could conceivably happen too. But HDR just gives you so much more room to play around with footage, that you’ll probably want to play around with it.
For this reason, never, ever shoot using ST 2084 as the gamma curve for a non-live production with 10-bit output. ST 2084 accomplishes the trick of being able to squish a staggering 0-10,000 nit range into a 10-bit signal by precisely matching the contours of the human contrast sensitivity function. If you play around with that signal in post, then the way that ST 2084 manages to just duck under the threshold where we can see banding across the visible light range is broken, so banding becomes evident.
Field recorders like the Atomos Ninja/Shogun Inferno have an “HDR exposure” slider to help you preview the results if you play around with footage in post on an HDR display. Notably this slider doesn’t work when in PQ mode, partly for this very reason. PQ isn’t meant for the field! It’s only meant for mastering and delivering content.
HDR-compatible shooting formats
Minimum requirements, in a nutshell:
- A log or log-like curve which covers wide dynamic range
- At least 10bpc for log or log-like
- 12bpc is better for traditional gamma-like
- A minimally-compressed format, like RAW, ProRes, or very high bitrate AVC
- For ProRes or AVC, 4:2:2 color or better
- A sensor with wider dynamic range
It’s not like there’s something magic about these requirements; you can plug in SDR or 8-bit footage and poke and stretch it into submission, although it takes a huge amount of work and the results are often middling. These minimum requirements will hopefully prevent you from having to tear your hair out in post over a bad capture format of otherwise-good footage.
Cameras that have worked well in my experience
Remember: this doc is not an official YouTube doc and doesn’t reflect any product endorsement from YT.
RED cameras have produced excellent footage. My favorite HDR videos so far have all been shot on RED.
BlackMagic has what is currently among the most cost-effective options for RAW internal recording in the URSA Mini Pro. I’ve worked with the URSA Mini 4.6k (not Pro), and while it can produce some very nice footage, it definitely is… fussy. I think the Pro might fix a lot of those issues.
On the Pana side, I’ve heard good things about VariCam with V-Log but I haven’t seen any footage from it. I’m about to go rent a GH5 and test with it. The GH5 is probably the most affordable option all around; it has what Cinema5D rates as "10 usable stops" of dynamic range (although they note that the theoretical limit is 18 stops, if you push it with noise reduction). Pana will also announce a new camera at CineGear in early June; I’m excited to see what they get. It might be perfect for filming in tough conditions where I wouldn’t trust myself with the RED - skiing, for instance.
ARRI cameras are of course fantastic, but most YT creators are not in the market for an ARRI.
Action cams and the like can’t really be stretched enough to work well in HDR yet. Maybe the next gen will.
Exposing and lighting for HDR
tl;dr Shoot like SDR except you’ll see everything, so details matter more.
I'm an engineer, not a DP, but I've gotten some good advice that I'll pass on:
Expose like you would normally
As you start, don’t do anything special to your exposure settings. Even in HDR, the most important elements of your shot aren’t the highlights, but rather skin tones in the like, and you really want those to be exposed properly with lots of room. If highlights are clipped because you exposed for faces, it won’t necessarily diminish their punch - you can toss them up to the display’s peak if you really want something that sparkles, or you can roll them off well below the monitor’s peak to make them less distracting.
Like always, prefer underexposing to overexposing. Neat Video is a phenomenal denoising plugin; it took footage that was underexposed by maybe 2 full stops and made it usable. The alternatives for recovering overexposed footage are nowhere close.
Consider any source of light in frame carefully (practicals, sky, background lights)
If you have a bare bulb on the set as a practical, in SDR the bulb will roll off nicely. In HDR, you can often see the filament itself. Even if the practical is covered, it’ll still be the brightest thing in the room, to the point where viewers unused to HDR may spend more time staring straight at the light than they will at the subjects of the scene. (Sounds weird until you see it.)
(TODO: example photo)
Lighting color choices matter
For instance, if you have lights of a slightly different color temperature, the more accurate color representations and lack of a low-level gray tone to wash everything away will make that color temperature difference visible. Color-matching your lighting sources is more important than ever.
Unfortunately, the greenish cast of LED lights through digital sensors - a result of the interaction between the spectrum of the LED and the notches in a digital sensor’s color filter - is also very apparent in my experience. Try using fluorescent, tungsten or xenon lighting when possible.
(TODO: example)
Your C-stand is showing
In The Underdog, there’s a C-stand right outside the window in one of the shots. In SDR, the window is completely blown out; in HDR the C-stand is totally obvious. Things like… whatever those fake “put this painted curtain behind a window and light it really well and it looks like there are trees outside” things are called, will suddenly be really obvious in your shot. During color you can soft-clip them out a bit but it’ll be noticeable.
Post workflow
HLG vs PQ
HLG is a little less fussy to work with, because things behave a lot more like existing gamma curves. Part of that, though, is that like existing gamma signals, device manufacturers have more room to play with the way their content ends up being rendered. So you surrender a little bit of moral outrage when a phone has to raise the gray levels substantially to play your movie in the sunshine.
PQ is fussy from the ground up. It is all fuss. If you want to be very particular about how your content is displayed, for good or ill, use PQ. Note, however, that devices will be less free to make your content “look good in any light”.
Aside from that? Eh. They’re not really all that different. PQ has a burgeoning dynamic metadata ecosystem, which may aid in producing better SDR downconversions for YouTube, but by the time that stabilizes I personally predict it won’t matter anymore because many YouTube viewers watching HDR content will be doing so on an HDR device. On the other hand, HLG is somewhat less popular, but in a year or two it won’t matter since most everything will support both standards.
Getting gear to display HDR
Okay this is the major pain in the whole process. Getting HDR output from your editing/finishing gear is a tiresome task, as is validating the result. We're working to drive down the complexity as much as possible here.
Note: this section may be updated after CineGear '17 (~June 1, 2017).
Cheapest option if you don’t have any HDR gear
An Atomos Ninja Flame. At around $800, this HDMI device is mostly marketed as a capture system, but can also serve as an entry-level grading system. With a Ninja Flame, you don’t need any other accessories to work with HDR in Premiere and After Effects. The Ninja Inferno and Shogun Inferno are nice upgrades with the same panel, and the Sumo, with a 19” panel, is coming out very soon.
There’s a catch. The Ninja Flame has a dynamic range that’s higher than classic SDR but muuuuch lower than, say, an LG C7. Managing shadow details pretty much requires using two displays simultaneously, or using the Ninja Flame’s exposure control to check the shadows (and of the two Rec. 2100 formats, that exposure control only works with HLG). Fortunately, the Ninja Flame can help by performing a soft-clip and conversion to SDR gamma, so you can monitor highlights on one display and midtones/shadows on a separate SDR monitor. It can also drive another HDR display that *does* have midtone/shadow detail, which is a really versatile workflow; see below.
Cheapest option if you have an HDR TV already and using Resolve
Get a BlackMagic DeckLink Mini Monitor 4K PCIe card ($195 at time of writing). This the cheapest mastering output device that supports HDR metadata over HDMI, which means that it's capable of turning your TV into "HDR mode" correctly on its own.
Most TVs don't have the ability to configure HDR mode on in their settings menu, although you'd be forgiven for thinking otherwise - for instance, Samsung TVs have an "HDR+ Special Picture Mode", which a) has nothing to do with HDR, b) is actually disabled when running real HDR, and c) also has nothing to do with HDR10+, which is another Samsung standard for doing real HDR with dynamic metadata. Ugh, names. In any case, using this card with Resolve will set things up more or less correctly.
If your plan is to use AE alone, and not go through Resolve to grade, this isn't your best bet, as Adobe products don't configure the HDR settings on this card yet. They can still pipe output to something with manual configuration, like an Atomos Ninja.
If you’re using a laptop, it might work to get a PCIe breakout box and plug in the card over Thunderbolt. This is way cheaper than the BlackMagic UltraStudio 4K Extreme 3 that you’ll otherwise need to get HDR HDMI metadata.
Best option if you have an HDR TV already and using Premiere
AJA I/O 4K for laptops, or the desktop equivalent, the Kona 4K. This little box costs about 10x more than the Mini Monitor, but it does the same thing, and it doesn’t require a PCIe breakout box or weird system restarts.
Note that Resolve doesn’t see these devices *at all*.
Most versatile configuration still on a budget
TODO: This doesn’t work in practice yet! The Shogun Flame I have isn’t sending the right metadata to cause the C7 to flip into HDR mode, so it can’t be used to force a TV into HDR. I’m inquiring with Atomos about this, stay tuned.
Get an OLED HDR TV as your main mastering display, the Atomos Shogun Inferno to use for Premiere/AE workflows, and the DeckLink Mini Monitor 4K. When working in AE, connect the Shogun via HDMI to your GPU, and your TV via HDMI to the Shogun. Use the Shogun’s ability to force HDR in order to preview the results of your compositions on both the TV and Shogun. When moving over to Resolve, connect the HDR TV to the HDMI port of the Mini Monitor, the Shogun to the SDI port, and monitor on the OLED TV for the 0-700 nit range, and the Shogun for its highlights (consumer OLEDs have fantastic detail but the peaks are lower; the Shogun’s LCD isn’t as clear in the shadows but its peaks are very bright).
Note: it’s possible to get away with this using a Ninja Inferno, you’ll just spend more time swapping HDMI cables.
TODO: pictures (once it works)
Equipment in the Spaces
If you’re eligible for post-production days at the YouTube Space in LA, New York, London, or Tokyo, you can use the cinema-class BVM-X300 to master your content. The BVM-X300 is currently the best commercially-available display for mastering HDR. It is a phenomenal display. You have to, and should, see it to believe it.
Talk to your Production Coordinator after unlocking the Space to book time in the Post-Production Suite and gain access to the BVM-X300. Configure the display as shown in the MysteryBox blog post part 5. Special note: if grading against HLG, do not choose HLG System Gamma 1.2 from the EOTF menu; this option is bugged. Instead choose HLG Variable Gamma and then set System Gamma to 1.2 afterward.
If your production coordinator is unfamiliar with HDR workflows, tell them to “ping strobe@” - they’ll know how to do that. We’re still distributing knowledge about HDR workflows to all the Spaces.
TODO: our own pictures, since I have stuff to add about other stuff in that blog post
“The Future”
In the brave new world, you’ll be able to connect an HDR, WCG computer monitor, set up the HDR mode in Windows Creators Update, and have HDR highlights appear right in your controls panel.
This is not that day.
Not recommended, but…
You could in theory split two color managed composition viewers with different exposure settings in After Effects, then run through the rest of the workflow while sort of combining the lowlights and highlights in your head. You end up with no idea about how punchy your content really is, though, or how colors outside of Rec.709 behave. I do not recommend this approach.
Checking your settings
In the segment below this one, we’ll get to how to configure your software properly, but first I want to show you what it looks like when you’ve got things configured wrong, so you know in which direction to fix things.
Basic image misinterpretations
This is a boat.

Here’s what happens if you take the raw RGB values of this image, still in gamma form, but interpret them as being in the Rec. 2020 colorspace instead. That is, the image is 709, but the display thinks it’s 2020:
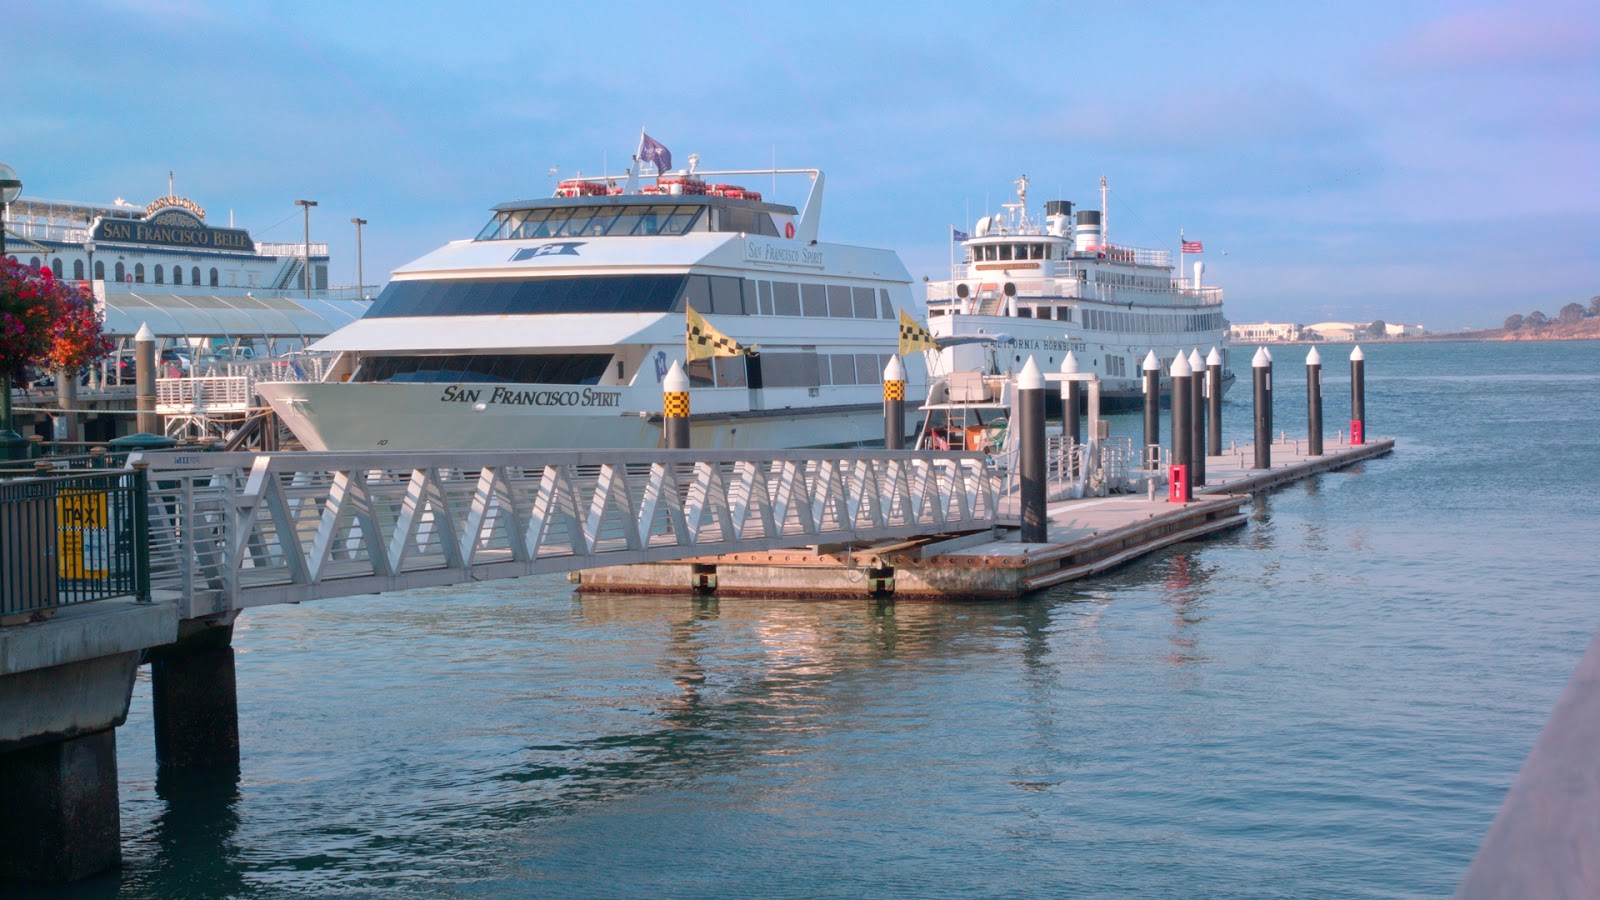
And the reverse; the image is 2020 but the display thinks it’s 709.

We see that images which are Rec. 2020, but get interpreted as 709, look desaturated. This makes sense because 2020 is so much larger than 709, so most natural colors don’t come anywhere close to the edges of the 2020 gamut, and so they get squashed more in the middle. (10-bit color precision makes up for this squishing so information is not lost.) Conversely, treating something like 2020 which isn’t leads to gross oversaturation.
The problem of misinterpretation is even more severe when we include gamma. Here’s a Rec. 709 image being interpreted as if it was in PQ, with Rec. 2020 color (technically it’s also spun down a bit for this SDR doc; on an HDR display it’d be super gross and hella bright):
If your images look like this, your content is actually SDR but your display is in an HDR mode. Turn your display to SDR.
On the other hand, if you have content that really is PQ/Rec. 2020, and you display it on a monitor that isn’t aware and is treating it like Rec. 709, you get this log-like, desaturated look:

If you’re seeing this, your display isn’t in HDR mode. Fiddle with it until it is.
Testcards to determine HDR device capability and knee
With the HDR spec extending so far beyond current display capabilities, it's important to learn not just whether your display is calibrated and configured correctly, but exactly what its true capabilities are. (Side note: I do recommend calibrating your display, but I'll let that be covered elsewhere.)
This clip (TODO: finish the clip and link to it) will help you understand your display's capabilities by showing a series of patterns that go to the limits of modern displays and beyond, making it simple to find where your display taps out.
Configuring software
DaVinci Resolve
Version note: we recommend Resolve Studio 14, as it has all the features and fixes for HDR. Some of the options described below are missing for Resolve 14 regular, and some of the export settings don’t work on Windows in Resolve 12.5.
Around the web: MysteryBox has a guide for doing this, which comes from a different perspective. It differs somewhat from the approach used here. I of course like my approach better, but YMMV.
Here’s what I use:
- In Project Settings -> Master Project Settings, set “Color science” to “DaVinci YRGB Color Managed”. If you’re running the Studio edition, also check “Enable HDR metadata over HDMI” - this only works with newer 4K BlackMagic HDMI output devices like the DeckLink Mini Monitor 4K. Be sure to set up Video Format here as well, and note the difference between 1080p and 1080pSf; you want the former, probably.

- In Project Settings -> Color Management, set up the Input, Timeline, and Output Color Spaces. You can just follow my configuration below, or I’ll explain:
- “Use Separate Color Space and Gamma”: You want this checked so you can keep the Timeline and Output color primaries (the left-hand column) the same, but use different “gamma” settings.
- The processing model is simple: the Input Color Space is used to map the underlying codepoints of encoded media files into the Timeline Color Space’s floating-point values. All grading operations, including Lift/Gamma/Gain controls, keys, and blending operations, happen in the Timeline Color Space. Finally, the Output Color Space transforms the floating-point internals to a value that can be encoded for export and delivery.
- Input Color Space and Gamma:
- If you’re importing RAW footage, this is ignored; don’t worry about it.
- If you’re importing SDR footage, keep this at Rec. 709 / Gamma 2.4. When SDR input gets dropped into your timeline, it’ll start off peaking at 100 nits, so you might have to “spin it up” first; this is OK.
- If you’re importing existing HDR material exported from e.g. Premiere, like the JPEG 2000 workflow noted below (that doesn’t work yet), you can choose something like Rec. 2020 / ST2084.
- You can override this on a clip-by-clip basis. Right-click on the clip(s) in the Media bin, choose Input Color Space, and then pick the option that fits. This lets you work with SDR and HDR material in the same project.
- Some Gamma settings have a “(scene)” suffix after them. For import, and import only, these Gamma settings will apply an extra Gamma boost to the imported footage, to make it feel more natural for a cinema environment. You can do this yourself using grading controls later down the line, too.
- Timeline Color Space and Output Color Space:
- For YouTube: always use Rec. 2020 for both of these options.
- There are reasons to choose Rec. 709 or P3 D65 for different applications. YouTube always does gamut conversion for SDR, even for HLG, so Rec. 709 is unnecessary. P3 D65 has no standard method of being signaled in ISO 23001-8 CICP, so YouTube has no way to ingest these files.
- Timeline Gamma:
- This is the most personal choice. It affects “how the controls work” throughout Resolve. It’s mathematically possible to use any setting here and achieve the same result, but working with e.g. Rec.709 will make Gamma, Curves and Keys behave very strangely.
- After much experimentation, I have ended up liking S-Log2 the best.
- Good options to try are also HLG and ST2084.
- HLG is more friendly to work in than ST2084, in my opinion; ST2084 pushes any controls that affect the “midrange” way too low. HLG is “normal” up to about its midpoint, making it a lot easier to use standard controls.
- Remember, this only affects how the controls work, not the output; it’s fine to have, say, a timeline in HLG and an output in ST2084, if you like that.
- Output Gamma:
- “ST2084”: use Dolby PQ / ST2084 as an output format, without clipping.
- “ST2084 1000 nit”: use PQ output, but hard-clip at 1000 nits. Resolve clips colors really nicely due to its YRGB processing; hard-clipping within Resolve may work better than letting TVs do it. But some intermediate options like 1500 nits aren’t available.
- “ARIB-STD-B67 HLG”: Use Hybrid Log-Gamma output.
- What about Rec.2100 options?
- They are mathematically equivalent - for instance, Rec.2100 Color Space is the same as Rec.2020 Color Space, and ST2084 Gamma is the same as Rec.2100 ST2084 Gamma.
- However, due to an issue with Resolve, these will not result in correct files during Export. YouTube won’t recognize files with Rec.2100 values as HDR.
- We’re working to get this cleaned up with the Resolve team.
- Apply Gamut Mapping from Timeline to Output Color Space: see the manual for details, but I recommend leaving this off.
- “HDR Mastering is for [ ] nits”: Check this to send HDR metadata over HDMI, which should kick your viewing display into HDR mode if grading on a TV.
- “3D Color Viewer Lookup Table”: If grading in ST2084, set this to “HDR 500 nits to Gamma 2.4”. This will only affect the output on your desktop monitor, not on the external display connected to a DeckLink or other frameserver card. Always use 500 nits for an SDR desktop monitor - this setting most closely approximates the SDR cut-down that YouTube performs, although ours does have a little bit more sauce to it. The 1000 and 2000 nit settings here push everything down, making the preview on your SDR desktop monitor uselessly dark.
- TODO: publish an example of out base LUT after desquiggling is complete

- Under Project Settings -> Color, if outputting in PQ, you can optionally “Enable HDR Scopes for ST.2084”. This setting changes the scopes from showing you the raw codepoints in PQ’s weird log-like curve to showing an actual log, with display values indicated in nits instead of on a 0-1024 scale. This is very useful at first when getting used to PQ.

- During grading, you can right-click on a node and choose “HDR mode”. This changes the feel of all the controls yet again, but in a way that makes a lot of operations just work better. This is especially good for keying and the log color wheels. When enabled, a node will be flagged with a little HDR tag.

Exporting to YouTube
Quick reminder: use Resolve 14 for all the output features listed below.
When Resolve Color Managed mode is enabled and QuickTime output is chosen, Resolve will write standards-compliant metadata and YouTube will read it, so no additional steps are needed to handle files from Resolve.
There are three supported codecs for HDR: VP9 (420 or 422, 10- or 12-bit), ProRes (422 or 4444), and DNxHR (HQX or 444, 10- or 12-bit). All are configured to be at visually lossless out of the box.
If you are on a hyperfast internet connection, ProRes and DNxHR are good choices because they’re fast to export. If you’re on a more normal connection, we recommend using VP9 422 10-bit or better. (VP9 is currently only available on Mac.) If using VP9, be sure to turn down the “Quality” setting - this setting is confusingly named, as it actually controls the CPU used during encoding. The default, “Best”, is absurdly slow. Going down to “High” or even “Medium” should still give you a higher-bitrate render with no visible artifacts, but in a tenth of the time.
Checking “Network Optimization” can also let YouTube start encoding your upload before it’s done uploading. A long 8K60 HDR file can take a few hours to process in all resolutions, so this helps reduce waiting.

Adobe suite: Mercury Transmit and Kona or I/O 4K
If you’re not going to finish your grade in Resolve, you’ve got to set up Mercury Transmit first.
Mercury Transmit is the playback solution across Creative Suite applications that allows you to bypass your OS’s desktop color management and turn on advanced capabilities like HDR. First step is to turn it on and select your output devices. In Premiere -> Project Settings -> Playback, you can turn on Mercury Transmit and select your AJA device after you install the driver and do the update dance.

Then slam that Setup button and you get to choose an HDR format from the Color Space menu. When working in Creative Suite, we advise you to use PQ 2020 for now; there’s no reasonable way to export in HLG or other forms of PQ yet.

When you’ve got the Lumetri scopes and
Premiere-based HDR workflow
The Color workflows article on the Premiere Pro User Guide site has more details.
If your output device is rendering HDR, you can then flip the Lumetri scopes into HDR mode
After Effects + Resolve: simple edits, straightforward HDR grading
Note: All Premiere/AE workflows may be updated after CineGear '17 (~June 1, 2017).
Work in standard gamma, take care with highlights, grade in Resolve
The easiest approach is to work in all clips as if producing a standard SDR composition, and render the results down to standard Rec. 709 using “Replace with Render” before exporting the FCPXML just like the previous approach. In this case, the image isn’t “HDR” at all until it hits Resolve and you can pump up the jam.
This approach is “easiest” in the sense that AE’s HDR grading tools are finicky and unforgiving. Resolve has made it very easy to get a good grade in HDR, where you can accidentally discover something that looks awesome in a few clicks. I have trouble recreating that look in AE-based HDR even when I know what I’m shooting for.
When doing this approach, don’t be afraid to underexpose the raw footage before compositing by a lot during this step (using a color corrector placed before other steps) - this gives you room to have effects with punch when needed. As always, it’s easier to correct an underexposed shot than an overexposed one; if any channel clips in the composition, pull the whole thing back so you have room to recover in HDR grading later.
One trick to this approach is to use the Atomos unit, if you have it, in Rec. 709 mode at full brightness in your dimmer grading environment. The display will give you a sense of how punchy things will be in your composition, and make you comfortable with leaving the kind of headroom needed later.
This approach may be familiar, but there are downsides. Even with a 12-bit format like Cineform RGB, there’s still not enough information when using a gamma curve to cover the brightness range, and Premiere won’t let you “Render and Replace” with OpenEXR. If you’re targeting 1,000 nit displays, it’s not too big a deal; if in the future you can upgrade to 2,000 nit or brighter, it’ll start to show (but by then hopefully the workflow isn’t as much of a mess).
Also worth noting is that this approach doesn’t get you access to wide color gamut until the grading stage, making it more difficult (but not impossible) to take advantage of the wider gamut later. But if you have punchy effects, maybe nobody notices.
After Effects: heavy composites, simple grades
Note: All Premiere/AE workflows may be updated after CineGear '17 (~June 1, 2017).
Work in Dolby PQ, grade in After Effects
For this to work, you must grade every shot in After Effects! You can’t do any composition (like motion graphics) in Premiere, since Premiere is not color managed, nor can you leave any shot without passing it through AE, since it won’t have the correct output color space applied.
This workflow also requires a display that you can connect to your GPU and on which you can manually enable HDR. This rules out most TVs (no way to force HDR) and even the mighty BVM-X300 (at least without a 4K HDMI->2x 3G SDI bridge). The Atomos Ninja/Shogun fit the bill nicely, however.
In Premiere:
- Edit your footage together. After we flip over to AE, all the shots will look weird back in Premiere land, so I suggest getting this pretty close to finalized before starting to do any compositing.
- Pick the first shot on your timeline, and send it to AE.
In After Effects:
- Go to File -> Project Settings -> Color Settings
- Choose Depth of “32 bits per pixel (float)”
- Choose Working Space of “Rec.2100 PQ”
- Make sure “Linearize Working Space” is not selected
- This option is currently incompatible with turning off display compensation in the viewer, meaning you won’t be able to see what you’re doing if you have it on.
- Choose “Blend Colors Using 1.0 Gamma”
- “Gamma” is a lot steeper in PQ, and PQ is not perceptually uniform in brightness, so haloing would be even more of a problem without linear blending.

- Hit OK
- Click on the title next to the word Composition above the viewer and choose New Comp Viewer:

- Tear off the new viewer by dragging the word “Composition” all the way over to the Atomos display
- With the viewer on the Atomos display selected, go to the View menu and make sure “Use Display Color Management” is unchecked
- You can also do this using the three color dots icon at the bottom of the viewer on the Atomos display.

- If you use Lumetri Scopes in your workflow, enable them and make sure they’re set to HDR mode (lower right hand corner)
On the Atomos unit:
- Click on the yellow menu icon in the lower right
- Choose the AtomHDR option
- Cycle through Camera Type until you get to Rec.2100
- Ensure the Gamma setting is on PQ
- Ensure the Color Gamut setting is on Rec.2020
Back on your desktop monitor in AE:
- Just to make sure it all works, grab the “HDR Compander” effect and drop it on your clip
- Set the mode to “Expand” and set the value to, say, 1.8
- The image on your Atomos unit should pop, while a
Okay, so what does that give us?
On your desktop monitor in AE, if Display Color Management is still enabled (the default), there’s an automatic SDR cut-down of the signal. With the compander set to 1.5, you might see some clipping of peaks.
On your Atomos display, with Display Color Management disabled, After Effects is pumping raw RGB pixel values in PQ/2020 to your unit, and it’s interpreting the results using PQ/2020. This is HDR! With the compander boosting the signal, you should see that the display is clearly brighter than your average desktop monitor, and has much more range for the highlights than the clipped signal.
If you disable Display Color Management in AE on your desktop monitor, you’ll see the underlying RGB pixels as if they were gamma-encoded. This makes the image look like “a really bad log encoding”, worse because it doesn’t even go to the peak of 1.0.
I set up these three configs side by side and took a picture with (photographic, multi-exposure-bracketing) HDR turned off on my phone, with exposure set for the Atomos display (which goes to show how insanely bright that display is):

Another version, with a bit higher exposure so the Atomos display is clipped a bit:

In the upper left, you can sorta see the log-like image of raw PQ interpreted as gamma when a signal without Display Color Management is used on my 80-nit monitor. The upper right shows with Display Color Management on, a version converted to gamma and clipped, completely crushing the result. (You can use the viewer’s individual exposure control to bring down the highlights, making the normal monitor’s viewer a lot more useful while seeking and stuff.)
On your After Effects Lumetri scopes in HDR mode, you’ll notice that the signal peak now sits well above 1.0, even though we can see via the log-like display with no Color Management on that the raw RGB values are in fact well below 1.0. This is because setting the working space to PQ has anchored SDR white, or 100 nits, to the value 1.0, even though in the 10-bit data sent to the encoder or display, a value of 100 nits is somewhere around a codepoint of 500. This could be a longer explanation. If you feel like I need to give more or less detail here, shoot a message to the yt-hdr-guide@google.com mailing list.
Back in Premiere, you’ll notice that all the HDR highlights will be clipped off, and the previews look more like the color managed version in AE. This is because Premiere doesn’t really have any color management yet; it’s just taking the raw values passed in from AE. Most encoders would just choke on these values above 1.0; DPX and EXR can use floating-point values, but they’re frame sequence plugins that YouTube can’t process. But there are two special ones that can handle these values above 1.0: HEVC Main10 and JPEG2000. Here’s a shot of the HEVC encoder settings page, configured as needed to get proper output:

A few things to do on this long page.
- By default, “Profile” was checked, meaning it copied the input setting of Main, which, sure, okay, although this was a DNx file originally. But when we uncheck that box, we get the option to set it to Main10.
- After unchecking the box and choosing Main10, we can then check Rec. 2020 Color Primaries…
- Which unlocks the High Dynamic Range checkbox, that we also check.
- Bitrate settings come in way too low for 4K HDR by default. Be sure to crank these up. I’d also bump quality to Higher just to make sure YouTube gets a visually lossless original to produce its transcode stack from, now and in the future.
Aaand, finally, after all of that, you should be ready to upload to YouTube. Congratulations on your enormous success!
After Effects + Resolve: heavy composites, heavy grades
Note: All Premiere/AE workflows may be updated after CineGear '17 (~June 1, 2017).
Work in Dolby PQ, pull content back into Resolve to grade
Oh, that wasn’t enough pain for you? Well, I’ll keep this description simple then, since you’re obviously a glutton for workflow. Export the whole render EXR frame sequence and an audio track, drop both into a timeline, then export the EDL from Premiere to segment the timeline or use the scene detection feature in Resolve to do it by hand. Grade and deliver as for Resolve.
(JPEG 2000 should work instead of EXR, if you configure it like the below, but I can’t get it to round-trip in my 4AM testing. YMMV? It’s red because it doesn’t work yet for me.)

Color grading advice
Around the web
Alexis Van Hurkman has a wonderfully discursive writeup here.
My own advice
Challenge yourself to not peak every scene
If you’re making anything even slightly narrative, make sure at least one scene does not peak anywhere close to the full range of whatever you’re shooting for.
The temptation when first discovering HDR is “holy shiiiiit this is cool”, so you end up blasting every frame to make it look its best. But unless you’re producing a reel of cool shots with no narrative arc - which I'm not against, mind you - the power you get from saving up for a good punch is worth it, and a good way to force yourself to that spot is to hold back once in a while to remind your itchy gain finger that it’s okay.
Use the power of P3 sparingly
Super-saturated colors are harder to map down than highlights for SDR downconversion. Not to hate, but it’s easy to be… generous with saturation in a way that leads to way oversaturated downconversions. If you have both a Rec.709 and a Rec.2020 reference display, like the Atomos display + LG TV setup described
Controlling YouTube’s SDR downconversion
You can provide YouTube with a custom LUT to achieve additional control over how SDR downconversion works. Right now, we do simply honor this LUT by applying it directly, but this is not a guarantee; in the future, when we apply machine learning to produce better SDR downgrades, we may elect to use the LUT as a hint rather than use it directly.
This process requires a bit of command-line fu, as our drag and drop tool is not cross-platform or perfectly reliable just yet.
Generating an SDR downconversion LUT
We'll do this one in Resolve.
- Start a new Resolve project. Do not apply any of the workflow settings described in the Resolve guide for how to master in HDR; in particular, do not enable Resolve Color Management or HDMI metadata injection. We'll be working in SDR for this one.
- Make sure any monitoring devices are set to SDR mode, or just do this step entirely on your computer's monitor without using an external display.
- Import the media you were going to send to YouTube, create a new timeline with it, and flip over to the Color page.
- Right-click on the first corrector and choose '3D LUT -> HDR ST 2084 -> HDR 4000 nits to Gamma 2.4'. (The nits value doesn't matter as long as it's at least as large as your mastering target.)
- Use non-temporal, non-spatial correctors to tune the downconversion, like:
- Lift/Gamma/Gain wheels
- Log wheels
- Contrast/Saturation/Hue/Tint/etc
- Curve controls
- Keys based exclusively on HSV/RGB (no Matte Finesse allowed)
- Some items will not have any effect on the output LUT:
- Denoising
- Power Windows
- Spatial key controls
- Spatial-frequency effects like "midtone detail"
- ResolveFX or other OpenFX plugins
- Because the LUT applies to the whole file, no temporal effects like scene-by-scene changes apply either. We're working to offer scene-by-scene control via dynamic metadata soon.
- When satisfied, right-click on the video thumbnail and choose "Export to LUT (CUBE)".
Attaching a LUT to your media
- Download and install the latest version of "mkvtoolnix".
- MacOS: available in homebrew
- Linux: available in most distributions
- Windows: available from https://mkvtoolnix.download/
- Run the program from the command line like:
- mkvmerge -o PATH_TO_OUTPUT.MKV --colour-matrix 0:9 --colour-transfer-characteristics 0:16 --colour-primaries 0:9 --chromaticity-coordinates 0:0.68,0.32,0.265,0.690,0.150,0.060 --white-colour-coordinates 0:0.3127,0.3290 --max-luminance 0:1000 --min-luminance 0:0.001 --attachment-mime-type application/x-cube --attach-file PATH_TO_LUT.CUBE PATH_TO_INPUT.MOV
- ...replacing the three bolded parameters, and updating any other constants as needed according to 'mkvmerge --help'.
Work in progress
This is work in flight by us or other organizations that will make this complex workflow a little less heinous in the future.
Atomos: fix HDR metadata signaling
Atomos units should be capable of sending HDR metadata over HDMI to activate a remote monitor for the After Effects workflow, but at this time they’re not doing so in my testing.
After Effects: Turn off “Display Color Management” for Mercury Transmit
Currently, Mercury Transmit forces the activation of a default, SDR gamma-like Display Color Management mode before writing frames. This makes it impossible to use Mercury Transmit with an HDR output device. Being able to write raw RGB values directly to the display, or even better, to be able to choose a Rec.2020 ST2084 display profile built-in so creators could use a linearized working space with an HDR monitor.
Premiere: support a Color Managed workflow
There’s no effective way to work with HDR right in Premiere, leading to the “you must run every one of your clips through AE” workflow.
Adobe (AE/Premiere/Media Encoder): support VP9
It’s a long shot to request this but we do like VP9 better than HEVC.
Adobe (AE/Premiere): send HDR metadata over HDMI for compatible Mercury Transmit devices
The BlackMagic DeckLink API might need to grow a new method call for this.
Resolve, Premiere, AE: support Windows Creators Update HDR for the color viewer
Once displays start coming out, this is the simplest solution to get HDR output (but it would likely be a significant rewrite of the display code for each of these apps).
Resolve: signal HDR color primaries and transfer characteristics for Rec.2100 settings in RCM
You can’t select Rec.2100 settings right now for upload to YouTube; the output is labeled incorrectly.
Resolve: support VP9 export on Linux and Windows
Currently Resolve only writes VP9 on Mac.
Resolve: support authoring royalty-free dynamic metadata
Resolve supports Dolby Vision’s proprietary metadata if you license stuff for DV, but no royalty-free format. We should create a more friendly, royalty-free workflow for creators that can't afford DV's expensive process and licensing.
Resolve: support Adobe's JPEG 2000 MXF OP1a 4:4:4 RGB PQ 12-bit
Currently Resolve won't handle this format for unknown reasons. Ffmpeg seems to parse it OK, so I think the problem is with Resolve in this instance.
YouTube: generally improve downconversion
We have a few minor tweaks and improvements to automated SDR downconversion on the way. We’ll rerun all old videos with the improvements when they roll out.
YouTube: use HDR10+ (SMPTE ST 2094-40) dynamic metadata for HDR downconversion
HDR10+ is the only dynamic metadata standard that’s royalty-free, and it’s straightforward in a way that we like. We intend to create tool that would generate dynamic metadata for an SDR downconversion by taking SDR and HDR assets and mapping between them. We could then embed this metadata in the original to provide more control over the downconversion.