D.I.Y. VENUE HARM REDUCTION - http:// d-i-y.fyi + diyvenueharmreduction@gmail.com. Use saferspac.es to offer or request help for a venue.
D.I.Y.
VENUE HARM REDUCTION
DIY VENUE HARM REDUCTION PRESS
The Stranger
Archinect (Podcast)
Metropolis Magazine
Next City
East Bay Times
ArchPaper
Billboard
Mixmag
Paper Mag
Stoney Roads
ACTION ALERT
Around the USA, city officials are evicting venues in response to the Oakland fire.
Use these scripts to call your local representatives to tell them: #DIYSavesOurLife
Share the Seattle Arts & Music Commissions’ recommendations for how cities can support DIY Venues with your city officials.
DONATE TO OAKLAND FIRE VICTIM FAMILIES AND LOVED ONES
- Trans Assistance Project for loved ones of trans women who perished in the fire
- Immediate Oakland Fire Relief for roommates, non-bio-family affected
DIY Venue Harm Reduction is a resource for people who manage spaces, host events, and/or attend events. This is an incomplete, evolving draft of suggestions for fast, free and low-cost changes that can be implemented immediately. This is not a comprehensive safety manual or replacement for involving licensed experts and meeting fire / building codes. This collaborative effort is edited by community and professional experts who span a range from DIY/lived experience to credentialed professionals in architecture, fire rescue and prevention, disability justice, and more.
Our title has most often been interpreted as [DIY Venue] Harm Reduction (harm reduction for DIY Venues). But we think of it more as [DIY] Venue Harm Reduction (an DIY approach to harm reduction for all venues, events, and gathering). Instead of gatekeeping the definition of a “DIY Venue,” we focus on community safety everywhere. Many “legal” venues that pay rent and meet building and fire codes realized they could do more to improve their safety and accessibility measures following the 2016 Ghost Ship tragedy. This resource centers the needs of low-budget, precarious DIY situations, while expanding beyond ad hoc strategies.
This information is also helpful for pop-up or temporary events. Whether you live in a punk house that hosts monthly shows in your basement, or you are hosting a permitted, one-time event in a public park, you can keep your community as safe as possible. Integrated support and solidarity with all of our neighbors, including but not limited to communities of color, low-income communities, immigrant communities, and vulnerable communities who are likely to inhabit spaces at risk of fire, eviction, or gentrification, is a high priority for the editors of this document. The information is relevant beyond niche subcultures throwing parties in warehouses. In DIY communities like that of the Ghost Ship, “Safer Spaces” has most often been interpreted to mean keeping a space free from racism, sexism, homophobia, transphobia, classism, harassment, violence, and other interpersonal and social concerns. The Ghost Ship tragedy brought forward the need to also consider the physical and structural safety of the buildings and structures where these social relationships take place. This document is therefore strongly aligned with disability justice values, which have long made the case for these improvements.
In addition to modifying spaces and policies on the part of venues and event hosts, we identified strategies and improvements that attendees and guests can use. We wanted to emphasize audiences’ agency in harm reduction and venue safety
For accountability purposes: this document was initiated by Susano Surface, a curator, unlicensed architectural designer, curator, and long-term DIY musician and music community member currently based in Seattle, WA. It was started concurrently with saferspac.es, which was initiated by Park Frost (also an architecture professor, unlicensed architectural designer, and long-term DIY music community member) as a platform where service providers and professional or technical experts can connect with venues or community members in need of those services. It is maintained by a community of collaborators worldwide.
This is a living document: there’s always more coming soon.
IMMEDIATE LOW-COST & FREE BUILDING & SAFETY MODIFICATIONS
- De-clutter your space and surrounding areas. Piles = fires and obstruction.
- Prioritize disability justice in all updates and maintenance of your space. For every decision you make, consider how people with disabilities (mobility, blindness, deafness/hard of hearing, intellectual disabilities), elders, children, intoxicated people, and others with mobility challenges will navigate the space. Everyone must be able to get out, so make decisions that support the most vulnerable inhabitants. As you make improvements, when possible, hire/pay disabled people to accessibility-audit your venue.
- Clear obstructions to doorways. To ensure people can safely enter or exit a doorway, remove any objects or clutter that may prevent the door from opening fully. This should especially be checked during events when equipment may be temporarily placed in front of a door.
- ACCESSIBILITY RAMPS - INFO TBD. Unless your building is already mobility accessible via pre-installed ramps or easements, aftermarket ramps can be purchased and installed to ensure all emergency exits are also accessible to wheelchairs. (for some options see Amazon).
- Prevent the public from entering off-limits areas by using signs, tape, and/or barricades, so these are not mistaken as exit paths or accessible space..
- Do not allow large installations or dividers of fabric, paper, flammable wood, etc. unless the materials are known to be flame retardant and/or the space has working sprinklers. [[ "Require all existing large installations or divers made of flammable material to be fireproofed. There are cheap, low-cost methods as well as standard products, and they vary for different flammable materials that can be found by searching online. Note that some fireproof materials can (when there isn’t a fire) cause adverse reactions in people with chemical sensitivities.]]
- Clear paths to exits. Mark and label building circulation with reflective tape or paint on the floor. Ideally, these glow in the dark, paths should be at least 44" (1.2m) wide, with doors a minimum 36” (90cm) wide. Whenever possible, design your navigation so it's possible to get through the space while using a wheelchair.
- Clearly mark all exit doors. Use reflective, or battery-powered LED-lit signage (approx. $35).
- Label the circuits on your breaker box. This makes it easy to kill the power to something without the lights going out.
- Figure out which outlets are on which circuits, and what the maximum current is for every circuit. Make sure you’re not overloading a circuit.
- Install battery operated exit signs with integral strobes as not all visitors can hear a fire alarm. This will also help with the location of exits in instances of crowd panic.
- Clearly mark all emergency exits, including non-barred windows, fire escapes, etc.
- Obtain escape ladders for upper-story rooms and make sure they are easily usable in emergencies. (Kidde KL-2S Two-Story Fire Escape Ladder is approximately $35. Make sure to test on windows. Train key people on use.)
- Obtain at least one carrying chair per set of stairwells in your location and per floor. The chair should be stored in a clearly marked and unobstructed place. Key residents/volunteers should be trained on how to appropriately use it in times of emergencies. The cheapest these chairs run are $154 (soft carriers requiring 4 people to carry one person can be purchased here; hard carriers that allow one-person to carry one other person can be purchased here). Used ones may also be found for much cheaper from closing hospitals, schools, and government buildings.
- Ensure all major exit path infrastructure is made of fire-safe material. This includes hallways, doors, stairs. (Especially if you have "decorative" or private stairs, lofts, ladders, poles.) Note: standard, single layer drywall is designed to withstand a fire for only 30 minutes, though it is possible to purchase materials and design walls to last for up to 1 hour in a fire. Code compliant exit stairs are typically rated for 1.5 to 2 hours. For detailed diagrams, go here - free registration required.
- Make sure doors swing away from you as you move along the exit (egress) path. Re-orient hinges as necessary. Doors need to move in the direction of “egress,” or total exit from both the “building envelope” (exterior walls) and its grounds. (For example, a door that opens to the outdoors but into an enclosed courtyard does not count as true “egress.”) Exit signs should ideally point in the direction of egress, not just any point on the building envelope. Make sure doors swing freely and don’t stick!
- Ideally, at least one exit should open onto a street that is at least 20’ wide. Narrow driveways, parking lots, and alleys don’t count. (this might just be for venues with 50+). If you have the means to add or modify an exit, you will need to consult with a professional. It may require a licensed structural engineer if a new opening needs to be placed in a masonry wall.
- Install panic hardware AKA “crash bars” on your exit doors where it is possible to replace knobs or latches. It makes sure venues can be locked from the outside without sacrificing the ability to open them from the inside. A Panic Exit Bar costs approximately $60 + labor and typically requires a skilled person to install. (code compliant panic hardware is a lot more expensive than $60) If you can’t afford panic hardware, push plates are an economical option.
- Doors along the egress (exit) path, including stair doors, should always be unlocked in the direction of egress.
- In non-exit doors, locks that require keys from both sides are illegal in public or multi-occupant buildings. These locks should be replaced with exit deadbolt locks (accessible by key on exterior/hall, use latch from inside the room. These are useful for individual studios and cost approximately $30 each.
- Obtain and install functional smoke and carbon monoxide detectors (30 feet apart in common areas, one in each enclosed room). Consult the manual of your individual detector for testing frequency, but if you don’t have the manual, test the batteries at least every 6 months. More information from FEMA about smoke detectors can be found here.
- Obtain, install, and clearly label non-expired fire extinguishers (75 feet apart in common areas). If your space has contained studios or bedrooms, include a fire extinguisher in each. Check the fire extinguishers annually: verify pressure is in the green area on the dial, and make sure there aren't any obstructions in the nozzle. Dry chemical extinguishers (like most multi-use extinguishers) should be inverted and shaken about once a month to prevent the powder from compacting at the bottom of the container. A Multi-Purpose Fire Extinguisher labeled for Type A, B and C fires will cover many types of fires (paper, oil, electric) and costs approximately $55 for a 5lb extinguisher. If you have specific risky conditions (flammable material; complex/extensive electrical wiring) place the appropriate extinguisher nearby. Have fire extinguishers professionally serviced annually, and replace it if it has been used or if the hose or nozzle is cracked, ripped, or blocked; the locking pin is missing or unsealed; or the handle is wobbly or broken. High-quality extinguishers can often be picked up used at low cost. Recertifying is a $10-20 investment if the extinguisher is not too old.
- Store flammable/combustible/hazardous material properly (solvents, gasoline, kerosene, spray paint, solvent soaked or oily rags, and more.) Use appropriate individual containers, flammable materials cabinets, etc (These can be bought for$300 or less from lab/office supply liquidators. The blue hazmat cabinets typically offer the same fire protections as the yellow flammables cabinets, and may be cheaper). Keep a MSDS (Material Safety Data Sheet) for all hazardous materials onsite in an easily accessible location.
- Keep all electrical panels, water and gas valves, meters, and other infrastructure accessible and identifiable, with a minimum 3' of space at their front and sides at all times, in case someone needs to access them in an emergency. Depending on the area of the building, you may want to use chain-link fence to define space around panels/meters to prevent objects from being stacked against them, while offering a visual connection.
- Make sure your electrical wiring is properly grounded and attached to breakers, so if the system overloads it shuts off rather than exploding. If you regularly lose power during events, first be thankful that the breakers are working as they should, but also acknowledge that your system is not adequate to handle your needs. You must update the system, or modify what you book there until you can update it. Using another object in place of a fuse or breaker is a solution far worse than the problem.
- Connect your electronics to surge-protecting power strips. Power intensive items, like heaters, ovens, microwaves, air conditioners, etc. should be plugged directly into the wall outlet wherever possible. If you must connect these items to an extension cord, ensure that it is rated for the appliance you want to use. Clear space around electronics and wiring, and keep electrical items dust-free. Ensure that surge strips are not daisy-chained together in place of the use of a proper extension cable of the appropriate gauge. When possible, uncoil extension cords entirely when using them, particularly when they are connected to power intensive appliances. Coiled extension cords are more likely to overheat causing a fire hazard.
- Avoid running long light gauge extension cords in order to access outlets. (Learn more about extension cord suggestions.) Use extension cords only temporarily, and place them in a way they are not a tripping hazard. Use surge protectors instead for more permanent installations; check condition regularly and replace if there are signs of wear. Never use flex cable (lamp cord, extension cord, etc) in permanent, hardwired installations. It’s not rated for permanent installation.
- Periodically check all appliance cables, extension cords, plugs, and outlets for any signs of damage. Do not use anything with exposed copper, frayed or nicked insulation, black burn marks, or any other sign that there might be damage to the cord. Don’t try repairing anything unless you know what you are doing.
- Provide a designated outdoor smoking area, free of clutter and flammables, with fire-safe disposal containers.
- Have a cleaning day -- including removing hazardous substances and unused objects, de-cluttering, etc. Dispose of toxic materials and large objects safely, per your city’s process.
- Have non-flammable, non-power-dependent lighting available indoors, for example, battery-operated candles and flashlights.
- Tip from a paraplegic wheelchair user who lives in a DIY art space: If there is no wheelchair user available to test accessibility in your space, try it out while sitting in a typical rolling office chair. This isn’t a perfect substitute, but will at least help you estimate if you are ‘close’.
- Create and review emergency procedures and run periodic emergency drills with residents, staff, and volunteers. Orient visitors to emergency procedures.
- Create a list of emergency contact numbers - Fire, landlord/real estate/owner, construction workers (plumber, carpenter, electrician, locksmith, etc), ambulance/medical help, local emergency supports (whether run by state, county, grassroots, etc.) You can also include contact information for first responders such as EMT and police. Be aware that minimizing police involvement and using alternatives to police is itself a harm reduction strategy when many vulnerable and informal communities are threatened and unsafe in police presence.
- Keep a list of staff and residents’ emergency contacts. (Balance this with security culture if your space is used for activist organizing, or by communities subject to police/state scrutiny.)
- Complete risk assessments for your space, taking all possible risks into account (these Australian/Canadian/British resources from CCOHS and WorkSafe Victoria have information that can be applied in many other places.) Document potential risks, as well as measures to mitigate them into a single document that can be referred to when necessary.
- Limit the sizes of storage rooms whenever possible - unless the room has sprinklers, or the walls are fire-rated. This is one of the most important things you can do, as storage rooms are major sources of fires. Do not use the spaces under stages for storage, unless they have adequate fire attenuation.
- Get training in First Aid and keep first-aid kits accessible - One authority suggests that “high-risk” workplaces (contains hazards that can lead to serious injury) should have about one First Aid officer and one first aid kit for every 25-50 people in the space. The link also contains resources for building a first-aid kit, outfitting a first-aid room, and other ways to maintain first aid in the space. (There are also first aid flyers made for workplaces that instruct on basic emergency techniques for choking victims, someone having a seizure, etc. that can be posted.)
- Do not exceed maximum occupancy restrictions for your venue. Make sure that you are aware of and enforce the maximum occupancy limits of your building established by International Building Code (IBC) and the National Fire Prevention Association (NFPA).
- Hold regular drills. Practice = safety. The more realistic the drill - the better. Look to Street Medic communities on how they run situational drills and apply similar techniques. Some possible options: hold a fire drill with the lights out; bring in smoke machines; add disorienting background noise; practice evacuating someone who is injured; practice using emergency ladders and carriers (if applicable); simulate mock phone calls to emergency personnel. These drills may be traumatizing to participants so be sure to work in space for self care afterward. However, drills will ensure that all key residents and volunteers are fully prepared in time of emergency.
- Each resident should prepare an emergency kit (for fire or earthquake) that can be stored in their space or in a secure outside location. The kit can include extra set of clothes/shoes/sweater, toiletries, flashlight, safety helmet, goggles, extra batteries, first aid kit, extra cash, emergency numbers, spare phone charger, gloves, etc.
- Call the city [OR ANOTHER KIND OF PROFESSIONAL?] to get an inspection on your space. Seek tenants rights services if there is a way to do this without risking eviction if you are in a live/work space which is not legal - maybe even consider making it look not lived in for the sake of the inspection. (In some cities, fire departments are happy to do a walk through by your local station and it should be done annually so that they are familiar with the building. Research whether your city will do a “pre inspection” where they will not cite you for anything but instead make recommendations. Another resource might be checking saferspac.es, or asking around your networks, to see if any “friendly” retired fire marshals, building inspectors, or other professionals can help. In the creation of this document, our co-authors included and received information from retired professionals. They hold the knowledge and experience, but have no license to lose anymore by taking on the risk and responsibility of looking into your situation.
- Speaking of earthquakes: review placement of large furniture and objects on shelves. Anchor furniture into wall studs. Secure objects to surfaces with museum wax or other safety tethering. Also consider whether there are fragile objects, including those made of glass, placed on unsecured shelves. If possible keep such objects in a cupboard with shelves. Examine hanging decorations or lighting and make sure they are adequately secured.
- Have emergency plan posted with building map on doors. As a visitor, review this plan when entering at-risk environments and take note of exits.
- Consider your electricity when presenting your work internationally, or hosting international artists. Instruments, amps, computers, and other electronics can catch fire! One example: In Europe, double check when US bands are touring that you have step-down convertors since plugging a 110 into a 240 outlet has been known to cause trouble. This is of course if they bring their own pedal boards, keyboards or effect racks and are not rented in Europe.
- Do not hang anything from roof deck - either wood or metal: these cannot support loading of speakers, stage curtain supports, etc. Use “uni-strut” attachments to structure, to hang anything.
- Tip: Many fire/building code departments are concerned with places where people are illegally living, mainly because they are worried about people being asleep while a fire or other emergency breaks out in the “public/venue” portion of a space. In these authorities’ viewpoints, the risk of people and pets being asleep/unconscious when an emergency happens, then getting trapped and unable to defend themselves, is why they take it so seriously and oiften move to shut such spaces down abruptly in a manner that feels adversarial. (This is also why places like residential housing, hotels, hospitals, jails, etc. where it’s expected that people are sleeping or unconscious at any given time, have specific building codes.)
SECONDARY and/or HIGHER-COST BUILDING IMPROVEMENTS AND INFORMATION
“Once you get to this level, you are almost certainly going to need to consult with professionals - what should be understood is that everything below could be seen as prescriptive, and some things are not necessary if you do sprinklers. Dampers and fire doors typically occur at rated assemblies; like between storage rooms and the assembly space…”
- Your venue (for up to 500 people) should have at least two exits.
- Have 2 exits: Venues hosting 1-500 Occupants typically need a minimum of 2 exits. In multi-story venues, most city codes require two points of egress on each floor (typically, the main exit stairwell and a fire escape on each floor.) The exits have to be separated by a min distance, which may vary based on location. One at each end of building is a good first pass.
- Do less in your space, not more. Just because the space has two exits, doesn’t necessarily mean you’ve accounted for the correct level of occupant exiting. The space could’ve been zoned as a Manufacturing floor - 200 gross s.f. Per occupant - where now one would like to use it as an Assembly space - 5 net s.f. per occupant. This effectively means a 10,000 manufacturing floor would have 50 occupants, and now a standing room only assembly could have 2,000 occupants - so two exits are not even close to being enough, four are required. 2 exits means 500 occupants max - don’t allow more than 500 just because the floor area allows 2,000.
- Post floor plans of the space in visible areas, with rooms (including “private/staff only” sections) doors, stairs, windows, bathrooms, any hazardous materials storage, and fire extinguishers clearly marked. These can be simple, informal, and hand-drawn.
- When possible, keep performance spaces on the ground floor/same floor as building exits.
- Replace DIY walls that don't have proper insulation and sheetrock. Wood panel walls with hollow cavities in the center are fire hazards. Consider the space’s use and your needs when choosing how to build a wall. Metal studs are relatively inexpensive and don’t add to fire risk, but they are less environmentally sustainable than wood studs, which do add to a structure’s “fire load.” Not all sheetrock is created equal! “Type X” sheetrock is recommended. If you live somewhere where earthquakes are a concern, there are additional seismic issues related to wall building.
- Keep heat-generating lighting equipment to a minimum. Use LED or fluorescent bulbs whenever possible, as they generate significantly less heat. While LED bulbs are initially more expensive, incandescent floods can overheat, becoming dangerous to the touch and potentially combustible. Avoid any lighting that uses tungsten/halogen lamps (like old stage lights) - they run *very* hot and need proper handling since the oil from your fingers on the bulbs can catch fire.
- Use flame-retardant fabrics and materials for sound absorption/isolation (eg, curtains, fiberglass panels). Do not use bedding or packing materials.
- Check your corridor length: Ideally, dead end corridors shall not exceed 20’ in length.
- Install emergency lighting along your exit (egress) paths. Include 1-2 fixtures on each path, with battery backup in case the power goes out. If you install exit lighting, signage it may help to install it low (1-2 feet up) to the ground. When there is smoke, you likely can’t see and will be moving low to the ground.
- Install sprinklers, if you are able and empowered to do so. It is possible to install a DIY residential sprinkler system, but it is ideal to to hire a local design/build fire protection contractor to handle all drawings, installation and fire inspection. It’s more feasible to do a DIY addition to an already-sprinklered building. In some cases, you can do the heavy work yourself or with a regular plumber, and only hire the certified crew to do the final inspection and connection to the system.
- Note that sprinklers are intended only to delay a building burning down long enough for people to exit.
- Install fire doors and fire dampers (equipped with panic bars!) to reduce the spread of fire and smoke through multiple rooms and (HVAC) ducts. These two investments will be a plus for future inspections.
- Install a secondary emergency generator that emergency lights for pathways and exits are connected. Test this system periodically.
- Building Upgrade Required, Prickly or Uncertain Owner - arm yourself with information. Get an estimate for design and installation of a sprinkler system including inspection fees.
- If in Oakland, KIVA Oakland provides micro-loans up to $5000. KIVA operates in several cities - research if this applies to you. The City of Oakland will work with groups to arrive at a compliant solution. But before approaching the City, show commitment by investing in extinguishers and emergency exit signs (you bought them, you own them). Get the space spic-and-span to show commitment to order. Approach KIVA with loan application (but do not submit); Approach City of Oakland with upgrade intent (conversation only). Once Oakland and KIVA give verbal blessing, approach landlord with desire to upgrade and that you will invest in the sprinkler but wish a 5-year lease with no rent increase during that time. The agreement should include if the owner sells, the owner is obligated to pay back the cost of the sprinkler. If down the road the owner does not repay for sprinklers, file a lien on the property. This will prevent the sale until repaid. (The cost of a fire sprinkler system for a small to mid sized warehouse is probably going to cost $50,000 to $100,000 or more).
- Strive to use best practices in your approach to everything safety related. If you can’t afford a particular solution, or are otherwise prevented from implementing it (uncooperative landlord, etc.) consider options that mitigate the risk as best possible. If you can’t implement all of the safety measures, do what you can do.
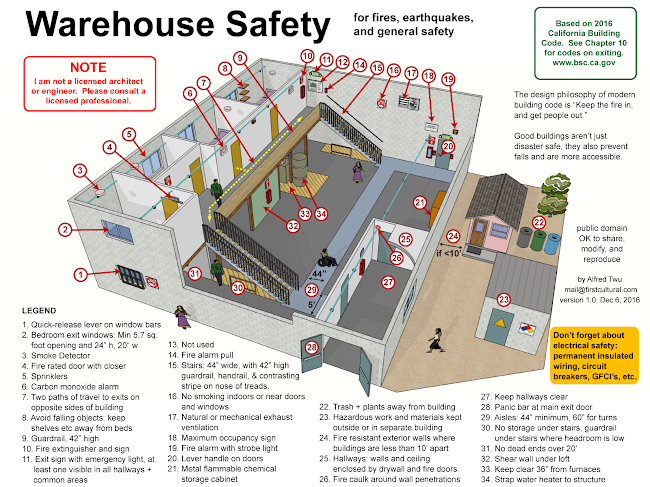
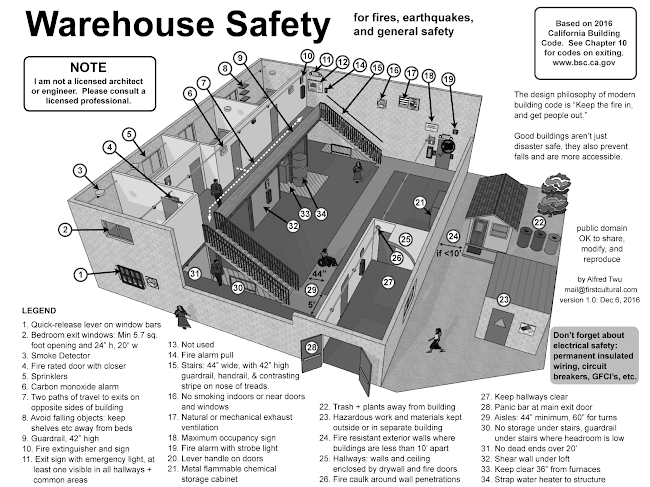
Diagram by Alfred Twu. Scroll down to last page for grayscale version
ACTIONS TO TAKE - FOR VENUES & PROMOTERS
- Limit the number of attendees based on your venue's size. Staff the entrances/exits to make sure it doesn’t get too full.
- Announce the location of exits before and during each event.
- Calculate the venue’s capacity. For a generic capacity estimate, assume you’ll need a minimum of 5 square feet per person in the common areas. Measure the square footage of public space in your building and divide by 5 - the result is the number of people you can allow in at one time. Check your local code: Oakland fire code says 7 sq ft per person standing, 15 sq ft per person, seated. Note that this is the rule of thumb for a dense assembly occupancy (how many people can reasonably fit in your space). It’s used to determine the number of exits and their minimum widths. Basic rules of thumb: if you do this math and it comes out to more than 50 people, you should have 2 doors (somewhat far apart from each other) out of there.
- Do not allow smoking, candles, pyrotechnics, fireworks, incense, or any open flame indoors. Suggest alternatives for smokers (abstention, vaping, nicotine patch, gum, edibles, LED fire spinners, etc.) especially if you cannot provide an adequate outdoor smoking area.
- Have an emergency plan (fire, flood, earthquake, active shooter, etc.). Have people in place who know what to do. Make sure these people are easily identifiable. If something goes wrong at an event, visitors need to know who can help. Designate a safety captain, or two who can offer clear direction. The safety person should stay a safe distance away to assist first responders, and have an updated floor plan indicating all the rooms in the building. Accountability and safety for everyone is paramount. Many times persons are killed in building fires because of unknown, or unauthorized spaces, where one thing was expected, but a whole different scenario is encountered.
- Ask your community for support. Many of us are contractors, electricians, plumbers, construction workers, architects, firefighters, acousticians, food safety experts, etc. who might be willing to at least evaluate your conditions, suggest options, or rank the urgency of changes needed. Offer an exchange based on what you can afford. For example, you might offer free admission for an agreed duration or number of events, or organize a fundraiser to compensate community members for their labor and expertise. Never expect anyone to work for free, but ask if anyone is willing and able to help pro bono or create a payment plan if you truly have no alternative. Just talk to your people to see what people’s availability and boundaries are, then make a plan when you are informed. It is better to get a quote/estimate (which is typically free) and have information about your options, than to completely avoid talking to anyone because you assume you can’t afford it.
- Communicate accessibility (or inaccessibility) information on event promotions, especially online where unlimited text is allowed. That way, attendees can consent in advance to the conditions they'll experience in the venue. Some specifics to note:
- Wheelchair accessibility of venue & restrooms (When bathrooms are inaccessible, you can rent an accessible port-a-potty. Ramps are rentable from medical supply stores and drugstores for $30-40.)
- Primary languages of performance or text content; availability of ASL or international language interpretation
- All-gender restrooms, or gendered restrooms
- Scent-free space or Scented products used
- All-Ages or Age-Restricted
- Space for chest feeding/pumping, diaper-changing
- Allergens: pets, plants, etc.
- Availability or un-availability of drug use harm reduction supplies (needle drop box, Naloxone kits, clean needle exchange, etc.)
- Assign Fire Watch volunteers in each room of your event to raise the alarm if a problem occurs and to help evacuate each room. This is especially important for spaces that don’t have a central fire alarm system with strobe lights to alert the entire building in case of fire. Fire Watch volunteers should ideally not be intoxicated or even using intoxicants at all, while serving in this role.
- Have medical providers (Street Medics, EMTs, Paramedics, Nurses, etc) at your event to provide first aid.
- Staff your event with people who are trained in crowd management. Free training is available online. Be aware that many people are unsafe in the presence of police or even official uniformed security guards. This may include people who are traumatized from police violence or who are demographically vulnerable to police violence: undocumented people, people with criminal records, people of color, sex workers, unhoused people, people who use street drugs, etc. The addition of “security” or police-type staff does not necessarily increase actual or perceived safety for everyone. Behavioral training and identifiable presentation/dress can and should be modified to meet the needs of your community.
ACTIONS TO TAKE - FOR THE PUBLIC
- Offer support to local venues if you are able to share skills and expertise in building safety. Clarify up front your credentials, your availability, any personal or professional boundaries, and compensation expectations (pro bono, trade/barter, or cash). Don’t be shy to expect fair compensation for your efforts. Your hard work and wisdom are worth it.
- Ask venues how you can help in other ways: organize and attend work parties; fundraise or get materials for improvements.
- Make a plan. When you first get to a place that you haven't been before, consider possible dangers such as fire, earthquake, flood, active shooter or violent aggressor, etc. Note where exits and fire extinguishers are and make quick emergency plans.
- Be aware of people with mobility limitations when you attend public events. This includes those with disabilities, children, elders, people who are intoxicated. It is standard emergency-protocol to keep oneself safe first when an emergency is actually taking place, but in non-emergencies we can all be more aware of each other’s needs when we are together.
- Speak up. We have begun to establish a culture where it is considered helpful and welcome to demand safer spaces that are free of behavioral threats, such as gender-based and sexual harassment, abuse, assault, misogyny, homophobia, transmisogyny, transphobia, racism, xenophobia, ableism, fatphobia, ageism, classism, and bigotry in all its forms. We must also include literal building and life safety in our demands to keep our spaces safer. It is integral to disability justice, as well as overall community safety. If you witness questionable conditions, investigate - you deserve to understand. If you know something is dangerous, call it out immediately and demand change so the venue can become a safer space for your whole community.
RESOURCES
ORGANIZING EFFORTS
- SAFERSPAC.ES - Post offers or requests for venue safety support, from a DIY perspective
- 1+ - An established nonprofit clearinghouse of architects, engineers, and other allied professionals who are interested in providing general pro-bono design services
DONATE TO OAKLAND FIRE VICTIM FAMILIES AND LOVED ONES
- Oakland Ghost Ship Fire Relief Fund by Gray Area Foundation for the Arts
- Oakland Athletic Teams Ghost Ship fire relief fundraiser
- Trans Assistance Project for loved ones of transgender women who perished in the fire
TIPS AND INFO
- DoDIY.org - PDF covering basics of running a DIY venue
- In Every Town: An All-Ages Music Manualfesto - manual on running all-ages spaces
- The Architect's Studio Companion: Rules of Thumb for Preliminary Design, 5th Edition - Edward Allen and Joseph Iano. Design manual that may be inaccessible to some (due to cost and extensiveness), but contains substantial basic information.
- A Guide To Fire Safety in Industrial Spaces - Gui Cavalcanti. Strategies that venues can implement immediately, for free or low cost.
- Facebook post with fire safety tips - Ian Baker, fire artist and warehouse resident. Links to installation tips and specific products.
- Event Safety Tips: Electronic Music Alliance
- Creating More Accessible Events - event accessibility checklist by writingresistance.org
- Radical Access Mapping Project (RAMP) - accessibility audits for venues/spaces
- Volunteer Lawyers & Accountants for the Arts (National Directory) - Consult a local chapter of VLAA for legal advice regarding landlord/tenant issues for live/work warehouse spaces, including unsanctioned ones. In many cases, renters do not realize that they do have rights despite lacking a formal residential lease. Laws vary by location; check with local tenants rights groups.
- What to do instead of calling the police
- Making Spaces Safer, by Shawna Potter for AK Press
- Causa Justa – tenant services in Oakland and San Francisco
- Come Hell and High Water: A Handbook on Collective Process Gone Awry.
REFLECTION AND ANALYSIS
- Kimya Dawson's beautiful explanation of how DIY spaces save lives
- The Paradox of Life-Affirming Death Traps by Brian Chippendaie of Fort Thunder, Providence, RI
- The Housing Crisis, Not Ravers, Is Responsible for the Oakland Fire: Analysis of systemic injustice leading to the tragedy in Oakland
- Mayor Schaaf’s Response To Oakland Fire Was A Total Disaster - A heartfelt response that stresses the importance of acknowledging victims’ whole communities in addition to blood family, and also communicates the value of independent venues.
- Oakland warehouse fire is product of housing crisis, say artists and advocates
- Preventing another Oakland warehouse tragedy means supporting artists, not punishing them.
CONTRIBUTORS -
Please note if you do NOT want to be credited or contacted.
If you are a licensed architect, contractor, electrician, or otherwise credentialed professional/expert and you are willing to share that information, please note with *asterisk
Phil Armstrong David Bernier Mike Bray Rob Bru Christina C. Patton Christofides Jonathan Darr Eveline Darroch Joshua Deutsch Fraser Evans Daniel Gatenio Daniel Gies Alex Gribov Neil Harris Corey Hennessey Melissa Iverson Robin Jaede Jennifer Jordan Samantha Katz Michaela Kennedy Leah Lakshmi Piepzna-Samarasinha Moose Lane | Jodie Layne Jay Linski Sarah Lockhart Katherine M. Jennifer Marca Kate Maxwell Helen McCarthy Donna Ozawa Addison Palmer Kevin Patricio S. Porter *Joseph Pred Kristen Ray Nathan Russell Nadine Saez Ben Sand Tiara Shafiq Samuel Siegel Christopher Slater Carolyn Reese T…? Doe Taryn Alfred Twu Elizabeth Vertina Dave X Dianne Yee |
BELOW THIS PAGE
A holding container for not-yet-organized expanded safer-space strategies, including but not limited to:
Accessibility
Language & Cultural Inclusion
Social / Psychological / Behavioral Safety
Substance Use Harm Reduction
HOLISTIC SAFER SPACE STRATEGIES
This document focuses on the building/facilities aspect of harm reduction and making Safer Spaces. But buildings and (literal) space are just one part of a broader “Safer Spaces” strategy that includes disability justice/accessibility, language and cultural inclusion, social/psychological/behavioral safety (free of abuse, harassment, violence, racism, sexism, etc.), substance use, etc.
ACCESSIBILITY & DISABILITY JUSTICE
LANGUAGE & CULTURAL INCLUSION
SOCIAL / PSYCHOLOGICAL / BEHAVIORAL SAFETY
INTOXICANT USE HARM REDUCTION
Injection Drug Use Harm Reduction Strategies
- Have safer drug use supplies on hand, including Naloxone kits in case of overdose. Supply new needles, alcohol swabs, tourniquets, clean water, sterile cookers or spoons, and sterile crack pipes and/or straws. Have needle drop boxes on site for disposal of used needles. Find a local harm reduction agency who has educators that can school you on how to reduce harm in injecting and supply these items or, at the very least, watch this video. Purchase Naloxone kits and receive instruction on how to use them in case of opioid overdose. http://berkeleyneed.org/
ACOUSTICS INFO
- There are no gold standards in acoustics. Do not feel pressured by musicians, sound experts, or audience members who claim the room doesn’t sound right. Every room is unique - embrace the sound of yours, keep treatment minimal, and only add treatment if you are certain it is flame resistant and safe. The music is what matters.
- People absorb and diffuse sound. The presence of people will make a room sound better than it does empty. Never exceed safe occupancy.
- Your loudspeaker system is the most important component of the sound of your room. Aim it at the audience to avoid exciting excess reverberation in the room. Use sound levels/volumes that don’t overload the room. Good systems can minimize or eliminate the usefulness of acoustic treatment.
- No amount of applied treatment will prevent sound from transferring from one space to another or to the outside. Sound transfer is caused by the construction of the walls, floor, and ceiling, and not what you attach to those surfaces. Never allow complaining neighbors to justify the application of treatment.
- If you add treatment, target its location to keep quantities low. Generally the back wall is an effective location for acoustic treatment because it catches the first reflection from loudspeakers.
- Never use non-acoustic foam such as egg crate or packing foam, or any foam of unknown origin. All foam that is not specifically designed for acoustic use should be considered flammable and dangerous, and should never be applied to surfaces even in small amounts. Flame resistant foams tend to “break” on the surface if you push your finger into them, and flammable foams are soft and pliable. Track used or donated materials back to their manufacturer to learn about their fire ratings. Never take a chance with any product you are unsure of.
- Generally speaking, fiberglass panels, melamine acoustic foam, mineral wool, and IFR fabrics are fire-safe, and just about everything else is not. IFR means “Inherently Flame Resistant”. Fabric labeled FR is “Flame Resistant” but may need to be chemically treated every few years to maintain its resistance.
- Flame resistant treatment chemicals can trigger sensitivity, allergy, or other symptoms in people, even as they ultimately keep the space safer from fire. Keep this in mind when considering options.
- Do not use materials that can melt above an audience. HDPE (milk jug plastic) is a good example of a material that is unsafe because it melts at a relatively low temperature.
- Never allow open flames, even if you’re sure acoustic treatment is flame resistant. Do not allow smoking, candles, pyrotechnics, fireworks, incense, or any open flame indoors. Even professionals have had disastrous results with these materials.
- Rigid Porous ARPRO® Acoustical (P.E.P.P.) Planks