Into HTML

Hello and welcome to my ’into html’ document where you’ll learn about the magic of coding, the difference between programming languages & more. Thanks for checking this out and please consider commissioning me by clicking here. Thank you very much.
Disclaimer. I made this document for everyone to find a place for reference when coding, especially carrd making! I hope this ends up being useful, and remember, everything is on google and free! This is a work in progress, so if you’d like me to add something quite specific, please dm me here.
Table of contents.
The languages.
Coding is so much fun when you know what you’re doing. You have probably heard the terms CSS, HTML or even JAVASCRIPT sometime in your life, but you have to consider that these three languages are very different from each other. Juan van Niekerk explains the characteristics of these three languages in a very easy way to comprehend.
CSS (Cascading Style Sheet) | HTML (HyperText Markup Language) | JAVASCRIPT |
|
|
|
As you can see, these three languages have their own purposes, but if you haven't figured out what or how they are seen on the code exactly, here's how:
CSS | HTML | JAVASCRIPT |
Everything between <style> and </style>. | Everything that shows after </style> as in <html> / <body> | Everything between <script> and </script> |
Once you understand how these work and what their purpose is, you can continue to the fun part which is coding itself.
Let’s talk about HTML.
- Structure & Tags
- About Colors
- About Links
- About Images
- About Text
Structure & Tags.
Now that you understand the pure base of what HTML Coding is, let's start with the structure. There are plenty of ways to make a code, you can either start with the HTML or the script, but i find it easier to start this way:
<head>
<script>
You write and add your JavaScript here.
</script>
<style>
You generate the CSS, how you want your site to be structured.
</style>
</head>
<html>
<body>
You present your website, where you want your elements to be.
</body>
</html>
The HTML code is filled with tags, which is everything in between brackets or <>. The first rule of HTML is that brackets always come in pairs. Once you open a tag (example: <body>) you have to close it by using its pair, in this case, (</body>).
Some basic tags you need to know, and the ones you will use the most:
- <p> used to start a paragraph, a sentence or a line break.
- <p align=”left”> used to align a text to the left. you can change “left” to “right” to align the text to the right.
- <h1> which stands for header 1.
- <strong> or <bold> to make a word bold.
- <em> or <i> to italicize text.
- <font size=”#”> text here </font> to change the size of your text.
- <font color=”#color”> to change the color of your text.
About colors.
Inside the tags and CSS of your code, you will be using a code to add colors, but how do you do this? There are multiple ways to insert a color in a code.
- HEX Values. An example could be #FFFFFF which is white or #000000 which is black. A site which I definitely recommend is this one, you can upload a picture and get the codes from it to align colors with your site.
- RGB Values. Values of the primary colors, for example rbg(253, 58, 151).
- Color Name. An example could be: blue, as simple as it sounds.
For the Color Names, each color has its own keyword. Some of them could include, red, blue, DarkBlue, maroon, etc. Please check this site out for more keywords of your desired colors.
Please consider using colors that make contrast, and not colors that resemble each other.
Do’s:
- Dark & Light colors.
Don’t’s:
- Light & Light colors.
- Dark & Dark colors.
About links.
Every website has links, whether it's a hyperlink or a link in general, these can be led to a site outside your page or inside. But how do you do this?
To open a link in a new tab.
Insert this text inside your HTML: <a href=”link” target=”_blank”> example text </a>
target=”_blank” means that the link will open in a new tab, specifically if your link is not a section in your site.
Example: <a href=”https://www.google.com” target=”_blank”> google </a>
To open a link in the same tab.
Insert this text inside your HTML: <a href=”link”> example text </a> meaning it will open inside your page.
Example: <a href=”https://www.google.com”> google </a>
Make sure the links (not sections of your site) are included as https://www.site.com rather than just site.com.
About images.
The most fun part of coding is adding images rather than just text. I will teach you the most common, and the easiest way of adding images.
To add an image, add this to your HTML: <img src=”link of image”>
The link of the image can be recovered by double clicking on an image and copying the ‘image address’, or, by uploading your image to imgur or discord. We will specify how to edit the style of this image in the section of CSS below.
An attribute you could also add to this code, is a name to your image. In case it stops appearing, the title will show.
Add this to your HTML: <img src=”link of image” alt=”name”>
About text.
To finish with the HTML section, let’s talk about texts. Every website has text in it, as in a sentence, paragraph, title, etc, your page cannot be a page without text. Let’s start with the basic tags.
As I mentioned above, <p> is used to start a paragraph or to have a line break...
Like this.
<br> is a break, used for a line break.
An example would be the space between the sentence above and this one.
You can also use different tags for different types of texts.
- <p> for a normal paragraph.
- <h1> for a heading.
- <title> for the name of your page (tab title).
- <u> for a text underlined.
- <s> for a text with strikethrough.
And for every tag, you need to close the brackets. For example,
<p> text here </p>
<u> text here </u>
And so forth.
Let’s talk about CSS.
- About & Structure
- Divs & Classes
- Styling Elements
- Tips for CSS
About & Structure.
CSS, short for Cascading Style Sheets, is most definitely my favorite part of coding. It is used to style the layout of your website — for example, to change the font, color, the size of a text, or any other decorative features. There are many different ways to display this language, depending on which hosting site you’re making your site.
Let’s start by displaying the CSS on sites like neocities.
Getting Started
There are many different ways to add CSS to your HTML document, for now, we’ll learn the easiest and quickest way of doing so — linking CSS from the head of your document.
If you’re able to make a separate stylesheet here is a step by step guide!
- Create a file inside the folder where you have your HTML document and save it as style.css. The .css extension shows that this is a CSS file.
To link a style.css to your index.html document (which would be your “main” document), a line like the following will go somewhere in the <head> of your HTML:
<link rel="stylesheet" href="styles.css">
Here, the <link>, rel, and href attributes are put together to form a link, to show your browser that there is a stylesheet, as well as its location.
- To start.
Let's say for example, you want your page to have a certain background color. On your style.css sheet you’d write something like this:
body {
background: #ff0000;
}
And, after linking the style sheet to your index (html), you’d want to include this tag to make sure the background is set.
<body>
</body>
In my opinion, this is the easiest way to edit your site’s style. Nonetheless, not every hosting site has this feature. An example would be carrd, therefore, another way to display the CSS would be by making a whole code together.
Although this method will make your code longer, it works.
Getting Started
Start the code by using this structure:
<head>
<style>
</style>
</head>
<body>
</body>
Inside the style tags, you will display every div or class attribute to design each element displayed on the HTML or “body” part of your site.
Let’s say, you want to make a red, Times New Roman text in an embed (where the code goes in carrd), you’d write something like this:
<style>
#text01 {
font-family: Times New Roman;
font-size: 10px;
color: #ff0000;
}
</style>
<body>
<div id=”text01”> text </div> (displays your text in the code)
And so, you’d want to keep adding styles to different tags inside the style tag. Depending on how you want your element to look like, you’ll keep adding attributes to fit your liking. I’d also recommend adding them in order of how you manage your html, this way, you will edit each part according to your HTML.
Divs & Classes.
“The id attribute is a unique identifier which is used to specify the document. It is used by CSS and JavaScript to perform a certain task for a unique element. In CSS, the id attribute is written using # symbol followed by id.
The class attribute is used to specify one or more class names for an HTML element. The class attribute can be used on any HTML element. The class name can be used by CSS and JavaScript to perform certain tasks for elements with the specified class name. The class name in the CSS stylesheet uses “.” symbol.
The only difference between them is that “id” is unique in a page and can only apply to at most one element, while “class” selector can apply to multiple elements.” (GeeksForGeeks, 2019).
Examples of IDs and Classes:
.image {
width: 100px;
height: 20px;
}
CLASS !
#image {
width: 100px;
height: 20px;
}
ID !
Styling Elements.
Understanding the structure, classes & ids and how a Cascading Style Sheet is constructed is the base for designing your page. But of course, the base of everything would really be the image of how you want to present your site. Every element is styleable, and can be changed with a tag or attribute, it ends up being your choice how to style it.
For texts, you can add animations, hover effects, different fonts, etc. For images the same plus different borders, etc. And the list goes on and on.
Animations.
- CSS allows texts to have animations without using JS or Flash. “When you specify CSS styles inside the @keyframes rule, the animation will gradually change from the current style to the new style at certain times. To get an animation to work, you must bind the animation to an element.” (W3SCHOOLS).
Example:
div {
width: 100px;
height: 100px;
background-color: red;
animation-name: example;
animation-duration: 4s;
}
@keyframes example {
from {background-color: red;}
to {background-color: yellow;}
}
The keyframes specify what the animation should do (in this case it changes colors every 4 seconds). Click here to view the code.
Fonts.
- To give your texts more you-ness CSS allows you to import your own fonts! Be it from google fonts (default ones) or discover your own from freelance publishers, the only rule you must follow is @font-face. This rule specifies the custom font on your embedded text.
Example:
@font-face {
font-family: chocolate;
src: url(https://dl.dropbox.com/s/dxf67xld9fmv92u/Chocolate.ttf);
}
#chocolate {
font-family: chocolate;
}
The font family specifies a name that will be used as the font face value for font properties. The src: url() specifies where the font is taken from, preferably in an .ttf or .otf format. These fonts work on every device they’re presented on. A more detailed tutorial on @font-face for carrd is found here!
On Hover / Mouseover effect.
- Definitely my favorite effect made with CSS, this refers to the action an element does when you interact with it. It is generally triggered by the action of hovering it or passing the mouse or cursor over it. On the CSS it is defined by adding :hover to the tag of the element you wish to have this effect, for example, lets say i want my image to blur when i hover it.
We’ll start by making a class for this image, and opening brackets like this:
.image {
Then specify the style of the original image, (this can totally change depending on your likes.
.image {
width: 200px;
height: 200px;
object-fit: cover;
}
Now that you styled your image, add an on hover effect, after your first class, your CSS will look like this:
.image {
width: 200px;
height: 200px;
object-fit: cover;
}
.image:hover {
webkit-filter: blur(1px); /* Chrome, Safari, Opera */
filter: blur(1px);
}
This means that when you hover on the image, it will blur. Click here to see how the code would work.
Styling images (the basic stuff).
- Rounded edges: add this code: border-radius: (#)px;
- Borders: add this code: border: (#)px solid #HTMLCOLOR;
- Filters:
Add any of the codes above after filter: (code) ;
- blur(Xpx)
- brightness(X%)
- contrast(X%)
- grayscale(X%)
- hue-rotate(Xdeg)
- invert(X%)
- opacity(X%)
- saturate(X)
- sepia(X%)
- contrast(X%)
(Note: any X or # can be changed into a number).
Positioning.
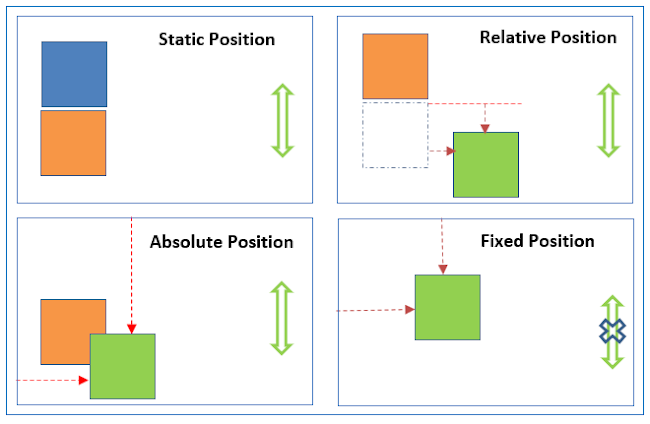
- In CSS there are many ways to position an element. For example, position relative means that an element will have a different position but relative to the original one, whilst position absolute will move around the page without being relative to any other object. The image explains visually the difference between positions.
- An example of how to code a position in an element would be something like this:
#element {
position: relative; (this can vary)
bottom: #px;
left: #px;
Z-index: #; (this means the stack order of an element!)
}
Backgrounds.
- A background in CSS can be literally anything, a color, an image, a gif, etc. As long as you use the attribute background: ; you can plug any code you’d like inside your site.
For instance, let’s say you want your site background to be an image, you’d have to write a code like this:
Background: url(‘image link here’);
And your background could be the image of your choice. That same code also works for colors, and it doesn’t have to be only for the background of your site but a container’s background or even a scrollbox!
Scrolling elements.
- To make an element (for example a container) scroll you have to add overflow: scroll; to your code. There are several types of overflow attributes, like for example, horizontal scroll you’d have to make it overflow-x and for vertical scroll overflow-y, this tag means that when elements reach the height/width capacity of its container, it won't go outside, but scroll for you to keep them inside the box.
If you want to hide the overflow, on the other hand, you’d have to replace the scroll for hidden.
Tips for CSS.
There are of course many, hundreds of attributes that can be used for styling your page, nonetheless these are the ones I use the most, and the ones I found more helpful. Honestly, having a structure well based on your code can save your life, knowing what tags need to be closed and where to add others. CSS is most definitely the most entertaining part of coding.
Remember to make your site accessible with colors that contrast each other, so it can be easier to read or visualize. Margins and paddings can save your life as well, since it helps your code look neat. Keep your codes clean!
Resources.
To end with this small document guide into html I will link my favorite resources such as tutorials and websites for you to learn way more!
Favorites.
- W3SCHOOLS
- 30 SECONDS OF CODE
- HTML.COM
- Learn HTML5 and CSS3 From Scratch - Full Course
- Learn web development as an absolute beginner
Codes & more.
References
Niekerk, J. (2017). How do HTML, CSS and JavaScript work together. Retrieved from: https://www.itonlinelearning.com/blog/how-do-html-css-and-javascript-work-together/
MDN. Web Docs. (2021). Tutoriales Para principiantes completos de la web. Retrieved from: https://developer.mozilla.org/es/docs/Web/Tutorials
GeeksForGeeks, (2019). Difference between an id and class in HTML? Retrieved from: https://www.geeksforgeeks.org/difference-between-an-id-and-class-in-html/