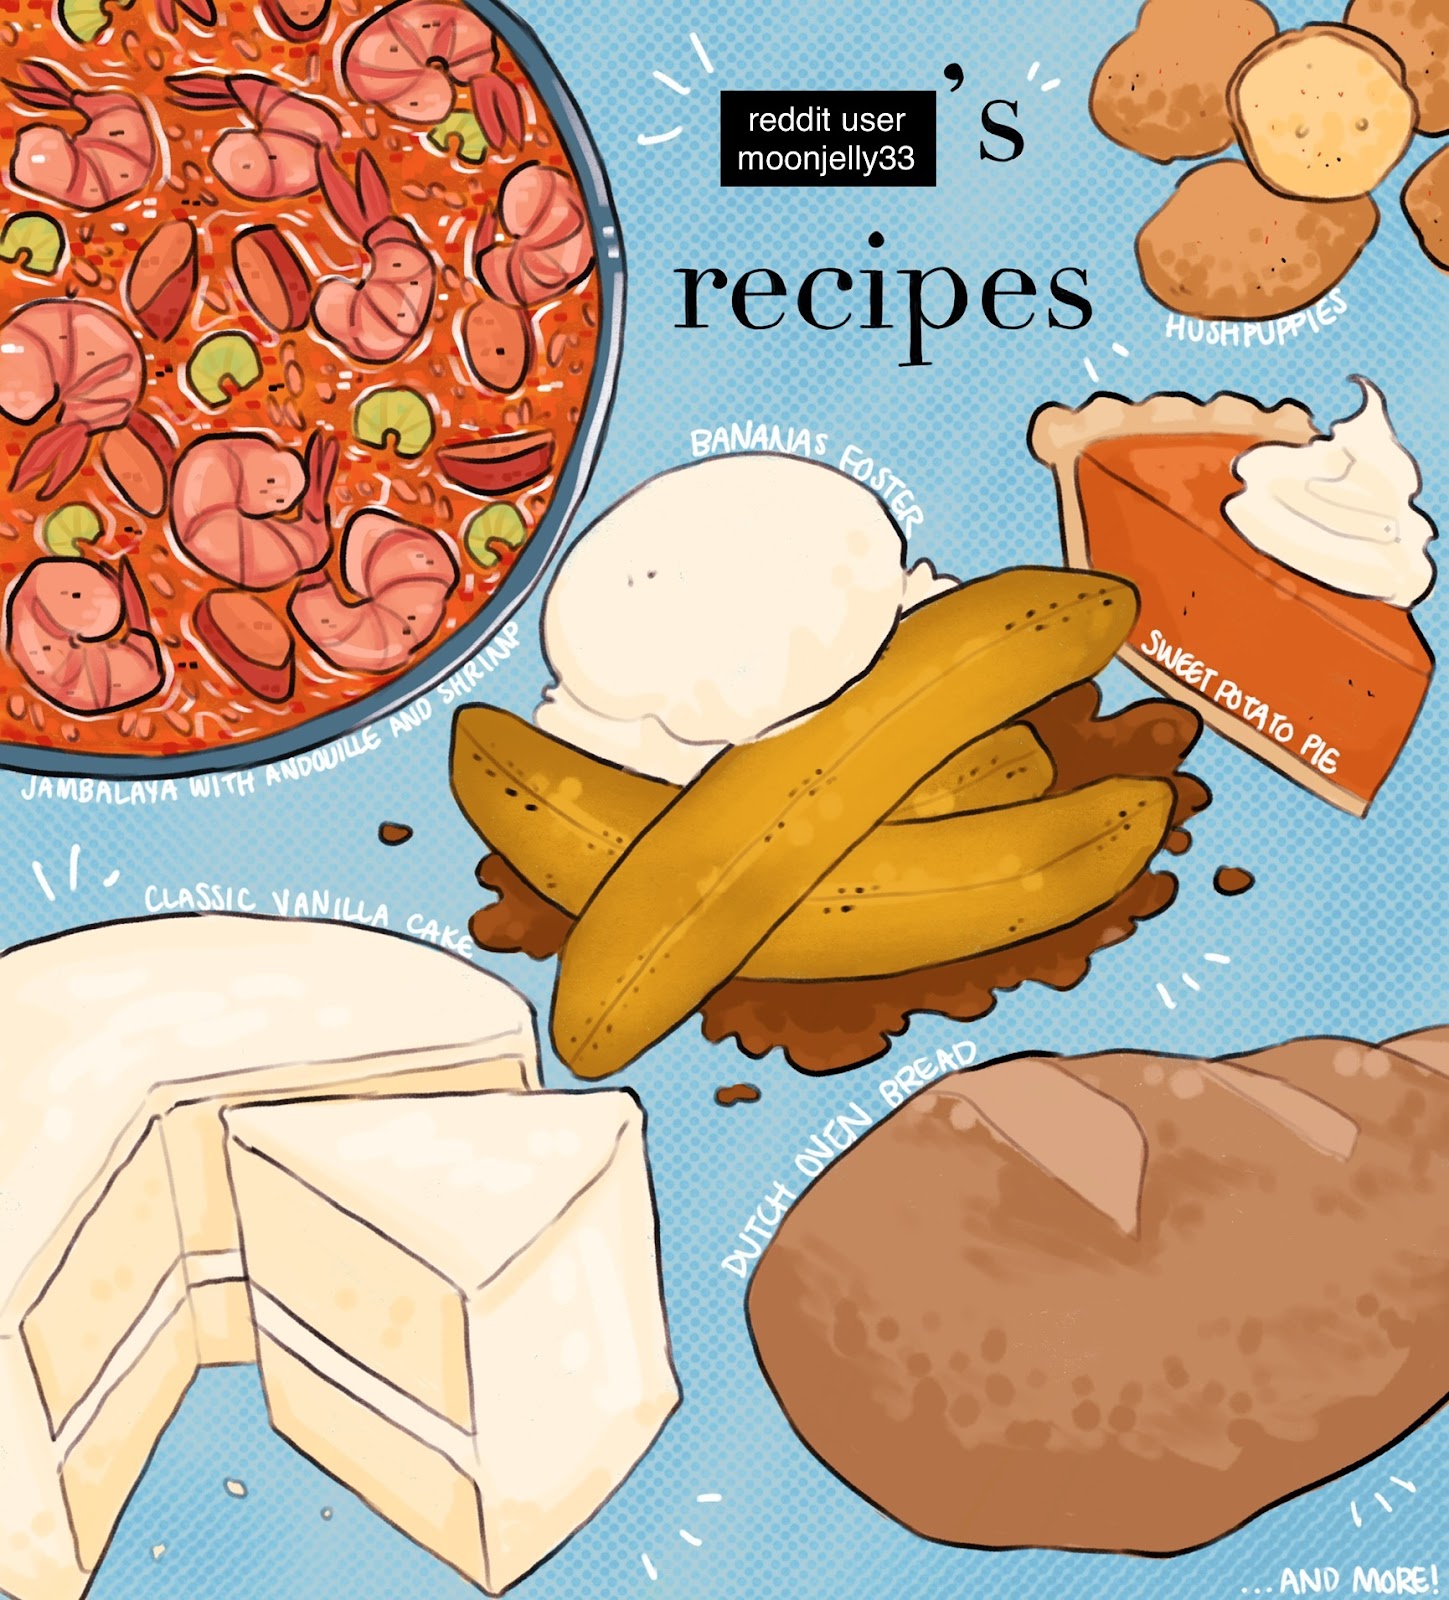
moonjelly’s recipes 2023
DISCLAIMER: I am an amateur home baker. I love to research, adapt, and develop recipes, and I made this cookbook to share with family and friends. I hope these recipes work for you, but as always, there can be differences in kitchens, environments, temperatures, etc., so what works for me (or what I developed for my preferences) might not be to your taste. The joy of baking, for me, is in the journey of testing things out, learning what works and what doesn’t and why, building on foundational knowledge, and adapting recipes to suit my taste and style (which is simple and flexible). No recipe is sacred or set in stone; the point of food is the person eating it.
Table of Contents
GOOEY CHEWY CHOCOLATE CHIP COOKIES 9
DUTCH OVEN BREAD (GARLIC HERB BUTTER SWIRL) 22
DARK CHOCOLATE BRAIDED BUNS 31
GÂTEAU AU YAOURT (1-2-3 CAKE) 38
TOASTED COCONUT LIME TART (EGG OR NO EGG) 49
CREAMY FRENCH YOGURT (INSTANT POT) 61
JAMBALAYA WITH ANDOUILLE AND SHRIMP 71
HUSHPUPPIES WITH HONEY BUTTER 79
The first steps to every recipe:
|
COMMON CONVERSIONS
1 cup all-purpose flour, spooned & leveled | 120g all-purpose flour |
1 cup white sugar | 200g white sugar |
1 cup brown sugar, packed | 200-220g brown sugar |
1 cup powdered sugar | 120g powdered sugar |
½ cup (1 stick) butter | 113g butter |
½ cup neutral (veg or canola) oil | 100g neutral (veg or canola) oil |
1 cup full-fat dairy (whole milk, sour cream, greek yogurt, butter, cream cheese, etc.) | 227g full-fat dairy (whole milk, sour cream, greek yogurt, butter, cream cheese, etc.) |
1 cup water | 240g water |
1 large egg | 50g egg (60% white, 30% yolk = 33g white, 17g yolk) |
1 tsp baking powder | 4g baking powder |
1 tsp baking soda | 6g baking soda |
1 cup chopped chocolate | 170g or 8 oz chopped chocolate |
Most conversions from King Arthur master list
1 Tablespoon | 3 teaspoons |
4 Tablespoons | ¼ cup |
To chemically leaven 1 cup flour: 1 tsp baking powder or ¼ tsp baking soda Baking powder has baking soda in it, and reacts with or without acid. | Baking powder:baking soda = 3:1. As a rule of thumb, baking soda is 3x more potent than baking powder. So, if a recipe calls for ½ tsp baking soda and you don’t have any, use 1 ½ tsp baking powder. Vice versa, use ⅓ the amount of baking powder and add 1 tsp of acid (vinegar or lemon juice) per every ½ tsp of baking soda. |
To make buttermilk: 1 Tbsp white vinegar or lemon juice in a measuring cup. Fill with milk to 1 cup line. Stir and let sit 10 minutes to thicken and curdle.
COOKIES AND BARS
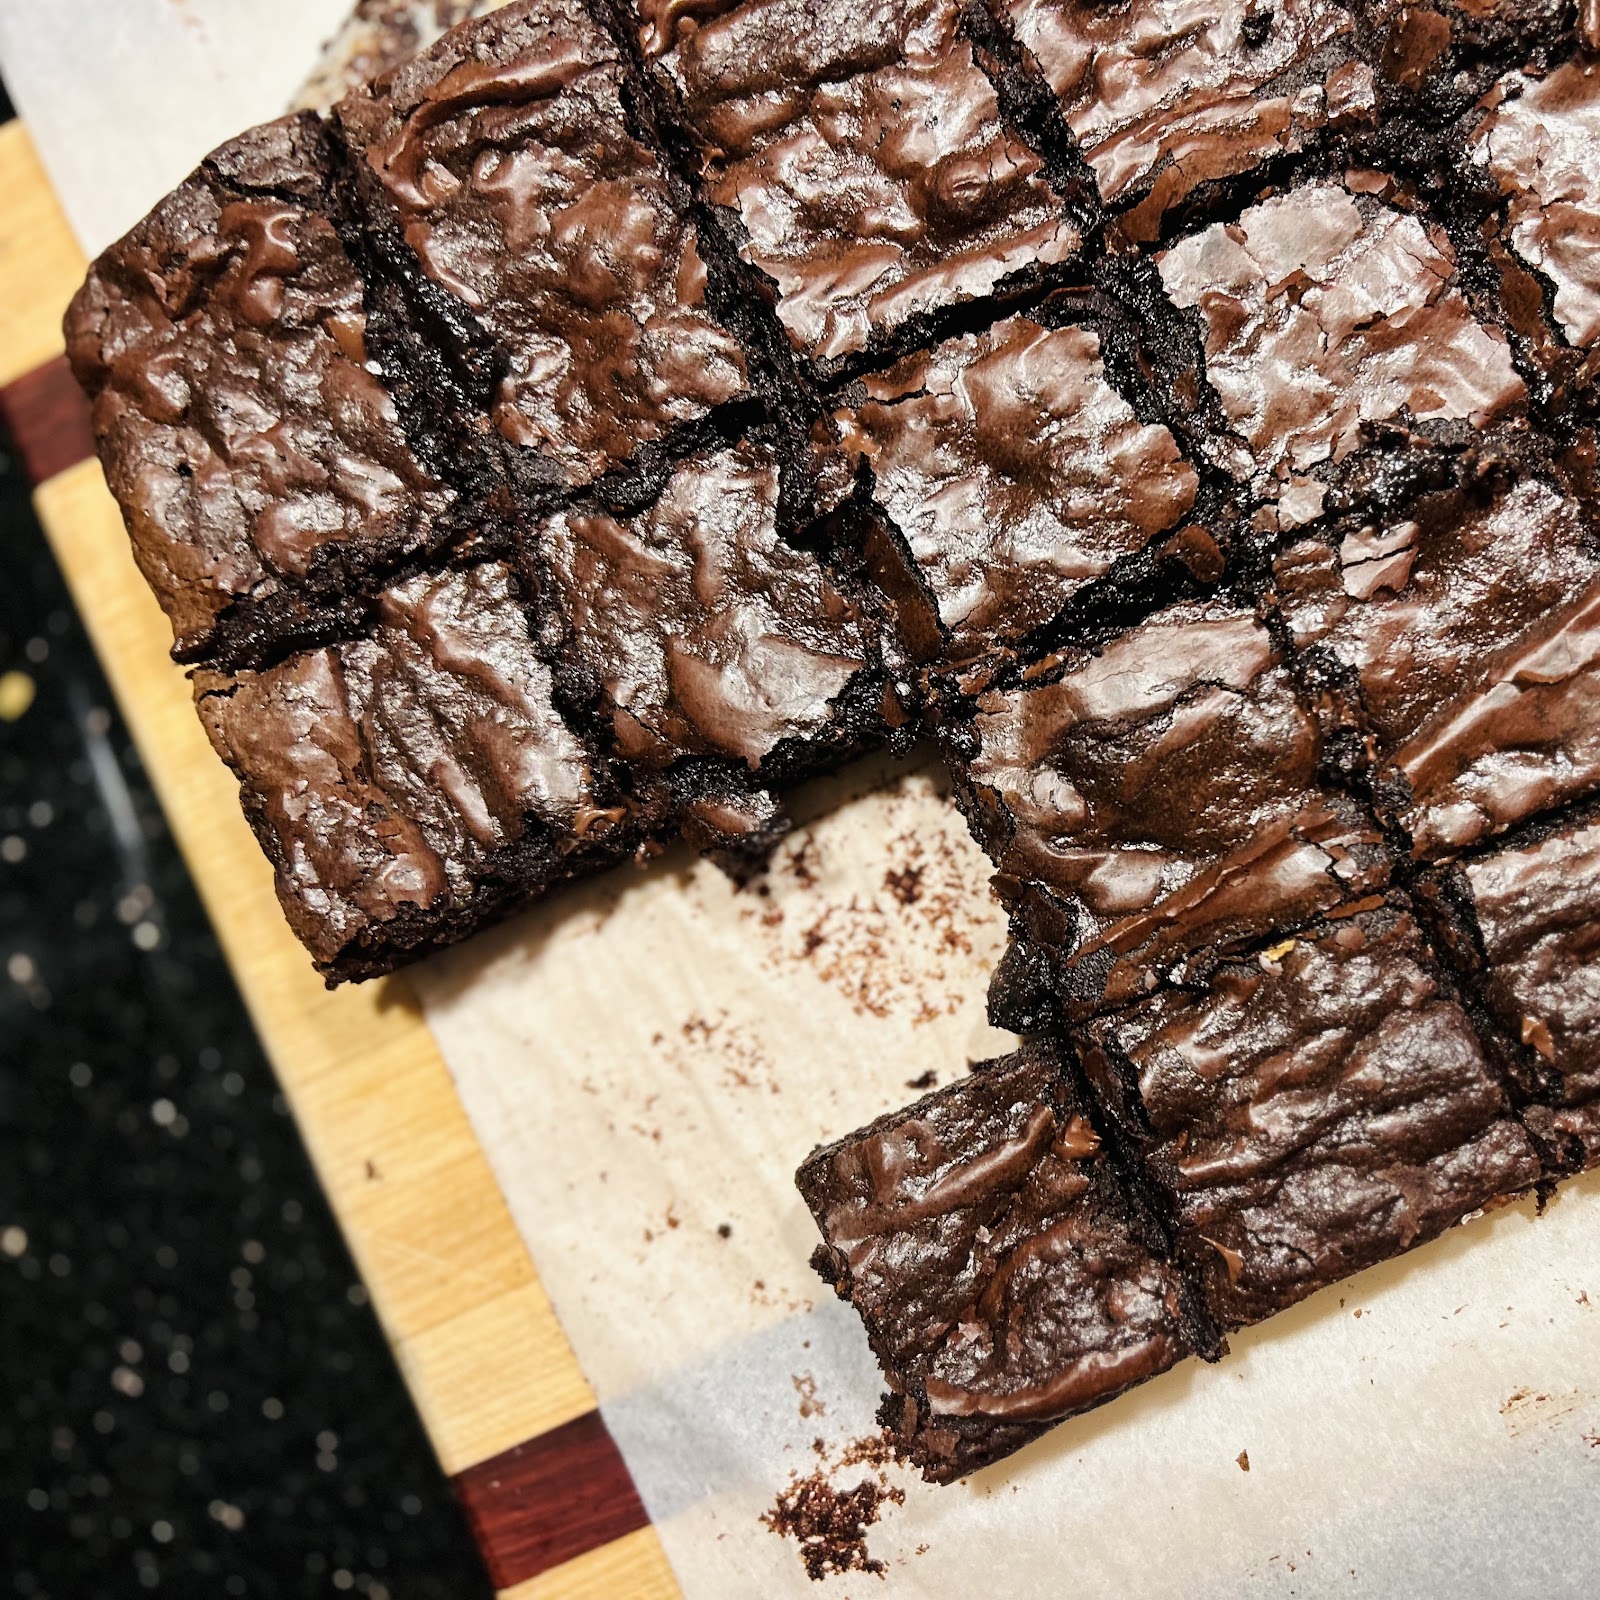
GOOEY FUDGY BROWNIES
MAKES: 1 x 9x13” pan, or 1 x 8x8” pan (extra thick)
This recipe came about after I read through most-loved/top-rated recipes for gooey, fudgy brownies, noting common ingredient ratios and techniques. It is adapted from Stella Parks’ Glossy Fudge Brownies, Broma Bakery’s Brown Butter Brownies, Tasty’s Best Fudgy Brownies, Nick Malgieri’s Supernatural Brownies, and Sally McKenney’s Seriously Fudgy Brownies.
INGREDIENTS
1 cup (227g) butter, to be browned
1 cup (90g) Dutch-process cocoa powder
4 oz (113g) dark or semisweet (60% cacao) chocolate, finely chopped
1 tsp instant espresso (or 1 Tbsp instant coffee)
1 ½ cups (300g) white sugar
½ cup (100g) brown sugar
1 Tbsp vanilla
4 eggs
1 cup (120g) AP flour
1 tsp kosher salt
optional: 1 cup additional chopped chocolate or chocolate chips, or 1-2 cups chopped walnuts, dried cherries, etc.
DIRECTIONS
- Preheat oven to 350°. Grease a 9x13” pan (light-color metal), or line with foil or parchment paper with overhangs for easy removal.
- Put cocoa powder, chopped chocolate, and espresso powder in a heat-proof bowl.
- Make brown butter: Melt butter in a light-color saucepan over medium-low heat. Once foaming and spitting, stir and scrape bottom with a spatula every 10-15 seconds. Grainy white milk solids will begin to appear on the bottom. Continue for 5-10 minutes (go by senses, not time). When foam clears and spitting noises go silent, watch closely: The milk solids will toast in seconds. As soon as the solids turn brown and smell nutty, remove pan from heat so it doesn’t burn.
- Immediately pour hot brown butter into prepared bowl, to bloom cocoa and melt chocolate. Stir until smooth. Set aside to cool.
- Foam eggs: With a stand or hand mixer, whip sugars, vanilla, and eggs on medium-high until thick, smooth, fluffy, and lightened in color. For very moist, rich brownies, stop after 4-5 minutes. For slightly more height and fluff, whip 8-10 minutes until very thick and pale. (I recommend starting at the lower end of the spectrum.)
- Reduce speed to low. Slowly pour chocolate-butter mixture into egg foam mixture until incorporated.
- Using a spatula, fold in flour and salt until just incorporated. Fold in additional chocolate if using. Batter will be very thick.
- Scoop and spread batter evenly into prepared pan.
- Bake 25 minutes until surface is glossy and just set (not jiggly in center). Do not overbake. They will finish cooking as they cool.
- Let cool at least 30 minutes before removing from pan to slice.
NOTES
- White sugar + foaming eggs = fudgy centers with classic glossy, crackly tops. The thicker your egg foam, the glossier/cracklier your top crust.
- Brown butter deepens flavor and evaporates excess water in the butter. If you don’t want to brown the butter, melt it in a saucepan with the chopped chocolate, stirring until smooth. Pour over cocoa powder and espresso powder. Stir until smooth.
- For extra thick brownies, use an 8x8” pan. Bake time might be a bit longer.
MORE NOTES
Texture
- The key to getting glossy, crackly tops = white sugar + foaming eggs. Beating for multiple minutes (vs. just whisking together, or only beating until incorporated) dissolves the sugar and aerates the eggs, just like meringue (which also has a glossy surface, so that tracks). A couple recipes did it Swiss meringue-style, whisking the sugar and eggs over a double boiler to dissolve sugar and warm the eggs (adding structure). When properly dissolved, some of the sugar-egg mix rises to the surface as the brownies cook, creating that classic ultra-shiny, crackly top.
- Most “Classic Brownies” recipes achieve a glossy top by melting together the butter and sugar, dissolving the sugar that way. But from what I observed, those tops come out less shiny and crackly—and not “hair-thin” like I was looking for. It seems using the meringue method is the best way to achieve the perfect top.
- Some recipes used baking soda to leaven, but I wanted to ensure density by relying on eggs for lift.
Cocoa
- Dutch-process cocoa is a must for the dark-as-night center. Blooming the cocoa is also a must for the most intense flavor.
- Cocoa vs. chocolate: Most recipes used a mix of both cocoa and melted chocolate; sometimes equal, sometimes not. Cocoa = moister, fudgier brownies; cocoa powder contains no cocoa butter (solidifies when cool) and adds no moisture to the batter (so you don’t need to add more flour to compensate). Chocolate adds complexity of flavor, but might contain added sugar, emulsifiers, etc. that are not ideal. I used both (volume ratio 1 cup cocoa powder:0.5 cup/4oz chocolate), but only because I had high-quality semisweet bar chocolate. If I didn’t have high-quality chocolate, I’d stick to Dutch-process cocoa powder (replacing 1/2 cup chocolate with more cocoa) and fold in chocolate chips at the end. (Bon Appetit has a great article about this.)
- Some recipes sifted the flour + cocoa powder together as dry ingredients. I knew I wanted to bloom the cocoa powder, so that was a no-go.
Ratios
- Most recipes had about the same basic volume ratios (when scaled): 1 cup fat (usually melted butter), 1-2 cups chocolate (cocoa, chocolate, or mix of both) (not counting additional folded-in chocolate), 2 cups sugar, 2-4 eggs, 1 cup flour. Some recipes did 2 eggs + 2 yolks for extra chewiness. Bravetart does 6 eggs, whipped for 10 minutes; some reviews complained about fluffy, cakey texture that didn’t turn fudgy until the next day. So, I split the difference and used 4 eggs.
- Some recipes (such as Claire Saffitz) use half melted butter, half oil to ensure moistness (butter solidifies as it cools; oil stays liquid). I stuck to butter—with such a high ratio of wet ingredients like sugar and eggs, and so little flour, I wasn’t too worried about needing oil.

GOOEY CHEWY CHOCOLATE CHIP COOKIES
MAKES: 20-24 cookies depending on how big you want them
Updated recipe. My ideal chocolate chip cookie: Crispy edges, gooey (but not raw) center, slightly thicker than the typical chewy cookie which spreads very flat (but not Levain thick).
INGREDIENTS
2 ¼ cups (270g) AP flour
1 tsp baking soda
1 tsp kosher salt
½ cup (113g) butter, cold, sliced
¾ cup (150g) brown sugar
¼ cup (50g) white sugar
1 egg + 1 egg yolk
1 tsp vanilla
1-2 cups (170-340g) chocolate chips or chopped chocolate
DIRECTIONS
- Preheat oven to 400°. Line 2 baking sheets with parchment paper.
- Whisk together flour, baking soda, salt. Set aside.
- With a stand or hand mixer (or whisking vigorously by hand) beat cold butter until smooth and creamy, 2 minutes. (By hand, smear butter against sides of bowl with a wooden spoon before whisking so it doesn’t lump up in the whisk.) Add sugars. Cream together until paler and fluffy, 3-4 minutes. Beat in egg, egg yolk, and vanilla until fully incorporated.
- Add dry ingredients all at once and mix until just barely combined in a soft dough. Fold in chocolate chips. Do not overmix: It can result in flat or tough cookies.
- Let the dough rest (at room temp or in fridge) 5 minutes so flour absorbs moisture.
- Use an ice cream scoop (or big spoonfuls) to scoop dough balls the size of ping pong balls. Do not roll the balls smooth; leave them craggy. When placing on baking sheet (at least 3” apart), roughly shape them into “towers” taller than they are wide.
- Bake 1 tray at a time for 8-11 minutes until the edges are crisping, wrinkled, and golden brown, light honey-color. The centers should be just barely set: uniformly light golden brown, with no patches of pale dough-color or shiny liquid areas. Do not overbake. They will finish cooking as they cool.
- Let cool on tray at least 10 minutes to fully set.
NOTES
- Chilling: Ideally, you would chill the cookie dough in the fridge for at least 1 hour before scooping and baking. Realistically, when I want chocolate chip cookies, it is a sudden craving and I don’t want to wait that long. (Sometimes I preheat the oven after scooping a tray of cookies, and put the tray and bowl in the fridge for 10 minutes while it preheats.)
- Butter: Most “chewy chocolate chip cookies” recipes use melted butter and then chill the cookie dough before baking. I wanted to compensate for the fact that I will rarely chill the cookie dough because of who I am as a person. Cold butter creamed with sugar = thicker cookies (melting butter evaporates excess water, resulting in a flatter spread), and also you don’t have to chill them because the dough is already cool, not greasy.
- Shaping the dough balls into towers prevents cookies from spreading too flat, even without chilling.
- 5 minute rest: Resting dough 5 minutes after mixing dry and wet ingredients = flour absorbs moisture and becomes firmer, again preventing oven spread. (This also happens during chilling.) I do the same thing with the enriched dough I use for monkey bread, cinnamon rolls, etc. (With that dough, the difference is more stark—in 5 minutes, it goes from sticky gloop to smooth, kneadable dough.)
- Oven temp/bake time: A high temp (400°) gets you crispy edges and cooked centers without too flat of a spread. The longer the cookies are in the hot oven, the more they spread; high temp and shorter bake time > lower temp and longer bake time. (If your oven runs hot, try 375° first). Check the cookies at 8 minutes and bake 2-3 minutes longer as needed. Mine generally take 9-10 minutes.
- Chocolate chips: I go for 1 cup (170g) chocolate chips, then press more into the tops of the cookies when they come out of the oven.
- Mostly brown sugar + extra egg yolk = extra moist, gooey, chewy. Feel free to play around with the brown:white sugar ratio to suit your preferences. There’s 1 cup (200g) total sugar in the recipe.
- Baking soda = chewy and browned, with crispy edges. Baking powder = soft, cakey.
MILLIONAIRE’S SHORTBREAD
MAKES: 12-16 bars (1 x 8x8” pan)
INGREDIENTS
SHORTBREAD
2 cups (240g) AP flour
1 cup (227g) butter, room temp
¾ cup (90g) powdered sugar, or ½ cup (100g) granulated sugar
1 tsp vanilla
1 tsp kosher salt
CARAMEL
1 x 14 oz can (397g) sweetened condensed milk
½ cup (113g) butter
¼ cup (50g) white or brown sugar
1 tsp kosher salt
1 Tbsp vanilla
CHOCOLATE
1 cup (8 oz/170g) chopped chocolate (any kind you want; I prefer dark or semisweet)
DIRECTIONS
- Preheat oven to 350°. Line 8x8” pan with parchment paper overhangs.
- Make shortbread: Cream butter, sugar, vanilla, and salt together until smooth and fluffy, 3-4 minutes. Add flour and mix until combined. Press dough into the pan in an even layer. Bake 30-35 minutes until edges are golden brown. Let cool completely (20-30 minutes).
- Make caramel: Add all ingredients except vanilla to a saucepan. Slowly bring to a boil over medium-low heat, whisking constantly. Cook, still whisking, until color deepens, texture thickens (if you run a spoon down the middle it should leave an empty trail on the bottom of the pan), and caramel reaches 225°, 6-10 minutes. Remove from heat and whisk in vanilla. Pour caramel over cooled shortbread crust. Let cool completely (30 minutes). (Most of the cooling should happen at room temp, but you can finish it off in the fridge.)
- Temper chocolate (optional): Put ⅔ of chopped chocolate in a microwave-safe bowl. Microwave in 10-second bursts, stirring vigorously in between, until chocolate is just melted (about 1 minute total). Add remaining ⅓ of chocolate (seed chocolate) 1 spoonful at a time, stirring vigorously in between, fully melting each spoonful before adding more. Once all chocolate is melted in, continue stirring vigorously until chocolate has cooled to between room and body temperature (put a dot of the chocolate on your upper lip. If it feels cool, it’s ready). Then, microwave in 1 more 10-second burst, stirring vigorously after. Use immediately.
- If you don’t want to bother with tempering, simply melt the chocolate.
- Spread chocolate over the cooled caramel layer. Cool in fridge until chocolate is set.
- Remove from pan and slice into bars.
NOTES
- Chocolate: Tempering the chocolate is only necessary if you want a nice glossy snap to your chocolate layer. If you don’t mind the lack of snap, just melt it. The way tempering works is: You heat the chocolate slowly and evenly until just melted, then cool it rapidly, then make it slightly warmer. Stir vigorously throughout to purposefully agitate the chocolate crystals; you are essentially un- and re-crystallizing the chocolate.
- Some recipes call for a ganache. I prefer a thin, snappy dark chocolate layer—just enough to add texture and cut the caramel’s sweetness.
- Caramel: Most US recipes do 1 can condensed milk + 1 cup sugar and sometimes corn syrup. I find this far too sweet. Most Scottish/British recipes do 1 can condensed milk + ¼ cup Lyle’s golden syrup, which I’m sure is closer to the taste I remember from when my best friend’s English mother made these for me growing up. However, I can never find golden syrup in US grocery stores and I would rather find workarounds than have to order special ingredients. So, if I’m using condensed milk, I just do ¼ cup sugar.
- For a more classic caramel, replace sweetened condensed milk with 1 cup (227g) heavy cream, and replace ¼ cup sugar with 1 cup (200g) brown sugar. (Taste-wise I prefer this! But heavy cream is more expensive than sweetened condensed milk….)
- Make sure the caramel is completely cool and set before spreading the chocolate on top. Otherwise they’ll mix together and mess up your layers.
- Powdered sugar makes the shortbread extra crisp and velvety. Granulated is also great.

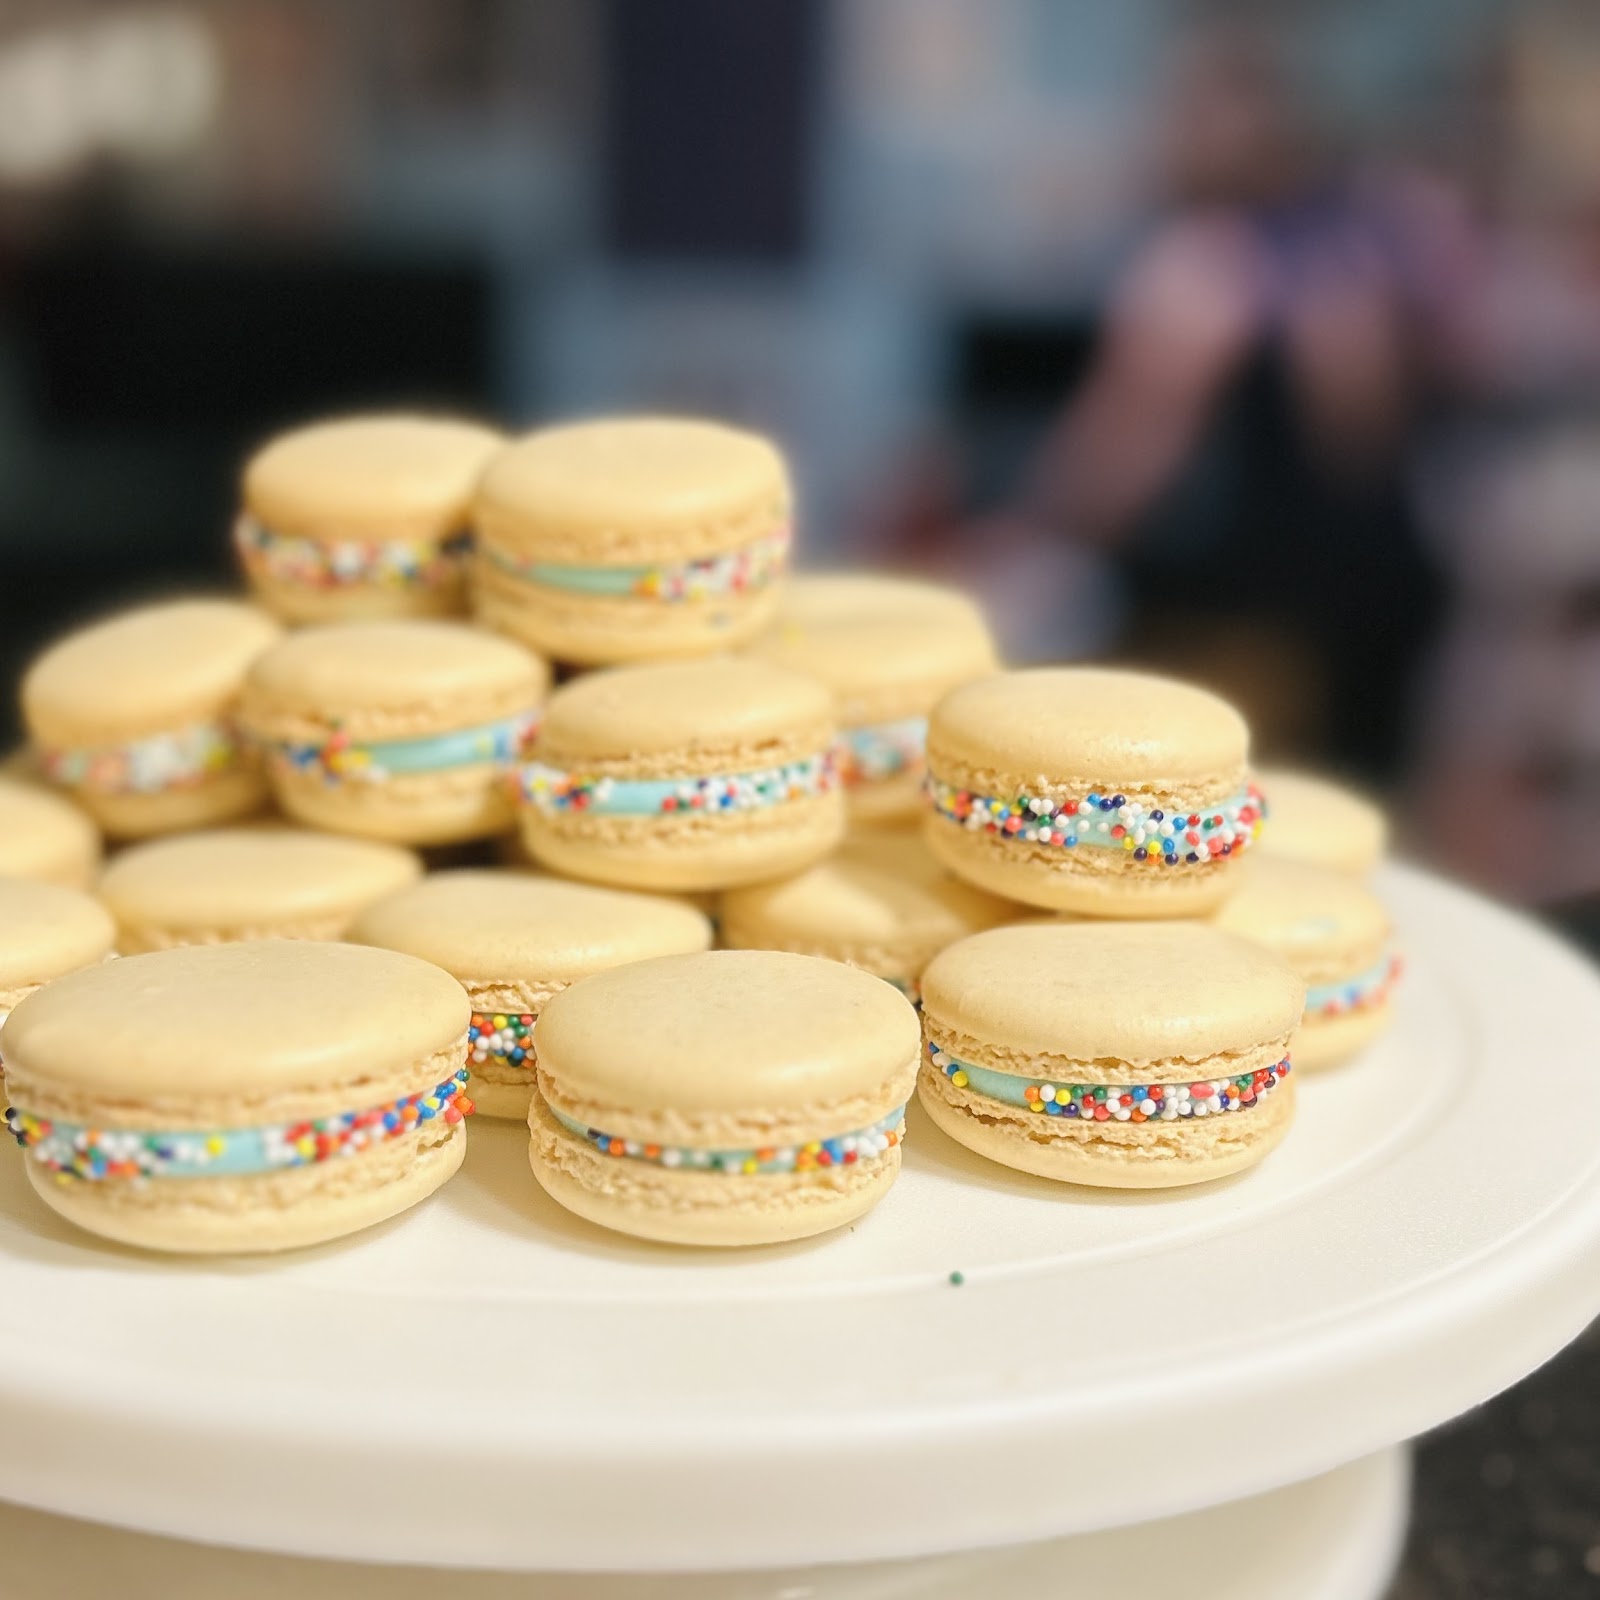
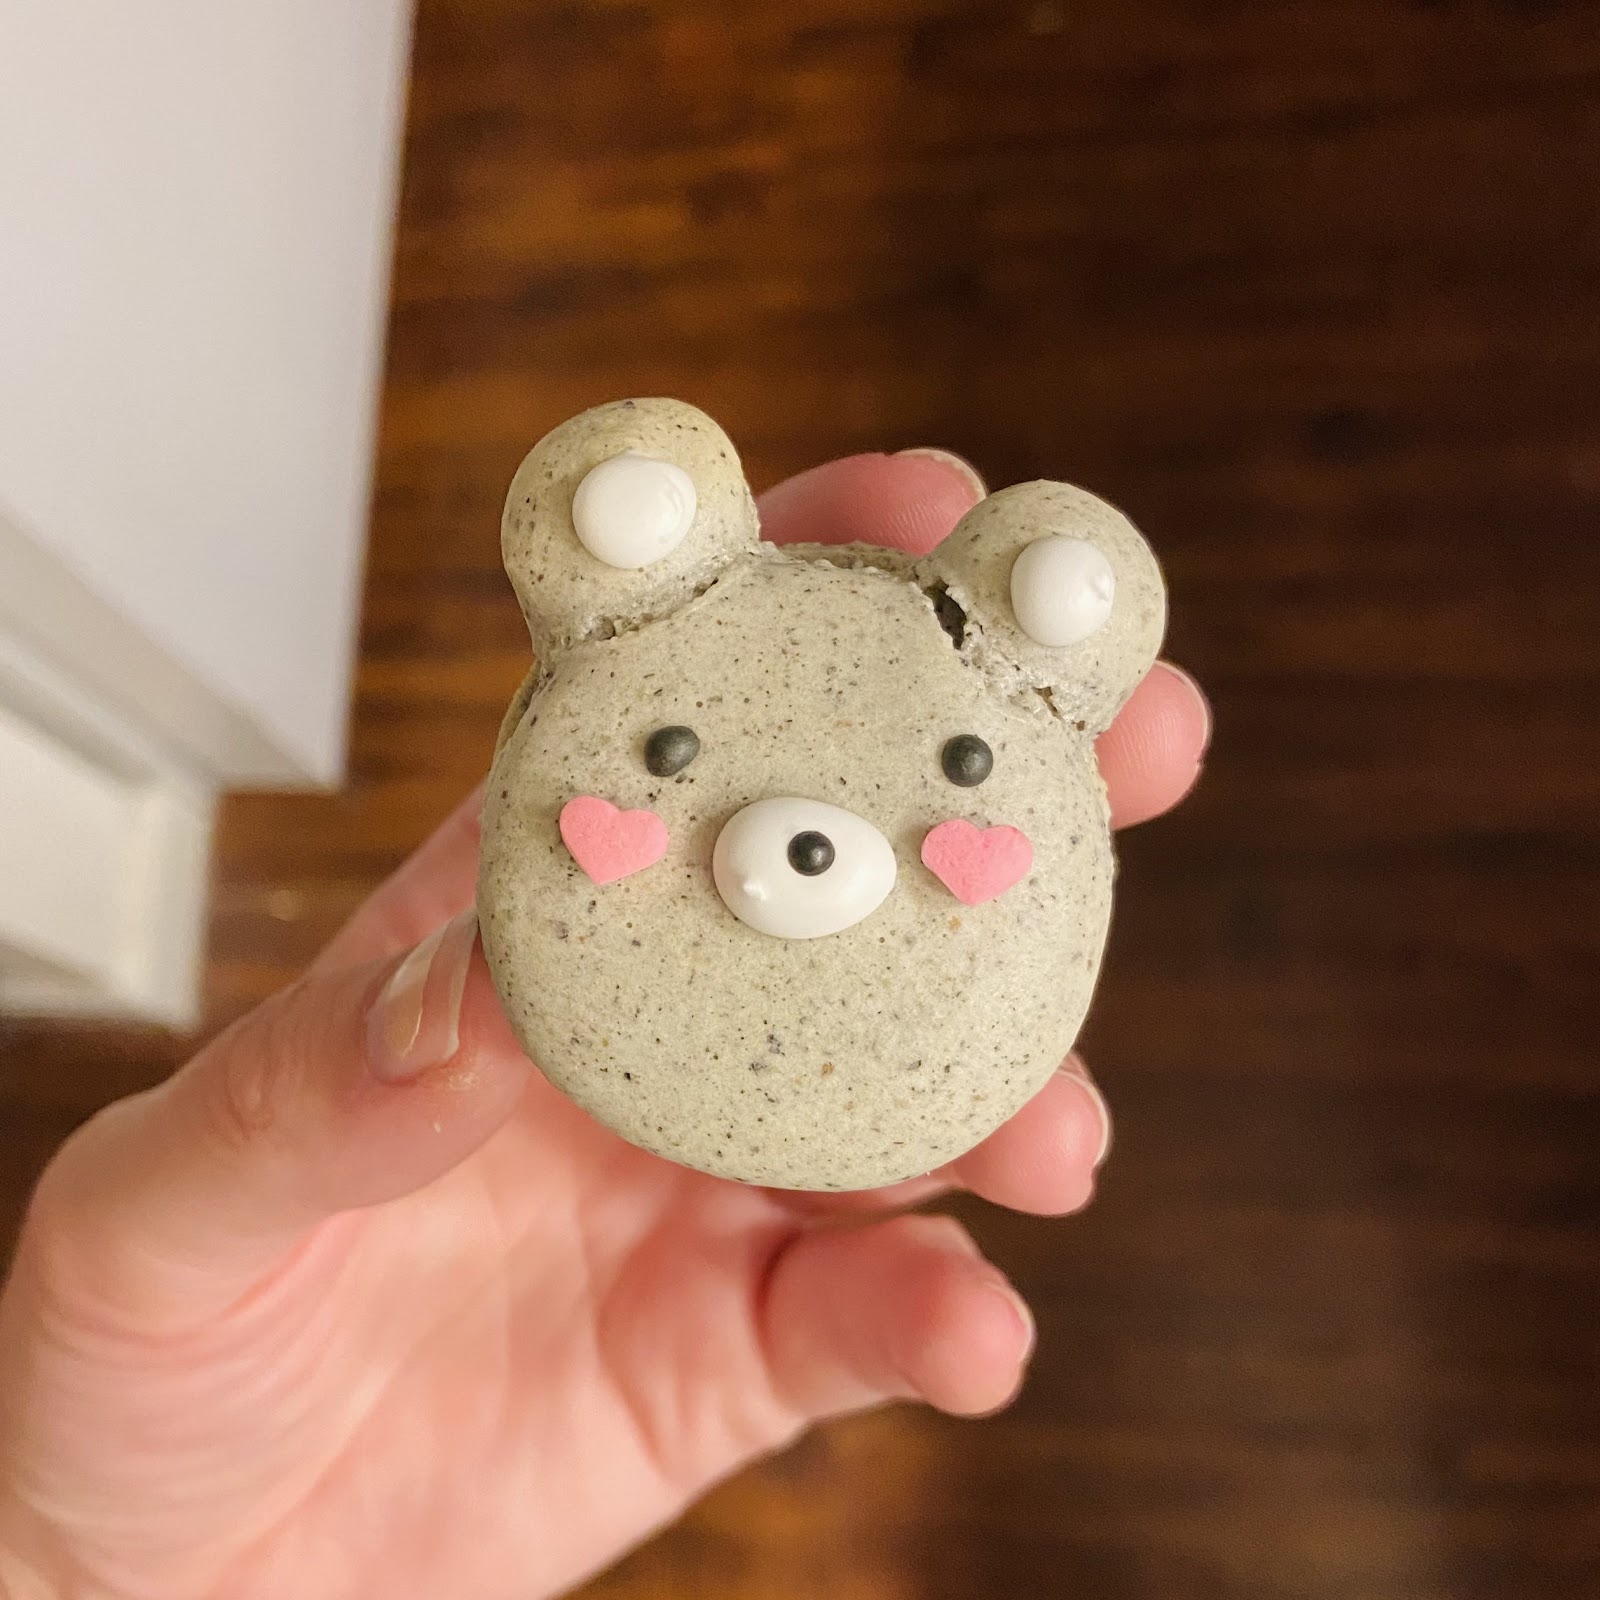
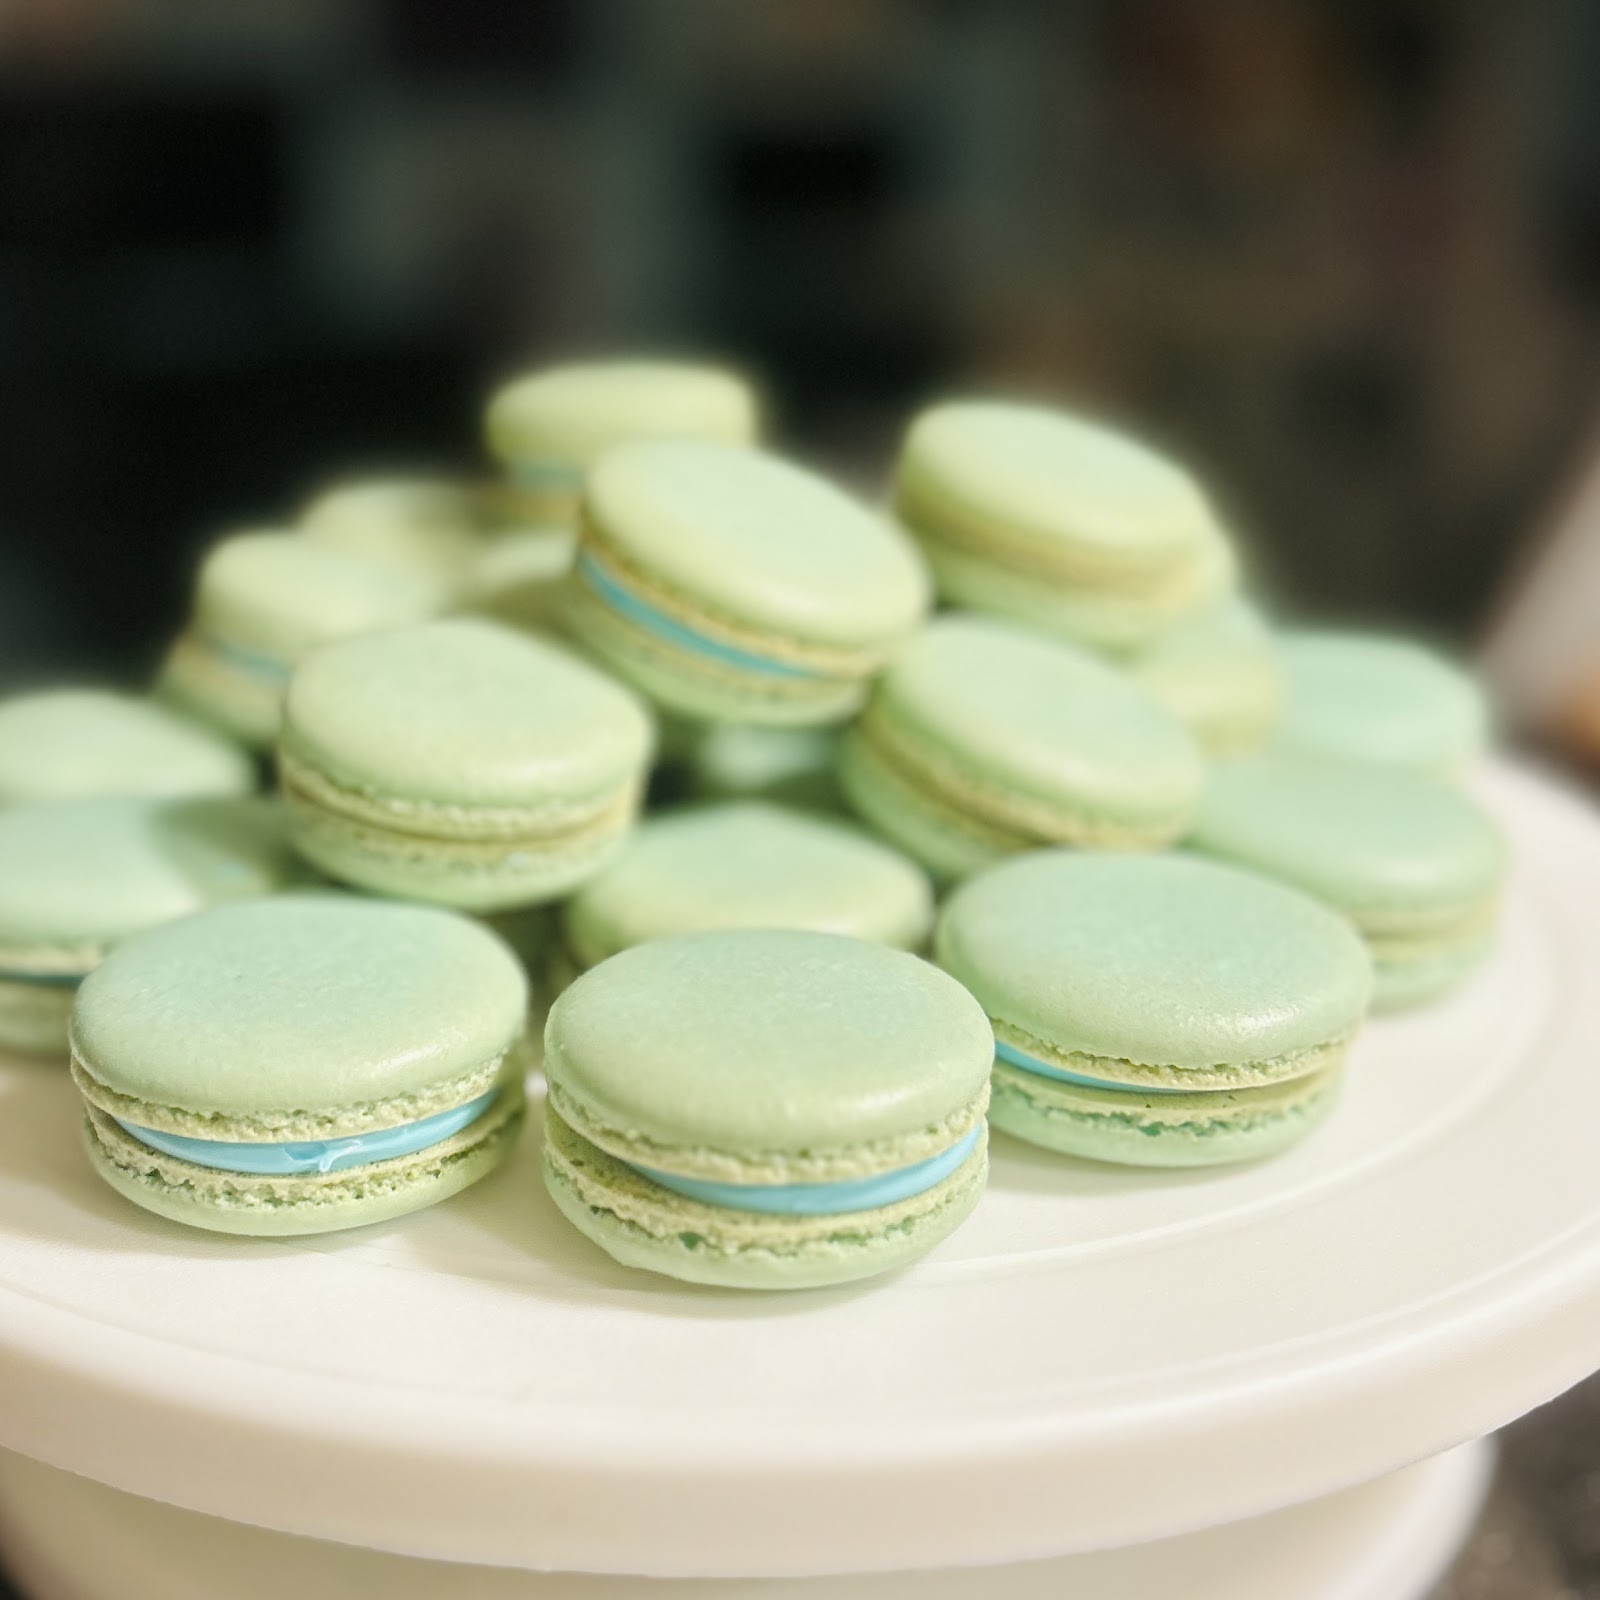
FRENCH MACARONS
MAKES: 60 shells (30 macarons)
I use baker’s percentages (by weight in grams), calculating my ingredient ratios based on the weight of 3 (or however many) egg whites.
INGREDIENTS
egg whites:granulated sugar:almond flour:powdered sugar BAKER’S PERCENTAGES: 85:70:100:100 almond flour, powdered sugar = 100% egg whites = 85% granulated sugar = 70% (or 82% of egg whites) FORMULA egg whites (variable) = X To find granulated sugar: (70 ÷ 85 = 0.82); 0.82 • X (granulated sugar = 82% of egg whites) To find almond flour, powdered sugar: X ÷ 0.85 (egg whites = 85% of almond flour, powdered sugar) EXAMPLE weight of 3 egg whites = 98g 0.82 • 98 = 80g granulated sugar 98 ÷ 0.85 = 115g almond flour, powdered sugar So, with 98g egg whites, my ratios would be 98g:80g:115g:115g. optional ingredients: ¼ tsp cream of tartar (stabilizes meringue), 2-3 drops gel (NOT liquid) food coloring |
EGG WHITES
- Room temp, not straight from the fridge.
- Make sure there’s zero yolk in the whites; even a speck of fat/oil will prevent your meringue from whipping up properly.
ALMOND FLOUR
- Finely ground. I’ve used both Bob’s Red Mill and Blue Diamond brands; I vastly prefer Blue Diamond. (Bob’s Red Mill was noticeably coarser.)
DIRECTIONS
- Prepare: 2 baking sheets lined with parchment paper (or silpats); large piping bag fitted with a 0.5” round tip (see Wilton tip 1A or 12), ready to be filled (set up in a tall glass).
- Make dry mix: Sift almond flour and powdered sugar together 3x. Set aside.
- Make meringue: Using a stand or hand mixer, whip egg whites (and cream of tartar, if using) on medium-high speed just until foamy. Slowly, while whipping, pour in granulated sugar ⅓ at a time, with 30 seconds of whipping in between each addition. Once sugar is added, whip meringue on medium-high speed to stiff, glossy peaks (see Notes: Meringue), 10-15 minutes. (If adding gel coloring, do it near the end, once you’re close to stiff peaks.)
- Combine dry and wet: Add dry mix to meringue ⅓ at a time, by hand, gently cutting in with a flexible rubber spatula to incorporate each addition before adding more.
- Macronage: Once all ingredients are incorporated, begin macronage. This is not the same as stirring or mixing: It is a specific technique that involves cutting and smearing with a spatula (see Notes: Macaronage). Macronage just until you get an unbroken flowing ribbon for 7-8 seconds where you’re able to draw 4-5 figure 8s before the ribbon breaks (see Notes: Texture/Consistency).
- Pipe shells: Fill piping bag with batter. Pipe shells 1.5-2” in diameter, evenly spaced 2” apart: Hold piping bag perpendicular (at a 90° angle) to the baking sheet, with the tip ½” off the surface. Pipe from the center (imagine a target; pipe from the bullseye), letting the batter spread into a circle. Do not swirl or move your piping bag; do not start from the outer edge. When the circle reaches 1.5-2” in diameter, simply lift the piping bag away and pipe the next one. If you have macaronaged correctly, the little peak from “liftoff” will smooth out on its own.
- Bang pans: Once shells are piped, bang each pan on the counter 3-4x so air pockets rise to the surface. Break any larger pockets with a toothpick. After banging, the tops of the shells should be perfectly smooth and glossy, with no peaks or tracks from piping (see Notes: Texture/Consistency).
- Rest shells: Let shells rest at room temp for 30-60 minutes (see Notes: Baking Directions) until the tops are matte, not glossy, and if you very gently touch one with your fingertip it doesn’t stick. (This is called forming the “skin.”)
- Bake (see Notes: Baking Directions) one tray at a time. Let shells cool completely before removing from trays to fill. Macarons are best after maturing (filled, stored in airtight container) in the fridge 12-24 hours, so the filling sinks into the shells to soften them.
NOTES — READ THROUGH IN ENTIRETY
The most important thing to know about macarons is that they are a journey you must undertake on your own. There is no such thing as a standard macaron recipe. Sometimes you’ll strike gold on the first try; sometimes it’ll take 20 batches to figure out a recipe that works for your kitchen. These are the most annoying, finicky cookies in the world, and any hobbyist who dedicates significant time to perfecting them is nuts and probably a masochist.
METHODS
There are 3 primary methods for making macarons: French, Swiss, and Italian.
French and Swiss are the easiest and most similar to each other. They’re generally interchangeable: You can make a French method recipe using the Swiss method without changing any ingredient ratios and vice versa.
The French method is the most basic: You make a standard meringue using raw egg whites and sugar, and that’s the base structure for your batter. Benefit: super easy, and very hard to over-whip your meringue. Drawback: raw-egg meringue is slightly less stable than warmed/cooked-egg meringue.
The Swiss method is one step more complicated: You make a Swiss meringue, which involves warming the egg whites and sugar over a double boiler, then proceeding as usual. Cooking the egg-sugar syrup makes a strong, stable meringue (less volume than French, but silkier). Some people swear by it; I found it less consistent than French.
The Italian method is another step more complicated: You mix part of the egg whites into the dry mix to make a paste. Then you make an Italian meringue, which involves cooking sugar and water into a hot syrup and drizzling it into the egg whites to instantly cook them while whipping. Professionals tend to prefer this method; it’s the most reliable, and the hot sugar syrup makes for ultra-shiny, ultra-smooth shells. However, it’s definitely more of a hassle.
Whichever method you use is up to you. Having tried all three, I prefer French; it’s easy, consistent (once you get the basics down), and just works best for me.
MERINGUE
- Stiff peaks: Stiff peaks = meringue clumps up in a ball around the whisk while whipping; when you lift the whisk out of the meringue, it forms a stiff, straight “beak” without any droop. Watch videos demonstrating stiff peaks. It is very hard to know when you’ve hit the right consistency if you haven’t seen it in a video.
- The stiffness of your meringue depends on your method. The French method requires very stiff peaks; the Italian method requires stopping the moment you reach relatively stiff peaks.
MACARONAGE
- Again: Watch videos. Written descriptions will never be as helpful as videos demonstrating proper technique. Watch videos from multiple bakers to get a full sense of the technique, how long it takes, what consistency to look for, etc.
- Macaronage is the process of pressing air out of the macaron batter until it reaches the ideal consistency.
- “So first I whip all that air into the meringue, then I press it right back out?” Yes.
- “Can’t I just whip the meringue less in the first place?” No. The stiff meringue forms your base structure. Starting with a soft meringue will not give the same result as a stiff meringue which is then deflated.
- Macaronage is different from stirring or mixing. It uses cutting and smearing motions, generally in a J-shape: Cutting down through the center of the batter (stem of the J), then smearing batter against the side of the bowl (hook of the J). As you smear, you’ll hear a faint crackling, like soap foam, as the tiny air bubbles break.
- Use a flexible rubber spatula, not a wooden spoon or any other utensil. (I’ve done macaronage in a stand mixer on low, but it’s VERY easy to overmix.)
TEXTURE/CONSISTENCY
- Watch videos, for the love of god.
- Pre-piping: When you lift the spatula a few inches high, the batter should slowly, evenly flow back into the bowl in a smooth, unbroken ribbon for 7-8 seconds. (This texture is often compared to flowing lava, or honey.) If the ribbon looks grainy or lumpy, or breaks after only 3-4 seconds, the batter is undermixed and needs a few more smears. If it keeps flowing forever, or dribbles quickly like soup, it is overmixed.
- You should be able to draw 4-5 figure 8s without the ribbon breaking. Watch the figure 8s: They should dissolve smoothly back into the batter within 10-15 seconds. If they hold their shape too long, the batter is too thick (undermixed). If they disappear immediately like soup, the batter is too thin (overmixed).
- Start checking (ribbon and figure 8s) early. Undermixing can be fixed; overmixing can’t.
- Macaronage generally takes about 4-5 minutes, but it really depends. Don’t go by time; go by senses and frequent testing.
- The batter will also look glossy/shiny once you’re at the right consistency (it starts out matte).
- Post-piping: After piping, the shells should only spread out a tiny bit, enough to make the tops perfectly smooth. If they don’t smooth out, and you can still see the tracks/peaks from piping: undermixed. If they spread out wide and thin: overmixed.
BAKING DIRECTIONS
If using parchment paper, I recommend testing these two baking methods:
- Oven shower method: Rest piped shells for just 20 minutes (or try not resting at all). Preheat oven to 275°. Put a tray of shells in the oven, with the door cracked open, for 2 minutes. Close the door. Set the temp to 315°. Bake 15-16 minutes.
- Standard method: Rest piped shells for 30-60 minutes (or just until matte skin forms). Preheat oven to 315°. Bake one tray at a time for 13-14 minutes.
If using silpat: Rest piped shells for 25-35 minutes. Preheat oven to 315°. Bake one tray at a time for 13-15 minutes.
Because parchment paper is so thin, the centers of the shells will heat and rise quickly. At higher oven temps (anything above 300°), this might cause the centers to break through the tops, resulting in volcano-like cracks. The oven shower method “quick-dries” the tops for ultra-smooth, shiny shells, then raises the oven temperature slowly over the first half of the bake, so the centers and tops rise in tandem.
- The oven shower method is especially helpful for humid climates, where resting on the counter may not sufficiently dry out and mattify the shells.
With silpats (silicon mats), because the mat is thicker and conducts heat more slowly, the centers of the shells will generally not hit peak rise until the second half of the bake. If the tops rise and set much faster, they’ll leave the centers behind and cause hollows. So, try resting the shells for only 25-30 minutes, so the tops will stick to the centers (instead of drying/crisping fully) and rise in tandem.
IMPORTANT NOTE: The nature of macarons is that there’s a solid chance none of this will work in your kitchen. Some people only find success baking at 300° for 20 minutes. Some people bake at 325° or higher for 8-10 minutes. It will almost certainly take trial and error to find what works for your oven and kitchen. Read multiple recipes, see what other people are doing, and test things out.
BAKE TEMP/TIME
- Macaron recipes will give you an oven temp of anywhere from 270-350° and a bake time of anywhere from 8-25 minutes. What works for you depends entirely on your oven and the atmosphere in your kitchen (dry, humid; warm, cool, etc.). You just have to test things out. Treat any given macaron recipe as a jumping off point.
- Bake on the middle rack. You don’t want your oven’s heat source too close to the tops or bottoms of the shells.
- Temp too low: If your oven temp is too low, the shells will not firm and crisp up fast enough, causing them to collapse into the soft, moist centers; this results in wrinkly, oily-looking tops. (Wrinkly tops can also be caused by under-whipped meringue, over-macaronaged batter, or anything else that makes the shells too dense/wet.)
- Temp too high: If your oven temp is too high, the “skin” of the shells will rise and set much faster than the centers, resulting in hollow shells. (Hollows can also be caused by over-whipped meringue, under-macaronaged batter, or anything else where there’s too much air in the batter.) You’ll also get browned bottoms and a hard, crunchy texture that doesn’t go away with maturation.
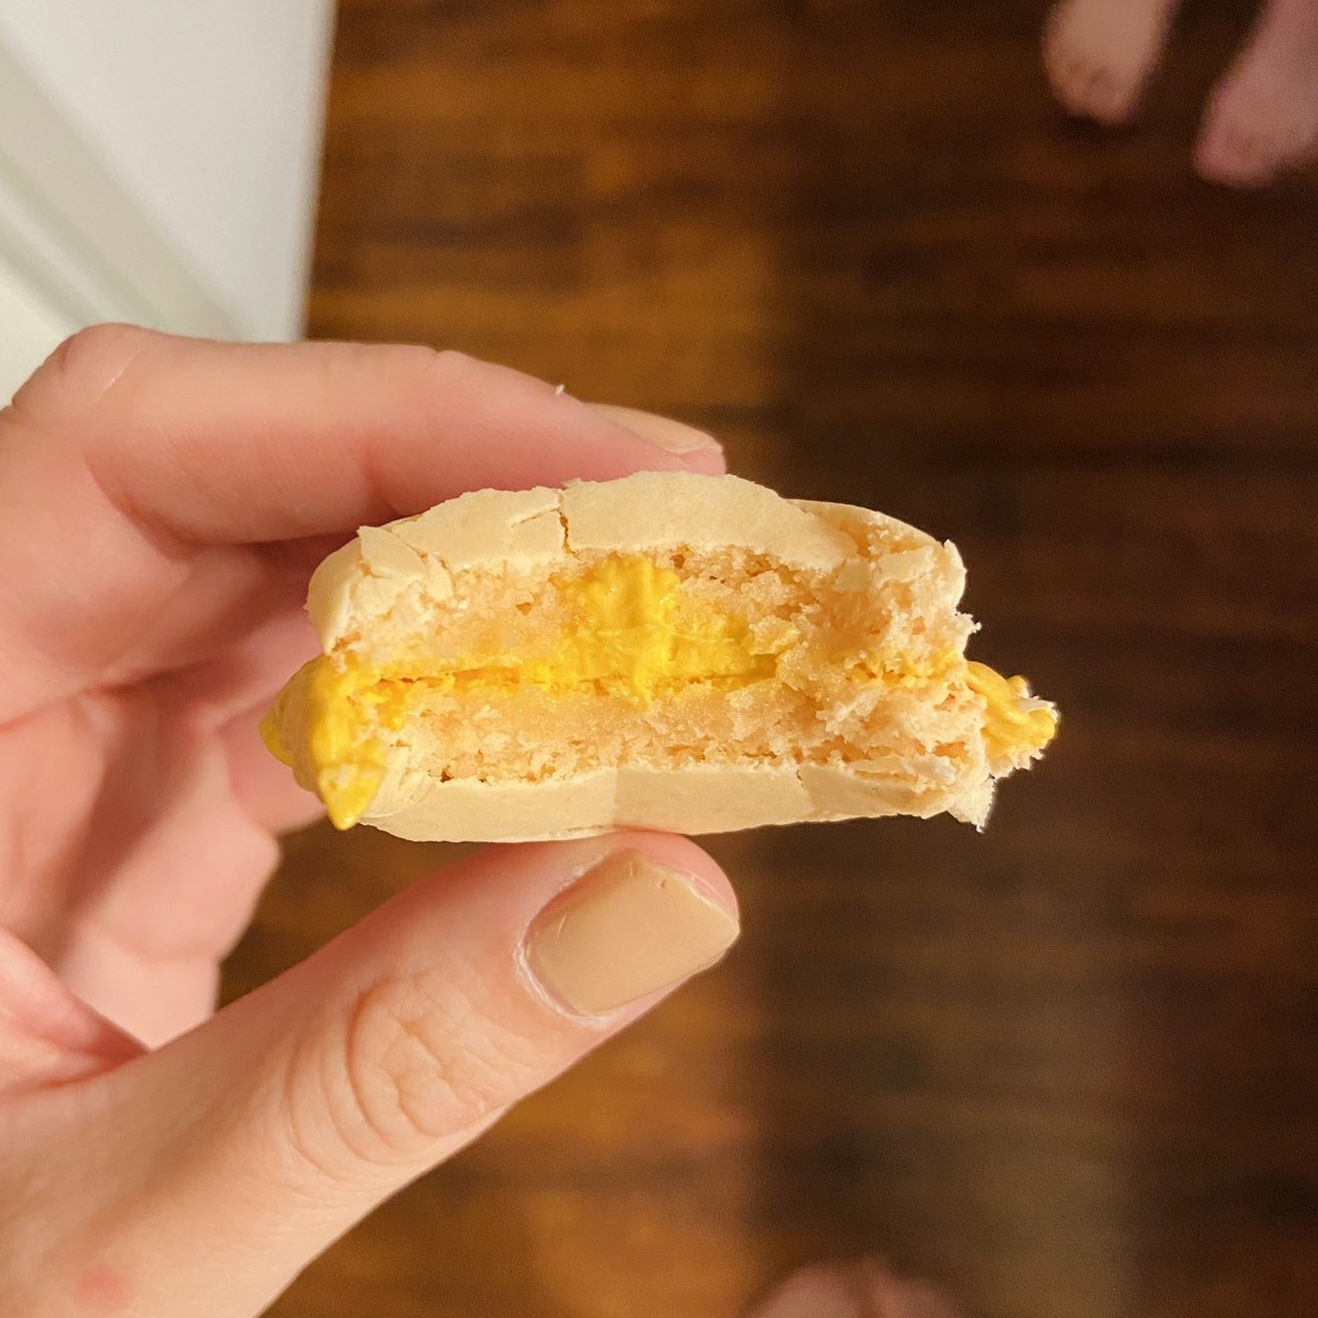
- I have a big, non-convection, standard US oven. For me, baking at any temp below 310° = wrinkly tops, without fail. It doesn’t matter how perfect my batter is, how long the shells rest, how long I bake for—if the oven temp is below 310°, the shells will come out wrinkly. If the temp is over 320°, I get browned shells, permanent hollows, and overly crunchy texture. I have found the most consistent temp + time for my oven is 315° for 13-14 minutes. This results in shells that sometimes have small hollows, but the hollows are greatly reduced/eliminated after maturing 24 hours. During maturation, the filling sinks into the shells (osmosis) and the shell texture changes to a soft, creamy chewiness, with a crisp, hair-thin skin, but no brittleness or crunch.
- What you’re looking for: A temperature hot enough to create tall feet (the ruffle at the bottom of the shell) that don’t spread outward—only uniformly straight upward. The feet should peak in height at the halfway point of your bake time, then fall/settle slightly during the second half of the bake. A tall, slow, even rise + second-act fall tends to result in full, creamy, chewy shells with perfect feet, vs.:
- Fast rise (likely hollow)
- Low/short or very slow rise (overmixed, too dense)
- Spread or overly fluffy feet (batter issues; too much air)
- Tiny feet (undermixed batter, meringue issues)
- “Volcano” cracking or high domes (oven too hot or heat source too close to the bottom of the shells, causing centers to rise faster than tops)
INGREDIENT RATIOS
- Just about every macaron recipe is different—not just in method (French, Swiss, Italian) but in the basic ratios of the 4 ingredients! Some have a lower ratio of meringue to dry mix (wet:dry); some will be closer to 1:1:1:1; some have less granulated sugar and more powdered sugar to make up for it, etc. Again: It depends on your method, kitchen, atmosphere, preferences, etc. There is no standard.
For example, here are 5 popular recipes for French or Swiss method macarons (French and Swiss ingredient ratios are interchangeable; Italian method requires different ratios mixed in different ways):
recipe | egg whites:granulated sugar:almond flour:powdered sugar (by weight in grams) | baker’s percentages (almond flour = 100%) |
Sally’s Baking Recipes | 100g:80g:125g:125g | 80:64:100:100 |
Preppy Kitchen | 100g:90g:140g:130g | 71:64:100:92 |
Sugar Spun Run | 110g:95g:150g:150g | 73:63:100:100 |
Pies and Tacos | 100g:100g:105g:105g | 95:95:100:100 |
Sugar Bean | 80g:75g:95g:85g | 84:80:100:90 |
Average baker’s percentages (from the 5 recipes above) = 80:73:100:96
My recipe’s percentages: 85:70:100:100
As you can see, even scaled, there’s a lot of variation. The recipes do follow a pattern: meringue (egg whites + granulated sugar) < dry mix (almond flour + powdered sugar).
The average % ratio of wet:dry = 78:100, with the outlier being Pies and Tacos at 95:100.
In general, a recipe with a higher ratio of wet to dry (closer to equal parts meringue and dry mix) tends to be more forgiving during macaronage; it’s less stiff and you have a bigger “window” of how much air to press out before you hit overmixing territory. (The Pies and Tacos Swiss method recipe tends to be a hit with beginners, though for me it consistently resulted in hollow shells.) If you’re struggling with a chosen recipe, try one with a higher (or lower) ratio of meringue to dry mix and see how it feels.
All that said….
In my experience, ingredient ratios come second to practice and technique. An experienced macaron baker (someone who knows when to stop macaronage, how to compensate for looser or stiffer batter, etc.) will be able to make solid macarons with pretty much any recipe. It really just takes practice.
On the flip side, because these are the most annoying cookies in the world, no level of expertise can prevent you from fucking up the occasional batch. Sometimes you know what you did wrong; sometimes you did nothing wrong and they’re fucked anyway. That is just how it is.
FILLING/FLAVORING
- Fill macarons with flavored buttercreams, ganache, or anything else you want (as long as it will set and not melt; whipped cream is not a good bet). Pipe buttercream circles and fill the centers with jam, curd, chocolate, caramel, etc. There are a million lists of fun and funky macaron flavors to try.
- Generally, flavor should come from the filling, not the shells; the shells are too finicky to handle more than maybe 1 tsp/5g of dry flavoring such as cinnamon or other spices, matcha or espresso powder, ground tea leaves, etc.
As you can see, macarons are absurd. The best thing you can do is read a bunch of recipes, watch a bunch of videos, and practice a bunch of times. It is admittedly deeply satisfying the first time you achieve technical perfection. Godspeed.

BREADS AND QUICK BREADS
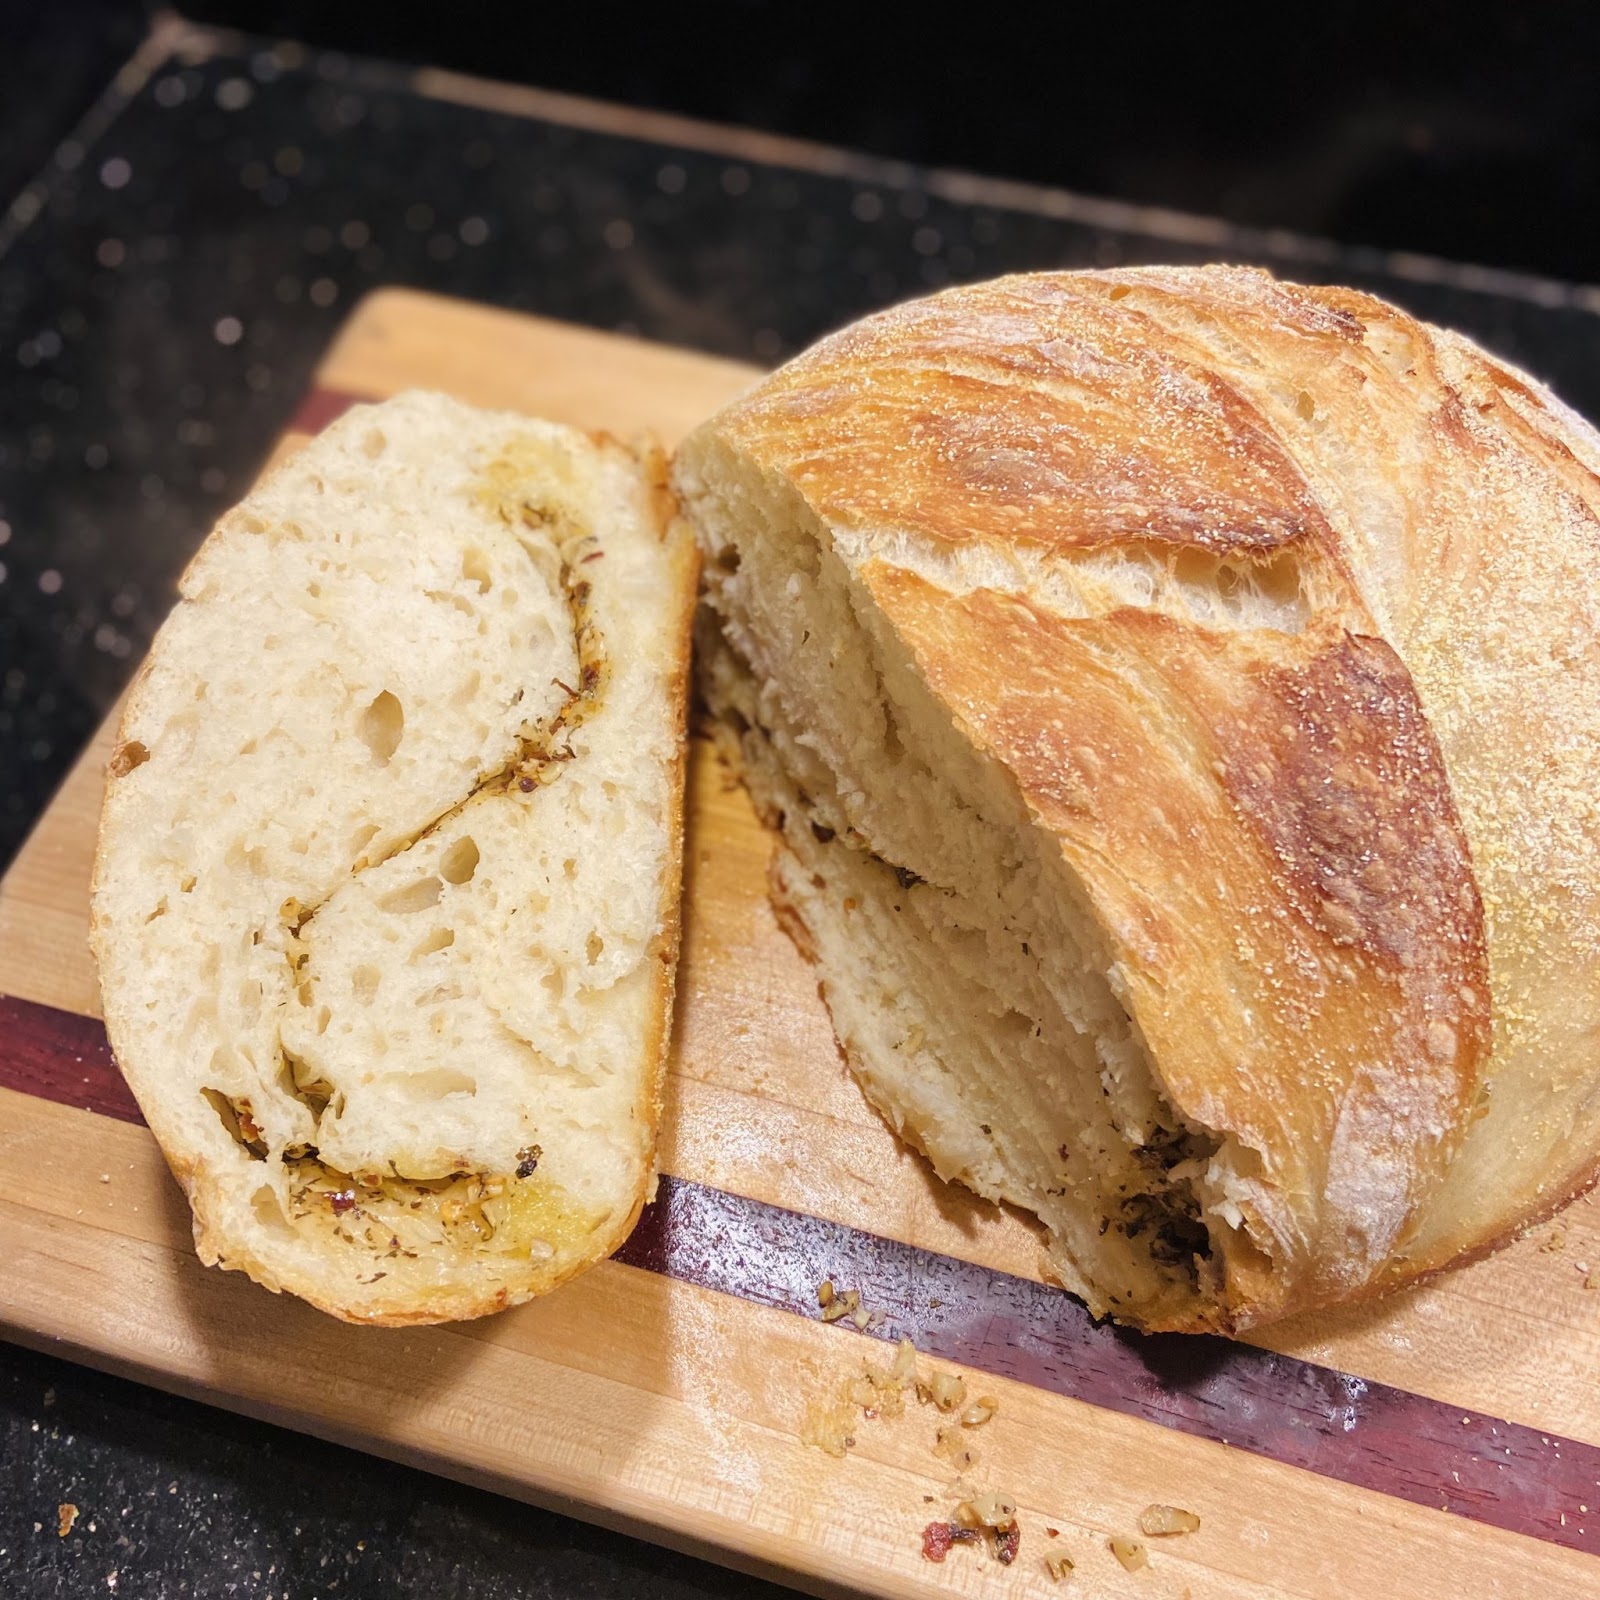
DUTCH OVEN BREAD (GARLIC HERB BUTTER SWIRL)
MAKES: 1 large boule
You need a Dutch oven.
INGREDIENTS
BREAD
2 cups (480g) warm water
2 ¼ tsp (1 packet, 7g) instant or active dry yeast
1 Tbsp white or brown sugar
4 ½ cups (540g) AP or bread flour
1 Tbsp kosher salt
optional: 2 Tbsp corn meal, to coat bottom of loaf
GARLIC HERB BUTTER
1/4 cup butter, softened
4 cloves garlic, minced
1/2 tsp each parsley, sage, rosemary, thyme
optional: 1 Tbsp red pepper flakes
DIRECTIONS
- In a large bowl (or the bowl of a stand mixer), whisk together water, yeast, and sugar. Cover with a clean kitchen towel and let sit 5 minutes until frothy.
- Add flour 1 cup at a time, mixing in between with a rubber spatula or wooden spoon (or dough hook) to incorporate. Mix until no more dry patches. Dough will be wet, sticky, and shaggy.
- 1st Rise: Cover bowl. Let sit in a warm place for 1-2 hours until doubled in size.
- Meanwhile, make garlic herb butter: Mix all ingredients together.
- Shape loaf: Scrape dough onto a clean, floured surface. With floured hands, dusting with flour as needed, bring the corners of the dough into the center 6-8x until it is smoother, with tighter surface tension, all over. (Different from kneading.) Add garlic herb butter: Spread the prepared butter in a thick layer over the dough, then pull the corners into the center one last time to completely envelope butter. Finally, turn the loaf over (seam side down).
- 2nd Rise: Cover loaf with a clean kitchen towel and let proof for 30 minutes until slightly puffy and wobbly when touched.
- Meanwhile, preheat oven to 450° with Dutch oven inside.
- Dust loaf liberally with flour, then brush off excess so the whole surface is lightly coated.
- Carefully remove Dutch oven from preheated oven. Sprinkle corn meal into the bottom. Place loaf inside, seam side up. (You can also do seam side down and score the top.)
- Bake: Bake with Dutch oven lid on, 30 minutes. Remove lid. Bake 25-30 more minutes until crust is deep golden brown.
- Let bread rest for at least 1 hour before slicing. (If you absolutely must slice it early, start from the edges so the center stays hot and steamy as long as possible.)
NOTES
- A Dutch oven with a fitted lid is required to form a humid environment for a crisp, crackly crust.
- If you don’t have a Dutch oven: Put the proofed loaf on a baking sheet lined with parchment paper. Fill a large roasting pan with 1-2” boiling water and place in the oven on a rack below the loaf. After the first 30 minutes of bake time, remove the pan.
- Other mix-ins: 2-3 Tbsp herbs, spices, or seeds; chopped or whole roasted garlic cloves; 1 cup shredded or shaved parmesan, asiago, or other semi-hard cheese; 1 cup olives, chopped date and walnut, other dried fruits or nuts, etc.
BANANA BREAD
MAKES: 1 x 9” loaf
INGREDIENTS
2 cups (240g) AP flour
1 tsp baking soda
1 tsp cinnamon
½ tsp kosher salt
¼ tsp nutmeg
2 eggs
¾ cup (150g) white or brown sugar (or a mix)
½ cup (100g) neutral oil
¼ cup (56g) sour cream, greek yogurt, or buttermilk
1 tsp vanilla
1-2 cups (250-350g) overripe bananas (2-3 bananas), mashed to purée texture
optional: up to 1 cup total chocolate chips, chopped toasted pecans or walnuts, and/or chopped dried fruit (raisins, dates, apricots, etc.)
DIRECTIONS
- Preheat oven to 350°. Grease (or line with parchment paper sling) a 9x5” loaf pan. (If toasting nuts: Arrange nuts in single layer on a baking sheet. Toast in preheated oven 5-8 minutes.)
- Whisk together flour, baking soda, salt, spices. Set aside.
- In a separate bowl, vigorously whisk together eggs and sugar until smooth and lightened in color, 2 minutes. Drizzle in oil while whisking to emulsify. Whisk in sour cream and vanilla, then mashed bananas, until fully incorporated.
- Mix wet into dry with a spatula until just barely combined (stop as soon as no more dry streaks). Do not over mix.
- Pour batter into prepared pan.
- Bake 55-65 minutes until top is cracked and deep golden brown, and a knife inserted into the center comes out with only a few moist crumbs. Start checking at 55 minutes, then in 5-minute intervals. If edges start getting too dark, cover top loosely with foil.
- Let cool in pan 10 minutes, then tip out to remove. (You can leave it in the pan, but you might get a soggy bottom.) Wait at least 30 minutes before slicing—if you slice too early, it will release steam and dry out loaf. Ideally, leave overnight and slice for breakfast the next day.
NOTES
- Bananas: Mash with a fork until smooth. Don’t leave any unmashed lumps—they’ll sink and look gray/gummy after baking. Aim for purée texture. The ideal “banana bread banana” is very overripe, with a peel that’s more brown than yellow.
- 2 bananas = lighter loaf. 3-4 bananas = denser loaf. Don’t use more than 1 ½ cups (350g) of banana—it will get too dense.
- Toast nuts so they remain crisp in the moist loaf.
- Sugar: Use all brown, all white, or any mix. More brown sugar = darker, denser loaf with moist top. More white sugar = lighter, fluffier loaf with crisp top.
- Fat: Use oil, not butter, for a loaf that stays perfectly moist for days. Butter will lead to a dry, coarse loaf. The banana flavor is rich enough without butter.
MONKEY BREAD
MAKES: 1 bundt pan (if no bundt pan, use 9x13” pan)
INGREDIENTS
DOUGH
3 ½ cups (420g) AP or bread flour
2 ¼ tsp (1 packet, 7g) instant or active dry yeast
1 cup (227g) full-fat milk, warm
2 Tbsp (25g) sugar
2 Tbsp (28g) butter, melted
1 egg, beaten
1 tsp kosher salt
CINNAMON SUGAR
½ cup (100g) white sugar
1 Tbsp cinnamon
BUTTERSCOTCH SAUCE
1 cup (200g) brown sugar
½ cup (113g) butter
1 tsp salt
¼ cup heavy cream or evaporated milk
DIRECTIONS
- In a large bowl (or the bowl of a stand mixer), whisk together yeast, milk, and sugar. Cover and let sit 5 minutes until frothy, then whisk in butter, egg, and salt.
- Add flour in 3 parts, mixing in between with a rubber spatula (or dough hook). Mix for 2-3 minutes to form a very moist, sticky dough.
- Let dough sit untouched in bowl 5 minutes so flour absorbs moisture. After resting, dough will pretty much immediately be smooth and workable instead of too sticky.
- Transfer dough on a clean, floured surface. Sprinkle flour over the top. Knead, dusting lightly with flour as needed, until dough is soft, smooth, elastic, and springs back to form in 2-3 seconds when poked, 6-7 minutes.
- 1st Rise: Cover and let rise 1 hour until doubled in size.
- Near the end of 1st Rise: Grease a bundt pan. Combine cinnamon sugar ingredients in a bowl.
- Make butterscotch sauce: In a saucepan, combine brown sugar, butter, and salt. Bring to a boil over medium heat, whisking frequently. Turn off heat. Slowly pour in heavy cream (it will froth and spit). Stir until smooth. Put back on the heat until it reaches 240°. Then set aside.
- Once dough is risen, pinch off bits the size of donut holes. Roll each dough ball liberally in the cinnamon sugar, then drop into pan. Halfway through, pour ½ of the warm butterscotch sauce over the dough balls. Reserve the other half. Sprinkle any leftover cinnamon sugar over the dough balls at the end.
- 2nd Rise (Proof): Cover and let rise until visibly puffy, 20-30 minutes.
- Preheat oven to 350°. Once dough is proofed, pour remaining ½ of butterscotch sauce over the top. Shake gently to make sure sauce sinks to the bottom.
- Bake 35-40 minutes until top is a deep golden brown.
- Let rest in the pan 15 minutes. Then carefully flip monkey bread onto a large plate. (If you remove too early, the sauce will be runny. If you remove too late, it will stick instead of coming out easily.)
- Let rest an additional 5-10 minutes before serving.
NOTES
- Butterscotch is just caramel but with brown sugar instead of white.
- Many recipes use a simple butter and brown sugar sauce, but it can result in a grainy, crystallized texture. Add cream and heat all the way to 240° to get a gooey, silky caramel texture.
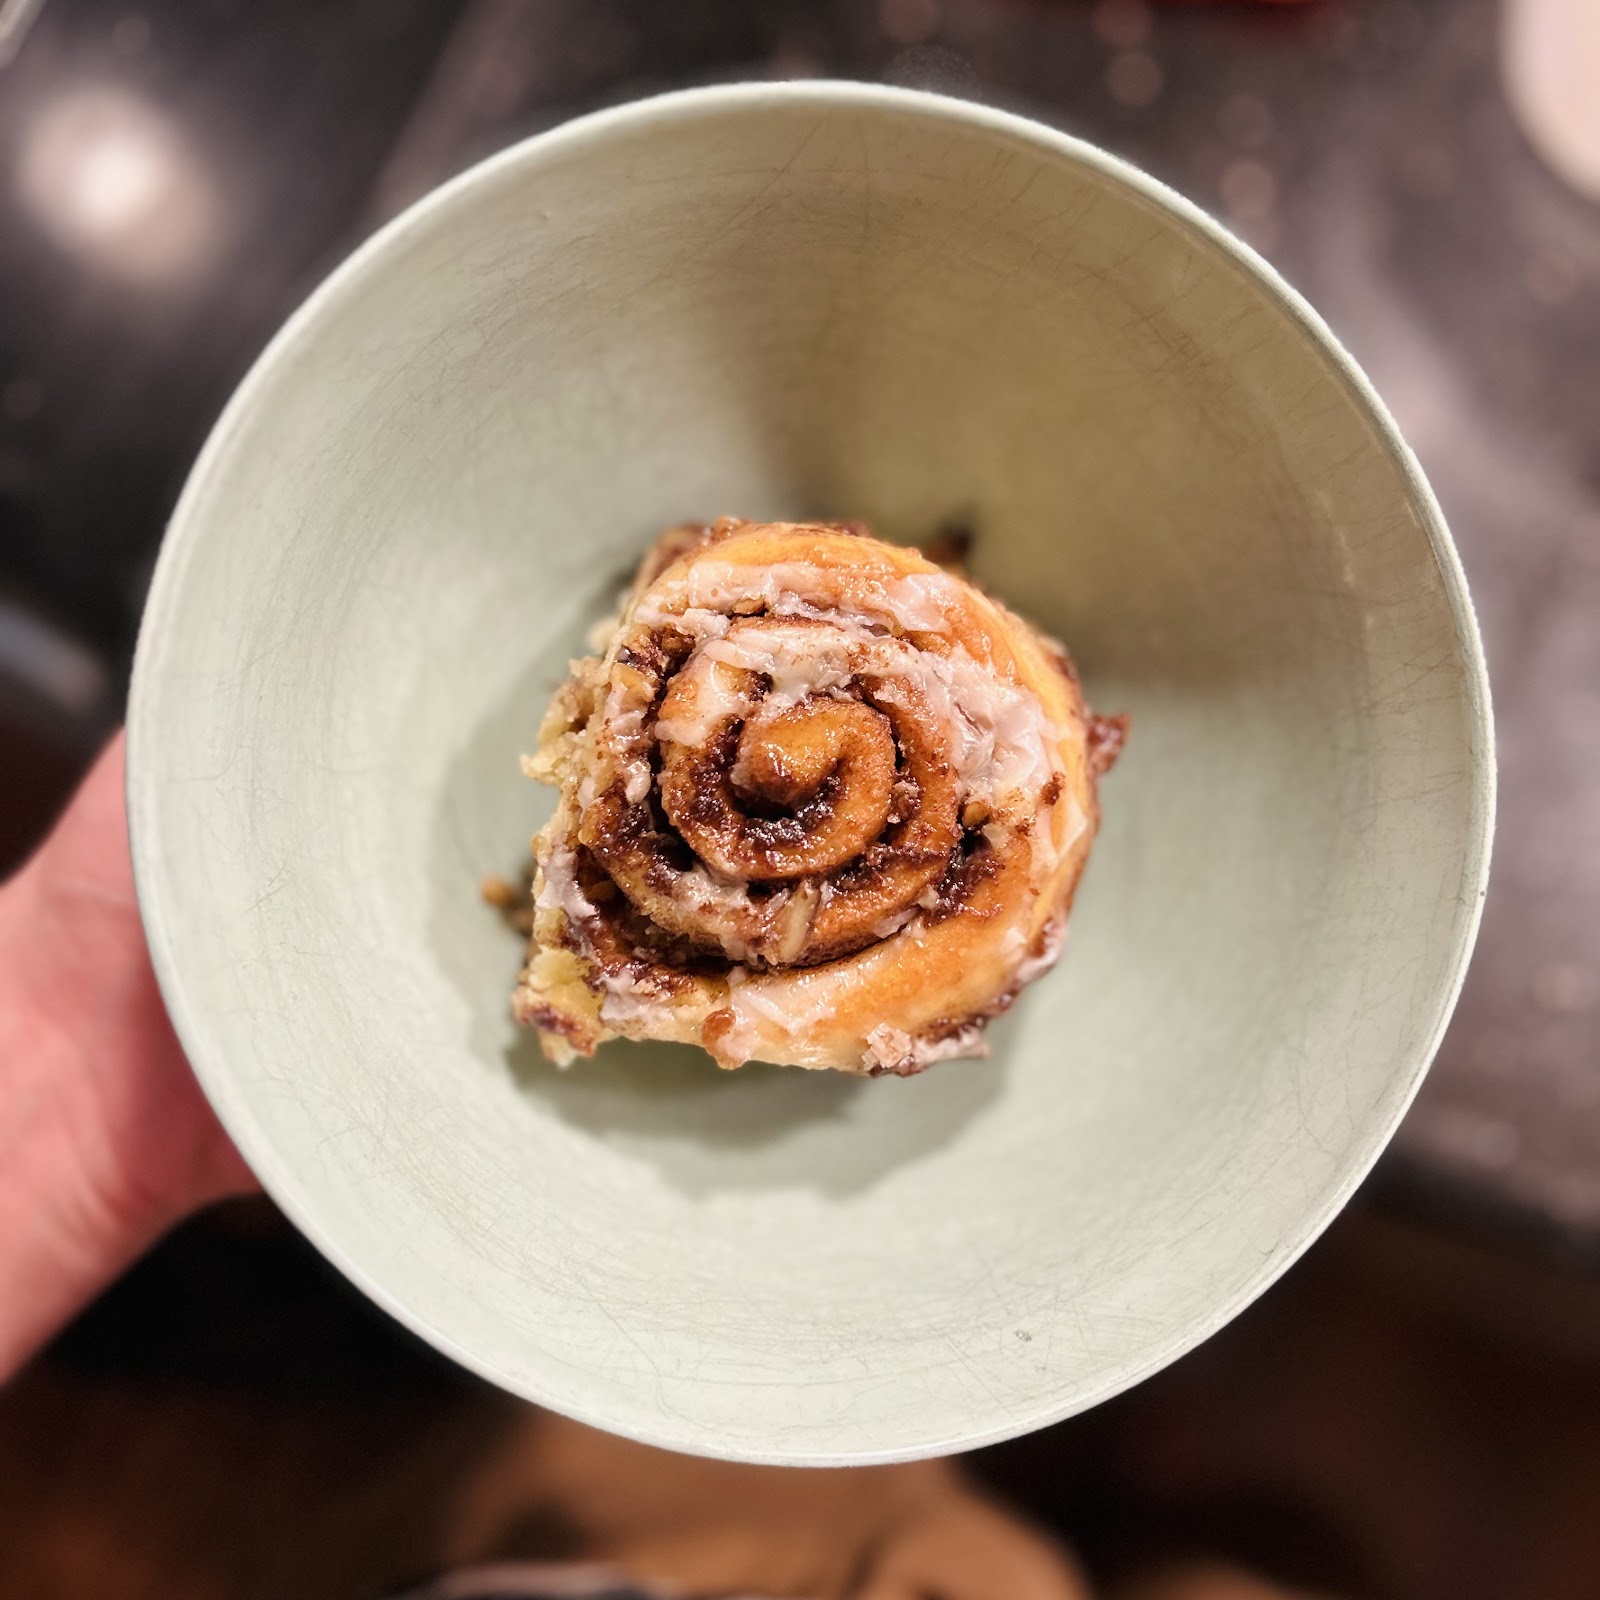
GOOEY CINNAMON ROLLS
MAKES: 12 rolls (1 x 9x13” pan)
INGREDIENTS
DOUGH
3 ½ cups (420g) AP or bread flour
2 ¼ tsp (1 packet, 7g) instant or active dry yeast
1 cup (227g) full-fat milk, warm
2 Tbsp (25g) sugar
2 Tbsp (28g) butter, melted
1 egg, beaten
1 tsp kosher salt
FILLING
1 cup (200g) brown sugar
½ cup (113g) butter, very soft
2 Tbsp cinnamon
optional: 1 cup chopped walnuts
½ cup heavy cream or full-fat milk, warmed right before rolls go in the oven
optional: Vanilla Glaze (½ cup powdered sugar, 2 Tbsp milk, 1 tsp vanilla. Stir until smooth. Add more sugar or milk to reach desired texture.)
DIRECTIONS
- In a large bowl (or the bowl of a stand mixer), whisk together yeast, milk, and sugar. Cover and let sit 5 minutes until frothy, then whisk in butter, egg, and salt.
- Add flour in 3 parts, mixing in between with a rubber spatula (or dough hook). Dough will be very moist and sticky. Mix for 2-3 minutes until strands are pulling away from the sides of the bowl, like webbing.
- Let dough sit untouched in bowl 5 minutes so flour absorbs moisture. After resting, dough will pretty much immediately be smooth and workable instead of too sticky.
- Transfer dough on a clean, floured surface. Sprinkle flour over the top. Knead, dusting lightly with flour as needed, until dough is soft, smooth, elastic, and springs back to form in 2-3 seconds when poked, 6-7 minutes.
- 1st Rise: Cover and let rise 30 minutes until puffed but not doubled in size.
- Make filling: Beat all ingredients together into a smooth, dark paste.
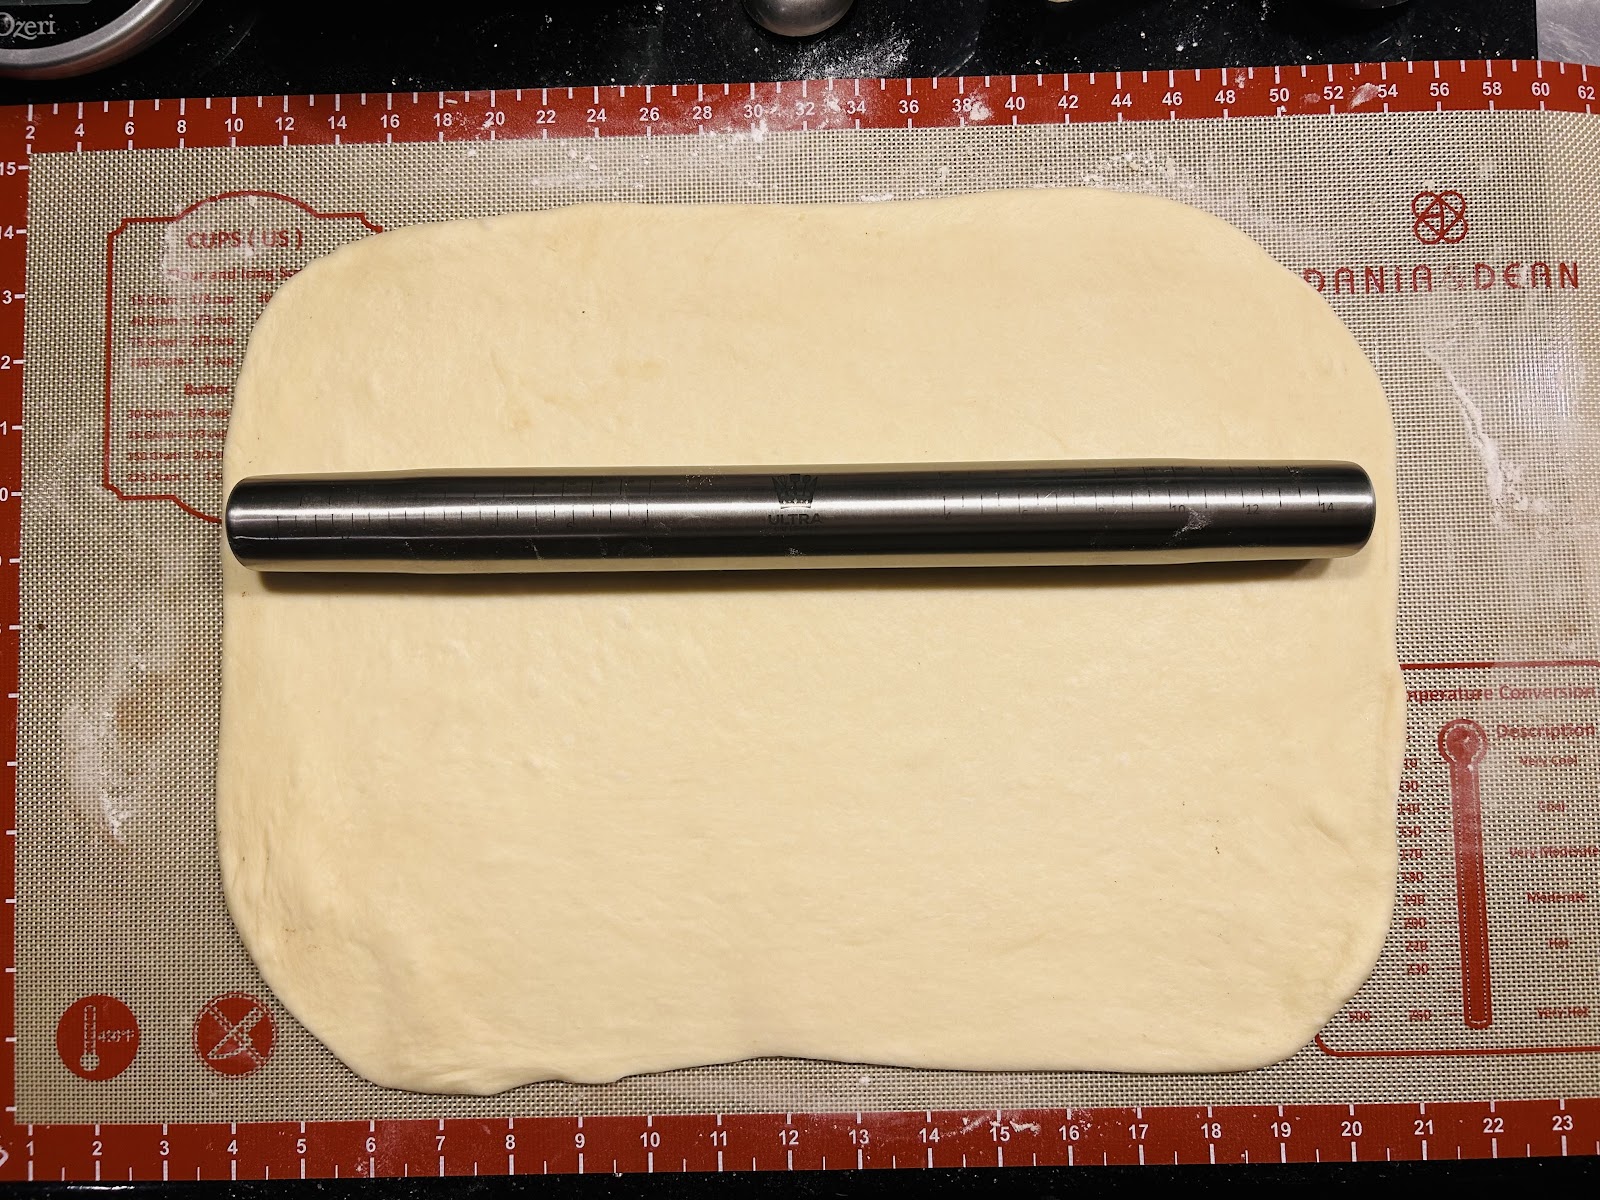
- Roll out dough: On a clean, floured surface (or silpat), roll out dough into a large, ½”-thick rectangle about the size of a baking sheet, 12x17”.
- Spread filling over the dough in an even layer. Leave ½” of space at the edges, and 2” of space along the bottom for easy sealing. (If using walnuts, sprinkle over top.)
- Starting at the top, tightly roll up the dough lengthwise. It helps to start in the upper corner and go sideways first, then straighten out. Roll tightly to avoid gaps. Pinch the dough to seal along the seam.
- Using a large, sharp knife, slice the roll into 12 pieces. If they get a bit misshapen, just pat back into shape as you go. They don’t have to be perfectly round.
- 2nd Rise: Arrange the rolls in the pan. Cover and let proof for 20-30 minutes, until slightly puffier.
- Preheat oven to 375°.
- Pour the warm cream or milk over the tops of the proofed rolls, letting it pool in the bottom of the pan.
- Bake the rolls for 25-30 minutes until the tops are golden brown.
- Let rest in the pan for 15-20 minutes before removing. If using Vanilla Glaze, drizzle over the rolls while they’re warm but not hot.
NOTES
- Same dough as Monkey Bread. I’ve experimented with richer enriched doughs (most recipes use more sugar and 2 eggs in the dough) but I tend to find them too cakey. I prefer a soft, almost stretchy, bready cinnamon roll.
- Pouring warm milk over the rolls before baking = ultra soft, moist, and gooey.
- I’ve found that baking at 350 takes too long for the tops to get golden brown. I go for a higher temp (I’ve gone up to 400) to avoid overbaking.
16” rolling pin
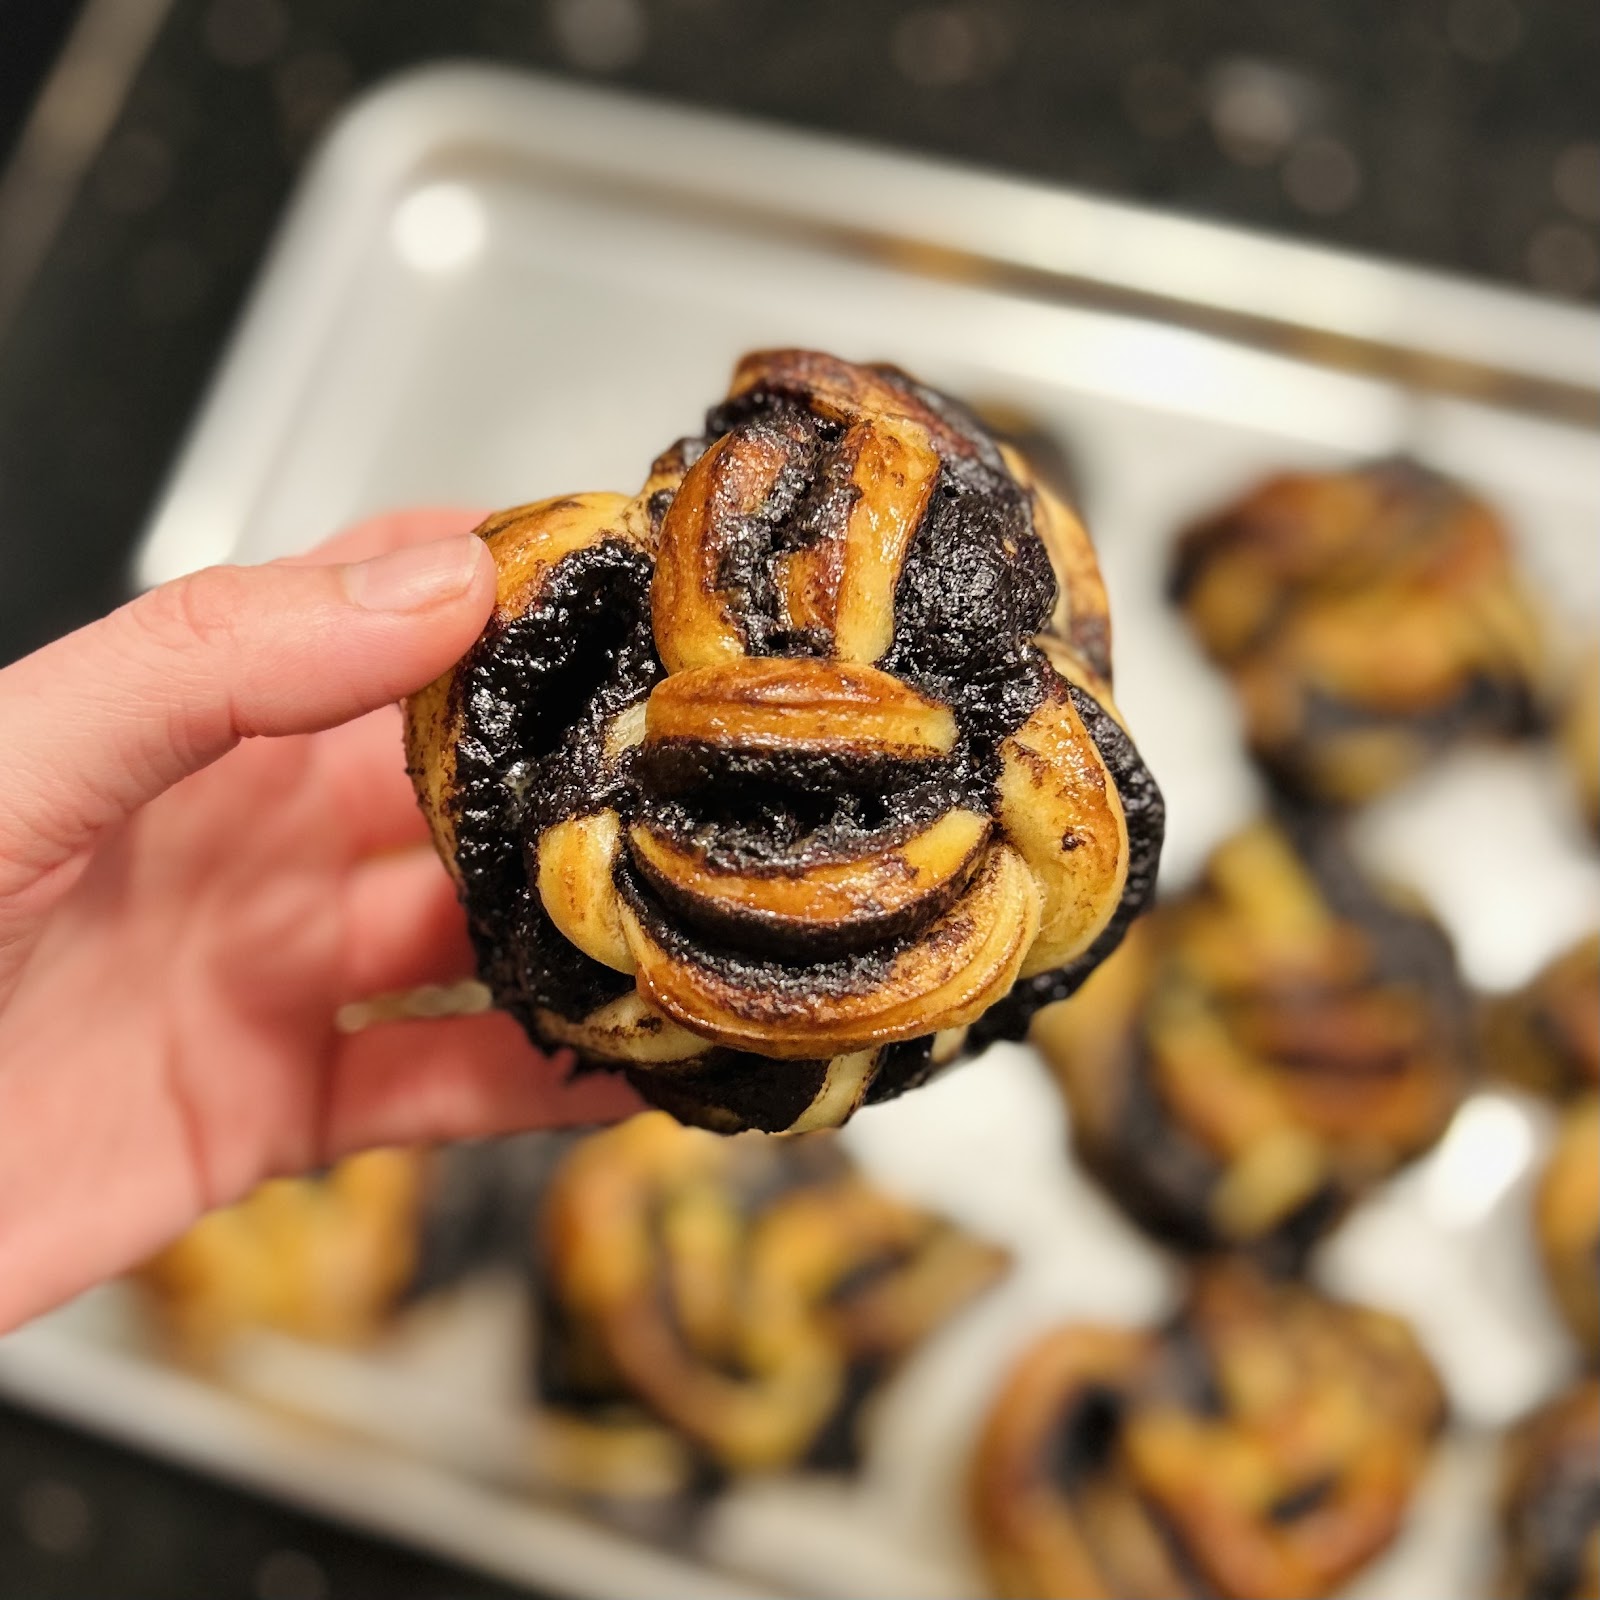
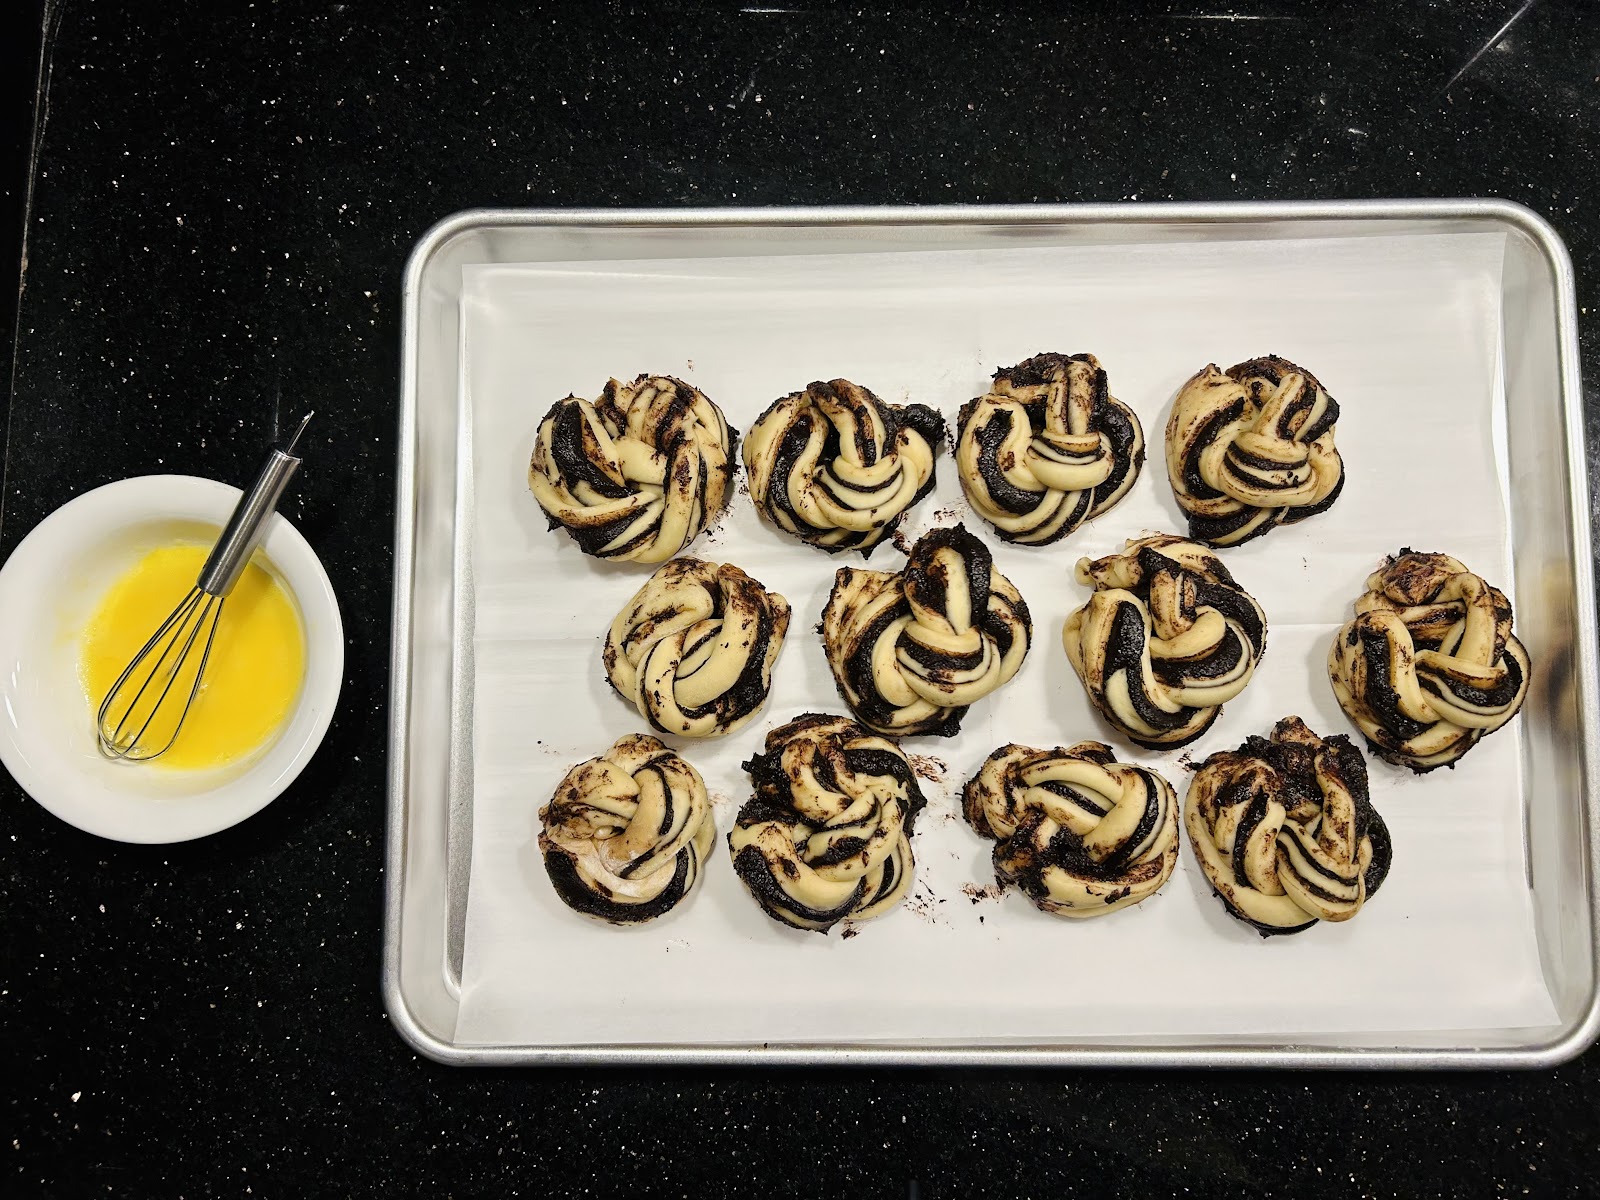
DARK CHOCOLATE BRAIDED BUNS
MAKES: 12 buns
INGREDIENTS
DOUGH
3 ½ cups (420g) AP or bread flour
2 ¼ tsp (1 packet, 7g) instant or active dry yeast
1 cup (227g) full-fat milk, warm
2 Tbsp (25g) sugar
2 Tbsp (28g) butter, melted
1 egg, beaten
1 tsp kosher salt
FILLING
¼ cup (25g) Dutch-process cocoa powder (or 2 oz dark or semisweet chocolate, melted)
1 cup (200g) brown sugar
½ cup (113g) butter, very soft
1 tsp cinnamon
egg wash: 1 egg yolk + 1 Tbsp milk + 1 pinch kosher salt
DIRECTIONS
- In a large bowl (or the bowl of a stand mixer), whisk together yeast, milk, and sugar. Cover and let sit 5 minutes until frothy, then whisk in butter, egg, and salt.
- Add flour in 3 parts, mixing in between with a rubber spatula (or dough hook). Dough will be very moist and sticky. Mix for 2-3 minutes until strands are pulling away from the sides of the bowl, like webbing.
- Let dough sit untouched in bowl 5 minutes so flour absorbs moisture. After resting, dough will pretty much immediately be smooth and workable instead of too sticky.
- Transfer dough on a clean, floured surface. Sprinkle flour over the top. Knead, dusting lightly with flour as needed, until dough is soft, smooth, elastic, and springs back to form in 2-3 seconds when poked, 6-7 minutes.
- 1st Rise: Cover and let rise 30 minutes until puffed but not doubled in size.
- Make filling: Beat all ingredients together into a smooth, very dark paste.
- Line 2 baking sheets with parchment paper, or grease a 12-cup muffin tin.
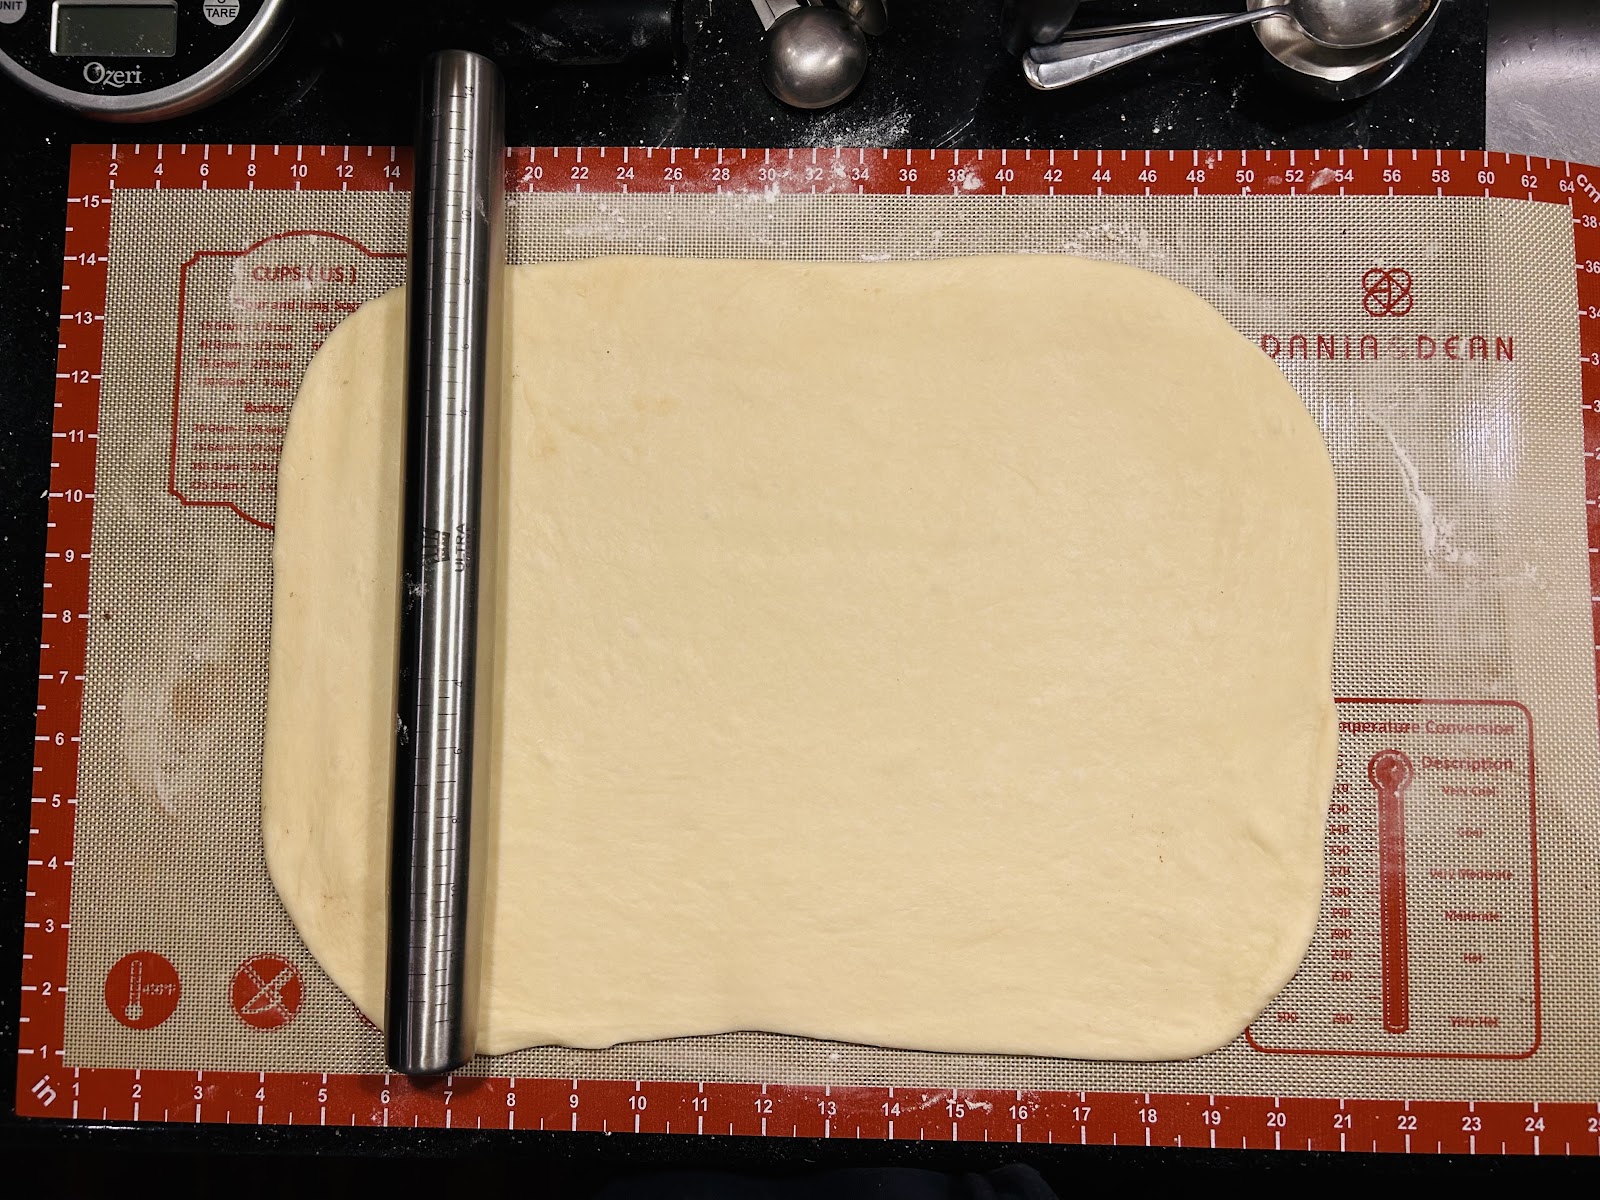
- Roll out dough: On a clean, floured surface (or silpat), roll out dough into a large, ½”-thick rectangle about the size of a baking sheet, 12x17”.
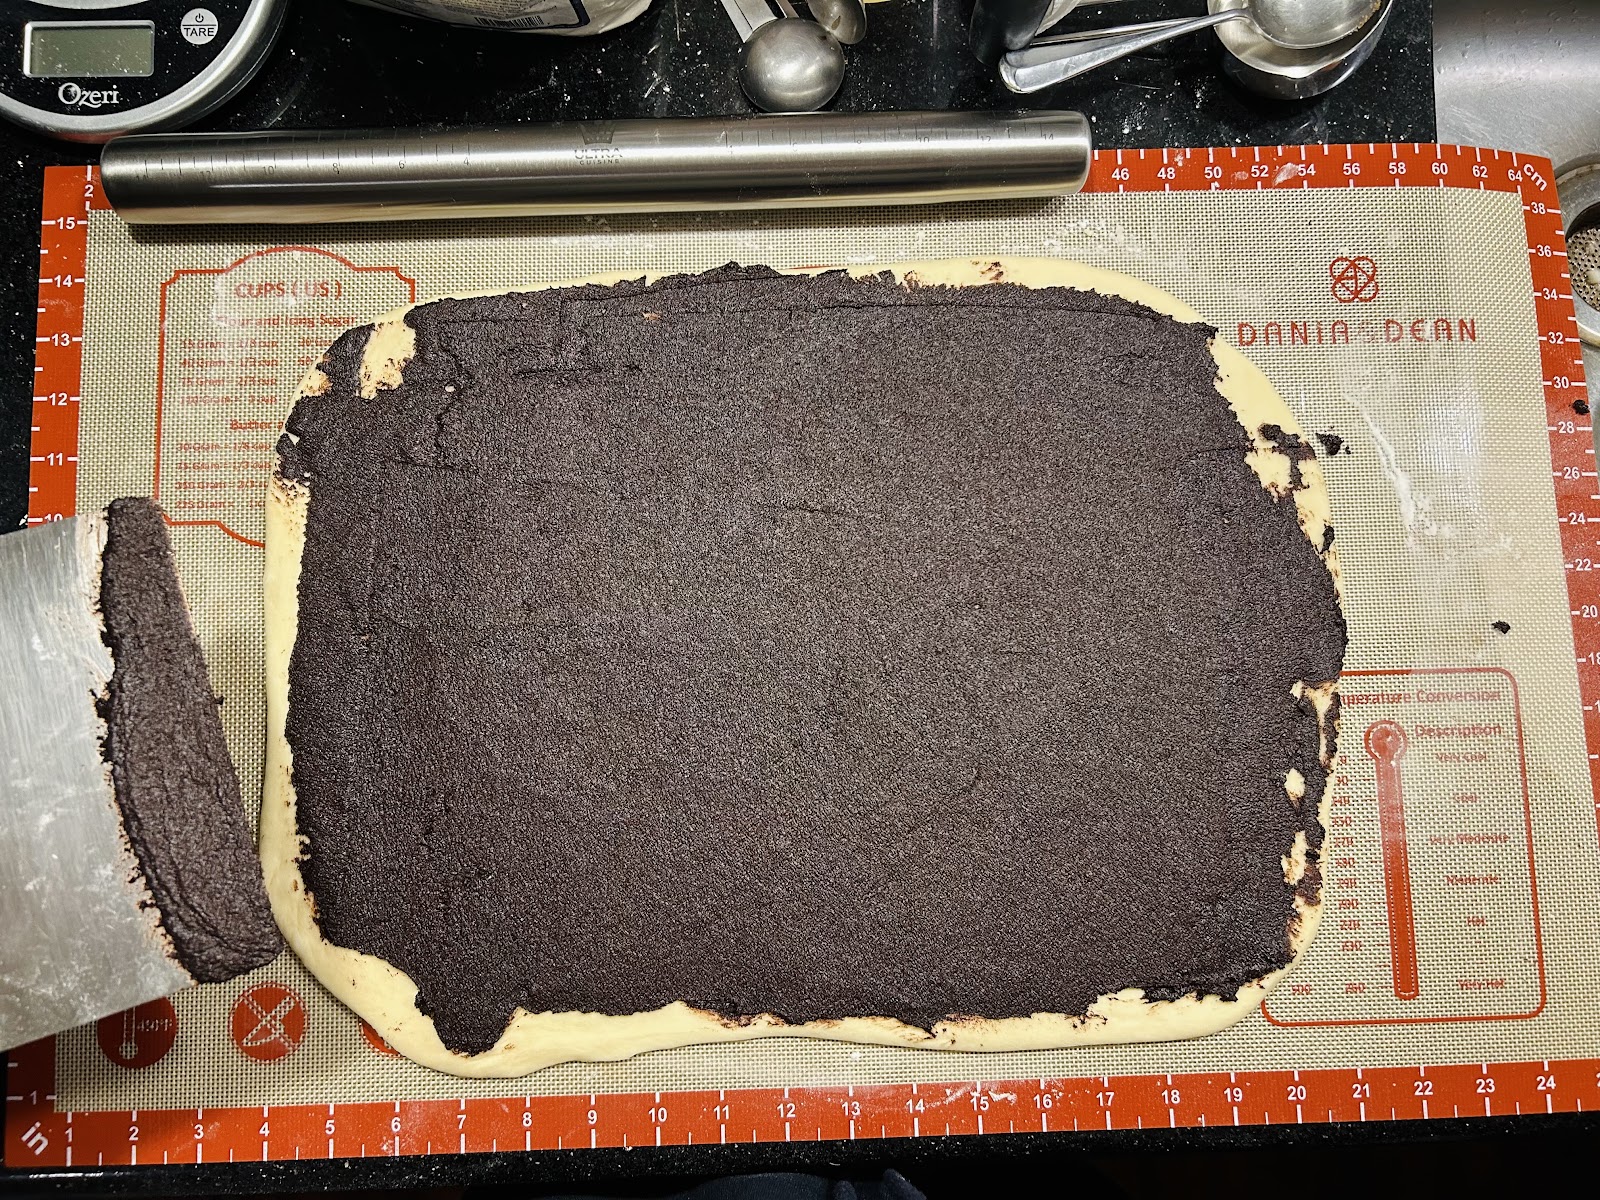
- Spread filling over the dough in an even layer, leaving ½” of space at the edges.
- Fold dough into thirds like a business letter. Pinch edges and along seam to seal. Gently roll rolling pin over folded dough block 1x to flatten slightly and smooth it out. (Recommended: Chill the dough block for 20-30 minutes to make next step easier.)
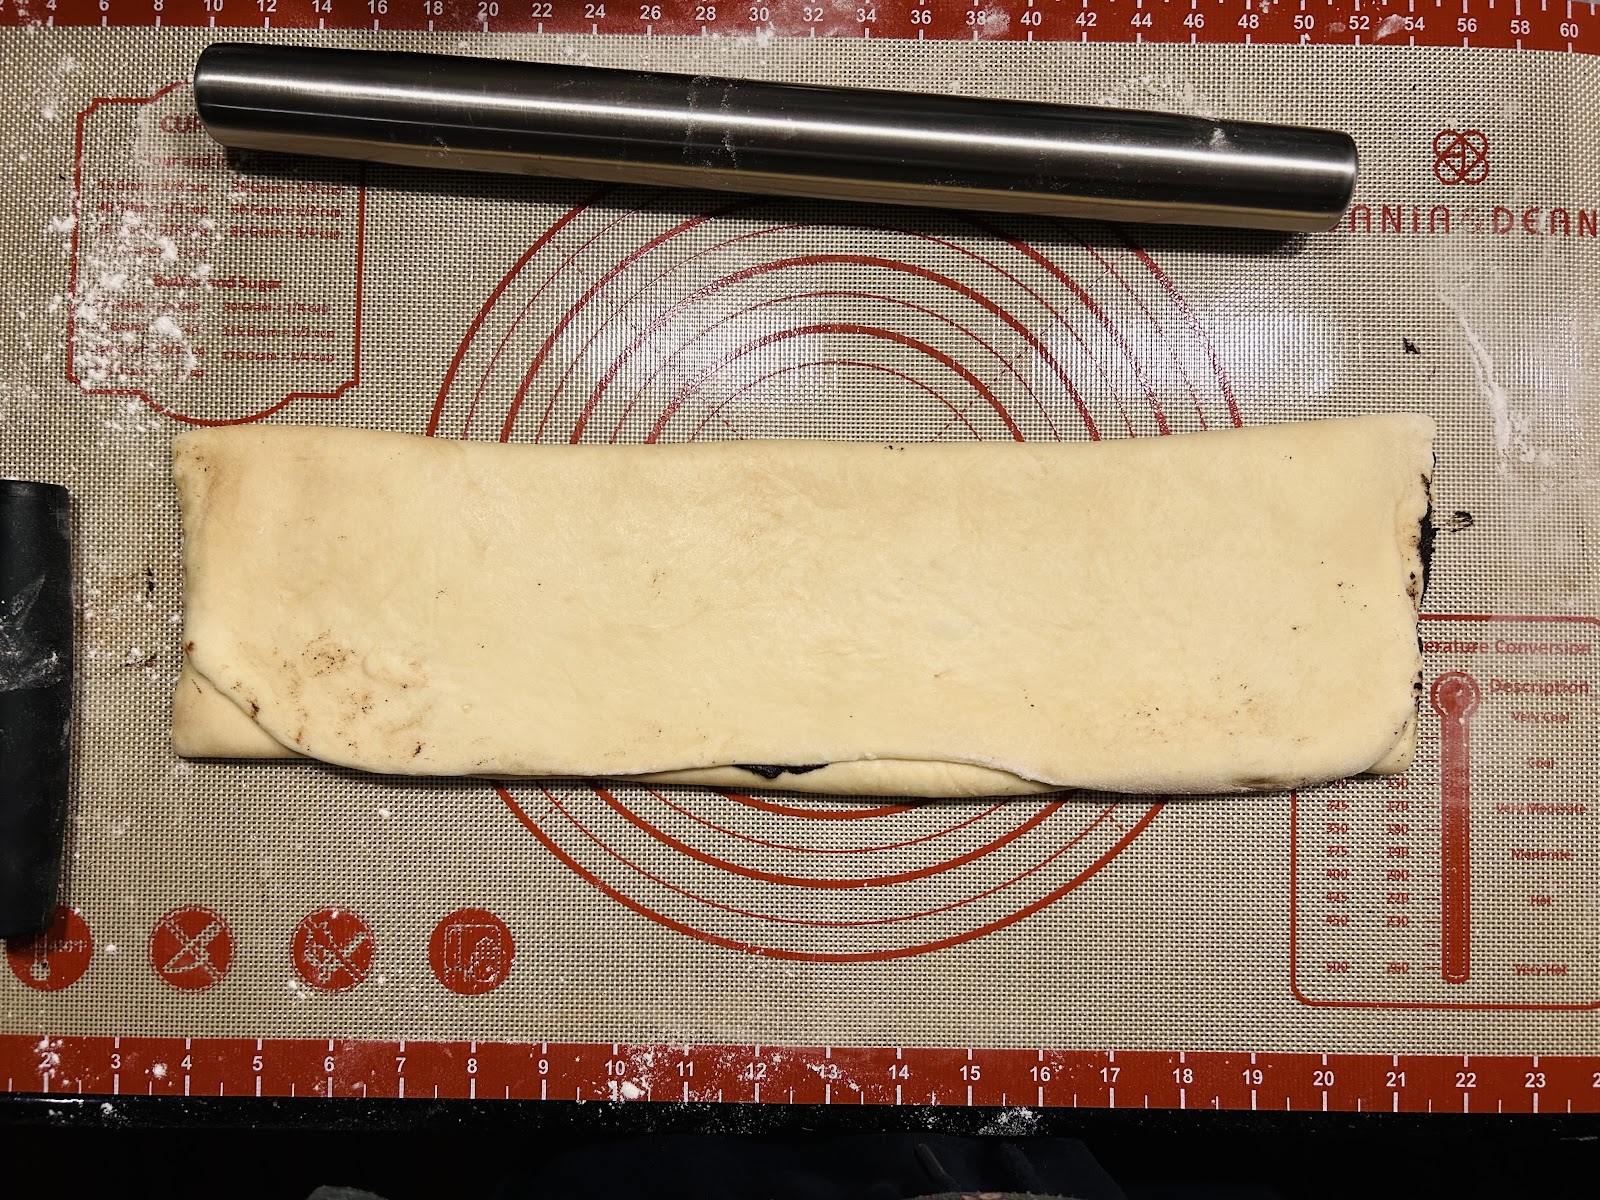
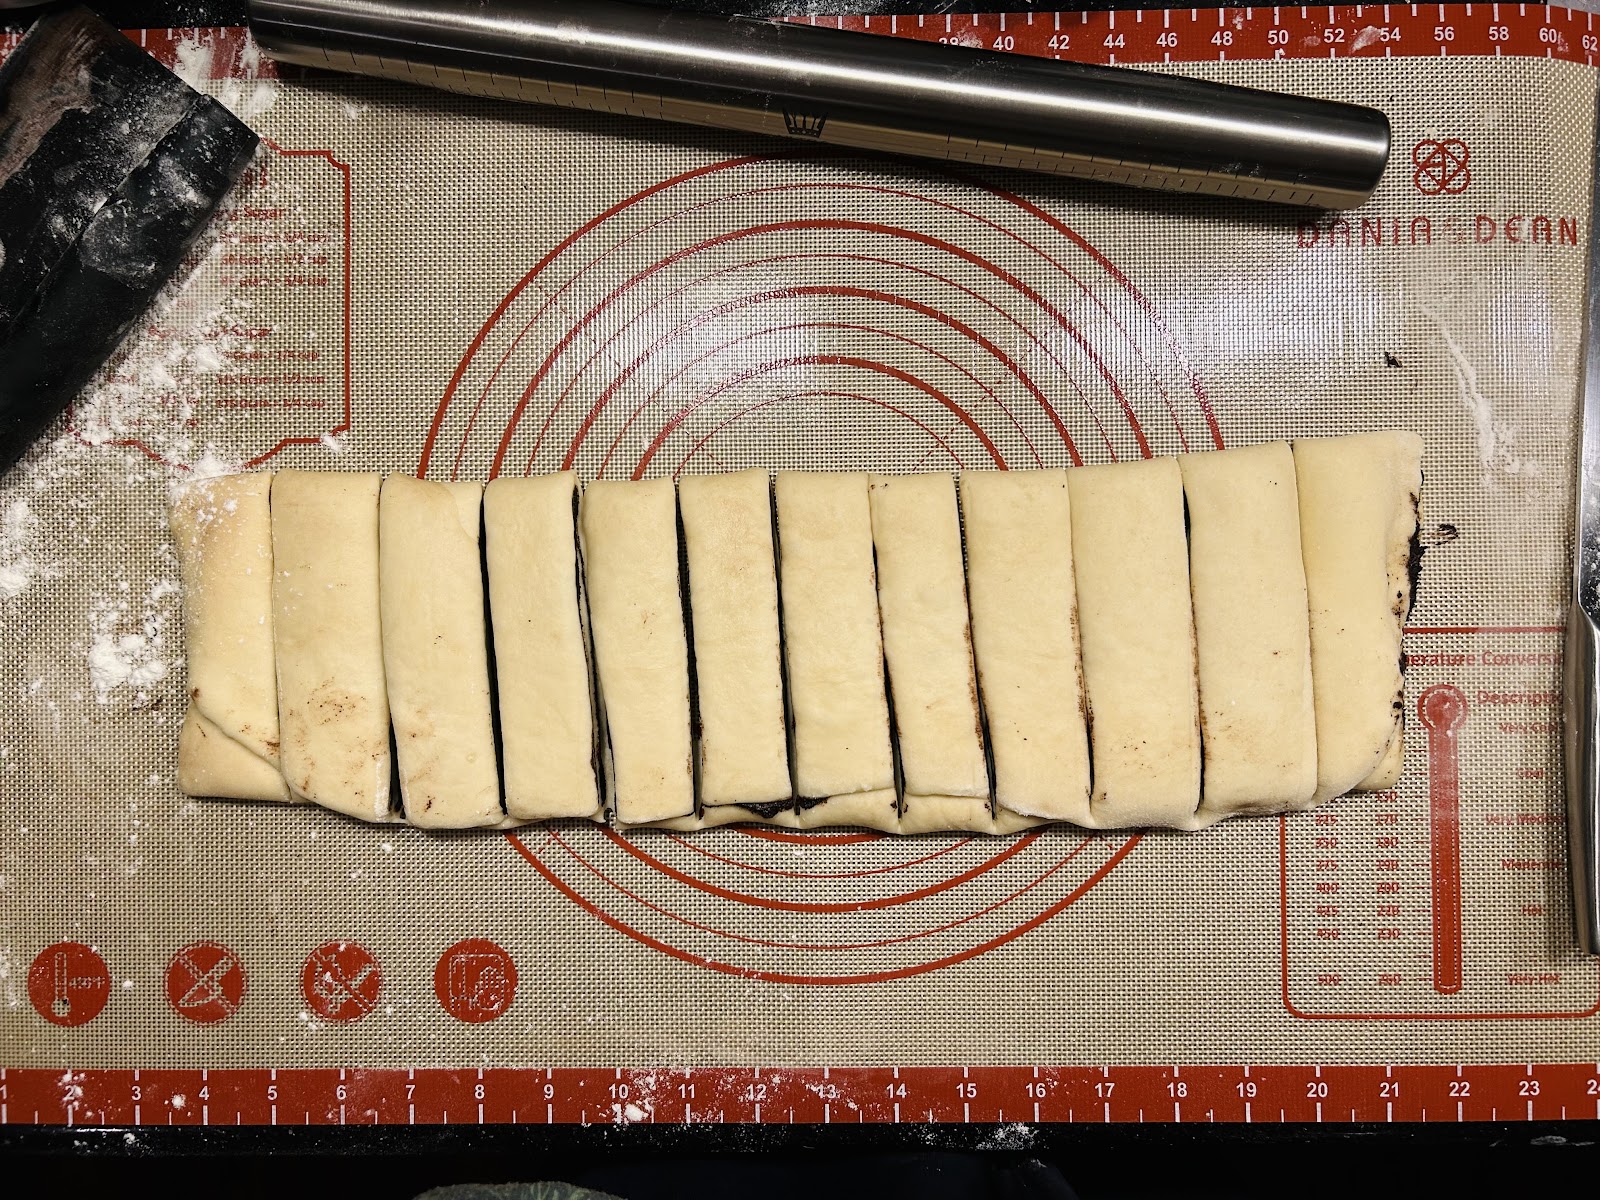
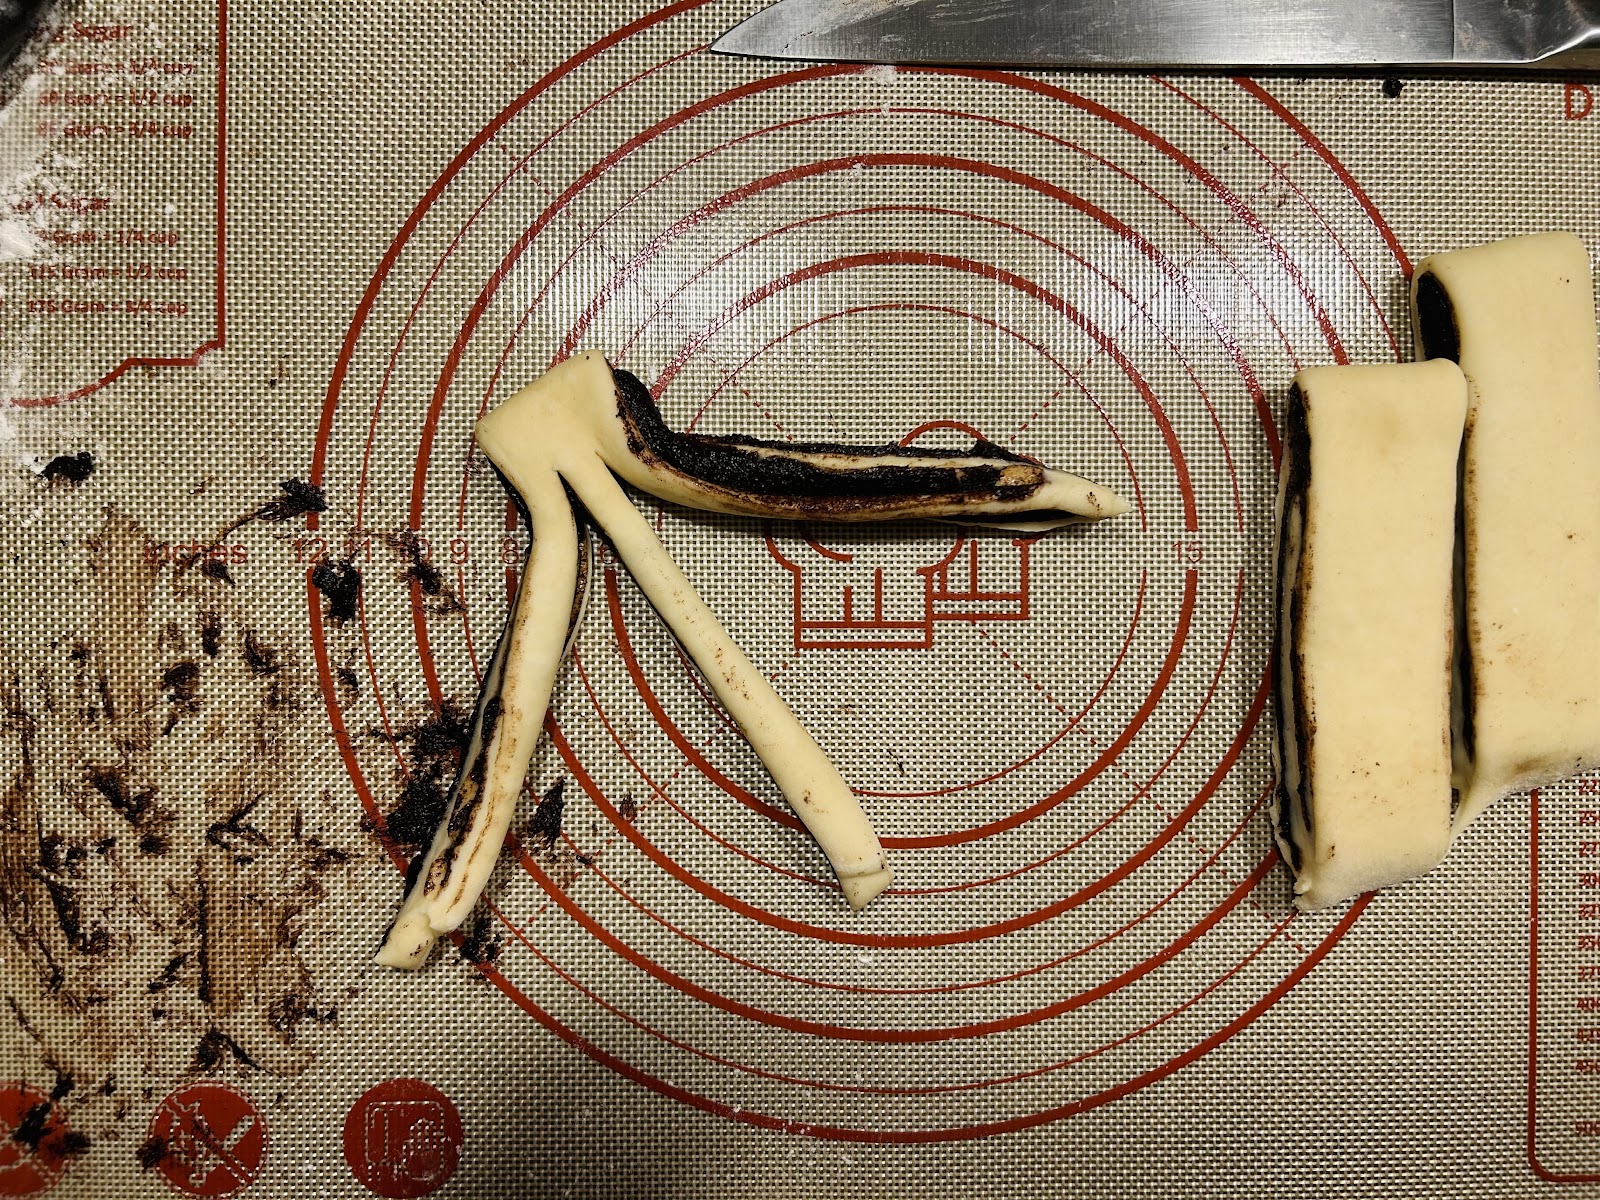
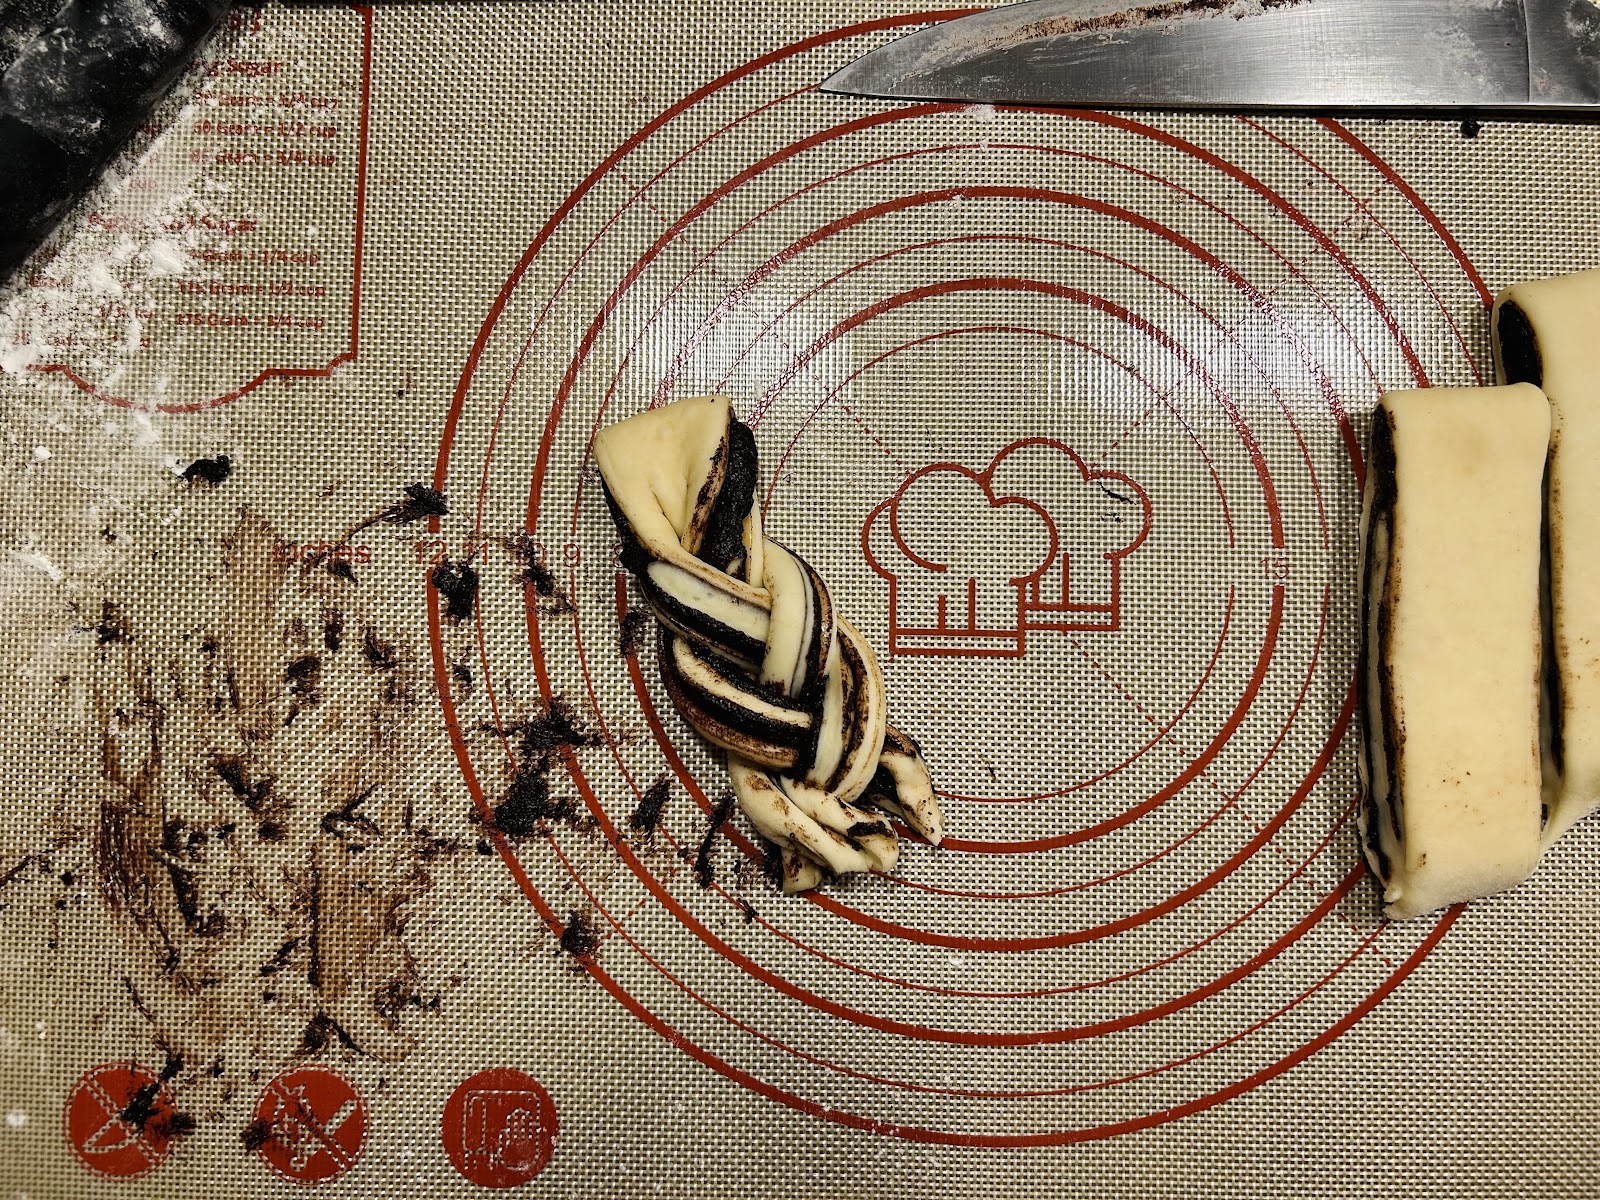
- Shape buns: Using a large, sharp knife, slice the dough block into 12 even strips. Cut each strip lengthwise into 3 thinner strips, leaving ½” uncut at the top. Braid, then coil braid into itself and tuck the ends under, pinching to seal, to form a round bun. Place buns 3-4” apart on prepared pans.
- 2nd Rise: Cover loosely with clean kitchen towels and let proof 20-30 minutes until slightly puffier.
- Preheat oven to 375°.
- Brush egg wash over the tops of the buns. Bake 1 tray at a time (put other tray in fridge so it doesn’t overproof) 16-20 minutes until tops are deep golden brown.
- Let cool on pan 15 minutes before removing.
NOTES
- This is my all-time favorite enriched dough. I use it for monkey bread, cinnamon rolls, babka, etc. It’s best when made with bread flour, but AP works great too. It’s soft as a cloud, with a light chew and stretch, not at all cakey.
- The 5-minute rest after incorporating all ingredients is crucial. In 5 minutes, the dough goes from goopy and unworkably sticky to soft and moist but beautifully kneadable.
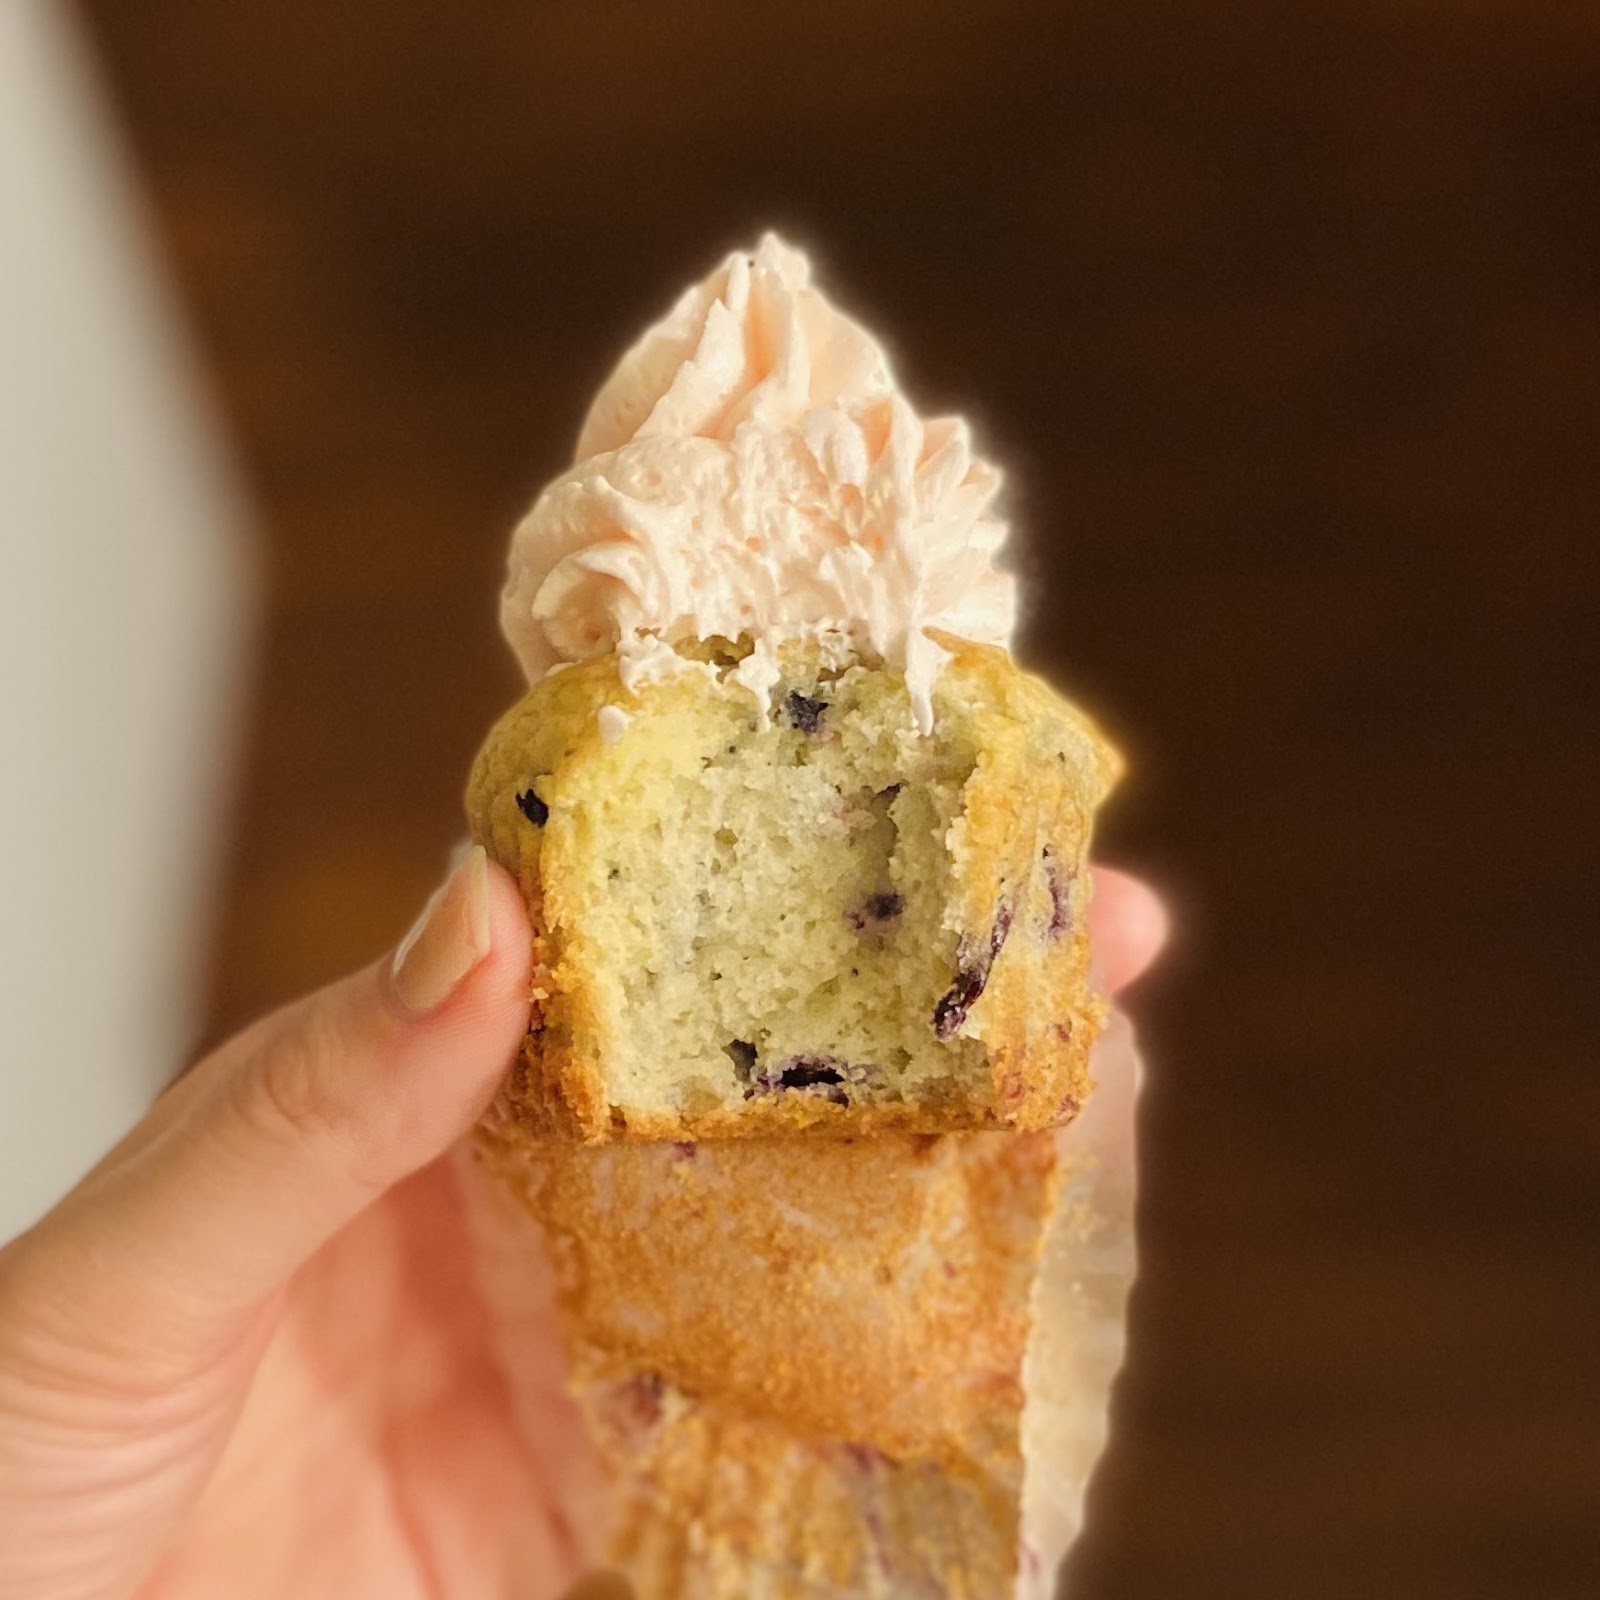
LEMON POPPY SEED MUFFINS
MAKES: 12 muffins
INGREDIENTS
1 cup (200g) white sugar
2 Tbsp lemon zest (zest of 2 lemons)
2 ½ cups (300g) AP flour
2 ½ tsp baking powder
½ tsp baking soda
½ tsp kosher salt
2 Tbsp poppy seeds
2 eggs, room temp
1 cup (227g) sour cream, greek yogurt, buttermilk, or any combination thereof, room temp
¼ cup (56g) butter, melted
¼ cup (50g) neutral oil
1 tsp vanilla
LEMON SIMPLE SYRUP
4 Tbsp lemon juice (juice of 2 lemons)
2 Tbsp white sugar
optional, or alternative to simple syrup: Lemon Glaze (½ cup powdered sugar, 2 Tbsp lemon juice. Stir until smooth. Add more sugar or lemon juice to reach desired texture. If you want it to soak in, make a thin glaze and drizzle onto still-hot muffins. If you want it to be decorative, make a thick, opaque glaze and drizzle onto cooled muffins.)
DIRECTIONS
- Preheat oven to 425°. Grease a 12-cup muffin tin.
- In a large bowl, whisk together sugar and lemon zest until the zest releases fragrant oils. Add flour, baking powder, baking soda, salt, and poppy seeds. Whisk to combine.
- In a separate bowl, whisk together eggs and sour cream until smooth. Whisk in butter, oil, and vanilla.
- Fold wet ingredients into dry ingredients until just combined. Do not overmix.
- Gently scoop batter into muffin tin. Fill each cup all the way to the top, or even heaped a little over.
- Bake at 425° for 8 minutes. Reduce temp to 400° and bake for an additional 15-20 minutes until tops are light golden brown and centers are toothpick clean.
- While muffins are baking, make lemon simple syrup: Add lemon juice and sugar to a small saucepan. Bring to a boil over medium heat. Reduce heat to low and simmer, swirling pan occasionally, until syrup is slightly thickened, 3-4 minutes.
- After muffins finish baking (while still hot), poke each one 5-6 times with a toothpick. Brush syrup over tops of muffins and let it soak in deeply.
- Let muffins cool in tins for 10 minutes, then remove to finish cooling on a wire rack.
NOTES
- Lemon flavor: If you add lemon juice to the muffin batter, it will mostly bake off—you won’t get a strong lemon flavor. I use lemon sugar and syrup or glaze instead. If you have lemon extract, feel free to add 1 tsp with wet ingredients.
- For extra tall domes: Let batter sit, covered, at room temp for 20-30 minutes (up to 1 hour) before baking to give the baking powder a “head start.” The batter will be visibly puffy after resting. Scoop very gently into tins, being careful not to deflate.
- Filling tins: With cupcakes, you only fill the cups 2/3 full. Cupcake batter is thin and airy, and will collapse under its own weight if the cups are overfilled. Muffin batter is thick and heavy, and needs extra support to achieve the ideal height. Fill the cups all the way. Spoon extra batter on top if you have some left over.
- Oven temp: The initial burst of heat (425) gives “thrust” for a strong structural rise. This is how you get tall, bakery-style muffin domes.
- Fat: All butter makes for a rich taste but dense, coarse, dry texture (butter solidifies as it cools). All oil makes for a less rich taste, but light, fluffy texture that stays moist for days. Half butter, half oil = best of both worlds.
- Sugar: With cupcakes, butter and sugar are creamed together to create a light, aerated base. Muffins are meant to be denser—they’re a quick bread (e.g. banana bread), not a cake—and rely on high amounts of leaveners for lift. (When you add wet to dry, the batter will froth/fizz as the leaveners activate.) So, no creaming the butter and sugar; instead, sugar is treated as a dry ingredient.
CAKES
GÂTEAU AU YAOURT (1-2-3 CAKE)
MAKES: 1 x 8-9” cake
This is a “no-measure” cake. See Notes for details.
INGREDIENTS
1 part full-fat plain or greek yogurt 2 parts white sugar 3 parts AP flour 1 tsp baking powder 1 part neutral oil 3 eggs optional: 1 tsp salt, 1 tsp vanilla, 1 Tbsp lemon zest 1 part = ½ cup, or any similar small container (such as a 4 oz/125g yogurt pot) as long as you use the same one throughout. Tip: 1 cup is about the size of your loose fist. Imagine dipping your fist halfway into a container, stopping at the base knuckle of your thumb. That’s about ½ cup. Using ½ cup, the measurements are: ½ cup yogurt, 1 cup sugar, 1 ½ cups flour, 1 tsp baking powder, ½ cup oil, 3 eggs. But it’s easier to just remember 1:2:3 + 1 tsp baking powder, 1 part oil, 3 eggs. |
DIRECTIONS
- Preheat oven to 350°.
- Grease a 9” cake pan. Line with parchment paper round for easy turnout.
- In a large bowl, beat together wet ingredients (yogurt, sugar, oil, and eggs) until fully smooth. Add dry ingredients (flour, baking powder). Mix until just combined. Do not overmix.
- Pour into pan. Bake 30-35 minutes until top is deep golden brown and toothpick clean.
- Let cool in pan 15 minutes before serving or removing.
NOTES
- This recipe is easy to memorize and can be made without measuring cups or a scale. As long as you have 1 small container, stick to the ratios and it will come out perfect. It can be made in a cake pan or a loaf pan.
- In lieu of yogurt you can use sour cream or buttermilk.
- Top with: sifted powdered sugar, sugared berries, a thin layer of apricot jam, vanilla glaze, chocolate drizzle, etc. Eat plain or with fresh fruit and whipped cream, jam and clotted cream, creme fraiche, vanilla ice cream, etc.
- To flavor: 1 tsp vanilla, lemon extract, or orange blossom essence; 1-2 Tbsps lemon or orange zest; 1 Tbsp instant coffee; 1 tsp cinnamon, cardamom, other warm spices, etc.
- Fruit upside-down cake: Melt 4 Tbsp butter and pour into the bottom of the empty pan. Add 1 part (½ cup) brown sugar and stir to combine. Add a single layer of any fruit (sliced peach, apple, plum, pineapple; berries; etc.). Pour cake batter on top and bake as directed.
- You can replace the oil with melted coconut oil or butter, though it will affect the texture.
- This is a common afternoon tea cake in France, and is often the first cake children learn to make because it’s so easy to remember and is based on standard French yogurt pots.
- To make your own yogurt, see recipe for Creamy French Yogurt.
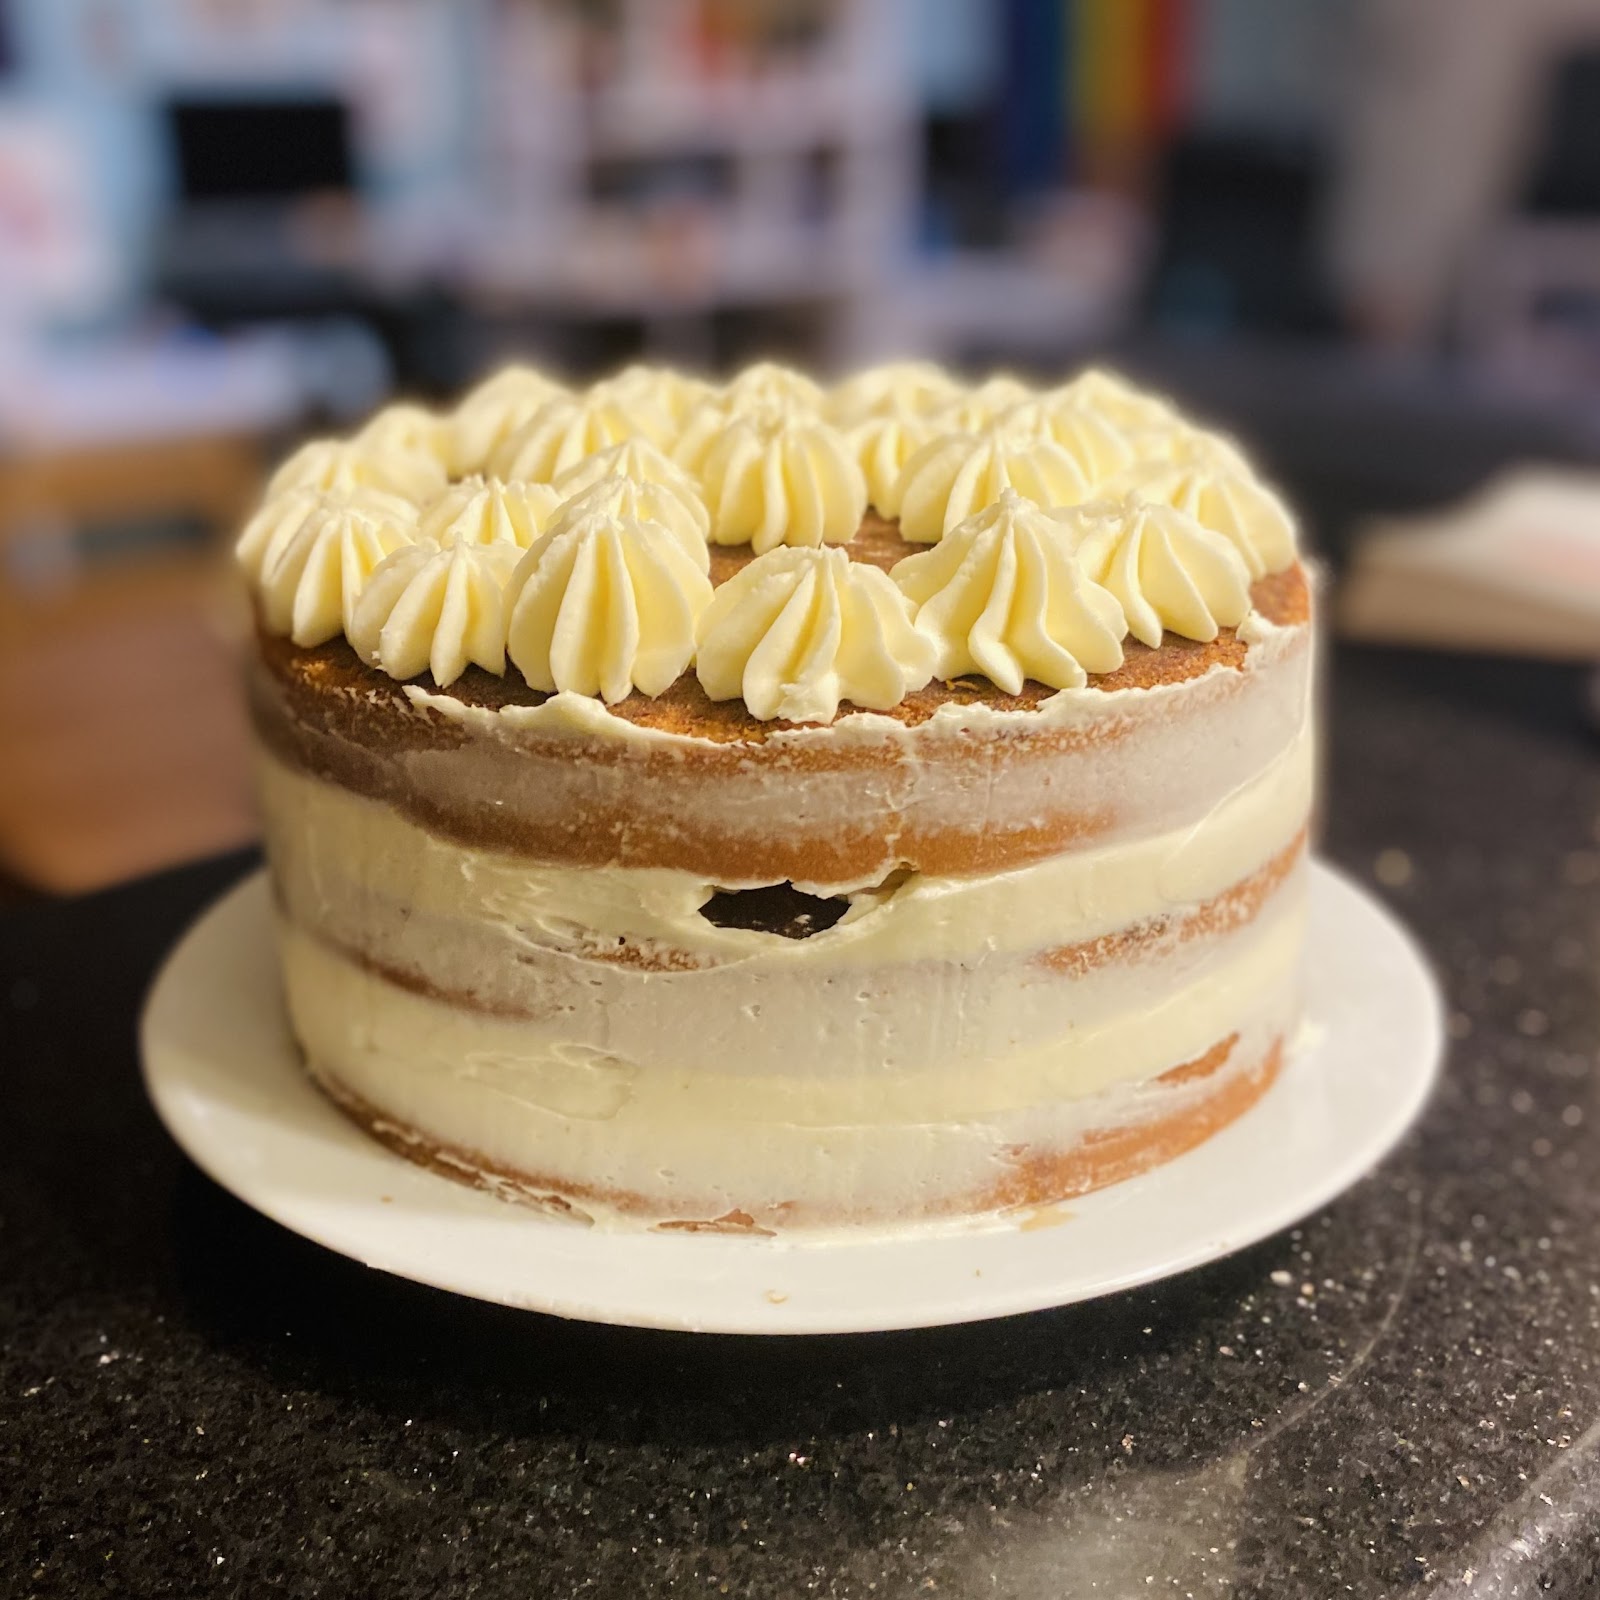
CLASSIC VANILLA CAKE
MAKES: 2 x 8-9” cake layers
INGREDIENTS
2 cups (240g) AP flour
2 tsp baking powder
1 tsp kosher salt
4 eggs, room temperature
1 ½ cups (300g) granulated sugar
½ cup (113g) butter, sliced
1 cup (227g) full-fat milk
2 Tbsp neutral oil
1 Tbsp vanilla
DIRECTIONS
- Preheat oven to 350°. Grease 2 x 8-9” cake pans and line with parchment paper rounds.
- Whisk together flour, baking powder, and salt. Set aside.
- Whip eggs: Using a stand or handheld mixer, whip eggs on medium-high speed until frothy. Slowly, over 1 minute, pour in sugar while whipping. Once sugar is added, continue whipping on medium-high speed 7-8 minutes until mixture is near-white and tripled in volume.
- Meanwhile, add butter and milk to a small saucepan so they’re ready to go for Step 6.
- Gently fold (or slowly pour while mixing on lowest speed) dry ingredients into the egg mixture until just incorporated. Do not overmix.
- Make hot milk: Heat butter and milk on medium heat until butter is melted and milk is just beginning to steam and simmer (do not boil). Take off heat. Stir in vanilla and oil. (Tip: I put the vanilla and oil in a large liquid measuring cup, then simply pour the hot milk into that so I don’t have to deal with the saucepan during the next step.)
- Slowly, while mixing on lowest speed, pour hot milk mixture into batter.
- Once hot milk is incorporated, give batter a final fold by hand, gently. Batter will be thin.
- Pour into cake pans.
- Bake 25-30 minutes until golden brown and toothpick clean in the center.
- Let cool in pans 10 minutes, then slice around the edge with a sharp knife and turn out onto a wire cooling rack. Let cool completely before frosting.
NOTES
- This recipe is developed from old-fashioned US Southern hot milk cakes. Instead of creaming butter and sugar as a base, the butter is melted into a hot milk mixture, which is then poured into the batter to give form and rise to the aerated eggs. This method results in a very moist, tender, velvety crumb.
- Most of the rise comes from the eggs. Once the eggs are whipped, add other ingredients slowly and mix gently to avoid deflating.
- To make 12 cupcakes: Halve recipe. Fill cupcake liners ⅔ full. Bake at 350° for 22 minutes or until toothpick clean.
- This vanilla cake pairs well with just about any frosting and filling combination, such as buttercream or whipped cream frosting + fruit curd/compote/jam, creme pat or diplomat, mousse, caramel, etc.
- It’s also a great base for delicately flavored cakes: You can infuse the hot milk with instant coffee/espresso, tea leaves, cinnamon, lavender, etc. Start with 1-2 tsp flavoring and add more to taste. (Strain out leaves/flowers.)
PIES AND TARTS
ALL-BUTTER PIE CRUST
MAKES: 1 generous double-crust pie
INGREDIENTS
3 ½ cups (420g) flour
1 Tbsp white sugar
1 tsp kosher salt
1 ½ cups (339g) butter, cold, diced
1 Tbsp white vinegar or vodka
½ cup minus 1 Tbsp (105g) ice cold water
DIRECTIONS
- Add 1 Tbsp vinegar to liquid measuring cup. Fill with cold water to ½ cup line. Put in the freezer to chill.
- In a large bowl, whisk together flour, sugar, and salt.
- Add diced butter in 2 parts, tossing in between to coat with flour.
- Work fat into flour: Smash each piece of butter with your knuckles to form large flakes. Continue to work butter into flour by smashing and rubbing/smearing butter pieces between flour-coated fingers. Stop when the mixture resembles coarse, crumbly clay soil, with small, granola-like crumbles of butter and only a few larger flakes. Work efficiently: Keep butter cold. (If butter starts to get greasy, put the bowl in the freezer for 15 minutes.)
- Add ice water mixture in 2 parts, mixing with spatula to combine. Stop when large clumps form. Ideal texture: moist but not sticky or wet; clumps together and retains its shape when squeezed.
- Turn dough onto a clean, well-floured surface. Using floured hands, knead 3-4 times, just enough to form a cohesive ball without any dry crumbles. Using a rolling pin, flatten dough into a 1” thick rectangle. Fold dough over itself in thirds, like a business letter, to form rough layers. Repeat 5-7 times, until flour and fats are fully incorporated and smooth, with only a few remaining flecks of butter and no sticky spots. (Dust sticky spots and exposed butter with flour as you go.)
- Form dough into a smooth ball. Divide in half. Shape each half into a 1” thick disc.
If you are using crust today: Roll out discs, between 2 sheets parchment paper or floured silpats, into 12-14” diameter circles (aiming for 2” overhang when placed in 8-9” pie tin, so measure against your pie tin) ⅛” to ¼” thick (the width across your pinky fingernail).
Shape crust: Press into pie tin. Slice off any uneven bits (press them lightly into the bottom), leaving an overhang of 2” all the way round. Fold the overhang over itself backward (so the rough, uneven edges are hidden between the crust and pie tin—not pressed into the inner shell), then crimp the folded edge with your fingers, pinching sideways. Chill shaped shell in fridge or freezer for at least 1 hour before using.
If you are NOT using crust today: Wrap discs in plastic wrap and store in fridge for up to 1 week. Let sit out 5-10 minutes before using to soften slightly, but not long enough to reach room temp. (Store in freezer indefinitely. Thaw in fridge before using.)
TO PAR-BAKE (if using a custard or no-bake filling) Roll out crust. Press into pie tin, fold over edges, and crimp. Chill the shaped shell in the freezer for 30+ minutes. Preheat oven to 400°. Line the inside of the frozen shell with 1 or 2 sheets parchment paper (crumple paper first to shape more easily). Fill the lined shell with pie weights, dried beans, or uncooked rice, heaping against the sides to prevent shrinkage. Bake 15 minutes. Remove from oven and carefully remove paper with pie weights inside. Prick bottom of shell with a fork in 1” intervals. For a partially baked crust, bake 10-12 more minutes until bottom crust is just beginning to brown. For a fully baked crust, bake 15-18 more minutes until bottom crust is fully golden brown. |
NOTES
- For a classic flaky crust, make as written.
- For a tender, short crust (short as in crumb, i.e. shortbread), use a food processor to combine ingredients through Step 4, when large clumps form, then finish by hand.
- Small, thin (not large!) butter streaks = pieces of butter melt and give off steam, forming air pockets that make flaky layers.
- Butter completely incorporated, no visible flecks = melts-in-your-mouth, crumbly texture.
- Keep things cold. The worked dough should be soft, flexible, and smooth, like well-worn leather, and feel cool to the touch as you roll it out. You should be able to transfer it to your pie tin easily with your hands, without having to scrape it off the counter and without any rips. (Dust liberally with flour as needed as you work dough to form layers. Brush off excess at the end.) The dough should never feel warm or sticky. If it feels sticky, brush with flour and/or refrigerate it for 20 minutes.
- Do not overwork the dough, though some kneading is fine! The addition of vinegar helps prevent gluten formation. (You don’t want a chewy crust.)
- Coating butter pieces in flour gives them a protective “wall” to prevent melting.
- To deepen flavor: (a) Sub 1 tsp water with vanilla or almond extract, or (b) Add 1-2 tsp spices (cinnamon or pumpkin pie spice, freshly ground black pepper, lemon pepper, chili powder, turmeric, etc.), or (c) Add up to 1 Tbsp herbs or citrus zest.
SWEET POTATO PIE
MAKES: 1 x 8-9” pie
INGREDIENTS
1 ½ lbs sweet potatoes (2-3 potatoes) (3 cups flesh), whole, to be roasted
1 x 12 oz can evaporated milk
1 cup (200g) dark brown sugar
2 eggs
5 Tbsp (70g) butter, melted
1 Tbsp lemon zest (zest of 1 lemon)
1 tsp lemon juice
1 Tbsp cinnamon
½ tsp kosher salt
½ tsp ginger
¼ tsp nutmeg
2 cracks (⅛ tsp) freshly ground black pepper
1 disc (½ recipe) All-Butter Pie Crust
DIRECTIONS
- Roast sweet potatoes: Preheat oven to 400°. Line a baking sheet with foil. Wash and scrub whole sweet potatoes. Pierce potatoes all over 3-5x with paring knife. Roast 45 minutes until fork tender. Let cool, then collect 3 cups flesh.
- Prepare crust: Roll out pie dough (12-14” diameter circle, ¼” thick). Press into tin and crimp edges. Chill shaped shell in fridge or freezer until ready to use.
- Preheat oven to 350°.
- Make filling: Put all ingredients in food processor. Pulse 3-4x until smooth. (You can also use a blender, or simply beat ingredients until fully combined.)
- Pour filling into pie shell.
- Bake 45-60 minutes until puffed and firmly set (toothpick clean) everywhere except the very center, which should retain a very slight jiggle (but not look liquid). The center will set as it cools. Start checking at 45 minutes and continue baking at 5 minute intervals until set. (If crust gets too brown, shield edges with foil.)
- Let cool completely before serving, at least 1 hour.
NOTES
- Roast the potatoes whole, in the skins, so the sugars & starches properly caramelize. Do not steam or boil potatoes, even whole. They will take on water and make the filling soggy.
- You can roast the potatoes up to 1 week in advance. Collect flesh day of.
PECAN PIE
MAKES: 1 x 8-9” pie
INGREDIENTS
2 cups (250g) chopped pecans
1 cup (200g) dark brown sugar
1 cup light or dark corn syrup
¼ cup (56g) butter
4 eggs
1 Tbsp vanilla
1 tsp kosher salt
1 tsp cinnamon
1 disc (½ recipe) All-Butter Pie Crust
DIRECTIONS
- Prepare shell: Roll out pie dough (12-14” diameter circle, ¼” thick), press into tin, crimp edges. Chill shaped shell in fridge or freezer until ready to use.
- Preheat oven to 350°.
- Cook sugar syrup: In a saucepan, bring sugar, corn syrup, and butter to boil over medium heat for 1-2 minutes, whisking constantly, to cook sugar. Take off heat. Let cool slightly, 3 minutes.
- Temper eggs: In a bowl, beat eggs until lightened and frothy. Slowly, while whisking, pour ½ cup of warm syrup into eggs. Whisk to combine. Then, while whisking, slowly pour egg mixture back into the remaining syrup mixture. Whisk until smooth.
- Whisk in vanilla, salt, and cinnamon.
- Pour chopped pecans into bottom of pie shell. Pour filling over pecans.
- Bake 45-60 minutes until fully set everywhere except the very center, which should retain a very slight jiggle. The center will set as it cools. Start checking at 45 minutes and continue baking at 5 minute intervals until set.
- Let cool completely before serving, at least 1 hour.
NOTES
- Many recipes do not require you to cook the sugar before baking the pie. However, pre-cooking the sugar (and tempering the eggs) ensures the ideal gooey, silky, perfectly smooth texture.
- Toast pecans if desired: Arrange pecans in a single layer on a baking sheet and toast in preheated oven 5-8 minutes.
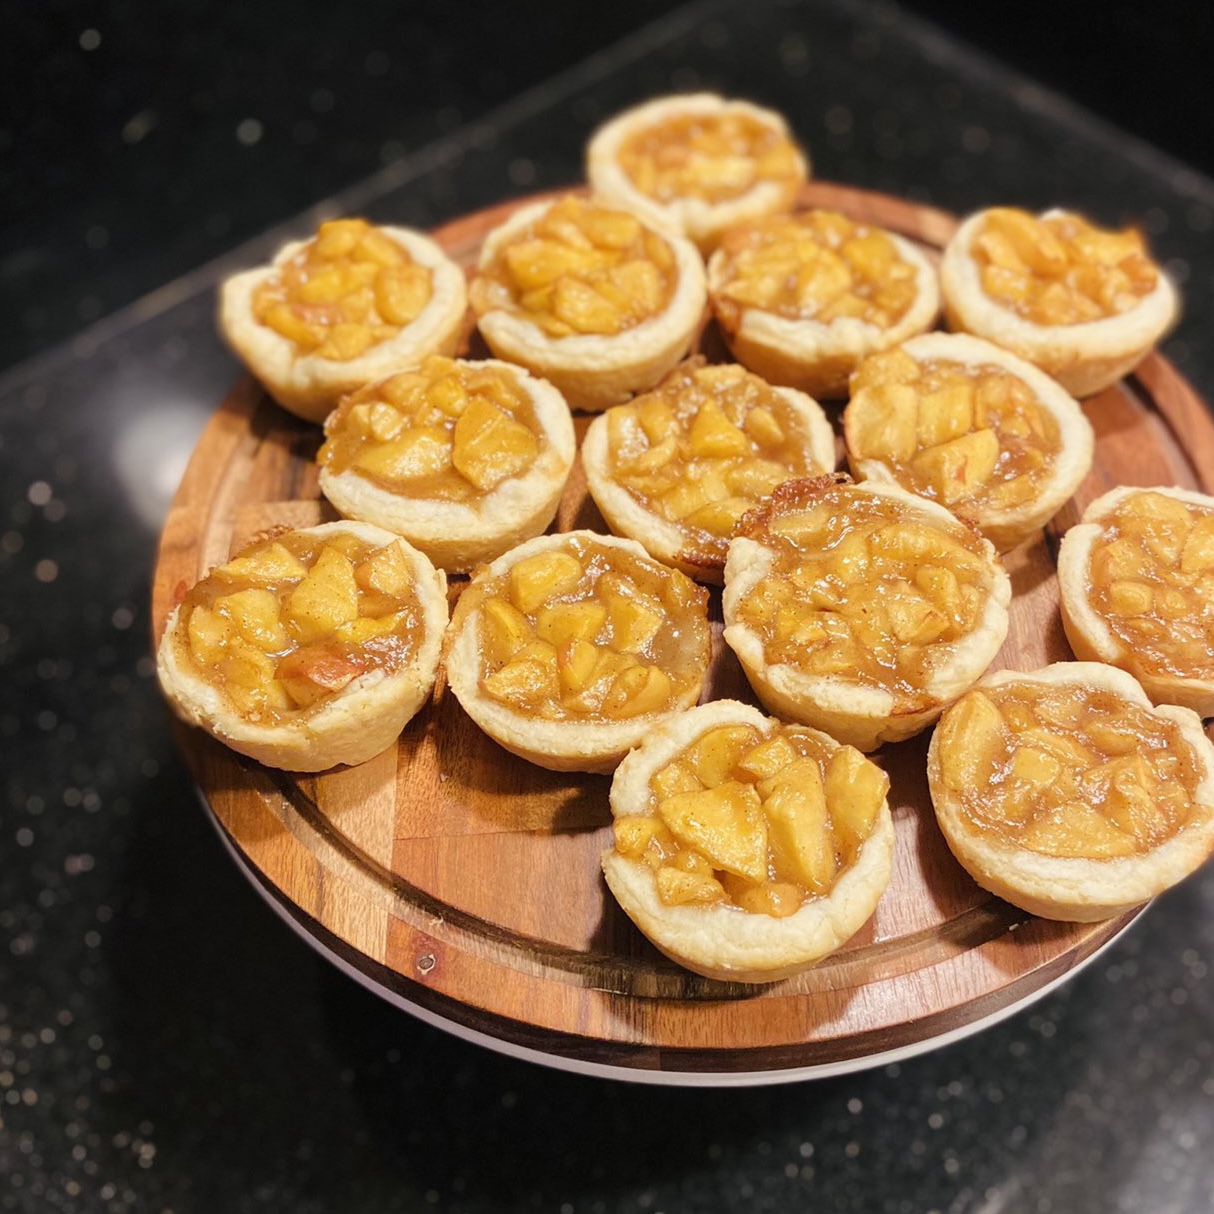
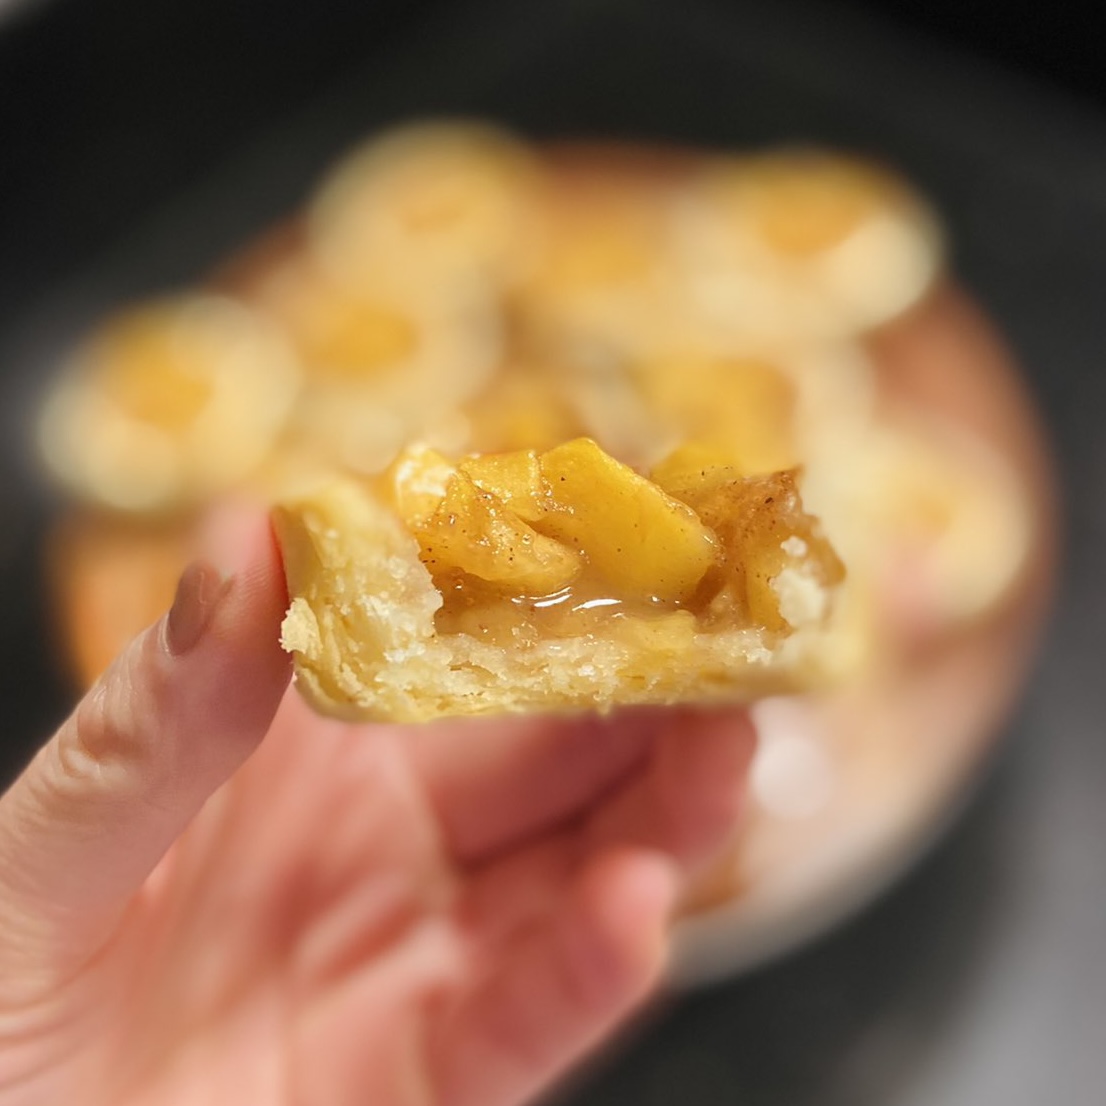
MUFFIN TIN APPLE PIES
MAKES: 16 mini apple pies
INGREDIENTS
2-3 large apples, peeled and diced (3 cups/250-300g diced apple)
¼ cup (56g) butter
¼ cup (50g) brown sugar
1 Tbsp maple syrup or honey
1 Tbsp cinnamon
¼ tsp each nutmeg, cloves, ginger
1 tsp kosher salt
1 Tbsp cornstarch + 1 Tbsp water, mixed into a slurry
1 tsp vanilla
1 tsp lemon juice
1 disc (½ recipe) All-Butter Pie Crust
DIRECTIONS
- Prepare crust: Grease 2 x 12-cup muffin tins. Roll out pie dough ¼” thick. Using a 3.5-4” diameter cookie cutter or drinking glass, cut out circles of pie dough. Press dough circles into the muffin tin cups, 8 in each tin (so weight is evenly distributed). Put tins in fridge or freezer to chill pie shells until ready to use.
- Make filling: Melt butter in a saucepan over medium heat. Add brown sugar, maple syrup, cinnamon, spices, and salt. Bring to a simmer, whisking frequently. Once simmering, whisk in cornstarch slurry. Simmer 2 minutes, whisking constantly, until thickened. Turn off heat. Whisk in vanilla and lemon juice. Add diced apples and stir to coat apples in syrup. Set aside to cool slightly, 5 minutes.
- Meanwhile, preheat oven to 375°.
- Spoon filling into shells all the way to the top, about 2-3 Tbsp filling per shell.
- Bake 30-35 minutes until edges of crust are golden brown.
- Let mini pies cool in tins 15-20 minutes, then gently remove/tip out with a fork to finish cooling on a wire rack.
TOASTED COCONUT LIME TART (EGG OR NO EGG)
MAKES: 1 x 8-9” tart
INGREDIENTS
¼ cup (25g) shredded or flaked coconut, to be toasted
1 x 14 oz can condensed milk
1 x 13.5 oz can coconut milk or cream
4 Tbsp lime juice (juice of 3-4 limes)
2 Tbsp lime zest (zest of 3-4 limes)
½ tsp cardamom
¼ cup (28g) corn starch
2 Tbsp water
2 Tbsp (28g) butter
1 Tbsp vanilla
1 recipe Pate Sablee
DIRECTIONS
- Prepare tart shell: Roll out dough into a 12-14” diameter circle ¼” thick. Press into a tart pan or pie tin. Line with parchment paper and baking weights. Fully bake the shell according to Par-Bake directions for All-Butter Pie Crust.
- Toast coconut: Add shredded coconut to a small saucepan over medium-low heat. Toast, stirring frequently, until most of the coconut is light golden brown. Be careful: It will go from toasted to burnt quickly.
- In a saucepan, add condensed milk, coconut milk, butter, lime juice, lime zest, and cardamom. Prepare cornstarch slurry: In a small bowl, stir together the cornstarch and water until smooth. Bring the milk mixture to a boil over medium heat, whisking constantly. Pour in the slurry. Cook 3-4 more minutes, whisking, until mixture thickens enough for the whisk to leave tracks on the surface. Remove from heat. Whisk in butter and vanilla.
- Spread custard into cooled, pre-baked shell. Sprinkle the toasted coconut (and any leftover lime zest) in a ring around the edge, or however you want.
- Chill in fridge until fully set, 4 hours.
NOTES
- “Yes Egg” version: Replace cornstarch with 4 egg yolks. Temper the egg yolks with the hot milk mixture according to Temper Eggs directions for Pecan Pie. Once everything is combined, cook for 3-4 more minutes and continue as instructed.
- The Yes Egg version will be richer, more of a classic custard. The cornstarch version is lighter, but otherwise similar in taste; you can’t taste the cornstarch once it’s been fully cooked. This one came about because I had coconut and lime, wanted to make a tart, had no eggs, improvised, was pleasantly surprised.
PATE SABLÉE
MAKES: 1 x 8-9” tart shell
INGREDIENTS
1 cup (120g) AP flour
½ cup (50g) almond flour (or ½ cup AP flour)
½ cup (113g) butter, cool room temp
¼ cup (30g) powdered sugar
1 egg yolk
½ tsp kosher salt
DIRECTIONS
- In a food processor, pulse dry ingredients 1x to combine.
- Add the butter and pulse 2-4x to combine.
- Add the egg in 2 parts, pulsing to combine in between, until dough forms a cohesive ball.
- Scrape dough onto floured surface. Shape into a disc (or, if using today, roll out into a 12-14” circle ¼” thick), then wrap in plastic. Chill at least 1 hour before using.
PATE SUCRÉE
MAKES: 1 x 8-9” tart shell
1 ½ cups (180g) AP flour
½ cup (113g) butter, cool room temp, sliced
¼ cup (50g) white sugar
1 egg yolk
½ tsp kosher salt
DIRECTIONS
- With a stand or hand mixer, cream butter and sugar until light and fluffy, 5 minutes.
- Add egg yolk. Beat to combine. Add flour and salt. Mix on low speed until fully moist and crumbly, 1 minute.
- Scrape dough onto floured surface. Shape into a disc (or, if using today, roll out into a 12-14” circle ¼” thick), then wrap in plastic. Chill at least 1 hour before using.
NOTES
- Pate Sablée (“sandy dough”) has a very tender, sandy-crumbly, shortbread texture; it uses powdered sugar and fully incorporates the flour and fats (see Notes for All-Butter Pie Crust). Pate Sucrée (“sweet dough”) is less short in texture, more crisp, though not as flaky as Pate Brisée; it uses granulated sugar and creams butter and sugar together as a base.
FROSTINGS AND FILLINGS
VANILLA CREME PATISSERIE
MAKES: about 2 ½ cups
INGREDIENTS
2 cups (454g) whole milk
½ cup (100g) white sugar
4 egg yolks
2 Tbsp (15g) cornstarch
½ tsp kosher salt
2 Tbsp (28g) butter
1 Tbsp vanilla
DIRECTIONS
- In a saucepan over medium heat, bring milk to a simmer. Turn off heat.
- While milk is heating, whisk together sugar, egg yolks, cornstarch, and salt until smooth and pale yellow.
- Temper eggs: Slowly, while whisking, pour ½ cup of hot milk into the egg mixture. Whisk to combine. Then, while whisking, pour egg mixture into hot milk.
- Bring to a boil over medium heat, whisking constantly, until mixture thickens and bubbles in the center. Take off heat.
- Whisk in butter and vanilla until smooth. (If you see any grainy bits, press through a sieve.)
- Transfer into a container. Cover surface of custard with cling wrap so it doesn’t develop a skin. Chill until fully set, 1-2 hours.
- Give it a good whisk before using.
NOTES
- To make creme diplomat: Fold in a 1:1 weight ratio of whipped cream. (To make whipped cream: 1 cup cold heavy cream, 2 Tbsp powdered or granulated sugar, 1 tsp vanilla. Whip with a stand or hand mixer until fluffy and tripled in volume, with medium peaks, 4-6 minutes.)
- To make chocolate creme pat: Stir in ⅓ cup (60g) finely chopped dark chocolate at the end with the butter and vanilla.
- Bringing to a boil and cooking at a boil for 1-2 minutes ensures the starch blooms and cooks off (so no cornstarch flavor), and the egg yolk proteins don’t gel or get lumpy.
- Once you add the eggs, you cannot stop whisking.
GERMAN BUTTERCREAM
MAKES: about 5 cups, enough to generously frost one 2- or 3-layer 9” cake, 9x13” sheet cake, or 12-16 cupcakes
INGREDIENTS
1 recipe Vanilla Creme Patisserie, room temp (after setting in the fridge)
2 cups (454g) butter, room temp
powdered sugar to taste or to stiffen, if needed
½ to 1 tsp kosher salt to taste, if needed
DIRECTIONS
- With a stand or hand mixer, beat butter on medium-high until ivory, smooth, and fluffy, 5-6 minutes.
- Add the creme patisserie 1 big spoonful at a time, while beating, until fully incorporated. Beat on medium-high 5 more minutes until smooth, light, and fluffy, scraping down the sides of the bowl as needed. (If the bottom of the bowl is cool to the touch, or the buttercream looks dense or greasy: Take 2 Tbsp buttercream and put in a small microwave-safe bowl. Microwave 15-20 seconds just until warm and liquid, not too hot. Drizzle back into the bowl while mixing. Buttercream will warm slightly and whip up smooth and glossy.)
- Use buttercream immediately.
NOTES
- If it starts looking a little loose or soupy while still adding the creme pat, just keep going, it will even out. If it still looks loose 2 minutes after creme pat is fully incorporated, chill the bowl for 15 minutes then continue.
- If you want a stiffer or slightly sweeter buttercream, add powdered sugar 1-2 Tbsp at a time to stiffen (after creme pat is fully incorporated).
- For piping details: Set aside a small amount of frosting. Beat in powdered sugar 1 Tbsp at a time until you reach a desired stiff consistency.
- To color: Add 1-2 drops gel food coloring (preferably not liquid) after the creme pat is fully incorporated.
- German Buttercream is probably my favorite. It’s much less sweet than American, not as complicated as Swiss or Italian, and is lighter and holds its shape better than French. It’s also very easy to flavor: You can infuse the creme pat with tea, coffee, florals, spices, citrus, etc.
Troubleshooting buttercream Issues with buttercream are almost always because of temperature. If it’s loose or soupy, it’s too warm; chill it in the fridge. If it’s curdled or lumpy, it’s too cold; let it sit for a few minutes to come to room temp. If your buttercream breaks—looks super grainy and awful—it’s probably because you added a cold thing into a room temp thing and now your temperatures are all out of whack. Take 2-3 Tbsp of broken buttercream into a small, microwave-safe bowl. Microwave 15-20 seconds, just so it melts into a warm liquid without getting too hot. Drizzle the melted buttercream back into the main bowl while mixing on medium-low, then beat on medium-high. Within 2-3 minutes, the buttercream will go from grainy to smooth again. Keep beating until you reach the desired fluffy volume. |
FRENCH BUTTERCREAM
MAKES: about 3 cups, enough to frost a 2- or 3-layer 9” cake (see Notes), 9x13” sheet cake, or 12 cupcakes
Recipe method from Stella Parks.
INGREDIENTS
5 egg yolks
½ cup (100g) white sugar
2 Tbsp water (or bourbon, brandy, rum, tea, coffee, etc.)
1 Tbsp vanilla
1 tsp kosher salt
1 ½ cups (340g) butter, room temp, sliced
powdered sugar to taste or to stiffen, if needed
DIRECTIONS
- Prepare double boiler: Fill a wide pot with 2” of water (up to the second knuckle of your index finger). Find a heat-proof, wide-bottomed bowl that can sit comfortably on the pot without touching the water. You also need a cooking thermometer. (If you have a stand mixer and the bowl you’re using is not the stand mixer bowl, be prepared to transfer the hot egg mixture into the bowl of your stand mixer.)
- Bring the water to a simmer over medium-high heat. While water is heating, add egg yolks, sugar, and water to the wide-bottomed bowl and whisk to combine. (Do this separately, not over the double boiler.) Once water is simmering, reduce heat to low so it’s just steaming.
- Cook egg syrup: Place the bowl on the steaming pot. Stirring and scraping constantly with a spatula, cook the egg yolk mixture until it reaches 155° and turns from a thick, grainy paste into a thinner syrup, 3-4 minutes. Once it comes to temp, immediately remove from heat.
- Whip egg syrup: Using a stand or hand mixer, whip egg yolk syrup on high speed for 7-8 minutes until it’s pale yellow-white, doubled or tripled in size, and completely cooled to room temp.
- Add vanilla and salt. Add butter 1 Tbsp at a time while mixing on medium speed. The mixture will look soupy for a couple minutes. That’s normal, keep going. Once butter is incorporated, whip on medium-high for 5 more minutes until buttercream is light (see Notes), fluffy, and silky.
NOTES
- Color: The final color should be pale yellow-white (the color of butter) and stiff enough to hold its shape. If it’s at all droopy, or a deeper yellow than butter, chill in fridge for 15-20 minutes, then whip until it reaches the right color and consistency.
- Recipe yield: French buttercream is very rich, and softer than other buttercreams. It’s not generally suitable for detailed piping, and it’s not the kind of buttercream I’d want to thickly frost a whole cake with—I prefer to use it as filling between cake layers (it’s incredible paired with lemon curd, if you ever have 10 egg yolks to use up), in macarons, or on modestly frosted cupcakes.
- Method: Most French buttercream recipes cook the egg yolks by heating sugar syrup to 238° and then drizzling it into the egg yolks while whipping. I’ve used this method plenty of times and it works great. However, it is more stressful (hotter temps, pouring screaming-hot sugar syrup into a running mixer) and doesn’t guarantee fully cooked eggs (sugar changes the cooking temp of eggs, and drizzling the syrup might leave uncooked egg particles). Either way is fine, but the double boiler method is simpler.

ERMINE (ROUX) FROSTING
MAKES: about 3 cups, enough to frost a 2- or 3-layer 9” cake, 9x13” sheet cake, or 12 cupcakes
INGREDIENTS
1 cup (227g) milk
1 cup (200g) white sugar, divided
5 Tbsp (40g) AP flour
1 ½ cups (340g) butter, room temp, sliced
1 Tbsp vanilla
1 tsp kosher salt
powdered sugar to taste or to stiffen, if needed
DIRECTIONS
- Make roux: Add milk, ½ of sugar, and flour to a saucepan. Whisk until smooth. Bring to a boil over medium heat, whisking constantly, and cook until mixture is a smooth, thick paste, like a very thick pudding, 4-5 minutes. Remove from heat, scrape into a bowl, and set aside (or in the fridge) to cool completely. You can whisk it vigorously to speed this up if you like.
- Using a stand or hand mixer, whip butter until paler and fluffy, 3-4 minutes. Add remaining ½ of sugar. Cream together on medium-high speed until white and fluffy as whipped cream and sugar grains are fully dissolved. This will take at least 10 minutes.
- While mixing on medium speed, add vanilla, salt, and cooled roux 1 Tbsp at a time. Once roux is incorporated, whip on medium-high for 5 more minutes until the buttercream is light, fluffy, and silky smooth.
NOTES
- Ermine frosting is lighter, smoother, and less sweet than American buttercream. It is ideal for layer cakes, though generally too soft for detailed piping. You can add powdered sugar to stiffen it.
- Most recipes have you cook all the sugar into the roux, eliminating the graininess issue. However, without sugar crystals to cut air pockets into the butter, the frosting will not get sufficiently light and fluffy as whipped cream. It takes a while for the sugar to dissolve, but it’s worth it.
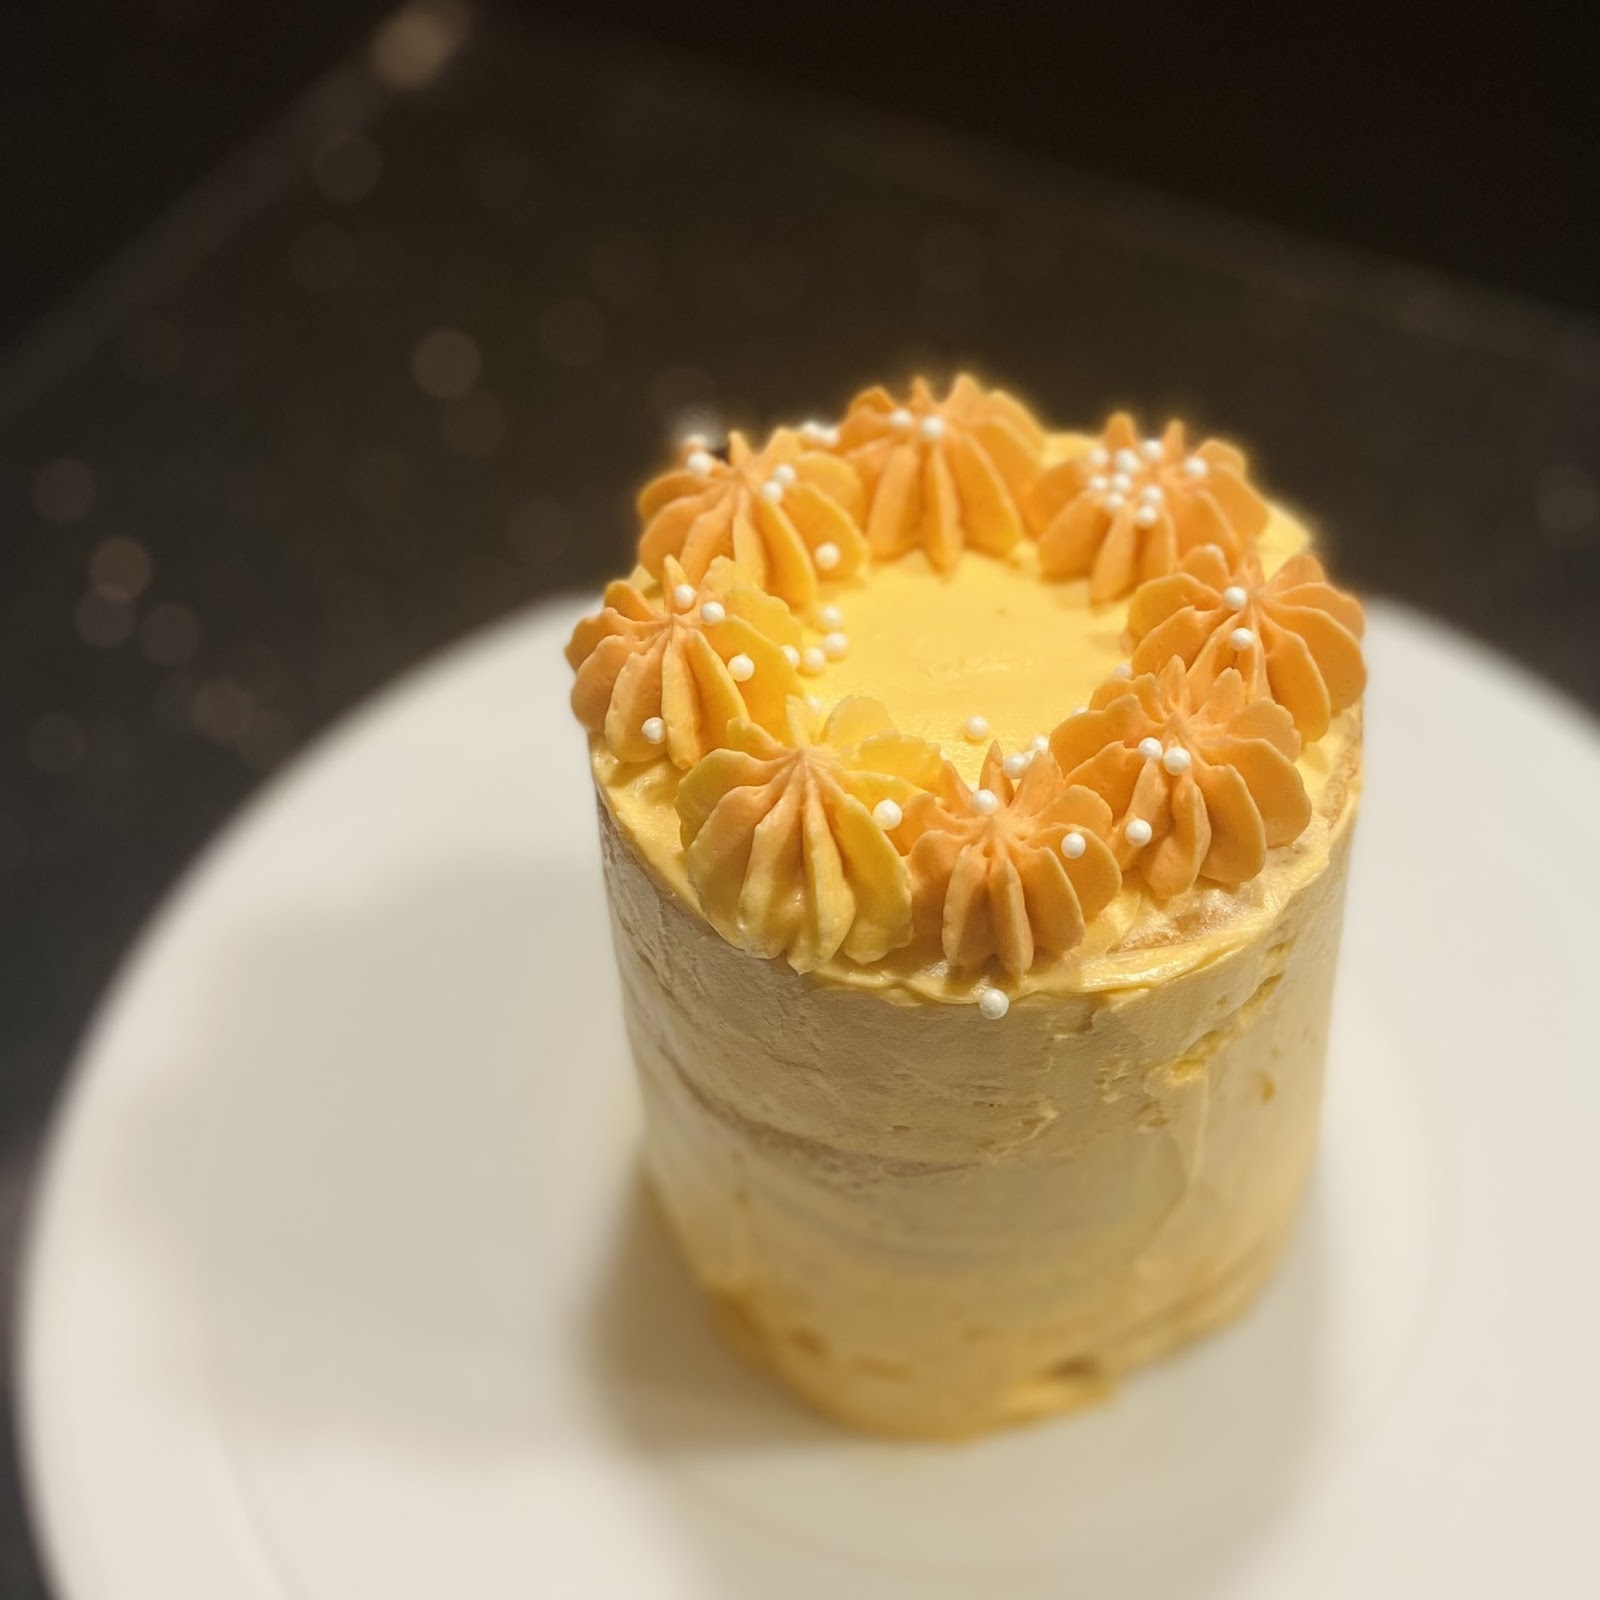
SALTED CARAMEL
MAKES: 1 ½ cups
INGREDIENTS
1 cup (200g) white sugar
1 Tbsp light corn syrup or honey (optional but recommended)
4 Tbsp (56g) butter, room temp, sliced
½ cup (113g) heavy cream, to be warmed in microwave
1 Tbsp vanilla
1 tsp kosher salt, more to taste
DIRECTIONS
- Prepare all ingredients so they’re 100% ready to go. Timing is key. You don’t want to fuck about with hot sugar on the line.
- Melt sugar: Add sugar and corn syrup to a light-color saucepan with high sides. Melt sugar over medium heat, giving it the occasional gentle stir to encourage even heating. It will clump up for a bit, then melt to a liquid. This can take anywhere from 6-10 minutes; do not rush it.
- Cook sugar: Once sugar is melted, stop stirring. It should be a light blond color. Reduce heat to low (once it starts caramelizing, you’re locked in and it burns quickly). Continue cooking on low, whisking occasionally, until it turns the deep coppery amber color of honey.
- Meanwhile, warm cream 1 minute in the microwave.
- Add butter: As soon as the sugar reaches a deep amber color, turn off heat. Add butter all at once and whisk until fully combined. (Err on the side of adding butter too early, not too late.) Be careful: The sugar will bubble rapidly when you add the butter.
- Add cream: Once butter is incorporated, slowly drizzle in warm cream, 1 Tbsp at a time, whisking in between to incorporate. Be careful: It will froth and spit. Whisk until fully smooth, then whisk in vanilla and salt.
- Let cool slightly, then pour into a glass jar. It will thicken as it cools. Store in the fridge; warm in microwave before using.
NOTES
- The goal is to avoid crystallization or seizing. 1 Tbsp corn syrup (or 1 tsp acid such as white vinegar) prevents crystallization: The sugar crystals “see” the liquid structure of the corn syrup and they’re like, “Cool, let’s do that then.”
- Seizing happens when very hot sugar suddenly drops in temperature: i.e., when you add cool butter and cream. I do a few things to prevent this:
- Use room temp butter and warm cream
- Turn off heat before adding butter and cream, so the sugar is no longer actively cooking (also prevents burning)
- Stir constantly while adding butter and cream
- Add the cream very slowly, a little bit at a time (especially in the beginning), to slowly bring down the temperature and thin out the caramel; the thinner it gets, the less chance of seizing
- If the caramel seizes: Hold it over low heat, stirring occasionally, until it all melts. This can take 10-15 minutes, but it will happen eventually. Don’t rush it; go low and slow to avoid uneven heating or further temperature shock.
- To flavor: You can easily infuse the cream with 1-2 tsp instant coffee or espresso powder; cinnamon, cardamom, or other spices; gochujang for heat, etc.
- To make fruit caramel: Reduce salt to ½ tsp if desired. Stir ¼ to ½ cup (up to 100g) fruit puree or freshly squeezed fruit juice into the cream before warming. (In addition to, not replacing ½ cup cream—you could do it as a sub out, but things might get dry or lumpy. The “cream cushion” gives you more room to play around.) The caramel texture won’t be as silky smooth if you add puree (though you can sieve it first), but the taste is amazing. Any fruit works: plum, peach, apple, berries, mango, etc…. I’ve also made sweet potato caramel with ¼ cup cooked sweet potato mash.
OTHER
CREAMY FRENCH YOGURT (INSTANT POT)
MAKES: 4 cups (1 quart) yogurt
You need an Instant Pot with a yogurt setting and either 6-8 small jars or 2-4 Mason jars.
INGREDIENTS
4 cups (1 quart) whole milk (optional: sub 1-2 cups with heavy cream, half ‘n’ half, evaporated milk, nondairy milk, etc.)
¼ cup (50g) white or brown sugar (optional but recommended)
2 Tbsp (28g) plain or vanilla yogurt with active cultures
1 Tbsp vanilla
DIRECTIONS
- Scald milk: In a saucepan over medium heat, bring milk, sugar, and vanilla to 180° (180-190° is your safe window). Reduce heat and hold there, adjusting heat as needed, for 10-30 minutes, stirring and scraping bottom of pan to avoid scorching milk solids. (Similar process to brown butter, just longer.) Do not let it boil—it should be steaming but not simmering.
- Cool milk: Cover and cool at room temp to between 90-110° (no higher than 115°), 20-30 minutes.
- Add yogurt: In a separate small bowl, whisk ¼ cup milk mixture with the yogurt starter until smooth. Then add back to the main pot and whisk to fully incorporate.
- Pour yogurt mixture into clean jars, leaving 1” space. Cover tops loosely with foil, or jar lids not sealed all the way.
- Incubate: Put jars in Instant Pot (no trivet or water). Set the yogurt setting for 8 hours (not Boil mode), or 12 hours for tangier flavor. (Set the valve to Venting, though it doesn’t matter either way; there’s no pressure involved.)
- Once done incubating, refrigerate 4 hours to set.
For ultra-thick (thicker than Greek yogurt), ultra-creamy yogurt: Scald the milk for 30 minutes and incubate for 10-12 hours. This is how I do mine and it’s amazing.
NOTES
- Scald time: Scalding the milk for longer = more water evaporates = thicker yogurt. It can be tricky to hold it at the right temp for longer than 10 minutes, but not too hard. Just keep a thermometer in there and adjust heat as needed. Stir pretty much constantly to avoid scorching the milk solids.
- Yogurt starter: 2 Tbsp starter per 4 cups (1 quart) of milk. You can use any yogurt, just make sure there’s live bacteria strains listed in the ingredients.
- French yogurt: The difference between French yogurt vs. other kinds is that French yogurt is incubated (fermented) in small pots or jars, as opposed to fermenting in a big batch and then being scooped into containers. Incubating directly in the pots = rich, creamy, silky smooth (even unstrained) yogurt.
- I ferment mine in the cute little glass pots that Yoplait Oui comes in. They’re the perfect serving size (and perfect size to use for Gâteau au Yaourt!). You can buy cute silicon lids for the pots on Amazon. Yoplait also sells them.
- If you don’t have an Instant Pot or yogurt maker, you can still make this yogurt. All the Instant Pot does is reliably hold the yogurt at 100-110° for 8-12 hours. I haven’t experimented with other incubating methods, but you can research options; I know people use the oven, microwave, or even a hot sunny day to incubate.
- Humans have been making yogurt without Instant Pots (or thermometers) since the Neolithic period. It’s very forgiving.
FLAVOR VARIATIONS
Fruit on the bottom
2-3 Tbsp fruit jam, curd, compote, etc., or diced canned fruit, per jar.
(Disclaimer: I have seen people get up in arms about homemade fruit-on-the-bottom yogurt due to risk of introducing unwanted bacteria. The World Health Organization’s Codex Alimentarius says, of Flavored Fermented Milks, that nondairy ingredients such as fruit can be added before or after fermentation. So, make your own choices.)
Coffee
Start with 1 Tbsp instant coffee, or 1 tsp espresso powder, per 2 cups milk. Add during scalding. Add more to taste.
Chocolate
Start with 1 Tbsp (15g) Dutch-process cocoa powder, or 1 oz (28g) finely chopped dark or semisweet chocolate, per 2 cups milk. Put cocoa or chocolate in a small bowl. During scalding, take ½ cup hot milk and pour over, then stir until smooth. Pour mixture into main pot and whisk to combine.
Coconut
Replace milk with 2 x 13.5 oz cans coconut milk or cream.
Honey
Replace ¼ cup sugar with honey.
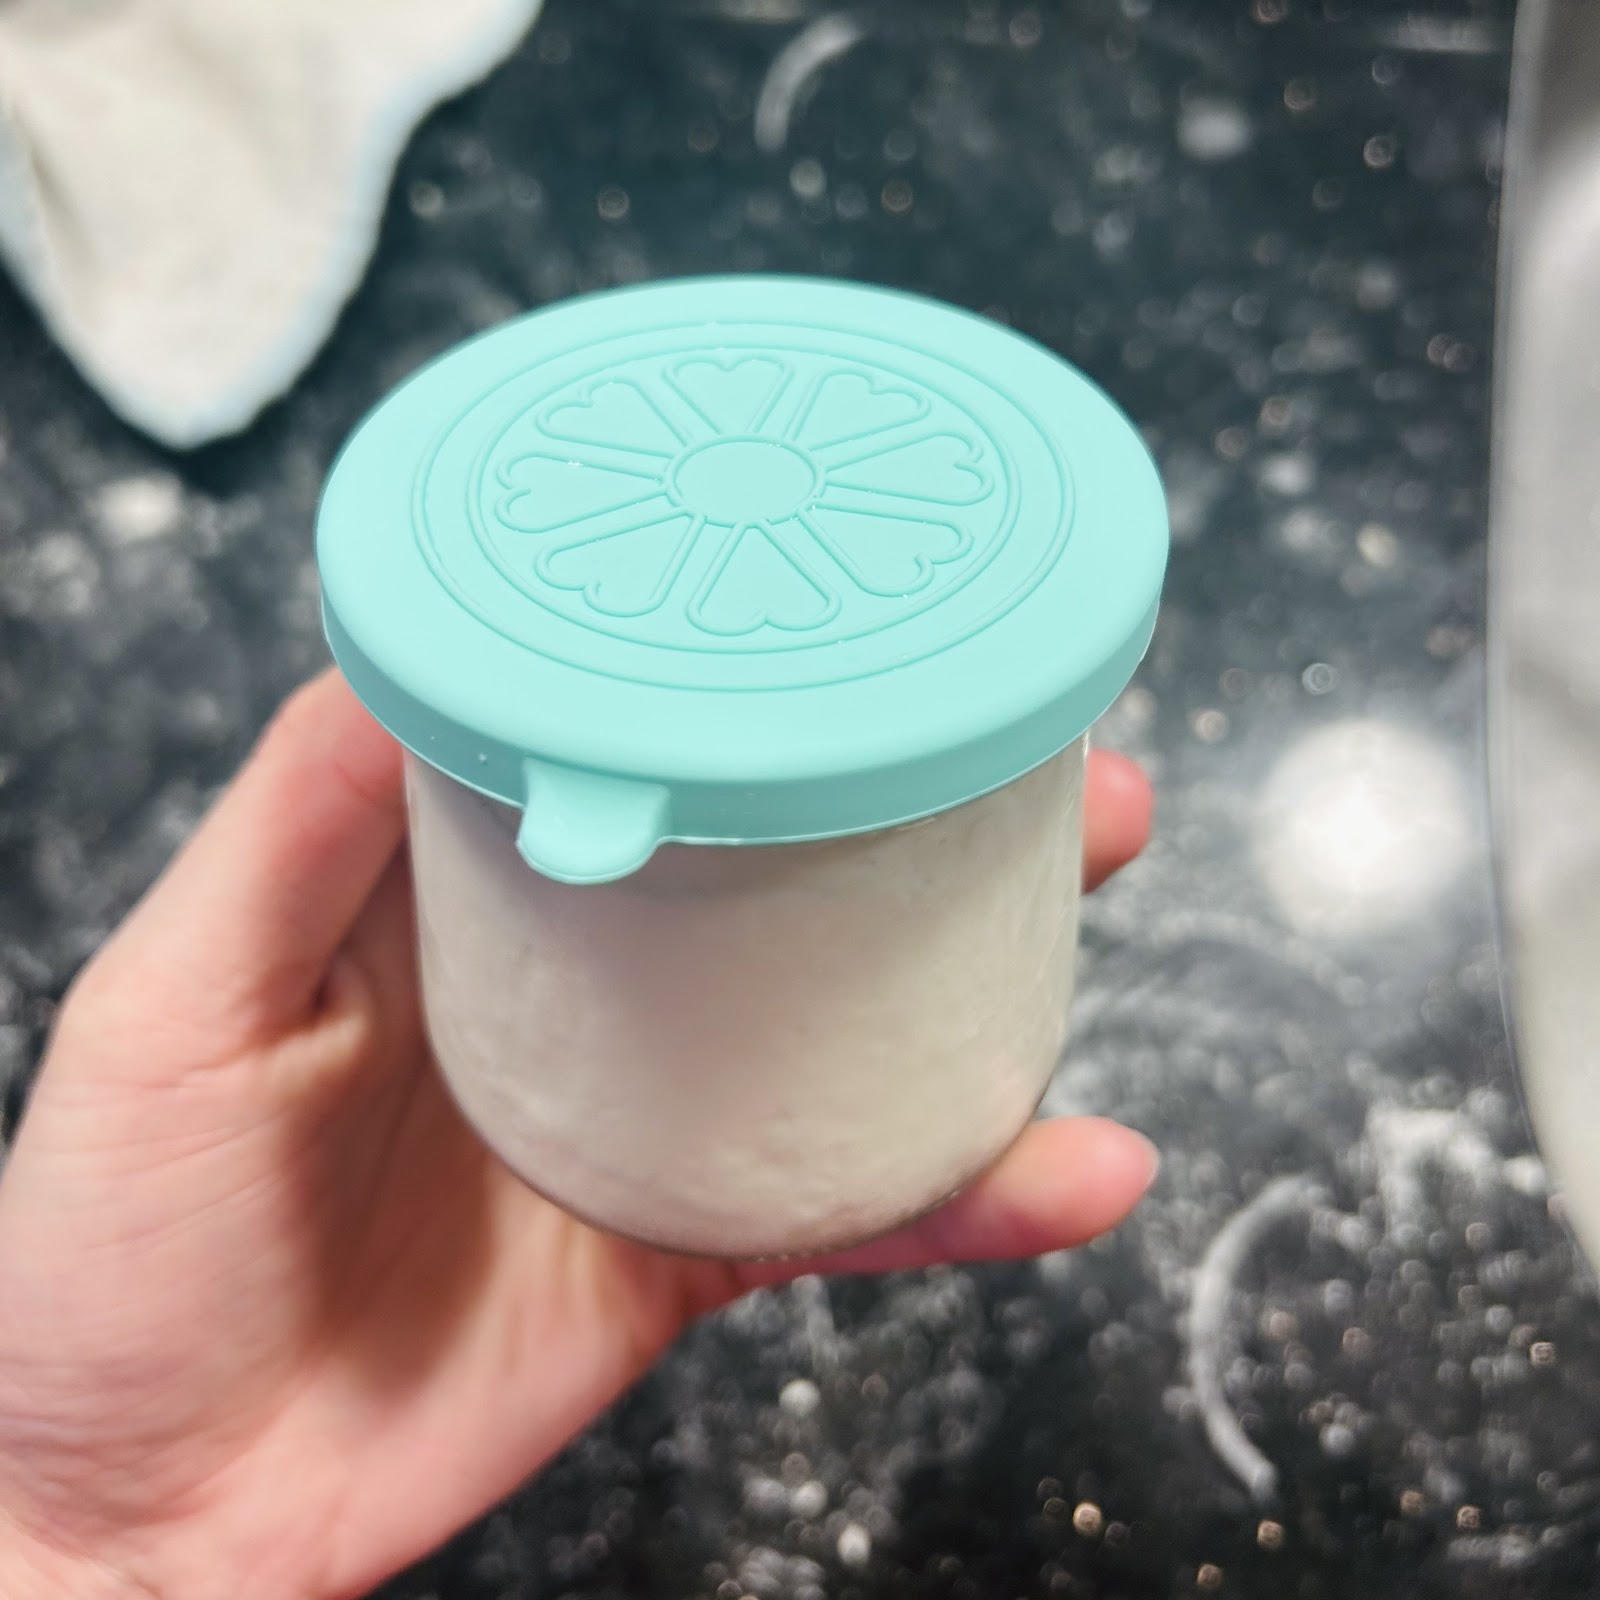
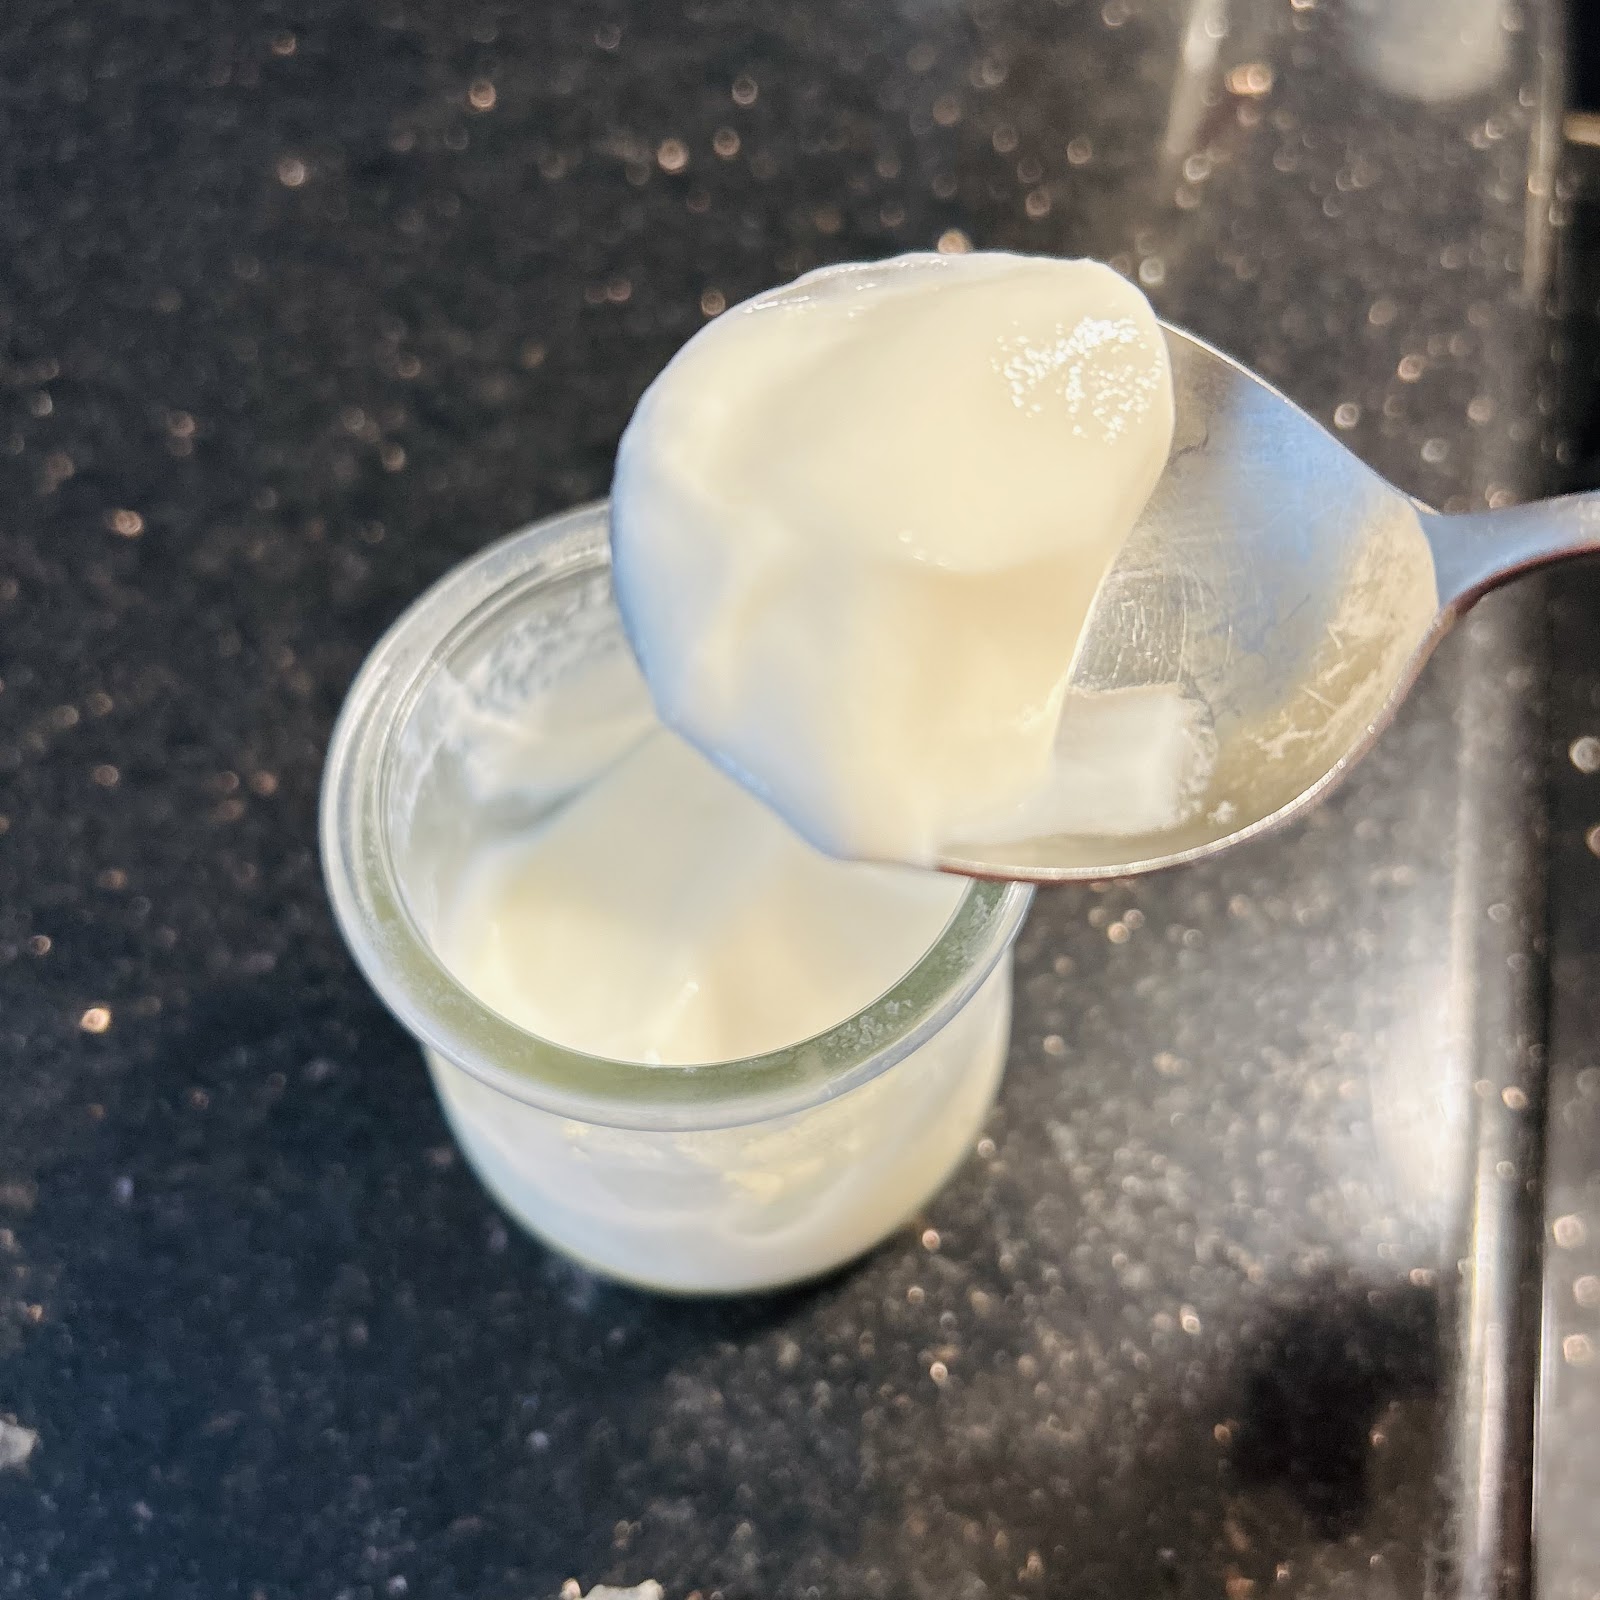
CREME BRULÉE
MAKES: 6 servings
You need a kitchen torch and 6 ramekins.
INGREDIENTS
5 egg yolks
½ cup (100g) white sugar
2 cups (454g) heavy cream
1 Tbsp vanilla
½ tsp kosher salt
optional: 1 tsp espresso powder, 1 tsp cardamom
2-3 Tbsp additional sugar, for topping
DIRECTIONS
- Preheat oven to 325°. Set 6 ramekins in a large roasting pan (for bain-marie).
- In a bowl, beat egg yolks and sugar with a whisk until smooth and paler yellow, 2 minutes.
- To a saucepan, add heavy cream, vanilla, and salt (and espresso powder if using). Bring just to a simmer, then turn off heat.
- Temper eggs: Slowly, while whisking, pour ½ cup hot cream mixture into egg yolk mixture. Whisk to combine. Then, while whisking, slowly pour egg-milk mixture back into main pot. Whisk until smooth.
- Divide custard evenly between ramekins.
- Boil a kettle of water. Pour into the roasting pan, around the ramekins, 1” deep to make a bain-marie. Be careful not to get any water in the custards. Carefully transfer to oven.
- Bake custards for 30-35 minutes until the centers are no longer liquid. They should still have a slight uniform jiggle if gently shaken. They will set fully as they chill.
- Let cool 10 minutes at room temp, then refrigerate 4 hours to set.
- To serve: Sprinkle about ½ tsp sugar in a thin layer over each custard. Use a kitchen torch to caramelize the sugar in small, circular motions until golden brown and glossy. Let sit 30 seconds until hardened, then serve.
NOTES
- There is absolutely no good way to brulee the sugar without a kitchen torch. The internet will lie to you about this. It will suggest seemingly viable methods such as using the oven broiler, heating a spoon, using a lighter, etc. These methods will not work, and you will end up with ruined, melted, grainy custard. If you don’t have a kitchen torch, this is a recipe for delicious vanilla custard.
- If, for some reason, you desperately need to cut down on the setting time: Let cooked custards cool at room temp for 10 minutes, then put in freezer for 15 minutes, then transfer to fridge. After that, you may put them in the freezer only for 5-10 minutes at a time, with 20 minutes of fridge time in between. Basically, avoid actually freezing them: Frozen crystals will mess up the texture.
- “That sounds like a huge hassle. It would be much easier to simply refrigerate them for the allotted 4 hours.” Yes. Very much so. But, as someone who has been in the position of needing to chill creme brulees quickly, this is what works.
- The better the vanilla, the better the taste. If you have high quality vanilla, use it here. If you have vanilla beans, you are richer than me, congrats.
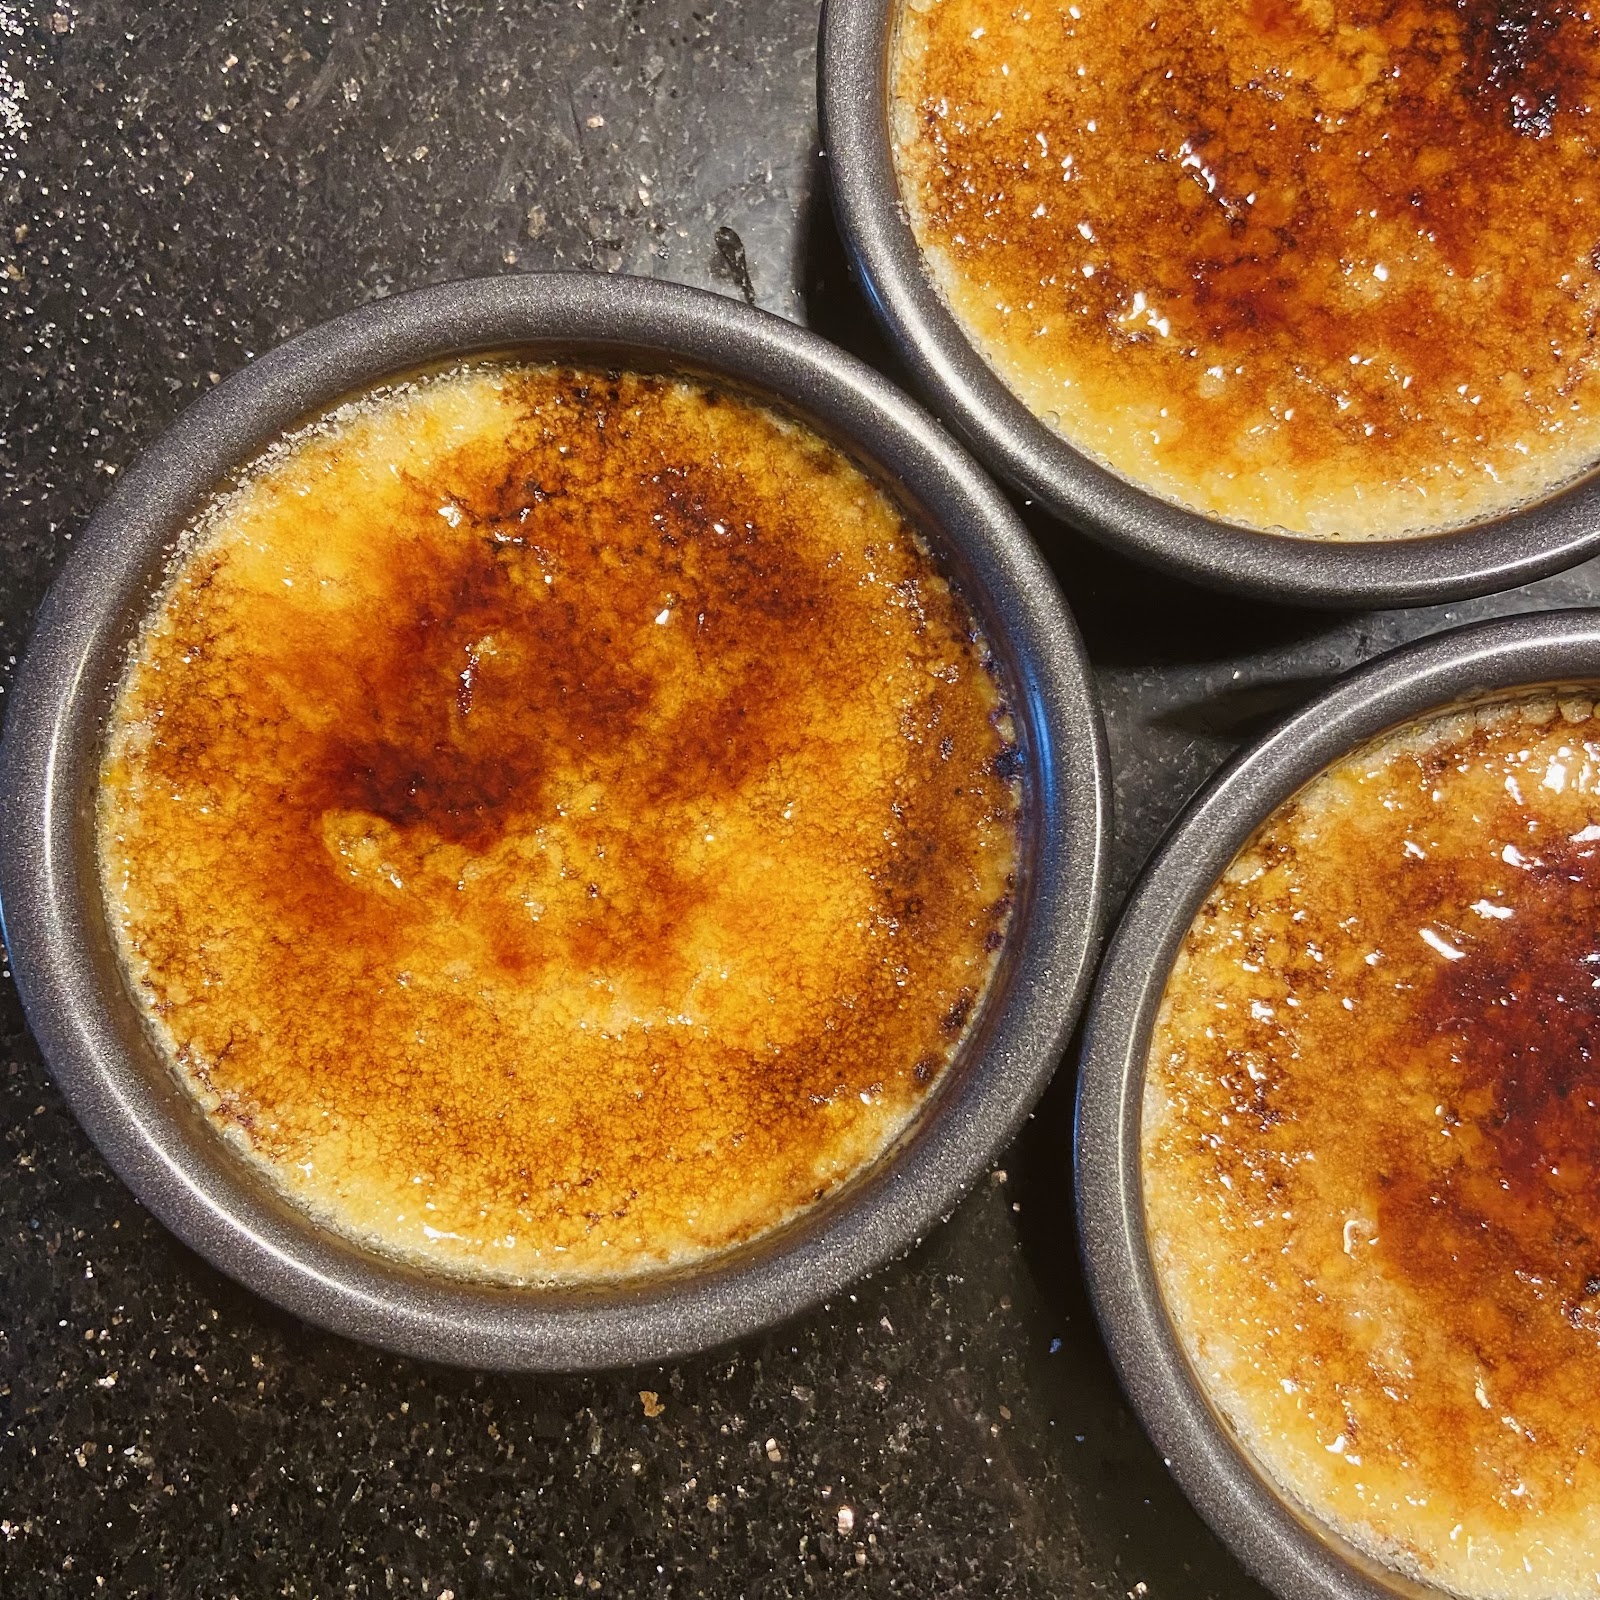
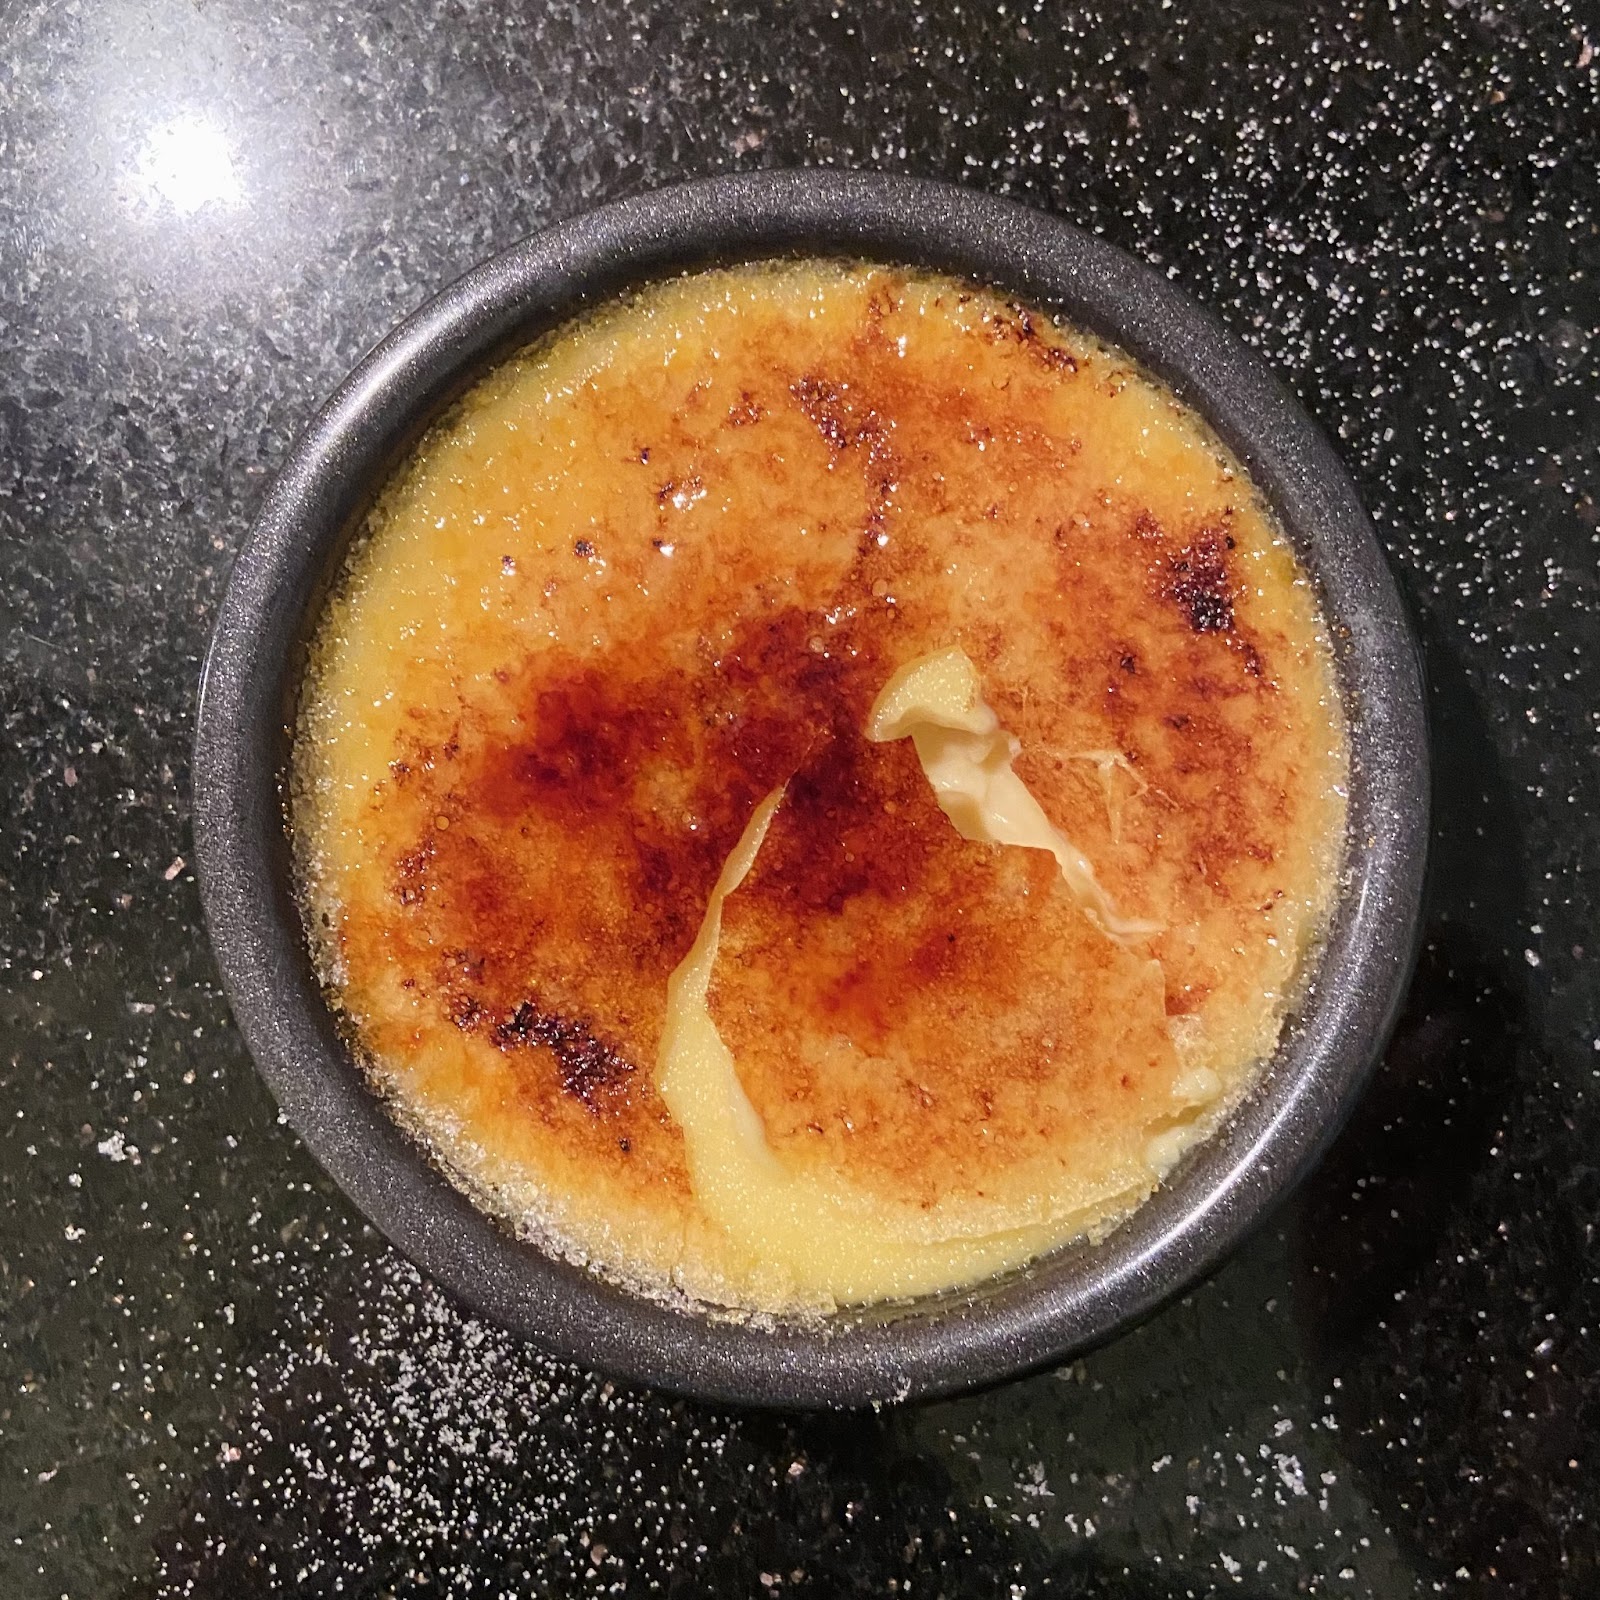
BANANAS FOSTER
MAKES: 8-10 servings
INGREDIENTS
4-6 ripe bananas, sliced lengthwise then in half
½ cup (113g) butter
1 cup (200g) brown sugar
1 tsp kosher salt
1 tsp vanilla
½ tsp cinnamon
optional: 2 Tbsp dark rum, 1 handful chopped walnuts
vanilla ice cream, to serve
DIRECTIONS
- Melt butter in a large, deep skillet over medium heat. Stir in brown sugar, salt, vanilla, cinnamon, and rum. Stirring frequently, bring to a low boil and hold it there for 1 minute.
- Add bananas (and walnuts if using). Cook for 2-3 minutes just until warm and coated in sauce, flipping each slice at least once. Do not go over 3 minutes; they’ll get mushy.
- Serve immediately over vanilla ice cream.
NOTES
- Bananas Foster is a New Orleans classic and my mother’s favorite dessert. It is the slightly less thrilling cousin of Bananas Flambé, where you set the alcohol on fire.
SAVORY
COTTAGE CHEESE QUICHE
MAKES: 1 x 8-9” quiche
INGREDIENTS
BASE
4 eggs (200g)
1 cup (227g) full-fat cottage cheese
½ tsp salt
1-2 Tbsp dried herbs of your choosing, can’t go wrong (I default 1 tsp each parsley, sage, thyme, chives)
½ tsp each freshly ground black pepper, garlic powder, paprika
optional: ½ tsp chili or cayenne powder or 1 Tbsp red pepper flakes
MIX-INS
1-2 cups (200-300g) any combination of the following, chopped or diced:
meat (pre-cooked): sausage, bacon, ham, Spam, chicken, etc.
leafy greens (fresh): spinach, kale, swiss chard, etc.
veg (generally pre-cooked): onion, green onion or shallot, broccoli, peppers, mushrooms, etc.
1 disc (½ recipe) All-Butter Pie Crust
optional: ¼ cup (56g) grated or crumbled cheese (parmesan, asiago, goat, feta, gruyere, cheddar, etc.), to sprinkle over top before baking
DIRECTIONS
- Par-bake pie crust: Preheat oven to 400°. Roll out crust into 12” diameter circle and press into deep-dish pie tin (or cake pan—it needs to be deep). (Ideally, chill shaped crust in freezer at least 15 minutes.) Line crust with 1 sheet parchment paper (crumple first to shape more easily). Fill with pie weights, dried beans, or uncooked rice. Heap against sides to prevent shrinkage. Bake 15 minutes. Remove pie weights and paper. Prick bottom of crust with fork in 1” intervals. Bake 10 more minutes until bottom is starting to turn light blond and dry-looking. Set aside to cool.
- Prepare mix-ins: All meat and most veg must be pre-cooked before adding. I usually just pan-fry everything in the laziest way possible or chop up whatever leftovers we have. Leafy greens can be left fresh, just chop or tear into small pieces.
- Preheat oven to 400° if it’s not already there.
- Make base: In a food processor, combine all base ingredients (eggs, cottage cheese, salt, herbs, spices). Pulse 3-4x until smoothly blended.
- Put mix-ins into bottom of pie crust. Pour base mixture over mix-ins and swirl with a fork to evenly distribute. Sprinkle extra cheese over top (if using) and swirl again so it’s not all exposed.
- Put quiche in oven. Reduce temp to 350°. Bake 45-50 minutes until center is set, edges are puffed, and crust is golden brown.
- Let rest 10 minutes before serving.
NOTES
- The base is roughly a 1:1 weight ratio of eggs and cottage cheese. Using cottage cheese instead of milk or cream makes for a perfectly fluffy, never runny filling. Cottage cheese also has tons of protein so that’s nice.
- Oven temp: Starting with a burst of heat which falls slightly over the first 10-15 minutes of bake time gives extra “thrust” to the eggs for a high, fluffy rise.
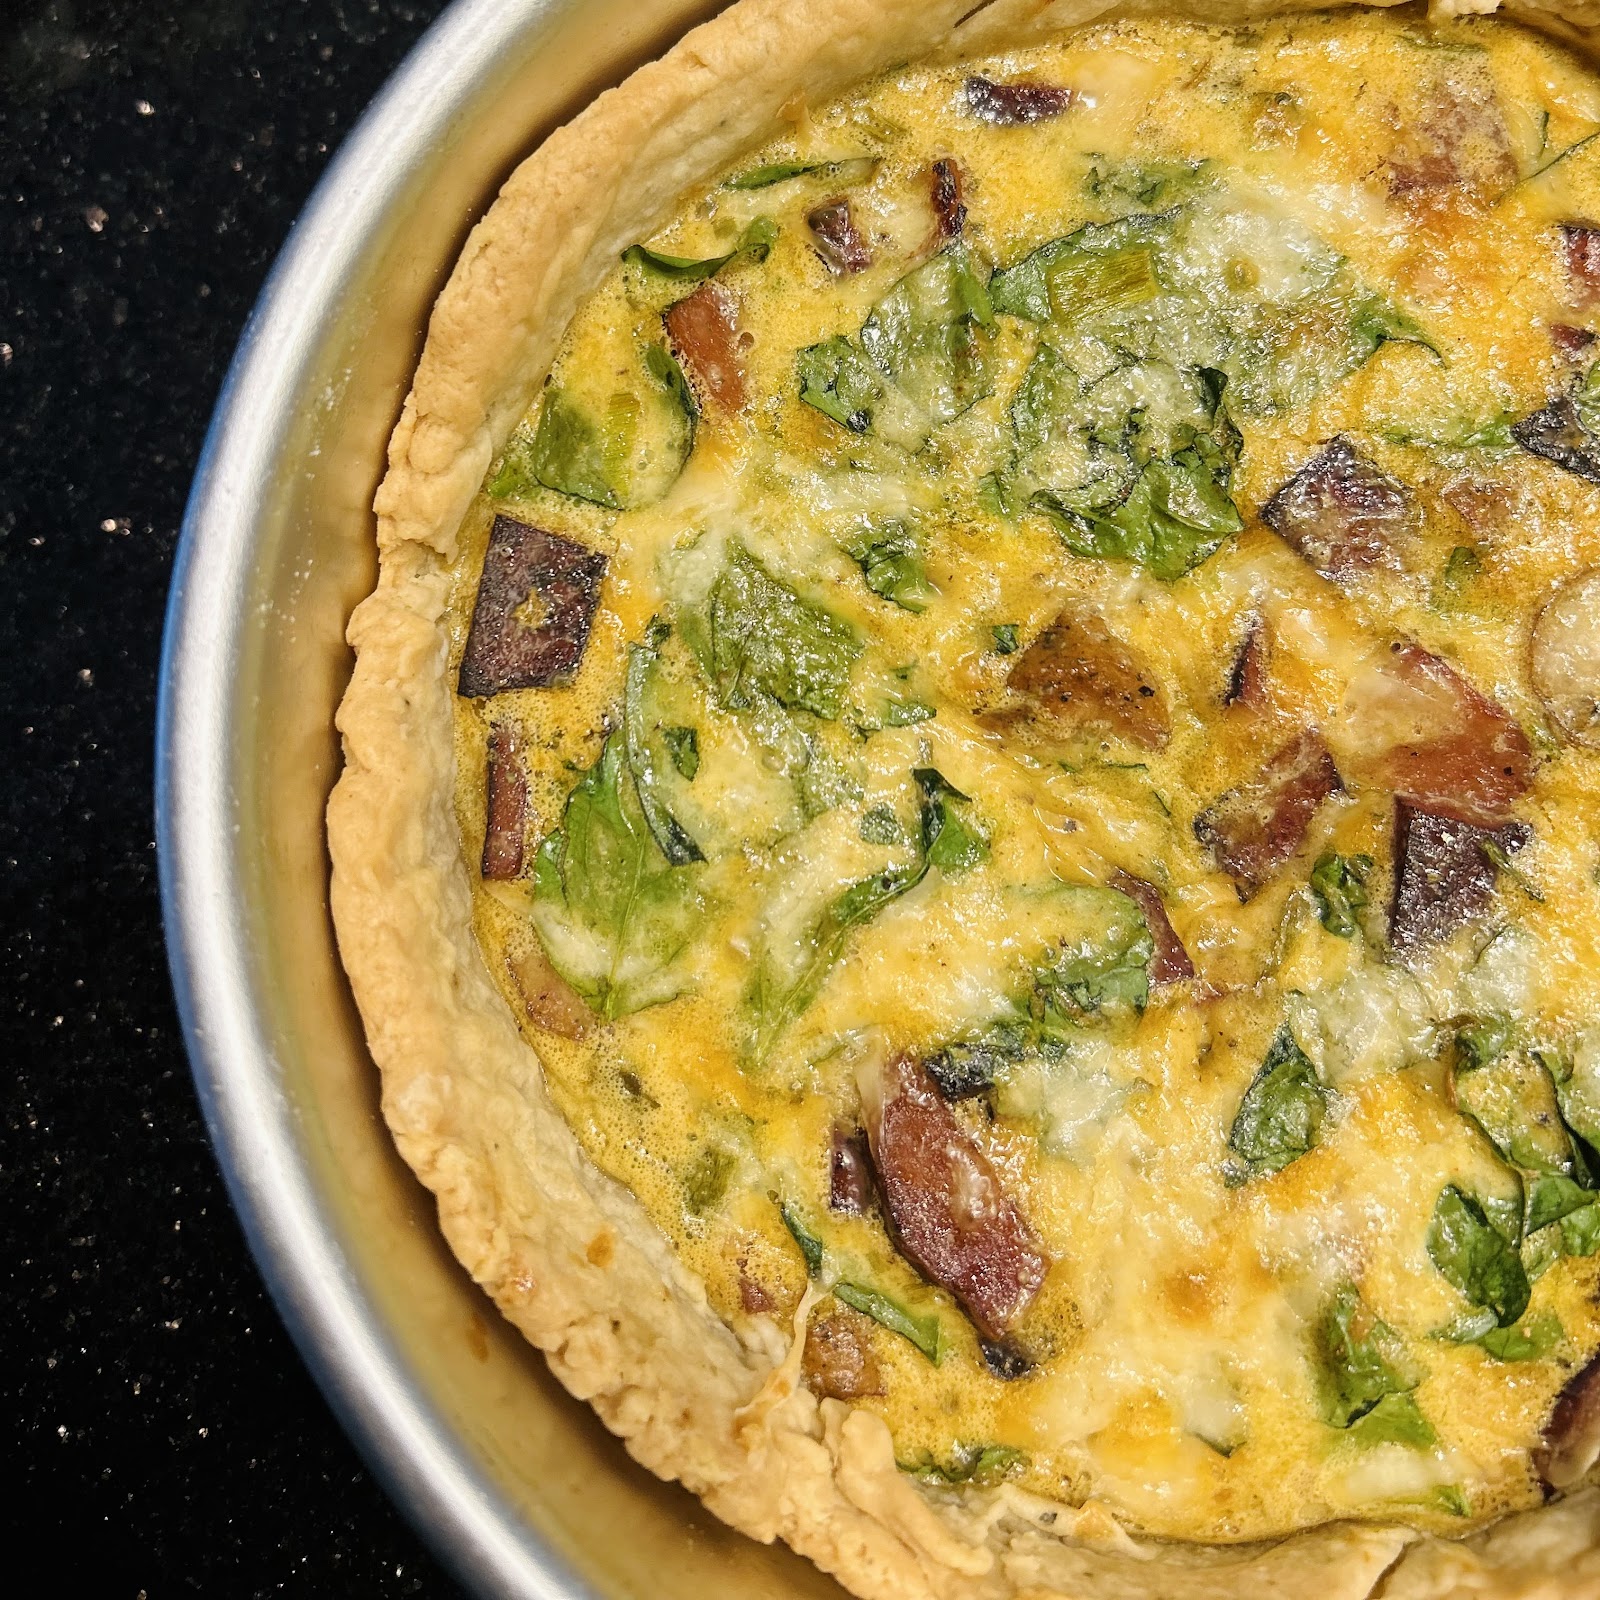
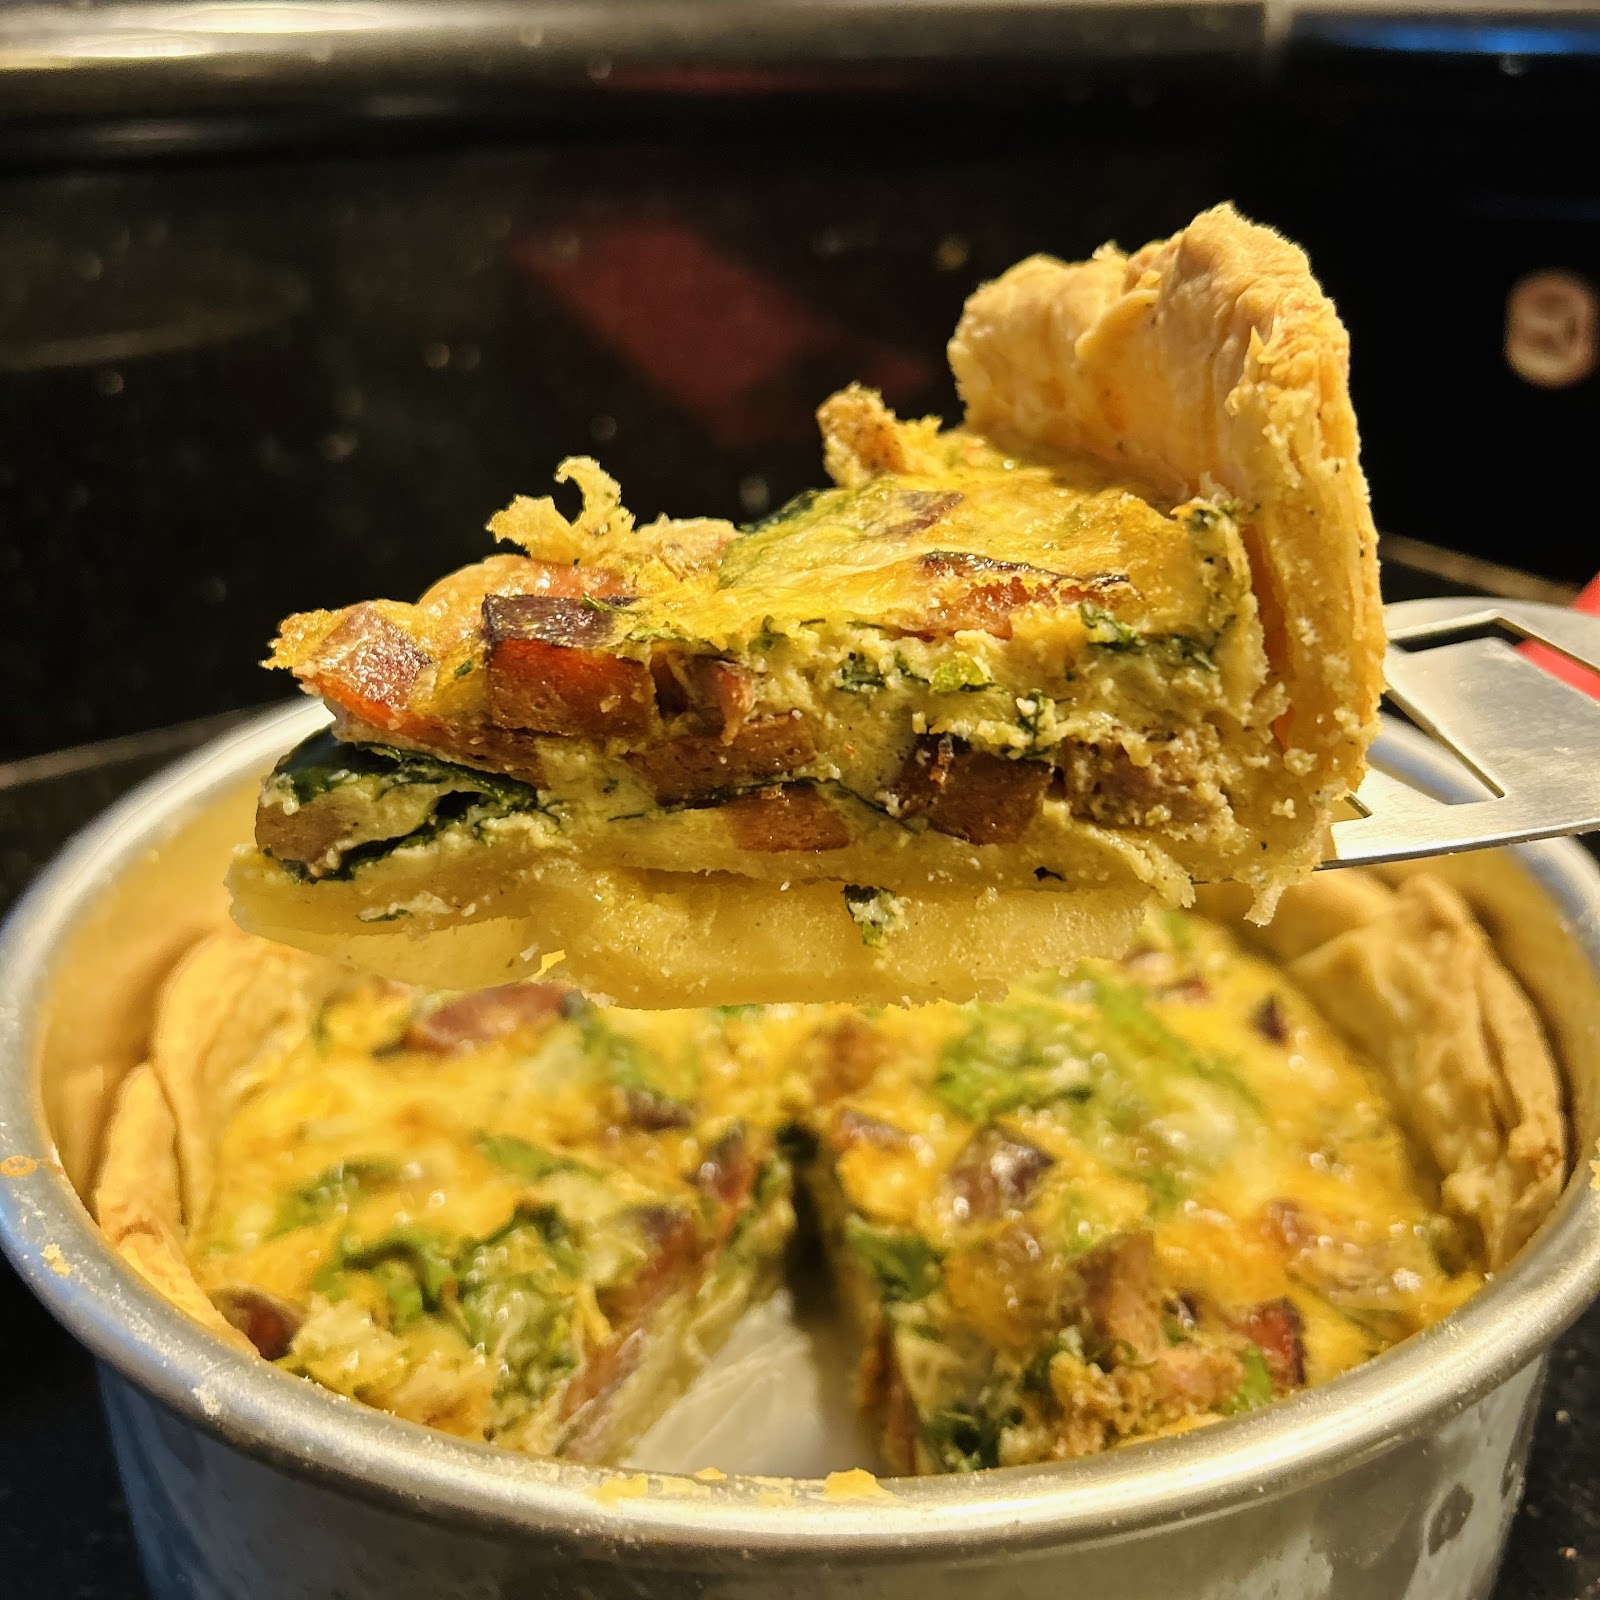
JAMBALAYA WITH ANDOUILLE AND SHRIMP
MAKES: 1 big pot (6-10 servings)
INGREDIENTS
3 Tbsp neutral oil, divided
1 lb andouille sausage, sliced into ½” rounds
2 red or green bell peppers, diced
1 yellow onion, diced
3 stalks celery, chopped
4 cloves garlic, minced
1 x 14 oz can crushed tomatoes
1 jalapeno pepper, seeded and finely chopped (optional)
2 Tbsp Cajun seasoning (see Notes)
2 Tbsp Worcestershire sauce
1 tsp kosher salt
1 tsp freshly ground black pepper
1 tsp each dried thyme, basil, parsley, oregano, red pepper flakes
1 bay leaf
1 tsp red, vinegar-based hot sauce (see Notes)
2 cups (370g) uncooked white rice (long or short grain)
4 cups (1 quart) chicken stock
1 lb raw shrimp, peeled and deveined
optional: green onions or fresh parsley, finely chopped, to garnish
DIRECTIONS
- Prepare all the ingredients so they’re ready to go.
- In a large pot over medium heat, heat 1 Tbsp oil. Fry the sausage rounds 2-3 minutes on each side until browned. Remove with tongs and set aside.
- Add remaining 2 Tbsp oil to the pot. Fry onion, bell pepper, and celery in the oil and sausage drippings until onions are soft and translucent, 5-7 minutes.
- Add garlic, fry 30 seconds until fragrant.
- Add tomatoes, jalapeno, seared sausage, and all seasonings. Cook 5 minutes, stirring frequently.
- Add rice and chicken stock. Bring to a boil, then reduce heat to low or medium-low. Cover pot and let simmer 20-25 minutes until liquid is absorbed and rice is cooked, stirring every 5 minutes so rice doesn’t stick to the bottom of the pot. If liquid absorbs before rice is fully cooked, add 1 more cup chicken stock or water.
- Add more Cajun seasoning (or salt, pepper, herbs) to taste, 1 tsp at a time.
- Finally, add shrimp. Cover and cook 5 more minutes until shrimp is pink.
- Serve with hot sauce and optional garnishes.
NOTES
- Cajun seasoning: If you don’t have Cajun spice blend (such as Slap Ya Mama) on hand, you can make your own. Mix together: 2 Tbsp sweet or smoked paprika; 1 Tbsp each garlic powder, onion powder; 1 tsp each black pepper, white pepper, cayenne. Use 2 Tbsp in the recipe; store leftover spice blend in airtight container.
- The base of this jambalaya is the Creole/Cajun “Holy Trinity”: celery, onion, bell pepper. Once everything is chopped, you should have about 1 cup of each.
- This is a Creole or “red” jambalaya due to the tomatoes. Cajun or “brown” jambalaya tends not to have tomatoes.
- Unlike gumbo, jambalaya generally isn’t made with a roux. The rice soaks up the liquid so it doesn’t need any thickening. (It also tends not to have okra, another thickener, though I often add some in mine.)
- Hot sauce: Any red, vinegar-based hot sauce will do, such as Louisiana brand, Crystal, Texas Pete, Frank’s Red Hot, etc.
- People will get up your ass about what hot sauce to use but I’m here to tell you it doesn’t matter. If the quality of your jambalaya is dependent on a specific brand of hot sauce you’re doing it wrong.
- On that note, the entire point of jambalaya is that it’s quick, easy, cheap (non-coastal shrimp prices aside), and feeds the whole family from one pot. You can put whatever you want in jambalaya. Clean out the fridge, who cares.
- Andouille: You should be able to find andouille (Cajun-style smoked sausage) in most grocery stores in the precooked sausage section. You can also use spicy Italian sausage, kielbasa, chorizo, longanisa, etc.
- Meat: Andouille and shrimp is my favorite combination, but you can also do chicken (1 lb boneless, skinless chicken thighs, rubbed with Cajun blend, chopped; fry until browned as with sausage), crawfish (1 lb raw crawfish tail meat, peeled and deveined; add at the very end like the shrimp), etc.
- This recipe is developed from the “Sausage and Ham Jambalaya” in the classic New Orleans cookbook La Bonne Cuisine. The writer of that cookbook once personally complimented my mother’s jambalaya at a house party.
BUTTERMILK FRIED CHICKEN
MAKES: 6-8 servings
INGREDIENTS
SPICE BLEND
1 Tbsp (about 15g) each kosher salt, freshly ground black pepper, paprika, garlic powder, chili or cayenne powder, mixed, to be divided
MARINADE
3-4 lbs raw chicken (whatever kind you want: boneless or bone-in, breasts/thighs/wings, etc.)
2 cups (454g) buttermilk (see Common Conversions)
⅓ spice blend
1-3 tsp hot sauce of your choosing
DRY MIX
2 cups (240g) AP flour
1 cup (100g) cornstarch
⅔ spice blend
4 cups (1 quart) vegetable or canola oil, for deep frying
DIRECTIONS
- Marinate chicken: In a large bowl, whisk together buttermilk, ⅓ of prepared spice blend, and hot sauce. Add the chicken, making sure it’s all covered with the marinade. (You can also do this in a gallon bag.) Cover and marinate in fridge 4-24 hours, the longer the better.
- Prepare dry mix: Whisk together flour, cornstarch, and remaining ⅔ spice blend. Spread into a large dish or tray. Drizzle 2-3 Tbsp of buttermilk marinade into the dry mix, tossing to coat. This is how you get flaky, crispy bits on your chicken.
- Dredge chicken: One piece at a time, dip the marinated chicken into the dry mix. Press down hard on the chicken with your knuckles, on both sides, to make a “glue” of the marinade and dry mix. Let the coated pieces sit for 5-10 minutes so the starch absorbs moisture. Then dip back in the buttermilk marinade. Then dredge in the dry mix one more time. (So you’re doing wet, dry, wet, dry.)
- In a large, deep pot, heat frying oil over medium-high. Bring the oil to an initial temp of 375°: The ideal frying temp is 350°, and when you add pieces of chicken it will bring the oil temperature down.
- Fry the chicken 2-3 pieces at a time, flipping halfway through, until deep golden brown all over with an internal temperature of 150-165° (see Notes). This will take 10-15 minutes per batch, about 6-8 minutes on each side.
- Place fried chicken on a wire rack over a baking sheet to catch excess oil.
NOTES
- Use buttermilk for the acidity, which tenderizes the chicken.
- General ratios: 2 parts flour:1 part cornstarch; 1-2 tsp each spice:1 cup (120g) flour.
- Frying oil: On medium heat, it generally takes 7-10 minutes to heat the oil. The oil in your pot should be 2-3” deep for proper frying.
- Chicken temp: You can cook the chicken to 165°, but it’s not necessary. Chicken pulled at 150° (measured where thickest) is fully cooked, safe to eat, and will be perfectly plump and moist.
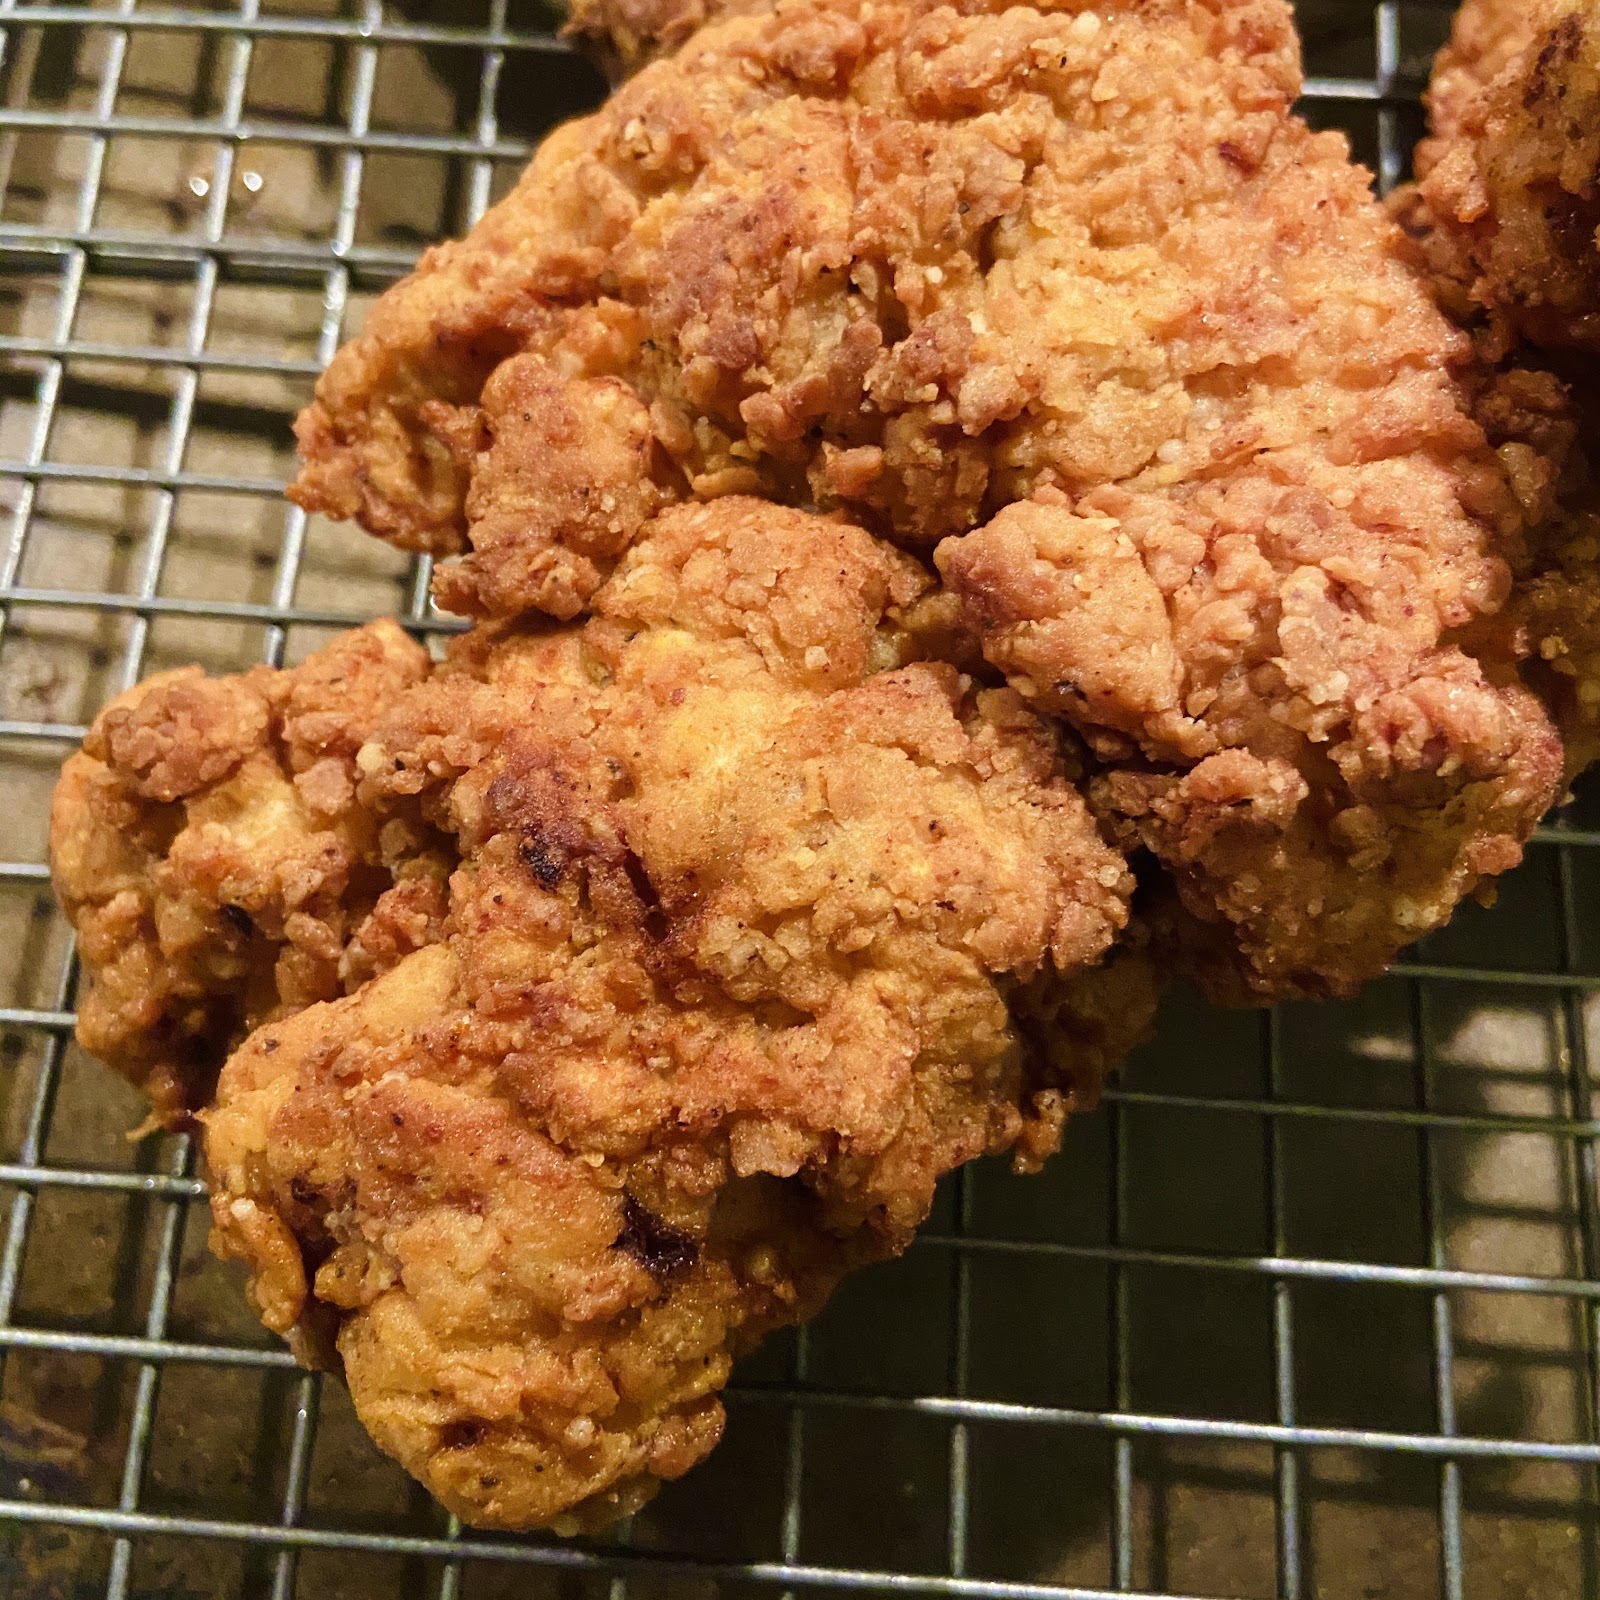
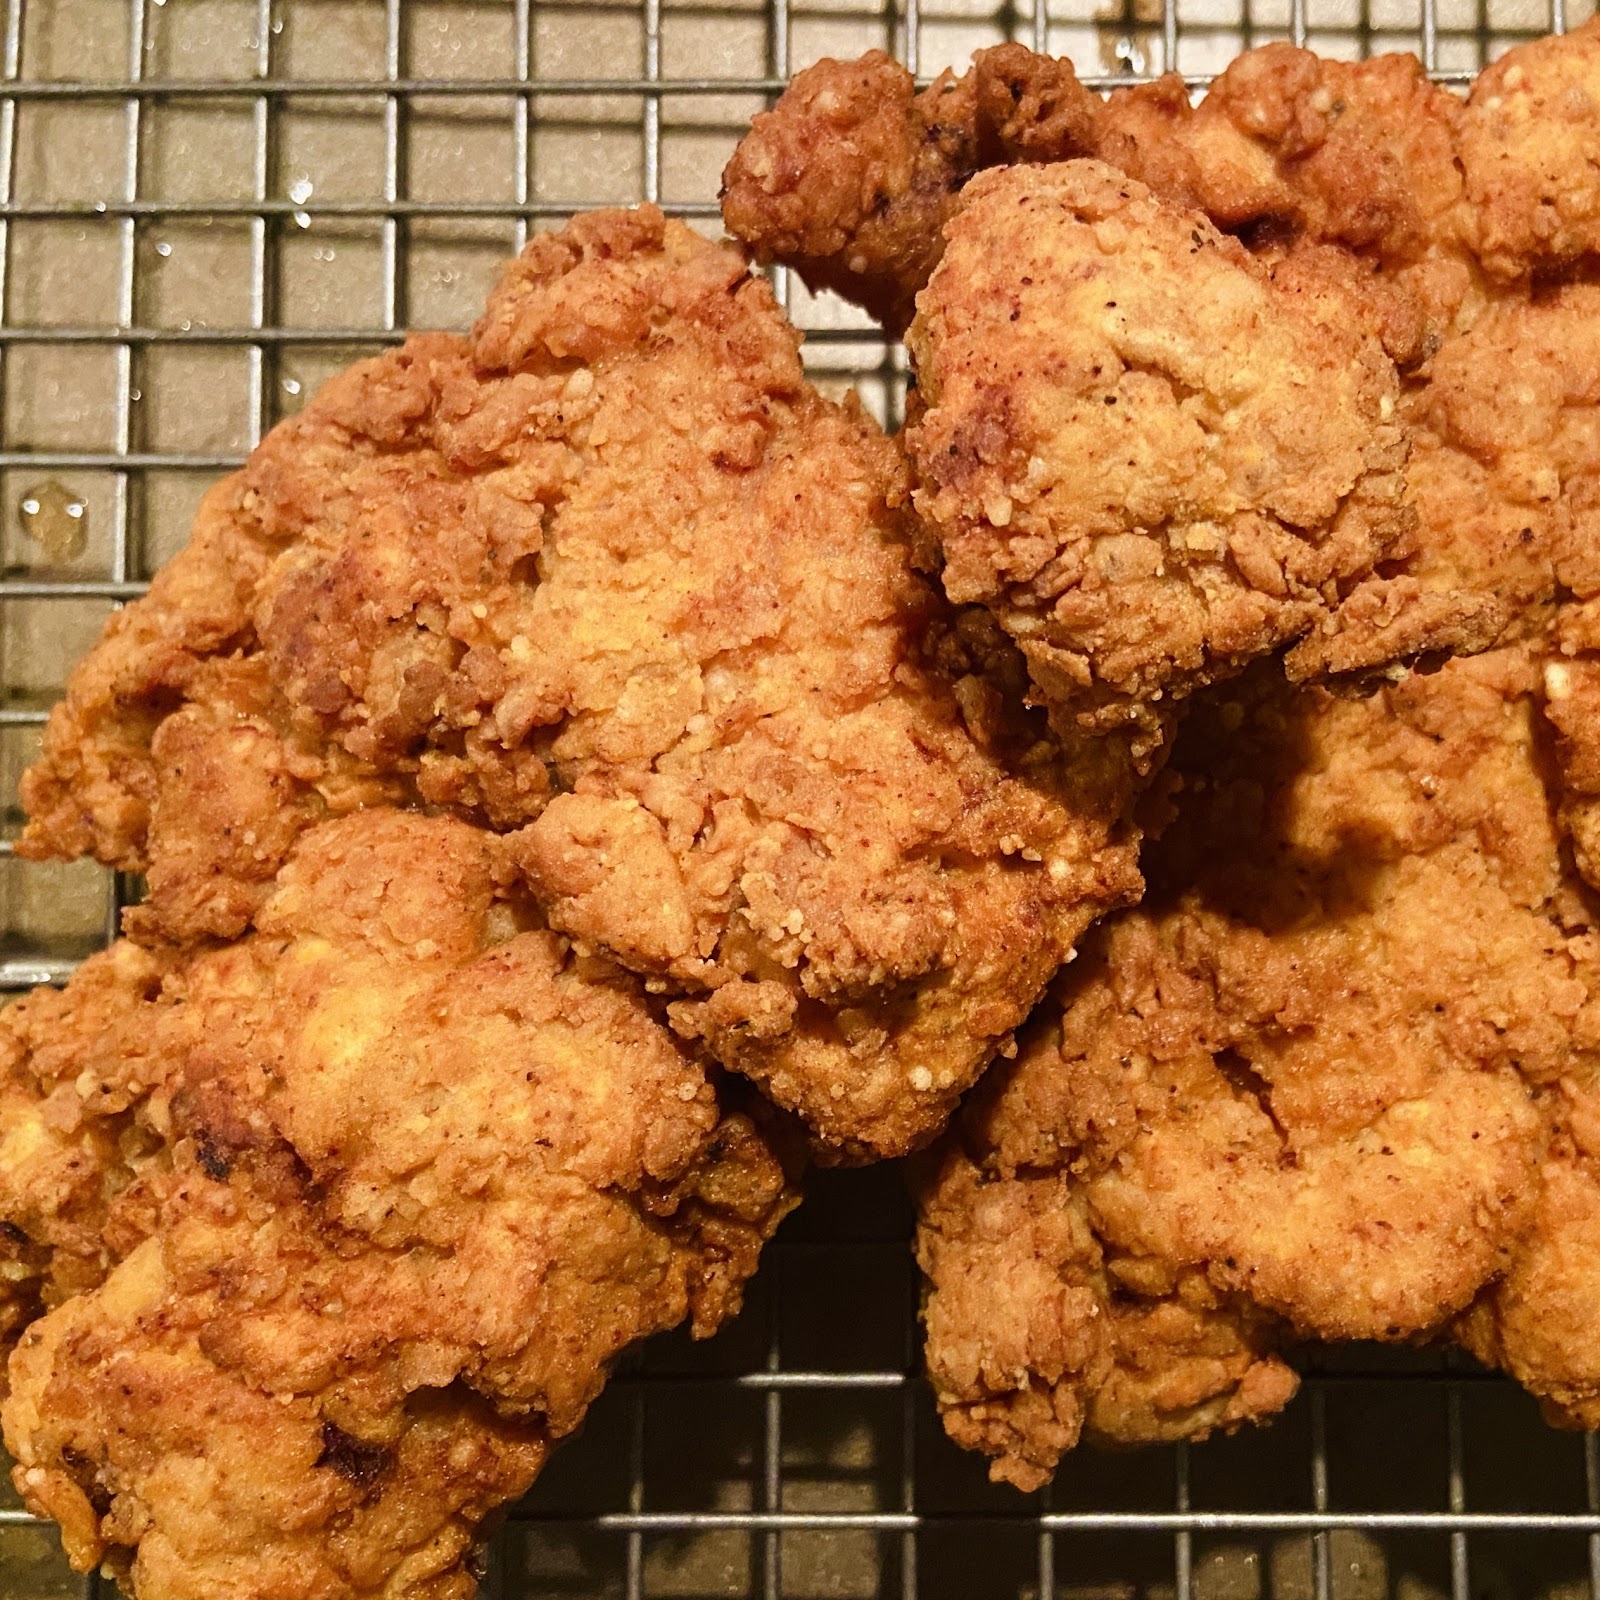
BUTTERMILK BISCUITS
MAKES: 8-10 biscuits
INGREDIENTS
2 ½ cups (300g) AP flour
2 Tbsp (yes, Tbsp!) baking powder
1 Tbsp white or brown sugar or honey
1 tsp kosher salt
¾ cup (170g) butter (ideally salted), cold, sliced thin
1 cup (227g) cold buttermilk (1 Tbsp white vinegar + fill to 1 cup line with milk, let curdle 10 min)
optional: 1 Tbsp melted butter + 1 Tbsp honey, to brush over tops before baking
optional: honey butter (4 Tbsp softened butter + 2-4 Tbsp honey to taste; creamed), to serve
DIRECTIONS
- Preheat oven to 450°. Grease a cast iron skillet, or line a baking sheet with parchment paper.
- In a large bowl, whisk together flour, baking powder, sugar, and salt.
- Work fat into flour: Add the sliced butter. Toss to coat each piece in flour. Use your knuckles and fingers to smash, rub, and smear butter into flour mix until it resembles coarse, moist, crumbly sand, with granola-like crumbles of butter. Some larger flakes are fine. Work quickly: Keep butter cold.
- Add buttermilk in 3 parts, mixing with a spatula in between, just until large clumps form. You might not need all the buttermilk! Dough will be shaggy and moist but not unworkably sticky. (If too sticky, sprinkle liberally with flour during next step; brush off excess as you go.)
- Form layers: Turn dough onto a clean, floured surface. With floured hands and a bench scraper, shape into a mass. Do not knead or overwork. Pat or roll out into a slab roughly 1” thick. Fold it in half, then pat back out. Repeat 3-5x to form layers.
- Cut biscuits: Pat into a 1” thick slab. Use a biscuit cutter to cut 8-10 biscuit rounds, OR shape dough into a 1” thick rectangle (about 6x12”; the goal is 8 x 3x3” square biscuits). Using a large, sharp knife, slice ¼” off the outer edges to expose layers. Slide the edge strips under the dough so they don’t show. Cut the rectangle into 8-10 biscuits of desired size.
- Arrange biscuits in cast iron skillet or on baking sheet with the sides very lightly touching. Brush tops with honey butter if desired (you can also brush it on after baking).
- Bake 16-20 minutes until tall and golden brown.
NOTES
- Cast iron vs. baking sheet: Either works. Baking in a cast iron = crispy bottom crust.
- Cutting: The edges must be sliced to expose the layers so they can properly rise—use a biscuit or cookie cutter, not a drinking glass, or just cut square biscuits. If using a biscuit cutter: Do not twist while pressing down—it will smear layers together and inhibit rise.
- Arranging: Biscuits love to lean on each other. Make sure their sides are very lightly touching (not too close; they will expand as they rise) so they can cling to each other and climb higher during the bake.
- Keep dairy cold. If butter starts looking greasy, chill dough in fridge or freezer 15 minutes.
CORN MAQUE CHOUX
MAKES: 6-8 servings
INGREDIENTS
4 slices uncooked bacon, chopped
2 stalks celery, chopped
1 yellow onion, chopped
1-2 red or green bell peppers, chopped
1 jalapeno, chopped (optional)
3-4 cloves garlic, chopped or minced
1 Tbsp Cajun seasoning (see Notes)
4 cups (500-600g) yellow corn (4-5 ears; 2 x 16 oz bag frozen; 2 x 15 oz can, drained)
1 cup heavy cream (or ½ cup heavy cream, ½ cup chicken stock)
1 Tbsp brown sugar
DIRECTIONS
- In a large, deep skillet or wok over medium-high heat, cook bacon, tossing occasionally, until lightly browned and crisping on both sides, 5 minutes. Remove and set aside.
- Reduce heat to medium. Add celery, onion, bell peppers, and jalapeno. Cook in the bacon drippings until slightly softened, 5-6 minutes. Add 1 Tbsp oil if needed.
- Add garlic and Cajun seasoning and fry 30 seconds until fragrant.
- Add corn. Cook, stirring occasionally, until corn kernels touching the pan begin to brown and caramelize, 5-7 minutes. Add cooked bacon.
- Reduce heat to low/medium-low. Stir in heavy cream and brown sugar. Simmer for 7-10 minutes, stirring frequently, until liquid is slightly thickened. Add kosher salt and freshly ground black pepper to taste if desired.
- Serve immediately, with hot sauce on the side.
NOTES
- Corn: Fresh or frozen is best; canned is perfectly fine. Make sure to drain liquid.
- Cajun seasoning: To make your own, see Notes for Jambalaya with Andouille and Shrimp. You can also season to taste with kosher salt, freshly ground black pepper, sweet or smoked paprika, garlic powder, onion powder, and chili or cayenne (optional). Start with ½ tsp of each and go from there.
- Maque choux is a Cajun medley of summer corn and the Holy Trinity (celery, onion, bell pepper), likely adapted from Native succotash dishes.
- To make it dairy-free, use chicken stock instead of cream. To make it vegetarian, leave out bacon and cook vegetables in oil, then add 1-2 Tbsp butter at the end for taste.
HUSHPUPPIES WITH HONEY BUTTER
MAKES: 20 hushpuppies
INGREDIENTS
1 cup (150g) yellow cornmeal
1 cup (120g) AP flour
2 Tbsp brown sugar
½ tsp baking powder
½ tsp baking soda
½ tsp each kosher salt, freshly ground black pepper, paprika, garlic powder, onion powder, chili powder or cayenne
½ cup buttermilk (see Common Conversions)
1 egg
¼ cup (56g) butter, cold, cubed
2-3 cups (enough to fill large pot 1” deep) vegetable or canola oil, for frying
HONEY BUTTER
4 Tbsp butter, very soft + 2-4 Tbsp honey to taste, creamed until smooth
DIRECTIONS
- In a large, deep pot, heat frying oil to 375°. The ideal frying temp is 350°; the temperature will drop when you add spoonfuls of batter.
- While oil is heating, make batter: In a large bowl or stand mixer, whisk dry ingredients together. Add buttermilk and egg. Beat to combine. Add butter and beat until just combined, with most of the butter smeared out but some larger flakes remaining.
- Fry heaping spoonfuls of batter 3-4 at a time, flipping halfway through, until golden brown all over, about 8 minutes per batch or 3-4 minutes on each side.
- Place fried hushpuppies on wire rack over baking sheet, or tray lined with paper towels, to catch excess oil.
- Serve hot, with honey butter.
NOTES
- Hushpuppies are the perfect side for seafood or BBQ. Some of my favorite beach memories involve going to the nearest crab shack for a huge pile of fried shrimp and hushpuppies. When I make Southern food spreads for my friends I do vinegar pulled pork, coleslaw, biscuits, greens, hushpuppies with honey butter….
The End (for now)! Thank you for reading! <3