So you want to run Dishonored.
(Getting set up on Windows)
Introduction
When speedrunning Dishonored, quite a few things should be set up to have the best experience possible. This document will guide you through the process of getting ready for all the major categories. I would ask that you at least skim over all parts of the document before asking any follow up questions in the Disholdnerds Speedrunning Discord. Good luck on your runs!
Table of Contents
Full Any% video guide is out now! 1
Setting up config files (.ini) 3
Premade config files (easier setup) 4
Do you have a free scroll mouse? 6
Setting up the auto splitter 6
Whenever you want to attempt a run 8
Full Any% video guide is out now!
Written by @lurven_
Down patching (Steam Only)
IMPORTANT: The downpatch only works for the Steam version of Dishonored, since that was the version used to create the downpatch. Currently there is no way to downpatch on any other pc versions, such as Epic Games Store, Microsoft Store or GOG.
This section contains instructions for installing the game on PC with the proper patch for a given category. The two main choices are:
- Patch 1.4 - The newest version and the one you probably downloaded through Steam. Used to play Knife of Dunwall and Brigmore Witches.
- Patch 1.2 - Downloadable below or from the speedrun.com page for Dishonored. Version 1.2 is the patch where any% and most full game categories are run, since certain glitches only work on 1.2. (Link for downloading 1.2 is on the next page)
- Install the game normally (through Steam, read important notice above) and run it once (completing the first time setup).
- Choose which patch you would like to play on. (For 1.4, you’re done!)
- Locate your Steam games directory. This is usually found at:
C:\Program Files (x86)\Steam\steamapps\common\
- In your Steam games directory, find a directory called “Dishonored” among any other games you have installed. Make a backup copy of the “Dishonored” directory called “Dishonored 1.4” or something similar.
- The down patch includes two directories named “Binaries” and “DishonoredGame”. Copy these into the original “Dishonored” folder, this will copy over files of the same name. You will have to confirm this overwriting.
You now have version 1.2 installed, but for your runs to be legal on the leaderboards there is a glitch you need to fix.[1]
- Find your dishonored “Config” directory, usually found at:
C:\Users\[username]\Documents\My Games\Dishonored\DishonoredGame\Config and navigate there.
Note that this is NOT the DishonoredGame/Config folder we just pasted to.
- Open the file “DishonoredInput.ini” in said folder with a text editor.(If you’re unsure of which text editor to use, use Notepad).
- Find these lines in the .ini file:
- BaseBindings=(Name="GBA_QuickSave",Command="Dis_Save 15")
- BaseBindings=(Name="GBA_QuickLoad",Command="Dis_Load 15")
- CHANGE the 15 at the end of each line to 13.
- Save the file.
- To make sure the changes aren’t overwritten by the game during launch, set the file to “Read-only”
- Close the file
- Right click “DishonoredInput.ini” and choose “Properties”
- A window will open, in “Attributes:” you will find a checkbox marked “Read-only”, make sure this is checked.
- Press “Ok” or “Apply”
Done!
If you want to revert to version 1.4 from 1.2:
- Locate your Steam games directory. This is usually found at:
C:\Program Files (x86)\Steam\steamapps\common\
- Change the name of the “Dishonored” directory to “Dishonored 1.2” and
- “Dishonored 1.4” to “Dishonored”.
- Done!
Down patch (1.2) can be found here.
Downpatching FAQ:
Q: Do slip clips and elevators work on version 1.4 / 1.2?
A: Yes.
Q: How do I check if the downpatch worked?
A: If you check what DLCs are available in the Missions menu and the only DLC is “Dunwall City Trials”, you’re on 1.2
(Unless Dunwall City Trials is the only DLC you have purchased and have not downpatched).
Q: What are the changes when downpatching to version 1.2?
A: Downpatching allows you to clip out of / back into bounds in a way not available in version 1.4. For example, the clip out of bounds required for sewer skip is only possible in version 1.2.
Q: My quick saves take about a second before I can load after I downpatched, how do I fix this?
A: This is actually an intended part of downpatching. Instant quick saves were introduced after version 1.2 and having them in version 1.2 is cheating. Steps 6-9 of the downpatch guide are simply making the quick saves work as intended for 1.2.
Having instant quick saves on version 1.2 is CHEATING and will invalidate your run for the leaderboards.
Setting up config files (.ini)
Dishonored is far from perfectly optimized and has a few tricks that are very inconsistent out of the box. We change some .ini files to both fix these and increase performance in general. None of these changes affect core gameplay. The changes are focused on making the game run smoother (glitchier) and rebinding some inputs. We will start with engine tweeks.
Premade config files (easier setup)
Som1Lse made a set of .ini files that have the changes already implemented. Download here (direct download from speedrun.com)
These files work for both Epic Games Store and Steam, and are installed in the same folder for both.
Read me for the install included on download.
Manual install (harder installation, only recommended for people who want specific changes to the speedrun.com files, but includes some customizability)
Engine tweeks
- Find your dishonored “Config” directory (NOT THE SAME DIRECTORY AS LAST PAGE), usually found at:
C:\Users\[username]\Documents\My Games\Dishonored\DishonoredGame\Config
- Open the file “DishonoredEngine.ini” in the said folder with a text editor. (If you’re unsure of which text editor to use, use Notepad).
- Under these instructions you will find a list consisting of 7 lines, each line on the list is one value you’ll want to change. Search the .ini file for the first 5-10 letters of each line until you find the value you’re looking for.
- Make sure each value is consistent with the lines below. You might for example find line 6 says “=false”. If so, change it to match said line from this document.
- Repeat for all 7 lines.
- Save the file.
- To make sure the changes aren’t overwritten by the game during launch, set the file to “Read-only”
- Close the file
- Right click “DishonoredEngine.ini” and choose “Properties”
- A window will open, in “Attributes:” you will find a checkbox marked “Read-only”, make sure this is checked.
- Press “Ok” or “Apply”
Done!
Lines we are changing in DishonoredEngine.ini:
- bSmoothFrameRate=TRUE
- MaxSmoothedFrameRate=250
- DynamicLights=false
- DynamicShadows=false
- bAllowLightShafts=false
- bForceNoStartupMovies=true
- bPauseOnLossOfFocus=false
Input tweeks
Now we will remap some keys for a smoother experience and to make spamming certain inputs much easier. Full explanation of each command below.
- Find your dishonored “Config” directory, usually found at:
C:\Users\[username]\Documents\My Games\Dishonored\DishonoredGame\Config and navigate there.
- Open the file “DishonoredInput.ini” in said folder with a text editor.
- Find the lines in the open file that starts with “m_PCBindings=”
- Here you want to add commands to the file. We are adding lines 1-2 after the line that completes the same action.
So: For line 1, you’ll have to find the file’s line with Command=”GBA_Jump”, add an empty line after and copy the contents of line 1 in. (equivalent for line 2 but add it after the line with “Command="GBA_Use …”)
- Add lines 3-5 to the very end of the “m_PCBindings=” section.
- To make sure the changes aren’t overwritten by the game during launch, set the file to “Read-only”
- Close the file
- Right click “DishonoredInput.ini” and choose “Properties”
- A window will open, in “Attributes:” you will find a checkbox marked “Read-only”, make sure this is checked.
- Press “Ok” or “Apply”
Done!
Lines we are introducing to DishonoredInput.ini:
- m_PCBindings=(Name="MouseScrollDown",Command="GBA_Jump")
- m_PCBindings=(Name="MouseScrollUp",Command="GBA_Use | Dis_PlayerChoice_RequestSkip | OnRelease Dis_PlayerChoice_RequestSkip_Released")
- m_PCBindings=(Name="F3",Command="set Engine MaxSmoothedFrameRate 60")
- m_PCBindings=(Name="F2",Command="set Engine MaxSmoothedFrameRate 5")
- m_PCBindings=(Name="F4",Command="set Engine MaxSmoothedFrameRate 250")
Explanation of each line introduced:
- Sets your scroll wheel down input to jump, allowing you to spam jump by scrolling. Necessary for Outsider Warp and the Sewer leap.
- Sets your scroll wheel up input to interact (also known as F), allowing you to spam interact by scrolling. This is useful throughout the game.
- Makes your F3-key set your frame rate to 60 FPS. This is currently only used for the sewer leap. (See another note)
- Makes your F2-key set your frame rate to 5 FPS. This is used for Sambell skip.
- Makes your F4-key revert your maximum FPS back to 250. Used to end the effect of line 3.
Note: If you would like to change which direction on your scroll wheel that does jump or interact, simply change “MouseScrollDown” on line 1 to “MouseScrollUp” and vice versa.
Another note: You can change the frame rate values in lines 3-5 as you like. 250 frames per second is recommended for elevators, while 60 FPS and under is recommended for the sewer climb, exactly 5 is recommended for Sambell, Samolov and Samer.
Do you have a free scroll mouse?
Players that have a mouse that allow free scrolling (Logitech G502 is the most common example) are at a significant advantage in Dishonored. If you do not, then there is a macro available that is allowed and that evens the playing field. It can be found here. Note that this macro is the only macro allowed if you want to submit to the speedrun.com leaderboards.
A tutorial for how to setup the macro made by Cearadeth is available here
Setting up the auto splitter
NEW: Cearadeth made a video showing how to set this up, if you prefer a video tutorial click here.
We time our runs in Dishonored with an autosplitter made by Fatalis.[2] The software does frame perfect load removal and autosplitting. Install:
- Download and install LiveSplit 1.6 or newer, this is the splitting software we will be using. Download here.
- Open LiveSplit and right click LiveSplit
- Press “Open Splits”, then press “From speedrun.com”
- A window will open, search for Dishonored and find a set of splits for the category you want to run. [3] Download these.
- Right click LiveSplit again, but press “Edit Splits…” this time.
- Close to the top of the “Splits Editor”-window you should have the option to activate / deactivate load removal and auto splitting. Make sure it is active.
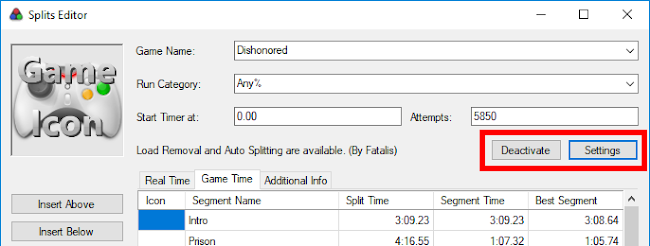
- There is a settings button next to the activate / deactivate button, toggle everything in this menu for most categories.
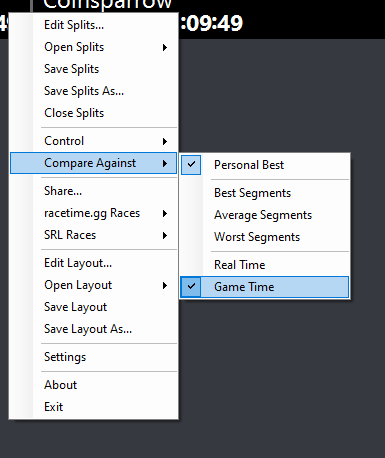
- Right click LiveSplit once again and then press “Compare Against”, make sure you are comparing against Game Time, not Real Time.
- Right click LiveSplit and save your splits where you want them.
The auto splitter will now activate when loading your starting save in the Intro split and end upon opening Emily’s room door in End.
Note for submitting to the leaderboards: make sure that your video has LiveSplit, set to Game Time, in the recording. This is the only accepted way to show that your run is the LRT (Load Removed-Time) you claim, so double check this unless you are fine with only your RTA (Real Time) being on the leaderboards.
Setting up your save file
A run starts as soon as the player gains control of their character, not when the game is launched. This is so we do not have to watch the first cutscene of the game every single run. You’ll want to make a save file right after the first cutscene. To do this:
- Start a new game from the Main Menu and watch the first cutscene.
- Make sure to stand completely still while the cutscene ends.
- About a second after the cutscene is over the game will auto-save.
Load this auto-save.
- At some point after the loading screen allows you to continue, press any key and pause the game as soon as possible, then make a save.
This save file should be as close to game start as possible.
Whenever you want to attempt a run
- Load the save you created.
- At some point after the loading screen allows you to continue, press any key and quick-save. Load this quick-save to restart your run.
Good luck!
Written by @lurven_
/8
[1] https://pastebin.com/Kn6cvx5H More on that here: