CONTENT WARNING! detailed talk about wounds, medical/anatomical terms, mention of diseases/infections, mention of self harm (obviously), etc.
this document is in no way encouraging or promoting self harm. the primary purpose is to promote harm reduction.
TABLE OF CONTENTS
- TOOL MANAGEMENT
- DETECTING THE DEPTH OF A WOUND
- WHAT DID YOU HIT?
- GENERAL FIRST AID**
- CLOSE HEALING A WOUND
- CARING FOR EPIDERMIS CUTS
- CARING FOR DERMIS CUTS
- CARING FOR FAT CUTS
- SYMPTOMS YOU MAY EXPERIENCE**
- OVERGRANULATION
- SIGNS OF AN INFECTION**
- SUPPLY GLOSSARY (WITH IMAGES)
**STARRED** are the parts i’d recommend for those who are squeamish/just want the most basic first aid advice
TOOL MANAGEMENT
- NEVER use a tool you found on the ground or any tool you don’t know the history from (where it came from/what it touched). this can put you at risk for
- tetanus
- blood diseases
- hiv/aids
- covid 19
- and other potentially life threatening diseases
- dispose of tools after 3-5 uses or if you haven’t used it in a while
- disinfect before and after each use, this is especially important for after. wiping it off with a cloth soaked in hydrogen peroxide is ideal, but using warm water works just as well so long as it is thoroughly dried after. try not to leave your tools bloody after use.
- always check for rust, and never use a blade that has rust on it, as it puts you at risk for tetanus
- store your tools in a dry place away from humidity and water. keep them stored in a clean container, cloth, or paper package.
- when you throw out your tools, close them in a sturdy pill bottle or wrap them with cardboard and tape. disposing of sharps can be potentially dangerous for sanitation workers and anyone who ends up handling your trash.
- be very careful of where you take your blades. sneaking blades into an inpatient facility/psych ward can be considered a criminal offense and can be charged as one too. many schools also have policies against bringing blades on site, so be mindful of where you take sharps with you.
DETECTING THE DEPTH OF THE WOUND
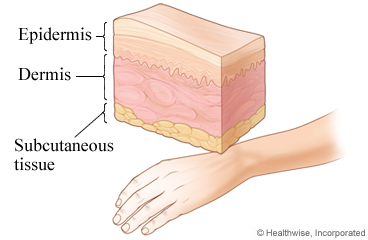
- epidermis (sometimes informally called “cat scratches” or “epis”) the first layer of skin, does not show a separation of skin. may or may not bleed, depending on whether you hit a capillary.
- dermis (sometimes informally called “styro”) - when you hit dermis, your wound will gape open and expose a white layer of skin before blood comes to fill in the wound. as soon as you hit styro, you put yourself at risk for hitting veins, arterioles, and nerves. risk of infection is a lot higher
- hypodermis, also known as the subcutaneous layer or the fat layer (sometimes informally called “beans”) - contains both a network of blood vessels for thermoregulation and, of course, fat. cuts to this depth will gape wide open and expose yellow cells or “bubbles” of fat (these bubbles can appear flat or protrude outwards). fat cuts tend to bleed more rapidly and for longer because of the capillaries, which are a type of blood vessel, that are hit when you cut into fat tissue. the risk of hitting major blood vessels such as arteries and nerves increases at this layer.
- fascia - the layer that separates the subcutaneous tissue(fat) from muscle. it will appear as a thin white skin sitting underneath the fat layer. more likely to result in permanent damage, along with all the other risks mentioned above.
- muscle - the layer directly below the fascia, has a reddish brown color to it. increased chance of infection and paralysis, along with all the other risks mentioned above.
WHAT DID YOU HIT?
types of blood vessels
- capillary - most common type of blood vessel. color of the blood varies. there are different types of capillaries which bleed at different speeds/produce different amounts of blood. when in the epidermis or dermis layers the flow of blood is often slow, whereas in the hypodermis(fat) layer the bleeding can be incredibly rapid. if your wound draws blood and the bleeding does not have the characteristics of a vein, arteriole, or artery, it is most likely a capillary.
- vein - flows in a thin, high pressure stream, dark red or blackish blood. (for visual reference, imagine poking a hole into a plastic water bottle and squeezing it)
- arteriole - a small branch of an artery. squirts when you nick or hit it. pulsates in time with your heart. bright red, sometimes yellowish blood
- artery - large amount of squirting blood that doesn’t stop. will pulsate in time with your heart. bright red, sometimes yellowish blood.
other
- nerves - shockwave of pain as soon as you hit it: stabbing pain, pins & needles sensation. can also lead to a numbness in the area of the wound/difficulty moving the limb. mild nerve damage can heal on its own, but in more severe scenarios you may permanently lose control/sensation/function of your limb
arteries and major veins need internal stitching and medical care. leaving them severed can be life threatening and/or permanently impairing.
GENERAL FIRST AID**
- avoid using toilet paper, cotton balls, tissues, napkins, or anything else that breaks apart easily to clean your cuts; the debris can get into the wound, which can cause infection. using clean cotton towels/cloths is ideal, but if you don’t have access to those you can use a paper towel that doesn't shed its fibers. you can also cut up a clean t-shirt you dont want and use that, so long as its fibers do not shed.
- if one of your cuts is continuously bleeding, use your cloth/towel and apply constant pressure for at least ten minutes. this means you press down on it as hard as you can for ten minutes straight, with no peeking in between. concentrating pressure on areas of the wound where you notice blood flowing is most effective. note that if what you are using to apply pressure breaks apart easily it may stick to your wound once you stop pressure, and pulling it off will only start the bleeding all over, negating this step entirely. this is another reason why using a cloth/towel is ideal, and you may even apply a very thin layer of some antibacterial ointment to it before using to further prevent sticking. if possible, raise the injured body part above the level of your heart to further slow blood flow.
if the wound is still bleeding after ten minutes of successful, repeat the pressure again for the same duration. and if it’s still bleeding after that, it is HIGHLY recommended that you seek hospital care, especially if you think the bleeding may be attributed to an artery or vein (see “what did you hit” section). closing your wound with steri strips and/or using compression bandages on top of regular wound dressings is a way you can mediate this yourself, but please only do this if you absolutely cannot seek medical attention. - avoid picking your scabs as much as possible! when you do this, you are removing the shield your blood clots made to protect you from bacteria(etc) getting into your cut, which is the body’s natural defense against infection. it can also reopen your wound to the point where it’s bleeding, which sets you back in the process of healing.
- keep your wound covered with gauze/bandages/cloth wraps/etc as much as possible. change your coverings every day, and clean your wound/the area around it when you change them.
- apply antibacterial ointment to your dressings to prevent them from sticking to your wounds. don’t apply ointment directly to your wounds if they breach deeper than dermis.
- before caring for wounds, it’s important to wash your hands with antibacterial soap with no fragrance. fragrances can irritate your wounds and sometimes even lead to infection.
CLOSE HEALING A WOUND
- it’s highly advised that any wounds that gape open (dermis or deeper) are healed closed, as it reduces scarring, decreases healing time tremendously, and decreases risk of infection. closed healing is by far the safest method of healing wounds.
- for closed healing, you need steri strips. if you don’t have steri strips, you can use regular bandaids or medical/surgical tape. if you don’t have either of those, you can use duct tape as a last resort.
- stop the bleeding and clean the area around the wound with distilled water/saline/antiseptic solution. then, pat it dry with a clean, dry towel/cloth that doesn’t shed its fibers.
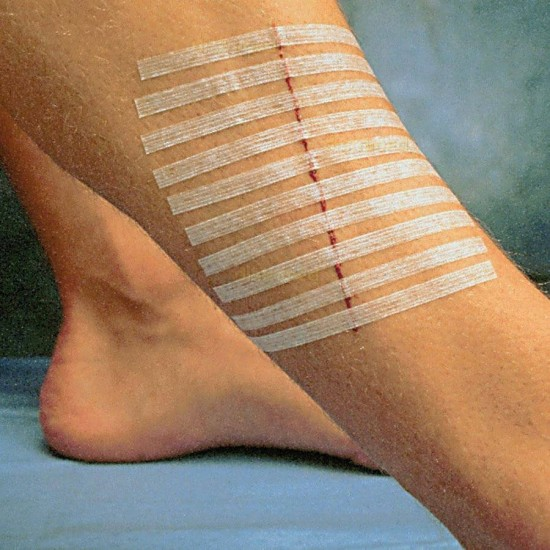
- it’s best to apply steri strips one by one for the most precision. they are placed along wounds perpendicular to the actual incision (see image one).
- stick the first part of your steri strip right beside your wound, then press it down so it stays. after that, pull the wound shut from one side with the steri strip, and push it from the other side with your free hand. if you are only using one hand, you’ll have to pull it closed using just the tape itself, which can be tricky.
- once your wound is closed, bring the tape over and stick it down, keeping the tension. remember, the purpose of steri strips are to hold wounds closed, so they need to be kept on tight. press down over the steri strip to ensure that it is stuck
- repeat until the entire wound is closed. usually, people start at one end of the wound and then go to the other. keep your steri strips evenly spaced
- you can add two additional steri strips parallel to your wound for extra security (see image two)
- here’s a video for those who need a visual reference
- you can close a wound up for up to 24 hours after making it, and once you put them on you keep them on for around 7-9 days. try to avoid contact with water in that time, and especially avoid scrubbing the area. covering the entire area with a large bandaid or pad of gauze can be helpful, but is not necessary.
- it is highly recommended to get stitches for wounds that gape more than 0.5 centimeters(0.2 inches). that being said, you must NEVER stitch yourself at home, so if medical care simply isn’t an option for you, the next best thing would be to steri strip your wounds.

CARING FOR EPIDERMIS CUTS
after you have stopped the bleeding, clean off all the dry blood with distilled water/saline/antiseptic solution and apply a bandage. you can also apply antibiotic ointment or unscented petroleum jelly/vaseline if you are prone to infection, which can also help with any itchiness that you experience. healing takes anywhere from a few days to a week.
CARING FOR DERMIS CUTS
after you have stopped the bleeding, clean off all the blood with distilled water/saline and then disinfect by applying antiseptic solution. if you are choosing not to closed heal, use gauze pads or a non stick pad and secure it with surgical/medical tape onto your wound. rolling a compression bandage on top to reduce blood flow is also a good idea, but isn’t necessary. you can also apply a thin layer of antibacterial cream/ointment to the pad so it doesn’t stick to your wound.
change bandages every 24-48 hours or if they get dirty/soaked through with blood. clean your wound each time you change them. these cuts can take one week to a month to open heal. if you’re choosing to closed heal, please read the “close healing a wound” section above.
CARING FOR FAT CUTS OR DEEPER
fat cuts normally should be taken care of by a medical professional, who can stitch the wounds closed and better monitor for infection. if you cut to fat or deeper, please consider seeking medical attention. if that isn’t an option, here are some tips on what to do after you have stopped the bleeding.
antiseptic solutions actually damage subcutaneous tissue, so if your cut goes deeper than dermis, stick to distilled water/saline to wash it out.
keep in mind that closing fat cuts is the safest way to heal them, and it also reduces the healing time dramatically. if you wish to closed heal your cut, please read the “close healing a wound” section above.
if you are choosing not to closed heal, apply antibacterial cream around the edges of the wound and secure a gauze pad/non stick pad on top with medical tape. rolling a compression bandage on top to reduce blood flow is also a good idea, but isn’t necessary. you can also apply a thin layer antibacterial cream/ointment to the pad so it doesn’t stick to your wound.
change bandages every 24-48 hours or if they get dirty/soaked through with blood. clean your wound each time you change them. these cuts can take anywhere from a couple weeks to a couple months to open heal. it’s especially important to learn the difference between what normal healing looks like and the signs of an infection for fat cuts, as it’s normal for them to leak out a yellowish-clear fluid as they heal and to look pretty disgusting despite not being infected. symptoms you may experience and signs of infection are below for reference.
SYMPTOMS YOU MAY EXPERIENCE**
all of these are completely normal to experience and not at all an indicator for an infection, especially if you do not experience any of the infection signs listed in the section below.
- bruising or tenderness around wounds: when you cut, small blood vessels under the skin around the area of the cut may be broken, which causes bruising and tenderness. this effect can be exacerbated with increased speed and/or pressure in the act of cutting. this bruising can also be present around stitches. bruises can take on various shades of purple, red, blue, and yellow.
- itchiness: the body’s natural process of healing a wound and clearing out infection often go hand in hand with an itching sensation. using a cold compress or an ice pack can alleviate this itch. if your wounds go to epidermis and no deeper you can also use antibiotic ointment or unscented petroleum jelly/vaseline to alleviate itching.
- serous fluid: a watery, clearish yellow/green/brown fluid that the body produces to help heal a wound. wounds can often leak this fluid, and often times the deeper they get the more fluid they will leak. this may create a yellow/green tint to your bandages that you see after you remove them. the big difference between serous fluid (normal) and pus (infection) is that pus is opaque and has a thicker consistency, whereas serous fluid is a lot more thin and watery. additionally, pus usually comes along with other signs of an infection, so if you are not seeing any other signs of infection it’s not likely that the fluid leaking from your wound is related to infection.
- for deeper cuts: you may find white/light green spots in your wounds (sometimes informally called a “moldy” appearance). this is a type of wound exudate that is essentially a clump of white blood cells, which are there to facilitate healing.
OVERGRANULATION
overgranulation(also called hypergranulation) is a complication that can occur in deeper wounds if it is too moist during healing, which can happen if bandages are continuously left on for more than 24 hours instead of being changed out. an overgranulated wound will bulge out of the wound bed and continue to grow outwards(see image below), with a pink or red color and somewhat grainy or sometimes lumpy texture. they are also very moist and sensitive/prone to bleeding. wounds that are overgranulated may have trouble healing until the overgranulation is treated. medical professionals can prescribe specific bandages for treatment, so if seeing a professional is an option for you this is the time to do so. otherwise, you can treat at home by implementing iodine wound dressings (dressing normally but with iodine pads in between the dressing and the cut) or hydrocortisone cream (applied to the wound every 8-12 hours) into your healing routine. you can also leave your coverings on for less time or completely switch to dry/uncovered healing, but be sure to keep cleaning your wound regularly. treating overgranulation is a very slow process, which is why it’s important to be diligent about changing your bandages regularly. note that hydrocortisone cream should not be used on wounds unless they are overgranulated.

SIGNS OF AN INFECTION**
- your wound feels hotter to the touch than normal skin
- there is an expanding redness around the wound
- the wound is more painful or sensitive than expected/usual
- there is swelling/tenderness/pain around the wound
- there is opaque yellow or green pus leaking, usually with an odor (this is a sign of a late-stage infection)
- a fever, which indicates that the infection is spreading
if you suspect that your wound is infected, you can clean it out with distilled water and, if dermis or shallower, apply antiseptic solution. if you are exhibiting only a few of the symptoms above, your wound may not necessarily be infected, only irritated. routine cleaning can prevent irritation from progressing to infection.
the safest thing to do when wounds are infected, however is to go to a medical professional. once infections spread throughout the body, they can rapidly develop and result in amputation and sepsis(causes shock/nausea/vomiting/severe headaches and even death)
SUPPLY GLOSSARY (WITH IMAGES)
bandaids - can usually be found in different sizes. fabric bandaids such as the one below are much higher quality, so if you have to pick choose those.
gauze pads - doesn’t have any sticky parts, must be secured via medical tape. an alternative to these is to use menstrual pads, but keep in mind they aren’t necessarily sterile.
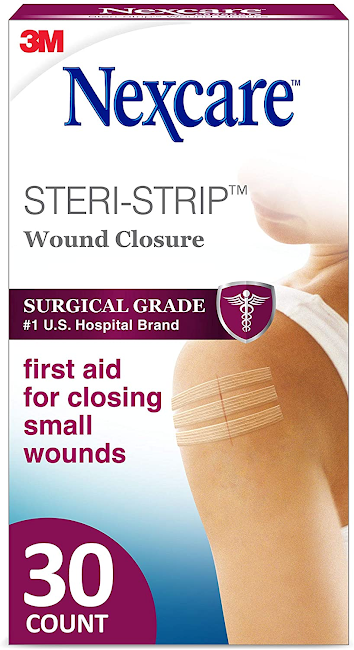
steri strips - used to hold wounds closed as they heal, which is ideal for wounds that reach dermis or deeper and/or gape open. alternatives include medical tape or even duct tape. you can also use butterfly bandages, which can also be fashioned from regular bandages, medical tape, or duct tape. i didn’t include much on butterfly bandages because personally i don’t like using them, but if you’re curious here is a video guide.
distilled water - this is water that doesn’t include any minerals that may be in purified water that may not be sterile for wounds. if you boil tap water and let it cool, you can use that as well, as boiling removes impurities and minerals.

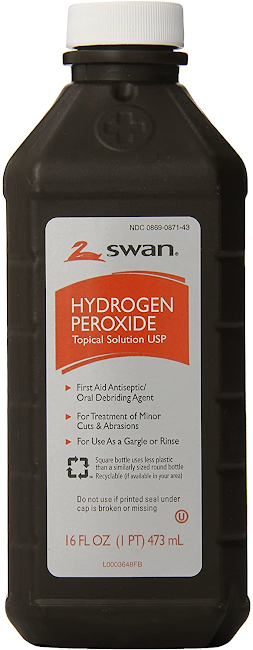
antiseptic solution - can also be called “hydrogen peroxide”, and can come in spray bottles as well
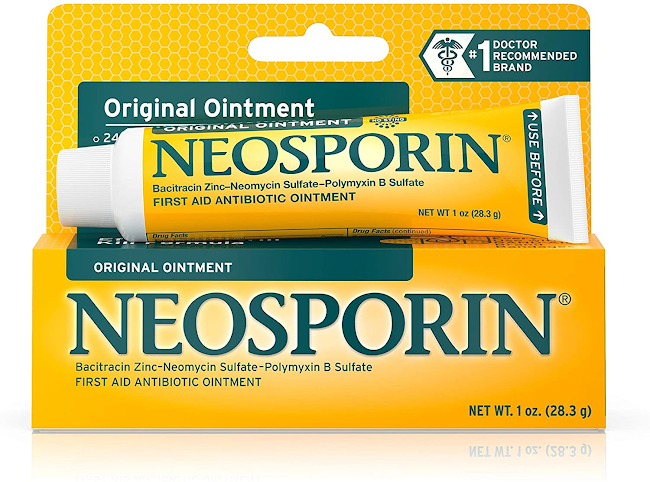
antibacterial/antibiotic ointment - can also be called “topical antibiotic”. brands in the us include neosporin, aquaphor, bacitracin, polysporin, etc.
saline - usually called “wound wash” and sold as a spray. made by combining four cups of distilled water and two teaspoons of salt, mixing until dissolved. (different amounts of saline can be made, but the ratio must remain the same)
