A L I E N
XENOMORPH GUIDE

GUIDE WRITTEN BY TheMrHeadache
Contributions from Ghost_Anonymous_, testing help from TheBeastGamers33 & OnlyDess, video references from UGHaulnd.
If there is a question that you cannot find the answer to in this guide, feel free to ask me using the following link:
🡂 https://forms.gle/u7CzVMna7fWM9CJMA 🡀
Without further ado
G U I D E B E L O W
INDEX
CH1: POWER TERMINOLOGY………………………………. PG 3
CH2: CONTROL STATIONS………………………………….. PG 5
CH3: TUNNELS………………………………………………… PG 13
CH4: CRAWLER MODE………………………………………. PG 18
CH5: TAIL ATTACKS…………………………………………… PG 25
CH6: FLAME TURRETS………………………………………. PG 43
CH 7: ADD-ONS……………………………………………….. PG 48
CH 8: BUILDS & PERKS……………………………………… PG 61
CH 9: MAPS, TILES, & LOOPING…………………………… PG 138
MAP TIER LIST………………………………………….. PG 206
FREQUENTLY ASKED QUESTIONS………………………... PG 251
REVISIONS……………………………………………………… PG 251
OUTRO……………………………………………... PG 252
(DISCLAIMER: If you have trouble viewing the images, gifs, and videos present in this doc, be patient as they still may be loading. There are visual aids for nearly every section of the guide, so there is a lot to load. Media on Google Docs also have trouble loading on non-PC platforms)
B A S I C S
CHAPTER 1: POWER TERMINOLOGY
These are the terms we will be using to refer to the XENOMORPH’s power based on their official in-game names.The following are the terms that will be most relevant to the guide:
► CONTROL STATIONS
- These are your entry points into the TUNNELS, your map traversal tool. This is also where survivors are able to collect a FLAME TURRET, the survivors’ main counterplay tool against you.

► TUNNELS
- The tunnels are your map traversal tool after entering a CONTROL STATION.

► CRAWLER MODE
- This is your alternative mode where the XENOMORPH becomes quadrupedal, giving you access to a smaller terror radius and your TAIL ATTACK.

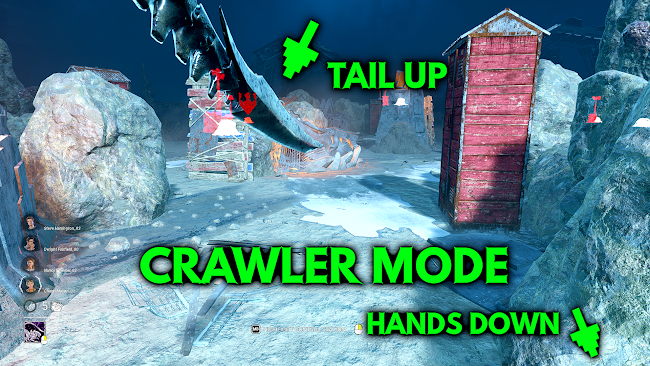
► FLAME TURRETS
- These are the survivors’ main counterplay tools against the XENOMORPH, used to knock the XENOMORPH out of CRAWLER MODE and extended chases.
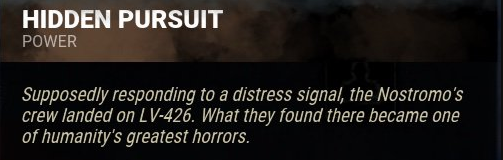
► HIDDEN PURSUIT
- This is the formal name for the XENOMORPH’s collective power in Dead by Daylight. This guide will not be utilizing this terminology, because the game itself scarcely uses it. However, it is important to know the formal name regardless for reference in any official Dead by Daylight material.
CHAPTER 2: CONTROL STATIONS
In this chapter, we will be going more in depth about the CONTROL STATIONS and how to get the most out of them as the XENOMORPH and as a survivor facing the XENOMORPH. As the XENOMORPH, you will be using your CONTROL STATIONS to enter the TUNNELS, which is your main map traversal tool. As the survivors, CONTROL STATIONS are the center point for your counterplay against the XENOMORPH.
USING THE CONTROL STATIONS AS THE XENOMORPH
- When you spawn into a trial, the XENOMORPH comes with 7 CONTROL STATIONS placed across the map.
- The CONTROL STATIONS are marked with a white aura, so the XENOMORPH can see the CONTROL STATIONS at all times.
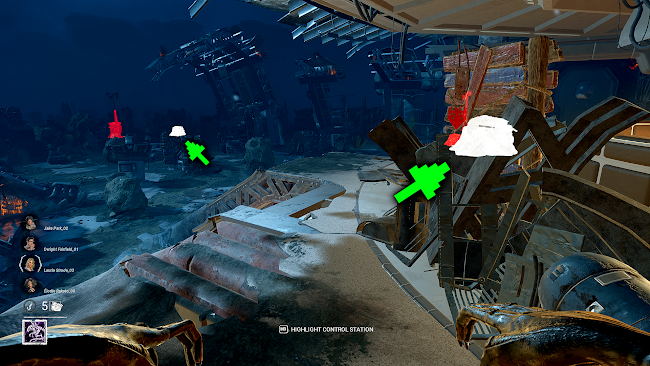
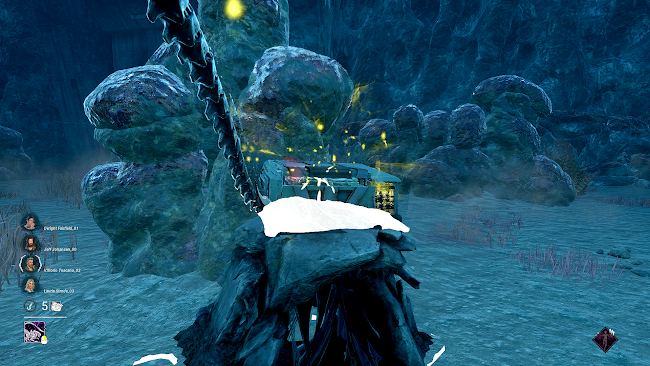
- The XENOMORPH can aim at a CONTROL STATION, causing a red arrow to appear above it. Use your secondary power button to mark the CONTROL STATION yellow.
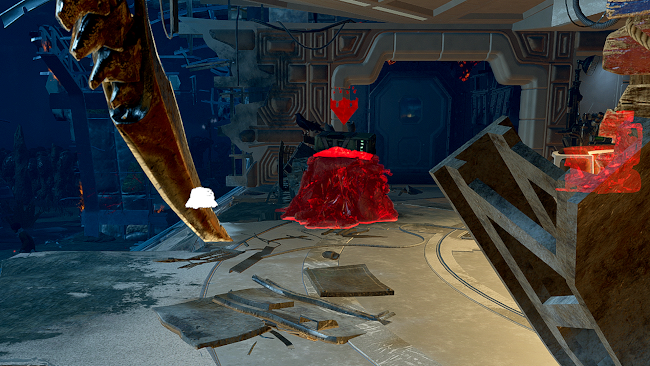
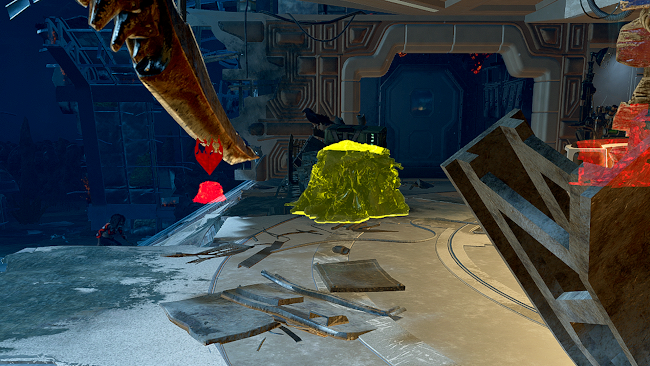
- A CONTROL STATION marked in yellow will generate a yellow trail inside the TUNNELS that shows the fastest available path between your location and the marked CONTROL STATION.
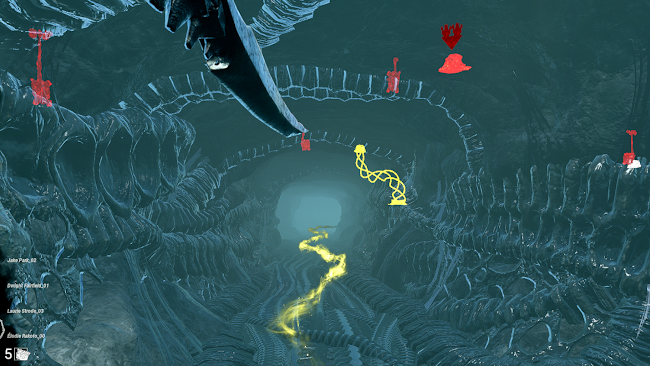
- While necessary early on, you will eventually get used to the layout of the TUNNELS, and be able to find the optimal path unaided. The value you get out of this will diminish over time.
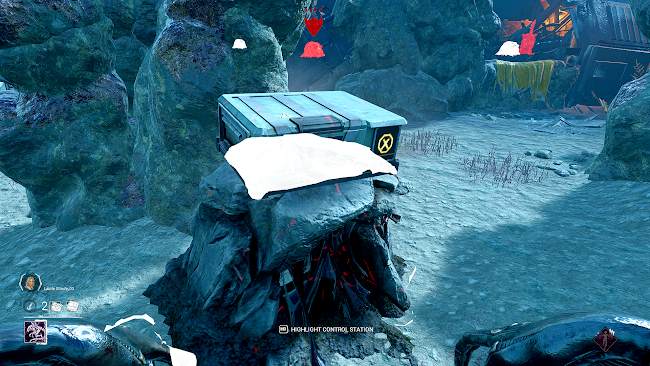
WHAT DO THE NUMBERS & SYMBOLS MEAN ON THE CONTROL STATIONS?
- The number on the CONTROL STATION represents the amount of FLAME TURRETS available for the survivors to deploy. Survivors can place no more than 4 FLAME TURRETS at one time.

- Use this to keep track of how many FLAME TURRETS are in play on the map. Survivors will use them to knock you out of CRAWLER MODE and extend their chases, so keep an eye on how many you will be running into.
- You can also use this information to determine survivor conglomeration at the beginning of the match. Since CONTROL STATIONS cannot be accessed for 30 seconds after a FLAME TURRET is grabbed, you can assume by seeing 2 or more FLAME TURRETS used that the survivors spawned spread apart.
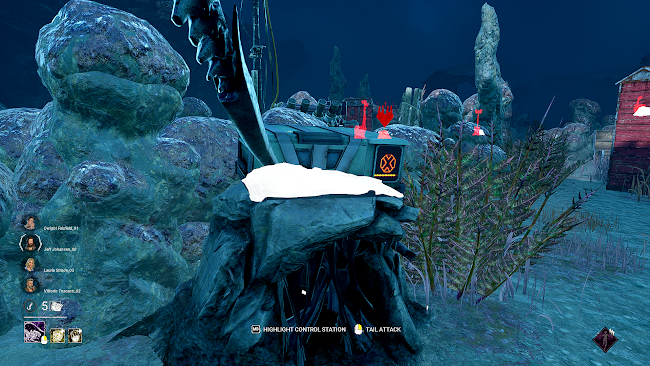
- The yellow X symbol on the CONTROL STATION means that the station is on cooldown, meaning it cannot deploy another turret, even if there isn’t the maximum 4 in play.
- The cooldown duration for a turret being grabbed from the same station is 30 seconds. This will also be displayed as a loading progress bar on the CONTROL STATION screen.
- If you see the yellow symbol on a nearby CONTROL STATION, there is a high chance only one turret is nearby (because survivors would have to carry another turret a long way to place them side by side). So stay frosty!
- The blue turret symbol on the CONTROL STATION will be accompanied by the CONTROL STATION lid being open, this means a survivor attempted to grab a FLAME TURRET, but did not complete the action.

- These FLAME TURRETS can be destroyed by the XENOMORPH
- You should go out of your way to destroy FLAME TURRETS that are still inside the CONTROL STATIONS. This is because FLAME TURRETS have a default respawn of 30 seconds, but double to 60 seconds if destroyed by the XENOMORPH.
- In addition, even if you do not have time to break the FLAME TURRET in the CONTROL STATION case, the FLAME TURRET will automatically self-destruct after 55 seconds, placing it on cooldown.
- This is a pretty lenient window however, so this should not be used as a primary tactic to deal with the FLAME TURRETS.
- The red X symbol on the CONTROL STATIONS means that there are no more FLAME TURRETS available to place. This appears if all 4 FLAME TURRETS are placed or if all FLAME TURRETS are destroyed and are on cooldown. If the FLAME TURRETS are respawning, the duration will be shown as a progress bar.
USING THE CONTROL STATIONS
- Using the CONTROL STATIONS is very rudimentary and we will expand further in the TUNNELS section.
- Find a CONTROL STATION as soon as possible when you load in as the XENOMORPH. You do this because your power, CRAWLER mode, charges quicker inside the TUNNELS.
- Outside of the TUNNELS, you charge your CRAWLER mode at 1 charge per second. Inside the TUNNELS, you charge your CRAWLER mode at 8 charges per second, which is far superior.

- For this reason, any time you find yourself outside of CRAWLER MODE throughout the match, finding a nearby CONTROL STATION is the quickest way to regain your CRAWLER mode.
- Furthermore, the XENOMORPH, despite having a smaller terror radius in CRAWLER mode, often suffers on indoor maps because CONTROL STATIONS will be behind walls, on separate floors, and other barriers making them inconvenient to access.
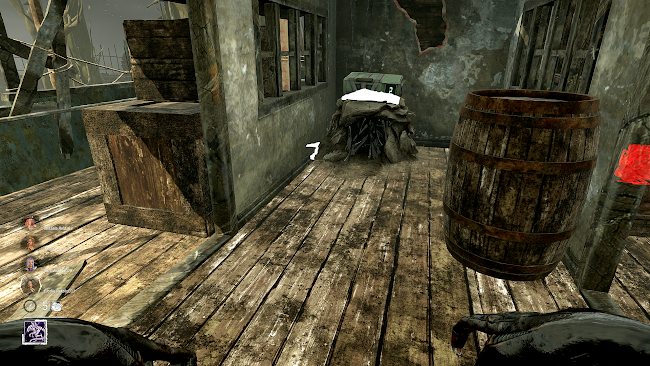
THE OTZDARVA CUT COIN TECH
- Otzdarva infamously brought to light the “CUT COIN TECH”, which was very popular around the time the XENOMORPH came out. In short, the Cut Coin offering has the ability to manipulate killer belonging spawns, the XENOMORPH’s CONTROL STATIONS being one of them. We will shorthandedly be going over the tech here, but if you want the full explanation, visit the original video here.
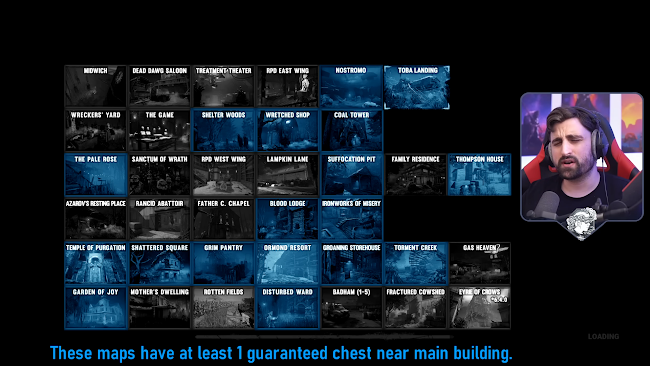
- Some maps in Dead by Daylight have a fixed chest spawn, meaning a chest will spawn guaranteed. You will often see this in various main buildings such as Pale Rose, Grim Pantry, etc.

- The Cut Coin offering removes 2 chests from the map and will remove the fixed location chest. In its place, a CONTROL STATION will now be available to you.
- Why does this matter?
- CONTROL STATIONS are your entry point to your TUNNELS, which are your main map traversal tool. Not having access to a CONTROL STATION in a main building means that your TUNNELS are cut off from that main building, so you will have to travel normally to the main building to apply pressure, which is more inefficient.
- By having access to the main building through a CONTROL STATION, you will be more easily able to defend main building generators and chase survivors in those areas.
- Do I recommend bringing a Cut Coin?
- In every match? No. If you look at the image from Otzdarva’s explanation below, you can see that only roughly half of the maps in the game benefit from this tech. Otherwise, this is a wasted offering, and an expensive one as a Very Rare offering. I would rather bring bloodpoint offerings or moris over this, but bringing one every game may be handy on something more serious like a winstreak. Though it is worth noting that most winstreak rulings don’t even allow Cut Coins as well.
CHAPTER 3: TUNNELS
In this chapter, we will be covering the TUNNELS, which serve a dual purpose as the XENOMORPH’s main map traversal tool and one of the best built-in information tools in Dead by Daylight.
THE NUMBERS BEHIND WHY THE TUNNELS ARE SO GOOD
MAP TRAVERSAL
- First off, the TUNNELS serve as your main map traversal tool because of the immense speed you have inside the TUNNELS. The XENOMORPH moves at 18 METERS PER SECOND.
- Watch the difference between walking across the map as a 115 killer versus using the TUNNELS
- For this reason, you should ideally be using the TUNNELS to move across the map as much as possible as it is measurably faster than simply walking from point A to point B.
- The only detriment to TUNNEL movement is that climbing out of a CONTROL STATION is slower when you are within 16 meters of a hooked survivor. Base exit speed is 2.25 seconds, but raises to 4.5 seconds when within that 16 meter range.
- However, it is worth noting that this is only while the survivor is hooked. The moment the survivor comes off the hook, you return to the normal 2.25 second exit speed.
INFORMATION GATHERING
- The XENOMORPH has the best basekit information out of any killer in Dead by Daylight. All of this basekit information is stored within abilities you have while within the TUNNELS. These abilities are so good, you can often simply run without any info perks and only rely on the info that the TUNNELS afford you!
- While within the TUNNELS, the XENOMORPH is able to detect walking and running within a 16 meter radius. These appear as orange footstep auras that fade after 1.5 seconds of being seen. The counter to this is to crouch walk or be carrying a turret.

- BEWARE: For some weird reason, the Hinderance status effect also turns off the footstep detection. My only working theory for this is that the footstep detection mechanic is detecting the speed of the movement instead of the actual type of movement.
- EX: Survivor walk speed is 2.25 meters per second, so anything that brings you below that like crouching, a Hindered state, etc. may be turning off the footstep detection.
- For this (and more reasons we will discuss), you should enter the TUNNELS as soon as the match begins so you can attempt to locate survivors as quickly as possible.
- You should also enter the TUNNELS whenever you are unsure of where survivors are for the same reason.
- In addition to 16 meters of footstep detection, the XENOMORPH while in the TUNNELS, can also hear any noises above them within a 16 meter radius.
- This means that even if survivors are standing still to avoid footstep detection, if they are performing any action that generates noise (generators, healing, etc), you will still hear them!
- HOWEVER, the XENOMORPH is UNABLE to hear EXIT GATES or the HATCH. This is unfortunate, but makes sense as it would allow the XENOMORPH to win the end game with too much ease.
- However, you can still use your footstep detection to find the survivor approaching either the EXIT GATES or HATCH.
- As if this was not already an awesomely overwhelming amount of info afforded basekit, the XENOMORPH also applies KILLER INSTINCT to all survivors within 12 meters of exiting the TUNNELS through a CONTROL STATION

THE BAIT TECH
- I’m sure you have noticed in recent Dead by Daylight matches that immersion is a more common playstyle than ever, with perks like Distortion and Calm Spirit becoming meta. This includes survivors sticking generators, but using stealth to hide from you if they hear you coming, just to return to the generator if you cannot find them. However, the XENOMORPH’s basekit info deletes this strategy if you use this tech.
- If you are suspicious someone is nearby (generator progress, scratch marks that went cold, etc), find the closest CONTROL STATION.
- Enter the CONTROL STATION and wait for info to appear. If someone is hiding, they will leave footstep auras as they come out of hiding.
- If they are hiding completely still, exiting the CONTROL STATION will reveal them with KILLER INSTINCT if they are within 12 meters.
FREQUENTLY ASKED QUESTIONS ABOUT THE TUNNELS
- Can the survivors hear me in the TUNNELS?
- No, the survivors do get a noise notification map wide when you enter a CONTROL STATION. Once in the TUNNEL, you are undetectable and only get a sound notification locally when you exit the CONTROL STATION.
- The exception to this is if the survivors have set up a FLAME TURRET, which comes with a motion tracker that tracks the XENOMORPH for 41 meters.
- They beep with increasing speed as the XENOMORPH gets closer, essentially functioning as an alternative terror radius. This DOES track you while you are in the TUNNELS.
- Am I still on the map while in the TUNNELS?
- Yes, you are directly below the survivors. So proximity based perks and mechanics (like the anti-camp meter) will still apply.
- If I have a perk effect applied, does it still work in the TUNNEL?
- Yes. You are still present on the map, so perks still apply to you. This is most often asked with HASTE perks. Obviously anything that clashes with undetectable will not work.
- How far below the map are you?
- It is hard to measure without modding tools, but you are roughly 12 meters below the map while in the tunnels (since Batteries Included is 12 meters and activates when you’re directly below a generator). This is important for perks that are distance based.
- Can I camp a hook from the TUNNELS?
- Yes and no. If you are directly below the survivor, you will trigger the anti-camp mechanic and the extra CONTROL STATION exit cooldown if you exit before the unhook occurs. My recommendation would be to put yourself at around that 16 meter range and proxy camp the hook instead.
- What happens if a survivor is taking a FLAME TURRET out of the CONTROL STATION the moment I come out of the TUNNELS?
- It breaks the FLAME TURRET immediately! This is a rare but fun interaction. I would not try to intentionally do this however, as the survivor is vulnerable either way.
- On two story maps, how do I tell which floor I’m coming out on when using the TUNNELS?
- The TUNNELS must spawn below the map, meaning they will always be closest to the bottom floor. As a result, the tubes connecting the TUNNELS to the CONTROL STATIONS will be short going to the first floor, but noticeably longer going to the second floor. So longer tubes go upstairs, short tubes go downstairs.
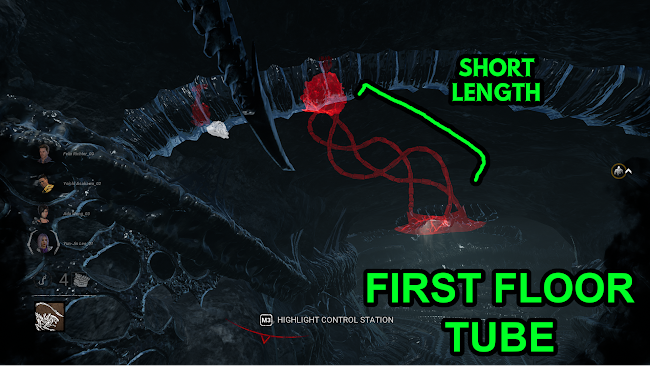
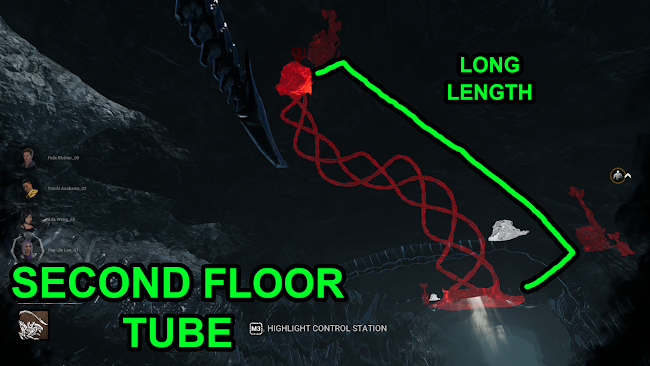
- *NOTE: On Forgotten Ruins, the “first floor” is the dungeon and the “second floor” is the main floor.
CHAPTER 4: CRAWLER MODE
The CRAWLER mode and its granted ability, the TAIL ATTACK, is an extremely complex short-range projectile attack with immense versatility. Once mastered, the TAIL ATTACK is one of the most deadly short range abilities in the game. However, one must first understand how the mode that grants it, the CRAWLER mode, works.
THE SMALLER TERROR RADIUS
- The CRAWLER mode does give the XENOMORPH a smaller terror radius, shrinking it down from the standard 32 meters to 24 meters.
- This obviously implies that the XENOMORPH is a stealth killer, synergizing with perks like Monitor & Abuse and can sneak up on survivors easily. However, THIS IS NOT THE CASE.
- As we mentioned in the TUNNEL FAQ section, FLAME TURRETS come with built in motion trackers that have a very large 41 meter detection on the XENOMORPH, in and out of the TUNNELS. This beeps more quickly as the XENOMORPH gets closer to the FLAME TURRET. This essentially renders any sort of terror radius or undetectable perk useless as long as a survivor has a FLAME TURRET nearby. This unfortunately includes CRAWLER mode’s own smaller terror radius.
- So do not fall into this trap! The CRAWLER MODE’s stealth is largely useless and you should not rely on it to perform consistently well!
- FUN FACT: While most aspects of stealth are weaker on XENOMORPH, one edge the XENOMORPH does have is that they do not disturb crows while in CRAWLER MODE.
- This is helpful for tracking survivors that disturb these crows nearby since you will know you didn’t do so yourself, but also creates synergy with perks like Languid Touch and Spies From The Shadows.
THE BASICS OF THE CRAWLER MODE
*STAYING IN CRAWLER MODE AS MUCH AS POSSIBLE IS YOUR NUMBER ONE PRIORITY
The biggest error I see in most emerging XENOMORPHS is that they do not take staying in CRAWLER MODE seriously enough. So let’s discuss how to get into and stay in our CRAWLER MODE.
- The good thing about XENOMORPH is that you will always be automatically charging your CRAWLER mode whenever you’re in your normal mode.
- It takes a total of 35 charges to reach CRAWLER MODE.
- You gain 1 charge a second while outside the TUNNELS.
- You gain 8 charges a second while moving inside the TUNNELS.
- The only way you voluntarily can exit the CRAWLER MODE is when you pick up a survivor, which places you down at 26.25 charges instead of fully restarting at 0 charges. Your CRAWLER MODE will not gain charges until the survivor leaves your grasp.
- The only time you fully restart your charges is when knocked out of the CRAWLER MODE by a FLAME TURRET.

- IMPORTANT NOTE: While on the topic of carrying a survivor, survivors usually grunt 10 times before wiggling out of a killer’s grasp.
- However, the XENOMORPH introduced a new carry animation, the choking animation, that has a separate amount of grunts before wiggle.
- The survivor grunts 6.5 times before they wiggle out instead!
- Once the survivor leaves your grasp, your CRAWLER MODE immediately begins recharging. You will regain your power after 8.51 seconds.
- This charge rate CAN be improved using the OVOMORPH add-on which increases your charge time outside the TUNNELS by 25%.

- With the OVOMORPH add-on, your new power recovery time is 7 seconds.

HOW TO STAY IN CRAWLER MODE
As mentioned before, staying in CRAWLER MODE as much as possible should be your primary objective as the XENOMORPH. In this section, we are going to discuss the best strategies to avoid being taken out of your power by the FLAME TURRETS.
*THE NUMBER ONE AND PRIMARY RULE OF PLAYING XENOMORPH IS:
DESTROY FLAME TURRETS THE MOMENT YOU SEE THEM
This is the most important advice you should take in this guide. The number one error I see among XENOMORPH players is that they do not destroy the FLAME TURRETS as soon as possible. YOU WILL NOT MAKE THIS MISTAKE!
Let us very briefly discuss how the FLAME TURRETS actually knock you out of CRAWLER MODE so it makes more sense WHY you must destroy them immediately:
- The FLAME TURRETS have a default detection radius of 10 meters and will open fire on the XENOMORPH once they are in line of sight.
- Keep in mind, you do suffer a movement penalty while under the effect of flames specifically while in CRAWLER MODE (you are unaffected in your normal mode). You drop down to 92% (previously 115% default) while under the effect of flames. So take this into account before dealing with a FLAME TURRET.
- The FLAME TURRETS operate on a separate system with flame damage
- 100 charges are needed to stun a Xenomorph out of CRAWLER MODE
- 66 charges are applied per second of flame on the XENOMORPH
- This means it takes less than a second and a half to be knocked out of your CRAWLER MODE!
- The only way to offset this is to use the add-on EMERGENCY HELMET, which resists the FLAME TURRET charges by 35% in addition to the stagger, lowering it to only 42 charges applied per second.

- This now makes your CRAWLER MODE last almost 2 full seconds before being knocked out!
- For this reason, it is XENOMORPH’s best addon and should ideally be run at all times.
- The only other add-on that affects the FLAME TURRETS is LAMBERT’S STAR MAP, which decreases the maximum range of the FLAME TURRETS from 10 meters to 8 meters, but does not directly affect the charge rate.

- While this does not affect charge rate, it does allow you to get closer to the FLAME TURRETS, allowing you to break them easier or avoid poorly placed FLAME TURRETS entirely.
- Sidenote: Destroying a FLAME TURRET with your TAIL ATTACK counts as a “miss”, which puts you into a cooldown for 3 seconds. Attacking normally with your M1 does not incur this penalty so you should be using this over your TAIL ATTACK whenever possible. LAMBERT’S STAR MAP creates more of these situations.
- This is XENOMORPH’s second best add-on for this reason. However, it could be argued that it is the best add-on simply because it is nearly as helpful as EMERGENCY HELMET despite only being an uncommon add-on. This is one of the best performing uncommon add-ons in Dead by Daylight!
HOW TO BEST DEAL WITH THE TURRETS
- If a FLAME TURRET is further out of reach, use your TAIL ATTACK to destroy it using your 4.8 meters of range.
- Keep in mind, as we mentioned above, destroying a FLAME TURRET with your TAIL ATTACK counts as a “miss”, so you do suffer a cooldown penalty for 3 seconds and a movement speed penalty of 1.2 meters a second while the Tail Attack is on cooldown. Conversely, a basic attack only has a cooldown of 2.7 seconds.
- For this reason, if a FLAME TURRET is close to you, use your normal attack to destroy the FLAME TURRET instead, as this is quicker!


- The only situations you should avoid breaking a FLAME TURRET on sight would be if the FLAME TURRET is near max range (10 meters) and you will not be running back into its range after leaving it.
- Even then, you will often be forced to deal with this FLAME TURRET later in the match even though you ignored it the first time, so it is smarter to just deal with the FLAME TURRETS as you see them!
- FLAME TURRETS also experience a deactivation period upon a XENOMORPH exiting a CONTROL STATION. FLAME TURRETS are unable to throw flames during this period, so destroy them while they are useless!
- Also be aware that since the PTB release of XENOMORPH, there has been a long-standing bug where the FLAME TURRETS randomly are invincible. So far, there seems to be no rhyme or reason as to why this happens or when it happens. There are even moments where a FLAME TURRET will retain invincibility for MULTIPLE hits.

- (This bullet point will be removed whenever they finally get around to fixing this… hopefully soon)
- (This is still not fixed… guess it’s a feature)
With that out of the way, let’s get to the part that most of you are probably here for, the Tail Attack section.
CHAPTER 5: TAIL ATTACKS
This section is going to be the longest section in the guide. The TAIL ATTACK is where most of the XENOMORPH’s strength lies, as it is an extremely oppressive anti-chase tool. However, it can also be one of the most frustrating and difficult anti-chase tools to use in Dead by Daylight. Let’s make sure that you unleash the full potential of the TAIL ATTACK by breaking down and understanding how it works.
RANGE OF THE TAIL ATTACK
The TAIL ATTACK has shorter range than other projectiles in the game, but makes up for its range by being a 4.6 movement killer with low windup and cooldown. However, one must still master the range of the TAIL ATTACK, or else you will find yourself missing shots out of range frequently.
- The TAIL ATTACK is a 4.8 meter range projectile attack that is only available to the XENOMORPH while they are in the CRAWLER MODE.
- If you are unsure of how to visualize what 4.8 meters looks like in Dead by Daylight, it is roughly the length of the red corvette car that appears on the Macmillan and Badham Preschool maps.

AIMING THE TAIL ATTACK
Aiming the TAIL ATTACK can be particularly difficult and frustrating at first, but there are some handy tips that can make your life much easier:
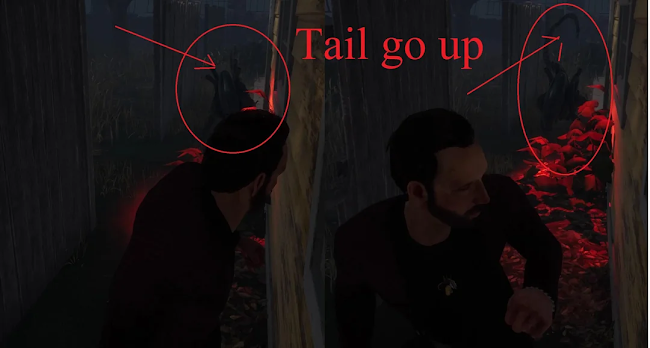
THE TAIL TIP
- The tip of the XENOMORPH’s tail hangs in frame at the top of the screen while in CRAWLER MODE. While seemingly useless and often accused of being distracting, this is actually done for your benefit.
- In actuality, the tip of the XENOMORPH’s tail hangs almost exactly where the center of your screen is, meaning that you can use the tip of the tail to aim your TAIL ATTACKS!
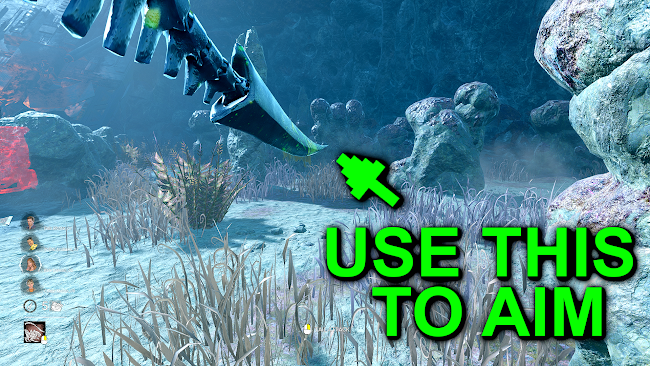
- Keep in mind that it is not entirely accurate. If you look below, I applied an actual crosshair overlay to my game, so you can see roughly how much higher the tail tip is.
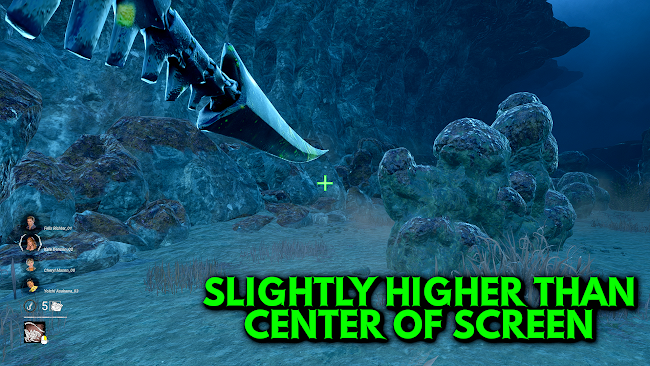
- Either way, the tip of the tail is a great guide on how to generally aim your TAIL ATTACKS, as long as you can account for the slight discrepancy!
TAIL TIP COSMETIC AIM RANKING
As you may have guessed, while TAIL ATTACK aiming using the tip is good advice, each skin has its own accuracy when it comes to the aiming. Below, I’ve provided a comparison and a grade for how accurate each cosmetic tip is.
DEFAULT - Grade B (Good)
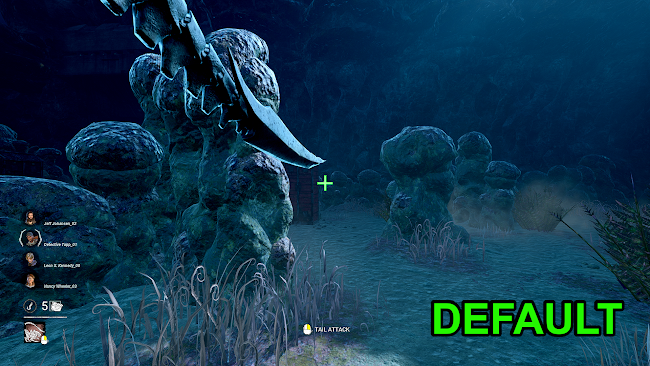
- The default tip is fairly accurate. On the horizontal axis, it is practically level. The vertical axis does have the tail tip about a half a centimeter of space above the center of the screen.
PRESTIGE - Grade B (Good)

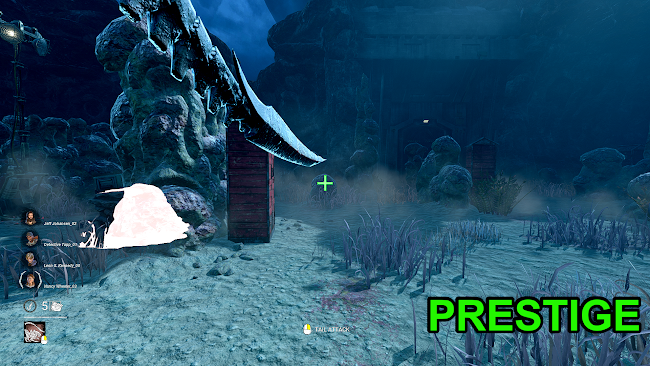
- The default and prestige tail tip should theoretically be the same, but they are barely not. The tip is very slightly more turned upward than the default tip. These two are practically the same, with the horizontal axis almost being perfect, just a smidge higher vertically than the default tip.
GRID - Grade C (Okay)
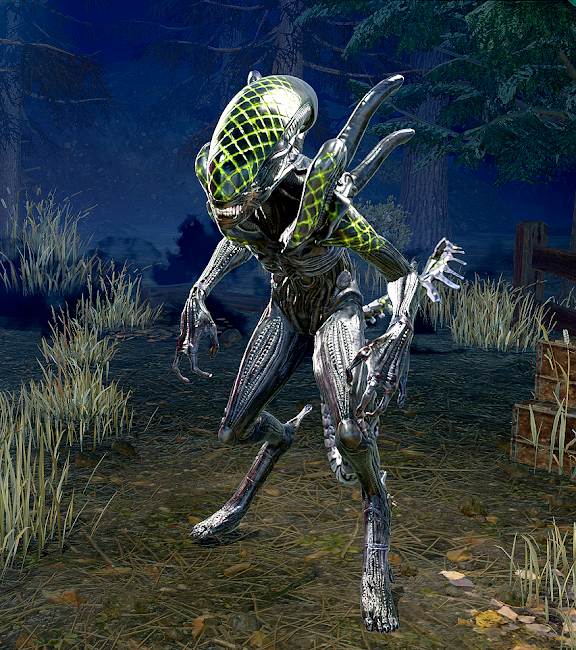

- The Grid tail tip is slightly inaccurate. The horizontal axis is slightly off, a few millimeters to the right of center. The vertical distance to the center is the same as default/prestige, with about half a centimeter of distance. This in addition to the tail itself being bulkier makes it only an alright choice for aiming.
CLONE - Grade D (Poor)
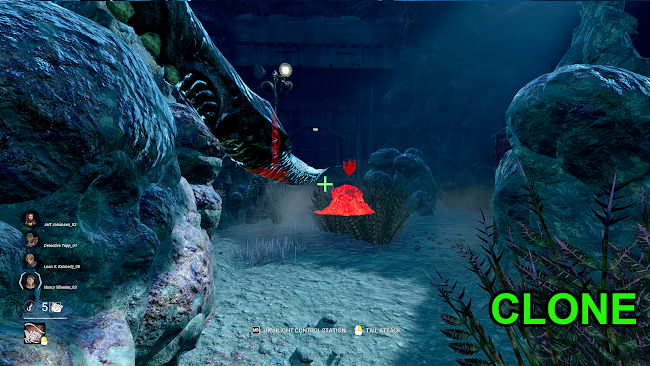
- The Clone tip is mediocre compared to the other tail tips. While it may be physically closer to the center on both planes, it’s actually completely off. The main problem is that the tail tip itself is upturned to the upper right. This places the tip a few millimeters off horizontally and vertically. That in addition to how bulbous and visually obscuring the rest of the tail itself is, it serves to be in the way more often than it helps.
QUEEN - Grade A (Great)

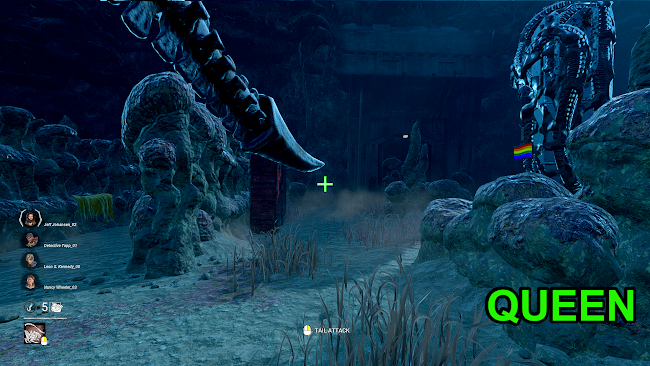
- The Queen tip is almost the best tip for aiming. The horizontal plane is perfectly aligned to the center. The tip is also a few millimeters lower vertically than the default. This in addition to the tail itself being very thin and non obscuring, makes this an excellent choice for aiming.
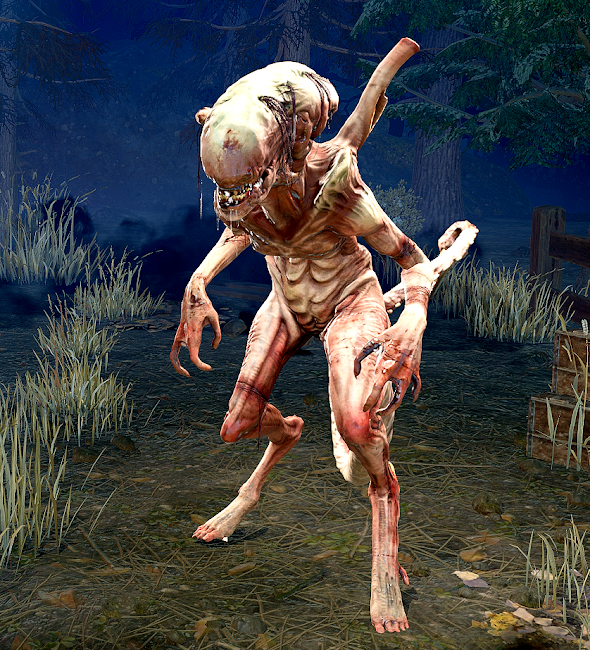
BLIGHTED - Grade S (Best)
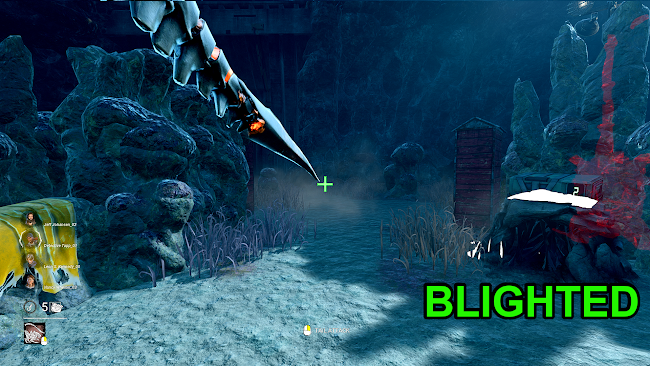
- The Blighted tip is the best option for aiming. The long slender tip is non obscuring and sits almost at the dead center of the screen. The tip is a couple millimeters to the left horizontally and almost level vertically. The tail itself is also the most off the screen compared to every other tail. Run this cosmetic if you want the most accurate tail tip aim!
MISS & HIT COOLDOWN
The TAIL ATTACK does not have very many drawbacks, making it one of the better anti-chase tools in Dead by Daylight, but it does have them.
- The TAIL ATTACK has 3 second cooldown on both hit & miss.
- HOWEVER, your movement speed on a missed TAIL ATTACK slows down to a whopping 1.2 meters a second.
- This makes missing a TAIL ATTACK particularly punishing, especially since successfully destroying a FLAME TURRET with a TAIL ATTACK still counts as a miss.
- For this reason, it is wise to go for TAIL ATTACKS as they are necessary instead of recklessly, as missing them can extend your chase time severely.
- It is worth noting that the cooldown for hits and misses are technically both 3 seconds long, but the 1.2 movement speed penalty for a miss is what makes it take longer for you to regain control of the XENOMORPH.
TYPES OF TAIL ATTACKS
There are many different kinds of shots that the TAIL ATTACK can make, each having different uses for different situations. Let’s cover these:
NORMAL SHOTS
- Normal Shots, also often referred to as “stabs”, are just straight shots. These are simple and safe, but not very versatile.
- Use these when survivors are in locked animations like vaulting a window, but otherwise, the other shots are superior.
STRAFE SHOTS
- This is the most common and versatile type of TAIL ATTACK. Similar to the tentacle strike attack from Nemesis, strafing (moving) during a TAIL ATTACK will spread the hitboxes, allowing you to cover a wide space and make it nearly impossible for survivors to dodge.

- Use this shot in as many situations as possible. You should make sure to be careful not to hit obstacles around you while going for this shot, because unlike Nemesis, striking collision DOES cancel the attack.
- Otherwise, there is no reason to not try and spread your hitboxes over as large a space as possible.
- When strafing with the TAIL ATTACK, you should prioritize aiming with your MOVEMENT (L Control Stick/WASD) over your CAMERA (R Control Stick/Mouse). The reason you do this is because it keeps your vertical aim level, making sure you do not miss the target or hit some collision on the world around you. Minimize using your CAMERA to aim STRAFE SHOTS.

- Where your CAMERA aim comes into play, is when you need your vertical aim to go diagonally across obstacles like a car or oddly shaped loop. In these cases, still primarily use your BODY to move the horizontal plane, and use your CAMERA to adjust vertically as needed.
- A Reddit user by the name of UGHaulnd has made excellent videos depicting how the TAIL ATTACK really works from the game’s back end. The first half of this video depicts how the hitboxes work with STRAFE SHOTS. (Click on image to bring up the link!)
ARC SHOTS
- This is the most difficult, but flashy type of TAIL ATTACK. Like a Huntress hatchet, you are able to send your TAIL ATTACK up and over objects and connect with survivors on the other side.
- The trick with ARC SHOTS is “lobbing” or “arcing” the shot over the obstacle. You should vertically swipe up to put the starting hitboxes over the object, then drag the ending hitboxes down to land it onto your target.
- ARC SHOTS are mostly helpful with dealing with strong window vaults and pallets with verticality like the RPD main hall god pallet or the Garden of Joy god window. This kind of TAIL ATTACK in particular is what makes XENOMORPH one of the better chase killers in Dead by Daylight as it shuts down extremely strong resources.
- The latter half of Reddit user UGHaulnd’s first video depicts how hitting an ARC SHOT over an object works. The first half of his second video goes more in depth at showing ARC SHOTS as well. (Click on the image to bring up link)
ANTI-BODYBLOCK SHOT
- This is an application of the ARC SHOT and the STRAFE SHOT with the specific purpose of shutting down body blocks.
- If you are in a situation where a survivor is body blocking another, you can use an ARC SHOT to go up and over the hitbox of a survivor to hit one directly behind them. This works the exact same as the way you ARC SHOT over a window vault or other obstacle, just treating the pill shaped hitbox of the first survivor as an obstacle.

- While much more rare and harder to pull off, you can also STRAFE SHOT to pull this off horizontally. However, this has a much lower success rate, often just hitting the survivor in front.
SNIPE SHOTS
- SNIPE SHOTS are probably the most niche shots that you can do with the TAIL ATTACK. The radius hitbox for the XENOMORPH’s TAIL ATTACK is 14 cm. While the TAIL ATTACK’s hitbox is not as small as something like Deathslinger’s harpoon or Trickster’s knives, it is still fairly small, meaning you can thread it through holes in the environment.
- From what you’ve seen in UGHaulnd’s video, the TAIL ATTACK hitbox is roughly the size of a basketball, being about as big as two survivor heads put together. Use this as reference to what you can and cannot shoot through.

- These shots will not trick smarter survivors that are aware, but can be a fun one time shot for the unaware. It’s also nice for a fancy clip :).
- The latter half of UGHaulnd’s second video shows the hitboxes as they go for a SNIPE SHOT through a stairwell hole on Ormond.
ANTI UNHOOK SHOTS
- This application of the SNIPE SHOT can actually shut down the most common survivor unhook tech. Survivors will typically circle around the hook and place the hooked survivor between you and them. The reason they do this is because survivors have invincibility frames until they are fully unhooked, so they are using the hooked survivor as a shield.
- However, the XENOMORPH can actually circumvent this. If you go for a SNIPE SHOT through the gap between the hook and the hooked survivor, you can actually hit the unhooker from the other side!
2 FOR 1 SHOTS
- This shot exclusively takes advantage of the fact that the TAIL ATTACK on a FLAME TURRET counts as a “miss”. Because hitting a FLAME TURRET counts as a “miss”, the hitbox remains active instead of canceling upon breaking the FLAME TURRET
- As a result, if a survivor is standing directly behind a FLAME TURRET while placing it, you can hit them behind it!
- WARNING: If you use a single shot after the FLAME TURRET is fully placed, the 2 For 1 does not work.
- YOU MUST USE A STRAFE SHOT TO HIT THEM THROUGH THE FLAME TURRET IF IT IS FULLY PLACED.


- Remember, this is beneficial not only for the efficiency of destroying a FLAME TURRET and hitting a survivor at the same time, but because FLAME TURRET cooldown doubles from 30 seconds to 60 seconds when destroyed by the XENOMORPH!
COLLISION
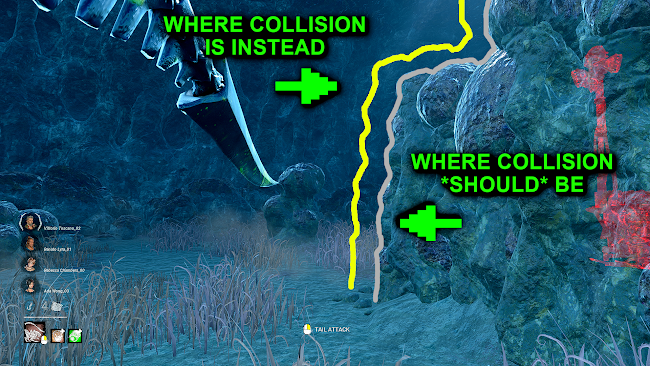
Your arch nemesis when it comes to using your TAIL ATTACK is Dead by Daylight’s collision. If you have played other projectile killers, you have probably noticed that Dead by Daylight’s collision is awkward, with a lot of invisible walls extending beyond the actual object. This in combination with the large 14 centimeter hitbox creates a nasty combination for missed TAIL ATTACKS.
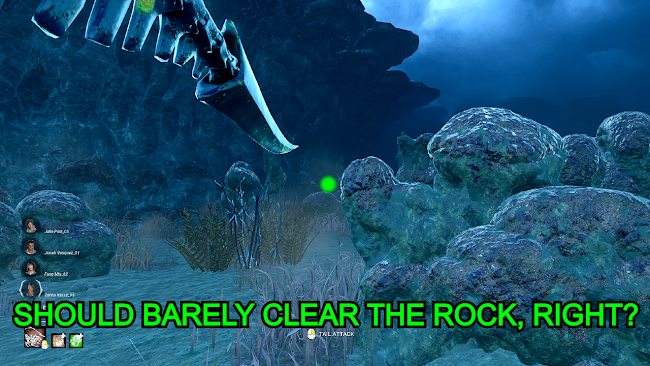

The best way around this, unfortunately, is to just play and earn enough experience to get used to the way the collision works. However, there are some tips as you embark on this journey:
- As a rule of thumb, play as if most objects to have a half foot-ish or more of extra collision around them.
- The ground, obviously, has collison. However, your TAIL ATTACKS have a weird interaction with the ground collision when you aim your TAIL ATTACKS low.
- For whatever reason, sometimes Dead by Daylight will prioritize collision over the hitbox of a survivor when a survivor is close to said collision. If you have played Hillbilly before, you’ve probably run into a situation where you’ve had a survivor pinned against a wall with no obstacles and hit the wall instead of the survivor. This essentially works the same way.

- To avoid this, you should aim at the center mass of survivors. If you are unfamiliar with that term, it means from the waist up on a person. If you aim center mass, you will get way less instances of hitting the ground instead of the survivor

FREQUENTLY ASKED QUESTIONS ABOUT THE TAIL ATTACK
- Is the TAIL ATTACK reactable?
- Yes, but it is VERY difficult to do so.
- The Tail Attack windup is 0.4 seconds from animation start to hitbox activation, and anything about 0.24 seconds is reactable to most individuals with practice.
- There is actually a visible indicator that a TAIL ATTACK is being wound up, all credit to ZEPHANDRYPUS for the image below:
- There is also a distinct audio cue that plays for the windup before the TAIL ATTACK becomes active, which you can hear here. If you are interested in the full TAIL ATTACK sound, listen here.
- FUN FACT: There is actually one instance where the TAIL ATTACK has 0.25 windup, which occurs if the XENOMORPH TAIL ATTACKS the moment that CRAWLER MODE activates.
- (This is far harder to react to, if not nearly impossible)
- Should I be using my TAIL ATTACK as much as possible?
- Generally yes, the main exception being when a survivor is directly in front of you. As you’ve seen, collision misbehaves often with the TAIL ATTACK, so it’s better to take the safe normal attack over a TAIL ATTACK. In addition, the cooldown of your basic attack is 0.3 seconds faster than the TAIL ATTACK, even on successful hits.
- Should I zone using the TAIL ATTACK?
- You should ideally only be zoning when you are trying to force the survivor away from a resource (window, pallet, etc), otherwise, your chase will be faster by using your TAIL ATTACK over a normal attack.
CHAPTER 6: FLAME TURRETS
This section is going to be wrapping up the basics of the FLAME TURRETS. By this point in the guide, most of the FLAME TURRET mechanics have been explained, but I will explain them short handedly again if you skipped to this section.
The FLAME TURRETS are the main counterplay to the XENOMORPH and have three primary functions:
- Knocking the XENOMORPH out of their CRAWLER MODE power.
- Serving as a body block to extend chases for the survivors.
- Providing tracking on the XENOMORPH through the built-in motion sensor.
- Survivors can deploy up to 4 FLAME TURRETS maximum, which can be retrieved from any CONTROL STATION on the map, as long as there are FLAME TURRETS available and the CONTROL STATION is not on cooldown.
- (Refer back to the CONTROL STATION section if you want more specifics)
- While a survivor has a FLAME TURRET in their possession, they are HINDERED by -35%, EXHAUSTED and INCAPACITATED. Survivors are able to “sprint” with FLAME TURRET in hand, but it only moderately speeds up their walk instead.

- Recall that survivors are unable to be seen on the XENOMORPH’s footstep detection while in the TUNNELS while they are holding a FLAME TURRET
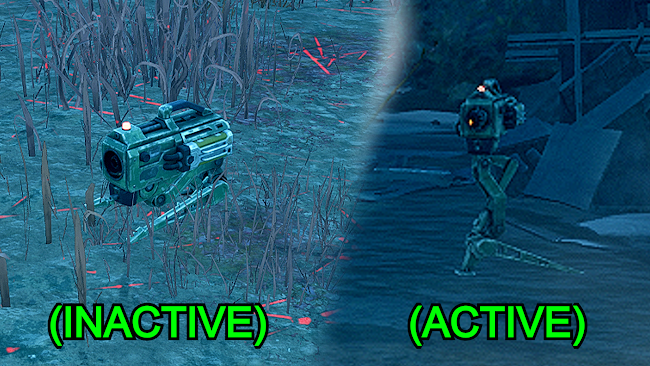
- FLAME TURRETS can be placed on the ground instead of being set up and activated, in which they go into an inactive mode where they no longer affect gameplay.
- While in this inactive mode, the FLAME TURRET is completely invincible to the XENOMORPH.
- A FLAME TURRET can only be inactive for 30 seconds before it self-destructs.
- However, if a survivor is within 6 meters of an inactive FLAME TURRET, its self-destruct timer temporarily pauses.
- Once placed, the FLAME TURRETS will target the XENOMORPH once they are within 10 meters and begin throwing flames.
- Recall that FLAME TURRETS need 100 charges to knock a XENOMORPH out of their CRAWLER MODE and apply 66 charges a second by default
- (REFER BACK OUR “STAYING IN CRAWLER MODE” SECTION FOR MORE)
- The FLAME TURRETS once placed are not invincible however.
- FLAME TURRETS suffer from their own overheat mechanic that puts the FLAME TURRETS on deactivation mode, which the only other way the FLAME TURRETS deactivate is when a XENOMORPH emerges from a CONTROL STATION.
- FLAME TURRETS accumulate heat at a rate of 25% per second, taking a total of 2.26 seconds to overheat.
- After a FLAME TURRET overheats, survivors must REPAIR the FLAME TURRET for 3 seconds or else it will self-destruct after 30 seconds.
- Do not forget that in addition to being able to throw flames, the FLAME TURRETS come with a built-in motion sensor that tracks the XENOMORPH for 41 meters.
- This motion sensor comes with an auditory and visual warning that the XENOMORPH is coming, growing with intensity the closer the XENOMORPH is.
- For this reason, undetectable and terror radius perks/add-ons are far weaker on the XENOMORPH
FREQUENTLY ASKED QUESTIONS ABOUT THE FLAME TURRETS
- When should I break the FLAME TURRETS?
- The moment you see them. Even if you are able to avoid them, they will often come back to haunt you later. Better to deal with them immediately.
- Are the FLAME TURRETS useless for survivors?
- No, not even remotely. This misconception comes from the idea that the FLAME TURRETS are only used for knocking the XENOMORPH out of its power, which is not their only function.
- If you want to confirm the knock out of a XENOMORPH’s CRAWLER MODE, place two FLAME TURRETS near each other and even with addons, they will build up flame charges too quickly to avoid it.
- The main function of the FLAME TURRETS is to buy extra time in chase by acting as placeable body blocks.
- When a XENOMORPH encounters a FLAME TURRET, they must either:
- a.) Ignore the FLAME TURRET and lose their CRAWLER MODE, meaning they now chase as a 115 normal killer which is far weaker.
- b.) Destroy the FLAME TURRET, but lose almost 4 seconds of chase due to TAIL ATTACK recovery.
- Use these 4 seconds to reach the next available tile or resource so that you can extend the chase even longer!
- Where do we place the FLAME TURRETS as survivors?
- Place the FLAME TURRETS anywhere near you that 4 extra seconds of time would help you avoid a dead zone or extend a chase substantially.
- EX: If you are working on a generator that is far away from a pallet, place the FLAME TURRET between your generator and the pallet, that way you can reach the pallet without being hit.
- Dead zones and loops are often the best places to place FLAME TURRETS
- Placing FLAME TURRETS out of sight, like in bushes or tall grass, will make it harder for the XENOMORPH to spot right away and make them lose extra time.
- AVOID placing FLAME TURRETS near edges and corners. As we covered earlier, if a XENOMORPH uses their normal attack to destroy a FLAME TURRET, they do not suffer the movement speed penalty for the TAIL ATTACK, meaning they will catch up to you far quicker.
- Placing FLAME TURRETS as out in the open as you can forces the XENOMORPH to use their TAIL ATTACK to destroy them, ergo forcing them to endure the movement speed penalty.
- Can FLAME TURRETS be affected by BLINDNESS?
- While the Blindness status effect is unable to hide the CONTROL STATIONS, it can in fact hide the aura of FLAME TURRETS, making it more difficult for the survivors to know where to run to mid-chase!

CHAPTER 7: ADD-ONS
Now that we’ve covered how to efficiently use the XENOMORPH’s power, it’s time to cover the quality of the XENOMORPH’s add-ons and which ones you should be running the most. The XENOMORPH unfortunately only has a handful of add-ons that are truly worth running, but at least that is more than characters like Nemesis & Pyramid Head.
We will be breaking down each individual addon, their grade, why I put them there, and whether or not you should be running them.
CEREAL RATIONS - Grade: B (Alright)

CEREAL RATIONS is a helpful add-on, moreso for beginner XENOMORPHs or players that struggle in the macro pressure department. Knowing where FLAME TURRETS are placed while in the TUNNELS helps you keep track of where survivors are throughout the match, as well as help you avoid FLAME TURRETS which are the survivors’ main counterplay tool.
While the aura reading is helpful, the XENOMORPH already comes with basekit information while in the TUNNELS. Much of the info CEREAL RATIONS tells you, you could spend mere seconds longer in the TUNNELS and likely locate the survivors anyways without the use of a whole add-on slot.
BENEFITS:
- Aids in macro pressure
- Good beginner add-on (both to the XENOMORPH and to the KILLER role)
- Partially limits need for information perks like LETHAL PURSUER & BARBEQUE & CHILI
DRAWBACKS:
- Very redundant because of XENOMORPH’s basekit information
- Doesn’t affect the game enough to justify the add-on slot over a stronger choice
DRINKING BIRD - Grade: C (Not Worth It / Too Situational)

DRINKING BIRD is only a slightly helpful add-on that unfortunately doesn’t pull enough weight to justify the perk slot. The KILLER INSTINCT when a XENOMORPH comes out of a CONTROL STATION is extremely helpful. Coming out of a CONTROL STATION can sometimes be disorienting, especially to a newer XENOMORPH player, so an extra two seconds can help with that. However, this add-on doesn’t do much else.
BENEFITS:
- Helps with CONTROL STATION disorientation
- Good add-on for beginner XENOMORPHs
DRAWBACKS
- Simply too weak of an effect to justify the add-on slot
- Other add-ons of the same rarity (common) heavily outclass it
OVOMORPH - Grade: B (Alright)

Ovomorph is a helpful addon if you are still getting used to dealing with FLAME TURRETS and find yourself outside of your CRAWLER MODE a lot. Even outside of a beginner role, Ovomorph can allow you to play a bit more aggressively as your total power recovery time will go from 69 seconds to 52 seconds. However, as we covered earlier, your recovery speed can already be boosted by EIGHT TIMES the normal recovery speed by entering the TUNNELS, so this add-on is made redundant if you utilize that strategy (which you definitely should be).
BENEFITS
- Great add-on for beginner XENOMORPHs
- Allows more aggressive playstyle
DRAWBACKS
- Made redundant by the TUNNELS increased recovery speed
RIPLEY’S WATCH - Grade: C (Not Worth It / Too Situational)

RIPLEY’S WATCH seems on the surface to be designed as a beginner add-on for the XENOMORPH. If you are still getting used to destroying FLAME TURRETS and are getting knocked out of your CRAWLER MODE a lot, RIPLEY’S WATCH will destroy the FLAME TURRETS for you. In addition to the effects in the description, this also counts as the XENOMORPH breaking a FLAME TURRET. This is important because FLAME TURRET respawn time doubles from 30 seconds default to 60 seconds when destroyed by the XENOMORPH. More FLAME TURRET downtime means more time in your CRAWLER MODE! However, in reality, this is redundant because unless survivors are consistently repairing every single FLAME TURRET, they self-destruct automatically eventually anyways. Furthermore, this add-on teaches the bad habit that FLAME TURRETS can be ignored, which you should be ideally destroying all FLAME TURRETS as soon as possible.
BENEFITS
- Good add-on for beginner XENOMORPHs
DRAWBACKS
- Made redundant by base self-destruct mechanic
- Reinforces the bad habit of neglecting to destroy FLAME TURRETS on sight
ASH’S INNARDS - Grade: C (Not Worth It / Too Situational)

ASH’S INNARDS is part of the anti FLAME TURRET add-on tree, which mostly are qualified as the best kind of add-ons the XENOMORPH can have since FLAME TURRETS are their main form of counterplay. However, this add-on unfortunately completely underperforms compared to other add-ons of the same tree. While having the turrets down an extra 10 seconds is helpful, it by no means is impactful enough to justify the add-on slot, especially in its own rarity (uncommon)
BENEFITS
- Opposes the FLAME TURRETS, the XENOMORPH’s main counterplay tool
DRAWBACKS
- Simply too underwhelming of an effect to justify the use of a whole add-on slot
- Outclassed by other add-ons in its own rarity (uncommon)
BRETT’S CAP - Grade: C (Not Worth It / Too Situational)

BRETT’S CAP barely makes the cut of grade C, only made possible by the fact that the XENOMORPH has two add-ons that are nearly useless or outright useless. Blindness as a status effect can be very detrimental to survivors, especially survivors not in outside communication. However, this add-on comes with not one, but two restrictions. The first is that it only affects survivors within 16 meters of a FLAME TURRET, meaning it’s going to be rare you blind more than one survivor, if even that. This add-on also has a low duration of only 25 seconds. For reference, the HUNTRESS add-on, Amanita Toxin, applies blindness for 60 seconds and is a common rarity add-on.
BENEFITS
- Blindness can be a nasty effect against non-comms survivors
DRAWBACKS
- Too small of an area of effect to be meaningful
- Too short of a duration to make the rarity of the effect going off worthwhile
- Other killers have better blindness add-ons for cheaper
CREW HEADSET - Grade: B (Alright)

CREW HEADSET improves the already very powerful and useful footstep detection while in the TUNNELS, buffing the base range of 16 meters to a whopping 22 meters. This is tremendously helpful as not only does it help you get more information about survivors close to you as you plan to exit a CONTROL STATION, but also gives you more macro knowledge of survivors further away. However, there is an add-on that outclasses this add-on in its own rarity (uncommon).
BENEFITS
- Buffs an already excellent basekit information ability
- Allows for more planning and macro play
DRAWBACKS
- Outclassed by an add-on of the same rarity (uncommon)
LAMBERT’S STAR MAP - Grade: S (Best Choices)

LAMBERT’S STAR MAP is one of the best performing uncommon add-ons in Dead by Daylight and serves to be one of the XENOMORPH’s best add-ons. The main gameplan of the XENOMORPH is to stay in CRAWLER MODE as much as possible so you have access to your vicious TAIL ATTACK, so FLAME TURRETS are your mortal enemy. At base, FLAME TURRETS can fire 10 meters, but this reduces their range to only 8 meters. This add-on allows you to often outright ignore certain FLAME TURRETS because the FLAME TURRETS are simply too far away to turn on, allowing you to stay in chase and deal with the FLAME TURRET at your own leisure. As we mentioned earlier, destroying a FLAME TURRET with your normal attack avoids the TAIL ATTACK movement speed penalty. LAMBERT’S STAR MAP helps you get closer to the FLAME TURRET in order to deliver these normal attacks. Not to mention, this add-on is only an uncommon add-on, making it extremely cost efficient to run every game. If rarity was taken into account for strength, this would objectively be the XENOMORPH’s best add-on.
BENEFITS
- Opposes the FLAME TURRETS, the XENOMORPH’s main counterplay tool
- Allows more aggressive playstyle
- Extremely cost efficient
DRAWBACKS
- None
LIGHT WAND - Grade: D (Bad)

LIGHT WAND is one of the rare cases in Dead by Daylight where an add-on is near useless to use. We discussed earlier that FLAME TURRETS enter a deactivation period when a XENOMORPH first emerges from a CONTROL STATION. However, in a previous patch, the FLAME TURRETS used to have invincibility when they were deactivated. The LIGHT WAND add-on’s purpose was to allow you to get to FLAME TURRETS before they became active again, so you could destroy them the moment they became active. However, now FLAME TURRETS can be destroyed while in this deactivation mode, so this add-on doesn’t really serve much purpose.
The one thing this addon CAN do is buy you slightly more time to use a basic attack to destroy a FLAME TURRET coming out of a CONTROL STATION. This is forgoing that survivors should not be placing FLAME TURRETS that close to the CONTROL STATIONS anyways, but there is that very minor benefit.
BENEFITS
- None
DRAWBACKS
- Very unhelpful effect
EMERGENCY HELMET - Grade: S (Best Choices)

EMERGENCY HELMET is the best XENOMORPH add-on available. This add-on directly nerfs the charge rate of the FLAME TURRETS, making it take roughly 0.3 seconds longer to knock you out of your CRAWLER MODE. This could be the difference between staying in your CRAWLER MODE for a quick and decisive chase, or being knocked out of your CRAWLER MODE and entering a brutal recovery. As we mentioned earlier, destroying a FLAME TURRET with your normal attack avoids the TAIL ATTACK movement speed penalty. EMERGENCY HELMET’S resistance helps you stay in the flames longer to deliver these normal attacks. Ideally, you should always be running EMERGENCY HELMET in tandem with another add-on.
BENEFITS
- Best choice to oppose the FLAME TURRETS, the XENOMORPH’s main counterplay tool
- Allows more aggressive playstyle
DRAWBACKS
- None
KANE’S HELMET - Grade: B (Alright)

KANE’S HELMET is the quintessential MANGLED status effect add-on that many killers have in Dead by Daylight, the XENOMORPH’s being applied upon successful TAIL ATTACK. Since you should ideally be going for as many TAIL ATTACKS as possible, being able to apply a free slowdown effect is simply just a win-win. The only downside being that other killers have both MANGLED and HEMORRHAGE as a single add-on, but the XENOMORPH does not.
In addition, the nerf to Mangled and Mangled add-ons across the board hurt KANE’s Helmet. It’s still a good add-on, but dropped from its former A tier placement as a result.
BENEFITS
- Free slowdown
DRAWBACKS
- Inefficient add-on design compared to others of the same type on other killers
MOLTED SKIN - Grade: D (Bad)

MOLTED SKIN is nearly a useless add-on, just barely avoiding the bottom of the tier list. This is the quintessential EXHAUSTION add-on that many killers have, which are usually extremely helpful add-ons. However, the trigger state for this add-on is abyssmally specific. After FLAME TURRET deployment is a terrible trigger state for many reasons. Firstly, if you catch a survivor carrying a FLAME TURRET, they are already a sitting duck due to the 35% HINDERED, so that’s a guaranteed hit anyways. Otherwise, the survivors are gaining 3 seconds of EXHAUSTION and HINDERED while you’re not around, since survivors don’t often place FLAME TURRETS while directly under threat of the XENOMORPH.
BENEFITS
- Good effect in the extremely rare times it will go off
DRAWBACKS
- Trigger state is too specific
- Trigger state is often already a guaranteed hit for the XENOMORPH
- Duration is not long enough for the already small window of effect to matter.
MULTIPURPOSE HATCHET - Grade: C (Not Worth It / Too Situational)

MULTIPURPOSE HATCHET is an extremely puzzling add-on. Some killers have MANGLED and HEMORRHAGE combined into a single add-on, which is extremely good. The XENOMORPH unfortunately has their effects separated, which isn’t entirely awful as many killers have a rare MANGLED add-on and an uncommon HEMORRHAGE add-on. However, the XENOMORPH’s HEMORRHAGE add-on is a rare add-on for some bizarre reason. HEMORRHAGE is a helpful status effect as a slowdown for healing, but a rare add-on is simply too expensive for the level of impact it has.
BENEFITS
- Free slowdown
DRAWBACKS
- Extremely expensive add-on for the effect it gives
PARKER’S HEADBAND - Grade: C (Not Worth It / Too Situational)

PARKER’S HEADBAND is yet another puzzling add-on. This add-on seems inspired by the ONYRO’s add-on, BLOODY FINGERNAILS, which boosts her speed after exiting a TV. Similarly, this add-on gives the XENOMORPH a speed boost after exiting a CONTROL STATION. However, the numbers are so painfully low that the add-on is nearly purposeless. The HASTE isn’t fast enough to make sudden surprise plays from the CONTROL STATIONS. The duration isn’t long enough for the XENOMORPH to get a good head start on a chase post CONTROL STATION exit. So what is this add-on’s point?
BENEFITS
- Could get a hit in slim circumstances where a CONTROL STATIONS is extremely close to a generator
DRAWBACKS
- HASTE effect is not high enough
- Duration isn’t long enough
CAT CARRIER - Grade: C (Not Worth It / Too Situational)

CAT CARRIER is the quintessential UNDETECTABLE add-on that many other killers in Dead by Daylight have. However, this add-on underperforms for a multitude of reasons. Firstly, if you recall, UNDETECTABLE as a whole is a fairly weak status effect for the XENOMORPH because the FLAME TURRETS come with motion sensors that detect you for 41 meters. In addition to this, the trigger state for this add-on is losing your CRAWLER MODE, which is the opposite of your goal as the XENOMORPH which is to stay in your CRAWLER MODE as much as possible. Taking into account that this is a very rare add-on on top of it, it’s just not worth running.
BENEFITS
- Could fit in niche builds possibly
DRAWBACKS
- Applies UNDETECTABLE which is weak on the XENOMORPH
- Forces you to lose CRAWLER MODE and ergo your TAIL ATTACK
- Very rare is extremely expensive for how not helpful this add-on is
- Outperformed by another add-on in its own class (very rare)
HARPOON GUN - Grade: C (Not Worth It / Too Situational)

HARPOON GUN knows its place as a niche scream add-on made for niche scream builds. The information you get from this add-on can be nice in a macro sense, but the trigger state of getting a hit within 10 seconds of exiting a CONTROL STATION can sometimes be hard to achieve. This add-on is mostly made to fit into fun builds, but does not consistently perform well, especially not on its own.
BENEFITS
- Good fit for niche builds around screaming
DRAWBACKS
- Sometimes difficult trigger state
- Very expensive add-on compared to the effect of the add-on
SELF-DESTRUCT BOLT - Grade: A (Great Choices)

SELF-DESTRUCT BOLT is the XENOMORPH’s best non-anti FLAME TURRET add-on available. Dead by Daylight’s map design still leaves a lot to be desired, with some maps having insufferable vaults that make killer lives miserable. With SELF-DESTRUCT BOLT, you are able to shut down strong windows by vaulting through them with extreme speed, which sets up easy TAIL ATTACKS to put icing on the cake. This add-on is extremely strong when combined with the perk BAMBOOZLE, so even if you do not get the TAIL ATTACK immediately after the vault, that vault is shut down for the rest of the chase. The only problem being that the XENOMORPH’s TAIL ATTACK already is an anti-vaulting tool, often hitting survivors before they get to a vault, while they're vaulting, or after they’ve vaulted to the other side. So this add-on does have some redundancy to it.
BENEFITS
- Extremely good anti-chase tool
- Works with CRAWLER MODE, which you should be in as much as possible
- Synergizes extremely well with BAMBOOZLE
DRAWBACKS
- The TAIL ATTACK already deals with vaults fairly well, so there is some redundancy
SEMIOTIC KEYBOARD - Grade: B (Alright)

SEMIOTIC KEYBOARD is an information add-on based around letting the XENOMORPH know the progress of generators that are being worked on near FLAME TURRETS. While this is helpful information, especially when running slowdown perks, it is to some extent made redundant by the XENOMORPH’s powerful basekit information. The XENOMORPH could deduce the same information by traveling in the TUNNELS, it would just take slightly longer to get that information. The fact that this is a very rare add-on for something the XENOMORPH can do with extra time seems too pricey. This isn’t even mentioning that CEREAL RATIONS gives you most of this information for a common add-on.
BENEFITS
- Very good information
- Synergizes with slowdown perks
DRAWBACKS
- Made redundant by the XENOMORPH’s basekit information
- Very expensive add-on for the effect it gives
ACIDIC BLOOD - Grade: C (Not Worth It / Too Situational)

ACIDIC BLOOD on the surface is an extremely strong add-on. Very few killer add-ons in the Dead by Daylight grant an injury state to something that does not initially grant it, this case being when the XENOMORPH is stunned by a pallet. However, this add-on is actually fairly underwhelming for many reasons. First, the trigger state is very specific, only counting for stuns that occur 20 seconds after leaving a CONTROL STATION as well as only working in CRAWLER MODE (if you got burned out of CRAWLER MODE by a FLAME TURRET on the way to that stun, you’re out of luck). Secondly, the XENOMORH’s TAIL ATTACK allows you to swing over most pallets on most maps. An iridescent rarity add-on for something so restrictive and redundant to your basekit is puzzling. The only benefit being is that you can play aggressively and tank pallet stuns on purpose more often, but that’s about it.
BENEFITS
- Very rare and impactful effect
- Allows more aggressive playstyle
DRAWBACKS
- Extremely specific trigger state
- Made redundant by the XENOMORPH’s TAIL ATTACK
IMPROVISED CATTLE PROD - Grade: B (Alright)

IMPROVISED CATTLE PROD is yet another information add-on for the XENOMORPH, which if you’ve caught on by this point, this entire add-on tree of information is mostly redundant since the XENOMORPH gets so much information basekit from the TUNNELS. This add-on is no exception, but is more offensive than the others because of its rarity and trigger state. This add-on ups the ante to giving full aura reading to survivors within 10 meters of CONTROL STATIONS, but this only applies whenever a generator is completed. So this only has a maximum of 5 instances of use throughout a match without the guarantee of any value besides at least the one survivor who completed the generator. Such a limiting trigger state makes no sense on an iridescent add-on, your most costly rarity of add-on to upkeep and bring match to match.
The bright side to this add-on is that when run with LETHAL PURSUER, provides extra aura reading which can be the difference between a chase having a decisive end, or extending longer.
BENEFITS
- Aura reading is a very good add-on effect
DRAWBACKS
- Made redundant by the XENOMORPH’s basekit information
- Extremely limited trigger state
- Very expensive add-on for the effect it gives
CHAPTER 8: BUILDS & PERKS
In this section, we will be covering what builds and perks are good to run on the XENOMORPH. This is challenging because the XENOMORPH has one of the most well-rounded base kits in Dead by Daylight, so many perks get little to no value on them. The old adage “suffering from success” comes to mind. However, there are still plenty of perks and builds for every kind of player that you can run on the XENOMORPH.
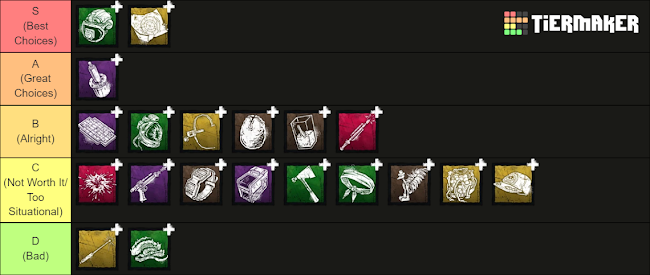
PERK TIER LIST
Below, we will be providing a loose tier list for how each perk fares on the XENOMORPH. There are a tremendous amount of perks in Dead by Daylight, so I will not be going individually into why each perk is good or bad, instead giving explanations on specific perk groups.
(Note: The perks are in no particular order in their tier)

VAULT PERKS - HIGH PICK RATE
__________________________________________________

The XENOMORPH synergizes very well with vault perks due to their add-on, SELF DESTRUCT BOLT, which increases vault speed by 30% while in CRAWLER MODE. Any perk that improves vaults even further, makes window play extremely easy for the XENOMORPH.
KICK PERKS - HIGH PICK RATE
__________________________________________________

The XENOMORPH synergizes very well with kick perks due to their extreme mobility and information while in the TUNNELS. The trade off for kick perks is usually that there is some level of decision making on which generator to apply them to, or simply the lack of mobility to apply them efficiently. The XENOMORPH is able to easily find out which generators are being worked on using their footstep and sound detection in the TUNNELS, and be able to reach them quickly with the 18 m/s speed while in the TUNNELS. There are also many addons like SEMIOTIC KEYBOARD, CEREAL RATIONS, etc. that outright give information on where the survivors are operating on generators.
HEX TOTEM PERKS - FAIR PICK RATE
__________________________________________________

The XENOMORPH synergizes well with hex totems for the same reason they synergize well with kick perks. The 18 m/s speed in the TUNNELS allows you to readily check on and defend your hex totems, which is usually difficult for other killers. Furthermore, you can use the footstep and audio detection in the TUNNELS to catch survivors working on, or actively on their way to a hex totem. The only issue being that hex totems in general are very map dependent as are your CONTROL STATIONS. CONTROL STATIONS are not coded to spawn conveniently around totems, so even with the right information, the XENOMORPH may not always be able to defend a totem in time.
END GAME PERKS - FAIR PICK RATE
__________________________________________________

The XENOMORPH cannot hear the exit gates or the hatch in end game, which makes playing endgame difficult. However, many end game perks require hooking the entire team or finding a specific survivor to build stacks (ex: Remember Me), which the TUNNELS help find survivors easily. In addition, the built in information inside the TUNNELS still works, just not on the exit gates or hatch specifically, so the XENOMORPH still has some level of tracking in the end game.
HASTE PERKS - FAIR PICK RATE
__________________________________________________

Because of the versatility of the TAIL ATTACK, many chase perks like Enduring are made redundant. XENOMORPH, in a sense, suffers from success. However, haste is always beneficial and in no way clashes with their basekit. Haste also still applies in the TUNNELS, buffing an already incredible speed.
EXHAUSTION PERKS - FAIR PICK RATE
__________________________________________________

Similarly to haste perks, exhaustion perks do not clash in any way with the XENOMORPH’s base kit. XENOMORPH does not synergize very well with chase perks because of how well their TAIL ATTACK already circumvents chases. Eliminating a possible Lithe, Balanced Landing, etc. is an easy way to improve your chases as the XENOMORPH.
AURA PERKS - MODERATE PICK RATE
__________________________________________________

While aura perks in general are fairly helpful (while Distortion is not in play), the XENOMORPH gets diminishing value compared to other Dead by Daylight killers. The XENOMORPH already comes with built in information in the TUNNELS with 16m of footstep and sound detection. As a result, the XENOMORPH can rely on this as sort of a “5th perk” and use those four perk slots for better, stronger choices as long as the XENOMORPH player is consistently using the TUNNELS.
ANTI-HEAL PERKS - MODERATE PICK RATE
__________________________________________________

The only aspect of XENOMORPH that synergizes with an anti-heal playstyle (more than other killers) are their add-ons KANE’S HELMET and MULTI-PURPOSE HATCHET which apply Mangled and Hemorrhage. The efficient map traversal can serve to potentially break up survivor heals more often, but other killers fare far better with the anti-heal playstyle.
SLUGGING PERKS - MODERATE PICK RATE
__________________________________________________

The only aspect of XENOMORPH that synergizes with slugging is the fact that the TAIL ATTACK can create some quick two tap situations that make going to another survivor easy. Other than that, there are no other basekit or addon traits the XENOMORPH has that synergizes with slugging.
BASIC ATTACK PERKS - LOW PICK RATE
__________________________________________________

The XENOMORPH does not synergize well with basic attack perks. The TAIL ATTACK is an extremely versatile and oppressive anti-chase tool, so you should be using it as much as possible. Using perks that only benefit off of basic attacks limits your TAIL ATTACK use, which is an underutilization of your extremely powerful base kit chase ability.
STUN PERKS - LOW PICK RATE
__________________________________________________

The XENOMORPH does not synergize well with stun perks because the TAIL ATTACK already very efficiently circumvents pallets, often eliminating the chance of getting stunned at all. As a result, getting value out of stun perks is very inconsistent.
LOCKER PERKS - LOW PICK RATE
__________________________________________________
There’s nothing in the XENOMORPH’s basekit that inherently synergizes with locker perks. Nothing in XENOMORPH’s power causes them to check lockers, so any locker perk will be you going out of your way to get value.

ANTI VAULT & PALLET PERKS - LOW PICK RATE
__________________________________________________
The XENOMORPH’s tail attack is already your amazing anti vault and pallet tool. When survivors are in locked animations, the TAIL ATTACK is devastating. Running perks that block these like Cruel Limits and Dissolution are redundant.

STEALTH PERKS - LOW PICK RATE
__________________________________________________

The XENOMORPH does not synergize well with stealth perks because the FLAME TURRETS come with a motion sensor that tracks the XENOMORPH for 41 meters regardless of terror radius or undetectable status. This cannot be turned off in any way. As a result, as long as FLAME TURRETS are up, the XENOMORPH will struggle to get value out of stealth perks consistently.
BUILD SUGGESTIONS
Below, we will be providing build suggestions for various playstyles on the XENOMORPH. We will start from the most effective strong builds and go down into gimmick and fun builds just to have a good time.
We will cover builds that will fit into four different categories:
- Meta
- Well - Rounded
- Fun
- Gimmick
- DISCLAIMER: These builds are simply suggestions and may not reflect the best builds for your MMR, region, casual versus competitive play, etc. Please take these variables into consideration when choosing to run builds offered by this guide!
META BUILDS
These builds are built with the intent of winning as much as possible with as much ease as possible. If you like consistently winning your games, these are the builds for you.
GEN BLOCKING BUILD
__________________________________________________
The main purpose of the build should be obvious by the name. This build focuses on blocking the gens for as much of the match as possible, while also taking special attention to not have the blocking effects overlap to the point of lost value.
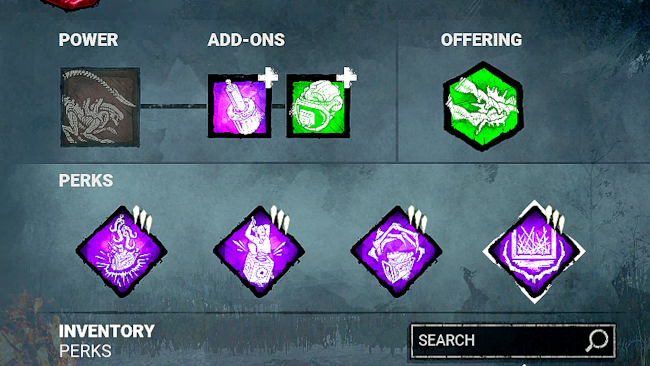
- OVERVIEW

Perks
- Grim Embrace
- Dead Man’s Switch
- Corrupt Intervention
- Scourge Hook: Pain Resonance
Add-ons
- Lambert’s Star Map
- Emergency Helmet
- THE BUILD
PERKS
—-------------------------------------------------------
GRIM EMBRACE
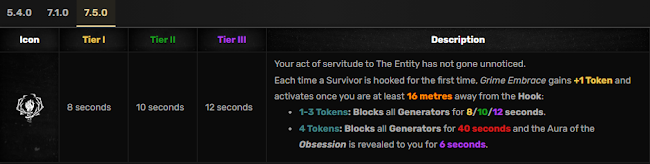
- Grim Embrace has come into its own as one of the best slowdowns in the game, alongside Pain Res and Pop. This perk will synergize with Pain Res in our build since both perks provide moderate slowdown perk token, but also require all 4 stacks to be used for the most value. Grim Embrace also, at least as of 7.5.0, works with Dead Man’s Switch.
- Grim Embrace synergizes with the XENOMORPH as you need to get 16 meters from the hook to activate Grim Embrace, which is very easy with your 18 m/s speed in the TUNNELS.
DEAD MAN’S SWITCH

- Dead Man’s Switch is probably the best known (and effective) gen blocking perk outside of Corrupt Intervention (and now Grim Embrace). This perk serves both as a moderately good slowdown, but also info on what generators are being worked on. Furthermore, this perk synergizes with Pain Res, the scream from Pain Res triggering Dead Man’s Switch.
- Dead Man’s Switch synergizes with the XENOMORPH for multiple reasons. The built-in motion sensors actually can work in your favor, as a paranoid survivor may be more prompted to let go of a generator and activate Dead Man’s. Even if the survivor did not place a FLAME TURRET at their generator, coming out of a CONTROL STATION and surprising a survivor will definitely get value.
CORRUPT INTERVENTION
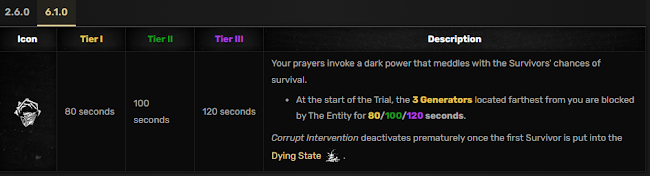
- Corrupt Intervention is the most long-standing gen blocking perk in the game, except this one focuses on blocking at the beginning of the match in order to prevent early game generator efficiency.
- This works on the XENOMORPH as Corrupt corrals survivors away from the areas of the map where the generators aren’t blocked, making it easy to track down the survivors from the TUNNELS early on.
SCOURGE HOOK: PAIN RESONANCE

- Pain Resonance is the only non-gen blocking perk on this build. Pain Resonance is the best slowdown perk in the game and you are already aiming to hook all 4 survivors in the trial for maximum Grim Embrace value, so it synergizes well.
- Pain Resonance is good on every character in Dead by Daylight, but it works well on XENOMORPH because immense tracking abilities in the TUNNELS will help you hunt down the remaining survivors you do not have stacks used for yet.
ADD-ONS
—-------------------------------------------------------
LAMBERT’S STAR MAP

- Your TAIL ATTACK as the XENOMORPH can make your chases go very quickly, which will help you farm token uses for both Grim Embrace and Pain Res (obviously Dead Man’s needs a hook to activate as well). So staying in CRAWLER MODE so you can use your TAIL ATTACK as much as possible, is how you get the most use out of this build.
EMERGENCY HELMET

- As with Lambert’s Star Map, your TAIL ATTACK as the XENOMORPH can make your chases go very quickly, which will help you farm token uses for both Grim Embrace and Pain Res (obviously Dead Man’s needs a hook to activate as well). So staying in CRAWLER MODE so you can use your TAIL ATTACK as much as possible, is how you get the most use out of this build.
BUILD SHOWCASE
—-------------------------------------------------------
- (Click on image to bring up the link!)
ALL PURPOSE SWEAT BUILD
__________________________________________________
The main purpose of the build is to retain strength while being versatile enough to cover any challenging situations that may arise in a match of Dead by Daylight.
- OVERVIEW
Perks
- Scourge Hook: Pain Resonance
- Pop Goes The Weasel
- Corrupt Intervention
- Bamboozle
Add-ons
- Self-Destruct Bolt
- Emergency Helmet
- THE BUILD
PERKS
—-------------------------------------------------------
SCOURGE HOOK: PAIN RESONANCE

- Pain Resonance is the strongest slowdown perk in Dead by Daylight, delivering flat damage as opposed to proportional damage like many of the generator damage perks do. This should be a staple perk of any build you wish to be “sweaty” or “meta”.
- Pain Resonance is good on every character in Dead by Daylight, but it works well on XENOMORPH because immense tracking abilities in the TUNNELS will help you hunt down the remaining survivors you do not have stacks used for yet.
POP GOES THE WEASEL

- Pop Goes The Weasel is the second strongest slowdown perk in the game. The caveat that makes it second to Pain Resonance is the fact that its 20% damage is proportional, meaning it only does 20% of the current gen progress, not the full bar. This means you will have to be careful about wasting your Pop uses on generators with barely any progression started!
- This however synergizes with the our other perk, Pain Res, because once a generator is hit by Pain Resonance, if survivors choose to un-regress the generator, then that opens it up to a use of Pop Goes The Weasel. A generator taking 20% flat damage then immediately 20% proportional damage is akin to deleting a generator entirely.
- Pop Goes The Weasel synergizes with the XENOMORPH because the information you get from the TUNNELS allows you to quickly track down a generator with moderate progress and quickly deliver your Pop use (generator kick perks in general work well with the XENOMORPH for this reason).
CORRUPT INTERVENTION

- Corrupt Intervention is your best tool for preventing early generator efficiency from the survivors. Instead of being able to spawn near a generator and immediately begin repairing, survivors must now waste time traveling deep into the map to begin their objective. This also increases their chances of running into you early on.
- The XENOMORPH synergizes with Corrupt Intervention as Corrupt corrals survivors away from the areas of the map where the generators aren’t blocked, making it easy to track down the survivors from the TUNNELS early on.
BAMBOOZLE
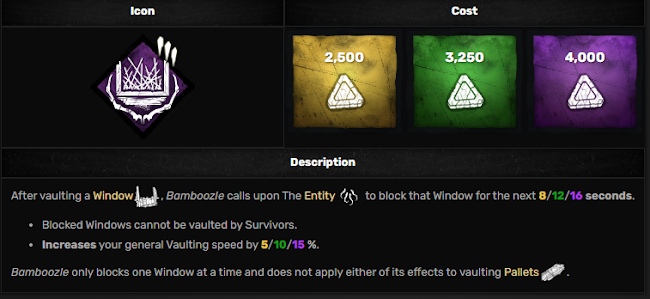
- Bamboozle is a perk often found in many meta and competitive builds because of its ability to shut down extremely overpowered window spawns that appear on certain maps in Dead by Daylight. Perfect examples are the god windows on the Garden of Joy main building and Mother’s Dwelling main building.
- This perk synergizes with the XENOMORPH because while the XENOMORPH’s TAIL ATTACK does a good job of circumventing vaults, some are simply even too strong for the TAIL ATTACK to handle consistently. Combined with Self-Destruct Bolt, you can now ensure that no window in Dead by Daylight is too strong for the XENOMORPH to deal with.
ADD-ONS
—-------------------------------------------------------
SELF-DESTRUCT BOLT

- SELF-DESTRUCT BOLT is an add-on that gives you the Wesker teachable perk, SUPERIOR ANATOMY, practically for free. The only difference being that it is 10% weaker and does not require a survivor fast vault to activate.
- While often redundant because of the TAIL ATTACKS ability to deal with vaults extremely well, when SELF-DESTRUCT BOLT is paired with BAMBOOZLE, even the strongest of vaults in Dead by Daylight will no longer be an issue for you.
EMERGENCY HELMET
- Your TAIL ATTACK as the XENOMORPH can make your chases go very quickly, which will help you farm token uses for Pain Resonance and uses of Pop Goes The Weasel. So staying in CRAWLER MODE so you can use your TAIL ATTACK as much as possible, is how you get the most use out of this build.
BUILD SHOWCASE
—-------------------------------------------------------
- (Click on image to bring up the link!)
ULTIMATE KICK BUILD
__________________________________________________
The main purpose of this build is to focus completely on gaining your pressure from kicking generators, which the XENOMORPH excels at thanks to their quick movement and information they gain while inside the TUNNELS.
- OVERVIEW

Perks
- Nowhere To Hide
- Pop Goes The Weasel
- Eruption
- Overcharge
Add-ons
- Lambert’s Star Map
- Emergency Helmet
- THE BUILD
PERKS
—-------------------------------------------------------
NOWHERE TO HIDE
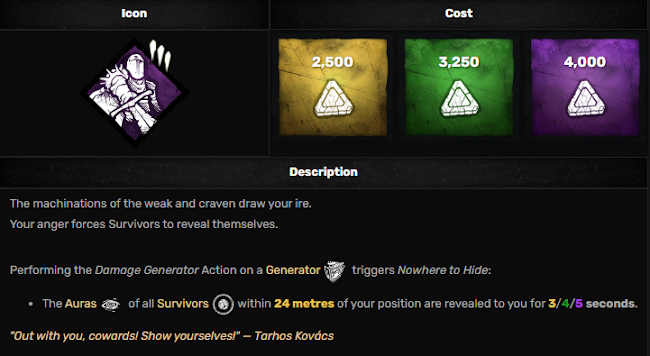
- Nowhere To Hide is one of the most excellent information perks in Dead by Daylight. Many generator regression perks like Pop, Eruption, Overcharge, etc. already require kicking a generator, so benefiting from information on top of it is immaculate.
- Furthermore, one of main counterplays of survivors to generator pressure is to simply hide whenever the killer approaches, then return to repairing the generator the moment they leave. Nowhere To Hide shuts that down.
- Nowhere To Hide synergizes with the XENOMORPH especially because the XENOMORPH can quickly act on a hiding survivor revealed by Nowhere to Hide with their TAIL ATTACK. Furthermore, Nowhere to Hide travels WITH your character as you move, which works excellently with the XENOMORPH’s 18 meters a second movement while in the TUNNELS.
POP GOES THE WEASEL
- Pop Goes The Weasel is the second strongest slowdown perk in the game. While Pain Resonance’s flat damage is more consistent, Pop Goes The Weasel’s proportional damage means that it can be more effective on nearly finished generators. Furthermore, Pain Resonance runs out after all tokens are expended, whereas Pop refreshes every single hook state.
- Pop Goes The Weasel synergizes with the XENOMORPH because the information you get from the TUNNELS allows you to quickly track down a generator with moderate progress and quickly deliver your Pop use (generator kick perks in general work well with the XENOMORPH for this reason).
ERUPTION
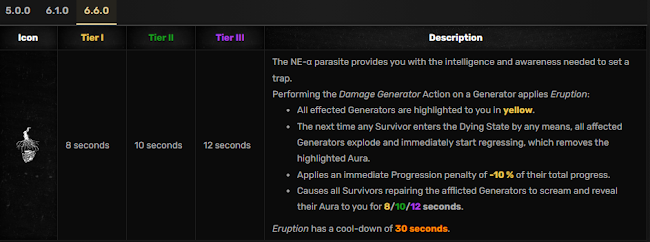
- Eruption is an excellent perk on killer powers that do damage. Many killer powers do not synergize with common slowdown perks like Surge and Sloppy Butcher because they require normal attacks to activate. However, this slowdown can be used by killers that primarily use their power to inflict damage.
- You will already be going around the map applying kicks to generators to apply Pop and Overcharge with this build, so adding Eruption is a no brainer. This way, the next time you down a survivor, you apply even more slowdown to an already damaged generator, on top of information if a survivor was actively on it at the time.
- Eruption synergizes with the XENOMORPH because you will be downing survivors a lot with your TAIL ATTACK, and Eruption activates off all downs, not just normal attack downs. Furthermore, Eruption applies to any generator you kick, so the XENOMORPH’s fast mobility in the TUNNELS will allow you to kick more generators and get more Eruption damage events.
OVERCHARGE

- Overcharge is no longer able to carry a match by itself like it used to, but still finds niche use in kick builds. The missed difficult skill check may provide information previously not held and the extra regression can leave a less coordinated team down a generator.
- This build already has you traveling around the map kicking generators to apply Pop and Eruption, so why not add a difficult skill check and extra regression on top of that?
- The XENOMORPH synergizes well with Overcharge because of its fast mobility in the TUNNELS allowing it to quickly return to a generator if a survivor misses the difficult skill check.
ADD-ONS
—-------------------------------------------------------
LAMBERT’S STAR MAP
- Your TAIL ATTACK as the XENOMORPH can make your chases go very quickly, which will help you farm uses of Pain Res and Pop. So staying in CRAWLER MODE so you can use your TAIL ATTACK as much as possible, is how you get the most use out of this build.
EMERGENCY HELMET
- As with Lambert’s Star Map, your TAIL ATTACK as the XENOMORPH can make your chases go very quickly, which will help you farm uses of Pain Res and Pop. So staying in CRAWLER MODE so you can use your TAIL ATTACK as much as possible, is how you get the most use out of this build.
BUILD SHOWCASE
—-------------------------------------------------------
- (Remember to click on the image to bring up the link!)
OTZDARVA WIN STREAK BUILD
__________________________________________________
This build name should explain itself. This is the build that Otzdarva used when he went on his XENOMORPH win streak. The build itself was focused on more general slowdown pressure plus unorthodox add-ons.
- OVERVIEW
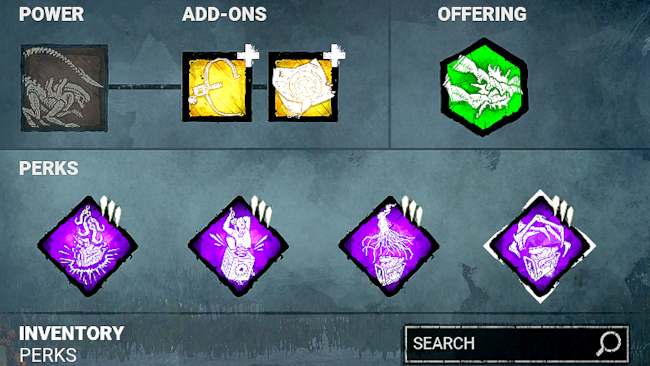
Perks
- Scourge Hook: Pain Resonance
- Pop Goes The Weasel
- Eruption
- Corrupt Intervention
Add-ons
- Crew Headset
- Lambert’s Star Map
- THE BUILD
PERKS
—-------------------------------------------------------
SCOURGE HOOK: PAIN RESONANCE

- Pain Resonance is the strongest slowdown perk in Dead by Daylight, delivering flat damage as opposed to proportional damage like many of the generator damage perks do. This should be a staple perk of any build you wish to be “sweaty” or “meta”.
- Pain Resonance is good on every character in Dead by Daylight, but it works well on XENOMORPH because immense tracking abilities in the TUNNELS will help you hunt down the remaining survivors you do not have stacks used for yet.
POP GOES THE WEASEL
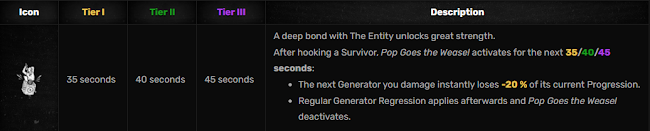
- Pop Goes The Weasel is the second strongest slowdown perk in the game. The caveat that makes it second to Pain Resonance is the fact that its 20% damage is proportional, meaning it only does 20% of the current gen progress, not the full bar. This means you will have to be careful about wasting your Pop uses on generators with barely any progression started!
- This however synergizes with the our other perk, Pain Res, because once a generator is hit by Pain Resonance, if survivors choose to un-regress the generator, then that opens it up to a use of Pop Goes The Weasel. A generator taking 20% flat damage then immediately 20% proportional damage is akin to deleting a generator entirely.
- Pop Goes The Weasel synergizes with the XENOMORPH because the information you get from the TUNNELS allows you to quickly track down a generator with moderate progress and quickly deliver your Pop use (generator kick perks in general work well with the XENOMORPH for this reason).
ERUPTION
- Eruption is an excellent perk on killer powers that do damage. Many killer powers do not synergize with common slowdown perks like Surge and Sloppy Butcher because they require normal attacks to activate. However, this slowdown can be used by killers that primarily use their power to inflict damage.
- You will already be going around the map applying kicks to generators to apply Pop, so adding Eruption is a no brainer. This way, the next time you down a survivor, you apply even more slowdown to an already damaged generator, on top of information if a survivor was actively on it at the time.
- Eruption synergizes with the XENOMORPH because you will be downing survivors a lot with your TAIL ATTACK, and Eruption activates off all downs, not just normal attack downs. Furthermore, Eruption applies to any generator you kick, so the XENOMORPH’s fast mobility in the TUNNELS will allow you to kick more generators and get more Eruption damage
CORRUPT INTERVENTION
- Corrupt Intervention is your best tool for preventing early generator efficiency from the survivors. Instead of being able to spawn near a generator and immediately begin repairing, survivors must now waste time traveling deep into the map to begin their objective. This also increases their chances of running into you early on.
- The XENOMORPH synergizes with Corrupt Intervention as Corrupt corrals survivors away from the areas of the map where the generators aren’t blocked, making it easy to track down the survivors from the TUNNELS early on.
ADD-ONS
—-------------------------------------------------------
CREW HEADSET

- CREW HEADSET buffs your 16 meters of footstep detection to a whopping 22 meters of footstep detection. This aids this build because you can track survivors from farther away attempting to reach generators.
LAMBERT’S STAR MAP
- Your TAIL ATTACK as the XENOMORPH can make your chases go very quickly, which will help you farm uses of Pain Res and Pop. So staying in CRAWLER MODE so you can use your TAIL ATTACK as much as possible, is how you get the most use out of this build.
BUILD SHOWCASE
—-------------------------------------------------------
- (Remember to click on the image to bring up the link!)
WELL-ROUNDED BUILDS
These builds are for those that want to win consistently, but want their skill to shine through instead of their “perks playing the game for them”. There are enough good tools in these builds to win consistently, but may be rough against coordinated all-meta 4 man SWFs.
SCOURGE HOOK BUILD
__________________________________________________
This build puts its focus around using the SCOURGE HOOK mechanic to the max while still presenting enough strength to consistently win your matches.
- OVERVIEW

Perks
- Scourge Hook: Pain Resonance
- Scourge Hook: Floods Of Rage
- Scourge Hook: Gift Of Pain
- Agitation
Add-ons
- Lambert’s Star Map
- Emergency Helmet
- THE BUILD
PERKS
—-------------------------------------------------------
SCOURGE HOOK: PAIN RESONANCE

- Pain Resonance is the strongest slowdown perk in Dead by Daylight, delivering flat damage as opposed to proportional damage like many of the generator damage perks do. This should be a staple perk of any build you wish to be “sweaty” or “meta”.
- Pain Resonance is good on every character in Dead by Daylight, but it works well on XENOMORPH because immense tracking abilities in the TUNNELS will help you hunt down the remaining survivors you do not have stacks for yet.
SCOURGE HOOK: FLOODS OF RAGE

- Floods of Rage is the perfect synergy perk to Pain Resonance. Since you are already going to be going for Scourge Hooks anyways, it only makes sense to benefit further from this by gaining the auras of every other survivor for 7 seconds when they unhook from said Scourge Hook.
- Floods of Rage also synergizes with Pain Resonance as you need 4 unique hooks to get full value, as well as Gift of Pain that has an effect for the first 4 unique hooks, so the aura reading helps you identify and track down the survivors who haven’t had their unique hook yet.
- Floods of Rage synergizes well with the XENOMORPH because the aura reading can help setup, aim, and land TAIL ATTACKS. Also, the XENOMORPH can utilize the 18 m/s TUNNEL movement to quickly reach survivors whose auras are revealed far away.
SCOURGE HOOK: GIFT OF PAIN
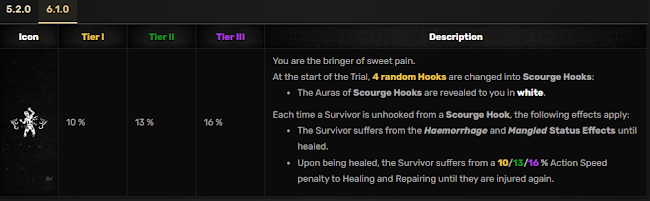
- Gift of Pain is a slowdown perk more for killers that rely on their power to end chases. Sloppy Butcher is an excellent perk that slows and interrupts healing progress, however, this requires a normal attack to activate. Gift of Pain gives Sloppy Butcher’s effects by hooking the survivor on a Scourge Hook.
- Furthermore, Gift of Pain also applies a one time generator repair debuff upon the first unique hook of a survivor, slowing them by 16%. This obviously synergizes with Pain Resonance well, as that perk also requires 4 unique hooks to get the most value.
- Gift of Pain synergizes well with the XENOMORPH because you should be going for as many TAIL ATTACKS as possible, meaning you would usually miss out on normal attacks required to activate Sloppy Butcher. With Gift of Pain, you essentially get a stronger version of Sloppy Butcher that plays well with your TAIL ATTACKS.
AGITATION

- Agitation is the glue that holds this build together. While Agitation is generally a very nice Quality-Of-Life perk that helps your hooking process go faster, the function of Agitation in this build is to confirm Scourge Hook use since our other 3 perks are Scourge Hooks.
- Scourge Hook spawns are random and that RNG can spawn them extremely out of the way, or worse, all together in one place. This often happens on multifloor maps where you would have to travel to the nearest staircase and to a completely different floor just to utilize a Scourge Hook.
- Agitation’s 18% carry speed helps you mitigate poor spawn RNG and map design in order to ensure the use of your three Scourge Hook perks.
ADD-ONS
—-------------------------------------------------------
LAMBERT’S STAR MAP
- Your TAIL ATTACK as the XENOMORPH can make your chases go very quickly, which will help you farm uses of Pain Res and Gift of Pain. So staying in CRAWLER MODE so you can use your TAIL ATTACK as much as possible, is how you get the most use out of this build.
EMERGENCY HELMET
- As with Lambert’s Star Map, your TAIL ATTACK as the XENOMORPH can make your chases go very quickly, which will help you farm uses of Pain Res and Gift of Pain. So staying in CRAWLER MODE so you can use your TAIL ATTACK as much as possible, is how you get the most use out of this build.
BUILD SHOWCASE
—-------------------------------------------------------
- (Remember to click on the image to bring up the link!)
ANTI-RAT KICK BUILD
__________________________________________________
This build is alike to the meta ULTIMATE KICK BUILD that we covered earlier, but this time, we are swapping out a perk that trades effectiveness of slowdown for combating the recent stealth playstyle that’s been popular (Distortion, Calm Spirit, etc.).
- OVERVIEW

Perks
- Nowhere To Hide
- Pop Goes The Weasel
- Eruption
- Call of Brine
Add-ons
- Lambert’s Star Map
- Emergency Helmet
- THE BUILD
PERKS
—-------------------------------------------------------
NOWHERE TO HIDE
- Nowhere To Hide is one of the most excellent information perks in Dead by Daylight. Many generator regression perks like Pop, Eruption, Overcharge, etc. already require kicking a generator, so benefiting from information on top of it is immaculate.
- Furthermore, one of main counterplays of survivors to generator pressure is to simply hide whenever the killer approaches, then return to repairing the generator the moment they leave. Nowhere To Hide shuts that down.
- Nowhere To Hide synergizes with the XENOMORPH especially because the XENOMORPH can quickly act on a hiding survivor revealed by Nowhere to Hide with their TAIL ATTACK. Furthermore, Nowhere to Hide travels WITH your character as you move, which works excellently with the XENOMORPH’s 18 meters a second movement while in the TUNNELS.
POP GOES THE WEASEL

- Pop Goes The Weasel is the second strongest slowdown perk in the game. While Pain Resonance’s flat damage is more consistent, Pop Goes The Weasel’s proportional damage means that it can be more effective on nearly finished generators. Furthermore, Pain Resonance runs out after all tokens are expended, whereas Pop refreshes every single hook state.
- Pop Goes The Weasel synergizes with the XENOMORPH because the information you get from the TUNNELS allows you to quickly track down a generator with moderate progress and quickly deliver your Pop use (generator kick perks in general work well with the XENOMORPH for this reason).
ERUPTION
- Eruption is an excellent perk on killer powers that do damage. Many killer powers do not synergize with common slowdown perks like Surge and Sloppy Butcher because they require normal attacks to activate. However, this slowdown can be used by killers that primarily use their power to inflict damage.
- You will already be going around the map applying kicks to generators to apply Pop and Overcharge with this build, so adding Eruption is a no brainer. This way, the next time you down a survivor, you apply even more slowdown to an already damaged generator, on top of information if a survivor was actively on it at the time.
- Eruption synergizes with the XENOMORPH because you will be downing survivors a lot with your TAIL ATTACK, and Eruption activates off all downs, not just normal attack downs. Furthermore, Eruption applies to any generator you kick, so the XENOMORPH’s fast mobility in the TUNNELS will allow you to kick more generators and get more Eruption damage events.
CALL OF BRINE
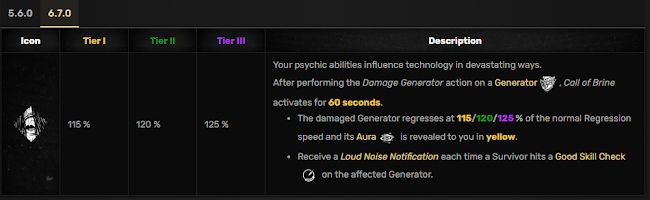
- Call of Brine is the perk that deviates from our Ultimate Kick Build. Instead of opting for the extra slowdown, we instead swap to Call of Brine.
- You’re probably thinking “this only adds 4 extra seconds so why ever recommend this perk???”
- Call of Brine’s place in this build is not as a slowdown, but as an info perk. Call of Brine’s info is given as a Loud Noise Notification, meaning the info activates on the generator and not the survivor. This means that stealth perks like Distortion (blocks auras) and Calm Spirit (blocks screams), do not activate since technically, the survivor is never targeted.
- So if you hate rat (stealthy) gameplay, Call of Brine is surprisingly helpful!
ADD-ONS
—-------------------------------------------------------
LAMBERT’S STAR MAP
- Your TAIL ATTACK as the XENOMORPH can make your chases go very quickly, which will help you farm uses of Pop and Eruption. So staying in CRAWLER MODE so you can use your TAIL ATTACK as much as possible, is how you get the most use out of this build.
EMERGENCY HELMET
- As with Lambert’s Star Map, your TAIL ATTACK as the XENOMORPH can make your chases go very quickly, which will help you farm uses of Pop and Eruption. So staying in CRAWLER MODE so you can use your TAIL ATTACK as much as possible, is how you get the most use out of this build.
BUILD SHOWCASE
—-------------------------------------------------------
- (Remember to click on the image to bring up the link!)
BALANCED BUILD
__________________________________________________
This build is as it is labeled, balanced. It’s meant to give you the two strongest slowdown to defend generators efficiently, while also giving you two quality-of-life perks that make your chasing and hooking easier.
- OVERVIEW
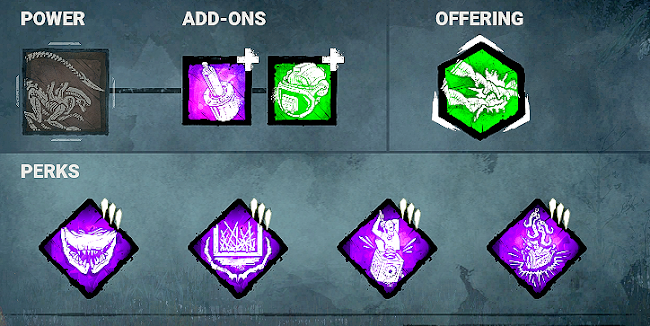
Perks
- Agitation
- Bamboozle
- Pop Goes The Weasel
- Scourge Hook: Pain Resonance
Add-ons
- Self-Destruct Bolt
- Emergency Helmet
- THE BUILD
PERKS
—-------------------------------------------------------
AGITATION
- Agitation is a very nice quality-of-life perk that helps your hooking perk process go faster. Dead by Daylight is a time efficiency game at its core, so saving time anywhere can be useful for you.
- Agitation’s 18% carry speed synergizes with Pain Resonance as it mitigates poor Scourge Hook spawn RNG and map design in order to ensure the use of your Pain Resonance.
BAMBOOZLE
- Bamboozle is a perk often found in many meta and competitive builds because of its ability to shut down extremely overpowered window spawns that appear on certain maps in Dead by Daylight. Perfect examples are the god windows on the Garden of Joy main building and Mother’s Dwelling main building.
- This perk synergizes with the XENOMORPH because while the XENOMORPH’s TAIL ATTACK does a good job of circumventing vaults, some are simply even too strong for the TAIL ATTACK to handle consistently. Combined with Self-Destruct Bolt, you can now ensure that no window in Dead by Daylight is too strong for the XENOMORPH to deal with.
POP GOES THE WEASEL

- Pop Goes The Weasel is the second strongest slowdown perk in the game. The caveat that makes it second to Pain Resonance is the fact that its 20% damage is proportional, meaning it only does 20% of the current gen progress, not the full bar. This means you will have to be careful about wasting your Pop uses on generators with barely any progression started!
- This however synergizes with the our other perk, Pain Res, because once a generator is hit by Pain Resonance, if survivors choose to un-regress the generator, then that opens it up to a use of Pop Goes The Weasel. A generator taking 20% flat damage then immediately 20% proportional damage is akin to deleting a generator entirely.
- Pop Goes The Weasel synergizes with the XENOMORPH because the information you get from the TUNNELS allows you to quickly track down a generator with moderate progress and quickly deliver your Pop use (generator kick perks in general work well with the XENOMORPH for this reason).
SCOURGE HOOK: PAIN RESONANCE

- Pain Resonance is the strongest slowdown perk in Dead by Daylight, delivering flat damage as opposed to proportional damage like many of the generator damage perks do. This should be a staple perk of any build you wish to be “sweaty” or “meta”.
- Pain Resonance is good on every character in Dead by Daylight, but it works well on XENOMORPH because immense tracking abilities in the TUNNELS will help you hunt down the remaining survivors you do not have stacks used for yet.
ADD-ONS
—-------------------------------------------------------
SELF-DESTRUCT BOLT
- SELF-DESTRUCT BOLT is an add-on that gives you the Wesker teachable perk, SUPERIOR ANATOMY, practically for free. The only difference being that it is 10% weaker and does not require a survivor fast vault to activate.
- While often redundant because of the TAIL ATTACKS ability to deal with vaults extremely well, when SELF-DESTRUCT BOLT is paired with BAMBOOZLE, even the strongest of vaults in Dead by Daylight will no longer be an issue for you.
EMERGENCY HELMET
- Your TAIL ATTACK as the XENOMORPH can make your chases go very quickly, which will help you farm token uses for Pain Resonance and uses of Pop Goes The Weasel. So staying in CRAWLER MODE so you can use your TAIL ATTACK as much as possible, is how you get the most use out of this build.
BUILD SHOWCASE
—-------------------------------------------------------
- (Remember to click on the image to bring up the link!)
HOOK ALL FOUR BUILD
__________________________________________________
This build’s intention is to capitalize on hooking all 4 survivors at least once. There is a flex perk here that is used to help ensure better chases, but if you want to fully commit to the gimmick, Gift of Pain would be a good final perk slot.
- OVERVIEW
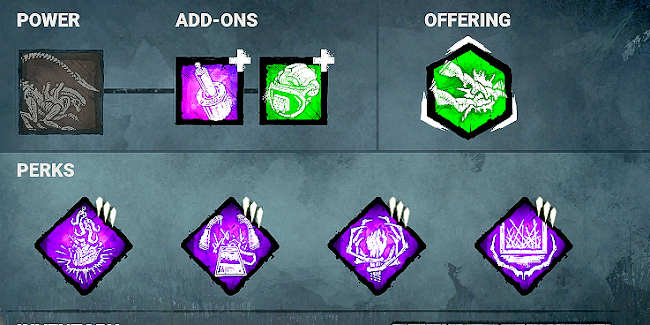
Perks
- Scourge Hook: Pain Resonance
- No Way Out
- Grim Embrace
- Bamboozle
Add-ons
- Self-Destruct Bolt
- Emergency Helmet
- THE BUILD
PERKS
—-------------------------------------------------------
SCOURGE HOOK: PAIN RESONANCE

- Pain Resonance is the strongest slowdown perk in Dead by Daylight, delivering flat damage as opposed to proportional damage like many of the generator damage perks do. This should be a staple perk of any build you wish to be “sweaty” or “meta”.
- Pain Resonance is good on every character in Dead by Daylight, but it works well on XENOMORPH because immense tracking abilities in the TUNNELS will help you hunt down the remaining survivors you do not have stacks for yet.
NO WAY OUT

- No Way Out is one of the strongest non-slowdown perks in the game, denying the survivors the ability to power the exit gates for a long duration. Even if you somehow fail to hook a single survivor, No Way Out still blocks the exit gates for 12 seconds.
- This synergizes with Pain Resonance and Grim Embrace because you will be hooking each survivor once anyways, so you should be getting all 4 stacks of No Way Out.
- Even if Pain Resonance and Grim Embrace do not prevent the end game from happening, No Way Out will halt the match from ending, allowing you to get more sacrifices or outright turn a loss into a win.
GRIM EMBRACE
- Grim Embrace has come into its own as one of the best slowdowns in the game, alongside Pain Res and Pop. This perk fits into our build as another 4 unique hook perk to slowdown the match.
- Grim Embrace synergizes with the XENOMORPH as you need to get 16 meters from the hook to activate Grim Embrace, which is very easy with your 18 m/s speed in the TUNNELS.
BAMBOOZLE
- Bamboozle is a perk often found in many meta and competitive builds because of its ability to shut down extremely overpowered window spawns that appear on certain maps in Dead by Daylight. Perfect examples are the god windows on the Garden of Joy main building and Mother’s Dwelling main building.
- This perk synergizes with the XENOMORPH because while the XENOMORPH’s TAIL ATTACK does a good job of circumventing vaults, some are simply even too strong for the TAIL ATTACK to handle consistently. Combined with Self-Destruct Bolt, you can now ensure that no window in Dead by Daylight is too strong for the XENOMORPH to deal with.
- As stated in the introduction to this build, this is a flex perk to help your chases go smoother. If you want to fully commit to the 4 unique hook gimmick, equip Gift of Pain which has a partial 4 unique hook debuff.
ADD-ONS
—-------------------------------------------------------
SELF-DESTRUCT BOLT
- SELF-DESTRUCT BOLT is an add-on that gives you the Wesker teachable perk, SUPERIOR ANATOMY, practically for free. The only difference being that it is 10% weaker and does not require a survivor fast vault to activate.
- While often redundant because of the TAIL ATTACKS ability to deal with vaults extremely well, when SELF-DESTRUCT BOLT is paired with BAMBOOZLE, even the strongest of vaults in Dead by Daylight will no longer be an issue for you.
EMERGENCY HELMET
- Your TAIL ATTACK as the XENOMORPH can make your chases go very quickly, which will help you farm token uses for Pain Resonance and uses of Grim Embrace. So staying in CRAWLER MODE so you can use your TAIL ATTACK as much as possible, is how you get the most use out of this build.
BUILD SHOWCASE
—-------------------------------------------------------
- (Remember to click on the image to bring up the link!)
FUN BUILDS
These builds are built with the intent of just having fun. Victory takes a backseat to fun themes or perk value. Do not expect to consistently 4K with these builds, use them to simply have a good time!
OBSESSION SPEED BUILD
__________________________________________________
This build is probably my personal favorite to run. The build hybridizes chasing the obsession efficiently with constant haste effects to make you even more deadly.
- OVERVIEW
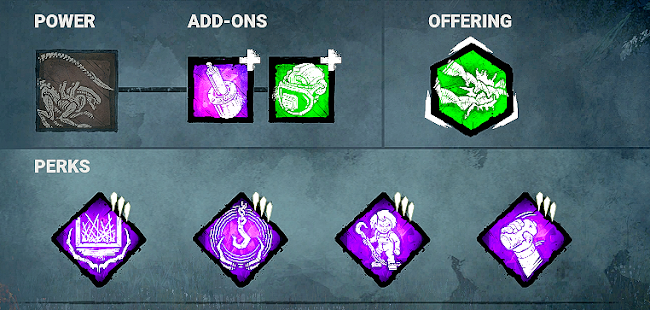
Perks
- Bamboozle
- Furtive Chase
- Friends ‘Til The End
- Batteries Included
Add-ons
- Self-Destruct Bolt
- Emergency Helmet
- THE BUILD
PERKS
—-------------------------------------------------------
BAMBOOZLE
- Bamboozle is a perk often found in many meta and competitive builds because of its ability to shut down extremely overpowered window spawns that appear on certain maps in Dead by Daylight. Perfect examples are the god windows on the Garden of Joy main building and Mother’s Dwelling main building.
- This perk synergizes with the XENOMORPH because while the XENOMORPH’s TAIL ATTACK does a good job of circumventing vaults, some are simply even too strong for the TAIL ATTACK to handle consistently. Combined with Self-Destruct Bolt, you can now ensure that no window in Dead by Daylight is too strong for the XENOMORPH to deal with.
- This perk fits into the speed side of the build, specifically going extremely fast through vaults with Self-Destruct Bolt for a combined +45% vaulting speed.
FURTIVE CHASE
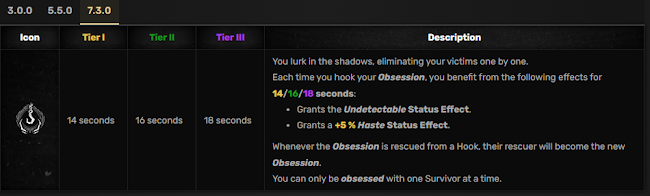
- Furtive Chase plays into both sides of our build. By hooking your obsession (which you should already be naturally doing due to Friends ‘Til The End), you gain undetectable, but more importantly +5% haste.
- The idea is that you use this haste and undetectable status effect to quickly engage the new obsession in chase, down and hook them, then repeat the process.
FRIENDS ‘TIL THE END
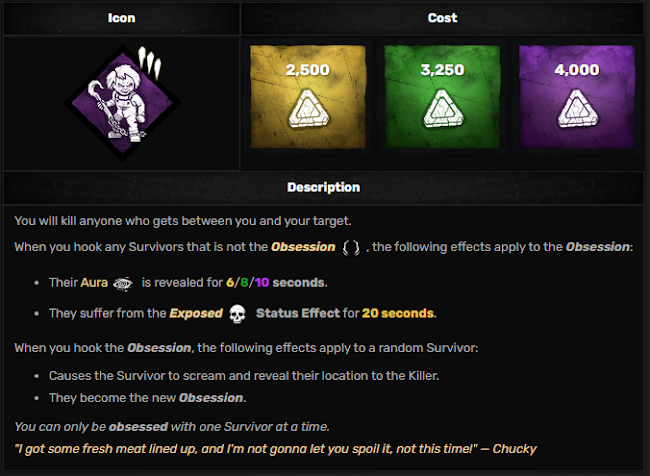
- Friends ‘Til The End is the main perk of this fun build. The main objective of this build is to hook the obsession and be fast in doing so.
- Even if you do not find the obsession first, the obsession will be revealed to you and be exposed after hooking the non-obsession to get you back on track.
- After hooking the actual obsession, a new random survivor will become the obsession. Use the scream from this perk in tandem with the haste and undetectable of Furtive Chase to quickly locate and down the new obsession.
BATTERIES INCLUDED

- Batteries Included is a mostly fun pick here. Build extra haste on top of what you get from Furtive Chase by intentionally routing past finished gens for an extra +5% haste.
- This perk has unironically helped me close chases faster when survivors have chosen to loop within 12 meters of a generator.
ADD-ONS
—-------------------------------------------------------
SELF-DESTRUCT BOLT
- SELF-DESTRUCT BOLT is an add-on that gives you the Wesker teachable perk, SUPERIOR ANATOMY, practically for free. The only difference being that it is 10% weaker and does not require a survivor fast vault to activate.
- While often redundant because of the TAIL ATTACKS ability to deal with vaults extremely well, when SELF-DESTRUCT BOLT is paired with BAMBOOZLE, even the strongest of vaults in Dead by Daylight will no longer be an issue for you.
- This also hilariously fits into our speed side of our build.
EMERGENCY HELMET
- Your TAIL ATTACK as the XENOMORPH can make your chases go very quickly. So use EMERGENCY HELMET to stay in CRAWLER MODE so you can use your TAIL ATTACK as much as possible.
BUILD SHOWCASE
—-------------------------------------------------------
- (Remember to click on the image to bring up the link!)
DEVOUR HOPE VALUE BUILD
__________________________________________________
This build name explains itself. This build is all about getting value out of the fun (but very RNG) perk, Devour Hope. The other perks and add-on choices are meant to prolong and protect from the cleansing of Devour Hope.
- OVERVIEW
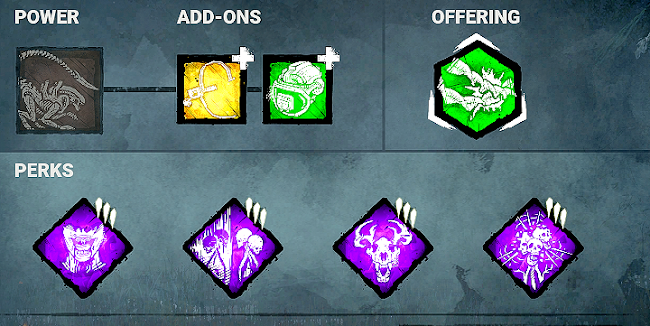
Perks
- Hex: Devour Hope
- Hex: Undying
- Hex: Thrill Of The Hunt
- Hex: Retribution
Add-ons
- Crew Headset
- Emergency Helmet
- THE BUILD
PERKS
—-------------------------------------------------------
HEX: DEVOUR HOPE
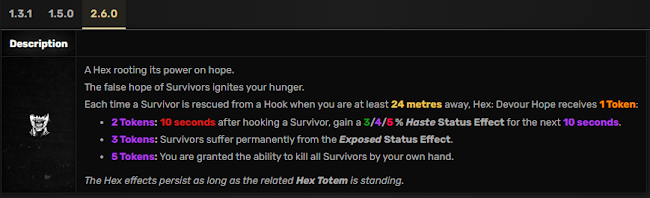
- Devour Hope is the central perk for this build. Devour Hope is a perk based heavily in RNG. The RNG could be good vs poor spawn location, survivor teams doing vs ignoring totems, etc.
- However, if you can keep the hex totem up long enough, it is essentially a free win with exposed downs and eventual moris before death hook. So this build will be centralized around minimizing as much of that RNG factor as possible.
HEX: UNDYING
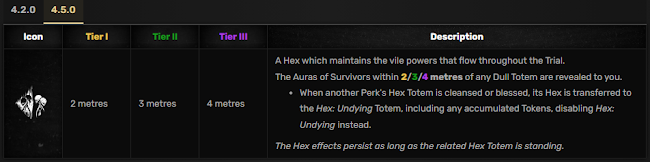
- Our first line of defense for Devour Hope is Undying, which if Devour Hope is found and cleansed, will replace it on the Undying totem while retaining any stacks you’d built up so far.
- However, this is a one time effect, so you should be utilizing the new two perks and specific add-on as preventative measures first. Think of this more as a fail safe.
HEX: THRILL OF THE HUNT
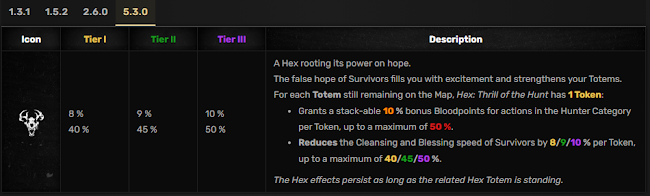
- Thrill of the Hunt’s benefit in this build lies in its 50% cleansing speed debuff. Use the XENOMORPH’S TUNNELS to track survivors attempting to approach and cleanse your totem (including the add-on, Crew Headset, which buffs the footstep detection by almost 40%).
- With these tools, you should be able to detect and prevent the cleansing of Devour Hope, using the cleansing speed debuff from Thrill of the Hunt to buy you more time to reach the survivor and interrupt.
HEX: RETRIBUTION

- Retribution is our last perk to round out our defense of Devour Hope. This plays a similar role to Thrill of the Hunt, as it is meant to help us interrupt a survivor cleansing Devour Hope using the Oblivious status effect to sneak up on them.
- The XENOMORPH will be detected by any FLAME TURRETS within 41 meters, but most survivors will not hesitate to immediately start cleansing a hex totem and will not place a FLAME TURRET nearby before cleansing.
- Another effect of Retribution is 15 seconds of aura reading after a Hex Totem is cleansed or blessed. This is helpful because sometimes survivors will find Undying first, and you will get handy aura reading without even losing Devour Hope yet.
ADD-ONS
—-------------------------------------------------------
CREW HEADSET
- CREW HEADSET buffs your 16 meters of footstep detection to a whopping 22 meters of footstep detection. This aids this build because you can track survivors approaching your Devour Hope from very far off, potentially even cutting them off before they even spot the hex totem.
EMERGENCY HELMET
- Your TAIL ATTACK as the XENOMORPH can make your chases go very quickly. This is more helpful in this build so you can farm Devour Hope stacks as quickly as possible. So use the Emergency Helmet to help you stay in CRAWLER MODE.
BUILD SHOWCASE
—-------------------------------------------------------
- (Remember to click on the image to bring up the link!)
SPEEDY VAULT BUILD
__________________________________________________
The name for this build is also self-explanatory. We are forgoing any general efficiency to maximize our vaulting capabilities. It may not always be effective or helpful, but it certainly is entertaining to vault through a window at mach speed.
- OVERVIEW
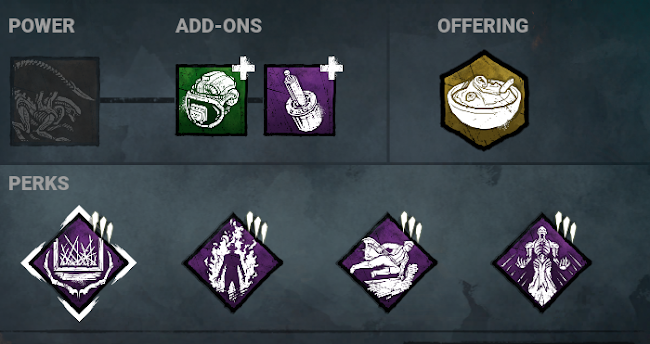
Perks
- Bamboozle
- Superior Anatomy
- Fire Up
- Dark Arrogance
Add-ons
- Self-Destruct Bolt
- Emergency Helmet
- THE BUILD
PERKS
—-------------------------------------------------------
BAMBOOZLE
- Bamboozle is the center of this build, increasing vault speed, but also blocking the window so even if the survivor somehow makes it back to the window, they cannot vault through it anymore.
- Bamboozle is a perk often found in many meta and competitive builds because of its ability to shut down extremely overpowered window spawns that appear on certain maps in Dead by Daylight. Perfect examples are the god windows on the Garden of Joy main building and Mother’s Dwelling main building.
- This perk synergizes with the XENOMORPH because while the XENOMORPH’s TAIL ATTACK does a good job of circumventing vaults, some are simply even too strong for the TAIL ATTACK to handle consistently. Combined with Self-Destruct Bolt, you can now ensure that no window in Dead by Daylight is too strong for the XENOMORPH to deal with.
SUPERIOR ANATOMY

- Superior Anatomy is the best pairing for vault builds with Bamboozle. While the activation trigger is fairly restrictive (distance requirement, fast vault requirement, AND a cooldown), the massive 40% buff to vaults makes up for it.
- Keep in mind, Bamboozle already speeds up vaults by 15%. This brings us to a 55% increase to our vault speed.
FIRE UP
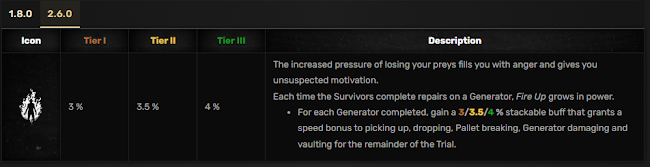
- Fire Up is our next vault speed buff perk, giving you a 4% buff to vaulting for each generator lost (5 max for +20%). In tandem with Bamboozle and Superior Anatomy, you can end up with a 75% vault speed!
- This perk serves a dual purpose as it also speeds up pallet breaking speed by that same 4% per generator lost.
DARK ARROGANCE
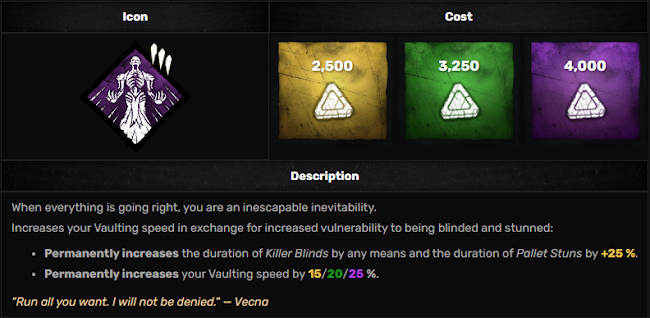
- The perk from VECNA, Dark Arrogance, is going to be a staple in any vault build going forward. The extra blind and stun duration is more than worth it for the whooping 25% increase in vault speed base. Especially on a character like Xenomorph, who really doesn’t get stunned very much, this perk is excellent.
ADD-ONS
—-------------------------------------------------------
SELF-DESTRUCT BOLT
- SELF-DESTRUCT BOLT is an add-on that gives you the Wesker teachable perk, SUPERIOR ANATOMY, practically for free. The only difference being that it is 10% weaker and does not require a survivor fast vault to activate. This stacks with our other vault perks will make vaults take a blink of an eye.
- While often redundant because of the TAIL ATTACKS ability to deal with vaults extremely well, when SELF-DESTRUCT BOLT is paired with BAMBOOZLE, even the strongest of vaults in Dead by Daylight will no longer be an issue for you.
EMERGENCY HELMET
- Your TAIL ATTACK as the XENOMORPH can make your chases go very quickly, but for the purposes of this build, the SELF-DESTRUCT BOLT vault speed is just as important of a reason to stay in CRAWLER MODE as the TAIL ATTACK. So use the EMERGENCY HELMET to accomplish this.
BUILD SHOWCASE
—-------------------------------------------------------
- (Remember to click on the image to bring up the link!)

POPSCARE BUILD
__________________________________________________
The build has a unique goal of getting the most value out of the XENOMORPH suddenly exiting a CONTROL STATION to pressure survivors on and around generators. All the perks in this build are meant to nerf the survivors and buff the XENOMORPH as generators finish and you emerge from the CONTROL STATION.
- OVERVIEW

Perks
- Mindbreaker
- Bitter Murmur
- Batteries Included
- Cruel Limits
Add-ons
- Cereal Rations
- Emergency Helmet
- THE BUILD
PERKS
—-------------------------------------------------------
MINDBREAKER
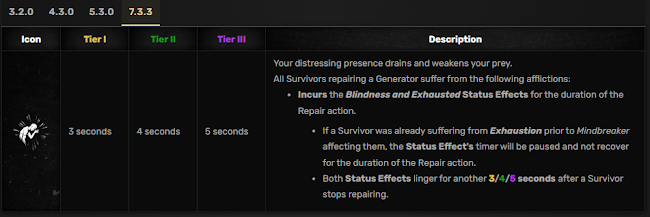
- Mindbreaker is the central perk of this build. When the XENOMORPH exits a CONTROL STATION to surprise a survivor on a generator, that survivor will now suffer from exhaustion and blindness.
- Often, the XENOMORPH emerging from the CONTROL STATION can be shut down by perks like Sprint Burst and Lithe, allowing the survivors a quick escape despite getting the drop on them. Mindbreaker stops this from happening!
BITTER MURMUR
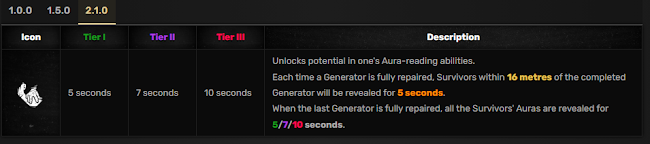
- Bitter Murmur is the start of our strategy to capitalize on pressuring survivors the moment they complete a generator. While a survivor will be exhausted and blinded coming off a completed generator from Mindbreaker, Bitter Murmur will give you the exact aura of the survivor so you can coordinate your attack before and after exiting the CONTROL STATION.
BATTERIES INCLUDED

- Batteries Included buffs your speed as you come out of the CONTROL STATION near a completed generator. You will be moving 5% faster, making you 120% movement speed while tracking down the exhausted and blind survivor (that you have aura reading on) after surprising them out of the CONTROL STATION.
CRUEL LIMITS

- Cruel Limits is the final piece of the puzzle for pressuring a survivor that has just completed a generator. Through our other perks, a survivor that just finished a generator is exhausted, blinded, and is being read through aura reading. Now, with Cruel Limits, all vault locations on the map are blocked for 30 seconds whenever a generator is completed.
- Essentially, if played correctly, a survivor should have nothing but pallets to use against the XENOMORPH as they surprise attack from the CONTROL STATION.
ADD-ONS
—-------------------------------------------------------
CEREAL RATIONS

- Cereal Rations is helpful for this build because when you are surprising the survivor outside the CONTROL STATION, you want to be able to do this as unimpeded as possible. Cereal Rations highlights FLAME TURRETS so that you can pre plan how to deal with them as quickly as possible so you can continue your surprise attack.
EMERGENCY HELMET
- Your TAIL ATTACK as the XENOMORPH can make your chases go very quickly, but for the purposes of this build, the EMERGENCY HELMET is to help shield you from the FLAME TURRETS around CONTROL STATIONS that you may have to take care of before chasing the surprised survivor.
BUILD SHOWCASE
—-------------------------------------------------------
- (Remember to click on the image to bring up the link!)
GIMMICK BUILDS
These builds differ from our other suggested builds as they all try to fulfill a specific purpose like detering healing, applying specific status effects, etc. Instead of trying to fill a general purpose for fun or victory, these builds overachieve at their specific niche.
SCREAM BUILD
__________________________________________________
The build centralizes around forcing the survivors to scream and getting the most value out of said screams as possible.
- OVERVIEW

Perks
- Ultimate Weapon
- Friends ‘Til The End
- Hex: Face The Darkness
- Dead Man’s Switch
Add-ons
- Harpoon Gun
- Parker’s Headband
- THE BUILD
PERKS
—-------------------------------------------------------
ULTIMATE WEAPON
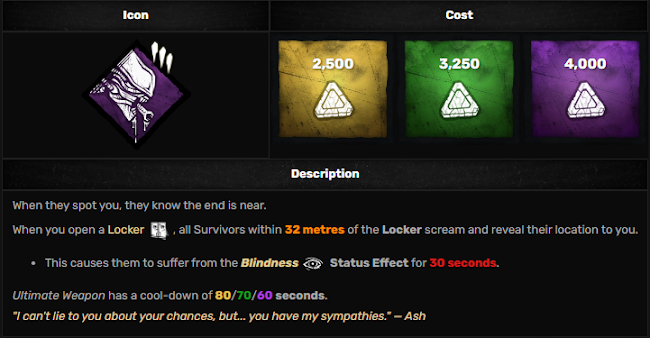
- Ultimate Weapon is likely the best scream perk in Dead by Daylight, so it must be in our build. Even as its weaker version with the localized scream, it fits perfectly into our interruption scream build.
- You should be using Ultimate Weapon whenever you have Dead Man’s Switch active to force as much value as possible.
FRIENDS ‘TIL THE END

- Friends ‘Til The End is another excellent information perk, which conveniently for us, also includes the scream mechanic. Whenever you hook the obsession (which you should be doing to get the most value out of the perk), another random survivor becomes the obsession and they scream and reveal their location to you.
HEX: FACE THE DARKNESS

- Face the Darkness is the most consistent scream activating perk outside of Ultimate Weapon in our build. After injuring a survivor, a dull totem lights and all other survivors scream every 25 seconds outside of your terror radius (and also gives more info with 2 seconds of aura reading).
- This will help activate Dead Man’s Switch without any sort of active input from you, helping with ease of value out of the build.
DEAD MAN’S SWITCH
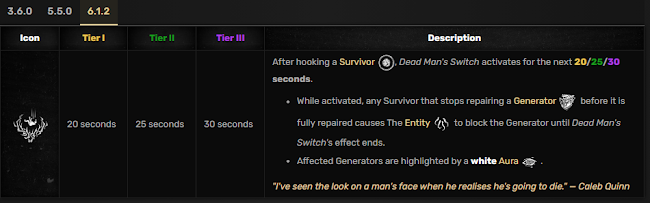
- Dead Man’s Switch is the glue that holds this build together. The screams provide excellent information, but to actually make this build viable, we need more.
- With Dead Man’s Switch, after you hook a survivor, any survivor letting go of a generator blocks that generator for the rest of the 30 second duration. Screams are one of the mechanics in Dead by Daylight that forces survivors to let go of generators, hence activating Dead Man’s Switch.
- The idea is to get as many activations of Dead Man’s Switch as possible by having a ton of scream activating perks and add-ons.
ADD-ONS
—-------------------------------------------------------
HARPOON GUN

- Harpoon Gun is yet another way to activate screams from the survivors, by hitting a survivor within 10 seconds of coming out of a CONTROL STATION, forcing survivors outside 24 meters to scream and reveal their locations.
PARKER’S HEADBAND

- Parker’s Headband is used for a little bit of extra insurance to make sure you get the required 10 second hit needed to activate Harpoon Gun’s effect. The 5% haste for 3 seconds is not impactful in most scenarios, but may clutch a use of Harpoon Gun you would have barely missed.
BUILD SHOWCASE
—-------------------------------------------------------
- (Remember to click on the image to bring up the link!)
AURA READING BUILD
__________________________________________________
The build focuses on activating aura reading on the survivors as much as possible through both perks and add-ons.
- OVERVIEW

Perks
- Nowhere To Hide
- Eruption
- Gearhead
- Lethal Pursuer
Add-ons
- Improvised Cattle Prod
- Cereal Rations
- THE BUILD
PERKS
—-------------------------------------------------------
NOWHERE TO HIDE

- Nowhere to Hide is one of the best anti-stealth information perks in Dead by Daylight. Often survivors will leave a generator early if they know the killer is coming and hide nearby while the killer checks the generator and walks away. This will out these survivors that hide to greed the generator.
ERUPTION

- Eruption does serve its purpose as a slowdown, but what many do not realize about Eruption, is that it gives a scream and aura reading to the survivor for 12 seconds if they were actively on the generator at the time of activation.
GEARHEAD

- This aura reading perk is meant to serve as your macro information perk. After injuring a survivor, auras will be revealed to you of survivors on generators when they hit good skill checks. Use this to keep track of survivors map wide.
LETHAL PURSUER

- Lethal Pursuer is somewhat redundant on the XENOMORPH as you can use the TUNNELS to find survivors in the early game, but this perk serves as the glue of our build because Lethal also extends ALL aura reading effects by 2 seconds, perks AND add-ons alike!
ADD-ONS
—-------------------------------------------------------
IMPROVISED CATTLE PROD

- While Bitter Murmur may have seemed like a good option for this build, IMPROVISED CATTLE PROD provides a very similar effect as an add-on. Each time a generator is completed, you see auras of survivors within 10 meters of any CONTROL STATION (of which there are 7) for 15 seconds.
CEREAL RATIONS

- Cereal Rations gives aura reading on FLAME TURRETS while you are traveling inside the TUNNELS. While this does not get affected by our other aura perks, it still ties together the build as it is an alright add-on for dealing with FLAME TURRETS.
BUILD SHOWCASE
—-------------------------------------------------------
- (Remember to click on the image to bring up the link!)
ANTI-HEALING BUILD
__________________________________________________
The build is dedicated to slowing, interrupting, and preventing healing using both perks and add-ons.
- OVERVIEW
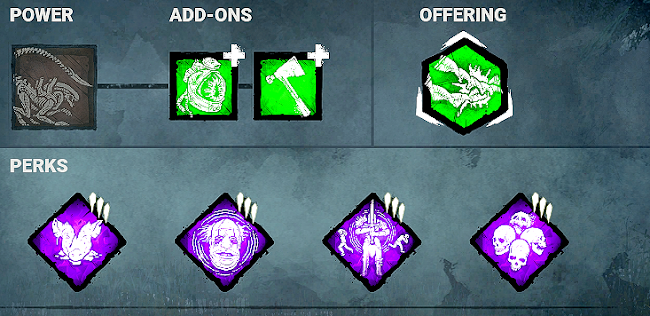
Perks
- Sloppy Butcher
- Coulrophobia
- Hex: Face the Darkness
- Thanatophobia
Add-ons
- Kane’s Helmet
- Multi Purpose Hatchet
- THE BUILD
PERKS
—-------------------------------------------------------
SLOPPY BUTCHER

- Sloppy Butcher is usually a perk you’d never run on the XENOMORPH because Sloppy Butcher only activates on normal attacks, and you should be using the TAIL ATTACK as much as possible.
- However, the point of this build is to have as many survivors mangled and hemorrhaged as often as possible, and sometimes a TAIL ATTACK is not always a possible or easiest option in a chase. So to cover your bases, we have Sloppy Butcher to inflict Mangled and Hemorrhage as well.
COULROPHOBIA

- Coulrophobia is to add insult to injury to the already applied Mangled and Hemorrhage. The already slowed healing progress gets 50% worse while the survivors are in your terror radius.
- However, the real pain of this perk comes from the extra +50% speed of healing skill checks, which makes them incredibly difficult to hit. Keep in mind, each missed skill check halts the heal, which causes the healing progress to regress.
HEX: FACE THE DARKNESS

- Face the Darkness also aids in our ability to interrupt heals, taking full advantage of the hemorrhage effect from Sloppy and Multi-Purpose Hatchet.
- After injuring a survivor, all other survivors outside of your terror radius (which is great since the XENOMORPH only has a 24 meter terror radius in CRAWLER mode), scream every 25 seconds and reveal their locations, which interrupts any heals they would be attempting and regresses their healing progress.
THANATOPHOBIA
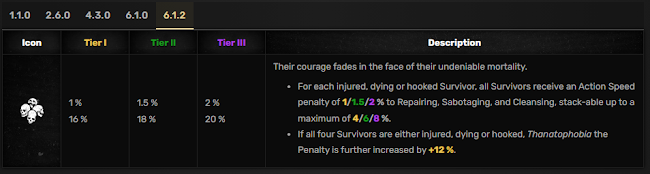
- If the whole point of the build is to keep the survivors injured as often as possible, then might as well benefit from the slowdown made to specifically benefit off of survivors being injured.
- Across all our perks and add-ons, you should be able to get the maximum 20% generator repair debuff by keeping all four survivors injured throughout the match.
ADD-ONS
—-------------------------------------------------------
KANE’S HELMET

- Kane’s Helmet is the main way you’re going to be applying mangled. As the XENOMORPH, you should be using your TAIL ATTACK as much as possible. Kane’s Helmet applies mangled through this.
MULTI PURPOSE HATCHET

- Multi Purpose Hatchet is the main way you’re going to be applying hemorrhage. As the XENOMORPH, you should be using your TAIL ATTACK as much as possible. Kane’s Helmet applies mangled through this.
BUILD SHOWCASE
—-------------------------------------------------------
- (Remember to click on the image to bring up the link!)
BLINDNESS BUILD
__________________________________________________
The build is dedicated to applying the blindness status effect, a rare and interesting effect that is not often seen in daily matches of Dead by Daylight. Blindness can lead to many troubling obstacles like the survivors not being able to see hooked survivors.
- OVERVIEW

Perks
- Ultimate Weapon
- Mindbreaker
- Hex: Third Seal
- Hex: Undying
Add-ons
- Brett’s Cap
- Emergency Helmet
- THE BUILD
PERKS
—-------------------------------------------------------
ULTIMATE WEAPON

- Ultimate Weapon used to be infamous for its information and survivor screams, but it is often forgotten that Ultimate Weapon actually also applies Blindness to the survivors that scream as well for 30 seconds.
- Just like with the scream intention from the last build, this is on-demand blindness just by opening a locker.
MINDBREAKER

- Mindbreaker is mostly used as an anti-exhaustion perk, but Mindbreaker also applies Blindness for the whole duration they are on the generator and lingers for 5 seconds after leaving the generator.
HEX: THIRD SEAL
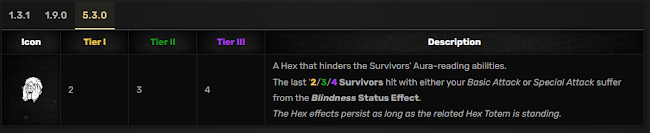
- Third Seal is the most foolproof perk for applying the blindness status effect to the survivors in Dead by Daylight. By simply injuring a survivor, they are now blind. It’s really that simple. Of course, it’s a hex totem so this effect will likely not last the whole game. However, its ease of application is excellent.
HEX: UNDYING

- Undying serves as a bit of insurance for Third Seal, so that you can keep your easiest method of applying blindness up for longer.
ADD-ONS
—-------------------------------------------------------
BRETT’S CAP

- Brett’s Cap applies blindness whenever a FLAME TURRET is destroyed near a survivor. This will be a fairly common occurrence since survivors need the FLAME TURRETS to shield them from you as the XENOMORPH.
EMERGENCY HELMET

- Emergency Helmet’s function is to help you stay in your CRAWLER MODE as this is always beneficial for you.
BUILD SHOWCASE
—-------------------------------------------------------
- (Remember to click on the image to bring up the link!)
CHAPTER 9: MAPS, TILES, & LOOPING
In this chapter, we will be focusing on how to loop all general tiles in Dead by Daylight as the XENOMORPH, how to loop map specific tiles (such as main buildings), and which maps are good or bad for the XENOMORPH.
GENERAL TILE LOOPING
In this section, we will be covering how to loop general tiles that appear on most maps in Dead by Daylight (such as shack, jungle gyms, etc). While there will be good general looping advice for playing killer in general, the XENOMORPH can play tiles far more dynamically because of their TAIL ATTACK.
The LEGEND
__________________________________________________
Before we begin to dissect how we chase each tile in Dead by Daylight, it is important to notate how we will be visualizing the loops. We will be visualizing the loops from the top down (overhead) view, with the following icons used to indicate the different variables:
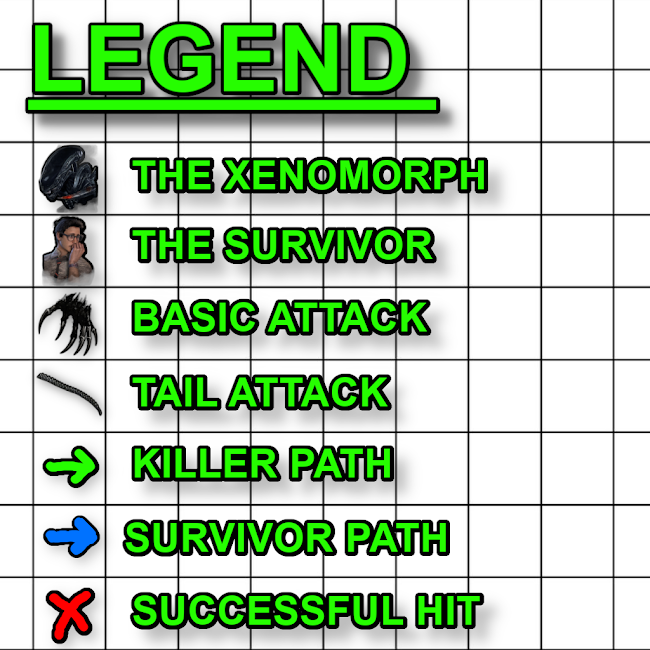
- THE XENOMORPH - This is the position the XENOMORPH will be when going for their attack.
- THE SURVIVOR - This is the position the survivor will be when they are going to get hit.
- BASIC ATTACK - Indicates that the successful hit will be made with a BASIC ATTACK.
- TAIL ATTACK - Indicates that the successful hit will be made with a TAIL ATTACK.
- KILLER PATH - Indicates the optimal path the XENOMORPH should move in order to get a successful hit.
- SURVIVOR PATH - Indicates the path the survivor is looping as the XENOMORPH chases them.
- SUCCESSFUL HIT - Indicates that a successful hit has occurred.
- The following top down (overhead) views of the general tiles were all found on dbdmaps.com. You can also find full layouts of all the current maps in Dead by Daylight as well as the competitive callouts that go along with them. In addition, the author has made a more general tile guide that can be found on Steam. Credit for the base layer of the following images goes to them!
- Also, for the purposes of what I consider a “general tile”, it will be tiles that appear on 3 or more maps in Dead by Daylight. If there are specific tiles from specific maps you want to see covered, please use the Google form at the beginning of the guide to submit a request!
KILLER SHACK
_________________________________________________
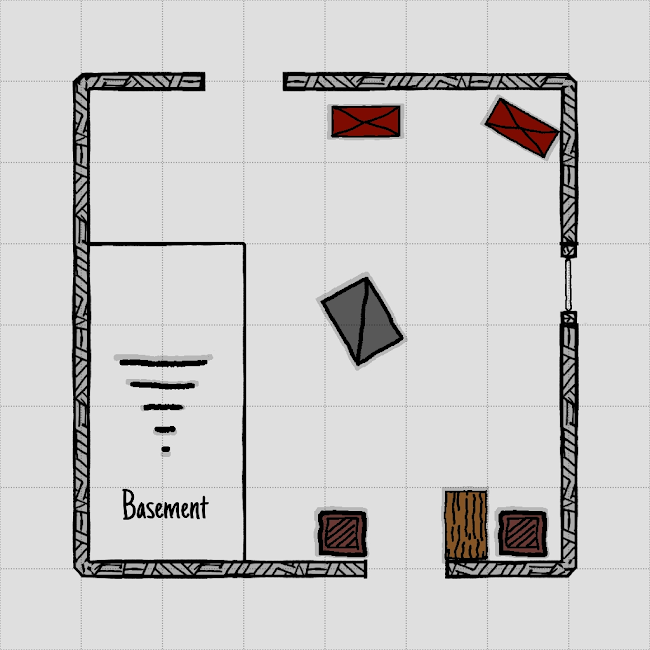
Killer shack has traditionally been the strongest general tile that can spawn in the game, so much so that it often takes the place of the main building on multiple maps. However, the XENOMORPH has special ways of dealing with this extremely strong tile. The way you play killer shack varies based on how the survivor enters the shack. We will cover how to play all approaches.
- BACK DOOR
- A survivor entering from the back door of the shack has two options: the window or the god pallet.

- THE WINDOW - When the survivor opts to take the window of the killer shack, you should be able to hit them with your TAIL ATTACK as they go through the window. Just be careful to aim a little high to avoid catching the collision of the window itself.
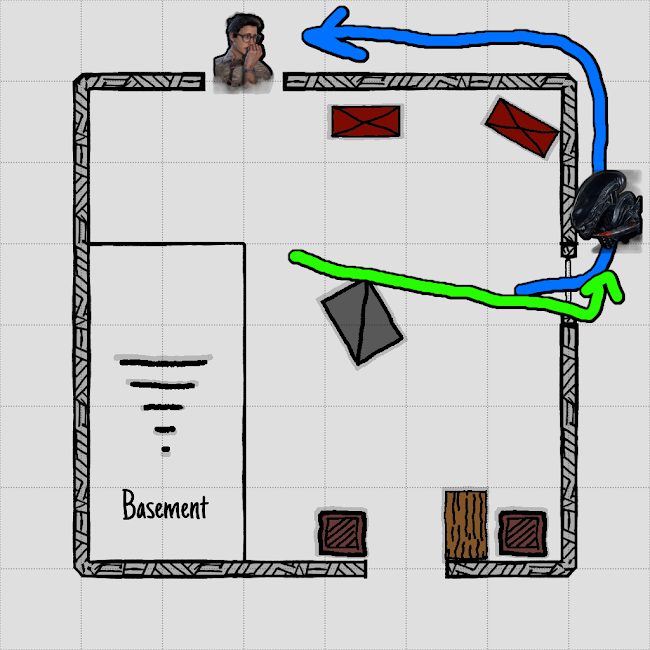
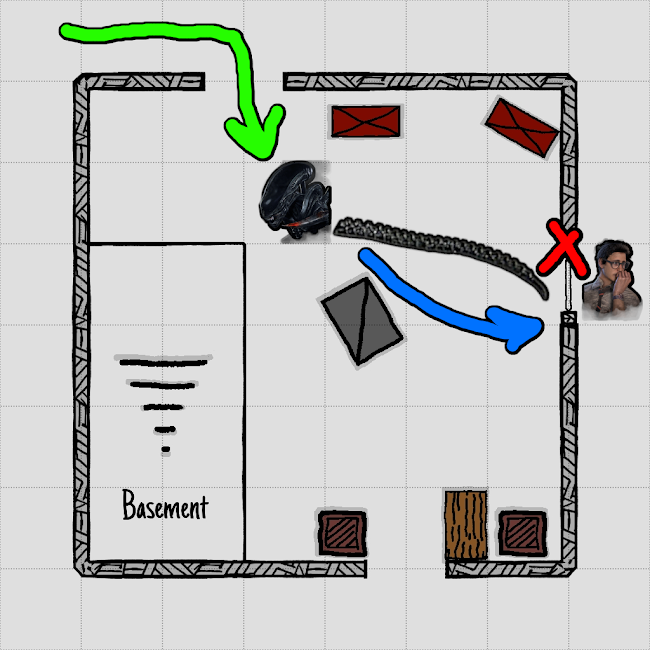
- If the survivor has too much distance on you by the time they vault, vault out after them and set up the TAIL ATTACK at the back door again. This is ESPECIALLY a good play if you have Self-Destruct Bolt, Bamboozle, Superior Anatomy, and/or Fire Up.
- Be wary that the survivor may fake the window at the last second and run to the right. Just be patient if you suspect the fake. Wait a single second and if they fake to the right, just TAIL ATTACK them there.
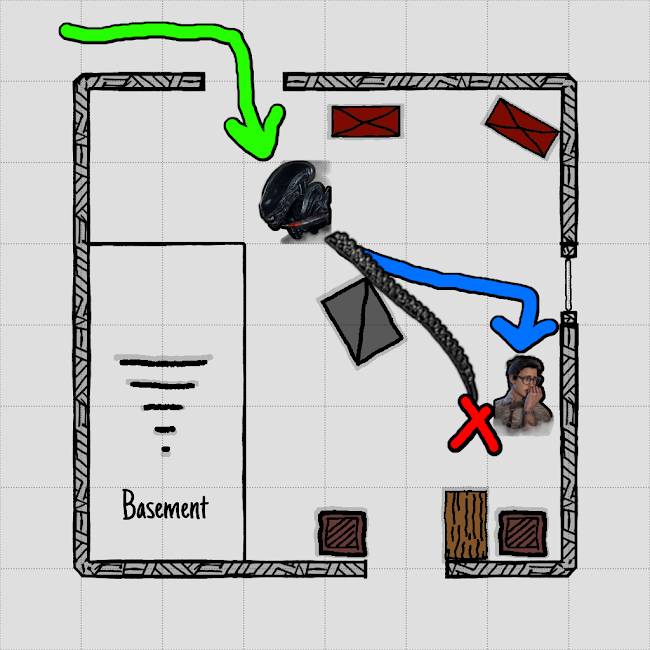
- Alternatively, after the survivor fast vaults shack window from the inside, you could attempt to double vault. A survivor that is not paying attention will almost run into you at the shack door, forcing them to double back. They can only medium vault the window from this angle, so either they get hit with your BASIC ATTACK medium vaulting or the TAIL ATTACK if they keep running.
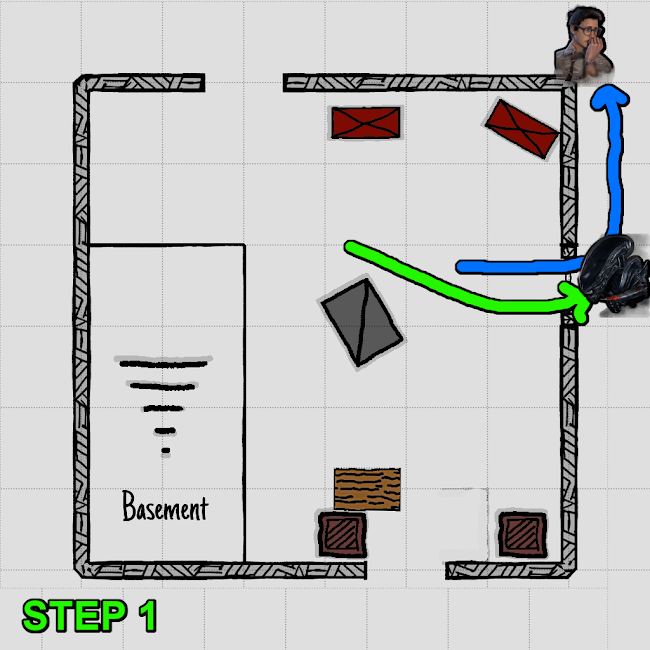
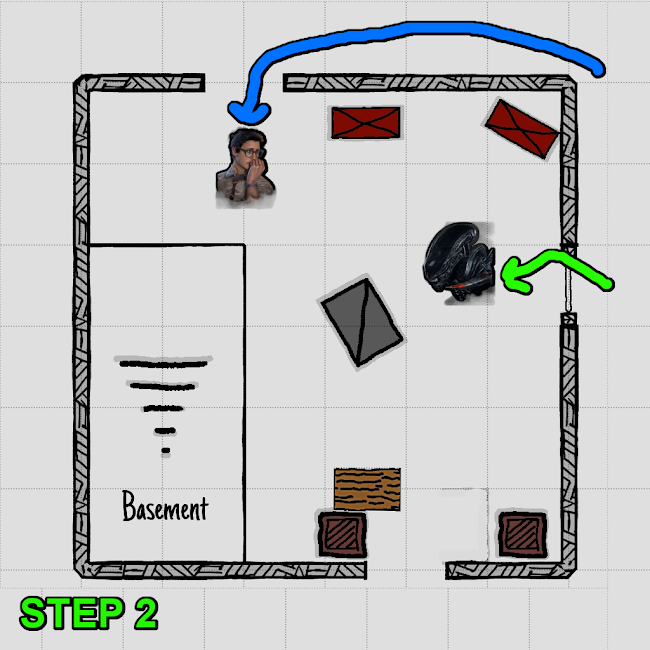

- THE GOD PALLET - When the survivor opts to go for the god pallet, attempt to TAIL ATTACK them on the way to the pallet if you are close enough to them.
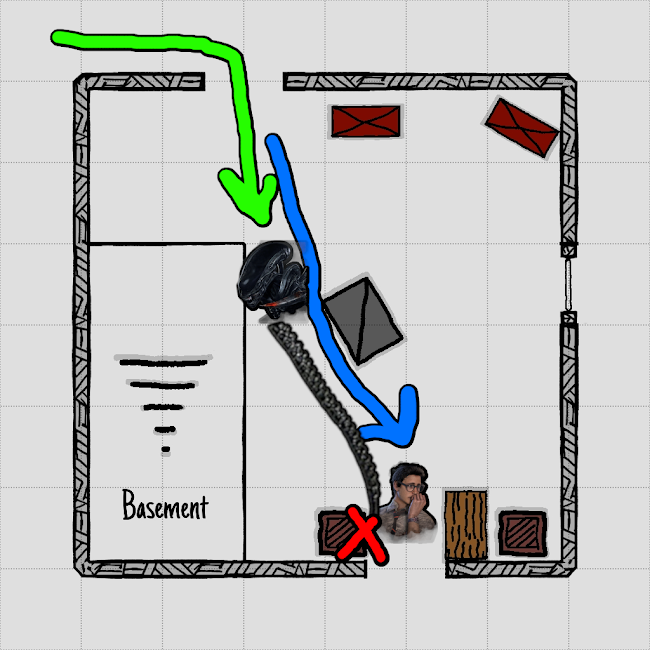
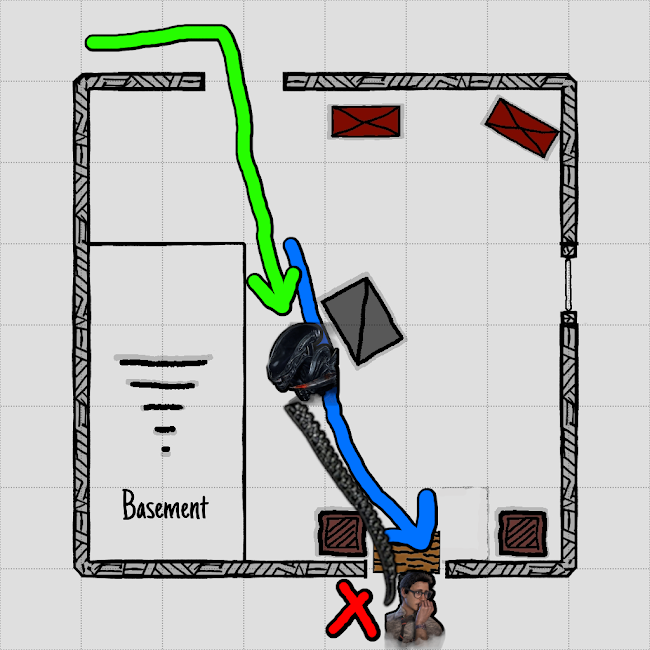
- If the survivor has extra distance on you, they may be able to drop the god pallet before you are in range for a TAIL ATTACK. However, this is an easy hit as the survivor is now in a locked animation. Go for the TAIL ATTACK over the pallet!
- If the survivor has so much distance that they can safely drop the god pallet and be outside the 4.8 meter TAIL ATTACK range, simply kick the pallet and continue chasing for another setup.

- Just like with the shack window, expect that some survivors will fake going towards the pallet and juke away at the last second. Just like last time, wait a second to call out the bait, then TAIL ATTACK where they dodge.

- If the god pallet is gone, or the survivor chooses to not use shack pallet and keeps running, they will not have enough distance to reach the window without medium vaulting, so simply hit them with a BASIC ATTACK as they go through.
- If the survivor has enough distance on you, they can actually swing wide and use that angle to get a fast vault, meaning a BASIC ATTACK will not work. However, you will be able to TAIL ATTACK through the window and hit them. You should use a STRAFE SHOT across the window here to cover the left AND right dodge options.
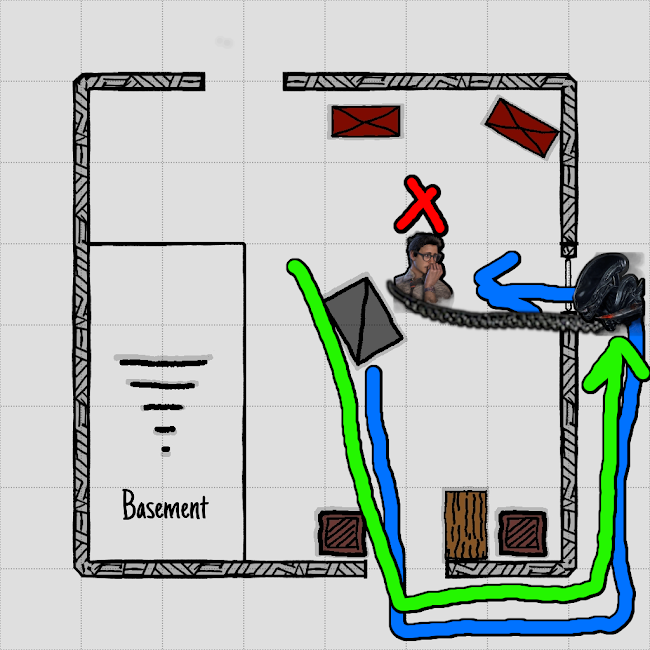
- If the survivor for some reason opts to run away from the window and god pallet to take the long side of the shack, they will not have enough distance to make it back to either resource, so it is a free BASIC ATTACK or TAIL ATTACK.
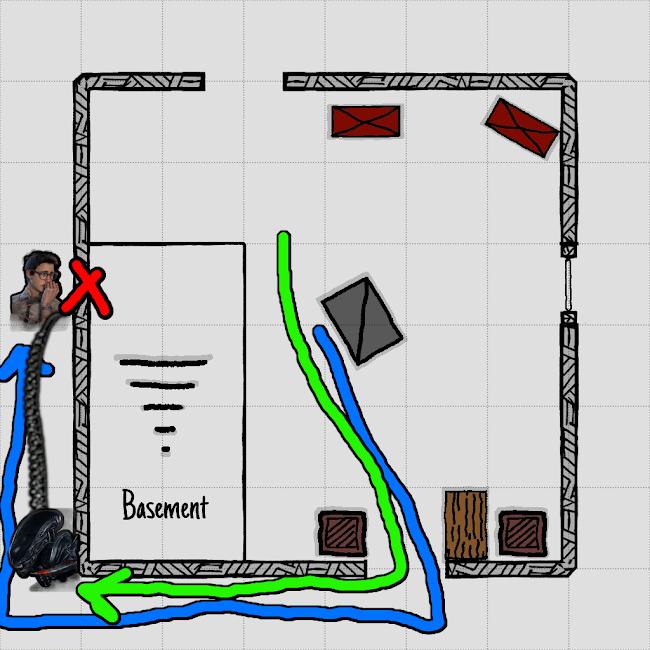
- THE WINDOW
- A survivor vaulting shack window gives you two options based on if they got a medium vault or a fast vault approaching the window.
- If the survivor approaches the window head on, they are going to fast vault. You should use your TAIL ATTACK to hit them as they are in the locked animation going through the window, just be sure to aim a little high so you do not collide with the window’s collision.

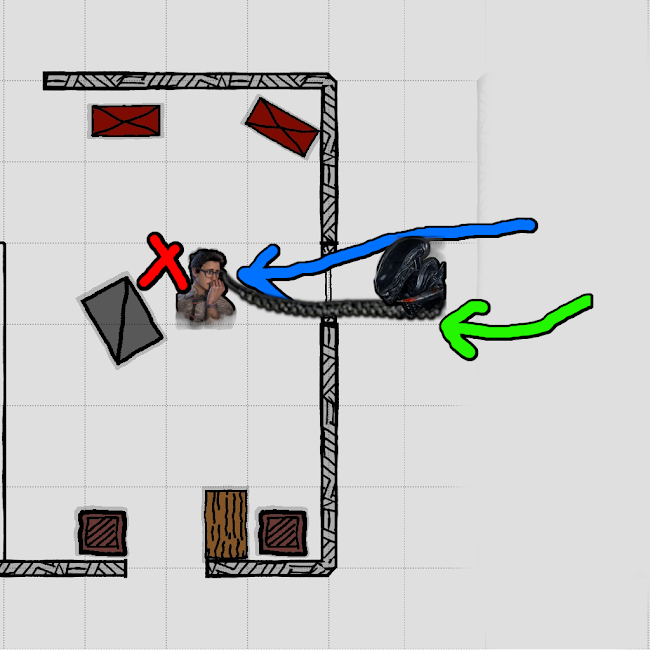
- If the survivor had a bit of distance on you, they may be able to complete the fast vault and keep moving. Approach the window and use a STRAFE SHOT across the window to cover both dodge options. Be careful if the generator is in the center, you may catch its collision in this attempt!
- If the survivor is not coming at the window head on, then they are going to be using a medium vault, which has an extremely long lingering hurtbox. Swing at the survivor with your BASIC ATTACK, even if you think it’s not going to work. You’d be surprised.

- FRONT DOOR
- A survivor has limited options going through the killer shack’s front door, making pressuring the survivor way easier than other approaches.
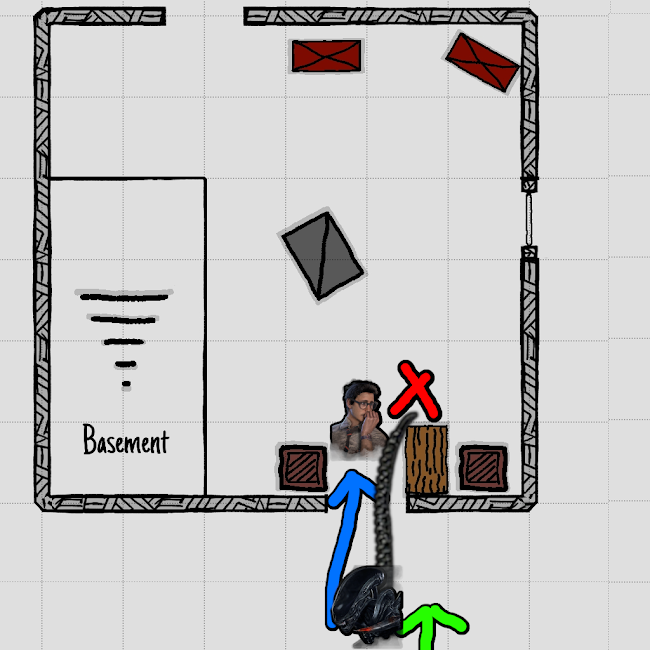
- If you are within 4.8 meters and the survivor is entering the front door, simply go for a TAIL ATTACK before they can even drop the pallet. Some survivors will even try to fake drop here, which only benefits you.
- If the survivor has a bit of distance on you, they may be able to drop the pallet. However, this is a locked animation, meaning they cannot move their character to dodge. Use your TAIL ATTACK to hit them over the pallet.

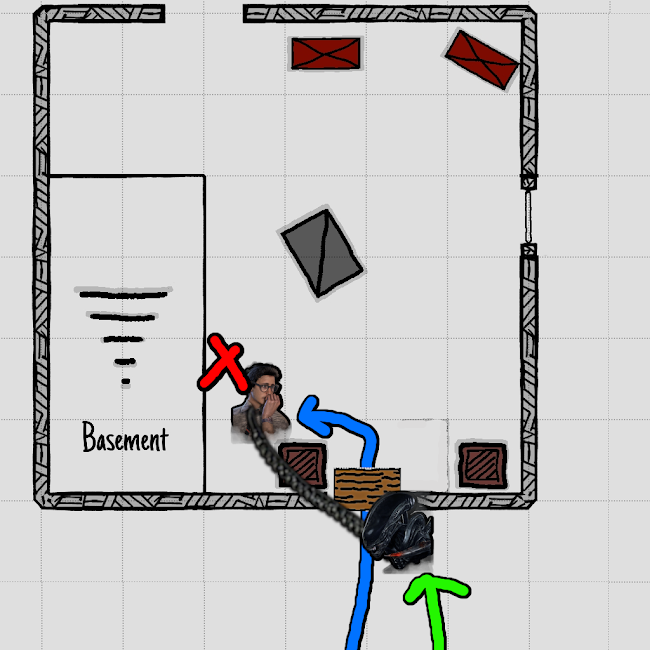
- If the survivor had enough distance to drop the pallet and move, the survivor will likely try to hide behind the boxes near the front door and crouch down. Approach the downed pallet and use an ARC SHOT, to hit them up and over their cover.
- If the survivor is able to drop the god pallet and make it outside the 4.8 meter range (or the obstacles by the front door are denying you an ARC SHOT), then simply kick the god pallet and continue the chase.
- FAKE OUT SHOT
- At any long wall vault in Dead by Daylight, you can do a mind game that can trick survivors into running into your TAIL ATTACK. If you frequent my streams, you may recall this as the “Welcome to Wendy’s” shot as it hilariously mimics a fast food drive through.
- Whenever the survivor is on the opposite side of a long wall vault from you and you are out of sight, pretend you are passing the window. The survivor will assume you’re going that way and double back to make distance away from you, walking back into view of the window. Moonwalk back in front of the window and use your TAIL ATTACK to surprise them.
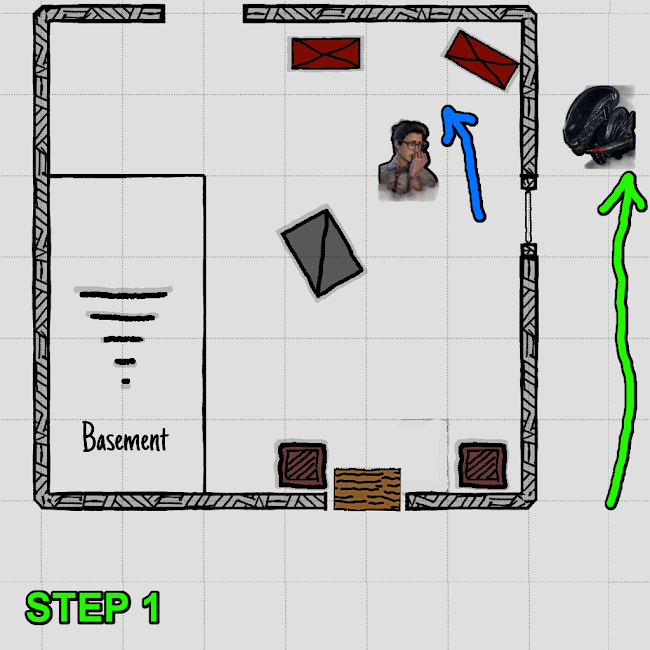
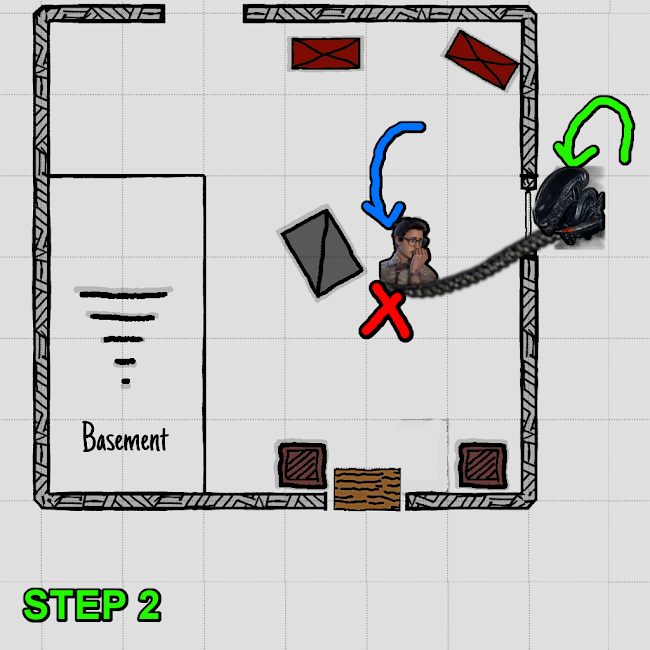
- A good survivor will be paying attention and will not fall for this, but there isn’t a reason to not at least attempt the shot!
- This shot is reversible and can be done on the other side of the window as well!
LONG WALL JUNGLE GYM
________________________________________________
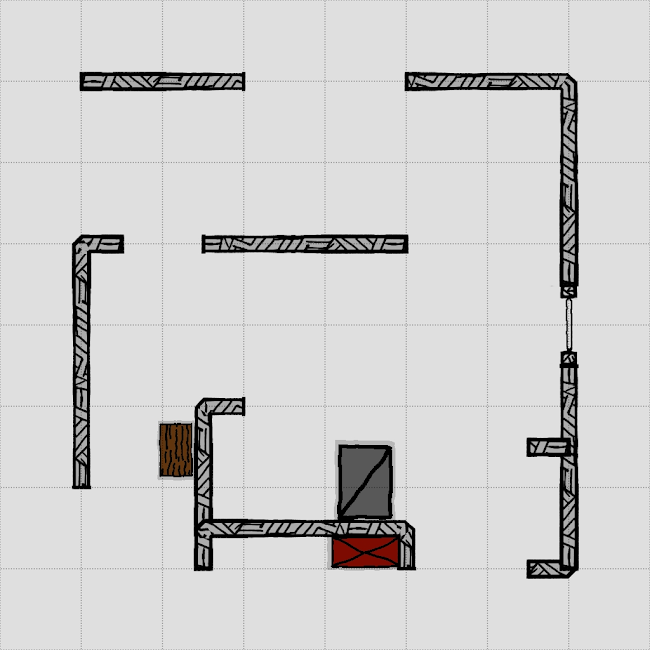
The strongest general tile outside of killer shack that can spawn on maps in Dead by Daylight. Accompanied by an almost completely safe pallet as well as a long wall vault similar to the shack window, this tile can be particularly difficult. However, the XENOMORPH has special ways in which they can deal with it based on how the survivor approaches the tile.
- PALLET SIDE
- If the survivor approaches the tile from the pallet side, try to hit them with a Tail Attack as they pass by the pallet with a STRAFE SHOT to cover the whole area.

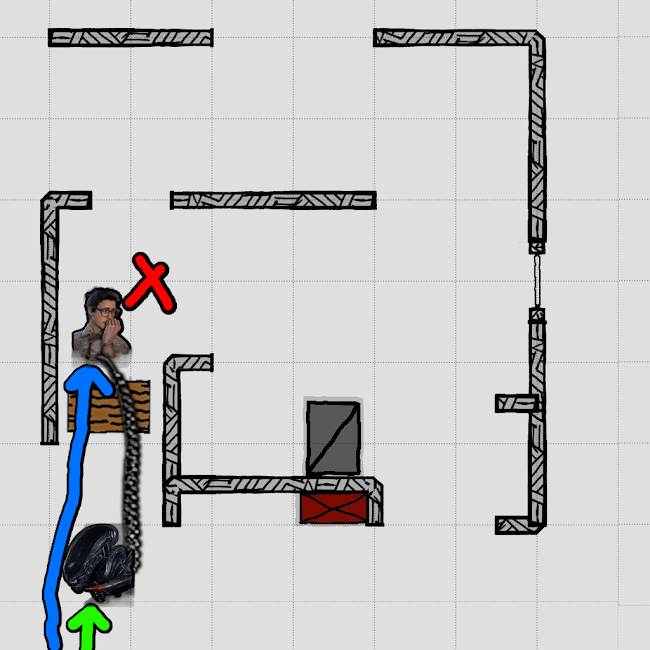
- Even if the survivor choses to drop the pallet, they are now in a locked animation. STRAFE SHOT to cover the whole area across the pallet. This will work even if they have some distance and can start running.
- Sometimes the survivor will opt to not use the pallet and continue to run into the heart of the tile. They will likely either take the long wall window vault, or they will continue to loop the pallet side of the tile.
- If the survivor opts to attempt the window vault, use your TAIL ATTACK to hit them as they go through the window since it is a locked animation and they cannot dodge. Make sure to aim slightly higher in order to avoid hitting the window ledge itself.
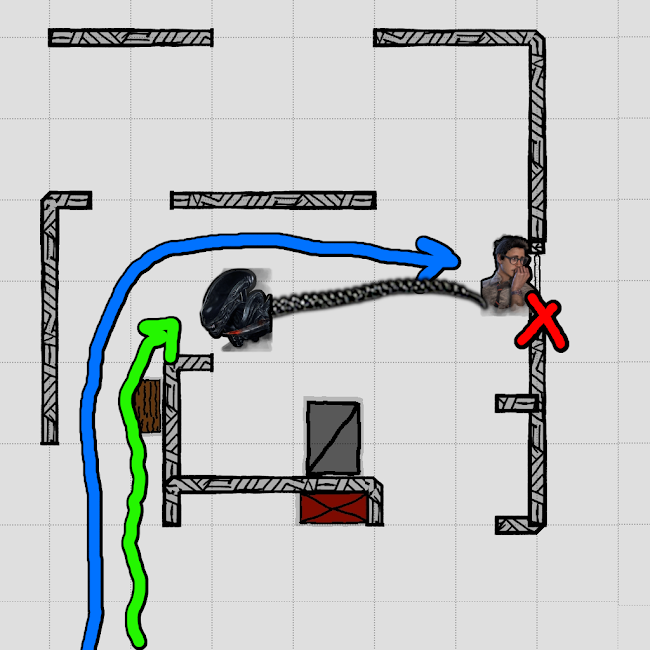
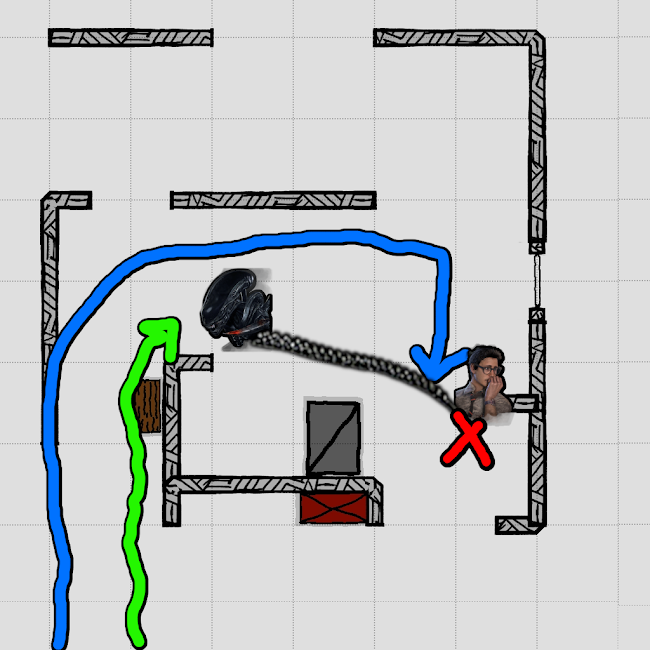
- Keep in mind, the survivor may choose to bait your TAIL ATTACK and dodge at the last second as they reach the window. Simply wait a second and call out the dodge, then TAIL ATTACK them anyways. Be careful here as STRAFING may catch the environment instead of the survivor.
- Sometimes the survivor will have too much distance on you and will be able to make the fast vault safely. When this happens, there is a specific mindgame you do here.
- Approach the window vault then pretend to start chasing them around the back side of the loop. Then turn around and vault the window, if done right, the survivor will almost run into you as you vault. Chase them around the wall and get your hit.
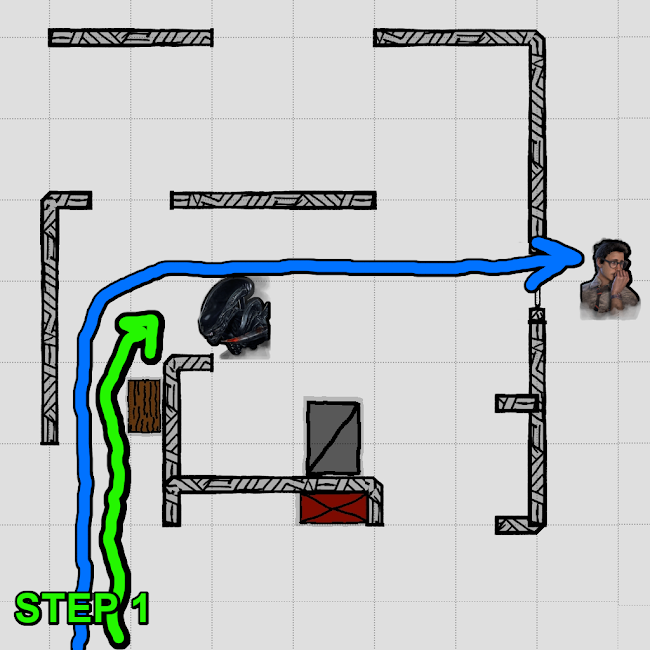
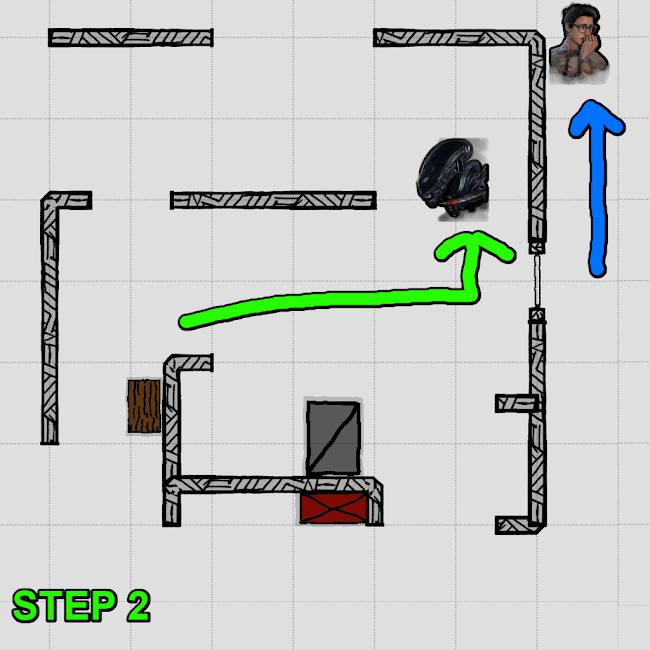
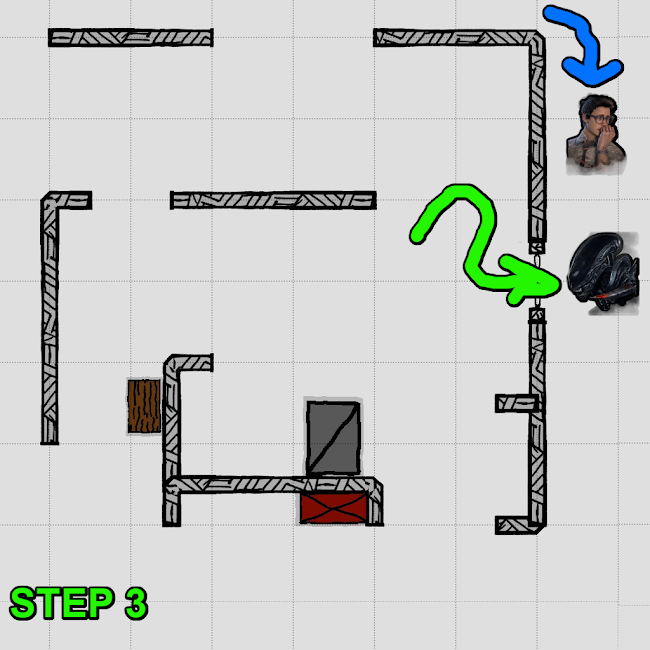

- Alternatively, you may also go for the same FAKE OUT shot that we do at the shack window here at this long wall window if the survivor choses to vault the window.
- Recall that when the survivor vaults the window, you fake going the same direction as them on the opposite side of the wall, double back and try to TAIL ATTACK them through the window as they double back with you!
- Just like with the other FAKE OUT shot, you can also go for this play on the other side of the long wall!


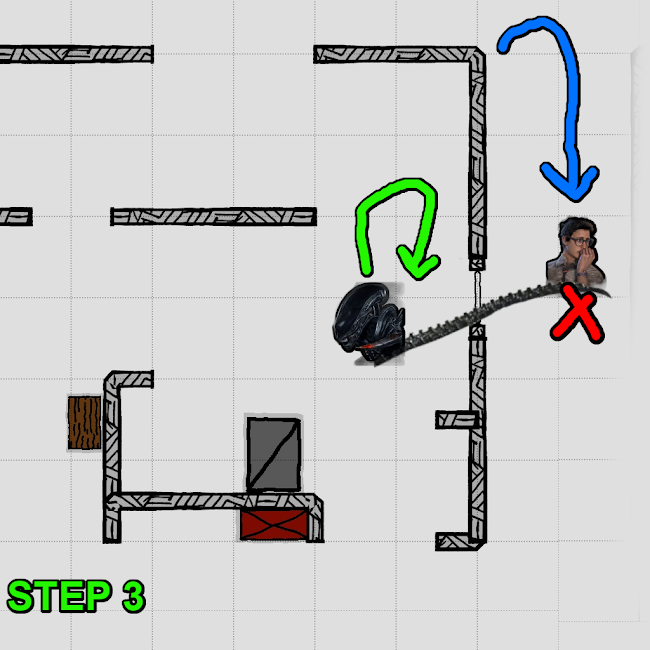
- Just like with the other FAKE OUT shot, you can also go for this play on the other side of the long wall!
- However, like we said earlier, the survivor has the option to keep looping the pallet after choosing not to use it instead of taking the window vault, so here is how you deal with that.
- Keep chasing around the loop until you exit the gym on the top side again. Line up a TAIL ATTACK and hit the survivor before they reach the pallet once more.

- WINDOW SIDE
- If the survivor approaches the window side, the play differs based on how much distance the survivor had on you.
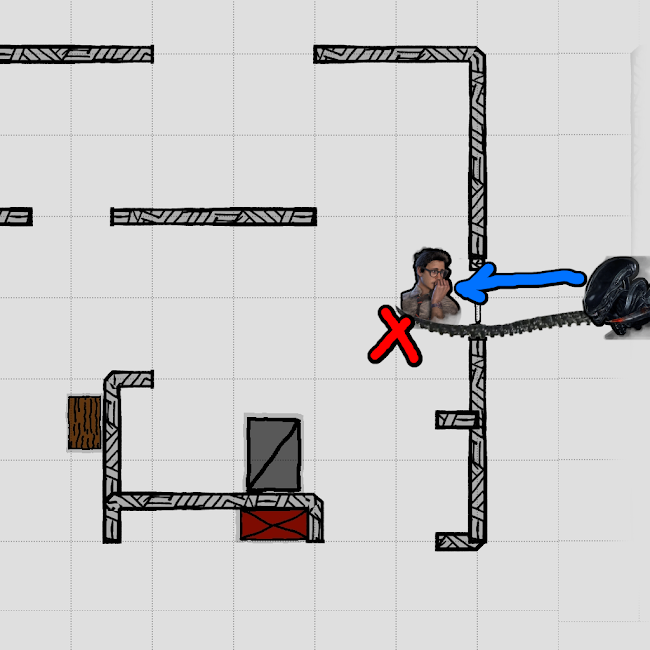
- If you are within 4.8 meters and the survivor vaults in front of you, use your TAIL ATTACK to hit them on the way through. Remember again, aim slightly high so as to not hit the window ledge itself.
- This is where this tile gets complicated. If the survivor had enough distance to fast vault safely out of TAIL ATTACK distance, the survivor can go one of two ways.
- If the survivor runs towards the pallet, vault after them (especially if you have Self-Destruct Bolt) and try to catch them with a TAIL ATTACK at or over the pallet.
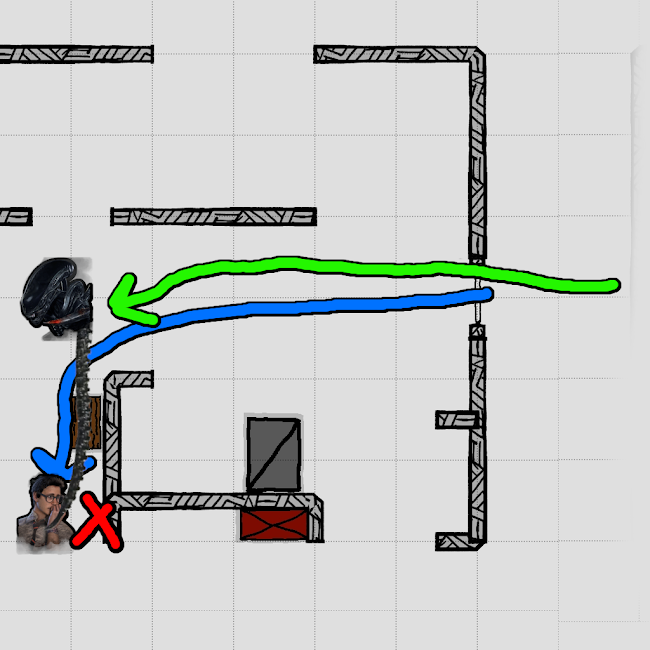
- Alternatively, you can go around the side of the long wall to try and bait the survivor to path back towards the window, then cut them off. However, the survivor may not fall for this bait and won’t double back.
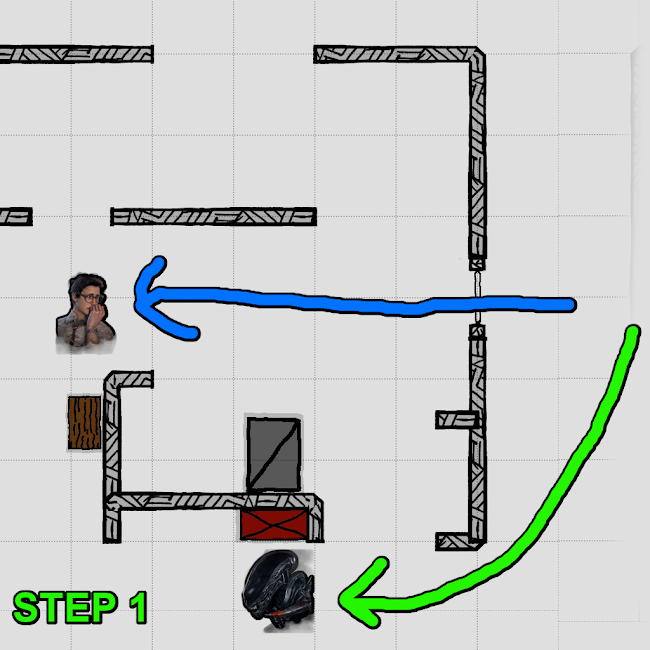
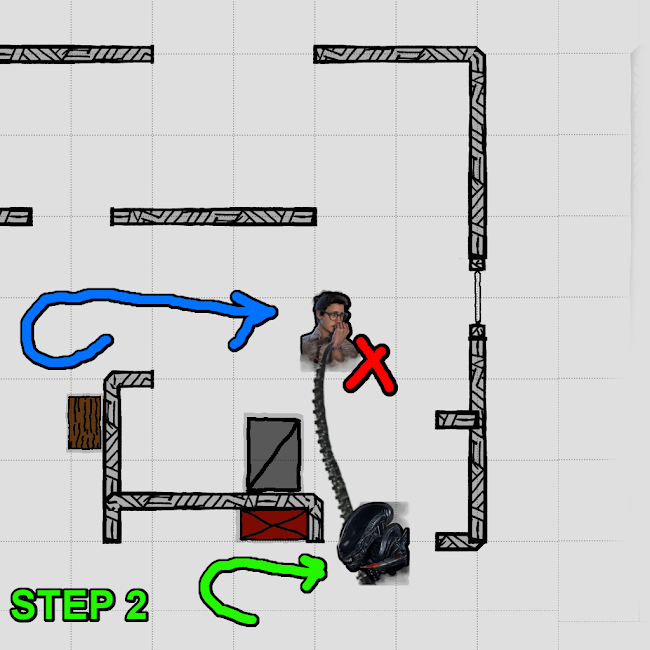
- If the survivor continues to loop the long wall, go around the long wall and attempt to TAIL ATTACK the survivor as they go to the window.

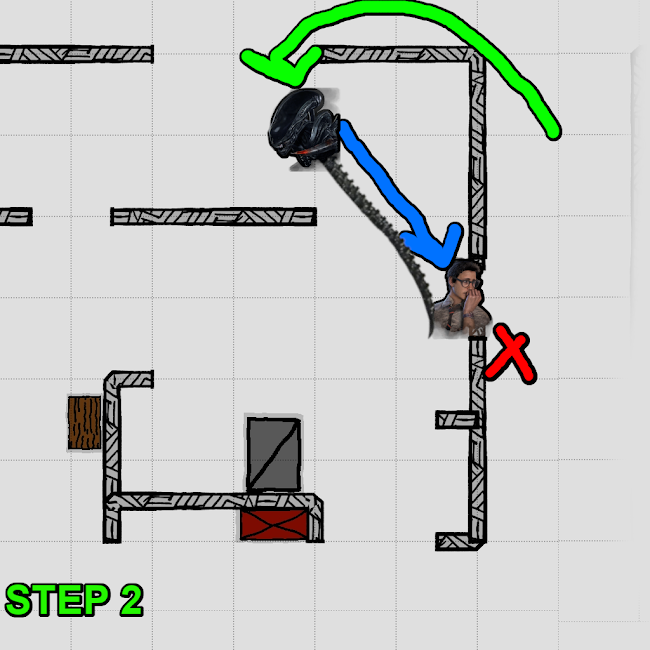
L-WALL JUNGLE GYM
________________________________________________
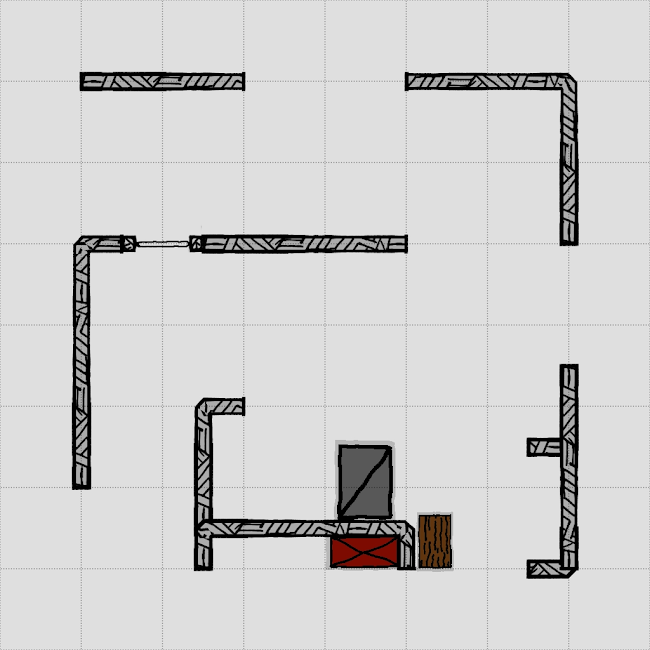
The L-wall jungle gym is nearly the same as the long wall jungle gym. The difference is that the window is moved from the long wall to an L-wall where the pallet used to be. Now, the pallet is swapped over to the other side of the top of the gym. This is the third most powerful general tile that spawns on most Dead by Daylight maps, behind Killer Shack and the Long Wall Jungle Gym.
- PALLET SIDE
- First thing’s first, try to TAIL ATTACK the survivor as they reach the pallet.

- If the survivor drops the pallet, try to hit them as they are dropping it in the locked animation, or shoot over the pallet if the survivor is within 4.8 meters and they have enough distance to start moving.
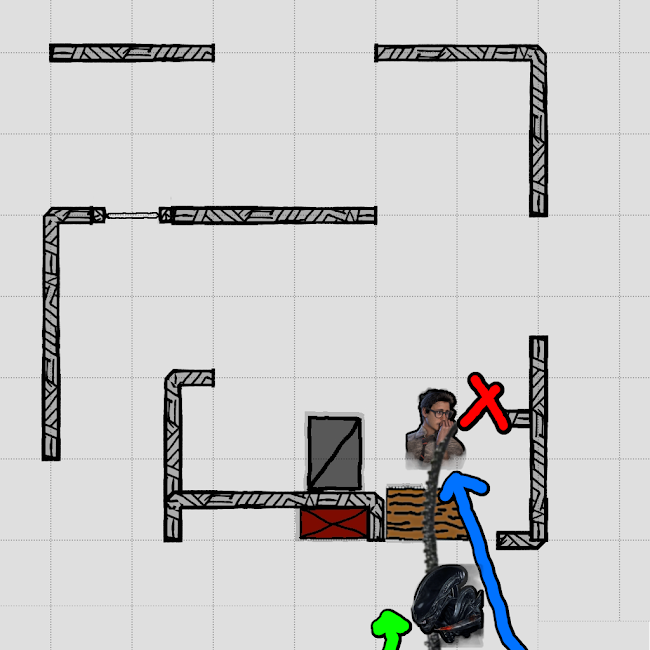
- If the survivor chooses to greed the pallet and continue to loop it, simply follow them through and line up a TAIL ATTACK attempt.

- WINDOW SIDE
- Like with all windows with the XENOMORPH, if you are within 4.8 meters while the survivor is vaulting or just past the vault, go for the TAIL ATTACK. Remember to aim slightly higher to avoid hitting the window ledge.
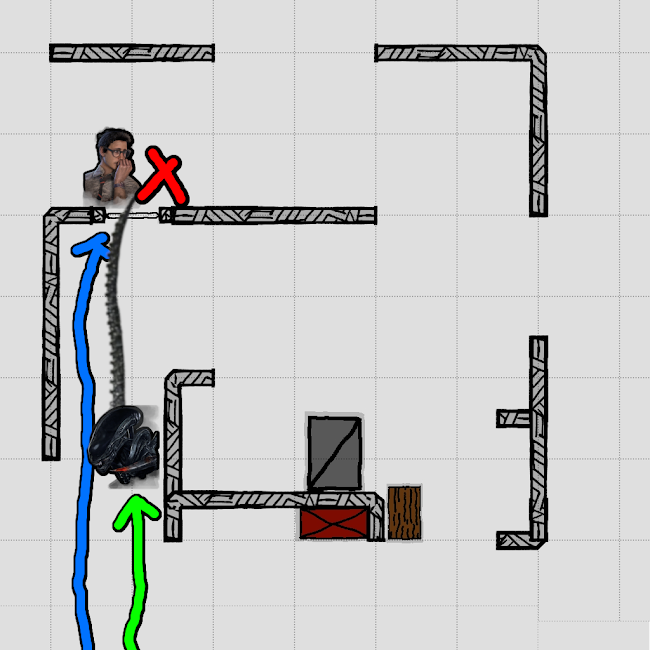
- If the survivor has enough distance on you to safely fast vault, then you have multiple options:
- If the survivor paths left, back up and go around the outside of the L-wall. The survivor will be forced to take the medium vault on the window again or take a basic attack. When they vault, TAIL ATTACK them through the window.
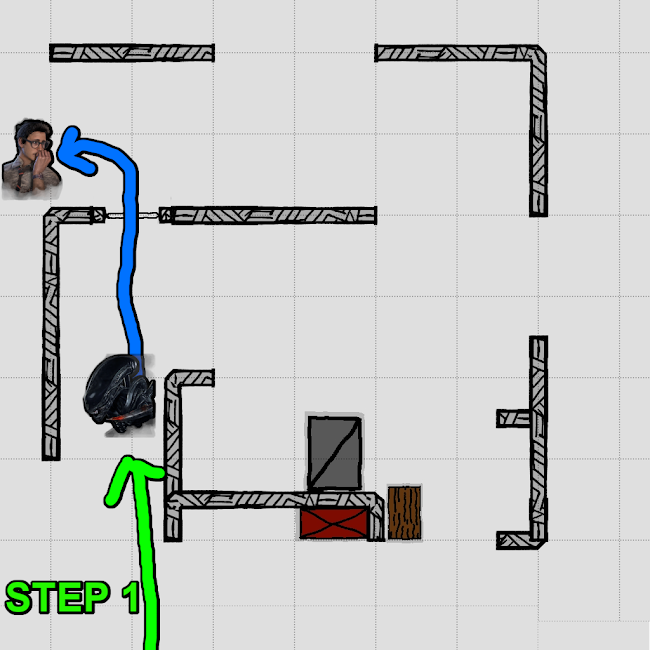

- If the survivor paths right, they will be forced to double back and medium vault the window. A basic attack should work here, but sometimes they’ll be able to vault safely if they have good ping. In this case, just TAIL ATTACK through the window after them.
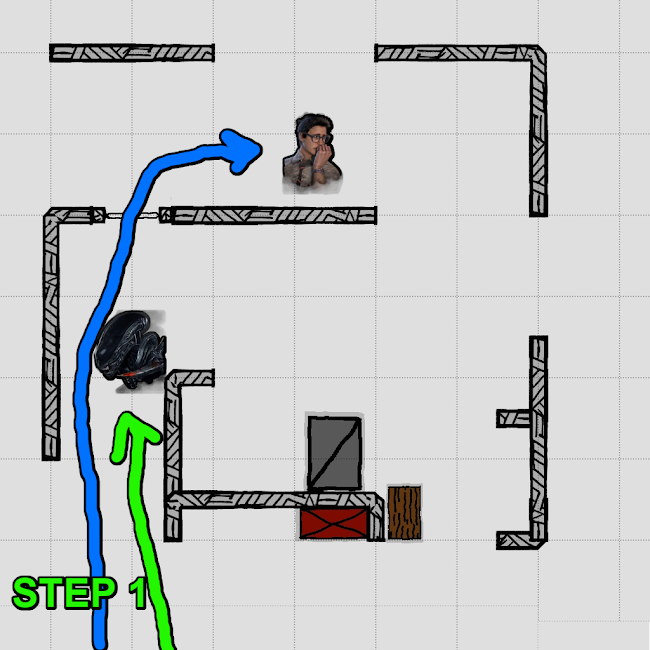
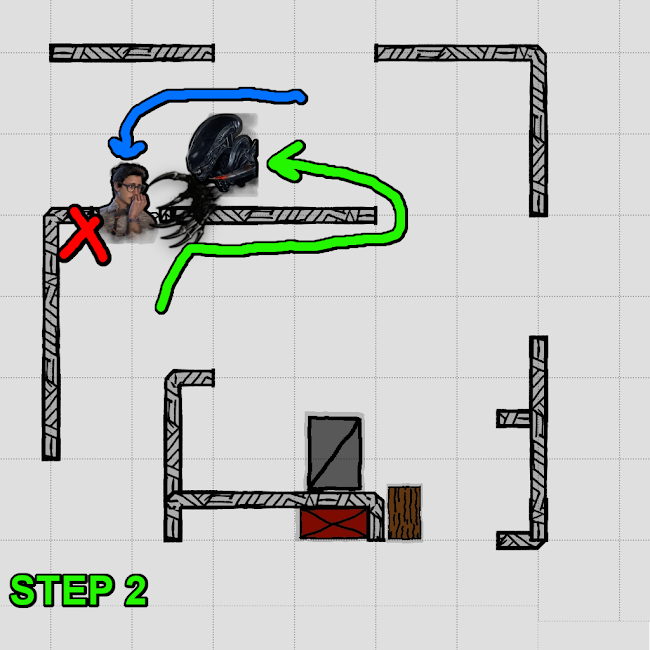
- Alternatively, the survivor may bypass the window and keep running, simply line up a TAIL ATTACK and hit them.
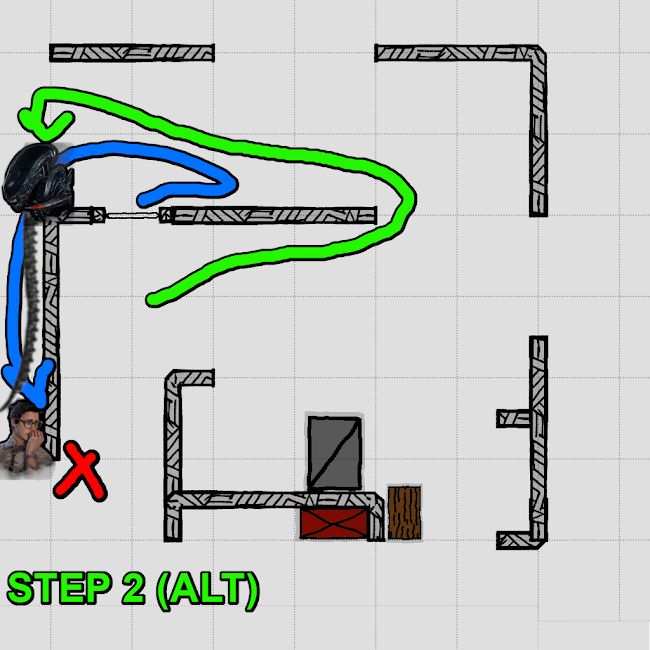
- Just like with any lengthy wall with a window vault in Dead by Daylight, you can also go for a FAKE SHOT at this window. Simply pretend you are following the survivor, then double back when they would double back, then attempt the TAIL ATTACK at the window.
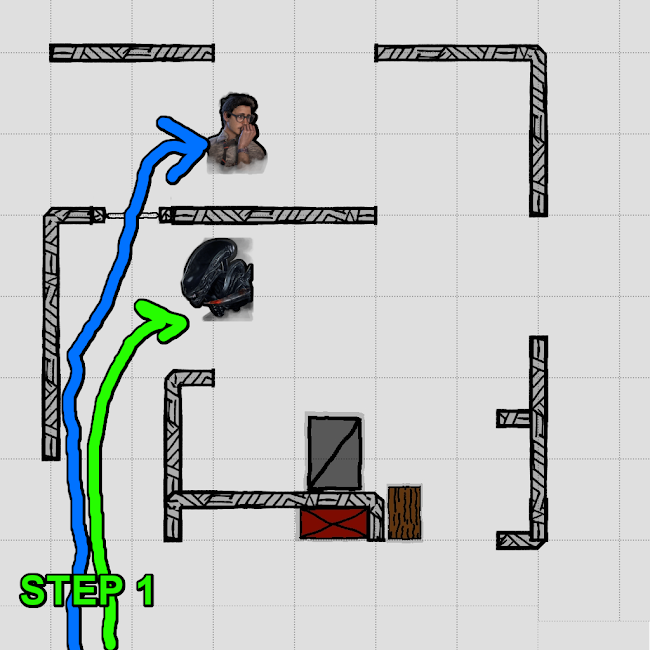

- If for some reason, the survivor chooses to bypass the L-wall vault and run towards the pallet, simply line up a TAIL ATTACK and hit them before they reach said pallet.
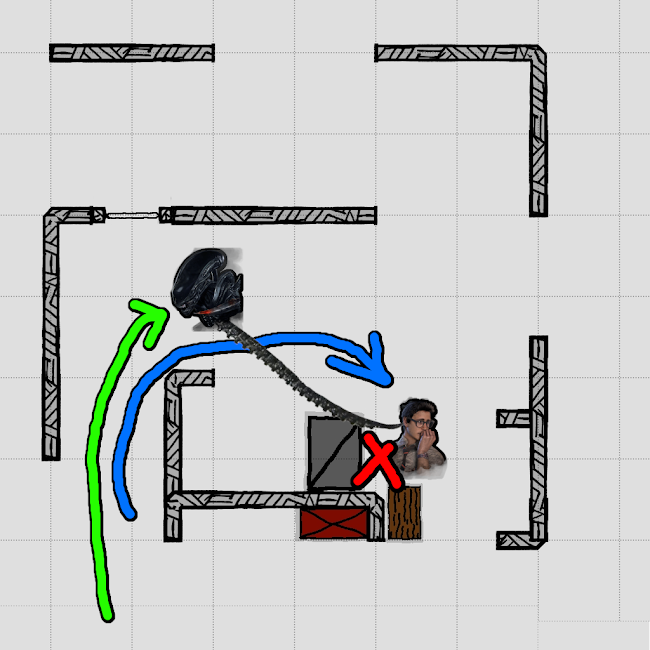
4 LANES
________________________________________________
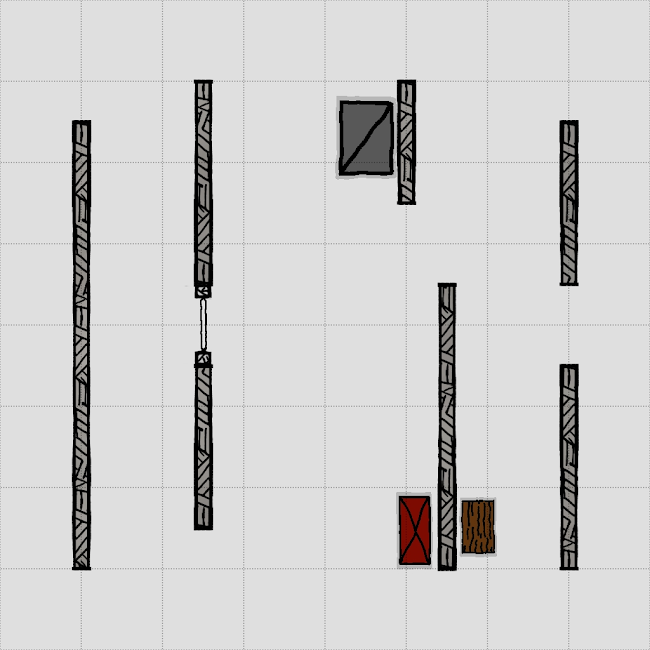
The 4 lane is a special kind of tile that spawns with two variations, window on the inside and window on the outside. Each one comes with an average strength pallet. This tile in general serves as an average strength pallet for survivors to use, making it easier for killers to deal with.
The inside vault variation of the 4 lane is weaker because you can only fast vault the window from the inside of the tile, where the outside vault variation plays roughly the same as any other long wall in Dead by Daylight. In addition, the pallet on the inside vault variation has shorter walls, making it more unsafe than the outside vault variation that has one extremely long wall on one side for safety.

INSIDE VAULT VARIATION
- First thing’s first, try to TAIL ATTACK the survivor as they reach the pallet. Whenever within 4.8 meters, there’s no reason to attempt this shot at a pallet.

- Even if the survivor drops the pallet, simply hit them in the locked animation with a TAIL ATTACK, or hit them over the dropped pallet with a TAIL ATTACK.

- Unlike other downed pallet loops so far, this pallet is surrounded by short walls on both sides, making it fairly weak. As a result, you can simply walk around one of these walls and line up a TAIL ATTACK on the survivor as well.
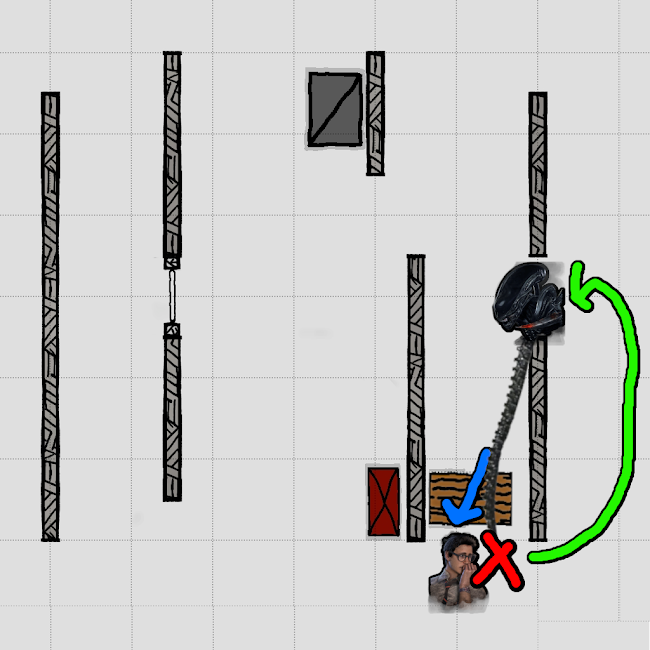
- If the survivor chooses to bypass the pallet and run towards the window, simply follow them and TAIL ATTACK them as they go through the window. Remember as always, aim slightly higher to avoid hitting the window ledge.
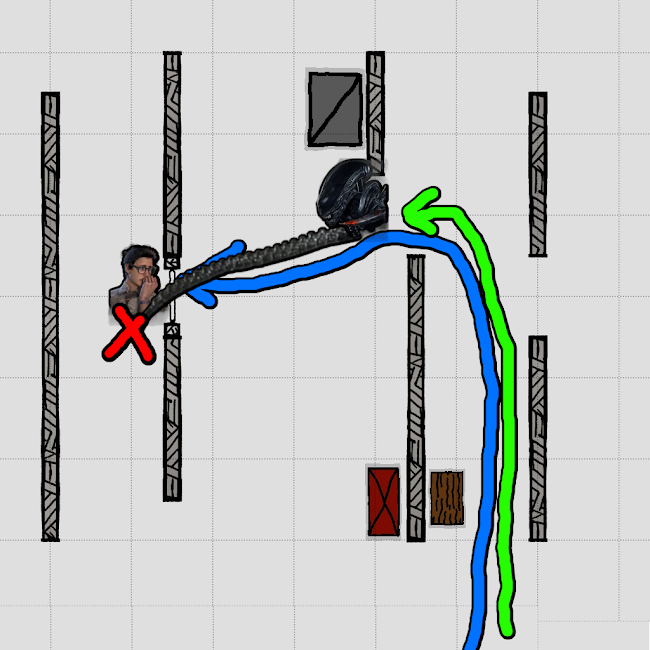
- If the survivor had enough distance to fast vault safely, do the fake where you pretend to follow them around, but double back last second. Use this to either go for a FAKE OUT shot, or vault the window to gain distance for a hit.
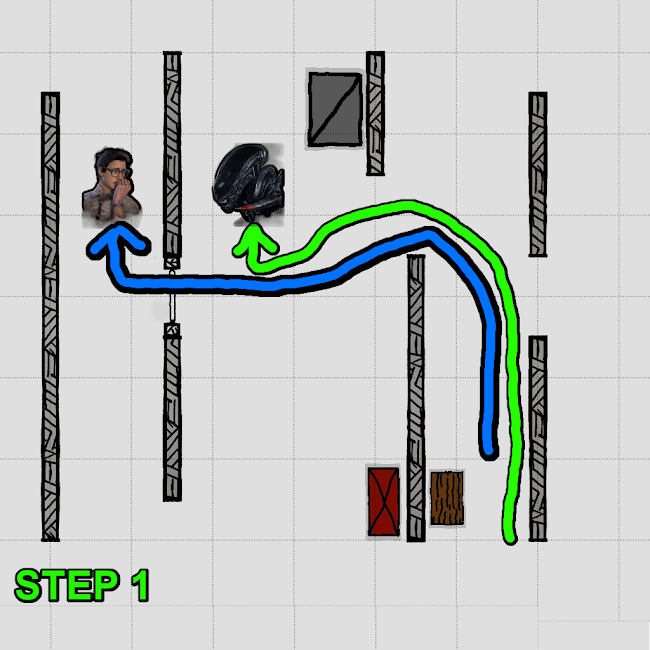
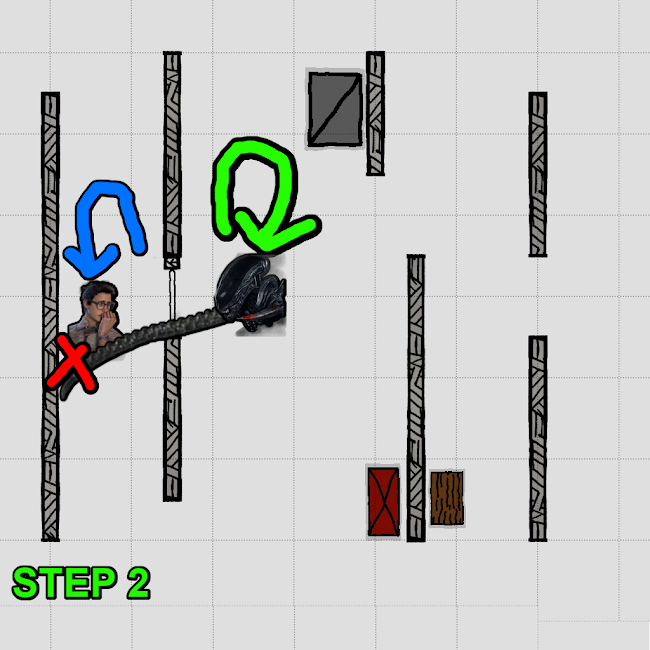
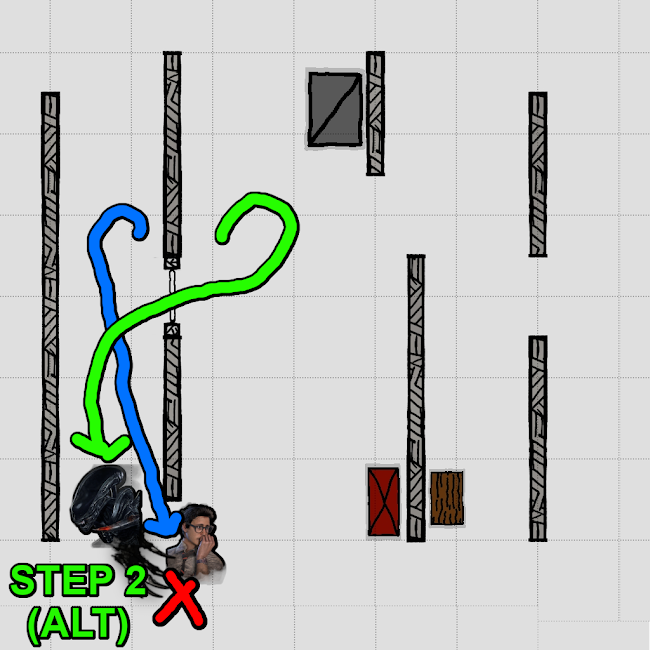
- You may have noticed there is no “window side” section for this 4 Lane variation. That is because the survivor will be medium vaulting from the inside, which is almost always an easy hit.
OUTSIDE VAULT VARIATION
- PALLET SIDE
- First thing’s first, try to TAIL ATTACK the survivor as they reach the pallet.

- Even if they throw the pallet, try to hit them in the locked animation as they drop it, or hit them over the dropped pallet using your TAIL ATTACK.

- If the survivor chooses to bypass the pallet, what you do depends on where the survivor goes afterwards.
- If the survivor chooses to loop the long wall side of the pallet, then you simply follow them until you can basic attack or line up a TAIL ATTACK.
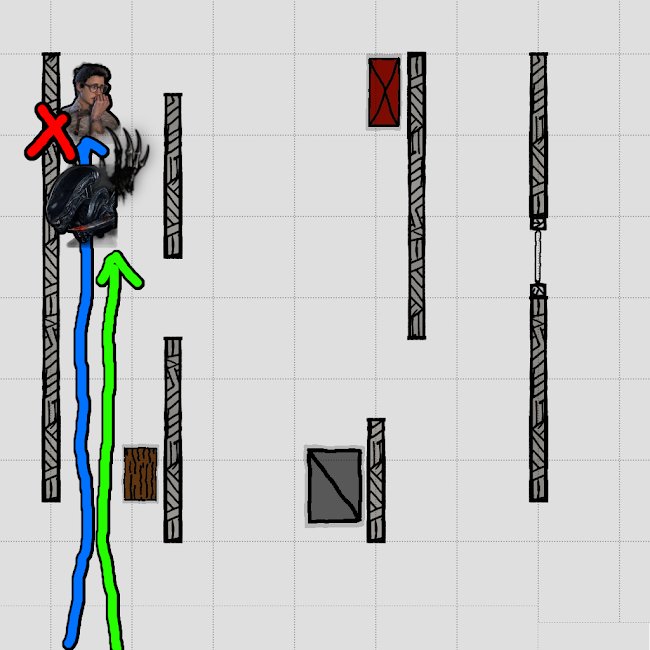
- If the survivor starts running towards the window vault, follow after them and line up a TAIL ATTACK before they get to the window.

- Alternatively, if you catch that the survivor is going to greed the pallet early, then you can cut them off by placing yourself at the center of the tile, forcing them to the pallet and guaranteeing a TAIL ATTACK. Even if the survivor somehow makes distance, the long wall side of the pallet has no vault so it provides no safety for them.
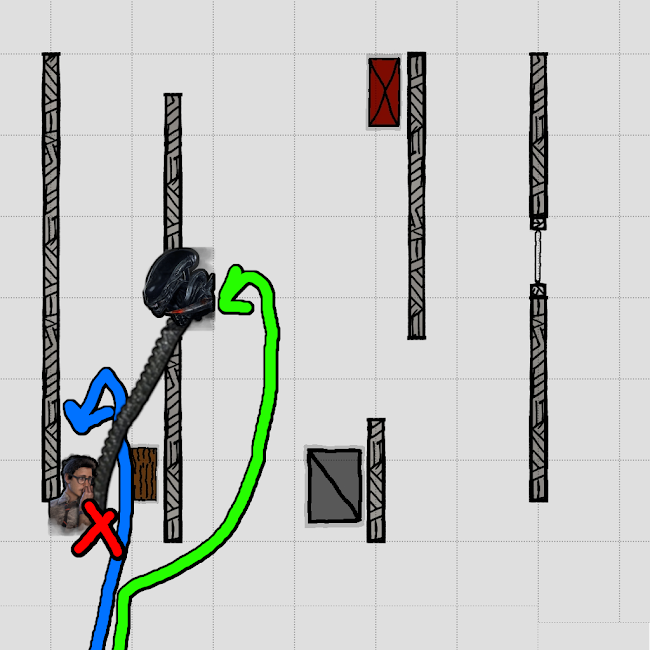
- Conversely, if the survivor makes a enough distance that they can vault the window safely, then we return to the FAKE OUT mindgame. Pretend to follow them around the wall, then double back when they double back. Either use this to line up a TAIL ATTACK or vault the window to gain distance for a hit.


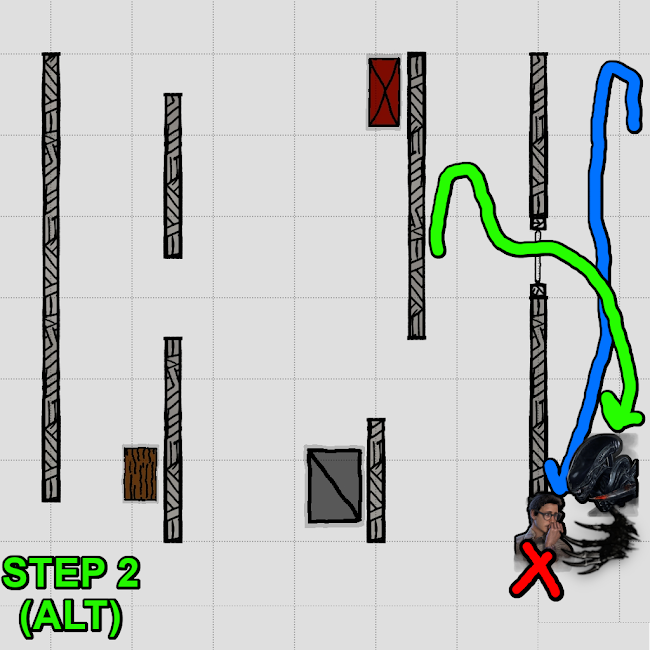
- WINDOW SIDE
- First thing’s first, if the survivor is within 4.8 meters, use a TAIL ATTACK to hit the survivor as they are locked into the vaulting animation or hit them over the window. Make sure to aim high to avoid the collision of the window itself.

- If the survivor has enough distance to fast vault safely, then you have multiple options based on where they go to next.
- If the survivor goes towards the pallet, vault after them. The reason you do this is because the pallet’s short side is facing you, so it is extremely weak on this side. Force the survivor into a lose-lose by going for a TAIL ATTACK at the pallet.

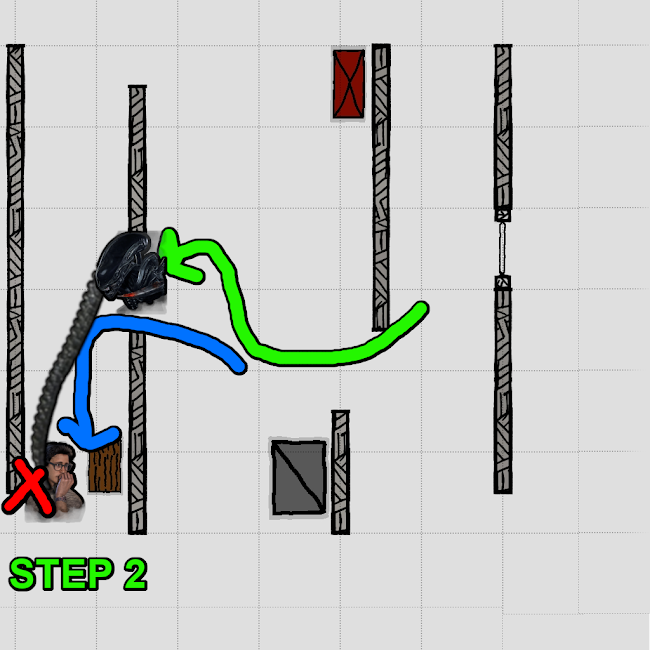
- If the survivor chooses to continue vaulting the long wall vault, follow them around the wall. This forces them to take a risky medium vault, that you can either basic attack or TAIL ATTACK (if they have good ping). Or this forces them to the center of the tile, in which you use the above strategy at the pallet.
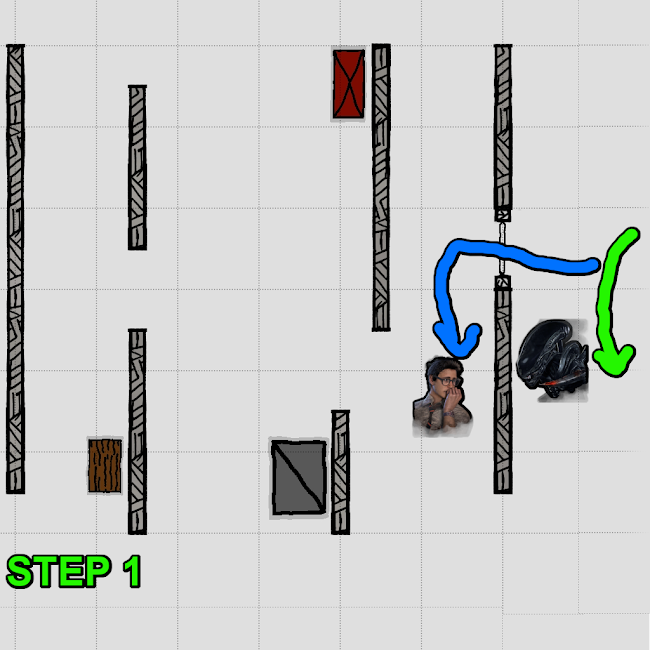
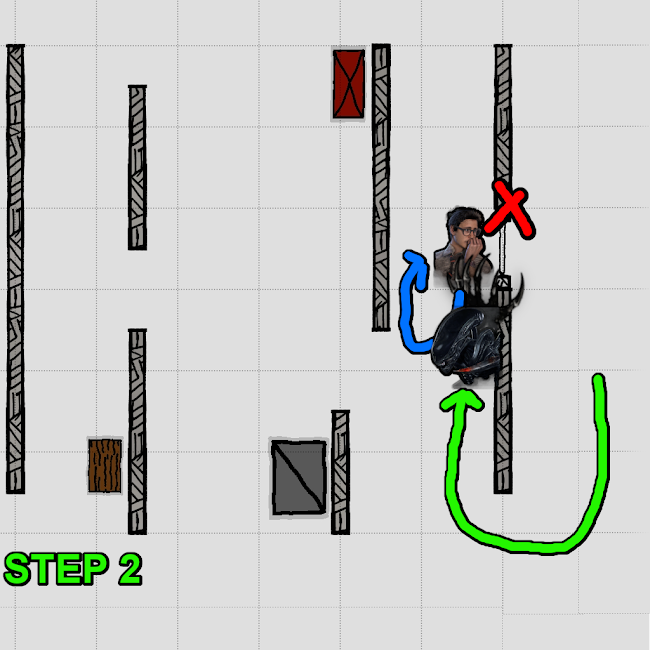
- I would actually NOT recommend using the FAKE OUT mind game when approaching from the outside of the window, as doing this mind game will just allow the survivor to make distance to the pallet instead.
L-WALL T-WALL
________________________________________________
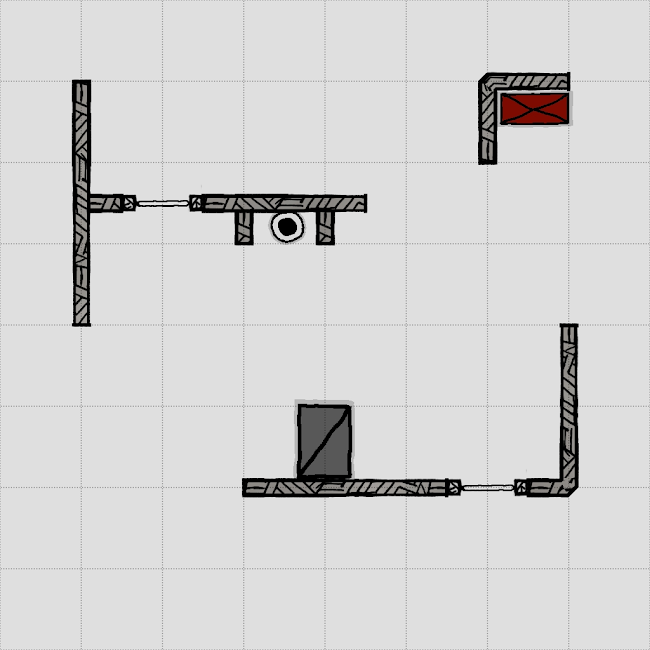
The L-Wall T-Wall is the weakest general tile that spawns in Dead by Daylight. Made up of one short L-Wall vault and a slightly stronger T-Wall vault, this loop does not leave the survivors with much to work with. However, the XENOMORPH actually makes this already weak tile, even weaker!
- The general point of looping an L-Wall T-Wall is to cut off the survivor from making a fast vault at either of the windows, putting them into a risky situation. Any killer in Dead by Daylight can do this by running counter clockwise and forcing the survivor to play the T-Wall. At this point, it is an easy hit.


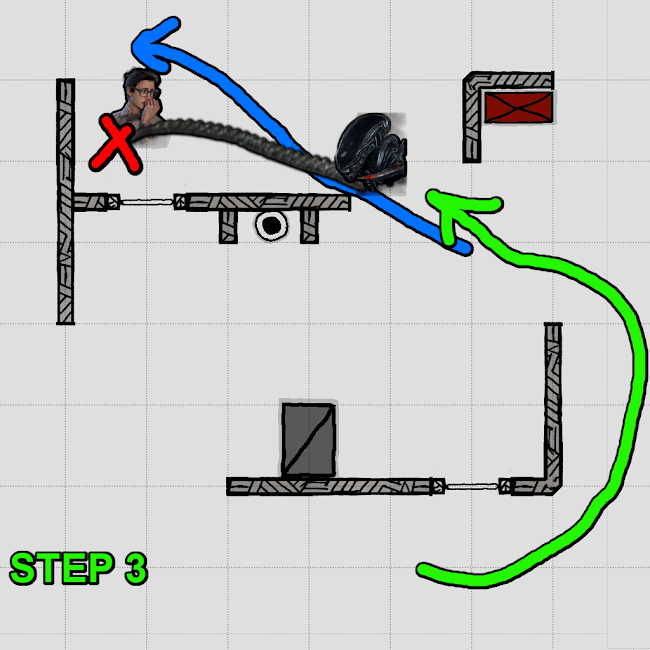
- However, the XENOMORPH is actually one of the few killers in Dead by Daylight that can actually play an L-Wall T-Wall clockwise. Baiting a survivor into taking the fast vault is good for you, as it is a locked animation that guarantees a TAIL ATTACK. This works at either window.
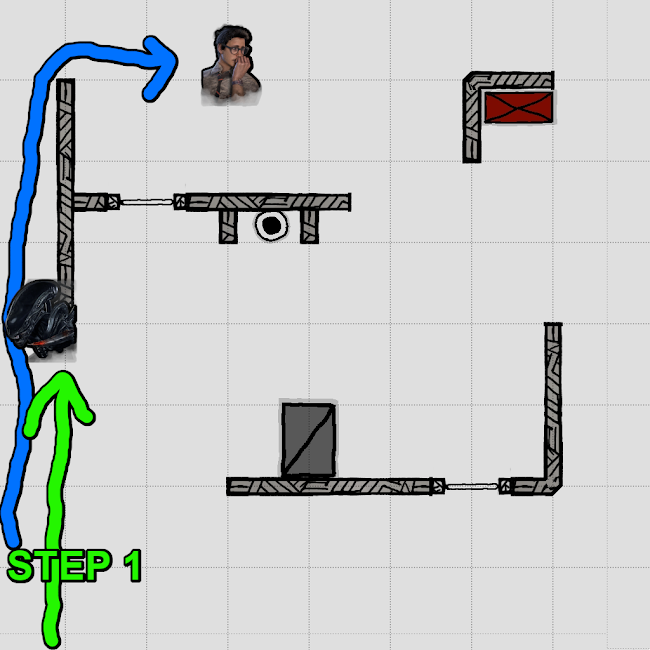

LONG WALL SHORT WALL
________________________________________________

The long wall short wall is a moderately weak tile. It’s a simple pallet with one long side and one short side, hence the name. With no window, this means that once the pallet is thrown, this is essentially a dead tile. Even before the pallet is thrown, the short side of the pallet makes the loop fairly unsafe.
- Firstly, within 4.8 meters of the survivor as they are passing by the pallet, go for a TAIL ATTACK to hit them.
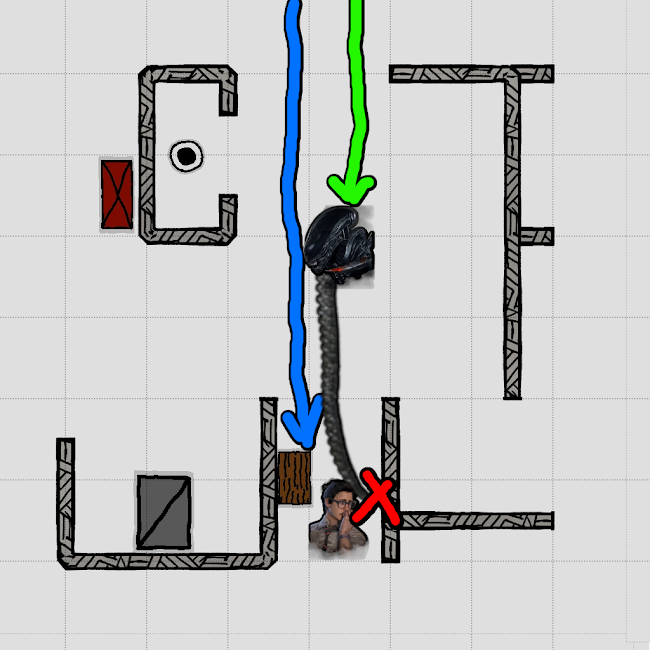
- Even if the survivor drops the pallet, go for a TAIL ATTACK as the survivor is dropping the pallet in the locked animation, or hit them over the pallet after they’ve dropped it.
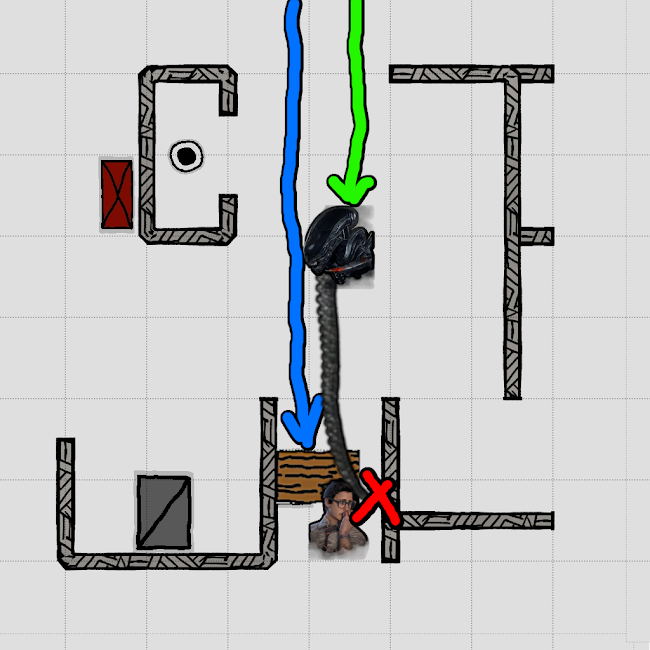
- If the survivor has enough distance on you and chooses to bypass the pallet, there are two possible plays.
- If the survivor takes the long wall side of the pallet, follow them and line up a TAIL ATTACK on the other side before they reach the pallet.
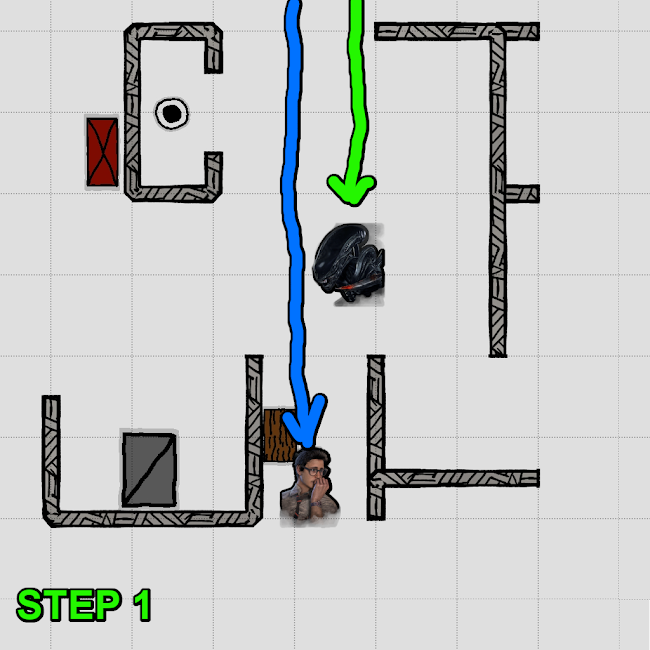
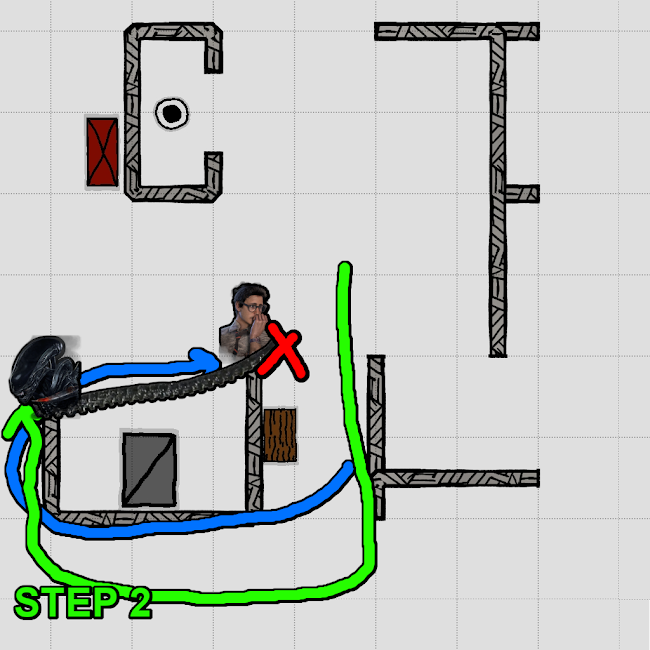
- If the survivor loops the short wall side of the pallet, they are in an even worse situation. Just follow them and go for a basic attack or TAIL ATTACK.
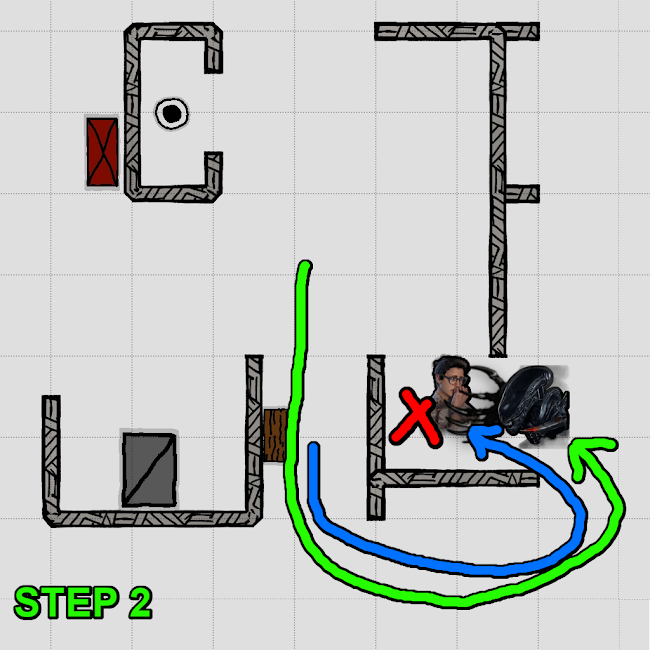
TRASH TILE
________________________________________________
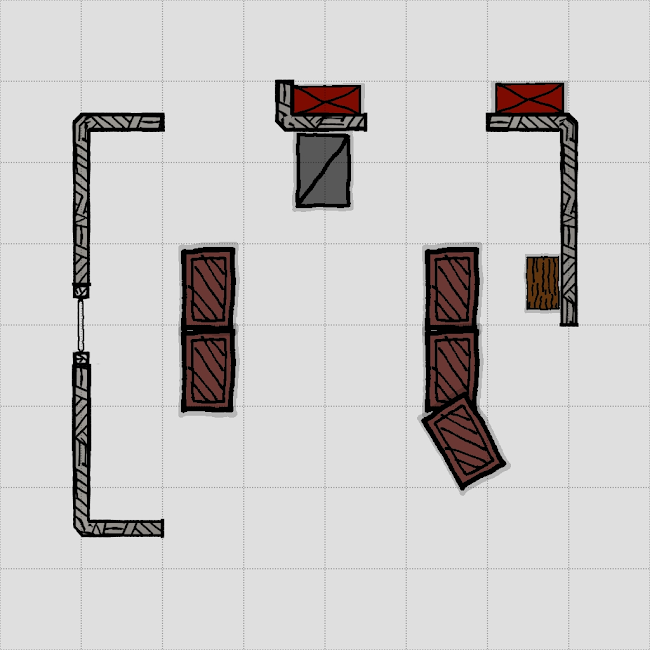
The trash tile is a moderately strong general tile with a long wall vault and an average strength pallet. The tile is named as such for the double trash pile that spawns in the middle of the tile. This tile is one that often gives killers trouble. However, the XENOMORPH has ways of dealing with it that other killers in Dead by Daylight do not.
- PALLET SIDE
- As is custom for any pallet in Dead by Daylight for the XENOMORPH, if the survivor is passing by the pallet at 4.8 meters, go for the TAIL ATTACK.

- Even if the survivor is able to make it to the pallet, TAIL ATTACK them in the locked animation of the pallet drop, or TAIL ATTACK them over the pallet right after they’ve dropped it.
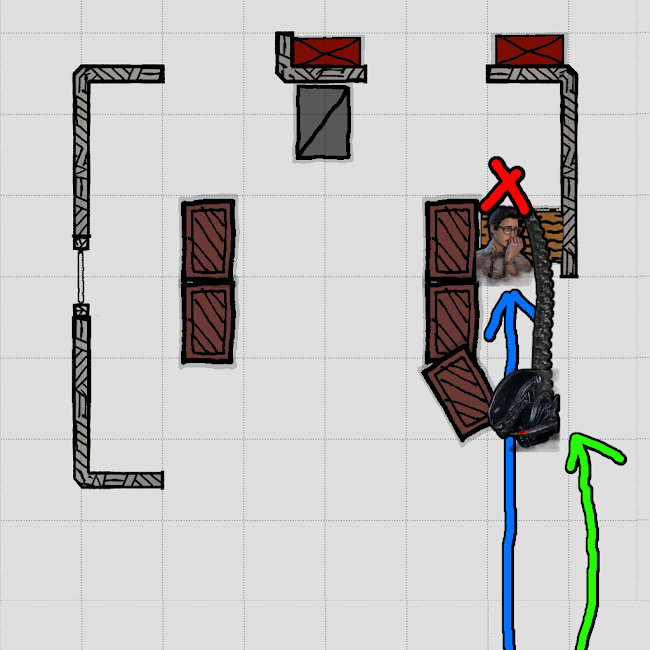
- If the survivor chooses to continue to loop the pallet here, it essentially just sets up this same shot over and over, so loop until you get it.
- However, if the survivor chooses to bypass the pallet and head towards the window, try to land a TAIL ATTACK before they make it behind the next trash pile.
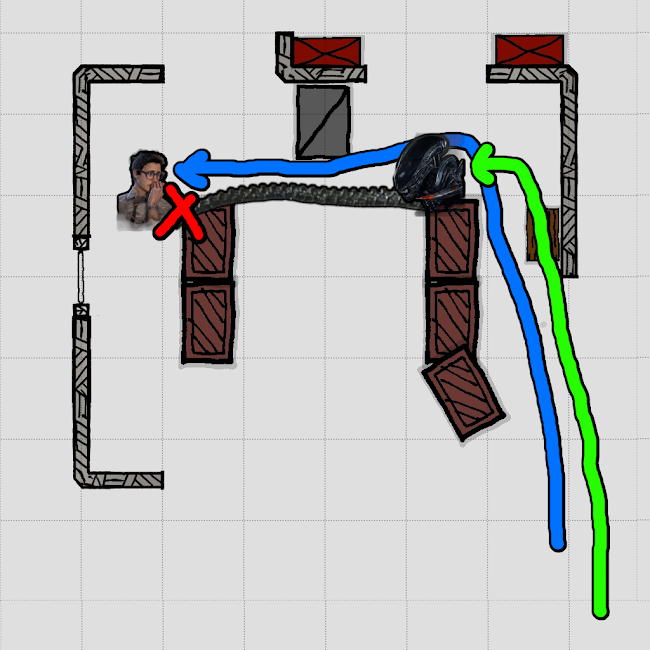
- If the survivor has too much distance and makes the window, you enter into our general long wall mind game. Fake going one direction and double back when the survivor does, then either go for a FAKE OUT shot or vault after them to gain distance.

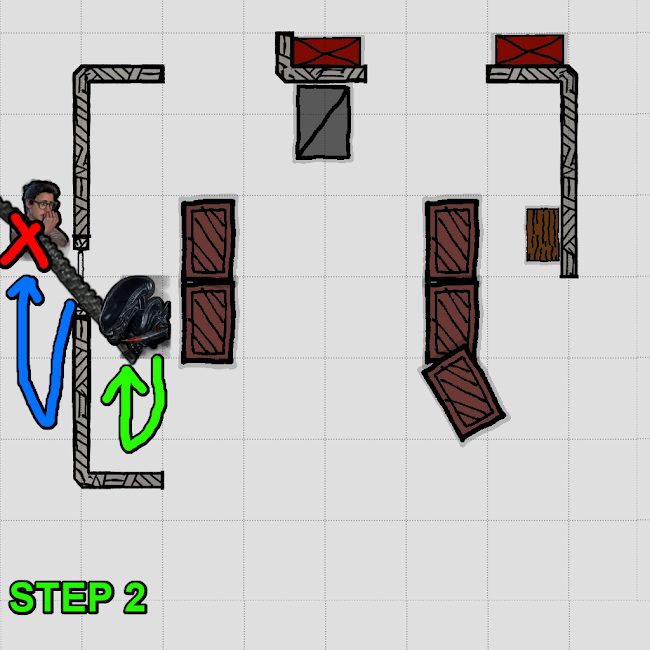
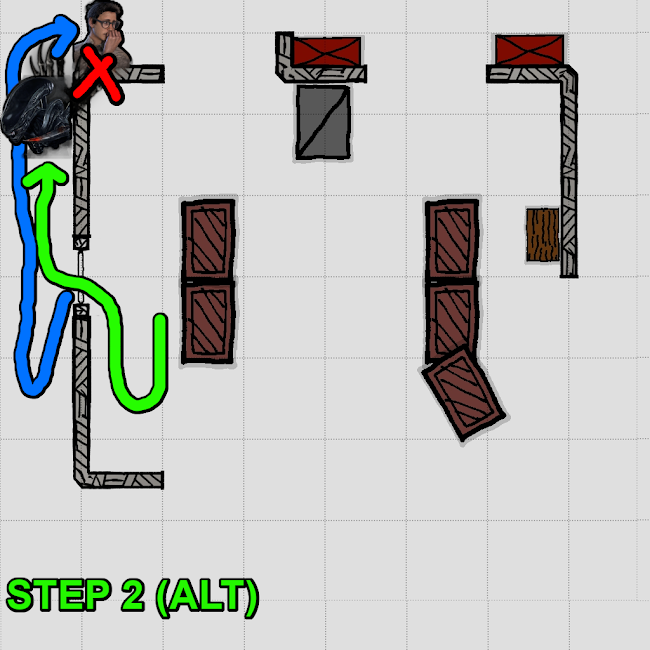
- WINDOW SIDE
- First thing’s first, if the survivor is within 4.8 meters, use a TAIL ATTACK to hit the survivor as they are locked into the vaulting animation or hit them over the window. Make sure to aim high to avoid the collision of the window itself.
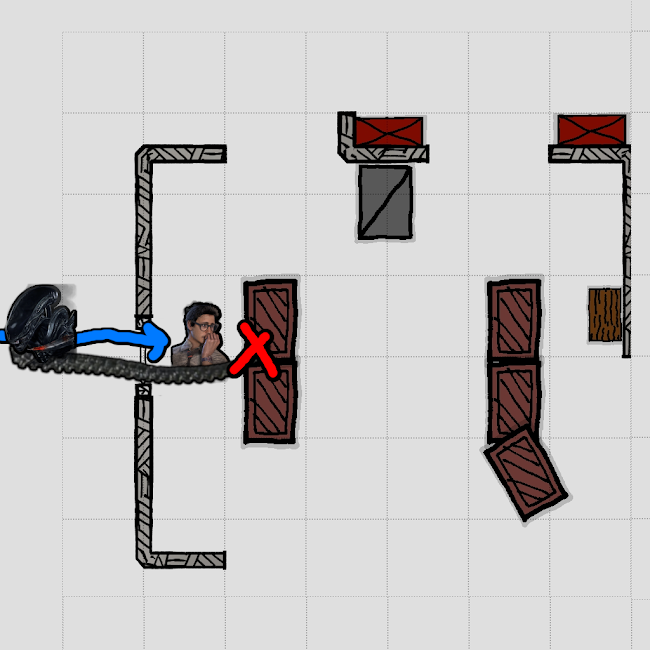
- If the survivor has enough distance to make the fast vault safely, how you play the window depends on what direction they decide to go afterwards.

- If the survivor opts to continue looping the long wall, vault after them and try to line up a TAIL ATTACK down the wall. If they have a lot of distance and can vault again, TAIL ATTACK through the window after them.
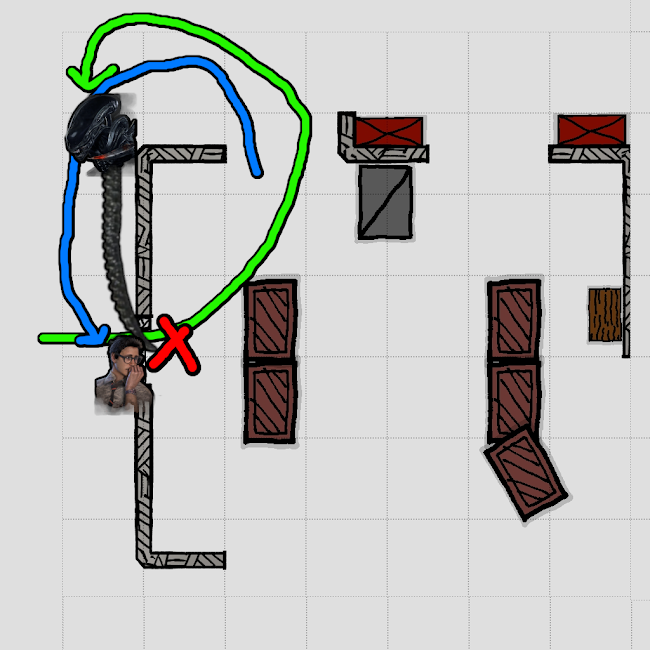
- I would NOT advise doing the FAKE OUT mind game here because a smart survivor will just opt to run towards the pallet with that extra distance.
- If the survivor opts to run towards the pallet, vault after them and begin the pallet plays that we highlighted previously.
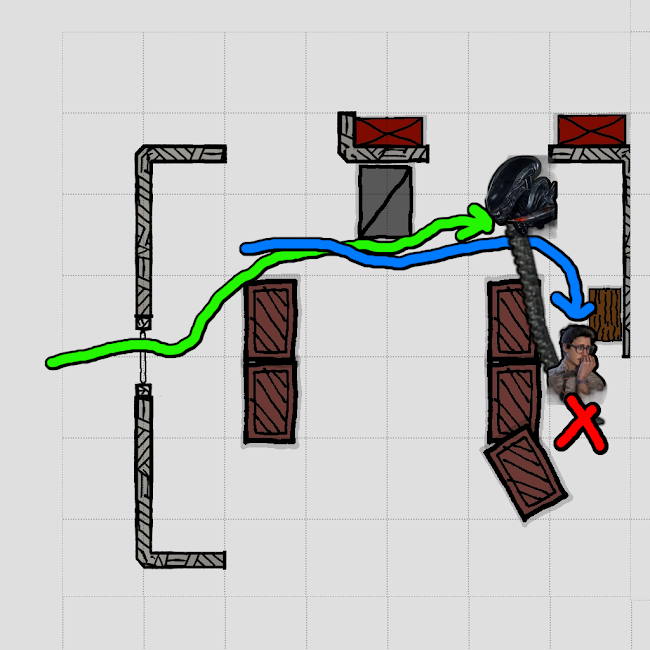
MAZE TILE
________________________________________________
The maze tile is a strange tile that appears on Ormond, Yamaoka, etc. It comes in two variations: Wolfpack and Lone Wolf. Wolfpack is the variation where the pallet and window are on the same side. The Lone Wolf variation is where the pallet and window are separated. The Wolfpack tile is the stronger variation, as it has an easy option to fast vault while also looping the pallet. The main strength in these tiles is that they are confusing and hard to identify from a glance, but we’ll help you loop them correctly!
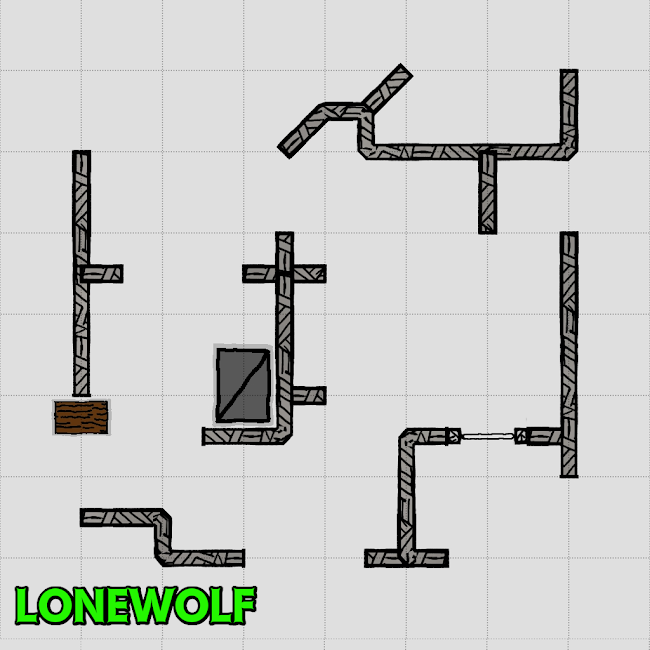
WOLFPACK VARIATION
- PALLET SIDE
- As is custom for any pallet in Dead by Daylight for the XENOMORPH, if the survivor is passing by the pallet at 4.8 meters, go for the TAIL ATTACK.
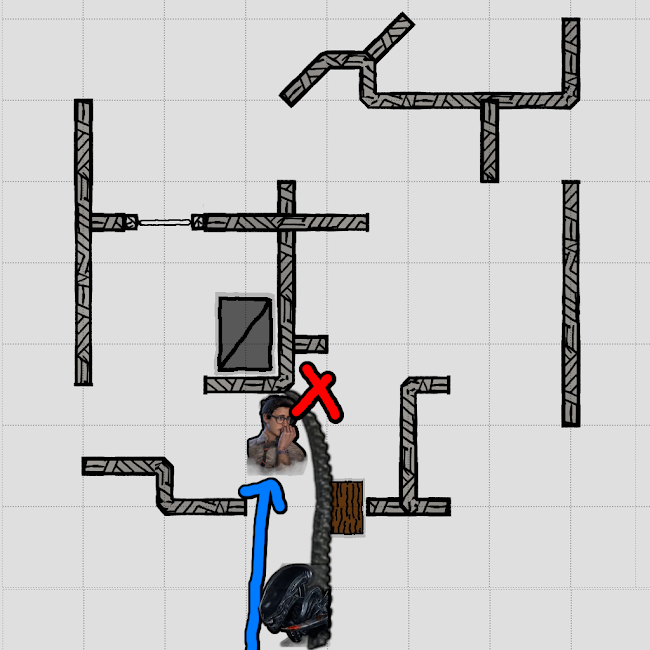
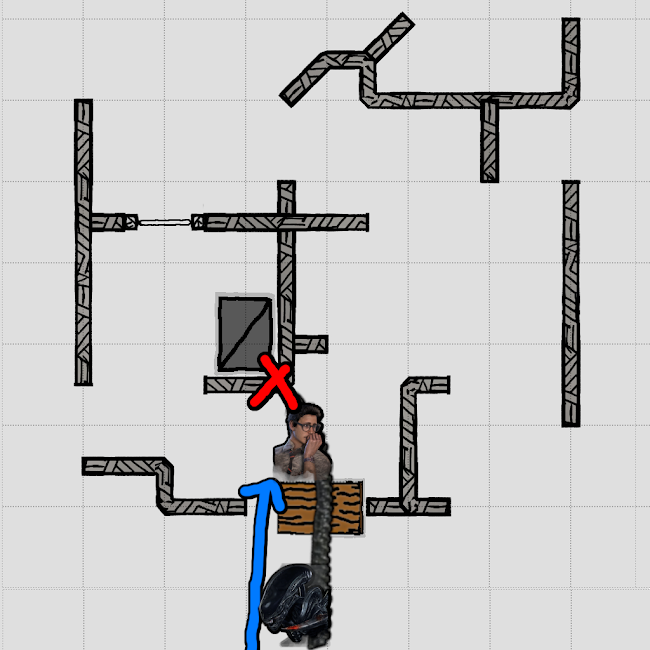
- Even if the survivor is able to make it to the pallet, TAIL ATTACK them in the locked animation of the pallet drop, or TAIL ATTACK them over the pallet right after they’ve dropped it.
- If the survivor has enough distance avoid the TAIL ATTACK, how you loop depends on which way they go afterwards.
- If the survivor opts to continue looping the pallet, this is an extremely weak option. You can easily catch up for a BASIC ATTACK.
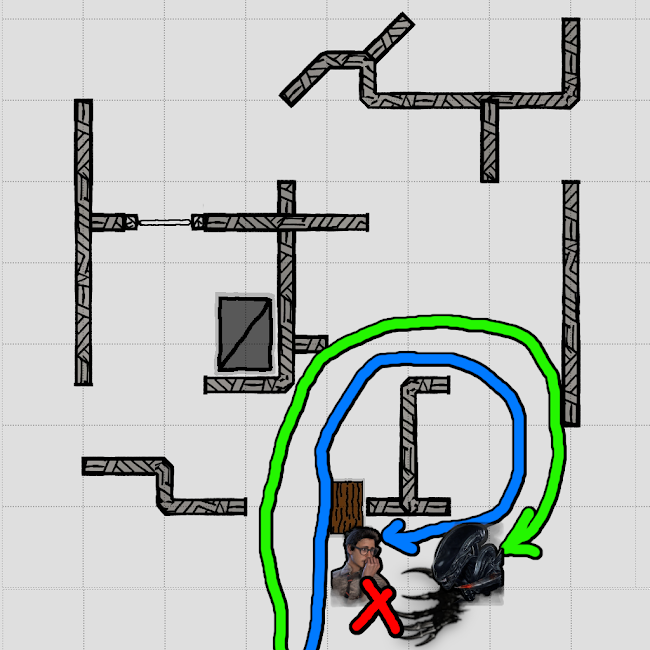
- If the survivor opts to go towards the window vault, follow them and attempt a TAIL ATTACK as they go through. As always, make sure to aim slightly high so you can avoid potentially hitting the window pane.

- If the survivor has enough distance to greed the pallet AND make the window vault, chase them around the right to force them away from the pallet, then you have two options:
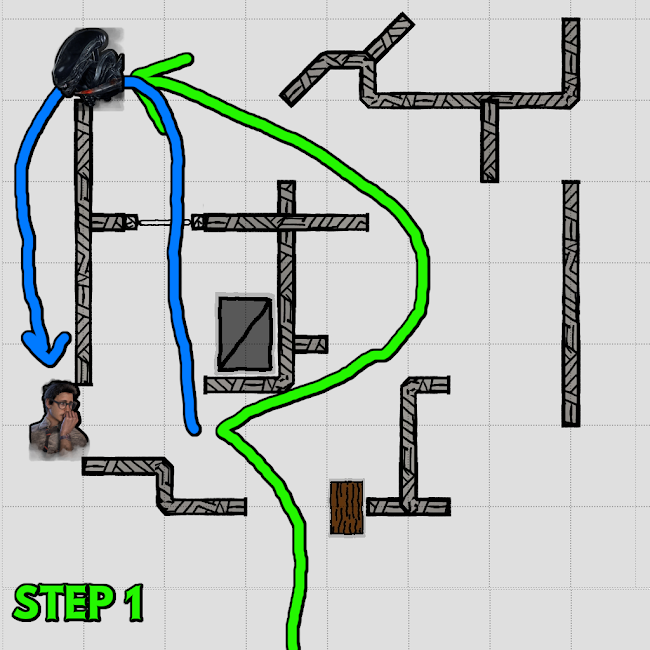
- If they attempt to vault the window again, go for a TAIL ATTACK as they go through the window.
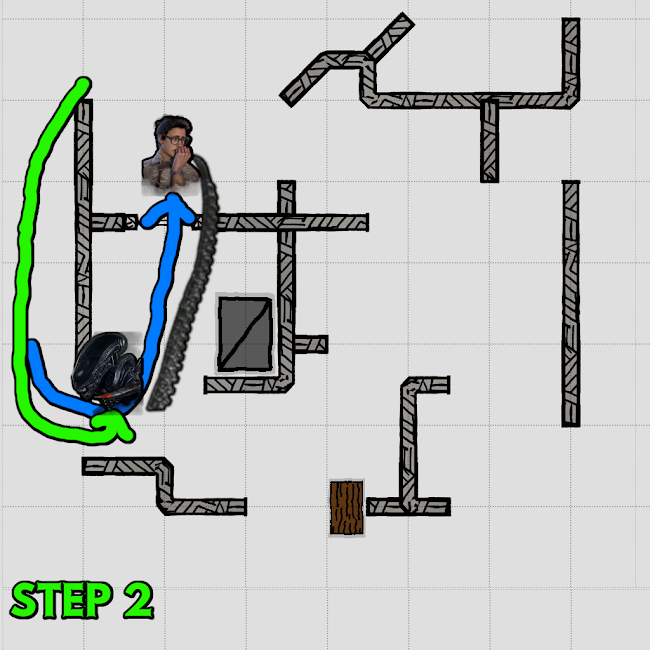
- If they attempt to loop the pallet, return to the pallet play we listed before. Attempt to hit them with a TAIL ATTACK as they go through the pallet or after dropping said pallet.
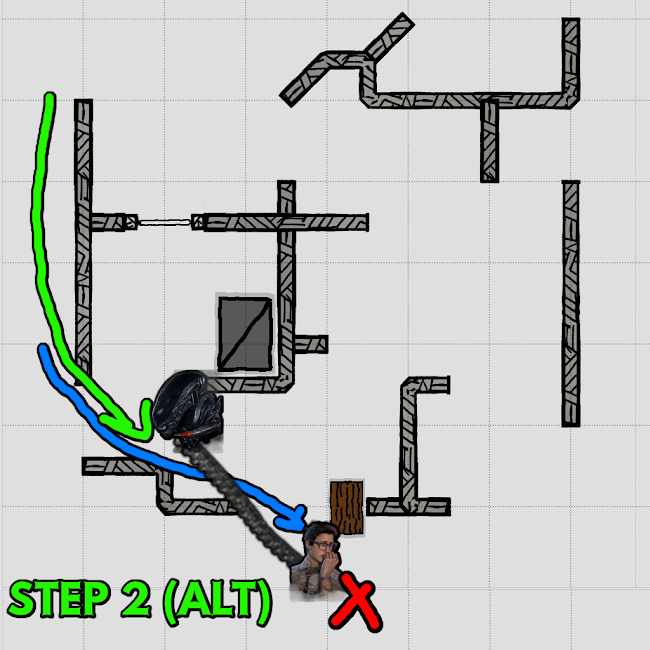
- If for some reason, the survivor greeds the pallet but opts to loop on the INSIDE of the tile, this is an easy situation. You can often simply get a BASIC ATTACK before they hit the window. If they somehow get the fast vault, just TAIL ATTACK over the window.
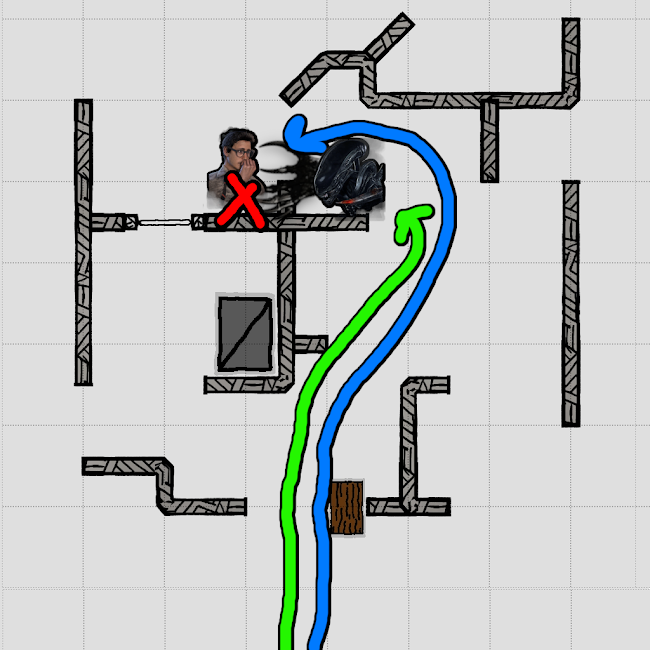
- WINDOW SIDE
- First thing’s first, if the survivor is within 4.8 meters, use a TAIL ATTACK to hit the survivor as they are locked into the vaulting animation or hit them over the window. Make sure to aim high to avoid the collision of the window itself.

- If the survivor has enough distance to make the fast vault safely, what you do next depends on which way they choose to loop afterwards:
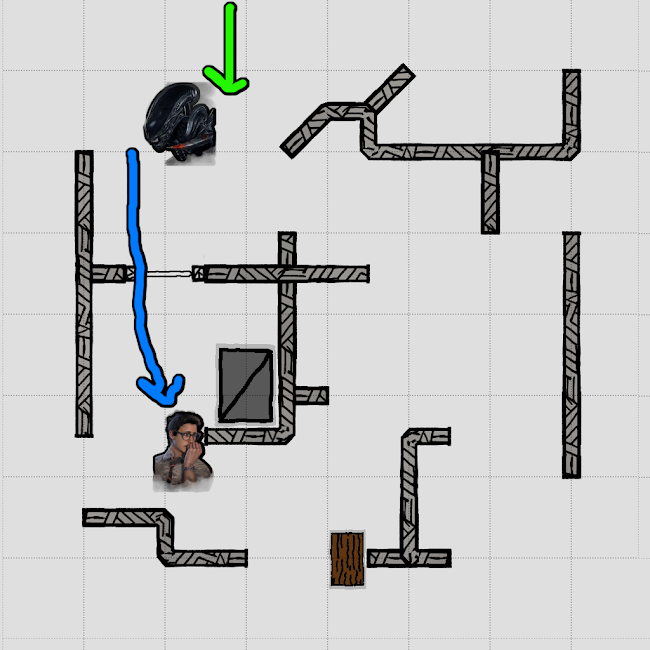
- If they choose to path into the center of the tile, enter the center of the tile yourself. This will force the survivor to play the window or the pallet.
- If they choose to play the window from the outside, simply follow them around and line up a TAIL ATTACK as they are going back to the window.


- If they choose to play the window from the inside, they are now pinned at the window.

- If they vault the window, double back and TAIL ATTACK them around the corner.
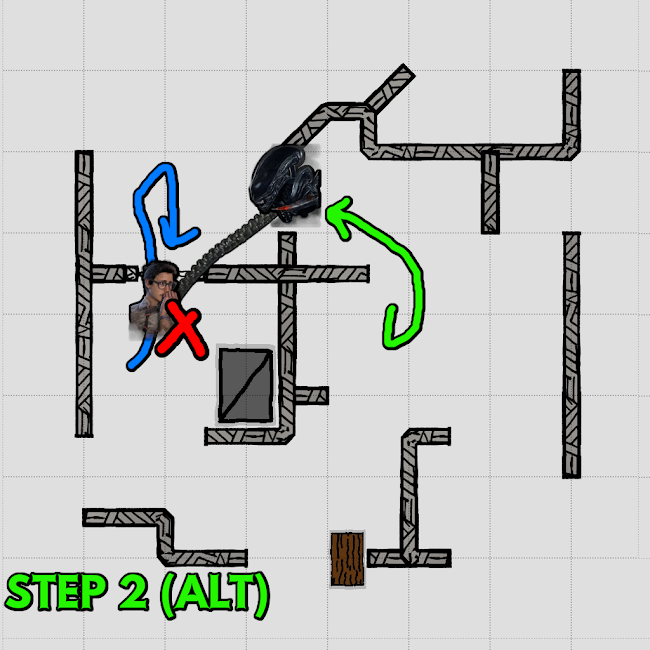
- If they try to double back and take the outside wall, they will not have enough distance to avoid a TAIL ATTACK when you follow them around.

- If they choose to play the pallet side, refer back to how we play the pallet. Either hit over the pallet or as they are going through it. Otherwise, line up a TAIL ATTACK as they go past said pallet.
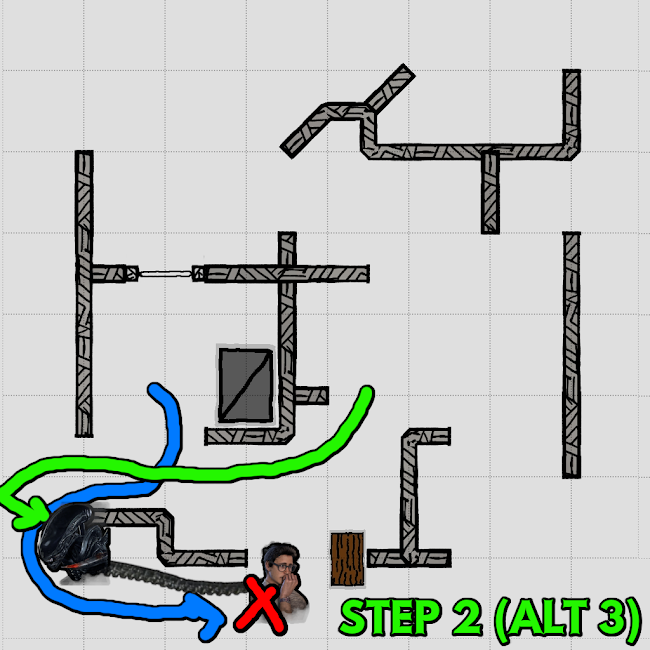
LONEWOLF VARIATION
- PALLET SIDE
- As is custom for any pallet in Dead by Daylight for the XENOMORPH, if the survivor is passing by the pallet at 4.8 meters, go for the TAIL ATTACK.
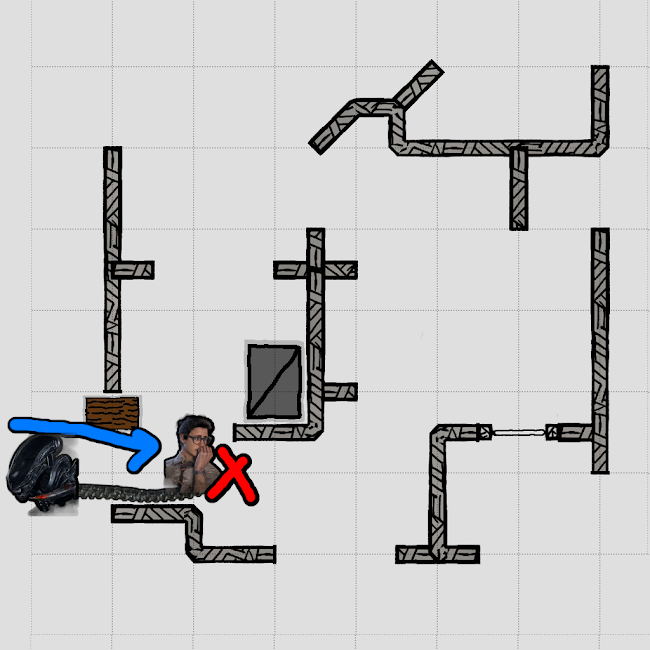
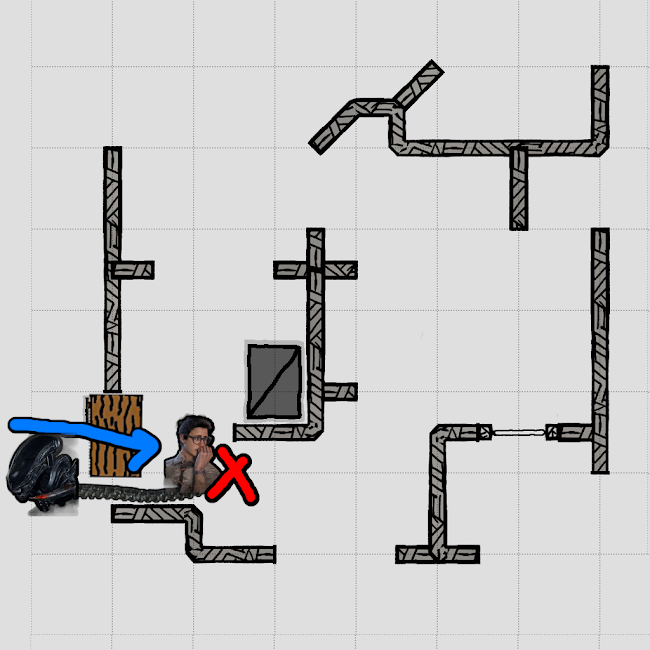
- Even if the survivor is able to make it to the pallet, TAIL ATTACK them in the locked animation of the pallet drop, or TAIL ATTACK them over the pallet right after they’ve dropped it.
- If the survivor has enough distance avoid the TAIL ATTACK, how you loop depends on which way they go afterwards.
- If they continue to loop the pallet on the long side, follow them and line up a TAIL ATTACK.

- If they continue to loop the pallet on the short side, just follow them and use a BASIC ATTACK.
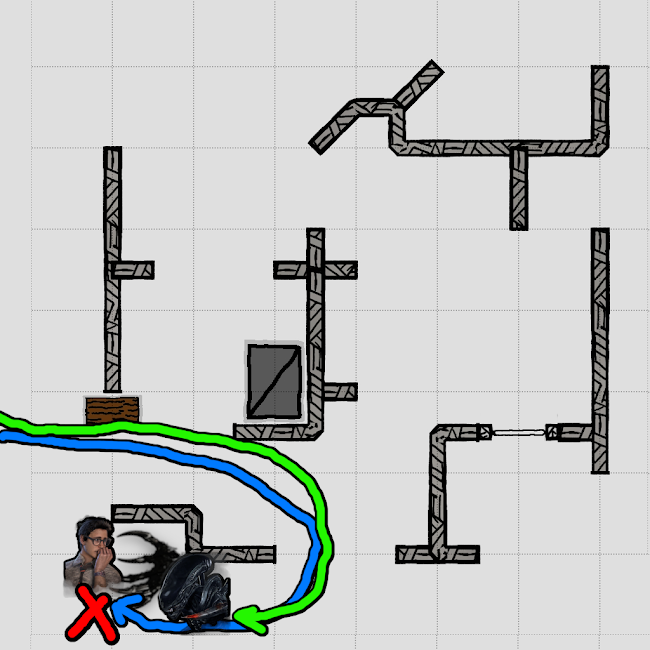
- If the survivor chooses to run to the window, follow them and TAIL ATTACK them before they can vault on either side.
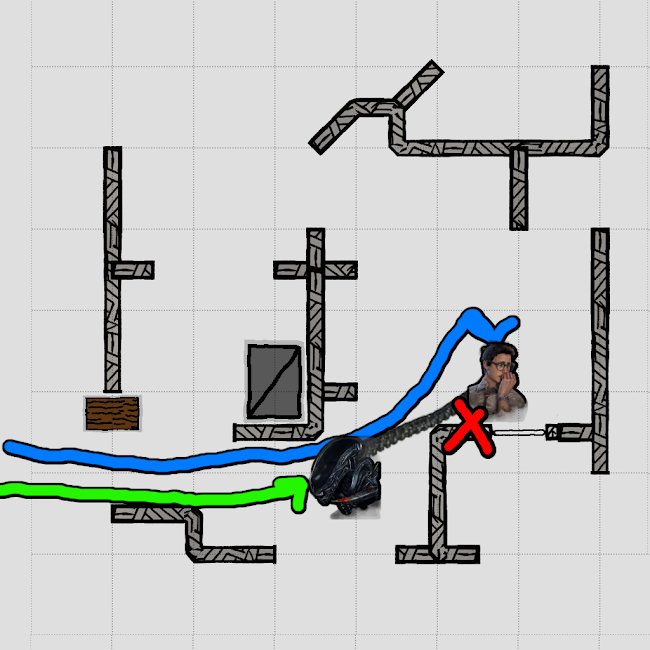
- WINDOW SIDE
- First thing’s first, if the survivor is within 4.8 meters, use a TAIL ATTACK to hit the survivor as they are locked into the vaulting animation or hit them over the window. Make sure to aim high to avoid the collision of the window itself.

- If the survivor has enough distance to make the fast vault safely, there’s not a whole lot they can do after. No matter which side they take, follow them around and force them back towards the window. While going through the window, they are vulnerable to a TAIL ATTACK.

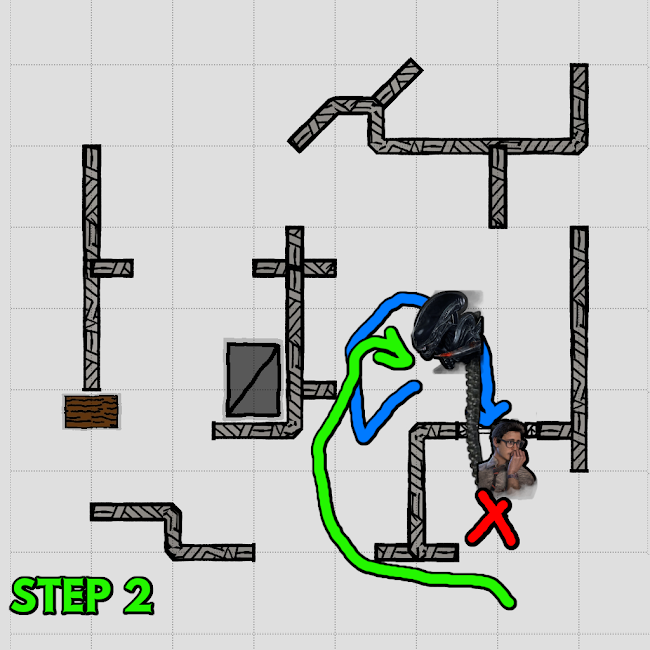
LOCKER GYM
________________________________________________

The locker gym is a tile that appears on maps like Red Forest, Ormond, etc. It is a singular long wall vault, accompanied by a pallet on the other side of the vault. This tile is fairly simple to run, especially when the pallet is out of the way. This one should not give you much trouble as THE XENOMORPH.
- PALLET SIDE
- As is custom for any pallet in Dead by Daylight for the XENOMORPH, if the survivor is passing by the pallet at 4.8 meters, go for the TAIL ATTACK.

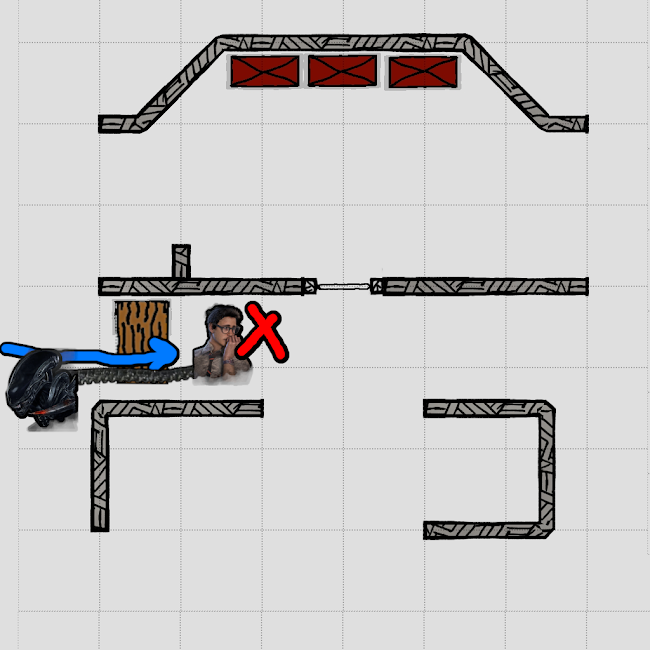
- Even if the survivor is able to make it to the pallet, TAIL ATTACK them in the locked animation of the pallet drop, or TAIL ATTACK them over the pallet right after they’ve dropped it.
- If the survivor is able to make enough distance to pass the pallet safely, what you do next depends on where they go.
- If they medium vault the window, do the FAKE OUT mindgame to pretend to go back to the pallet, then double back and vault the window. This will gain distance and where you can TAIL ATTACK at or over the pallet.
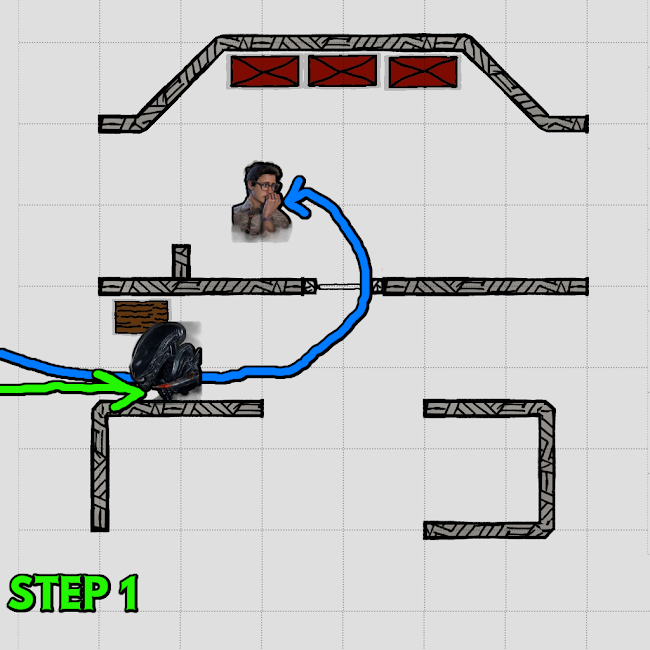
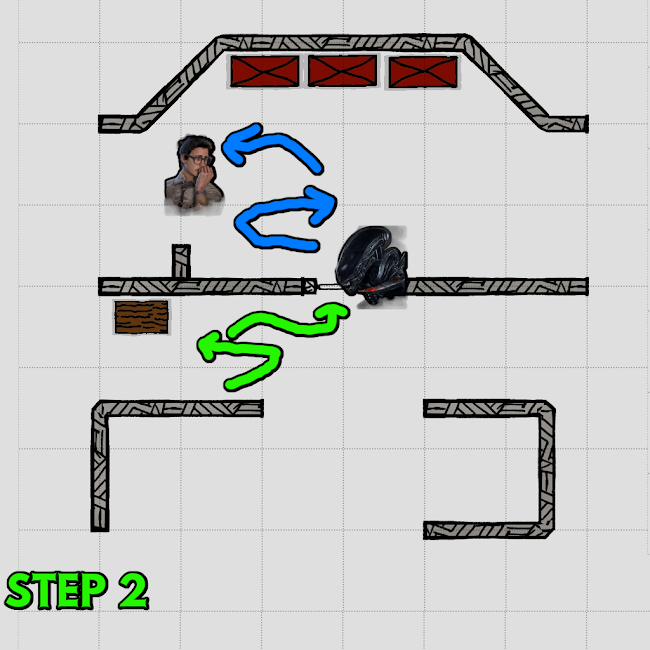
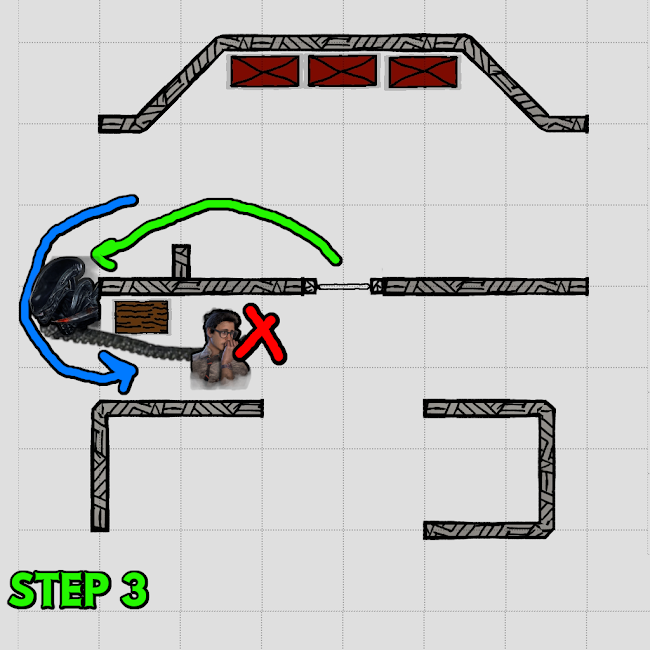
- Alternatively, you can attempt a FAKE OUT shot here. Repeat the beginning of the mind game by pretending to go back to the pallet and double back, but this time, attempt a TAIL ATTACK through the window. Remember, smarter survivors are less likely to fall for this
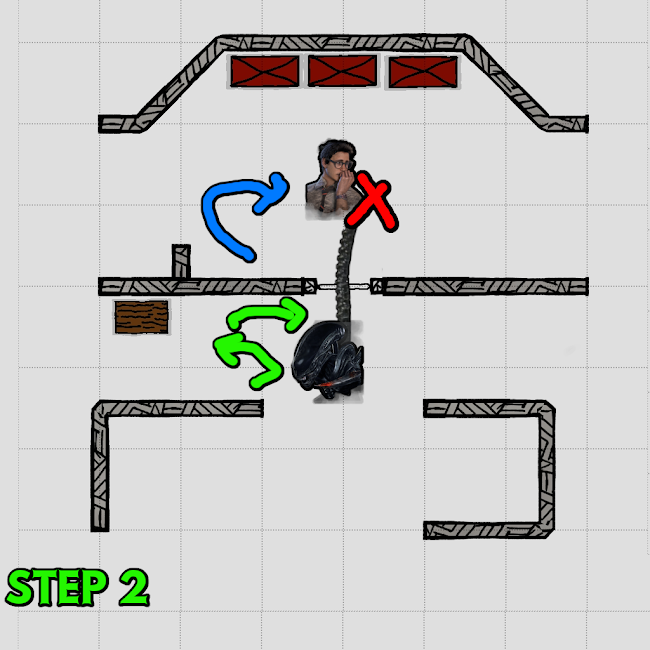
- If they loop around the long wall, they will not have enough time to make it back to the window without you using the TAIL ATTACK to hit them.
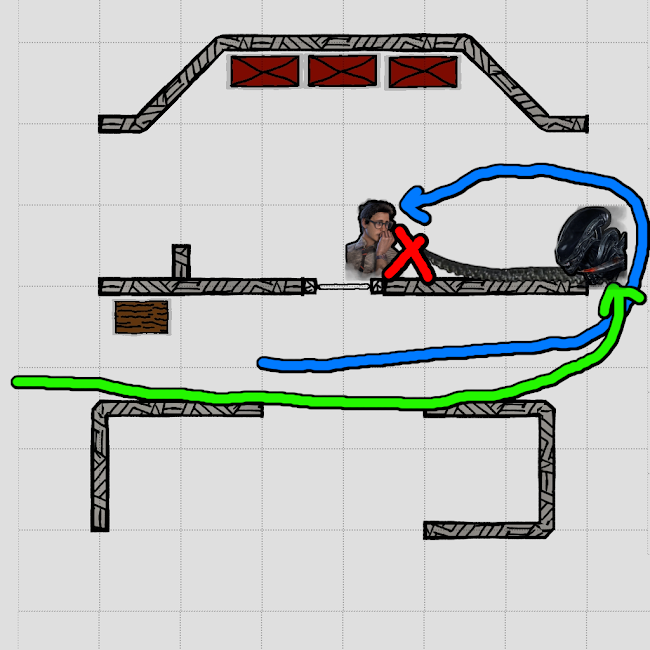
- If they choose to continue to loop the pallet side, follow them and line up a TAIL ATTACK at or over the pallet like before.
- WINDOW SIDE
- This part is relatively simple. Like always, if the survivor is within 4.8 meters, use a TAIL ATTACK to hit the survivor as they are locked into the vaulting animation or hit them over the window. Make sure to aim high to avoid the collision of the window itself.
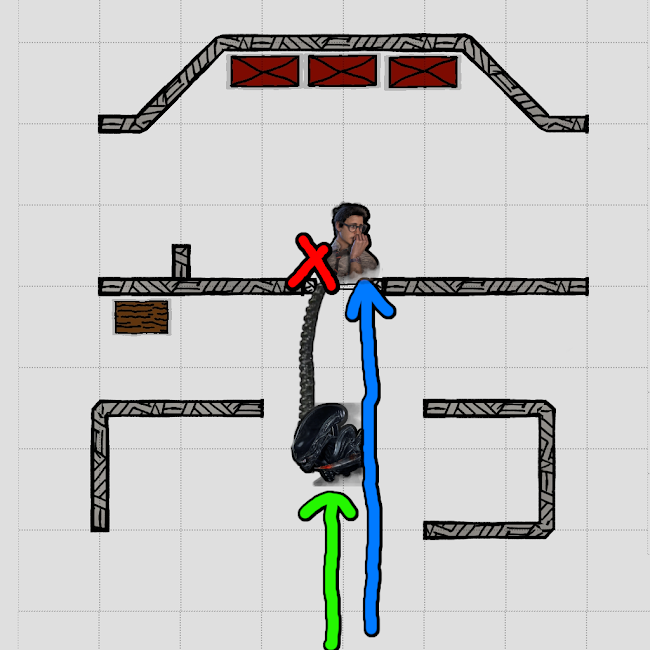
- If the survivor has enough distance to make the fast vault safely, you play the window differently depending on where they go next.
- If they try to run to the pallet, this is the same as if they had vaulted from the pallet side. Go for a FAKE OUT mindgame or a FAKE OUT shot like before.
- If they decide to keep looping the long wall, vault after them and line up a TAIL ATTACK. They will not be able to vault or reach the pallet safely before you can strike.
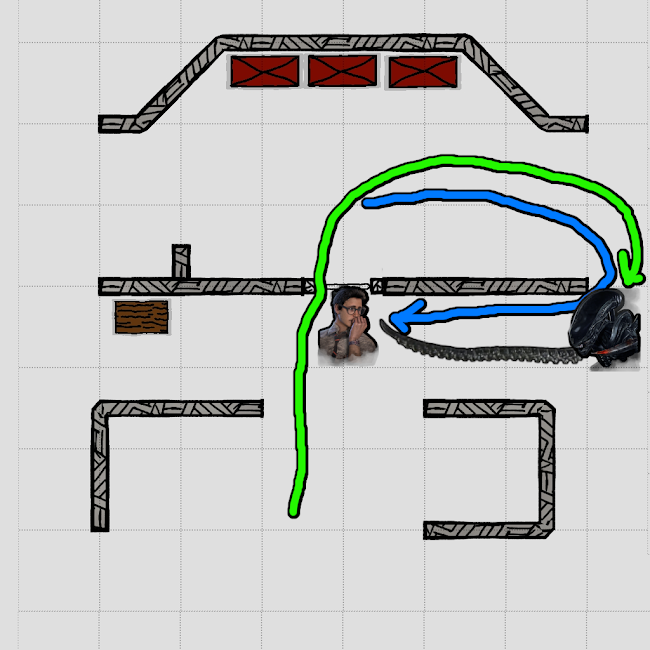
DOUBLE LONG WALL VAULT
________________________________________________
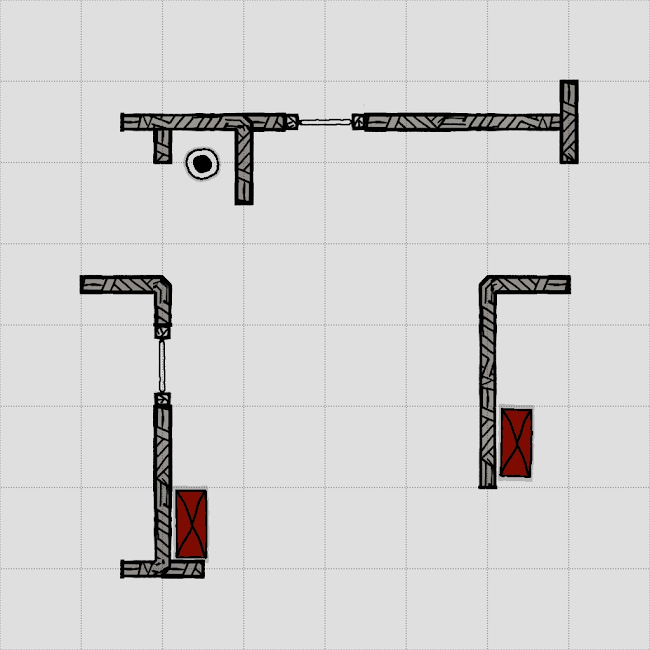
This loop is fairly new compared to the others on this list, but actually serves as one of the weaker general tiles in Dead by Daylight. With only two long wall vaults and no pallet to use, it essentially functions as an alternate L-Wall T-Wall tile. However, it is slightly more complex on how to deny the fast vaults, but still easy.
- If a survivor is looping the top wall, just like with an L-Wall T-Wall, follow the survivor counter clockwise in order to cut off a possible fast vault from being made.
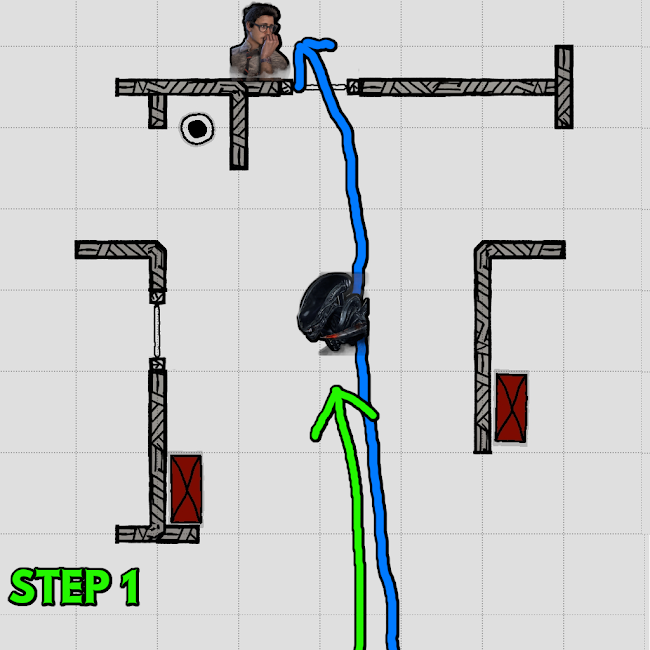


- If the survivor is looping the bottom long wall, run the loop clockwise to cut off the fast vault.
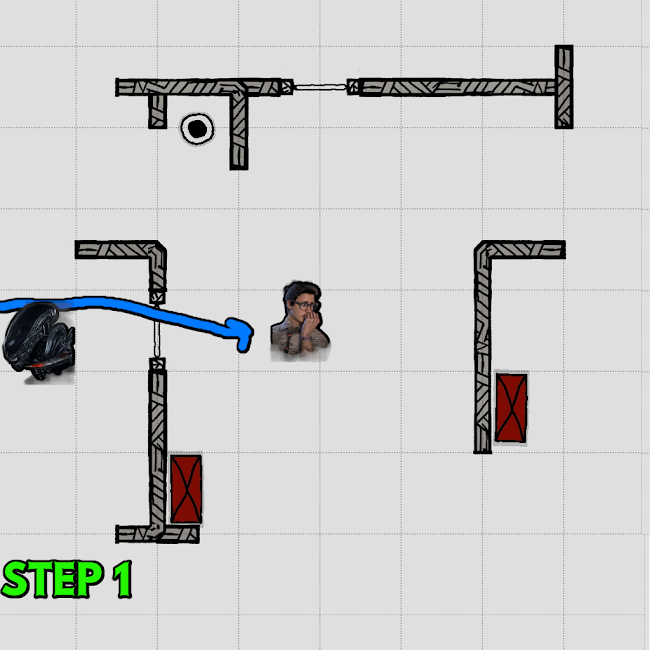
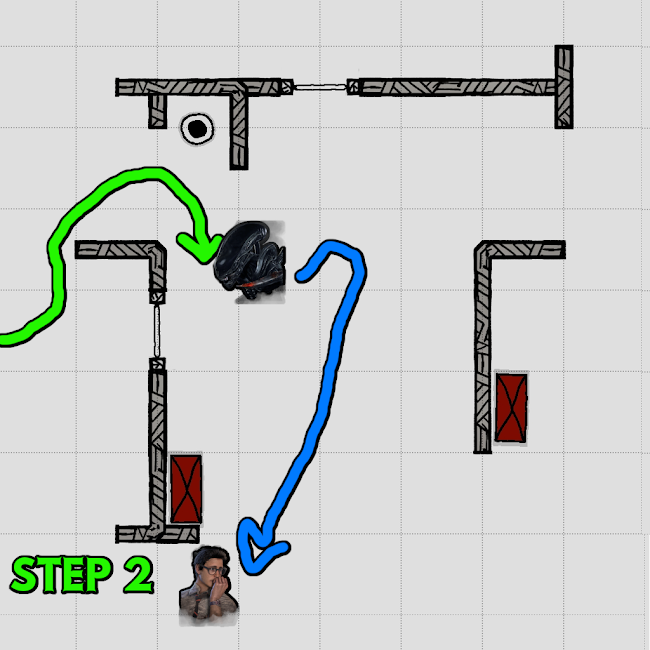

- Also, don’t forget the fundamental rule of windows with the XENOMORPH, if you are within 4.8 meters, there’s no reason not to go for a TAIL ATTACK over the window. Just remember to aim high to avoid collision.

VARIANT GYMS
________________________________________________
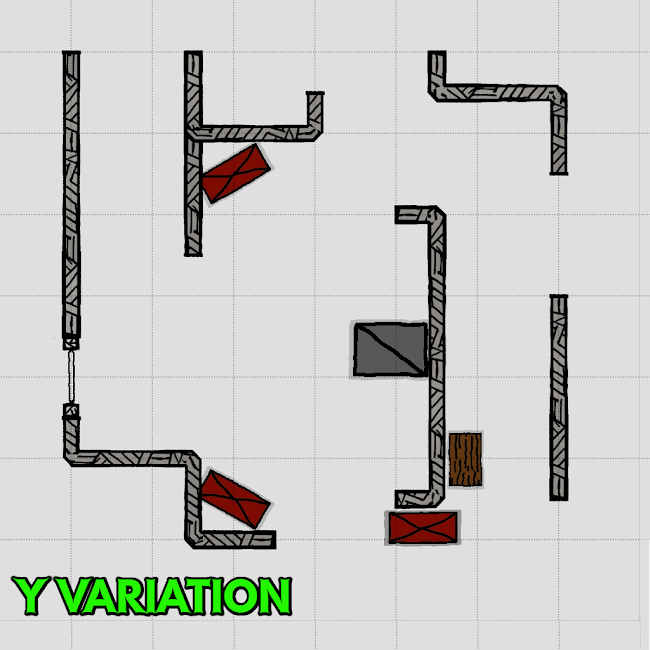
This loop is a moderately strong loop that shows up on many maps in Dead by Daylight. There are two variants to this (hence the name), a Y and a C variant. These are noted by the shape of the closest wall to the window vault. The window vault is short on one side, but long on the other. The pallet is moderately safe, making this a pretty solid tile for survivors.
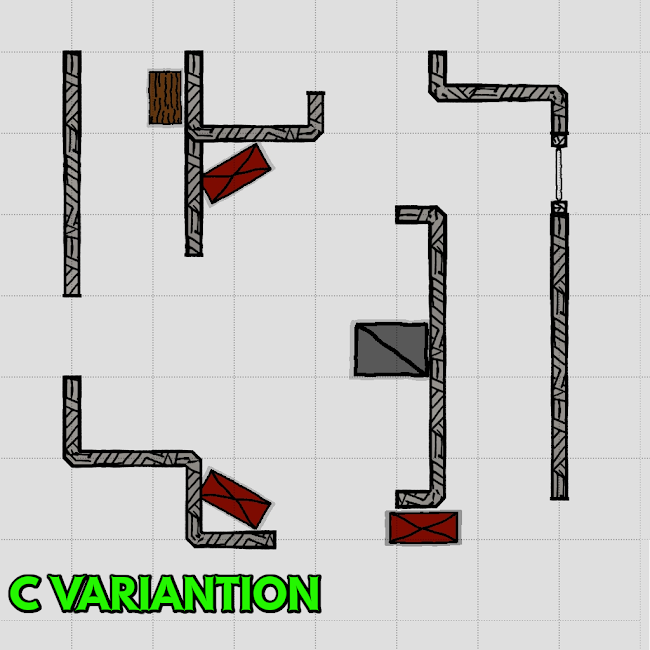
Y VARIATION
- PALLET SIDE
- As is custom for any pallet in Dead by Daylight for the XENOMORPH, if the survivor is passing by the pallet at 4.8 meters, go for the TAIL ATTACK.
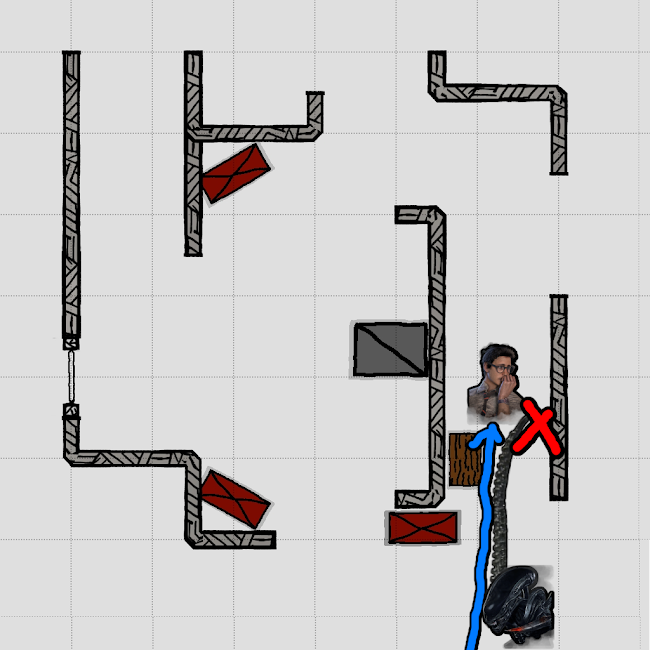
- Even if the survivor is able to make it to the pallet, TAIL ATTACK them in the locked animation of the pallet drop, or TAIL ATTACK them over the pallet right after they’ve dropped it.

- If the survivor has enough distance to safely pass by the pallet, how you chase them depends on where they go:
- If they continue to loop the pallet, follow after them and line up a TAIL ATTACK when they come back around to the pallet.
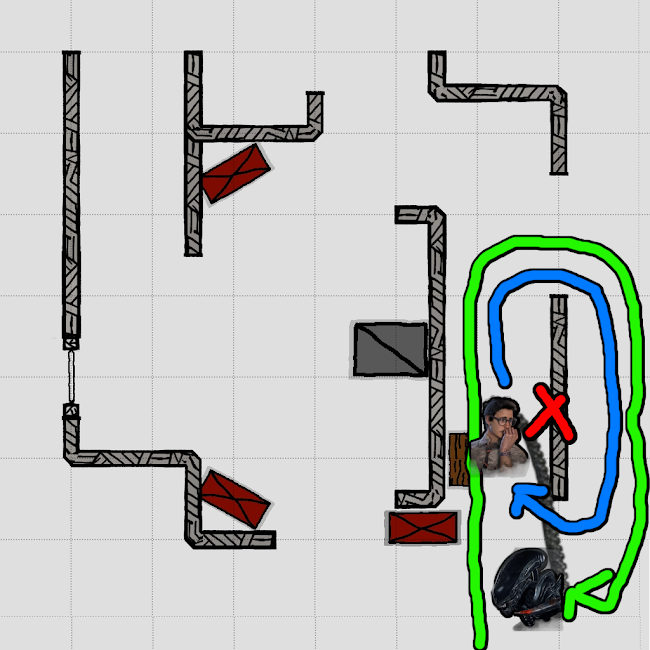
- If they path to the window, follow after them and try to TAIL ATTACK as they go through the window. Be careful, the survivor may bait you here so be patient.

- WINDOW SIDE
- Like always, if the survivor is within 4.8 meters, use a TAIL ATTACK to hit the survivor as they are locked into the vaulting animation or hit them over the window. Make sure to aim high to avoid the collision of the window itself.

- If the survivor has enough distance to make the fast vault safely, how you chase depends on where the survivor goes next:
- If the survivor decides to loop the long side of the vault, vault after them and force them to attempt a medium vault. TAIL ATTACK them as they attempt this.

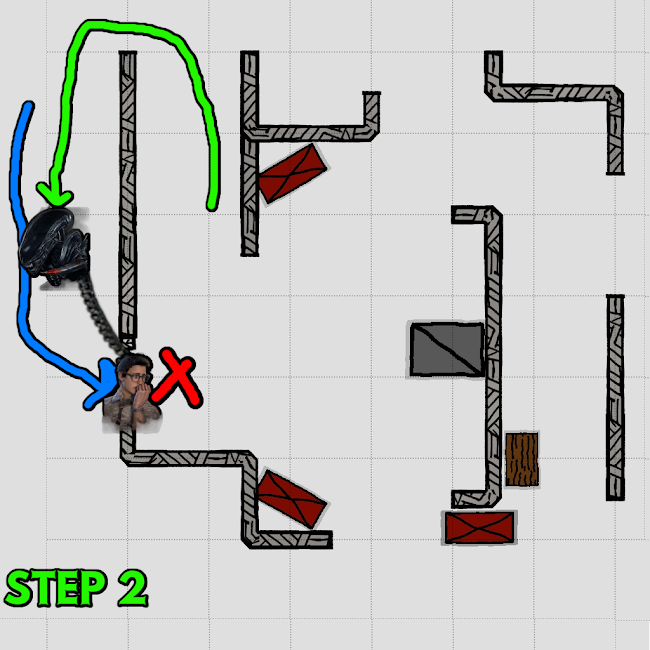
- If the survivor decides to loop the short side of the vault, follow around the short side and force the survivor back through the vault. From this point, you should be familiar with what comes next. Go for a FAKE OUT mindgame to gain distance, or go for a FAKE OUT shot.

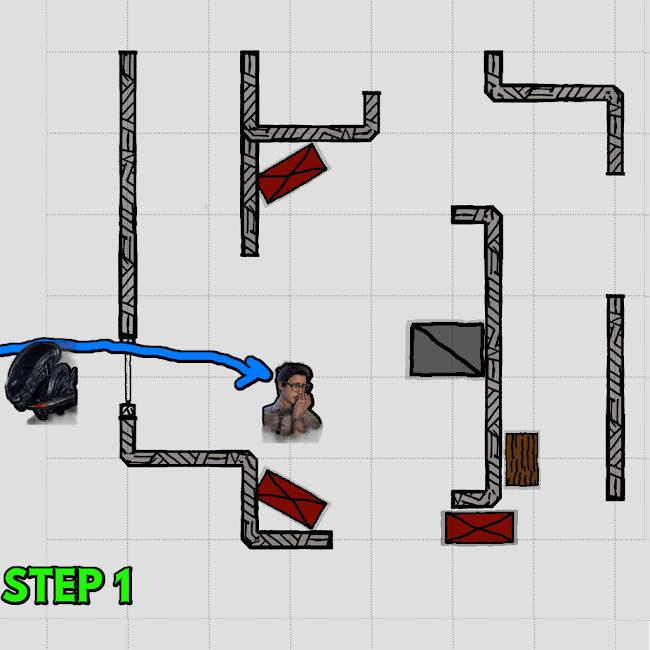
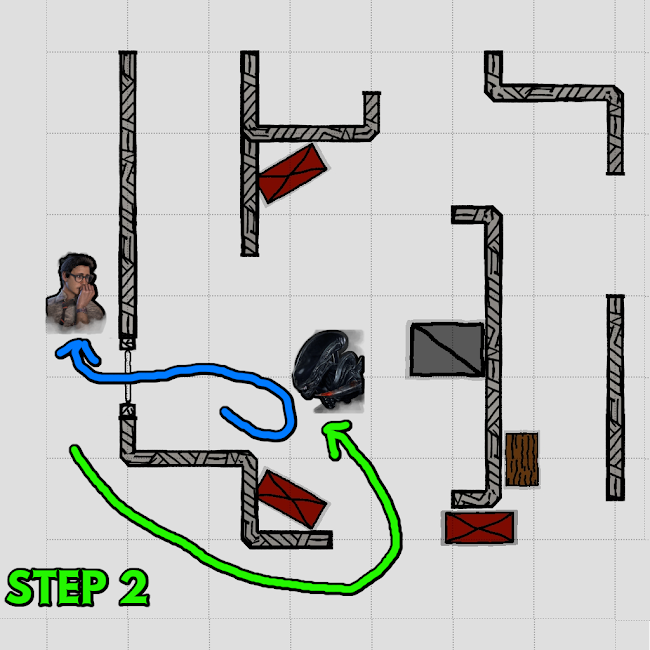
- If the survivor decides to run towards the pallet, go around the short side of the vault and line up a TAIL ATTACK at the pallet.
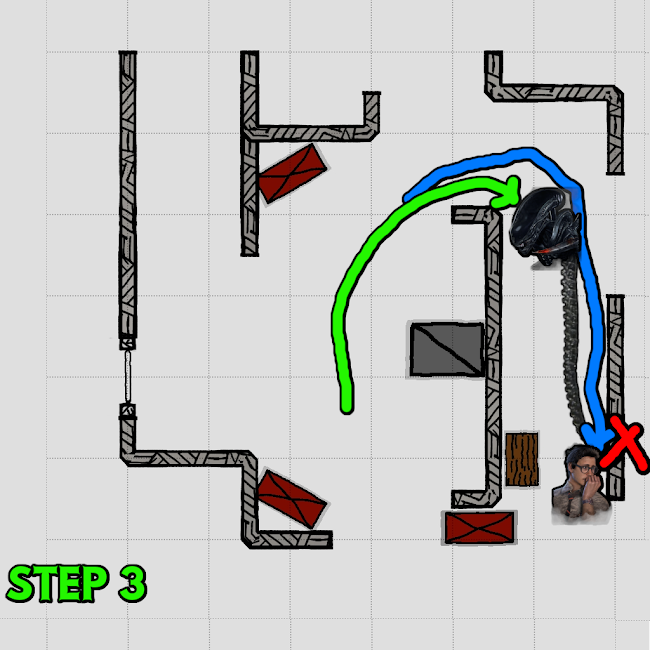
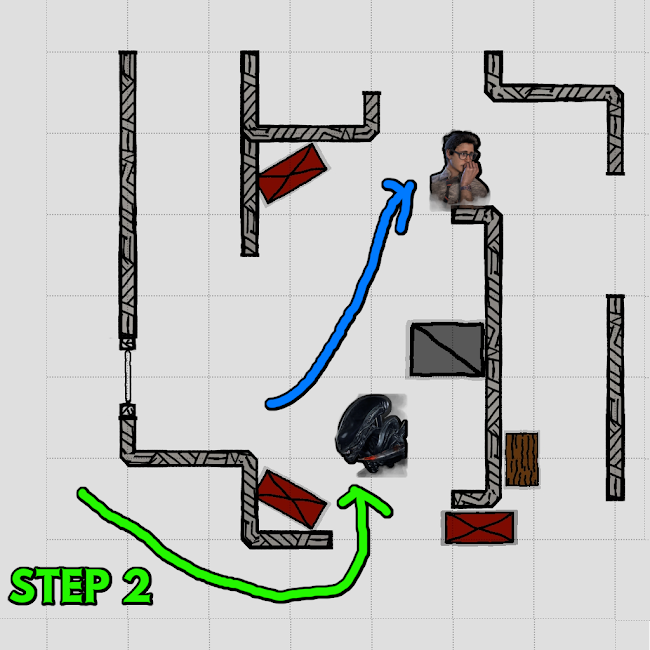
C VARIATION
- PALLET SIDE
- As is custom for any pallet in Dead by Daylight for the XENOMORPH, if the survivor is passing by the pallet at 4.8 meters, go for the TAIL ATTACK.
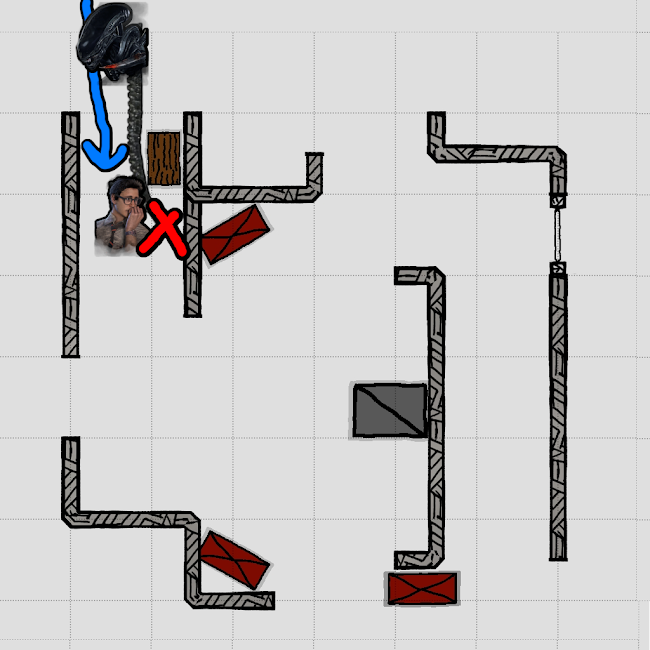
- Even if the survivor is able to make it to the pallet, TAIL ATTACK them in the locked animation of the pallet drop, or TAIL ATTACK them over the pallet right after they’ve dropped it.

- If the survivor has enough distance to safely pass the pallet, how you chase next depends on where they go:
- If the survivor continues to loop the pallet on either side, follow them and line up a TAIL ATTACK.
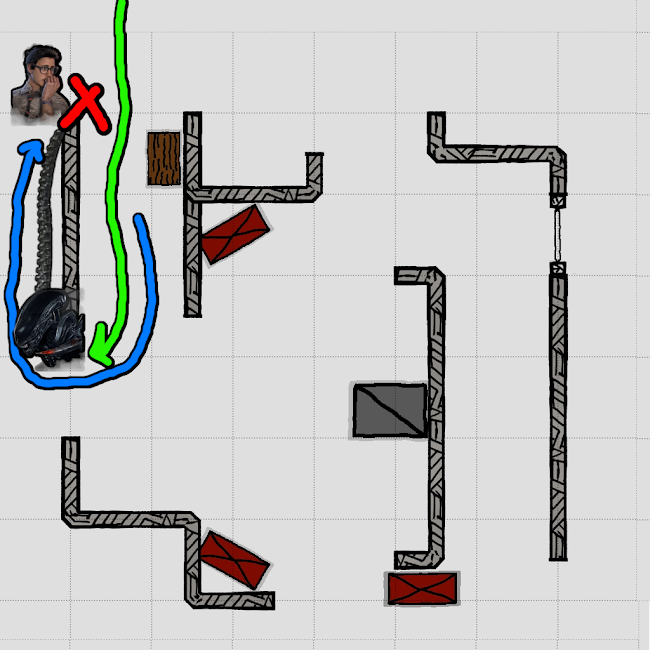
- If the survivor tries to make it to the window, follow them and TAIL ATTACK them as they go through the window. Be careful, they may try to bait your TAIL ATTACK here, so be patient.
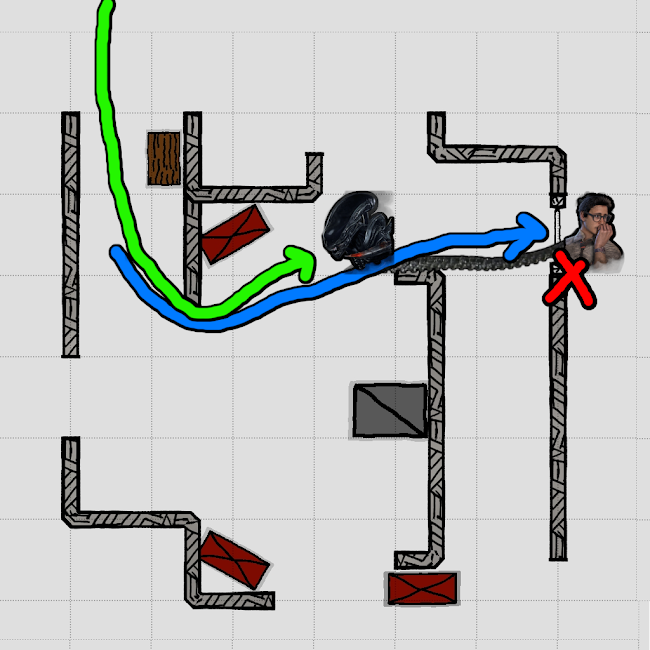
- WINDOW SIDE
- Like with windows in general, if the survivor is within 4.8 meters, use a TAIL ATTACK to hit the survivor as they are locked into the vaulting animation or hit them over the window. Make sure to aim high to avoid the collision of the window itself.
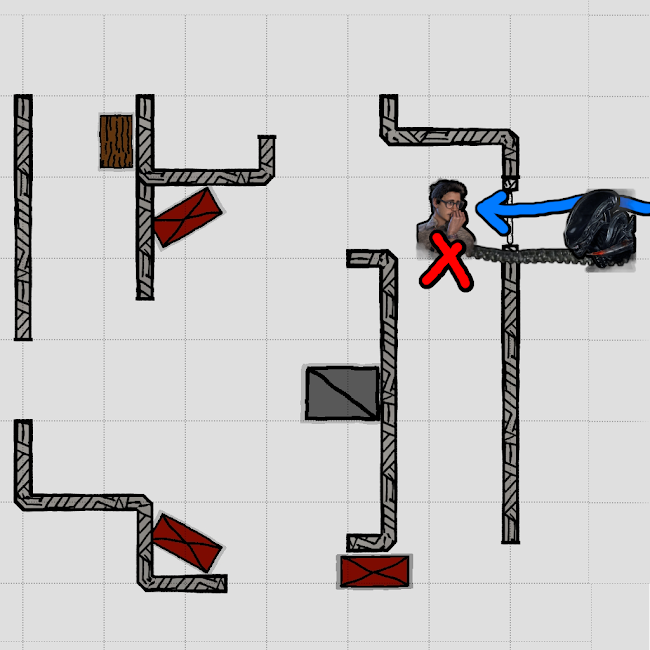
- If the survivor has enough distance to safely make the fast vault, what you do next depends on which way the survivor goes:
- If the survivor loops the short side of the window, go the short side as well and force them back through the window. From there, commence with your FAKE OUT mindgame or your FAKE OUT shot.
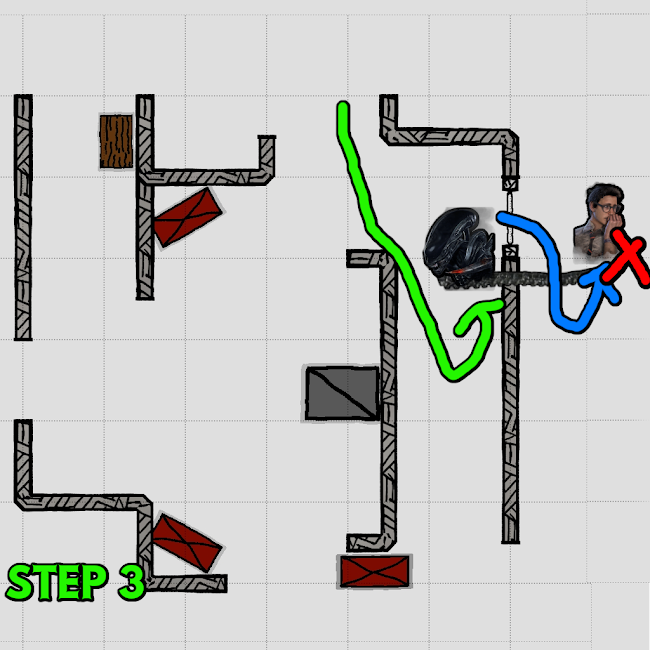


- If the survivor loops the long side of the window, vault after them and then line up a TAIL ATTACK on the other side of the wall.
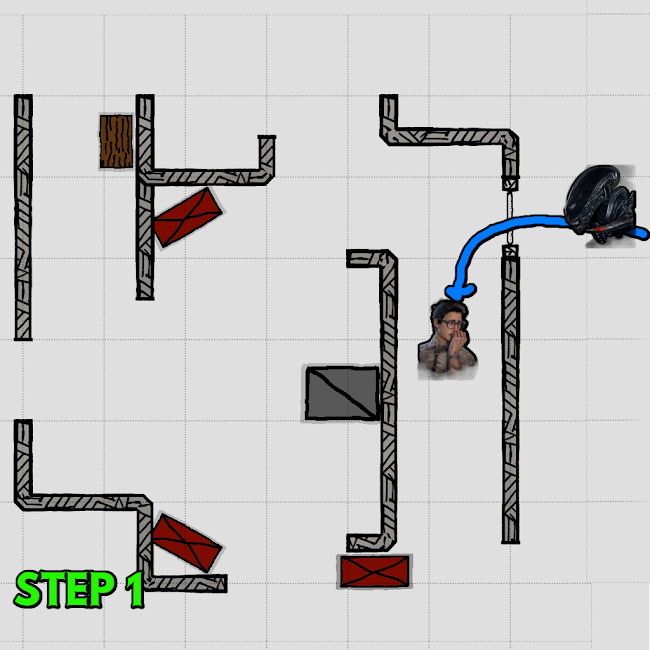
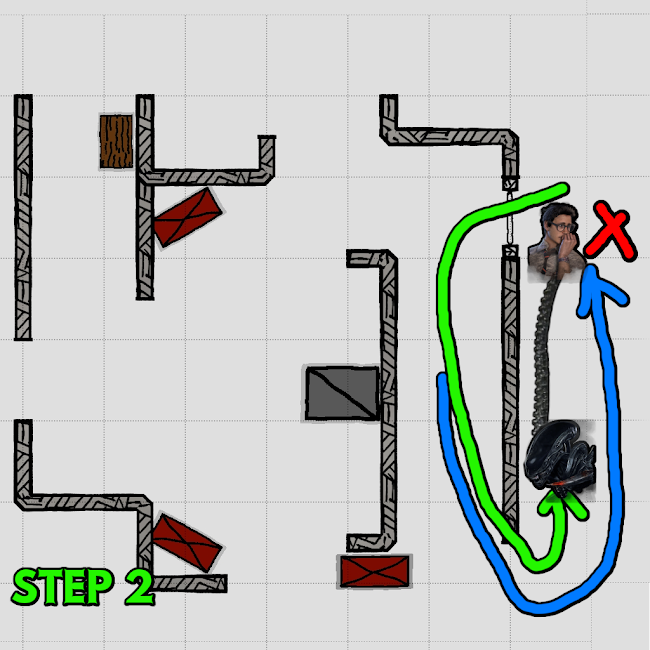
- If the survivor paths towards the pallet, follow around the short side of the window and force a TAIL ATTACK at the pallet.
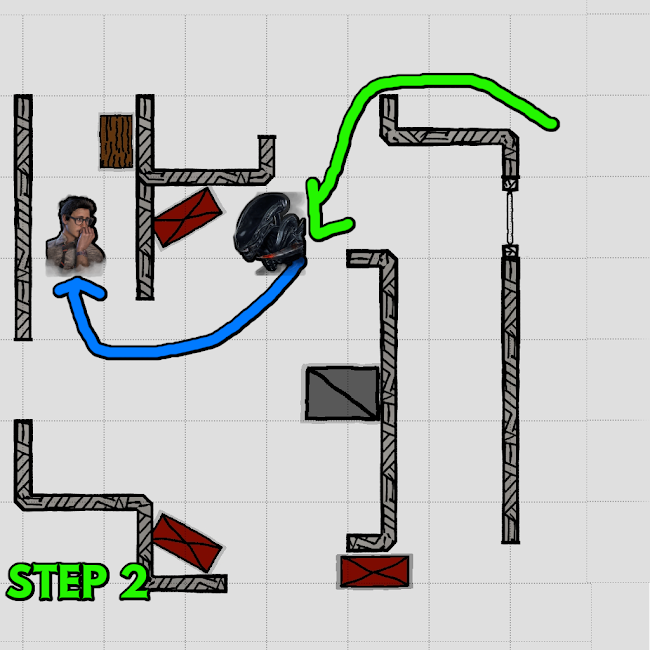

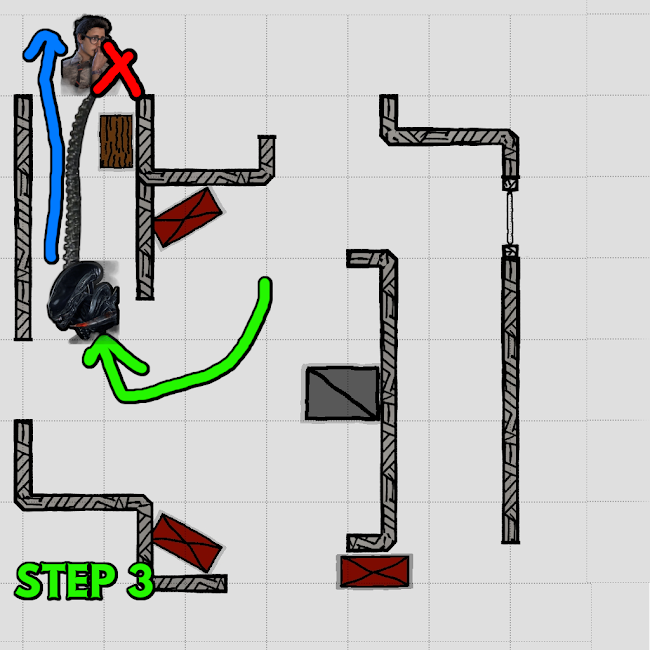
PATH PALLETS
________________________________________________
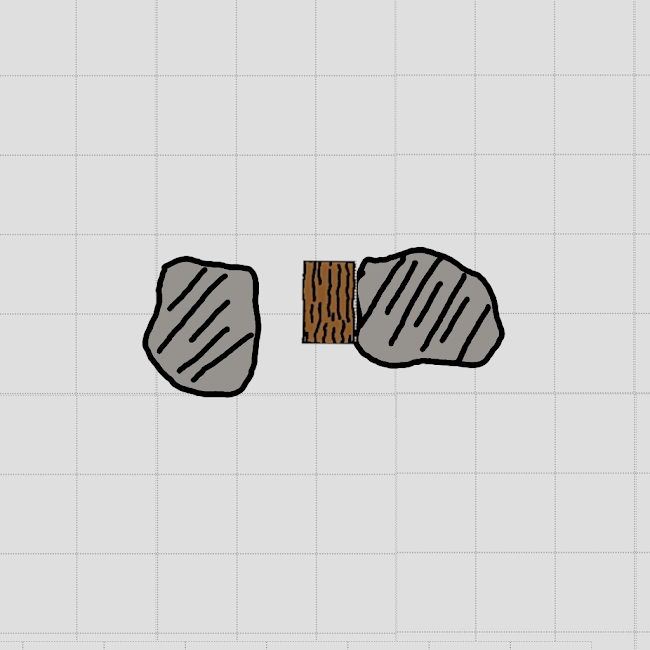
Path pallets are simply tiles that serve as tools for the survivor to path to a full tile. Often, these pallets are only two small objects on each side, just enough to hold up the pallet. Even the weakest killer in Dead by Daylight can put survivors in a 50-50 with a moonwalk or other mindgame. However, the XENOMORPH can play path pallets in a particular way that other killers in Dead by Daylight cannot.
- The simplest way to play this tile is to wait for the survivor to drop the pallet and TAIL ATTACK them over said pallet.
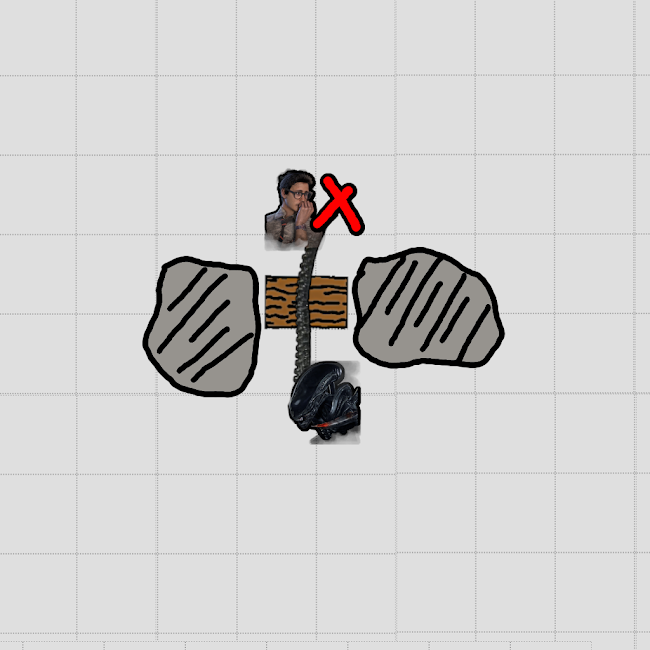
- Like we mentioned, the XENOMORPH does have an alternative special way to play path pallets. However, this is dependent on the style of the path pallet spawn on the map.
- If the objects surrounding the path pallet are roughly the height of the XENOMORPH’s tail in CRAWLER MODE, go for an ARC SHOT over the loop.
- If the objects are way taller than the XENOMORPH while in CRAWLER MODE, then you will have to play the tile normally.
MAP SPECIFIC TILE LOOPING
In this section, we will be covering how to loop the tiles that are rare and only show up on 2 or less maps. This section will be a work in progress, since I have to make the special tiles from scratch. Enjoy these as they come out!
_________________________________________
TOBA LANDING & NOSTROMO WRECKAGE
_________________________________________

U WALL JUNGLE GYM
The U Wall jungle gym is an odd variation of the standard jungle gym. Instead of the window vault being on the corner of an L-wall, it is instead buried in a U wall. The pallet is also in an odd place, positioned more like a Long-wall Short-wall pallet instead. This tile is a little more difficult for the XENOMORPH. While the pallet side presents easier TAIL ATTACK opportunities, the window vault being insulted by walls on each side make TAIL ATTACKS difficult.
- PALLET SIDE
- If the survivor approaches the tile from the pallet side, try to hit them with a TAIL ATTACK as they pass by the pallet with a STRAFE SHOT to cover the whole area.
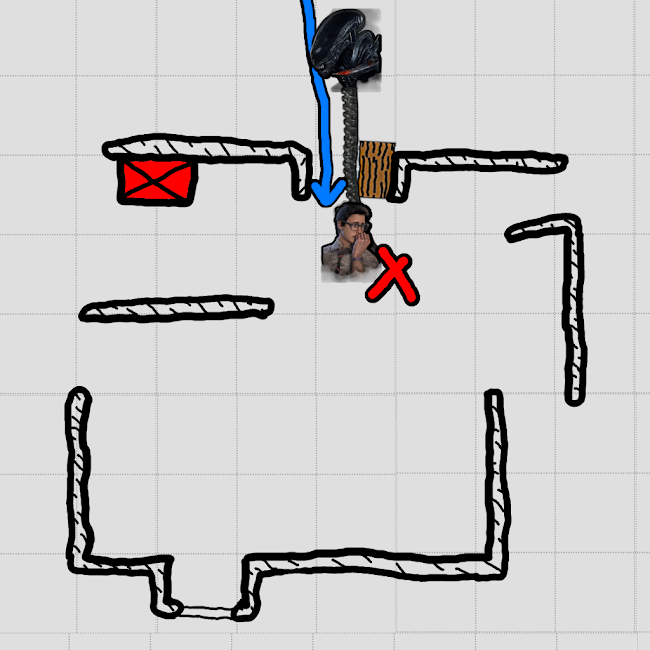
- If the survivor drops the pallet, try to hit them as they are dropping it in the locked animation, or shoot over the pallet if the survivor is within 4.8 meters and they have enough distance to start moving.
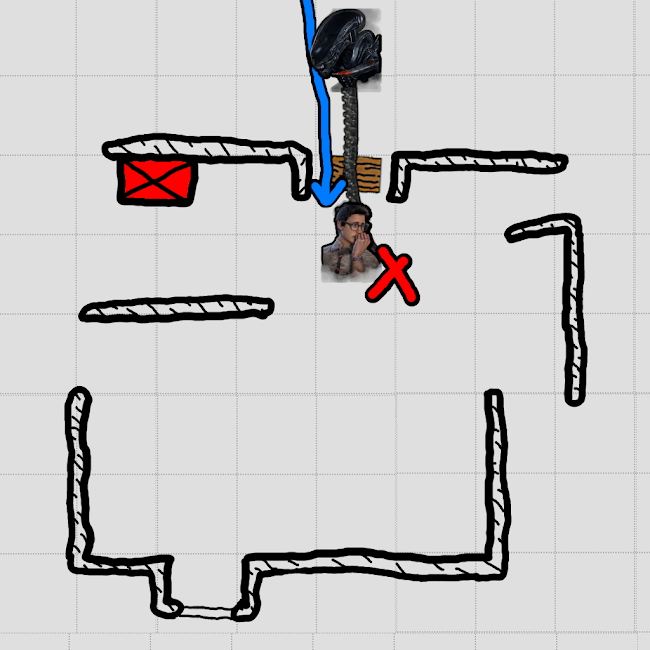
- If the survivor has enough time to safely bypass the pallet, the way you loop next depends on where the survivor goes:
- If the survivor chooses to continue to loop the pallet, follow them and line up a TAIL ATTACK on the other side.
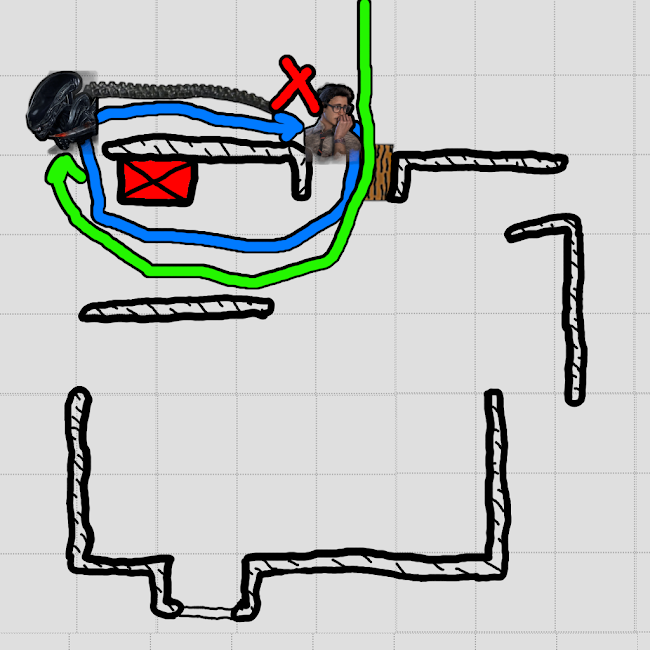
- If the survivor chooses to go towards the window, follow them down and attempt a TAIL ATTACK as they go through the window. Make sure to aim high to avoid colliding with the window.
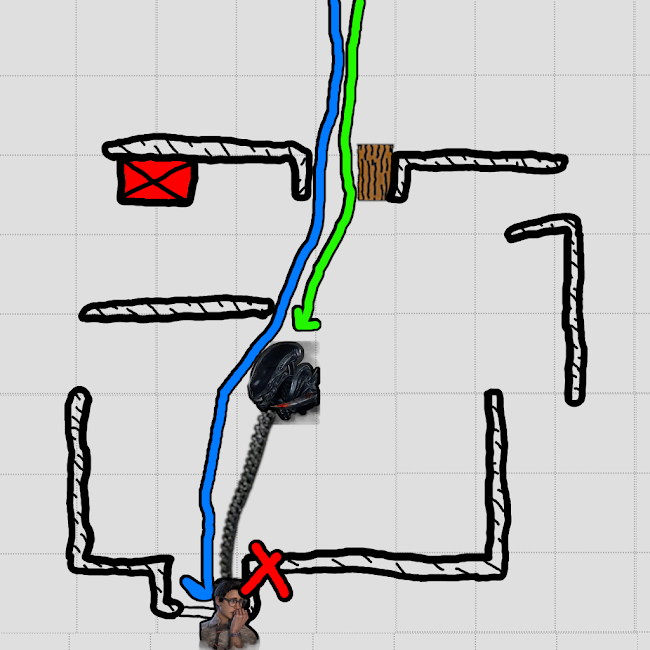
- If the survivor has enough distance to safely make the window vault, vault after them and line up a TAIL SHOT on the other side before they reach the cubby where the window sits.
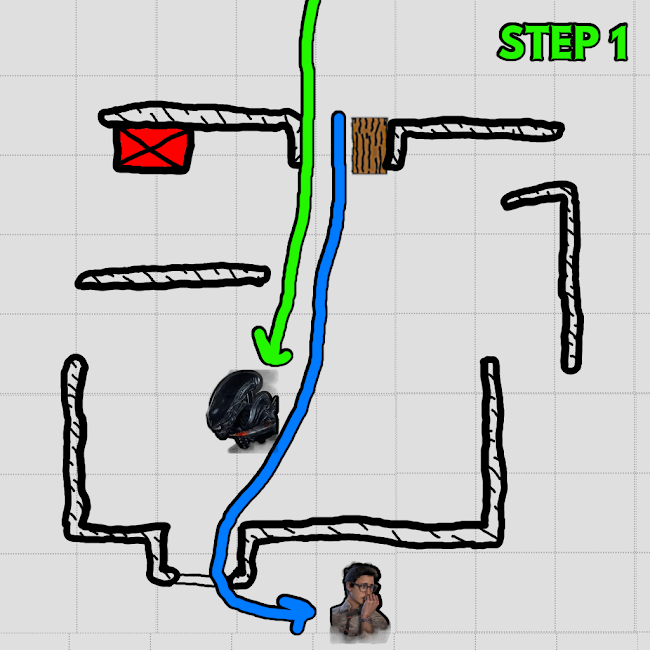
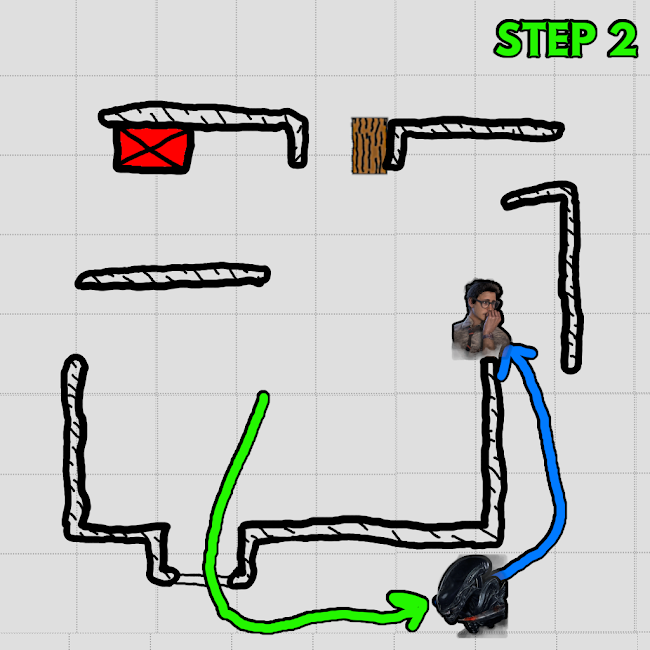
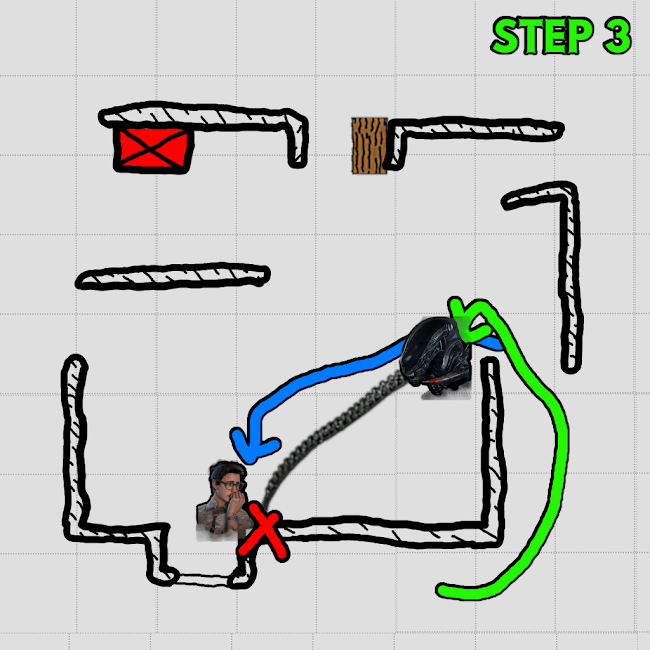
- You may also attempt a FAKE OUT shot here, but be careful, the “cubby” the window sits in may catch collision more often than a normal window vault.
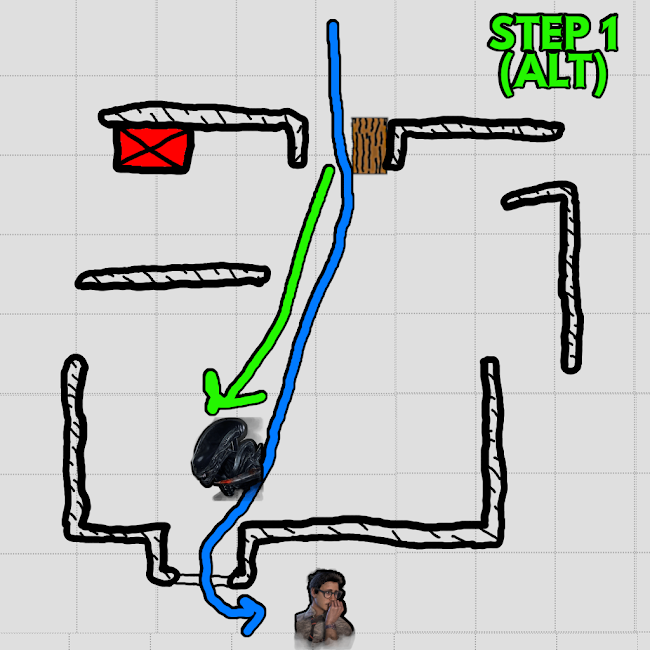

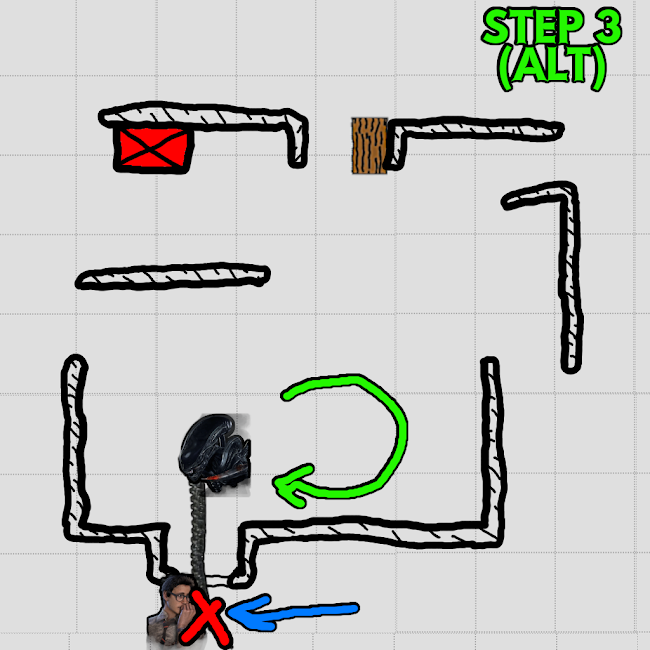
- WINDOW SIDE
- If the survivor is vaulting through the window in front of you, try to TAIL ATTACK them while they are in the locked animation. If they have enough distance to fully vault, TAIL ATTACK over the window and hit them.
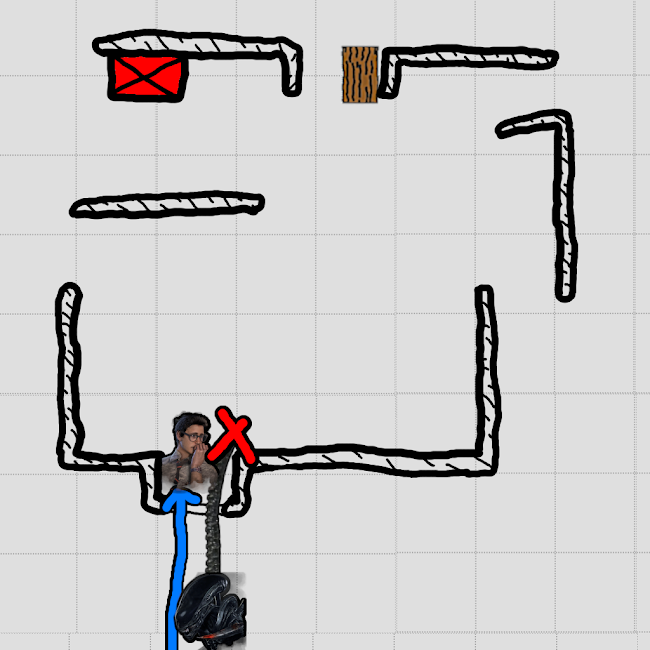
- If they have enough distance to safely make the window vault, what you do next depends on if they continue to loop the window or go to the pallet.
- If the survivor continues to loop the U-wall, vault after them and TAIL ATTACK them as they come back to the window.

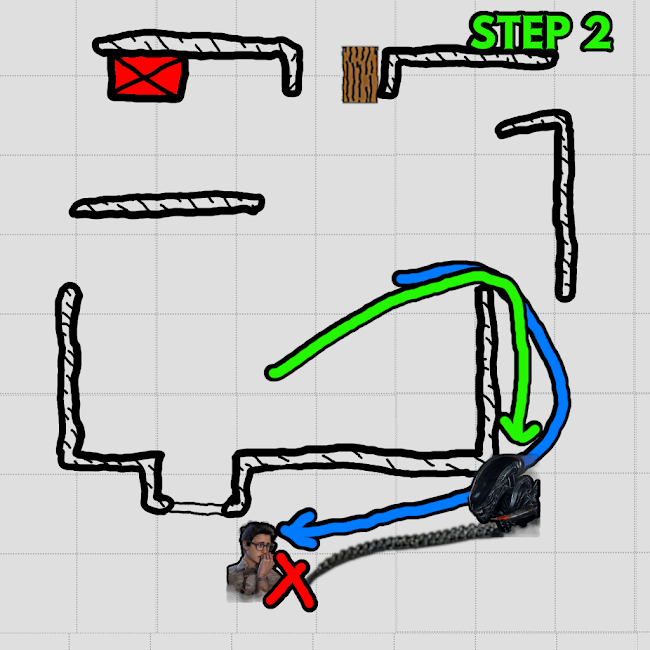
- If they go to the pallet, vault and follow straight after them. They will either be forced to drop the pallet and run away, or they greed the pallet, so you just loop around and line up a TAIL ATTACK.

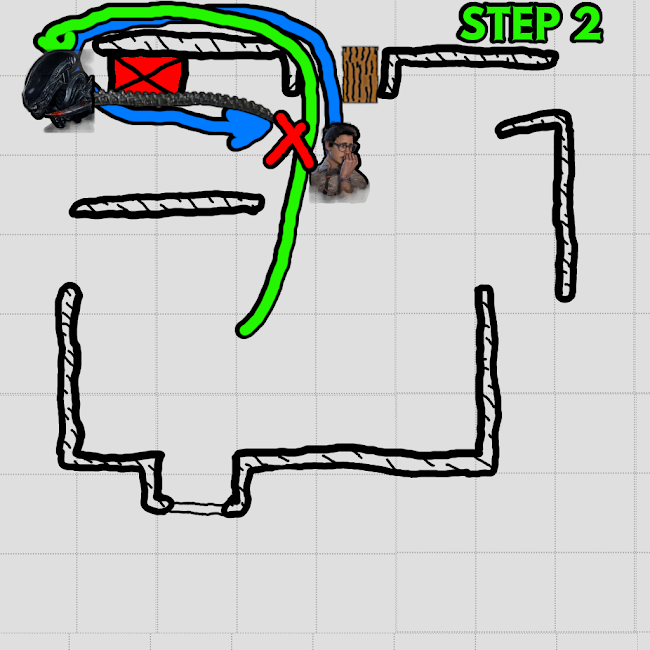
(Remember, more tiles will be added as I finish the diagrams!)
MAP TIER LIST
In this section, we will be going over each map in Dead by Daylight and giving them a rating based on how well the XENOMORPH generally performs on them. Variables that affect the ranking of each map include quality of CONTROL STATION spawns, available TAIL ATTACK shots, sensical collision, general killer sidedness versus survivor sidedness, etc.
GENERAL TIER LIST

(If you would like to use this map tier list I made, here’s the link: https://tiermaker.com/create/dead-by-daylight-map-tier-list-up-to-tomb-raider-16906238 )
COAL TOWER - Grade: A (Great)
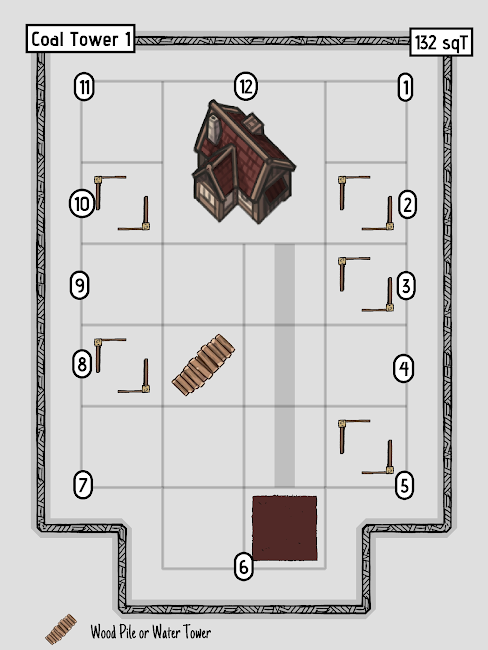
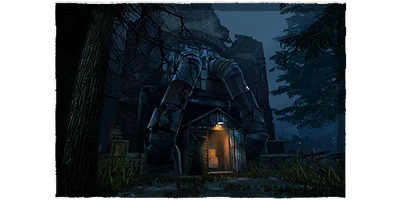
Coal Tower is widely regarded as one of the most fair maps in Dead by Daylight, and with good reason. The map is not too big and generally has fair tile strength spawn for killers. However, this map is great for the XENOMORPH for multiple reasons. Coal Tower’s path pallet tiles are surrounded by either rocks or junk, both of which you can TAIL ATTACK over. Coal Tower is also one of the maps that you can force a main building CONTROL STATION spawn with a cut coin offering.
BENEFITS
- TAIL ATTACK friendly path pallet loops.
- Cut Coin Tech works here.
- Fair size.
DRAWBACKS
- Can occasionally spawn really strong tile setups on the top right of the map.
COAL TOWER II - Grade: A (Great)
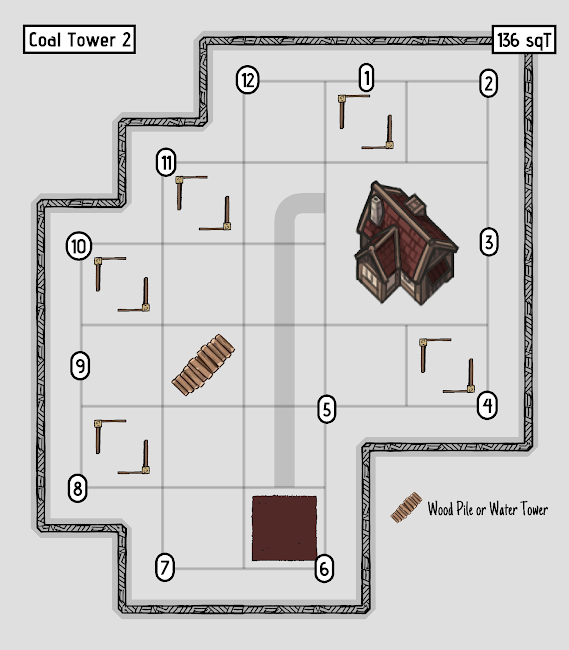
Coal Tower is fairly similar to Coal Tower I, except this variation exhibits a wider shape with a slightly bigger size. The orientation of tiles is different as well, with Killer Shack being off to the center-side instead of at the foot of the map. The trade off for this more central shack is that the middle is more of a deadzone than on Coal Tower I. Generally, the map is still as fair as COAL TOWER I with all of the same benefits of Coal Tower I.
BENEFITS
- TAIL ATTACK friendly path pallet loops.
- Cut Coin Tech works here.
- Fair size.
DRAWBACKS
- More accessible shack than the other variation
GROANING STOREHOUSE - Grade: C (NOT FAVORABLE)
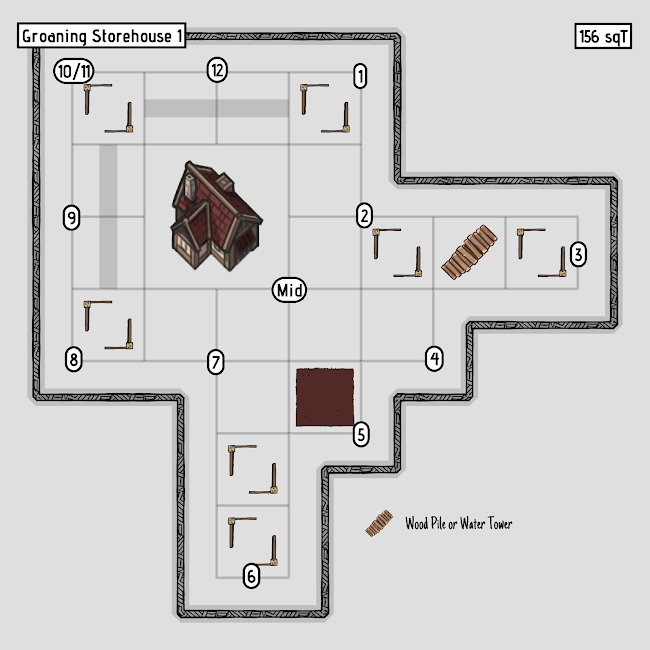
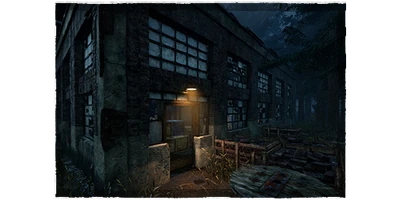
There is very little to like about Groaning Storehouse as the killer role, much less as the XENOMORPH. The only real benefit to being on this map is that the Cut Coin Tech does work here and that there are TAIL ATTACK friendly path pallet loops. Otherwise, this map is rough to win consistently on. The map is larger in size, the main building is fairly strong with no real way to circumvent it as the XENOMORPH, and the “cubbys” on the right and bottom of the map cut off the killer’s pressure and make it hard to control the map. Main buildings like this one are why Self-Destruct Bolt is an extremely helpful add-on, so you can deal with extremely strong window setups.
BENEFITS
- TAIL ATTACK friendly path pallet loops.
- Cut Coin Tech works here.
DRAWBACKS
- Large size map
- Strong main building
- “Cubbys” that extend map size and cut off pressure
GROANING STOREHOUSE II - Grade: B (Alright)

Groaning Storehouse II is a measurable improvement over the original version. The map is slightly smaller, making it a more fair size to play on. The problematic “cubbys” that cut off your pressure have been widened and more integrated with the map. The main building’s position is not as centralized, making it easier to pressure survivors without the threat of them just running to the main building. That in addition to the Cut Coin Tech and TAIL ATTACK friendly path pallet loops make this map bearable to play on.
BENEFITS
- TAIL ATTACK friendly path pallet loops.
- Cut Coin Tech works here.
DRAWBACKS
- Moderately large size map
- Strong main building
IRONWORKS OF MISERY - Grade: C (NOT FAVORABLE)

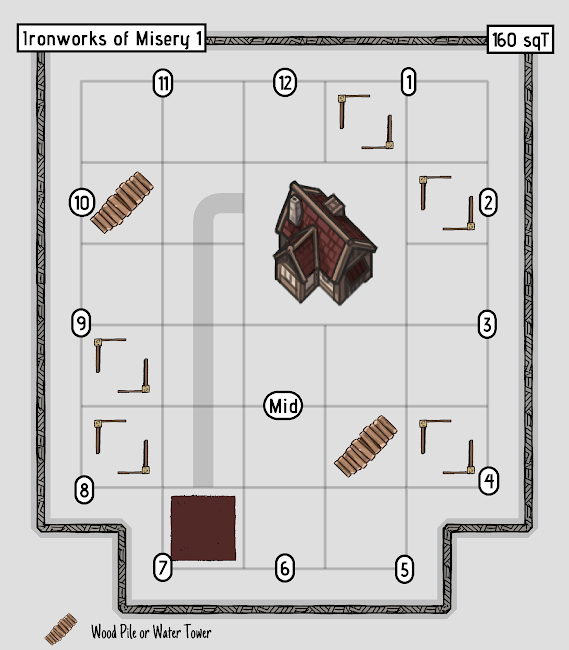
Ironworks of Misery is not a particularly fun map to play on. The main benefit to this map is that the Cut Coin Tech works here and it shares the same TAIL ATTACK friendly path pallet loops like the other MacMillan maps. That’s where the benefits end. The main building, while not exceptionally strong by itself, is really large and sits at the dead center of the map. As a result, it blocks off most of the map from your ability to pressure with ease. The Cut Coin Tech is even arguable to be not that helpful since the CONTROL STATION created is far upstairs, which is far away from the generator you want to pressure and doesn’t give you easy access to other parts of the map. For the XENOMORPH and the killer role in general, this is not a fun map.
BENEFITS
- TAIL ATTACK friendly path pallet loops.
- Cut Coin Tech works here (but not as helpful).
DRAWBACKS
- Moderately large size map
- Large main building
- Main building blocks off the map, making it hard to travel to other areas easily.
IRONWORKS OF MISERY II - Grade: B (Alright)


Ironworks of Misery II is similar to Groaning Storehouse 2 in that a lot of the issues in the original are resolved with the variation. The main building has been moved to the top left side of the map, meaning the map is now very breathable and easy to pressure as the killer role. There are also measurable dead zones that appear at the top corners of the map, which are excellent for the killer role. That on top of the Cut Coin Tech still working and TAIL ATTACK friendly path pallet loops, this map is way more manageable for the XENOMORPH.
BENEFITS
- TAIL ATTACK friendly path pallet loops.
- Cut Coin Tech works here (but not as helpful).
DRAWBACKS
- Moderately large size map
- Large main building
SHELTER WOODS - Grade: C (NOT FAVORABLE)
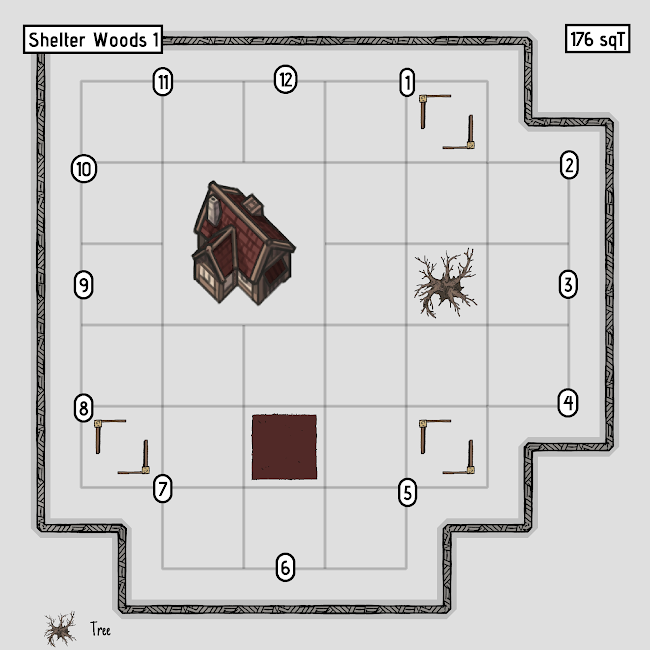
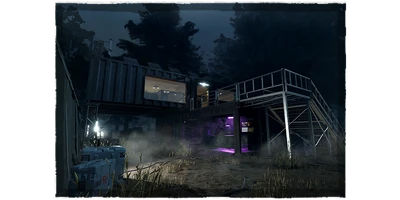
Shelter Woods is currently one of the largest maps in the game at 176 square tiles, tied with its own variation and Azarov’s Resting Place. Any map that is large puts the killer role at a disadvantage, much less one of the largest ones. The main building is very strong as well, with the tents in particular able to spawn a potential infinite. This is another map where Self-Destruct Bolt will be extremely helpful. The only real benefit to this map is that the Cut Coin Tech works here and that there are TAIL ATTACK friendly path pallet loops.
BENEFITS
- TAIL ATTACK friendly path pallet loops.
- Cut Coin Tech works here
DRAWBACKS
- One of the largest maps in the game
- Main building can spawn an infinite (and is still extremely strong otherwise)
SHELTER WOODS II - Grade: C (NOT FAVORABLE)

Unlike the other MacMillan variations, Shelter Woods II does little, if anything, to solve the issues that the original version had. The map retains its size as one of the largest maps in the game. The main building can still spawn ridiculously strong setups. The only benefit is a less centralized killer shack and a hill dead zone around the tree spawn. That’s it.
BENEFITS
- TAIL ATTACK friendly path pallet loops.
- Cut Coin Tech works here
DRAWBACKS
- One of the largest maps in the game
- Main building can spawn an infinite (and is still extremely strong otherwise)
SUFFOCATION PIT - Grade: C (NOT FAVORABLE)
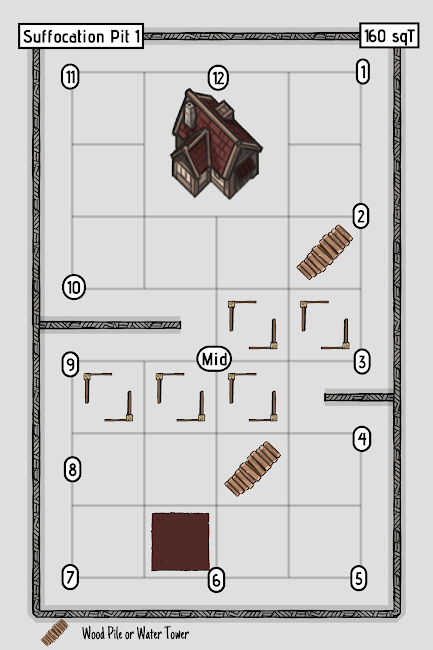
Suffocation Pit is a map that is both good and bad for the XENOMORPH at the same time. It carries over the same qualities of the other MacMilan maps like the Cut Coin Tech and TAIL ATTACK friendly path pallet loops. In addition, it is an I-shaped map, meaning there is a choke point in the center you can use to create three generator situations and pressure survivors. However, the main building is moderately strong. Its most frustrating aspect is the five connected tiles in the middle of the map, which can create some absolutely uncounterable setups, even as the XENOMORPH.
BENEFITS
- TAIL ATTACK friendly path pallet loops.
- Cut Coin Tech works here.
- The I-shape of the map helps create three generator situations and pressure on the survivors.
DRAWBACKS
- Moderately large map.
- Moderately strong main building.
- Sequence of connected tiles can create unwinnable loops if chained correctly.
SUFFOCATION PIT II - Grade: B (Alright)

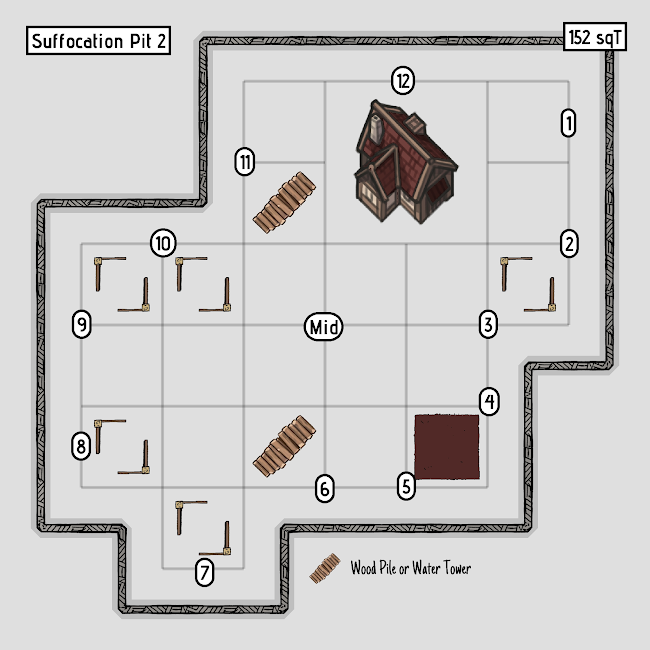
Suffocation Pit II’s variation returns to form, addressing some of the problematic issues the original form had. The massive amount of the pallets tied together in the middle have been spread out across the map. You unfortunately lose the I-shape of the map that helped you create three generator situations and pressure survivors, but this is a more than worthwhile trade in the XENOMORPH’s favor. The map is also slightly smaller in size, which helps a little.
BENEFITS
- TAIL ATTACK friendly path pallet loops.
- Cut Coin Tech works here.
DRAWBACKS
- Moderately large map.
- Moderately strong main building.
AZAROV’S RESTING PLACE - Grade: C (NOT FAVORABLE)

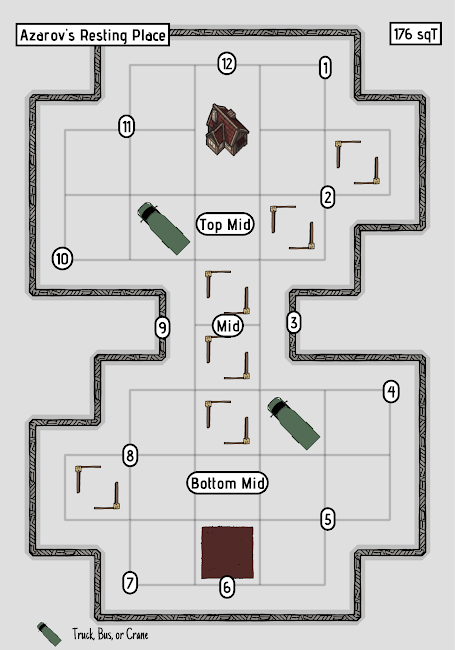
Azarov’s Resting Place is tied for the largest current map in the game, tied with both versions of Shelter Woods at 176 square tiles. This map also has the same problem as Suffocation Pit where it is an I-shaped map which should help you, but the tiles all tied together in the center can create some near unwinnable setups. Unlike Suffocation Pit, there is barely ever a dead zone on this map, especially after the Autohaven realm buff where edge path pallets were added pervasively. Cut Coin Tech does not work here either. The only benefit to this map is that there are several TAIL ATTACK friendly tiles. Path pallet tiles have rocks that you can shoot over and around. There are junk and truck loops specific to Autohaven that you can shoot over as well.
BENEFITS
- TAIL ATTACK friendly path pallet loops.
- TAIL ATTACK friendly map specific loops.
- An I-shaped map can help create three generator situations and pressure survivors.
DRAWBACKS
- One of the largest maps.
- Several connected tiles can create near unwinnable setups.
- Barely any dead zones.
BLOOD LODGE - Grade: B (Alright)
Blood Lodge used to be one of the worst Dead by Daylight maps, but the remake made it far more bearable. The map is still moderately large at 156 square tiles and the main building can be rough against Balanced Landing users. However, the quantity of tiles has been reduced. The shack is in the corner of the map, mostly disjointed from the rest of the map. Blood Lodge’s main building is one where the Cut Coin Tech works as well as retaining the path pallet tiles that have rocks that you can shoot over and the junk and truck loops specific to Autohaven that you can shoot over as well.
BENEFITS
- TAIL ATTACK friendly path pallet loops.
- TAIL ATTACK friendly map specific loops.
- Cut Coin Tech works here.
DRAWBACKS
- Moderately large map.
- Moderately fine main building can be made unplayable by Balanced Landing.
GAS HEAVEN - Grade: C (NOT FAVORABLE)


Gas Heaven is not as obnoxious as it used to be since the removal of the car walls, but the new version has its own problems. The main issue with this map used to be an open door at the back of the main building, but they recently re-added the breakable wall in the doorway, fixing the issue. Self-Destruct Bolt is still a big help at this main building. That on top of it still being a moderately large map doesn’t help you much. Cut Coin Tech also does not work on this map. At least this map retains the path pallet tiles that have rocks that you can shoot over and the junk and truck loops specific to Autohaven that you can shoot over as well.
BENEFITS
- TAIL ATTACK friendly path pallet loops.
- TAIL ATTACK friendly map specific loops.
DRAWBACKS
- Moderately large map.
- Extremely strong main building.
WRECKER’S YARD - Grade: S (Best)

Wrecker’s Yard is what I believe to be the best XENOMORPH map in the game. It is a smaller map at only 144 square tiles, which benefits the killer role in general. There is a lack of a main building, only a killer shack. Most of the loops on this map are not formal tiles, but instead the path pallet tiles & Autohaven specific tiles that the XENOMORPH can use the TAIL ATTACK to circumvent with ease. Generally, there’s no real downside to Wrecker’s Yard besides the fact that due to the small size of the map, tiles are closer together.
BENEFITS
- TAIL ATTACK friendly path pallet loops.
- TAIL ATTACK friendly map specific loops.
- Small map is easy to traverse both through the TUNNELS and normal movement.
DRAWBACKS
- Tiles spawn closer together because of the map’s small size.
WRETCHED SHOP - Grade: A (Great)

Wretched Shop is a bizarrely behaving map. It is a fairly large map at 164 square tiles, which should indicate that this map is likely not great for the XENOMORPH. However, there is a lot in your favor here. Wretched Shop’s pallet spawn rate is extremely variable, being able to spawn a single digit amount of pallets if RNG is in your favor. The main building is also extremely weak, with no pallet and only one window, which can spawn with a breakable wall that makes it literally useless. Cut Coin Tech also works on this main building as well. Other than that, the map can spawn some serious dead zones that leave survivors with nothing to defend themselves with. Don’t forget the path pallet tiles that have rocks that you can shoot over and the junk and truck loops specific to Autohaven that you can shoot over as well.
BENEFITS
- TAIL ATTACK friendly path pallet loops.
- TAIL ATTACK friendly map specific loops.
- Weak main building.
- Dead zones are common.
- Cut Coin Tech works here.
DRAWBACKS
- Fairly large map.
FRACTURED COWSHED - Grade: B (Alright)

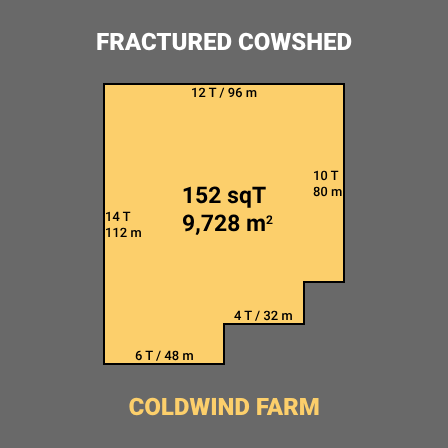
Fractured Cowshed, similarly to Blood Lodge, used to be infamously one of Dead by Daylight’s worst maps. However, the map remake did a lot to aid its issues. The map is moderately sized at 152 square tiles which isn’t in your favor. Also, Coldwind Farms have hay bale loops, cart loops, etc. that the XENOMORPH is unable to TAIL ATTACK over because they are simply too tall. The benefit of this map is that it creates some massive dead zones, particularly on the left side of the map, which are easy for you to take advantage of. On the plus side, the XENOMORPH plays the Coldwind Farms tractor tile extremely well, being able to TAIL ATTACK as survivors go up the ramp or as they vault either of the tractor windows. The Cow Tree loop is also usually a very troublesome loop for the killer role, but the XENOMORPH can TAIL ATTACK over this tile and shut it down early.
BENEFITS
- TAIL ATTACK friendly map specific loops.
- Weaker main building.
- Dead zones are common.
DRAWBACKS
- Moderately large map.
RANCID ABATTOIR - Grade: A (Great)
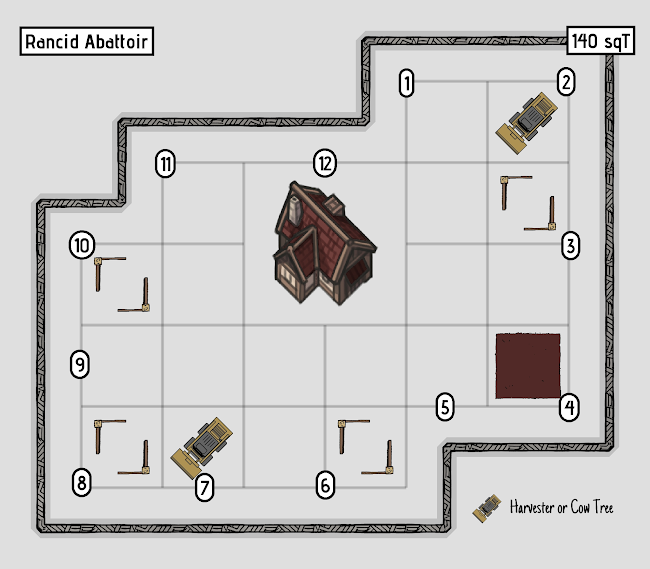
Rancid Abattoir is the best Coldwind Farms map for the XENOMORPH. The map’s smaller size at only 140 square tiles makes it easy to pressure from both the TUNNELS and traveling normally. The main building also used to be way better, but had a fairly recent nerf that made the window there weaker and an easily circumventable pallet in the middle. As per every Coldwing Farms map, the XENOMORPH can circumvent tractor tiles extremely well, being able to TAIL ATTACK as survivors go up the ramp or as they vault either of the tractor windows. The Cow Tree loop is also usually a very troublesome loop for the killer role, but the XENOMORPH can TAIL ATTACK over this tile and shut it down early. The downside being that there are hay bale and cart loops still that you will not be able to TAIL ATTACK over.
BENEFITS
- TAIL ATTACK friendly map specific loops.
- Weaker main building.
- Smaller map.
DRAWBACKS
- Map specific tiles cannot be circumvented with the TAIL ATTACK.
ROTTEN FIELDS - Grade: C (NOT FAVORABLE)

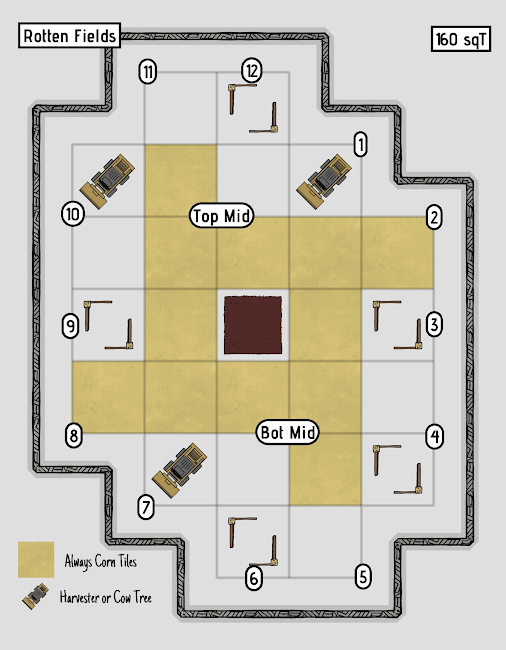
Rotten Fields has traditionally been a very challenging map for the killer role. While the lack of a main building may incline you to believe it would be beneficial for the XENOMORPH, just about everything else is working against you. The map is deceptively large at 160 square tiles. The main issue though is that there is a ring around the entire map of connected tiles. This means if a survivor wished, they could loop you around the whole map without running out of resources as long as they stuck to the edge. This makes Rotten Fields a particularly frustrating map to play on. The only real benefit for you here is the usual Coldwind Farms benefits, that being that you can TAIL ATTACK to circumvent the tractor and cowtree tiles. However, this is still weighed down by hay bale and cart tiles that you cannot.
BENEFITS
- TAIL ATTACK friendly map specific loops.
- No main building
DRAWBACKS
- Map specific tiles cannot be circumvented with the TAIL ATTACK.
- Large sized map.
- Connected tile loop around the entire edge of the map.
THE THOMPSON HOUSE - Grade: B (Alright)

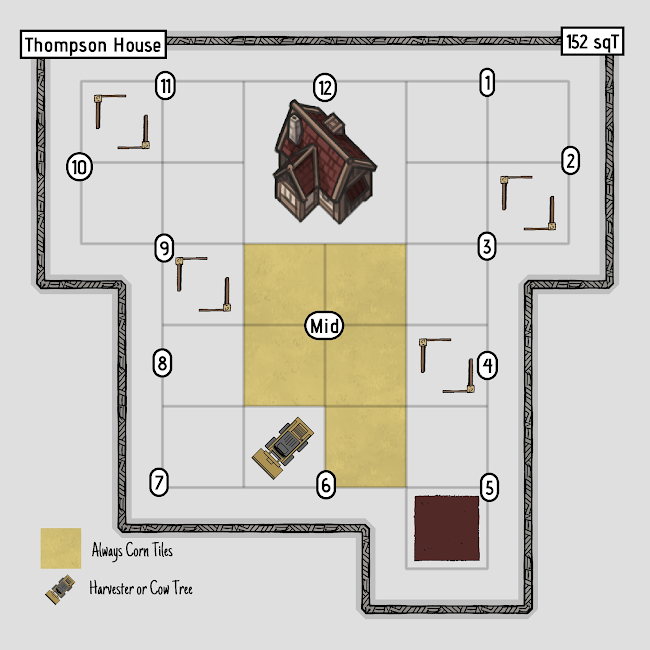
Thompson House is a middle of the road map for the XENOMORPH. The map is moderately large at 152 square tiles, but a lot of that space is not occupied well. There are two massive dead zones that consistently spawn in the middle and bottom left of the map, often only having an extremely weak path tile to use. However, the main building can be hard to circumvent, often requiring you to break breakable walls to continue looping efficiently. Cut Coin Tech does work on the main building here at least. You still have access to TAIL ATTACK over the Coldwind Farms specific loops like tractor and cow tree, but also blocked by hay bale and cart loops that you cannot shoot over.
BENEFITS
- TAIL ATTACK friendly map specific loops.
- Massive dead zones that consistently spawn in the same places.
- Cut Coin Tech works here.
DRAWBACKS
- Map specific tiles cannot be circumvented with the TAIL ATTACK.
- Moderately large sized map.
- Main building can be time consuming to run.
TORMENT CREEK - Grade: C (NOT FAVORABLE)

Torment Creek has traditionally been a troublesome map for the killer role. The map is extremely large at 168 square tiles, making it hard to traverse even while using the TUNNELS. The main building itself is not too strong, only one strong window that can be made weak by breaking a breakable wall. The problem is that there is always consistently a lot of pallets that spawn around the main building, meaning there’s almost always somewhere to go even if that breakable wall is gone. The Cut Coin Tech does work here, but that’s about the only benefit to the main building. To your benefit, there is a consistent dead zone that always spawns to the left of the main building that will always be there. Otherwise, it’s the usual benefit of being able to circumvent the cow tree and tractor loops with your TAIL ATTACK, but being unable to circumvent the hay bale and cart loops.
BENEFITS
- TAIL ATTACK friendly map specific loops.
- Consistent dead zone spawn.
- Cut Coin Tech works here.
DRAWBACKS
- Map specific tiles cannot be circumvented with the TAIL ATTACK.
- Very large sized map.
- Main building can be time consuming to run because of pallets spawning all around it and a breakable wall to kick.
DISTURBED WARD - Grade: D (Worst)

Disturbed Ward has always been one of Dead by Daylight’s strongest survivor maps, mixing together a lot of poor map design decisions all into one place. The map is a top five sized map in the game at a whopping 172 square tiles. The previously mentioned “cubbys” make a return on this map, which makes it hard for the killer role to consistently pressure those areas. The main building is extremely strong, spawning a few great windows and pallets that cannot be easily circumvented. Self Destruct Bolt will be helpful here. You can use the Cut Coin Tech here at least. The only real benefit to you here as the XENOMORPH is that the burned out building tiles have gaps that you can TAIL ATTACK over, but that is difficult considering the collision is wonky on them.
BENEFITS
- TAIL ATTACK friendly map specific loops.
- Cut Coin Tech works here.
DRAWBACKS
- One of the largest maps in the game.
- One of the strongest main buildings in the game.
- “Cubbys” make it hard to pressure the map and survivors efficiently.
- Poor collision on map specific loops.
FATHER CAMPBELL’S CHAPEL - Grade: C (NOT FAVORABLE)
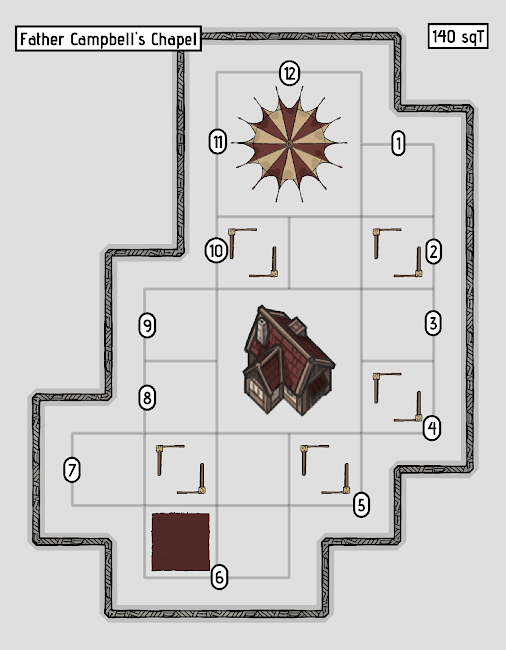
Father Campbell’s Chapel is a better alternative than the other Crotus Prenn map, but not by much. The map is at least moderately smaller at only 140 square tiles. However, the main building is consistently strong, and can even spawn a god window that cannot be circumvented in any way other than Bamboozle (another Self Destruct Bolt handy map). Another nasty part of this map is that there is always a consistent tile spawn straight into killer shack, making for some near unwinnable combinations. The only reason this avoids the worst maps grade is because the carnival tiles can almost all be easily circumvented with a TAIL ATTACK, in addition to the burned out building tiles where you can do the same.
BENEFITS
- TAIL ATTACK friendly map specific loops.
- Map is smaller in size.
DRAWBACKS
- Strong main building that can spawn a god window.
- Poor collision on map specific loops.
- Consistent tile spawn into the killer shack can create unwinnable loops.
HADDONFIELD - Grade: B (Alright)

The initial version of Haddonfield that was out when XENOMORPH released was their worst map. Double window houses, the god window in the main building, and extremely inconvenient CONTROL STATION spawns made the map an absolute chore to play on. However, the most recent remake of this map turns it around. Double window houses are gone, meaning that you can TAIL ATTACK through the singular window or over the pallet inside the house. The god window in the main building is made easier by a hole in the wall, and also it is no longer guaranteed. Either you get the window at the front of the main building OR the porch vault at the back (the porch vault you can ARC SHOT over). CONTROL STATION spawns are a bit better, with a couple consistent spawns closer to gens, but still ultimately have underwhelming CONTROL STATION spawns. A new addition is the 4-6 pallets that spawn in the street (formerly a big dead zone). Almost all these pallets are TAIL ATTACK friendly, being able to shoot over or around the loops. An amazing turn around overall, Haddonfield went from being the XENOMORPH’s worst map to a moderately advantageous map for them.
BENEFITS
- TAIL ATTACK friendly map specific loops.
DRAWBACKS
- Poor collision on map specific loops.
- CONTROL STATION spawns are inconvenient.
THE PALE ROSE - Grade: B (Alright)

The Pale Rose is a moderately favorable map for the XENOMORPH. It is a larger map at 161 square tiles, but there is still a lot in your favor. The main building contains good pallets, but the one upstairs and downstairs can be circumvented by your TAIL ATTACK through gaps with SNIPE SHOTS. The window vaults aren’t particularly strong either. As if that already wasn’t enough, you can use the Cut Coin Tech here too. There are waist high map specific loops in the middle of the map made of boxes and rotting boats that you can easily shoot over with your TAIL ATTACK. The smaller boat structure at the right of the map can also be circumvented with your TAIL ATTACK. Your main problems on this map as the XENOMORPH is that the rock path pallets cannot be shot over with your TAIL ATTACK as they are too high, and the pier tile can spawn some extremely strong combinations that can be time consuming to chase.
BENEFITS
- TAIL ATTACK friendly map specific loops.
- Cut Coin Tech works here.
- Main building can be circumvented with TAIL ATTACKS.
DRAWBACKS
- Larger sized map.
- Pier tile can be particularly time consuming to run if it spawns strong.
GRIM PANTRY - Grade: C (NOT FAVORABLE)

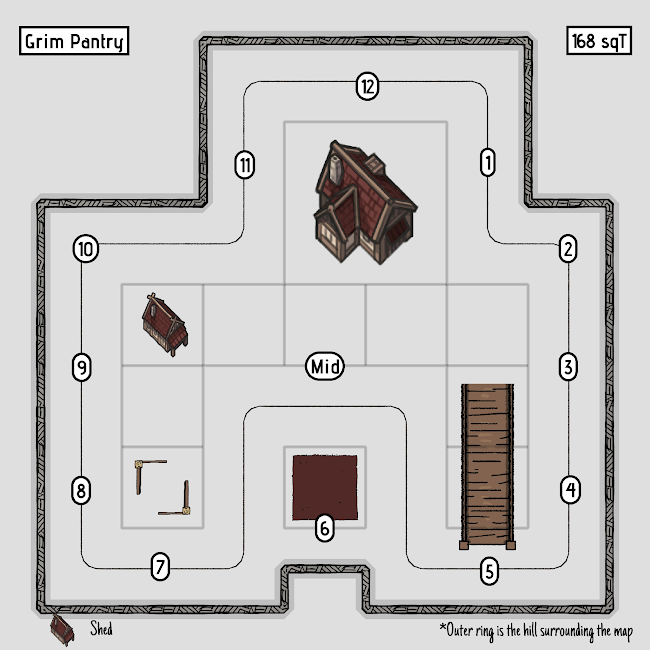
Grim Panty, unlike the other Backwater Swamp map, is way harder for the XENOMORPH. Firstly, the map is fairly large at 168 square tiles. While you can use the Cut Coin Tech here, the main building is generally a problem. There are several strong windows and pallets here that cannot be circumvented with TAIL ATTACKS. In particular, the double window vaults upstairs have notoriously bad collision with the TAIL ATTACK. Unlike Pale Rose, the smaller pantry building is not easily circumventable with a TAIL ATTACK unless they are looping the waist high pallet loop downstairs. Recently, the map was patched to have rock loops in the middle instead of the box/boat loops that were waist high, so that takes away some TAIL ATTACK potential. This in addition to the pier still being able to spawn some really strong setups just makes for a nasty experience for the killer role in general, much less the XENOMORPH.
BENEFITS
- TAIL ATTACK friendly map specific loops.
- Cut Coin Tech works here.
DRAWBACKS
- Very large map size.
- Main building is extremely strong.
- The smaller building is not very TAIL ATTACK friendly.
- Pier tile can be particularly time consuming to run if it spawns strong.
TREATMENT THEATRE (LERY’S) - Grade: A (Great)

Lery’s may surprise you as a good XENOMORPH map. Generally, indoor maps can be troublesome for the XENOMORPH because of the TAIL ATTACK's poor behavior interacting with collision. Obviously, having walls everywhere can throw a wrench in that. However, there is a lot actually in your favor here. Firstly, the map is extremely small at only 98 square tiles, meaning pressuring the map through the TUNNELS or normal traversal is fairly easy. Secondly, despite the enormous amount of windows, none of them are particularly strong, meaning you can easily circumvent them with TAIL ATTACKS. In addition, there are a large amount of SNIPE SHOTS available on this map through broken glass, through hospital beds, etc. that can make your chases way faster.
BENEFITS
- TAIL ATTACK friendly map specific loops.
- Plenty of available SNIPE SHOTS.
- Very small map size.
- Windows are generally never too strong.
DRAWBACKS
- Indoor map means that collision is going to be rough for your TAIL ATTACKS.
MOTHER’S DWELLING - Grade: B (Alright)


Mother’s Dwelling used to be one of the roughest maps for the killer role because of its enormous 188 square tile size, but the recent remake shrunk it to 152 square tiles, making it far more easy to manage. The main building can be particularly rough with a god window and a couple good pallets to boot (another Self-Destruct Bolt helpful map). However, most of the loops on the Red Forest realm are quite TAIL ATTACK friendly, being able to shoot over fallen trees and between standing trees.
BENEFITS
- TAIL ATTACK friendly map specific loops make up a lot of the map.
DRAWBACKS
- Moderately large map size.
- Strong main building with god window.
TEMPLE OF PURGATION - Grade: B (Alright)
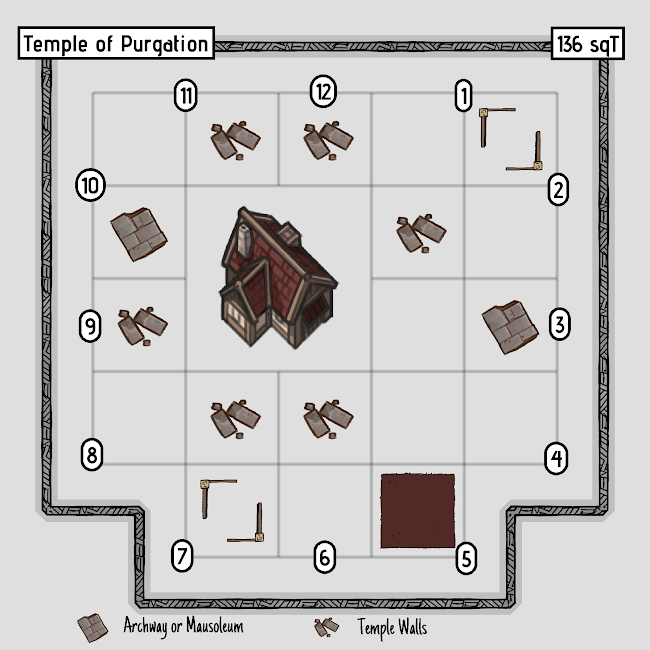
Temple of Purgation shares Mother’s Dwelling’s trait of formerly being a huge map, shrinking from a massive 172 square tiles all the way down to a small 136 tiles as of today. The smaller size makes it easy to pressure the map with the TUNNELS and normal traversal. There are map specific rock tiles here in addition to the other Red Forest tree loops that are also TAIL ATTACK friendly. The main building windows can be fairly strong, but become weak once the main building generator is finished. This is a main building you can use the Cut Coin Tech with however.
BENEFITS
- TAIL ATTACK friendly map specific loops make up a lot of the map.
- Cut Coin Tech works here.
- Smaller map size.
DRAWBACKS
- Moderately strong main building.
BADHAM I - Grade: D (Worst)

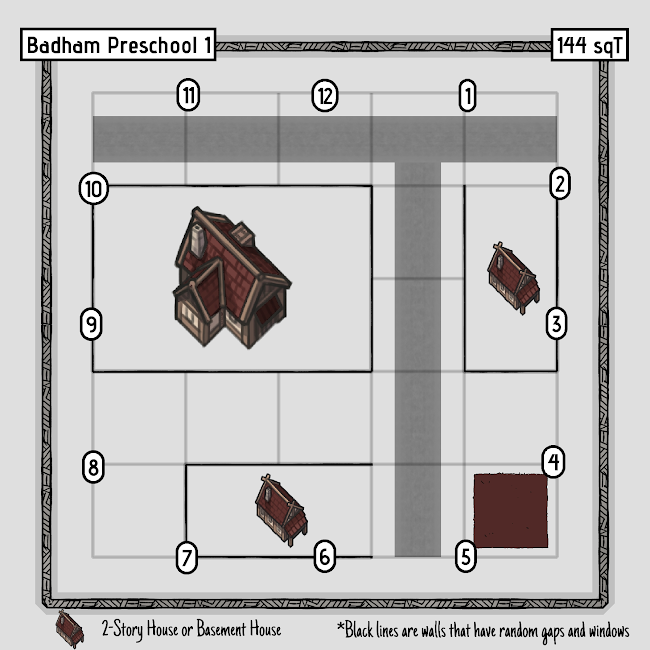
This ranking shouldn’t come as a surprise to anyone, because Badham has consistently been one of the worst maps in Dead by Daylight for the killer role. Three main buildings, all of which have good pallet and window setups. This in addition to path pallet loops everywhere make for a pretty miserable experience. Badham I in particular is quite guilty for this, putting path pallets on cars, vans, and trees to tie an already awful map together. The only true benefit to you on this map is that some of the car and concrete path pallets are TAIL ATTACK friendly, but it’s only some.
BENEFITS
- TAIL ATTACK friendly map specific loops on some of the map.
DRAWBACKS
- Three strong main buildings.
- Strong and frequent path tiles that connect the map very well.
- Many path pallet tiles are not TAIL ATTACK friendly.
BADHAM II - Grade: D (Worst)
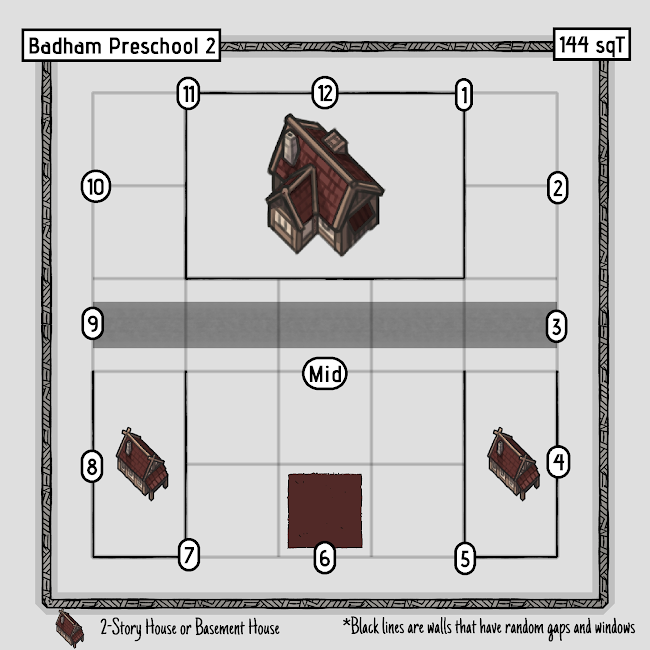
Badham II is more of the same terrible issues that plague Badham I, just with some variation. The main difference is that instead of path pallet tiles that make for a connected map, there is a vast concentration in the center of the map and especially around the killer shack. I’ve been in situations where I’ve seen up to 5-6 path pallets spawn straight into the killer shack. Even one tile spawning near the killer shack makes that structure even stronger, much less 5-6. That in addition to the 3 main buildings, TAIL ATTACK unfriendly tiles, etc. make this a miserable experience. Like before, the only benefit is that some of the car and concrete loops are circumventable with a TAIL ATTACK.
BENEFITS
- TAIL ATTACK friendly map specific loops on some of the map.
DRAWBACKS
- Three strong main buildings.
- Strong and frequent path tiles in the middle of the map.
- Can spawn multiple tiles into the killer shack.
- Many path pallet tiles are not TAIL ATTACK friendly.
BADHAM III - Grade: C (NOT FAVORABLE)
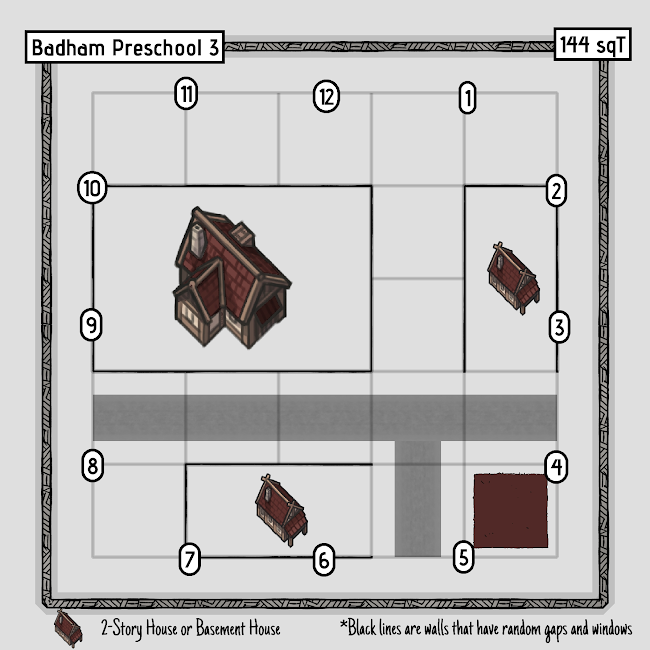

Badham III is slightly better than the first two variations of Badham. It is plagued by the same issues that there are three main buildings, many TAIL ATTACK unfriendly tiles, etc. However, the map has been oriented to where there is some space above the main building where many TAIL ATTACK friendly path pallet loops spawn. The abundance of these at the top of the map is the only thing that pulls it out of the worst map grade category.
BENEFITS
- TAIL ATTACK friendly map specific loops, with a frequent spawn in a consistent area.
DRAWBACKS
- Three strong main buildings.
- Can spawn tiles into the killer shack.
- Many path pallet tiles are not TAIL ATTACK friendly.
BADHAM IV - Grade: C (NOT FAVORABLE)
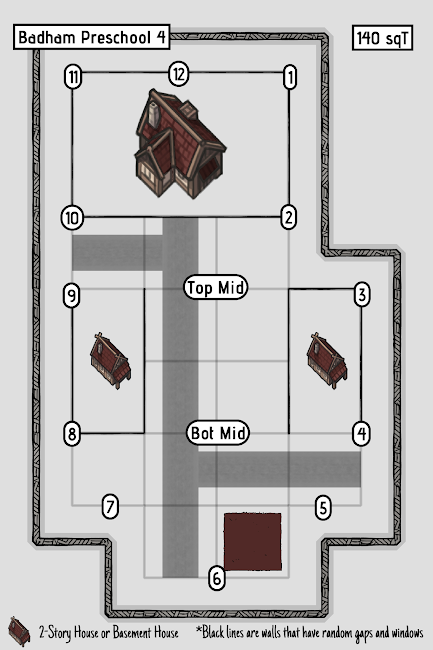
Badham IV also barely avoids the worst category. The caveat to this version of Badham is that most of the path pallet tile spawns in this map are in the middle and they are car loops, making these more TAIL ATTACK friendly. Otherwise, it’s the same old troubles with the three main buildings, TAIL ATTACK unfriendly tiles, etc.
BENEFITS
- TAIL ATTACK friendly map specific loops, with a frequent spawn in a consistent area.
DRAWBACKS
- Three strong main buildings.
- Can spawn tiles into the killer shack.
- Many path pallet tiles are not TAIL ATTACK friendly.
BADHAM V - Grade: C (NOT FAVORABLE)

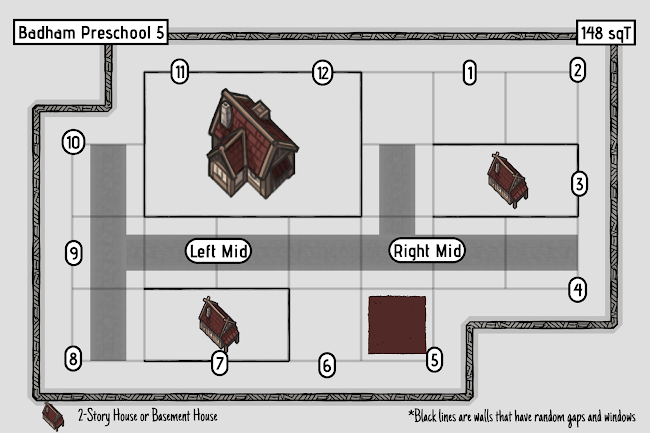
The last Badham also barely avoids the worst category for the same reason that the other two did. Because of the rectangular layout, most of the path pallet spawns are either car or concrete loops, meaning they are TAIL ATTACK friendly. These spawn in the street and above the main building that spawns on the right side. Otherwise, it’s awful for all the same reasons.
BENEFITS
- TAIL ATTACK friendly map specific loops, with a frequent spawn in consistent areas.
DRAWBACKS
- Three strong main buildings.
- Can spawn tiles into the killer shack.
- Many path pallet tiles are not TAIL ATTACK friendly.
THE GAME (Gideon Meat Plant) - Grade: B (Alright)
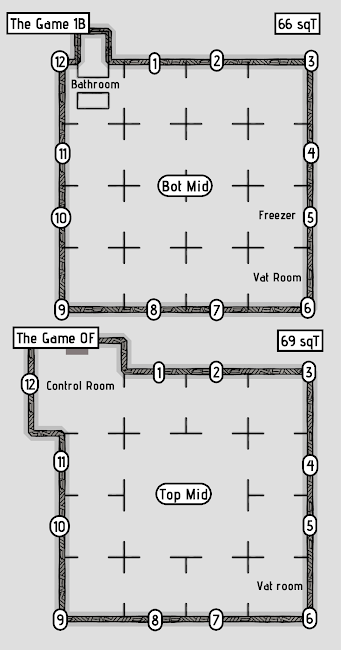
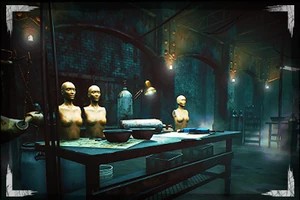
Gideon’s Meat Plant has often been seen as a killer unfavorable role, but this map is more manageable for the XENOMORPH. The reason people believe this is for a few reasons. First, the map is extremely small at only 69 square tiles at the widest. Secondly, the loops are almost entirely pallet based, meaning that eventually these tiles will deplete and you will snowball off of dead zones. Third, for the XENOMORPH, in particular, there are so many TAIL ATTACK spots on this map. The pipe drop down is a free TAIL ATTACK from the railing. Almost all the loops on the top floor are TAIL ATTACK-able due to their height.
However, there are problems. Firstly, the CONTROL STATION spawns are very inconvenient on this map, often spawning you through a wall or on a completely separate floor than the generator or area you wish to pressure. Secondly, the TAIL ATTACK does not play well with poor collision, which there will be a lot of on an indoor map. Thirdly, if a survivor opts to pre-drop a pallet outside the 4.8 meter range of the TAIL ATTACK (which is technically the right play), the extremely high pallet count means they can do this without much consequence and you simply have to respect it.
BENEFITS
- TAIL ATTACK friendly map specific loops
- A LOT of neat SNIPE SHOTS available.
DRAWBACKS
- Indoor maps don’t play well with the TAIL ATTACK collision.
- CONTROL STATION spawns are inconvenient and troublesome.
- Pre-dropping is extremely strong here, which shuts down your TAIL ATTACK.
FAMILY RESIDENCE - Grade: B (Alright)
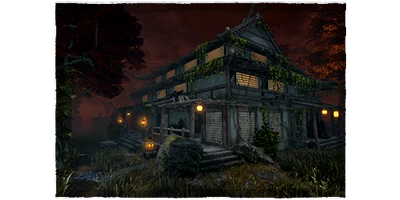

Family Residence is a middle of the road map for the XENOMORPH. The map is fairly large at 156 square tiles. The main building is window only, but these can be circumvented with the TAIL ATTACK or spending time breaking breakable walls. While the tiles are strong, there are many map specific tiles that spawn that are only waist high, which are TAIL ATTACK friendly. Even the pagoda tiles that spawn here can be circumvented with an ARC SHOT over the railing. There are also certain rock path pallets here that have depressions that you can TAIL ATTACK over. Overall, it’s a fairly TAIL ATTACK friendly map, but it’s still obnoxious because of its large size and abundance of normal tiles.
BENEFITS
- A lot of TAIL ATTACK friendly map specific loops
DRAWBACKS
- Large map size.
- Many normal tile spawns that cannot be circumvented with a TAIL ATTACK easily.
FAMILY RESIDENCE II - Grade: B (Alright)

Family Residence II is a middle of the road map for the XENOMORPH, but Family Residence II is slightly better than the original. The main difference being that the orientation of the map is shifted to where there is a rather noticeable deadzone at the center of the map and the former rectangular shape of the map, which made it hard to pressure for killer, has been streamlined. The main building is window only, but these can be circumvented with the TAIL ATTACK or spending time breaking breakable walls. While the tiles are strong, there are many map specific tiles that spawn that are only waist high, which are TAIL ATTACK friendly. Even the pagoda tiles that spawn here can be circumvented with an ARC SHOT over the railing. There are also certain rock path pallets here that have depressions that you can TAIL ATTACK over.
BENEFITS
- A lot of TAIL ATTACK friendly map specific loops
- Streamlined map shape
- Noticeable dead zone
DRAWBACKS
- Large map size.
- Many normal tile spawns that cannot be circumvented with a TAIL ATTACK easily.
SANCTUM OF WRATH - Grade: B (Alright)
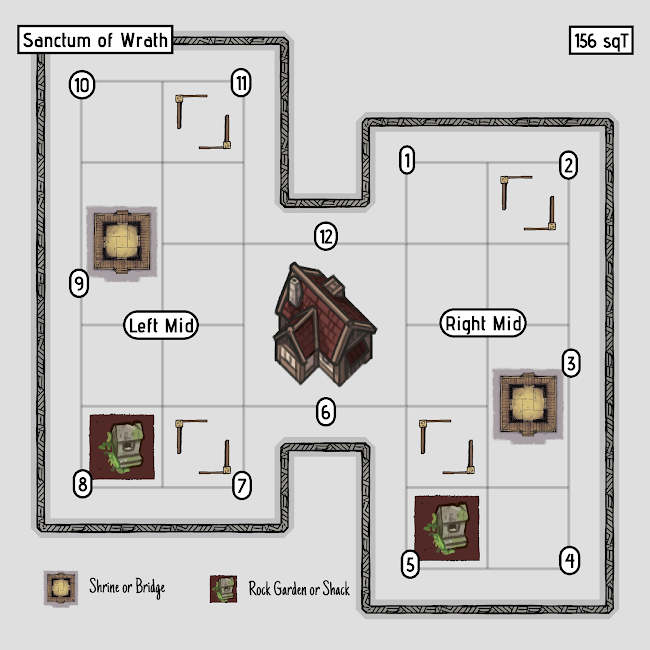
Sanctum of Wrath is the more killer role friendly of the two Yamaoka Estate realm maps. The size is still the same at a large 156 square tiles. The difference is that this map is an I-shaped map, meaning that you can create three generator situations easier. There are less TAIL ATTACK friendly tile spawns on this map, but the ones that are there are very good for the XENOMORPH. There are also some fun ARC SHOTS you can do on the main building itself, such as shooting over the staircase vault.
BENEFITS
- A good amount of TAIL ATTACK friendly map specific loops
- The I-shaped map means more three generator situations and pressure on the survivors.
- Fun ARC SHOTS are possible here.
DRAWBACKS
- Large map size.
- Many normal tile spawns that cannot be circumvented with a TAIL ATTACK easily.
SANCTUM OF WRATH II - Grade: B (Alright)
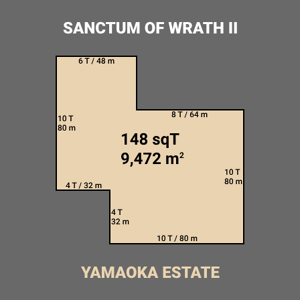

Sanctum of Wrath II widens the map shape of the original Sanctum to cut back on the three generator situation that often happens on this map. While arguably more healthy overall, this does make the map less favorable for the killer role in general. On the flip side, the map space that was moved to be in the middle, has made the opposing sides of the sanctum main building very short, which cuts off survivor tile chainability. Think of this as more of a sidegrade than a superior or inferior variation at the moment. There are less TAIL ATTACK friendly tile spawns on this map, but the ones that are there are very good for the XENOMORPH. There are also some fun ARC SHOTS you can do on the main building itself, such as shooting over the staircase vault.
BENEFITS
- A good amount of TAIL ATTACK friendly map specific loops
- Short sides of the map lead to less tile chainability
- Fun ARC SHOTS are possible here.
DRAWBACKS
- Large map size.
- Many normal tile spawns that cannot be circumvented with a TAIL ATTACK easily.
- The chokepoint from Sanctum I has been widened.
MOUNT ORMOND RESORT - Grade: C (NOT FAVORABLE)


Mount Ormond has always been an extremely strong survivor map, formerly being one of the strongest survivor maps in Dead by Daylight before its remake. Even after, it still retains a great deal of its strength. Firstly, it is a fairly large map at 156 square tiles. This is made even worse by the fact that the main building is huge and cuts off most of the map from being able to be pressured easily by the killer. The main building itself is extremely strong, with a guaranteed double god pallet spawn and strong windows as well. This is also probably the strongest Balanced Landing map in the game, allowing the survivor to speed burst to any part of the map they wish from the main building’s balcony. The only saving grace here is that this is a main building you can use the Cut Coin Tech on. This map was also recently patched to be stronger by removing the rock wall out front and replacing it with path pallet loops. Generally, most of the map will have a path pallet loop or map specific tile around, meaning most of the map is connected. The only saving grace that makes this map not one of the XENOMORPH’s worst is that most of the path pallet tiles and even some of the map specific tiles (the snowplow pallet’s rock side) can be circumvented with TAIL ATTACKS.
BENEFITS
- TAIL ATTACK friendly map specific loops
DRAWBACKS
- Large map size.
- Extremely strong and large main building
- Lots of tiles connect together, making the map fairly dead zone free.
MOUNT ORMOND RESORT II - Grade: B (Alright)


Mount Ormond’s original problem was that the main building was the dead center of the map, allowing easy tile chainability and balanced landing abuse from the survivors. In the second variation, the main building is at the back of the map and the length of the map has been spread horizontally. This even includes the very strong snow plow tile, which is also at a corner of the map instead of being between tiles. This makes Ormond II way more breathable and playable on killer.
This map is an improvement over Ormond I, and upon further testing, the top and bottom of Ormond II is so barren for survivors that even if the survivors find a resource there, the XENOMORPH can often TAIL ATTACK over them. The sides of the map are the only part that the XENOMORPH needs to worry about.
BENEFITS
- TAIL ATTACK friendly map specific loops
- Main building is not central
- Noticeable dead zones.
DRAWBACKS
- Large map size.
- Extremely strong and large main building
MOUNT ORMOND RESORT III - Grade: A (Great)
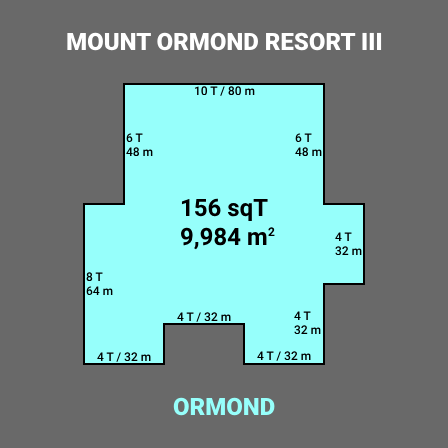

Mount Ormond’s 3rd variation is almost the same as Ormond II, except the snowplow and shack tiles have been moved up into cubbies at the top of the map. While usually cubbies are often awful for the killer, the cubbies on this map are so small that they can only hold one tile. So this is the weaker version of an already favorable map. For that reason, this is going to be a great map for XENOMORPH.
BENEFITS
- TAIL ATTACK friendly map specific loops
- Main building is not central
- Cubbies, but too small and put valuable resources out of the way of the survivors.
DRAWBACKS
- Extremely strong and large main building
THE UNDERGROUND COMPLEX (HAWKINS) - Grade: B (Alright)
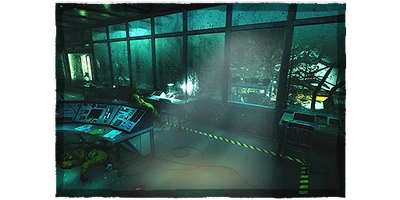

Hawkins may surprise some for getting an alright grade for this tier list, but for the XENOMORPH, it makes sense. Firstly, the map is fairly small at only 138 square tiles. Secondly, despite a large amount of pallets, most of them are waist high, meaning that they can be easily circumvented with TAIL ATTACKS. Most of the map specific loops, like the yellow railing loops, can also be circumvented with TAIL ATTACKS. There are even some fun SNIPE SHOTS you can do in the center room spawns. The main issues for XENOMORPH here are the fact that it is an indoor map, meaning that the TAIL ATTACK is going to be weighed down by collision hits. Also, the CONTROL STATION spawns are poor here, spawning you behind a wall or on a different floor than the place you want to pressure.
BENEFITS
- A lot of TAIL ATTACK friendly map specific loops
- Smaller sized map.
DRAWBACKS
- Indoor map means collision will weigh down TAIL ATTACKS.
- CONTROL STATION spawns are not convenient here.
DEAD DAWG SALOON - Grade: A (Great)
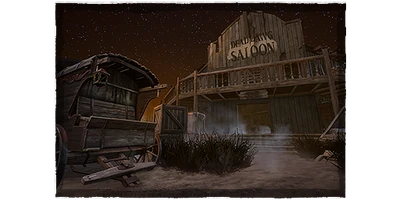
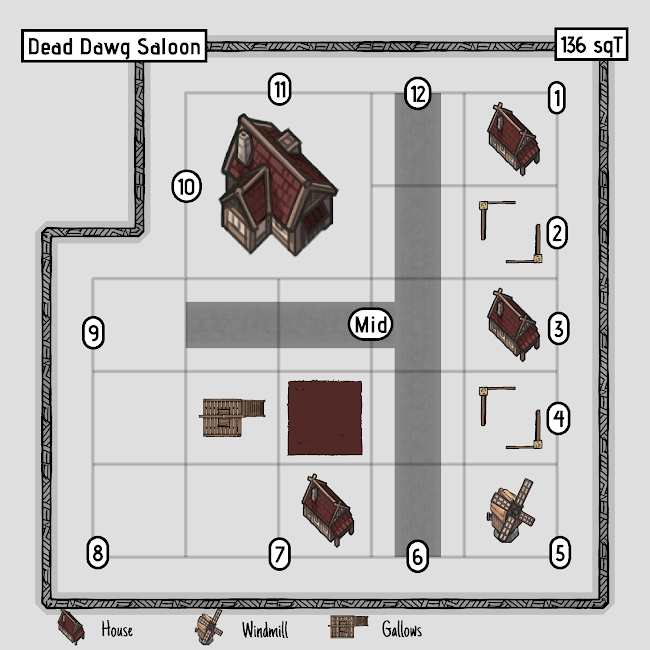
This ranking probably doesn’t come as a surprise as Dead Dawg Saloon is traditionally viewed as a killer role favored map. This also carries over favor with the XENOMORPH. Firstly, the map is smaller at only 136 square tiles. Many of the tiles on this map outside of the town side loops are waist high or lower, meaning you can easily TAIL ATTACK over them. The killer shack here is also the only killer shack in the game that can be made weaker by breaking a breakable wall. The main problem with Dead Dawg is that the main building is fairly strong. Even after breaking breakable walls, the vaults here are hard to circumvent (another good map for Self Destruct Bolt). However, there are ARC SHOTS you can use to try and help with this, even though they are difficult.
BENEFITS
- A lot of TAIL ATTACK friendly map specific loops
- Smaller sized map.
- Weaker killer shack.
DRAWBACKS
- Main building is fairly strong.
MIDWICH ELEMENTARY SCHOOL - Grade: A (Great)


Midwich is my personal favorite map in the game, and is generally seen by the community as the most killer role sided map in the game. However, there are some small hang ups that barely keep it out of the best map for XENOMORPH. First to cover the positives. Midwich is the smallest map in the game at only 64 square tiles at the widest. Most loops on Midwich are extremely weak, only amounting to path pallet strength at best. Most of these are only waist high, meaning they are ripe for TAIL ATTACKS. There are even tiles that spawn with only desks. I’m not joking. No windows, no pallets, just rooms of nothing that spawn on purpose. The aspects of Midwich that just barely keep it out of being a XENOMORPH favored map are twofold. Firstly, it’s an indoor map, meaning that TAIL ATTACKS will get caught on a lot of poor collision. Secondly, CONTROL STATION spawns here are inconvenient, often spawning you in separate rooms or whole different floors than the places you want to pressure.
BENEFITS
- Mostly TAIL ATTACK friendly map specific loops.
- Smallest map in Dead by Daylight.
- Lots of dead zones and weak loops.
DRAWBACKS
- Indoor maps don’t mix well with the TAIL ATTACK.
- CONTROL STATION spawns are very inconvenient.
RACCOON CITY POLICE DEPARTMENT (EAST) - Grade: A (Great)

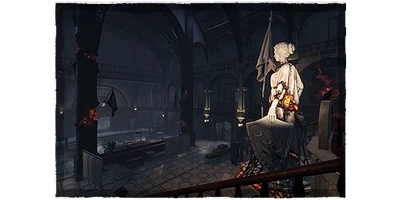
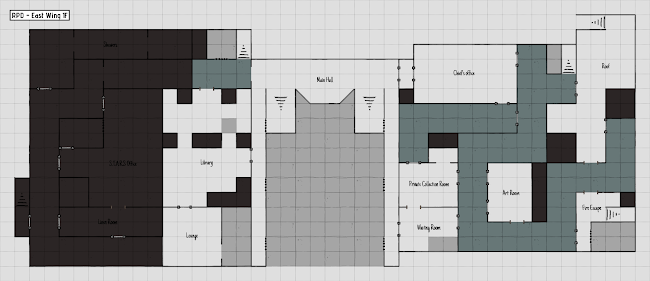
RPD East has been agreed upon in the Dead by Daylight community to be a killer role sided map, and this carries over to the XENOMORPH as well. The map does not contain any impressive loops, with only two god pallets (one of which barely sees play because it is so out of the way from any objective). The main hall god pallet can be circumvented by the XENOMORPH’s TAIL ATTACK on both sides over the railing as well. Generally, you’d be hard pressed to find a loop on this map that cannot in some way be made easier with the XENOMORPH’s TAIL ATTACK. Most loops can be shot over except for a select few (like the weapon’s locker room). RPD East is also an I-shaped map, meaning you can pressure survivors easily from the center chokepoint (the main hall). The drawbacks are that it is an indoor map, meaning TAIL ATTACKS will be harder and that CONTROL STATION spawns are not convenient.
BENEFITS
- Mostly TAIL ATTACK friendly map specific loops.
- Smaller sized map.
- The I-shape of the map makes for easy pressure on survivors.
DRAWBACKS
- Indoor maps don’t mix well with the TAIL ATTACK.
- CONTROL STATION spawns are very inconvenient.
RACCOON CITY POLICE DEPARTMENT (WEST) - Grade: B (Alright)

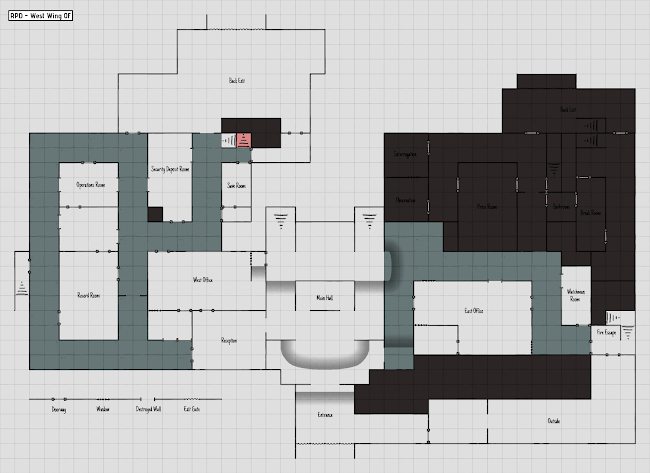

RPD West is similar to RPD East, except it is far more survivor sided. Firstly, the map is larger, having more of the RPD available to loop than the East version. Furthermore, many of these loops that are opened up are far stronger than the ones available on East (the courtyard pallet and upstairs hallway god pallet come to mind). This coupled with the previous issues of indoor map collision and poor CONTROL STATION spawn make this a noticeable downgrade for the XENOMORPH than playing on RPD East, avoiding the A Grade ranking.
BENEFITS
- A lot of TAIL ATTACK friendly map specific loops.
- The I-shape of the map makes for easy pressure on survivors.
DRAWBACKS
- Indoor maps don’t mix well with the TAIL ATTACK.
- CONTROL STATION spawns are very inconvenient.
EYRIE OF CROWS - Grade: D (Worst)
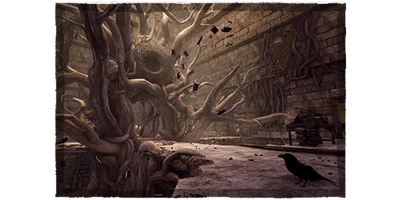
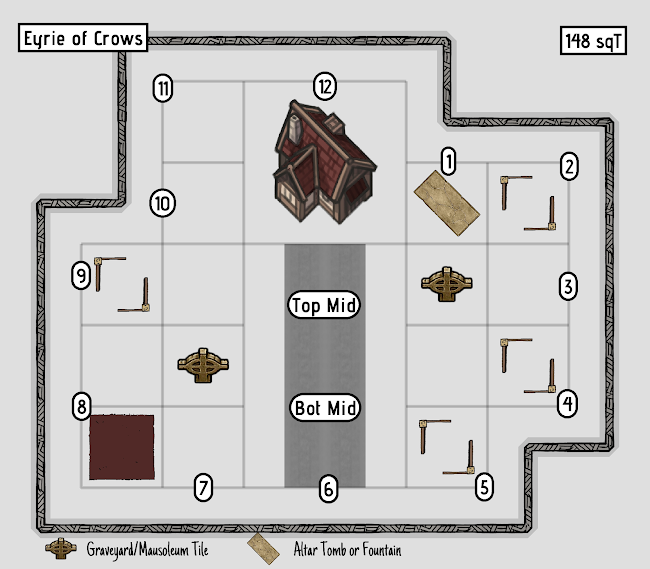
This may be a surprise pick for the worst maps for XENOMORPH, but allow me to explain. Firstly, the map is moderately large at 148 square tiles. However, the main issue lies with its tiles and its collision. Almost every tile on Eyrie of Crows is not TAIL ATTACK friendly. Sometimes this is on purpose with high wall loops, even the path pallets often have such huge rocks around them that they can’t be circumvented. However, there are some loops that in theory you should be able to shoot over, but because Eyrie of Crows has such poor environmental collision, you’ll end up hitting thin air a lot of the time. The pallet count is high on this map, meaning that survivors will rarely ever run out of resources to work with. The main building is strong with an inconvenient CONTROL STATION spawn (and no Cut Coin Tech to circumvent it). There’s basically no upside to going to Eyrie of Crows as the XENOMORPH besides certain crumbled building loops that you can actually consistently TAIL ATTACK over.
BENEFITS
- Some TAIL ATTACK friendly map specific loops.
DRAWBACKS
- CONTROL STATION spawns are very inconvenient.
- High pallet spawn count.
- Environmental collisions are some of the worst in the game.
- Very strong main building.
GARDEN OF JOY - Grade: C (NOT FAVORABLE)


This one may surprise people as not a worst map pick for the XENOMORPH. Garden of Joy has been agreed upon by the Dead by Daylight community to be one of, if not the worst designed maps in the game currently. This is because of many things. Firstly, it is a fairly large map at 164 square tiles. The main building is abysmal to loop, with an uncircumventable god window and a god pallet on the porch. The generator that spawns upstairs here is also fairly safe to do since there is a window right next to it. However, the XENOMORPH has a lot of ways to deal with this main building. The XENOMORPH can TAIL ATTACK over the white railing of the porch from both sides, being able to circumvent the god window loop. Also, Self Destruct Bolt shortens the distance survivors get from said vaults. Another thing that makes Garden of Joy particularly difficult is that most of the map is tied together by path pallets and formal tiles. One troublesome loop being the parking lot loop, which functions like another jungle gym. However, the XENOMORPH can TAIL ATTACK over the car and fence side of this loop easily. TL;DR, while this map is awful to play on for the killer role in general, it is very TAIL ATTACK friendly which makes it easier for the XENOMORPH than others.
BENEFITS
- Mostly TAIL ATTACK friendly map specific loops.
- SNIPE and ARC SHOTS available in many places.
- Cut Coin Tech works here.
DRAWBACKS
- Main building is extremely strong.
- Fairly large sized map.
- Connected tiles across almost the whole map.
GREENVILLE SQUARE - Grade: A (Great)


The newest map to Dead by Daylight at time of writing, Greenville Square is an interesting map that favors the XENOMORPH. At first glance, the large 160 square tile size may make you think it wouldn’t favor us. However, most of the pallet loops on this map are waist high, meaning they are easily circumventable by the TAIL ATTACK. Furthermore, there are a lot of dead zones between these waist high loops. The main building itself is not particularly strong and easy to pressure.
BENEFITS
- Almost entirely TAIL ATTACK friendly map specific loops.
- SNIPE and ARC SHOTS available in many places.
- Weaker main building
DRAWBACKS
- Map is fairly large.
THE SHATTERED SQUARE (BORGO) - Grade: B (Alright)

Borgo is a map that used to be extremely survivor sided with a massive size of 168 square tiles, very high pallet count, and a central main building. However, the map got reworked fairly recently and is way more favorable for the XENOMORPH. The map is now fairly small at only 144 square tiles. The pallet count has been lowered and the collision made less troublesome. As the XENOMORPH, you can circumvent a lot of the loops on this map with your TAIL ATTACK, but some rock walls are still too high for you to hit over.
BENEFITS
- Some TAIL ATTACK friendly map specific loops.
- Map is fairly small.
DRAWBACKS
- Some rock wall loops aren’t TAIL ATTACK friendly.
FORGOTTEN RUINS (BORGO) - Grade: C (Not Favorable)

Forgotten Ruins is a map that is particularly incoherent to play as XENOMORPH. It’s initially disorienting because the dungeon is treated as the first floor and the ground floor as the second floor. If you are a XENOMORPH who is still learning the travel distance visually between a first floor and second floor tunnel to a CONTROL STATION, this map is going to be really challenging for you. Also, the CONTROL STATION spawns are very puzzling. Often, CONTROL STATIONS will spawn in pairs, providing double coverage for an area which is silly and pointless. The worst thing about this map for the XENOMORPH are the portals. The portals lock you in an animation for a long time. Survivors like to place FLAME TURRETS straight in front of the portals, forcing you into the flames before you can even actively try to break them. The jury is still out on if this is a killer sided or survivor sided map, but as for the XENOMORPH specifically? It’s very problematic.
BENEFITS
- TAIL ATTACK friendly path pallet loops.
DRAWBACKS
- CONTROL STATION spawns are nonsensical.
- CONTROL STATION tunnels are hard to read.
- PORTALS lock XENOMORPH in place to be fired on by FLAME TURRETS
TOBA LANDING - Grade: B (Alright)

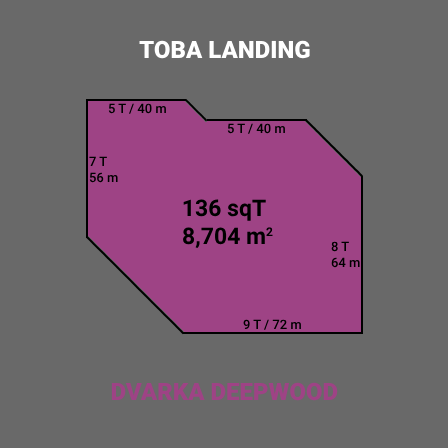
Toba Landing is sort of a middle of the road map for the XENOMORPH. The main benefit to this map is that it’s a fairly small map at only 136 square tiles. The main building is not particularly strong, with every loop in and around it being circumventable by TAIL ATTACKS. The Cut Coin Tech even works here. However, this map has notoriously poor environmental collision, so much so that BHVR has already had to patch it once, which only marginally helped. Toba also has this odd problem where much of the map's resources are crammed close together, meaning there’s very little in the way of dead zones.
BENEFITS
- TAIL ATTACK friendly map specific loops.
- Weaker main building.
- Map is fairly small.
DRAWBACKS
- Environmental collision is poor.
- Closely knit tile placement makes for a lack of dead zones.
- Strong formal tile spawns.
NOSTROMO WRECKAGE - Grade: B (Alright)

Lastly and fittingly, we will cover XENOMORPH's home map, the Nostromo Wreckage. The map is moderately large at 152 square tiles. This map has a similar situation to Toba where a lot of the tiles are crammed close together, meaning it is easy for the survivors to chain resources together. This map also has a pallet count on the higher side as well. The problem with this is that most of the loops are actually not circumventable by the TAIL ATTACK, whether that be on purpose because the loops are too high, or by accident because Nostromo has notoriously poor environmental collision. There are benefits to going to Nostromo. The main building has fairly weak pallet and window spawns (most of the loops you actually can TAIL ATTACK over are here). The Cut Coin Tech works here as well. In addition, the “killer shack” on this map is a crashed shuttle that only has an extremely weak pallet and no window.
BENEFITS
- Some TAIL ATTACK friendly map specific loops.
- Weaker main building.
DRAWBACKS
- Environmental collision is poor.
- Anti TAIL ATTACK friendly loops.
- Closely knit tile placement makes for a lack of dead zones.
- Strong formal tile spawns.
BONUS - ALL MAP SIZES ORDERED
As a bonus resource, I’ve taken the time to order all the maps in Dead by Daylight (as of Greenville Square being added) according to their size. This should make it easy to compare maps. Use this not only for your XENOMORPH improvement, but knowledge of Dead by Daylight in general!
FREQUENTLY ASKED QUESTIONS
This section will be reserved for frequently asked questions I get as those come in that can’t quite fit into a specific category. This will be placed here informally for questions I get outside the guide or formally through the Google submission form, which I will repost here: https://forms.gle/u7CzVMna7fWM9CJMA.
- Should I use a crosshair on XENOMORPH?
- Not really. The tail tip already serves as a nearly accurate crosshair (depending on the skin you’re using) for aiming the TAIL ATTACK. Using an actual crosshair would be redundant.
KNOWN BUGS
This section will be reserved for documenting CURRENT known bugs for the XENOMORPH. These will be removed from this list as they are addressed by BHVR.
Known as of 3/28/2024
- Flame Turret Invincibility Bug
- FLAME TURRETS will for some reason gain invincibility and require multiple hits to destroy. This seems to apply indiscriminately between the basic attack and the TAIL ATTACK. There is no known reason why this triggers or a way around it.
- Maximum Range Tail Attack Phantom Hits
- For some reason, occasionally max range (or close to it) TAIL ATTACKS will simply travel through the survivor without hitting them. Once again, there seems to be no rhyme or reason as to why this happens. As a result, there is no way to consistently avoid this.
- Flame Charge Phantom Hits
- For some reason, while under the effect of the FLAME TURRET flames, occasionally the TAIL ATTACK will lose its ability to hit survivors. You are supposed to be able to hit survivors with your TAIL ATTACK while under the effect of the flame charges, but sometimes, this simply doesn’t work.
I am unsure if this is tied to the hit registration problem with the maximum range TAIL ATTACKS or what culprit actually is.

- Invisible Double Break Flame Turret
- Very rarely, you’ll break a FLAME TURRET, but for some reason, it will remain active except now it is invisible. Hitting it again breaks it for sure. Once again, unsure why this happens or what triggers it.

Known as of 3/29/2024
- Zero Recovery Falling Tail Attack
- Sometimes when falling and hitting a survivor with your TAIL ATTACK, you will not suffer any recovery and speed after the survivor. I was not able to replicate this in custom games in a half hour of attempts, which may mean this is a server issue with online play only. I will continue testing on this most recent bug. This should go without saying, but don’t attempt to use this for a competitive advantage. This is an exploit and it will get you banned.

(Bug footage from Wynterbliss)
Known as of 4/3/2024
- Permastuck Power Gauge
- A very rare bug that has returned from the PTB, sometimes when you start a match, the XENOMORPH’s Crawler Mode gauge will get stuck at 99 and not progress. This seemed to recently come back after the All Things Wicked chapter.
Known as of 4/7/2024
- FLAME TURRET Blue Highlight Bug
- For some reason, the XENOMORPH is sometimes able to see the blue highlight aura that survivors get when looking to place a FLAME TURRET that they are holding. This bug is completely harmless thankfully. However, it is still worth noting as a bug.

(Bug footage supplied by Xenomorph_XX121)
Known as of 4/26/2024
- CONTROL STATION Exit Bug
- Patch 7.7.0 has broken many things, but the worst bug for XENOMORPH is that for some reason, you will randomly be not allowed to fully exit CONTROL STATIONS when leaving the TUNNELS. You will instead get stuck the moment you come out. The only way around this is to go back into the CONTROL STATION and come out somewhere else. This seems to happen most on Red Forest realm maps, but there are unconfirmed reports of it happening on other maps such as Lery’s.

(Bug footage from OrochiSnake on Twitter)
Known as of 8/1/2024
- ACIDIC BLOOD BUG
- The add-on, ACIDIC BLOOD, has been activating inconsistently. Sometimes it will not activate at all, other times once a match. You should avoid running this add-on until it is fixed!
FIXED BUGS
This section will be reserved for documentation of the fixes to standing bugs that the XENOMORPH has. I may go back to add older fixed bugs later, but for now, I will be focusing on posting fixes for current bugs as they happen!
CREATORS TO WATCH
This section will list resources of good creators to watch, follow, etc. if you’re looking to improve at & enjoy the XENOMORPH.
- Ghost is a XENOMORPH main (#13 in total TAIL ATTACKS) with an extremely kind and positive attitude. Ghost also contributed to the TAIL ATTACK section of this guide with windup numbers.
- Cinthean is a XENOMORPH main (#6 in total TAIL ATTACKS). Cinthean is well known in the XENOMORPH community and has a good attitude.
- Wynter is a XENOMORPH main who has a couple shots featured in this guide. They also have helped in identifying and testing bugs that appear in this guide as well.
- MsPawley is a XENOMORPH main (#4 in total TAIL ATTACKS). MsPawley is very kind and active in the XENOMORPH community!
REVISIONS
This section will be reserved for documenting revisions made to the Xenoguide throughout its life. This can be anything as big as new map drops, or as small as numerical errors. Either way, all of it will be documented here.
3/11/2024
- The XENOMORPH guide is released.
3/13/2024
- All instances of Kane’s Helmet have been replaced in the guide to reflect the new updated version from patch 7.6.0.
3/14/2024
- The fun build, “Speedy Vault Build”, has been amended since the patch 7.6.0 release of the Unknown. The Unknown’s teachable perk “Unbound” has replaced Brutal Strength, to make a full quad vault perk build. Perk text, images, and full showcase have been replaced to reflect the new build.
- In the map tier list section, I provided the link to the tier list I made to order the XENOMORPH map strengths. It’s up to date with the current patch (7.6.0), enjoy!
- In the TAIL ATTACKS section, in the FAQ where I talk about avoiding the TAIL ATTACK, I uploaded the audio que for the TAIL ATTACK windup as well as the full TAIL ATTACK sound effect.
3/21/2024
- Discovered a new tech, the ANTI UNHOOK SHOT, which is where the XENOMORPH can use a SNIPE SHOT between a hooked survivor and the hook to hit a survivor unhooking on the other side. This has been added to the TYPES OF TAIL ATTACKS section with full explanation and instructional gif.
3/27/2024
- Added a warning notice to Gift Of Pain in the build section. It is currently bugged back to the 6.1.0 patch numbers and has not yet been fixed. This will be removed and the perk description updated when this is patched!
- Added a new section in the Tail Attack chapter under the Aiming The Tail Attack section to visualize how accurate each individual XENOMORPH cosmetic is for aiming the TAIL ATTACK. Instructional images and descriptions are included.
3/28/2024
- Added a new section at the end of the guide covering current known bugs. This includes another section where I will document these bugs as they are fixed.
3/29/2024
- Discovered a new bug when falling and landing a TAIL ATTACK, you speed after the survivor for some reason. Added to the KNOWN BUGS section.
3/31/2024
- Added the “Map Specific Tile Looping” section after the General Tile Looping section. These will include tiles that are specific to only a map or two. First added tile is the U-Wall Jungle Gym from Toba Landing & Nostromo Wreckage.
- Further testing using the add-on “Semiotic Keyboard” with deliverable slowdown (perks like Pop Goes The Weasel, Eruption, etc) showed it was stronger than the original tier list reflected. The Semiotic Keyboard has been moved to the top of B tier.
- Added my general Dead by Daylight resource where I ordered the maps based on their total square tile size. This has been added as a bonus section at the end of the Map Tier List section.
4/1/2024
- Added a section at the end of the guide for reputable content creator recommendations for the XENOMORPH. This will be added to as I become acquainted with more creators!
- Moved the Revisions section to the bottom of the guide. This section is already getting long, so I wanted to put it at the bottom so it did not get in the way of other information.
- Added the CONTROL STATION Hawkins bug fix to the Fixed Bugs section. CONTROL STATIONS no longer spawn in lockers or other blockers.
4/3/2024
- A PTB bug where the CRAWLER MODE power charges would get stuck at 99 at the beginning of the match has returned to the game. Added to the Known Bugs section.
4/4/2024
- Did some testing and discovered that when a XENOMORPH’s add-on destroys a FLAME TURRET, this DOES count as the XENOMORPH itself destroying the FLAME TURRET. This is important because default FLAME TURRET respawn is 30 seconds, while FLAME TURRETS destroyed by the XENOMORPH respawn for a whole 60 seconds, which is far superior. This has been added to all add-on descriptions this pertains to.
4/7/2024
- A new bug recorded where the FLAME TURRETS sometimes show the blue aura that is used for survivors to place the FLAME TURRET. This has been added to the Known Bugs section.
4/10/2024
- Tested and added the numbers behind the slowdown while under the effect of a Flame Turret (92%). This was added to the “How To Stay In CRAWLER MODE” Section.
4/17/2024
- Haddonfield tile count graphic listed the total square tiles as 20 more than the accurate size. This has been fixed.
4/24/2024
- Haddonfield map has been re-rated with the arrival of the new version in patch 7.7.0. The overall map tier list has also been adjusted accordingly.
- Added the power recovery rate for CRAWLER MODE after carrying a survivor. Both the default and Ovomorph add-on recovery rates have been added to the CRAWLER MODE section.
4/28/2024
- Added the CONTROL STATION Exit bug to the Known Bugs section.
5/6/2024
- Flame Turret PLACEMENT Invincibility bug fix added to the Fixed Bugs section.
5/14/2024
- Flame Turret PLACEMENT Invincibility bug fix has been removed from the Fixed Bugs section as it was found to still be in the game.
- Old perk descriptions have been replaced (Ultimate Weapon & Sloppy Butcher) as it seems the perks are staying the way they are for the foreseeable future.
- Additional testing with Batteries Included (12 meter activation) with the TUNNELS shows that you are closer to 12 meters below the map, TUNNELS section has been updated with this info accordingly.
- The ability to break a FLAME TURRET if you emerge from a CONTROL STATION the moment a survivor grabs the FLAME TURRET has been added to the FAQ section of the TUNNELS chapter.
5/26/2024
- The Hawkins Control Station Spawn bug has returned to the game, as such, it has been removed from the Fixed Bugs section.
6/4/2024
- Updated the Builds & Perks chapter to reflect the many slowdown adjustments made in Patch 8.0.0. Descriptions for Pain Resonance, Pop Goes The Weasel, and Deadlock have been adjusted accordingly.
6/5/2024
- Updated the Speedy Vault Build in the Builds & Perks chapter to include new Vecna perk, Dark Arrogance. The showcase has been updated as well.
- Map tier list has been updated to include the new Dungeons & Dragons map, Forgotten Ruins. Full description added as well.
7/4/2024
- A PERK TIER List section with explanations for each perk type has been added to CHAPTER 8: BUILDS & PERKS.
7/9/2024
- Small text additions to the addon, LIGHT WAND, based on additional addon testing (tier list placement did not change).
- Redundant informational gifs were removed for flow and functionality of the document.
7/15/2024
- Small adjustments to add-on tier list based on continued testing. Improvised Cattle Prod moved up into the bottom of B tier and some organization of the C tier shifted.
7/18/2024
- New variations for Ormond and Yamaoka realms have been added to the map tier list section.
- The Game (Gideon Meat Packing Plant) has been moved up into the bottom of B due to availability of TAIL ATTACK shots.
- Other miscellaneous maps have shifted within their own tier (whole tier list remade as a result)
- (NOTE: Forgotten Ruins and the new variations are still missing their tile counts)
7/21/2024
- The formal term for XENOMORPH’s power, “Hidden Pursuit”, has been added to the terminology section. While it is not used at all by the game besides the power name itself, it is still helpful to know when other official material references the XENOMORPH.
8/4/2024
- The third variation for Mount Ormond has been added to the map tier list. Mount Ormond’s second variation has also moved up into the B tier for the XENOMORPH. The map tier list image has been adjusted accordingly (including the resource that you can use yourself).
- (Tile counts are still missing for maps post the Dungeons & Dragon update)
8/15/2024
- Infographics and explanation added to the TUNNELS frequently asked question section covering how to determine which floor you will come out of on two floored maps.
8/18/2024
- The CONTROL STATION section has been updated to include the self-destruct timer on FLAME TURRETS left inside their case, instructional gif included.
- Some additions to earlier sections of the guide had messed up the formatting in later sections of the guide. This has been fixed.
- The add-on, KANE’S HELMET has been shifted down into B tier after continued testing showed that the nerf was fairly harmful to its effectiveness
- Other miscellaneous add-ons have been moved within their own tiers.
- Some additional miscellaneous info has been added in places deemed necessary
- (EX: clarifying that basic attacks have a 2.7 second cooldown when talking about the XENOMORPH’s 3 second cooldown on their TAIL ATTACK)
8/19/2024
- Tile counts have been released for the Ormond and Yamaoka variations; these have been added to the guide accordingly.
8/21/2024
- The ability to hide placed FLAME TURRET auras using the BLINDNESS status effect has been added to the frequently asked questions section of the FLAME TURRET section. An instructional gif has been attached with this as well.
- Added the fact that crows do not get disturbed while in CRAWLER MODE to the stealth subsection of the CRAWLER MODE section. An instructional gif has also been attached.
- Map size tier list has been updated with the new map variations since their tile counts were finally released.
THANK YOU FOR READING
A L I E N
XENOMORPH GUIDE
WRITTEN BY ME TheMrHeadache
It was an incredibly long and fun journey to write this guide. I’ve always wanted to be a positive and good influence on the Dead by Daylight community. Hopefully through this, I’ve created an excellent resource to help you learn and stay great at the wonderful character we call the XENOMORPH. Again, remember to reach out if you have any further thoughts & questions that you did not feel was covered in the guide.
Otherwise, enjoy and I hope you have a wonderful day friends~!
Love,
Bran
(TheMrHeadache)