
Creating Non-Visit Prescriptions in SpecVet
When a Client comes in to pick up a prescription for a Patient that does not have any active visits, the user must go through these steps to correctly generate an invoice to the Client record.
First, click on the Contacts logo at the SpecVet home page.
Next, choose your desired Client/Contact Name (filterable)
Click on the Patients tab at the left hand side of the screen.
Patients highlighted in red are deceased; patients highlighted in black are active.
Once the desired Patient has been located, click on the blue arrow next to the corresponding Patient ID and Patient Name.
After clicking on the blue arrow, you will be automatically taken to the Patient Detail Module window.
While viewing the ‘Patient Detail’ module, click on the RXs tab.
To create a new prescription, click on the + New RX button.
The ‘Pick a DVM’ pop-up window will now appear. Take the time to choose the correct prescribing DVM.
After choosing your DVM, the ‘New RX’ pop-up window will appear. There are 4 steps to consider in this pop-up window, and they are as follows…
- Enter Rx Information
- Refill Info
- If Dispensing, Check Info
- Action
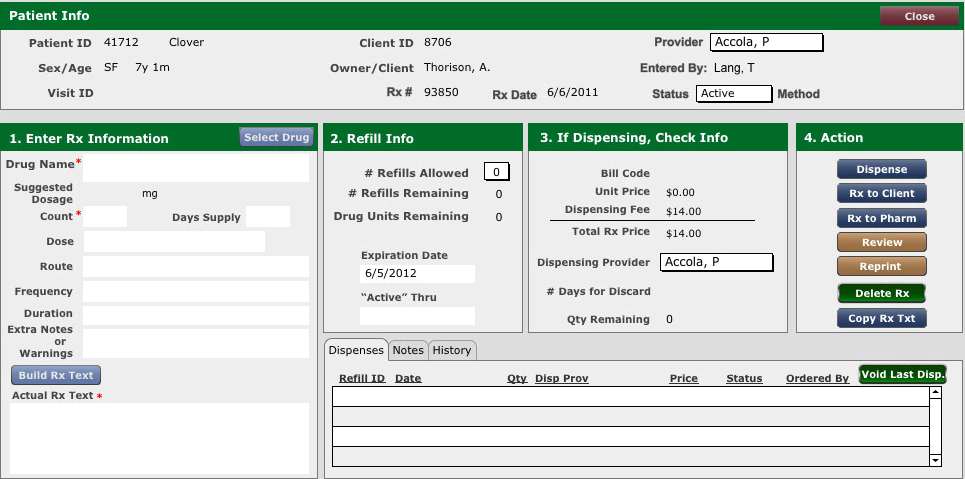
- Enter RX Information
If you are not automatically prompted to select your desired prescription drug, click the blue button titled ‘select drug’ found in the Enter RX Information area of the ‘New RX’ module window.

When clicked, this button will open the ‘Select Prescription Item’ pop-up window.
From this window you can filter by category and search for a drug’s name. Click on the desired item to be prescribed.
The ‘Select Prescription Item’ pop-up window will automatically close after selection is complete, taking the user back to the ‘New RX’ window.
Next, fill out all fields marked with an asterisk (fields marked with asterisks are required fields).
Then, fill in any other applicable fields.
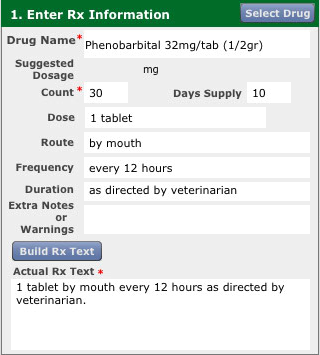
After all necessary details have been entered into the ‘Enter RX Information’ section of the ‘New RX’ module you may click on the blue ‘Build RX Text’ button to populate the ‘Actual RX Text’ field located directly below the button.
(Note: This field is marked with an asterisk, meaning it is a required field).
You may now move on to the next section of the ‘New RX’ window…
- Refill Info
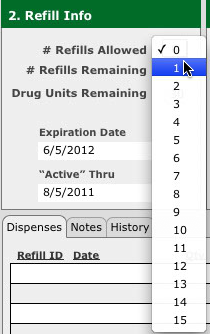
In the ‘Refill Info’ section of the ‘New RX’ window, fill in the fields for ‘# of Refills Allowed’, as well as the ‘Expiration Date’ and ‘Active Through’ date fields.
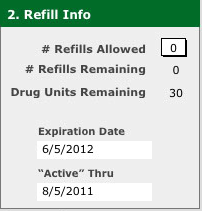

Related fields will be automatically generated (such as ‘# of Refills Remaining’ and ‘Drug Units Remaining’).
Upon completion of these steps, you may move onto the next section of the ‘New RX’ window…
- If Dispensing, Check Info
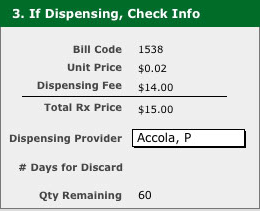
The information seen in this step of the ‘New RX’ window is generated automatically based upon details entered in steps one and two.
When dispensing medication, check and make sure this information is correct before proceeding.
- Action
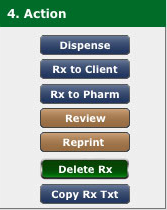
After all sections of the ‘New RX’ window have been filled out, proceed to click on the blue ‘Dispense’ button.
Print Label dialog box will now appear, select the number of label required and click OK.
After clicking on ‘Dispense’, the prescription label will print and the prescription will be “admitted” to the Inventory Management System.
Hospital personnel may now fill the prescription.
For non-visit prescription invoicing, navigate to the Clinical Dashboard.
- Non-Visit Prescription Invoicing
After any non-visit prescription has been ordered and dispensed, its’ status is automatically set to .

To update prescription status & generate non-visit invoices, follow these instructions…
First, navigate to the clinical dashboard…
After navigating to the Clinical Dashboard, scroll through the portals on the right hand side of the screen using the blue arrow buttons until the ‘Prescriptions’ module is visible.


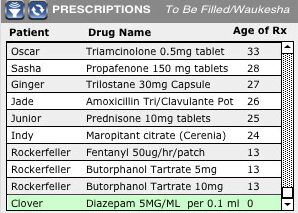
Click the Funnel button in the upper left hand corner of the ‘Prescriptions’ module to filter by site, drug name, status and more.
Once the desired non-visit prescription has been located, select it by clicking on the prescription details within the ‘Prescriptions’ module List.
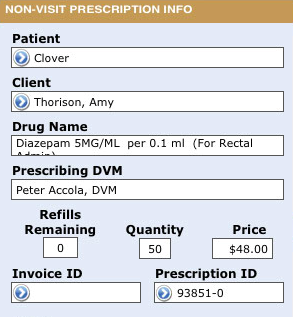
When the item is selected, it will appear highlighted in green and Non-Visit Prescription Information will populate to the left of the Prescription module.
Once the appropriate non-visit prescription has been selected and the prescription has been filled, the Non-Visit Prescription Information status must be updated from ‘To Be Filled’ to ‘Filled’.
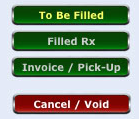
To update the status, simply click on the appropriate button. For example, if the prescription has been filled, click on the “Filled RX” button.
The current status step is highlighted in yellow letters.
After the prescription has been filled and the status has been updated, it will be “Discharged” from the IMS and the completed prescription is to be given to the front desk.
Once a non-visit prescription has been picked up by a client, the status must be updated and marked as “Invoice/Pick-Up”.
After the status has been updated, an invoice will automatically be created and an invoice ID will be generated and populated under the ‘Non-visit Prescription Info’ section of the clinical dashboard.