
Blackboard Grade Center
Contents:
1. How to access the Grade Center
3. How & Why to Create and Modify GC Columns
- To create new columns in Grade Center, follow these steps:
- Modifying Grade Center Columns
- Hiding and Making Hidden Columns Visible
4. Inputting, Downloading, and Uploading Grades
5. How to Create Midterm and Final Grades
6. How and Why to Create and Modify Groups
7. How and Why to Create Smart Views
Introduction
Grade Center at a Glance
Blackboard Grade Center contains numerous new tools that instructors can use to support improved student learning. Some of those options are:
- Add comments for any grade to give students individual feedback
- Use the integrated tool for Email to contact any students who get a low grade on a quiz or exam
- Define grading periods such as Mid-term and Final Grade and move grade columns into the appropriate period. For each of your grading periods create a new Calculated column for Weighted, Total, Average, or Minimum/Maximum, as you wish
- Define as many grade schemas (equivalency tables of letter grades and scores) as needed. For example, if you want to provide different grading curves for easier tests and harder tests
- Create individual grade reports that can be printed out and distributed to your students
- Exempt a grade for an individual student or remove from calculations any column you want to exclude for the whole class
- Create Smart Views to see subsets of the class, such as grad students vs. undergraduates
Action Bar: Within the action bar there are many of the pull-down menus necessary for basic and more advanced procedures in GC.
Work Offline: This button allows you to Upload and Download grades from an Excel Spreadsheet.
Other Grade Center Views: Use Current View to toggle back and forth between the Full Grade Center, Smart Views, and Grading Periods
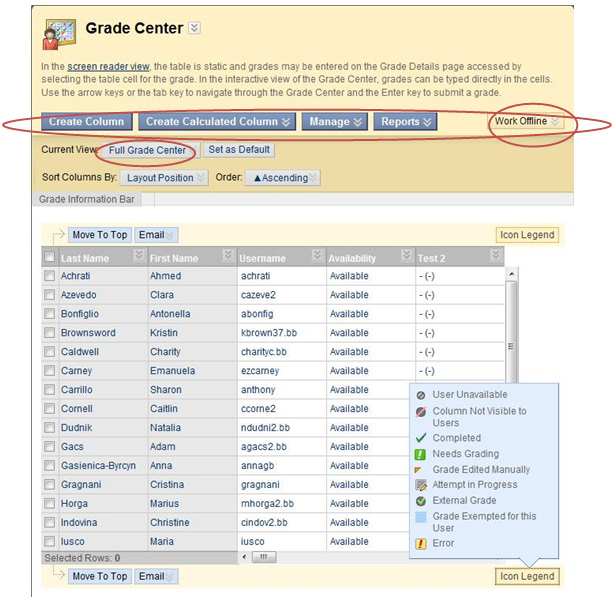
Grade Center Spreadsheet: The spreadsheet is where grades are entered and calculated. Each student in the class has their own row and every individual GC Item (test, quiz, assignment, etc.) has its own column. Each column can be hidden with the exception of Last Name
Now that you know the basics about GC, detailed information follows:
Basic Grade Center
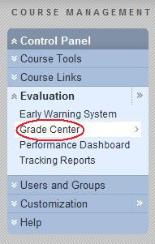
1. How to access the Grade Center
- Enter your Blackboard course and access the Control Panel
- Click on the Grade Center link under the Evaluation section
- The Grade Book view spreadsheet will appear
- Options for managing GC will be listed across the Action Bar
2. Utilizing Categories
Categories are helpful in organizing and utilizing the GC. Grade Center can be sorted by creating specific categories to compare scores between things like homework and tests.
(Examples of Categories)
Syllabus:
Tests 40% - Homework 10% - Attendance 20% - Wiki 30%
(Examples of Columns)
Individual Items:
Test 1 - Homework 1 - Day 1 - Post 1
Categories are also used to create Smart Views (Sec. 7). In addition, categories integrate with calculated grade columns. For example, weighted grade columns can be created and average grade columns based on all the items within a category.
Note: Set up Categories before you start entering grades. It will make things much easier.
The GC contains four default Categories that are pre-created (e.g. Assignment and Test.) They cannot be modified or removed. However new, unique categories can be created as well to meet the specificities of a given course. Some of those categories might include items such as Oral Exams, Quizzes, etc., and they can be created through the Manage Categories page.
2.1 Creating Categories
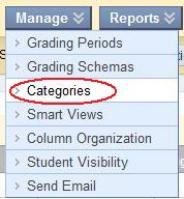
- Click Manage in the Action Bar of the Grade Center
- Select Categories from the Action Link menu
- Click Create Category
- Enter a Name for the Category. For example, Oral Exams
- Enter a Description. The Description field can help differentiate Categories, and explain a Category’s purpose
- Click Submit
- Columns [that is, individual graded items like: Test 1, Test 2, etc.] associated with a Category are listed on the Manage Categories page. To associate a column with a Category, see (Sec. 3.1)
3. How & Why to Create and Modify GC Columns
A Column must be created for each assignment, test, quiz, etc. given in the course. Without Columns, there is no place to put your student’s grades. Columns can be modified after they have been.
- GC items that are not assigned a Category upon creation are automatically assigned to No Category
- To avoid this, create Categories (Sec. 2.1) before creating GC Items. Having GC Items associated with Categories is helpful when creating Smart Views (Sec. 7.0)
- It is recommended to create columns ahead of time, not as the course goes along
Columns (gradable items) can be added to GC automatically, manually, or by uploading graded items from a spreadsheet.
Automatically Generated Grade Center Columns
Columns are automatically generated for these default gradable items provided by Blackboard: Discussion Boards, Assignments, Surveys, and Tests. As any of these items are added to the course, Blackboard will automatically create a column where a grade can be entered.
3.1 To create new columns in Grade Center, follow these steps:
1. Click Create Column in the Action Bar of the GC

*For a step by step guide on how to fill out the options below, please see the following screenshot:
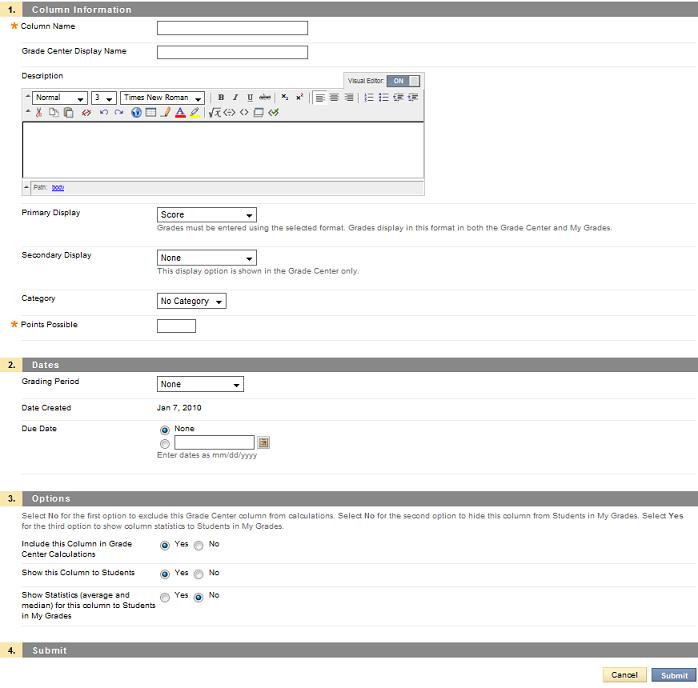
- Enter Column Name: This is displayed in the GC if no Grade Center Display Name is entered
- Enter Grade Center Display Name: This appears as the column header in the Grade Center. The Grade Center is the only area where this name is used
Note: Make 2. and 3. equivalent to avoid confusion. GC will only accept 12 characters for the display name
- Description: entering this information will help in identifying the column
- Primary Display: the default choice is Score unless otherwise indicated in the settings. For example, the number of points received. If scores for students are entered, make the primary display score. If percentages are entered, make percentages the primary display.
- Secondary Display: If you want a secondary format to display grades choose one. For example, the percentage could be displayed here in addition to the primary display that you have already chosen.
- Category: select from the drop down menu
NOTE: Categories (Sec. 2.1) must be created before they can be associated with a column
- Points Possible: Nonnumeric entries are not accepted. This item cannot be left blank
- Grading Period: Grading Period and the drop-down menu will not display unless Grading Periods have previously been created. See Section 5.3
- Creation Date: Automatically displays the date the Grade Item was created
- Due Date: Select from the following:
- None – there will be no due date for the Grade Item
- Due on – specify the due date for the Grade Item
- Additional options can be set for the column by clicking the Yes or No button for the following:
- Include Column in GC Calculations – the column is included in the possible selections of items when creating Calculated Columns, such as Weighted Grades Columns or Total Point Columns
- Show this Column in My Grades – Grades will appear in My Grades, View Grades, and the Report Card module when available
- Show Statistics (average and mean) for this column in My Grades – Includes statistical information with the grade value when shown to students
- Click Submit to save
3.2 Modifying Grade Center Columns
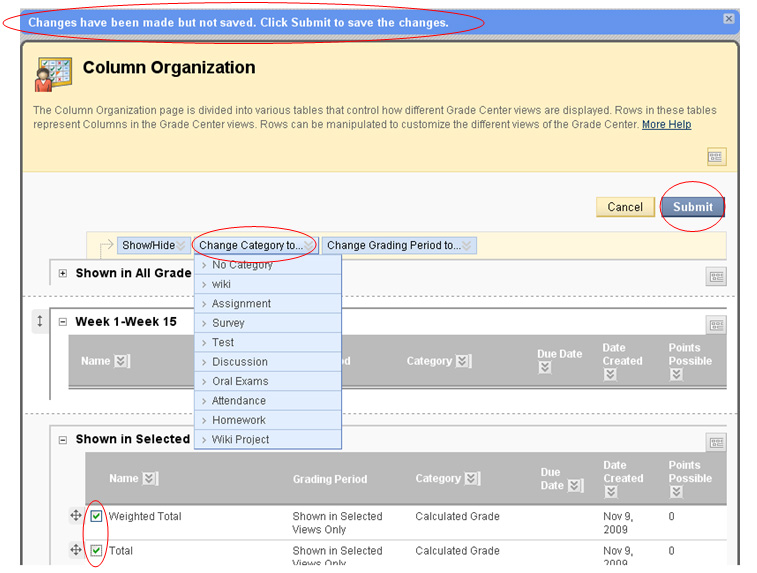
To Change the Category of Grade Columns follow these steps:
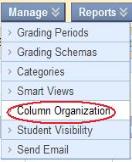
1. Click on Manage
2. Click Column Organization
3. Check boxes next to the columns where Category changes necessary
4. Click Change Category to
5. Assign the desired Category (assignment, test, survey, etc.) from the drop down menu
6. Click Submit to save changes
Note: changes will not be saved until Submit is clicked
3.3 Hiding and Making Hidden Columns Visible
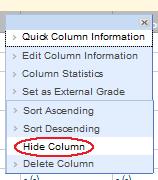
- Click on the Action Link in the desired column header
- Click Hide Column
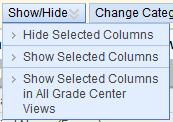
- To make the column visible again, Click Manage in the Action Bar
- Click Column Organization from the pull-down menu
- Check the columns you wish to make visible again
- Click the appropriate option for you
4. Inputting, Downloading, and Uploading Grades
After creating a Column (Sec. 3.1) in GC, students’ grades can be updated.
To Manually Input Grades follow these steps:
1. Open the Control Panel and click on Grade Center
2. Move the cursor over the desired cell and click
3. Type the value
4. Press Enter
Note: GC will only allow you to upload two types of files. The Excel .xls option is recommended
To Download Grades follow these steps:
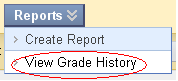
- Click Reports in the Action Bar of the Grade Center. Select View Grade History from the Action Link menu
- Choose the file format you wish to create from your downloaded file. Remember Tab files open in Excel. This is the easiest choice to work with later
- Click Submit
- Click Download to work on the file offline
- Choose a program to open the file. E.g., Excel
- Click Save As to save a local copy to work from on your computer or flash drive
To Upload Grades follow these steps:
- Click Work Offline on the far right-hand side of the Grade Center. Select Upload from the Action Link menu. Browse for the file.
- Select the Delimiter Type, Comma, Tab, or Auto. Auto will attempt to automatically detect the delimiter used in the selected file.
- Click Submit to upload the selected file.
- Review the list of data from the file to be uploaded. Use the check boxes to de-select any data to be excluded from the upload. Using this method, it is possible to upload only the desired columns of data from the file.
- Review the Data Preview Column to ensure the correct data is being uploaded. The Data Preview will only show a sample of the data in each column in the file.
- Large files take a long time to upload and a warning message will be displayed for any files that need extra time to process. To avoid long processing times, break up large files into separate uploads.
- Click Submit to confirm and upload the file.
Note: GC will only allow two types of files to be uploaded. The Excel .xls option is recommended
5. How to Create Midterm and Final Grades
Weighted grades are used to set total final scores for a class. A weight can be set for each Grade Center Column to determine a final grade. GC provides two different options for weighting items - weight by category, or weight by column. All weights must add up to 100% before the Blackboard will accept them.
See Example below:
Syllabus/Categories | Tests | Homework | Attendance | Wiki | Oral Exams | Total Score |
Individual Items/Columns | Test 1 Test 2 Test 3 | Homework 1-5 | 32 Days | 3 Posts | 2 Exams @ 5 Minutes each | 350 Points |
Weighted Grade | 30% | 25% | 10% | 15% | 20% | 100% |
Weighting by Category – All items within the category can be assigned equal weights. For example, the Homework category is given a weight of 25% and there are 5 Gradebook items assigned to that Category, each item could be given a weight of 5% (25%/5).
Weighting by Item – each individual item (column) is given a separate weight. Different weights can be assigned to items (columns) that belong to the same category. For example, instead of giving each of the oral exams an equal weight as displayed above, they could be given individual weights--for example, maybe making the second more important than the first.
5.1 Creating a Weighted Grade
To create a Weighted Grade column in the GC, follow these steps from the Grade Center View Spreadsheet.
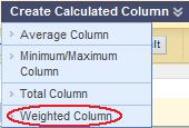
- Move the cursor over the Create Calculated Column icon in the Action Bar of the GC
- Select Weighted Column from the Action Link menu
- Enter a Column Name
- Enter a Grade Center Display Name. This appears as the column header in the Grade Center. The Grade Center is the only area where this name is used.
Note: Make 3. and 4. equivalent to avoid confusion. GC will only accept 12 characters for the display name
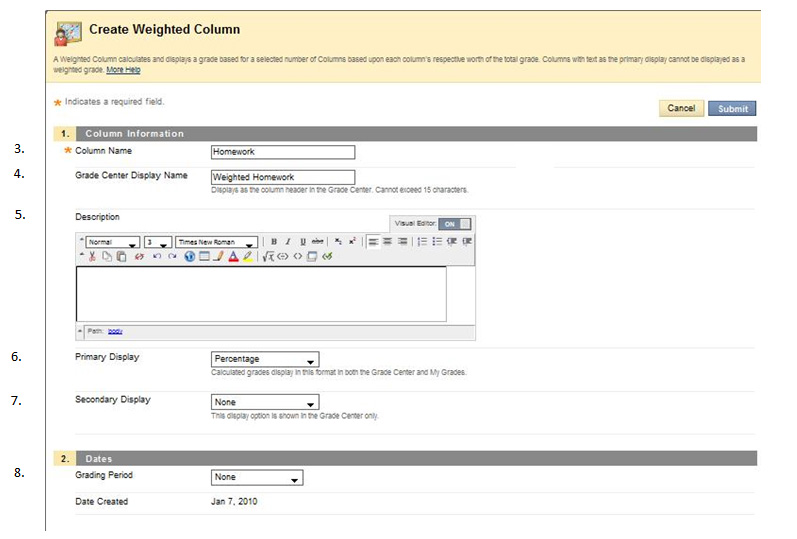
- Enter a Description. A description will help Instructors and other graders identify the column.
- Choose a Primary Display option from the drop-down menu. The default choice is Score unless otherwise indicated. For the number of points received, it is recommended that a percentage is used so students will have a better idea of what their grade is. If score is selected, then they will not know their grade unless they know how many points were possible, which GC does not show them.
- Select a Secondary Display from the drop-down menu. This selection displays the secondary format for this Weighted Grade column in the GC.
- Select a Grading Period (Sec. 5.3) from the drop-down menu
Note: This is only possible if grading periods were previously created.
- Select the items to be included in the Weighted Grade Column, and enter the Percentages for each column or Category to be included in the Weighted Grade
- Columns to Select – A list of all the columns in the GC. Select the Column and click the arrow to add it to the Weighted Grade column.
- Categories to Select – A list of all Categories in the GC. Select the category and click the arrow to add it to the Weighted Grade column.
- After all Columns and Categories have been selected, enter the percentage for each selection
When a Category has been selected, several other options appear:
- Select a Grading Period for the Category using the drop-down menu. This will only appear if a Grading Period has been created. Only columns within the selected Grading Period will be included in the Weighted Grade.
- Select how to weigh columns within the Category Equally or Proportionally. Choosing Equally applies equal value to all Columns within a Category. Choosing Proportionally applies the appropriate value to a Grade Item based on its points compared to other columns in the Category.
- Decide whether to drop high or low grades within the Category or use the lowest or highest value in the category. To remove a selected Grade Item or Category from consideration, click the red “X”.
A Grade column that is set to no for the Include in Grade Center Score Calculations setting will not display in the selection list.
- Calculate as a running total – Select Yes to calculate the weight as a running total to include only the Columns that have been graded. Select No to include all items.
- Share Weighted Grade column with users. The following permissions can be selected to add the column to My Grades:
- Include Column in the Grade Center calculations – Makes the Column available for use in other calculations
- Show Column in My Grades – Shows the column in My Grades
- Show Statistics (average and median) to Students– Shows the Weighted Grade column statistics in My Grades
Note: don't do this at the beginning of the course because those students who drop the course will remain a part of the class average. This could cause students to questions their grades later

5.2 Weighted Columns vs. Total Columns
A Grade Center Total Point column is a grade based on the cumulative points received, related to the points allowed for a period of time to be specified by the user.
- All Grade Columns – All individual Grade Columns added to the Grade Center
- Grade Columns in a Grading Period - All Grade Columns that have been added to a Grading Period
- Selected Gradable Columns and Categories - Any grade Columns and any or all Categories
For example, a Total Points column can be created to determine the final grade for the first quarter by creating a column that includes a point total of the columns in the first quarter Grading Period. Alternatively, a Total Points column can be created that displays the percentages of a particular column, categories, or multiple categories.
5.3 Creating Grading Periods and Midterm Grades
Grading Periods are user created and can be defined in terms of whatever time period the instructor deems necessary. By defining grading periods, Grade Center data can be effectively reported. Grading periods can also be used to:
- View the performance of students in a certain Grading Period
- Create a report that displays the performance for a grading period
- Calculate a Grade column for for a Grading Period
To create a Grading Period follow these steps:
- Click Manage in the Action Bar of the GC.
- Select Grading Periods from the Action Link menu.
- Click Create Grading Period.
- Enter a Name for the Grading Period. The name will appear on the Manage Grading Periods page.
- Select the Grading Period Dates.
- Select None or set a Range based on Start Date and End Date, including the month, day, and year. If a date range has been specified, checking Associate Existing Items will associate all Grade Columns and Calculated Colunms that were previously created with Due Dates to the corresponding Grading Period.
- Click Submit.
Advanced Grade Center
6. How and Why to Create and Modify Groups
GC was updated to make tracking groups of students easier. Before or during your class you can create groups such as: graduate, undergraduate, ESL, transfer, or possibly group students in danger of failing the course. GC will allow you to view these groups individually at any time.
To create groups follow these steps:
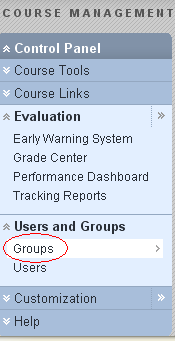
- Access the Control Panel
- Click on the Groups link under the Users and Groups section
- Click on Manual Enroll under the Create Single Group menu
- Name the group accordingly and give it a Description. Also, give the group permissions as necessary
- Click Submit
Note: Be sure to add all the students that are to be included in the group under section 4 before clicking submit
- Click on the names of the students that are to be added to the group, or click Select All
- Use the Arrows located between the two lists to add or delete students from the group
8. Click Submit
7. How and Why to Create Smart Views
Smart Views allows quick tracking of students with ease. It is a great way to view individual students or groups. There is no limit to the amount of Smart Views that can be created.
Four types of Smart Views can be created:
1. Groups: allows you to select groups created with group management
2. Benchmark: allows you to view students based on performance
3. Focus: allows you to view individual students
4. Investigate: allows you to combine options from the other three smart views
To build a Smart View based on Group Membership, follow these steps:
- Click Manage in the Action Bar of the GC
- Select Smart Views from the Action Link menu
- Click Create Smart View
- Enter a Name for the Smart View. This is a required field and will appear in the Current View Action Link menu on the GC page. It will also appear as a link to the Smart View on the Manage Smart Views page.
- Enter .
- Select the Search Type Group by selecting the corresponding radio buttona Description of the Smart View. It will appear on the Manage Smart Views page
- Select the Condition for the Group. Selections include Equal to and Not equal to
- Select the Value of the Group, which would be the Group Name
- Select the Filter Results by clicking which Columns to Display in Results from the dropdown menu.
Steps A-E are similar for the other three types of Smart Views. The options after that are course and user specific. Please attempt trying them before contacting the LCLC with any questions.
To access Smart Views:
1. Create Smart Views desired
2. Open Grade Center Spreadsheet
3. Click the Action Link for the Current View
4. Click the desired Smart View
5. Any Smart View can be set as the Default view
8. More Grade Center Tips
For further information about how to use Grade Center, please contact the LCLC or visit:
ACCC's FAQ page about using Grade Center
Last Updated 12 April 2011 by CMA