Nikki and the Robots: Editor Tutorial
Intro
A very nice feature of „Nikki and the Robots“ is the level editor, which allows you to easily create your own levels. While the editor is still in alpha stage and will be improved and more polished, you can already do quite a lot of things with it! We'd like to encourage you to play around with the editor, and this tutorial should help you with your first steps.
Note that there is also a 3:18 minutes long English-language video tutorial.
Getting Started
You can access the editor from the main menu under COMMUNITY LEVELS > EDITOR > NEW LEVEL. You can then choose between BLUEWITHGRID and EMPTY LEVEL. For beginners we recommend BLUEWITHGRID, which will load a basic template with a blue image and a grid in the background. You will see something like this (except for the the numbered references):
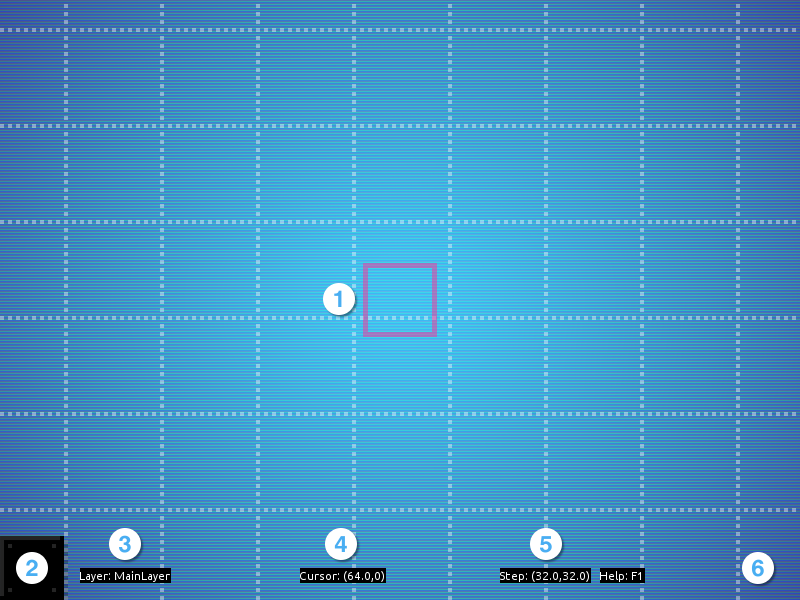
The Editor Screen
- Your Cursor
- Current Object
- Current Layer
- Position Coordinates of the Cursor
- Step Size of the Cursor
- Current Focused Object (nothing is focused in the image above)
Basic Controls
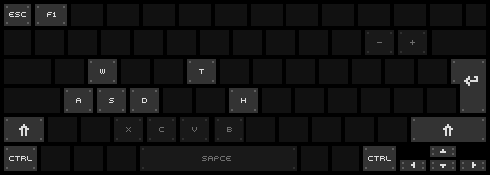
Primary (light) and secondary (dark) controls
- Use the ARROW KEYS to move your cursor.
- CTRL will place the current object in the scene, more specifically to the current layer.
- SHIFT will erase the current focused object that the cursor hovers over. The placement of the cursor and the object refers to the lower left corner, by the way.
- Use A and D to cycle through the available objects, e.g. Nikki, tiles, robots, and so on.
- You can change the step size of the cursor with W and S. The default is set to the size of a standard tile, which is 64 by 64 pixels. In other words, the cursor will move in steps of 64 pixels.
- Use + and – to switch to another layer. We recommend to not use this feature in the very beginning, but to make sure that the MainLayer is set as the current layer.
- T will let you test the level, and so will H with Nikki spawning at the current cursor position.
- F1 or any unused key will bring up a help screen, ESC will bring up the editor menu.
Part 1: First Steps
The most basic elements that you usually need in a level are Nikki, some tiles for Nikki to stand on, and a switch. Since the objective in a community level is to find and activate all switches, you must place a least one switch in the level. So, let's built something very simple like this:

Nikki and Switch
Use the ARROW KEYS to move the cursor and then place the objects into the MainLayer with CTRL. To select the different objects, you could actually cycle through everything using A and D until you find what you are looking for, but in many cases it will be more convenient to select objects by using the editor menu. Press ESC and go to SELECT OBJECT > NIKKI to set Nikki as the current object. For the switch you will go to SELECT OBJECT > SWITCH > LEVELEXIT. Using the editor menu, you can select all available objects of the game.
SAVING
After having created those objects, it would be a good time to save the level. Press ESC to bring up the editor menu again, select SAVE LEVEL, enter a name and hit RETURN. The levels are automatically saved in .nl format to the following directories:
LINUX: ~/.nikki-free-levels/userLevels/
MAC: ~/.nikki-free-levels/userLevels/
WINDOWS: %APPDATA%\nikki-free-levels\userLevels\
(It is currently not possible to rename levels or save them as copies from within the editor, so you have to manage this in your file browser.)
Before we head on to the next part of this tutorial, let's playtest what we have just built! Select TRY PLAYING THE LEVEL from the editor menu or hit T on the Keyboard to switch from editing mode to testing mode. Instead of T you can also press H, which will allow you to start playing at the current cursor position. This way you can instantly try out your designs any time. Return to editing mode by pressing ESC.
Part 2: Robots and Terminals
Now, we will create a robot and a terminal and then link them together. First, put some more tiles in the level to have a little more room. Then, go to SELECT OBJECTS > ROBOTS > JETPACK and SELECT OBJECTS > TERMINAL and place these objects in your scene. You should build something like this:
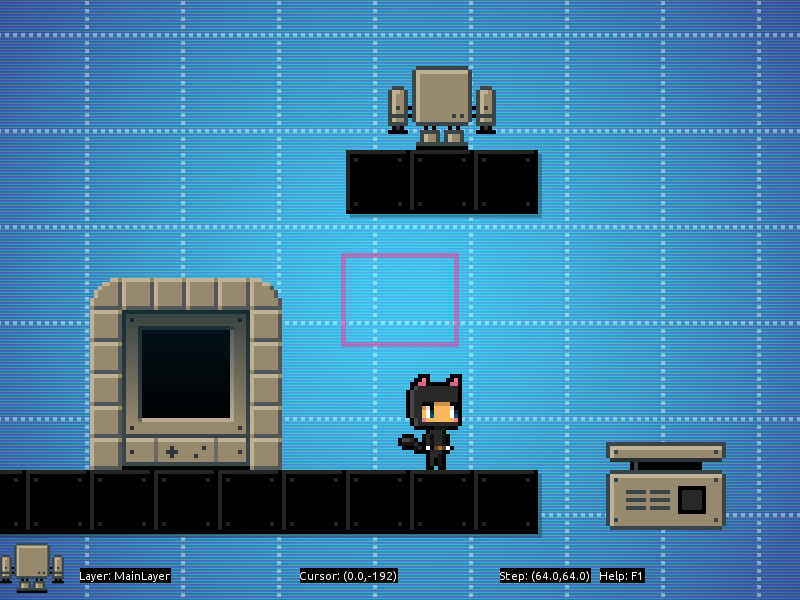
Adding Robot and Terminal
In order to make robots accessible for Nikki, you have to link them to a terminal. Place the cursor over the terminal, so that the bottom left corners are lined up. When positioned correctly, you can see a thumbnail of the terminal as the current focused object in the lower right corner of the screen:
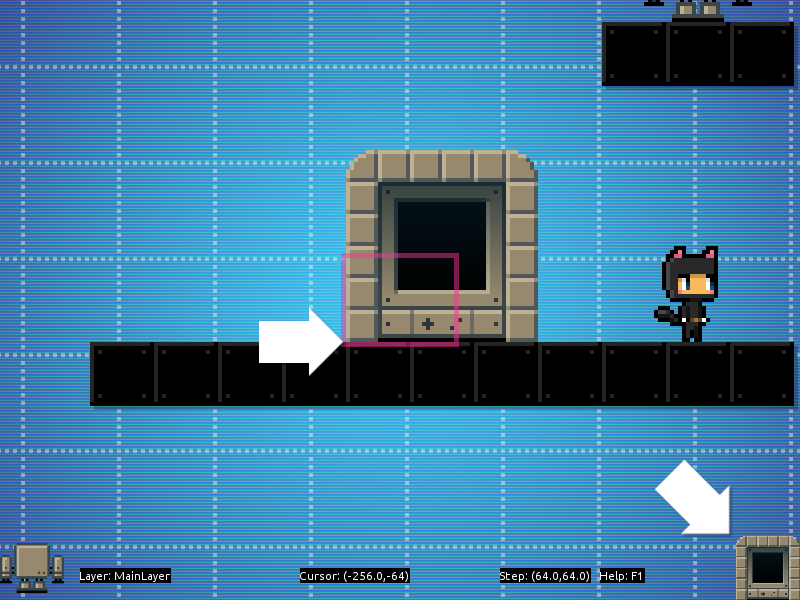
Focusing Objects
Open the editor menu with ESC and select the new entry EDIT OBJECT. The camera will jump to the robot and a dark yellowish rectangle will appear around it. Simply press CTRL once to link the robot to the terminal. The rectangle around the robot will become brighter, indicating that the robot has been linked. Return to regular editing with ESC.
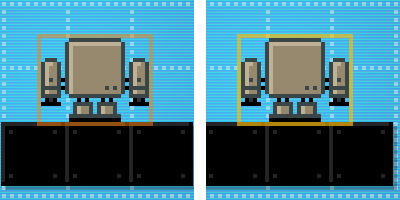
Left: Robot not linked Right: Robot linked
When pressing T for a playtest, the red lamp should now be lit up and you should be able to access and to control the robot:
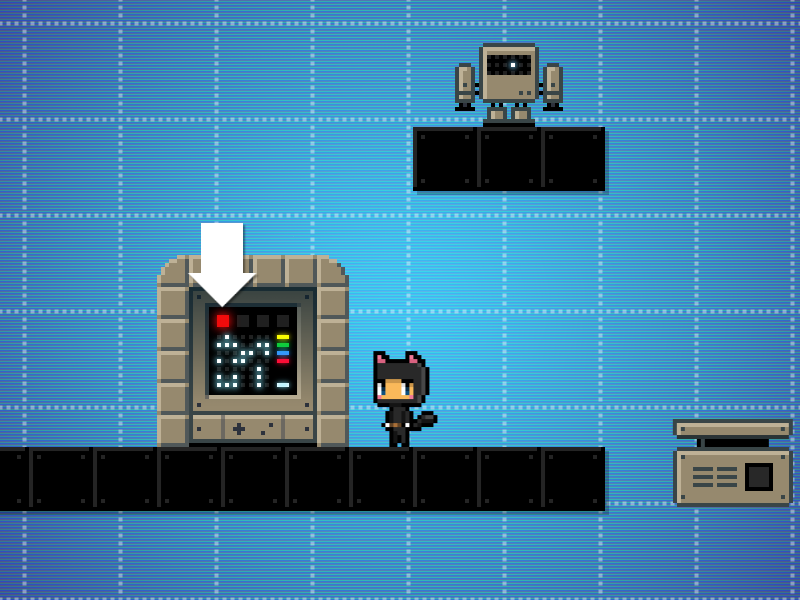
Linked Consoles
You can link up to four robots to each terminal. The robots are linked to red, green, blue and yellow in this order. If you delete a terminal or a robot, the according links will also be deleted, of course. Please also refer to ”Dr Lacroix’s Robots Compendium” (at the end of this document) to learn more about the specific settings and features of the different robots.
Part 3: Advanced Functions
LOWER LIMIT (AKA DEATH ZONE)
Now we'd like to introduce some of the more or less advanced functions. Let's start out with the “Lower Limit”. By default, the levels have no boundry towards the bottom. If you fall, you will fall forever. The SELECT OBJECTS > LOWERLIMIT object will create a kind of abyss, that causes a level failure, when Nikki falls below it. The “Lower Limit” must be placed in the MainLayer and the horizontal position should be 0. The vertical position can be placed at any height, so that it makes sense for your level design.
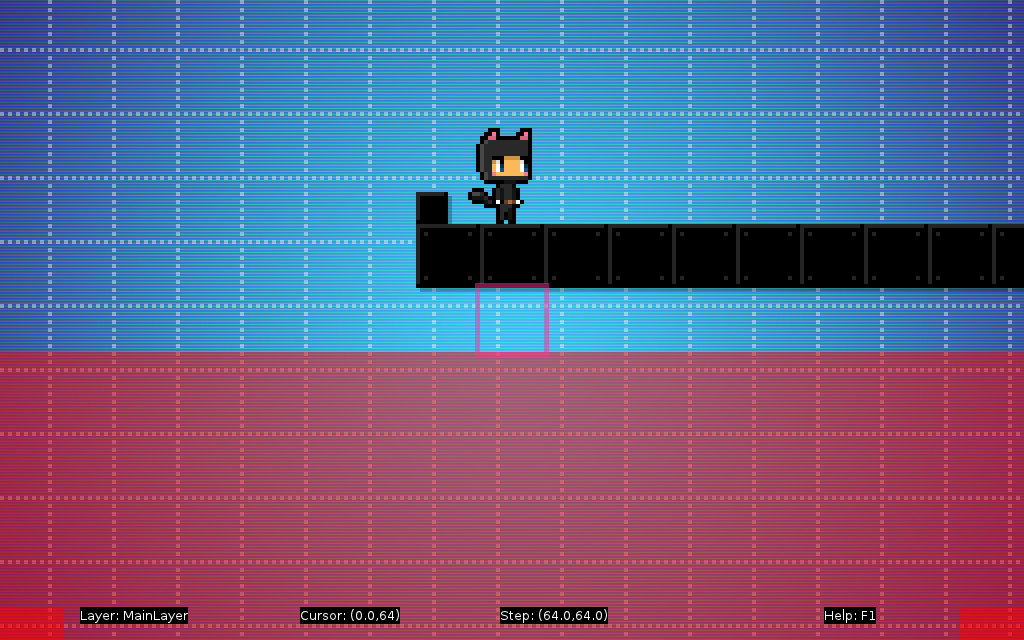
Placing the Lower Limit
By the way, robots that are below the “Lower Limit” can not be controlled via terminals, but they are not completely lost either. For example, a platform robot can follow a path with nodes above as well as below the limit.
SELECTION MODE
The selection mode can be used to copy, paste or delete all objects contained in a highlighted area. To start the selection mode, you can either- access it from the editor menu or simply hit SPACE on the keyboard. Then, move the cursor to create a rectangle around the area that you want to select and choose from the following:
- Press C to copy all highlighted objects to the clipboard.
- Press X to cut all highlighted objects to the clipboard.
- Press SHIFT to delete all highlighted objects.
- Use ESC to access these options from a menu (or to select EXIT SELECTION MODE without doing anything...)

Selecting multiple blocks and batteries
Having copied or cut objects to the clipboard, you can then paste them anywhere by pressing V. By the way, the selection mode only affects objects in the current layer, but they can be pasted to other layers as well.
LAYERS
Which brings us to layers. First, there is the MainLayer, where all the action happens. This is the default layer, where you place Nikki, the robots, the terminals, physics objects and so on. Everything that will collide with Nikki or other objects.
Additionally you can add any number of background layers, which are rendered in the background. In our example above (started from the template BLUEWITHGRID) there already is one background layer containing the blue background as well as the grid. To add a background layer you choose EDIT LAYERS > ADD BACKGROUND LAYER from the editor menu. The new layer will be inserted between the MainLayer and the foremost background layer.
Further, you can also add foreground layers. These are just like the background layers, but – well – in the foreground. To add a foreground layer you choose EDIT LAYERS > ADD FOREGROUND LAYER. The new layer will be inserted between the MainLayer and the back most foreground layer.
To cycle between the layers in your scene, you press the + and - keys.
Layers can be used to create objects that Nikki will disappear behind or objects that Nikki will walk in front of. Further, layers can be used to achieve the illusion of visual depth, often referred to as multilayer scrolling or parallax scrolling. You can set a specific distance for each layer, which will affect the speed of the layer as the camera moves around the scene. Switch to the layer that you want to edit and then choose EDIT LAYERS > CHANGE LAYER DISTANCE. You will be asked to enter an x-distance affecting the horizontal movement and then to enter a y-distance affecting the vertical movement.
These are some typical values, for example:
- 1 – same speed as MainLayer
- 0 – static background
- 0.5 – half the speed as MainLayer (usually only for multilayer backgrounds)
- above 1 – faster than MainLayer (usually only for multilayer foregrounds)
Here are some more notes, so you won’t get confused:
- When working with layers, be careful to switch to the correct layer before placing or editing anything!
- Layers that are further in the foreground than the current layer will become invisible, so that your view won’t get obstructed.
- When using different distances for the layers, the actual offset of each layer will always be displayed correctly. This results in the camera visually jumping to another point when switching layers, although the cursor coordinates actually remain the same.
OK, that’s it for this tutorial. Thanks for reading and we hope it will be helpful. Please keep in mind that the game is still in alpha stage and some functionality is likely to change. We will be looking to it, that there won’t be too many compatibility issues. But we can’t guarantee for sure that every level that you are building right now will still be working exactly the way you intended in the final release. We hope, you understand. That said, have fun with the editor!
Best wishes, Joyride Laboratories
DR. LACROIX’S ROBOTS COMPENDIUM
Note from Dr. Lacroix:
All information in this compendium is classified!
Don’t read it without authorization! All your robots are belong to me!
PLATFORM ROBOT
Game Controls
CTRL: Movement On/Off
Editor Settings
ON/OFF: When the cursor hovers over the robot as focused object, select EDIT OBJECT from the editor menu. In edit object mode you can press SPACE to toggle the initial state of the robot between ON and OFF.
EDIT PATH: When the cursor hovers over the robot as focused object, select EDIT OBJECT from the editor menu. In edit object mode you can place new path nodes with CTRL. To delete a path node, place the cursor over it and press SHIFT.
We have designed the platform robots in a way that makes it easy to set up even complex systems: As long as the lengths of the paths are equal or a multiple, the system will always stay exactly in sync. Even if some robots get stuck for a while, the system will most likely return to its original cycle.
JETPACK ROBOT
Game Controls
ARROW KEYS LEFT/RIGHT: Steer
CTRL: Boost
Editor Settings
Nope, nothing here to set up.
PATROL ROBOT
Game Controls
CTRL: Shock On/Off
Editor Settings
ON/OFF: When the cursor hovers over the robot as focused object, select EDIT OBJECT from the editor menu. In edit object mode you can press SPACE to toggle the initial state of the robot between ON and OFF.
EDIT PATH: When the cursor hovers over the robot as focused object, select EDIT OBJECT from the editor menu. In edit object mode you can place new path nodes with CTRL. To delete a path node, place the cursor over it and press SHIFT.
While shock is turned on, touching the platform robot will make Nikki fail the level. Patrol robots always move along their path, they can not be halted. Their movement behavior is identical to that of platform robots.
CANNON ROBOT
Game Controls
ARROW KEYS LEFT/RIGHT: Aim
CTRL: Shoot!
Editor Settings
Works out of the box.
LASER ROBOT
Game Controls
CTRL: Laser On/Off
Editor Settings
ON/OFF: When the cursor hovers over the robot as focused object, select EDIT OBJECT from the editor menu. In edit object mode you can press CTRL to toggle the initial state of the robot between ON and OFF.
DIRECTION AND LENGTH: While in EDIT OBJECT mode, use arrow keys (up/right/down/left) to set direction and length of the laser.
In development: Conveyor, Crane, Train, and many more!