Preparing For EC2 Persistent Storage
Using LVM + DRBD + NFS + Heartbeat + VTun To Gain Data Persistence, Redundancy, Automatic Fail-Over, and Read/Write Disk Access Across Multiple EC2 Nodes
M. David Peterson
Chief Architect
3rd & Urban, LLC
mailto:m.david@3rdandUrban.com
DOCUMENT STATUS: As of May 9th, 2008 @ 8:05 P.M. GMT
Introduction and Summary: 100% Complete
Code: 100% of scripts and related commands are inline and functional.
Section Overviews: 100% complete.
Detailed Explanation Text: 100% complete.
Additional Sections:
Extended "Setting Things Up" section with info related to availability zones.
Added test section to provide a walk-through to ensure everything is up and running as it should be.
PLEASE NOTE: While the entire paper is technically complete, the current state of the paper should be viewed as beta quality. I've created a discussion group on Google Groups to continue the conversation related to this paper and the ongoing discussion related to the 3rd&Urban platform and related technologies such as cloud computing, decentralized communications, and so forth. The first post related to this whitepaper has been made and is awaiting your thoughts, comments, criticisms, and suggestions. Thanks in advance for your contributions!
Table of Contents
- Table of Contents
- Copyright and Licensing
- Special Thanks
- Problem Statement
- Solution Summary
- Publicly Available Information Related to EC2 Persistent Storage
- The Solution
- Automated Installation Script
- Verifying Everything Has Been Setup Correctly
- Understanding How The Scripts Works
- Function: configure_vtun_server_list
- Function: configure_vtun_server
- Function: configure_ssh
- Function: update_fedora_8
- Function: unmount_mnt
- Function: configure_lvm
- Function: install_drbd
- Function: create_drbd_meta_data_loopback
- Function: configure_drbd
- Function: create_drbd_meta_data_disk
- Function: bring_up_drbd
- Function: create_data_dir
- Function: configure_primary_drbd_node
- Function: create_xfs_file_system
- Function: mount_drbd_device
- Function: configure_primary_nfs_file_system
- Function: configure_secondary_nfs_file_system
- Function: install_vtun
- Function: configure_vtun_client
- Function: configure_system
- Function: configure_services
- Function: configure_heartbeat
- Function: install_heartbeat_scripts
- Function: generate_cib_xml
- Function: append_hosts_allow
- Function: append_rc_local
- Function: start_services
- Function: mount_volumes
- Function: cleanup_files
Copyright and Licensing
The original textual content contained in this white paper is © 2008 M. David Peterson and licensed under a Creative Commons Attribution-Noncommercial-Share Alike 3.0 license.
Unless otherwise noted, the scripts and code both contained and linked to in this document are © 2008 M. David Peterson and licensed under a Creative Commons Attribution-Share Alike 3.0 license.
Any non-original code and content is the copyright of its original author(s).
If either of these licenses are incompatible with your specific needs, please contact the author to discuss alternative licensing options.
Special Thanks
Firstly, a HUGE thank you to Jeff Barr, lead Technical Evangelist for Amazon Web Services, for taking the time to read, edit, and provide feedback that has helped round out this paper in the proper areas. Thanks, Jeff!
Secondly, all of what follows is only possible due to the hard work and dedication of the core developers, maintainers, and contributors to the LVM, DRBD, NFS, Heartbeat, and VTun projects. To each of these aforementioned folks, thanks!
In addition to Jeff Barr, special thanks to a bunch of really talented folks@AWS including Martin Buhr, Rudy Valdez, Kathrin Jackson, Roland, Andries, MattG, Andrew, Atle (Beyond "@AWS", I wish I knew their last names!) and a whole list of internal AWS folks who have contributed in one form or another to the development of this whitepaper.
Lastly, a special thanks to AWS community members Mitch Garnaat, Thorsten von Eicken, scientastic, Edward Goldberg, Dan Kearns, Allen, and D. Kavanagh for helping to work through a lot of the initial ideas that went into the creation of this paper.
Thanks, everyone!
Problem Statement
At 3rd&Urban, and in particular amp.fm (3rd&Urban is the parent company of amp.fm), our entire platform is built on top of Amazon Web Services products such as EC2, S3, and SimpleDB and driven by community-created content and interaction. Due to the nature of computer hardware -- especially those with moving parts -- while complete failure of an entire system is unlikely, failure of individual components within that system such as power sources and supplies, network cards, switches and routers, hard drives, processors, memory, and other components with an understood life expectancy is considered normal, if not rare, behavior. However, failure of any given component which results in outages which have crippling effects on the continued operations of the entire system are considered catastrophic. Designing and building fault-tolerance into any given system is critical to ensure that you always have back-up components in place to fall back on during an outage or failure of any given system component. Like any other data and community-centric company, we are committed to reducing the chance of a catastrophic system-wide failure to as close to zero as can be considered reasonable given understood component failure rates and unforeseen catastrophic events such as natural disasters.
While EC2 facilitates the ability to both add and replace instances on the fly, during the failure of an instance, at present time, any data on these instances that is not properly backed up will be lost. While backing up data to S3 is standard practice, data backups do not guarantee uninterrupted read/write access to that data, only the ability to recover from catastrophic failure, a process which, depending on the size of the data set, can take anywhere from a few minutes to a few hours to rebuild the effected data components. This time frame can potentially be even longer for data sets of considerable size and data structure complexity. As it relates to maintaining an always on, always accessible web business, we consider this a completely unacceptable scenario to potentially find ourselves faced with. As such, at the center of our system architecture resides a foundation of fault-tolerance techniques designed to ensure data persistence, redundancy, network accessibility, and automatic fail-over which, when combined together with off-the-shelf, open source software components, provides reasonable assurance of maintaining close-to-100% system up-time regardless of the failure of individual system components.
Solution Summary
Amazon Web Services recently announced they are actively working on providing persistent storage as part of their EC2 offering, aiming to launch this service later this year. From the previously linked EC2 forum entry the Amazon EC2 team provides the reasoning behind this pre-beta release announcement,
"Many of you have been requesting that we let you know ahead of time about features that are currently under development so that you can better plan for how that functionality might integrate with your applications. To that end, we would like to share some details about a major upcoming feature that many of you have requested - persistent storage for EC2."
Speaking directly to,
"... so that you can better plan for how that functionality might integrate with your applications..."
... the primary focus of this paper is to present both a detailed overview as well as a working code base that will enable you to begin designing, building, testing, and deploying your EC2-based applications using a generalized persistent storage foundation, doing so today in both lieu of and in preparation for release of Amazon Web Services offering in this same space.
PLEASE NOTE: I have used generalized assumptions related to persistent storage solutions during the writing of this paper. Some of these assumptions extend from information that has been made public by AWS. I'll provide a summary of both the official announcement as well as Jeff Barr's (AWS Technical Evangelist) blog entry related to their persistent storage offering in the section that follows.
DISCLAIMER: There is no known direct or indirect connection between the material presented in this paper and the AWS persistent storage solution. While there is no reason to believe the same generalized ideas and technologies contained in this paper will be incompatible with Amazon's persistent storage offering when it becomes publicly available later this year, there is no guarantee this will be the case. While designing, building, testing, and deploying applications using the methodologies outlined in this paper, please do so with the understanding that you may have to re-design, re-build, re-test, and re-deploy certain aspects of (this|these) application(s) to take full advantage of the features and functionality provided by the public release of Amazon's persistent storage solution.
Please keep in mind, however, that regardless of any extended features and/or functionality introduced as part of the Amazon's public persistent storage release, the technologies and techniques describe in this paper will continue to work standalone, as-is.
Publicly Available Information Related to EC2 Persistent Storage
As part of the same official announcement linked to and quoted above, MattG@AWS, a member of the EC2 team, had the following information to share regarding their up-and-coming persistent storage service,
This new feature provides reliable, persistent storage volumes, for use with Amazon EC2 instances. These volumes exist independently from any Amazon EC2 instances, and will behave like raw, unformatted hard drives or block devices, which may then be formatted and configured based on the needs of your application. The volumes will be significantly more durable than the local disks within an Amazon EC2 instance. Additionally, our persistent storage feature will enable you to automatically create snapshots of your volumes and back them up to Amazon S3 for even greater reliability.
You will be able to create volumes ranging in size from 1 GB to 1 TB, and will be able to attach multiple volumes to a single instance. Volumes are designed for high throughput, low latency access from Amazon EC2, and can be attached to any running EC2 instance where they will show up as a device inside of the instance. This feature will make it even easier to run everything from relational databases to distributed file systems to Hadoop processing clusters using Amazon EC2.
When persistent storage is launched, Amazon EC2 will be adding several new APIs to support the persistent storage feature. Included will be calls to manage your volume (CreateVolume, DeleteVolume), mount your volume to your instance (AttachVolume, DetachVolume) and save snapshots to Amazon S3 (CreateSnapshot, DeleteSnapshot).
In follow-up to this announcement, Jeff Barr, lead Technical Evangelist for Amazon Web Services, provided both an overview of the persistent storage offering and a demo of how it works,
I spent some time experimenting with this new feature on Saturday. In a matter of minutes I was able to create a pair of 512 GB volumes, attach them to an EC2 instance, create file systems on them with mkfs, and then mount them. When I was done I simply unmounted, detached, and then finally deleted them.
First I created the volumes from the command line of my Windows desktop:
U:\USER\Jeff\Amazon> ec2-create-volume -s 549755813888
VOLUME vol-4695702f 549755813888 creating 2008-04-13T22:17:35+0000
U:\USER\Jeff\Amazon> ec2-create-volume -s 549755813888
VOLUME vol-59957030 549755813888 creating;2008-04-13T22:17:49+0000
U:\USER\Jeff\Amazon> ec2-describe-volumes
VOLUME vol-4695702f 549755813888 available 2008-04-13T22:17:35+0000
VOLUME vol-59957030 549755813888 available 2008-04-13T22:17:49+0000
Then I attached them to my EC2 instance:
U:\USER\Jeff\Amazon> ec2-attach-volume vol-4695702f -i i-6b3bfd02 -d /dev/sdb
ATTACHMENT vol-4695702f i-6b3bfd02 /dev/sdb attaching 2008-04-13T22:36:32+0000
U:\USER\Jeff\Amazon> ec2-attach-volume vol-59957030 -i i-6b3bfd02 -d /dev/sdc
ATTACHMENT vol-59957030 i-6b3bfd02 /dev/sdc attaching 2008-04-13T22:36:55+0000
Then I switched over to my instance, formatted and mounted them, and I was all set:
# yes | mkfs -t ext3 /dev/sdb
# yes | mkfs -t ext3 /dev/sdc
# mkdir /space1 /space2
# mount /dev/sdb /space1
# mount /dev/sdc /space2
# df -h
Filesystem Size Used Avail Use% Mounted on
/dev/sda1 9.9G 765M 8.6G 8% /
none 851M 0 851M 0% /dev/shm
/dev/sda2 147G 188M 140G 1% /mnt
/dev/sdb 504G 201M 479G 1% /space1
/dev/sdc 504G 201M 479G 1% /space2
He then followed his overview with,
Perhaps I am biased, but the ability to requisition this much storage on an as-needed basis seems pretty cool.
I agree, it does seem pretty cool. In fact, as Jeff continues,
A few EC2 customers are already using these new volumes...
As one of these same mentioned customers using this new capability, I can attest to the fact that this is incredibly cool. While I am unable to speak to any of the specifics that go beyond that which is publicly available, I can assure you of one thing: Similar to the effect that S3, EC2, and SimpleDB have had on enabling the ability for individuals and companies, both small and large, to quickly and cheaply get started with utility-based cloud computing, Amazon's persistent storage offering will completely change the way you both think about and implement web and software-as-a-service applications. The end result is that of -- once again -- adding a hugely beneficial and much needed arrow into yours and/or your companies "Grow-as-you-go" utility computing quiver.
To summarize, the following features are known to be in the works as part of the Amazon's persistent storage offering,
- Highly durable persistent storage block devices that live independently of any given EC2 instance.
- The ability to create volumes ranging in size from 1 GB to 1 TB.
- The ability to create snapshots of your volumes and back them up to Amazon S3.
- The ability to attach and detach any given block device to and from any given EC2 instance.
In the mean time, however, as cool as the persistent storage offering from Amazon will be, at present time access to this functionality is still confined to a handful of private alpha participants, with no word yet as to when this offering will become more widely available in either a limited and/or open public beta. The remainder of this paper will focus on that which has already been outlined above: Gaining at least some of the benefits of persistent storage today, while at the same time preparing your systems to take full advantage of what Amazon's persistent storage service will offer when it becomes publicly available later this year.
The Solution
To ensure a proper understanding of what this solution provides and what it does not provide, the following two sections are a comparison of the publicly announced features of Amazon's persistent storage solution,
Features This Solution Provides
The following features are provided as part of this solution,
- Data redundancy via near-real-time synchronization of two block devices contained on two separate EC2 nodes using DRBD.
- Network mountable shares (NFS ) which provides the ability to mount these shares on more than one EC2 node at a time.
- Automatic fail-over between the primary and secondary DRBD nodes.
- Automatic and transparent remapping and remounting of an NFS share during the fail-over process.
- The ability to create snapshots of your volumes and back them up to Amazon S3.
- The ability to increase or reduce the size of any given volume that is part of the configuration, limited only by disk availability and capacity.
- At present time disk availability refers to the additional ephemeral block devices contained on m1.large and m1.x-large instance types.
- As already specified, while there are no guarantees this will work, in theory it will be possible to extend a logical volume with additional EC2 persistent storage block devices when this service becomes available.
Features This Solution Does NOT Provide
The following features are NOT provided as part of this solution,
- Highly durable persistent storage block devices that live independently of any given EC2 instance.
- The ability to create volumes ranging in size from 1 GB to 1 TB.
- Using LVM, it is possible to create logical volumes that range from 1k to the maximum capacity of your available ephemeral block devices.
- It's not possible, however, to extend things past the maximum size of the available ephemeral block devices.
- The ability to attach and detach any given block device to and from any given EC2 instance.
- However, mounting block devices over NFS on multiple nodes does provide some of the benefits of this announced feature.
Preparations
The solution presented in this paper uses DRBD, LVM, NFS, Heartbeat (Linux-HA), VTun, and the Fedora Core 8 Base AMI provided by Amazon Web Services. Providing a detailed overview of each of the individual components referenced is beyond the scope of this paper's primary focus. With this in mind, if you are unfamiliar with any of these mentioned technology projects I would recommend you spend adequate time gaining a high level understanding of their primary purpose and function. For your convenience, the first paragraph of each technology's Wikipedia page is provided inline below, with links to the source for further information.
DRBD
DRBD (Distributed Replicated Block Device) is a distributed storage system for the Linux platform. It consists of a kernel module, several userspace management applications and some shell scripts and is normally used on high availability (HA) clusters. DRBD bears similarities to RAID 1, except that it runs over a network. [DRBD on Wikipedia]
LVM
LVM is a logical volume manager for the Linux kernel. It was originally written in 1998 by Heinz Mauelshagen, who based its design on that of the LVM in HP-UX. [LVM on Wikipedia]
NFS
Network File System (NFS) is a network file system protocol originally jointly developed by Sun Microsystems and IBM in 1984, allowing a user on a client computer to access files over a network as easily as if the network devices were attached to its local disks. NFS, like many other protocols, builds on the Open Network Computing Remote Procedure Call (ONC RPC) system. The Network File System protocol is specified inRFC 1094, RFC 1813, and RFC 3530 (which obsoletes RFC 3010). [NFS on Wikipedia]
Heartbeat
The Linux-HA (High-Availability Linux) project provides a high-availability (clustering) solution for Linux, FreeBSD, OpenBSD, Solaris and Mac OS X which promotes reliability, availability, and serviceability (RAS). The project's main software product is Heartbeat, a GPL-licensed portable cluster management program for high-availability clustering. [Heartbeat on Wikipedia]
VTun
VTun is a networking application which can set up Virtual Tunnels over TCP/IP networks. It supports Internet Protocol (IP), Point-to-Point Protocol (PPP) and SLIP protocols. It exists as the reference implementation of the Tun/Tap user-space tunnel driver which was included in the Linux kernel as of version 2.4, also originally developed by Maxim Krasnyansky. Bishop Clark is the current maintainer. [VTun on Wikipedia]
Fedora [Core 8]
Fedora is an RPM-based, general purpose Linux distribution, developed by the community-supported Fedora Project and sponsored by Red Hat. Fedora's mission statement is: "Fedora is about the rapid progress of Free and Open Source software." [Fedora on Wikipedia]
NOTE: As of the writing of this paper, Core 8 is the latest release of the Fedora Project. Fedora Core 9 is expected in a few short weeks, though the Fedora Core 8 Base AMI's from Amazon should continue to be available for quite some time.
How These Technologies Are Being Used
The following image provides a graphical representation of how the system is configured,
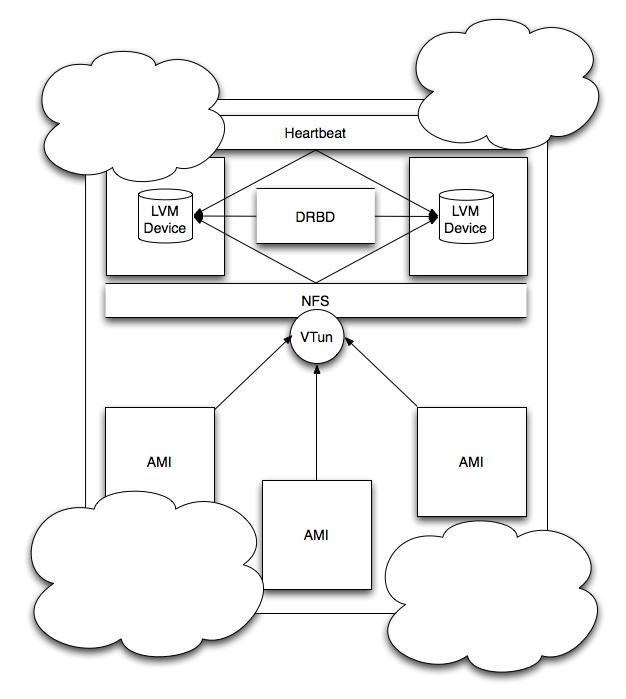
DRBD and Heartbeat
At the core of this solution is DRBD, or Distributed Replicated Block Device, and Heartbeat, a core member of the Linux-HA (Linux High Availability) project. Using two(2) EC2 nodes, DRBD replicates changes to the configured block device on the primary node directly to the configured block device on the secondary node. The end result is that of providing a near-to-real-time mirroring of data, and therefore ensuring there is always a second copy of your data that exists to fall back on in the event of a failure. In addition, when combined with Heartbeat, it provides the ability to execute a scriptable fail-over routine between nodes if the primary node becomes inaccessible for longer than the configured length of time. In the configuration used in this white paper that means after ten(10) seconds of "dead-time", though the initial warm-up process will begin after two(2) seconds such that if the primary node is still inaccessible after ten(10) seconds, the secondary node can immediately begin the take over process.
VTun and NFS
VTun is configured on both DRBD nodes to act as the client in a client-server point-to-point tunnel connection. When Heartbeat is started on the primary node and each of the services it manages have been brought up, VTun will make a connection to each of the server nodes specified in the configuration file. The server nodes are configured to mount the DRBD block device as a local device via NFS, or Network File System, via a pre-configured node name which maps to a specified static IP, the same static IP which both DRBD nodes are configured to claim if and when they become the primary node in the configuration. If the primary node in the DRBD configuration fails, Heartbeat will spring into action, start all related services on the secondary node, and then make a point-to-point tunneled connection to each of the configured servers, using the same static IP to ensure the process is completely transparent to the connecting servers. Allowing for the latency encountered during the startup time, the server nodes are configured to remount any drives that have become inaccessible after a specified time-out period, continuing to do so until the re-mount completes successfully.
LVM
Though LVM is the first thing we will configure when setting up each node, it's also the final piece in our fault-tolerant architecture. When we first configure each node, we do so by splitting the block device into two logical volumes: one to act as the primary volume in our DRBD configuration, the other as a buffer for holding snapshots of our primary volume made in regular intervals using LVM's built in snapshot capabilities. The snapshots are then backed up to S3 such that in the event a new node is brought into our DRBD configuration, we can rebuild the DRBD block device to its last backed up state before reconnecting with the primary node and synchronizing the remaining differences between the two block devices.
In addition, in the event of catastrophic failure of both nodes in our configuration, the last known snapshot can be used to rebuild the entire node set from scratch. While the chance of both instances going down at or near the same time is close-to-zero, it is not impossible and therefore maintaining snapshots of our data at regular intervals helps to guarantee that we always have something to fall back on.
Caveats
One obvious caveat in the above architecture is that of halving our available disk capacity to ensure we always have enough disk space to hold our backups. This could potentially be avoided by using the ephemeral block device of a third instance that was temporarily mounted via NFS to hold the snapshot. The problem with this strategy is that our snapshot process will temporarily freeze any writes to our block device while it performs the backup. Because NFS is network bound, our backup process is then limited by the speed we can send bits over our local network. This may be less of a problem than it initially seems, as the speed at which we are able to write data to our disk could potentially be about the same as the speed at which we are able to send those same bits over the wire. In this regard, more experimentation and testing would be required before we could look at using a third node for housing snapshots and therefore enable us to use the capacity of the entire disk for writing data to. We would also need to determine if the additional cost of running a third node would offset the additional disk capacity gained by using one logical volume in our configuration instead of two. As such, without more data, it is too early to determine if there would be any advantages gained by using an additional node in our configuration to manage the storage and retrieval of disk snapshots.
Prerequisites and Assumptions
The following prerequisites must be met before continuing forward with an implementation of the material presented in this paper,
- An active AWS account.
- A subscription to the EC2 web service.
- Access to a Unix-based machine for running the contained scripts.
- At some point I'd like to port this to Windows (more than likely as a Windows PowerShell script), but because it's just as easy to run this script from an existing EC2 instance, this is currently a low priority.
- However, using Cygwin, the contained scripts should work as-is.
In addition, while great care has been taken to ensure a minimum requirement of pre-existing knowledge, this paper assumes a basic understanding of the following,
- The Unix command line interface(cli).
- The file and directory structure of a typical Unix-based system.
- A typical make-based build process.
- vi or similar cli-based text editor.
- secure shell(ssh).
In addition, it is assumed that you have a basic understanding of how to launch, access via SSH, and manage an EC2 instance.
If you do not posses sufficient knowledge in any of these areas, it will be difficult, at best, to follow along with the material presented in this paper. If obtaining and/or brushing up your knowledge of any of these prerequisites is necessary, please do so before continuing.
EC2 Requirements
The core of this paper revolves around the usage of DRBD to replicate data across two separate and distinct nodes. As such, there is a pretty straight forward requirement,
REQUIREMENT: You need to be running a bare minimum of two(2) AMI's (Amazon Machine Images) to implement this architecture. There is no way, nor would there be any derived benefit, to implement this architecture on a single EC2 node.
In addition, due to an understood limitation with various Heartbeat resource scripts, while it's both possible and necessary to mount the DRBD block device on the primary node in a DRBD relationship, attempting to mount this same device as an NFS shared drive on either of the nodes in the DRBD relationship can cause the NFS server to stop responding1. As such, it is highly discouraged to make attempt at mounting the NFS drive on either the primary or secondary DRBD node, which brings us to our next requirement,
REQUIREMENT: To use any of the technologies that sit on top of the DRBD device stack effectively you need to have an EC2 cluster of at least three(3) nodes; two(2) for the DRBD block device and at least one(1) to mount this same device over NFS such that a fail-over from one node in the DRBD relationship to the other will be completely transparent to the rest of the nodes in your cluster.
Setting Things Up
For our test case we'll be using four(4) of the 32bit x86 m1.small Fedora Core 8 Base images (ami-f51aff9c) provided by Amazon Web Services: Two(2) as our DRBD/Heartbeat pair, and two(2) to connect to via VTun and mount the DRBD-backed drive over NFS. This same method, related scripts, and underlying code base can also be used in conjunction with the x86_64-based Fedora Core 8 Base image (ami-f21aff9b) with slight modification: That of changing the referenced devices in the DRBD config file. More information related to this subject is available in the DRBD configuration section of this document.
IMPORTANT POINT OF CONSIDERATION: To gain a truly fault-tolerant architecture you should consider running the two DRBD nodes in this configuration in separate availability zones. There a couple of pro/con points to consider when making this decision,
- Pro
- A stronger guarantee against failure of an entire availability zone.
- Data-redundancy and fail-over between the primary and secondary node are given a considerable boost.
- Con
- Increased cost due to the $0.01 USD/Gigabyte price of data transfer between availability zones.
- Increased latency due to the physical separation of availability zones within the data center.
- If a node becomes unavailable during a write process, the increased latency means a greater chance of lost data.
From my own perspective, the increased cost + latency between nodes is still worth it given the fact that the entire purpose of this solution and the derived benefit of availability zones go hand-in-hand. That said, the risk that an entire availability zone will fail is much less than the risk of a single node failing. With this in mind, you need to make a determination for yourself how much risk you are willing to take, and therefore whether the cost of running the persistent storage instances in separate availability zones makes sense.
Launch Instances
After making the determination as to whether or not you want the additional redundancy and fail-over benefits of using multiple availability zones, we first need to launch the four(4) instances we'll be using in our persistent storage solution. As it relates to this paper, we are going to take advantage of the additional benefits derived from using separate availability zones.
If you would prefer to avoid the additional costs incurred between availability zones, the following command will launch all four(4) instances within the same availability zone,
$ ec2-run-instances ami-f51aff9c -n 4 -g amp.fm-http -g default -k amp.fm-admin -t m1.small
IMPORTANT NOTE: You will need to replace the -g and -k (group(s) and (private) key) parameters with values that match the group(s) you want associated with these nodes and the private key you plan to use, respectively.
The above command will produce something similar to,
RESERVATION r-37e3265e 187551516474 amp.fm-http,default
INSTANCE i-cfb17ea6 ami-f51aff9c pending amp.fm-admin 0 m1.small 2008-05-09T08:54:20+0000
INSTANCE i-ceb17ea7 ami-f51aff9c pending amp.fm-admin 1 m1.small 2008-05-09T08:54:20+0000
INSTANCE i-c1b17ea8 ami-f51aff9c pending amp.fm-admin 2 m1.small 2008-05-09T08:54:20+0000
INSTANCE i-c0b17ea9 ami-f51aff9c pending amp.fm-admin 3 m1.small 2008-05-09T08:54:20+0000
To gain the derived benefits of availability zones, you'll want to launch one(1) AMI at a time, specifying which availability zone to use. We first need to know what availability zones are available to us. To do this we run,
$ ec2-describe-availability-zones
AVAILABILITYZONE us-east-1a available
AVAILABILITYZONE us-east-1b available
AVAILABILITYZONE us-east-1c available
With the above information in hand, we can begin the launch process for our AMI's,
$ ec2-run-instances ami-f51aff9c -n 1 -g amp.fm-http -g default -k amp.fm-admin -t m1.small -z us-east-1a
... which will produce something similar to,
RESERVATION r-37e2275e 187551516474 amp.fm-http,default
INSTANCE i-d8b07fb1 ami-f51aff9c pending amp.fm-admin 0 m1.small 2008-05-09T09:42:45+0000 us-east-1a aki-a71cf9ce ari-a51cf9cc
Next, we'll run the same command again, but this time changing the availability zone to one of the other two available options,
$ ec2-run-instances ami-f51aff9c -n 1 -g amp.fm-http -g default -k amp.fm-admin -t m1.small -z us-east-1b
... which will produce something similar to,
RESERVATION r-36e2275f 187551516474 amp.fm-http,default
INSTANCE i-dbb07fb2 ami-f51aff9c pending amp.fm-admin 0 m1.small 2008-05-09T09:42:59+0000 us-east-1b aki-a71cf9ce ari-a51cf9cc
Lastly, we'll run the same command again, but this time changing the number of instances to two(2), and the availability zone to the last remaining option,
$ ec2-run-instances ami-f51aff9c -n 2 -g amp.fm-http -g default -k amp.fm-admin -t m1.small -z us-east-1c
... which will produce something similar to,
RESERVATION r-0be22762 187551516474 amp.fm-http,default
INSTANCE i-dcb07fb5 ami-f51aff9c pending amp.fm-admin 0 m1.small 2008-05-09T09:43:15+0000 us-east-1c aki-a71cf9ce ari-a51cf9cc
INSTANCE i-dfb07fb6 ami-f51aff9c pending amp.fm-admin 1 m1.small 2008-05-09T09:43:16+0000 us-east-1c aki-a71cf9ce ari-a51cf9cc
No matter which of the above options you choose, after launching the necessary AMI's and after a short period of time (I would allow between 30 and 60 seconds for small instance types) running,
$ ec2-describe-instances
... will provide the information we need to launch our configuration script,
RESERVATION r-37e2275e 187551516474 amp.fm-http,default
INSTANCE i-d8b07fb1 ami-f51aff9c ec2-72-44-53-69.compute-1.amazonaws.com domU-12-31-38-00-9C-55.compute-1.internal running amp.fm-admin 0 m1.small 2008-05-09T09:42:45+0000 us-east-1a aki-a71cf9ce ari-a51cf9cc
RESERVATION r-36e2275f 187551516474 amp.fm-http,default
INSTANCE i-dbb07fb2 ami-f51aff9c ec2-75-101-252-243.compute-1.amazonaws.com ip-10-251-70-176.ec2.internal running amp.fm-admin 0 m1.small 2008-05-09T09:42:59+0000 us-east-1b aki-a71cf9ce ari-a51cf9cc
RESERVATION r-0be22762 187551516474 amp.fm-http,default
INSTANCE i-dcb07fb5 ami-f51aff9c ec2-75-101-193-159.compute-1.amazonaws.com domU-12-31-39-00-E8-A1.compute-1.internal running amp.fm-admin 0 m1.small 2008-05-09T09:43:15+0000 us-east-1c aki-a71cf9ce ari-a51cf9cc
INSTANCE i-dfb07fb6 ami-f51aff9c ec2-67-202-53-151.compute-1.amazonaws.com domU-12-31-39-00-5D-C6.compute-1.internal running amp.fm-admin 1 m1.small 2008-05-09T09:43:16+0000 us-east-1c aki-a71cf9ce ari-a51cf9cc
In particular we are interested in the public and private DNS machine names for each AMI. In the above example, ec2-67-202-53-151.compute-1.amazonaws.com represents a public DNS machine name and domU-12-31-39-00-5D-C6.compute-1.internal the private DNS name of the same machine. If you are running all nodes (or at very least the two data persistent nodes) in the same availability zone, you'll need to make a determination as to which two(2) machines will represent your persistent storage node set and which will mount the persistent storage solution over NFS. Given that in this particular case each AMI is exactly the same it really doesn't matter which you choose. If, however, you were to create specialized AMI's that were preconfigured for a particular purpose, in addition to modifying the contained script, you would need to be sure to launch the proper AMI particular to each purpose, matching the instance ID (e.g. i-dfb07fb6) returned by the ec2-run-instances command with the public and private DNS name returned by the ec2-describe-instances command and then referencing these names as the parameter values of either a primary/secondary DRBD node (-pm, -sm), or as a VTun Server Profile node (-vsp), whichever would be appropriate for your specific use case.
Installation and Configuration
Initially we will be taking a look at how the automated installation script can be used to -- as the name implies -- automate the process of preparing two EC2 nodes to act as our fail-over persistent storage hub, connecting to the other two nodes via a point-to-point tunnel to allow direct mounting of the DRBD-backed device via NFS. We'll then spend time walking through each portion of the automated script to ensure you gain a proper understanding of what is taking place inside of each function. Lastly, I'll summarize these actions and then talk about some next steps you can make to enhance and extend your applications to increase the throughput performance, reliability, and scalability of your EC2-based applications.
POINT OF INTEREST: All scripts used in this solution can also be viewed online at http://code.google.com/p/nuxleus/source/browse/linux-distro/build/configure_ami/configure and checked out of git at http://nuxleus.googlecode.com/svn/build/configure_ami/
Automated Installation Script
In addition to custom passwords, node names, and volume names, we will be invoking the script that follows using the internal and external machine names of the AMI's we previously launched. That script can be found at,
http://code.google.com/p/nuxleus/source/browse/linux-distro/build/configure_ami/configure
Before being able to run this script correctly, two things need to take place,
- Clone the git repository at https://code.google.com/p/nuxleus/
- cd into [CLONED_LOCAL_REPO]/linux-distro/build/configure_ami
- run `chmod +x configure`
IMPORTANT NOTE: If you are taking advantage of availability zones please be sure you use the correct machine names for the -pm and -sm switches as it relates the machines you plan to designate as your primary and secondary nodes in your persistent storage node set.
$ ./configure \
-pk ~/amp.fm-admin.pem \
-pm domU-12-31-38-00-9C-55.compute-1.internal:ec2-72-44-53-69.compute-1.amazonaws.com \
-sm ip-10-251-70-176.ec2.internal:ec2-75-101-252-243.compute-1.amazonaws.com \
-amn "the_off_ramp" \
-vp "BoomBoomRoomZoom" \
-vsp domU-12-31-39-00-E8-A1.compute-1.internal:ec2-75-101-193-159.compute-1.amazonaws.com:domU-12-31-39-00-E8-A1:yes \
-vsp domU-12-31-39-00-5D-C6.compute-1.internal:ec2-67-202-53-151.compute-1.amazonaws.com:domU-12-31-39-00-5D-C6:yes \
-hp "FooBarFightersROCK" \
-vg "the_off_ramp" \
-lv1 "mookie_blaylock" \
-lv2 "pearl_jam" \
--overwrite-data-of-peer
To gain an understanding of what the above switches and related values represent, you can run ./configure -u to gain access to the usage information,
$ ./configure -u
SYNOPSIS
./configure -pk -pm -sm [-vd] -vp -vsp [-vsp] -hp -vg -lv1 -lv2 [--overwrite-data-of-peer]
SUMMARY
Configures each of the nodes in a given two node DRBD configuration as well as each specified VTun server node to use LVM, DRBD,
NFS, Heartbeat, and VTun for fail-over data persistence and network mountable read/write access.
OPTIONS
-pk/--private-key Filename of private key to use when logging in to each machine in the configuration.
-pm/--primary-machine Internal:External machine name of the primary machine in the DRBD configuration.
The two machine names should be separated by a colon.
-sm/--secondary-machine Internal:External machine name of the secondary machine in the DRBD configuration.
The two machine names should be separated by a colon.
-amn/--active-machine-name The machine name that the active node should use across the virtual network. This
is different than the internal name of the primary machine, and should represent something
distinctive and easy for you to recognize.
-vp/--vtun-password The password that should be used between client and server when establishing
a point-to-point tunnel.
-hp/--heartbeat-passphrase The passphrase to be used by heartbeat when establishing a connection with
its paired node.
-vd/--volume-device The device to act as the LVM physical volume.
-vg/--volume-group-name The name of the LVM volume group to use in the configuration.
-lv1/--logical-volume-one The name of the first/primary logical volume to use in the configuration.
This is the primary read/write volume that will be used in the DRBD configuration.
-lv2/--logical-volume-two The name of the second/backup logical volume to use in the configuration.
This will be used when making snapshots of the primary volume for purpose of backup.
-vsp/--vtun-server-profile The internal machine name, external machine name, and profile name to be used in the
VTun client and server configuration file. This should use the format
INTERNAL-MACHINE-NAME:EXTERNAL-MACHINE-NAME:profile_name.
Optionally you can add a fourth argument with the value of "yes" or "no" which specifies
whether or not VTun should be installed on the remote machine. The default is no.
--overwrite-data-of-peer Overwrite any data contained on the DRBD secondary peer. For safety, by default this
is set to no, but for this to work on a new two node configuration, you MUST use this
switch or DRBD will refuse to mark the primary node as primary until both devices
are in sync. This would then require human intervention, which defeats the purpose of
this script.
-u/--usage/-h/--help/-? Prints this menu and exits.
After you have replaced the internal_machine_name:external_machine_name into the appropriate places and hit enter, you should expect to see between 5-7 minutes worth of output stream across your screen, the last of which should look something similar to,
Fri May 9 09:54:53 UTC 2008:MOUNT:VOLUMES:INFO: Mounting volumes on ec2-72-44-53-69.compute-1.amazonaws.com and ec2-75-101-252-243.compute-1.amazonaws.com
mount: mount to NFS server 'the_off_ramp' failed: timed out (retrying).
mount: mount to NFS server 'the_off_ramp' failed: timed out (retrying).
Fri May 9 09:56:06 UTC 2008:CLEANUP:FILES:INFO: Cleaning up files on local machine
Fri May 9 09:56:06 UTC 2008:CLEANUP:FILES:INFO: AMI Configuration Complete
Notice line two and line three, both of which read,
mount: mount to NFS server 'the_off_ramp' failed: timed out (retrying).
This is normal, expected behavior, the reason being that the command just before this starts up Heartbeat and all related services on the persistent storage nodes, taking between 30 to 60 seconds for Heartbeat to initialize the system for the first time. As such, when attempting to mount the NFS drive on the server nodes in our configuration, it will take a few attempts before Heartbeat has successfully started all services and the NFS device made available for mounting externally.
Verifying Everything Has Been Setup Correctly
As long as the above script hasn't thrown any obvious errors, we should now be able to login to each of our four(4) nodes and run some tests, the first of which is ensuring we are able to access our mounted NFS drive on our two VTun server nodes.
$ ssh root@ec2-75-101-193-159.compute-1.amazonaws.com
__| __|_ ) Fedora 8
_| ( / 32-bit
___|\___|___|
Welcome to an EC2 Public Image
:-)
Base
--[ see /etc/ec2/release-notes ]--
$
Our first test is to simply ensure that our VTun point-to-point tunnel is up and running correctly,
$ ifconfig
eth0 Link encap:Ethernet HWaddr 12:31:39:00:E8:A1
inet addr:10.254.239.79 Bcast:10.254.239.255 Mask:255.255.254.0
inet6 addr: fe80::1031:39ff:fe00:e8a1/64 Scope:Link
UP BROADCAST RUNNING MULTICAST MTU:1500 Metric:1
RX packets:17801 errors:0 dropped:0 overruns:0 frame:0
TX packets:9193 errors:0 dropped:0 overruns:0 carrier:0
collisions:0 txqueuelen:1000
RX bytes:24849771 (23.6 MiB) TX bytes:707054 (690.4 KiB)
lo Link encap:Local Loopback
inet addr:127.0.0.1 Mask:255.0.0.0
inet6 addr: ::1/128 Scope:Host
UP LOOPBACK RUNNING MTU:16436 Metric:1
RX packets:0 errors:0 dropped:0 overruns:0 frame:0
TX packets:0 errors:0 dropped:0 overruns:0 carrier:0
collisions:0 txqueuelen:0
RX bytes:0 (0.0 b) TX bytes:0 (0.0 b)
tun0 Link encap:UNSPEC HWaddr 00-00-00-00-00-00-00-00-00-00-00-00-00-00-00-00
inet addr:10.3.0.1 P-t-P:10.3.0.100 Mask:255.255.255.255
UP POINTOPOINT RUNNING NOARP MULTICAST MTU:1450 Metric:1
RX packets:11 errors:0 dropped:0 overruns:0 frame:0
TX packets:11 errors:0 dropped:0 overruns:0 carrier:0
collisions:0 txqueuelen:500
RX bytes:928 (928.0 b) TX bytes:1284 (1.2 KiB)
The interesting entry in the above list is tun0, which as we had hoped is up, running, and therefore configured correctly.
For sake of brevity, I'll only show the output of one node, though you will want to make sure you login to both nodes to verify things are working correctly.
Next, we want to be sure the drive is mounted and available,
$ df
Filesystem 1K-blocks Used Available Use% Mounted on
/dev/sda1 10321208 1214748 8582172 13% /
/dev/sda2 153899044 192076 145889344 1% /mnt
none 873880 0 873880 0% /dev/shm
the_off_ramp:/data/export
78139392 264 78139128 1% /data
The last line is what we are interested in, and yes, in fact, the_off_ramp:/data/export has been successfully mounted locally at the /data mountpoint.
Next, let's add some files to the /data folder and then verify they have been propagated across the network,
$ touch /data/foo /data/bar
$ ls /data
bar foo
Now, to be sure we can see these changes across the network, let's log into the second VTun server node,
$ ssh root@ec2-67-202-53-151.compute-1.amazonaws.com
$ ls /data
bar foo
Now that we have verified we can see the files we created across the network, lets add a few more files, logout, and then login to our primary node in the persistent storage node-set to run a few more tests.
$ touch /data/foobar /data/barbaz
$ ls /data
bar barbaz foo foobar
Next, let's logout of our VTun server node and login to our primary persistent storage node,
IMPORTANT NOTE: Such that we would have a location to place files that we didn't want exposed over the network, we created an export folder in the /data directory in our persistent storage solution. As such, what is found in /data on our VTun server nodes will appear in /data/export on our persistent storage nodes,
$ ssh root@ec2-72-44-53-69.compute-1.amazonaws.com
$ ls /data/export
bar barbaz foo foobar
Now that we've verified that all file additions have been propagated successfully across our network, let's run some tests to ensure that if our primary node fails, the secondary node will pick things up and continue forward until the primary node comes back online,
$ service heartbeat stop
Stopping High-Availability services:
[ OK ]
Next, let's logout of our primary persistent storage node and login to our secondary node to ensure it has taken over the necessary services.
$ ssh root@ec2-75-101-252-243.compute-1.amazonaws.com
$ ifconfig
eth0 Link encap:Ethernet HWaddr 12:31:3A:00:41:42
inet addr:10.251.70.176 Bcast:10.251.71.255 Mask:255.255.254.0
inet6 addr: fe80::1031:3aff:fe00:4142/64 Scope:Link
UP BROADCAST RUNNING MULTICAST MTU:1500 Metric:1
RX packets:43839916 errors:0 dropped:0 overruns:0 frame:0
TX packets:22359177 errors:0 dropped:0 overruns:0 carrier:0
collisions:0 txqueuelen:1000
RX bytes:3831951697 (3.5 GiB) TX bytes:2372148957 (2.2 GiB)
lo Link encap:Local Loopback
inet addr:127.0.0.1 Mask:255.0.0.0
inet6 addr: ::1/128 Scope:Host
UP LOOPBACK RUNNING MTU:16436 Metric:1
RX packets:74 errors:0 dropped:0 overruns:0 frame:0
TX packets:74 errors:0 dropped:0 overruns:0 carrier:0
collisions:0 txqueuelen:0
RX bytes:6332 (6.1 KiB) TX bytes:6332 (6.1 KiB)
tun0 Link encap:UNSPEC HWaddr 00-00-00-00-00-00-00-00-00-00-00-00-00-00-00-00
inet addr:10.3.0.100 P-t-P:10.3.0.1 Mask:255.255.255.255
UP POINTOPOINT RUNNING NOARP MULTICAST MTU:1450 Metric:1
RX packets:0 errors:0 dropped:0 overruns:0 frame:0
TX packets:0 errors:0 dropped:0 overruns:0 carrier:0
collisions:0 txqueuelen:500
RX bytes:0 (0.0 b) TX bytes:0 (0.0 b)
tun1 Link encap:UNSPEC HWaddr 00-00-00-00-00-00-00-00-00-00-00-00-00-00-00-00
inet addr:10.3.0.101 P-t-P:10.3.0.2 Mask:255.255.255.255
UP POINTOPOINT RUNNING NOARP MULTICAST MTU:1450 Metric:1
RX packets:0 errors:0 dropped:0 overruns:0 frame:0
TX packets:0 errors:0 dropped:0 overruns:0 carrier:0
collisions:0 txqueuelen:500
RX bytes:0 (0.0 b) TX bytes:0 (0.0 b)
$ df
Filesystem 1K-blocks Used Available Use% Mounted on
/dev/sda1 10321208 1494056 8302864 16% /
none 873880 0 873880 0% /dev/shm
/dev/drbd0 78139392 268 78139125 1% /data
So far, so good. Now we need log back into our VTun server nodes to verify they have been able to remount the NFS drive,
$ ssh root@ec2-75-101-193-159.compute-1.amazonaws.com
$ ifconfig
eth0 Link encap:Ethernet HWaddr 12:31:39:00:E8:A1
inet addr:10.254.239.79 Bcast:10.254.239.255 Mask:255.255.254.0
inet6 addr: fe80::1031:39ff:fe00:e8a1/64 Scope:Link
UP BROADCAST RUNNING MULTICAST MTU:1500 Metric:1
RX packets:18073 errors:0 dropped:0 overruns:0 frame:0
TX packets:9368 errors:0 dropped:0 overruns:0 carrier:0
collisions:0 txqueuelen:1000
RX bytes:24873559 (23.7 MiB) TX bytes:731752 (714.6 KiB)
lo Link encap:Local Loopback
inet addr:127.0.0.1 Mask:255.0.0.0
inet6 addr: ::1/128 Scope:Host
UP LOOPBACK RUNNING MTU:16436 Metric:1
RX packets:0 errors:0 dropped:0 overruns:0 frame:0
TX packets:0 errors:0 dropped:0 overruns:0 carrier:0
collisions:0 txqueuelen:0
RX bytes:0 (0.0 b) TX bytes:0 (0.0 b)
tun0 Link encap:UNSPEC HWaddr 00-00-00-00-00-00-00-00-00-00-00-00-00-00-00-00
inet addr:10.3.0.1 P-t-P:10.3.0.100 Mask:255.255.255.255
UP POINTOPOINT RUNNING NOARP MULTICAST MTU:1450 Metric:1
RX packets:0 errors:0 dropped:0 overruns:0 frame:0
TX packets:0 errors:0 dropped:0 overruns:0 carrier:0
collisions:0 txqueuelen:500
RX bytes:0 (0.0 b) TX bytes:0 (0.0 b)
$ ls /data
bar barbaz foo foobar
$ touch /data/foobarbaz /data/barbazfoo
$ ls /data
bar barbaz barbazfoo foo foobar foobarbaz
Okay, now the other VTun server,
$ ssh root@ec2-67-202-53-151.compute-1.amazonaws.com
$ ifconfig
eth0 Link encap:Ethernet HWaddr 12:31:39:00:5D:C6
inet addr:10.254.98.52 Bcast:10.254.99.255 Mask:255.255.254.0
inet6 addr: fe80::1031:39ff:fe00:5dc6/64 Scope:Link
UP BROADCAST RUNNING MULTICAST MTU:1500 Metric:1
RX packets:18149 errors:0 dropped:0 overruns:0 frame:0
TX packets:9577 errors:0 dropped:0 overruns:0 carrier:0
collisions:0 txqueuelen:1000
RX bytes:24888318 (23.7 MiB) TX bytes:740665 (723.3 KiB)
lo Link encap:Local Loopback
inet addr:127.0.0.1 Mask:255.0.0.0
inet6 addr: ::1/128 Scope:Host
UP LOOPBACK RUNNING MTU:16436 Metric:1
RX packets:0 errors:0 dropped:0 overruns:0 frame:0
TX packets:0 errors:0 dropped:0 overruns:0 carrier:0
collisions:0 txqueuelen:0
RX bytes:0 (0.0 b) TX bytes:0 (0.0 b)
tun0 Link encap:UNSPEC HWaddr 00-00-00-00-00-00-00-00-00-00-00-00-00-00-00-00
inet addr:10.3.0.2 P-t-P:10.3.0.101 Mask:255.255.255.255
UP POINTOPOINT RUNNING NOARP MULTICAST MTU:1450 Metric:1
RX packets:0 errors:0 dropped:0 overruns:0 frame:0
TX packets:0 errors:0 dropped:0 overruns:0 carrier:0
collisions:0 txqueuelen:500
RX bytes:0 (0.0 b) TX bytes:0 (0.0 b)
$ ls /data
bar barbaz barbazfoo foo foobar foobarbaz
$ touch /data/bazfoobar /data/barfoo
$ ls /data
bar barbaz barbazfoo barfoo bazfoobar foo foobar foobarbaz
Okay. And last, but certainly not least, lets log back into our currently "dead" primary Heartbeat node, restart Heartbeat, and then verify the data has been propagated,
$ ssh root@ec2-72-44-53-69.compute-1.amazonaws.com
$ ifconfig
eth0 Link encap:Ethernet HWaddr 12:31:38:00:9C:55
inet addr:10.252.163.163 Bcast:10.252.163.255 Mask:255.255.254.0
inet6 addr: fe80::1031:38ff:fe00:9c55/64 Scope:Link
UP BROADCAST RUNNING MULTICAST MTU:1500 Metric:1
RX packets:28002657 errors:0 dropped:0 overruns:0 frame:0
TX packets:27644520 errors:0 dropped:0 overruns:0 carrier:0
collisions:0 txqueuelen:1000
RX bytes:2604751406 (2.4 GiB) TX bytes:631951852 (602.6 MiB)
lo Link encap:Local Loopback
inet addr:127.0.0.1 Mask:255.0.0.0
inet6 addr: ::1/128 Scope:Host
UP LOOPBACK RUNNING MTU:16436 Metric:1
RX packets:98 errors:0 dropped:0 overruns:0 frame:0
TX packets:98 errors:0 dropped:0 overruns:0 carrier:0
collisions:0 txqueuelen:0
RX bytes:8588 (8.3 KiB) TX bytes:8588 (8.3 KiB)
$ df
Filesystem 1K-blocks Used Available Use% Mounted on
/dev/sda1 10321208 1494572 8302348 16% /
none 873880 0 873880 0% /dev/shm
$ ls /data
$ service heartbeat start
Starting High-Availability services:
[ OK ]
To ensure Heartbeat has adequate time to take over the responsibilities of the primary node, let's give it about 15 seconds or so before checking if things are as they should be,
$ df
Filesystem 1K-blocks Used Available Use% Mounted on
/dev/sda1 10321208 1494708 8302212 16% /
none 873880 0 873880 0% /dev/shm
/dev/drbd0 78139392 272 78139121 1% /data
$ ifconfig
eth0 Link encap:Ethernet HWaddr 12:31:38:00:9C:55
inet addr:10.252.163.163 Bcast:10.252.163.255 Mask:255.255.254.0
inet6 addr: fe80::1031:38ff:fe00:9c55/64 Scope:Link
UP BROADCAST RUNNING MULTICAST MTU:1500 Metric:1
RX packets:28686850 errors:0 dropped:0 overruns:0 frame:0
TX packets:28319472 errors:0 dropped:0 overruns:0 carrier:0
collisions:0 txqueuelen:1000
RX bytes:2667845811 (2.4 GiB) TX bytes:2435374519 (2.2 GiB)
lo Link encap:Local Loopback
inet addr:127.0.0.1 Mask:255.0.0.0
inet6 addr: ::1/128 Scope:Host
UP LOOPBACK RUNNING MTU:16436 Metric:1
RX packets:172 errors:0 dropped:0 overruns:0 frame:0
TX packets:172 errors:0 dropped:0 overruns:0 carrier:0
collisions:0 txqueuelen:0
RX bytes:15064 (14.7 KiB) TX bytes:15064 (14.7 KiB)
tun0 Link encap:UNSPEC HWaddr 00-00-00-00-00-00-00-00-00-00-00-00-00-00-00-00
inet addr:10.3.0.100 P-t-P:10.3.0.1 Mask:255.255.255.255
UP POINTOPOINT RUNNING NOARP MULTICAST MTU:1450 Metric:1
RX packets:0 errors:0 dropped:0 overruns:0 frame:0
TX packets:0 errors:0 dropped:0 overruns:0 carrier:0
collisions:0 txqueuelen:500
RX bytes:0 (0.0 b) TX bytes:0 (0.0 b)
tun1 Link encap:UNSPEC HWaddr 00-00-00-00-00-00-00-00-00-00-00-00-00-00-00-00
inet addr:10.3.0.101 P-t-P:10.3.0.2 Mask:255.255.255.255
UP POINTOPOINT RUNNING NOARP MULTICAST MTU:1450 Metric:1
RX packets:0 errors:0 dropped:0 overruns:0 frame:0
TX packets:0 errors:0 dropped:0 overruns:0 carrier:0
collisions:0 txqueuelen:500
RX bytes:0 (0.0 b) TX bytes:0 (0.0 b)
$ ls /data/export/
bar barbaz barbazfoo barfoo bazfoobar foo foobar foobarbaz
Excellent! Now one last check on the VTun servers just to be sure they have, once again, properly remounted the NFS drive.
$ ssh root@ec2-75-101-193-159.compute-1.amazonaws.com
$ ls /data
bar barbaz barbazfoo barfoo bazfoobar foo foobar foobarbaz
$ CTRL+d
$ ssh root@ec2-67-202-53-151.compute-1.amazonaws.com
$ ls /data
bar barbaz barbazfoo barfoo bazfoobar foo foobar foobarbaz
Perfect! Just as we had hoped. :)
SPECIAL NOTE REGARDING LATENCY: As we talked about at the start of this section, one of the costs we have to take into consideration when dealing with availability zones is the latency we incur when passing data between physically, and potentially geographically, separated zones. To gain a proper understanding of what we're dealing with let's run some basic tests, the first between the persistent storage nodes in us-east-1a and us-east-1b,
[root@domU-12-31-38-00-9C-55 ~]# ping ip-10-251-70-176.ec2.internal
PING ip-10-251-70-176.ec2.internal (10.251.70.176) 56(84) bytes of data.
64 bytes from ip-10-251-70-176.ec2.internal (10.251.70.176): icmp_seq=1 ttl=60 time=0.870 ms
64 bytes from ip-10-251-70-176.ec2.internal (10.251.70.176): icmp_seq=2 ttl=60 time=0.927 ms
64 bytes from ip-10-251-70-176.ec2.internal (10.251.70.176): icmp_seq=3 ttl=60 time=0.975 ms
64 bytes from ip-10-251-70-176.ec2.internal (10.251.70.176): icmp_seq=4 ttl=60 time=0.929 ms
64 bytes from ip-10-251-70-176.ec2.internal (10.251.70.176): icmp_seq=5 ttl=60 time=0.982 ms
64 bytes from ip-10-251-70-176.ec2.internal (10.251.70.176): icmp_seq=6 ttl=60 time=0.922 ms
64 bytes from ip-10-251-70-176.ec2.internal (10.251.70.176): icmp_seq=7 ttl=60 time=0.945 ms
64 bytes from ip-10-251-70-176.ec2.internal (10.251.70.176): icmp_seq=8 ttl=60 time=0.949 ms
64 bytes from ip-10-251-70-176.ec2.internal (10.251.70.176): icmp_seq=9 ttl=60 time=1.10 ms
64 bytes from ip-10-251-70-176.ec2.internal (10.251.70.176): icmp_seq=10 ttl=60 time=0.891 ms
--- ip-10-251-70-176.ec2.internal ping statistics ---
10 packets transmitted, 10 received, 0% packet loss, time 9001ms
rtt min/avg/max/mdev = 0.870/0.949/1.106/0.070 ms
$ traceroute ip-10-251-70-176.ec2.internal
traceroute to ip-10-251-70-176.ec2.internal (10.251.70.176), 30 hops max, 40 byte packets
1 dom0-10-252-160-173.compute-1.internal (10.252.160.173) 0.082 ms 0.103 ms 0.093 ms
2 10.252.160.2 (10.252.160.2) 0.750 ms 0.908 ms 0.987 ms
3 othr-216-182-224-11.usma1.compute.amazonaws.com (216.182.224.11) 1.691 ms 1.684 ms 1.799 ms
4 ip-10-251-68-158.ec2.internal (10.251.68.158) 0.920 ms 0.919 ms 0.912 ms
5 ip-10-251-70-176.ec2.internal (10.251.70.176) 1.098 ms 1.089 ms 1.090 ms
Okay, now between our two VTun servers, both of which are in us-east-1c,
$ ping domU-12-31-39-00-E8-A1.compute-1.internal
PING domU-12-31-39-00-E8-A1.compute-1.internal (10.254.239.79) 56(84) bytes of data.
64 bytes from domU-12-31-39-00-E8-A1.compute-1.internal (10.254.239.79): icmp_seq=1 ttl=61 time=0.267 ms
64 bytes from domU-12-31-39-00-E8-A1.compute-1.internal (10.254.239.79): icmp_seq=2 ttl=61 time=0.272 ms
64 bytes from domU-12-31-39-00-E8-A1.compute-1.internal (10.254.239.79): icmp_seq=3 ttl=61 time=0.263 ms
64 bytes from domU-12-31-39-00-E8-A1.compute-1.internal (10.254.239.79): icmp_seq=4 ttl=61 time=0.355 ms
64 bytes from domU-12-31-39-00-E8-A1.compute-1.internal (10.254.239.79): icmp_seq=5 ttl=61 time=0.283 ms
64 bytes from domU-12-31-39-00-E8-A1.compute-1.internal (10.254.239.79): icmp_seq=6 ttl=61 time=0.297 ms
64 bytes from domU-12-31-39-00-E8-A1.compute-1.internal (10.254.239.79): icmp_seq=7 ttl=61 time=0.289 ms
64 bytes from domU-12-31-39-00-E8-A1.compute-1.internal (10.254.239.79): icmp_seq=8 ttl=61 time=0.274 ms
64 bytes from domU-12-31-39-00-E8-A1.compute-1.internal (10.254.239.79): icmp_seq=9 ttl=61 time=0.301 ms
64 bytes from domU-12-31-39-00-E8-A1.compute-1.internal (10.254.239.79): icmp_seq=10 ttl=61 time=0.303 ms
--- domU-12-31-39-00-E8-A1.compute-1.internal ping statistics ---
10 packets transmitted, 10 received, 0% packet loss, time 9106ms
rtt min/avg/max/mdev = 0.263/0.290/0.355/0.029 ms
$ traceroute domU-12-31-39-00-E8-A1.compute-1.internal
traceroute to domU-12-31-39-00-E8-A1.compute-1.internal (10.254.239.79), 30 hops max, 40 byte packets
1 dom0-10-254-96-150.compute-1.internal (10.254.96.150) 0.062 ms 0.077 ms 0.067 ms
2 10.254.96.3 (10.254.96.3) 0.329 ms 0.331 ms 0.392 ms
3 dom0-10-254-236-168.compute-1.internal (10.254.236.168) 0.271 ms 0.263 ms 0.251 ms
4 domU-12-31-39-00-E8-A1.compute-1.internal (10.254.239.79) 0.493 ms 0.487 ms 0.477 ms
So there's a fairly large gap in the average round-trip-time between nodes in us-east-1a and us-east-1b compared to the two nodes in us-east-1c (0.949 vs. 0.290) , but there is only one additional hop (4 vs. 5). One of these additional hops, however, provides the clue to the primary reason behind the latency difference:
othr-216-182-224-11.usma1.compute.amazonaws.com (216.182.224.11) 1.691 ms 1.684 ms 1.799 ms
The nodes IP adress is 216.182.224.11, an external public IP address, which is exactly what we would expect to find when dealing with physically separated availability zones. The upside, of course, of using two different availability zones is that we've decreased the chances of finding ourselves without access to at least one of the nodes in our persistent storage solution. The downside being that of decreased performance and an increase -- albeit slight -- in the operational costs. Which one is best for your particular requirements, however, is something that can only be determined by you.
Understanding How The Scripts Works
This script has been written to first, setup the various values we will be using through the remainder of the scripts, to then invoke the various functions that are related to each nodes primary focus using the "verb_noun" syntax similar to that used by Windows PowerShell. The functions we are going to call, in the order we will be calling them, are as follows,
- configure_vtun_server_list
- configure_ssh
- update_fedora_8
- unmount_mnt
- configure_lvm
- install_drbd
- create_drbd_meta_data_loopback
- configure_drbd
- create_drbd_meta_data_disk
- bring_up_drbd
- create_data_dir
- configure_primary_drbd_node
- create_xfs_file_system
- mount_drbd_device
- configure_primary_nfs_file_system
- configure_secondary_nfs_file_system
- install_vtun
- configure_vtun
- configure_system
- configure_services
- configure_heartbeat
- install_heartbeat_scripts
- generate_cib_xml
- append_hosts_allow
- append_rc_local
- start_services
- mount_volumes
- cleanup_files
Most of the above functions will be called twice, once for each node in our DRBD/Heartbeat configuration. We'll use the variables $PRIMARY_EXTERNAL_MACHINE_NAME and $SECONDARY_EXTERNAL_MACHINE_NAME to denote which machine the function should operate upon when invoked. In some cases, such as the configuration of NFS on the primary and secondary node, we will only call each function once. In other cases, such as configure_vtun_server_list, the function is configured to call additional functions to complete its primary task.
POINT OF INTEREST: While it would be more efficient to generate a complete script for each machine, copy the script to the related machine, and then invoke it as part of a single SSH session, given the fact that we are focused on building out a synchronized mesh of EC2 nodes, we'll instead be calling each primary function one at a time, doing so in such a way that upon completion of the process our system will be up, running, and fully functional as a single unit. This also allows us the ability to write additional scripts that we can use to manage our cluster, adding additional nodes to the mix that we plan to mount the pre-configured NFS drives upon, eliminating the need for a majority of the scripts functions as a result.
The entire script follows in-line below, after which we will be walking through each function to provide a proper understanding of what it does, and why.
at http://nuxleus.googlecode.com/svn/build/configure_ami/configure
- #!/bin/sh
- PRIVATE_KEY_FILE="not-set"
- PRIMARY_MACHINE="not-set"
- SECONDARY_MACHINE="not-set"
- PRIMARY_EXTERNAL_MACHINE_NAME="not-set"
- SECONDARY_EXTERNAL_MACHINE_NAME="not-set"
- ACTIVE_MACHINE_NAME="not-set"
- VTUN_PASSWORD="not-set"
- HEARTBEAT_PASSPHRASE="not-set"
- VOLUME_DEVICE="/dev/sda2"
- VOLUME_GROUP_NAME="not-set"
- LOGICAL_VOLUME_ONE="not-set"
- LOGICAL_VOLUME_TWO="not-set"
- DRBD_OVERWRITE_PEER=""
- VTUN_CLIENT_CONFIG_FILE="/usr/local/etc/vtund-client.conf"
- VTUN_SERVER_CONFIG_FILE="/usr/local/etc/vtund-server.conf"
- BASE_VTUN_SUBNET="10.3.0"
- VTUN_SERVER_VIRTUAL_IP_CLASS_D_BASE=1
- VTUN_CLIENT_VIRTUAL_IP_CLASS_D_BASE=100
- PRIMARY_MACHINE_IP="not-set"
- SECONDARY_MACHINE_IP="not-set"
- usage() {
- cat <<END
- SYNOPSIS
- ./configure -pk -pm -sm [-vd] -vp -vsp [-vsp] -hp -vg -lv1 -lv2 [--overwrite-data-of-peer]
- SUMMARY
- Configures each of the nodes in a given two node DRBD configuration as well as each specified VTun server node to use LVM, DRBD,
- NFS, Heartbeat, and VTun for fail-over data persistence and network mountable read/write access.
- OPTIONS
- -pk/--private-key Filename of private key to use when logging in to each machine in the configuration.
- -pm/--primary-machine Internal:External machine name of the primary machine in the DRBD configuration.
- The two machine names should be separated by a colon.
- -sm/--secondary-machine Internal:External machine name of the secondary machine in the DRBD configuration.
- The two machine names should be separated by a colon.
- -amn/--active-machine-name The machine name that the active node should use across the virtual network. This
- is different than the internal name of the primary machine, and should represent something
- distinctive and easy for you to recognize.
- -vp/--vtun-password The password that should be used between client and server when establishing
- a point-to-point tunnel.
- -hp/--heartbeat-passphrase The passphrase to be used by heartbeat when establishing a connection with
- its paired node.
- -vd/--volume-device The device to act as the LVM physical volume.
- -vg/--volume-group-name The name of the LVM volume group to use in the configuration.
- -lv1/--logical-volume-one The name of the first/primary logical volume to use in the configuration.
- This is the primary read/write volume that will be used in the DRBD configuration.
- -lv2/--logical-volume-two The name of the second/backup logical volume to use in the configuration.
- This will be used when making snapshots of the primary volume for purpose of backup.
- -vsp/--vtun-server-profile The internal machine name, external machine name, and profile name to be used in the
- VTun client and server configuration file. This should use the format
- INTERNAL-MACHINE-NAME:EXTERNAL-MACHINE-NAME:profile_name.
- Optionally you can add a fourth argument with the value of "yes" or "no" which specifies
- whether or not VTun should be installed on the remote machine. The default is no.
- --overwrite-data-of-peer Overwrite any data contained on the DRBD secondary peer. For safety, by default this
- is set to no, but for this to work on a new two node configuration, you MUST use this
- switch or DRBD will refuse to mark the primary node as primary until both devices
- are in sync. This would then require human intervention, which defeats the purpose of
- this script.
- -u/--usage/-h/--help/-? Prints this menu and exits.
- END
- }
- log_info() {
- echo `date`:$CURRENT_PROCESS":INFO: "$1
- }
- log_warn() {
- echo `date`:$CURRENT_PROCESS":WARN: "$1
- }
- log_error() {
- echo `date`:$CURRENT_PROCESS":ERROR: "$1
- }
- get_ip_from_machine() {
- echo `ssh -i $PRIVATE_KEY_FILE -o StrictHostKeyChecking=no root@$1 ifconfig | grep 'inet addr:'| grep -v '127.0.0.1' | cut -d: -f2 | cut -d ' ' -f1`
- }
- get_ip_from_machine_name() {
- echo $1 | sed -e "s/ip-//g" -e "s/-/./g"
- }
- append_vtun_profile_to_haresources() {
- echo "VTun::$1::$2::$3 \\" >> config/haresources
- }
- generate_vtun_profile() {
- cat <<END
- $1 {
- passwd $2;
- type tun;
- proto tcp;
- up {
- ifconfig
- "%% $3 pointopoint $4 mtu 1450";
- };
- down {
- ifconfig "%% down";
- };
- }
- END
- }
- configure_ssh() {
- if [ ! -r ${HOME}/.ssh/id_rsa.pub ]; then
- ssh-keygen -b 2048 -t rsa -N ""
- fi
- cat ~/.ssh/id_rsa.pub | ssh -i $PRIVATE_KEY_FILE -o StrictHostKeyChecking=no root@$1 "cat - >> .ssh/authorized_keys"
- }
- update_fedora_8() {
- ssh root@$1 "yum -y install flex heartbeat xfsprogs lzo lzo-devel zlib-devel openssl-devel byacc system-config-nfs svn"
- }
- unmount_mnt() {
- ssh root@$1 "umount /mnt"
- }
- configure_lvm(){
- log_info "Creating Physical Volume on device: $VOLUME_DEVICE"
- ssh root@$1 pvcreate $VOLUME_DEVICE
- log_info "Creating Volume Group: $VOLUME_GROUP_NAME"
- ssh root@$1 vgcreate $VOLUME_GROUP_NAME $VOLUME_DEVICE
- log_info "Determining PE of Volume Group: $VOLUME_GROUP_NAME"
- PE=`ssh root@$1 vgdisplay $VOLUME_GROUP_NAME | grep "Total PE" | sed -e "s/Total PE//g" -e "s/ //g"`
- PE_DISK_SIZE=`echo $(($PE / 2))`
- log_info "Total PE size is: $PE"
- log_info "Each Logical Volume will be set to: $PE_DISK_SIZE"
- log_info "Creating Logial Volume: $LOGICAL_VOLUME_ONE"
- ssh root@$1 lvcreate -l $PE_DISK_SIZE $VOLUME_GROUP_NAME -n $LOGICAL_VOLUME_ONE
- log_info "Creating Logial Volume: $LOGICAL_VOLUME_TWO"
- ssh root@$1 lvcreate -l $PE_DISK_SIZE $VOLUME_GROUP_NAME -n $LOGICAL_VOLUME_TWO
- }
- install_drbd(){
- log_info "Downloading, extracting, and installing the precompiled DRBD modules"
- scp get-install-config-drbd root@$1:get-install-config-drbd.sh
- ssh root@$1 sh ./get-install-config-drbd.sh
- }
- create_drbd_meta_data_loopback() {
- log_info "Creating DRBD meta-data loop back file"
- ssh root@$1 dd if=/dev/zero of=/var/drbd-meta bs=512K count=512
- log_info "Attaching DRBD meta-data loop back file"
- ssh root@$1 losetup /dev/loop0 /var/drbd-meta
- }
- configure_drbd() {
- sed -e "s/@@PRIMARY_MACHINE@@/$PRIMARY_MACHINE/g" \
- -e "s/@@SECONDARY_MACHINE@@/$SECONDARY_MACHINE/g" \
- -e "s/@@VOLUME_GROUP_NAME@@/$VOLUME_GROUP_NAME/g" \
- -e "s/@@LOGICAL_VOLUME_ONE@@/$LOGICAL_VOLUME_ONE/g" \
- -e "s/@@PRIMARY_MACHINE_IP@@/$PRIMARY_MACHINE_IP/g" \
- -e "s/@@SECONDARY_MACHINE_IP@@/$SECONDARY_MACHINE_IP/g" \
- config/drbd.conf | ssh root@$1 "cat - > /etc/drbd.conf"
- }
- create_drbd_meta_data_disk() {
- ssh root@$1 "yes | drbdadm create-md r0"
- }
- bring_up_drbd() {
- ssh root@$1 "yes | drbdadm up all"
- }
- create_data_dir() {
- ssh root@$1 mkdir /data
- }
- configure_primary_drbd_node() {
- ssh root@$1 "yes | drbdadm -- $DRBD_OVERWRITE_PEER primary r0"
- }
- create_xfs_file_system() {
- ssh root@$1 mkfs.xfs -f -b size=512 /dev/drbd0
- }
- mount_drbd_device() {
- ssh root@$1 mount /dev/drbd0 /data;
- }
- configure_primary_nfs_file_system() {
- ssh root@$1 "mv /var/lib/nfs/ /data/; \
- ln -s /data/nfs /var/lib/nfs; \
- mkdir /data/export; \
- umount /data"
- }
- configure_secondary_nfs_file_system() {
- ssh root@$1 "rm -rf /var/lib/nfs; \
- ln -s /data/nfs/ /var/lib/nfs"
- }
- configure_vtun_server_list() {
- for server_vars in `cat vtun_server_list`; do configure_vtun_server $server_vars; done;
- }
- install_vtun(){
- ssh root@$1 "wget http://superb-east.dl.sourceforge.net/sourceforge/vtun/vtun-3.0.1.tar.gz; \
- tar xf vtun-3.0.1.tar.gz; \
- cd vtun-3.0.1; \
- ./configure; make; make install; modprobe tun"
- }
- configure_vtun_client() {
- cp config/vtund-template.conf vtund-client.conf
- cat vtund-client.conf.temp >> vtund-client.conf
- cat vtund-client.conf | ssh root@$1 "cat - > /usr/local/etc/vtund-client.conf"
- }
- configure_vtun_server() {
- EXTERNAL_SERVER_MACHINE_NAME=`echo $1 | cut -d ':' -f1`
- SERVER_IP=`echo $1 | cut -d ':' -f2`
- PROFILE=`echo $1 | cut -d ':' -f3`
- VTUN_CLIENT_VIRTUAL_IP=`echo $1 | cut -d ':' -f4`
- VTUN_SERVER_VIRTUAL_IP=`echo $1 | cut -d ':' -f5`
- INSTALL_VTUN=`echo $1 | cut -d ':' -f6`
- configure_ssh $EXTERNAL_SERVER_MACHINE_NAME
- generate_vtun_profile $PROFILE $VTUN_PASSWORD $VTUN_CLIENT_VIRTUAL_IP $VTUN_SERVER_VIRTUAL_IP >> vtund-client.conf.temp
- echo "VTun::$SERVER_IP::$PROFILE::$VTUN_CLIENT_CONFIG_FILE" >> haresources.temp
- update_fedora_8 $EXTERNAL_SERVER_MACHINE_NAME;
- if test $INSTALL_VTUN = "yes"; then
- scp ./install-vtun root@$EXTERNAL_SERVER_MACHINE_NAME:
- ssh root@$EXTERNAL_SERVER_MACHINE_NAME "./install-vtun; mkdir /data; rm -f install-vtun"
- fi
- generate_vtun_profile $PROFILE $VTUN_PASSWORD $VTUN_SERVER_VIRTUAL_IP $VTUN_CLIENT_VIRTUAL_IP | cat - config/vtund-template.conf | ssh root@$EXTERNAL_SERVER_MACHINE_NAME "cat - >> $VTUN_SERVER_CONFIG_FILE"
- echo "$ACTIVE_MACHINE_NAME:/data/export /data nfs rsize=8192,wsize=8192,timeo=20,hard,intr,nolock,udp 0 0" | ssh root@$EXTERNAL_SERVER_MACHINE_NAME "cat - >> /etc/fstab"
- echo "$VTUN_CLIENT_VIRTUAL_IP $ACTIVE_MACHINE_NAME" | ssh root@$EXTERNAL_SERVER_MACHINE_NAME "cat - >> /etc/hosts"
- echo "/data 10.3.0.0/255.255.0.0(rw,sync,no_root_squash,no_all_squash)" | ssh root@$EXTERNAL_SERVER_MACHINE_NAME "cat - >> /etc/exports; exportfs -a"
- ssh root@$EXTERNAL_SERVER_MACHINE_NAME "vtund -f $VTUN_SERVER_CONFIG_FILE -s -L $SERVER_IP"
- echo $EXTERNAL_SERVER_MACHINE_NAME >> mountlist
- }
- start_vtun_server() {
- ssh root@$1 "vtund -f $VTUN_SERVER_CONFIG_FILE -s -L $2"
- }
- configure_system(){
- log_info "Adding /data/export and proper IP permissions to /etc/exports on $1"
- echo "/data/export 10.3.0.0/255.255.0.0(rw,sync,no_root_squash,no_all_squash)" | ssh root@$1 "cat - >> /etc/exports"
- log_info "Adding proper IP:NETMASK rules to /etc/hosts.allow"
- echo "10.251.0.0:255.255.0.0" | ssh root@$1 "cat - >> /etc/hosts.allow"
- ssh root@$1 mkdir /var/run/heartbeat/rsctmp/
- }
- configure_services() {
- ssh root@$1 "chkconfig rpcbind on; chkconfig drbd off; chkconfig heartbeat off; chkconfig nfs off; chkconfig nfslock off;"
- }
- configure_heartbeat() {
- sed -e "s/@@HEARTBEAT_PASSPHRASE@@/$HEARTBEAT_PASSPHRASE/g" config/authkeys | ssh root@$1 "cat - > /etc/ha.d/authkeys; chmod 600 /etc/ha.d/authkeys"
- sed -e "s/@@PAIRED_MACHINES_IP@@/$2/g" \
- -e "s/@@PRIMARY_MACHINE@@/$PRIMARY_MACHINE/g" \
- -e "s/@@SECONDARY_MACHINE@@/$SECONDARY_MACHINE/g" \
- config/ha.cf | ssh root@$1 "cat - > /etc/ha.d/ha.cf"
- cat config/haresources haresources.temp | tr '\n' ' ' | sed -e "s/@@PRIMARY_MACHINE@@/$PRIMARY_MACHINE/g" | ssh root@$1 "cat - > /etc/ha.d/haresources"
- }
- generate_cib_xml() {
- ssh root@$1 "rm -f /var/lib/heartbeat/crm/cib.xml*; /usr/lib/heartbeat/haresources2cib.py >> /dev/null"
- }
- install_heartbeat_scripts() {
- cat scripts/VTun.etc | ssh root@$1 "cat - > /etc/ha.d/resource.d/VTun; chmod +x /etc/ha.d/resource.d/VTun"
- cat scripts/VTun.ocf | ssh root@$1 "cat - > /usr/share/ocf/resource.d/heartbeat/VTun; chmod +x /usr/share/ocf/resource.d/heartbeat/VTun"
- cat scripts/killnfsd.etc | ssh root@$1 "cat - > /etc/ha.d/resource.d/killnfsd; chmod +x /etc/ha.d/resource.d/killnfsd"
- cat scripts/killnfsd.ocf | ssh root@$1 "cat - > /usr/share/ocf/resource.d/heartbeat/killnfsd; chmod +x /usr/share/ocf/resource.d/heartbeat/killnfsd"
- }
- append_hosts_allow() {
- echo "10.0.0.0:255.0.0.0" | ssh root@$1 "cat - >> /etc/hosts.allow"
- }
- append_rc_local() {
- echo "modprobe tun; modprobe drbd; losetup /dev/loop0 /var/drbd-meta; service drbd start; service heartbeat start" | ssh root@$1 "cat - >> /etc/rc.local"
- }
- start_services() {
- ssh root@$1 "modprobe tun; modprobe drbd; service rpcbind start; service drbd start; service heartbeat start"
- }
- mount_volumes() {
- for machine in `cat mountlist`; do ssh root@$machine mount -a ; done;
- }
- cleanup_files() {
- rm -f haresources.temp vtund-client.conf.temp vtund-client.conf vtun_server_list mountlist
- }
- while [ "$#" -gt "0" ]
- do
- case $1 in
- -pk|--private-key)
- shift
- PRIVATE_KEY_FILE=$1
- ;;
- -pm|--primary-machine)
- shift
- PRIMARY_MACHINE=`echo $1 | cut -d ':' -f1 | cut -d '.' -f1`
- PRIMARY_EXTERNAL_MACHINE_NAME=`echo $1 | cut -d ':' -f2`
- PRIMARY_MACHINE_IP=`get_ip_from_machine $PRIMARY_EXTERNAL_MACHINE_NAME`
- ;;
- -sm|--secondary-machine)
- shift
- SECONDARY_MACHINE=`echo $1 | cut -d ':' -f1 | cut -d '.' -f1`
- SECONDARY_EXTERNAL_MACHINE_NAME=`echo $1 | cut -d ':' -f2`
- SECONDARY_MACHINE_IP=`get_ip_from_machine $SECONDARY_EXTERNAL_MACHINE_NAME`
- ;;
- -amn|--active-machine-name)
- shift
- ACTIVE_MACHINE_NAME=$1
- ;;
- -vp|--vtun-password)
- shift
- VTUN_PASSWORD=`echo $1 | tr ' ' '_'`
- ;;
- -vsp|--vtun-server-profile)
- shift
- INTERNAL_SERVER_MACHINE_NAME=`echo $1 | cut -d ':' -f1`
- EXTERNAL_SERVER_MACHINE_NAME=`echo $1 | cut -d ':' -f2`
- SERVER_IP=`get_ip_from_machine $EXTERNAL_SERVER_MACHINE_NAME`
- PROFILE=`echo $1 | cut -d ':' -f3`
- INSTALL_VTUN=`echo $1 | cut -d ':' -f4`
- VTUN_CLIENT_VIRTUAL_IP="$BASE_VTUN_SUBNET.$VTUN_CLIENT_VIRTUAL_IP_CLASS_D_BASE"
- VTUN_SERVER_VIRTUAL_IP="$BASE_VTUN_SUBNET.$VTUN_SERVER_VIRTUAL_IP_CLASS_D_BASE"
- VTUN_CLIENT_VIRTUAL_IP_CLASS_D_BASE=$(($VTUN_CLIENT_VIRTUAL_IP_CLASS_D_BASE+1))
- VTUN_SERVER_VIRTUAL_IP_CLASS_D_BASE=$(($VTUN_SERVER_VIRTUAL_IP_CLASS_D_BASE+1))
- echo "$EXTERNAL_SERVER_MACHINE_NAME:$SERVER_IP:$PROFILE:$VTUN_CLIENT_VIRTUAL_IP:$VTUN_SERVER_VIRTUAL_IP:$INSTALL_VTUN" >> vtun_server_list
- ;;
- -hp|--heartbeat-passphrase)
- shift
- HEARTBEAT_PASSPHRASE=`echo $1 | tr ' ' '_'`
- ;;
- -vd|--volume-device)
- shift
- VOLUME_DEVICE=$1
- ;;
- -vg|--volume-group-name)
- shift
- VOLUME_GROUP_NAME=$1
- ;;
- -lv1|--logical-volume-one)
- shift
- LOGICAL_VOLUME_ONE=$1
- ;;
- -lv2|--logical-volume-two)
- shift
- LOGICAL_VOLUME_TWO=$1
- ;;
- --overwrite-data-of-peer)
- DRBD_OVERWRITE_PEER="--overwrite-data-of-peer"
- ;;
- -u|--usage|-h|--help|-?)
- usage
- exit 0 ;;
- *)
- echo "parameter $1 is unknown"
- exit 1 ;;
- esac
- shift
- done
- if test $PRIMARY_MACHINE = "not-set"; then
- echo "--primary-machine needs to be set"
- exit 1
- fi
- if test $SECONDARY_MACHINE = "not-set"; then
- echo "--secondary-machine needs to be set"
- exit 1
- fi
- if test $ACTIVE_MACHINE_NAME = "not-set"; then
- echo "--active-machine-name needs to be set"
- exit 1
- fi
- if test $VTUN_PASSWORD = "not-set"; then
- echo "--vtun-password needs to be set"
- exit 1
- fi
- if test $HEARTBEAT_PASSPHRASE = "not-set"; then
- echo "--heartbeat-passphrase needs to be set"
- exit 1
- fi
- if test $VOLUME_GROUP_NAME = "not-set"; then
- echo "--volume-group-name needs to be set"
- exit 1
- fi
- if test $LOGICAL_VOLUME_ONE = "not-set"; then
- echo "--logical-volume-one needs to be set"
- exit 1
- fi
- if test $LOGICAL_VOLUME_TWO = "not-set"; then
- echo "--logical-volume-two needs to be set"
- exit 1
- fi
- if test $PRIMARY_MACHINE_IP = "not-set"; then
- echo "--primary-machine-ip could not be determined"
- exit 1
- fi
- if test $SECONDARY_MACHINE_IP = "not-set"; then
- echo "--secondary-machine-ip could not be determined"
- exit 1
- fi
- CURRENT_PROCESS="INITIALIZATION"
- log_info "Initializing AMI Configuration"
- CURRENT_PROCESS="CONFIGURE:VTUN_SERVER_LIST"
- log_info "Configuring each of the VTun servers"
- configure_vtun_server_list
- CURRENT_PROCESS="SSH"
- log_info "Configuring SSH on $PRIMARY_EXTERNAL_MACHINE_NAME"
- configure_ssh $PRIMARY_EXTERNAL_MACHINE_NAME
- log_info "Configuring SSH on $SECONDARY_EXTERNAL_MACHINE_NAME"
- configure_ssh $SECONDARY_EXTERNAL_MACHINE_NAME
- CURRENT_PROCESS="UPDATE:FEDORA"
- log_info "Updating Fedora on $PRIMARY_EXTERNAL_MACHINE_NAME"
- update_fedora_8 $PRIMARY_EXTERNAL_MACHINE_NAME
- log_info "Updating Fedora on $SECONDARY_EXTERNAL_MACHINE_NAME"
- update_fedora_8 $SECONDARY_EXTERNAL_MACHINE_NAME
- CURRENT_PROCESS="UNMOUNT:/MNT"
- log_info "Unmount /mnt on $PRIMARY_EXTERNAL_MACHINE_NAME"
- unmount_mnt $PRIMARY_EXTERNAL_MACHINE_NAME
- log_info "Unmount /mnt on $SECONDARY_EXTERNAL_MACHINE_NAME"
- unmount_mnt $SECONDARY_EXTERNAL_MACHINE_NAME
- CURRENT_PROCESS="CONFIGURE:LVM"
- log_info "Configuring LVM on $PRIMARY_EXTERNAL_MACHINE_NAME"
- configure_lvm $PRIMARY_EXTERNAL_MACHINE_NAME
- log_info "Configuring LVM on $SECONDARY_EXTERNAL_MACHINE_NAME"
- configure_lvm $SECONDARY_EXTERNAL_MACHINE_NAME
- CURRENT_PROCESS="INSTALL:DRBD"
- log_info "Installing DRBD on $PRIMARY_EXTERNAL_MACHINE_NAME"
- install_drbd $PRIMARY_EXTERNAL_MACHINE_NAME
- log_info "Installing DRBD on $SECONDARY_EXTERNAL_MACHINE_NAME"
- install_drbd $SECONDARY_EXTERNAL_MACHINE_NAME
- CURRENT_PROCESS="CREATE:DRBD_META_DATA_LOOPBACK"
- log_info "Creating DRBD meta-data loopback on $PRIMARY_EXTERNAL_MACHINE_NAME"
- create_drbd_meta_data_loopback $PRIMARY_EXTERNAL_MACHINE_NAME
- log_info "Creating DRBD meta-data loopback on $SECONDARY_EXTERNAL_MACHINE_NAME"
- create_drbd_meta_data_loopback $SECONDARY_EXTERNAL_MACHINE_NAME
- CURRENT_PROCESS="CONFIGURE:DRBD"
- log_info "Configuring DRBD on $PRIMARY_EXTERNAL_MACHINE_NAME"
- configure_drbd $PRIMARY_EXTERNAL_MACHINE_NAME
- log_info "Configuring DRBD on $SECONDARY_EXTERNAL_MACHINE_NAME"
- configure_drbd $SECONDARY_EXTERNAL_MACHINE_NAME
- CURRENT_PROCESS="CREATE:DRBD_META_DATA_DISK"
- log_info "Creating DRBD meta-data disk on $PRIMARY_EXTERNAL_MACHINE_NAME"
- create_drbd_meta_data_disk $PRIMARY_EXTERNAL_MACHINE_NAME
- log_info "Creating DRBD meta-data disk on $SECONDARY_EXTERNAL_MACHINE_NAME"
- create_drbd_meta_data_disk $SECONDARY_EXTERNAL_MACHINE_NAME
- CURRENT_PROCESS="BRING_UP:DRBD"
- log_info "Bringing up DRBD on $PRIMARY_EXTERNAL_MACHINE_NAME"
- bring_up_drbd $PRIMARY_EXTERNAL_MACHINE_NAME
- log_info "Bringing up DRBD on $SECONDARY_EXTERNAL_MACHINE_NAME"
- bring_up_drbd $SECONDARY_EXTERNAL_MACHINE_NAME
- CURRENT_PROCESS="CREATE:DATA_DIR"
- log_info "Creating /data directory on $PRIMARY_EXTERNAL_MACHINE_NAME"
- create_data_dir $PRIMARY_EXTERNAL_MACHINE_NAME
- log_info "Creating /data directory on $SECONDARY_EXTERNAL_MACHINE_NAME"
- create_data_dir $SECONDARY_EXTERNAL_MACHINE_NAME
- CURRENT_PROCESS="CONFIGURE:PRIMARY_DRBD_NODE"
- log_info "Configuring primary DRBD node on $PRIMARY_EXTERNAL_MACHINE_NAME"
- configure_primary_drbd_node $PRIMARY_EXTERNAL_MACHINE_NAME
- CURRENT_PROCESS="CREATE:XFS_FILE_SYSTEM"
- log_info "Creating XFS file system on $PRIMARY_EXTERNAL_MACHINE_NAME"
- create_xfs_file_system $PRIMARY_EXTERNAL_MACHINE_NAME
- CURRENT_PROCESS="MOUNT:DRBD_DEVICE"
- log_info "Mounting DRBD device on $PRIMARY_EXTERNAL_MACHINE_NAME"
- mount_drbd_device $PRIMARY_EXTERNAL_MACHINE_NAME
- CURRENT_PROCESS="CONFIGURE:PRIMARY_NFS_FILE_SYSTEM"
- log_info "Configuring primary NFS file system on $PRIMARY_EXTERNAL_MACHINE_NAME"
- configure_primary_nfs_file_system $PRIMARY_EXTERNAL_MACHINE_NAME
- CURRENT_PROCESS="CONFIGURE:SECONDARY_NFS_FILE_SYSTEM"
- log_info "Configuring secondary NFS file system on $SECONDARY_EXTERNAL_MACHINE_NAME"
- configure_secondary_nfs_file_system $SECONDARY_EXTERNAL_MACHINE_NAME
- CURRENT_PROCESS="INSTALL:VTUN"
- log_info "Installing VTun on $PRIMARY_EXTERNAL_MACHINE_NAME"
- install_vtun $PRIMARY_EXTERNAL_MACHINE_NAME
- log_info "Installing VTun on $SECONDARY_EXTERNAL_MACHINE_NAME"
- install_vtun $SECONDARY_EXTERNAL_MACHINE_NAME
- CURRENT_PROCESS="CONFIGURE:VTUN_CLIENT"
- log_info "Configuring VTun client on $PRIMARY_EXTERNAL_MACHINE_NAME"
- configure_vtun_client $PRIMARY_EXTERNAL_MACHINE_NAME
- log_info "Configuring VTun client on $SECONDARY_EXTERNAL_MACHINE_NAME"
- configure_vtun_client $SECONDARY_EXTERNAL_MACHINE_NAME
- CURRENT_PROCESS="CONFIGURE:SYSTEM"
- log_info "Configuring system files on $PRIMARY_EXTERNAL_MACHINE_NAME"
- configure_system $PRIMARY_EXTERNAL_MACHINE_NAME
- log_info "Configuring system files on $SECONDARY_EXTERNAL_MACHINE_NAME"
- configure_system $SECONDARY_EXTERNAL_MACHINE_NAME
- CURRENT_PROCESS="CONFIGURE:SERVICES"
- log_info "Configuring services on $PRIMARY_EXTERNAL_MACHINE_NAME"
- configure_services $PRIMARY_EXTERNAL_MACHINE_NAME
- log_info "Configuring services on $SECONDARY_EXTERNAL_MACHINE_NAME"
- configure_services $SECONDARY_EXTERNAL_MACHINE_NAME
- CURRENT_PROCESS="CONFIGURE:HEARTBEAT"
- log_info "Configuring Heartbeat on $PRIMARY_EXTERNAL_MACHINE_NAME"
- configure_heartbeat $PRIMARY_EXTERNAL_MACHINE_NAME $SECONDARY_MACHINE_IP
- log_info "Configuring Heartbeat on $SECONDARY_EXTERNAL_MACHINE_NAME"
- configure_heartbeat $SECONDARY_EXTERNAL_MACHINE_NAME $PRIMARY_MACHINE_IP
- CURRENT_PROCESS="INSTALL:HEARTBEAT_SCRIPTS"
- log_info "Installing Heartbeat scripts on $PRIMARY_EXTERNAL_MACHINE_NAME"
- install_heartbeat_scripts $PRIMARY_EXTERNAL_MACHINE_NAME
- log_info "Installing Heartbeat scripts on $SECONDARY_EXTERNAL_MACHINE_NAME"
- install_heartbeat_scripts $SECONDARY_EXTERNAL_MACHINE_NAME
- CURRENT_PROCESS="GENERATE:CIB_XML"
- log_info "Generating cib.xml on $PRIMARY_EXTERNAL_MACHINE_NAME"
- generate_cib_xml $PRIMARY_EXTERNAL_MACHINE_NAME
- log_info "Generating cib.xml on $SECONDARY_EXTERNAL_MACHINE_NAME"
- generate_cib_xml $SECONDARY_EXTERNAL_MACHINE_NAME
- CURRENT_PROCESS="APPEND:HOSTS_ALLOW"
- log_info "Appending hosts.allow on $PRIMARY_EXTERNAL_MACHINE_NAME"
- append_hosts_allow $PRIMARY_EXTERNAL_MACHINE_NAME
- log_info "Appending hosts.allow on $SECONDARY_EXTERNAL_MACHINE_NAME"
- append_hosts_allow $SECONDARY_EXTERNAL_MACHINE_NAME
- CURRENT_PROCESS="APPEND:RC_LOCAL"
- log_info "Appending rc.local on $PRIMARY_EXTERNAL_MACHINE_NAME"
- append_rc_local $PRIMARY_EXTERNAL_MACHINE_NAME
- log_info "Appending rc.local on $SECONDARY_EXTERNAL_MACHINE_NAME"
- append_rc_local $SECONDARY_EXTERNAL_MACHINE_NAME
- CURRENT_PROCESS="START:SERVICES"
- log_info "Starting services on $PRIMARY_EXTERNAL_MACHINE_NAME"
- start_services $PRIMARY_EXTERNAL_MACHINE_NAME
- log_info "Starting services on $SECONDARY_EXTERNAL_MACHINE_NAME"
- start_services $SECONDARY_EXTERNAL_MACHINE_NAME
- CURRENT_PROCESS="MOUNT:VOLUMES"
- log_info "Mounting volumes on $PRIMARY_EXTERNAL_MACHINE_NAME and $SECONDARY_EXTERNAL_MACHINE_NAME"
- mount_volumes
- CURRENT_PROCESS="CLEANUP:FILES"
- log_info "Cleaning up files on local machine"
- cleanup_files
- log_info "AMI Configuration Complete"
Function: configure_vtun_server_list
During the script configuration process the value of each -vsp parameter is parsed and, after various operations, the results appended to the vtun_server_list file. Once the script configuration process is complete, we will begin processing the vtun_server_list file via the configure_vtun_server_list function which loops through the file, passing each line to the configure_vtun_server function for further processing,
for server_vars in `cat vtun_server_list`; do configure_vtun_server $server_vars; done;
A typical line in this file will look similar to,
ec2-67-202-60-213.compute-1.amazonaws.com:10.251.126.227:ip-10-251-126-227:10.3.0.100:10.3.0.1:yes
In the above line each parameter value is separated by a colon and represents,
- the external machine name,
- the internal private IP of that machine,
- the profile name,
- the virtual client IP,
- the virtual server IP,
- and an optional parameter that specifies whether VTun should be installed first,
... respectively
Function: configure_vtun_server
The first portion of the configure_vtun_server function parses the string passed to it to extract the paramater values specified above. This is done by using the Unix program cut. Please see man cut for extended detail on how to use this utility.
EXTERNAL_SERVER_MACHINE_NAME=`echo $1 | cut -d ':' -f1`
SERVER_IP=`echo $1 | cut -d ':' -f2`
PROFILE=`echo $1 | cut -d ':' -f3`
VTUN_CLIENT_VIRTUAL_IP=`echo $1 | cut -d ':' -f4`
VTUN_SERVER_VIRTUAL_IP=`echo $1 | cut -d ':' -f5`
INSTALL_VTUN=`echo $1 | cut -d ':' -f6`
Once set, the related variables are used throughout the remainder of the function to properly install and configure VTun on the AMI.
Our first internal function call is to configure_ssh,
configure_ssh $EXTERNAL_SERVER_MACHINE_NAME
Please see Function: configure_ssh below for the specific details of this function.
The next function, a call to generate_vtun_profile, uses the passed parameters to generate the textual configuration that VTun will use on the persistent storage machines when making a point-to-point connection with each -vsp machine. This includes the profile name, the virtual IP's to be used, and the password used to validate each connection request,
generate_vtun_profile $PROFILE $VTUN_PASSWORD $VTUN_CLIENT_VIRTUAL_IP $VTUN_SERVER_VIRTUAL_IP >> vtund-client.conf.temp
Once generate_vtun_profile completes its call, the result is output into a temporary holding file called vtund-client.conf.temp. A typical addition to this file will look something similar to,
ip-10-251-126-242 {
passwd "BoomBoomRoomZoom";
type tun;
proto tcp;
up {
ifconfig
"%% 10.3.0.2 pointopoint 10.3.0.101 mtu 1450";
};
down {
ifconfig "%% down";
};
}
IMPORTANT NOTE: We'll be making another call to the generate_vtun_profile function a little further down, switching up the location of the virtual IP's, and then storing this file on the machine currently being processed. So, for example,
ifconfig
"%% 10.3.0.2 pointopoint 10.3.0.101 mtu 1450";
... will instead look like,
ifconfig
"%% 10.3.0.101 pointopoint 10.3.0.2 mtu 1450";
The reasoning for this is pretty straight forward: The client will use ifconfig to configure a connection to the server whereas the server will use ifconfig to configure a connection with the client, and therefore the proper IP's need to be referenced in the proper location within each machines VTun configuration.
The next step in this process is the addition of the -vsp related entry into a temporary holding file. The contents of this same holding file will later be copied to each of our persistent storage machines and used to generate the cib.xml file which Heartbeat uses to determine what services should be started and stopped when switching from one machine to another,
echo "VTun::$SERVER_IP::$PROFILE::$VTUN_CLIENT_CONFIG_FILE" >> haresources.temp
POINT OF INTEREST: For those unfamiliar with the syntax of the Unix command line, when a command is followed by > this means to place the output of the preceding command into the filename that follows, replacing the contents of an existing file if one exists, or creating a new file is one does not. When the same command is followed by >> this means to append the output of the preceding command to the end of the specified file if it exists, or create a new file is one does not. In this particular example, given the fact that there can be an unlimited number of -vsp parameters passed into our script, using >> ensures we don't clobber any existing entries in the file.
Our next function should be pretty obvious in regards to what action it performs,
update_fedora_8 $EXTERNAL_SERVER_MACHINE_NAME;
Please see Function: update_fedora_8 which follows in-line below for the specific details as to what packages are updated during this process.
Following the update of Fedora, we run a check to see if this particular machine should have VTun installed. Given the fact that if a machine already has VTun installed there's a good chance it will have already been updated with the necessary packages, you might wonder why we don't also check to see if the machine needs updating, skipping the call to update_fedora_8 if it has. The reasoning for this is simple: If the machine has already been updated, the yum process (the Unix application which Fedora uses for managing packages) will skip the installation of any and all packages which are already up-to-date. When we build an application from source, which is what we do with VTun (there is no VTun package in the default Fedora yum repositories), it will copy over an existing installation which would destroy any existing entries in the configuration file. As such, adding this extra layer of configuration ensures we have to explicitly state we want the machine updated with a new installation of VTun before the build process will be run.
if test $INSTALL_VTUN = "yes"; then
install_tun $EXTERNAL_SERVER_MACHINE_NAME
fi
Our next function is our second call to generate_vtun_profile function. For the reason specified above, this second call reverses the location of the VTun client and server IP's that is passes into the function. The result of the call to generate_vtun_profile will be concatted to the content of the config/vtund-template.conf file (which contains the global configurations settings that apply to both the client and server machines), the result of which will be appended to the end of the file specified by the $VTUN_SERVER_CONFIG_FILE variable, in this case /usr/local/etc/vtund-server.conf on the specified remote machine.
generate_vtun_profile $PROFILE $VTUN_PASSWORD $VTUN_SERVER_VIRTUAL_IP $VTUN_CLIENT_VIRTUAL_IP | \
cat - config/vtund-template.conf | \
ssh root@$EXTERNAL_SERVER_MACHINE_NAME "cat - >> $VTUN_SERVER_CONFIG_FILE"EDIT:NOTE: I just noticed a bug: I need to update the script to only cat config/vtund-template.conf to the result of generate_vtun_profile if we are setting up VTun on this machine for the first time. I'll get the script updated after finishing out the last few bits of the function overview.
The next step in this function is to append /etc/fstab on the remote machine, telling it to mount the specified remote folder on the specified machine using the local /data folder as its mount point, doing so using the NFS protocol.
echo "$ACTIVE_MACHINE_NAME:/data/export /data nfs rsize=8192,wsize=8192,timeo=20,hard,intr,nolock,udp 0 0" | ssh root@$EXTERNAL_SERVER_MACHINE_NAME "cat - >> /etc/fstab"
TODO: Provide a proper understanding of the the values contained in size=8192,wsize=8192,timeo=20,hard,intr,nolock,udp.
The next line echos the value of the $VTUN_CLIENT_VIRTUAL_IP $ACTIVE_MACHINE_NAME variables which are passed to SSH and concatted to the /etc/hosts file on the remote machine. This ensures that any references to the $ACTIVE_MACHINE_NAME (such as that contained in /etc/fstab which we updated above) will be properly dereferenced to the virtual IP of the client machine.
echo "$VTUN_CLIENT_VIRTUAL_IP $ACTIVE_MACHINE_NAME" | ssh root@$EXTERNAL_SERVER_MACHINE_NAME "cat - >> /etc/hosts"
After updating the /etc/hosts file, our next step ensures that when we mount the remote /data/export directory over NFS we will gain proper read/write access to the device, retaining proper group:user ownership of files that are created locally. This is done by adding no_root_squash,no_all_squash to our settings for the local /data mountpoint.
echo "/data 10.3.0.0/255.255.0.0(rw,sync,no_root_squash,no_all_squash)" | ssh root@$EXTERNAL_SERVER_MACHINE_NAME "cat - >> /etc/exports; exportfs -a"
Before we will be able to make any client connections to this machine we need to start the vtund process with reference to the configuration file represented by $VTUN_SERVER_CONFIG_FILE. We also need to tell the process to treat this as a server, listening for connections on the specified IP,
ssh root@$EXTERNAL_SERVER_MACHINE_NAME "vtund -f $VTUN_SERVER_CONFIG_FILE -s -L $SERVER_IP"
After starting the VTun server on the remote machine, we append the value of the $EXTERNAL_SERVER_MACHINE_NAME variable to the mountlist file which we will later use to connect to all of the VTun servers in our configuration to mount the NFS drives, completing our process, putting into motion the last piece of our overall solution.
echo $EXTERNAL_SERVER_MACHINE_NAME >> mountlist
Function: configure_ssh
To ensure we can login to a remote machine without first requiring a password, we'll use the public key of the machine running the script to remove the password requirement by adding the public key to the list of authorized keys. Before we can do that, however, we first need to make sure a public key has been generated and if it has not, generate the key before proceeding forward,
if [ ! -r ${HOME}/.ssh/id_rsa.pub ]; then
ssh-keygen -b 2048 -t rsa -N ""
fi
Once we've either verified the key exists, or generated a new key, we then copy the contents of the public key file to the .ssh/authorized_keys on the remote machine. We'll use the value of the $PRIVATE_KEY_FILE variable which was set via the -pk parameter passed into this script to login to the machine for the first time.
cat ~/.ssh/id_rsa.pub | ssh -i $PRIVATE_KEY_FILE -o StrictHostKeyChecking=no root@$1 "cat - >> .ssh/authorized_keys"
From this point forward we can simply run the ssh command directly without need of typing in a password or appending the $PRIVATE_KEY_FILE to the parameter list each time we login to a remote machine.
Function: update_fedora_8
We need to install some additional packages that are not a part of the Fedora Core 8 Base AMI. To do this we SSH into the remote machine and use yum to update the desired packages.
ssh root@$1 "yum -y install flex heartbeat xfsprogs lzo lzo-devel zlib-devel openssl-devel byacc system-config-nfs svn"
As specified above, if any of these packages have already been updated, yum will ignore the request to update them again.
Function: unmount_mnt
Pretty straight forward: We login to the specified remote and unmount the current device mounted on the /mnt mountpoint.
ssh root@$1 "umount /mnt"
Function: configure_lvm
LVM will provide the ability to both manage the various volumes we have on each device as well as allow us to create snapshots quickly and easily for backup. On large instances you have the option of adding /dev/sdb and /dev/sdc ephemeral devices to the physical volume and on x-large /dev/sdb, /dev/sdc, /dev/sdd, and /dev/sde. In the case of a small instance type there is only a single ephemeral block device. This might make you wonder the point of using LVM at all on small instance types, which is really a fair argument. As mentioned above, LVM facilitates the ability to quickly and easily create snapshots (both full and diff) of a block device for backup. Given that our primary purpose is to gain the benefits afforded to us by persistent storage, having the ability to take snapshots that can then be used in case of catastrophic meltdown of one or both nodes in our configuration is of significant interest and importance to us. So while adding multiple block devices to our LVM physical volume isn't an option, quick recovery after server meltdown is of significant value and therefore interest to us.
IMPORTANT NOTE: If you plan to use RAID on the large or x-large instance types, you'll want to configure the device FIRST before adding it to LVM. Please see http://developer.amazonwebservices.com/connect/entry.jspa?externalID=1074 for more information regarding setting up RAID on EC2 instances.
The first part of configuring LVM is to to create a new physical volume,
ssh root@$1 pvcreate $VOLUME_DEVICEWe then need to create our configured $VOLUME_GROUP on the previously created $VOLUME_DEVICE,
ssh root@$1 vgcreate $VOLUME_GROUP_NAME $VOLUME_DEVICETo ensure we have enough disk space to store snapshots, we're going to split our volume group into two equal pieces. To do this we first gain access to the Total PE size of the volume group to then divide the result by two(2).
PE=`ssh root@$1 vgdisplay $VOLUME_GROUP_NAME | grep "Total PE" | sed -e "s/Total PE//g" -e "s/ //g"`
PE_DISK_SIZE=`echo $(($PE / 2))`
With the calculated $PE_DISK_VALUE in hand, we then create the first logical volume, using the value of $LOGICAL_VOLUME_ONE as the name of the logical volume,
ssh root@$1 lvcreate -l $PE_DISK_SIZE $VOLUME_GROUP_NAME -n $LOGICAL_VOLUME_ONE
With the same calculated $PE_DISK_VALUE in hand, we now create the second logical volume, using the value of $LOGICAL_VOLUME_TWO as the name of the logical volume,
ssh root@$1 lvcreate -l $PE_DISK_SIZE $VOLUME_GROUP_NAME -n $LOGICAL_VOLUME_TWO
POINT OF INTEREST: As per Jeff Barr's persistent storage entry discussed above, the ability to mount multiple EC2 persistent storage devices on a single node is a planned feature of their persistent storage offering. Keeping in mind that there are no guarantees, when this same offering becomes publicly available, expanding the capacity of each of our DRBD-based node set(s) should be as simple as configuring a new persistent storage block device and adding this to our LVM volume group as either a new logical volume or as an extension to an existing logical volume, expanding the capacity of this volume group by an amount equal to the allocated size of this device.
An additional and, in many ways, required benefit to using LVM on small instance types is that it provides the ability to easily partition and re-partition a single block device into manageable chunks that can be labeled and used for different purposes. We are taking advantage of this feature by separating our ephemeral block device into two equal sized logical volumes, one to act as our active volume for reading and writing data to, and the other to allow a temporary storage location for creating snapshots of our active volume for purpose of backup and recovery in case of catastrophic failure of either node in our DRBD configuration. Beyond basic data persistence and recovery, this will enable the ability to lessen the amount of data that must be synchronized to a new ephemeral device when bringing in a completely fresh instance to take the place of a dead instance, improving the overall performance of the collective node set as a result.
Function: install_drbd
POINT OF INTEREST: In most places throughout the configure script we simply append the desired commands to the end of our SSH login, which is our way of telling SSH to run the specified commands on the remote machine after logging in. Because the bash interpreter will dereference variables or embedded commands (denoted by the ` character at the start and end of the embedded command, e.g. `cat -`) locally BEFORE logging into the remote machine, when the desired command contains references to variables or embedded commands which we want dereferenced or called on the remote machine it's easier to place these commands in a separate file which we then copy to the remote machine before running.
With the above in mind, our first step to installing DRBD is to copy the get-install-config-drbd script to the remote machine,
scp get-install-config-drbd root@$1:get-install-config-drbd.shThe contents of this script looks like,
#!/bin/sh
wget http://nuxleus.com/drbd-8.2.5.`uname -m`.precompiled.tar.bz2
tar xf drbd-8.2.5.`uname -m`.precompiled.tar.bz2
cd drbd-8.2.5; make install; modprobe drbd; rm -f get-drbd
The embedded command I am referring to is contained in,
tar xf drbd-8.2.5.`uname -m`.precompiled.tar.bz2...
where `uname -m` provides us the system architecture of the remote machine such that we can access and install the correct precompiled DRBD modules based on whether we are sitting on an x86 or x86_64 machine. After logging into the machine and calling the get-install-config-drbd.sh script,
ssh root@$1 sh ./get-install-config-drbd.sh
... we are now ready to begin the process of preparing each machine in our persistent storage solution to use DRBD for replicating data between nodes.
Function: create_drbd_meta_data_loopback
DRBD needs a meta-data disk to keep track of changes made to each device in the configuration. As such, we'll first generate a local file which has been zeroed out which is large enough to contain all of the necessary pieces of meta-data that DRBD needs to keep the two devices in sync.
ssh root@$1 dd if=/dev/zero of=/var/drbd-meta bs=512K count=512
After creating this file we then log back into the machine and mount it via a loopback device,
ssh root@$1 losetup /dev/loop0 /var/drbd-meta
Function: configure_drbd
Because each time we run this script we'll be configuring two new machines for use as our persistent storage node set, we need to update the IP's and machine names of each new node in the /etc/drbd.conf file. We'll use sed to accomplish the desired search and replace functionaity over the config/drbd.conf file before then copying the result into the /etc/drbd.conf file on the remote machine,
sed -e "s/@@PRIMARY_MACHINE@@/$PRIMARY_MACHINE/g" \
-e "s/@@SECONDARY_MACHINE@@/$SECONDARY_MACHINE/g" \
-e "s/@@VOLUME_GROUP_NAME@@/$VOLUME_GROUP_NAME/g" \
-e "s/@@LOGICAL_VOLUME_ONE@@/$LOGICAL_VOLUME_ONE/g" \
-e "s/@@PRIMARY_MACHINE_IP@@/$PRIMARY_MACHINE_IP/g" \
-e "s/@@SECONDARY_MACHINE_IP@@/$SECONDARY_MACHINE_IP/g" \
config/drbd.conf | ssh root@$1 "cat - > /etc/drbd.conf"
Function: create_drbd_meta_data_disk
Now that we have things properly configured we can then initialize the creation of our DRBD meta-data disk.
ssh root@$1 "yes | drbdadm create-md r0"
Function: bring_up_drbd
With our DRBD meta-data disk created on both nodes, we can now bring up both devices in preparation of the initial synchronization process.
ssh root@$1 "yes | drbdadm up all"
Function: create_data_dir
Before we can mount the DRBD-backed device on a local machine, we first need to create the folder in which we plan to use as our mountpoint.
ssh root@$1 mkdir /data
Function: configure_primary_drbd_node
With both devices configured and connected, our next task is the login to the primary node and start the initial sync process. As specified earlier in this paper, to ensure that we only obliterate any data on the secondary device if we intended to do so, we'll pass the value of $DRBD_OVERWRITE_PEER, which is initially an empty string, to the drbdadm command. The only way the value will be set to --overwrite-data-of-peer, which tells drbdadm to obliterate the data on the secondary device, is if we explicity passed this value into the script as a parameter.
ssh root@$1 "yes | drbdadm -- $DRBD_OVERWRITE_PEER primary r0"
Function: create_xfs_file_system
There are several advantages to using an advanced journaling file system such as XFS. Instead of going into each of the reasons, the primary reason we use it in this solution is due to the fact that it provides the xfs_freeze utility which, when combined with LVM, facilitates the ability to create live snapshots of a device without running risk of the disk being written to during the snapshot process. With this in mind, our next step is to create the XFS file system on our remote device.
ssh root@$1 mkfs.xfs -f -b size=512 /dev/drbd0
If you would prefer to use a different file system you will want to update the above call accordingly.
Function: mount_drbd_device
With our XFS filesystem created, we can now mount the drbd device on our primary machine,
ssh root@$1 mount /dev/drbd0 /data;
Function: configure_primary_nfs_file_system
To ensure that both nodes are reading from the same NFS configuration files, we need to move a few things around on the primary node once we've mounted the DRBD device,
ssh root@$1 "mv /var/lib/nfs/ /data/; \
ln -s /data/nfs /var/lib/nfs; \
mkdir /data/export; \
umount /data"
Function: configure_secondary_nfs_file_system
On the secondary machine we simply want to create a symlink to the location of the NFS files once the DRBD device has been brought up and mounted on the local /data mountpoint.
ssh root@$1 "rm -rf /var/lib/nfs; \
ln -s /data/nfs/ /var/lib/nfs"
Function: install_vtun
In the same way we installed VTun onto each of the nodes we plan to mount our persistent storage device, our next step is to install VTun on each of the nodes in our persistent storage configuration,
ssh root@$1 "wget http://superb-east.dl.sourceforge.net/sourceforge/vtun/vtun-3.0.1.tar.gz; \
tar xf vtun-3.0.1.tar.gz; \
cd vtun-3.0.1; \
./configure; make; make install; modprobe tun"
Function: configure_vtun_client
As mentioned above, config/vtund-template.conf contains the global settings that are used in both the client and server VTun configuration files. As such, we'll make a copy of this file to then append the client specific configuration to before pushing it to each client machine.
cp config/vtund-template.conf vtund-client.conf
We previously generated the vtund-client.conf.temp as part of the configure_vtun_server function. We're now going to append the content of this file to the vtund-client.conf file we just created.
cat vtund-client.conf.temp >> vtund-client.conf
Lastly, we copy this file to the current machine being processed,
cat vtund-client.conf | ssh root@$1 "cat - > /usr/local/etc/vtund-client.conf"
Function: configure_system
We need to configure each node in our persistent storage solution to allow external access to the /data/export directory. We do this by appending the /etc/exports file with the proper configuration info,
echo "/data/export 10.3.0.0/255.255.0.0(rw,sync,no_root_squash,no_all_squash)" | ssh root@$1 "cat - >> /etc/exports"
For some reason Heartbeat doesn't create the /var/run/heartbeat/rsctmp/ folder during the setup process. As such, before Heartbeat will properly start, we need to create this necessary folder,
ssh root@$1 mkdir /var/run/heartbeat/rsctmp/
Function: configure_services
Another straight forward function: We need to setup each of the related services to either startup automatically or not start up automatically. In the cases in which we turn off auto-startup we are doing so because we will either start them ourselves, or Heartbeat will start and stop them when and as necessary.
ssh root@$1 "chkconfig rpcbind on; chkconfig drbd off; chkconfig heartbeat off; chkconfig nfs off; chkconfig nfslock off;"
Function: configure_heartbeat
Our first step is to replace the configured Heartbeat passphrase in the config/authkeys file and then push this into the /etc/ha.d/authkeys file on the remote machine. We then change the permissions of that file such that only the files owner, in this case root, can read its contents,
sed -e "s/@@HEARTBEAT_PASSPHRASE@@/$HEARTBEAT_PASSPHRASE/g" config/authkeys | \
ssh root@$1 "cat - > /etc/ha.d/authkeys; chmod 600 /etc/ha.d/authkeys"
We have some more search and replace work to do, this time with the IP of the opposite machine in our configuration, as well as the names of the primary and secondary machines. We run this over the config/ha.cf file, storing the result to the /etc/ha.d/ha.cf file on the remote machine,
sed -e "s/@@PAIRED_MACHINES_IP@@/$2/g" \
-e "s/@@PRIMARY_MACHINE@@/$PRIMARY_MACHINE/g" \
-e "s/@@SECONDARY_MACHINE@@/$SECONDARY_MACHINE/g" \
config/ha.cf | \
ssh root@$1 "cat - > /etc/ha.d/ha.cf"
Our last step in this function is to replace the name of the primary machine in our configuration inside of the config/haresources file and then append the content of the haresources.temp file we created in the configure_vtun_server function before pushing it to the /etc/ha.d/haresources file on the remote machine,
cat config/haresources haresources.temp | \
tr '\n' ' ' | \
sed -e "s/@@PRIMARY_MACHINE@@/$PRIMARY_MACHINE/g" | \
ssh root@$1 "cat - > /etc/ha.d/haresources"
Function: install_heartbeat_scripts
We have some Heartbeat resource scripts that we need to install on the remote machine such that it knows how to properly start and stop the various services when switching from one node to another in our configuration,
cat scripts/VTun.etc | ssh root@$1 "cat - > /etc/ha.d/resource.d/VTun; chmod +x /etc/ha.d/resource.d/VTun"
cat scripts/VTun.ocf | ssh root@$1 "cat - > /usr/share/ocf/resource.d/heartbeat/VTun; chmod +x /usr/share/ocf/resource.d/heartbeat/VTun"
cat scripts/killnfsd.etc | ssh root@$1 "cat - > /etc/ha.d/resource.d/killnfsd; chmod +x /etc/ha.d/resource.d/killnfsd"
cat scripts/killnfsd.ocf | ssh root@$1 "cat - > /usr/share/ocf/resource.d/heartbeat/killnfsd; chmod +x /usr/share/ocf/resource.d/heartbeat/killnfsd"
Function: generate_cib_xml
Before we can successfully start the Heartbeat service, we need to generate the /var/lib/heartbeat/crm/cib.xml file based on the current content of the /etc/ha.d/haresources configuration file. We do this by running the /usr/lib/heartbeat/haresources2cib.py python script after first removing any existing /var/lib/heartbeat/crm/cib.xml files.
ssh root@$1 "rm -f /var/lib/heartbeat/crm/cib.xml*; /usr/lib/heartbeat/haresources2cib.py >> /dev/null"
Function: append_hosts_allow
We need to grant access permission to each of the remote machines who will be connecting and mounting the NFS drive,
echo "10.0.0.0:255.0.0.0" | ssh root@$1 "cat - >> /etc/hosts.allow"
Function: append_rc_local
To ensure the proper kernel modules are loaded, and the proper services started when the machine is restarted, we need to append the necessary commands to the /etc/rc.local file,
echo "modprobe tun; modprobe drbd; losetup /dev/loop0 /var/drbd-meta; service drbd start; service heartbeat start" | ssh root@$1 "cat - >> /etc/rc.local"
Function: start_services
With everything properly setup and configured, the last step on our persistent storage machines is to load the required kernel modules and start the necessary services to bring our persistent storage solution to life,
ssh root@$1 "modprobe tun; modprobe drbd; service rpcbind start; service drbd start; service heartbeat start"
Function: mount_volumes
The last step before cleaning up all of the temporary files we've created is to connect to each machine in the mountlist file and tell it to mount the devices contained in the /etc/fstab file that have not already been mounted. We do this using the mount command and the -a switch,
for machine in `cat mountlist`; do ssh root@$machine mount -a ; done;
IMPORTANT NOTE: Because we only just started the services on the persistent storage machines it will take a bit before everything is up and running. As such, the first call to the mount_volume function will time out a couple of times on the remote machine before finally mounting the device successfully. This is normal, expected behavior.
Function: cleanup_files
Lastly, we clean up all of the temporary files we created during the process to ensure we don't use any of their contents in future calls to the configure script.
rm -f haresources.temp vtund-client.conf.temp vtund-client.conf vtun_server_list mountlist
Conclusion
The lack of a persistent storage offering has long been considered the Achiles Heel of Amazon's EC2 service. While Amazon has recently announced they are working on a persistent storage solution which is due out later this year, at this moment in time that solution is only available to a handful of private alpha participants, with no real understanding of what "later this year" actually represents.
In this paper we have explored the reasoning behind the need for not only a persistent storage solution, but a solution that also provides built-in redundancy for backup and automatic fail-over from one machine to another in the event that the primary machine in our configuration becomes inaccessible. We've taken a look at various open source technologies and provided a strategy that uses these open source technologies to provide a persistent, redundant, and automatic fail-over solution that can be used on EC2 today. We then discussed the high level architecture of this proposed solution, and then walked through the technical details of an automated script that builds out, configures, and starts up the necessary services on EC2 using a total of four(4) nodes: Two(2) for our data persistence, redundancy, and automatic fail-over, and two(2) additional nodes that mount the persistent storage via NFS for local read/write access.
We also discussed a possible scenario in which Amazon's future persistent storage service could be used to expand the capacity of our logical volume by creating a new block device, attaching it to our persistent storage node set, and using the tools provided by LVM to logically extend our available storage on an as needed basis.
Next Steps
Extending from this solution, there are several avenues we can begin to explore that can provide increased disk and application performance as well as greater levels of fault tolerance. These avenues include,
- Using RAID 0 on large and x-large EC2 instance types to increase the read/write performance of our disks.
- Using our persistent, redundant, and automatic fail-over solution for writing data and a RAID 0 configuration for reading data.
- Using a combination of SimpleDB, S3, and rsync to implement a lazy-evaluation meta-disk search and retrieval system that enables us to reduce the load on our local disks by minimizing the number of seeks necessary to gain access to the data of interest.
- Using memcached to gain instant access to our most commonly requested files and database queries w/o first performing a disk seek.
- Using availability zones with front facing load balancers and reverse proxies to ensure the highest level of uptime/system availability.
In future papers I plan to extend into these areas of potential interest as well as explore additional problems and proposed solutions to further expand our foundation of highly scalable, persistent, redundant, and fault-tolerant solutions in the cloud.
Appendix
Base Configuration Reference Files, Extension Scripts, and Heartbeat Resource Scripts
Referenced above, the following base configuration files and resource scripts finish out the collective and complete code base for this solution. Each file is preceded by a link to its online location in this projects folder in the Nuxleus Project SVN repository.
auth 3
3 md5 @@HEARTBEAT_PASSPHRASE@@
@@PRIMARY_MACHINE@@ drbddisk::r0 Filesystem::/dev/drbd0::/data::xfs killnfsd nfslock nfs
use_logd yes
logfacility daemon
keepalive 1
warntime 2
deadtime 10
auto_failback on
ucast eth0 @@PAIRED_MACHINES_IP@@
node @@PRIMARY_MACHINE@@ @@SECONDARY_MACHINE@@
crm yes
skip {
}
global {
usage-count yes;
}
common {
syncer { rate 10M; }
}
resource r0 {
protocol C;
handlers {
pri-on-incon-degr "echo o > /proc/sysrq-trigger ; halt -f";
pri-lost-after-sb "echo o > /proc/sysrq-trigger ; halt -f";
local-io-error "echo o > /proc/sysrq-trigger ; halt -f";
outdate-peer "/usr/lib/heartbeat/drbd-peer-outdater -t 5";
}
startup {
degr-wfc-timeout 120;
}
disk {
on-io-error detach;
}
net {
after-sb-0pri disconnect;
after-sb-1pri disconnect;
after-sb-2pri disconnect;
rr-conflict disconnect;
}
syncer {
# For m1.large and m1.xlarge instance types, the following value can be set higher
# due to the fact that the larger instance types have consistent access to greater bandwidth.
# Through trial and error it seems that the maximum accepted value is 500M,
# where M represents megabytes, not megabits.
rate 100M;
al-extents 257;
}
on @@PRIMARY_MACHINE@@ {
device /dev/drbd0;
disk /dev/@@VOLUME_GROUP_NAME@@/@@LOGICAL_VOLUME_ONE@@;
address @@PRIMARY_MACHINE_IP@@:7788;
meta-disk /dev/loop0[0];
}
on @@SECONDARY_MACHINE@@ {
device /dev/drbd0;
disk /dev/@@VOLUME_GROUP_NAME@@/@@LOGICAL_VOLUME_ONE@@;
address @@SECONDARY_MACHINE_IP@@:7788;
meta-disk /dev/loop0[0];
}
}
/usr/local/etc/vtund-[client|server]-template.conf
options {
port 5000;
ifconfig /sbin/ifconfig;
}
default {
compress no; # Compression is off
encrypt no; # ssh does the encryption
speed 0; # By default maximum speed
keepalive yes;
stat yes;
}
#!/bin/sh
wget http://superb-east.dl.sourceforge.net/sourceforge/vtun/vtun-3.0.1.tar.gz
tar xf vtun-3.0.1.tar.gz
cd vtun-3.0.1
./configure; make; make install
modprobe tun
#!/bin/sh
wget http://nuxleus.com/drbd-8.2.5.`uname -m`.precompiled.tar.bz2
tar xf drbd-8.2.5.`uname -m`.precompiled.tar.bz2
cd drbd-8.2.5; make install; modprobe drbd; rm -f get-drbd
#!/bin/sh
#
# Resource script for VTun
#
# Author: M. David Peterson <m.david@xmlhacker.com>
#
# Description: Establishes a point-to-point tunnel with specified IP of VTun server.
#
# Note: This command requires an argument, unlike normal init scripts.
#
# This can be given in the haresources file as:
#
# VTun::10.251.126.214::/usr/local/etc/vtund-client.conf::my_tunnel
#
# The above connects to 10.251.126.214 and establishes a relationship as defined by the my_tunnel profile contained in /usr/local/etc/vtund-client.conf
#
# OCF parameters are as below:
# OCF_RESKEY_vtunServerIP
# OCF_RESKEY_vtunClientConfig
# OCF_RESKEY_vtunProfile
#
# License: GNU General Public License (GPL)
#
# Copyright: (C) 2008 M. David Peterson
# Source function library.
. /etc/ha.d/resource.d//hto-mapfuncs
usage() {
echo "Usage: $0 <server_ip> <vtun_config_file> <vtun_client_profile> $LEGAL_ACTIONS"
exit 1
}
case "$#" in
0|1|2)
echo "VTun server IP and VTun client profile are required."
usage
;;
3)
cmd=$3
OCF_RESKEY_vtunServerIP=$1
OCF_RESKEY_vtunProfile=$2
OCF_RESKEY_vtunClientConfig="/usr/local/etc/vtund-client.conf"
export OCF_RESKEY_vtunServerIP OCF_RESKEY_vtunProfile OCF_RESKEY_vtunClientConfig
;;
4)
cmd=$4
OCF_RESKEY_vtunServerIP=$1
OCF_RESKEY_vtunProfile=$2
OCF_RESKEY_vtunClientConfig=$3
export OCF_RESKEY_vtunServerIP OCF_RESKEY_vtunProfile OCF_RESKEY_vtunClientConfig
;;
*)
echo "Additional parameters found: $# but max. 3 are allowed!"
usage
;;
esac
OCF_TYPE=VTun
OCF_RESOURCE_INSTANCE=${OCF_TYPE}_${OCF_RESKEY_vtunProfile}
export OCF_TYPE OCF_RESOURCE_INSTANCE
ra_execocf $cmd
/usr/share/ocf/resource.d/heartbeat/VTun
#!/bin/sh
#
# Resource script for VTun
#
# Author: M. David Peterson <m.david@xmlhacker.com>
#
# Description: Establishes a point-to-point tunnel with specified IP of VTun server.
#
#
# This can be given in the haresources file as:
#
# VTun::10.251.126.214::my_tunnel::/usr/local/etc/vtund-client.conf
#
# The above connects to 10.251.126.214 and establishes a relationship as defined by the my_tunnel profile contained in /usr/local/etc/vtund-client.conf
#
# OCF parameters are as below:
# OCF_RESKEY_vtunProfile
# OCF_RESKEY_vtunServerIP
# OCF_RESKEY_vtunClientConfig
#
# License: GNU General Public License (GPL)
#
# Copyright: (C) 2008 M. David Peterson
#######################################################################
# Initialization:
. /usr/share/ocf/resource.d/heartbeat/.ocf-shellfuncs
#######################################################################
usage() {
echo "Usage: $0 {start|stop|status|monitor|meta-data|validate-all}"
}
meta_data() {
cat <<END
<?xml version="1.0"?>
<!DOCTYPE resource-agent SYSTEM "ra-api-1.dtd">
<resource-agent name="VTun">
<version>1.0</version>
<longdesc lang="en">
This is a resource agent for VTun. It establishes a point-to-point tunnel client connection with a specified VTun server.
</longdesc>
<shortdesc lang="en">VTun resource agent</shortdesc>
<parameters>
<parameter name="vtunServerIP" unique="0" required="1">
<longdesc lang="en">
The IP address of the VTun server to establish a point-to-point tunnel client connection with.
</longdesc>
<shortdesc lang="en">VTun Server IP Address</shortdesc>
<content type="string" default="" />
</parameter>
<parameter name="vtunProfile" unique="0">
<longdesc lang="en">
The profile used when establishing a connection w/ the VTun server.
</longdesc>
<shortdesc lang="en">VTun Client Configuration File</shortdesc>
<content type="string" default="" />
</parameter>
</parameters>
<parameter name="vtunClientConfig" unique="0">
<longdesc lang="en">
The VTun client configuration file.
</longdesc>
<shortdesc lang="en">VTun client configuration file</shortdesc>
<content type="string" default="/usr/local/etc/vtund-client.conf" />
</parameter>
<actions>
<action name="start" timeout="10" />
<action name="stop" timeout="10" />
<action name="status" depth="0" timeout="10" interval="10" start-delay="10" />
<action name="monitor" depth="0" timeout="10" interval="10" start-delay="10" />
<action name="meta-data" timeout="5" />
<action name="validate-all" timeout="5" />
</actions>
</resource-agent>
END
}
VTunProgram() {
/usr/local/sbin/vtund -f $1 $2 $3;
}
VTunStart() {
ocf_log info "Starting vtund with parameters: " $OCF_RESKEY_vtunClientConfig $OCF_RESKEY_vtunProfile $OCF_RESKEY_vtunServerIP;
VTunProgram $OCF_RESKEY_vtunClientConfig $OCF_RESKEY_vtunProfile $OCF_RESKEY_vtunServerIP;
ha_pseudo_resource VTun_${OCF_RESOURCE_INSTANCE} start
}
VTunStop () {
killall vtund
ha_pseudo_resource VTun_${OCF_RESOURCE_INSTANCE} stop
}
VTunStatus () {
if ha_pseudo_resource VTun_${OCF_RESOURCE_INSTANCE} monitor
then
echo "running"
return $OCF_SUCCESS
else
echo "stopped"
return $OCF_NOT_RUNNING
fi
}
VTunValidateAll () {
# TO BE WRITTEN
return $OCF_SUCCESS
}
if
( [ $# -ne 1 ] )
then
usage
exit $OCF_ERR_GENERIC
fi
case $1 in
meta-data) meta_data
exit $OCF_SUCCESS
;;
status|monitor) VTunStatus
exit $?
;;
usage) usage
exit $OCF_SUCCESS
;;
*) ;;
esac
if
[ -z "$OCF_RESKEY_vtunServerIP" ]
then
ocf_log err "VTun server IP is required."
exit $OCF_ERR_GENERIC
fi
if
[ -z "$OCF_RESKEY_vtunProfile" ]
then
ocf_log err "VTun profile is required."
exit $OCF_ERR_GENERIC
fi
case $1 in
start)
VTunStart
;;
stop)
VTunStop
;;
validate-all)
VTunValidateAll
;;
*)
usage
exit $OCF_ERR_UNIMPLEMENTED
;;
esac
exit $?
#!/bin/sh
#
# Resource script for VTun
#
# Author: M. David Peterson <m.david@xmlhacker.com>
#
# Description: Ensures that all nfsd processes have been killed before restarting them.
#
# License: GNU General Public License (GPL)
#
# Copyright: (C) 2008 M. David Peterson
# Source function library.
. /etc/ha.d/resource.d//hto-mapfuncs
usage() {
echo "Usage: $0 $LEGAL_ACTIONS"
exit 1
}
case "$#" in
*)
cmd=$1
;;
esac
OCF_TYPE=killnfsd
OCF_RESOURCE_INSTANCE=${OCF_TYPE}
export OCF_TYPE OCF_RESOURCE_INSTANCE
ra_execocf $cmd
/usr/share/ocf/resource.d/heartbeat/killnfsd
#!/bin/sh
#
# Resource script for killnfsd
#
# Author: M. David Peterson <m.david@xmlhacker.com>
#
# Description: Ensures that all nfsd processes have been killed before restarting them.
#
# License: GNU General Public License (GPL)
#
# Copyright: (C) 2008 M. David Peterson
#######################################################################
# Initialization:
. /usr/share/ocf/resource.d/heartbeat/.ocf-shellfuncs
#######################################################################
ARGS="$0 $*"
usage() {
echo "Usage: $0 {start|stop|status|monitor|meta-data|validate-all}"
}
meta_data() {
cat <<END
<?xml version="1.0"?>
<!DOCTYPE resource-agent SYSTEM "ra-api-1.dtd">
<resource-agent name="killnfsd">
<version>1.0</version>
<longdesc lang="en">
Ensures that all nfsd processes have been killed before restarting them.
</longdesc>
<shortdesc lang="en">kills all running nfsd processes</shortdesc>
<actions>
<action name="start" timeout="10" />
<action name="stop" timeout="10" />
<action name="status" depth="0" timeout="10" interval="10" start-delay="10" />
<action name="monitor" depth="0" timeout="10" interval="10" start-delay="10" />
<action name="meta-data" timeout="5" />
<action name="validate-all" timeout="5" />
</actions>
</resource-agent>
END
}
KillNFSDProgram() {
killall -9 nfsd;
}
killnfsdStart() {
ocf_log info "Killing all nfsd processes";
KillNFSDProgram;
ha_pseudo_resource killnfsd_${OCF_RESOURCE_INSTANCE} start
}
killnfsdStop () {
ocf_log info "Killing all nfsd processes";
KillNFSDProgram;
ha_pseudo_resource killnfsd_${OCF_RESOURCE_INSTANCE} stop
}
killnfsdStatus () {
ocf_log warn "Don't stat/monitor me! killnfsd is a pseudo resource agent, so the status reported may be incorrect"
if ha_pseudo_resource killnfsd_${OCF_RESOURCE_INSTANCE} monitor
then
ocf_log info "killnfsd process is running"
return $OCF_SUCCESS
else
ocf_log info "killnfsd process is stopped"
return $OCF_NOT_RUNNING
fi
}
killnfsdValidateAll () {
# TO BE WRITTEN
return $OCF_SUCCESS
}
if
( [ $# -ne 1 ] )
then
usage
exit $OCF_ERR_GENERIC
fi
case $1 in
meta-data) meta_data
exit $OCF_SUCCESS
;;
status|monitor) killnfsdStatus
exit $?
;;
usage) usage
exit $OCF_SUCCESS
;;
*) ;;
esac
case $1 in
start) killnfsdStart
;;
stop) killnfsdStop
;;
validate-all) killnfsdValidateAll
;;
*) usage
exit $OCF_ERR_UNIMPLEMENTED
;;
esac
exit $?
/var/lib/heartbeat/crm/cib.xml
<cib admin_epoch="0" epoch="1" have_quorum="false" ignore_dtd="false" num_peers="2" cib_feature_revision="2.0" generated="false" num_updates="4" cib-last-written="Tue May 6 10:13:59 2008">
<configuration>
<crm_config>
<cluster_property_set id="cib-bootstrap-options">
<attributes>
<nvpair id="cib-bootstrap-options-symmetric-cluster" name="symmetric-cluster" value="true"/>
<nvpair id="cib-bootstrap-options-no-quorum-policy" name="no-quorum-policy" value="stop"/>
<nvpair id="cib-bootstrap-options-default-resource-stickiness" name="default-resource-stickiness" value="0"/>
<nvpair id="cib-bootstrap-options-default-resource-failure-stickiness" name="default-resource-failure-stickiness" value="0"/>
<nvpair id="cib-bootstrap-options-stonith-enabled" name="stonith-enabled" value="false"/>
<nvpair id="cib-bootstrap-options-stonith-action" name="stonith-action" value="reboot"/>
<nvpair id="cib-bootstrap-options-startup-fencing" name="startup-fencing" value="true"/>
<nvpair id="cib-bootstrap-options-stop-orphan-resources" name="stop-orphan-resources" value="true"/>
<nvpair id="cib-bootstrap-options-stop-orphan-actions" name="stop-orphan-actions" value="true"/>
<nvpair id="cib-bootstrap-options-remove-after-stop" name="remove-after-stop" value="false"/>
<nvpair id="cib-bootstrap-options-short-resource-names" name="short-resource-names" value="true"/>
<nvpair id="cib-bootstrap-options-transition-idle-timeout" name="transition-idle-timeout" value="5min"/>
<nvpair id="cib-bootstrap-options-default-action-timeout" name="default-action-timeout" value="20s"/>
<nvpair id="cib-bootstrap-options-is-managed-default" name="is-managed-default" value="true"/>
<nvpair id="cib-bootstrap-options-cluster-delay" name="cluster-delay" value="60s"/>
<nvpair id="cib-bootstrap-options-pe-error-series-max" name="pe-error-series-max" value="-1"/>
<nvpair id="cib-bootstrap-options-pe-warn-series-max" name="pe-warn-series-max" value="-1"/>
<nvpair id="cib-bootstrap-options-pe-input-series-max" name="pe-input-series-max" value="-1"/>
<nvpair id="cib-bootstrap-options-dc-version" name="dc-version" value="2.1.3-node: 552305612591183b1628baa5bc6e903e0f1e26a3"/>
</attributes>
</cluster_property_set>
</crm_config>
<nodes>
<node id="0ef6b379-57e4-4207-9906-2fca5ad1a824" uname="ip-10-251-127-133" type="normal"/>
<node id="bfa8a639-b2e5-42e6-bd49-86af3d88aacd" uname="ip-10-251-126-227" type="normal"/>
</nodes>
<resources>
<group id="group_1">
<primitive class="heartbeat" id="drbddisk_1" provider="heartbeat" type="drbddisk">
<operations>
<op id="drbddisk_1_mon" interval="120s" name="monitor" timeout="60s"/>
</operations>
<instance_attributes id="drbddisk_1_inst_attr">
<attributes>
<nvpair id="drbddisk_1_attr_1" name="1" value="r0"/>
</attributes>
</instance_attributes>
</primitive>
<primitive class="ocf" id="Filesystem_2" provider="heartbeat" type="Filesystem">
<operations>
<op id="Filesystem_2_mon" interval="120s" name="monitor" timeout="60s"/>
</operations>
<instance_attributes id="Filesystem_2_inst_attr">
<attributes>
<nvpair id="Filesystem_2_attr_0" name="device" value="/dev/drbd0"/>
<nvpair id="Filesystem_2_attr_1" name="directory" value="/data"/>
<nvpair id="Filesystem_2_attr_2" name="fstype" value="xfs"/>
</attributes>
</instance_attributes>
</primitive>
<primitive class="heartbeat" id="killnfsd_3" provider="heartbeat" type="killnfsd">
<operations>
<op id="killnfsd_3_mon" interval="120s" name="monitor" timeout="60s"/>
</operations>
</primitive>
<primitive class="lsb" id="nfslock_4" provider="heartbeat" type="nfslock">
<operations>
<op id="nfslock_4_mon" interval="120s" name="monitor" timeout="60s"/>
</operations>
</primitive>
<primitive class="lsb" id="nfs_5" provider="heartbeat" type="nfs">
<operations>
<op id="nfs_5_mon" interval="120s" name="monitor" timeout="60s"/>
</operations>
</primitive>
<primitive class="heartbeat" id="VTun_6" provider="heartbeat" type="VTun">
<operations>
<op id="VTun_6_mon" interval="120s" name="monitor" timeout="60s"/>
</operations>
<instance_attributes id="VTun_6_inst_attr">
<attributes>
<nvpair id="VTun_6_attr_1" name="1" value="10.251.127.69"/>
<nvpair id="VTun_6_attr_2" name="2" value="ip-10-251-127-69"/>
<nvpair id="VTun_6_attr_3" name="3" value="/usr/local/etc/vtund-client.conf"/>
</attributes>
</instance_attributes>
</primitive>
<primitive class="heartbeat" id="VTun_7" provider="heartbeat" type="VTun">
<operations>
<op id="VTun_7_mon" interval="120s" name="monitor" timeout="60s"/>
</operations>
<instance_attributes id="VTun_7_inst_attr">
<attributes>
<nvpair id="VTun_7_attr_1" name="1" value="10.251.126.242"/>
<nvpair id="VTun_7_attr_2" name="2" value="ip-10-251-126-242"/>
<nvpair id="VTun_7_attr_3" name="3" value="/usr/local/etc/vtund-client.conf"/>
</attributes>
</instance_attributes>
</primitive>
</group>
</resources>
<constraints>
<rsc_location id="rsc_location_group_1" rsc="group_1">
<rule id="prefered_location_group_1" score="100">
<expression attribute="#uname" id="prefered_location_group_1_expr" operation="eq" value="ip-10-251-126-227"/>
</rule>
</rsc_location>
</constraints>
</configuration>
</cib>
----