Encounter Table
Prelude - Approach Finality
Traversal
Traversal
Traversal
New things
Thank you to Hailey (Discord: haileyredrix) for drawing the first 1st encounter map, charl (Discord: chrlmain) for the higher-detail 1st encounter map, and Vanir (Discord: vanir) for invaluable help figuring out the 1st enc mechanics. Thank you to u/psi32 for the comment in the 2nd encounter guide.
Prelude
Strand grapple highly recommended, there's a lot of platforming. Run straight ahead from landing, climb up and follow the bridge until it gets steeper, there's two lit openings in the wall to your right. Jump into the top one. Follow the white-lit path (some hidden openings in corners require crouching and are lit in red) until the first encounter. There's a bunch of ads along the entire way. The path ends at a closed door which opens when the entire fireteam is near.
Room real early on that shows the resonance mechanic, possibly linked to red border: https://discord.com/channels/283270604172296192/1248611438059323402/1248707954140512407
https://discord.com/channels/283270604172296192/1248611438059323402/1248708871023755335
Odd object with text “you are found lacking” when approached, go under the stairs in the next photo to find it

Encounter 1: Substratum
Encounter challenge: Touch and Go. In Substratum, complete the encounter without any player acquiring an additional stack of resonance before the rest of the fireteam has gained a stack of resonance (Thanks to u/RemoteManner9591)
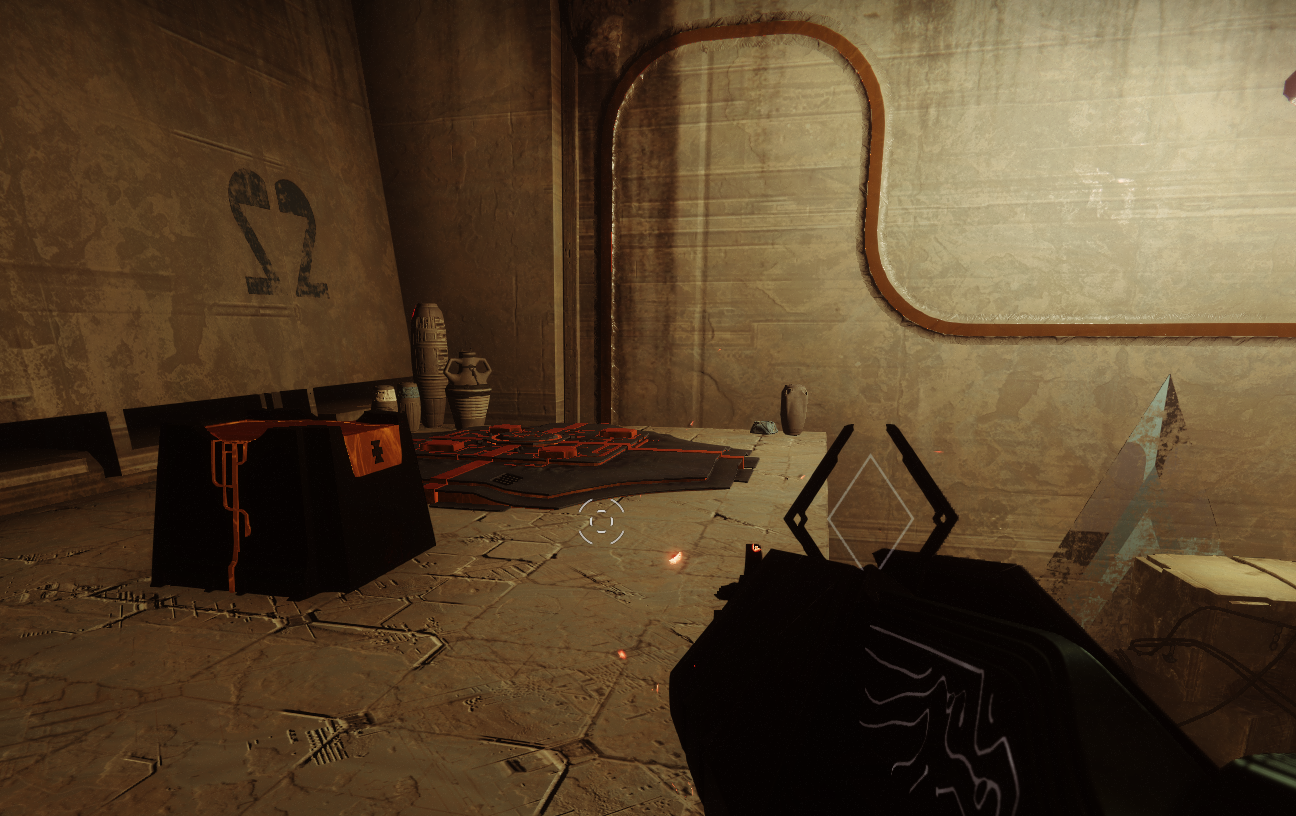
Layout: Big arena with several rooms, one central room in which you start the encounter, which contains a Resonant Altar, and several rooms running in a circle around it. There are doors leading from the centre to each surrounding room, and doors running around the perimeter connecting all the surrounding rooms. In each surrounding room (8 total) there is a black plate, all the plates are connected in a circuit by orange wires. Each side room also contains a Resonance Conduit pillar.
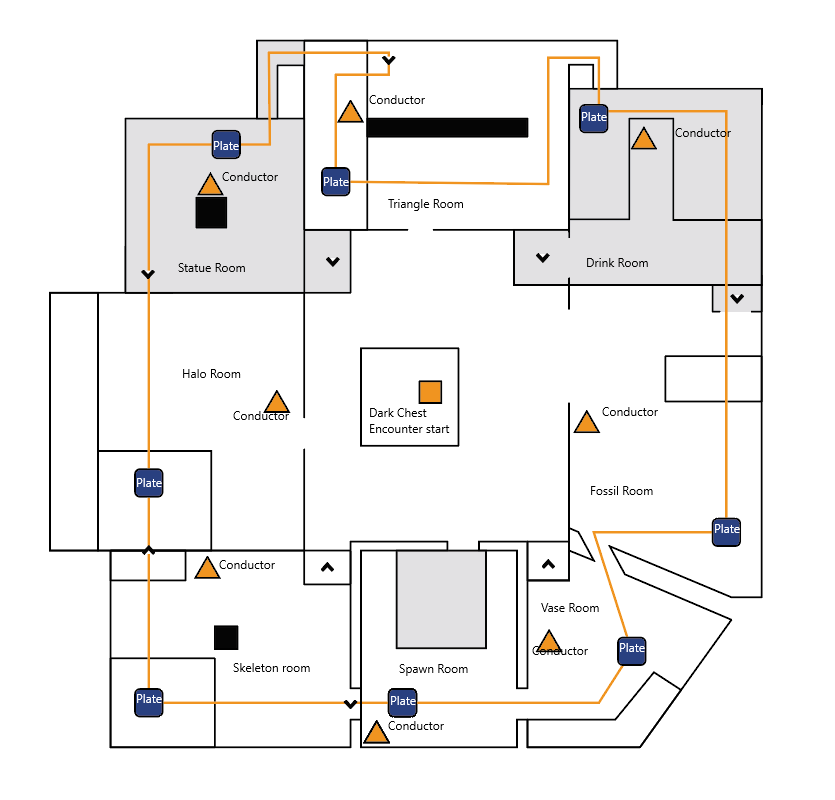
High detail composite map with labels: https://imgur.com/a/Ox7FRy0 (Thank you to charl / chrlmain for drawing the map, and the anonymous who labeled it!)
- Map: https://imgur.com/a/VElQ2AA (Thank you to Hailey / haileyredrix)
- Higher detail map: https://imgur.com/a/pUnpAwB (Thank you to charl / chrlmain)
Phase 1: Powering up the plates
You enter a room with a Resonant Altar. All doors into the room close. After a short while with the entire fireteam in that room, the doors close and a Pyramidal Resonance shard spawns nearby. Picking up the shard gives you the Pyramidal Resonance debuff with a 90 second timer, and dunking that debuff into the Altar starts the encounter, summoning an Arm of the Witness and a bunch of Supplicants. It also gives you the "Final Shape Looming" debuff, which is a wipe timer of 4m15s.
Two adjacent doors open into 2 different side rooms, split up 3+3 and enter.
Hand thing in centre periodically casts ZONE OF TRIANGLE, standing inside that when the hand pulses instakills you. Standing nearby deals damage but doesn’t kill.
In side rooms: Kill Quantum Minotaurs to spawn Keepers of the Monolith (Hydras) on the opposite side. Kill hydras to open doors that lead around the perimeter so you can find Devotees of the Witness (overload champions), then kill the overloads to spawn a Threshold Sentinel (Tormentor) in the centre: “You are being beckoned back to the center”. All the doors leading to the center open at this point to let you get there easily.
Killing the Threshold Sentinel gives the message: “Energy flows into the architecture”, which makes the plate in the floor of the room where you killed the Devotee (overload) glow. At this point stepping on the glowing plate is possible but impractical, so you should wait until you've killed another Sentinel before trying that loop.
After killing the first Tormentor, the doors all close and it resets, starting the loop over again.
Every so often the doors around the circuit will close, and you will need to kill more hydras to open them again.
Find another Devotee of the Witness, kill it to spawn a second Threshold Sentinel in the centre, then kill that to power up another plate where you killed the second Devotee.
Phase 2: Gathering Pyramidal Resonance
At this point you have one glowing plate on each side, and two people from each team should run back out with the third staying in the centre (so you're 2+2+2). One player on each side should run to the glowing plate (but don't step on it yet) and the other needs to find a room where the Resonance Conductor pillar has started glowing. This will be the 2nd plate in that pair.
Stepping onto the first glowing plate will bounce the glow along the wire to the second plate, which will start to glow for a moment before a quickly shrinking resonant circle appears on it. If you step onto that plate while it has the circle, Pyramidal Resonance shards spawn in each room (both plates + centre), and the glow bounces back to the first plate.
Another circle will then appear on the first plate, and you can keep bouncing it back and forth as many times as you want as long as you don't mess it up, spawning in a maximum of 9 total Pyramidal Resonance shards per side after three bounces (You get the message "All resonance has been pulled forth" when you've spawned in all of them).
If you mess up a bounce chain, either by stepping on the plate too early or too late (before the circle appears or after it's gone), the plates stop glowing and an Omen of the Witness (Subjugator) spawns on the first plate in the pair. Any Pyramidal Resonance you haven't picked up yet will also despawn. Killing the Subjugator lets you try again.
Always immediately step off the plates, if you ever step on both plates at the same time it spawns an Omen Subjugator.
For each bounce, the glow seems to move more slowly along the wire so you have more time to pick up Resonance. Each player should try to pick up 3 Pyramidal Resonance stacks. Picking up more than 3 stacks kills you.
The only way to end a bounce chain cleanly is by closing the Resonant Conductor near the 2nd plate right before stepping on a glowing plate.
To close the Resonant Conductor, you need the person on the 2nd plate to shoot it while they have Pyramidal Resonance and while the glow is travelling between plates. You'll see damage numbers, and then immediately once you step onto the glowing plate the Conductor closes and the glow stops. This also despawns any Pyramidal Resonance shards you haven't already picked up.
Close 2 Resonant Conductors (one on each side) to spawn a Harbinger of the Witness (Subjugator) in the centre room.
Phase 3: Dunking
All players return to the centre, and kill the Harbinger. This closes all side doors and spawns another Resonant Altar, where you can dunk all your Pyramidal Resonance. Each resonance you dunk increases the Final Shape Looms wipe timer by 20 seconds, up to the original cap of 4m15s total (13 Resonance). If you have less than 30 seconds left on the wipe timer when the first person dunks, the timer is immediately increased to 30 seconds. After a short while, the Altar disappears, the rest of your extra time is added all a<t once, and you go back to Phase 1.
You don't need to dunk a specific amount of Resonance to finish. You might have to dunk at least 1 per cycle, though this hasn't been confirmed. The dunks are mainly for the wipe timer.
The encounter is always 3 cycles, when you dunk for the 3rd time the encounter ends and you can continue to the next traversal.
Encounter 2: Dissipation - Herald of Finality
Layout: The arena is a large open area with a rectangular field in the centre and three Resonance Conduit pillars with corresponding plates on the left, right and close side. Split up in pairs for each conduit. There are now two types of resonance, with Spherical Resonance appearing alongside Pyramidal Resonance.
Phase 1: Getting the Stolen Valor buff
Start the encounter by shooting the taken blight in the middle of the arena. Boss spawns in the centre and taken + dread enemies spawn around the conduits. Yellow bar taken knights and larger orange bars spawn on each side, Trammel of Demise (Wizard) on left, Trammel of Something (Phalanx) centre and Trammel of Somethingelse (Ogre) right. You also have the same Final Shape Looming debuff as in Substratum.
The witness arm keeps spawning resonant bees, those just fly into the triangle instakill area and don't really bother you otherwise, so just avoid and otherwise ignore them.
Killing all three orange bars gives one person per side a Call for Reckoning buff. The people who get the buff need to head into the centre resonant area (inside the huge rectangle where the boss is running around).
Once all three people with Reckoning are in centre, shoot the boss in the head to spawn in taken blights around the arena. 3-6 (number unconfirmed) blights spawn around the entire arena, and a small blight appears above the boss' head.
The fireteam then needs to break all the big blights, which removes the blight above the boss' head and allows you to damage him again. Shoot him in the head until it breaks, and the Call for Reckoning buff turns into a Stolen Valor buff, which allows you to see symbols on the Resonance Conduit (like Scanner/yellow buff in DSC).
When you have Stolen Valor, return to your sides.
The people with Reckoning must not leave the centre area during this phase until they have received Stolen Valor, or it resets and you have to spawn another round of blights.
Phase 2: Closing the Resonance Conduits
The person with Stolen Valor looks at the symbol on their Conduit, it will be either a Sphere or a Pyramid depending on the Resonance required to close it.
Closing the Conduit works exactly the same way as in the first encounter, except you now get half Spherical Resonance and half Pyramidal Resonance.
The player on the plate nearest the Conduit should pick up the Resonance that matches that conduit. The other player should pick up the opposite Resonance. You don't need to pick up exclusively that type of Resonance - picking up one converts your entire stack, so only the last one needs to be the "correct" type.
After the 3rd bounce, when you are full on resonance, close the pillar as usual. This despawns any Resonance that you haven't yet picked up. If you mess up the bounces, another orange bar taken spawns and you need to kill it to retry.
When all 3 pillars are closed, everybody runs into the centre.
Phase 3: Damage
When all 3 pillars are closed, a Resonant Altar spawns at the far side of the arena (you might possibly have to run into the centre first). Dunk all your Resonance into the Altar to increase the wipe timer (up to a max of 3m20s, so 10 shards).
DPS phase starts. Damage the boss as much as you can until he turns invincible again.
The encounter goes back to Phase 1, rinse and repeat until you reach Final Stand.
Final Stand
Passing a damage threshold puts you into final stand. This stops the encounter from going back to Phase 1, and extends the current damage phase.
We're not sure of the specifics here, but: you wipe if you don't kill the boss in time here, and Taken Ogres spawn around the arena.
Encounter 3 - Repository
This encounter is another variation on the plates mechanic. Two new types of Resonance are introduced: Cubed Resonance and Hexahedral Resonance. You have to dunk Resonance on three different levels, moving up every time you dunk on a Resonant Chest. Dunking resonance increases the Final Shape Looming timer as usual, up to a maximum of 3m30s.
There are three rooms, all three follow the same rotation.
Room rotation
Start the encounter, a Threshold Sentinel (Tormentor) spawns along with adds on each Resonant Conduit. Killing a Sentinel unlocks its corresponding plates and spawns in a bunch of turrets. Kill all 3 Sentinels.
The person that gets final blow on the Sentinel gets a Stolen Valor buff and can see the symbols on the Conduits.
Use the plates as normal, picking up stacks of Resonance and closing off all three Resonance Conduits with the correct type of Resonance. This spawns in the Resonant Altar in the centre of the room.
If you fail to close a Conduit, a Harbinger of the Witness (Subjugator) spawns on it, which you will need to kill to unlock the plates again. Killing it also spawns in another wave of turrets.
Once everybody has dunked on the Altar, a wave of adds and an Unstoppable Incendior spawns near the door at the back of the room, kill them off to unlock the door and progress to the next room.
Once you kill the Unstoppable Incendior add wave in the third room, you have completed the encounter.
Encounter 4 - Verity
Layout: There are two kinds of rooms. The Outside room, or the large white room you spawn in, and the Inside rooms, three mostly identical smaller rooms which will have a single player each for most of the encounter.
In the Outside room, there are six statues total, one of each fireteam member. Before you start the encounter, one of those glow yellow.
In the Inside rooms, there are three statues corresponding to the three players that are currently Inside, and a moving shadow on the front wall that switches between several symbols. It also has a mirror/glass back wall. You MUST have shadows on for this encounter, or you will not be able to see the shapes when you are Inside.
The encounter itself is fairly simple to do, but requires some understanding and for two things to happen in parallel inside and outside.
The encounter is based around matching up 2D and 3D shapes. The 2D shapes are Triangle, Circle and Square.
The 3D shapes are built up of the 2D shapes:
Circle + Circle = Sphere
Square + Square = Cube
Triangle + Triangle = d4
Circle + Square = Cylinder
Circle + Triangle = Cone
Square + Triangle = Pyramid
You generally only want the 3D shapes that are made up of two different 2D shapes.
Start the encounter by interacting with the glowing statue. Three players get teleported Inside into their own rooms. The other three stay Outside. You also get the Imminent End debuff with a 3m30s timer, which wipes you if it reaches 0.
Phase 1 Inside: Symbol Gathering
On the Inside, each player needs to find the statue of themselves and check which 2D shape it's holding (Circle, Triangle or Square). They then need to look at the shadow shapes on the wall, which will either loop between two different shapes, or the same shape twice.
One of the players should also call out the order of Inside shapes from left to right, for the Outside players, so they can start dissecting statues on the Outside. For example "Triangle Square Circle".
In this phase, your goal is to get two of the same shape on the wall as your statue is holding.
You can trade with the other Inside players by killing the Splintered Curators (Knight) that spawn by your wall. The Curators drop a 2D shape, which you can then pick up and deposit in the corresponding statue (E.g. drop a Triangle on the statue holding a Triangle).
Do not pick up your own shape, and do not pick up more than one 2D shape at a time or they'll combine into a 3D shape. Shapes you don't pick up disappear from the ground after a few seconds.
Killing both Knights will spawn in a Revenant Ogre, killing the Ogre will spawn new Knights.
After this first round of trades, each inside player has two of the same shape on the wall as their statue is holding (For instance, if your statue is holding a Triangle, your wall should have two Triangles).
Phase 2 Inside: Getting rid of the symbols again
For this phase, you want to do basically the same thing as in Phase 1 except you want to get rid of the shape on your statue so you have one each of the other shapes (e.g. if your statue is holding a Triangle, you want a Square and a Circle on your wall after the trade).
Simply kill the first knight, deposit your shape on one of the other statues, kill the 2nd knight, deposit your shape on the 2nd statue. Done correctly, this will make your shape vanish from your statue in the other Inside rooms, so that the only statue left with a shape in each room is the one matching the player in that room.
On either the 1st or the 2nd deposit, the Witness will notice and kill all three Inside players. This is intended and happens every time. To res you, somebody on the Outside has to run to the back of the room, pick up your ghosts, and deposit them on your statues from left to right.
If they dunk a ghost on the wrong statue, or in the wrong order, the person dunking also dies. When the Outside player picks up your ghost, you get a death cam following them and can give directions.
When the right ghost is deposited on your statue in the right order, you are immediately spawned back in your Inside room and can continue your trades if you only managed to do one.
At the end of this turn, you should have two different shapes on your wall, both of which should be different from the shape on your statue. For example, if your statue is holding a Triangle, your wall should have Circle and Square.
If the Outside players are done dissecting, you can start Phase 2.5.
Phase 2.5 Inside: Escaping through the mirror
Once the Outside players have confirmed that your statue has been dissected properly, and you have the shapes on your wall from Phase 2, you can finally kill both Knights and pick up both shapes at the same time to get a 3D shape aura. While holding this aura you can run through the glass wall at the back of the room, back into the Outside room and rendezvous with your fireteam.
Phase 1 & 2 Outside: Statue Dissection
On the Outside, players need to change the symbols on the Outside statues corresponding to the guardians stuck Inside. The goal is for the 3D shape on the Outside statue to be made out of the shapes that are not held by the corresponding Inside statue. For example, if the Inside statue is holding a Triangle, the Outside statue should be holding a Cylinder (Circle + Square).
You do this by Dissecting the statues, swapping a 2D shape from one statue with another 2D shape on a different statue. For example, if you have one statue with a Cone (Circle + Triangle) and another statue with a Cube (Square + Square), you can dissect the Triangle from the first statue and a Square from the second statue to swap them, ending up with a Cylinder (Circle + Square) and a Pyramid (Square + Triangle) instead.
To dissect a shape from a statue, you need to pick up the corresponding shape from a Knight, then interact with the statue you want to remove it from.
Three Knights spawn at a time, each dropping one of the shapes. Dissecting two statues in a row swaps the shapes between those two statues, so Outside players will need to coordinate the order in which they dissect.
When you have killed all three Knights, an Unstoppable Ogre spawns. Killing the Ogre spawns three new Knights.
During this phase, the Witness will also periodically kill off players, and you will have to resurrect them. The first time, it kills one Outside player. Run to the back of the room, pick up their ghost, and deposit the ghost on their statue. The second time, it kills two Outside players. The last surviving Outside guardian has to deposit their ghosts on their statues, in order of the statue's position from left to right. The third time, it kills off all three Inside players. Resurrect them too from left to right.
If you deposit the wrong ghost on a statue, or you deposit them in the wrong order, depositing kills you.
Once you have dissected the three statues corresponding to the Inside players so they have the correct shapes, and all the Inside players have been resurrected, let them know they can come Outside. Once everyone is Outside, you are ready for Phase 3.
As an example, at the end of this phase, if the Inside statues hold Triangle Circle Square, then the Outside statues should hold Cylinder Pyramid Cone.
Phase 3: Orderly resurrection
Once all three Inside players have returned to the Outside room and all 6 players are together, the Witness kills off 5 players. The one surviving player will have to respawn the others, in the order of their statues from left to right like earlier. The respawned guardians can also help out by picking up ghosts and helping out with the depositing.
When all 6 players are back alive, the wipe timer vanishes for a few seconds before 3 new players are sent Inside and another cycle begins.
After 3 full cycles, you finish the encounter.
Encounter 5: Zenith - The Witness
Traversal:
Collectable azte found a collectable in the final traversal. https://clips.twitch.tv/SquareTardyWitchSwiftRage-dXV44QF8OrVndXCz
Layout: The area consists of a large V-shaped platform, with the Witness looming over the far end. At the far left end of the arena is a Light themed mural stone, and at the far right end of the arena is a Darkness themed mural stone. Between the legs of the V, right in front of the witness, sits a small round island with a well of light on it.
Step 1: Getting Glyphbreaker
When you start the encounter, three arms of the witness spawn on each side. One arm sticks up from the ground and periodically shoots bees. Another floats in from the side and periodically shoots lasers. A third floats from above, periodically making pulsing triangles. You also get the The Final Shape debuff with a 3m30s timer, which will wipe you if it reaches 0.
Stepping into the telegraph of any of these attacks will give you Resonance. The Triangular zone gives Pyramidal Resonance, the bee landing zone gives Spherical Resonance and the beams give Hexahedron Resonance.
Standing in the telegraph also allows you to shoot the wrist of the arm casting it, revealing a coloured band. The bands correspond with a Resonance shape: Yellow is Spherical, Red is Hexahedron, Green is Pyramidal.
A person with the corresponding buff can then go into the arm's telegraph and shoot the coloured band to get the Glyphbreaker buff.
When you have the Glyphbreaker buff, you can enter the well of light on the central island and shoot one of the Glyphs on The Witness' torso to break it. This also removes the Glyphbreaker buff and any Resonance from you.
Breaking a Glyph spawns in two Subjugators, one on each side. If you break more than one Glyph at a time before killing the Subjugators, you can minimise the amount of Subjugators you have to fight, because new ones won't spawn as long as the current ones are alive.
When you have broken all 6 Glyphs, the Witness raises the central platform up and damage phase begins.
Step 1.5: The Witness tests you
At one point during Step 1, the witness summons a bunch of resonance pillars ahead of it with the message "The Witness tests you". This is an instakill mechanic which you can only avoid by shooting the pillars into a specific pattern.
Which pattern to make depends on which colour was on the last arm you shot to generate Glyphbreaker. If the armband was Yellow, leave behind a diamond pattern. If the armband was red, leave a square. If the armband was green, leave a triangle. See image below for the specific patterns.
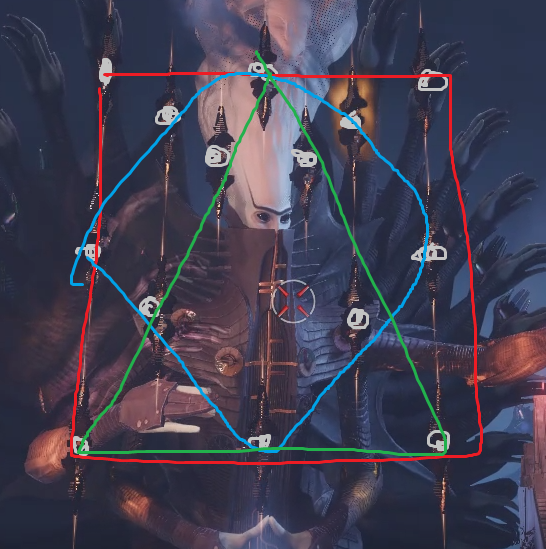
Thank you to Mactics for this masterpiece, original tweet https://twitter.com/MacticsG1/status/1799447316719673411
Making the correct pattern cancels the wipe and the Witness instead casts a resonant attack over the entire arena which you have to jump to avoid. Just like during damage phase, its eyes flash and make a swish sound right before it attacks so you can time your jump.
Step 2: Damage phase
The damage phase starts a short while after the last Glyph on the Witness' torso has been broken. Remember that this also spawns in two Subjugators, which you should kill as quickly as possible to be able to focus during DPS.
The damage phase is exactly the same as in the Excision activity, so if you're having trouble in the raid you can practice there.
The Witness raises the central platform up to chest height, and a crit spot on its chest starts glowing. The wipe debuff is removed. You can damage the crit spot, and Divinity makes a crit cage around its center as usual.
While you are trying to do DPS, the Witness is fighting back. It has three different attacks which mostly instakill you if they hit. The first attack in a pattern is fairly heavily telegraphed, but keep an eye out for further attacks as they can come in very rapid succession.
The different attacks are: Front left diagonal followed by back right diagonal, front right diagonal followed by back left diagonal, and the entire platform from directly ahead.
The diagonal attacks are avoided by walking onto the half of the island that isn't being attacked.
The attack from directly ahead has two variants, one slow and one fast. You can distinguish between them by its eyes, in both its eyes glow bright orange and it makes a "swish" sound right before it attacks (affectionately called its "anime eyes" by the WF team), so you have time to jump when you see or hear it.
After a while, The Witness straightens up, loses its crit spot, and lowers the platform again. The encounter goes back to phase 1 with a new wipe countdown.
Final Stand
When you deal enough damage to get The Witness' health down to the Final Stand threshold, it becomes invincible for a few seconds, before it redoubles its attacks. This stops the encounter from going back to Step 1, and extends the DPS phase.
During this phase, it attacks faster than before, and nearly continuously so you always have to keep moving around on the platform.
If you do not manage to kill The Witness during this phase, it will wipe you.
If you do manage to kill The Witness during this phase: Congratulations!!!! You've finished the raid!!!
Remember that you do not need to go to orbit to be recorded in this raid race. The only thing you need to do is interact with the huge chest that appears between the well of light and where The Witness stood.
If you want to, the fireteam leader can then launch you directly into Excision from the well of light, to really hammer in the kill :)