Task Force Elite Editor Documentation
Check our video tutorials at: https://www.youtube.com/channel/UCgCsU9-qumhgg-PdaANpOAQ
Basic Operations
Setup level settings and gamemode levels 5
Add gamemode level to level hierarchy 5
Setup compulsory actors/components 9
Test the mod in practice mode 22
Right click on the game on steam, go to properties > Betas > input this password: "rjsInternalTest2020" > select "Internal build" from the dropdown 22
Add your mod to server manager 23
Basic Operation of the editor 24
Saving your work and crashes 25
Advanced Operations
Add vehicle and commander object 26
How to see the collision box of an object/building: 32
How to take screenshot of viewport to showcase the map to the community: 33
How to make tunnels and underground maps: 33
How to use a character to determine if your wall height or building is ok 34
Create your own collections (local pc) 35
How to create overview images for tactical map/minimap 37
Startup the editor
Navigate to TaskForceEliteEditor/TaskForceElite
Run TaskForceElite.uproject
It will take a while to startup and the shader compilation process will kick in.
Depending on the cpu spec, it will be faster or slower, and will always be 100% until it’s done.

Important Note:
The editor cannot be launched from Steam. You have to go to: SteamLibrary\steamapps\common\Task Force Elite Editor\TaskForceElite and open the TaskForceElite.uproject
If it asks what program to use to open the file, choose this:
UE4Editor.exe located at SteamLibrary\steamapps\common\Task Force Elite Editor\Engine\Binaries\Win64
Setup the interface

First we will go through important UI:
1 - Modes : or “quick actor access list”. You can quickly find actors like spawn points, outposts, checkpoints, cameras here and drop them into level.
2 - Project navigation bar: most build functions can be found here, such as Play In Editor, Create a mod, Package a mod,...
3 - World outliner: this is where you will find all objects in the current level
4 - Levels: this is where you handle level setup, such as adding/removing gamemode sub-levels, or adding landscape,...
5 - Details : all details of selected actor/object will be shown here
6 - World settings: current level settings will be shown here (gamemode,sub-level names,tactical map widget, minimap widget)
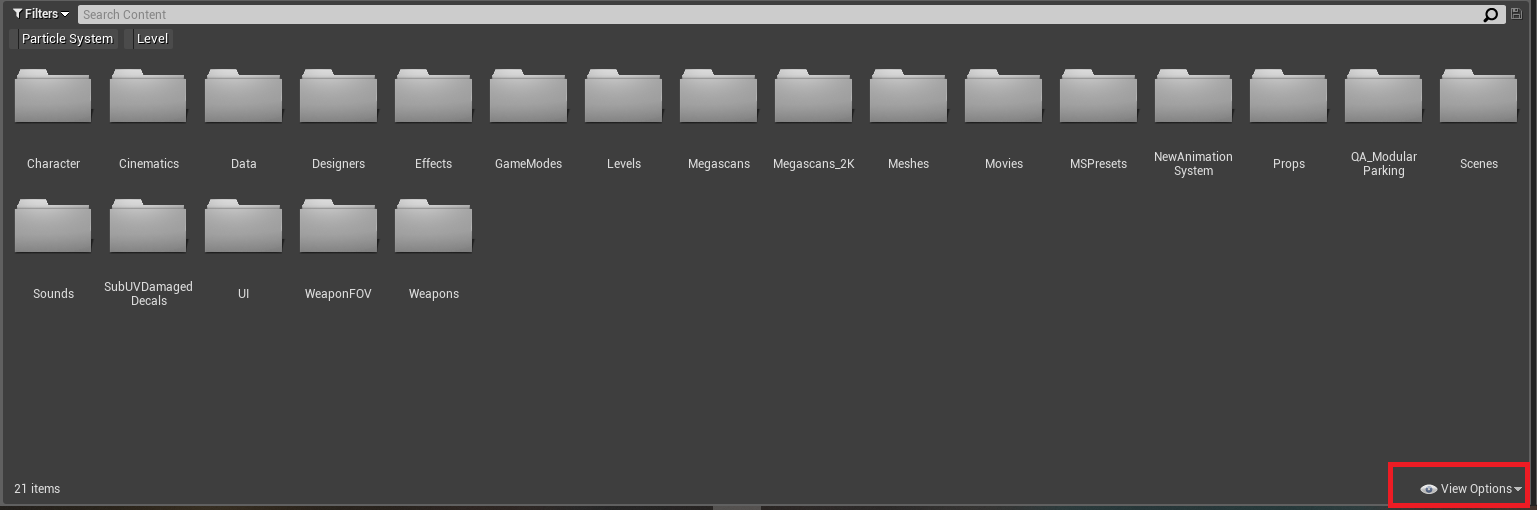
7 - Content Browser: all contents of the project are listed here
8 - Collection : sorted collections of assets, this is where you should use to avoid confusion.
NOTE: If you can’t find Collections area, go to show collection, go to Views Option -> Show Collections
If you want to check the logs of editor, you can turn it on by going to
Windows->Developer Tools->Output log
Create a mod
Important: Please follow the instructions below. Anything that deviates from it will cause errors on packaging and will make it very difficult to export your map to the live game. For example: Never, ever, copy level files between different mods. There are many references embedded into the files that you will disrupt by moving files around.
Navigate to Project Navigation Bar, select Create UGC

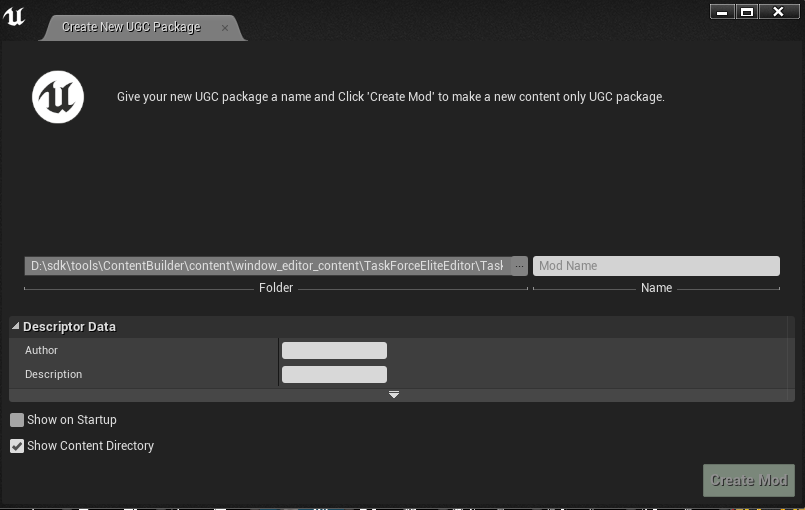

Give it a name in Mod Name field and click Create Mod. Once it’s done you will see something like this
DO NOT USE “_” in the map name. Mod and Map names should be simple words.

SampleLevel is your main level while Sub_SampleLevel_TKOTH is TKOTH level, which contains the gamemode related actors/components.
Make sure to replace SampleLevel with your level name.
NOTE: the level data file name has to follow the standard as “your-level-nameData”. So let’s say your level name (and file name) is SuperLevel, then level data file is SuperLevelData.
IMPORTANT:
The file name should be YourMapName and the sub-levels should be called Sub_YourMapName_Gamemode , data file should be called YourMapNameData
Don’t do stuff like Sub_Your_map_Name_custom_TDM
Setup level settings and gamemode levels
Important note:
The Level is where you should place all your buildings and assets. The sub-level is specific to a game mode (DM, TKOTH, TDM, Team Conquer, CTF). You should place the spawn points, Outposts / Checkpoints and any specific items for that game mode inside the sub-level file. ie: Like photoshop, the Level is the background locked layer, and the sub-levels are layers that go on top.
Each gamemode level will contain the corresponding setup for that gamemode. For example, you may want to have different spawn points for TKOTH + zone than for TDM.
There will be sample gamemode levels attached in the template for you whenever you create a new mod.
In this example, let’s say you want to include TKOTH to your level.
Add gamemode level to level hierarchy
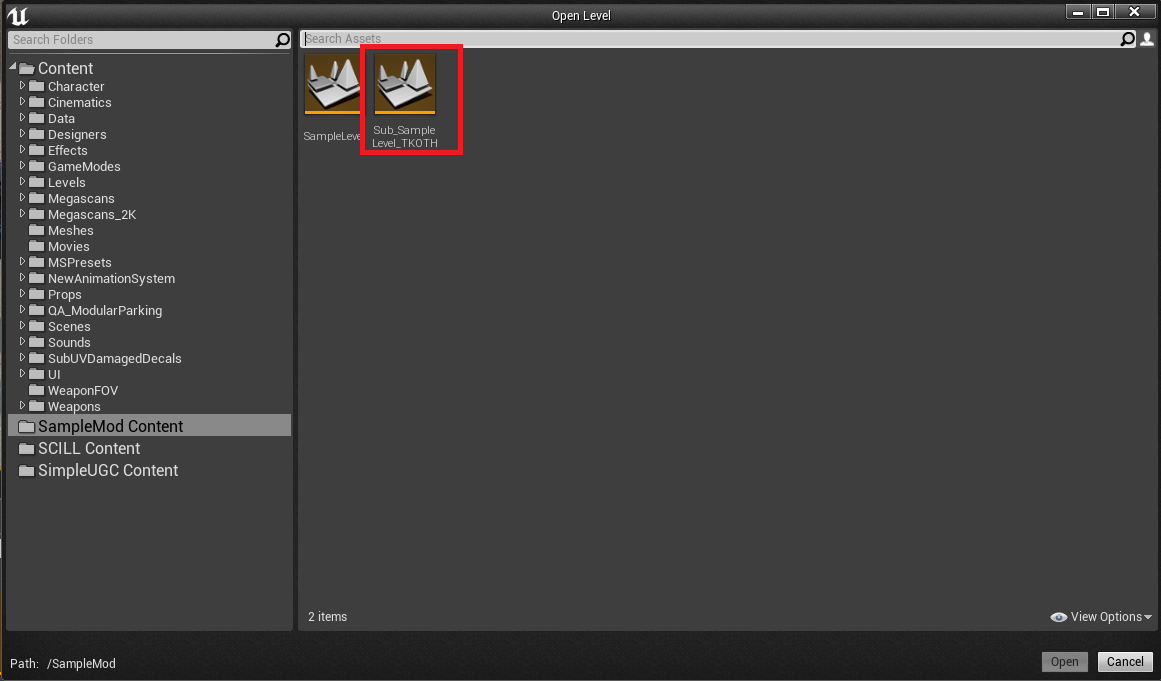
Open SampleLevel from your created mod folder.
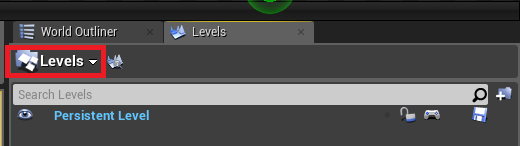
Click on Levels on top right area

Below is the hierarchy of your main level.
There is only one Persistent Level at the moment
NOTE: Gamemode related objects/actors should not be kept in Persistent Level unless they share the same setup. For specific actors like Zone/Flags/Outposts/Checkpoints/… they should always be put under gamemode levels.
Click on Levels
and select Add Existing…
Then navigate to your mod folder, and select Sub_SampleLevel_TKOTH
Once it’s done

Repeat the same process for any gamemode levels you want (TDM/TC/DM/CTF).
NOTE: next to the level name, there is an eye icon, which is used to toggle the level visibility.
Setup level settings
Click on World Settings

There are 5 fields for input, which correspond to the gamemodes
- Sub DMMap Name : name of deathmatch level
- Sub TDMMap Name : name of team deathmatch level
- Sub TKOTHMap Name : name of team king of the hill level
- Sub Team Conquer Name : name of team conquer level
- Sub CTFName : name of capture the flag level
In our example, let’s change the Sub TKOTHMap Name field to Sub_SampleLevel_TKOTH
Repeat the same process for any gamemode levels you want (TDM/TC/DM/CTF).
NOTE: if you forget this step, your gamemode levels won’t be loaded even if you add them to level hierarchy.
Additionally, there is an option called Default GameMode, of which you can change the gamemode for play-in-editor testing.
NOTE: Terrain Type and Environment is deprecated. Please do not change these values.
Setup level data
From Map Data field in figure above, you can select your Map Data object (i.e your-map-nameData). In this case it is SampleLevelData located in the same folder.
Once done, open SampleLevelData
Here are the fields you need to set up:
- Map Size : the size of the map, typically the size that tactical map will cover
- Grid Slot Size: how big is one grid in tactical map
- Initial zoom value: the initial zoom in level for minimap and tactical map. The smaller, the bigger the zoom
- Min zoom value: smallest zoom level
- Zoom step: delta change when zoom in/out
- Map Pick Thumbnail : image used for selection in map vote screen
- Actual Map Name: the actual name of the level. It is advised to use the same for name and level file name.
- Map Name Text: the name to display in host menu or in loading screen
- Loading image: image used for host map item and loading screen background
- Supported Map Mode: supported modes of the level. Click + icon to add modes
Setup compulsory actors/components
There are actors/components that are the core of the level and must not be forgotten.
NOTE: to edit the correct level, make sure to double click the level from level hierarchy until the name is bolded

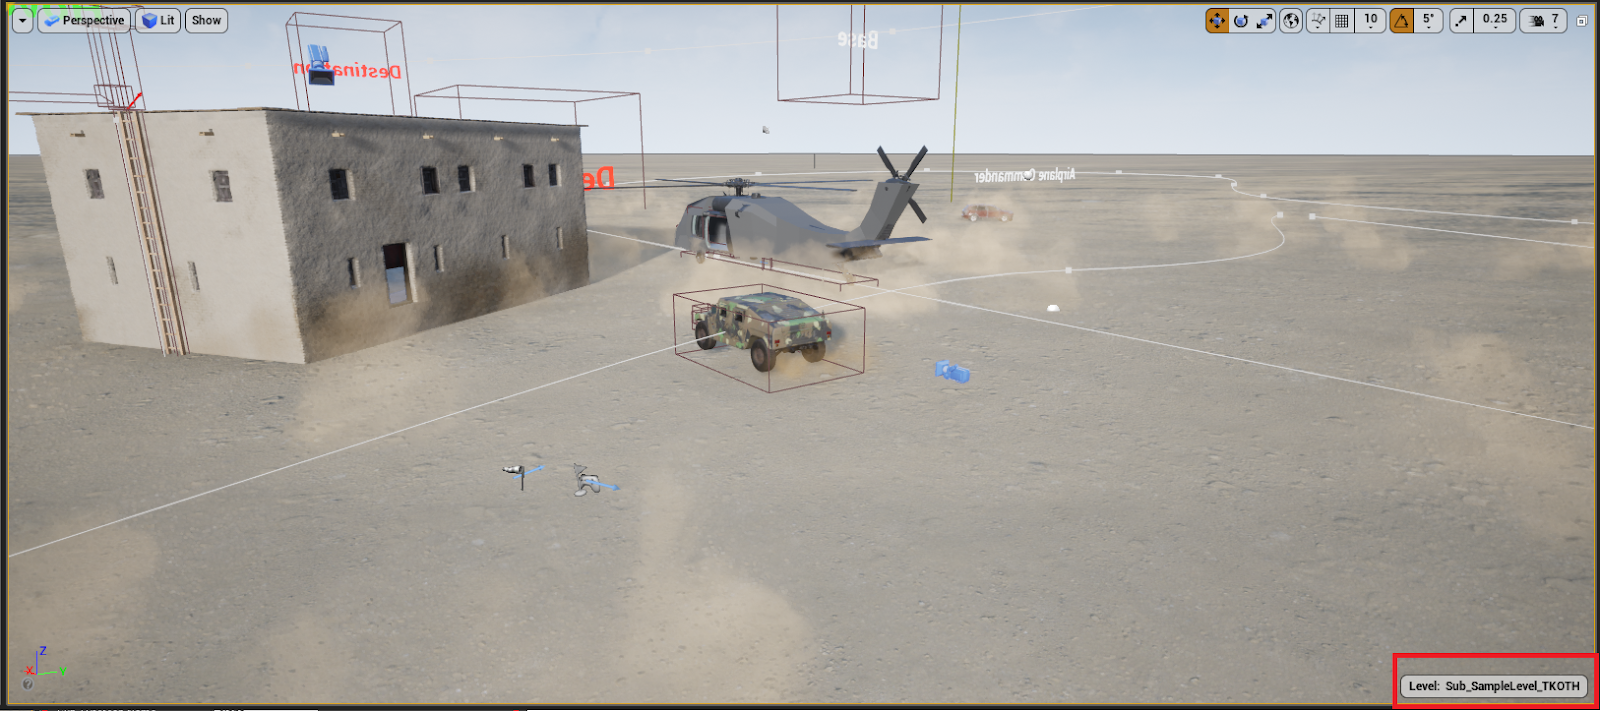
Or you can always check which level you are editing in viewport
Spawn point
There are 2 types of spawn points
- Base spawn points
- Outpost/checkpoint spawn points
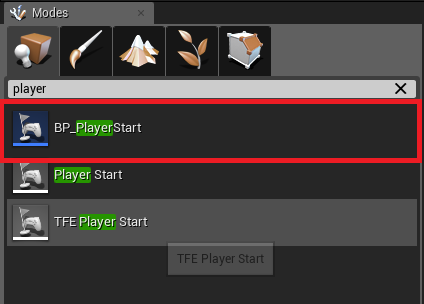
First, find BP_PlayerStart from either Modes area or from Functional collection and drop them into the level:

After that, click on the placed spawn point
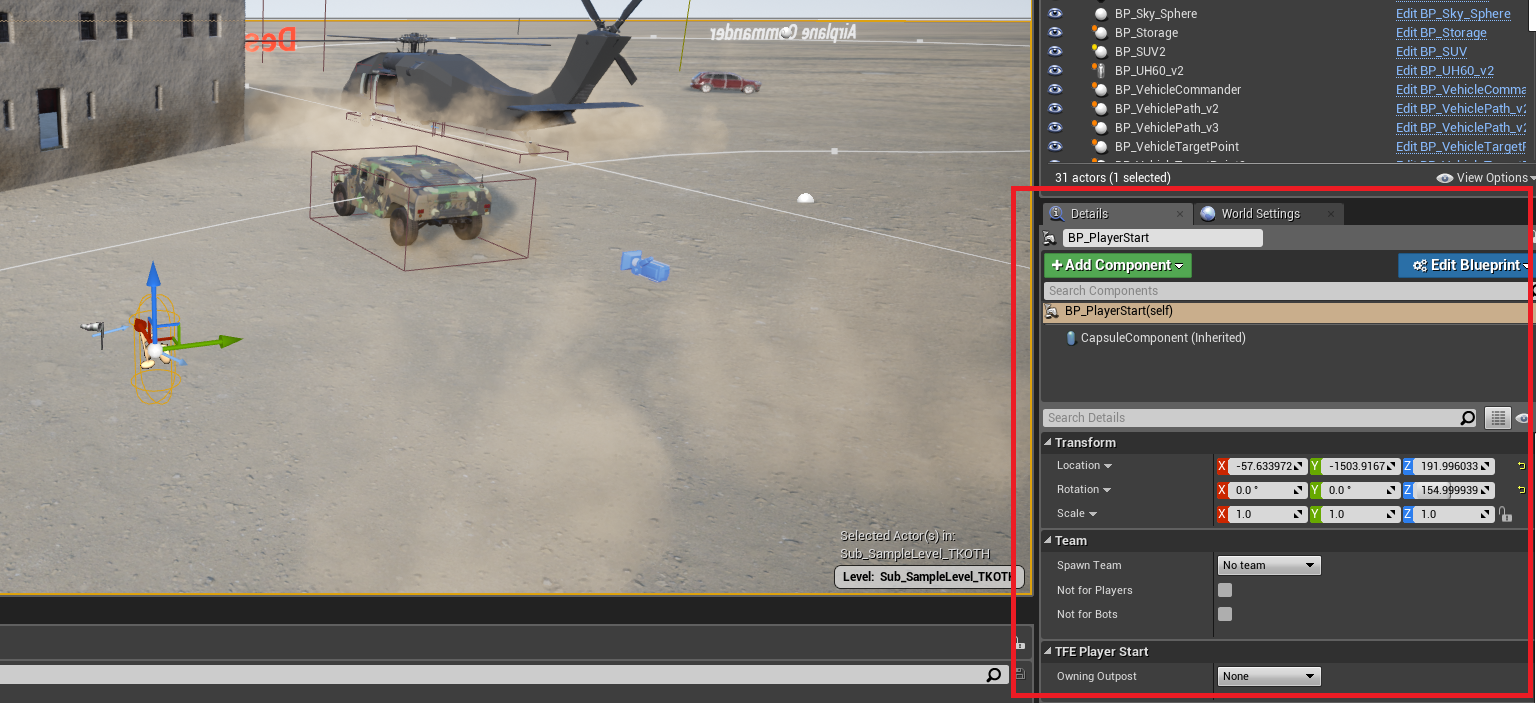
There are 2 fields to look into : Spawn Team and Owning Outpost
If you want to set up base spawn points, leave the Owning Outpost option as None, and change the option Spawn Team to either Blue team or Red team.
If you want to set up outpost/checkpoint spawn points, leave the Spawn Team option as No team, and change the option Owning Outpost to the corresponding outpost/checkpoint ID.
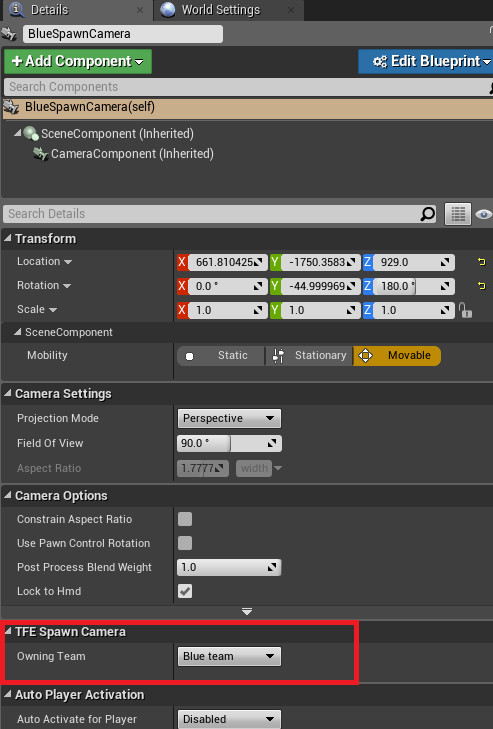
Spawn camera
Spawn cameras are cameras that are used for base spawning, aka the 90s cameras.
There should always be 2 cameras in gamemode level. If you use the same setup for all gamemodes, you can put the cameras in Persistent Level.
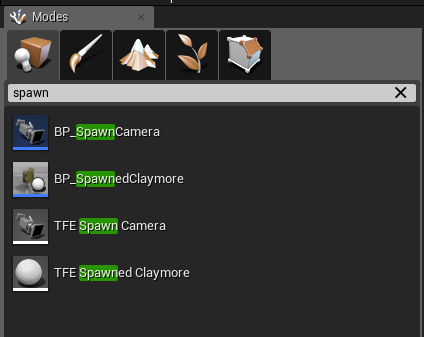
Find camera from either Modes area or Functional collection and drag-n-drop BP_SpawnCamera to the level

Click on the camera in level, under Details tab
Find Owning Team and change to the team you want it to use
Overview camera
Overview camera is a type of camera that players see whenever they first join the match or match has ended.
Find spec from either Modes area or Functional collection and drag-n-drop BP_MapSpectator to the level

You can place many overview cameras.
Death camera
Death camera is a special camera that is viewed when a player is injured or dead.
All you need to do is place one in the Persistent Level, anywhere.
Find mova from Modes area drag-n-drop MovableHelperCam to the level.
Storage
Find storage from either Modes or Functional collection then drag-n-drop BP_Storage to the level

Select the Storage in level, scroll down Details tab until you find this
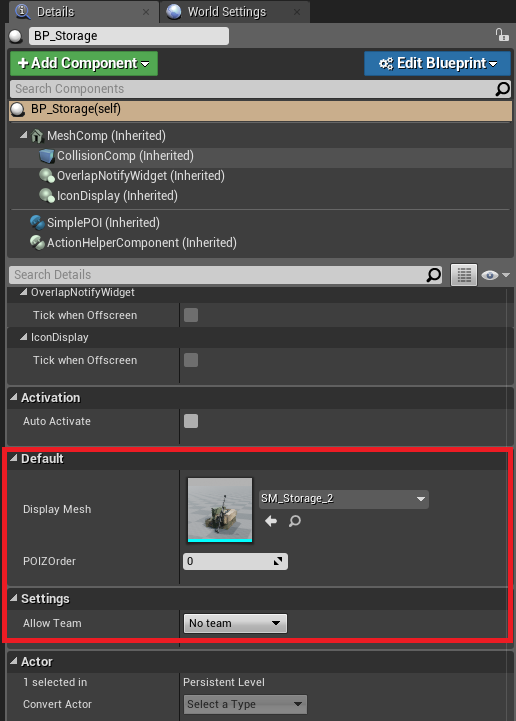
You can select your desired mesh under the Display Mesh option.
If you want to limit the access to certain, simply change the Allow Team option.
Additionally, you can change the access volume by selecting CollisionComp from Components list

And adjust your Scale values.
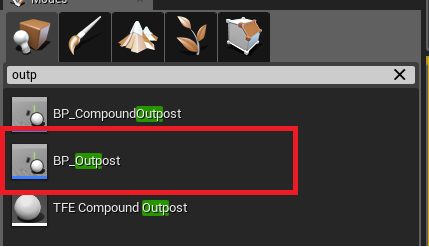
Outpost
Find outpost from either Modes or Functional collection then drag-n-drop BP_Outpost to the level
Select the outpost in level, and scroll down under Details tab until you see Settings session
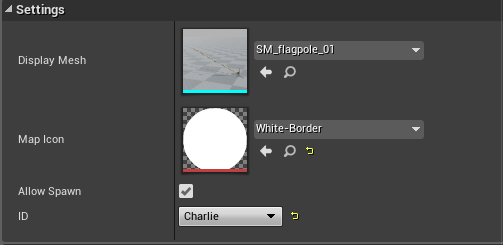
ID is what you need to change. In this case, let’s set it to Charlie.
NOTE: Do not untick Allow Spawn, since this is not used for outpost.
Once it’s done, you need to place spawn points for outposts. Please refer back to Spawn Point setup session above.
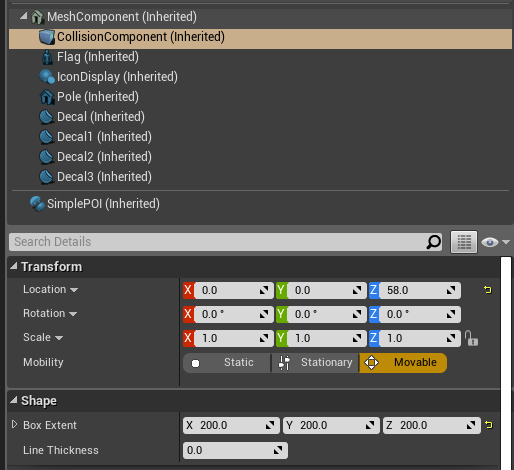
By default, the trigger volume has the size of 200x200x200. If you want to change the size,
click on Collision Component under Components area, then adjust your Scale values.
Checkpoint
Checkpoint behaves similar to outpost in terms of spawning mechanism but has some more setups.
You can easily tell the difference by looking at the volumes

Outpost only has 1 trigger volume while checkpoint has 3: trigger volume, inner zone volume and outer zone volume.
Find outpost from either Modes or Functional collection then drag-n-drop BP_CompoundOutpost to the level.

Click on the checkpoint you placed in level and scroll down under Details tab until you see Settings session

- Only Show In Range : tick this if you want the outline of the zone on tactical map and minimap only be shown if you are within the defined range.
- Min Height Zone: minimum height relatively to the zone that the outline is visible
- Max Height Zone: maximum height relatively to the zone that outline is visible
- Zone Line Color : color of the outline
- Line Size: thickness of the outline
- Zone Size : the size of the zone
- Allow Spawn: untick this if you don’t want players to spawn in this checkpoint
- ID : id of the checkpoint
NOTE: Do not change the zone size with the method shown in outpost session, as it can break the outline display. You can however change the trigger volume the same way as above.
Repeat the same process to place spawn points for a checkpoint.
Zone
If your gamemode is Team King of The Hill, you must place zone as the objective.
Find zone from either Modes or Functional collection then drag-n-drop BP_Zone to the level.
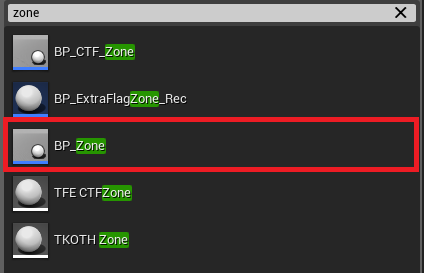
NOTE: Make sure BP_Zone is placed under TKOTH sub level instead if you have multiple gamemodes setup.
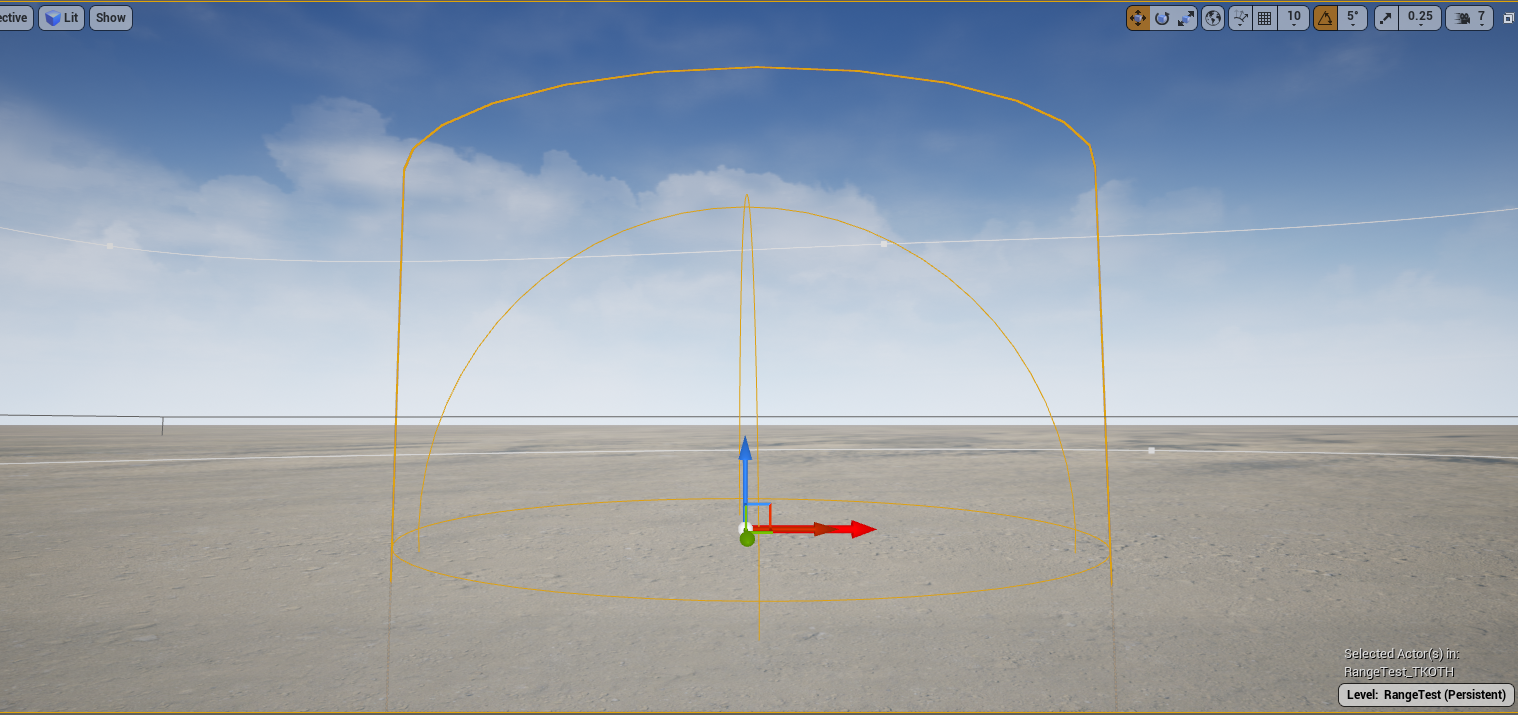
Click on the zone in the level, here is what it looks like
NOTE: If you can’t click on it, you can find it under World Outliner and click on it.
Scroll down under Details tab until you find Settings session:

There are 4 types of zone: each with a different shape, untick the one you don’t need to use.
Down under are each zone’s setup settings:

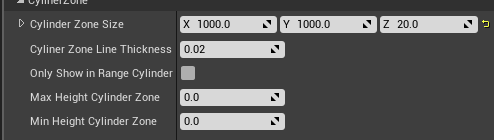
They share the same meanings as when you setup Checkpoint zone.
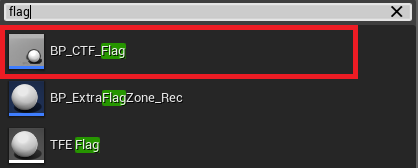
Flag
If your gamemode is Capture the Flag, you have to place flags and flag zones.
To place a flag, find flag from either Modes or Functional collection then drag-n-drop to the level.
Click on the flag and scroll down under Details tab until you find Settings session
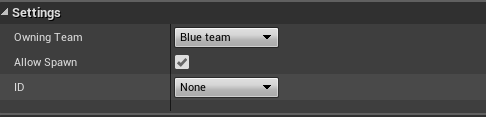
Since a flag has no id and not spawnable by default, we have set it to ignore the 2 parameters below Owning Team and what you should only do is to change the Owning Team.
The flag will change its color based on the team.
Finally, you have to change the capture volume, aka CollisionComponent. Navigate to the Components tab, locate CollisionComponent and update your desired size.
Flag zone
Flag zone is where players will capture the enemy flags.
Find zone from either Modes or Functional collection then drag-n-drop to the level

Select the placed zone in world, scroll down Details tab until you find Settings session.
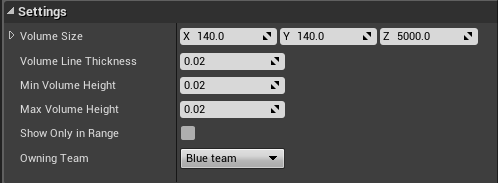
Aside from Owning Team, the rest is the same as setting TKOTH Zone.
Package a mod
To package, navigate to Project Navigation Bar, select Package UGC and then choose a mod.

Then select the directory you want to save your mod. Once it’s done, you will receive a zip file containing your mod.
In the zip, there are usually 2 files, a uplugin and a pak file. To host the server with your new mod, you only need to use the pak file.
Test the mod in practice mode
Download the latest build of the game
Then:
Navigate to the game installation directory, go to the following path:
../TaskForceElite/Mods/
This is where you can place your mod paks. You can copy-paste just the .pak file after you unzip the export of the mod.
Once that’s done, you can find your mods in the Practice menu.
Host a server with mod
Install mod to server
All you have to do is to place your mod paks in the Dedicated server tool’s Mods folder.

Setup server config
In order for players to automatically download the missing paks when they join your server, you need to provide them with urls and some extra configs.
First, navigate to TaskForceEliteDedicatedServer/TaskForceElite/Saved/Config/WindowsServer and open Game.ini with any text editor.
Let’s say your mod pak file name is
“SampleModpakchunk0-WindowsNoEditor.pak”.
And you store your mod pak under an URL:
myserver.mod.SampleModpakchunk0-WindowsNoEditor.pak
And your server is using https
And your pak file MD5 string is
“4C6BDFE131F2071FB7EF89791556F63E”.
Add the following lines:
[/Script/TaskForceElite.BaseGameMode]
RedirectReferences=(PackageName="SampleModpakchunk0-WindowsNoEditor.pak", PackageURLProtocol="https", PackageURL="myserver.mod.SampleModpakchunk0-WindowsNoEditor.pak", PackageChecksum="4C6BDFE131F2071FB7EF89791556F63E")
If you want to add another mod, just add another line below. Then save your ini file.
NOTE: to get your pak md5, you can use any available tools.
Add your mod to server manager
This step only applies to anyone using our server manager tool.
Make sure to close everything before adding your new mods.
From the system page, this is where you can add your new mod
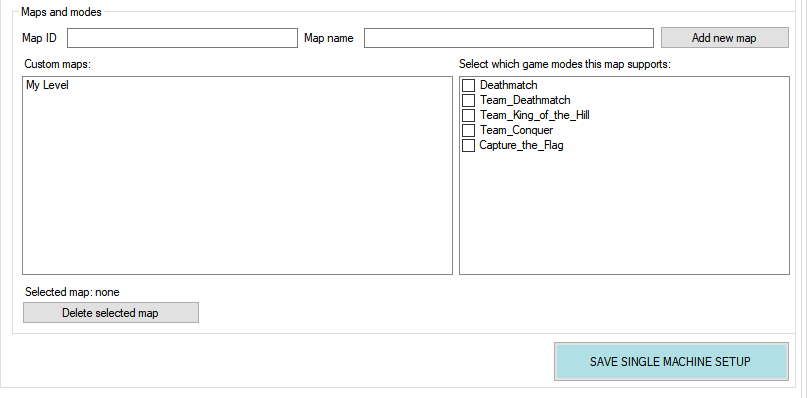
- Map ID : this should be the exact map name from your mod (or the map name file in editor). Locate your map’s data file “YourMapData”, and check what input there is in the “Actual map name” field and copy it exactly to the server tool.
- Map name: this is the name that is displayed when using the manager
Add new map when it’s done.
Then click on your newly created map, and tick on the game modes that it has.
Click save single machine setup when everything is done. Your mod should now be available for hosting.
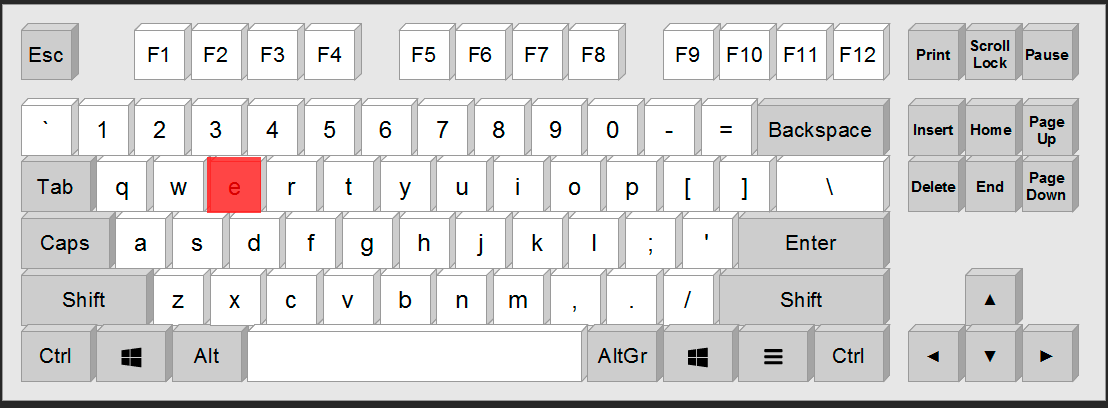
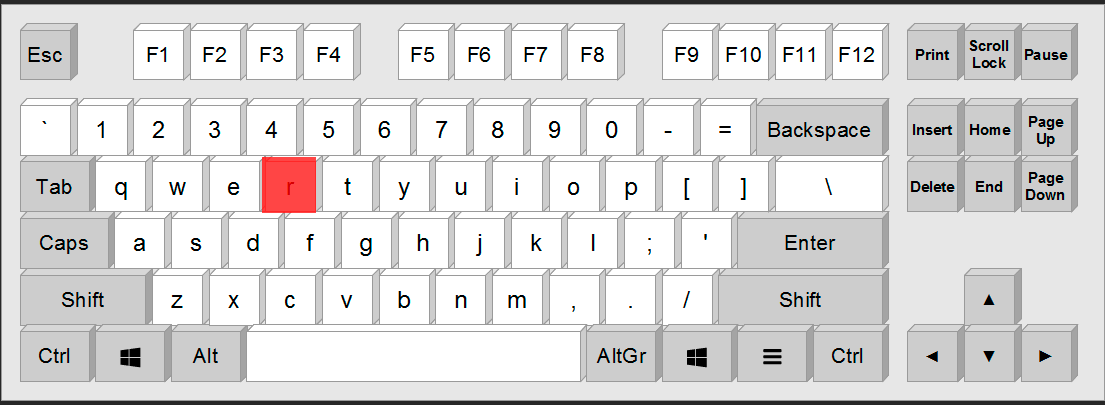
Basic Operation of the editor
- Move object “ press W + drag and drop “

- Rotate object “ press E + mouse click and push “
- Scale object ( Press R + use the arrows )
Saving your work and crashes
Unreal Engine is subject to frequent crashes while working with the Editor/Eddie. Please save your work as regularly as possible and setup the auto-saving to make sure you don’t lose much work in case of a crash.
Edit -> Editor Preferences -> Loading and Saving
However the auto-save can be annoying sometimes, if you are testing stuff and saves. There’s normally a few seconds with a warning on the bottom right corner of the screen informing you that it will do an auto-save in x seconds. You can cancel it. However the auto-save does not replace the need to do a manual save regularly.
Don’t forget to use the “Save All” instead of a simple Save, since Save All will make sure to save all changes made, not only to the main level, but also to the sublevels.
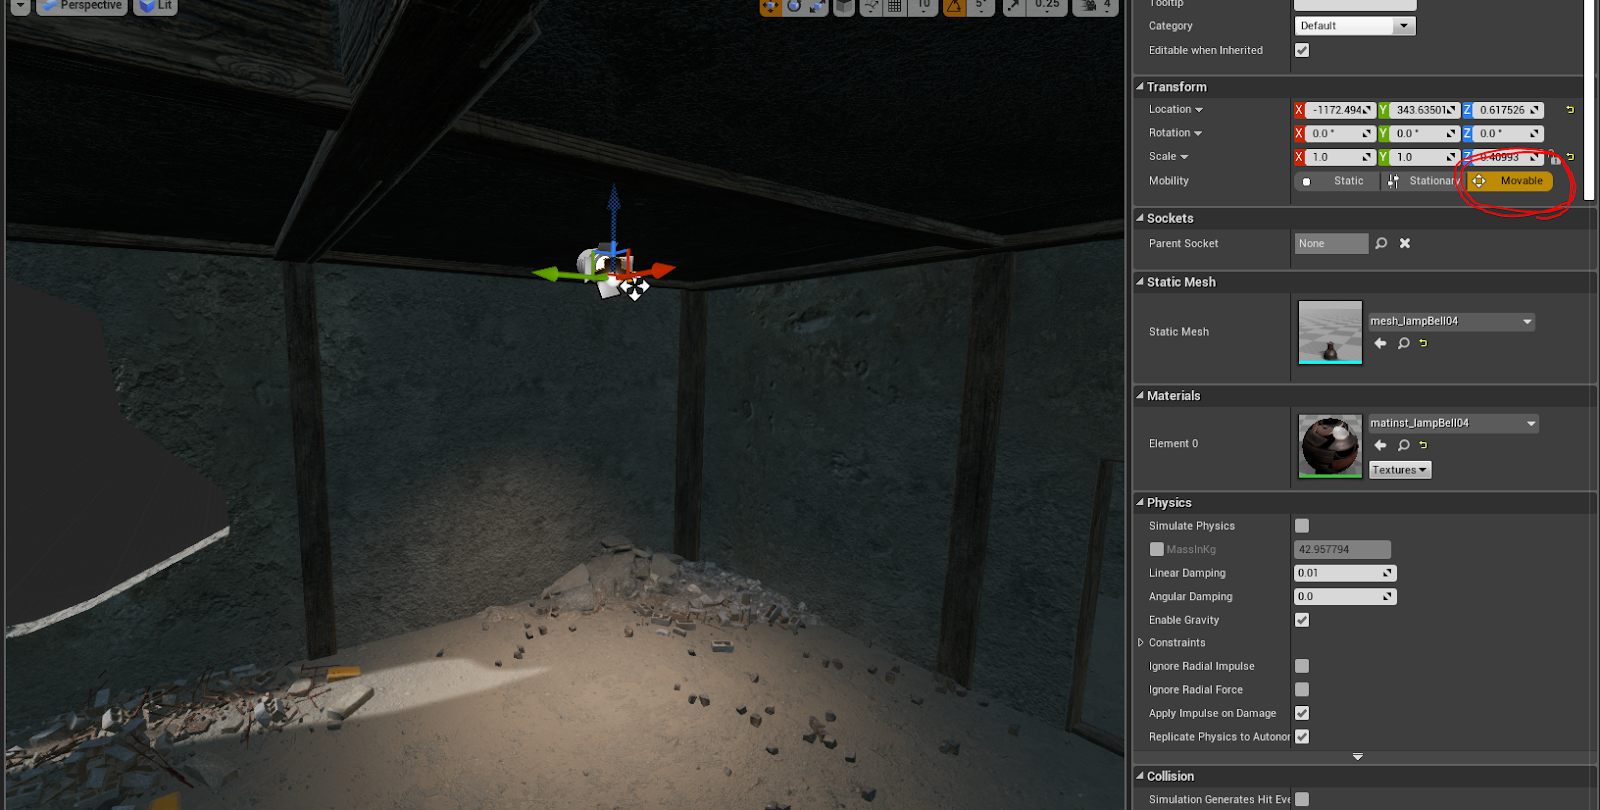
Lighting setup
Important note: Do not build lighting. Every light source you add to your scene, being directional light, points of light, etc should always be set to “movable” on the settings, to make sure that you don’t need to build lighting (otherwise will give you a red error on the viewport)
Setting up ladders
https://www.youtube.com/watch?v=joTgoZNr3ac
Helicopter setup
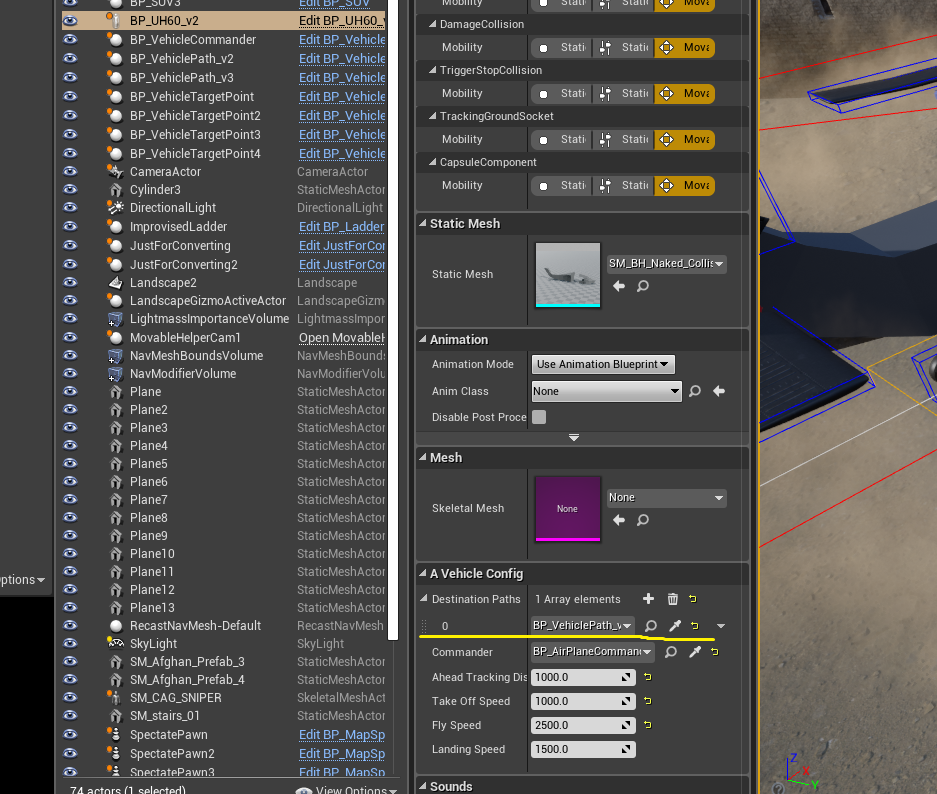
Add vehicle and commander object
In this example, let’s try to add a helicopter
- Add BP_UH60_v2 into the level
- Add BP_AirPlaneCommander into the level.
- Click on BP_UH60_v2 dragged in level, in Details tab, from the Commander item, pick BP_AirplaneCommander in level done from step 2

- Select BP_AirplaneCommander in level, choose the target vehicle. In this case, it is BP_UH60_V2
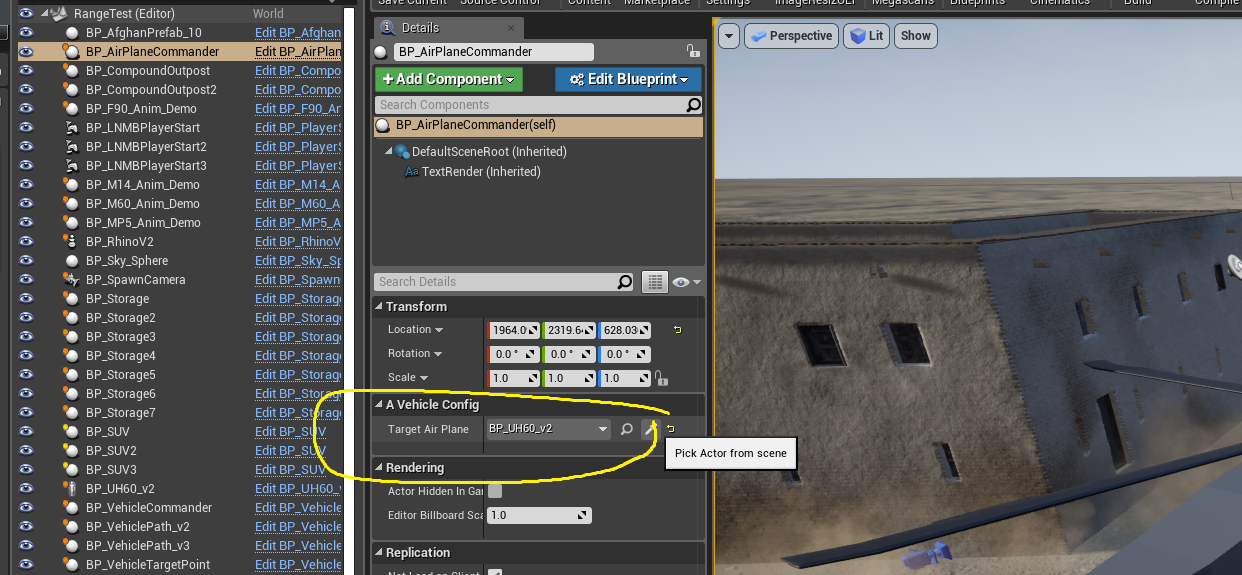
Note: 1 vehicle only has 1 commander and the corresponding commander only has 1 target vehicle.
Add path
To add a path, find BP_VehiclePath_v2 and drag it into level. Each path needs to have 1 instance of BP_VehiclePath_v2.
Select the helicopter in level, under Details tab, Destination option, add all the paths you have added in scene by using the + and select the path from the list.
Note: You can quickly add the path to the list by using the dropper icon.
Important about Crashes in Editor:
If there is a step missing on the setup, it will crash Eddie when you try to Play in Editor.
Make sure you have the vehicle path correctly set up as well as link the path to the vehicle.
Important about destination on path:
Helicopters do not require a destination to be set on the path. As the helicopter returns to base always. It’s a feature for humvees. Humvees require destinations.
Add stop/hover point
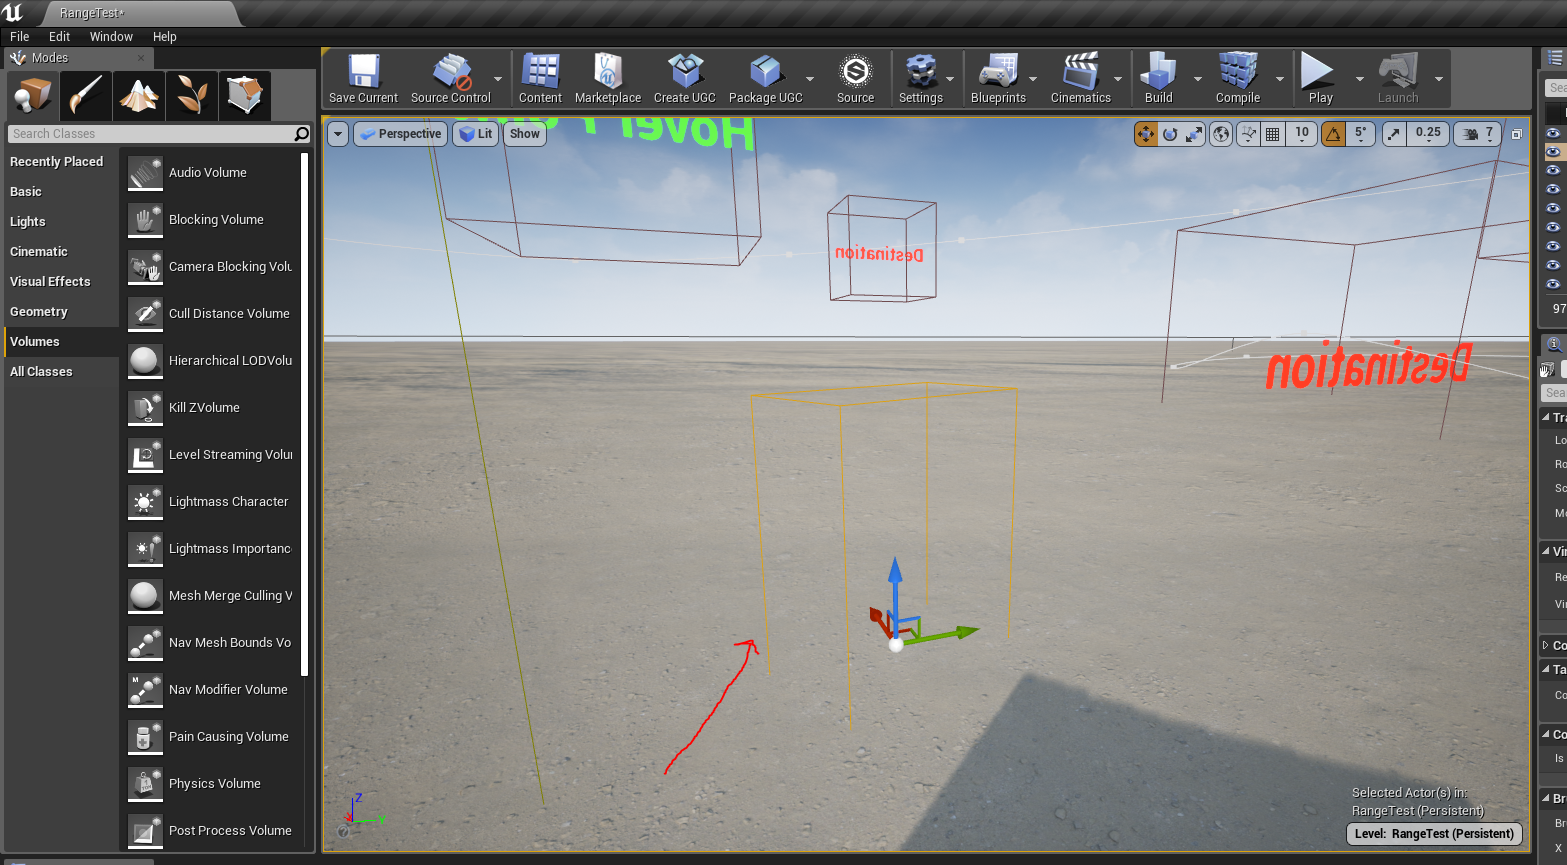
Add BP_VehicleTargetPoint into the level.
Note: Place the target points so that TriggerStopCollision (components of target point instance) covers part of the path like so

There are 4 types of target point:
- Destination: for this particular type, if the vehicle is a helicopter, it will land where the point is, before taking off again and returning to the path. If the vehicle is a humvee, it will stop.
- Base: this type is to specify the original point, or the base, which also marks the beginning/end of the path
- HoverPoint: this is a special type of point for helicopters. Instead of landing like Destination, helicopters will hover in the air for a while before resuming.
- POI Only: this is used for showing the destination on tactical map and minimap
In all cases, POI Only target points should be in the exact same location as the HoverPoint/Destination and Base target points.
Finally, pick a path in level, name it under Target Point Name, and add corresponding target points under Related Stopping Points which includes Destination, Hovering Points and Base).
Note: if the target point is not under Related Stopping Points list, then the vehicle won’t interact or go through that target point
Important: Make sure to include Base TargetPoint as a destination for helicopters, otherwise your vehicle won’t stop at base and will keep going through the path over and over again.
Creating and editing roads
https://www.youtube.com/watch?v=Q44mF3QHQSU
Adding blocking volumes
If you want to add an invisible wall to stop players from going either outside the map or from accessing certain spots, this is how you do it:
a) From left menu choose Volumes > Blocking Volumes and drag it to the viewport
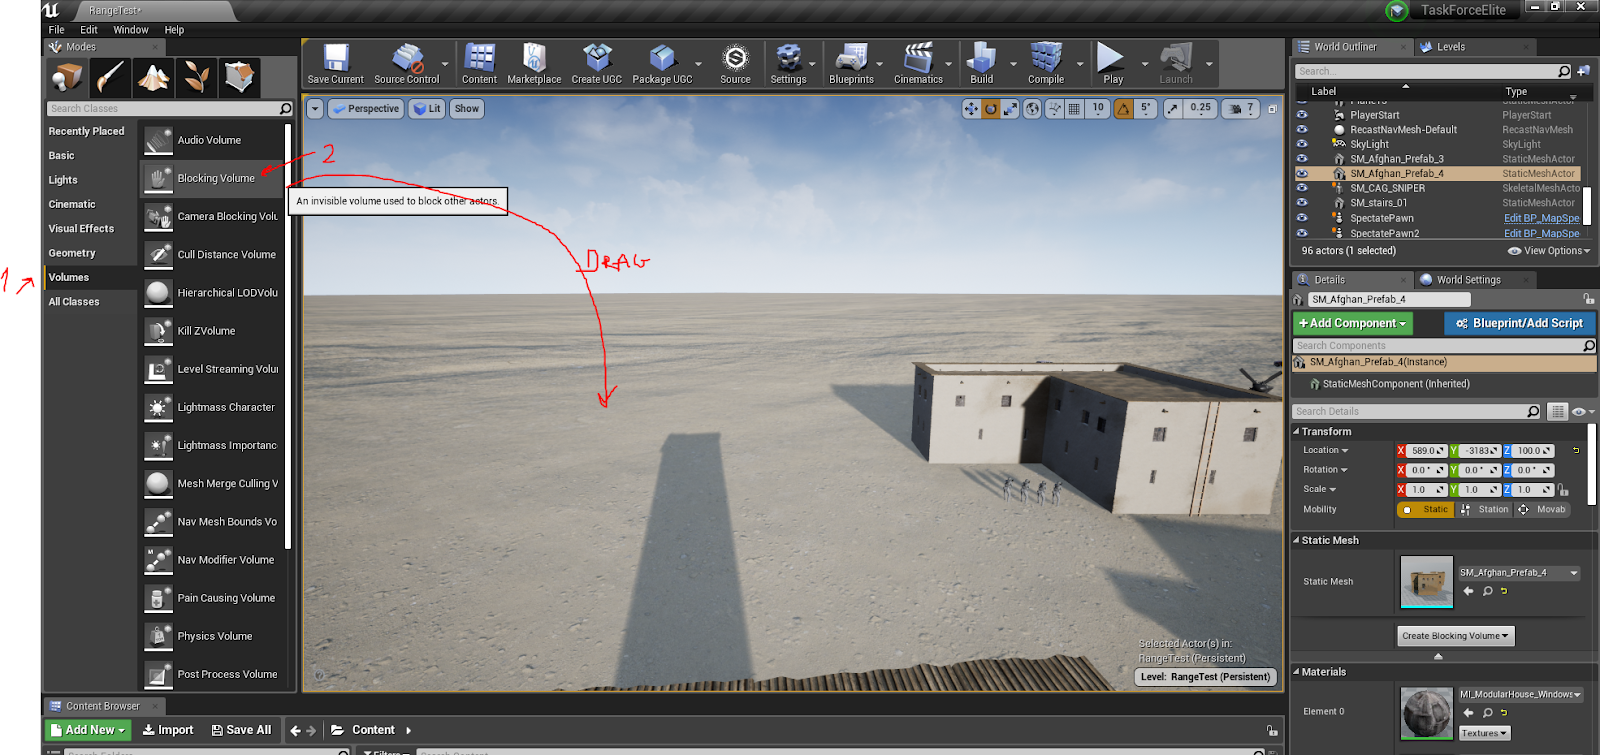
b) Press “G” to hide or show collision boxes and invisible lines and then scale the box to your liking and move it to the position
c) on the right panel, make sure the option is set to “invisible wall”:

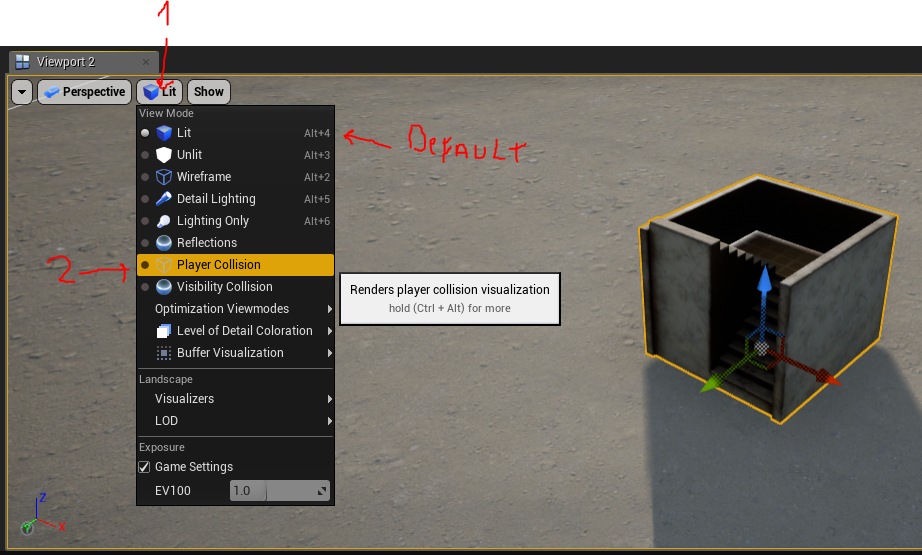
How to see the collision box of an object/building:
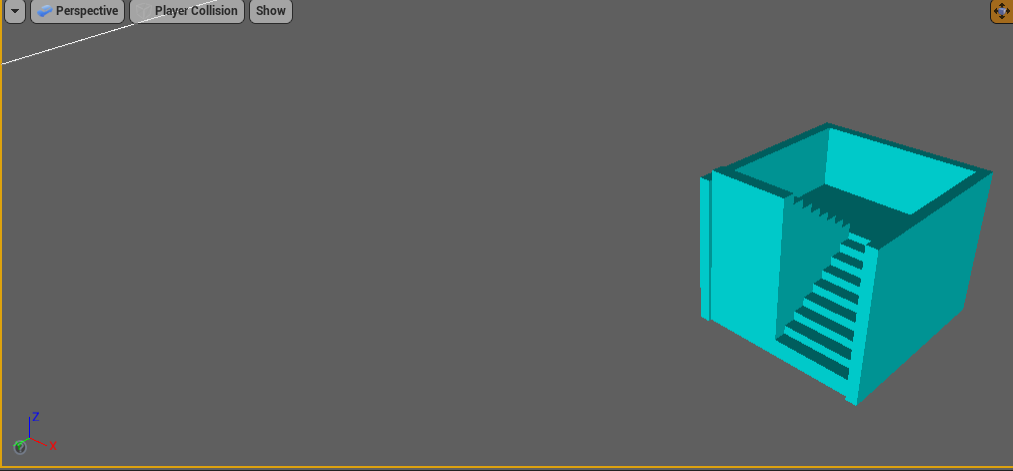
How to take screenshot of viewport to showcase the map to the community:
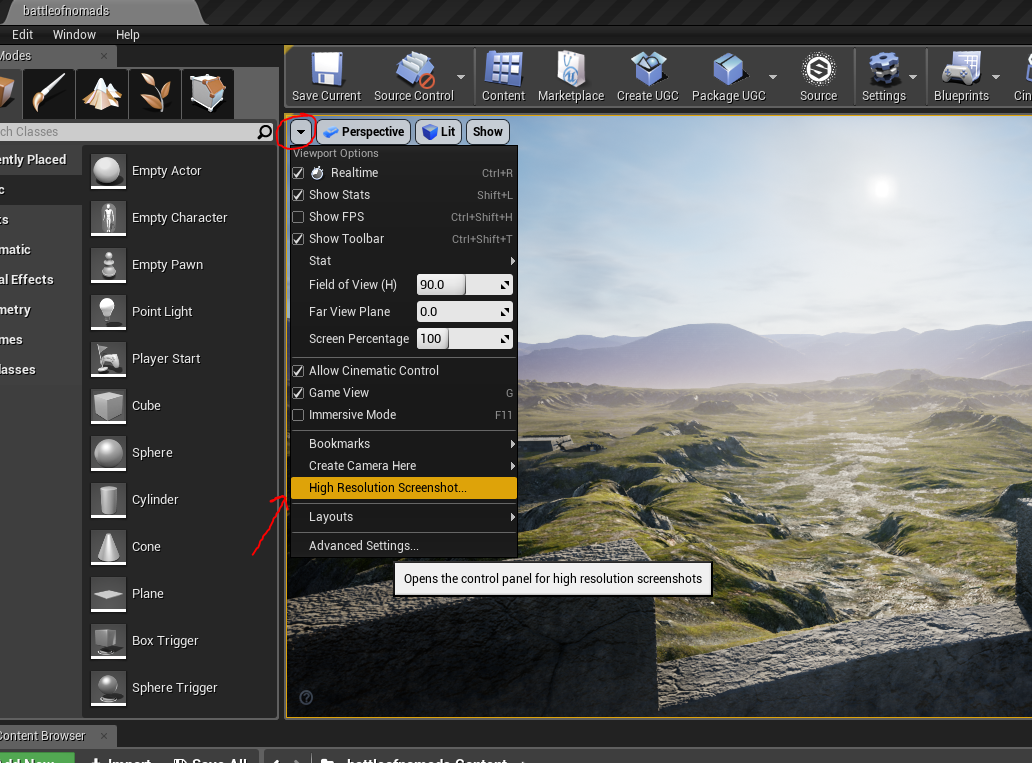
The screenshots to: SteamLibrary\steamapps\common\Task Force Elite Editor\TaskForceElite\Saved\Screenshots\Windows
How to make tunnels and underground maps:
https://www.youtube.com/watch?v=SxSnaC5FIvE
How to use a character to determine if your wall height or building is ok
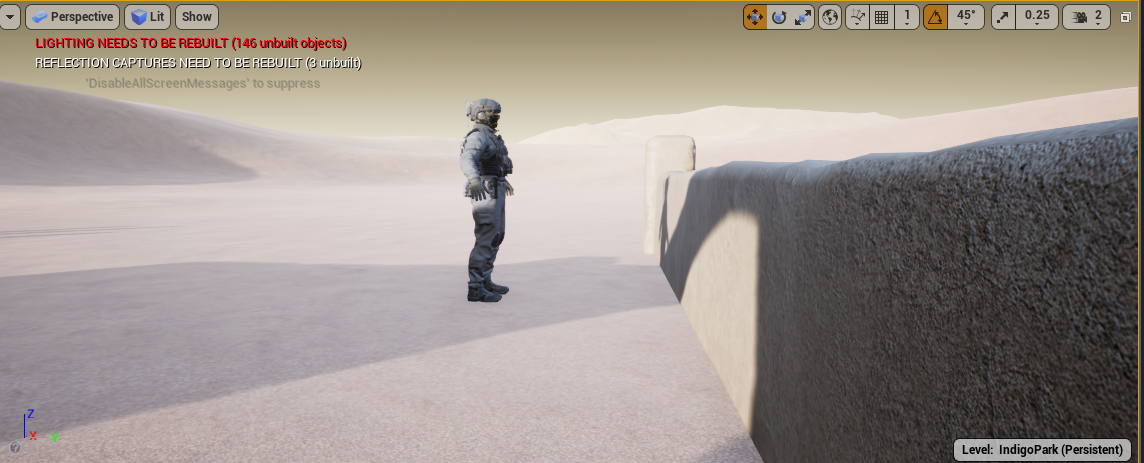
Steps:
- Find BP_NewSystemCharacter and pull it into the viewport/scene
- On animation mode select: Use animation asset
- On the dropdown highlighted on (3), select the stance you want the character to take
Image below:

Create your own collections (local pc)

- Click on the + symbol
- Click “Local collection”
- Rename the new collection to your liking
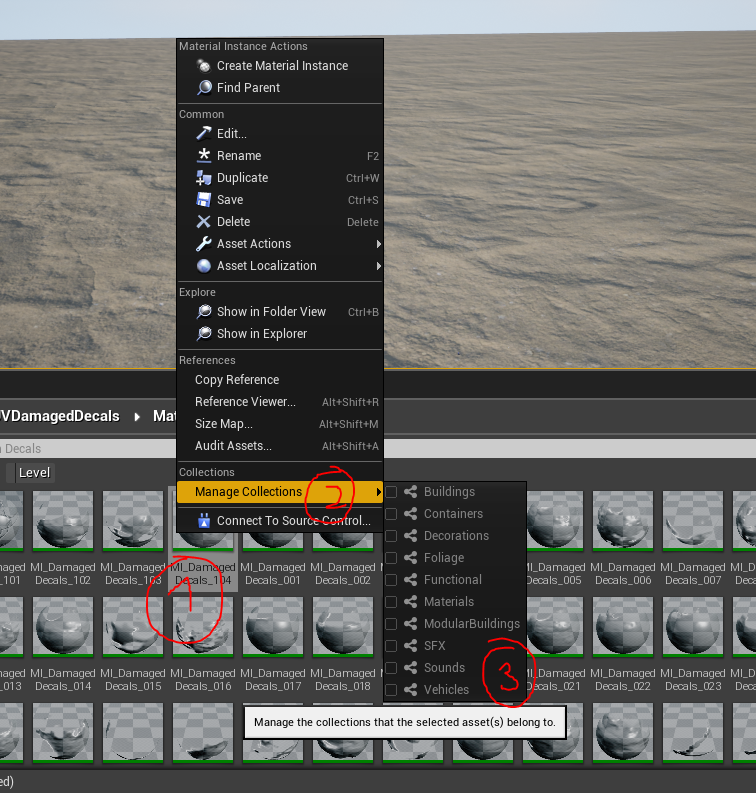
To add items to your collection. Right click on the asset > manage collections > choose which collection to add the asset into
Quick links to Video Tutorials (work in progress):
How to setup spawn points and spawn cameras : https://www.youtube.com/watch?v=Zju3UUZYNJc
How to setup outposts and spawn points https://www.youtube.com/watch?v=OuOJxpPQAS4
How to setup storages
https://www.youtube.com/watch?v=ayJ-rIJfi3A
How to setup CTF flags
https://www.youtube.com/watch?v=inILq_R25wU
How to setup helicopter path
https://www.youtube.com/watch?v=_Ou06_1zojM
How to create and add sub levels
https://www.youtube.com/watch?v=BgtBBmpZ4S0
How to add landscape as sub level
https://www.youtube.com/watch?v=mzBAQ0JD9z4
Inverting mouse axis to use in EDDIE:
Editor preferences -> Viewports -> Invert Mouse Look Y Axis/ Invert Orbit Y Axis
How to create overview images for tactical map/minimap
First navigate to the following folder directory : Designers/Song/Blueprints
There you will find:
- Map capturer : which will handle the capturing
- MapCapturerRenderTarget : which will stores the image of the map
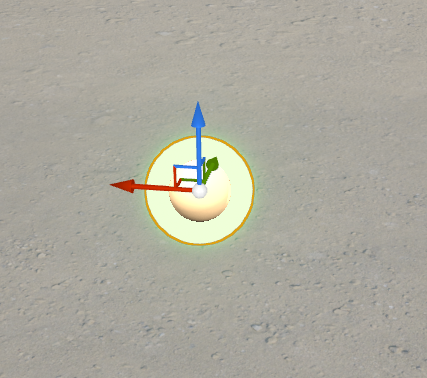
Simply drag MapCapturer into the scene. It should look like this
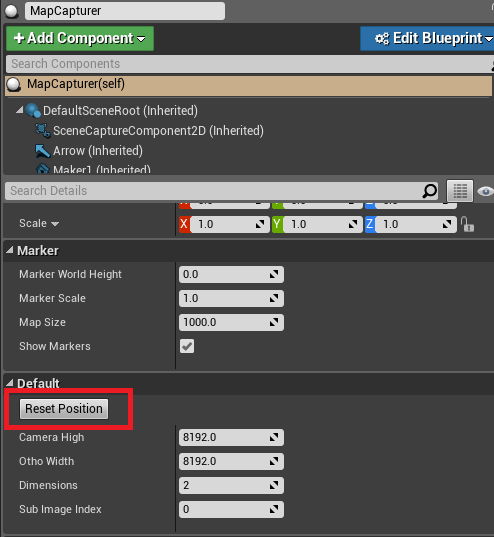
On the Details tab, click on Reset Position button so the actor is positioned into original world location (0,0,0)
NOTE: because the capturer always capture from 0 0 0 point in world, make sure you build your map around that location.
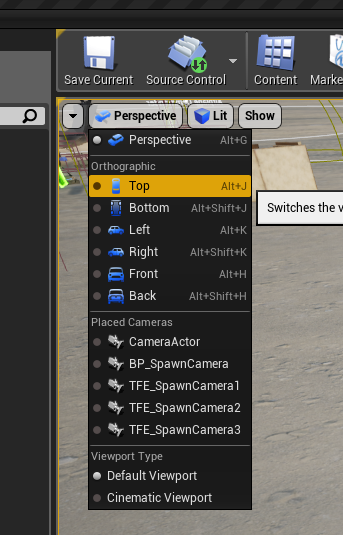
Simply switch to Top view for better visualization
Press Alt+J or go here
If your world is big, you won’t see your marker, so try to increase Marker Size from details tab:

until you can easily see the markers

- Green marker: represent center of tactical map and also center of world
- Red marker: represent the edge of the map
As you can see, red markers are not at the edge of the map yet, so we need to make it so.
First, measure the width dimension of the map (assuming width and length is relatively the same)
You can do so by holding Middle mouse and drag from one edge to the other

In the example above, it’s around 405163 centimeters, which is around 4 kilometers
So under Map Size, simply take 4 and multiply by 1000, which is 4000 and you will see the 2 red markers positioned at the edges
At the same time, we also set the Ortho Width to 10000 * 4 = 40000
Next, we set the Dimension, this tells how many images we want to use for our overview map. If you set it to 2, then you will have to take 4 images divided equally
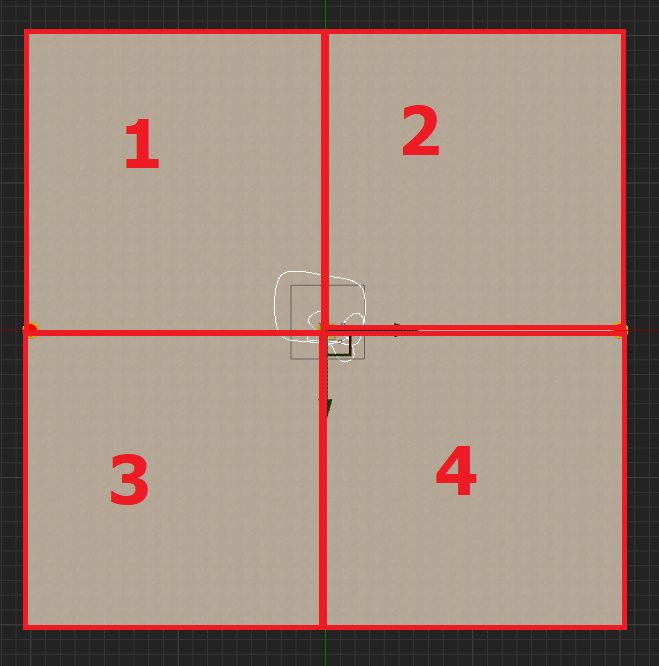
So now, we know we need to take 4 images, for each index (1,2,3,4) and 1 overview image (index 0), we start going one by one by simply changing the Sub Image Index to 0,1,2,3,4 respectively.
Before starting to capture, open up MapCapturerRenderTarget, on the right side Details tab

Set Size X and Size Y to your desired image resolution (X and Y must be equal and power of 2). The higher the resolution, the more gpu intensive.
Common values:
- 512
- 1024
- 2048
- 4096
Higher resolution = better image quality.
Everytime you change to an index, right click MapCapturerRenderTarget mentioned at the beginning, choose Create Static Texture
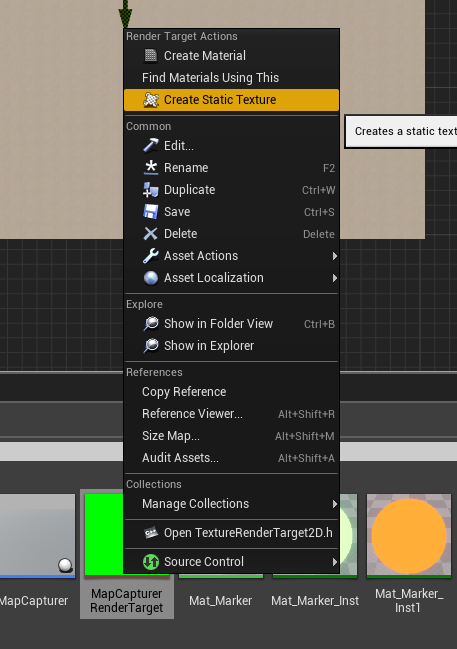
This will create a static image of the map, corresponding to the index you specify above, make sure to name it to something to not cause confusion later on.
NOTE: make sure to move your captured images to your mod folder.
Once you have finished capturing, go into World Settings
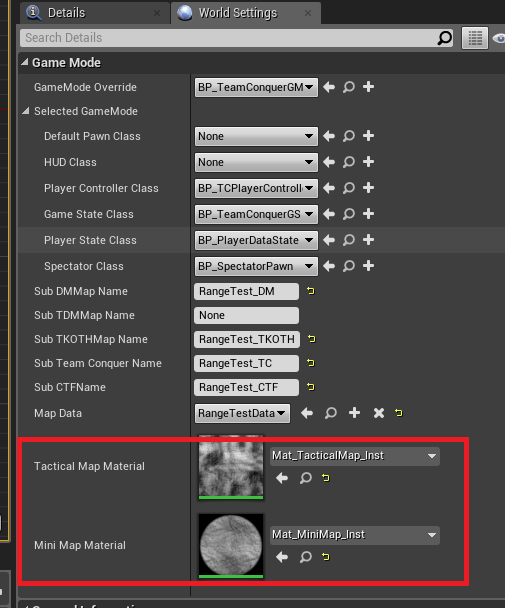
Here is where you will set your new Tactical Map and Minimap.
Tactical map
To create your TacticalMap material, go to the following folder directory
UI/Maps/TacticalMap/Materials/v2/
then duplicate Mat_TaciticalMap_v2, name your file and move it to your mod folder
Open up your new TacticalMap material instance:
You will find similar values you have set from MapCapturer. Tick on the box next to the name and set them to the same values.
You also have some new settings:
- Zoom : the default zoom on the tactical map, the smaller the value, the more zoom in
- FocusXPosition : the default focus X value on tactical map (however has been replaced by automatic focus to player location by default)
- FocusYPosition : the default focus Y value on tactical map (however has been replaced by automatic focus to player location by default)
In the current example, we have 4 images, so we tick 4 boxes: SubImage_1, SubImage_2, SubImage_3, SubImage_4 and set the corresponding textures captured above.
Scroll down below, you will also see MapImage box, tick it and set the captured image with index 0.
Once you’re done, set it to Tactical Map Material from World Settings.
Minimap
To create your Minimap material, go to the following folder directory
UI/Maps/MiniMap/Materials/v2
then duplicate Mat_MiniMap_Inst, name your file and move it to your mod folder
Open up your new Minimap material instance:
You will also find similar values as in TacticalMap, just set them as you would do for TacticalMap.
Once you’re done, set it to Mini Map Material from World Settings.
NOTE: once you have finished all, remember to remove MapCapturer in your map to avoid it consuming resources.
Editor preferences -> ViewEditor preferences -> Viewports -> Invert Mouse Look Y Axis/ Invert Orbit Y Axis
ports -> Invert Mouse Look Y Axis/ Invert Orbit Y Axis