Getting Started Guide - REDLINE MIRA7S and MIRA9S
Overview
What you will learn
In this guide, you will learn the essentials required to start working with your REDLINE MIRA7S or MIRA9S laser. This includes getting the workspace ready before delivery, unloading and setting up the machine once you receive it, unpacking and identifying any included items, and the first steps when powering on your machine.
When to do this
This guide is intended for beginners first receiving and/or working with their REDLINE MIRA7S or MIRA9S laser machine. Read through these guidelines fully before attempting to unbox and set up your machine.
What you need
- Work Gloves
- Safety Glasses
- Cutting Utensil(s)
- Drill or Impact Driver with #2 Phillips Head Bit and 5/16” (8 mm) Socket
- Furniture and/or Shoulder Dollies
- 1-2 Gal Distilled or Reverse Osmosis Water (Glass Tube Only)
- Funnel (Glass Tube Only, Located in Contents Box)
- Phillips Head Screwdriver
- Allen Keys (Located in Contents Box)
- Hose Clamps (Located in Contents Box)
- Machine Cabinet Key (Located in Contents Box)
- Machine Power Cord (Located in Contents Box)
- Machine Settings USB
- Friends or Family to Help
Prepare Your Workspace
DISCLAIMER: AEON LASER USA AND ENGRAVING MACHINES PLUS ARE NOT RESPONSIBLE FOR ANY DAMAGES OR INJURIES THAT MAY RESULT FROM FOLLOWING THESE SUGGESTIONS. USE CAUTION AT ALL TIMES.
Before your machine arrives, it is recommended you make sure that the workspace the machine is going to be living in is properly configured. Getting the following things done before the machine arrives will ensure you can get it up and running ASAP after receiving it.
Safety
Emergency Kit Checklist
- Certified ANSI-Approved CO2 Safety Glasses or Goggles (proper safety glasses will come with the machine)
- Halotron Fire Extinguisher
- Smoke Alarm
- Fire Resistant Gloves
- Eye Wash Station
- First Aid Kit
- VOC Detector
Fire Extinguishers
Fire extinguishers are an absolute necessity. Not only can the materials being cut or engraved catch fire, but the gasses released as the material is being vaporized can also ignite as the laser beam passes through them.
We recommend a Halotron fire extinguisher. Halotron extinguishers are usually more expensive, but offer certain advantages should you ever need to use an extinguisher. The Halotron extinguisher discharges a clean, easily removable substance that is not harmful to the mechanics or wiring of the laser system.
A multi-purpose dry chemical fire extinguisher can be acquired as a more affordable alternative, however, a dry chemical extinguisher discharges a sticky and corrosive powder that is very difficult to clean up. The powder released can also damage some internal components of the machine.
Eye Wash Station
Always have access to running water, or preferably an eye wash station, in case particulate matter gets into your eyes. Single-use gravity-fed eyewash stations are inexpensive and easy to set up in any location. An eye wash station is a proactive safety measure that helps protect you from eye injuries and facilitates the prompt response needed, in case of an accidental exposure to hazardous substances.
Processed Material Handling
Keep finished product, scrap material, and your honeycomb tray out of your living spaces if at all possible. Processed materials can give off gasses and volatile organic compounds (VOC). While some VOCs are relatively harmless, others can have adverse health effects. Short-term exposure to high levels of certain VOCs may cause irritation of the eyes, nose, and throat, as well as headaches and dizziness. Long-term exposure to some VOCs may be associated with more serious health issues. Regular monitoring with VOC detectors helps identify sources of contamination, prevent exposure to harmful levels of VOCs, and promote overall safety and well-being.
WARNING: Processed materials can continue to give off gas and VOCs long after being lasered. We recommend having some large storage bins to temporarily store finished products and scrap pieces of material.
Electrical
A REDLINE MIRA7S requires a dedicated 15A 110V/60Hz outlet and 15A breaker. A REDLINE MIRA9S requires a dedicated 20A 110V/60Hz outlet and 20A breaker. Ensure the circuit you plan to connect to is properly wired and grounded, and is done so in accordance with any local codes or regulations.


CAUTION: A dedicated 20A circuit for ANY machine is recommended, meaning ONLY THE MACHINE is connected to the circuit. Any wiring added to your home should be done by professionals.
DISCLAIMER: AEON LASER USA AND ENGRAVING MACHINES PLUS ARE NOT RESPONSIBLE FOR ANY DAMAGES OR INJURIES THAT MAY RESULT FROM FOLLOWING THESE SUGGESTIONS. USE CAUTION AT ALL TIMES.
Ventilation
Take the time to prepare your environment with a proper ventilation system ahead of the arrival of your machine. Decide on how the fumes generated while using the machine will be extracted, either by venting outdoors or using a fume extractor.
Option 1: Venting Outdoors

Ensure your exhaust system is set up to where it can deliver the utmost efficiency. Keeping the exhaust duct length and number of bends to a minimum will help to promote maximum airflow. Seal any joints along the exhaust run to prevent fumes from escaping. Ensure you install an exhaust exit port that is 6” in diameter to match the exhaust hosing and clamps that will come with a REDLINE MIRA7S or MIRA9S.
If you are considering using an inline fan instead of the stock fan, it is recommended to remove the stock fan and install the inline fan as close to the end of the exhaust hose as possible. The stock exhaust fan that the machine comes with is sufficient for straight exhaust runs of approximately 15 ft. If your exhaust ducting will run longer, it is recommended to keep the stock fan installed and add an inline fan around the 15 ft mark to help with fume extraction.
NOTE: Always ensure that fumes are being vented upwards and away from neighboring living spaces when venting outdoors. The higher you position the exhaust hose outlet, the less chances there will be of inadvertently polluting your garden, pets, and neighborhood.
Ensure there is an adequate source of make-up air in order to reintroduce clean air back into your workplace. An insufficient amount of make-up air can create negative pressure in your workplace, which reduces the efficiency of the fan. Ensure your make-up air is being drawn from a location opposite the laser. Otherwise, fumes will get pulled right back inside your workplace.
Option 2: Fume Extractor
If you are using a fume extractor, there is no need to worry about ducting, replacement air, or harming the environment. Choose the proper fume extractor for your CO2 laser. Matching your fume extractor capabilities to your laser's cabinet size and your unique application(s) is fundamental to maximizing the performance of the laser and the life of your filters.
Temperature Control
MIRA7S and MIRA9S both have two internal cooling options, based on the type of tube installed. The tube options are a water cooled glass CO2 tube, or an air cooled metal RF tube. Regardless of tube type, it is recommended that the machine be kept in a temperature controlled environment. These machines work best at a normal room temperature range, between 60-90 degrees F (15-32C). The temperature you set the workspace of the machine to will vary depending on the dew point and location of the machine. Both systems on the MIRA7S use the ambient air to cool the laser tube. The MIRA9S with a glass tube uses an internal chiller with an AC compressor and can operate as long as it stays above freezing, while a metal RF tube is air cooled.
See our AEON Laser Knowledge Base article on Winterizing Your Laser for detailed instructions for cold weather months. This is ESPECIALLY IMPORTANT for machines with a water chiller, due to the possibility of freezing water damaging internal components.
During extreme temperatures, if the exhaust hosing for the machine is configured to vent outdoors, ensure that the exhaust duct hose is disconnected from the machine so that the outdoor environmental air does not connect directly to the machine.
Receiving and Opening Your Machine
Transit and Receiving
Once the machine ships, you will get a notification email with tracking information from the carrier. Coordinate the delivery date with the carrier, either by contacting them directly or waiting for them to contact you. Occasionally carriers will show up with the machine mostly unannounced, so once you get the tracking information be prepared for imminent arrival!
Once the machine arrives, carefully inspect the crate. If signs of rough handling or visible damage are present, DO NOT REFUSE THE SHIPMENT. Here is what you should do:
- Take plenty of photos, the more the better. Every photo of damage makes a world of difference in the claims process.
- Have the driver note the damage on the bill of lading (BOL) before they leave.
- The delivery driver does not have to remain present for further inspection. You have a 14 day window to report any concealed damage to AEON Laser USA, which can then be used to make a claim with the shipping company.
- Submit a support ticket with photos and a detailed description of the damage.
- The machine MUST be thoroughly inspected before being removed from its pallet base. AEON Laser USA is not liable for any damage sustained during the machine's relocation. Additionally, once the machine is removed from the pallet base, any claims with the shipping company will no longer be valid.
NOTE: If you are NOT going to set up your machine right away, please keep in mind that neither AEON Laser USA nor the shipping company can be held responsible for any concealed damage reported beyond 14 days. It is recommended that you at least uncrate and unpack the machine to inspect it.
Uncrating
DISCLAIMER: AEON LASER USA AND ENGRAVING MACHINES PLUS ARE NOT RESPONSIBLE FOR ANY DAMAGES OR INJURIES THAT MAY RESULT FROM FOLLOWING THESE SUGGESTIONS. USE CAUTION AT ALL TIMES.
- If possible, position the crate so that it’s in the general area where you plan to keep the machine. Make sure to leave adequate room around the entire crate so that you can work comfortably.
NOTE: The “ATTENTION RECEIVING” sticker on the crate will be the front face of the machine.

- Put on a pair of safety goggles and work gloves, and leave them on during the entire uncrating process.
CAUTION: Be careful when handling the metal brackets during the uncrating process, as the edges can be sharp.
- Use a cutting utensil to carefully cut the binding straps surrounding the crate.
CAUTION: These straps are tensioned and may recoil suddenly as they’re cut.

- Start with removing the brackets and fasteners for the lid. Using a drill or impact driver with a Phillips head bit or a 5/16” (8 mm) socket, remove all fasteners from the lid. Set the hardware to the side once complete.

NOTE: If your machine has anything packed on top, remove the contents BEFORE removing the lid.
- Lifting straight up with the help of another person, remove the lid of the crate.
- Lean the lid at a slight angle against a wall and away from heavy foot traffic.
- Next, remove the brackets and fasteners from one of the short side panels. Using a drill or impact driver with a Phillips head bit or a 5/16” (8 mm) socket, remove all fasteners from the panel. Set the hardware aside when finished.


NOTE: To help stabilize the panel during removal, leave the fasteners securing the metal brackets to the pallet, and only remove those connected to the panel itself.
- After removing all fasteners, carefully lift the panel off the crate and set it aside, away from heavy foot traffic.

- Repeat Steps 7 and 8 to systematically remove the remaining three panels from the crate. For the long side panels, have a second person assist with removal.
- After all side panels are removed, use a drill or impact driver with a Phillips head bit or 5/16” (8 mm) socket to detach any remaining fasteners and brackets from the pallet. Set the hardware aside when finished.
- Finally, remove the outer foam and packing material to reveal your laser, cutting any tape carefully to avoid scratching the chassis. Inspect the chassis for any shipping damage, and if any is found, submit a support ticket with photos and a detailed description.


Unpack and Remove Contents
CAUTION: Take care when making any cuts close to the machine. The paint, lid, or keypad can easily scratch.
- Open the machine’s lid and cut the zip tie holding the ignition key and settings flash drive to the laser head. This USB is EXTREMELY IMPORTANT, it contains the factory settings found when your machine was being tested. Take care not to lose it, it can be inserted into the machine’s key ignition for safekeeping.
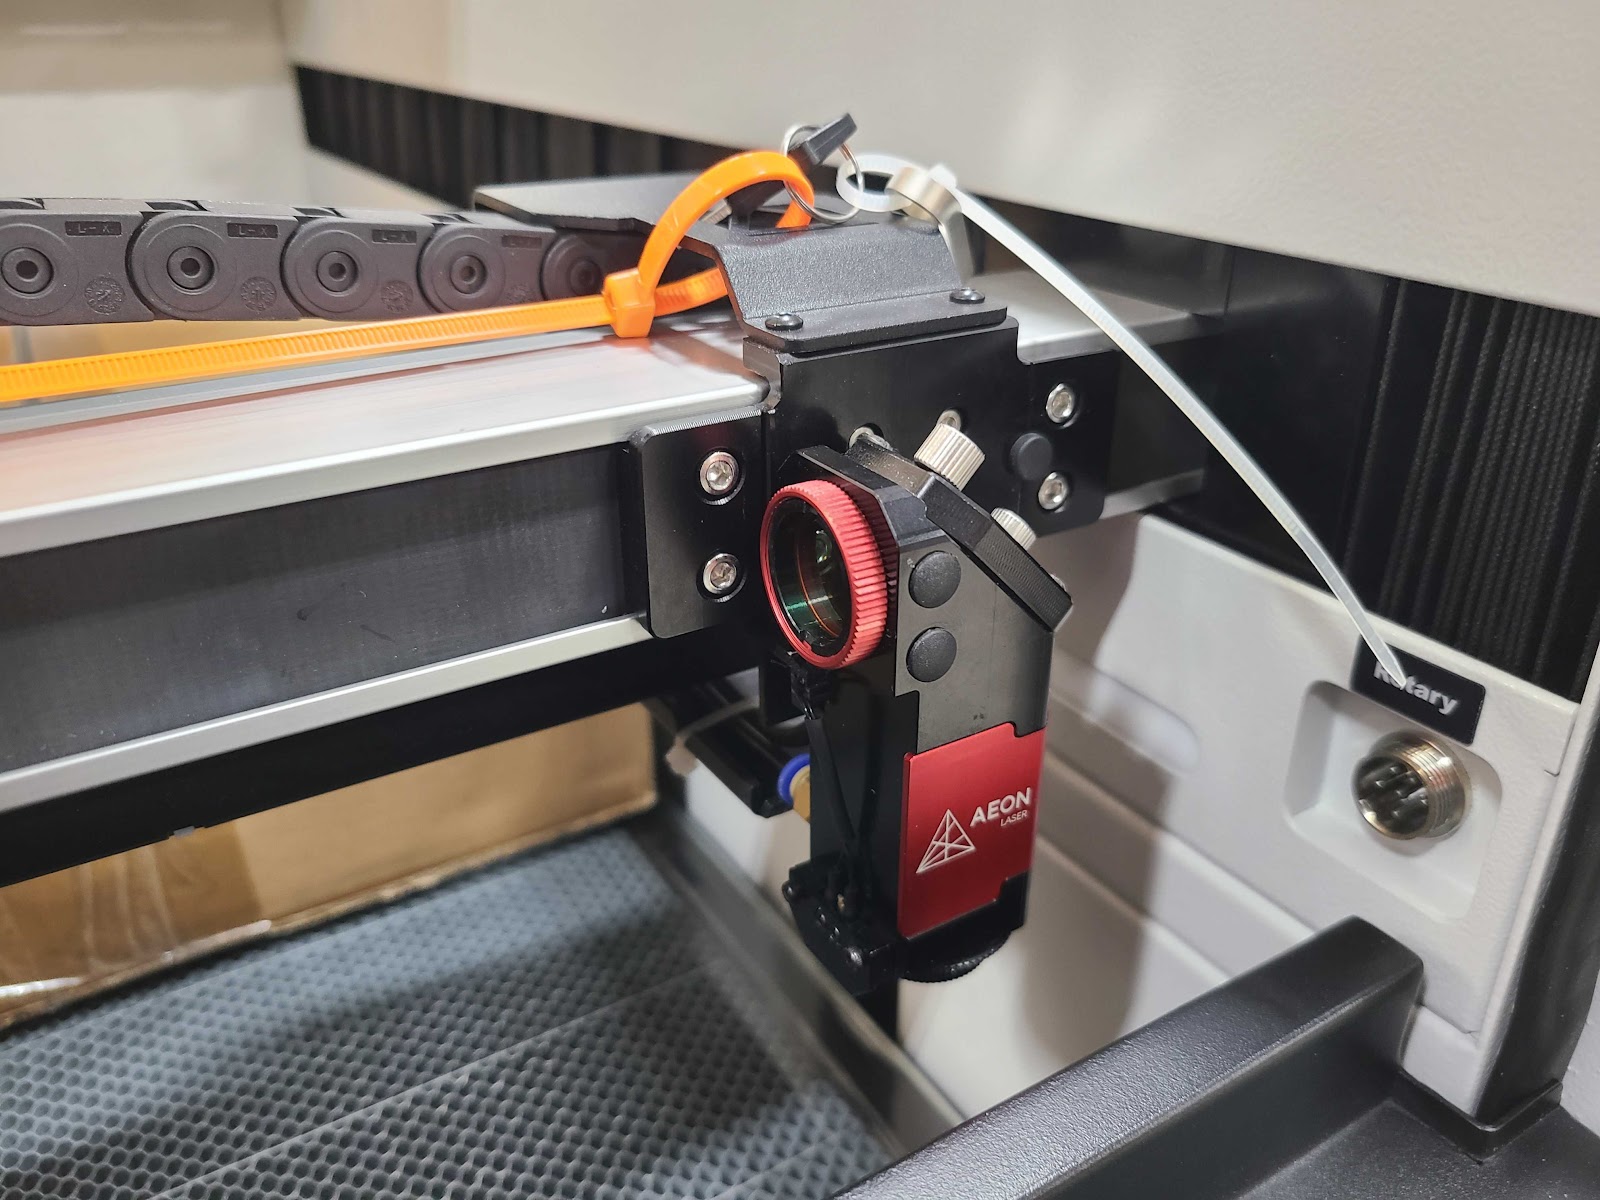
NOTE: The ignition key and USB will be zip tied directly to the laser head and can be placed into the machine’s ignition key slot for safe keeping.
- Remove all contents from the bed, including the honeycomb tray, and all packing material that is inside the bed. Cut anything securing the contents in the bed as necessary.
CAUTION: DO NOT cut the zip ties securing the air hose and laser head wiring from under the laser head.
Moving the Machine - Lifting Suggestions
DISCLAIMER: AEON LASER USA AND ENGRAVING MACHINES PLUS ARE NOT RESPONSIBLE FOR ANY DAMAGES OR INJURIES THAT MAY RESULT FROM FOLLOWING THESE SUGGESTIONS. USE CAUTION AT ALL TIMES. THE MACHINES ARE HEAVY AND SHOULD BE MOVED BY PROFESSIONALS.
Chiller Removal
You only need to remove the chiller if you need to turn the machine on its side in order to move through stairways, hallways, or doorways. If the machine can be put into the workspace without needing to tip on its side, skip this section.
Moving Through Stairways, Hallways, and Doorways
If you need to move your REDLINE MIRA7S or MIRA9S through a standard stairway, hallway, or doorway, you'll likely have to tip it on its side. Ensure you measure both the machine's dimensions and the tight spots along the travel route to ensure smooth passage. Do not tip the machine with the chiller still installed.
- Clear the bed of the machine, removing all contents including the honeycomb and blades.
- To remove the blades, use a 2 mm Allen Key (included in the contents box) to remove the four corner blade mounting brackets from the corners of the bed. Set the hardware aside for safe keeping.
- Once the mounting brackets are removed, lift the blades from the table.


- Use two ratchet straps to securely fasten a furniture dolly to the left side of the machine.
CAUTION: Avoid causing cosmetic damage by refraining from over-tightening the ratchet straps, and place a piece of foam padding between the machine and the ratchets/hooks.
- Enlist the help of several healthy and reasonably fit individuals to assist in tipping the machine onto its left side.
- Position the two strongest individuals at each corner of the right side of the machine, facing each other. Their role is to lift the machine upwards.
- For added strength, position a third person on the right side of the machine, facing towards the left.
CAUTION: DO NOT LIFT the MIRA9S by the tube extension.
- Place two more individuals at each corner of the left side of the machine, facing each other. Their task is to remain low and ensure the furniture dolly does not roll once the machine reaches a 45-degree angle, shifting the load onto just two wheels.
WARNING: Avoid standing on the left side of the machine as it presents a crushing hazard, should it tip beyond 90 degrees and fall in the opposite direction.
- On the count of three, have the three individuals on the right side of the machine lift straight up as a team while the two individuals on the left side ensure the furniture dolly remains stable.
CAUTION: To prevent injury, place your feet as close to the machine as possible, shoulder-width apart. Confirm that everyone is in position and has a good grip before lifting. Keep your head and back upright, and tighten your abdominal muscles as you lift. Only lift with your leg muscles.
- Carefully complete tipping the machine until all four wheels of the furniture dolly make contact with the ground.
CAUTION: Do not leave the machine unattended at this stage. There should always be at least two individuals with their hands on it at all times.
- Carefully move the machine to where it will be set.
Lifting with a Shoulder Dolly
DISCLAIMER: AEON LASER USA AND ENGRAVING MACHINES PLUS ARE NOT RESPONSIBLE FOR ANY DAMAGES OR INJURIES THAT MAY RESULT FROM FOLLOWING THESE SUGGESTIONS. USE CAUTION AT ALL TIMES. THE MACHINES ARE HEAVY AND SHOULD BE MOVED BY PROFESSIONALS.
Shoulder dollies are an excellent solution for transporting large and heavy objects. However, it's crucial to adhere to the guidelines provided by the manufacturer of the dollies to prevent injury or damage to anyone trying to move the machine or the machine itself. Exercise EXTREME CAUTION when lifting the machine, particularly when moving up or down stairs.
Lifting onto a Stand or Workbench
DISCLAIMER: AEON LASER USA AND ENGRAVING MACHINES PLUS ARE NOT RESPONSIBLE FOR ANY DAMAGES OR INJURIES THAT MAY RESULT FROM FOLLOWING THESE SUGGESTIONS. USE CAUTION AT ALL TIMES. THE MACHINES ARE HEAVY AND SHOULD BE MOVED BY PROFESSIONALS.
CAUTION: DO NOT LIFT the machine by the tube extension.
- Gather four individuals who are in good physical condition to assist in lifting the machine onto a workbench or optional stand.
- Assign one person to each corner of the machine, ensuring the two stronger individuals are positioned at the rear corners.
- On a synchronized count of three, lift the machine using leg and buttock muscles. Once upright, a fifth person can swiftly remove the base of the crate.
CAUTION: Ensure feet are close to the machine, grip is secure, and posture is maintained. Communicate clearly before lifting.
- Take small side steps towards the stand or workbench, adjusting grip if necessary.
NOTE: When placing on a workbench, lower the rear rubber feet first and pivot one side at a time until all four feet are in position. For the optional stand, align the rubber feet with the premade holes.
- Squat down simultaneously until all four rubber feet are in their respective holes and the base of the machine contacts the top of the stand.
CAUTION: Avoid pushing, as it may damage the rubber feet. Do not release your corner until all rubber feet are securely seated and all fingers are clear.
- Ensure no fingers are trapped between the base of the machine and the stand before releasing the load together.
- Roll the stand and machine together to the designated area.
- Rotate the leveling feet on each corner of the stand counterclockwise to lower them.
- Use a level and an adjustable wrench to systematically adjust each foot until the machine is perfectly level and secure.
Preparing for Power Up
Chiller Setup
Reinstall the Chiller (if necessary)
If the chiller was uninstalled to turn the machine on its side when moving, it needs to be reinstalled first. Follow the process of uninstalling the chiller, in reverse.
MIRA7S


MIRA9S
CAUTION: Ensure the correct water hose is returned to the correct bung. Failure to do so can cause damage to the laser tube.
Filling the Chiller
- Unscrew the water inlet cap.
- Fill the chiller with distilled or reverse osmosis water until it reaches the “FULL” section on the fill gauge.

- If needed, use the included funnel from the machine’s contents box to help fill the chiller.

- Screw the cap back onto the water inlet.
Venting the Fan
- Retrieve the exhaust hose, exhaust hose flange, and hose clamps from the contents box of the machine. Remove them from any packing material.
- Slide the hose clamp over one end of the exhaust hose. The clamp can be loosened with a 7 mm socket or Phillips head screwdriver if needed to get the hose through easily.
- Put the end of the hose with the clamp over the flange of the exhaust fan. Slide the hose clamp over the hose and flange and secure using a 7 mm socket driver or Phillips head screwdriver.
- Route the other end of the duct hose to the exhaust exit port installed before receiving the machine, or fume extractor. Excess slack can be trimmed from the hose as needed after routing.


NOTE: You may need to cut the duct hose to ensure you are giving your machine optimal ventilation. Keep the number of bends in the hose to a minimum.
- Add a hose clamp to the end of the hose and secure the exhaust hose to the exhaust exit port, or fume extractor, using a 7 mm socket driver or Phillips head screwdriver.
- Seal any junction points as needed.
Release the Gantry
- Locate the machine cabinet key that is inside of the machine contents box.
- Unlatch and remove both large side panels. Gently set the panels off to the side.
- Locate the pins locking the gantry in place. The pins will have a yellow lanyard attached for easy identification.
- Pull the pins from both sides of the machine to free the gantry, enabling it to move freely. Place the pins into the contents box for safe keeping.
- Reinstall the side panels, and lock using the machine cabinet key.


Power the Machine ON
- Check the work area to make sure there are no items left inside the cabinet that might result in a collision during the initialization process.
- Open the contents box and locate the power cord.
- Connect the power cord to the back of the machine and into the outlet that was installed for the machine before arrival.
- Locate the Emergency Stop button on the right side of the machine.
- Push in the Emergency Stop button and then rotate it clockwise so that it pops back out. The Emergency Stop button spun out is the ON position.

- NOTE: The Emergency Stop has arrows on it to show the direction to spin.

- Locate the ignition key and insert it into the key ignition on the right side of the machine.
- Turn the key a 1/4 turn counterclockwise (DO NOT force it). You should feel it click and the machine will power ON fully. If not, refrain from continuing to turn it and contact support immediately.
- The laser should now have power and be homing itself towards the back right corner. The control keypad display on the machine will read “Initializing”. Allow the machine to fully complete the initialization process.
- Once the initialization process is complete, use the X/Y arrow keys on the keypad to carefully jog the laser head to all 4 corners, ensuring the laser head does not collide with any part of the machine.
- Use the Z up/down arrow keys to ensure the bed raises and lowers without issue. Be careful not to raise the bed into the laser head during this step, it is recommended you keep the bed about 2” away from the laser head at this point.
- After completing the initial checks of the machine, the honeycomb tray can be placed back into the machine bed if desired.


After Power ON
LightBurn Setup
LightBurn will need to be configured to be able to properly use the machine. See our AEON Laser Knowledge Base article on LightBurn Setup here for MacOS, or here for Windows.
Getting LightBurn setup properly is instrumental in successfully using your machine. The device profiles MUST be imported as specified in the instructions linked above to properly run a job.
Alignment
More often than not, the laser will retain the alignment completed here at AEON Laser USA. It is highly recommended that you simply get started with using the machine, and run a test job. The USB that came with the machine will have a test file called “Material Rapid Test”, which can be run on any laser safe material. See our AEON Laser Knowledge Base article on the Material Rapid Test for some more information on what to expect when running this test. If your machine needs an alignment adjustment, see our AEON Laser USA Knowledge Base article on the alignment process. If something seems to be off or coming out wrong, please submit a support ticket, and our Support Team will be able to identify any possible issue.
Using the Blade Table
The blade table of the REDLINE MIRA series can be configured in either a flat or standing orientation, each with unique benefits tailored to different applications.
Flat Orientation
The blades will arrive in a flat orientation, which allows use of the threaded holes on their flat side. This setup is ideal for securing jigs to the laser bed, enabling convenient, repeated use for “plug-and-play” projects, such as running identical designs on a set of coasters. Additionally, the flat orientation helps catch small pieces from intricate cuts that might otherwise fall through when working directly on the blade table.
Standing Orientation
Alternatively, the blades can be arranged in a standing orientation, which increases airflow beneath the material, aiding fume extraction during cutting. This setup reduces the metal’s contact with the material, minimizing flashback marks on cut lines and making it ideal for clean, large scale cutting applications.
Changing the Blade Orientation
- If the blades are in the flat orientation, flip them into the standing orientation. Ensure the blade is sitting fully in the channel after standing.
- If the blades are in the standing orientation, lay them down into the flat orientation. Start laying them down from the leftmost side of the blade table. Ensure the blade is sitting fully in the channel after laying flat.


NOTE: To adjust or remove the blades on the edge of the blade table, you will need to remove the blade latches on the bed’s corners. Use a 2 mm Allen key for easy removal of these latches if necessary. If you aren’t adjusting or removing the edge blades, the latches can be left installed.


Conclusion
Setting up your REDLINE MIRA7S or MIRA9S is a multi-step process that requires careful preparation and attention to detail. By following this guide, you’ll be well-equipped to create a safe, functional workspace and handle the unboxing, setup, and initial power-up of your machine smoothly. Remember to prioritize safety throughout each step, from electrical and ventilation needs to handling the machine and accessories. With everything in place, you'll be ready to begin creating high-quality engravings with confidence. Your journey with the machine starts here—now it's time to make your mark!
If you have any questions or concerns, please send us an email at support@aeonlaser.us for the fastest service. If your laser is malfunctioning, please submit a support ticket.
Did you find this document helpful? Let us know what you liked or what we can improve on by sending an email to helpusgrow@aeonlaser.us.
DISCLAIMER: AEON LASER USA AND ENGRAVING MACHINES PLUS ARE NOT RESPONSIBLE FOR ANY DAMAGES OR INJURIES THAT MAY RESULT FROM FOLLOWING THESE SUGGESTIONS. USE CAUTION AT ALL TIMES.