Setting Up Your Windows Machine for CSCI 134
Throughout the semester, you should prioritize using the computers (in TCL 217A and TCL 216) to work on your lab assignments. All the utilities you need have already been installed on them, and they have been set up so students do not face any platform-dependent issues.
In case you want or need to use your personal machine, this document gives you instructions on how to set up your personal Mac machine. If you face any problems, please reach out to the CSCI 134 staff (cs134staff@cs.williams.edu).
Note. Each person's computer is different, and while these instructions work for most of them, there will inevitably be some unique issues and quirks that you may experience and learn how to workaround. If you encounter any such issues, please drop us a note.
Step 0. Windows 10 or above
Make sure that you have Windows version 10 or above. If you have an older version, you need to upgrade it (upgrading is free).
Step 1. Install Python
Install Python from the Windows Store by visiting the Python 3.11 for Windows page. Proceed to install with the default options for any choices you have during installation.
Step 2. Install VS Code
You need to install VS Code as an editor for your programs. Download it from https://code.visualstudio.com/. Once downloaded, click the installer (*.exe file). During installation, just select the default options. After installation, it should open VSCode automatically. At this point, you may wish to pin the VSCode icon (a sideways blue ribbon) to the bottom taskbar by right-clicking on the icon and selecting "Pin to taskbar".
- Open Visual Studio Code (often referred to as "VSCode").
- Close the "Get Started" tab (near the upper left of the window) using the X.
- VS Code provides its own terminal. Open it by selecting Terminal -> New Terminal from the top menu bar. . You should see a "prompt" that looks something like C:\Users\ew5>
- Whenever we say Terminal in the rest of the instructions, we mean this terminal provided within VS Code.
Step 3. Install the Git Source Code Control System
We will use Git to manage your source code for the labs, by downloading and running the Git for Windows Installer: https://github.com/git-for-windows/git/releases/download/v2.35.1.windows.2/Git-2.35.1.2-32-bit.exe .
Installing Git can be straightforward, but the installer will present you with many options you can configure. Simply stick with **default** options, **except for two specific features**:
- When you see the following dialog box to set Git's default editor, choose "Use Visual Studio Code as Git's default editor" from the pop-up menu before continuing.

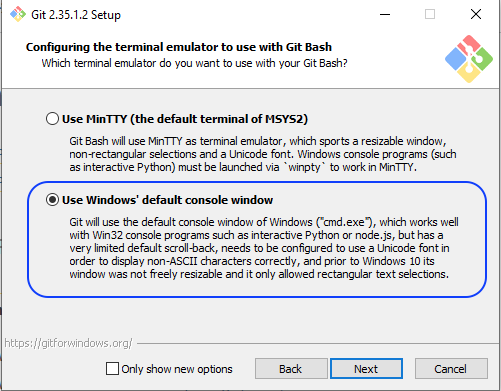
- When you see the following dialog box to set the terminal emulator for Git Bash, chose "Use Windows' default console window:
The installer on finishing may open a webpage containing "Release Notes". You can close that page.
Step 4. VS Code and Git Configuration
- In the Terminal, type
git --version |
- Next, type the following commands into the Terminal, replacing your-williams-id and your-CS-username email with your own.
git config --global user.email your-williams-id@williams.edu git config --global user.name your-CS-username git config --global push.default simple git config --global pull.rebase false git config --global http.sslBackend schannel |
- Upgrade the Python package installer, pip3. Type the following in the Terminal:
pip3 install --upgrade pip |
- Now that pip3 is available, we can use it to install Python packages that we will need this semester. Type the following command in the Terminal:
pip3 install jupyterlab matplotlib pillow colorama pygame |
Step 5. Setup CS134 Folder
Now are you ready to create your CS134 directory. Unix directories correspond to folders in your Mac or Windows operating system. You will be creating many files on your computer for this class. We suggest that you put all of your work in a single folder, called cs134 in your home directory. You can navigate to your home directory from within the Terminal as follows:
- Open the Terminal and navigate to your home directory, by typing the following (~ stands for home directory)
cd ~ |
- You can create your cs134 directory using the mkdir cs134 (short for make directory).
mkdir cs134 |
- Now if you use the command ls to list the contents of your current directory, you should see the newly created cs134 folder.
ls |
- We can navigate into the folder by running cd cs134 (short for change directory). Since this is an empty folder right now, if you ls, it will not show any contents.
- Now that you have created your cs134 folder, this is where you should always navigate to before you clone all your lab files.
Step 6. Clone Files from Evolene
- Log on to https://evolene.cs.williams.edu in your web browser.[1] (such as Chrome or Safari) using your CS username and password. (These credentials will be sent to you via email, and you are expected to change your password by following the instructions in that email. Notice that your CS username is slightly different from William's username. It is an honor code violation to share your CS credentials with others.) If you have trouble with accessing evolene, please email csaccounts@cs.williams.edu.
- Under Projects, you should see a repository named cs134-labs/23xyz3/setup where 23xyz3 is your CS username. This repository contains the starter files for this setup.
- Clone the repository: find the blue button that is a drop-down menu that says "Clone". Click on it and click on the "clipboard" icon (Copy URL) option next to "Clone with HTTPS".
- Return to the Terminal and type git clone followed by the URL of you just copied (you can paste on Mac by pressing Command-V and you can paste on Windows by pressing Ctrl-V). This should look like the following:
git clone https://evolene.cs.williams.edu/cs134-labs/22xyz3/setup.git |
- Type cd setup to navigate into the setup directory
cd setup |
- You can configure VS Code by running the command (this part is optional, so if this doesn't work, don't worry about it)
cp settings.json ~/Library/Application\ Support/Code/User/settings.json |
- You can execute the file welcome.py by running the following command in the Terminal
python3 welcome.py |
- You know everything worked if you see a congratulatory bovine message!
Note. You do not need to submit anything. The purpose of this lab was to set up your personal machine with CSCI 134 tools and test that the course workflow is working correctly.
[1] If you are off campus, this is the point where you need to connect to the Williams College VPN server.