_ Proxeus Handbook
Table of Contents
1 Introduction
The Proxeus software makes blockchain accessible by simplifying the creation of document-centered blockchain applications, allowing users to digitize and run their processes in a decentralized environment.
Proxeus provides you with a toolbox that already contains everything you need: workflow engine, document generator, connection to the Ethereum blockchain and more.

Reading this handbook and following our tips & tricks will improve your experience with your Proxeus platform.
This handbook is structured along the different user roles, going from novice to advanced. Proxeus has three groups of user roles: Consumers, Creators and Operators. The platform is also split into two areas: the User View and the Admin Panel.
- Consumers can browse, purchase and use workflows made available by Creators. They can only access the front area (“User View”) of the platform.
- Creators build, sell and maintain workflows. They can access the “User View” as well as parts of the “Admin Panel”.
- Operators are Platform administrators setting up and operating a Proxeus platform for their own purposes or in order to make it available to a set of users. They have access to additional Admin Panel areas to manage users, languages and data.
This handbook provides a guide across the activities available to each of the three user levels. The focus lies on the process of creating workflows, forms and templates, as well as the generation of documents.
2 Requirements
The following apps are needed to use Proxeus.
2.1 Google Chrome
We recommend using the Google Chrome browser. Other MetaMask- compatible browsers may work too.
2.2 MetaMask
MetaMask is required to set up and use a blockchain identity on the platform and to execute payments. You can download MetaMask directly from https://metamask.io/.
2.3 Document Editor
Template files must be uploaded in the ODT document format and can be created with any document editor that supports this format, the most common being LibreOffice, OpenOffice, and Microsoft Word.
A free download of LibreOffice can be found here:
https://www.libreoffice.org/download/download/.
3 Your Account
3.1 Signing up & Logging in
You can log in with MetaMask or sign up via email. Adding both your email and your Ethereum addresses to your profile is recommended for the best user experience.
3.2 Via MetaMask
- Navigate to the platform and click the “Sign up” button
- Sign in with MetaMask
- Complete your profile by clicking the icon on the top right corner
3.3 With an email address
- Navigate to the platform and click the “Sign up” button
- Enter your email address
- Click the link in the email you received
- Set your password
- Sign in
- Click on the icon in the top right corner to connect your Ethereum wallet with your account and complete your profile
Important: For the best user experience it is recommended that you fill out your user profile completely.
You can decide to add a profile picture and fill out the “About me” to make it easier for others to find you. |
3.4 Getting Ethers and XES
In order to fully use your Proxeus platform, you will need Ether to pay transaction fees and XES tokens to pay for services offered by Creators.
3.5 Account Settings
You can access your user account settings via the round icon on the top right corner of the page.
In the account settings, you can:
- Upload a profile picture
- Set an account name
- Add an account description
- Change your email address
- Change your password
- Change your ethereum address
- Set your privacy settings - do you “want to be found” in searches by your name and profile description? If not, you will only appear if searched by your Ethereum address.
- Delete your account
- Create API keys - if you intend to use the API, authentication keys can be created in the user profile.
4 User View
4.1 Documents
In the “Documents” view, you can start new workflows aiming to generate one or several documents. The “Create document” button in the top left corner takes you to the list of available workflows. If a price has been set by the corresponding Creator, the workflow will be charged for in XES.
Important: Before you start a workflow, it is strongly recommended that you connect an Ethereum wallet with your account. You can do this by opening your profile via the icon in the top right corner. |
Once started, you can pause or leave a workflow at any time. All progress will be saved. The paused workflow can be found in your “Documents” tab, marked as “Draft”.
Drafts can be deleted. Workflows purchased will be accessible until you have fully completed them, so deleting a draft will not void your purchase.
Once you have completed a workflow, the “Draft” label will disappear. You can now view and download your finished document(s).
4.1.1 Downloads
You can download your finalized documents as PDFs or Microsoft Word files (only PDFs can be verified on the blockchain for authenticity). Simply click on the file to display the available actions.

4.1.2 Requesting signatures
Once you have completed a workflow and generated a document, you can ask others to sign it. Examples of use cases involving signatures for confirming documents, voting or certification are available on the website. Signatures are created by a user’s Ethereum identity and will be publicly visible on the blockchain. You can view signatures on a Proxeus document using the verification interface.
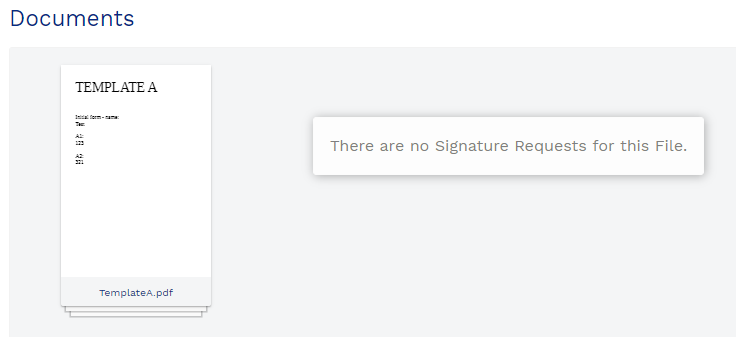
Your document, opened via “Documents” tab
Click on the document to see all available actions and find the signature requests on the right:
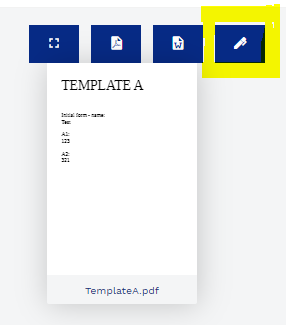
The available actions for your documents: view in browser, download as a PDF or Word file, request signatures
The signature request will appear in the interface of the corresponding user. If they provided an email address, an email notification will be sent. Once they have signed, you will also be notified.
4.2 Verification
The authenticity of documents which were created through the platform can be verified through a drag & drop interface. The interface compares the hash value of your document with the list of registered documents on the smart contract and displays a result, showing whether a document has been previously registered or signed.
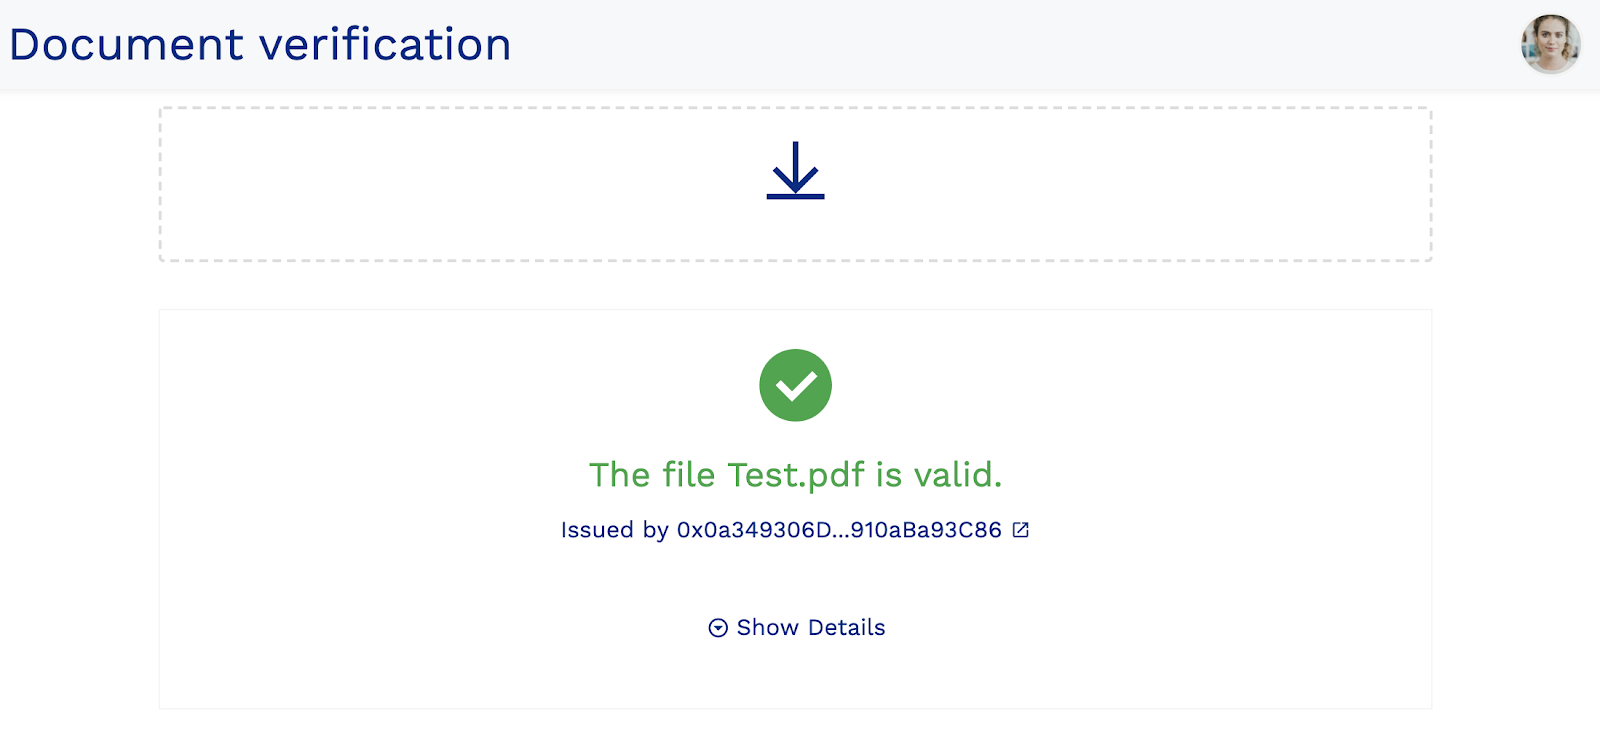
A successful verification - this file has been registered via Proxeus
The same verification tool can also be accessed on the public landing page of your platform and via the path /validation - i.e. xyz.com/validation
4.3 Signature Requests
If another user requests your signature, you will find their request in the “Signature Requests” tab. If you provided an email address, you will also receive an email notification. You can view the document online or download it as a PDF or Word file for further inspection. You can then sign the document or reject the request.

An open signature request
For signatures, you are required to have an Ethereum account linked to your profile and to be logged into this account. As the signature has to be added to a smart contract on the Ethereum blockchain, you will have to pay a small transaction fee. A MetaMask transaction request will pop up as you click “Sign”.
4.4 Data
User data, Templates, Forms, Workflows, Users, Translations and Settings can be imported and exported. The number of elements that can be imported/exported depends on the user role.
Data is imported with a “best effort” approach, meaning that errors will not block the rest of the import. Imported entries will be marked in the application.
5 Admin Panel
The Admin Panel is the backstage area of the platform. It can only be accessed by Operators and Creators, not by Consumers. It consists of three parts: “Workflows”, “Templates” and “Forms”. The “Share” and “Export” features will also be explained in this section.
5.1 Quick Start Guide
The following description is an example process for creating a workflow on the Proxeus platform:
- Think about the workflow and the documents that should be generated, perhaps map out the process on a piece of paper
- Start by creating the “Forms” you need
- Create the document template files in the ODT format
- Navigate to “Templates” and upload the ODT template files
- Test the templates on the “Templates” page using your forms on the left
- Create a workflow and add all forms and templates to it
- Switch to the “User View” and try out your workflow
This should give you an idea how to start things off. You’ll get the hang of it quickly.
5.2 Workflows
Workflows are built by connecting templates, forms and other workflow elements. Create your templates and forms before you start building a workflow.
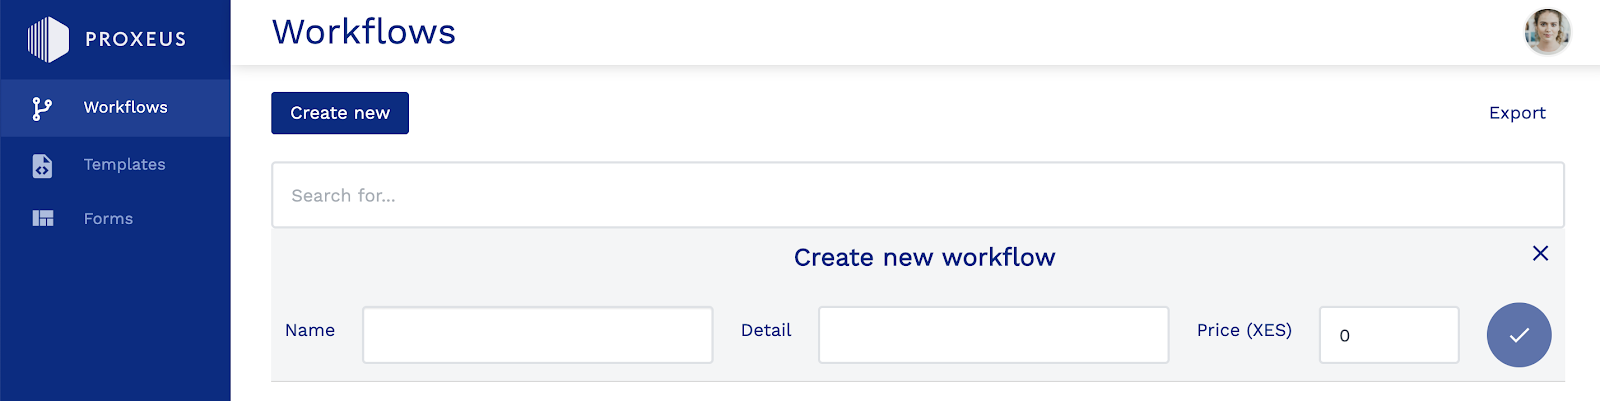
5.2.1 Creating a Workflow
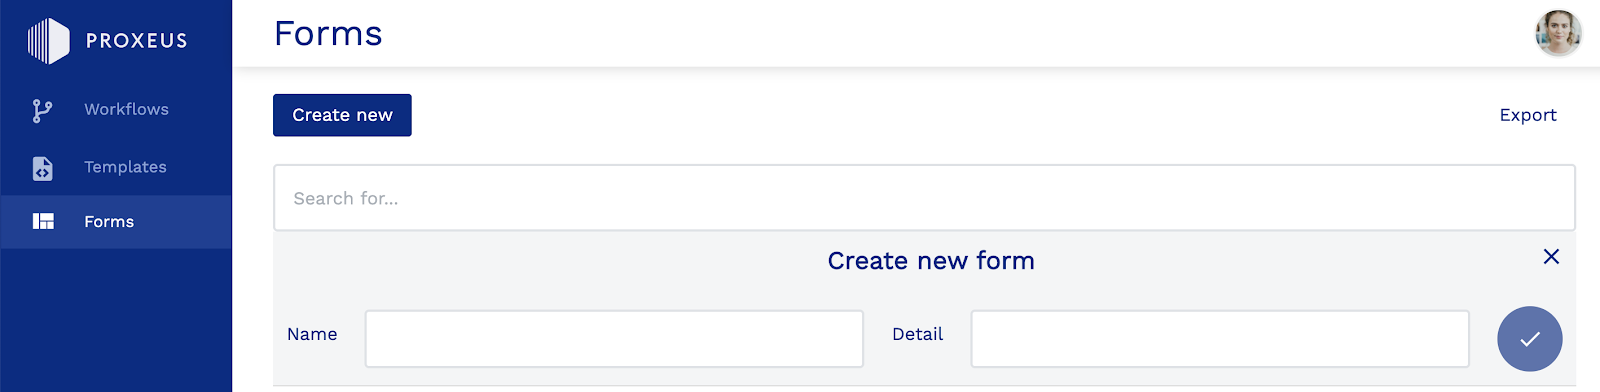
To create a new workflow, click on “Workflows” in the navigation panel and click on the “Create new” button.

Enter a “Name” for your new workflow. Optionally, you can add further information in the “Details” field. Click on “✓” and your workflow is created. Click on the newly created workflow to access it.
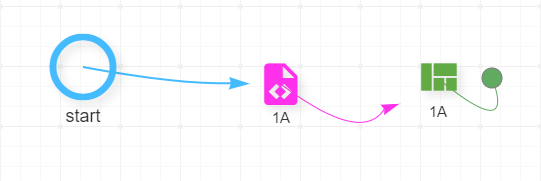
When building a workflow, the templates have to be inserted as the first steps, followed by the forms (as shown in the example below). It is also possible to create conditions that split workflows into different paths.
A simple workflow with one template (pink) and one form (green)
5.2.2 Price
Creators can decide to make a workflow available to users for a fee. A price of 0 means that it can be executed for free. Consumers will be charged the price set in XES on a pay-per-use basis (the purchase grants the right for one complete workflow execution).

The workflow settings with the price on the right
In order to receive payments, the workflow owner must have an Ethereum account linked to their user profile.
5.2.3 Publish
Since the sharing of workflows and its elements does not work recursively, the “Publish” function can be used to easily make the workflow executable by other users. This is done by giving read permission (for the workflow and all its elements) to everyone with a “User” role.
Publishing only grants execution rights in the front area of the platform, it does not share anything to be viewed by other Creators in the backend. Publishing can be undone by removing the group permission of the workflow.
5.2.4 Condition
Conditions can be used to guide the user through different paths of a workflow, depending on input from a previous form. It requires a basic understanding of JavaScript to customize. New conditions come with default code. For normal usage you may just have to exchange some variables without touching the code in any other way. To add a condition to your workflow, simply drag & drop it onto the canvas and a configuration window will pop up. "someVar" is the “Name” of the form component you want to evaluate, and "someValue" is the “Value”, which is set in the component. "something else" is the other “Value” of the component.
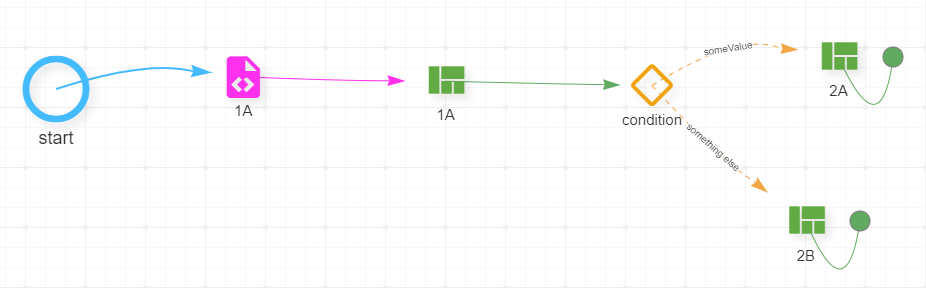
A workflow with a condition, sending the user to different forms based on inputs from a previous form
5.2.5 Custom Nodes
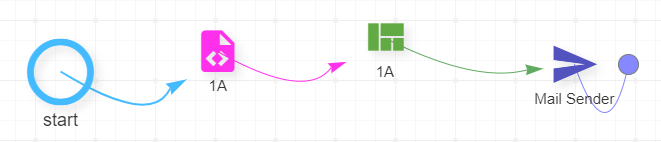
Proxeus allows you to develop custom nodes and to make them available to all users to be used in workflows. When adding elements to a workflow, you may encounter custom nodes like this:

You can add custom nodes at any position in the workflow.
A custom node at the end of our example workflow
5.2.6 Sub-workflows
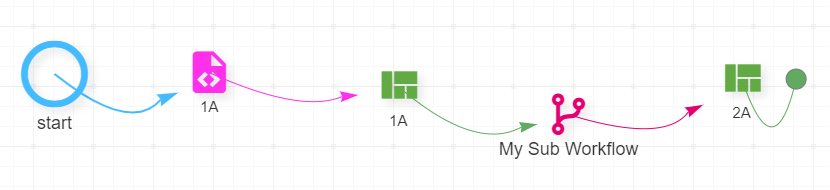
In Proxeus, you can also build workflows that call other workflows. The main workflow will start normally and then guide the user through the sub-workflow. After the user has completed this sub-workflow or “workflow in a workflow”, they will be brought back to the main workflow.
A workflow with a sub-workflow. The user will see form 1A first, then the forms of the sub-workflow and finally form 2A.
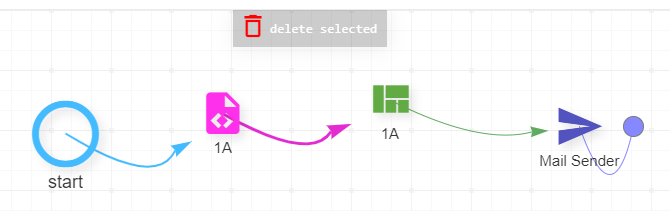
5.2.7 Deleting connections & elements
You can remove connections between workflow elements by clicking on the connection itself and then using the “delete selected” button that appears on top. Removing elements works the same. You can always re-add them afterwards.
Deleting the connection between the template and the form
5.3 Templates
Entries in the “Templates” section are used to upload ODT template files, which were created in a document editor that supports the OpenDocument Text format, the most common being LibreOffice, OpenOffice, and Microsoft Word. The ODT files need to contain the placeholder variables that are defined in your form components.
If the platform has multiple active languages, you may upload one version of the template for every language.
5.3.1 Creating an ODT Template File
Open the document creator of your choice and save the empty file in ODT format on your local machine. Make sure the filename does not contain any special characters.
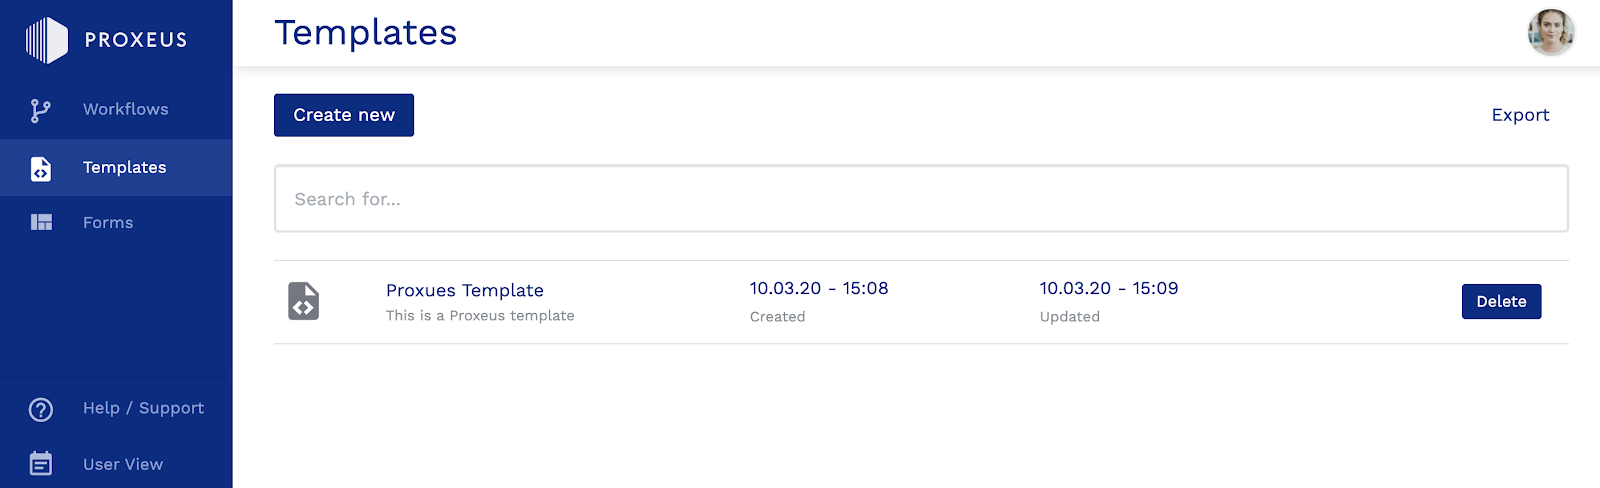
5.3.2 Creating a Template
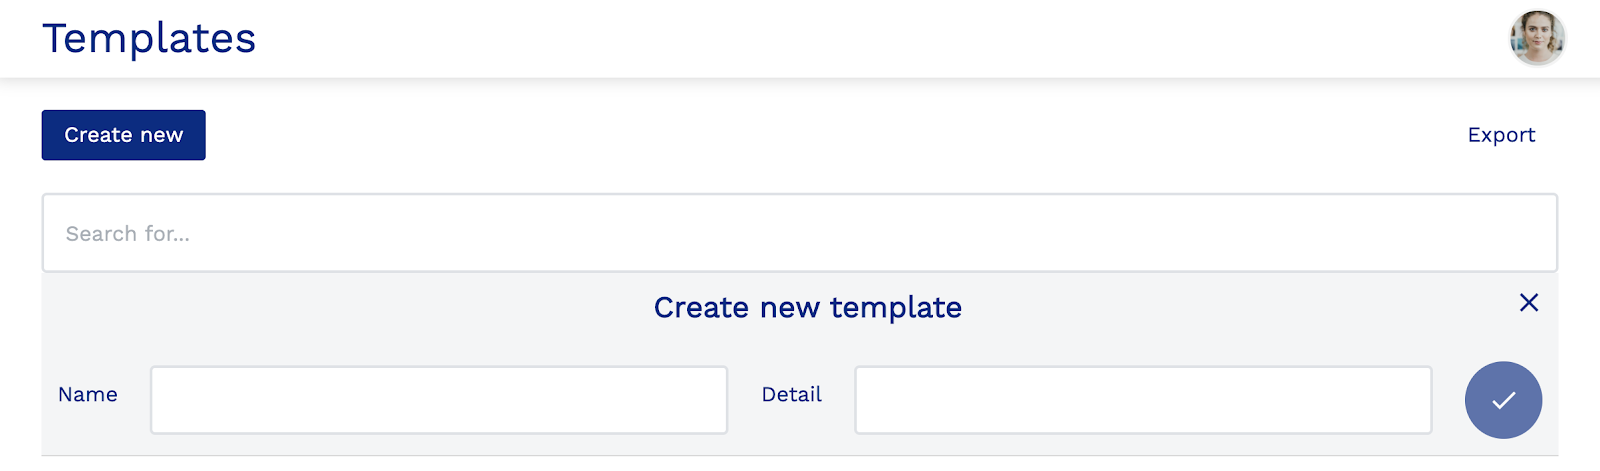
Click on “Templates” in the navigation panel and click on the “Create new” button to create a new template.
Enter a “Name” for your new template. Optionally, you can add further information in the “Details” field. Click on “✓” and your template is created.
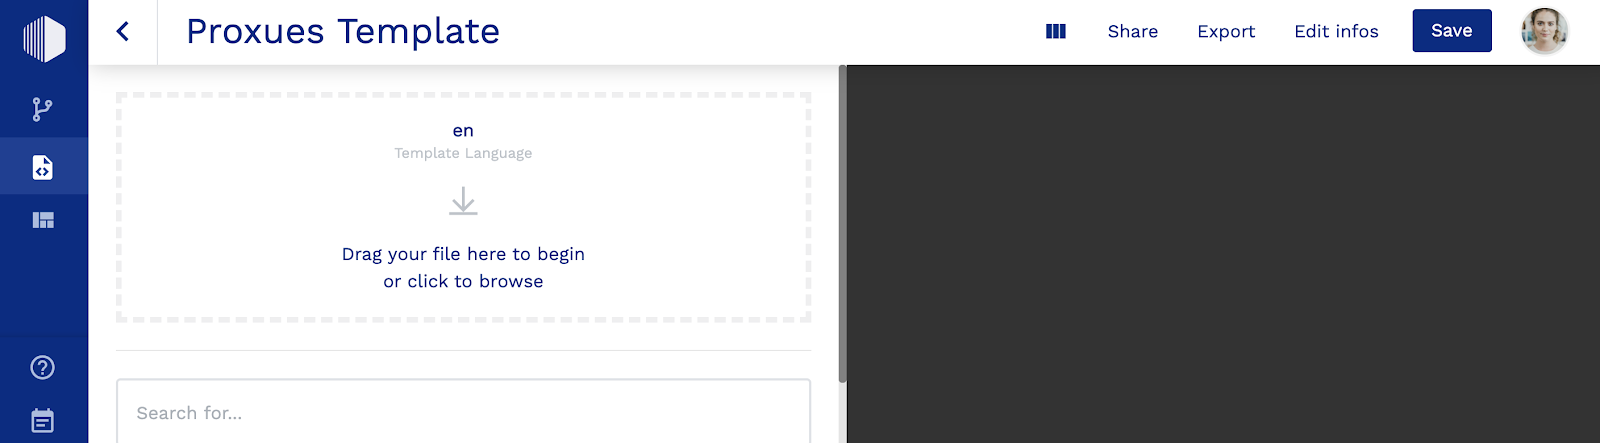
Click on the newly created template to access it. Drag the ODT file onto the upload area of the respective language or click on the area to browse your local directory and select the right file.
If your ODT file is already complete with all the content and variables needed, click on “Save”. If your ODT file is still empty, do not click on “Save” yet and proceed with transferring variables into the ODT file, which is explained in the next chapter.
5.3.3 Templating Assistance
The template management view offers you assistance in getting your ODT template file ready, including some useful real-time testing functions on the fly.
Preview
To start, you have to access the template you want to work on, upload the template file and open it on your local machine in your preferred document editor. Each time you save the file locally, all changes to your local file will be replicated in the preview window on the right-hand side of the view. If you then hit the save button on the Proxeus platform, your changes will be made on the server as well without a new manual upload. Therefore, when you are satisfied with the state of the document in the preview, it is important that you click the “Save” button.
Important: The connection between the freshly uploaded file on your local machine and the preview only persists as long as you don’t exit the template. In case you want to re-establish that connection, you have to re-upload the template file from your local machine. |
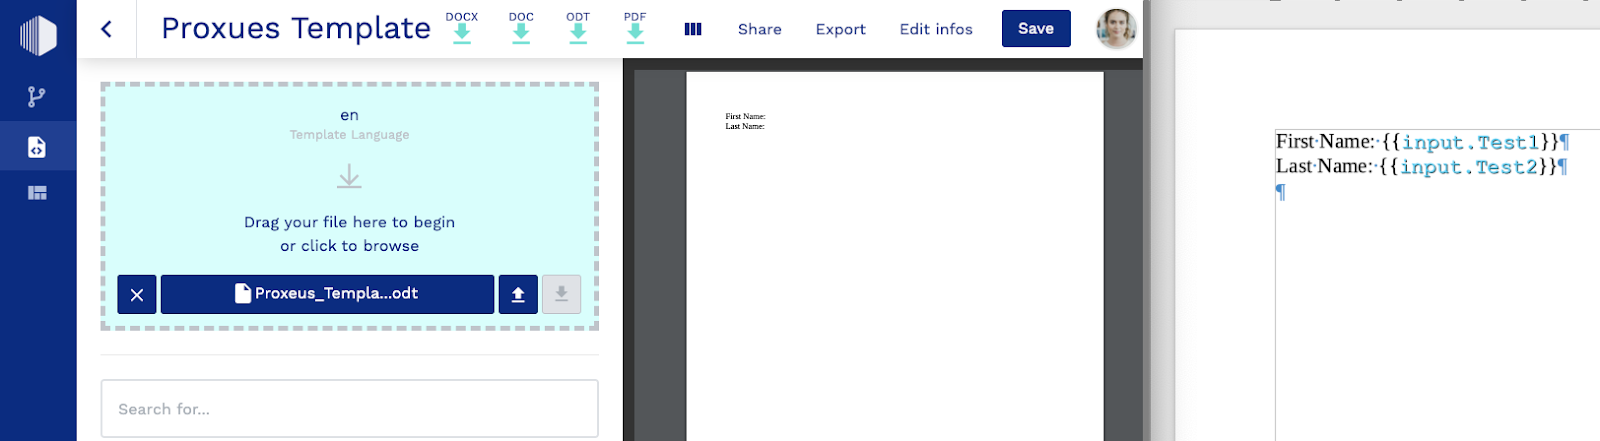
Copy-Paste Variables
To directly copy and paste variables, below the upload field, search for your form, click on it, and select the variable you want to copy. The confirmation “copied to clipboard” appears.
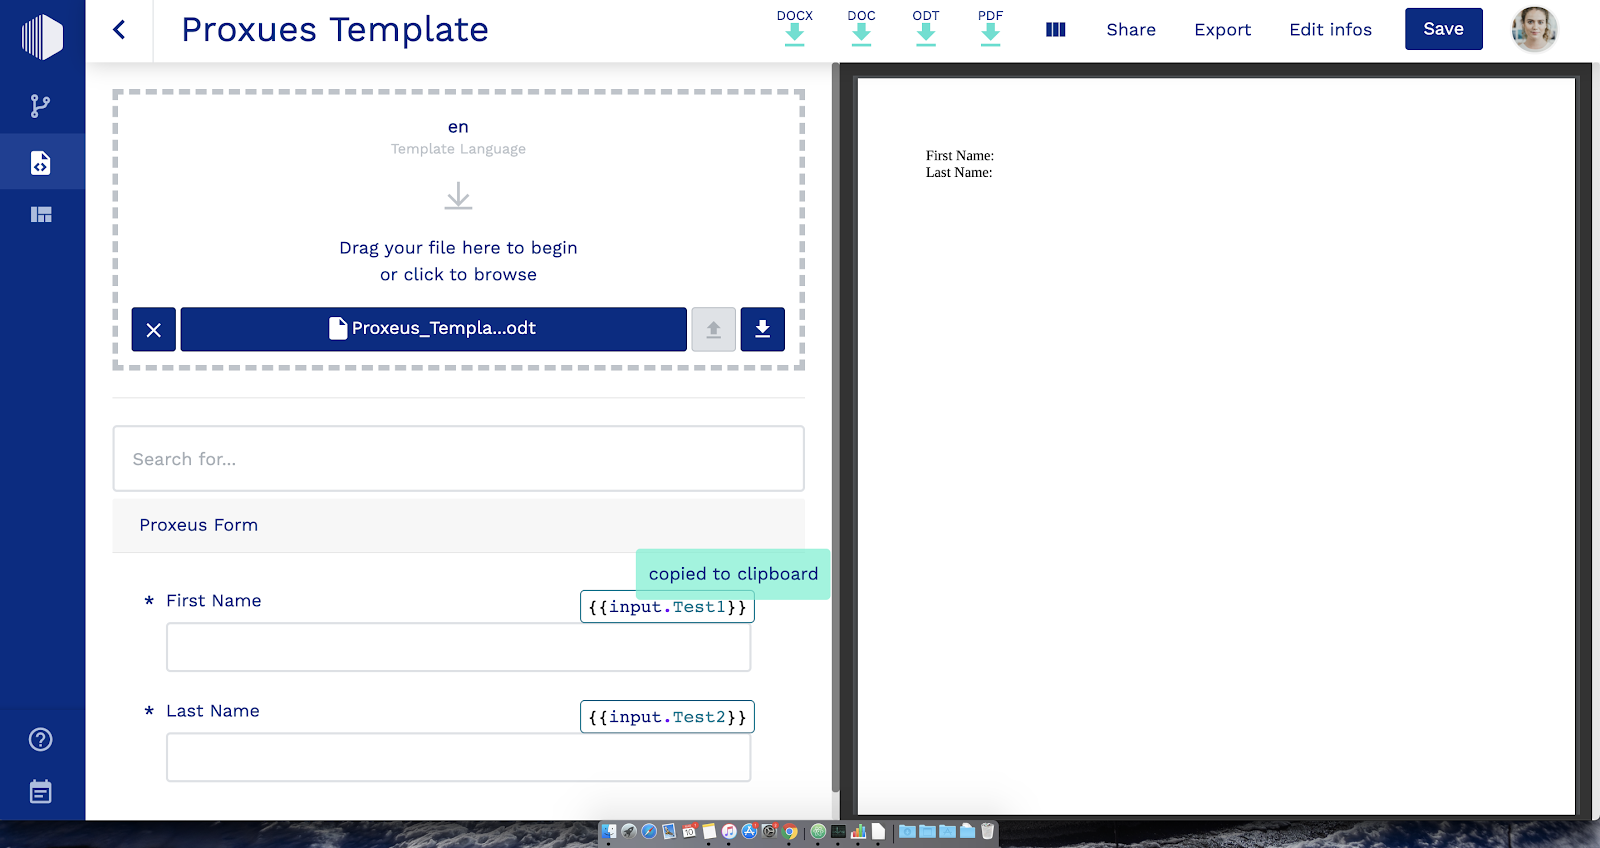
To insert the variables into your local ODT file, which is open in the document editor (not in the preview in the browser), simply paste them in the desired location. Of course, it is also possible to write the variables into the ODT file manually.
Important: Dynamic Lists and Checkboxes need to be added to the ODT template with the use of FOR Formulas. |
Test on the fly
In order to test whether the template file you uploaded behaves as desired, a testing on the fly functionality is available. In the search bar below the upload field, search for the form which contains the variable you want to test. Click on it, enter the values you want to test in the respective field and see the result in the preview.

5.3.4 Common Formulas
This section describes the most commonly used formulas that will suffice for many users when creating template files. For more advanced formulas, please refer to section 5.3.5., or, for the full reference, visit Jtwig.
IF-Formula
The IF-Formula contains a “condition” and content. This means, if the user enters a certain “Value” (= “condition”), a certain content will be displayed in the document.
Example: {%if input.Gender == 'male' %} Dear Mr. {%endif%}
Use “or” to add another “Value” to the condition, displaying the content in both cases.
Example: {%if input.Gender == 'male' or input.Gender == 'female' %} Dear Mr./Mrs. {%endif%}
Use “!=” instead of “==” to display the content if the “condition” does not match the “Value”.
Example: {%if input.Gender != 'male' %} Dear Mrs. {%endif%}
The same could also be achieved using the IF-ELSE-Formula.
IF-ELSE-Formula
The IF-ELSE-Formula displays different content, depending on the “Value” entered.
Example: {%if input.Gender == 'male' %} Dear Mr. {%else%} Dear Mrs. {%endif%}
IF-ELSEIF-ELSE-Formula
Use the IF-ELSEIF-ELSE-Formula to check two “conditions”, displaying different content if the “condition” is matched and showing the content after ELSE when both “conditions” don’t match.
Example: {%if input.Gender == 'male' %} Dear Mr. {%elseif input.Gender == 'female' %} Dear Mrs. {%else%} Dear Mr./Mrs. {%endif%}
FOR Formula
The “FOR” Formula is used to loop through an array of values (i.e. from the Dynamic Lists or Checkboxes) and create a list output.
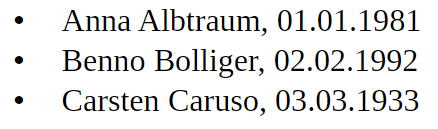
To gather the birthdays of our friends we have created a field, where multiple entries can be made.

To add all the entries from this “Dynamic List” to the document the following formula is used:
{% for item in input.FirstName %}
- {{input.FirstName[loop.index0]}} {{input.LastName[loop.index0]}}, {{input.Birthdate[loop.index0]}}
{% endfor %}
This will create a bullet point list (it works with other formatting too):
For checkboxes, the following formula can be used:
{%for item in input.Content %}
• {{item}}
{% endfor %}
Mathematical Operations
Calculations can be made using the following operators: +, -, *, /
Example: Adding one value to another
{{input.Value1 + input.Value2}}
Variables
Use the “Set Formula” to define “Values” that are not entered in the form but are needed in your document.
Use {% set MyValue = 'Content' %} to set a variable.
Example 1: {% set MyValue1 = 'This is my set variable one.' %}
Example 2: {% set MyValue2 = 'This is my set variable two.' %}
To set a number for the variable, leave out the ''.
Example 1: {% set MyNumber1 = 3 %}
Example 2: {% set MyNumber2 = 5 %}
There’s a possibility to set a text list.
Example: {% set MyList = ['My Value 1', 'My Value 2', 'My Value 3'] %}
There are different options to include the variables in the document:
Input (ODT template file) | Output (Document) |
{{MyValue1}} | This is my set variable one. |
{{MyValue1 ~ MyValue2}} | This is my set variable one. This is my set variable two. |
{{MyValue1 ~ ' and ' ~ MyValue2}} | This is my set variable one. and This is my set variable two. |
{{MyNumber1+MyNumber2}} | 8 |
{{MyValue1.contains('is')}} | true |
{{MyValue1.substring(MyValue1.lastIndexOf('set'))}} | set variable one. |
{{MyValue1.startsWith('This')}} | true |
{{MyValue1.endsWith('!')}} | false |
Tips
- IF-Formulas are helpful, if you want to display (or hide) certain text elements in the document, depending on “Values” entered by the user
- IF-Formulas don’t work if...
- they contain umlaute (ä, ö, ü, ...) or special characters (/, &, %, …)
- the checkbox or dynamic list component is used (because they allow multiple values)
- There doesn’t have to be content after {%else%}, in this case nothing will be displayed
- Use {{myNumber|number_format(2, '.', ',')}} to format numbers. The first parameter defines the number of decimal places, the second parameter defines the decimal point and the third parameter defines the thousands separator. The example formula turns 1234 into 1,234.00
- To check if an optional field has been completed or not (= is empty), use {% if MyValue1 == '' %} TEXT_IF_EMPTY {% else %} TEXT_IF_NOT_EMPTY {% endif %}. You can also use {% if MyValue1 != '' %} TEXT_IF_NOT_EMPTY {% endif %}.
5.3.5 Advanced Formulas
This section describes some useful advanced formulas that might be of interest when creating template files. For the full reference, visit Jtwig.
Simple Input Output
Input (ODT template file) | Output (Document) |
Current time {{'now'|date('dd.MM.yyyy HH:mm:ss.SSSZ')}} See other date patterns | 23.08.2019 12:08:33.018+0200. |
Handling null as math value {{(null)|number_format(2, '.', ',')}} | 0.00 |
Calc with text {{('2')|number_format * ('4')|number_format}} | 8 |
Custom style for output {% set MyValue3 = 'Value 3' %} {{MyValue3}} | Text Value |
Inline Condition {{(MyValue3 == 'Value 3')?'MyValue3 equals Value 3':'MyValue3 does not equal Value 3'}} | MyValue3 equals Value 3 |
Replace Text {{'I like this and that.'|replace({'this': 'foo', 'that': 'bar'})}} | I like foo and bar. |
Checks {{defined([1,2][5])}} {{empty([1,2])}} {{even(2)}} {{odd(2)}} {{iterable(2)}} {{iterable([2,3])}} {{first([1,2])}} {{last([1,2])}} | False False True False False True 1 2 |
Join / Merge {{join([1,null,2],', ')}} {{merge([1, 2], 3)}} | 1, 2 [1, 2, 3] |
Length {{length([1,2])}} {{length(null)}} {{length(9)}} | 2 0 1 |
Round {{round(1.33,'CEIL')}} {{round(1.33,'FLOOR')}} | 2 1 |
Capitalize {{capitalize('hello world')}} {{title('hello world')}} {{upper('jtwig')}} {{lower('jtwig')}} | Hello world Hello World JTWIG jtwig |
5.4 Forms
Forms are used to collect user input throughout a workflow process. The variables defined in the components will be used to reflect the user input on a document template.
5.4.1 Create a Form
To create a new workflow, click on “Workflows” in the navigation panel and click on the “Create new” button.

Enter a “Name” for your new form. Optionally, you can add further information in the “Details” field. Click on “✓” and your form is created. Click on the newly created form to access the form editor.
The forms editor is split into two parts. On the left side you’re building your form, on the right side you will find all available form components. Add components to your form by performing a simple drag & drop action.
The basic steps are:
- Drag & drop a component into the form area on the left
- Click on it to open its properties and set the name, label etc.
- Repeat 1 & 2 until your form is complete
- Activate the “Test” mode on the left to verify the result

The two form editor areas: your form (left) and the form component templates (right)

A correctly configured component. The name is used as a variable in the ODT Template file.
Important: Your component names must not include any spaces or special characters. |
5.4.2 Workspace
In the default view “Workspace”, the forms are built by dragging & dropping form components onto the canvas. Components include simple fields, radio buttons, checkboxes, and many more.

5.4.3 Action
Under Action, the form components can be conditionally linked to each other. This is useful if depending on a form input, more form components should be shown. Simply connect the blue dots of the components.
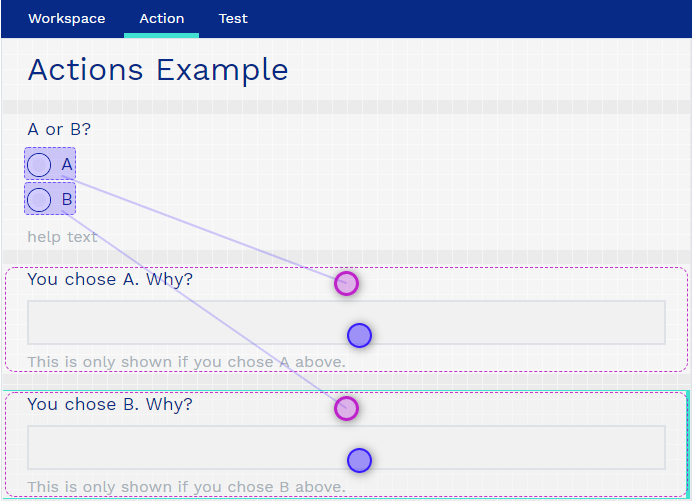
Demonstration of the action mode: depending on the user’s radio button choice, simple field A or B is shown.
5.4.4 Test
In the “Test” tab, the form can be tested live in action without having to switch to the “User View”. Do your components behave as intended? You will find out here.
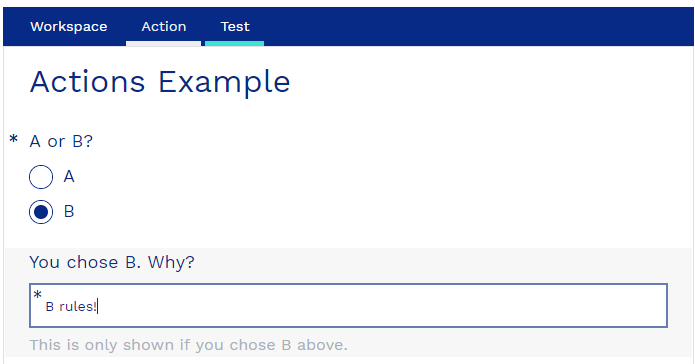
Demonstration of the Test mode using the “Actions Example” from above.
In the footer of the test tab, there is a “Reset” button to re-initialize the form and a “Play” button that activates the validation to check if the form can be finished with your current inputs. Validation errors such as empty required fields will then be displayed.

The “Form Reset” and “Form Validation” buttons
5.5 Sharing
The sharing dialog can be found in several places and is therefore explained in this separate subchapter to prevent redundancy.
Important: The sharing feature is designed for experienced users who would like to collaborate with other users or publish their work for others to use or copy. Using the sharing feature without a clear plan may lead to unintended results. Testing on a dedicated testing platform is recommended. |
All entities such as forms, workflows and templates are protected by permissions. By default only their owner can see, edit and use them. However, permissions can be extended to other users by using the “Sharing” feature present in the editing tools of all elements. The Proxeus permission model consists of “change owner”, “share by link”, “share with all users of a role” and “grant access to specific users”. Depending on your permissions on the element, this dialog might look different. The ownership grants full rights over the respective element and can be transferred.
Sharing does not work recursively on Proxeus; access rights can be granted at a fine granularity.
5.6 User Management
Superadmins and Root users can access the user management. They can search through all users, overriding the privacy flag (do not want to be found).
The following actions are available:
- Change the name and description (“More about me”)
- Change the role
- Remove API keys
You may not delete users or change their email or Ethereum address. You may change your own role, but only to lower ranks.
The user database can be exported completely or selectively. To only export specific users, you can use the search function and only export the results or open a profile for a single user export. Exported users can then be imported on another platform. Existing entries will be ignored when importing. Imported users will be marked.
5.7 Internationalization
Operators can access the “Internationalization” page. All titles, labels and texts of the platform can be found and edited.
Proxeus out of the box is configured using English as a default language. Scroll down to the “Languages” section to add additional languages. You can activate and deactivate languages there, too. If multiple languages are available, all users will find a language selection dropdown next to their profile icon when executing a workflow.
Translations can be exported language by language. You can prepare a new language on your testing environment, then import it to the productive environment when it is ready.
For developers: New labels are automatically detected and added to the translations database. There is no need to manually add them. |
5.7.1 Creating multilingual workflows
Once the platform has two activated languages, workflows can be made multilingual. There are two possible ways to do so:
- Duplicate the workflow completely, translate all the labels and upload the template(s) in the new language. Add the language to the workflow name. The users will see two entries and start the workflow in the prefered language.
- Add translation codes for all texts of your forms in the “Internationalization” editor. Activate the “i18n” in the forms and select the translation codes. Open the template entry and upload a second document template in the new language.
The second method is only available to Operators. It offers more possibilities but requires a well-structured approach. The steps are described below.
Add a new code in the translations by filling in the code search and the text search. This will enable the “+” button. The “text” field will be translated in your active language and can be changed later. Regarding the code, you could use a numbering system or a convention such as <Form name>.<component name>.<property to be translated>

The result looks like this:

Then navigate to your form and on the component property (e.g. label) that you wish to translate, activate the “i18n” slider. Now enter the translation code.
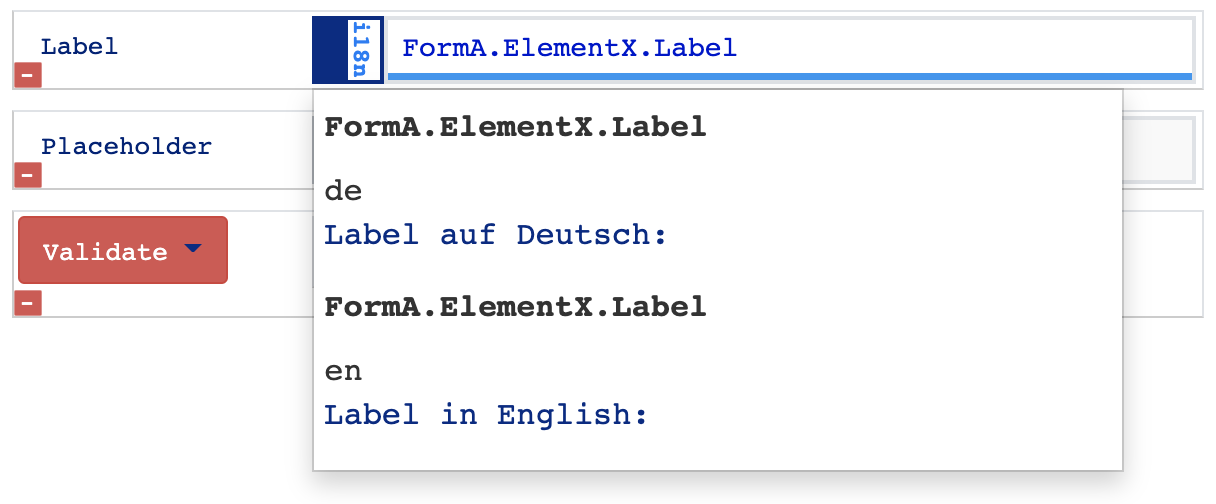
Form builder: selecting a translation code to be used for the “Label” property.
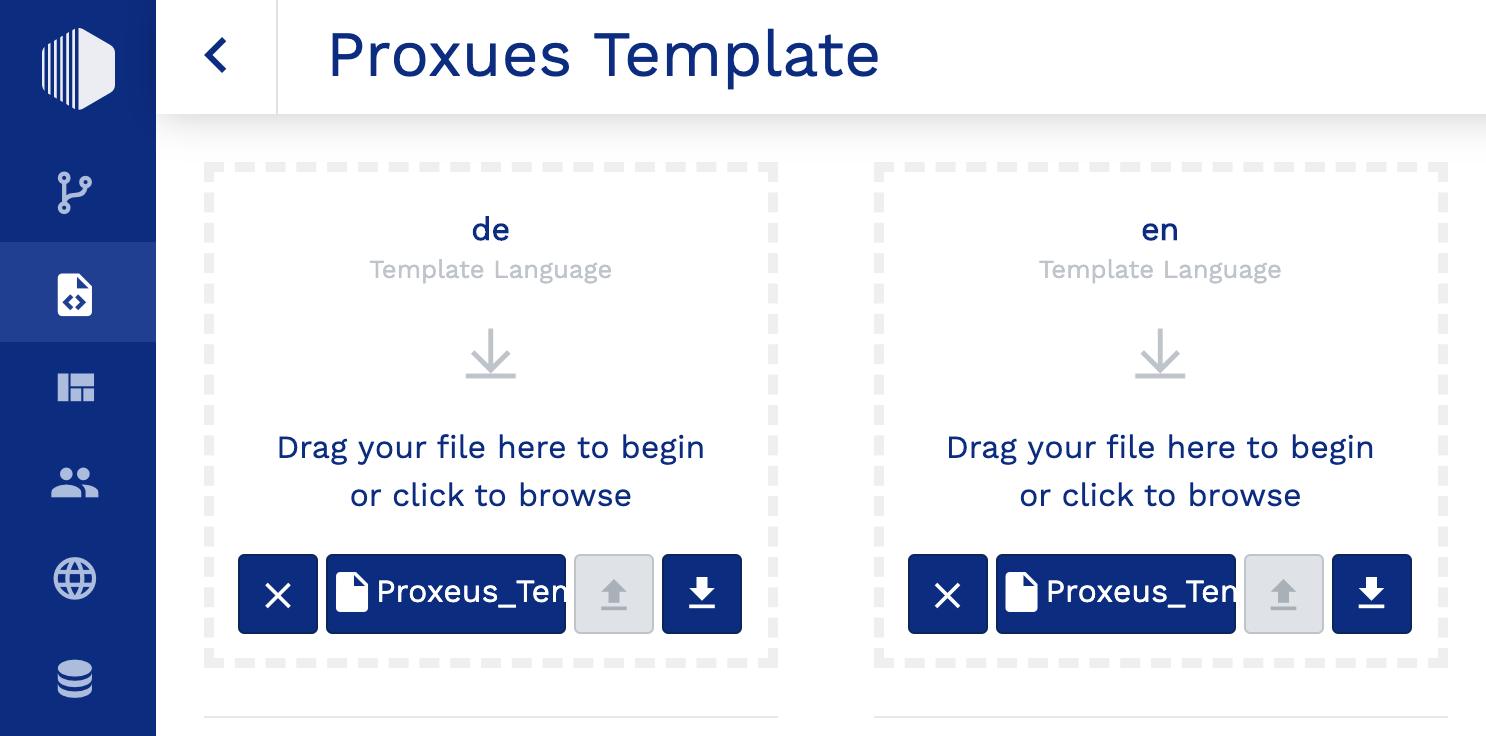
When multiple languages are active, you can upload translated versions of templates:
5.8 Data
Exports can either be done under “Data” or under “Workflows”, “Templates” and “Forms”.
Warning: Be careful when sharing your exports with others. Make sure it only contains elements that you are willing to share - and not any intellectual property that you want to keep for yourself.
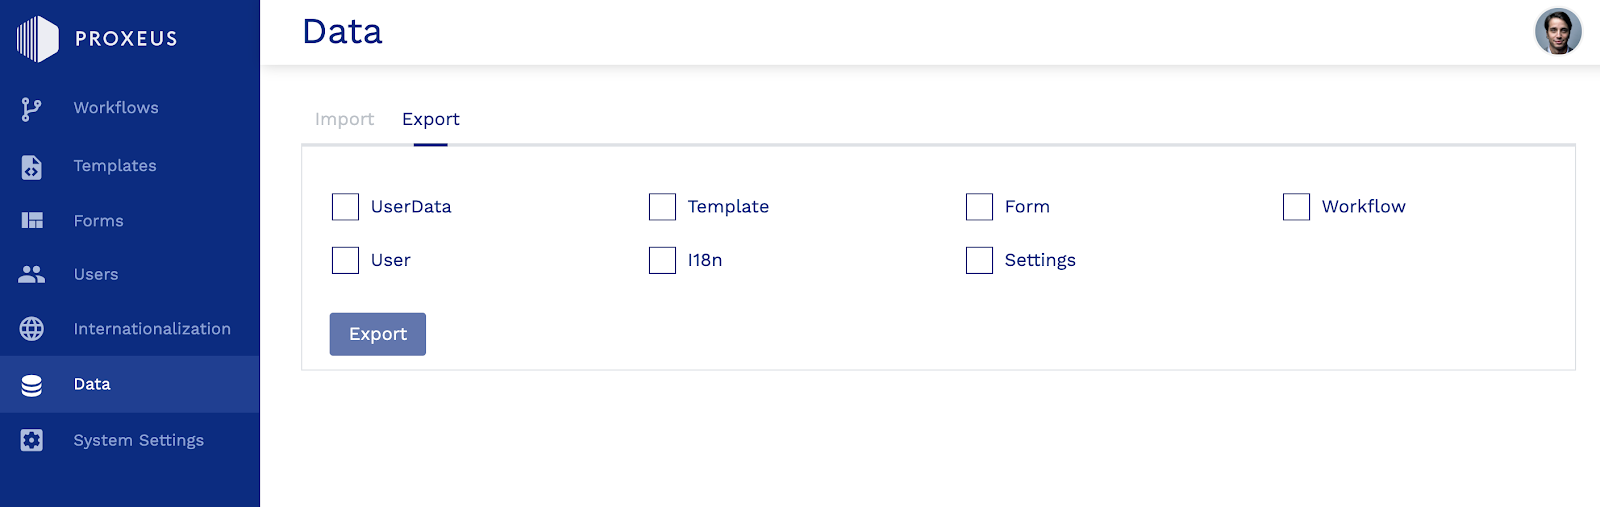
Under “Data”, User data, Templates, Forms, Workflows, Users, Translations and Settings can be imported and exported. The elements, which are allowed to be imported/exported depend on the user role.
Proxeus imports data with a “best effort” approach, meaning that errors will not block the rest of the import. Imported entries will be marked in the application.
Under “Workflows”, “Templates” and “Forms”, it is possible to only export the workflows, templates and forms. Also, the search function can be used to filter the elements which are to be exported.
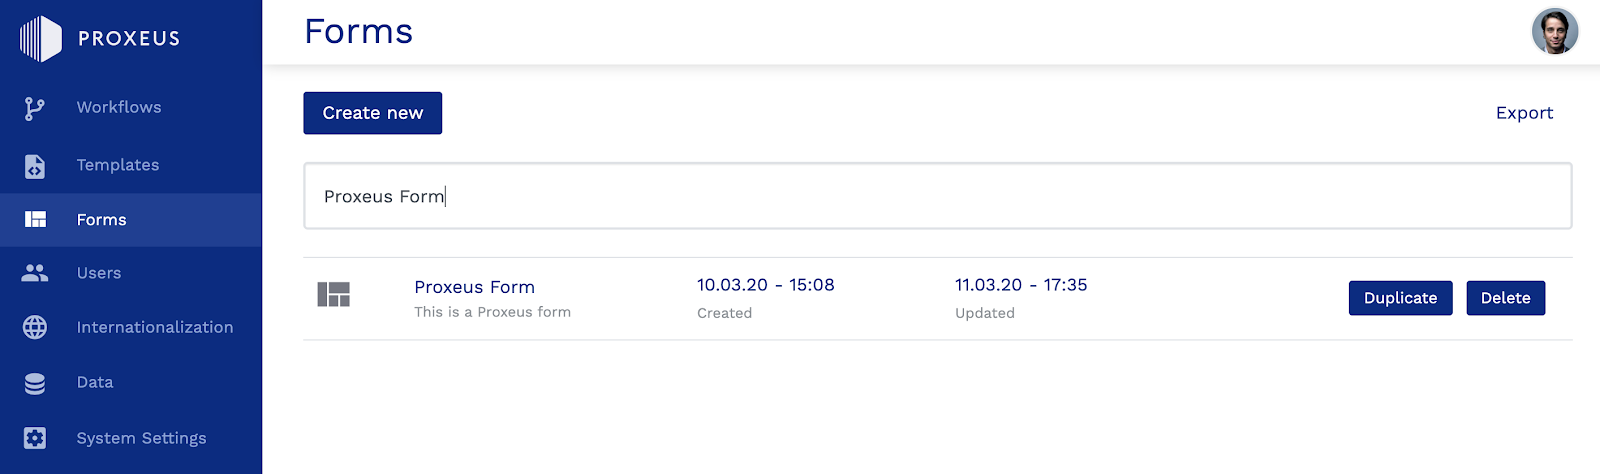
Using the search function to only export the “Proxeus Form”.
5.9 System Settings
Operators with the “Root” role can access the “System Settings” page. It is the same page that is also displayed on the “Power Up” screen during the installation of the platform. Please refer to the chapter “Platform Installation” for further information.
Changes made to the system settings are effective immediately. You can even switch to another Ethereum network without any code changes or service restarts.
Important: To avoid unintended results, the testing of System Setting changes on a dedicated testing platform is highly recommended. |
6 UI Guides
In the following UI guides, we’re explaining the different screens you might encounter in Proxeus. Make sure to read through these so you don’t miss out on any of the useful features.
6.1 Admin Panel
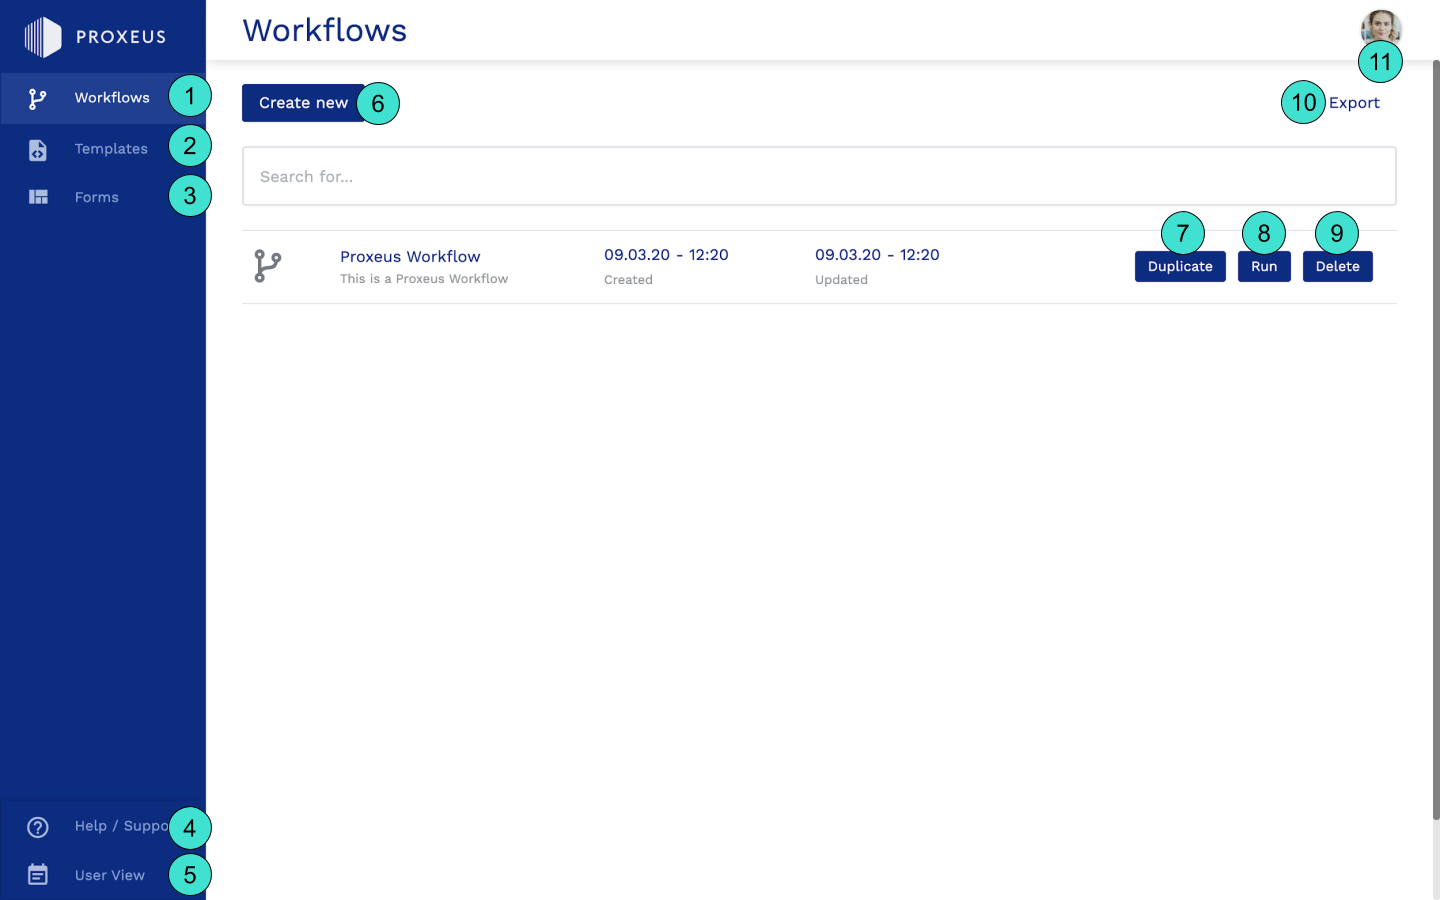
- List of workflows
- List of templates
- List of forms
- Help / Support (Handbook)
- Switch to “User View” to execute workflows, verify documents and request/approve/reject signature requests
- Create a new workflow
- Copy the workflow (doesn’t copy the contained templates and forms but adds them to the new workflow)
- Execute the workflow
- Delete the workflow (doesn’t delete the contained templates and forms)
- Export the workflow (doesn’t export the contained templates and forms)
- Account options (Profile picture, Personal details, Sign out)
6.1.1 Workflow
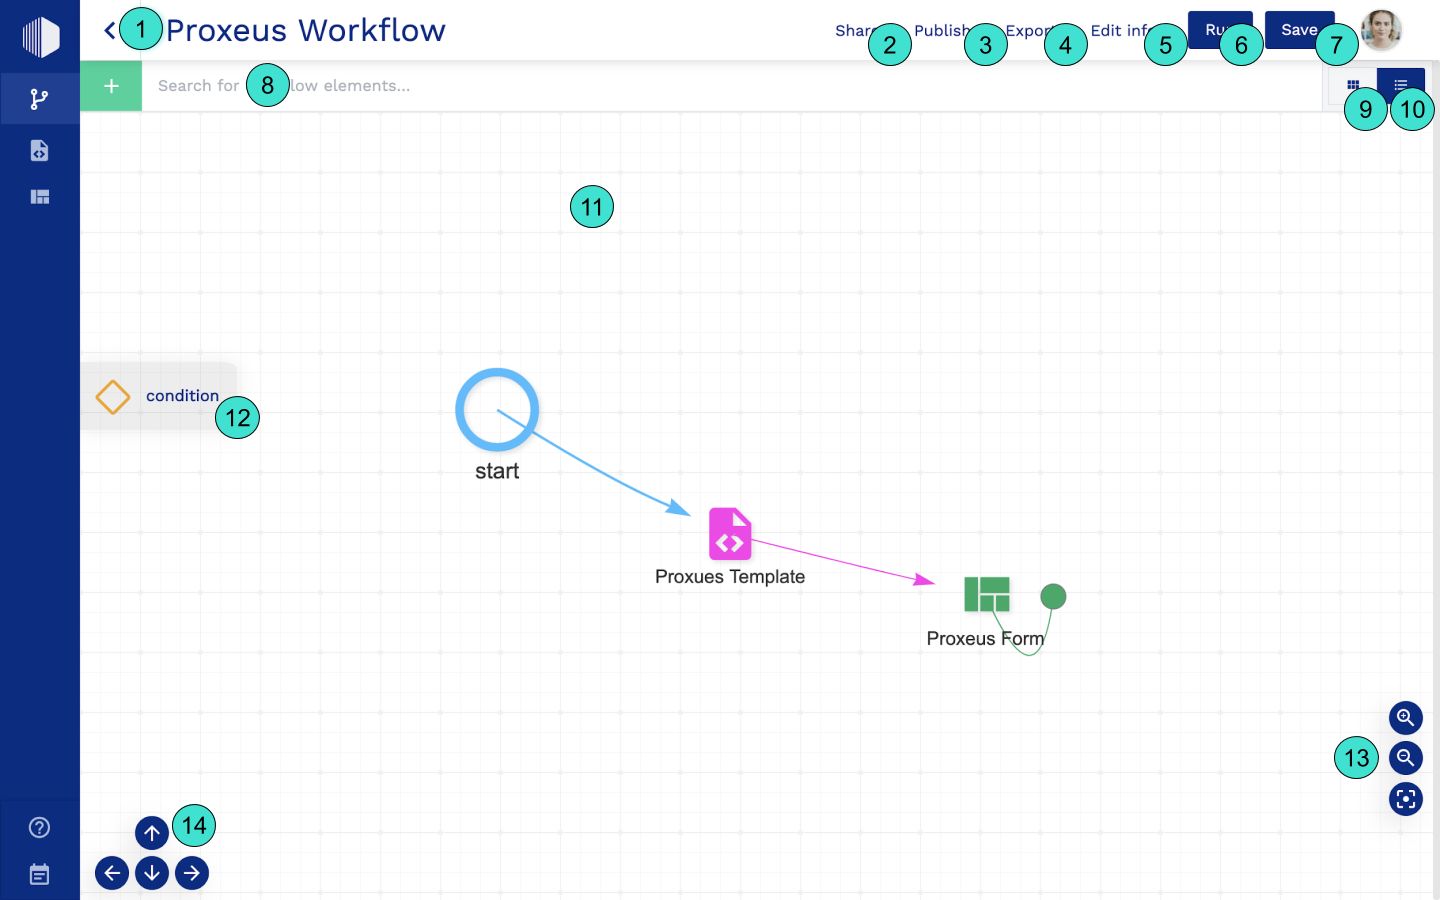
- Back to “Workflows”
- Share workflow with other users
- Publish workflow (make it executable for all users)
- Export the workflow
- Edit name, detail and price of workflow
- Execute workflow
- Save workflow
- Search elements to be added to workflow
- Display search results as icons
- Display search results in a list
- Workflow canvas
- Add condition (drag&drop)
- Center/Zoom in and out of canvas
- Canvas navigation
6.1.2 Template
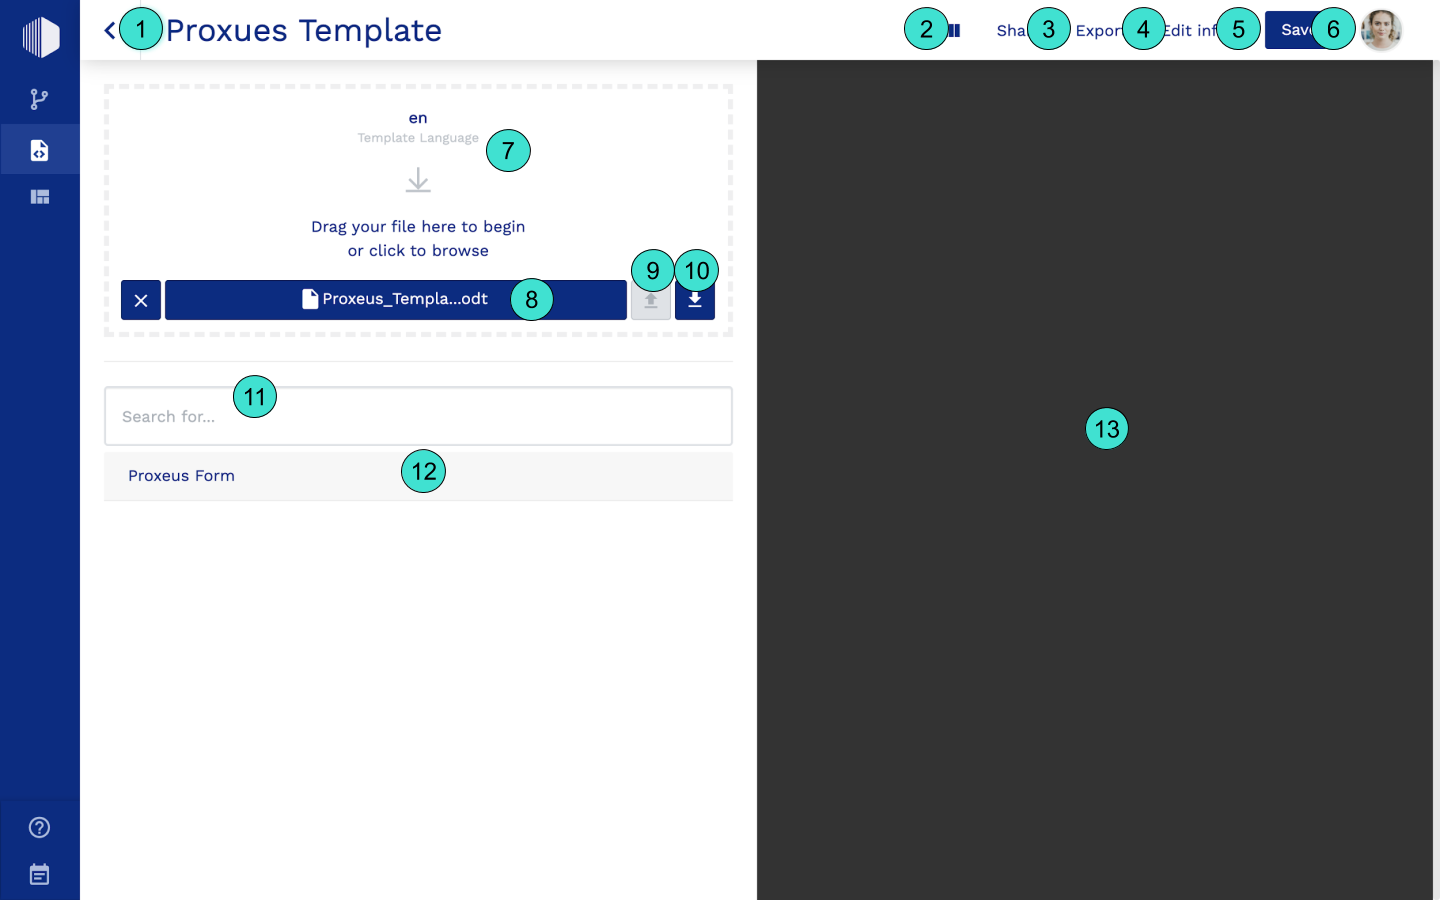
- Back to “Templates”
- Show/hide document preview
- Share template with other users
- Export template
- Edit name and detail of the template
- Save template
- Upload area
- Generate document preview
- Save template
- Download *.ODT template
- Search forms
- List of forms (click to open form)
- Document preview
6.1.3 Form
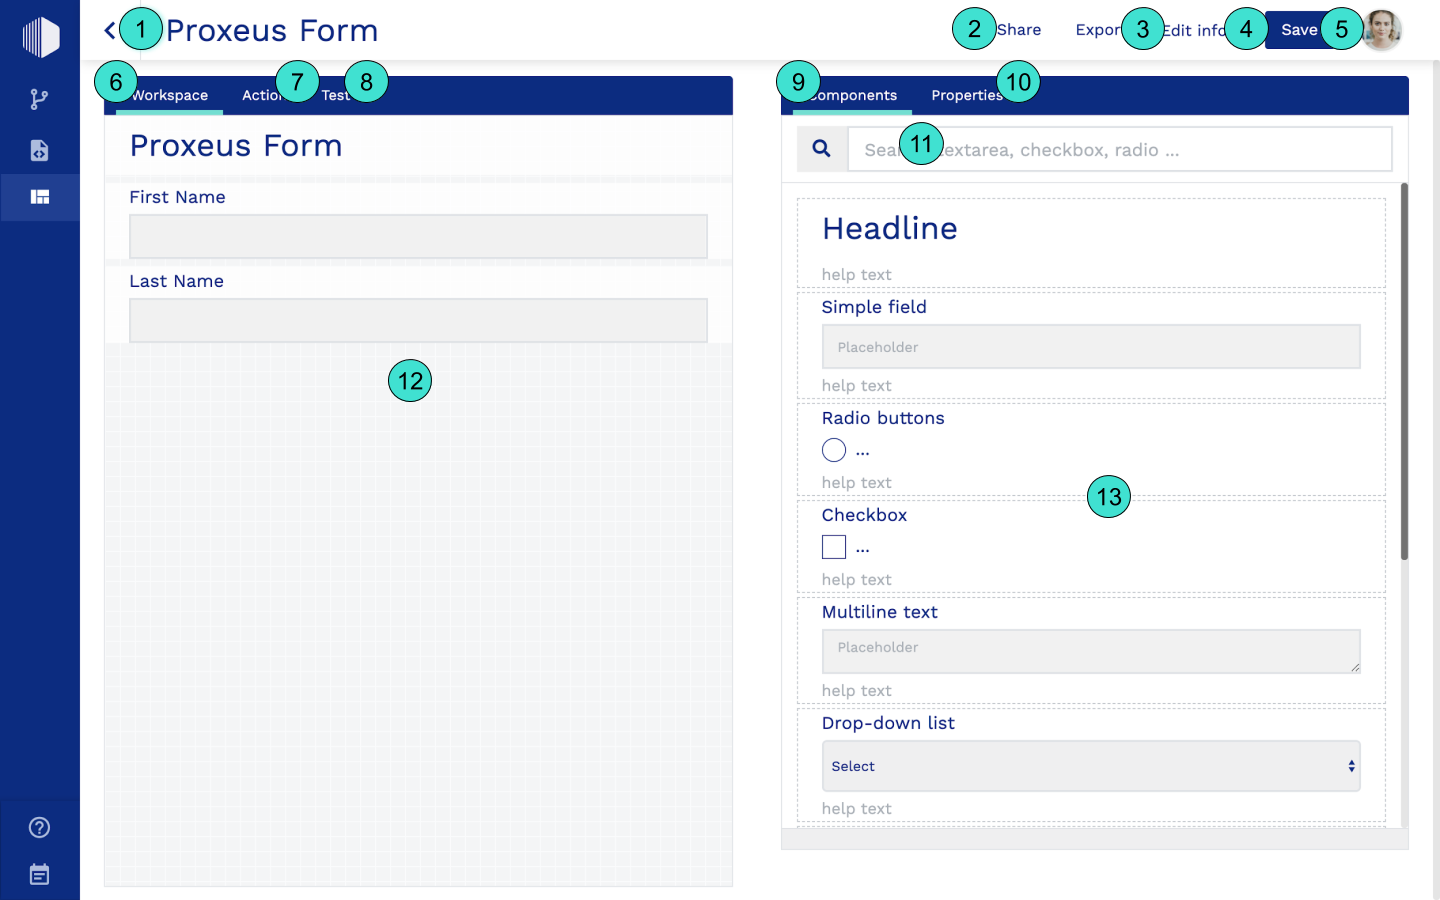
- Back to “Forms”
- Share form
- Edit name and detail of form
- Export form
- Save form
- Switch to “Workspace” mode
- Switch to “Action” mode
- Switch to “Test” mode
- List of form components
- Properties of selected component (click on component to view its properties)
- Search the list of components
- Form canvas
- Available components
6.2 User View
6.2.1 Documents
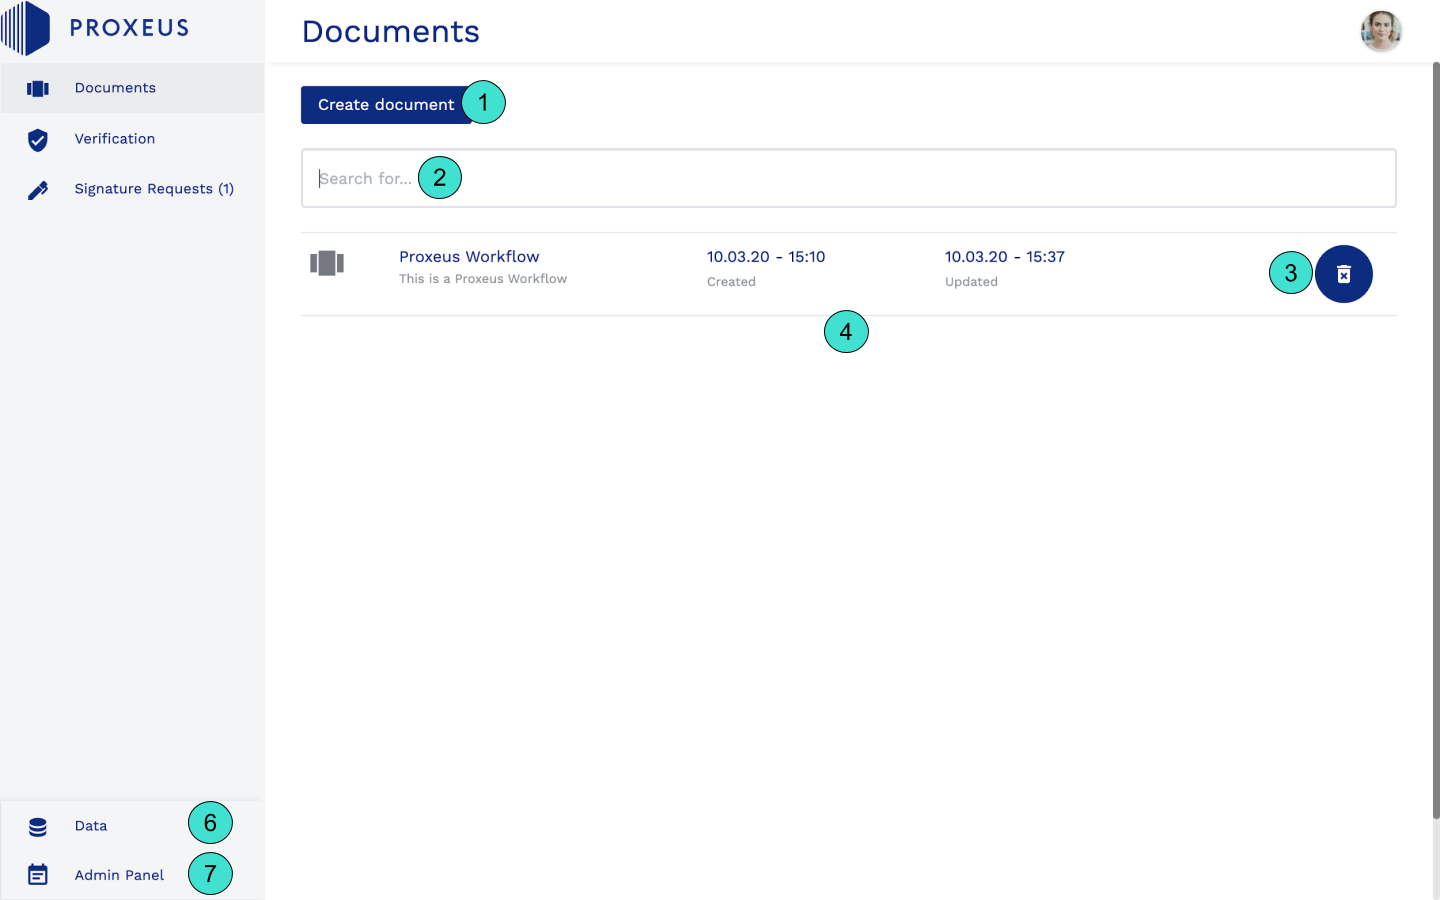
- Execute a workflow to generate a document
- Search through documents/drafts
- Delete document/draft
- List of documents/drafts (click to view, download or request signatures)
- Export/Import Proxeus data
- Switch to “Admin Panel”
6.2.2 Verification
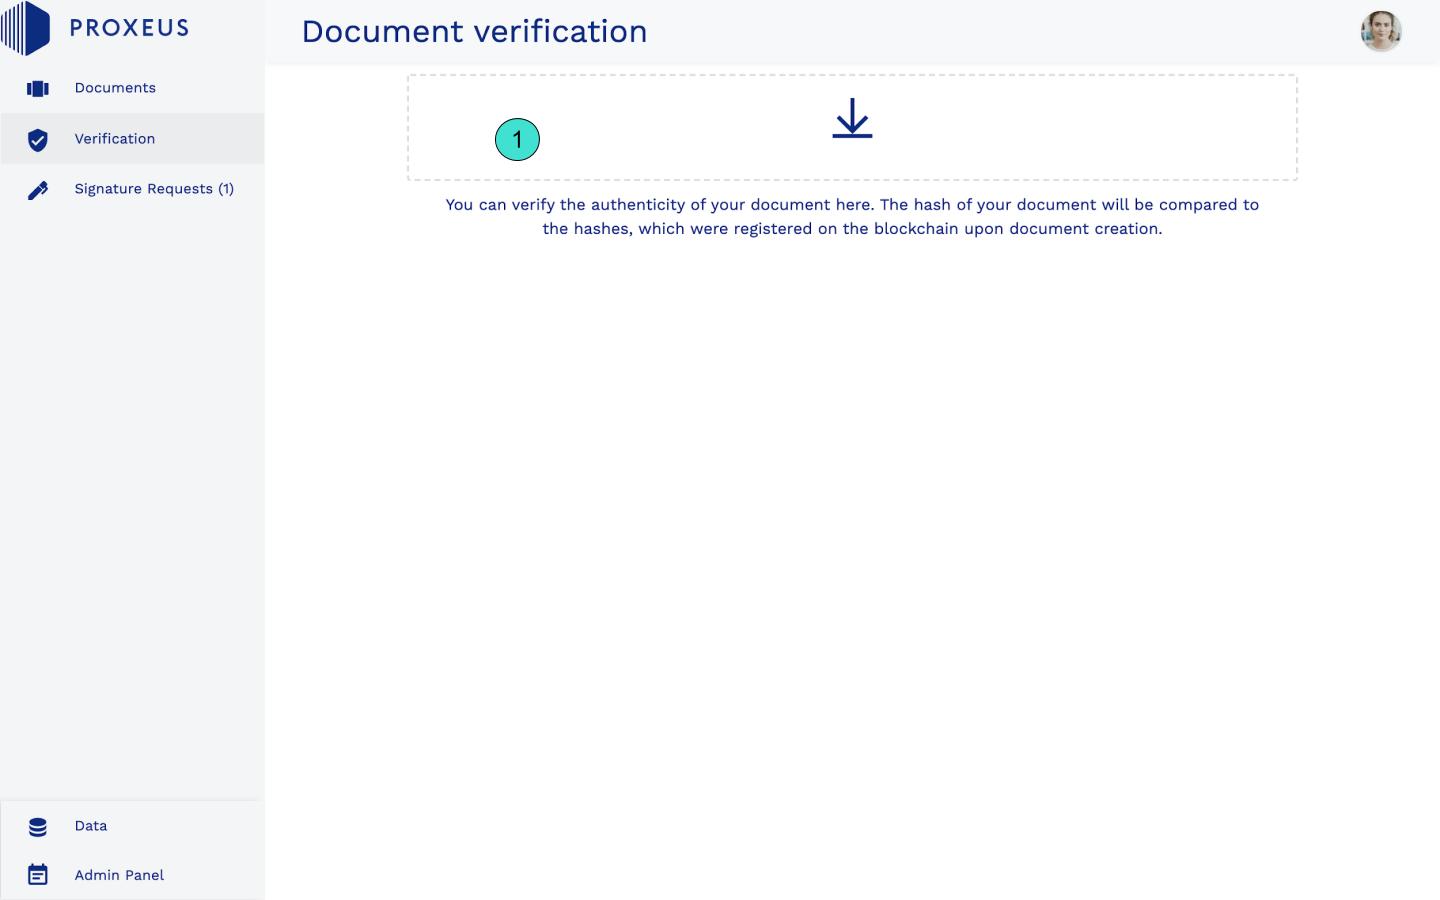
- Upload area
6.2.3 Signature Requests
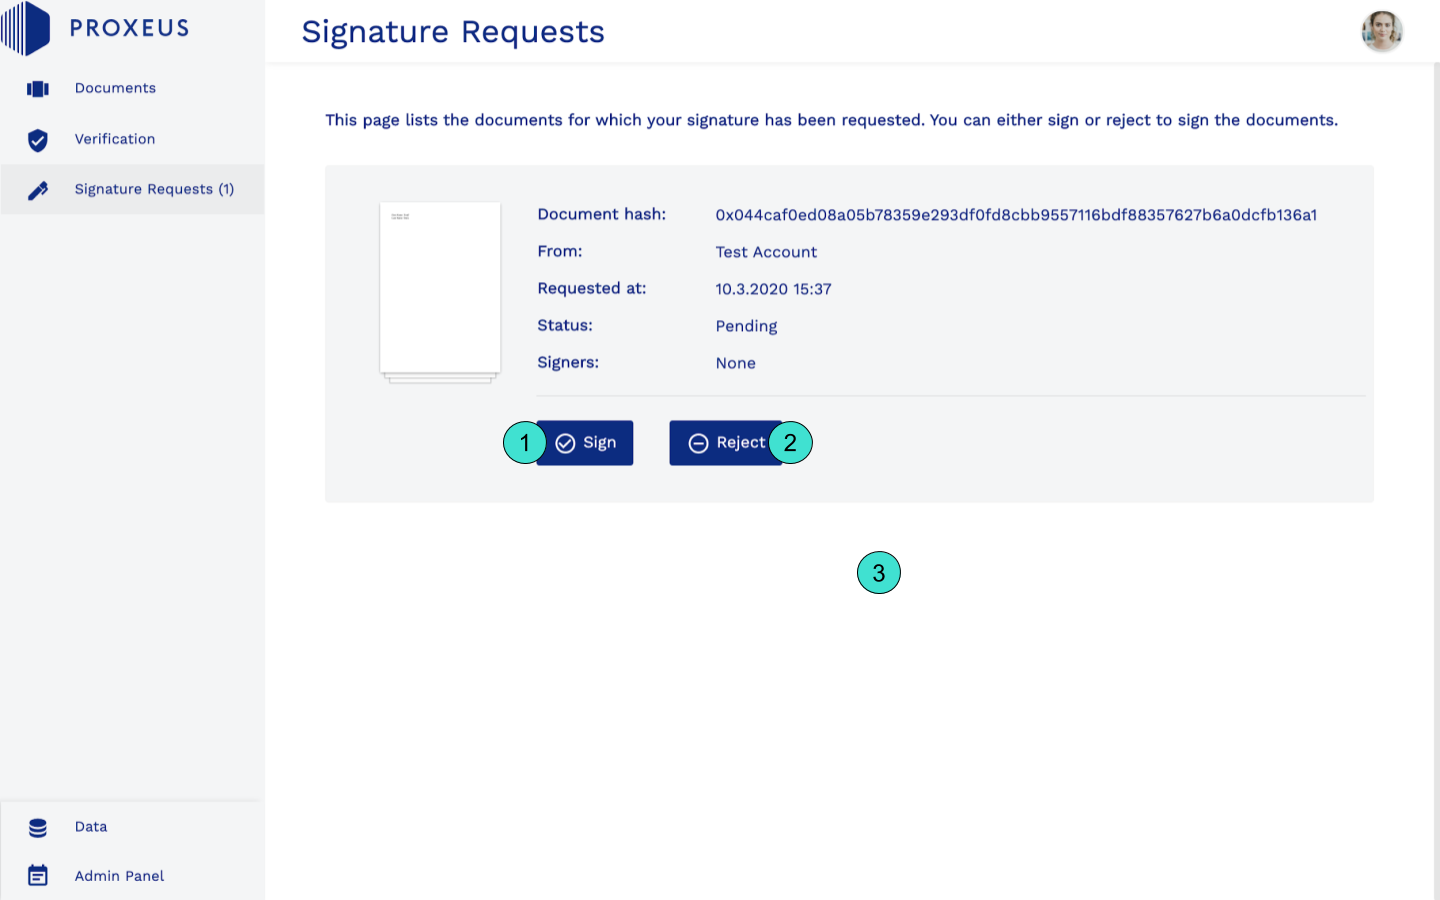
- Sign document
- Reject signature request
- List of signature requests
7 Roles
Proxeus has a broad set of user roles that come with different rights and permissions. Generally speaking, Proxeus has three user roles (Operators, Creators and Consumers) and multiple possible user rights.
7.1 Public
Visitors without an account will be detected as “Public” users. This role is only relevant for the sharing feature. Normally “Public” users can only browse the landing page and use the document verification tool. If provided with the right sharing link, though, they are able to view workflows and, for example, act as reviewers.
7.2 Guest
Guest is the lowest role a user account can have. Guests cannot access the platform. This role can be used by platform Administrators who want to verify and manually admit newly registered users by granting them the appropriate role.
7.3 User
Users can access the “User View” where they can browse and purchase all published workflows. They may purchase and execute workflows and thereby create and register documents.
7.4 Creator
In addition to the permissions granted to Users, Creators are able to create workflows, templates and forms, set a XES price and make their content available on a platform.
7.5 Admin
Admins are the caretakers of a platform. They manage the users and roles. They have access to all features including the internationalisation interface to change the labels and texts of the application. They can create backups or migrate data.
The Admin has all permissions of a Creator and, depending on the exact role (Admin / Superadmin / Root), the following permissions:
7.5.1 Users
Edit account settings of users and send invitations to new users via email.
7.5.2 Internationalization
Add, enable or disable languages and create corresponding translations.
7.5.3 Data
User data, templates, forms, workflows, Users, translations and settings can be imported and exported.
7.5.4 System Settings
Configuration of the platform, such as database directory path, session expiry or ethereum network (only accessible with the “Root” role).
7.5.5 View User Content
Operators with “Superadmin” or “Root” roles can see other users’ content in the “User View” and the “Admin Panel”.
8 Platform Installation
The platform can be installed in two different ways: you can use the latest Docker containers to quickly configure and run it or you can get the complete open-source code and compile an application yourself. After the installation, a power up screen will guide you through the basic platform configuration.
For more information regarding the installation, please consult the technical information in the project’s GitHub repository.
Important: Please read through all the steps before starting in order to gain a better understanding of what needs to be done in which order. If you decide to make a Proxeus platform available to the public, we recommend that you work with a legal counsel in order to ensure that your setup is compliant with your local laws and regulations (e.g. publication of a privacy policy), as well as to define usage terms and conditions. |
8.1 Power Up
For the following explanations we’ll assume that you are already working with an operational platform and can access the “Power Up” screen.
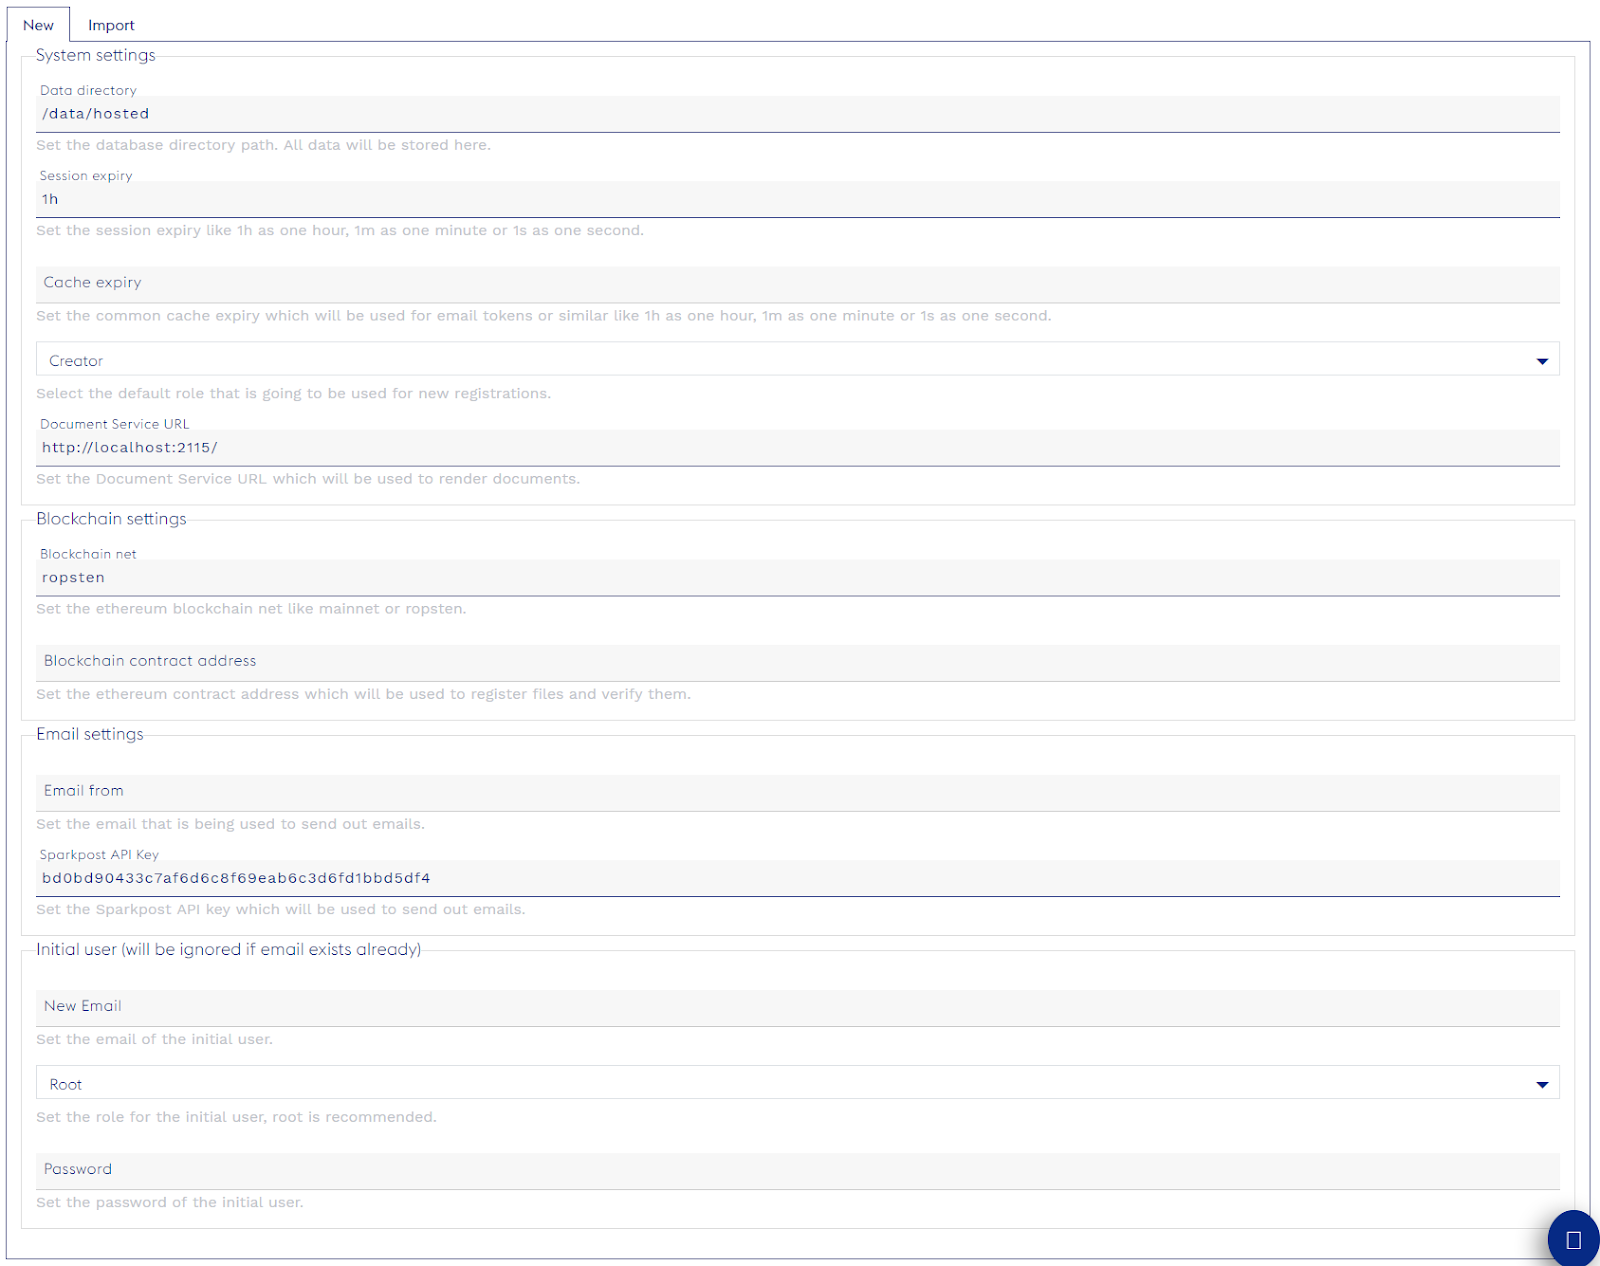
The “Power up” screen after successful installation
The settings are mostly self-explanatory and described on the configuration page itself. The default values usually don’t have to be changed.
In the power up mode, you are asked to create the “Root” account of the platform. This user has universal rights and can also give the role to other users. Root accounts should be kept secure by a strong password and/or a well-protected MetaMask wallet.
On the power up screen you may also set the default role all new users get. It’s recommended to choose “User” and to carefully promote select accounts.
In the Blockchain settings you can choose between “Mainnet” (the live Ethereum blockchain) and “ropsten”. Other networks should work as well, but have not been tested. Connecting to the Ropsten test network first means you can try your workflows with toy money - ropsten Ethers and ropsten XES. The root user can switch the active network of the platform at any time, effective immediately. Please be aware that the smart contract needs to be deployed on the network you are using.
8.2 Data migration
If you have an export file from a backup or from a different platform, you can load it in the “Import” tab. Proxeus imports data with a “best effort” approach, meaning that errors will not block the rest of the import. Imported entries will be marked in the application.

A successful data import
8.3 Customization
After setting up your own platform powered by Proxeus, you will be able to customize certain aspects of it. Texts can be customized using Proxeus’ internationalisation feature. Please consult the respective chapters in this manual for more information.
- Add your logo to the front-end by navigating to the “Internationalization” menu and setting the "Logo url" translation to the URL of the logo you want to show.
The logo should roughly measure 175x55 pixels, although there are no hard restrictions. - Replace the “first visit” messages for your users. These messages will be shown when a user visits the User View and the Admin Panel for the first time. You can use the same or different messages. Navigate to the Internationalization menu and set these two codes:
- First login documents
- First login admin
- Link to your platform’s privacy policy. Simply search for the code “Privacy Policy url” in the Internationalization area.
- Change the titles, texts, navigation labels etc. This can all be done in the “Internationalization” menu.
- Replace the help documentation of Proxeus with your own. By default it point to the Proxeus handbook. Change the link to your own document by navigating to “Internationalization” and changing the “Support Button Link” code.
8.4 Using the API
If you wish to programmatically use the API, your users need to create an API authentication key. This can be done directly in the user profile (top right corner).
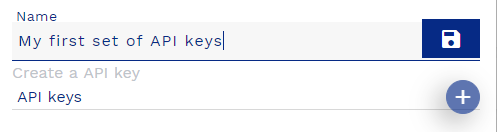
Name the API key you are generating
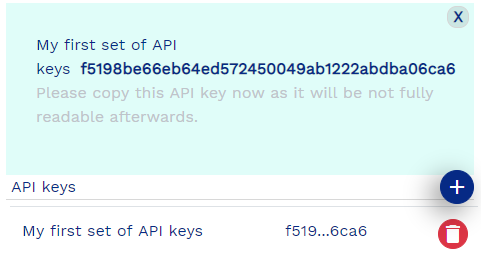
A successful key generation - use this key for API authentication