TPE Glitchless
Last updated July 17, 2021
Introduction
TPE Glitchless, or True Pacifist Ending Glitchless, is a popular category great for people of all skill levels. It is not very difficult to obtain a good time, and does not contain all of the glitches that are included in the glitched categories of undertale. It is the longest of the 5 main categories, with the world record clocking in at about an hour and 48 minutes. New runners can expect to get a time of around 2 hours and 30 minutes, while experienced runners will have times around 2 hours and 10 minutes. Advanced runners will be able to complete TPE Glitchless in under 2 hours.
This guide contains several route variations. More advanced routes will be marked with red text. If you’re just starting out, it’s safe to ignore these portions of the guide.
>> TIMING STARTS WHEN SELECTING “YES” <<
Ruins
The Ruins is the most RNG intensive part of the game, for a variety of reasons.
After hitting “Yes” at the name selection, you should hold right, so you can start moving as soon as possible.
Walk down the hallway to the right. Enter the doorway. Walk up towards Flowey and begin his dialogue. Mash the text and begin the battle.
Mash away the text as soon as Flowey talks to you. After Flowey winks, you won’t be able to mash the text away. Instead, repeatedly press Z and Enter, so you will end the text as soon as it reaches the end.
After Flowey winks, you will want to position yourself a little bit to the right of the top left corner. Being here will ensure that you get hit by the bullets friendliness pellets as soon as possible.
After being hit by the friendliness pellets, hold down and left. Moving to the bottom left corner and holding down the down and left arrow keys will make the circle attack hit you quicker than normal.
After being hit, prepare your mashing once again. Once Toriel appears, mash away her text.
You can hold up while mashing the text to move upwards as soon as you are able to. After mashing away Toriel's text, follow her upwards into the next room.
The beginning of Ruins
In the first room, walk up the staircase around the save point and into the door. Don’t bother saving, it just wastes time. In the next room, mash away Toriel’s text and hold up. You don’t need to move to enter the door.
This next room is a bit hard to do optimally. Hold up and right as you mash toriel’s text. When you get past the bridge, start wall humping and press Z when you pass the switch. Hold down and right until toriel walks out of the way, and then do the same thing for the 2nd switch. After hitting the 2nd switch, hold down right and mash away Toriel’s text.
In the next room, hold up-right while mashing away Toriel’s text and then interact with the dummy. Go to ACT and select “Talk” to spare the dummy.
In the next room, mash away Toriel’s text and follow her. You will encounter a froggit. Flee from the froggit. Mash away her text and watch the hand-hold cutscene. Take a sip of water, staying hydrated is important.
This next room is the hardest room in the game. Walk right and mash away toriel’s text.
The RNG Begins
The next rooms have random encounters. Unlike many categories, getting encounters is desirable because you need to have 7G to purchase an item you can after the napstablook fight that will allow you to skip the majority of a boss later in the game. To obtain G from monsters, you will need to encounter them and perform ACTs on the monsters and then subsequently Spare them. Here are the required ACTs for each monster to give gold.
- Whimsun: Terrorize, then Spare. Rewards 2G.
- Froggit: Compliment or Threat, then Spare. Rewards 2G.
- If you get the attack with a frog in the corner, run into the frog to end the attack early.
- Moldsmal: Flirt or Imitate, then Spare. Rewards 1G.
In the first room with the leaves, you will get a phone call at the very beginning. Mash the text and continue towards the bottom right. Do not bother using the save point, as it is unnecessary. With optimal movement, there is only a 38% chance to get an encounter in this room, so it is important to not continue to the next room without getting an encounter. Wallhump near the exit of the room if it is necessary to do so to get an encounter. Perform the necessary ACTs on whatever encounter you get, spare the encounter, and continue to the next room. If you accidentally enter the next room before getting an encounter, don’t worry about going back because going back will reset the step counter. There will be an opportunity to grind another encounter as a backup.
In the second room with the pit in the middle, fall down the pit, and if necessary, wallhump near the exit until you get an encounter. Perform the necessary ACTs on whatever encounter you get, spare the encounter, and continue to the next room. Again, if you accidentally enter the next room early, keep going rather than going back for the encounter.
In the third room with the single rock, you will get up to three phone calls. If you interact with the sign at the top of the room, you won’t get the third phone call. Go above the rock and hold Down+Right until the rock is on the switch, then let go of Down so you’re only holding right. An encounter in this room is unavoidable. Perform the necessary ACTs on whatever encounter you get, spare the encounter, and continue to the next room.
In the fourth room with the cracked tile maze, navigate through the maze and try not to fall. If you don’t know the path through the maze, the solution is shown by the leaves in the room below. If you skipped an encounter in an earlier room, grind for one here, ACT, and spare the encounter before entering the next room. Otherwise, keep going.
In the three rock room, stand to the right of the bottom rock and interact with the rock, letting it push you. After the third interaction, when the rock is on the switch, head towards the spikes until the rock moves off the switch, then turn around and start mashing. If you get an encounter while the rock is moving, you’ll be able to interact with the rock before the battle. This is called Rock Skip and is allowed in glitchless because it can be done accidentally. Once the rock is on the switch a second time, keep walking to the right. An encounter in this room is unavoidable, and depending on which encounter you get, you’ll need to ACT on a different monster.
- Froggit + Whimsun: Compliment or Threaten the Froggit, then Spare both. Rewards 2G.
- Double Froggit: Compliment or Threaten one Froggit, then Spare, then flee. Rewards 2G.
- If you get the attack with a frog in the corner, run into the frog to end the attack early. (This attack can only happen with a single Froggit, which is why you spare the first Froggit.)
- Single Moldsmal: Flirt or Imitate, then Spare. Rewards 1G.
- Triple Moldsmal: Flirt or Imitate one Moldsmal, then Spare all three. Rewards 1G.
In the room with the cheese, wall hump and mash Z to interact with the mouse hole. This is not needed, it’s just funny hearing the squeaks.
In the room with Napstablook, walk up to him and mash away the text. Select the default option on the choicer. In the battle, go to ACT and select “cheer” for the first 3 turns, and then on the 4th turn select either “cheer” or “flirt”. Make sure not to select anything else, as that can result in an extra turn at best and 2 minutes of timeloss at worst. The textbox after the third Cheer can be ended early by mashing Z/Enter.
After the Napstablook battle ends, mash away his text and proceed into the spider bake sale room to the right. Interact with the left web and buy a spider donut. You will need this to skip the Muffet fight later, so make sure you don’t eat it early. After buying the spider donut, exit the bake sale and go up into the next room.
The Rest of Ruins
From now until the end of Ruins, flee any encounters you get. If you accidentally spare the Moldsmal-Migosp encounter, you can run into the Migosp attack then spare again to recover some of the time back.
In the next room, simply walk to the end and mash away Toriel’s text. There’s a small chance you’ll get an encounter here.
In the room with the six pit traps, hold Down+Right to enter the bottom left pit. Pick up the ribbon, then exit the pit. The ribbon, as well as the rest of the armor acquired during the run, will be used during the Mettaton EX fight. It’s important that you DO NOT EQUIP ANY ARMOR BEFORE THE METTATON EX FIGHT. Once you equip the first piece of armor, the default piece of armor (the bandage) can’t be re-equipped, and fleeing is no longer guaranteed if you’re wearing any armor other than the bandage.
After exiting the bottom left pit, enter the top middle pit, interact with the switch, then leave the pit and exit the room.
There’s an alternate advanced route called Essay Skip Skip which involves skipping the ribbon. If you’re doing this route, enter the top middle pit only. The rest of Essay Skip Skip will be explained in the Mettaton EX fight. This route saves a couple seconds in 1.0-1.001, plus an additional second in 1.02+, plus a couple more seconds on 1.02+ console versions.
In the first perspective room, just walk down left to exit. In the second, interact with the first switch behind the pillar. In the third, interact with the switch behind the pillar at the end of the room. In the fourth, interact with the switch behind the pillar in the top left. The chance of getting an encounter is pretty unlikely, except for the fourth room where one is almost guaranteed.
In the next room, go up-right. Don’t bother with getting the toy knife, it’s not needed.
In the next room, mash Toriel’s text and enter the house. In the house, mash her text and then walk right. After she introduces you to your room, walk into the room and sleep in the bed. When you wake up, grab the pie, exit your room, and walk to the left until you get to Toriel. The pie saves about 30 seconds in total throughout the run, so make sure you don’t eat it early.
Talk to Toriel in the living room. Count how many choicers she gives you. On the 3rd one, select the rightmost option. If you miss it, you can just talk to Toriel once more and select the rightmost option. Mash her text and follow her into the basement.
Keep following her and mashing.
The Toriel Fight
This is the most RNG intensive part of the game, but also the last major RNG part. Keep sparing her throughout the fight, other options are pointless.
Toriel has many different attacks, but there are 2 we’ll be looking for: her hand attacks. You’ll want to run into the hands as soon as possible, since running into them ends the turn immediately, saving time. Each hand saves about 5 seconds.
The entire battle is 13 turns long, but the 13th turn is always harmless so realistically it’s only 12 turns long. You can get 6 non-hand attacks before losing time.
A good strategy is to count the turns in your head. When you’re at the later turns and your HP is still pretty high, start taking damage. The goal is to be at 3 HP entering the 12th turn, since getting hit at 3 HP also causes a turn cancel. Don’t worry about this if she’s giving you lots of hands.
There’s also another strategy you can do to get up to 8 hands instead of 6. View the gif below.
In this attack, the hitbox that spawns the fireballs is bigger than the actual fireballs. That means, with some careful positioning, you can take only 1 HP of damage. This allows you to get damaged by 2 more hand attacks, which saves around 10 seconds with good RNG. Note that this can only be done when you’re at 8 or higher HP, and it can only be done once. Doing it more than once is just a waste of health.
There is an even faster strategy that can potentially lead to 9 hands. Every time there’s a hand attack, there’s a 50/50 chance that a hand will spawn from the bottom. This hand does 3 damage instead of the usual 4. By hitting three bottom hands before reaching 7 or lower HP, you can get up to 9 hands total. If you only manage to hit two bottom hands, you still get a setup for 8 hands and if you only manage to hit one bottom hand, you get a setup for 7 hands. This is the most optimal way to do the Toriel fight RTA, if you’re able to react to the attack patterns fast enough.
After Toriel stops talking, just mash Z and Enter. When the battle starts fading out, hold up and mash away her text. Keep holding up throughout the entire thing.
Walk through the long hallway. Mash away Flowey’s text and enter the door.
Snowdin
Snowdin can generally be viewed as a test of your mashing and menuing abilities.
Snowdin Forest
Walk right down the long hallway, and be prepared to mash when you meet Sans. You will enter a cutscene with Sans and Papyrus talking. Mash all of their text. After the cutscene, continue right. Sans will talk again right before leaving the room, so prepare to mash again.
In the next room, interact with the save point to bring your health back to full. You will need to have health for a skip later in the game. You do not actually need to save here, you just need to interact with the save point.
After interacting with the save point, go over to the box, put all your items in the box, then take them back out. This will put the Tough Glove in your first inventory slot. Open your menu and equip the tough glove, then continue to the next room.
Mash through the next cutscene, and continue along the path.
There is an 11% chance to get a phone call somewhere in the middle of the path that wastes time. Prepare to mash in case you get the phone call.
There is also an unavoidable encounter in the room. Flee from the encounter.
Doggo
Continue Right. Once you reach Doggo’s house he will appear. Mash the text to start the battle.
Go to ITEM and use the stick. This will make Doggo Spareable on the next turn.
Doggo uses a slow sword attack that requires you to be completely still to dodge. You can speed up the attack by running towards the sword but stopping before getting hit. If you get hit by the sword, Doggo will no longer be sparable, and you will have to use the stick on him again. This means you have to take 2 turns on Doggo instead of the normal 1, which loses about 10 seconds.
Spare Doggo. Mash the rest of his text and continue right.
Papyrus’ Puzzles
In the room with the frozen pond, slide across the ice. Sliding across the ice will allow you to move without increasing the step counter, so you do not get an encounter in that room.
In Papyrus’ electric maze room, hold right while mashing to ensure that once the cutscene is over you get shocked by the maze as soon as possible. After the cutscene is over, walk through the maze, mash through the dialogue, and exit the room. The hitboxes of the maze are very generous, so you can cut some corners in the maze and still be fine.
In the room with the ball game, cross the bridge and continue down and to the right, making sure to not get stuck on the snowdecahedron.
In the next room, go right then mash when the cutscene starts. Walk past the paper on the ground. Mash through the cutscene, then continue right into the next room.
Continue right through the room with the cold spaghetti. Don’t bother saving, as it only loses time.
In the Snow puzzle room, immediately head to the switch to the top right of the room. Activate the switch. After that you should encounter the lesser dog. Flee from him. Head downwards and cross the bridge. The Dog Couple cutscene will begin. Mash their text and begin the battle.
Dogamy and Dogaressa
Once the battle begins, throw the stick. This will make Dogamy and Dogaressa spareable the next turn. Endure one attack. Spare the dog couple.
The axe attack is slightly faster than the dogs and hearts attack.
After the battle, mash the text and proceed downwards.
More of Papyrus’ Puzzles
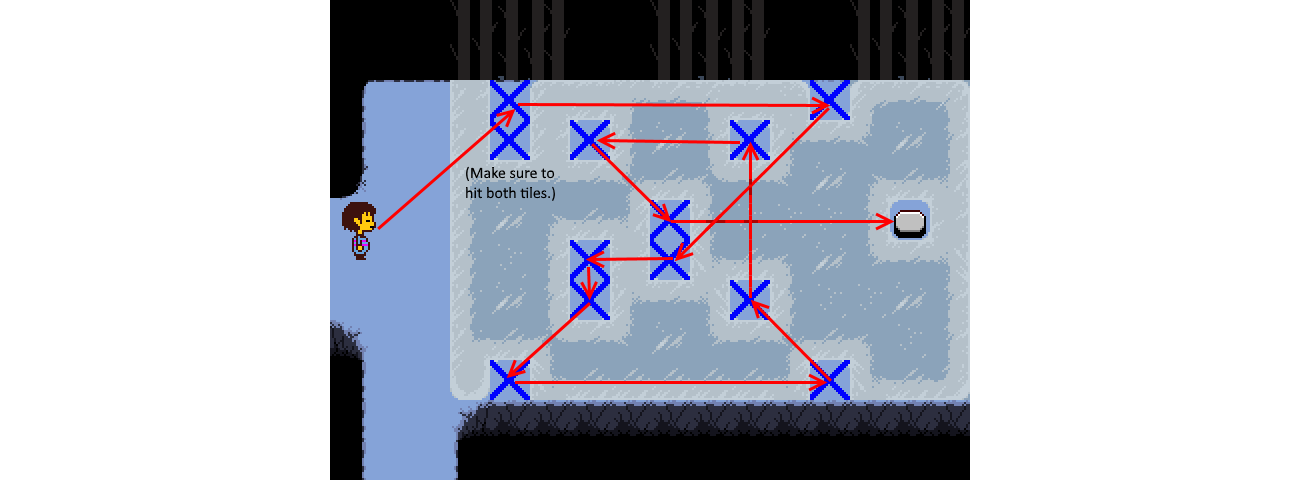
In the first XO tile puzzle room, turn the Xs into Os and hit the switch, then walk over to Papyrus. Mash Papyrus’ text and continue to the next room on the right.
In the second XO tile puzzle room, go to the first tree on the top of the room and activate the switch hidden inside it. Head towards the pressure plate, mash Papyrus’ text, hit the pressure plate, mash some more text, then continue to the room to the right.
The next room is the Colored tile puzzle room. Walk across the bridge and mash Papyrus’ dialogue. You will want to be careful here. He will ask you a question after a large amount of dialogue. Answer the 2nd choice. After this, another large set of dialogue will need to be mashed away. This is followed by yet another question. Answer the 2nd choice to this question as well. If you accidentally enter in the 1st choice on either question, you will have to wait out the color tile puzzle cutscene, which wastes around 15 seconds. After Papyrus exits the room, walk right past the tiles and enter the next room.
Ice puzzle
Complete the ice puzzle in the path that is shown in the image below.
If you mess up and fall, just go back up and try again.
Once you hit the button, slide right and walk to the next room to the right.
Greater Dog And The Last Room
Walk to the right and go to the snow poff blocking the exit to the room. Try not to get caught on any other snow poffs on the way there.
Watch the cutscene and begin the battle.
On the first turn, throw the stick at Greater Dog to make him spareable the next turn. After this you will get one of two turns. If you get an attack with a sleeping dog at the bottom of the frame, run into the dog to end the attack early. If you get a spear attack, get hit by the spear or dodge it, it doesn’t matter. The sleeping dog attack is around 3 seconds faster. After the attack, spare Greater Dog.
Alternatively, you can use the Ignore ACT on Greater Dog 4 times in a row. If you get all three sleeping dog attacks, you save about a second over using the stick to spare, but there’s only a 1 in 8 chance of this happening.
After the battle, walk right and exit the room.
In the Gauntlet of Terror room, walk across the bridge and trigger the last cutscene of Snowdin's Forest. Mash all of Papyrus’ and Sans’ text. Hold right as the screen slides back to you, and proceed right to Snowdin Town.
Snowdin Town
Walk right, and stop to go into the snowdin shop (house on the left). Purchase the Manly Bandanna. Don’t equip it. If you’re doing the Kindergarten Undyne fight, you’ll also need to buy a Bisicle here. Continue going right after exiting the shop. Don’t use the save point or the box. Use the igloo to get to the other side of town faster. After leaving the igloo exit through the right side of town.
Papyrus Fight
Walk down the hallway. Once the silhouette of both Frisk and Papyrus appear, Papyrus will begin to talk. Mash all the text and begin the battle.
This is the easiest boss fight in the entire run.
Select ITEM and throw the stick at Papyrus. Mash away the text. Papyrus’ speech bubble contains unskippable text but you will be able to end the dialogue very early, so mash Enter and Z.
If you accidentally use SPARE instead of throwing the stick, Papyrus will use his blue attack which can lose upwards of 12 seconds.
After throwing the stick, purposely run into the bones and take damage. Repeat this for 2 more turns. On the 3rd turn you will be put at 1 HP, and Papyrus will send you to his garage.
After being sent back to Papyrus’ garage, head back to him and mash his text again. Once you are in the fight with him, spare him instead of throwing the stick, and purposely get knocked down to 1 HP. Repeat this process one more time.
When you return to him the 4th time, Papyrus will let you choose to fight him again or to not fight him again. Choose the second choice to not fight him again. You need to be careful here because choosing the first choice to fight him again will cause you to lose almost a minute.
After choosing the second choice, Papyrus will give up on fighting you and spare you. Mash the large amount of dialogue. After that Papyrus will fly away. Proceed left to start the Papyrus Date.
Papyrus Date
Go to the front of Papyrus’ house and talk to Papyrus. Mash away his dialog and enter the house.
Go straight to the top left door and interact with it. Mash away Papyrus’ dialog and enter the door. Interact with him to start the date.
As soon as the date begins, press C. After that just keep mashing and mashing and mashing. When he asks you to search for his secret, interact with his chin. Any part of his head will work. 2 choicers will then appear. For the first one, you can just mash through it. For the second one, you’ll want to select the right option. This saves about 2-3 seconds. This is known as “spaghetti skip”.
Mash his dialog after that. The screen will turn to white and unskippable text will appear. Just mash Z and Enter for this. After the screen goes to normal, keep text mashing until the date ends. After the date ends, exit the house and continue right to Waterfall.
Waterfall
Waterfall is a calming part of the run. The only challenge is Mad Dummy and Undyne.
The Beginning of Waterfall
Keep walking right. Don’t save.
In the Waterfall and falling rocks room, hold right until you get to the middle of the waterfall, then walk into the secret entrance in the middle of the waterfall. Pick up the Old Tutu. Don’t equip it. After acquiring the Old Tutu, go back to the waterfall room and go into the next room on the right.
Mash the cutscene with Papyrus and Undyne. Continue right and mash the cutscene with Monster Kid.
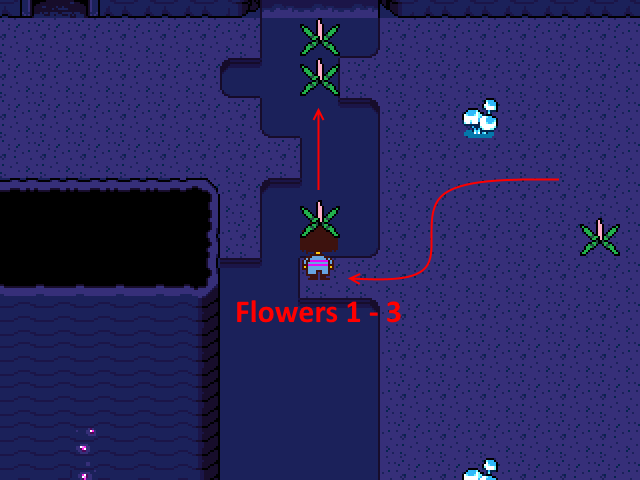
In the first flower bridge room, construct a bridge of flowers across the center. The pickup and placement of the flowers can be a bit finicky, so be careful. Hold right as the flowers are blooming to walk onto the bridge as soon as possible. Enter the next room on the right.
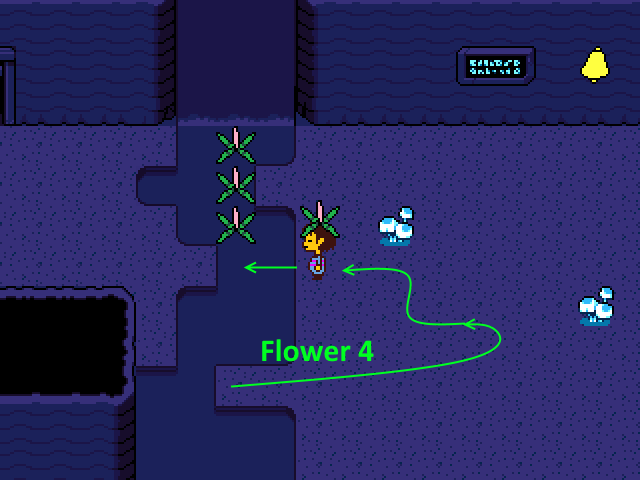
In the second flower bridge room, go right towards the bridge. You will get an unavoidable encounter just before the bridge. Flee from the encounter with Aaron. After walking across the bridge, go up and towards the flowers. Throw the flowers upwards from the bottom ledge extending from the right. With the fourth flower in hand, throw it from the right and complete the bridge.
After crossing the flower bridge in the second flower bridge room, you will get a phone call from Papyrus. Mash Papyrus’ text and go through the doorway at the top.
In the telescope puzzle room, go right and skip the telescope. Head upwards at the turn and go towards the secret exit. You will get an unavoidable encounter with Woshua somewhere near the telescope. Flee from Woshua. Interact with the wall at the top to reveal the hidden doorway. Enter the doorway.
In the Bridge room, head right and ride the wooden platform over to the right. Exit the room through the right.
In the long bridge room, Undyne will stop you for a cutscene, then throw spears at you while you run to the next room. You need to minimize the amount of times you get hit by the spears and to minimize the time you spend stopping to avoid spears.
Two things worth noting: 1) Undyne’s spears have a bit of RNG involved with them, but the differences aren’t huge. 2) Frisk’s hitbox is weird; They can get hit slightly below their feet, and the majority of their head doesn’t really seem to have a hitbox.
In the second room of the chase, literally just hold right to avoid the spears. After avoiding the spears and reaching the end, keep holding right so you will move as soon as the cutscene ends. After exiting the patch of grass, Monster Kid will come out of the grass and talk to you. Mash his text and then exit the room through the right.
Don’t bother saving in the crystallized cheese room unless you have taken a lot of damage in the spears chase scene.
There’s a 1/100 chance that you will walk into a special hallway after exiting through the right. This hallway will waste about 5 seconds to traverse. In addition to the 1/100 chance, there’s a 1/10 chance that a special door will appear in the hallway. Entering this door will lead you to Gaster. Whether or not you take advantage of the 1/1000 chance to interact with Gaster is up to you. If you get the special hallway, exit and re-enter the room. This is faster than walking through the hallway.
More of Waterfall
In the room with Sans and his telescope, walk past Sans and go down onto the bridge. Enter the next room.
In the next room with the assorted bridges and talking flowers, go right, then head downwards at the bridge. Skip the Ballet shoes. After you turn right at the bottom of the room, you will get a phone call from Papyrus. Mash his text and continue onwards. You will get an encounter on or after the 3rd bridge you cross in the room. This encounter will always be two moldsmalls. Spare them immediately after gaining control of the battle. Proceed upwards after the battle. Exit through the top.
Onion-san and Shyren
The next room is the Onion-san room. Walk up and then go right at the turn. Continue walking right and mash the text when Onion-san talks. Enter the next room on the right.
The next room is the Shyren room. Go right. You will encounter Shyren right after moving up or down to navigate the square in the room. Flee from Shyren. Don't go up, continue to the right. Enter the next room.
Walk right in the statue room and go to the next room.
Don’t grab an umbrella in the room with the garbage can full of umbrellas. Walk right to the next room.
Monster kid
In the first rainy hallway, go right. Walk up against the top wall while going right. This will make monster kid run behind you faster. Mash monster kid’s text and continue to the right. Go down at the turn and enter the next room.
In the second rainy hallway room, go downwards. Mash monster kid’s text along the way. Go right at the turn. Mash monster kid’s text once again. Enter the next room on the right.
In the room with the castle in the background, Wall Hump while moving right to gain a big speed boost. Exit through the right.
In the next room with the ledge, walk towards the ledge. Talk to Monster kid once and then wait for him to talk again. Once he talks again, mash his text, and interact with him once again. Once the cutscene is over and you have mashed the last of monster kid’s text, go right into the next room.
Don’t save in the next room. Keep walking right.
Undyne Spear Maze
Walk right in the next room. Trigger the cutscene and prepare to run.
The spears in the chase are fairly RNG-dependent, but you can easily manipulate where they appear. The game will try to predict where you will move and put spears there but it won’t account for if you’re moving into a wall or anything. So move against a wall and hold the directional key to walk into the the wall while still progressing.
In the long bridge room after the chase, keep walking right until you see the third set of spears fade away, then walk back. You don’t need to reach the very end of the bridge to end the spear chase.
After falling from the bridge you will get a short cutscene with unskippable text. Just mash Z and Enter.
After waking up on the pile of golden flowers, hold right and go right. The save point in the next room has possibly the longest dialogue for a save point in the game. Use it only if you really have to heal before mad dummy.
Mad Dummy
Walk into the Mad Dummy room and walk upwards.
Walk into the Mad Dummy cutscene.
Mash the text from the Mad Dummy cutscene and begin the battle.
Once the battle begins, move to MERCY and Spare the Mad Dummy. You will do this action for the rest of the battle.
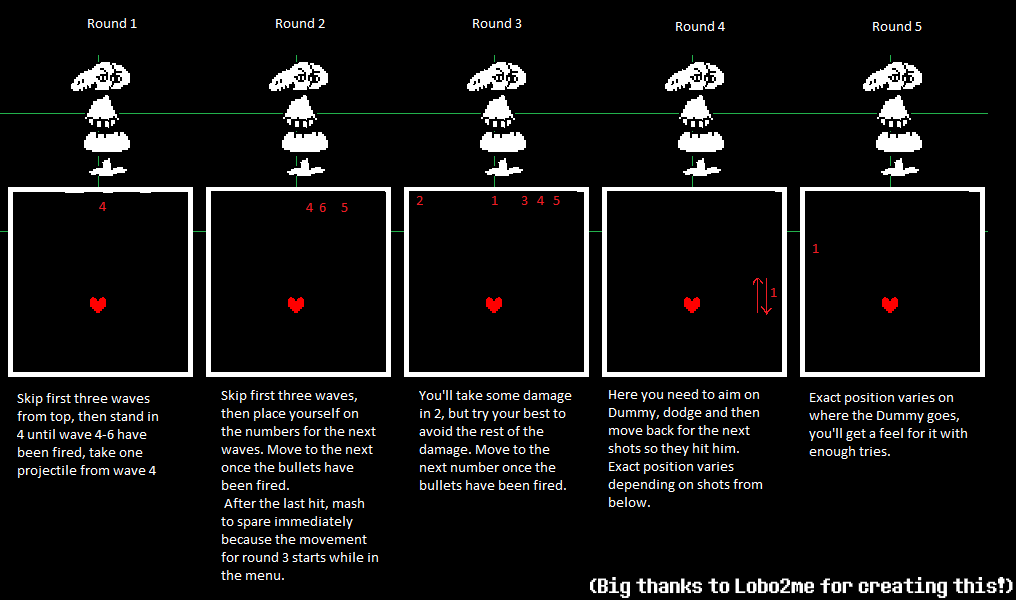
Land as many cotton balls on Mad Dummy as possible. During the first attack, dodge the first three waves of attacks, then position yourself at the top middle for the last three waves. Make sure you get hit by one cotton ball out of these waves, as this will set up attacks later in the battle. In this attack, the cotton balls only do 1 damage so there’s not much of a risk with health. Any other attack, though, the cotton balls will do 5 damage.
The cotton balls can become difficult to land as the attacks progress. The cotton balls have a fairly long travel time so you want to aim ahead of the Mad Dummy instead of at his current position. If you follow the positioning in the image and video below, you should be able to finish the first phase in 5 turns. This is 5 Cycle Mad Dummy.
Video on 5-Cycle Mad Dummy: https://www.youtube.com/watch?v=bMTqCu10XyA
After you finish the first phase, he will shout at his little dummies and then begin the rocket phase. When the first phase end, the dummies will appear from the edges of the battle box, so make sure you stay in the middle to avoid taking damage. In the second phase, you just have to dodge the rockets. Landing the rockets doesn’t matter at all.
After enduring three turns of rockets, Mad Dummy will throw a knife at you. Dodge it. Mash Z and Enter for the rest of the battle.
After the battle ends, mash the rest of Napstablook’s text. This text is skippable. Proceed upwards after you regain movement.
In the main hub room of Waterfall, walk up and mash Napstablook’s text. If you need to heal for Undyne, use the save point here. Then, enter the next room on the right.
The last few rooms of Waterfall
In Gerson’s shop hallway, walk right and enter the shop. Purchase a pair of cloudy glasses. Don’t equip them. Exit the shop after doing so and continue right into the next room.
After walking into the Firefly Hallway, walk right and exit into the room to the right.
In the mushroom puzzle room, you don’t actually need to light up the mushrooms to walk through the room. Look at the image below to see the path you will need to take.
In the lantern room, interact with the lamps as you pass them so you can see where you’re going. Enter the next room on the right at the end of the path.
In the “Behind you” flower room, hold up and right when entering the room to put yourself against the wall. After putting yourself against the wall, just hold right and mash. You want to talk to the “Behind you” flower as soon as possible, and mash away the text as soon as possible. Mash all the text for the cutscene.
After the cutscene, walk to the left and walk up the new path. Enter the next room.
In the Flower hallway room, go up and go right at the turn. Enter the next room on the right.
In the Monster kid bridge room, go to the right and trigger the cutscene. Mash all the text. When Monster Kid falls off the bridge, just run away to the right.
In the next room, mash Monster Kid’s text and go right across the bridge. Enter the next room to the right.
Undyne Battle
Once you enter the room with the large rock structure, hold up and right and run into the trigger for the cutscene. Mash the text for the cutscene. Once the screen pans back to you, the save will appear. Use this save if you need to heal or if you want to save.
Once you are ready to battle Undyne, walk towards the big rock structure. Undyne will jump down and battle you.
There are two different ways to fight Undyne. The normal fight is relatively straightforward, while the Kindergarten Undyne strat is much more difficult but saves about 8 seconds.
For the normal fight, you’ll want to use the Challenge ACT on the first four turns of the first phase. Using Challenge speeds up Undyne’s attacks. After each turn, mash away the battle box text like a normal textbox, then mash Z and Enter to end Undyne’s text earlier. Try to block as many attacks as you can, because taking too much damage will slow the attack speed down.
After you challenge Undyne four times, spare her. When she turns your heart red, make sure you flee. Keep running upwards into the next room until she catches you again.
For the second phase, challenge her three times, then Spare until she turns you red. When she does, Flee, then run up into the next room.
In the room with the “WELCOME TO HOTLAND” sign, walk to the 4th notch from the edge of the sign (see the picture below) and stop. Letting Undyne catch you here will skip a fourth attack cycle afterwards.

For the third cycle, challenge Undyne three times once again, then Spare the rest until you can flee. However, you’ll want to end this fight at low HP for a later skip. Make sure you end this phase at 1, 2, or 3 HP. The spears when you are green will do 5 damage, and the spear when you are turned red will do 4 damage. So, if you started with 20 HP, you will need to get hit by 3 spears and the very last spear when you are turned red. Keep in mind that the spear when you’re turned red has a hitbox that’s lined up with the shadow, not the spear itself. Also keep in mind that getting hit earlier in the fight can slow down later attacks, so it’s best to save your HP until the final attack. If you do all the Challenges and get to the final turn at 20hp, you can do nothing and automatically end the fight at 1hp.
After fleeing, continue to the right. Mash through the Papyrus phone call in the middle of the room and continue into the next room.
If you choose to do the Kindergarten Undyne strat, you’ll need a healing item, such as a bisicle. Start the fight by Challenging three times, taking one hit of intentional damage each time. On the fourth turn, use your healing item and take one more intentional hit. On the fifth turn, spare Undyne. This turn will be much faster and will be a random pattern, so be ready. After the fifth turn, Undyne will turn you red, but DO NOT FLEE. Keep sparing through the red attacks and into the green attacks. By doing this, Undyne skips straight to the final green phase. Like the normal fight, you’ll want to end this fight at 1, 2, or 3 HP. Use the unisicle if you need it, keeping in mind that you’ll need to get rid of it afterwards if you don’t use it.
Once Undyne turns you red a second time, flee. Run up and into the next room and keep running until Undyne catches you. This time, you can flee instantly. Run into the next room and keep running right. You don’t need to stop here like in the normal fight, so keep running, fleeing from Undyne when she catches you a third time and mashing away the Papyrus phone call. Continue into the next room.
Keep running past Sans and onto the bridge. Hold Up and Right on the bridge, and keep holding them until you run into the cutscene trigger in the next room. This will line you up perfectly with the water cooler.
When you regain movement, move right and interact with the water cooler, then move left and interact with Undyne. You don’t need to press Up or Down at all, because Undyne has an abnormally large hitbox here. Interacting with her above the bridge will cause you to be further to the right, saving a small amount of time.
After Undyne wakes up and leaves, continue into the next room. DO NOT HEAL OR INTERACT WITH THE SAVE POINT.
Hotland
Hotland features a lot of optimizations and small time saves.
The Lab
Don’t heal or use the save point. Continue to the right and enter the lab. In the Lab, walk to the right. Try to be as close to the upper wall as possible. You want to enter the cutscene from the highest point so that Alphys doesn’t have to walk as far during the cutscene. Trigger the cutscene. Mash the text. Experience the fancy lights. Once Mettaton is done talking, the battle will begin.
Spare Mettaton for the entire fight. The quiz will keep going until you reach 1 HP or Mettaton runs out of questions. If you’re at 1, 2, or 3 HP, you’ll only get two questions, which is the lowest possible number of questions. Each incorrect answer cuts your HP in half, rounding down. For the first question, answer anything but D. Spare Mettaton once again after his turn ends. Mash away the text. For the question about Alphys’ crush, the fastest answer is Undyne (A). Mash the rest of the battle.
Once the battle is over, continue to the right. Alphys will stop you to upgrade your phone. Mash through this cutscene and then enter the next room on the right.
Throughout hotlands you will get many random calls and notifications from Alphys. Be prepared to mash. After exiting the lab, go right and mash the various notifications you get from Alphys, then go up at the turn, and enter the next room.
The beginning of Hotland
In the room with the first set of moving floors, stay on the left side for the duration of the room. You will get an unavoidable encounter with Vulkin. Flee from Vulkin. Walk upwards and enter the next room.
In the room with the first set of vents, ignore the save and go to the right. Walk onto the vent pointing to the right. Next walk to the vent pointing up and walk onto it. Next, walk to the vent pointing right and walk onto it. Walk downwards and enter the room proceeding downwards.
In the Burnt Pan room, walk near the vent and wait for it to point leftwards. When it is pointing to the left, walk onto the vent. Fly over to the Burnt Pan and interact with it. Pick up the Burnt Pan. Equip the Burnt Pan, and then throw away the Tough Glove. If you equip the pan while on the conveyor belt, you will keep moving between closing the menu for the burnt pan and opening the menu for dropping the tough glove, saving a small amount of time. Walk onto the moving floor. Run back over to the entrance of the room and return to the room with the first set of vents.
After returning to the room with the first set of vents, use the vent to the left. Then walk to the vent pointing upwards and use it. Next, use the vent pointing to the left. Mash a few text boxes and then go up into the next room. In the Laser Hallway room, keep moving to the right and run into the first blue laser. If you didn’t heal after Mettaton’s quiz, you’ll be at 1 HP and Alphys will disable the lasers after the battle. You can’t die to these lasers, so don’t worry about dodging. After mashing away the text after the laser encounter, continue to the right. Don’t hit the switch. Exit into the room to the right.
East/West Puzzle
In the center East / West Puzzle room, go right and mash the multiple notifications. Go up at the turn. Mash a phone call. Ride the vent when it is pointing left or right. Complete the puzzles in the east and west rooms. Here’s the quick solutions for the puzzles:
- East Puzzle: Up, Left, Fire.
- West Puzzle: Up, Left, Down, Left, Fire.
Once you have completed the puzzles, go back to the center room and ride the vent when it’s pointing upwards. Wait for the big door to open then enter it. In the next room, walk up and then right. Mash a phone call, then ride the vents to the other side of the room. Exit to the right.
Cooking Show + Jetpack Minigame
In the dark room, walk right and up until you get a phone call. You’ll want to be against the upper wall when you get the phone call. Mash the text. Mash all the text after the lights come on. When you regain control, hold Up+Right and mash to grab all three ingredients, then walk down and place the food on the counter as soon as you can.
Mash the text for the rest of the cutscene. Once you regain control, go around Mettaton and go to the right. Hug the upper part of the wall when you approach the counter with the substitute ingredient. Mash the text for the cutscene, and begin the Jetpack minigame.
For the Jetpack minigame, you will not want to get hit. Each hit will lose a tiny bit of time. If you do it perfectly, you should arrive at the top by 15 seconds. When you arrive at the top, mash the rest of the text for the cutscene. When you regain your movement after descending to the floor, go right into the next room.
In the next room after the jetpack minigame, walk to the right through the rooms until you see an elevator. Go into the elevator. In the elevator, go to Right Floor 2.
There is an extremely low chance that you may see special NPC’s in some rooms with elevators. These NPC’s are known as Gaster followers, and they have around a .5% chance to appear. They’re nothing special really, they’re just a rare sight. If you see one of them, make note of them and don’t accidentally run into them. Walk around them and proceed with your run.
Floor 2
Exit the elevator. Ignore Hots Fireguy and go left and enter the next room. Simply hold left in Sans’ hot dog stand room. Exit left. In the long hallway room, hold down and left as you enter the room. Once you have reached the very bottom of the ground you can walk on, just hold left. Doing this will skip some notifications in the room. About ¼ of the way into the room, you will get an unavoidable encounter. Flee from the encounter, and continue down the room. When you come to the three way intersection, go down first, and enter the room proceeding downwards.
Inside the Stained Apron room, go downwards until you get a notification. You will get a friend Invite from Napstablook. Just mash this away. Go to the Stained Apron and interact with it, and pick it up. Don’t equip it. After that, return to the previous room. Go left at the intersection. Remember to hug the bottom wall. Go into the next room on the left.
The next room is the Three Switch Room. Hold up and left when you enter the room. You will get another phone call right before getting on the moving floors. Mash the text, then proceed onto the moving floor. You simply need to hit the first two switches to complete the puzzle. If you are accurate you can hold left during the entire duration of the puzzle. Once you are near the third switch, you will get another phone call. Mash it away, and then go left into the next room.
In the vent puzzle room, walk up to the first vent. You will get another phone call. Mash the text. Don’t press the button and ride the vent pointing left. After that, take the vents in this order:
- Down, Down, Left, Up, Down, Up, Up, Left.
Enter the next room to the left. The save in the Bad Opinion Zone room is a good safety save for what is about to come next. After saving (or not), exit through the left.
Royal Guards
In the Royal Guards room, walk to the left. You will eventually get stopped by the Royal Guards. Mash away their text. You will get pulled back, but then stopped once again. Mash away the text and begin the battle with the Royal Guards.
Go to ACT and select Guard 02. Select clean armor. In the next attack, try to touch the green 5 times. If you do not manage to do that, do the same thing next turn and try again. After Guard 02’s armor breaks, go to ACT and select Guard 01. Select whisper. Endure another attack. Mash the text for the cutscene. Once the cutscene is over, go to Mercy and Spare the Royal Guards.
After sparing the Royal Guards, go left, then up, then right. Enter the next room to the right.
News Show
Enter the dark room and hold down and right and mash through the phone call and cutscene. When the cutscene ends, walk down and right past the glass of water, and interact with the script bomb (It looks like a “blue-ish” book). You’ll want to interact with the script from the right side, which will position the dog in a better spot for later. Mash through some more text and the bomb countdown will start.
From where you interacted with the script bomb, you want to walk down the bridge and go left. If you ran into the earlier lasers at 1 HP, the lasers blocking the path will be disabled. Otherwise, dodge the lasers and run into the Game Bomb. Go to the ACT menu and hover over “Defuse Bomb” and press it when the bomb is in the defuse section of the screen.
Walk back to the right towards the moving platform. In order to not walk past the script bomb, when you are on the same horizontal plane as the bomb, hold down to stay in place and have the bomb move into you. Alternatively, you can aim towards the bomb and hit it without holding down. Repeat the process of going to the ACT menu to defuse the bomb.
Walk up and use the vent to go north to the present bomb. As soon as you interact with the bomb, start mashing enter and z to FIGHT the bomb as soon as possible to defuse it.
Use the vent to go the left and interact with the basketball bomb. You want to mash enter and z to FIGHT the bomb as soon as you can.
Go south and run into the dog bomb. Repeat the process of going to the ACT menu to defuse the bomb.
If done optimally, the glass of water should start coming towards you from the west and reach the middle of the area where the dog was. Walk into the Extremely Agile Glass of Water bomb and repeat the process of going to the ACT menu to defuse the bomb. Finishing with 63 seconds left on the countdown is optimal.
After the cutscene finishes, go right and go up at the turn. Enter the next room. In the long hallway after the News Show, go left at the turn and continue walking left into the next room. You will get a long phone call in this room, so be prepared to mash.
Go to the elevator and enter it. Go to Left Floor 3. After exiting the elevator, hold right and go to the next room. Hold right again in Muffet’s spider bake sale room. Go to the next room.
North/South Puzzles
In the North South Puzzle room, walk right, and mash a phone call with Alphys. After that, take this path in the maze of vents:
- Right, Up, Right, Down, Down, Right, Right, Down, Left, Down.
This will take you to the South Puzzle. Go down and enter the next room.
In the room with the Southern Puzzle, go down onto the moving floors. Hold right when the direction changes. To navigate through the blue lasers, simply hold left when you are near them, and let them pass by you. Start walking towards the puzzle room. You will get a phone call from Alphys, and she will ask you if you want to watch some anime with her. Tell her “...no...” to avoid listening to her talk about stupid anime and waste time. Enter the Puzzle room. Complete the puzzle with these inputs:
- Left, Up, Left, Left, Right, Fire.
After completing the puzzle, walk out of the puzzle room and go left and walk onto the floor moving to the left. Hold left while on the moving floor. Don’t stop to smell the flowers. Once you arrive at the end of the room, go up into the vent maze room.
Take this path in the maze of vents:
- Up, Left, Up, Right, Up, Right, Up, Up, Left, Up.
This will lead you to the northern part of the room. Go up into the next room and flee the scripted encounter.
In the Northern Puzzle room, walk up into the puzzle room. Use these inputs to complete the puzzle:
- Left, Right, Fire. That’s really it.
After completing the puzzle, go down and return to the main room.
In the main room, take this path in the maze of vents:
- Down, Down, Left, Down, Down, Right, Right, Right, Up, Right.
Continue walking right, and go up at the turn towards the door. Wait for the door to open. Enter the doorway.
In the next room, don’t save and go to the right into Muffet’s room.
Muffet
Avoid the Spider webs and go to the right. Mash the text boxes that pop up.
You can open a second game window to the main menu during the cutscene when you are stopped in the center to speed up a load coming up in a later room. When you reach the center, don’t move around as this delays the next cutscene and loses about 2 seconds. Mash Muffet’s text and begin the battle.
Immediately go to your items and use the spider donut. This is why you got it and have been carrying it this entire time. Eating the donut will make Muffet spareable the next turn. After eating the donut, mash Muffet’s text and spare her.
Once the battle ends, mash her text. Go back to the left and head towards the save point in the previous room. Save at the save point and return to Muffet’s room.
In Muffet’s room, go to the right and avoid the spider webs. Enter the next room on the right.
In the next hallway with the MTT poster, just go right into the next room.
Mettaton’s Musical
Walk to the right. When you are stopped and the text box pops up, close the game and reload.
Once the game has loaded back up, navigate the Musical room again. This time, mash the first text box. Once the screen pans up to Mettaton, mash carefully. On the sixth text box, Mettaton will ask you if you want to skip the musical. Select “Skip this” (the second option), and then mash the rest of the text, and get sent to the dungeon.
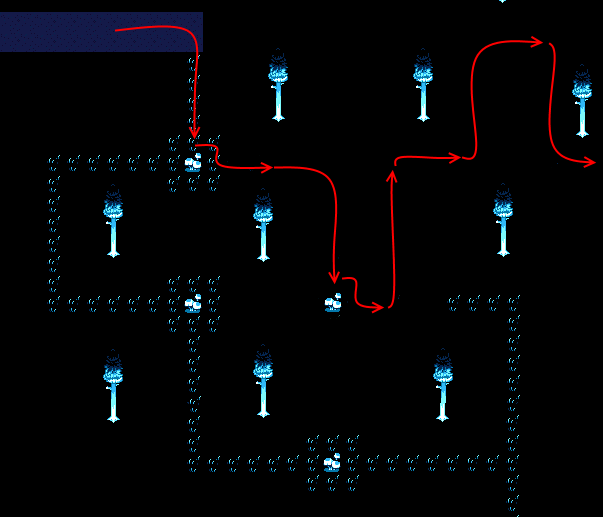
Next, you will need to complete the dungeon maze. Look at the image below for the path you will need to take. It’s much faster to complete the puzzle than to let the timer run out. If you finish the puzzle optimally, there will be 11 seconds left on the timer at the end.

Once the battle ends, mash a phone call from Alphys. Once that is over, go right and then go up into the next room.
In the next room, just go up into the next room.
In the room with the entrance to the hotel, go up into the hotel. Don’t go on a date with Sans, it’s unnecessary and wastes time.
In the hotel, go up, and dodge the fountain by going up and left. Continue going up into the core transition room.
In the core transition room, go up. You will trigger a cutscene. Simply mash all the text for this cutscene and progress upwards into the Core.
Core
One last hurdle to jump over before New Home.
First Rooms
In the first room of the Core, go up upon entering the room. You will get yet another phone call from Alphys. Mash the text away, then progress to the left doorway and enter it.
In the next room, there is a scripted battle. Walk up into the trigger for the cutscene. You will get another phone call, mash the text. After that, you will begin a battle with Madjick. Use the stick on the Madjick and Spare the next turn. Mash the rest of the cutscene and go up into the next room.
In the Laser Switch room, mash the phone call at the beginning of the room. After that, go to the switch. Hit the switch, and immediately go down and right. You can get some distance in before the blue lasers come. Stop for the two blue lasers. Once the two blue lasers pass, start moving onto the bridge and pass the orange laser. Cross the bridge. After crossing the bridge, mash the phone call. Go right and enter the next room.
In the next room, move right. Mash two phone calls you will get. Exit to the right.
Laser Hallway
After entering the Laser Hallway, head up and right. Walk into the trigger and mash away the text. Walk right until the lasers turn on and mash the text. Walk right and stop when the lasers turn back on. You can make it across after the lasers turn on 3 times. Go up after the phone call.
Core Puzzle
In first room of the Core maze, go left. In the next room, go up. In the next room, go left.
Complete the slider puzzle. The key presses you will need to do are:
- Up, Up, Left, Down, Left, Down, Left. Fire Twice.
Return to the first room of the with the save point. Go right, then up, then right again. This will put you in a room with a long bridge. Walk across the bridge. Near the middle of it you will get an unavoidable encounter. Flee from the encounter and continue to the right. Exit through the right.
In the last core room, a safety save is a considerable choice, but not necessary. After saving (or not), go into the doorway.
Walk up to Mettaton and begin the cutscene. Mash all the text. Once the music ends, the battle will begin.
Mettaton EX Battle
For the first phase, simply Spare Mettaton and mash his text. On the first attack, make sure you don’t keep mashing after clearing the last textbox or else you’ll shoot Mettaton and lose several seconds. It’s very important that you do not take damage in the first phase. Once you get a phone call from Alphys, go to you ACT menu and select Mettaton, then select Turn. Mash the text for the cutscene, and then the second phase will begin.
If you’re doing the Essay Skip Skip route (i.e. you skipped picking up the ribbon in Ruins), skip to the next red paragraph. Otherwise, you’ll have 5 equippable items that you’ve been carrying around for the whole run. In order to spare Mettaton as quickly as possible, you need to get his ratings up to 12,000 or higher. Each equippable item raises the rating by 1500, which can get the ratings up to about 11,500. For the other 500, you will need to shoot obstacles and/or take damage.
- Shooting the legs or arms will increase the ratings by 5 (note that these can be shot multiple times). Shooting a robot or bomb will increase it by 20.
- Getting hit will increase the ratings, but decrease with each hit (+50, +25, +20, +15, then +10). You will want to plan your hits out so you don’t die. It’s recommended to use one hit to damage boost through a group of three legs and rapid fire shoot the legs while you’re inside them.
- Ratings will decrease in between turns, so you need to be quick or you can lose a lot of ratings.
- There can only be one yellow bullet on screen, so shooting closer to an object will make you be able to shoot again sooner.
In order to finish the fight optimally, perform the following actions:
- First turn: Equip the Old Tutu (ITEM > Left > Z) and shoot the legs repeatedly.
- Second Turn: Equip the Faded Ribbon (ITEM > Right > Z) and shoot all 8 robots. You can do this by going to the top corner and shooting four times and then go to the opposite bottom corner and shoot 4 times.
- Third Turn: Equip the Cloudy Glasses (ITEM > Left > Right > Z) and shoot the legs repeatedly. You can shoot the legs faster by taking intentional damage and shooting while inside the legs.
- Fourth Turn: Equip the Mandana (ITEM > Down > Right > Z) and make sure to shoot all 5 robots.
- Fifth Turn: Equip the Stained Apron (ITEM > Left > Down > Z). If you were quick enough, you will end the battle there.
If you do the battle fast enough, you should skip the Essay turn. If you didn’t get to 12,000 ratings, type “hotfinenticute” for your essay to get 360 ratings, or “legs” to get 350, then throw the stick for 700 ratings.
If you’re doing the Essay Skip Skip route, you’ll only have 4 equippable items and you’ll have to make up the rest byhitting additional obstacles, the essay, and throwing the stick. When you get to the essay, you can save time by making your essay 1 character long if you have enough ratings to afford the lower reward (80 ratings). Keep in mind that throwing the stick earns 700 points.
- First turn: Equip the Mandana (ITEM > Down > Z) and shoot the legs repeatedly. You can shoot the legs faster by taking intentional damage and shooting while inside the legs.
- Second turn: Equip the Old Tutu (ITEM > Down > Right > Z) and shoot all 8 robots. You can do this by going to the top corner and shooting four times and then go to the opposite bottom corner and shoot 4 times.
- Third turn: Equip the Cloudy Glasses (ITEM > Left > Z) and shoot the legs repeatedly. You can shoot the legs faster by taking intentional damage and shooting while inside the legs.
- Fourth turn: Equip the Stained Apron (ITEM > Left > Right > Z) and make sure to shoot all 5 robots.
- Fifth turn: Use the stick and enter a single character into the essay (80 ratings), or if you’re short on ratings, answer with “hotfinenticute” (360 ratings) or “legs” (350 ratings).
- Sixth turn: Act > Pose. (600 ratings at 1hp)
Video demonstration: https://www.youtube.com/watch?v=9AbD_jPYNx0
Once you acquire 12,000 ratings, the battle will end and a cutscene will play. Mash all the text in this cutscene. The battle will end after it.
After the battle ends, Alphys will come into the room to talk to you. Mash all her text and progress upwards into the next room.
Alphys and Long Elevator
Once you enter the hallway after Mettaton, hold up and right. Move down the hallway. Alphys will return once again you talk to you. Mash her text as you move down the hallway. When you arrive at the elevator, interact with the door and mash all of Alphys’ text. Walk into the elevator.
If you’re using the Switch version of Undertale, you can just walk back out of the elevator to appear in New Home. Otherwise, interact with the elevator panel and wait out the painfully long time it takes for the elevator to reach the top. Once the door opens, walk out of the elevator.
After exiting the elevator, go right, then go up at the turn and enter the next room. Don’t bother saving.
In the next long hallway, hold up and right. Just hold right once you are on the path. Enter the next room to the right.
In the next room, go right then up. Enter the next room.
In the New Home Entrance room, just head towards the doorway and enter it. Don’t save.
New Home
The boring part of the run if you already know the story.
Go left once you enter New Home. Go into the living room. Walk towards the kitchen. On your way, you will get your first encounter. Mash Z and Enter to end the encounters as soon as possible. You will get many more after this one. Walk into the kitchen and grab the key. Leave the kitchen and go back and exit the living room back into the main room.
Walk right into the hallway and grab the key. Walk left and exit to the main room.
Unlock the gate, then go downstairs.
After that, just continue doing monstertale. There’s nothing more to monstertale after this.
Once you reach the Judgement Hallway, save at the save point.
Sans Judgement Skip
Walk down the Judgement hallway. When you hit the Sans trigger, leave the original window open while you open a new window to the main Continue/Reset menu. Wait until Sans’s first dialogue box appears, then close the original window and press Continue on the new window. Reloading here makes Sans’s dialogue skippable. After reloading, walk through the right and mash through all of Sans’s dialogue.
Walk through judgement hall and into the hallway before the throne room. Enter the throne room and mash through the cutscene. Save in the throne room after the cutscene. Enter the barrier hallway and mash through the cutscene. After doing this, make sure you have the Burnt Pan equipped, then enter the Barrier room.
Asgore
Mash Asgore’s text once you enter the Barrier room. Begin the fight.
On the first turn, use the pie to lower Asgore’s defense and attack.
On any other turn, you should choose to FIGHT, unless you need to do a safety heal.
This fight is why you got the Burnt Pan. The Burnt Pan is a weapon capable of dealing massive amounts of damage - far more than any other TPE / neutral weapon you’re able to get optimally in a run.
However, to deal a lot of damage with the Pan, you must land a perfect hit. A perfect hit consists of landing 4 white bars frame-perfectly (1 frame window) in the center of the attack meter. This is very difficult to achieve but extremely rewarding.
There are three types of hits you can get with the Burnt Pan:
- A regular hit, which consists of landing 4 bars anywhere near the center. This deals around 90 - 140 damage depending on accuracy.
- A gold hit, which consists of landing 3 perfect hits and one regular, or 2 perfects and 2 very close hits. This deals around 170 - 185 damage.
- A quad, which consists of landing 4 perfect hits. This attack can do 330 or more damage, effectively doubling or tripling your normal damage.
The battle mostly consists of attempting to land the perfect hits to beat Asgore faster.
Asgore’s battle length is usually measured in turns. A perfect, flawless Asgore is ten turns long. A beginner’s Asgore will likely be around 23 turns. Getting the perfects will reduce the turns it takes to beat Asgore.
Another rule of thumb is that a good Asgore fight will end before the music loops.
Asgore is by far the most difficult enemy to beat optimally. Don’t expect to beat him very quickly your first few times fighting him.
After dealing the final blow, mash Asgore’s text. The first part where everything fades away has un-mashable text, but after that it is mashable. After mashing all of his text, hold left and hit FIGHT.
Watch Asgore die and mash away Flowey’s text. Once the game closes, quickly relaunch it. You can start opening the game early to minimize the loading time, but make sure you don’t open it too early.
Flowey
Once the game relaunches, mash Z and Enter until Frisk appears. Walk up and interact with the save Point. Mash Z and Enter to end Flowey’s text as soon as possible. Begin the fight.
From a speedrunning standpoint, Photoshop Flowey is mostly an autoscroller. The fight is fairly easy once you figure out how to dodge everything. Newer players might die to Flowey once during their 2nd or 3rd time fighting him, but after that it shouldn’t be too difficult.
That being said, though, still try to dodge things. It’s still possible to die to Flowey.
One important thing to note: You cannot die during the individual ‘soul’ phases with the ACT button. Take as much damage as you would like during these.
Here is what you should do during each phase:
- During the Spinning Knives phase, wait for the knives to move left or right. Move in the directions that the knives move, and go up to the very top of the screen on the side that the knives moved to. Wait around for an ACT button and hit it.
- During the Tough Glove phase, move a little bit to the left and then move to the top of the screen. You will notice a circle of gloves come out of the very top. On the left side of the circle, the ACT button will appear. Stay there to hit it as soon as possible.
- In the Ballet Shoes phase, simply hold right and hug the right side of the screen, and mash Z and Enter. The ACT button will appear from the right. Staying inside the stars above you will ensure that you hit it as soon as possible.
- The book phase has a bit of RNG. There’s a 50/50 chance that the ACT button will come out of either side of the books, so it’s mostly a coin flip. You can just stay in the center and wait for the ACT button to appear. The ACT button will appear somewhere at the top portion of the area you can move in.
- In the Pan Phase, the ACT button will fly out of the middle pan. Just stay above the middle pan and wait for the ACT button to fly out, and hit it.
- The Gun Phase is a bit tricky. Move down to the bottom right of the screen and continue to hold down+right. Count the volley of bullets that the gun shoots. On the 8th volley of bullets, the gun will shoot the ACT button on the last shot. Hit the ACT button. Once the screen flashes and the gun shoots clovers, close the game.
Relaunch the game after closing it, or open the game early for a faster loading time. After relaunching the game, mash Z and Enter to clear Flowey’s text.
For the last part of the fight, try to stay on the FIGHT button as much as possible. Try to stay within the rectangle so you can hit it as soon as possible.
There’s a strategy to kill Flowey slightly faster than normal called Flowey Quick Kill, which involves delaying hitting certain FIGHT buttons with the correct timing. The FIGHT buttons to delay are #13, #25, and #36. See the video below and try to use the music to time the FIGHT button presses.
https://www.youtube.com/watch?v=kpBHCS_jTII
After dealing the last blow to Flowey, mash his text. When he circles you with bullets, edge yourself under the circle of bullets a bit so that when Flowey tries to hit you with the bullets, you hit them as soon as possible. After getting hit by the bullets, wait for Flowey to die.
There’s another reload you can do during the fadeout when Flowey dies. The game saves when the screen finishes fading to white and starts fading to black, so you can open another copy of the game to load up this save early and save a couple seconds.
When you start to hear the wind sound effects, start to hold left for about a second, then mash Z and Enter to hit the FIGHT button. After Flowey’s text appears, close the game and relaunch it, or open the game early for a faster load.
After launching the game, you will be in the final room with Flowey. Go up and around Flowey. Touch the Doorway. If you still have other instances of Undertale open, make sure to close them at this time to prevent the game from progressing in those instances and overwriting your save.
When you hear the “THUD” and the “UNDERTALE” text appears, close the game and relaunch it. Alternatively, you can open a new instance of the game early for a faster load time.
Dates and True Lab
Some dates and then the True Lab. Not much else.
Backtracking
Completing a Neutral ending is one of the requirements for the True Pacifist ending; however, there are still other things to do afterwards. Next up is dating Undyne and Alphys.
If you saved in the correct spot, you will appear at the end of the Throne Room. Walk down out of the throne room and hallway before throne room. Walk back through judgement hall and walk through the doorway above you. Walk into the elevator. Go down to the room with the entrance to the long elevator. Walk into the long elevator.
If you’re using the Switch version of Undertale, you can just walk back out of the elevator to get to Core. Otherwise, interact with the elevator panel and exit the elevator. Walk left through the hallway and down through Mettaton’s room. Continue downwards in Mettaton’s room. Take the elevator to the right, and keep walking down until you are back in Hotland.
Go right and take the elevator to Left Floor 1. Exit the elevator and go down to the Hotland Ferry area. Take the Ferry to Waterfall. Don’t accidentally go to Snowdin.
Undyne Date
Mash the Ferry person’s text as you’re riding to Waterfall. After getting off the Ferry, be careful to not talk to the Ferry person again.
Head up after getting off the Ferry. Exit to Gerson’s shop hallway. In Gerson’s shop hallway, go left at the three way intersection. Exit through the left. Go into the top left exit in the main hub room.
At the outside of Undyne’s house, talk to Papyrus. Select the first answer choice that comes up. Mash a ton of text. Follow Papyrus into Undyne’s house.
Inside Undyne’s house, mash a lot more text. When you regain movement after talking to Undyne by herself, go up and right and interact with the stool. Sit on the stool.
Hold right and mash Undyne’s text. After Undyne throws the spear at the table and you pick it, keep holding right until the spear points at the box of tea bags. Hit Z or Enter immediately when the spear points at the box of tea bags.
The rest of this date is pretty much just mashing the text. Select the first option for whatever dialogue option comes up. Press Z and Enter to stir the noodles when prompted. Hold right when you are asked to turn up the heat.
When the house catches on fire and Undyne challenges you to a battle, mash the battle text and FIGHT her as soon as possible. Don’t worry about landing an accurate hit, just end the attack as soon as possible.
After hitting Undyne, mash the rest of the date. After receiving Undyne’s letter, go back to the Waterfall Ferry and ride the Ferry to Hotlands.
Alphys Date
After riding the Ferry to Hotlands, once again avoid accidentally riding the Ferry again. Exit upwards to the area outside the lab.
Go right to the doors of the lab. Interact with the door. Mash and choose the first option for the dialogue choice. Mash a bunch.
In the first part of the date, if you mash fast enough, you can actually skip the part where the “DATING START” text builds up. It will just appear instantly. There are three different “DATING START” lines you can skip.
The date is 99% just mashing. Always choose the first choice that comes up. The first choice is always faster, and anime is definitely real.
After mashing all the text and ending the date, you will end up in the garbage dump again. Simply go back to the Waterfall Ferry and go back to Hotland.
Once you return to Hotland, go back to the lab. Enter the lab. Walk to the sliding door at the end of the lab with the note in front of it. Enter the sliding door doorway. Interact with the interface of the elevator. Hold down during the cutscene so you can move out of it as soon as possible when you regain movement.
True Lab
After exiting the elevator, go right and enter the next room. In the pre-True Lab hallway, walk right then turn up at the turn and walk into the next room. You can save at the save point in the main hub if you need to. Proceed to the left into the next hallway. Continue heading left into the next room.
Memoryhead
In the sink room, interact with the first sink over and over by mashing the text, until the amalgamate cutscene begins.
In the fight with Memoryhead, use the ACTs Cell, then Refuse. Then spare Memoryhead. Grab the red key and enter the room to the north.
Go up to the hole in the wall and insert the red key. Walk back down into the sink room and exit to the right. Then continue through the hall into the main hub. Go to the upper right and enter the unlocked door.
In the bedroom, hold up and right when you enter the room. Interact with the bed with the bedsheet pulled over the pillow as you pass it and pick up the yellow key. After getting the yellow key, go up, take the save if you need it, and enter the door in the top of the room. In the next hallway, go to the right.
Endogeny
In the Endogeny hallway, hold Up and Right and mash when you get near the switch to interact with it as soon as possible. Select “Yes” and hold left to move towards Endogeny after the cutscene. Use the stick and spare Endogeny, then head to the left into the hallway.
Keep going left until you see a door heading up. Enter the door. Walk towards the bathtub and interact with it when you reach it. Grab the green key, leave the room, and continue to the left.
Lemonbread
Enter the room to the left, and head upwards into the room to the north. Use the yellow key on the yellow key hole and exit the room. Interact with the “save point” to start the Lemonbread fight.
Use the following ACTs: Hum, Flex, Unhug. Then spare Lemonbread and proceed to the left into the next room.
Snowdrake’s Mom
In the room with the fridges, interact with the last fridge once and head towards the doorway to the left. The amalgamate cutscene will start. Use the Joke ACT until the battle ends. After the battle, don’t grab the key yet. Proceed into the room towards the upper left and insert the green key into the green key hole. Exit the green key room and grab the blue key. Go behind the fridges and press Up+Down for a speed boost. Exit to the right into the Lemonbread room, then proceed to the right into the next hallway.
Proceed down when the path splits to return to the bedroom. Save if you need to and head into the hall to the right.
Reaper Bird
In the reaper bird hallway, walk right and enter the reaper bird fight. ACTs for Reaper Bird: Pick On, Mystify, Pray. Then Spare. On the third attack, there’s a safe zone on the far right side of the battle box.
After the fight, walk into the room at the end of the hallway. Insert the blue key into the keyhole and leave the room.
Exit the hall to the left to return to the bedroom. Hold Down+Left to take the optimal path through the bedroom and keep heading to the left until you return to the main hub.
Generator Room
Enter the main door in the middle of the hub room and proceed through the hallway until you get to the generator room. Interact with the generator and select “Yes” to turn the generator on. Mash through all the text, then go back down into the hallway. Continue to the right. When you get to the elevator, mash the text and wait for the elevator cutscene to end.
Asriel
The final boss, the final cutscene, the final text box.
After the elevator cutscene ends, you will appear in front of the long elevator covered in vines. Hold right and go up into the next room.
Go into the elevator to the left. After taking the elevator, go down into the Judgement Hallway. Walk all the way to the barrier room.
Mash Asgore’s text when you enter the barrier room, and begin the battle.
Mash through the entire cutscene until the screen fades to white. Prepare for the final battle.
First Phase
The battle doesn’t progress until the rainbow effects start, so you have a couple turns to do some setup for the battle. First, go to your inventory and use the bandage to clear some inventory space. Then go to ACT and use Dream, which will give you two healing items. Then wait for the rainbow effect to start.
During the first phase, you can use Dream, Hope, or Spare, or use a healing item. Hope makes you take less damage but loses a small amount of time due to more menuing. Dream refills your healing items and heals you by 5hp. Spare is the fastest option but doesn’t heal you or raise your DEF. If you die during the battle, you’ll respawn a few turns back. Do NOT close out the game at any point as there is no autosaving in this battle.
Mash away Asriel’s text when he talks in the battle. Use the Last Dream before the 13th turn if you have below 20 HP (You’ll know it’s the 13th turn if in the previous turn Asriel will comment on your determination being ‘delicious’).
On the 13th turn, Asriel will use his "Hyper Goner" attack. Many diamonds will be summoned around you and you will have to dodge them. If you get hit by a diamond, you will be set to one HP. If you manage to not get hit, you will still have 20 HP. Not getting hit is a little faster than getting hit.
After Asriel’s Hyper Goner attack, he will begin his second phase. Whether or not you got hit by the Hyper Goner attack will affect the second phase.
Second Phase
If you were hit during the "Hyper Goner" attack, die during the first attack as fast as you can. Then die once again on his 4th attack. Doing this will end the attacks sooner and save some time. If you didn’t get hit, try your best to not die. That’s about it.
You can confuse Asriel’s bullets just like Undyne’s spears, but the manipulation is pretty unreliable and his attacks are still very RNG based.
After enough attacks, the screen will fade and text will appear. End the text and the screen will flash. Asriel’s third phase will begin.
Third Phase
Be careful not to select FIGHT.
Go to to the SAVE menu. It doesn’t matter what order you save the people in.
For Undyne, use any ACT for 2 turns, end with using 'Recipe' on the third turn.
For Alphys, use any ACT for 2 turns. shoot all of the robots and bombs to end the turns faster. End with Quiz on the third turn.
For Papyrus and Sans, use an ACT twice on Papyrus, then use Judgement on Sans.
For Toriel and Asgore, use the Pie first, then use ‘Hug’ on Asgore.
After saving everyone, use SAVE one more time. For the rest of the fight you just Save or Spare and mash away the text.
Child Asriel
After the battle, Asriel will turn back into a child. This is mostly just more mashing. Keep mashing until he lifts off the ground and breaks the barrier.
After breaking the barrier, Asriel will have one more set of dialogue. You will have to make a choice to either comfort or not comfort Asriel in this dialogue. Choose to not comfort Asriel, which is the 2nd choice. If you accidentally choose to comfort Asriel, you will hug him and waste about 22 seconds. This is usually referred to as the Goat Hug.
After hugging or not hugging the goat, mash the rest of the text. The screen will fade to white.
You can start opening another copy of the game after mashing Asriel’s last bit of text, but don’t close the current window yet.
Post-Asriel
Mash the text that appears after the screen fades to white. Once the screen fades back to normal, mash the text for the rest of the cutscene where everyone talks to you. When Toriel finishes talking to you and everyone turns top face forward, close the game and reload in the window you opened before. This reloads you to the other side of the room, saving a few seconds.
Go right and enter the doorway at the end of the hallway. In the final room, walk up. Touch the door, mash the text, and choose the 2nd option that comes up for the question.
On the final cutscene outside the underground, just mash away. The choices you make don’t matter. For the last question when you’re just with Toriel, pick the first choice. When she holds your hand and faces right, she will say the last text box of the run. Mash this text box and stop your timer.
STOP YOUR TIMER WHEN YOU CLOSE THE FINAL TEXT BOX WITH TORIEL SAYING "Everyone is waiting for us!"