The Official WMMT6RR Guide
Hello and welcome to the unofficial, official guide to Wangan Midnight Maxi Tune 6RR (WMMT6RR.) This was created by D★DOG (Dylan) to help remind himself the mechanics and for the girls in his life, so they learn how to play WMMT at a good level. This has been slightly rewritten and updated to match WMMT6RR new max 840HP tune. When there is additional information to be included, they will be updated down below. So now let’s get into it!
Story Mode Guide
This is the complete guide to how to play the story mode in WMMT. If you are starting on a new car without a discard car, put all first ten points into power. Then when you completed that, place the next ten points into handling. By then you will be at 600hp. Afterwards you may place them wherever you may like. When starting a new car, the first loop of story mode is set to easy with traffic in set positions on the track. This can make obtaining a yellow tachometer for that car easy. If you want to get the yellow tachometer you must not lose a race, MAKE SURE YOU HAVE RETIRE SETTING TURNED “ON” before attempting the yellow tachometer. Also to note the real race will be determined from 3km left. Never make a big mistake from this point, your absolute last chance to retire is at 2km.
When you have completed the first loop and are starting your second loop or more of story mode, you need to focus very hard on not crashing if you want to not lose. If you want to get the rest of the tachometers, you need to go undefeated. When playing story mode on your second loop or more, you can play it a bit more safely by having your car race turned to 720hp (or having the tune setting anywhere on Balance). You will win with a small advantage (no less than -50m) so make sure you bring your A game. Be aware that traffic will now start randomly spawning in different positions on the track and AI will get rough with you even more. Don’t breathe easy until the race is over and you finish first.
Below are tables with what HP setting I used personally in my 5th loop for each chapter and what the advantage gap was when I finished the race. Be warned there are quite a few story missions that will absolutely ruin you if you are not prepared. Now these are just a suggestion from WMMT5DX+ era when the max hp was at 830. Now with 840hp in WMMT6RR, this can become more challenging. I will leave a little asterisk mark at the end of the advantage if this particular story mission can cause harm and pain to your stomach and wallet. And you can refer below the tables for additional information to that mission.
1 - 800hp - 70m Advantage - Ignore Devil Z 2 - 800hp - 50m Advantage 3 - 720hp - 40m Advantage 4 - 720hp - 3m Advantage - Take Caution 5 - 720hp - 45m Advantage | 6 - 720hp - 40m Advantage - Ignore Reina 7 - 720hp - 30m Advantage - Ignore Ishida 8 - 720hp - 30m Advantage* - Overtake at 1.1km 9 - 800hp - 30m Advantage - Ignore Devil Z 10 - 720hp - 5m Advantage - Ignore Ishida |
11 - 720hp - 30m Advantage - Ignore Reina 12 - 720hp - 25m Advantage - Can boost off Z31 15 - 720hp - 30m Advantage - Ignore Devil Z, R32. | 16 - 720hp - 45m Advantage - Ignore Devil Z 17 - 720hp - 30m Advantage - Watch for traffic swing 18 - 720hp - 30m Advantage - S bend R/L @ 1.5km. 19 - 720hp - 30m Advantage* - Ignore Devil Z. 20 - 720hp - 10m Advantage - Take Caution |
21 - 720hp - 40m Advantage - Ignore Blackbird 22 - 720hp - 30m Advantage - Toll booth @ 2.4km 23 - 720hp - 40m Advantage* - Take Caution 24 - 720hp - 34m Advantage 25 - 720hp - 19m Advantage | 26 - 720hp - 30m Advantage - Ignore R33 27 - 720hp - 200m Advantage 28 - 720hp - 25m Advantage* - End line = straight 29 - 720hp - 40m Advantage* - Hairpin @ 1km 30 - 720hp - 38m Advantage* - Hairpin @ 3.5km, 800m |
31 - 720hp - 20m Advantage 32 - 720hp - 20m Advantage 33 - 720hp - 18m Advantage 34 - 720hp - 30m Advantage* - Get in front by 1.3km 35 - 720hp - 20m Advantage* - Hairpin @ 800m | 36 - 720hp - 32m Advantage - Ignore R33 38 - 720hp - 26m Advantage 39 - 720hp - 13m Advantage - Tight turns @ 1.3km 40 - 800hp - 19m Advantage - 5km the R33 dies |
41 - 720hp - 40m Advantage 42 - 720hp - 32m Advantage 43 - 720hp - 16m Advantage 44 - 740hp - 19m Advantage 45 - 720hp - 300m Advantage | 46 - 700hp - 23m Advantage 47 - 720hp - 27m Advantage 48 - 700hp - 20m Advantage - Left Hairpin @ 1.7km 49 - 720hp - 15m Advantage 50 - 800hp - 27m Advantage |
51 - 720hp - 100m Advantage 52 - 720hp - 30m Advantage 53 - 720hp - 60m Advantage 54 - 720hp - 60m Advantage* - Traffic Swing 55 - 700hp - 110m Advantage | 56 - 720hp - 30m Advantage - Take Caution 57 - 720hp - 18m Advantage - Take Caution 58 - 720hp - 18m Advantage - Hairpin last corner 59 - 720hp - 38m Advantage - Take Caution 60 - 740hp - 4m Advantage |
61 - 720hp - 30m Advantage - Left wall @ 2.7km 62 - 720hp - 20m Advantage* - Left wall @ 1.1km 63 - 720hp - 35m Advantage 64 - 720hp - 30m Advantage 65 - 720hp - 20m Advantage - Ignore Tomoya (R34) | 66 - 720hp - 33m Advantage - Toll booth @ 300m. 67 - 720hp - 33m Advantage - Left wall @ 2.5km 68 - 720hp - 23m Advantage - Traffic swing 69 - 720hp - 50m Advantage - Take Caution 70 - 760hp - 20m Advantage - Ignore R32, Blackbird |
71 - 720hp - 42m Advantage - Right wall @ 1.4km 72 - 720hp - 45m Advantage* - Ignore Devil Z 73 - 720hp - 28m Advantage 74 - 720hp - 19m Advantage - Take Caution 75 - 720hp - 20m Advantage - Ignore Blackbird | 76 - 720hp - 20m Advantage - Road pillar @ 1.2km 77 - 720hp - 73m Advantage 78 - 720hp - 10m Advantage* - Take Caution 79 - 720hp - 23m Advantage* - Ignore R32 80 - 720hp - 31m Advantage - Ignore Devil Z, Blackbird |
81 - 720hp - 35m Advantage - Take Caution 82 - 700hp - 25m Advantage - Ignore Blackbird 83 - 720hp - 12m Advantage* - Ignore Devil, Blackbird 84 - 720hp - ??m Advantage - Take Caution 85 - 720hp - 22m Advantage - Hairpin right @ 3.2km | 86 - 720hp - 22m Advantage 87 - 720hp - 16m Advantage - Take Caution 88 - 720hp - 20m Advantage - Ignore Reina (R32) 89 - 720hp - 15m Advantage* - Ignore Yuji (S2000) 90 - 720hp - 8m Advantage - Take Caution |
91 - 720hp - 10m Advantage* - Ignore Yamamoto 92 - 720hp - 25m Advantage - Hairpin right @ 1.1km 93 - 720hp - 20m Advantage - Ignore Ogishima (FD) 94 - 720hp - 40m Advantage - Wall @ 3.3km, @ 2km 95 - 720hp - 30m Advantage - Ignore Devil Z | 96 - 720hp - 60m Advantage - Hairpin right @ 2.8km 97 - 720hp - 18m Advantage - Traffic swing 98 - 720hp - 22m Advantage - Take Caution 99 - 700hp - 60m Advantage - Hairpin left @ 1.4km 100 - 700hp - 12m Advantage* - Take Caution |
The return of the devil Z - First Half -
1 -
2 -
3 -
4 -
5 -
The return of the devil Z - Second Half -
6 - Ignore white Reina (R32) as she spins out at 1.9km left.
7 - Ignore Ishida (White Lambo) as he will spin out 1.5km left.
8 - You will have to play catch up with Eriko in the Devil Z (Overtake before hitting 1.1km)
9 - Ignore Devil Z, he pulls to the left at just under 1km so be careful not to stick to the left.
10 - Ignore Ishida (White Lambo)
Perfect GT-R
11 - Ignore Reina (Black R32)
12 - Can boost off Z31 at 3.5km to get 145m Advantage
13 - Can boost off Z31 to get 132m Advantage
14 - Nothing to note.
15 - You can ignore the Devil Z and R32
The Akasaka Straight
16 - Ignore Devil Z
17 - Watch for traffic swing (this is when they will randomly switch lanes “swinging” like crazy)
18 - Just watch for the S-bend right-left @ 1.5km left.
19 - Ignore Devil Z he dies to the left @ 1.1km and watch for S-bend right-left-right @ 1.1km left.
20 - FD dies @ 6.2km, watch for sharp right hairpin at @ 2.8km followed by S-Bend left-right at @ 2km left.
Monster Machine - First Half -
21 - Ignore Blackbird. OH BOY C1! C1 route will fuck you. Watch for a sharp hairpin to the right @ 3km left.
22 - TAKE CAUTION! Toll booths @ 2.4km and can ruin you.
23 - Oh boy C1 again. Watch for a sharp right-left @ 2.8km and watch out for the two pillars shortly afterwards.
24 - Nothing to note.
25 - Nothing to note.
Monster Machine - Second Half -
26 - Red R33 Spins out at 3.2km
27
28 - You race for 18km and over take a Hiace, RX-7 and challenge the Supra. End line is dead straight.
29 - Hairpin turn to the left at 1.5km and another at 1km. If you tap the wall, retire as you will not have enough time to recover.
30 - 21km race. You’ll be racing Z, Blackbird and Supra. Hairpin turn to the right at 13km. Hairpin to the right at 6.5km. Hairpin to the left at 3.5km and tight turns from 2km. Hairpins at 800m DO NOT TOUCH THE WALLS.
R200 Club - First Half -
31 - Ignore Devil Z. Toll booth @ 2.2km left.
32 - Toll booth @ 1.5km left.
33 - Toll booth @ 3km left with a slight technical section afterwards.
34 - This has three cars that try to block/ram you. The first two GT-Rs can be easily avoided by just sticking to the edge of the side lanes. They also crash into each other @ 6km. The last car will actively overtake and ram you so avoid the hits, watch for the hairpin to the right @ 2.8km and make sure you can get in front by 1.5km left.
35 - Watch out for the wall on the left @ 2.2km as this can and will kill your unshade attempt if not cautious. Lastly watch the hairpin to the left at 800m. (Take Caution)
R200 Club - Second Half -
36 - Ignore Kuroki (R33) as he retires @ 4-3km left.
37 - Ignore Blackbird. Hairpin the left @ 1km so take extra caution.
38 - Nothing to note.
39 - Oh Shit C1 back at it again. Technical section in the last 2km with a sharp right-left. (Take Caution)
40 - 23.5km race against Devil Z and Reina. You can get a boost from R33 @ 5.9km. Ignore Kuroki (R33) as he retires @ 4.5km. Toll booth @ 1.2km left so caution is advised.
Hanshin Circular Line - First Half -
41 - We are leaving Tokyo with Blackbird! Slight technical section within the last 2km.
42 - oWo we are in Osaka la. Just as usual, take caution in the last 3km.
43 - Nothing to note.
44 - Shima isn’t driving his Blackbird, instead in EVO6. Big note is @ 3km you got a technical section that can do you in if you ain’t careful, so take caution.
45 - 15.5km dash back to Tokyo! Blackbird is chasing from behind, bring your A game and drive hard.
Hanshin Circular Line - Second Half -
46 - You race against Yamamoto, Ohta and Kamiya. You have to be in front @ 3km if you want to win.
47 - Ignore Devil Z.
48 - Kamiya upgraded from an EVO5 to RGO’s EV10 just for this chapter (prick) and he decided he wanted to go on the C1 (ass.) Watch for the sharp left hairpin @ 1.7km and make sure you break for it @ 1.8km.
49 - Ignore Kamiya (EVO5) as he retires @ 1.5km left. As per usual, take caution from 3km.
50 - 27km slog fest I mean race with Devil Z, Blackbird and Kamiya. Ignore Kamiya (EVO5) as he retires at @ 3km left. Also to note this is where “fight turning” is completed. Next phase is hell turning.
The legendary FC - First Half -
51 - BEST CAR IN THE GAME! The TV crew will screw you if you ain’t careful. Watch for Kijima and just drive with care.
52 - Reina is now driving the 911.
53 - Kijima is in the Devil Z. Traffic swings all over the road in the last 1km. You need to be really careful as the slightest touch of traffic can ruin you.
54 - Traffic swings all over the road in the last 2km. Slightest touch of traffic can ruin you.
55 - Mt. Taikan!? WMMT6RR wants you on the touge. Last 2km is a slight technical section with the finish line after the toll booth. Track knowledge is important so I’d advise doing a practice run prior to attempting this.
The legendary FC - Second Half -
56 - As usual, take caution in the last 3km.
57 - As usual, take caution in the last 3km.
58 - Ignore Kijima (FC) he retires @ 2.8km. The final turn is a sharp hairpin to the left.
59 - Watch out for traffic.
60 - 24km race. Ignore Kijima (FC) and Blackbird as they will both retire @ 5.9km and 3.6km respectively. Devil Z is your target so make sure you are ahead before 2.5km left. This is the end of story for WMMT5DX+ But if you are playing from WMMT6, you now have to play to story 100.
Garage ACE - First Half -
61 - Back onto the C1 baby! @ 2.7km watch out for the left hand wall and drive smoothly through the slight technical section.
62 - Watch out for the wall to the right @ 2.1km and the wall to the left @ 1.1km. Last section is right-left-right.
63 - Nothing to note.
64 - Nothing to note.
65 - Ignore Tomoya (R34) as he spins out @ 2.2km. Afterwards is a sharp hairpin to the right followed by slight technical section. Watch out for the wall @ 700m left.
Garage ACE - Second Half -
66 - Akio the sly dog took Reina’s R32. Toll booth @ 400m and a wall to the left @ 300m that will end you if you touch it.
67 - Watch for the wall on the left @ 2.5km as that will end your run. And @ 1.1km is a sharp left.
68 - Watch for traffic swing in the last 2km.
69 - Niice….But last 3km is technical section so bring your S game.
70 - 20.5km race. Ignore Tomoya (R32) and Blackbird as they retire @ 3km and 1.1km respectively
The legendary Turbine - First Half -
71 - Do not be fooled, Reina gets into the driver's seat and goes for it. Watch out for the wall @ 1.4km to the right.
72 - Don’t ever be like Hiroki, be like Reina. Ignore Devil Z and take caution in the last 3km.
73 - Nothing to note.
74 - As usual, take caution in the last 3km.
75 - Ignore Blackbird.
The legendary Turbine - Second Half -
76 - Watch out for the in road pillars on the C1 @ 1.2km left.
77 - Reina is driving Devil Z.
78 - As usual, take caution in the last 3km.
79 - Ignore Reina (R32) Watch out for the wall on the left @ 1.8km and 1.4km respectively.
80 - 30.7km race (seriously?) With Devil Z, Blackbird and Makoto. Ignore Devil Z and watch out for Blackbird as he crashes @ 3.1km left. When you finish the race, congratulations! Hell’s Tuning is complete!
Zero Fighter on the ground - First Half -
81 - As usual, take caution in the last 3km.
82 - Ignore Blackbird.
83 - Ignore Blackbird and Devil Z. Watch out for the wall on the right @ 1.8km and the sharp hairpin to the left @ 1.6km left.
84 - As usual, take caution in the last 3km.
85 - Sharp hairpin turn to the right @ 3.2km with a slight technical section at the end.
Zero Fighter on the ground - Second Half -
86 - Nothing to note.
87 - As usual, take caution in the last 3km.
88 - Ignore Reina (R32)
89 - Ignore Yuhi (S200) as he retires @ 3km. Just watch for the sharp hairpin to the left @ 1.8km
90 - 19km race. Just be careful from 3km.
FD Master - First Half -
91 - Ignore Yamamoto (R33) Watch for the sharp turn to the right and the run killer wall @ 1.8km and 1.4km.
92 - Sharp hairpin to the right @ 1.1km left.
93 - Ignore Ogishima (FD) as he retires @ 2km.
94 - Wall of death @ 3.3km with sharp left @ 2km.
95 - Ignore Devil Z
FD Master - Second Half -
96 - Sharp hairpin to the right @ 2.8km left.
97 - Watch for traffic after the 3km mark.
98 - As usual, take caution when there’s 3km left. ALSO FUCK YOU GAME GIVE ME BACK REINA!!
99 - Watch for the right-left-right move @ 2.6km and the hairpin left @ 1.4km.
100 - I recommend having a friend ready to help save you when you attempt this if you are going unshaded for this loop. If at any point you look like you are going to lose, they will jump in and save you via the VS BATTLE mode. For this to work make sure you have “VS accepted” via the red button on the machine. They will be hovering over “YES” to challenge
This is it, the final story mission. You are going up against the Devil Z, Blackbird and Ogishima in a 29.4km slog to the finish. This is going to take all of your energy and concentration to win this. Devil Z won’t show up till the 20km mark. If you are going to make mistakes and errors, get it out of your system before the 5km mark.
This is the true test right here. There is the sharp turn to the right @ 3km followed by the first wall that will kill this attempt @ 2.6km. The second wall to the left that will kill this attempt is @ 2.2km. If you touch it, turn around and retire ASAP. Third killing wall is to the left @ 1.4km and if you hit it, it’s over. And finally the fourth wall to the right is just after the 950m mark.
That is it, you have completed a full loop of story!
Story achievements
BGM Tracks
Complete a loop of story (100 episodes, 60 for 5DX+), shaded or unshaded, it doesn't matter. You unlock one music pack per loop.
1st Loop: Soundtrack from WMMT 5/DX/+ | 2nd Loop: Soundtrack from WMMT4 |
3rd Loop: Soundtrack from WMMT 3/DX/DX+ | 4th Loop: 10 Outrun |
5th Loop: Soundtrack from WMMT 1 & 2 | 6th Loop: Soundtrack from WMMT R |
Tachometers
To show that you are a real racer, when you complete the story mode without a loss (also known as unshaded) you unlock a special tachometer as a reward for doing so. This is progressive unlock scheme so if you want the blue tachometer, you’ll need to obtain the yellow and red tachometers prior in order to get the chance to get the blue one. At any point you feel like you’ll lose the race, turn the car around and retire. But first make sure you have retire mode turned on before you make an attempt.
Yellow Tachometer
100 story missions in a row without losing (complete unshaded). It has to be from beginning to end so if you fail half way through a story loop, you have to finish the story run and start again. Each tachometer is a checkpoint so if you fail after receiving one, you only need to complete the next story loop again (example, so if you fail at example story 101, you don't need to do 200 stories again, just 100 to unlock the next tachometer).
Red Tachometer
After unlocking Yellow tachometer, unshade 100 story missions in a row without losing.
Blue Tachometer
After unlocking Red tachometer, unshade 100 story missions in a row without losing.
Carbon Tachometer
After unlocking Blue tachometer, unshade 100 story missions in a row without losing.
WMMT6 Pro Tachometer
After unlocking the carbon tachometer, win 100 story missions in a row without losing. This tachometer looks like crap so don’t bother.
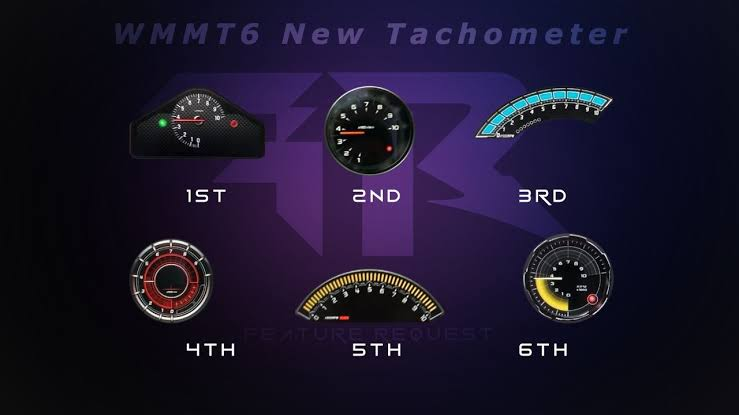
WMMT6RR Tachometers
After unlocking the WMMT6 Pro tachometer, there are five additional tachometers to unlock. Win 100 story missions in a row without losing. Photo below shows the order of which they unlock.
Secret Car Codes
Hidden Cars
There are hidden cars within the game which are accessible via a "cheat code". You do this by hovering (highlight) the associated car listed below, then enter the special code using the shifter. Start with the shifter in the neutral position then put it in each gear number that you select.
These will be stock and not fully tuned (unless you use a discard or FT ticket).
Mazdaspeed 6 Driving School ver. [GG3P]
Highlight the Mazdaspeed 6 [GG3P] and enter 665-4333-112-3444
Mitsubishi Pajero EVOLUTION [V55W]
Highlight the Mitsubishi Starion and enter 463-655-4636
Nissan GT-R SpecV [R35]
Highlight the Nissan GT-R [R35] and enter 135-235-335-55
Subaru R2 [RC2]
Highlight the Subaru SVX [CXD] and enter 64-64-64-64-64
Toyota Aristo Taxi Ver. [JZS161]
Highlight the Toyota Aristo V300 VERTEX EDITION [JZS161] and enter 111-222-333333-444-555-666666
Toyota Celsior Taxi Ver. [UCF10]
Highlight the Toyota Celsior [UCF10] and enter 1562-1562-1562
Toyota Corolla [NZE121]
Highlight the Toyota Supra 2.5GT [JZA70] and enter 4126
Toyota HIACE WAGON [KZH100G]
Highlight the Toyota MR2 [SW20] and enter 322-322-322
Toyota HIACE WAGON (jacked-up ver.) [KZH100G]
Highlight the Toyota Chaser [JZX100] and enter 33-44-33-44-262626
Time Attack (TA) Guide
Time Attack can be very beneficial to your improvement, even as a beginner. Aside from course knowledge, even having the basic knowledge of what the optimal setting is for each course will help you in all aspects of play. Please be aware that this is just an overall assumption on the course layouts. Some courses might require you to run at a slightly lower or higher setting, so please keep that in mind.
Settings for 840HP cars
C1 Inward 720HP - Balance | C1 Outward 700HP - Balance |
New Belt Line (CCW) 760HP - Balance | New Belt Line Clockwise (CW) 840HP - Dangerous |
Shibuya/Shinjuku Subcenter | Ikebukuro/Yamate Tunnel Subcenter |
Wangan Line Eastbound 840HP - Dangerous | Wangan Line Westbound 840HP - Dangerous |
Yokohane Upward 840HP - Dangerous | Yokohane Downward 840HP - Dangerous |
Yaesu Inward 700HP - Grip | Yaesu Outward 680HP - Grip |
Yokohama/Minato Mirai | Osaka 760HP - Balance |
Nagoya 800HP - Drift | Fukuoka 740HP - Balance |
Kobe 660HP - High Grip | Hiroshima 660HP - High Grip |
Hakone Inbound 760HP - Balance | Hakone Outbound 760HP - Balance |
Mt. Taikan Uphill 760HP - Balance | Mt. Taikan Downhill 740HP - Balance |
Metro Highway (Tokyo) 760HP - Balance | Metro Highway (Kanagawa) 840HP - Dangerous |
Settings for 830HP cars
C1 Inward 720HP - Balance | C1 Outward 700HP - Balance |
New Belt Line (CCW) | New Belt Line (CW) |
Shibuya/Shinjuku Subcenter 680HP - Grip | Ikebukuro/Yamate Tunnel Subcenter 700HP - Balance |
Wangan Line Eastbound | Wangan Line Westbound 830HP - Dangerous |
Yokohane Upward 830HP - Dangerous | Yokohane Downward 830HP - Dangerous |
Yaesu Inward 700HP - Balance | Yaesu Outward 700HP - Balance |
Yokohama/Minato Mirai 800HP - Dangerous | Osaka Hanshin Loop Line 760HP - Drift |
Nagoya Speed Ring 800HP - Dangerous | Kobe 640HP - High Grip |
Hiroshima 640HP - High Grip | Fukuoka 720HP - Balance |
Hakone Inbound 760HP - Drift | Hakone Outbound 760HP - Drift |
Mt. Taikan Uphill 760HP - Drift | Mt. Taikan Downhill 740HP - Balance |
Metro Highway (Tokyo) 760HP - Drift | Highway (Kanagawa) 830HP - Dangerous |
Rank Guide
There was at one point the ability to enter information from your car into a spreadsheet and find out exactly how close you were to levelling up your rank. This was helpful as you might have needed to just compete on more ghost trophy or get two more vs stars to level up. This is all outdated now.
https://docs.google.com/spreadsheets/d/14AB6Ixa9_Vho9EbnnbgYJIxtuiX49lG-HWfOZFHW1xY/edit#gid=0
Resource Links
Official Twitter for MaxiTune
The official twitter for WMMT (Japan.) This is where you’ll see what the daily bingo frames will be.
https://twitter.com/wangan_maxi?lang=en
Daily titles for WMMT6RR
This shows what titles are available for a certain day. If you missed out on one, you are going to have to wait 2 years for it to cycle back in. So make sure you plan and check ahead of time.
WMMT Japanese Wiki
A Japanese Wiki resource for everything WMMT related which is constantly updated. Use Google Chrome to translate as the entire site is of course, in Japanese.
Wangan Midnight Expressway Forums
This is a good forum resource.
https://wmexpressway.net/
TV Tropes for WMMT
Want to notice every discrepancy within the WMMT lore? This is the place for you!
https://tvtropes.org/pmwiki/pmwiki.php/VideoGame/WanganMidnight
-Reserved-
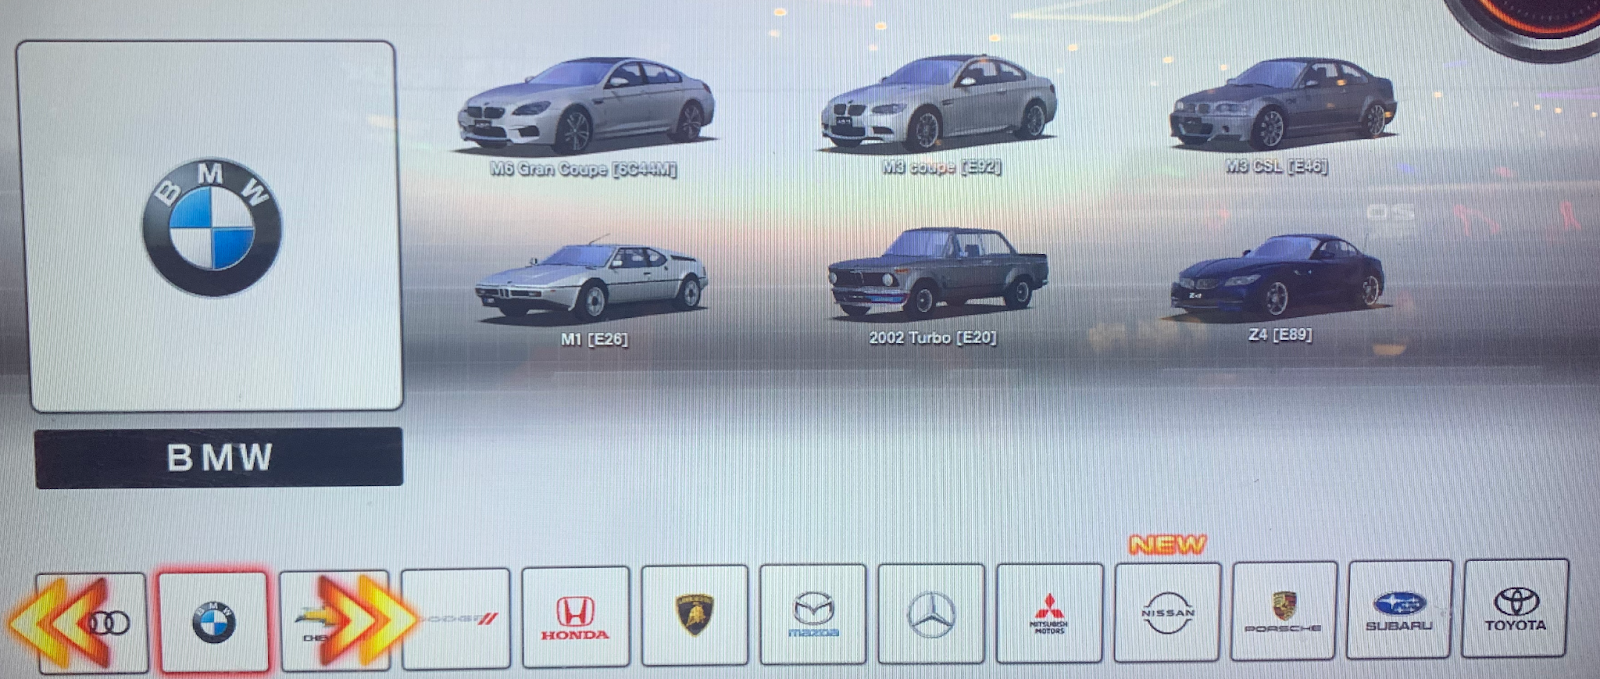
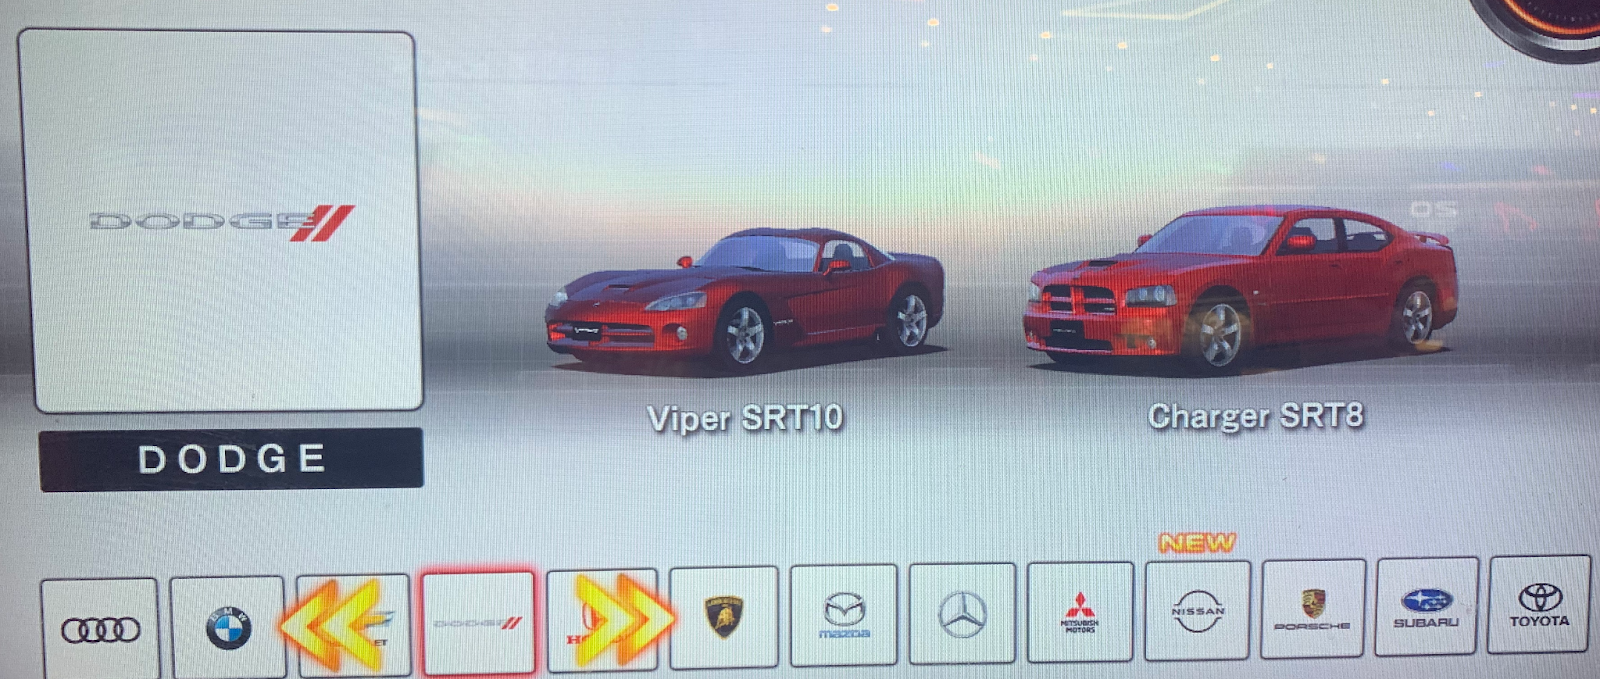
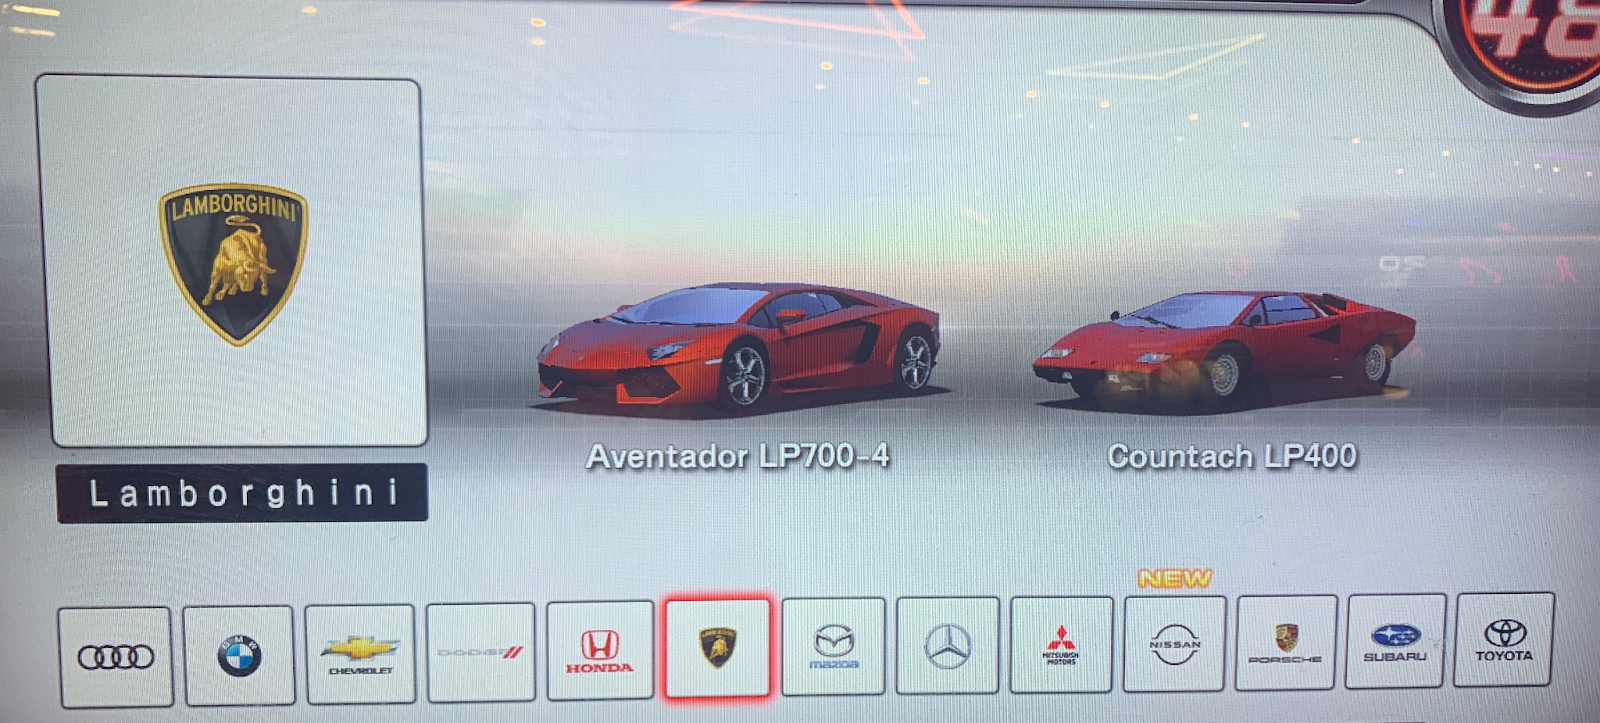
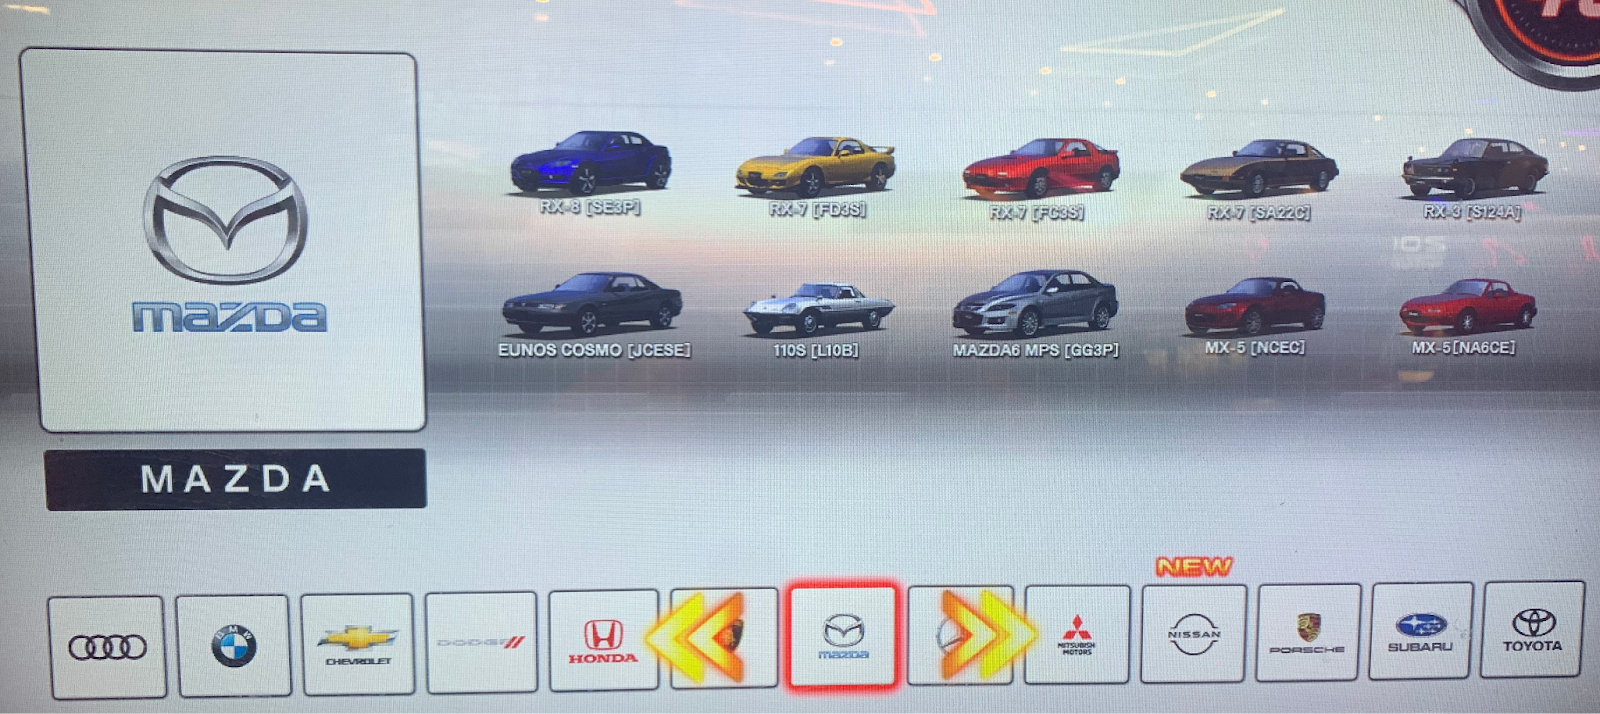
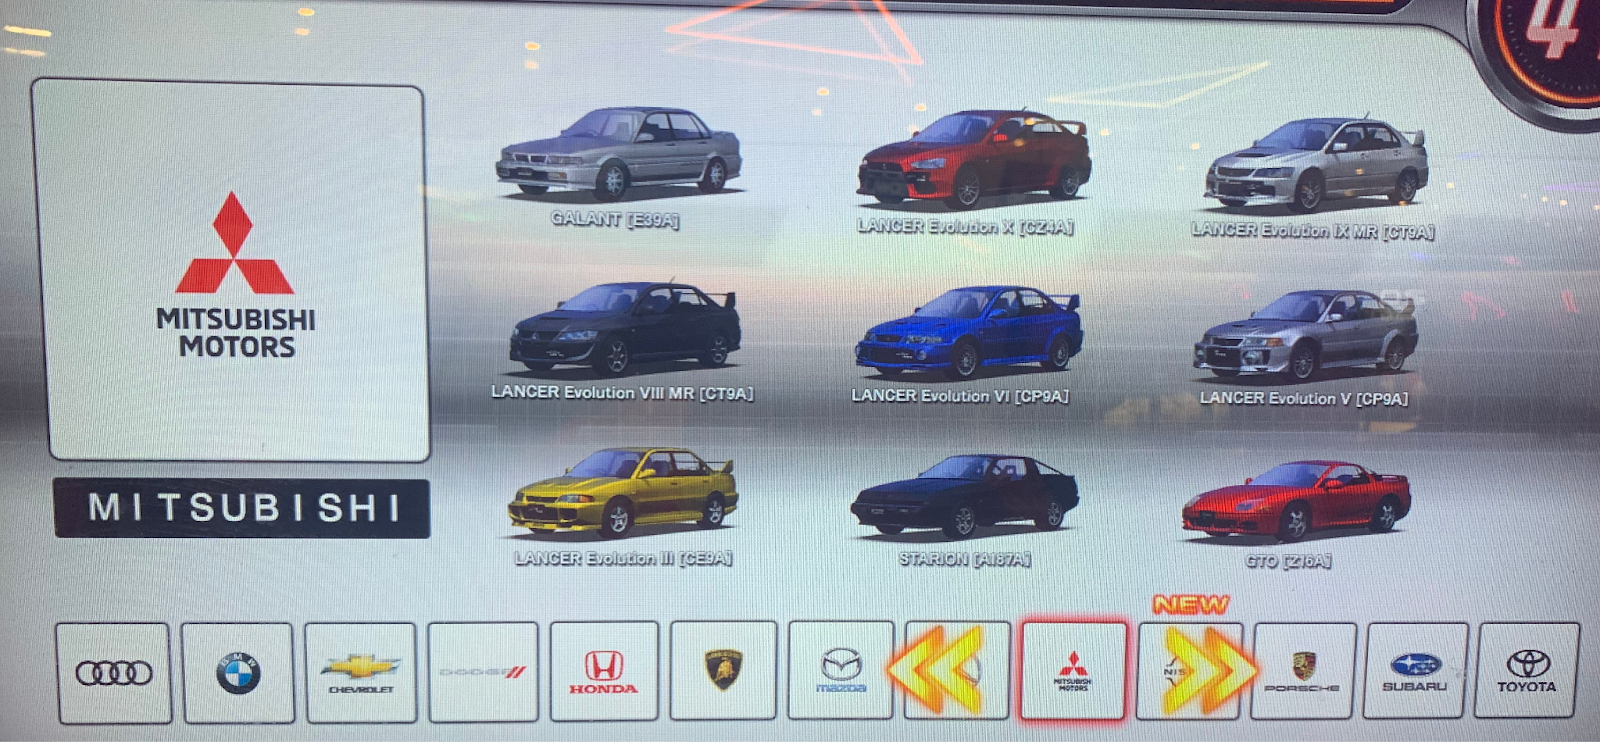
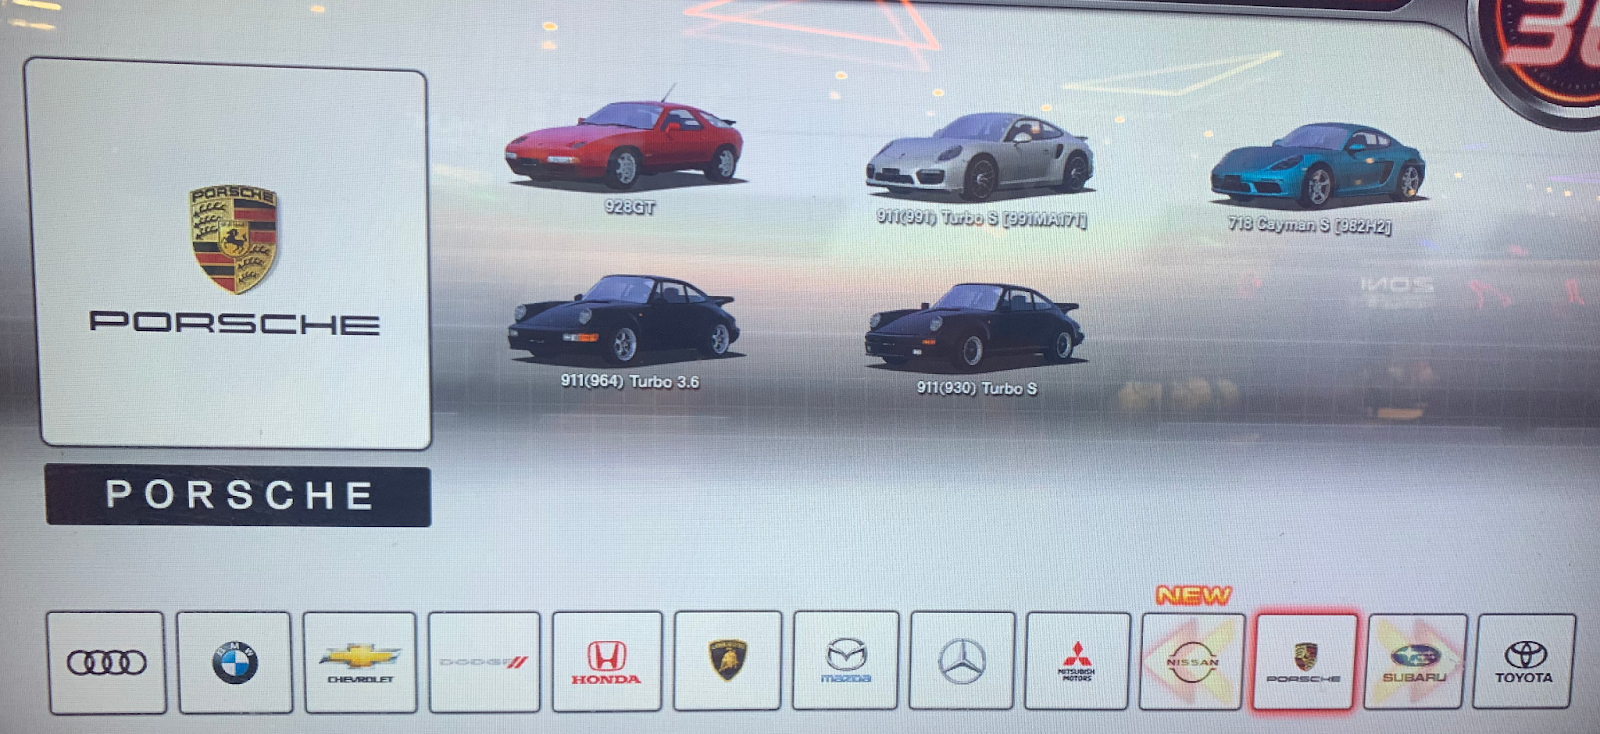
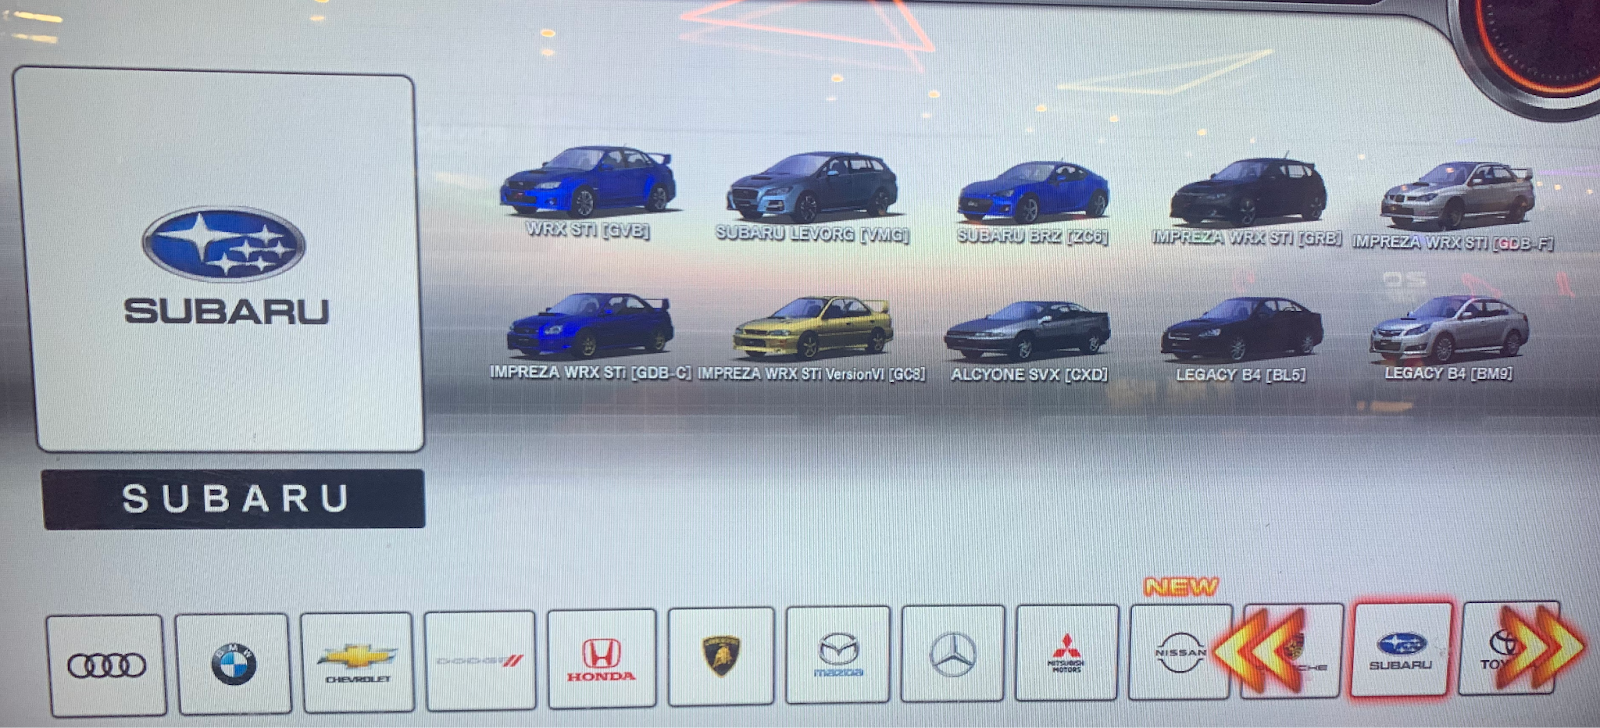
Car Checklist (6RR Edition)
Below are photos that you can save to your own notes that you can use as a checklist.
Audi

BMW
Chevrolet

Dodge
Honda

Lamborghini
Mazda
Mercedes-Benz

Mitsubishi
Nissan

Porsche
Subaru
Toyota
