Learning the basics of Java
Benson Huang
BTech in Computer Systems
New York City College of Technology, CUNY
This user manual was created as a class project in ENG2575 OL83, Fall 2020. Any questions about this project should be addressed to Benson Huang @ benson.huang@mail.citytech.cuny.edu.
Table of Contents
2.0 Description of the Equipment
2.1 Illustration of the Equipment
2.2 Description of the Equipment’s Parts
1.0 Introduction
The focus of this instructional manual is learning the basics of thethe coding language Java. “Java is an object-oriented programming (OOP) language, which means it focuses on objects” (Hillman, 2018). Java has been around for a long time and it is a very popular coding language. “Java is an Object-Oriented programming language developed by James Gosling in the early 1990s” (Bhatnagar , 2019). Gosling worked at Sun Microsystems when he developed Java. On April 20, 2009 “Oracle Corporation (NASDAQ: ORCL) and Sun Microsystems (NASDAQ: JAVA) announced today they have entered into a definitive agreement under which Oracle will acquire Sun common stock for $9.50 per share in cash” (Tillman, 2019). “According to Evans Data Corporation, there were 26,4 million software developers in the world in 2019, a number that in 2023 is expected to grow to 27,7 million and 28.7 million in 2024. The USA is taking the leading position by the number of software developers reached 4,2 million”(Team, 2020). If you want to start your coding adventures this is a good place to start.
1.1 Purpose
This manual will be for anyone who wants to start learning Java.
1.2 Intended Audience
Intended audience of this manual are people who have little to no experience in programming and want somewhere to start. Audience should have and know how to use a computer.
1.3 Scope
The reader will be able to install an Integrated development environment (IDE) and learn the basics of Java.
1.4 Organization Description
This manual will start with the equipment needed then move on to download an IDE then finally teach the basics of Java.
1.5 Conventions
OS - Operating System
IDE - Integrated Development Environment
1.5 Motivation
This manual is made to help fellow classmates and friends who wanted to start programming but found it way too confusing or difficult. This can also be used as a refresher for basics.
2.0 Description of the Equipment
2.1 Illustration of the Equipment
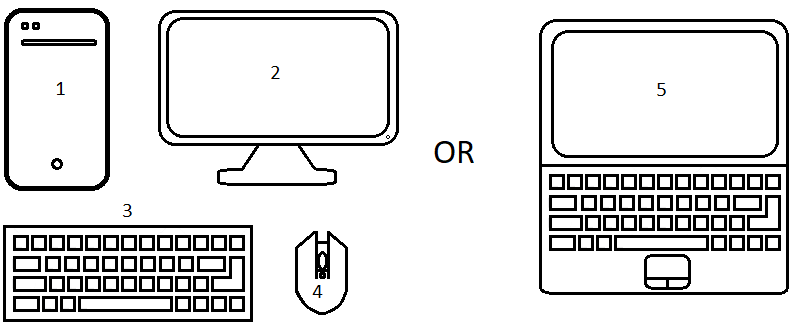
2.2 Description of the Equipment’s Parts
These are the parts of the computer illustrated above.
1 | Computer | Used to run the code |
2 | Monitor | Used to see the code |
3 | Keyboard | Used to program the code |
4 | Mouse | Used to move the cursor and click. |
5 | Laptop | 1-4 combined usually smaller |
3.0 Directions
For this manual we will be using a Windows 10 Desktop Computer to demonstrate.
3.1 Netbeans IDE
To start we will need to install an IDE which will allow us to run the java code. For this manual we will be using Netbeans 12.2. Latest version as of 4/12/21
3.1.1 Website
To begin open the web browser of your choice and google search “netbeans download”
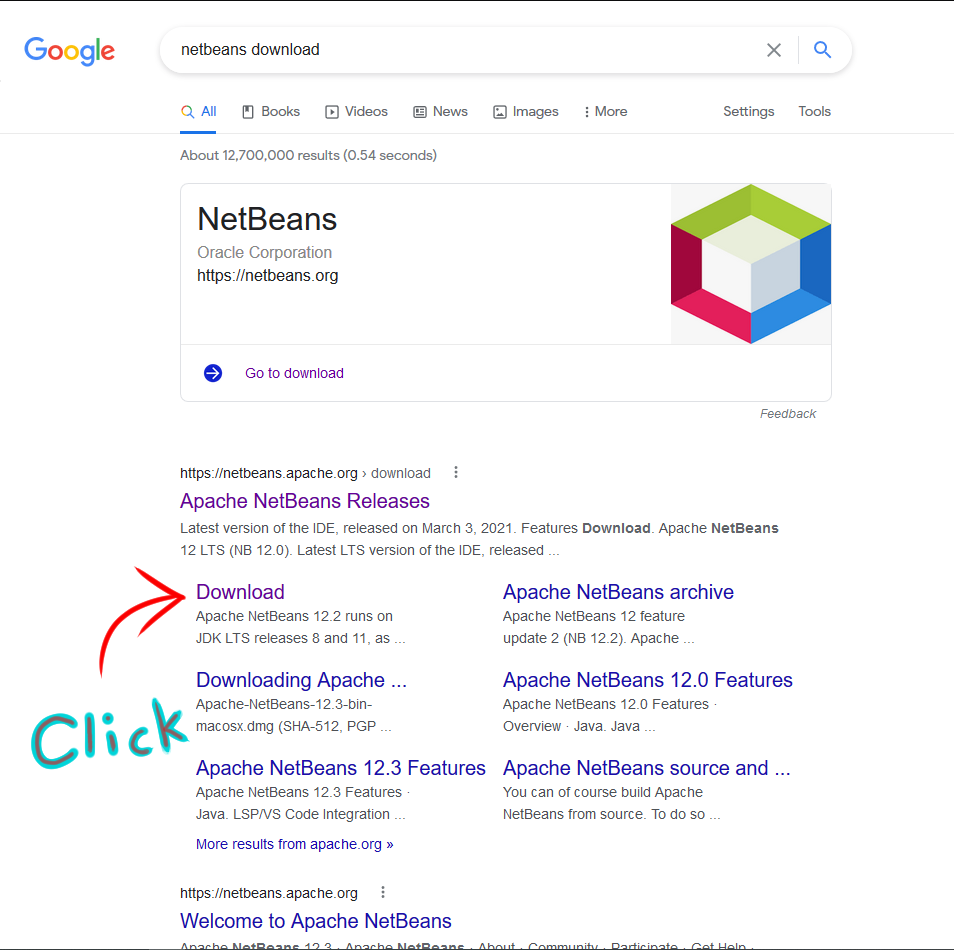
You will see Apache NetBeans Releases and click on the word Download just below.
3.1.2 Download
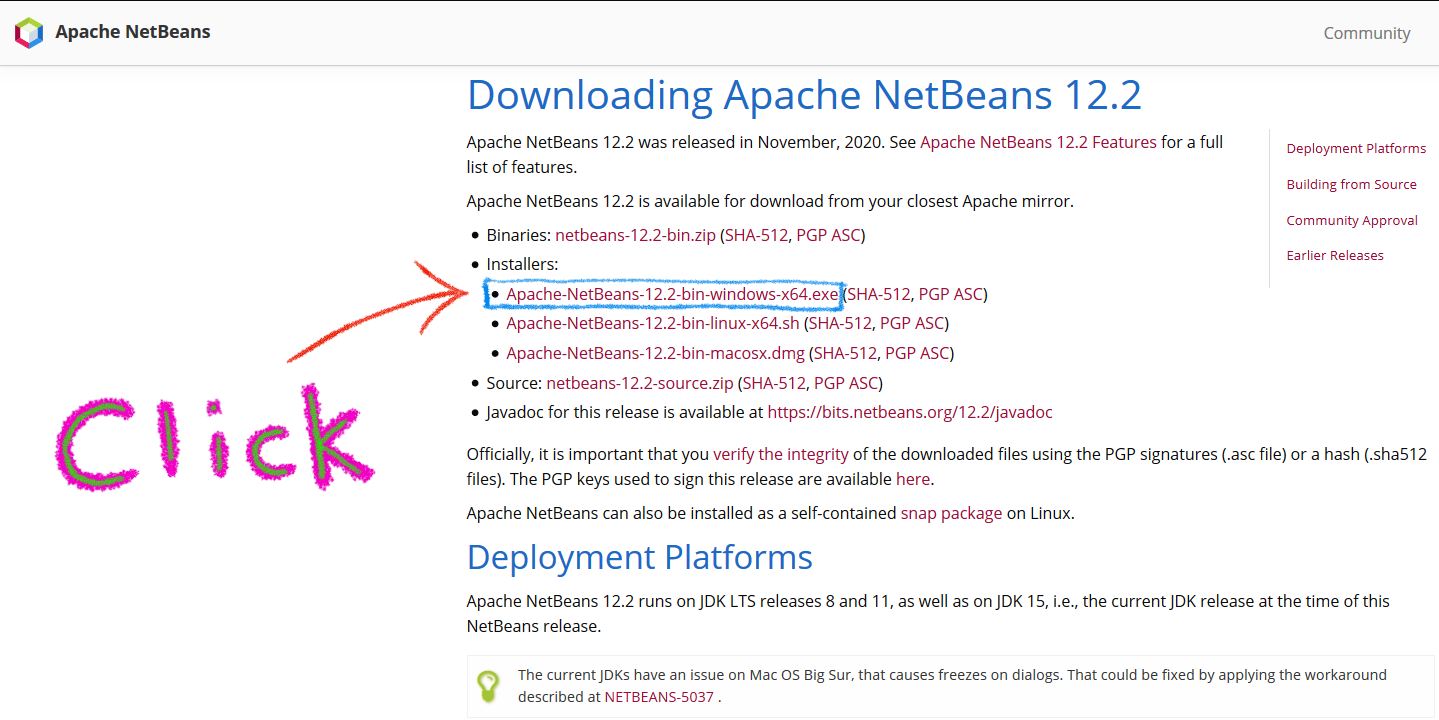
Once you have reached the download page look for the Installer section and choose the file for your respective OS. For this manual we will be downloading “Apache-Netbeans-12-2-bin-windows-x64.exe”
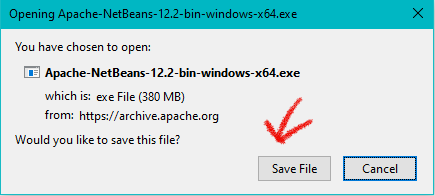
This prompt will pop up. Save this file wherever you want and run it.
3.1.3 Installing
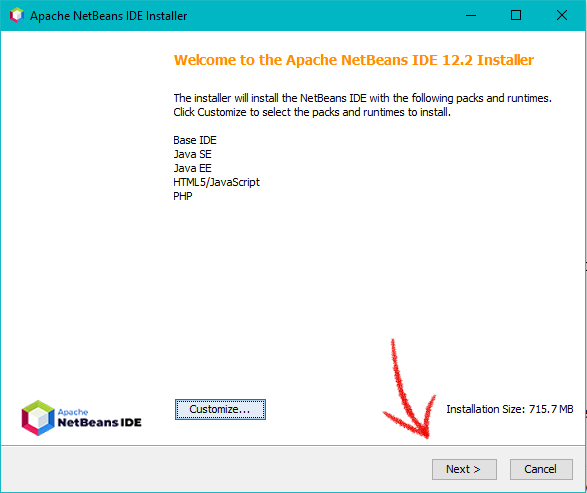
Once you run the Installer it will prompt you to customize what packs and runtimes you want to. We can ignore this and just click Next.
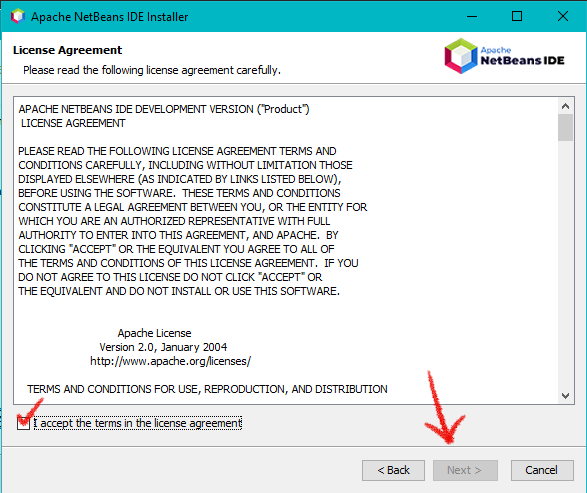
On the next step read the licence agreement, accept it then click Next.
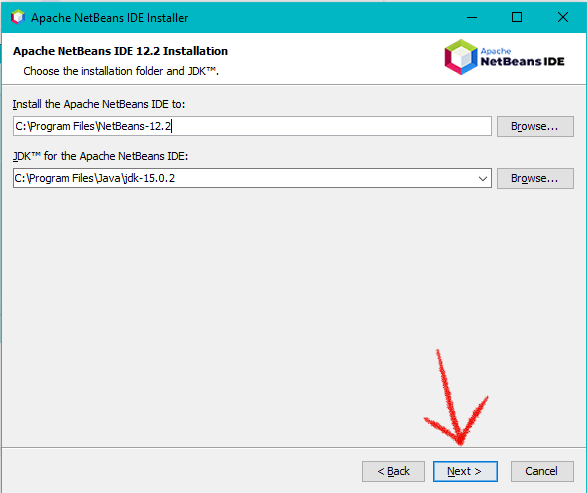
This next step will have you decide where you want to install the application and the JDK to.
Once you have decided press Next.
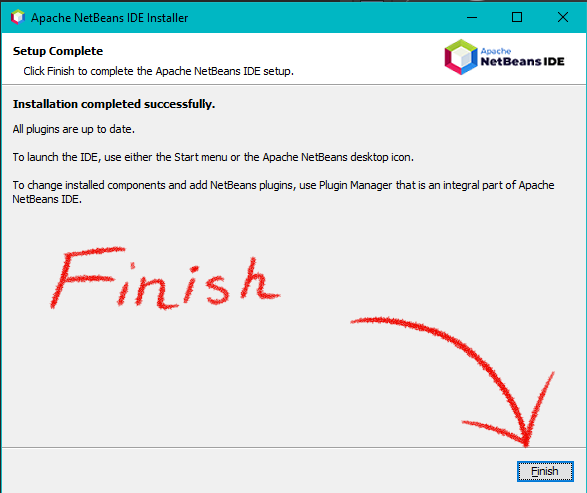
On the final step you can either choose whether or not you want plugins to auto update we can leave this checked and click Install.
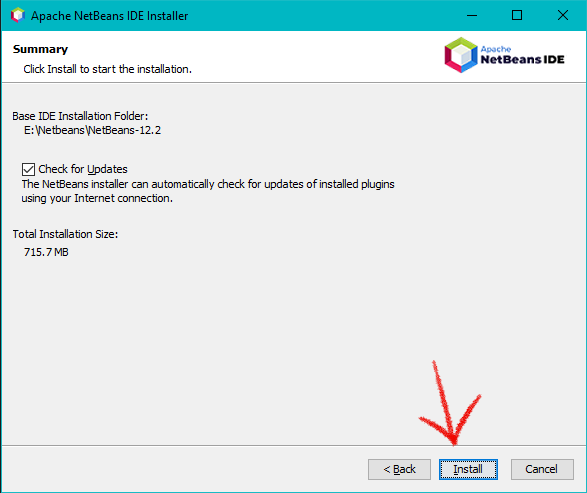
To finish the installation click Finish.
3.1.4 Running Netbeans

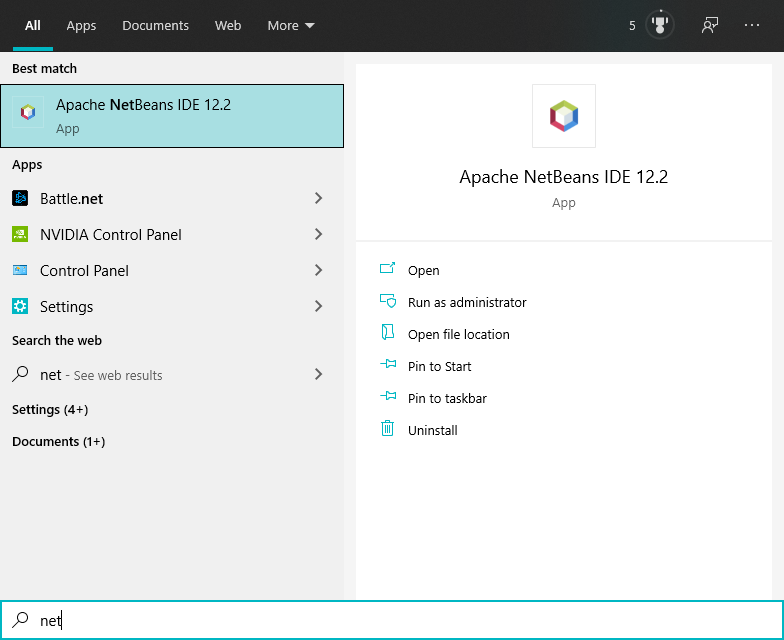
To run Netbeans, press the Windows Key the start menu will pop up.
Type in “net” and you will see the netbeans application.
Press enter or click on it and it will run.
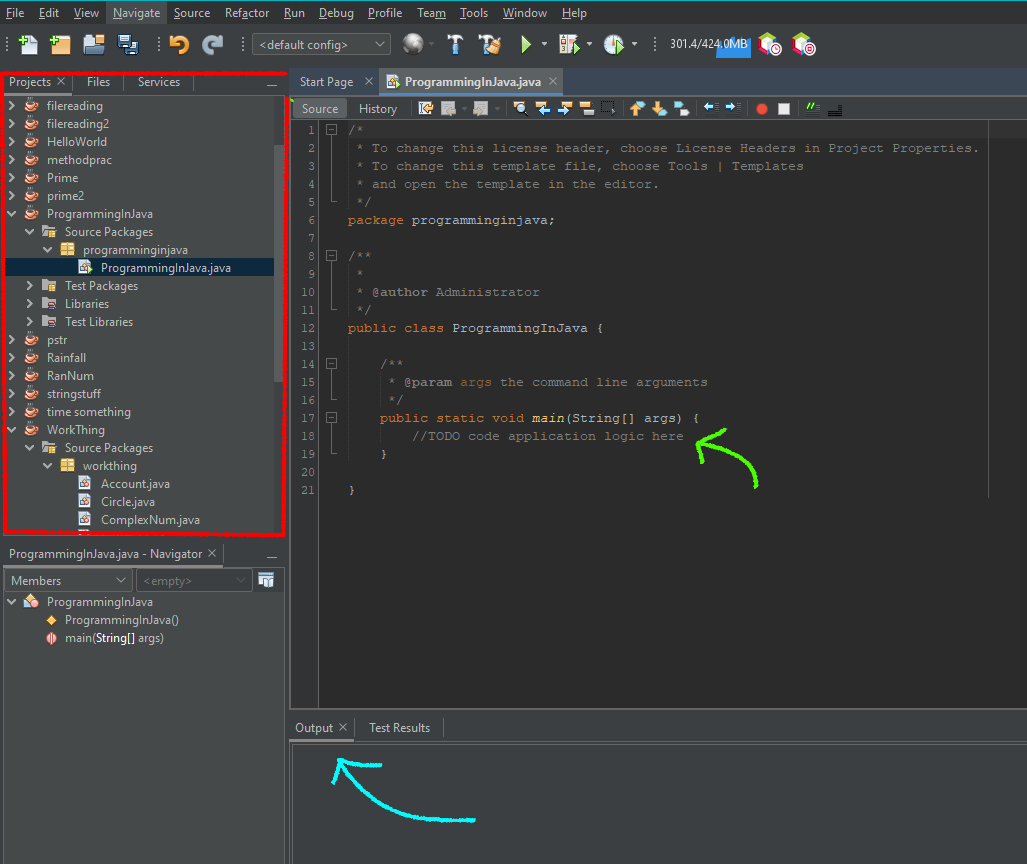
3.1.5 Starting A Project
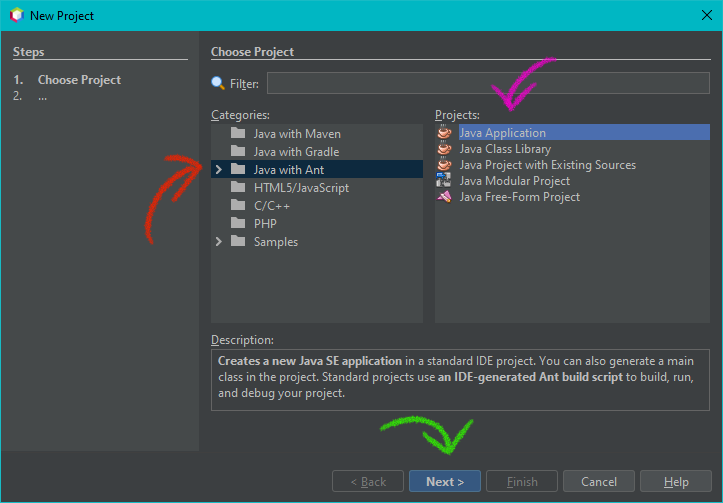
To start a new project click the yellow folder with a green plus sign

A window will pop up and by default it will be on Java with Maven.
However we will be using Java with Ant instead.
Click on Java with Ant. Then click on Java Application. Then click Next >.
Next you will be able to name your project. Once you have named your project everything else can be left alone and click Finish.
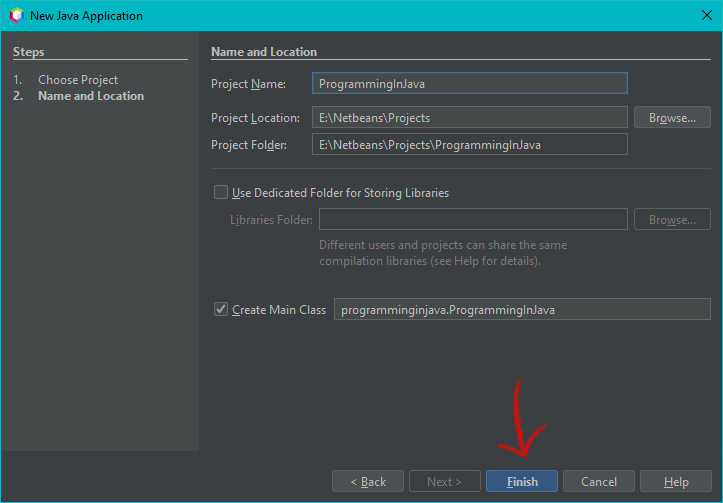
Congratulations! You have created a new Java Project! You can now begin coding.
All projects and files.
Most code should be typed here.
Output will be shown here.
3.2 Understanding the basics
One of the most important things when starting java is to understand at the end of every statement you must add a semicolon “;”. This is basically saying this instruction has ended and move on to the next one. Exceptions to these statements with brackets “{“ “}”. The following sections are basics in every programming language but the way they are used may be unique to their language.
3.2.1 Variables
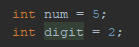
When naming a variable there are some things to note:
- Variable names must start with a letter a-z, an underscore “_” or a dollar sign “$”;
- Capitalization matters. Tomato is different from tomato;
- Numbers can only be used after the first character;
- Special characters such as @ cannot be used;
- Variable names can be of any size but it is advised to keep it short;
- Variable names must be unique;
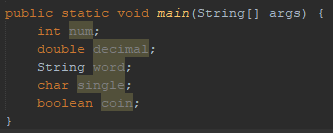
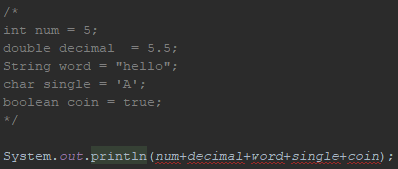
3.2.1.1 DataTypes
Variables must have datatypes assigned to them;
Datatypes are usually lowercase;
The basic datatypes are
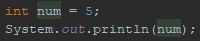
int | Integer | 5 |
double | Numbers with decimals | 5.5 |
String | words | hello |
char | Single character | A |
boolean | true or false | true |
A whole table of datatypes made by w3school can be found here at https://www.w3schools.com/java/java_data_types.asp
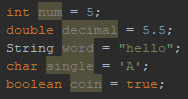
3.2.1.2 Declaring
When declaring a variable you start with the datatype first, then the variable name.
3.2.1.3 Assigning
To assign a variable to a value
- Type the variable name whose value you want to be changed
- Enter the equal sign “=”
- Whatever value you want to set the variable to.
Note that Strings must be encased in quotes “” and chars with apostrophes ‘’.
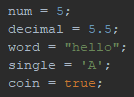
You can also assign values when declaring the variable.
You can also assign variables to other variables
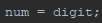
This would make num equal to 2 and digit would stay as 2.
Assigning variables to other variables work as long as the datatypes are the same.
When assigning values to numerical variables. You can use math operators like +, - , *, /.
For adding, subtracting, multiplying, and dividing respectively.
Using the num variable from earlier Let's get the value to become 10. We can do
this is the same as
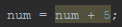

Mathematically these two line of code are basically doing this
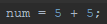
This can be done with other operators

Adding 5 to num
Subtracting 5 from num
Multiplying 5 to num
Dividing 5 from num
3.2.2 Printing
To print something simply use and put what you want to be printed in the parentheses “()”. Everything that is not a variable must be printed as a String. Which means it must be encased with quotes “”.

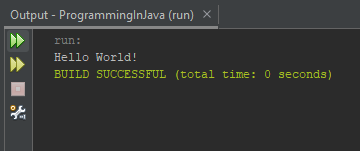
To print Hello World! All we have to do is

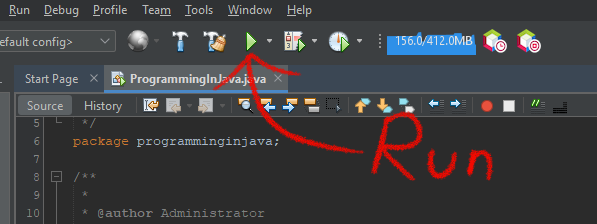
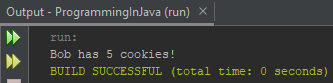
To run this program just click the green button on top and we will see the output on the bottom, below the code.
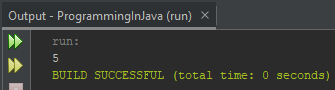
We can also print variables.
If we wanted to combine strings and variables together we could do that by using a + sign in println. Note that + signs here are concatenations and not mathematical.

3.2.3 Conditional Statements
Condition statements are simply booleans. True or False statements
3.2.3.1 Comparison Operators
You can make booleans out of other datatypes as well using comparison operators. These will compare your variables and output a true or false depending on... well if it’s true or false.
Equals To | == |
Not Equals To | != |
Greater Than | > |
Less Than | < |
Greater Than or Equal to | >= |
Less Than or Equal to | <= |
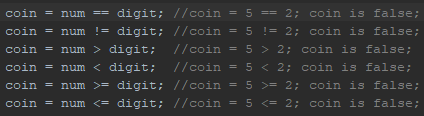
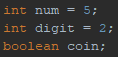
i.e. using num and digit.
3.2.3.2 Logical Operators
When dealing with conditions you can combine multiple booleans together with logical operators.
AND | && | Both must be true to be true; Otherwise false; |
OR | || | Both must be true to be true; Otherwise false; |
NOT | ! | Flips true false; |
Using num and digit for examples.
Marked in RED is boolean and marked in GREEN is the Logical Operators
coin is false; num is true; digit is false;
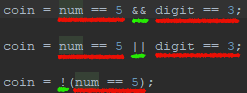
coin is true; num is true; digit is false;
coin is false;num is true;
3.2.5 If/Else
If statements check the conditional statements to decide whether or not to run the code in it.
If else statements know what code is in it by looking at the open and close brackets “{“ “}” anything in the brackets will run if the statement is true.
When an if statement is true, the else if and else statements following will be skipped.
If you don’t have anything to run when the if statement is false you can leave the else part out.
this first line is just to get a random number

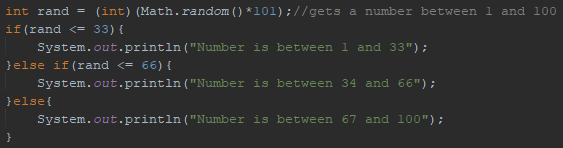
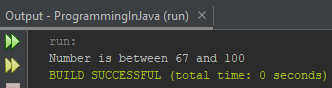
When this code ran
rand <= 33 is false
rand <=66 is false as well
else statement runs instead
If we used 2 if statements instead of the else if, we could have gotten this output if the random number was between 1 and 33 as it was also less than 66.
Of course this could be mitigated using Logical Operators like && to check if it was greater than and less than but that is more work. No one likes more work.
3.2.6 Loops
Loops are used when… well when you want things to loop. Do I have to explain that?
There are always 3 main things to make a loop work.
- You will always have an int variable where you start;
- Having a conditional statement to decide when to stop the loop;
- How much to increment the starter variable by, usually 1;
Loops also require “{“ “}” to tell the loop what to run when the condition is true;
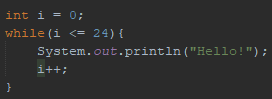
3.2.6.1 For
For loops are used when you know how many times you want to loop.
Layout of a For Loop is as such.

In a for loop the increment will always happen after the code.
Let’s say we want to print Hello! to 25 students in a classroom.

i is our starter variable at 0
Conditional statement is i <= 25
Meaning this for loop will run until i is greater than 25
Finally for our increment it is i++ which is the same as i+=1;
The output for this will be Hello! 25 times.
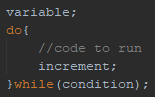
3.2.6.2 While
While loops are another form of loops.
Requiring the same 3 things: variable; condition; increment;
Layout of a while loop is as such.
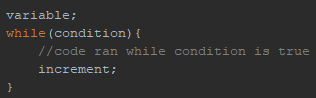
If we were to do the same program as the for loop just before it would be like this
Again, i is our starter variable at 0.
The conditional statement is i <= 25.
And we increment right before the while loop closes.
There is a slightly different while loop called a Do While Loop.
Unlike other loops that check the condition before running it’s code.
A do while loop will always run the code once before checking with the condition.
Even if the condition turns out false it will still run the code once.
Layout of one is as such.
An example for do while:
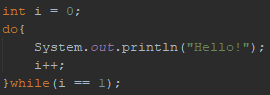
The output for this code prints Hello! twice.
The first time Hello! is printed is before the condition is checked. The second time Hello! is printed, i has incremented by 1 which prints it again.
3.2.7 Comments
You may have noticed that in some of the example code, some words are greyed out. Those are comments. When you comment stuff it can be used as notes or be used to just have existing code ignored when you run the code.
3.2.7.1 Method 1 “//”
When you use // everything after it in the line of code will be commented.
Everything before “//” will stay.

3.2.7.2 Method 2 “/**/”
When you use /**/ it is like open and close. Open with /* and close with */ and everything in between will be commented. This is useful when you are commenting chunks of code.
Note that if you comment something out like a variable it cannot be used in other parts of the code unless it is redeclared or uncommented.
3.2.8 Functions/Methods
Functions also known as methods are like variables but they refer to other code.
Methods are used when the same code needs to be run over and over again.
When writing functions they must be separate from the main method.
There are 5 things you should include when making a function.
- Public/Private
- Static/not static
- Return Type
- Name
- Arguments/Parameters

The layout of a function is as such
3.2.8.1 Public/Private
For starters you’ll likely be using public most of the time so you can probably ignore this section.
You’ll use public when you want anything to access whatever you’re setting public to like if you want another java file to use it.
For private it’s only usable to the class that it’s called in. To do this simply change public with private.
This can also be used with variables.
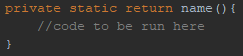
3.2.8.2 Static
When you declare something as static it means that it belongs to the class and not an object.
Since we’re not dealing with objects in this manual, we can ignore this and always have it.
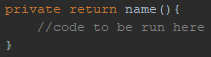
To make something non static, simply leave it out of the line as such.
3.2.8.3 Return type
When you make a function you will have to decide whether or not you want something to be returned. It is basically giving the function a datatype, just like variables from 3.2.1.
If you do decide to give a function a return type you will have to use return in the code section with the same datatype.
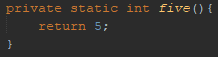
In this case if you call the method five() in the main method, these are similar to a variable with the value of 5. You can also use these functions just like a variable.
When you decide that you do not want any returned use void instead. You’ll usually use void when you want something printed or setting variables to another if you’re dealing with objects.

If you use this function PrintHello() in the main method it will simply print Hello and obviously a return type is not needed unless you want to return “Hello” as a string and print it yourself in the main method.
3.2.8.4 Name
When naming your function you should follow the same conventions as for variables back in 3.2.1
3.2.8.5 Arguments/Parameters
Parameters, arguments or args for short are extra variables or objects you can put in your function. They are placed in the parentheses () after the name. If you have no args simply leave it empty and if you have more than one args separate them with commas.
For an example let's use an addition function. Since the most simple addition uses 2 numbers we’ll have 2 args.

In the main method you can use this like this:
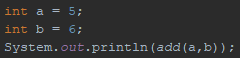
int a -> int x -> 5
int b -> int y -> 6
return 5+6; -> 11

When you put a variable into the function it is only the value going in and so any changes made to the value will not be saved unless you reference the variable itself.
4.0 Troubleshooting
In 3.1, when trying to download and install Netbeans make sure you have an active internet connection or the download or installation may not be successful. You should also make sure you have enough space in your drive as well. It is about 1GB.
In 3.2, when you are coding you may end up with a red line underneath some of it. This is the IDE telling you that something is wrong. Hover over it with your mouse and it will tell you what the problem is and a possible solution.
- You can use it’s suggested solution with Alt+Enter. This may not always work.
- Make sure you are coding under the “public static void main(String[] args) {“ section
- You should check your spelling and capitalization.
- Make sure needed code is not commented out.
In 3.2.1, an unlikely but possible error is when you create a name that is unique but still gives an error. This may be because java itself is using that name for something. A list of some of these can be found here https://www.w3schools.com/java/java_ref_keywords.asp
5.0 Glossary
Integrated development environment - or IDE for short, is a software used to write, build and run code.
Operating System - or more commonly known as OS, is the most important software on the computer. It manages both hardware and software for users as without an OS, other programs would be unusable.
Increment - to increase by one unless specified.
6.0 Reference List
Bhatnagar , A. (2019, May 2). The complete History of Java Programming Language. GeeksforGeeks. Retrieved from https://www.geeksforgeeks.org/the-complete-history-of-java-programming-language/.
Hillman, E. (2018). What is Java? In Understanding coding with Java (pp. 6–7). essay, PowerKids Press. Retrieved from https://cuny-ny.primo.exlibrisgroup.com/permalink/01CUNY_NY/1a8849m/alma991028005994506121
Refsnes D (1998). Java Data Types. w3schools . Retrieved from https://www.w3schools.com/java/java_data_types.asp
Team, D. (2020, February 9). Software Developer Statistics 2021: How Many Software Engineers Are in the US and in the World? [Updated]. Daxx Software Development Teams. Retrieved from https://www.daxx.com/blog/development-trends/number-software-developers-world.
Tillman, K. (2019, January 23). Oracle Buys Sun. Oracle. Retrieved from https://www.oracle.com/corporate/pressrelease/oracle-buys-sun-042009.html.