Whitelisting JCTIC Emails in your Personal Email Account
prepared by IAC Committee
Last updated on 10 May 2022
Note: The most updated version of this document can be found at ict.tic.edu.hk
Direct Link to this document: https://goo.gl/ALq8wb
Content
2) Why JCTIC mails are classified as SPAM 2
5) Screen by Screen Setup Instructions for Gmail Users 3
6) Screen by Screen Setup Instructions for Yahoo Users 5
1) Background
JCTIC Intranet uses emails extensively to communicate with parents and students through their registered personal email accounts. Many modules (e.g. API, QPI, TAI, DC Records, etc.) rely heavily on sending instant emails to various stakeholders. These emails serve as secondary reminders only, all such data can be found in our JCTIC Intranets.
The scale of the quantity of these JCTIC auto-emails may sometimes trigger your email service provider to classify them as SPAM mails. As a result, you may miss some of the mails (e.g. Quiz Scores) from the school. The mails may end up piling up in the SPAM (垃圾郵件) folder of your email account. Some parents even reported that the mails cannot be found even in the SPAM folder.
2) Why JCTIC mails are classified as SPAM
We send thousands of mails everyday from our Intranets to keep you informed of the data concerning your child. There's little or even nothing we can do to interfere with how email service providers (e.g. Gmail, Hotmail, Yahoo, etc.) classify emails as SPAM. Apparently the rise in fraudulent or phishing email attacks forces email service providers to step up and enforce their SPAM filter engine to fight against such crime. As a result, they may classify our JCTIC mass mails as SPAM.
3) Work Around
The problem is troublesome but yet there is a work around. You can set up rules (or filters) to WHITE-LIST all emails from JCTIC. Most JCTIC emails will then bypass the SPAM filter of your email service provider and end up in your INBOX.
Different email service providers may have slightly different procedures to set up such rules (or filters). Below is a list of the procedures involved for popular email services providers.
How to whitelist an email address with Gmail, Outlook.com or Yahoo! Mail
How to Setup a Whitelist in Gmail
These setup procedures may change over time when providers upgrade or update their services. You may have to search for the specific instructions for your email services provider. On the next few pages, you can find screen by screen setup instructions for Gmail users and Yahoo users. Setup instructions is similar for other email service providers.
The key is to whitelist all mails from
info@tic.edu.hk OR tic.edu.hk
4) Contact Us for Help
Please do not hesitate to contact us through email (ithelpdesk@tic.edu.hk).
5) Screen by Screen Setup Instructions for Gmail Users
Step 1:
Login your personal Gmail Account
Step 2:
Click the "gear" icon on the top right. Then Settings.

Step 3:
Click "Filters and Blocked Addresses", then click "Create a new filter" at the bottom.


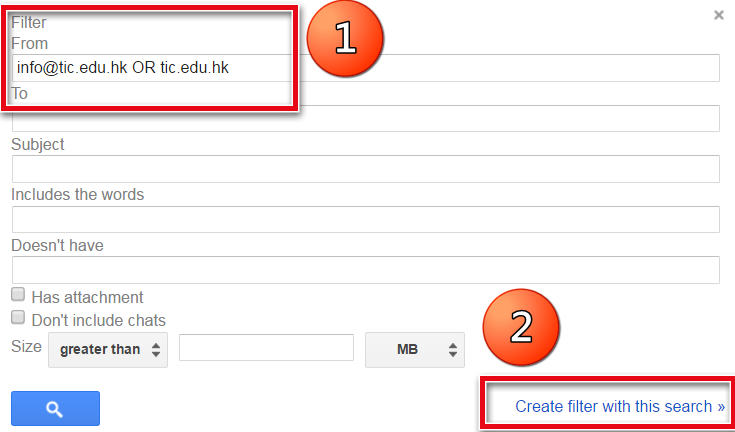
Step 4:
Fill in following information. Then click "Create filter with this search"
Note:
The setting of
From: info@tic.edu.hk OR tic.edu.hk
will whitelist all mails from the official school email address OR any emails from our school mail server.
Alternatively, you may simply enter From: tic.edu.hk
Step 5:
Check the following two checkboxes. Then click "Create Filter"

Done! You finished whitelisting all JCTIC emails.
From now on you should be able to receive all of our mails in your INBOX.
You can find the following filter in your "Filters and Blocked Addresses" settings.
You can activate/edit/delete the filter anytime.

6) Screen by Screen Setup Instructions for Yahoo Users
Step 1:
Login your personal Yahoo Account.
Step 2:
Click the top right "gear" icon.
Then click "Setup 設定", "Filter 過濾器", "Add 新增"


Step 3:
Setup the filter like this. Then click save.

Step 4:
Finish. You can find your new Filter in your setting. You can edit or remove any existing filters.
