Com.X20
| http://www.farsouthnet.com |
Version 3.2, August 2020 | |

Welcome to the world of Com.X, changing the communications landscape for good.
This leaflet will help you to get started with your new Com.X10 solution. This getting started guide addresses networking and installation of the Com.X10 unit and SHOULD be read in conjunction with the Com.X Administrator's guide.
The product user manuals and Administrator guides are available at: http://www.farsouthnet.com/support/manuals/
- This getting started guide addresses networking and installation of the Com.X20 host server with one or more Comma iTA devices and should be read in conjunction with the:
- · Comma iTA Getting Started guide: http://www.farsouthnet.com/wp-content/uploads/2013/08/comma-getting-started.1.05.pdf
- Comma iTA developer mediawiki access refer to:
- · User Guide: http://farsouthnet.com/mediawiki/index.php?title=Comma_User_Guide
- · Developer Resources: http://farsouthnet.com/mediawiki/index.php?title=Comma_Developer_Resources

Description
The Com.X20 host server includes 4 Ethernet ports, pre-configured to support LAN access, and other IO ports described below.

Com.X20 rear view IO port definition:
- 10/100/1000Base-Tx Ethernet: LAN1 to LAN8 (Eth0 to Eth 7)
- Power: 220Vac/50Hz
- Serial port: COM1
- USB2.0: USB4, USB5, USB8 & USB9
- Display: VGA & HDMI
Hardware Installation
Important: Refer to the Com.X20 Installation Guide for important safety instructions, installation guidelines, wiring and surge protection mechanisms and recommendations.
1. The Com.X20 host server is powered using the AC power cable included with your server. Connect the power cable to 220V/50Hz mains power supply and turn the server on.
2. Connect any Comma iTA units to available LAN ports using Cat5e Ethernet cables.
3. Connect the Com.X20 host server to the LAN switch using the first Ethernet port (Eth0) and a standard Cat5e cable.
Accessing the Com.X20 server
- Default access details for the Com.X20 is:
- user: comma
- password: farsout
- The Com.X20 server GUI can be accessed using the url http://<ip>, where <ip> is the IP addressed assigned to the unit via DHCP, or one of the statically configured IP's. All administrative tasks elaborated on below can be performed from the GUI. Please refer to the Administrator's guide for more detail.
- The Com.X20 server can also be accessed via its serial port using a null-modem cable with the following settings:
- baud rate: 115200
- data bits: 8
- stop bits: 1
- parity: none
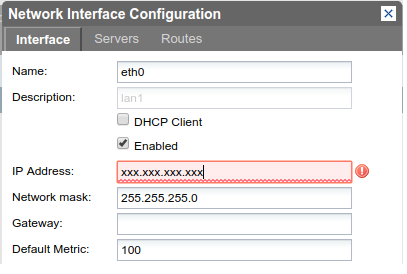
- The Com.X20 server requests its IP address from the LAN / WAN via physical Ethernet port LAN1, (labelled the eth0 interface in the Operating System). This interface can be re-configured with a static IP from the GUI, accessed by dropping down the “Start” menu and selecting “Configuration”. Navigate to the Network and cascading “Connections” tabs. Select “eth0”, right click, edit and uncheck “DHCP Client”, then edit “IP Address” as desired

- Note that the Operating System networking will need to be restarted after this configuration change: sudo/etc/init.d/networking restart
Networking
- The Com.X20 server comes pre-installed with Ethernet interfaces configured as follows:
Interface | Description | DHCP client | Comma sever | IP | Netmask |
eth0 | LAN1 | Yes | No | - | - |
eth1 | LAN2 | No | No | 192.168.101.1 | 255.255.255.0 |
eth2 | LAN3 | No | No | 192.168.102.1 | 255.255.255.0 |
eth3 | LAN4 | No | No | 192.168.103.1 | 255.255.255.0 |
eth4 | LAN5 | No | No | 192.168.104.1 | 255.255.255.0 |
eth5 | LAN6 | No | No | 192.168.105.1 | 255.255.255.0 |
eth6 | LAN7 | No | No | 192.168.106.1 | 255.255.255.0 |
eth7 | LAN8 | No | Yes | 192.168.107.1 | 255.255.255.0 |
- The Com.X20 server comes pre-installed with Comma Manager the following software:
- DAHDI with Dynamic span patches for PRI and analog
- mISDN with Comma patches for BRI
- Asterisk
- Comma-GUI
- The Com.X20 server is pre-configured with fixed IP addresses on the Ethernet ports which a Comma iTA is connected to.
For User Guide and Developer information please see http://farsouthnet.com/mediawiki
Identifying connected Comma iTAs
- From the GUI, select the Hardware panel. A Scan of the network will list additional devices.
- Alternatively from the console / ssh access type the following:
comma-ls -v
- Connected Comma iTA devices will be identified by their MAC addresses and IP addresses if connected correctly, and the hardware configuration and software versions will be listed.
- If IP addresses are not listed, the unit may be connected in the wrong order. Connect the units to different Com.X10 Ethernet ports. The units' MAC addresses can be viewed with their interface configuration in /etc/comma.conf in order to determine the correct connection order.
Logging and Diagnostics
- From the Comma-GUI, select the Monitoring menu for an extensive monitoring suite
- A log is maintained while the Comma Manager is running, typically found at /var/log/comma.log:
less /var/log/comma.log - The Com.X10 server system log keeps a record of system warnings and errors and can be viewed as:
less /var/log/syslog - The Asterisk PBX server command line can be accessed from the server as follows:
sudo asterisk -vvvr
Copyright © 2008-2018 Far South Networks (Pty) Ltd