Flipper Zero Animation Process

- Determine what you want to make your animation about. You can pic a gif, meme, video etc; or you can draw your own. Obviously if you want to draw an animation manually, just go ahead and do that. It’s easiest to make a PNG with a white background, it’s easier to work with in most cases.
- If you want to use source material, ezGIF is a great online tool to convert everything and make you able to quickly work with your GIF so you can convert it for use with Flipper.
- Start with your animation of choice, then go on over to ezGIF and make it a GIF it it is not already (mainly for video files).
- Once you have a GIF, change the aspect ratio to 2:1 so you can start working on the file. You’re going to want to have your image 128x64 in the end, so starting off at 2:1 will make life easier in the end.
- Optimize your GIF, you want to cut down as many frames as you can, so use the “Optimize” feature and start cutting frames. You may have to use the speed feature to readjust, but in the end, ideally you want to be in the sub 50 frames region. If you end up with a lot of frames, you might want to rethink your animation. I had to do this with my first animation that had 100 frames, it would load really slowly and was not ideal
- Once you’ve got your animation squeezed down to 50 or so frames, we need to size it down before we convert it to monochrome or grayscale. Go to resize and change it to 128x64.

- Goto “Effects” tab and select “monochrome” or “grayscale”. This is the tricky part, you need to make the animation look as good as you can so it will look good on the Flipper. Using sharpen at around 4 tends to help for something, also adjusting the brightness and contrast can help too. Play around, the better and more clear your GIF is, the better it’ll look on Flipper. One thing that I ran into way too late in my animating hobby is that Flipper actually has a tool for “painting” on your Flipper’s screen. You can also use this site to upload a sample PNG and see what it will actually look like on the screen, realtime without having to compile it.
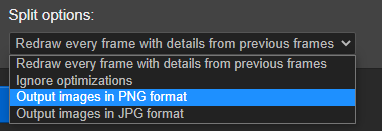
- Now that you have a successful GIF, click on the “Split” option and select output to PNG, save the zip and unzip it to a folder.
- Now that you have the animation frames, you need to rename it so you can work with it. Download Ant Renamer. Run that program and drag and drop your PNG’s from the folder into the app. Then go to Actions - > Enumeration. The string you need to rename the files correctly is : frame_%num%%ext% Click “Go”.
- Now that you have a list of files like frame_0.png, we need to create a new text file in your PNG folder called meta.txt.
- Meta.tx is a file that will tell the Flipper how to show your animation, it will take the image files and play them based on what meta.txt says. From here forward, we will start to refer to your PNG’s as BM’s because we’re going to convert our .PNG’s to .bm’s but that comes later. We’re going to add in an active frame at the end, sometimes this can help when compiling. Copy and paste this:
Filetype: Flipper Animation
Version: 1
Width: 128
Height: 64
Passive frames: 10
Active frames: 1
Frames order: 0 1 2 3 4 5 6 7 8 9 10 0
Active cycles: 1
Frame rate: 7
Duration: 3600
Active cooldown: 1
Bubble slots: 0
- Here is a brief runthrough of what each thing does:
- Width/Height: It’s just that, It should be 128x64 just like your gif
- Passive Frames : This is a number of frames that will play on repeat until the back button is pressed or you come back to the main screen from using an app. If you set the passive frames to your total number of frames . If you have a 10 frame sequence and all you want it to do is play those 10 frames in order and loop, just set Passive frames to 10.
- Active Frames : this is the number of frames AFTER your passive frames. These frames will ONLY play after the user either presses the back button or returns to the home screen after using the menu or an app. Your active frames + passive frames must equal out to the whole number of frames in your “Frames order” sequence. If you have Active Cycles set to greater than 1, you’ll need to make sure you have at least one active frame.
- Frames Order: This is your actual animation sequence. This is telling the flipper what frame to load. 0 will show frame_0.bm, 1 will show frame_1.bm. You can show frames in any order and even repeat frames. This makes it much more efficient to keep a single frame on the screen for longer without having to have several of the same .bm’s.
- Active Cycles: If you are using Active Frames, this is the number of times it will loop your Active Frames before going back to the Passive Frames and looping those again. If you are just using Passive Frames, you can leave this at 1 and you’re good.
- Frame Rate : This is how many frames per second are shown. The higher you go, the more taxing it is on Flipper, also if you go really fast (7 or higher) you will get ghosting on the screen as the Flipper barely has enough time to display the image on the screen. 5 is a good place for a faster animation, many people who hand animate especially like to go lower. Minimum frame rate is 1 and decimals are not an option.
- Duration: This is how many seconds it will display the animation before cycling to the next one.
- Active Cooldown: Number of seconds after entering Passive Mode before the Active Frames can be triggered again. If you set it at 30, once your Active Cycles conclude, it will take this number of seconds before they can play again from Passive Mode. For example, if you Active animation just looped back to Passive Frames, it will take 30 seconds before you can trigger the Active Frame sequence again.
- Bubble Slots: You can add Speech bubbles to your animations. If you’re just using Passive Frames, then you can leave your Bubble Slots to 0 because you’ll effectively be using the same slot for all of your bubbles. If you’re using Passive and Active frames, you’ll have to set it to 2. Your first slot is slot 0 and your second slot is slot 1. Slot 0 will let you use speech bubbles during your Passive Frames, while slot 1 will play during your Active Frames. We’ll come back to bubbles later
- If you’re having trouble, you can always make a meta.txt that only has one frame.
Filetype: Flipper Animation
Version: 1
Width: 128
Height: 64
Passive frames: 1
Active frames: 0
Frames order: 0
Active cycles: 0
Frame rate: 1
Duration: 3600
Active cooldown: 0
Bubble slots: 0
- Now that you have a folder with your sequentially named frame_0.png’s and what is hopefully a working meta.txt we need to convert our files so our Flipper can read it. First, make sure that your folder only has the PNG’s and meta.txt and rename the folder to whatever you want to name your animation. Example: Sasquach_Rocks
- Now for the fun part, you’re going to need to clone the official Flipper repository from GitHub. First, download the official GitHub app and install. Fire it up and go to File-> Clone Repository. Click on URL and change your “Local Path” to somewhere you’ll remember. Go to Flipper Zero’s official repository and click the Code button and copy the link. Enter the link into GitHub app and click “Clone”
- Now that you’ve cloned the repository, you’re going to need Windows Powershell or some other terminal program. If you do not have it, you can go here and figure out how to get it on your platform. This can be done in many other ways, but I’m on Windows and this has been pretty easy.
- Now that you have Powershell and the Flipper Repository, we need to move our folder into the proper location. Navigate to wherever you cloned your repository, and navigate to \flipperzero-firmware\assets\dolphin\external. You can paste your folder in this folder. Here you’ll also find a file called manifest.txt. Copy and paste the top entry and change the animation title to yours. Here’s an example of mine:


Filetype: Flipper Animation Manifest
Version: 1
Name: Sasquach_Rocks
Min butthurt: 0
Max butthurt: 10
Min level: 1
Max level: 3
Weight: 3
- The butthurt levels go 1-14, when Flipper is angry it will change its level of butthurt. We want our animation to play regardless of Flipper’s butthurt level, so we’ll include all levels. Same thing for Min/Max level, stock firmware has a max level of 3, RogueMaster has a max level of 30. The Weight is how likely your animation is to show up. The higher the number the more likely your animation is to show up when Flipper randomly chooses which animation to play next. Currently we’re not quite sure that the max weight is, but higher is better.
- Now that we have our files moved, our meta.txt made and our manifest.txt modified, it’s time to compile. Navigate to the root folder for your cloned Flipper Repository. In my case it’s “D:\Flipper Zero\Flipper Repository\flipperzero-firmware” (as you can see from my screenshot from GitHub app. Click on the address bar so you can copy the whole folder location so we can paste it into PowerShell:
- Open Powershell and enter the command:
Set-location “D:\Flipper Zero\Flipper Repository\flipperzero-firmware” - Now we need to ask the Flipper to kindly compile our animation for us. Now that PowerShell is in the root folder for the cloned Flipper Repository, we can use this code:
./fbt icons proto dolphin_internal dolphin_ext resources - If everything went to plan, it should complete without any errors pertaining to our new animation. It may have some random errors, but we’re only concerned about errors about our frames. Chances are if you have a problem, it’s because of meta.txt, however it can still get angry if manifest.txt is wrong. Check everything over again.
- You’ll now find your new animation in the folder flipperzero-firmware\assets\resources\dolphin. Copy the new folder that should contain your new frame_#.bm’s and meta.txt. We’re going to copy and paste that into your Flipper. I like to copy this folder into the folder that I use to mess around with files, something like D:\Flipper Zero\Finished Animations.
- Also grab the manifest.txt file that you modified and bring that into your Finished Animations folder.
- Fire up qFlipper and navigate to your Flipper’s file explorer and go to : SD Card - > Dolphin. Drag and drop your new animation folder and manifest.txt into this folder.

- Disconnect your Flipper from your computer and press the “Back” and “Left Arrow” buttons for a second to reboot your flipper. VOILA it should work! If it does not, you did something wrong or I wrote the instructions wrong. Either way, figure it out, I’m not here to hold your hand.
:: This Part is Still Under Development! Still need further clarity on some parts!:: - Bubbles! If you need to know about speech bubbles, this is your chance. Speech bubbles are used to create just that, speech bubbles wherever you want in your animation. The code will go at the end of your meta.txt and are formatted like this:
Bubble slots: 1
Slot: 0
X: 40
Y: 40
Text: Hello.....
AlignH: Right
AlignV: Top
StartFrame: 5
EndFrame: 38
- Slot: You can have multiple bubble slots which separate different sets of bubbles. For now, you can only have ONE speech bubble in your passive frames, so if you plan to have speech bubbles during both passive and active frames, you’ll need at least 2 slots. Bubbles in the same slot will play in order (unless you’re trying to put more than 1 bubble in a passive sequence which won’t work at this time) based on your start and end times.
- X and Y are coordinates. You don’t want to get too close to 0 in either direction because having your Bubbles start off screen will probably make them not show up.
- Text: This is what you want it to say. What’s cool is that you can add line breaks if you want with the “\n” code. It will look like this:
Printing on \nMultiple \nLines
Which looks like”
Printing on
Multiple
Lines - AlignH & AlignV: This is where the little arrow that the speech bubble originates from. You can select from H: Left, Center, Right and V : Top, Center, Bottom
- StartFrame : This is the number of frames for it to wait before displaying. You can count your frames in your “Frames Order” part of your meta.
- EndFrame: Same as StartFrame, but this is when your speech bubble stops.