Filmetrics F40 Operation Instructions
Special Notes or Restrictions:
- NO RESERVATIONS
- NOTE: BOLD ALL CAPS DESCRIBES A BUTTON IN THE SOFTWARE.
Startup
- Enable "Filmetrics" on Badger
- If necessary log into computer with Bitlocker PIN:
Bitlocker: 5T4VJ0212345
- Log in with the following username and password. Advanced training required for Engineering access.
- Windows Login
username: labmembers
password: labmembers
- Run FILMeasure software
- if software is already open, close previous window and reopen userID: opSNF or engSNF(needed to edit recipes)
- passwd: opSNF
- Make sure microscope filters and polarizers are out, adjust aperture
- microscope filters - on the right, make sure all 4 pins are pushed all the way out
- polarizers - on the left, make sure black slide is pulled out
- setaperture lever to bottom positionset center wheel to – BF
- Select Live Video on the left side of the program
- the black dot is what is being measured
- adjust focus until aperture is clearly- course focus
- Set lamp to intensity required by magnification
- select microscope objective that will be used for measurement. focus on surface to be measured(50X and 100X, focus is critical for background&measurement)
- Select Setup -> Raw Signal to display intensity on the graph
- Verify Integration time= 40 msec, #cycles = 1
- adjust lamp intensity knob so graph peaks are ~2500 counts. For 100X set lamp intensity as high as possible and pull viewport slider out
- click close
- Choose microscope objective from dropdown list
- Run Baseline
Step 1: Take Sample Reflectance
- Place film:wafer to be measured (For calibration- Filmetrics calibration wafer or SiO wafer from Nanospec 2 on the stage
- take Sample Reflectance -> Autoscale Gain -> OK
Step 2: Take Reflectance Standard
- choose underlying substrate material from the dropdown list
- focus on material used for the reflective standard wafer
- take Reflective Standard -> Autoscale Gain -> OK -> Next
Step 3: Take Background
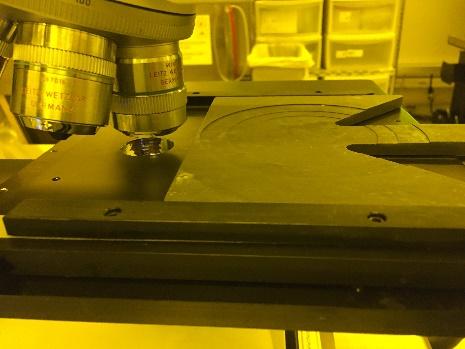
- move stage so the hole in the stage is under the objective
- take background -> finish
If the objective is changed, a new baseline must be run. Below are the measurement capabilities of the available objectives:
Magnification | Spot size with 250um aperture | Thickness range 400- 850nm illumination |
5X | 50 | 20nm – 40um |
20X | 12.5 | 20nm – ~40um |
50X | 5 | 20nm – ~2um |
100X | 2.5 | 20nm – ~1.5um |
Taking a Measurement
- Select recipe from the dropdown list of available films in SNF labmember folder
- Place wafer under objective and focus
- If the objective is changed, a new baseline must be run!
- Click Measure (inactive until baseline is run)
blue line = measured values
red line = calculated values
Saving Data
Go to the History tab above the graph -> display previous measurement -> save as
- bring your own USB!
Shutdown
Remove wafer
- Rotate objective to 5x
- Close FILMeasure program
- Disable"Filmetrics" on Badger
Troubleshooting
If computer screen is frozen -> restart computer under the desk
- warning: intensity changed -> press OK
Feb 2020