Online Lesson Book
Documentation

Table of Contents
Features of the Online Lesson Book 4
Customer or Student’s Side of Online Lesson Book Help 5
Overview of the Student’s Online Lesson Book 5
Arriving at the Online Lesson Book 5
[1] Search for available lessons 6
[2]To sign in to book a lesson reservation 6
Do you have a username and password? 7
Do you want to create a new account? 7
To check-in as a new customer 7
Do you want to book a lesson without creating an account? 8
After signing in to Lesson Book 8
To book a lesson using your credit card 9
To set up to use your credit card online 9
Online Lesson Book Set Up in Admin 13
Trainers using Online Lesson Booking 28
To check your training schedule 29
Trainers using their Lesson Reservations 30
To reserve a group lesson online 32
To book lessons using a group template 34
To paste a previously copied reservation (AKA How to move a lesson reservation to another time 34
To unlock a lesson reservation 35
Trainers Updating their Lesson Reservations 36
To mark the student as a No Show 38
To copy the lesson reservation (and paste it elsewhere) 40
To move a lesson reservation 40
To unlock a lesson reservation 40
Printing Trainers Schedules and Reporting 41
Printing your training schedule from Online Lesson Book 41
Overview
https://workflowy.com/#/2d47c7a5d9d6
Online Lesson Book is used to book lessons or group lessons with trainers at their specific rates at your site and your course. Lesson Book has also been used to book simulators, tennis lessons, tennis courts, and even your hot tubs. To see a video overview of Online Lesson Book, click here >>
Features of the Online Lesson Book
- Setting Lesson Book’s start time, end time, and intervals
- Set up maximum players in groups for a trainer
- Reserve a lesson for one player or group lesson
- Block/unblock time
- Cancel booking
- Display players in groups
- Check-in online
- Advance Booking
- Email Settings
- Lesson Book Settings
- My Appointments
- Online Tee Time
- Validate Data Entry
- Web Settings
- Payment Setting
- Custom CSS
To start, a website will be created for you by Club Prophet’s support agents. Then you must set up Lesson Book with your trainers and your specific rates and as in most cases, set that up in your inventory. Some of this setup takes place in your Club Prophet software with the Lesson Book v3 add-on module.
Here is an overview of the process to get Lesson Book up and running:
- Inventory in POS Express
- Set up Lesson Book in POS Express
- Options, Rates, Trainers and Site information, and others as needed
- The Online Admin set up of Lesson Book
Customer or Student’s Side of Online Lesson Book Help
The following instructions are to guide your customer through using the Online Lesson Book. Since you have many options to offer your customer when it comes to using the online Lesson Book, you may want to highlight the options that will be available for your customer. You could also offer your customer the following link to help them navigate through arriving at your online Lesson Book for the first time, here>>
Overview of the Student’s Online Lesson Book
Your customer-students using Lesson Book online, from their computer, phone, or tablet, can check for available lesson times for a specific day and time, for a specific trainer, and for a specific rate if this is set up to do so. They can also log on and reserve a lesson using their customer account or by creating a new account or by logging in as a guest.
Your online Lesson Book site must be set up prior to using it through the online Admin portal and some setup needs to take place on a local terminal running Lesson Book through POSExpress. See Lesson Book Set Up to help you with that. After the online part of Lesson Book is set up, the trainer can also look online to see and change their schedules and block time. See Trainers help for more information.
The student can do the following at your online Lesson Book website:
- Search for available lessons
- Book a lesson or update a lesson
- Create and update an account profile
- Cancel a lesson
Arriving at the Online Lesson Book
When your customer lands at your online Lesson Book, they could see one of the two following screens depending on how you have set it up:
[1] The Available Lessons screen Note: To set up to present the Available Lessons screen to your customer, click here>> | [2] The Sign In screen Note: To set up to present a Sign In screen to your customer, click here>> |
Go here to work on branching the different ways to book a lesson>
Go here to work on branching the different ways to book a lesson>
Click the screen above that resembles what you see when opening up the Lesson Book site, and you will be given the proper directions.
[1] Search for available lessons
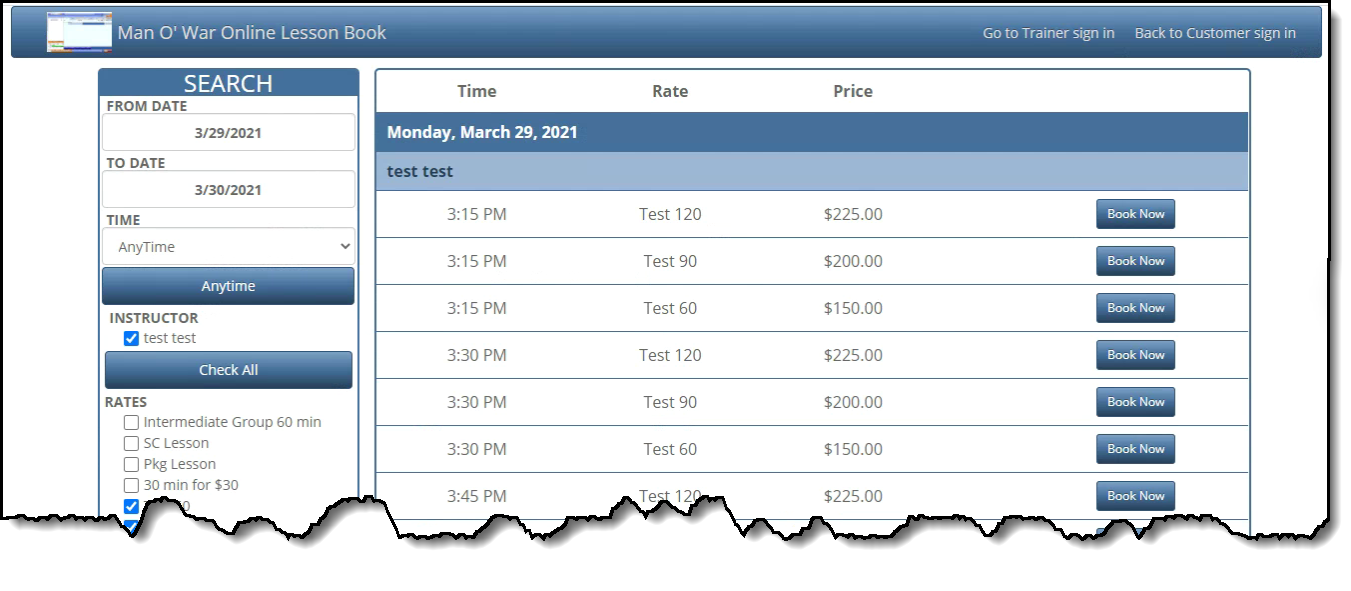
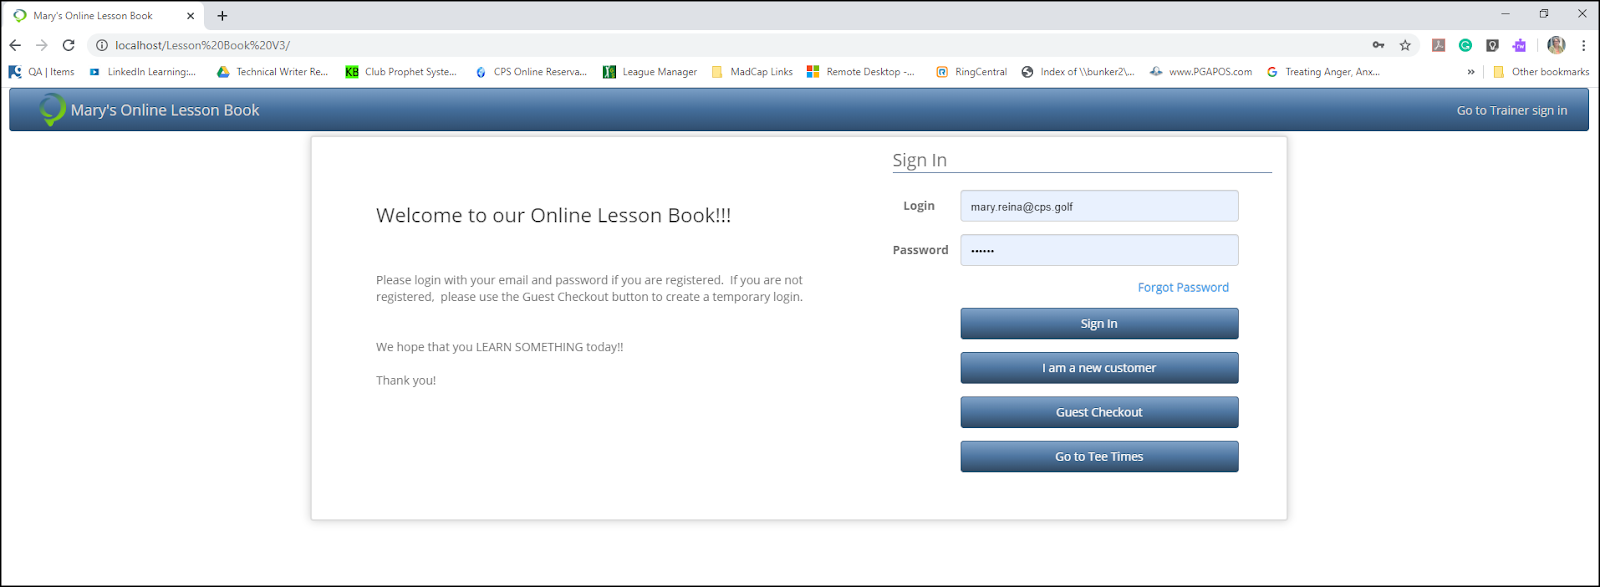
If your Lesson Book is set up to search for a lesson, you can search for a lesson without being signed in. When you enter the URL in your browser for the online Lesson Book site, you will see something like this:

Note: For the available lessons to display you must set it up in the backend to show/default trainers and if desired their rates. This functions very similar to tee time online reservations in that you have to tell the website what trainers/rates you want to be seen and which of those you want to default.
To start your search
- Pick your day or date range using the From DATE and TO DATE fields. When you click the date, you can click the date from the pop-up calendar.
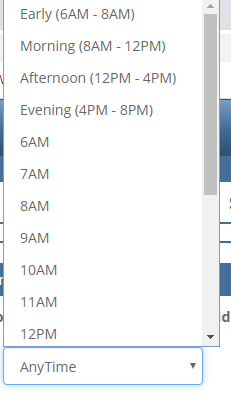
- To select the time, click the AnyTime drop-down and click the desired time.
- To select the instructor, click the Instructor button or select Check All.
- To select the desired rate for your lesson, click the Rates button or select the Check All button.
- Select Search. If there are lessons available with your selected criteria, they display on the screen. If not, a message displays stating “No lesson available, please try different criteria.”
Tip: You may want to use a wider time frame (both date and time), or try using Anytime, Check All in those fields.
Tip: Click the Go to Tee Times button to see available tee times for this course if set up.
[2]To sign in to book a lesson reservation
If the site is set up to log in first. your customer can be prompted to
- log on as a member (if previously created),
- log on as a guest, or
- create a new account,
before they book a lesson.

For the customer to log in to the online Lesson Book, do one of the following:
Do you have a username and password?
- Log in with a username and password that was previously set up, by doing the following:
Note: The username and password could be previously created by the customer using the I am a new customer button (see below), or this a customer was created in the Customer module. (See the Customer module.)
- Under the Sign In prompt, enter your username which is your email and password, and click Sign In. Skip to step 3 now.
Note: If you forget it click the Forgot Password button and follow the prompts.
Do you want to create a new account?
To check-in as a new customer
If you are a new customer, you can still reserve and pay for a lesson, you must click the I am a new customer button at the Sign In screen, then search for an available lesson if you haven’t already, then book a lesson reservation. After that, you check in and pay for your lesson.
- Create a new account using the I am a new customer button by doing the following:
Note: Creating this account here can be used for all other web-related logins.
- After you select the I am a new customer button, at the User Profile page, enter all needed information into the fields. The fields highlighted in red are required.
- In the Email field enter an email address. Note: This could be your username depending on how the site is set up for logins; it must have never been used before in the Club Prophet system.
- In the password field, enter at least six characters then re-enter the same characters into the Confirm Password field. They must match before you proceed.
- Enter all the required fields highlighted in red, and when finished, select Register. The Lesson Book scheduling page displays. Continue to step 3 below to book a lesson.
Do you want to book a lesson without creating an account?
To check-in as a guest
- Enter your email address at the Lesson Book Welcome page, then select the Guest Checkout button. The User Profile page displays the email you just entered in the Email field.
- Enter the relative information in these fields: First & Last Name and Mobile Phone.
Note: The Email field cannot be changed here. If you need to change the email address, select Cancel and enter it at the Welcome page and select Guest Checkout again.
- Click Register. The Lesson Book scheduling page displays. Continue to step 3 below to book a lesson.
Note: If you are presented with the Search screen first before the sign-in screen, you would use the Search Panel on the left side of the page, for help on that, click here>> This needs to be set up in Admin under Lesson Book Settings | Other Settings. To see more details on that, click here>>.
Note: If set up, you can also select the Go to Tee Times button to search to see if your tee times are available before you reserve a lesson.
After signing in to Lesson Book
- After signing in and the Lesson Book displays with times and trainers available, do the following to book a lesson:
Note: If no times and trainers display, click the Check All buttons under the Instructor and Rates sections and click Search.
- You may need to scroll to find the trainer and time slot to book your lesson and select Book Now to the right side of the screen. The Confirmation Info screen displays stating the details of your appointment.
--OR--
- If you want to book on a different date, use the Search panel to the left.
- To finalize this lesson, select Confirm Appointment. One of two things will happen:
- A confirmation key number and a message display stating “Appointment Confirmed!”; also, an email is sent out with the details of the appointment to you and to the trainer.
--OR--
- You will be prompted to enter your credit card information if the system has been set up this way. Note to facility: To learn how to set that up, jump here>>
Note: To see your appointments, select the My Appointments link at the top-right of the screen.
To book a lesson using your credit card
Your credit card will need to be set up before you book your lesson if this Lesson Book site is set up to accept credit cards. Click here to see how to set up the site to receive credit card payments.
Note: You must have created an account first before you can add a card; there is no place to add card information during the initial registration of your account.
To set up to use your credit card online
- Log on to Online Lesson Book with your email and password (see steps above).
- Select Edit Profile in the top right corner of the page. The User Profile page displays.
- Scroll to the bottom of the page, and select Add Card on File button.

- Enter all of the following credit card information:
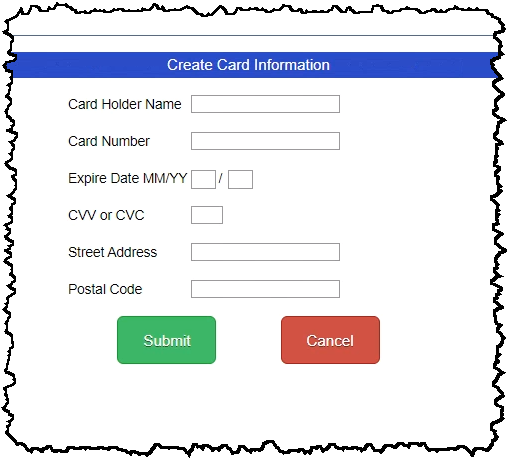
- Select Submit. The card will be checked for its validity. If it is valid, you can book your lesson using this card on file now. (See steps above).
To update your profile
You can change the following information in your Lesson Book profile:
- Account - Name, email, phone number, and password
- Address - Your demographic information
- Credit card - Add a card, delete a card, and change credit card information
To update this information, do the following:
- Log on to Online Lesson Book with your email and password (see steps above).
- In the top-right corner of the page, select Edit Profile. The Profile page displays.
- To update your account information, select the field and enter your changes as needed.
- To change the password, enter a new one in the Password field and then re-enter the same password in the Confirm Password field. They must match or you cannot save this page.
- To update an address, select the field(s) and enter the new address information. For the country, use the drop-down arrow to select a country. A country cannot be typed into the field.
- To delete a credit card on file, select the Delete button to the right of the screen next to the desired credit card to remove.
- To add a credit card or an additional credit card, see the steps above under To set up to use your credit card online.
- If you need to update credit card information such as the expiry date, you must delete the card (step 6 above), then re-enter the card information (see To set up to use your credit card online above), or call the pro-shop and ask them to do it for you.
- Select Save after updating any section above.
BEST PRACTICE: Select Save after updating a section and before you move onto another section if need be.
To cancel a lesson
The rule for canceling reservations is set up in the Admin page of Lesson Book under Advanced Booking in the section Default cancelation rule for all reservations. A time amount in the form of hours can be entered for how much time in advance you will allow for cancelations.
To cancel the booked lesson, a customer can cancel online, unless the time requirement has passed, as follows:
Note: Also, you can cancel the lesson for them at a local terminal using POS Express that is set up with Lesson Book. See Lesson Book v3 for help with this. A trainer can also cancel a lesson, see Trainers Updating their Lesson Reservations: To cancel a lesson.
- At the Lesson Book website, log in using the same username/password that the lesson was booked with. The Lesson Book home page displays.
- In the top-right part of the screen, select the My Appointments link. If you have appointments they display at the My Appointments screen.

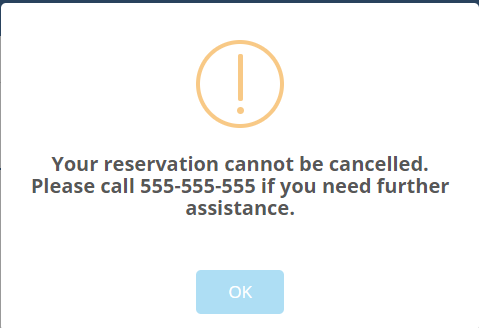
- Select Cancel to the right of the appointment you need to cancel. The appointment is removed and an email is sent to the customer and the trainer.
Note: If it cannot be canceled, a warning dialog displays giving details on what to do next:
To pay for a lesson online
After you have reserved a lesson online and are now ready to check-in, if the payment is not required online at the time you booked, the student pays at the facility when they arrive.
If the site was set up to collect a payment, the student will be prompted during the reservation process, IF credit card information was entered previously. If not, the option to do that now displays.
Do the following if you have not previously entered credit card information:
- In your favorite browser, enter the Online Lesson book URL to go to the site
- Sign in to Online Lesson Book using your email address/username or phone number.
- Find a lesson time and select Book Now (see the Book a lesson section for more information). The Confirmation Info page displays.
- Make sure the information is correct on this page and click Confirm Appointment. The Enter Credit Card Information screen displays.
- Enter the required information in all of the fields:
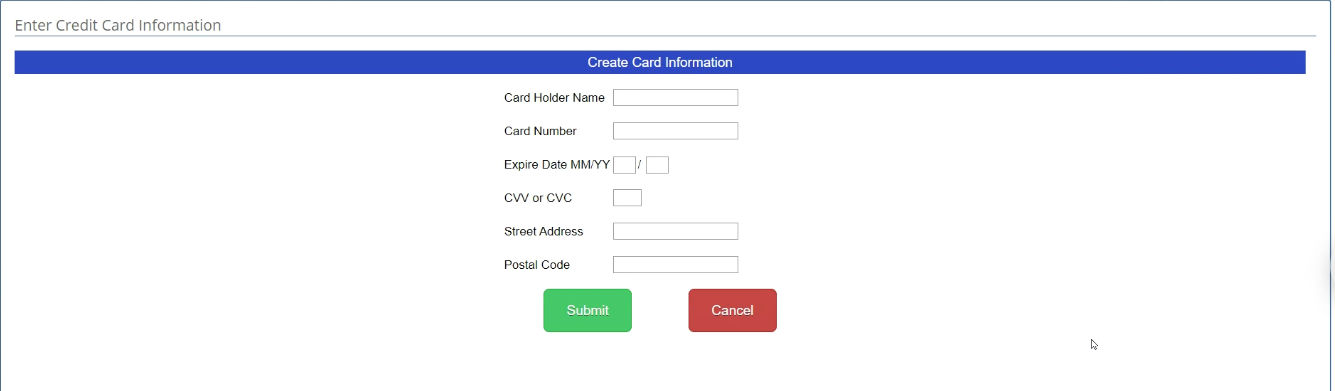
- Select Submit.
Online Lesson Book Set Up in Admin
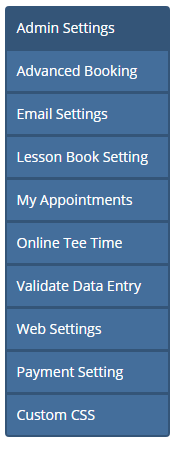
The following options are available online in the Admin Settings:
Admin Settings - You can update the admin account - username and password, and general facility information |
The Admin Settings
In the Admin Settings, you can update the account, update the username and password, and the settings for your facility. After you sign in as Admin, click the Admin Settings button to the left. The Admin Settings screen displays.

- To change the administrative username email and password, do the following:
Note: The default is admin@admin.com/admin.
- Type in a new email for the Admin account name in the Admin Email field. It does not have to be a real address; you can make one up.
- Type in the new password for the account in the Admin Password field. There are no restrictions on the password; it can be anything.
- To make changes to the Lesson Book’s name, email, phone number, website, and address, enter the information in the relative fields.
- Select Save. Update Successfully displays briefly at the bottom middle of the page. Now the new details display on the online Lesson Book for your customers to see.
Advanced Booking Options
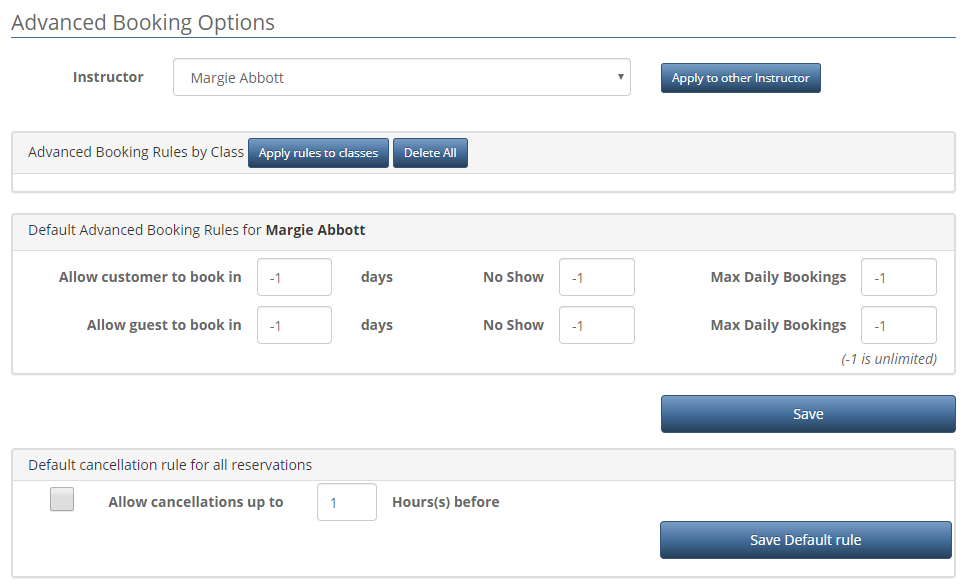
- After you sign in as Admin, click the Advanced Booking button to the left. The Advanced Booking Options screen displays.
Note: If you have never set up the booking settings for a trainer, you need to do that in the POS Express Lesson Book v3. To learn how jump here>>
- Select the Instructor from the drop-down list and do the following as needed:
Note: These instructors were set up in your Lesson Book v3 module on your local terminal.
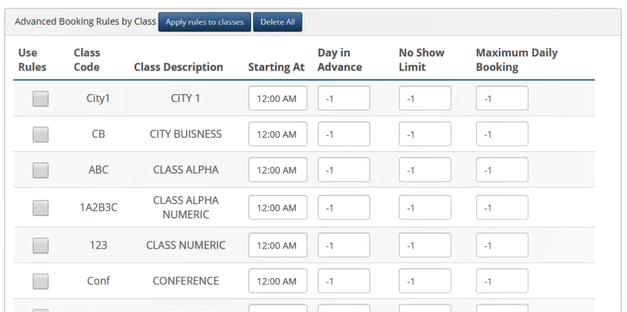
- Click the Use Rules checkbox next to the class code you want to apply.
- Enter a start time in the Starting at field when the online booking can start OR you can use the drop-down time menu to adjust the times needed.
- In the Days in Advance field, enter how many days in advance the booking can start.
- In the No Show Limit field, enter the number of chances the student has before they will be prevented from being able to book a lesson after missing.
- In the Max Daily Booking field, enter how many times a student can book a lesson on the same day.
Note: Select Delete All to delete all the booking rules for classes.
3. In the Default Advanced Booking Rules for [instructor name] section, enter the following:
- The number of days in the Allow customer to book in field - to
- The number of days in the Allow guest to book in field - to
- In the No Show fields to the right of each of the above fields, enter the number of no shows the customer or guest can have before they are unable to book again.
- In the Max Daily Bookings field to the right of each of the above fields, enter the number of daily bookings the customer or guest can have before they are unable to book again that day.
4. Click Save.
5. In the Default cancellation rule for all reservations section, check the box and enter the number of hours before the lesson can be canceled.
6. Click the Save Default rule button. Nothing happens but your changes are saved.
Note: If you want to apply these booking options to another instructor, select the Apply to other Instructor button. The instructors display below. Select the checkboxes next to the other instructor for the booking options to copy and click Apply. Next time that you select that trainer from the Instructor drop-down field, the same options as this trainer displays.
Email Settings
- After you sign in as Admin, click the Email Settings button to the left. The Email Settings screen displays.
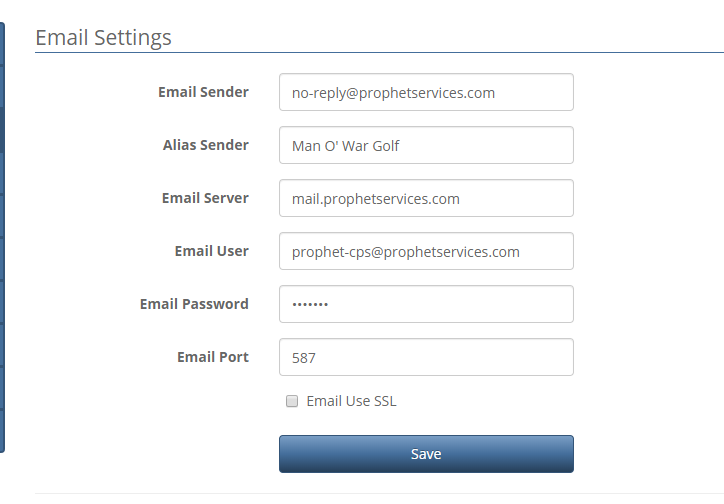
Note: You should keep all of the default settings as is (in the Email Sender, Email Server, Email User and Email Port fields) unless you have set up your own email server.
- You can update the Alias Sender field, with the name of your course or even a name if desired.
- You can update the email user and password in the Email User and Password fields however this email and password is required for the email service SMTP that Club Prophet provides. It should not be changed unless a Club Prophet support member has been consulted.
- Click Save when finished.
Lesson Book Setting
In the Online Lesson Book setting screen, you can edit your trainers, the rates, the search control, and other settings.
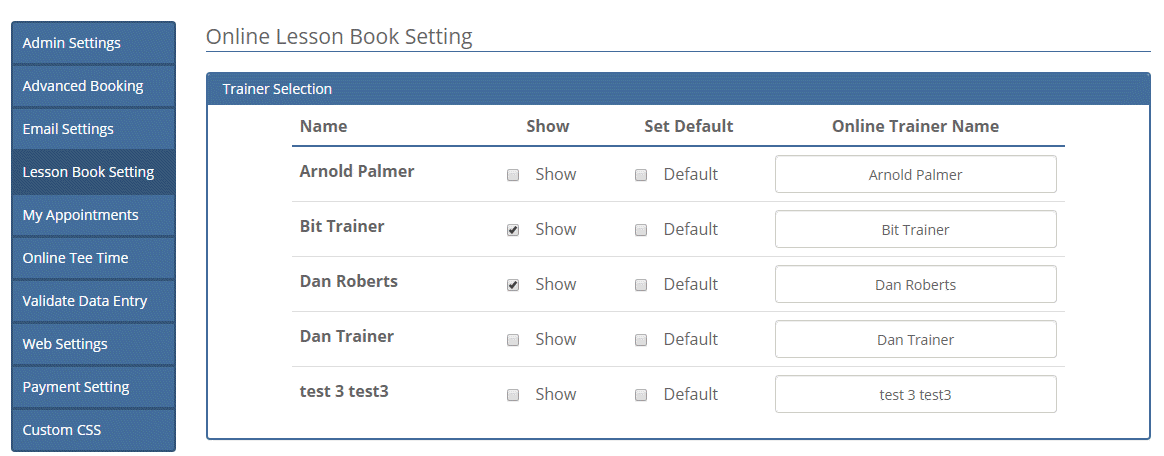
After you sign in as Admin, click the Lesson Book Settings button to the left. The Online Lesson Book Setting screen displays to the right. Now you can do the following:
Trainer Selection
You must have your trainers and rates set up in the Lesson Book v3 in POS Express for them to appear here. Set up is done in at Lesson Book | Admin | Trainer. See the Lesson Book v3 documentation for more information. Once they are set up there, you can edit them online in the Trainer and Rate Selection sections.
To update the trainer in the Trainer Section, do the following:
- Select the Show checkbox to display the trainer in the schedule of the Lesson Book
- Select the Default checkbox to set this trainer to be the one to be checked to search first.
- In the Online Trainer Name box, you can edit or change the online display name of the trainer by clicking the trainer’s name then typing the name.
- When finished making changes to the online trainer, scroll down and select Save.
Rate Selection
To update the rates in the Rate Section, scroll down if needed, and do the following:
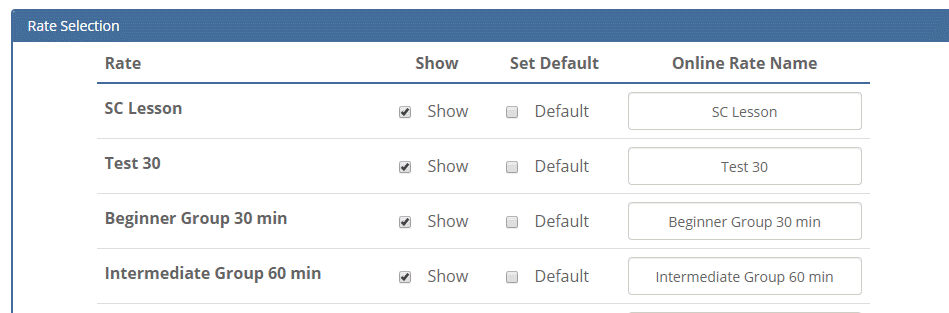
- Select the Show checkbox to display the rate in the schedule of the Lesson Book.
- Select the Default checkbox to set this rate as a default rate.
- In the Online Rate Name box, you can edit or change the online name of the rate by clicking the rate name then typing a new rate name.
- When finished making changes to the online rates, scroll down, and select Save.
Search Control Settings
You may have to scroll down in the Lesson Book Setting screen to see the Search Control Settings. You can set the following for your customer’s online Lesson Book searches:
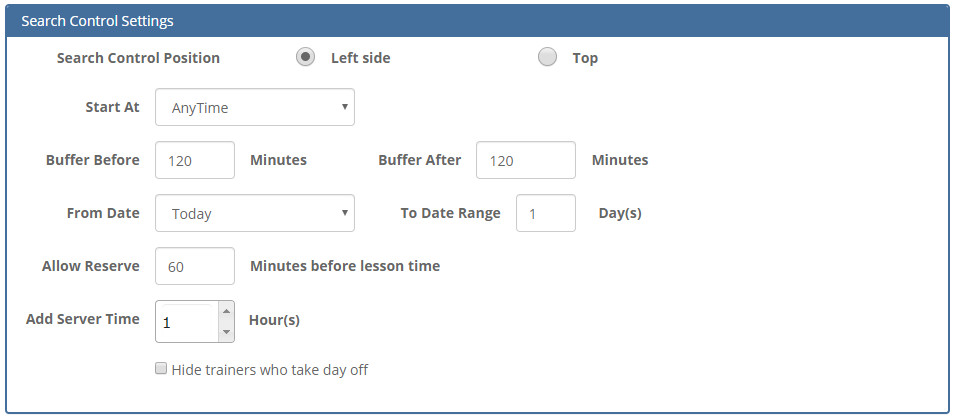
- To set the position of the search bar, select either the Left side or Top radio button.
- To set the start time, select the time from the Start At drop-down field.
Note: You have the options of Early, Morning, and Afternoon to group the start of the search.
- To set a search buffer for before and or after the time being searched, enter the times in the form of minutes into the Buffer Before and After Minute fields.
Example: If you want a buffer of 2 hours on either side of the search to display, enter 120 in both fields |
- To set the date range of the search, select in the From Date drop-down field, and enter the number of days from what was selected in the From Date in the To Date Range field.
- To set the time to allow to reserve before the lesson, enter the time in the form of minutes.
- If your computer server is in a different time zone, enter the server time difference.
- You can hide the names of the trainers who are not training for the day (or who have blocked their time off) by selecting the Hide trainers who take day off checkbox.
Other Settings
In the Other Settings section, the following can be set:
Note: You may have to scroll down to set the following.
- Select the Require login to start reservation process checkbox to display the login screen only.
Note: The student will not be able to search for open time slots when this is checked.
- You can allow your customers to log in by their username, email, or account number or a combination of any or all of these by selecting the respective checkboxes.
- You can hide the price of the lesson by selecting the Hide price checkbox.
- You can allow someone to log in as a guest by selecting the Allow user to login as guest. checkbox.
- You can allow someone to register as a customer by selecting the Allow register as customer checkbox, and set the default class, the type, and status of their registration using the drop-down fields respectively.
- Click Save when you are done making changes on this screen.
My Appointments Settings
- After you sign in as Admin, click the My Appointment Settings from the middle of the menu on the left.
- To hide the duration of the appointments, select the Hide duration (minutes) checkbox.
- To hide the rate for the appointments, select the Hide Rates checkbox.
- Select Save to keep your changes.
Online Tee Time
If you own both Lesson Book and Online Res products you can offer a quick way for your customers to move between the two. To add a button and a link from your lesson book to your online reservations site, do the following.
- After you sign in as Admin, click the Online Tee Time from the middle of the menu on the left.
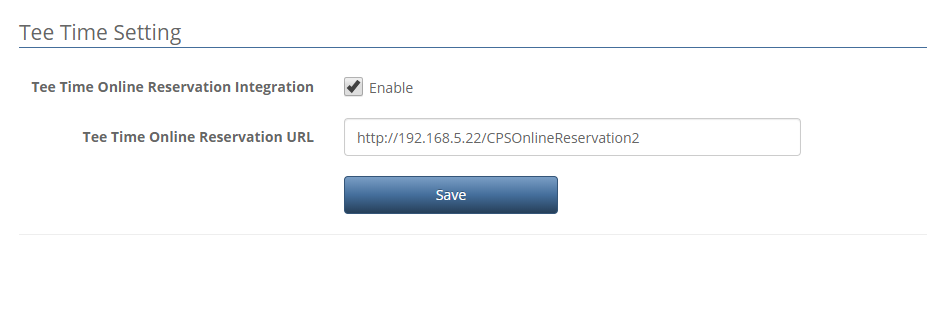
- Select the Tee Time Online Reservation Integration checkbox to enable online reservations for tee times.
- Enter the URL in the Tee Time Online Reservation URL field.
- Select Save to keep your changes.
Validate Data Entry
In this screen, you can validate the entries for both normal registrations which are the left-hand column, and the guest registrations which are the right-hand column. Your three options for each of the fields are:
- Required - the customer must enter into this field.
- Check for duplicates - the system looks for the same data entered into this field with data previously entered into this field.
- Hidden - this field will not be visible and therefore unusable.
Select the desired button to the right of the field. You can select both Required and Check duplicates. A green checkmark displays when that option is active. Select the Hidden button to make the field invisible to your online lesson book customers.

Make sure you scroll down and select Save at the bottom of the Validate Data Entry screen. Your changes take place immediately.
Web Settings
In the Web Settings, you can do the following to update your web settings:
Remember: When you are finished, click Save and reload your Online Lesson Book to see any changes you made.
- After you sign in as Admin, click the Web Settings from the menu on the left.
- To change the logo for the tab in the browser and the heading throughout the Lesson Book website, do the following:
- Select the Select File button under the Club Logo section. The navigation dialog displays.
- Navigate your hard to the location of your logo, and double-click it. Note: It can only be 50 pixels high, for example:
- After it loads, the name of your logo file displays to the right of the Select File button.
Note: Click Save and reload your Online Lesson Book to see it.
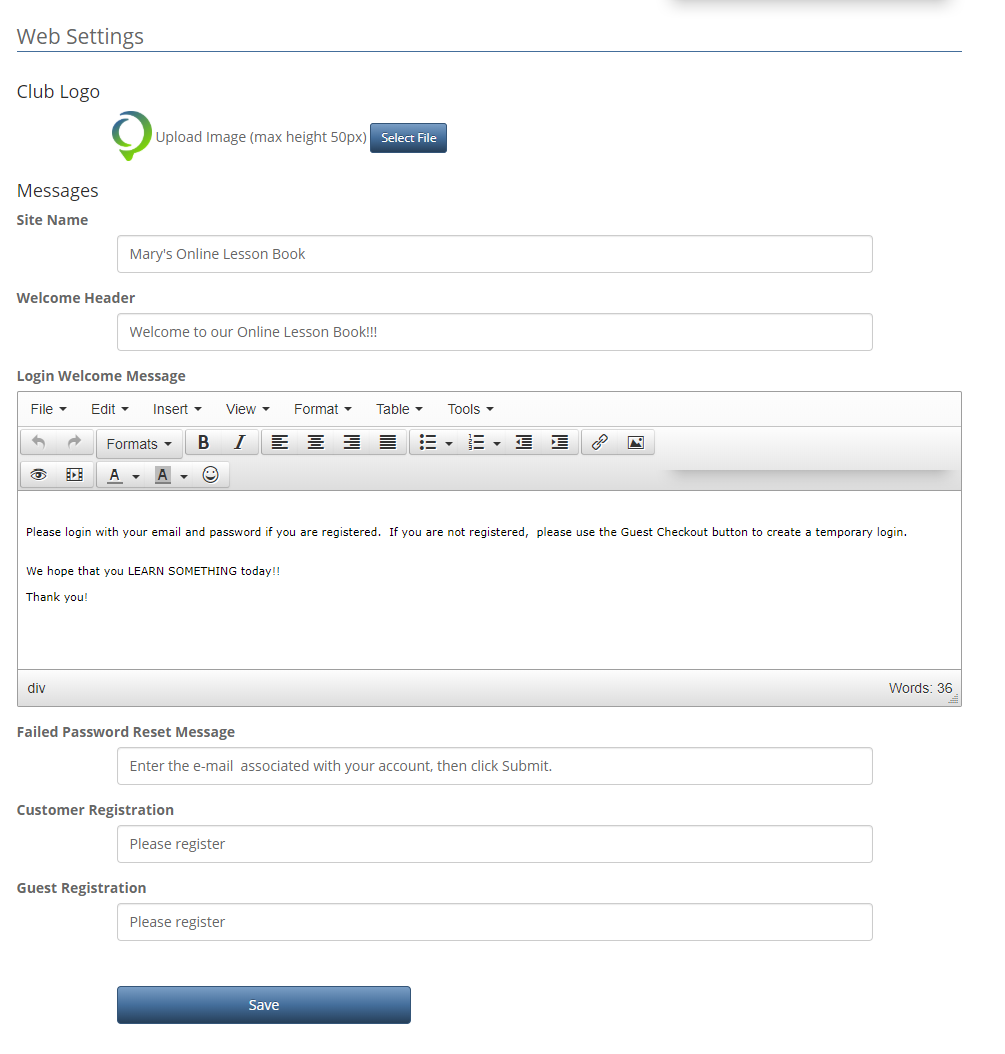
3. To add or update the name of your lesson book, enter the name in the Site Name field.
4. To add or update a welcome message that displays on the Sign in (AKA the first page) of your online Lesson Book site, enter the name in the Welcome Header field.
5. To add or update a welcome message that displays on the Sign in (AKA the first page) of your online Lesson Book site, enter the name in the Login Welcome Message field. Note: This text can be formatted using the tools in the bar above the field space, and an image can be used via a hyperlink.
Note: You may have to scroll down to see the next section:
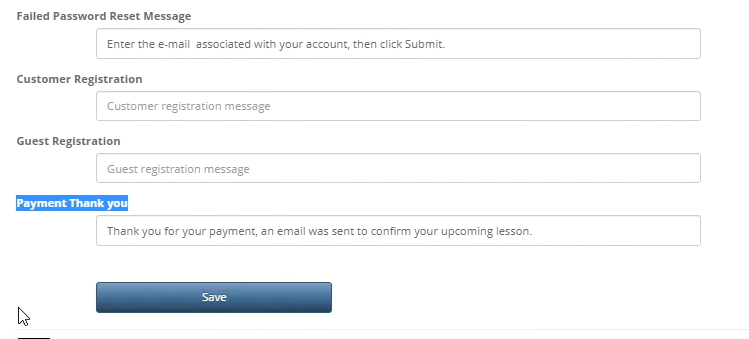
6. In the Failed Password Reset Message field, enter the message you want to display if the customer fails to log in with the correct username and password.
7. In the Customer Registration field, enter the message you want to display for a customer’s registration.
8. In the Payment Thank you field, enter the message you want to display for a customer’s payment.
8. In the Guest Registration field, enter the message you want to display for a guest registration.
9. Click Save when you are done making changes.
Payment Setting
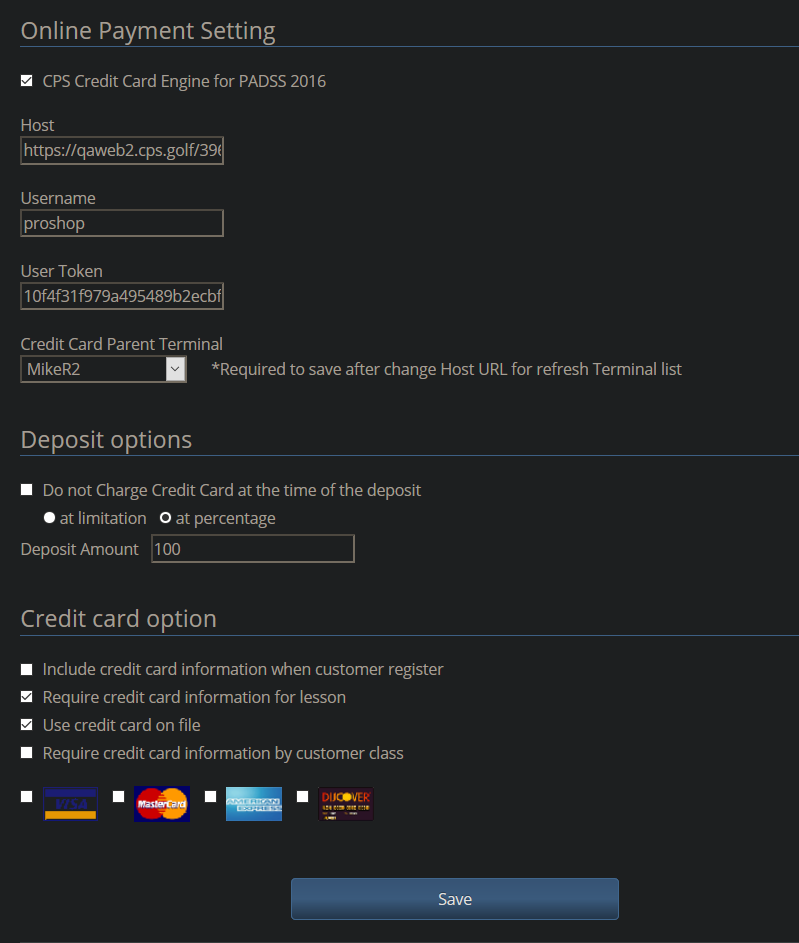
- Select the Payment Setting menu item. The Online Payment Setting screen displays.
Note: The following information for the Online Payment Settings is taken care of by a Club Prophet support agent.
- Select the CPS Credit Card Engine for PADSS 2016 checkbox to set up online credit card payments.
- In the Host field, enter the host field.
- In the Username field, enter the user name.
- In the User Token field, enter the user token.
Note to CP Support Agents: The username, password, and user token is found in the Club Prophet’s call log at the bottom of the page in the CCM Information section.
- From the Credit Card Parent Terminal drop-down field, select a terminal that is required to save after changing Host URL for refresh Terminal list.
- In the Deposit Options section, enter the following information as needed:
- Select the Do not Charge Credit Card at the time of the deposit checkbox to require the customer to provide a credit card when the customer reserves a lesson online. Note: No charges to the card will happen until they are checked in for their lesson. In the event they “no show” you can now charge them.
Tip: If you wanted to take a 100% deposit at the time of the reservation, then you would leave that box unchecked, and have a percentage with 100 as the deposit amount (See step c below). If you do not wish to take a deposit at all, you would leave the deposit amount field set to 0.
- Select at Limitation or at Percentage radio button.
- Enter the limitation or percentage amount you want to charge the credit card at the time of check-in. For example:
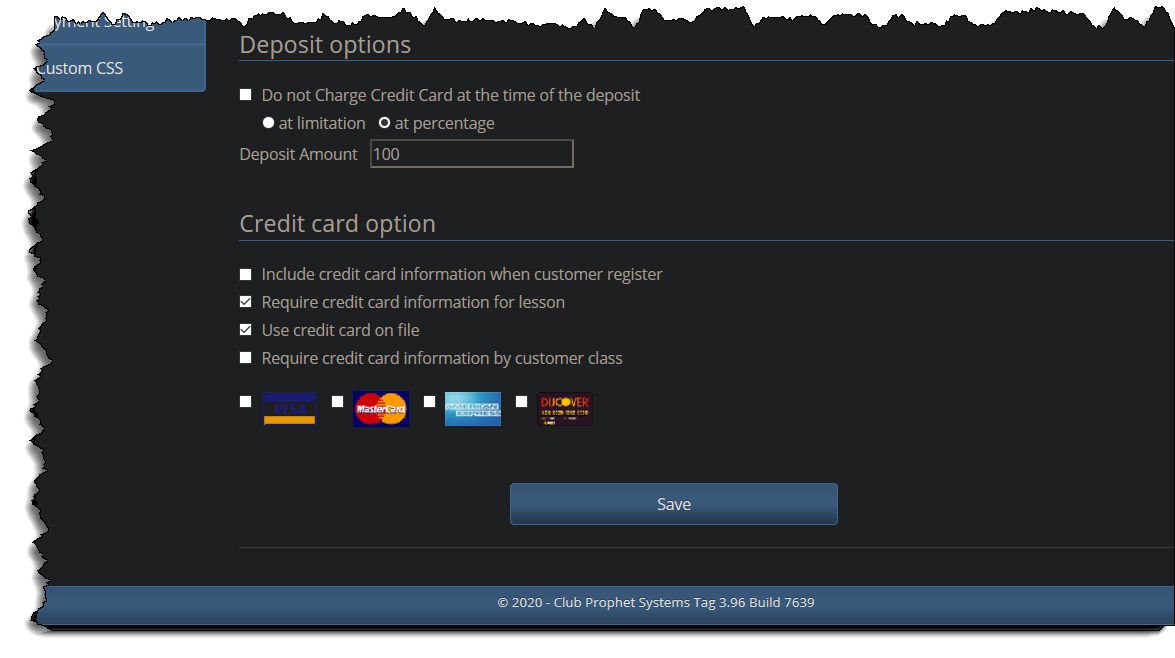
- In the Credit card option section, select the following checkboxes as needed:
- Include credit card information when customers register - requires the customer to enter their credit card information upon registration.
- Require credit card information for lesson - to require a credit card from your customer when they are booking, select the Require Credit Card When Register checkbox.
- Use credit card on file - makes it possible to charge the credit card which is on file.
- Require credit card information by customer class - allows you to require credit card information by class.
- Select the checkbox to the left of the picture of the credit card that you will accept.
- Select the Save button to keep your changes.
Custom CSS
- Select the Custom CSS menu item. The Custom CSS screen displays.
- In the large blank box, you would enter CSS code to customize the look of your website
- Click Save when done added CSS code.
Trainers using Online Lesson Booking
Overview
Trainers can log into Online Lesson Book from anywhere and do the following things:
- Check schedules
- Search button
- Reserve lessons
- Reserve group lessons
- Block time off
- Apply a group template
- Paste a lesson to another time slot
- Unlock a time slot
- Look at their schedule for the month
Note: The trainer cannot check the lesson in here. They need to log out of the online version of Lesson Book and log into the POS Express version of Lesson Book to check students in there. Also, the students can log in online and check in and pay online themselves.
Logging In
- To log in as a trainer, select the Go to Trainer sign in in the upper right-hand corner of the screen. The Trainer Sign In screen displays.
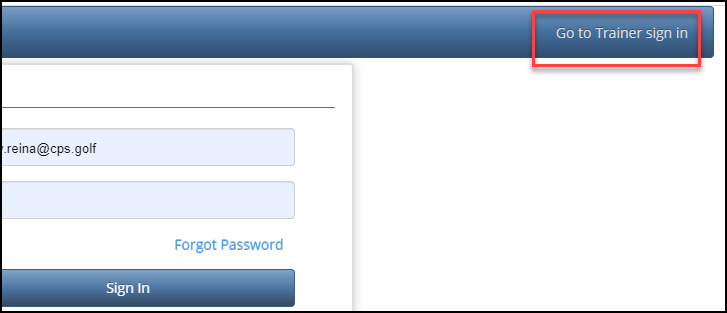
- Enter your username and password, and select Sign In. The trainers booking information screen displays.
Note: The trainer’s username (email) and password is created on the terminal running POS Express with Lesson Book v3 in the Admin.
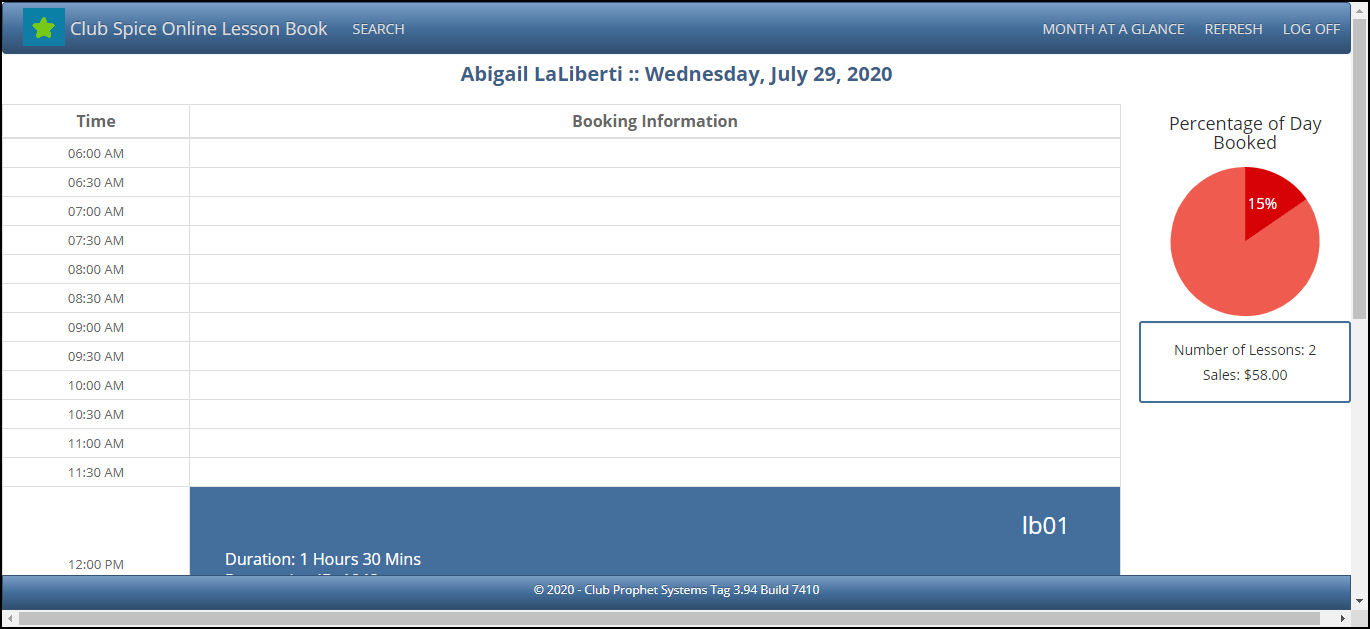
To check your training schedule
After you have logged in as a trainer, you can see your schedule by doing the following:
- Use the Search button - if you have a lesson scheduled in the future or want to see a past lesson, use the Search button
- Check the current screen which is today’s schedule (percentage and number of lessons)
- Month at a Glance - if you want to get a snapshot of the lessons scheduled for the month, click the Month at a Glance button.
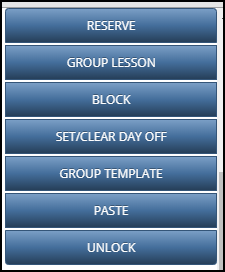
You will have two sets of menu buttons available to you on the right-hand side. One set is available when you select a time slot in the reservation table. This menu of buttons displays:
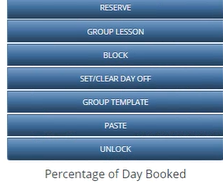
To see the help for these options, see the topics in Lesson Reservation below.
The other set of menu buttons displays when you select a reservation to update, cancel or get more information:
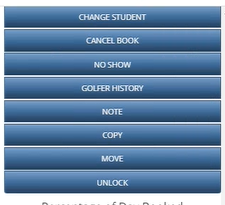
To see the help for these options, see the topics in Updating Lesson Reservations below.
Trainers using their Lesson Reservations
If you click anywhere in your table, this menu display to the rights:
You can do the following from this menu:
To reserve lessons online
- To start a new lesson reservation from online, find the time needed, and click in the Booking Information row next to the time slot. The Reservation button displays to the top-right of the screen.
- Click the Reservation button. The Reservation screen displays.
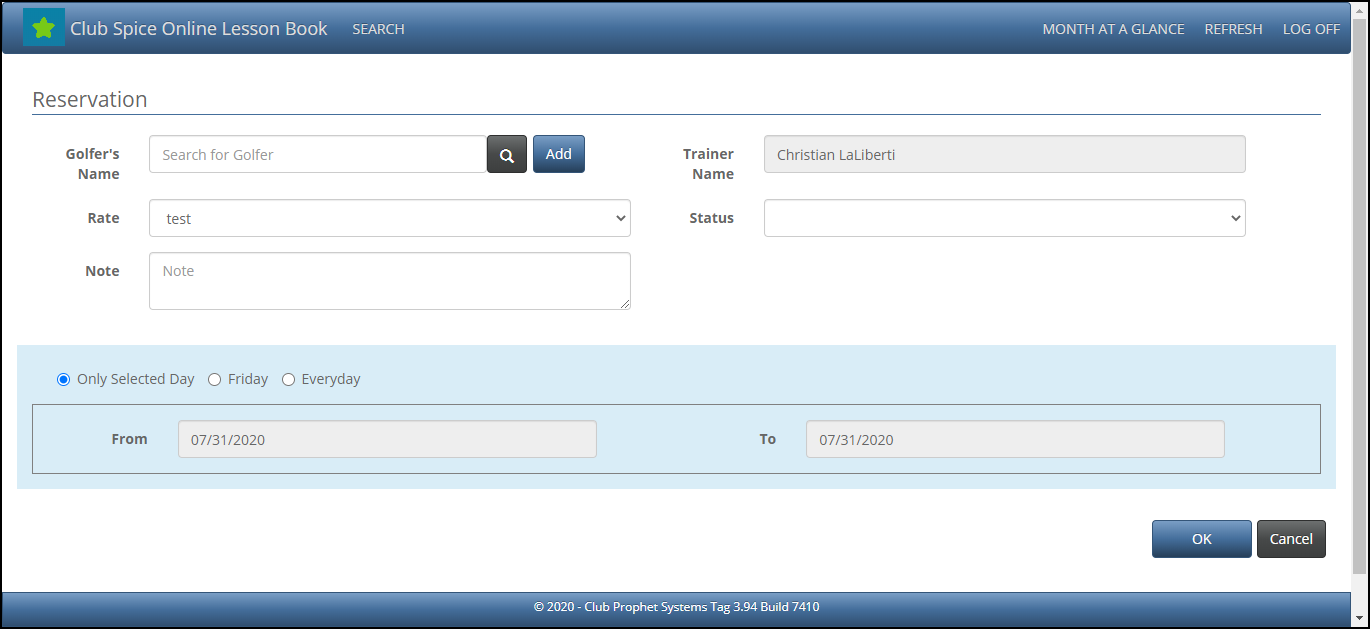
- Enter in the Golfer’s Name field, the student’s name, then click the spyglass to see if the student is in the database.
- If the student is not in the database, click Add now to add them now. The Add New Golfer screen displays.
- Click Customer or click Guest depending on the student and fill in the fields as needed. Note: The Customer option asks for type and class information.
- Click Save changes when finished.
- Click OK to add this student to the schedule. The lesson displays in the time slot selected, the Percentage of Day Booked is updated in the top-right, and the Number of Lessons and Sales figures are updated. If set up, an email is sent to the student and the trainer.
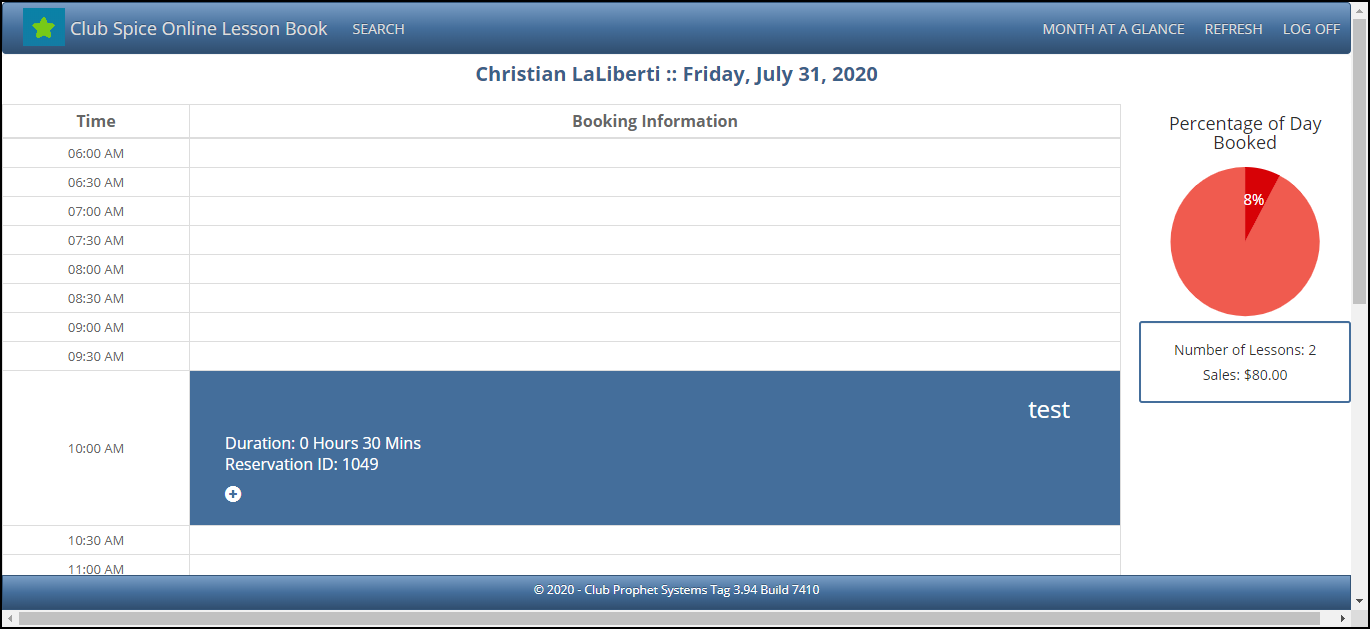
Note: The plus-sign at the bottom-left of the reservation when clicked, reveals the name of the student. Also, when the reservation is selected, the buttons in the top-right of the screen displays new options available for this reservation. See the Updating Lesson Reservations topics below
To reserve a group lesson online
You should be logged on as a trainer to the online Lesson Book to do the following:
- Find the time needed, and click in the Booking Information cell next to the desired time slot. The Group Lesson button displays to the top-right of the screen.
- Click the Group Lesson button. The Reservation screen for your group lesson displays.
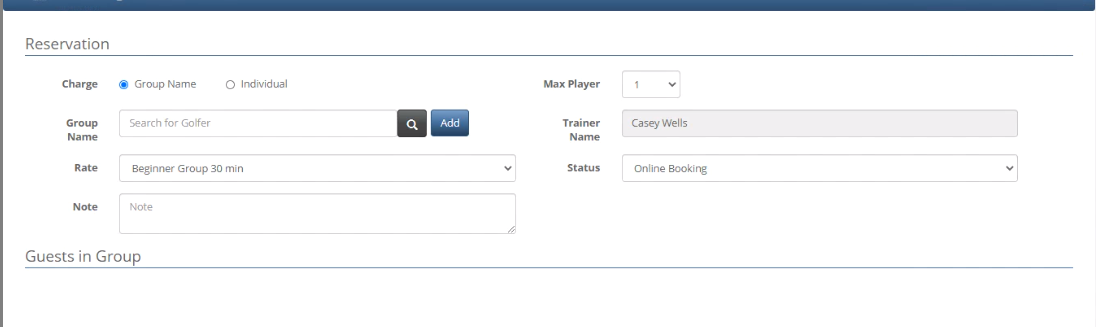
- To charge for this group lesson, do ONE of the following:
- Select the Group Name radio button if you want to charge the group as a whole. Notice the text Search for Golfer displays in light gray in the Group Name field and the spy-glass and Add button displays to the right of the field. Next, enter the name of a member who is in the system or select the Add button and add a player, either customer or guest, now to be the person responsible for payment for this group lesson.
Note: If you select Group name, you must assign the group name with a member account.
-OR-
- Select the Individual radio button if you want to charge an individual for this group lesson. Notice the text Group Name displays in light gray in the Group Name field. For example, a club like the Red Hat Society, or for an individual group lesson, as in a private lesson.
- To the right of the screen, select the maximum number of students for the lesson from the Max drop-down. The amount you selected creates the same number of Golfer’s Name fields below in the Guests in Group section.
- [Only for an Individual type lesson - from step 3 above] In the Group Name field, enter the name of the group.
- If need be, select a rate for this lesson from the Rate drop-down field. Note: These rates are set up in the local PC terminal in the POS Express Lesson Book module.
- Add a note if desired in the Note field.You can change the status of this book in the Status drop-down field. Note: The status selections can be created in the POS Express Lesson Book module in the local PC terminal.
- Add the names in the section below.
- Select Save.
To block time off
You should be logged on as a trainer to the online lesson book to do the following:
- Find the time to block, and click in the Booking Information cell next to the desired time slot. The Block button displays in the top-right of the screen.
- Click the Block button. The Block screen displays.
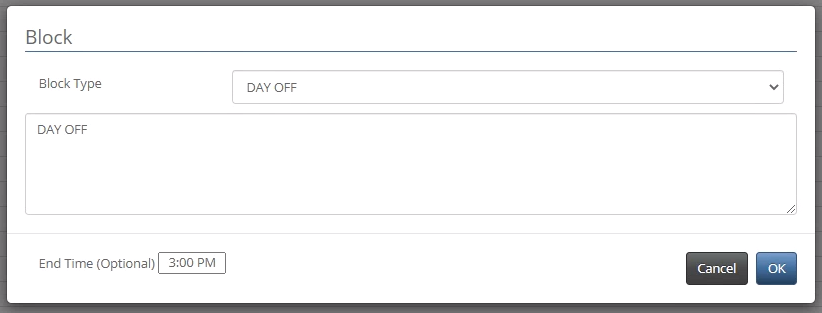
- From the Block Type drop-down, select the reason the time will be blocked from the list. The reason selected displays in the field below.
Note: This list is generated in the Lesson Book inside POS Express on a local terminal.
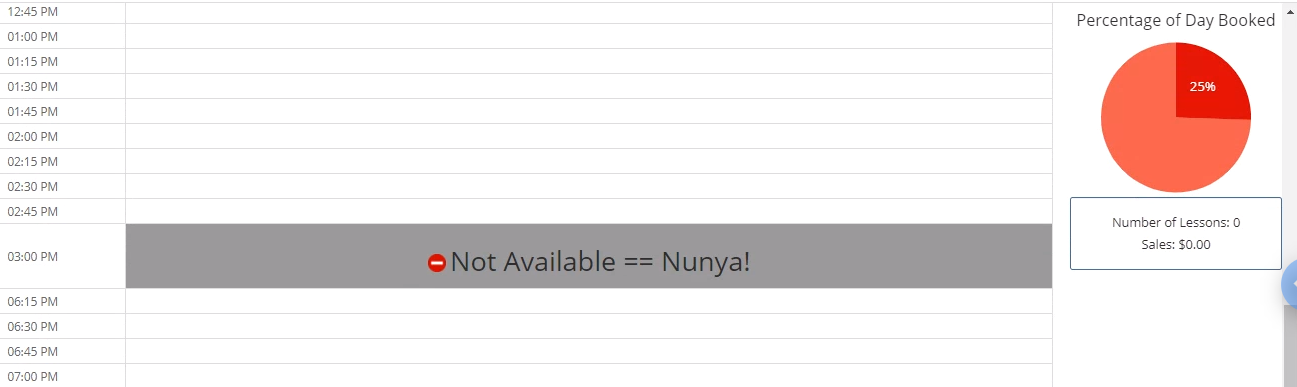
- You can add text to the block type reson in the large field, or remove the text that is in there. Note: This text displays in the cell after you save this block time.
- In the End Time (Optional) field, you can update the time originally selected and add a new end time. You can either select it from the drop-down list, or type in over the current time.
- Select OK. The changes display on your Booking Information screen.
To set or clear your day off
To set or clear a day off
You should be logged on as a trainer to the online lesson book to do the following:
- Find the day to set as off (or clear from previously being set to off), and click any cell in the Booking Information cell. The Set/Clear Day button displays in the top-right of the screen.
- Select the Set/Clear Day button. The Block screen displays.
To book lessons using a group template
You should be logged on as a trainer to the online lesson book to do the following:
- Find the day and time to reserve for this group, and click the cell. The Group Template button displays in the top-right of the screen.
- Select the Group Template button. The Group Template screen displays.
- From the drop-down field, select a group template that you have previously created in the Lesson Book v3 from a local terminal running POS Express.
- Click OK. The time slots are filled with the reservation and the applicable information about the group reservation.
To paste a previously copied reservation (AKA How to move a lesson reservation to another time
Note: This is the same topic as To Copy below.
The PASTE button is used in conjunction with the COPY button. The COPY button will only be visible in the menu after you have a student booked for a lesson and you need to change that lesson.
- Select the lesson reservation. The menu changes to reveal the COPY button.
- Select COPY.
- Search for a new day/time using the Search button in the top-left corner of the page, or select a new time slot for today on the Booking Information table.
- Select the desired empty row. The PASTE button displays in the menu.
- Select PASTE. The lesson reservation is copied to the new time slot.
To unlock a lesson reservation
When a reservation is being created perhaps on another terminal, events happen such as the user abandons the time, but the software still thinks they are working on the reservation, it is locked for editing, that reservation will need to be unlocked
- Select the locked lesson reservation from the schedule for which you want to unlock.
- Click Unlock from the right-hand side of the screen.
- Now you can edit or update that reservation as needed.
Trainers Updating their Lesson Reservations
If a lesson reservation is listed in your table, you can select it, and this menu displays:
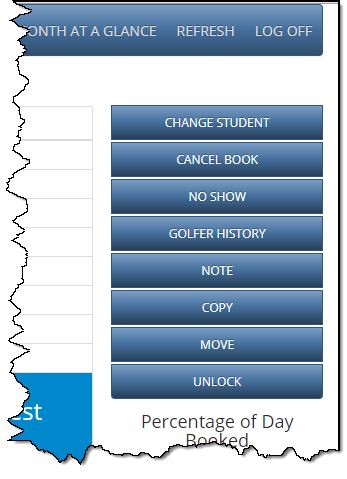
Note: If this was a group reservation, the top button would read: EDIT GROUP LESSON.
You can do the following to a lesson reservation:
- CHANGE STUDENT - Change the student
- EDIT GROUP LESSON - Change a group lesson
- CANCEL BOOK - Cancel the lesson
- NO SHOW - Reports a no show
- GOLFER HISTORY - Allows you to see when a student booked previously, how many times a student has booked, canceled, and moved their lesson
- NOTE - Allows you to read a note associated with this student and change the note if needed.
- COPY - Allows you to copy this reservation and paste it into a new time slot.
- MOVE - Moves the current reservation to another time slot.
- UNLOCK - Allows you to unlock a lesson reservation that was previously locked.
To change the student
- After you select the lesson reservation, click the Change button. The Change Student screen displays.
- Fill out the screen just as you would a new reservation (see above) adding or removing any information needed.
- Select the Save button when you are finished. The changes take place immediately.
To update a group lesson
If you have created a group lesson either from a template or using the GROUP LESSON button, you can change i-t. If you just want to see the details of this group reservation, single-click it and the block drops down to reveal the students in the group, and their information.
Logged in as a trainer, do the following:
- Find the reservation for the group lesson, then click it. The lesson block drops down and the Edit Group Lesson button displays to the right at the top of the menu buttons.
- Click the Edit Group Lesson button. The Edit Reservation page displays.
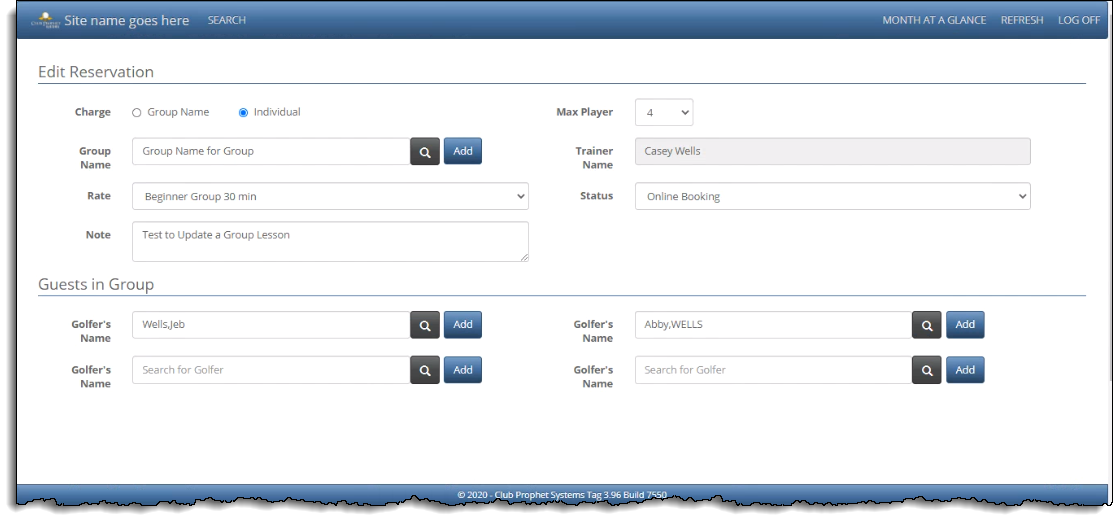
- From here you can change the following:
- Charge - Change the Group Name or Individual depending on who is getting charged for this lesson.
Note: If you change this from a Group Name charge to an Individual charge, notice the Rate, Note and Status fields shift. You might want to give the group a name, such as The Red Hat Society. The main change is that now the individuals will be charged for the lesson. If switching from Individual to Group Name, the person listed in the Group Name will incur the charges; make sure you change the name to a current customer listed in the database.
- Max Player - Change the number of players. Note: Increasing this number changes the number of player fields at the bottom of the screen so you can add more players. WARNING: Decreasing this number removes the last name displayed below; there is no way to retrieve that player information, so decrease the Max number field with care!
- Group Name - Change the name of the group. Note: If you change this from a Group Name charge to an Individual charge, the person listed in the Group Name will incur the charges; make sure you change the name to a current customer listed in the database or add that person now using the Add button.
- Rate - change using the drop-down to select a different rate which is set up on your local PC terminal in the POS Express Lesson Book module.
- Note - Add a note if desired in the Note field.
- Status - You can change the status of this book in the Status drop-down field. Note: The status selections can be created in the POS Express Lesson Book module in the local PC terminal.
Note: If updating a Group lesson made with a Group Template, the steps are the same as above.
To cancel the lesson
- After you select the reservation, click the Cancel Book button. A Cancel Appointment box displays.
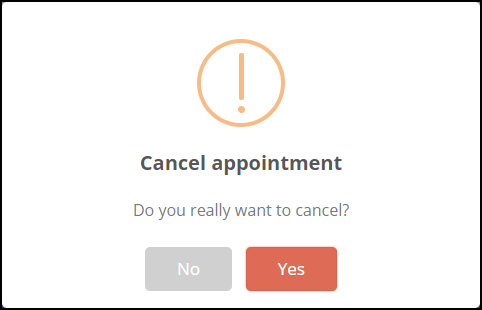
- Click Yes to cancel. The lesson is removed from the screen. Or, click No to cancel the cancellation.
Note: If set up, this cancellation will be counted in this student’s records and a warning will display after so many cancellations have occurred. See Advanced Booking Options in the Admin Settisection for more information on setting up this up.
To mark the student as a No Show
- After you select the reservation, click the No Show button. The screen displays with a xNO SHOWx across the reservation:
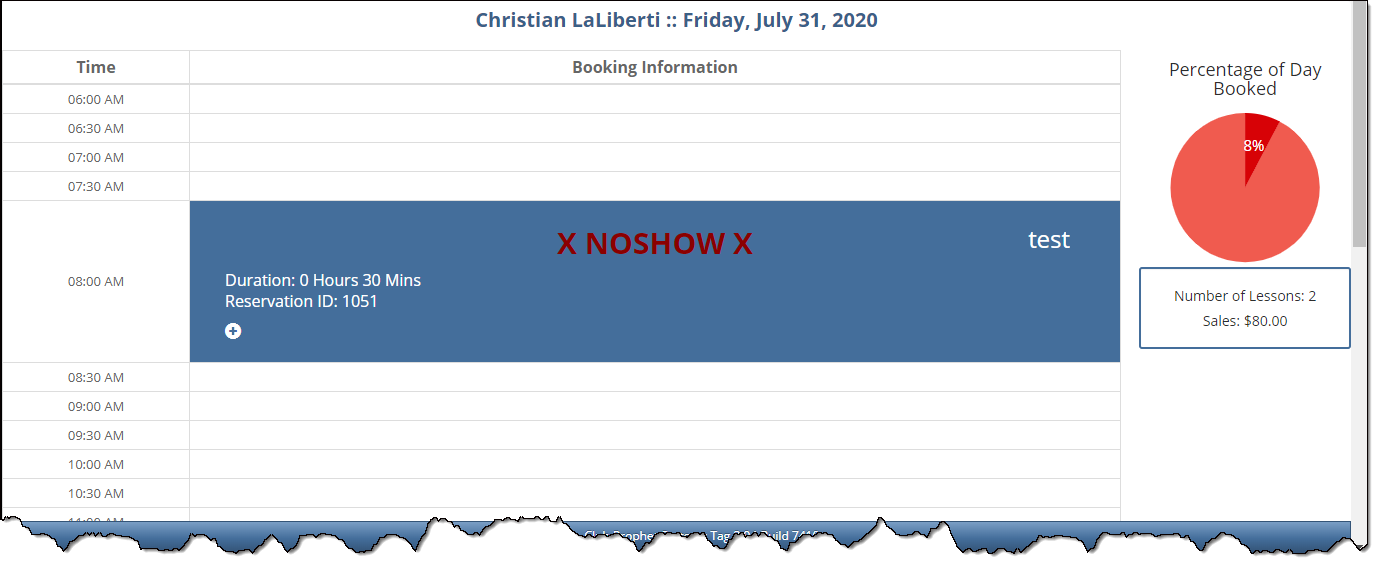
Note: If set up, this no show will be counted in this student’s records and a warning will display after so many cancellations
- If the student shows up and you need to reverse this, click their reservation and click No Show again.
To show the golfer history
- Click a reservation of the golfer for which you want to see history if they are located on the lesson schedule.
- Click the Golfer History button that displays on the right-hand side of the screen. If there are past and future lessons, that information displays in a pop-up window.
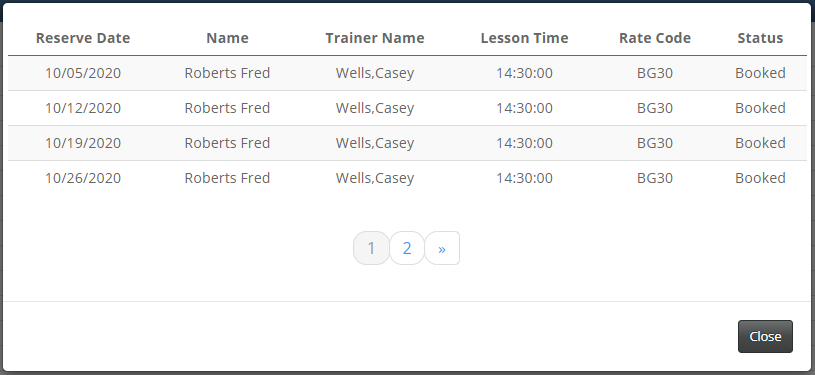
- Use the numbers or Double-Arrow >> to see more lessons for this golf student.
- Click Close when you are done reviewing the history.
To make notes
- Click the golfer for which you want to make a note if they are located on the lesson schedule.
- Click the Note button. The Reservation Note pop-up displays.

4. Enter the note needed for this reservation. You are limited to 256 characters.
5. Click Save when done.
To copy the lesson reservation (and paste it elsewhere)
- Select the golfer from the schedule for which you want to copy.
- Click Copy from the right-hand side of the screen. The reservation is being held in memory until you paste it.
- Search for another time slot in which you would like to paste this lesson reservation.
- Select the time slot on the day that you have picked, then select Paste (which is where the Copy button used to be.) The reservation is now duplicated on your new day and time slot.
Note: You can continue to paste this reservation over again onto other days and times that are needed.To move the reservation
To move a lesson reservation
- Select the lesson reservation from the schedule for which you want to move.
- Select the Move button from the menu on the right-side.
- Select another time slot using the calendar and the time table. The Paste button now displays.
- Select the Paste button. The lesson moves to your selected spot.
To unlock a lesson reservation
Same as the above “unlock” topic. Click here to see it.
Printing Trainers Schedules and Reporting
Printing your training schedule from Online Lesson Book
You cannot easily print your scheduled appointments from the online version of Lesson Book. Your browser will have an option for printing the page you are on; it is usually Ctrl+P for most browsers but it may not format correctly.
Tip: The best way to print out your training schedule is using the version of Lesson Book v3 on the local-terminal using POS Express. If you click the Print button at the top of the screen, you are able to print by Site, Course, Trainer, and Date. See the Lesson Book v3 documentation for more information.
Reporting
The reports in the Reports module can be run for additional sales information. You can run those reports by item or sales category, etc.