***Moodle ISU Guides have been relocated to the New Tiger Tracks Site. For up-to-date content please refer to the Knowledge Base.***
Backing up and Restoring Community Moodle Course Data Moodle ISU
Introduction
Moodle ISU Community is now available in a new location, with a brand new look.
Instructors who wish to continue using Moodle ISU Community will need to migrate course materials to the new site before September 30, 2017. The process is as follows:
- Sign into the new Moodle ISU Community site
- If you have an Idaho State University account, sign in with your ISU login information.
- If you do not have an ISU account, use the ‘Create new account’ button on the sign in page.
- Request course(s) on the new site.
- Moodle ISU Community Move Request
- Back up your course and download to your computer.
- Upload backup file to the new site and restore into your new course.
- Direct your students/users to sign into the new site to access your course.
Even if you don’t need to move your course to the new site, you may want to backup your old/current course and download it to your computer to retain your course materials. Access to the old site will be removed on September 30, 2017.
This handout explains how to backup and restore courses. A backup file can be created from a previous semester, saved on your computer, and uploaded into your most recent course. Once uploaded, your backup file can be restored in your new course.
This guide will help you to:
Backup Course Data from Old Community Site
Courses from the old community site can be located from http://elearning.isu.edu/community/
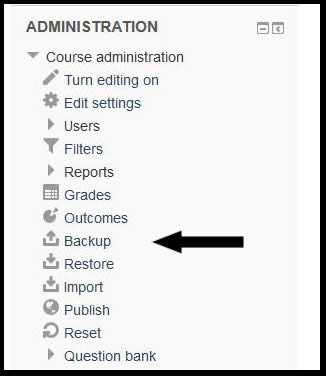
- Access the course you wish to backup.
- In the Administration Block, Select Backup.
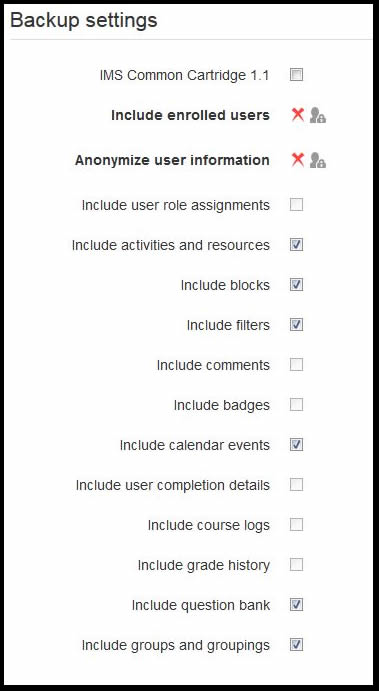
- On the Backup settings page, these options are checked automatically:
- Include activities and resources
- Include blocks
- Include filters
- Include calendar events
- Include question bank
- Include groups and groupings
Note: For backing up IMS Common Cartridge, contact the ITRC - (208) 282-5880 or email itrc@isu.edu
- Choose one of the following options:
- Jump to final step - this option automatically creates a backup file including everything in the course.
- Next - this option takes you to the next page to select the items you wish to include/exclude in the backup file.

Note: The following steps are to guide you through the backup process if you clicked Next.
- On the following page, Check/Uncheck the boxes next to the items you may or may not wish to include in the backup file.
- You can check/uncheck the entire course by clicking All or None at the top of the page.

- If you would like to add specific items from a week/topic, you must select the name of the week/topic and then check the specific items you wish to include in the backup file.
Note: It is recommended to include everything in the backup. When restoring, you can choose which items will be included.
- Once you have selected the items you wish to include, at the bottom of the page, Click Next.
- On the next page, you will see the backup filename, settings, and included items.
- If you choose to change the Filename, make sure to keep .mbz at the end of the file. Otherwise, the file will not work when you want to restore the course content. Example: Fall2014Course_Backup.mbz

- The included items will be checkmarked and the items not included will have an X next to them.
- At the bottom of the page, Click Perform backup.

Note: The backup process may take a few minutes. Do not do anything with the computer until the progress bar reaches 100%. If you feel the process is taking longer than it should, contact the
ITRC - (208) 282-5880 or email itrc@isu.edu

- After you receive the message, “The backup file was successfully created,” Click Continue.

- On the next page, Locate the Course backup area.
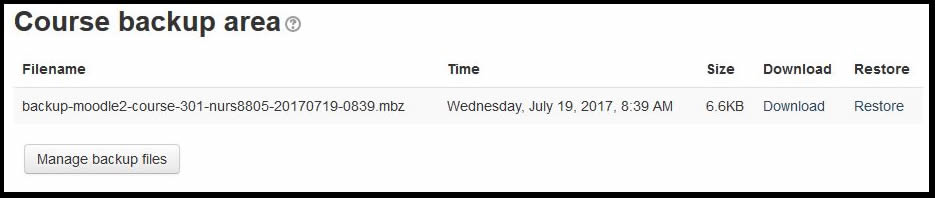
- The top file should be the most recent backup file created for the course.
- To the right of the filename, Click Download.
- In the pop-up, Select Save File.
- Click OK.
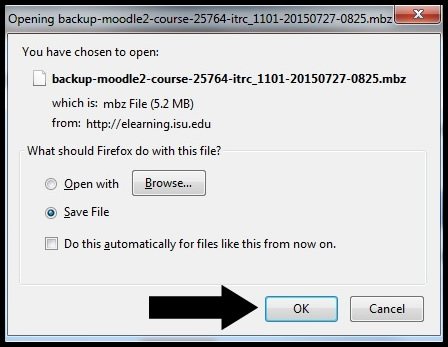
- Select an area on your computer to save the backup file.
- You can also save the backup file to a removable storage device.
- Click Save File.
Restore Course Data to New Community
Courses from the new community site can be locate at: https://elearn.isu.edu/community/login/index.php
Moodle ISU allows you to restore content from a backup file that has been previously created. If you receive an error during the process, contact the ITRC - (208) 282-5880 or email itrc@isu.edu
- Login to the New Moodle Community.
- In your Dashboard, Select the course you wish to restore the backup file to.
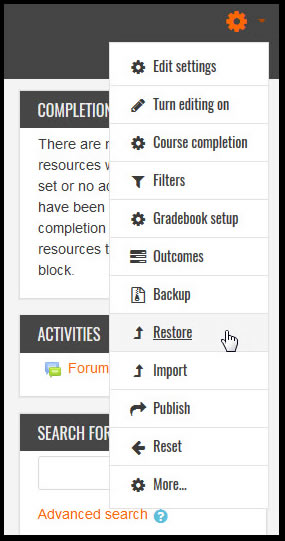
- In the Admin Gear Menu, Select Restore.
- In the Import a backup file section, Click Choose a file.
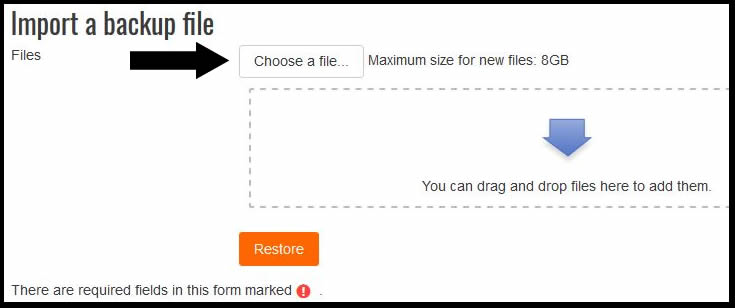
Note: You can also drag and drop the file to the Files box.
- Browse for the backup file you just saved.
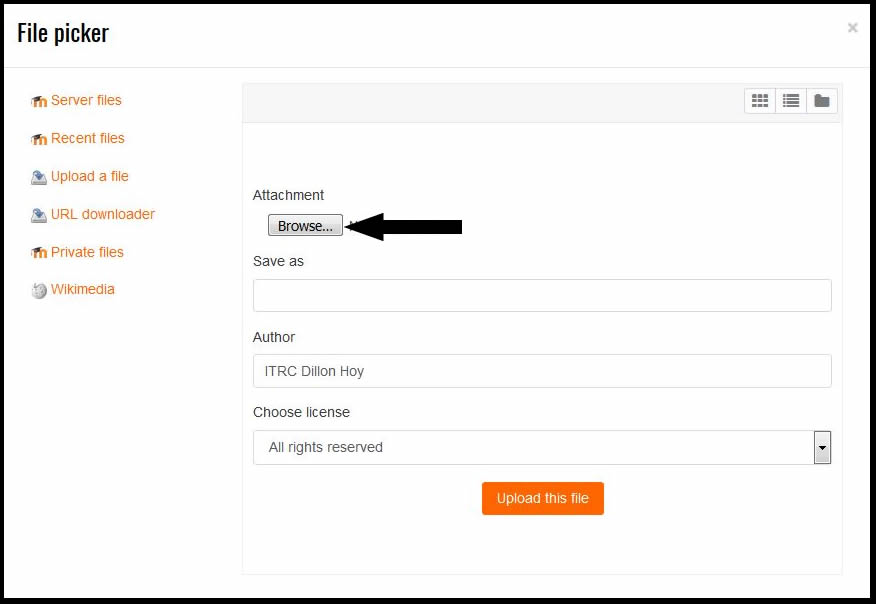
- Click Upload this file.

- Click Restore.

Note: If you receive the error message, “This file is bigger than the maximum size,” or, if you experience other problems while restoring, contact the ITRC - (208) 282-5880 or email itrc@isu.edu
- The Backup settings page shows all the items included in the backup file.
- At the bottom of the page, Click Continue.
- On the next page, in the Restore into this course section, Click Continue for Merge the backup course into this course.

- On the Restore settings page, the following are automatically checked to be included in the restore process:
- Include blocks
- Include filters
- Include calendar events
- Include groups and groupings
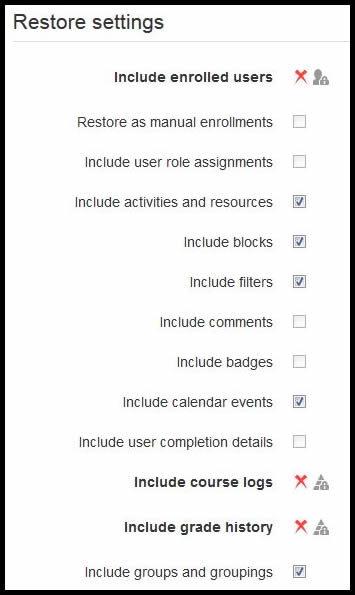
Note: Any item with an X next to it will not be included in the restore.
- Uncheck any setting you do not wish to include in your restore.
- At the bottom of the page, Click Next.

- On the Course settings page, Scroll down to the items with checkboxes.
- Check/Uncheck any item you may or may not wish to include in the restore.
- You can check/uncheck all of the items in the restore by clicking All or None at the top of the page.
- If you would like to add specific items from a week/topic, you must select the name of the week/topic and then check the specific items you wish to include in the backup file.

- At the bottom of the page, Click Next.

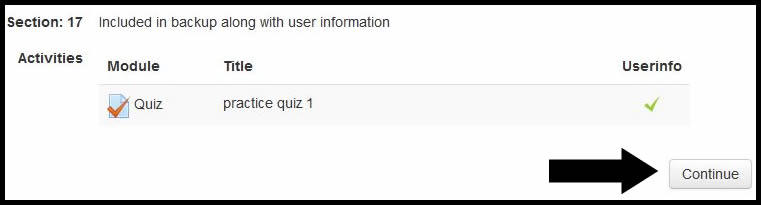
- On the next page, you will see all of the items you have chosen to include in the restore as checkmarked.
- The items not included in the restore will have an X next to them.
- If you wish to make any changes to your selections, Click Previous at the bottom of the page.

- At the bottom of the page, Click Perform restore.

- Wait for the progress bar to reach 100%.
- The restore process may take a few minutes. If you feel the process is taking longer than expected, contact the ITRC - (208) 282-5880 or email itrc@isu.edu

- When you receive the message, “The course was restored successfully…”, Click Continue.

Note: If you encounter a Technical information and warnings text area below the Continue button and your restore was successful, you can ignore the information in the box.
For more information, see the following:
For assistance with troubleshooting, contact the ITRC - (208) 282-5880 or email itrc@isu.edu

This work was done by Instructional Technology Resource Center at Idaho State University and is licensed under the Creative Commons Unported License. To view a copy of this license, visit Attribution Noncommercial 3.0 United States or send a letter to Creative Commons, 444 Castro Street, Suite 900, Mountain View, California, 94041, USA.