Buckyball Tips and Tricks
By Cmdr Bruski
Other resources
- For Outfitting and Engineering go here
- Gravity Well Approaches are beyond the scope of this document for now, and better demonstrated by videos.
Route Plotting
- Use bookmarks! They are a faster way to race and plot routes. Save the current race to your Favorites for fast access.
- You can change the order of your bookmarks which are ordered alphabetically by using a prefix, like “BRC-TV.01.Empire Capital Ship” “BRC-TV.02.Payton Holdings” “BRC-TV.03.Agnew’sFolly” etc. Change the numbers to change your race route without too much trouble.
- The galmap plotter always uses the range of your ship with a full tank of gas to plot a route, even if it's not full right now. You can jump further with manual system targeting to take advantage of partially empty tanks. Plot a route outside the ships computer system with your max range to figure out whether it's worth it for it for a race.
- If you plot a route to a bookmark by holding down the mouse button on the bookmark, it doesn't select the system for manual plotting (to optimize fuel ranges). So if you want to target it you have to manually select the system in the map, then target it.
- The galmap and system maps work much faster when you toggle in and out using dedicated keybinds, rather than backing out with escape or the equivalent.
- You can begin a race with a partially empty tank by downsizing your tank in the outfitting screen, and then returning to the station screen. This will reduce the amount of fuel in your ship. Then return to the outfitting screen and fit the right size fuel tank and it will be filled only with the previous tonnage of fuel. You can adjust this further by buying fuel tanks in two ton increments, or by buying 10% fuel refills in advance maintenance.
- If two stops are in the same system it can be faster to jump out and then back in, especially if they are within gravity wells. Test it for yourself!
Approaches (Ha I lied! There’s a bit about it here, but no death helix or cookiehole loop)
- If a stop or station is not close to a gravity wall, it can be faster to approach it with the deselection trick. Your ship's computer will slow down your FTL acceleration when you are near a targeted point of interest. So if you want to go down or speed up faster, deselect it, maneuver to an appropriate point, and then reselect it for final approach. High risk, but worth a nice chunk of seconds!
- When doing a planetary approach it seems like if your speed is below 7.5 km/s when you drop to glide you will not be going to fast. This is equivalent to a TTA (time to arrival) of :07 when you drop.
- You can gain speed with the throttle, and bleed speed by pointing away from your destination
- It can be fastest on a planetary approach to come in steep, since you drop at a specific altitude from the station, not a specific distance, so if you come in steep the distance will be smaller. Thanks trigonometry, you were finally useful! (I teach trig, with great reluctance)
- This also allows for lithobraking. There are various theories about whether striking landing pads at high speeds causes more or less ship damage than other structures or the ground itself. It seems you used to take less damage by hitting landing pads during the Horizon ship operating system, we are unsure if this continues in the Odyssey era.
Turnarounds
- Beginning a race from the top of the pad facing the station exit is faster than beginning it when backwards or in the mechanics bay
- Selecting "Launch" when turning around on a pad is faster than going down and then up
- If you accidentally (or deliberately) hit a button to go down towards the mechanic’s bay, you can cancel that by hitting “Launch” before / during the turnaround at the bottom and save a good chunk of seconds by not going into and out of the bay.
- Good times to select your next system are in this order:
- When turning around on a pad at a station
- During super cruise approaches
- But you need to reselect the current target of approach
- During planetary descents
- But don't mess up and lithobrake! (Or more likely mess up your glide)
- When zooming out of mass lock
- But be quick!
- Mostly only good for regulation runs
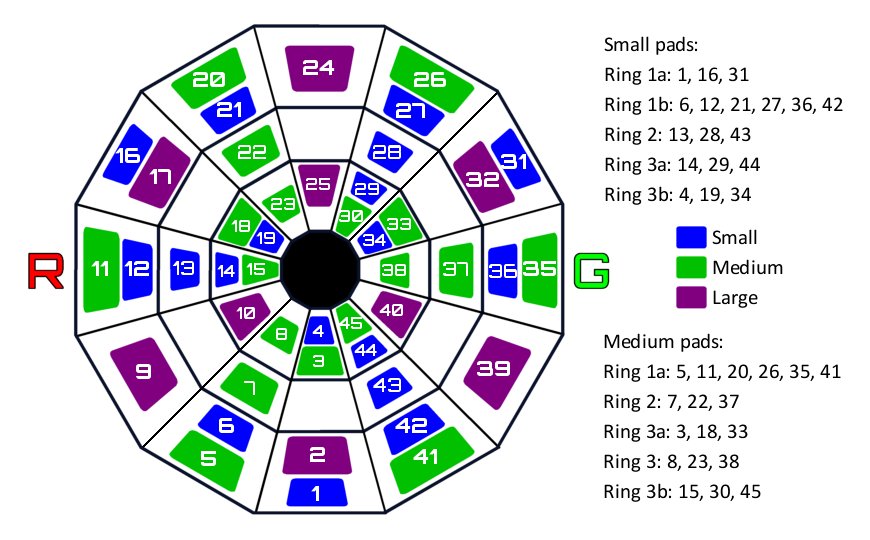
- In Bruski's opinion, the best small pads are 12, 13, 14, [red side] 36 [green side] because they line up with the slot and you can blast straight out. 14 is a bit far back and has a barrier in front of it though.
- In Bruski’s opinion, the best medium pads are 15, 38, 37, for the same reasons, although 15 and 38 are very far back.
- In Bruski’s opinion, the best large pads are 10, 25, 40, because they are at the back of the station, allowing heavy ships more time to slow down on the way in and line up with the slot on the way out. This may change significantly depending on the speed and handling of the particular cow.
- Landing pad maps available below:
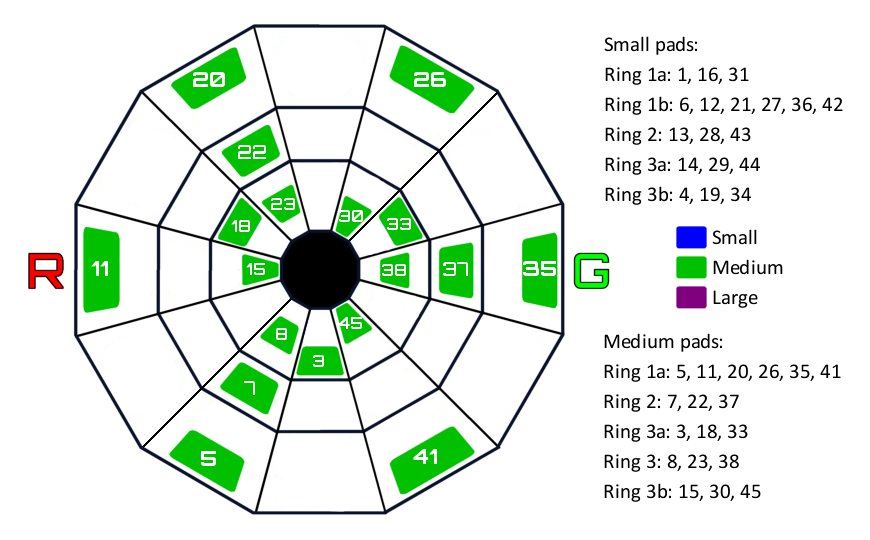
Landing Pad Maps
Stolen from somewhere, edited by Bruski
All Pads
Small Pads
Medium Pads

Large Pads
