Wet Bench wbflexcorr-1 and -2
Wet Bench wbflexcorr-1 and -2 is for wet chemical (corrosives) processing of standard (like silicon,quartz) and non-standard materials (like glass, gold, or metals), pieces, and wafers up to 6 inch for manual processing in beakers or labware.
Processing includes but is not limited to wafer cleaning, etching of silicon, silicon oxide etching using HF, metal etching such as aluminum, gold, or chrome.
The cleanliness is determined by the labware.
Wbflexcorr-1 provides one DI water sink, a separate drain for HF waste disposal, one hot plate for heating acids or bases in beakers.
Wbflexcorr-2 provides two 6 inch quartz-lined hot pots for SNF standard cleans or etchants (such as piranha, SC1, SC2, KOH), one 4 inch quartz-lined hot pot for 90% sulfuric acid/hydrogen peroxide (piranha) clean, and one dump rinser.
Gallium Arsenide [GaAs] and III-V compounds (indium, gallium, arsenic, aluminum and phosphide based) materials are allowed but only in personal labware, not in any of the hot pots or dump rinser.
Consult staff for non-standard processing conditions (such as elevated temperatures, unusually extended process times, or mixing of chemicals), even if standard SNF etchants and chemicals are to be used.
What the Tool CANNOT do
No solvents are allowed at this bench (solvent processing must be done at one of the solvent benches.)
Cleanliness Standard
(Same for both benches, wbflexcorr1and 2 and wbflexcorr3and4)
Substrates
(Same for both benches, wbflexcorr1and 2 and wbflexcorr3and4)
(Same for both benches, wbflexcorr1and 2 and wbflexcorr3and4)
How to Become a User
(Same for both benches, wbflexcorr1and 2 and wbflexcorr3and4)
System Overview, wbflexcorr1and2
Acid Waste Neutralization (AWN) alarm:
Safety
(Same for both benches, wbflexcorr1and 2 and wbflexcorr3and4)
Primary hazard classifications and components for most commonly used chemicals
Safety - Interlocks (wbflexcorr1and2 only)
Preparation - Personal Protective Equipment (PPE): apron, face shield, and gloves
Equipment Setup: Control Panel
Labeling Containers with "In-use Hazardous Chemical" Tags:
● Pouring sulfuric/peroxide "piranha":
Heating Chemicals using the hot plate
Disposing of Used Acids or Bases
PROCESS INFO for commonly used chemicals
SRS-100 resist remover for standard metals Ti, Al, W
Silicon wet etch using KOH, TMAH (by request only), or HNA:
Silicon oxides, nitrides, and poly Wet Etch Rates at SNF
Silicon nitride etch in Phosphoric Acid
Etch rates for various etchants and materials
Short Sheet for manual processing in beakers at wbflexcorr-1:
Short sheet to use the chemical baths at the wbflexcorr-2:
Picture and Location

The tool is located at A7 on the SNF Cleanroom Map
Cleanliness Standard
(Same for both benches, wbflexcorr1and 2 and wbflexcorr3and4)
The wet bench wbflexcorr-1 and wbflexcorr-2 appear in the Flexible (contaminated) equipment group.
- Most labware provided is in the flexible equipment group.
- For wafers to be allowed back into Clean or Semiclean Equipment, the labware must be fused silica or "quartz", which does not contain sodium found in normal lab glassware like Pyrex.
- For Clean equipment, the labware must never have been in contact with solutions or materials containing alkali (Na, K, Li) or any metals.
- For Semiclean equipment, labware must never come into contact with alkali nor any non-standard metals (standard metals are acceptable.)
- Labmembers must obtain their own labware, and must label and store it in their personal storage bins to prevent possible contamination through general use.
Substrates
(Same for both benches, wbflexcorr1and 2 and wbflexcorr3and4)
Substrates may be of most any type, size, shape and any material up to 6 inch.
GaAs is allowed for processing here.
Materials
(Same for both benches, wbflexcorr1and 2 and wbflexcorr3and4)
This wet bench is for standard and non-standard materials, like glass wafers, wafer pieces or substrates, gold or other non-standard films.
How to Become a User
(Same for both benches, wbflexcorr1and 2 and wbflexcorr3and4)
- Read all material on the SNF website concerning this tool.
- View the Plastic Tweezers Cleaning (9 minutes).
- Print the SNF Shadowing Form and the wet bench checklist on clean room paper and contact a qualified lab member of the wet bench to arrange to ‘shadow’ them while they use the tool. You are responsible to be with that lab member for the full time they are operating the tool, and it would be intelligent to ask questions and try to become as familiar as possible with the wet bench during this ‘shadowing.’ You may have to shadow the qualified lab member more than one time. The qualified lab member and you will have to sign the SNF Shadowing Form.
- Contact SNF training contact. There is a written test for the tool.
- The wet bench qualification will be canceled if It has been more than one year since the last use of any of the wbflexcorr benches.
System Overview, wbflexcorr1and2
This is a WAFAB brand wet bench. This station contains from the left to the right:
One DI water rinse sink which drains into the plenum and then into the acid waste neutralization system (AWN). Never pour HF down this drain!

One covered HF disposal module which drains into the HF waste collection system.

One hot plate for heating acids or bases in glass or quartz beakers.

Two quartz-lined hot pots for acids or bases which fit one 6 inch cassette (drain into AWN). Never use HF for these pots!

One quartz-lined hot pot only for 90% sulfuric acid/hydrogen peroxide (piranha) for one 4 inch cassette (drains into AWN) and one dump rinser for one cassette up to 6 inch (both drain into AWN).

The wet bench also contains two N2 guns and two DI water hand sprayer.

Each of these modules has its own micro-controller unit, mounted in the overhead control panel.
The aspirator, dump rinser, rinse sink, chemical pots, and the wet bench plenum (over which all the modules sit and collects runoff from the benchtop) drain into the acid waste neutralization system. Never pour HF down this drain!
Alarms
Acid Waste Neutralization (AWN) alarm:
The sink, aspirator, and plenum all drain into the general lab acid waste neutralization (AWN) system. These modules may be used only when the AWN is functioning. When there is a problem with the AWN, the yellow light above this bench will flash and no processing at any of the acid/base wet benches is allowed.
- If a cassette sits in a chemical bath, finish the process, place the cassette in a dump rinser but don’t start the water rinse.
- If a cassette sits in a dump rinser, stop the water rinse while filled up. If you are draining chemicals from a hot pot, stop the drain. Don’t start the spin-rinse dryers.
Exhaust alarm:
Not enough exhaust:
- press the red emergency power off button,
- evacuate the lab using a red pager phone
- and contact staff.
Safety
(Same for both benches, wbflexcorr1and 2 and wbflexcorr3and4)
Safety - Chemical Hazards
- Any of the SNF-standard, non-solvent etchants may be in use at this bench.
- Any non-SNF-approved etchants must undergo safety and contamination review by the Prom committee.
- Because this is a shared bench, you must read the Safety Data Sheets SDS and be aware of the hazards, not only of the chemicals you are using, but also for chemicals that are commonly used here which may be in use by others.
- Because mixing and pouring of chemicals into open containers are performed at this wet bench, users must be keenly aware of the potential handling hazards of these chemicals.
- Be aware that this bench is an entirely manual station, without safety features of other wet benches to prevent chemical mixing, spills, or other potential problems.
- Above all, users must understand and practice safe chemical handling procedures for working at this station.
- Remember: because of fire/explosion risk, flammables should not be mixed with corrosives or oxidizers.
- HF-based chemicals may cause serious, delayed tissue damage upon skin contact. The mechanism of action is the depletion of calcium from muscle and bone by free fluoride, which can readily pass through skin.
If skin contact with HF-based chemicals is suspected,
- rinse the affected area thoroughly,
- and then immediately apply calcium gluconate gel to the affected area,
- following the SNF guidelines in the SNF Lab Manual for first aid for HF exposure. HF-kits containing tubes of gel (along with instructions for use) are located in plastic bags at each wet station. Update Feb 2021, HF gel and instructions are provided by EH&S. - For more information about safety, consult the SNF Lab Manual.
Primary hazard classifications, components, and ph for most commonly used acids or bases:
- Aluminum Etchant Type A (Transene)
Phosphoric Acid 50 to 70 %, Acetic Acid 3 to 10%, Nitric Acid 1 to 5%, water 15 to 46%- Primary Oxidizer, corrosive, air/water reactive - Chromium Cr Etchant 1020 (Transene): 20 % Ceric Ammonium Nitrate, 6 %Nitric Acid, and Water 74 % -Primary Oxidizer, corrosive
- Gold Au Etchant TFA (Transene): Potassium Iodide (KI) 45 %, Iodine (I2) 2 %, Water 53 % - Toxic
- Hydrogen Peroxide (H2O2) 30%, ph 3.3 - Oxidizer HydrogenPeroxide 30%, VWR SDS 2021
Odor: Mild pungent
- Toxic if inhaled.
- Harmful if swallowed.
- Causes severe skin burns and eye damage.
- May cause respiratory irritation.
- May cause genetic defects.
- Causes damage to organs if swallowed.
- Sulfuric Acid (H2SO4) - Corrosive, ph 0.3, odorless Sulfuric Acid, Avantor SDS 2018
Causes severe skin burns and eye damage. May cause respiratory irritation. May cause cancer if inhaled. - Piranha
9 parts Sulfuric Acid (H2SO4) and 1 part Hydrogen Peroxide(H2O2) - Corrosive, oxidizer, air/water reactive - 50:1 HF = 2% Hydrofluoric Acid - Corrosive, toxic 50:1 Hydrofluoric Acid, SDS 2007
- Hydrofluoric Acid (HF) 49% - Corrosive, toxic HF 49%, SDS from 2013
- 20:1 BOE, Buffered Oxide Etchant 20:1, KMG SDS 2013
38% Ammonium fluoride (NH4F), Hydrofluoric acid 2.5%, 60% water - Corrosive, toxic - 6:1 BOE, Buffered Oxide Etchant 6:1 from Avantor, SDS 2020
34% Ammonium fluoride (NH4F), Hydrofluoric acid 7%, 59% water- Corrosive, toxic - Phosphoric Acid (H3PO4) 85% - Corrosive, oxidizer, air/water reactive Phosphoric Acid, JT Baker SDS 2006
- Potassium Hydroxide (KOH) 45% - Corrosive KOH, JT Baker SDS 2007
- Ammonium hydroxide (NH4OH) - Oxidizer, corrosive SDS
- Hydrochloric Acid (HCl), HighPurityProducts- Oxidizer, corrosive
- Nitric Acid (HNO3) 70%, pH: < 1 - Oxidizer, corrosive, water reactive SDS
Odor: pungent
Toxic if inhaled. Causes severe skin burns and eye damage. - Acetic Acid (CH3COOH) - Corrosive, Flammable (Flashpoint 38C) (incompatible with oxidizers), Strong, vinegar odor. Acetic Acid, SDS 2016 VWR
Update Dec 2020
Still allowed, but recommended to use at the wbresstrip:
- SRS-100 (replaces PRS3000) N-Methyl-2 pyrrolidone (NMP) ~60%, Tetramethylene sulfone ~30%, Isopropanolamine ~10% - Flammable, mildly corrosive
- PRS-1000, 2-(2-Ethoxy-ethoxy)ethanol (10-30%), sulfolone (25-45%), 1-Methyl-2-Pyrrolidinone (35-55%), Tetraethylene Glycol (1-10%), monomethanolamine (<0.1%) - Flammable, mildly corrosive
- Tetramethylammonium Hydroxide (TMAH) 25%- Corrosive
SDS
Update Feb 2021: PromCom approval required
25% TMAH will no longer be available.
Please read:
TMAH fact sheet from Stanford EH&S
TMAH poisoning
KOH should be used instead; or dry etch process
Safety-Equipment Hazards
Input power is 208 volts AC, three phase at 30 amps. Only qualified personnel are allowed to work on the electrical parts of this system. If any electrical problems are seen with this system, press the EMERGENCY POWER OFF button, shut the system down, and contact Maintenance staff.
Safety - Process Hazards
General process hazards involve handling of chemicals and materials which come into contact with chemicals used at this station. Wet benches are potentially the most dangerous operations in the lab, this particular one more so than the other because processing is completely manual. Be sure you understand all hazards and proper handling procedures before working at this or any other wet bench.
Safety - Interlocks (wbflexcorr1and2 only)
The wet benches are equipped with several interlocks. It is important to bear in mind, however, that no system is fool-proof; there is absolutely no substitute for a thorough understanding of the operating procedures, maintenance procedures, potential hazards, and safety issues associated with the wet benches.
For the hot pots:
- Heaters cannot be turned on if the bench is not enabled.
- If the level sensor detects that the acid level in the hot pot is too low, the heater will shut off and cannot be turned on.
- When DRAIN is on, the HEATER button is disabled.
- A thermal sensor prevents the hot pots from being aspirated if the temperature is 120 degrees C or above. Any attempt to do so will result in an alarm. As a fail safe, in case the temperature sensor itself is damaged, the signal from the sensor is continually monitored for electrical continuity.
- The heater cannot be turned off unless the timer is reset. This prevents someone from turning off the heater during a clean cycle.
- The temperature set point, undertemp limit, overtemp limit, process time, and prewarn time are all programmed into the controller. Only staff has access to modify these set points.
There are no interlocks for manual processing in beakers. So it is absolutely imperative that users must thoroughly understand the chemicals, materials and processes they are working with and their associated hazards.
Preparation - Personal Protective Equipment (PPE)
(Same for both benches, wbflexcorr1and 2 and wbflexcorr3and4)
Preparation - Gloves
When working with chemicals, which includes transferring chemicals from the storage area to the wet bench and back, pouring chemicals, or transferring cassettes in and out of chemical baths, cleaning the baths or bench, it is mandatory to wear gloves in following order:
1. Latex gloves, not chemical resistant (if you have allergies to Latex wear thin Nitril gloves instead)
2. Yellow chemically-resistant Nitril gloves, for chemical protection (check for holes)
3. Vinyl gloves, to protect the wet bench from potential contamination (important while working with clean labware, remember vinyl gloves are not chemical resistant)
After handling chemicals, vinyl gloves must be changed before handling cassettes.
For general use when not working directly with chemicals, vinyl gloves can be worn directly over latex gloves. The station-dedicated cassettes, handles, the inside of the wafer boxes and their lids, are all to be kept free of contamination. A glove touching anything else is considered contaminated.
Remember, the benchtop and the control panels are considered contaminated.
Change gloves frequently and especially whenever any contamination might be suspected.
Preparation - Personal Protective Equipment (PPE): apron, face shield, and gloves
When working with chemicals, which includes transferring chemicals from the storage area to the wet bench and back, pouring chemicals, or transferring cassettes in and out of chemical baths, cleaning the baths or bench, it is mandatory to wear Personal Protective Equipment (PPE), put it on in following order:
1. chemicals apron
2. face shield (over safety glasses)
3. yellow chemically-resistant Nitrile gloves (check for holes)
After each use, the face shield should be cleaned using the steamer.
Find more detailed information about safety, PPE, and chemical handling procedures in the SNF Lab Manual:
https://snfexfab.stanford.edu/guide/safety/general-policies-at-snf/general-chemical-safety
Cassettes and other Labware
GaAs processing requires dedicated GaAs labware. You may use only your own personally labeled labware to prevent contamination. Store the GaAs labware in your personal storage box.
You may use your own personally labeled, dedicated labware to prevent contamination of substrates. In order to be "clean" compatible, the labware must never have been in contact with solutions or materials containing alkali (Na, K, Li) or any metals. To be "semiclean", labware must never come into contact with alkali nor any non-standard metals (standard metals are acceptable.) Personal labware must be stored in personal storage space or will be considered contaminated. Dedicated "clean" (uncontaminated) labware must be made of either fused silica ("quartz") or electronics-grade Teflon. Standard Pyrex-brand glassware, which contains up to 5% sodium, is unacceptable as "clean" labware.
Labware must be compatible with the etchant to be used.
- Glass (like Pyrex) or quartz labware is acceptable for acids, bases, to heat chemicals or self heating mixtures like sulfuric/peroxide ("piranha").
Glass (like Pyrex) or quartz can’t be used for Hydrofluoric Acid (HF) or BOE etchants, since HF etches glass. - Teflon is acceptable for any of the commonly used etchants at room temperature.
Teflon should not be heated (heat is transferred poorly and Teflon will absorb etchant). Polypropylene is not acceptable for piranha (as it melts) although is acceptable for room-temperature HF or BOE etchants. In summary:
Labware material | Piranha | HF or BOE | KOH/TMAH |
Pyrex | OK | Will etch | OK |
Quartz | OK | Will etch | OK |
Teflon | OK | OK | Chemically OK Can't heat |
Polypropylene | Chemically OK but may melt | OK | Chemically OK but may melt |
For other etchants and material combinations, you may wish to consult SNF staff.
Tweezers
Tweezers should be decontaminated according to the standard lab procedures for tweezer cleaning.
Cleanroom Wipes
- Use the thicker cleanroom wipes for water only, not chemicals.
- Cleanroom wipes are to be kept off the benchtop, because they can get sucked up into the back of the bench, into the acids and into the exhaust system. This poses a fire hazard and may damage the exhaust system.
Equipment Setup: Control Panel
The control panel modules from left to right are:
Hot Plate Controller. This controls the heating element on the hot plate (not installed yet).
Badger unit for wbflexcorr-1
Exhaust gauge: > 05 and < 1.5
Light switch: leave light on
Aspirator Press the green button to start and the red button to stop the aspirator.
Power unit MPC-901 EPO by WAFAB: This controls power to the control panel. It contains the Emergency Off button (top) and the main power On/Off buttons. When in use or under standby conditions, the main power should always be left on, the MAIN and SYS keys are green.
Silence alarm: press yellow button to silence alarm sound
Temperature controller WTC1G by WAFAB for Hot Bath #1, up to one 6 inch cassette
Badger unit for wbflexcorr-plug: by request only
HIGH LIMIT RESET-1
Temperature controller WTC1G by WAFAB for Hot Bath #2, up to one 6 inch cassette
Badger unit for wbflexcorr-2
HIGH LIMIT RESET-2
Quick Dump Rinser (QDR) controller: MICROKLEEN RINSE By WAFAB for quick dump mode (or cascade mode by request only)
Temperature controller WTC1G by WAFAB for Hot Bath #3, up to one 4 inch cassette
HIGH LIMIT RESET-3
Make a reservation.
- Wbflexcorr-1
For manual processing in beakers, the hot plate, the HF drain, DI water sink, or aspirator usage. - Wbflexcorr-2
For manual processing in beakers, the hot pots, dump rinser, the HF drain, DI water sink, or aspirator usage. - Remember, you lose your reservation time if you are 15 minutes late.
Operating Instructions
Startup
- Check the exhaust; it should read > 0.5 and < 1.5 (exhaust gauge is located in the center of the control panel).

- Check that the acid waste neutralization (AWN) system is functioning.
When there is a problem with this system, the yellow warning light over this bench (or wbclean_res) will flash. If this happens, none of the wet benches may be used, as the waste will not be properly treated. Contact facilities.

- Ensure that the main power to the bench is on, the MAIN and SYS keys are green (located in the center of the control panel).

- Check the bench for any damage or any other obvious problems. Report and notify Maintenance if any problems are observed.
- The benchtop should be clean and dry before you work on it. Thoroughly rinse off any drips (assume they are acid) with the DI hand sprayer, gently dry with the N2 gun and, if necessary, remove residual water with cleanroom wipes. Avoid using cleanroom wipes to clean up unknown drips; these are then considered hazardous waste and must then be handled and disposed of accordingly. Do not leave cleanroom wipes on the bench top.
- Check the logsheet for the last acid change in the hot pot or tank you will be using. If you need to change the acid, follow the standard safety practices and the procedures outlined in Changing Chemicals.
- Enable wbflexcorr-1 or wbflexcorr-2.
- If your process requires the complete bench top or if you do not otherwise want to share the space with other users, make sure to reserve both modules for the time period you require. Even if you do not use the hot plate or the controlled temperature bath, you must enable one unit for a room temperature process.
Not more than two users are allowed to use this bench at the same time. - Wbflexcorr-plug by request only.
- Light should be left on.
Labeling Containers with "In-use Hazardous Chemical" Tags:
- Every beaker, open container, or chemical bath containing any chemical or water must have a "In-use Hazardous Chemical" label with it. The purpose of the tag is to identify the contents of the container as well as the labmember who is using the chemical. Fill the tag out before you pour chemicals in a beaker.
- Compositions of the solutions (including water) must be listed on the tag.
- Use complete chemical names on the tag (no chemical formulas, no abbreviations, and no jargon such as "piranha").
- Extra tags are available in the gowning room.
Transferring Acids or Bases
- No solvents may be used at this bench (use one of the solvent wet benches for processes with solvents.) Only acids and bases or other standard SNF, non-solvent etchants may be used.
- In obtaining chemicals, use proper protection (safety glasses, face shield, yellow chemical resistant Nitrile gloves, chemicals apron) to transfer chemicals from the storage area to the wet bench. Always double check the labels to ensure you have the correct chemicals!
- Always use transfer carts (plastic) to transport chemicals; chemicals must never be hand-carried in the lab.
- - Follow the instructions for transporting acids or bases, which are posted on the chemicals passthrough door.
Pouring Acids or Bases
- Before pouring chemicals, plan how you will dispose of used chemicals, especially if you are etching metals. All GaAs etching solutions and the rinse water from the first four rinses must be captured in appropriate hazardous waste containers, labeled as hazardous waste and placed into the passthrough for pick up. Organize the work bench accordingly.
- Make sure to label chemicals in beakers, even water, with the "In-use Hazardous Materials" card.
- It is advisable to have a beaker of water for rinsing your substrates.
- To pour the chemical, place the chemical bottle far enough under the hood to prevent fumes from escaping into the lab. Remove the bottle cap and place it topside down on the benchtop, to prevent contamination. Avoid contamination of the bottle: do not touch the inside of the bottle cap or the mouth of the bottle with your gloves. If the cap is inadvertently contaminated, rinse thoroughly before replacing it on the bottle.
- Using one hand around the neck and the other around the base of the bottle, gently pour the chemical into the beaker or other container. Pour slowly, to avoid any splashing.
Pouring sulfuric/peroxide "piranha":
- choose a glass or quartz container that is roughly twice the volume of what you plan to pour (boiling piranha tends to "spit".)
- First pour the concentrated sulfuric acid, then pour the hydrogen peroxide. The proportions do not need to be exact. Roughly speaking, four parts sulfuric and one part peroxide should be sufficient for most purposes and does not require heating unless processing for more than 20 minutes or so. Be very careful: sulfuric acid and hydrogen peroxide give off heat when mixed and this mixture will be quite hot.
Because sulfuric is heavy and viscous while peroxide is thin, they do not always mix well. Mix them by taking an empty cassette or appropriate handle and gently place it in the acid and bring it out several times (don't stir!)
- After pouring the chemical, replace the cap on the bottle. If any chemical drips onto the outside of the bottle, thoroughly rinse and dry the bottle before returning to the transfer cart. Return unused chemicals or empty bottles to the pass-through as soon as you are done pouring; never leave chemicals at the wet bench or on the transfer cart. Make sure the chemicals are returned to the appropriate labeled shelf (double-check!)
Chemical Handling
- Keep all open containers at least 6 inches from the front of the hood to ensure proper exhaust. The red tape line indicates 6 inches.
- Chemicals must remain at this bench. Open containers with chemicals may not be transferred to or from this bench.
Heating Chemicals using the hot plate
- Enable wbflexcorr-1.
DO NOT turn the heater on yet. - Fill out a chemical tag and place it next to the hotplate, make sure it will not get in contact with the hotplate.
- Place your glass or quartz (never plastic) beaker on the hot plate and fill it up with your chemical.
Do not use beakers made of materials other than glass or quartz which may melt. Do not heat an empty beaker.
Do not walk away from the station when heating. - Place a thermometer (never mercury) in the solution (make sure it is compatible with your chemical).
- Press the green Hot Plate Start button (times out after 2 hours).
- Start with a low temperature, this will heat up the hot plate. The hot plate will heat up the chemical inside of the beaker. The temperature of the chemical depends on the chemical mixture, volume, and beaker size. There is no direct temperature control of these heaters. If higher temperature is needed, ramp the temperature setting up SLOWLY. If unattended, the hot plate will shut off automatically after two hours.
- Following temperatures and chemicals are allowed, other chemicals or temperatures need staff approval:
- 40 C for Aluminum etchant
- 80 to 100 C for KOH
- 50 C for the 5:1:1 H2O:H2O2:NH4OH (SC1)
- 50 C for the 5:1:1 H2O:H2O2:HCl (SC2)
- 90 to 120 C for 4:1 or 9:1 sulfuric acid:hydrogen peroxide
Update Dec 2020
Still allowed but wbresstrip recommended: - 60 C for SRS-100
- 40 C for PRS-1000
How to use the hot pots
- Hot bath #3 only for 9:1 piranha (9 sulfuric acid : 1 hydrogen peroxide) at 120C.
It is pre-programmed and the chemical mixture can't be changed.
Only Teflon holders, baskets or one 4 inch cassette can be used.
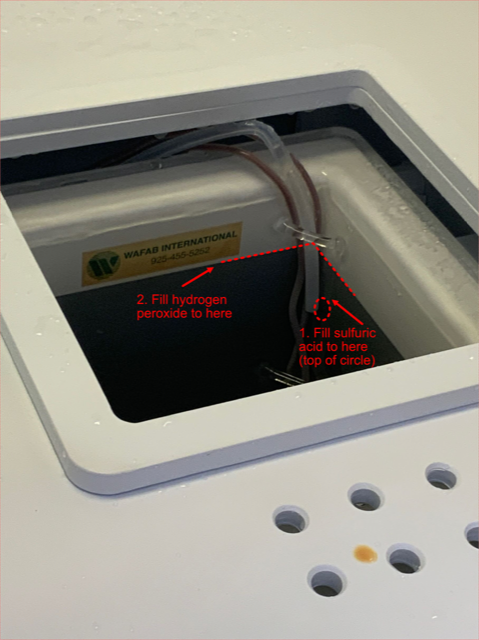
The piranha bath consists of 9 parts of concentrated sulfuric acid and 1 part hydrogen peroxide. Pour sulfuric acid to the top of the brown mark and then add hydrogen peroxide to the edge of the grey area. Be very careful: sulfuric acid and hydrogen peroxide give off heat when mixed. Because sulfuric is heavy and viscous while peroxide is thin, they do not always mix well. To help in mixing, place an empty cassette into the acid mixture and lift it out. This should be done with the heat off. Rinse the cassette/handle in the dump rinser and dry in the spin/rinse dryer.
- Hot baths #1 and #2 can be used for acids or bases approved at SNF at room temperature or heated up to 120C.
Note: HF containing chemicals, metal etchants and SRS-100, PRS1000 or similar corrosive/solvent mixtures are not allowed.
To make mixing of chemicals easier, each bath has 4 Teflon dip sticks for 9:1, 4:1, 5:1:1, or mixtures by liter.
- To fill one bath with 5:1:1 H2O:H2O2:NH4OH (SC1)
Fill DI water to the bottom of the 5:1:1 Teflon dip-stick. Then add hydrogen peroxide to the mark on the dip-stick and then add the NH4OH to the last mark on the dip-stick.
- To fill one bath with 5:1:1 H2O:H2O2:HCl (SC2):
Fill DI water to the bottom of the 5:1:1 Teflon dip-stick. Then add hydrogen peroxide to the mark on the dip-stick and then add the HCl to the last mark on the dip-stick.
NOTE: the H2O2 in both the NH4OH and HCl hot pots will 'boil' off in time and need to be replenished. This maintains the correct concentration of the mixture. Simply add H2O2 back to the correct level on the dip-stick.
- Following chemicals and temperatures are allowed, other chemicals or temperatures need staff approval:
- 40C for Aluminum etchant
- 80 to 100C for KOH
- 50 C for 5:1:1 H2O:H2O2:NH4OH (SC1)
- 50 C for 5:1:1 H2O:H2O2:HCl (SC2)
- 90 to 120 C for 4:1 or 9:1 sulfuric acid:hydrogen peroxide
WAFAB Temperature Controller DT-V130-33-TA24 functions:

Press ECS key if main page is not on display.
Default: Standby, heat off.
Set the time:
Press the down arrow key to jump into the process setup page.
Press ENTER key, cursor starts blinking.
Use the numeric keypad to enter desired value on the process timer.
Press ENTER key to save desired time.
Press the down arrow key again and set the prewarn time if desired.
Press ECS key to go back to the main page, desired time should be on display.
Set the temperature:
Press the down arrow key until you reach the Log In page.
Press ENTER key, cursor starts blinking, the password is 1, press ENTER key to log in.
Don't change the password, press the down arrow key to jump to the temperature setup page.
Press ENTER key, when cursor starts blinking, use the numeric keypad to enter desired temperature, press ENTER key to save the value.
Press ECS key to go back to the main page.
- To start the heat press 1 key, confirm on the left side of display: HEAT ON and on right side of display: HEATING.
Hot pots will heat to process temperature in about 10 minutes.
Once desired temperature has been reached: HEATING message not on display anymore.
Place a Teflon holder with your sample in hot bath.
Press F1 to start the timer (press F2 to stop the timer if set time was too long).
After the required time, alarm sounds, press F2 to stop the alarm sound.
- To stop the heat, press 3 key, confirm on display.
- To drain the bath, wait until temperature is below max drain temperature, 120C (interlocked). Absolutely do not try to speed up cooling by adding water, adding water will heat up the solution.
- Press 7 key to start the drain, set drain time is 5 minutes.
- Once the chemical is removed from bath, use the DI sprayer to rinse the bath very well. Rinse down the side walls of the bath from top to bottom, but do not splash water outside the bath.
- Press 9 key to stop the drain before the set drain time of 5 minutes.
Etching Substrates
- Prepare your substrates for etching. Various holders for wafers and wafer pieces may be found at this station. Ensure that whatever you choose to use is compatible with the etchant and that there is no risk of substrates or holders of slipping or being dropped.
- Set your timer.
- Etch your substrates for the appropriate time.
- Remove the substrates and place in a rinse beaker or dump rinser.
- With the rinse beaker in the rinse sink, turn on the DI water and allow rinse water to overflow in the rinse beaker for at least five minutes. Alternatively, you may use the DI hand sprayer to rinse a single piece. For very small pieces, you may rinse in a beaker.
- To dry substrates, you may use the N2 gun.
Dump rinser
Open the lid.
- Change vinyl gloves!
- Use the handle to gently lift the cassette out of the hot pot or tank. Hold the cassette over the hot pot or tank for several seconds to allow excess acid to drip off.
- Place the cassette into the dump rinser.
- Remove the handle and place it next to the cassette. This will ensure that the handle is completely rinsed. If the etch time is critical for your process, you should allow for the time required to move wafers from the etch tank to the dump rinser.
- Close the lid.
- Push START to start the multi-cycle rinse. This rinse tank fills and drains six times. The number of dump/rinse cycles is indicated by the LED at the top of this module.
- When rinse is done push STOP/RESET to stop the alarm.
- Push OPEN to drain the water.
- Open the lid.
- Use clean vinyl gloves and remove handle and cassette. Place the cassette into the next chemical bath or place it into the spin/rinse dryer at the wbmiscres in the litho area.
- Close the lid and press the START key and wait until the tank is filled up with water, press STOP twice. Please leave the dump rinser filled with water. If not in use, the dump rinsers will rinse under a dump/rinse cycle automatically every 90 minutes. This keeps the water lines clean.
- When the AWN warning system is flashing during the dump-rinse cycle, make sure the cassette is covered with water, then press STOP/RESET button to pause the dump/rinse cycling.
Disposing of Used Acids or Bases
- HF drain

HF-based acids such as BOE and acid mixtures containing HF must be poured down the HF drain. (These acids must NOT be aspirated or poured down the sink drain). First, carefully lift the HF drain lid. Then, using both hands gently pour the acid waste down the drain, being careful not to splash. Rinse the etchant container with water three times, pouring the rinse water each time into the waste container. Log the approximate amount and composition of acid drained on the station log sheet.
- AWN system
All standard, non-HF-based etchants, other than metal etchants must be aspirated. For safety reasons, chemicals must not be very hot (less than about 120 C) before aspirating. Do not pour these chemicals down the sink drain, as the sink is to be used only for rinsing.

- Remove the aspirator nozzle from its storage space and place the nozzle into the chemical container. Press the green Aspirator Start button.
- Once the container is empty, use the DI hand sprayer to rinse the inside 3 times and aspirate the rinse water as well. If the aspirator times out before you are done, press the green Aspirator Start button again.
- Lift the aspirator nozzle off the bottom of the container. Hold it either over the container or over the rinse sink. Thoroughly rinse the end of the nozzle with the DI hand sprayer. Continue to hold the aspirator until the nozzle end stops dripping and return the aspirator nozzle to its storage space.
- Rinse the inside and outside of the container in the rinse sink.
- Log the approximate amount and composition of chemicals drained on the station log sheet.
- We are required by the Stanford University - Utilities Services (Environmental Quality and Water Efficiency) to distribute the Best Management Practices (BMP) fact sheet. Please read the fact sheet and reduce the amount of pollutant for example by using smaller quantities of chemicals.

Hazardous waste collection
Metal etchants (including gold and chrome etchants) and mixtures containing solvents like SRS-100 or PRS1000 must be collected in waste containers, labeled and sent out for hazardous waste disposal and must absolutely not be aspirated or poured down the rinse drain. Any waste containing toxics and heavy metals must be collected locally. Toxics and heavy metals include, but are not limited to, the following:
Antimon, Arsenic, Barium, Beryllium, Boron, Cobalt, Manganese, Molybdenum, Selenium, Thallium, Vanadium, Cyanide, Formaldehyde, Gold, Phenols.
Any chemicals on the Federal List of Acutely Hazardous Chemicals or the California List of Extremely Hazardous Chemicals must also be collected locally. When in doubt, check with the SNF staff.
If you are working with multiple chemical mixtures, make sure to use separate containers for collecting different types of waste (acid versus base, for example.)
- Cleaned, empty hazardous waste containers and caps are stored in the service area. The containers have been chemically decontaminated by staff and their labels should be defaced. Contact staff if containers or caps are missing. Do not use empty chemical containers from the chemicals pass-through as they are not decontaminated and pose a chemicals hazard.
- Attach a temporary hand-written Hazardous Waste label to the waste container.

- Use a funnel (make sure it is chemically compatible with the etchant) to pour the used etchant into the appropriately labeled waste container. Rinse the etchant container with water four times and pour the rinse water each time into the waste container too.
- Cap the container, making sure that the outside of the container is clean and dry.
- Transport the container using the transfer cart. Place the container on the appropriate shelf in the chemicals pass-through.
- Stanford EH&S is no longer picking up bottles with hand-written labels.
EH&S Stanford chemical-waste-pickup
How to fill out an EH&S waste tag for hazardous waste created in the SNF cleanroom:
https://ehsapps.stanford.edu/waste-tag/
Create a 'New Waste Tag' (not Request a pickup!)
This is an example for one gallon of gold etchant and rinse water:
Source of Waste : Research
Building : PAUL G. ALLEN Center for Integrated Systems (04-050)
Room: L109
Principal Investigator : (find your Principal Investigator)
Physical State: liquid
Container Size: 1 gallon
Chemical Component Name: start typing, for example Gold etchant, if there is something similar in the database, it will show up. In the case of the Gold etch used in the SNF cleanroom, select Gold Etchant Type TFA.
% : 100
If other liquids are in the waste bottle, click on add a new row.
If the gold etch waste bottle contains rinse water too, guess the % for the gold etchant, for example 40 %.
Then click on the 'add reminder water' button, it will automatically add a row for water 60%.
Primary Hazards (select all that apply): Toxic
If you know you will create this waste again in the future, click on 'Save this mixture for later' before you click on print.
Then find this mixture under:
'List of Your Saved Mixtures'
Click on Save and print (contact staff if you don't have a printer).
Place the printout in a plastic pouch, available in the stockroom for staff, attach it to the waste bottle, place the waste bottle in the red taped area in the passthrough.
Staff will pick it up and transfer it to room 162A. EH&S will pick it up from this room.
Standby
- Fill out the log sheet.
- Clean up your workspace, return labware to the wbflexcorr-3and-4 and store your personal labware in your own bin.
- Ensure the benchtop is clean and dry.
- Turn off the heaters if you have used them.
- Leave the main power on.
- Disable the bench.
- Be sure you are leaving the station in neat condition.
ROUTINE MAINTENANCE AND CALIBRATION
Daily
- Keep the benchtop clean. Thoroughly rinse off any drips (assume they are chemicals) with the DI hand sprayer, gently dry with the N2 gun and, if necessary, remove residual water with cleanroom wipes. Avoid using cleanroom wipes to clean up unknown drips; these are then considered hazardous waste and must then be handled and disposed of accordingly. Do not leave cleanroom wipes on the bench top.
- Remove any cleanroom wipes that may be lying on the benchtop. These have a tendency to get sucked up towards the back of the bench by the exhaust, and into the chemical containers which not only contaminates them, but presents a serious fire hazard.
- Check the bench for damage or problems, report and notify Maintenance if any problems are observed.
- Chemicals apron, face shield, and gloves should be checked and changed if any staining or other damage is observed.
Weekly (Maintenance)
- N2 gun filters should be changed.
SHUTDOWN
Emergency Shutdown
- In the event of an emergency, the wet bench should be shut down by pressing the EMERGENCY POWER OFF button located in the center of the upper control panel. This will shut off all power to the bench.
- If the exhaust shuts down while there are chemicals in any beakers or other open containers at this station, EVACUATE THE LAB.
Extended Shutdown
- Bench top and plenum should be thoroughly rinsed and drained.
- Main power (located on the left side of the bench) should be shut off.
TROUBLESHOOTING
- If you are having any problems with equipment, contact Maintenance (because of potential safety and contamination issues, only qualified personnel are allowed to work on the wet benches.)
BACKUP EQUIPMENT
Wbflexcorr-1and-2
PROCESS INFO for commonly used chemicals
Aluminum etch:
- Run etch rate tests before you etch your process wafers!
- Aluminum Etchant Type A, link to SDS from Transene, link to technical note, new Oct 2023!
Type A is recommended for use on silicon devices.
- Phosphoric Acid 50 to 70 %, Acetic Acid 3 to 10%, Nitric Acid 1 to 5%, water 15 to 46%
- Wafers should be completely wet before being placed in the Al etch solution.
- Standard photoresist can be used as a mask.
- Al Etch rate (from Transene web site):
30 Å/sec at 25C
80 Å/sec at 40C
Note, the Al etch solution will not etch the silicon in AlSi, an additional Si freckle-etch in a dry etcher (Samco) is required.
- Al etch is a strong acid and oxidizing chemical mix. It should not be mixed or come in contact with SRS-100 or PRS-1000.
- Waste: must be collected in waste containers, labeled and sent out for hazardous waste disposal.
(Between Feb and May 2014, we tested Al 16:1:1:2 NP from KMP: 70 to 80%, Phosphoric Acid, 1 to 5 % Acetic Acid, 1 to 5 % Nitric Acid, and CMOS grade Surfactant)
(Until Feb 2014, we used the AL-11 Aluminum Etchant from Cyantek but the production has been discontinued, it consisted of 72% Phosphoric Acid, 3% Acetic Acid, 3% Nitric Acid, and 22% water).
(Oct 2023 J.T. Baker® Aluminum etch (80:15:3:2), CMOS™the production has been discontinued
Phosphoric acid (H₃PO₄) 72.5 - 74.5%
Acetic acid (CH₃COOH) 9.5 - 10.5 %
Nitric acid (HNO₃) 1.7 - 2.3%)
(Discontinued Oct 2023:
Aluminum etch (80:15:3:2), CMOS™, J.T. Baker® consists of:
Phosphoric acid (H₃PO₄) 72.5 - 74.5%
Acetic acid (CH₃COOH) 9.5 - 10.5 %
Nitric acid (HNO₃) 1.7 - 2.3%
Aluminum Etch 80:15:3:2 JT Baker SDS)
Chromium etchant:
- Chromium (Cr) etchant 1020 from Transene: http://transene.com/cr/
- 20 % Ceric Ammonium Nitrate, 6 % Nitric Acid, and Water 74 % -Primary Oxidizer, corrosive
- Chromium Etchant 1020 SDS
- Cr etch times range from 15 seconds to 60 seconds at room temperature.
- Compatible with positive and negative photoresists.
- Select Compatible materials: Au, Ti, oxide, nitride, Si.
See https://transene.com/etch-compatibility/ for more details.
- Select Incompatible materials: Al, Ni, Cu, NiCr
- Waste: must be collected in waste containers, labeled and sent out for hazardous waste disposal.
Gold Etchant TFA
- Gold (Au) etch TFA from Transene: http://transene.com/au-etchant/
- Potassium Iodide (KI) 45 %, Iodine (I2) 2 %, Water 53 % - Toxic
- Gold Etchant TFA, Transene SDS 2022
- Au etch rate at room temperature: 28A/sec
- Ph 6.5-8.0
- Waste: must be collected in waste containers, labeled and sent out for hazardous waste disposal.
SRS-100 resist remover for standard metals Ti, Al, W
- SRS-100 should be used at the wbres_strip bench, please contact staff for training.
- SRS-100 is used to remove resist from wafers with standard metals. Caution, it etches copper.
- SRS-100 consists of:
N-Methyl-2 pyrrolidone (NMP) ~60%, Tetramethylene sulfone ~30%, Isopropanolamine ~10% - Primary hazard classifications are: flammable and mildly corrosive
- Flashpoint is 93C.
- Please read the SDS before using it.
- Wafers must be very dry before going into this resist stripper, otherwise the exposed metal may be etched. Recommended processing temperature and time is 60C for 20 minutes. The SRS-100 resist strip is effective when resist has been used for masking wet aluminum etching. However, resist which has been used to mask implant, AMT oxide etch, or P5000 aluminum etch , or plasma etch is hardened by these processes and will require a special plasma etch prior to SRS-100 to be completely removed.
- SRS100 is similar to PRS3000: please read the Technical Note for PRS3000.
- Waste: must be collected in waste containers, labeled and sent out for hazardous waste disposal.
PRS1000
- PRS1000 should be used at the wbres_strip bench, please contact staff for training.
- PRS-1000 contains:
2-(2-Ethoxy-ethoxy)ethanol (10-30%),
sulfolone (25-45%), 1-Methyl-2-Pyrrolidinone (35-55%),
Tetraethylene Glycol (1-10%), monomethanolamine (<0.1%) .
PRS-1000 should not be mixed with strong oxidizers (i.e., strong acids or reducing agents.)
- Primary hazard classifications are: flammable and mildly corrosive.
- Flashpoint is 96C.
- PH: 9.2 - 10
- Please read the SDS for PRS-1000 before using it.
- PRS-1000 is used as a resist stripper, or the final clean before a furnace or deposition step. Because of the small amount of caustic base in both SRS-100 and PRS-1000, wafers and beakers must be very dry, otherwise the exposed metal may be etched.
- Recommended processing temperature and time is 40C for 20 minutes.
- Waste: must be collected in waste containers, labeled and sent out for hazardous waste disposal.
SC1/SC2, HF, and piranha
- check the Additional Process Info link: Additional Process Info
HF-based Etchants
Silicon wet etch using KOH, TMAH (by request only), or HNA:
Silicon wet etching KOH or HNA at SNF Summary
Silicon wet etch in KOH (Potassium Hydroxide)
Silicon wet etch, isotropic, in Hf/Nitric/Acetic (HNA), pdf from 2007
Silicon wet etch in TMAH module (by request only)
Silicon oxides, nitrides, and poly Wet Etch Rates at SNF
Silicon nitride etch in Phosphoric Acid
Etch rates for various etchants and materials
- These papers are from IEEE about wet and dry etching. Some of the etches, tools and materials will not be applicable for processing done at SNF.
Various Etches for wet and Dry Etching- 1996
Various Etches for wet and Dry Etching- UCB2003
Short Sheet for manual processing in beakers at wbflexcorr-1:
- Make reservation for wbflexcorr-1.
- Check reports/comments.
- Check exhaust and AWN systems.
- Make sure power and light are on.
- Make sure there are no chemicals or labware left from the previous user (return labware to the wbflexcorr-3and-4).
- Make sure the bench is dry and clean.
- Enable wbflexcorr-1 (Remember, only two labmembers are allowed to use the bench at the same time).
- Place empty beakers inside of bench (glass or quartz beakers for heating up chemicals or self heating chemical mixtures; plastic beakers for anything containing HF).
- Prepare Teflon holders with your samples.
- Fill out "In Use Hazardous Chemicals" cards, for each beaker one, and place cards under beakers or next to the hot plate.
- Fill up rinse beaker with DI water (don't forget the chemical tag/card).
- Check apron and chemical resistant Nitrile gloves for holes.
- Put on apron, face shield, and chemical resistant Nitrile gloves over latex gloves.
- Transfer acids or bases (solvents are not allowed) using plastic cart from chemicals passthrough to wet bench.
- Place chemical bottle inside of bench behind the red tape (6 inch).
- Fill up beakers with chemicals (don't forget the chemical tags/cards).
- Rinse and dry outside of the bottle if contaminated with chemicals.
- Return chemicals to the of passthrough.
- Place wafer using Teflon holder in chemical beaker.
- After the etch, place Teflon holder in rinse beaker.
- Rinse wafer and rinse beaker in sink.
- Dry your wafer using N2 gun (be careful with pieces).
- Drain any etchant containing HF in HF drain, acids or bases in the AWN system using the aspirator (temperature under 120C), and metal etchants in hazardous waste bottle.
- Rinse all chemical beakers three times with water and drain in appropriate waste collecting system.
- Rinse chemical beaker in sink.
- Leave beakers and holders on table opposite the wbflexcorr-3and-4 for drying. Never leave labware at this bench.
- Rinse and dry bench, you can rinse the hot plate too (make sure the hot plate is not too hot).
- Remove Nitrile gloves, face shield, and apron.
- Switch of hot plate if used.
- Discard chemical tags/cards.
- Fill out chemical log sheet.
- Disable wbflexcorr-1
Short sheet to use the chemical baths at the wbflexcorr-2:
- Make reservation for wbflexcorr-2.
- Check reports/comments.
- Check exhaust and AWN systems.
- Make sure power and light are on.
- Make sure there are no chemicals or labware left from the previous lab member (return labware to the wbflexcorr-3and-4).
- Make sure the bench is dry and clean.
- Enable wbflexcorr-2.
- Prepare Teflon holders with your samples.
- Fill out "In Use Hazardous Chemicals" cards" and place card next to the bath (not necessary for hot bath #3; here only piranha is allowed)
- Check apron and Nitril gloves, and clean face shield at wbflexsolv using IPA.
- Put on apron, face shield, and Nitril gloves over latex gloves.
- Transfer acids or bases (solvents are not allowed) using plastic cart from chemicals passthrough to wet bench.
- Place chemical bottle inside of bench behind the red tape (6 inch).
- Bath should be empty, if not, drain and rinse. Fill up bath with desired acid or base above low liquid level (don't forget the chemical tag/card).
- Rinse and dry outside of bottle if contaminated with chemicals.
- Return chemicals to the passthrough.
- If desired, heat up hot pot by pressing 1 key on temperature controller.
- Once desired temperature has been reached, place wafer using Teflon holder in chemical bath.
- Press F1 to start the timer (press F2 to stop the timer if set time was too long).
- After the required time, alarm sounds, press F2 to stop the alarm sound.
- After the etch, place Teflon holder in dump rinser, press start.
- After dump rinse, remove holder and wafer from dump rinser, keep dump rinser filled up with water and lid closed.
- Dry your wafer using N2 gun (be careful with pieces) or use SRD in litho area (which is in the contaminated equipment group) for 3, 4, or 6 inch wafers.
- Stop the heat by pressing 3 key on temperature controller.
- Drain bath (leave piranha in hot bath #3), temperature needs to be below 120C. Press 7 key to start the drain, set drain time is 5 minutes. Press 9 key to stop the drain before the set drain time.
- Rinse bath thoroughly with DI water gun, drain water.
- Return holders and labware to the wbflexcorr-3and-4.
- Rinse and dry bench.
- Remove Nitril gloves, face shield, and apron.
- Discard chemical tags/cards.
- Fill out chemical log sheet.
- Disable wbflexcorr-2.
Facilities
This bench has the following facilities: HF acid waste drain (awhf-f13), acid waste neutralization drain (awn-f15), deionized water (dih2o-f9), scrubber exhaust (exhsc-f16), house nitrogen (hn2-f1).