Neutral/True Pacifist
Last updated July 17, 2021
Introduction
Neutral, also known as Any%, is the game’s most popular and most competitive category. It is also one of the most difficult, containing many frame-perfect and pixel-perfect tricks. It is the shortest category of the main 5 categories, with the world record clocking in at under 53 minutes.
True Pacifist is the most difficult and second most popular category, and is similar in a lot of ways to Neutral. It’s around half an hour longer and contains True Lab, date segments and the Asriel boss fight. Route differences between Neutral and TPE will be marked in bold.
>> TIMING STARTS WHEN SELECTING “YES” <<
Ruins
The most RNG intensive part of the game.
After hitting “Yes” at the name selection, you should hold right, so you can start moving as soon as possible.
Walk down the hallway to the right. Enter the doorway. Walk up towards Flowey and begin his dialogue. Mash the text and begin the battle.
Mash away the text as soon as Flowey talks to you. After Flowey winks, you won’t be able to mash the text away. Instead, repeatedly press Z and Enter, so you will end the text as soon as it reaches the end.
After Flowey winks, you will want to position yourself a little bit to the right of the top left corner. Being here will ensure that you get hit by the bullets friendliness pellets as soon as possible.
After being hit by the friendliness pellets, hold down and left. Moving to the bottom left corner and holding down the down and left arrow keys will make the circle attack hit you quicker than normal.
After being hit, prepare your mashing once again. Once Toriel appears, mash away her text.
You can hold up while mashing the text to move upwards as soon as you are able to. After mashing away Toriel's text, follow her upwards into the next room.
The beginning of Ruins
In the first room, walk up the staircase around the save point and into the door. Don’t bother saving, it just wastes time. In the next room, mash away Toriel’s text and hold up. You don’t need to move left or right to enter the door.
This next room is a bit hard to do optimally. Hold up and right as you mash toriel’s text. When you get past the bridge, start wall humping and press Z when you pass the switch. Hold down and right until toriel walks out of the way, and then do the same thing for the 2nd switch. After hitting the 2nd switch, hold down right and mash away Toriel’s text.
In the next room, hold up-right while mashing away Toriel’s text and then interact with the dummy. Go to ACT and select “Talk” to spare the dummy.
In the next room, mash away Toriel’s text and follow her. You will encounter a froggit. Flee from the froggit. Mash away her text and watch the hand-hold cutscene. Take a sip of water, staying hydrated is important.
This next room is the hardest room in the game. Walk right and mash away toriel’s text.
The RNG Begins
The next few rooms have random encounters. The monster type is random, and in most rooms it’s random whether you even get one or not. For the first 5 rooms you should pay attention to which monster it is. If it’s a single whimsun or any type of moldsmal, spare it. This saves time over fleeing.
In Neutral, you can also kill a whimsun to save some time. Killing a whimsun loses 3 seconds over sparing it, however it saves 3.8 seconds due to Flowey’s laughing animation at the end being shorter, so overall it saves 0.8 seconds optimally in English versions and 1.1 seconds in Japanese versions. This also has the side effect of making the encounter rates slightly lower in some rooms so that encounters become less common. Do not do this in True Pacifist, as it aborts the Pacifist ending.
In the first rock room, hold up right while mashing Toriel’s texts. Read the sign, and then quickly hold down right. You can push the rock from the top by just holding down right. Reading the sign skips a phone call later in the room.
In the three rock room, ignore the top 2 rocks. Talk to the 3rd rock from the right side, as it’s faster to get pushed by the rock. If you get an encounter while talking to the rock you can perform a glitch known as Rock Skip that saves 1-2 seconds depending on how many times you have talked to the rock to that point.
In the room with the cheese, wall hump and mash Z to interact with the mouse hole. This is not needed, it’s just funny hearing the squeaks.
In the room with Napstablook, walk up to him and mash away the text. Go to ACT and select “cheer” for the first 3 turns, and then on the 4th turn select either “cheer” or “flirt”. Make sure not to select anything else, as that can result in an extra turn at best and 2 minutes of timeloss at worst.
After sparing Napstablook, walk up and right. Ignore the bake sale, it’s not like we’ll see Muffet anyways.
The Rest of Ruins
In the next room, simply walk to the end and mash away Toriel’s text. There’s a small chance you’ll get an encounter here.
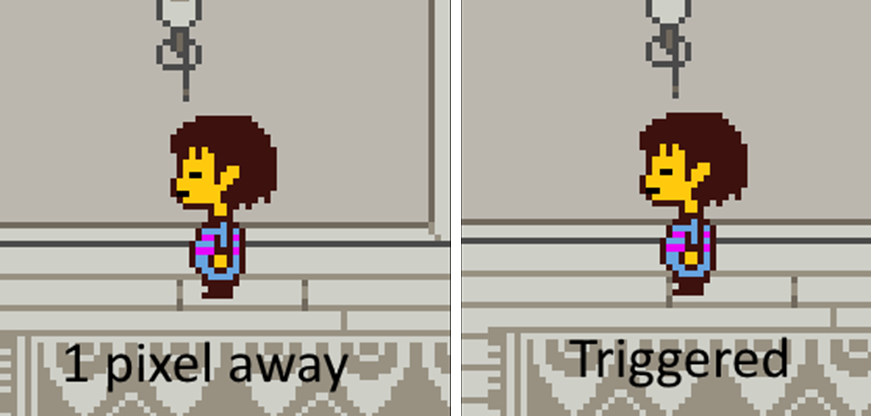
In the room with the six pit traps, move up 1 pixel after entering. You won’t need to move any more to enter the 2nd pit trap, which is where the switch is. Hit the switch and walk out of the room. There’s a pretty big chance you’ll get an encounter here.
In the first perspective room, just walk down left to exit. In the second, interact with the first switch behind the pillar. In the third, interact with the switch behind the pillar at the end of the room. In the fourth, interact with the switch behind the pillar in the top left. The chance of getting an encounter is pretty unlikely, except for the fourth room where one is almost guaranteed.
In the next room, go up-right. Don’t bother with getting the toy knife, it’s not needed.
In the next room, mash Toriel’s text and enter the house. In the house, mash her text and then walk right. After she introduces you to your room, walk back left. Getting the pie is not needed in Neutral, but in True Pacifist it saves lots of time later.
Talk to Toriel in the living room. Count how many choicers she gives you. On the 4th one, select the rightmost option. If you got the pie because you are running TPE, choose the rightmost option on the 3rd choicer instead. If you miss it, you can just talk to Toriel once more and select the rightmost option. Mash her text and follow her into the basement.
Keep following her and mashing.
The Toriel Fight
This is the most RNG intensive part of the game, but also the last major RNG part. Keep sparing her throughout the fight, other options are pointless.
Toriel has many different attacks, but there are 2 we’ll be looking for: her hand attacks. You’ll want to run into the hands as soon as possible, since running into them ends the turn immediately, saving time. Each hand saves about 5 seconds.
The entire battle is 13 turns long, but the 13th turn is always harmless so realistically it’s only 12 turns long. You can get 6 non-hand attacks before losing time.
A good strategy is to count the turns in your head. When you’re at the later turns and your HP is still pretty high, start taking damage. The goal is to be at 3 HP entering the 12th turn, since getting hit at 3 HP also causes a turn cancel. Don’t worry about this if she’s giving you lots of hands.
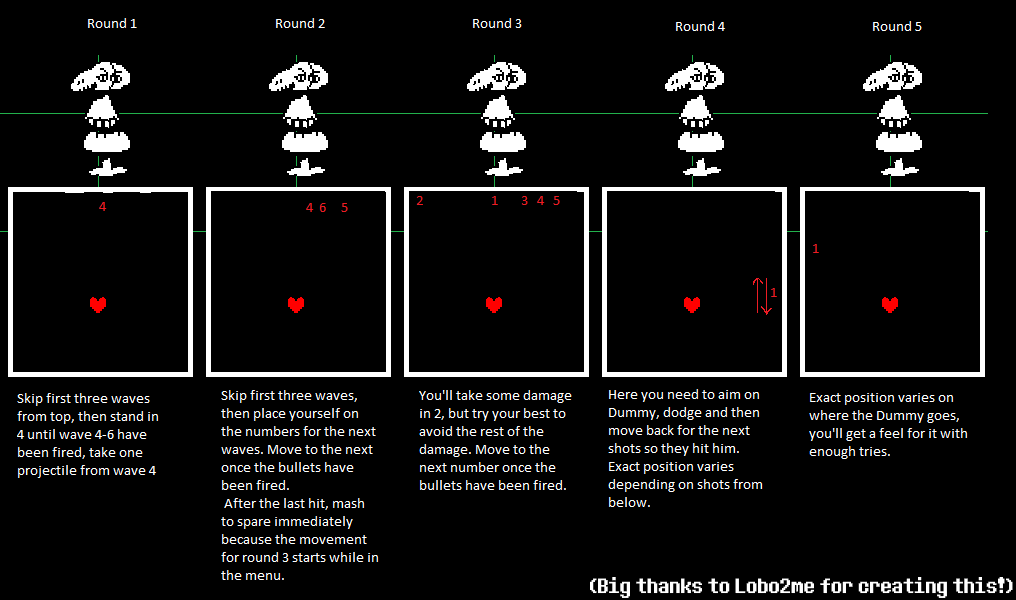
There’s also another strategy you can do to get 8 hands instead of 6. View the gif below.
In this attack, the hitbox that spawns the fireballs is bigger than the actual fireballs. That means, with some careful positioning, you can take only 1 HP of damage. This allows you to get damaged by 2 more hand attacks, which saves around 10 seconds with good RNG. Note that this can only be done when you’re at 8 or higher HP, and it can only be done once. Doing it more than once is just a waste of health.
There is an even faster strategy that can potentially lead to 9 hands. Every time there’s a hand attack, there’s a 50/50 chance that a hand will spawn from the bottom. This hand does 3 damage instead of the usual 4. By hitting three bottom hands before reaching 7 or lower HP, you can get up to 9 hands total. If you only manage to hit two bottom hands, you still get a setup for 8 hands and if you only manage to hit one bottom hand, you get a setup for 7 hands. This is the most optimal way to do the Toriel fight RTA, if you’re able to react to the attack patterns fast enough.
After Toriel stops talking, just mash Z and Enter. When the battle starts fading out, hold up and mash away her text. Keep holding up throughout the entire thing.
Walk through the long hallway. Mash away Flowey’s text and enter the door.
Snowdin
Snowdin can generally be viewed as a test of your mashing and menuing abilities
Snowdin Forest
Walk right down the long hallway, be prepared to mash when you meet Sans. You will enter a cutscene with Sans and Papyrus talking. Mash all of their text. After the cutscene, continue right. Sans will talk again right before leaving the room, so prepare to mash again.
In the next room, interact with the save point to bring your health back to full. You will need to have health for a skip later in the game. You do not actually need to save here, you just need to interact with the save point.
After interacting with the save point, go over to the box and take out the tough glove. If you have the pie, put it in the box first and then take everything out. This ensures that the pie is the 2nd item in your inventory. Open your menu and equip the tough glove. This will put the stick in the first inventory slot. Continue to the next room.
Mash through the next cutscene, and continue along the path.
There is an 11% chance to get a phone call somewhere in the middle of the path that wastes time. Prepare to mash in case you get the phone call.
There is also an unavoidable encounter in the room. Flee from the encounter.
Doggo
Continue Right. Once you reach Doggo’s house he will appear. Mash the text to start the battle.
Go to ITEM and use the stick. This will make Doggo Spareable on the next turn.
Doggo uses a slow sword attack that requires you to be completely still to dodge. You can speed up the attack by running towards the sword but stopping before getting hit. If you get hit by the sword, Doggo will no longer be sparable, and you will have to use the stick on him again. This means you have to take 2 turns on Doggo instead of the normal 1, which loses about 10 seconds.
Spare Doggo. Mash the rest of his text and continue right.
Papyrus’ Puzzles
In the room with the frozen pond, slide across the ice. Sliding across the ice will allow you to move without increasing the step counter, so you do not get an encounter in that room.
In Papyrus’ electric maze room, hold right while mashing to ensure that once the cutscene is over you get shocked by the maze as soon as possible. After the cutscene is over, walk through the maze, mash through the dialogue, and exit the room. The hitboxes of the maze are very generous, so you can cut some corners in the maze and still be fine.
In the room with the ball game, cross the bridge and continue down and to the right, making sure to not get stuck on the snowdecahedron.
In the next room, go right then mash when the cutscene starts. Walk past the paper on the ground. Mash through the cutscene, then continue right into the next room.
Continue right through the room with the cold spaghetti. Don’t bother saving, as it only loses time.
In the Snow puzzle room, immediately head to the switch to the top right of the room. Activate the switch. After that you should encounter the lesser dog. Flee from him. Head downwards and cross the bridge. The Dog Couple cutscene will begin. Mash their text and begin the battle.
There is an alternate strat to attempt to skip the Dogamy and Dogaressa fight. This skip is based off of getting an encounter on the same frame that the fight sequence begins. This skip is based off of rng, and only has a 1/30 chance of correctly working. After interacting with the switch, exit the room. Re-enter the room and hold Down+Right until you stop moving. Hold up until you reach the top of the room, then hold down until you hit the bottom of the room. Finally, hold Up+Right and walk into the cutscene. If you get the skip, you will get an encounter at the same time that you walk into the cutscene. Flee from the encounter, and hold down and exit the room.
Video Explanation: https://clips.twitch.tv/SpikyTrappedEndiveOSsloth
Dogamy and Dogaressa
Once the battle begins, throw the stick. This will make Dogamy and Dogaressa spareable the next turn. Endure one attack. Spare the dog couple.
The axe attack is about 1 second faster than the dogs and hearts attack.
After the battle, mash the text and proceed downwards.
More of Papyrus’ Puzzles
In the first XO tile puzzle room, turn the Xs into Os and hit the switch, then walk over to Papyrus. Mash Papyrus’ text and continue to the next room on the right.
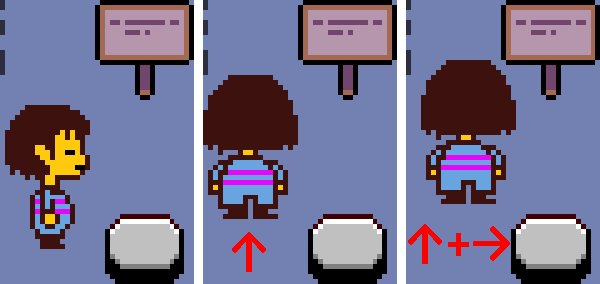
In the second XO tile puzzle room, go to the first tree on the top of the room and activate the switch hidden inside it. Head towards the pressure plate, mash Papyrus’ text, hit the pressure plate, mash some more text, then continue to the room to the right.
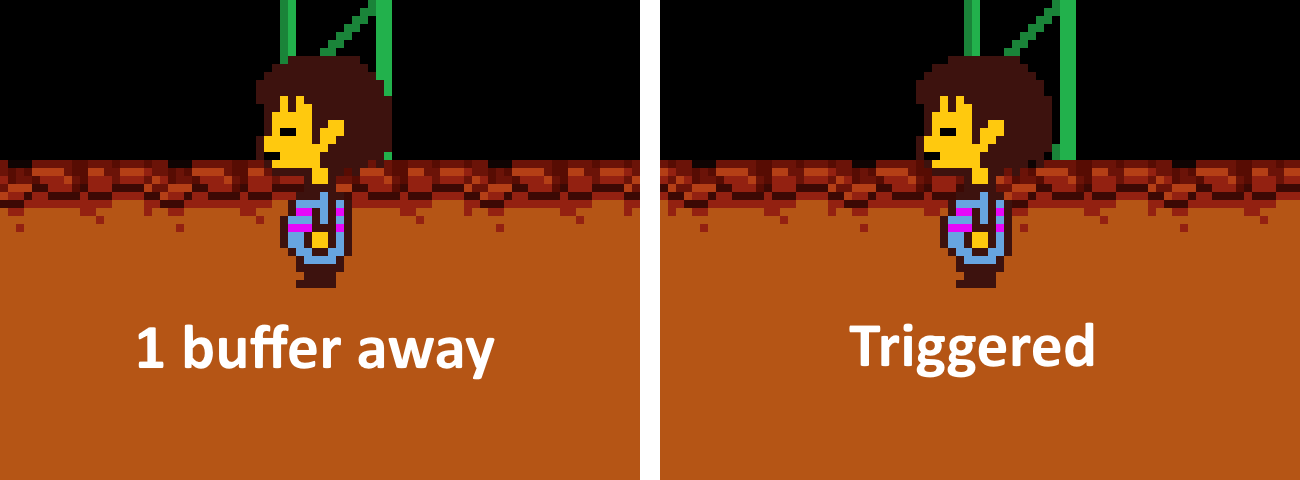
Alternatively, there’s a faster strat for the second XO puzzle. Line yourself up as shown in the images below, then interact with the sign on one frame and press down+right on the next frame. If done correctly, you’ll activate the switch with the textbox still open. Mash away the textbox and proceed right into the next room. Keep in mind that this strat is subpixel-dependent, so it may not work if you run into diagonal collision on the tree or if you teleport into the room using debug mode.
If you’re using v1.0, there’s a different skip you can do in the second XO puzzle room. Walk into the room and walk diagonally into the left side of the tree with the switch. You should bump into the tree and sort of phase into it for a short period of time. During this period of time, you will need to interact with the tree and turn the switch on. After doing this, walk into the pressure plate. You should hit it early, skipping the first part of Papyrus’ dialogue, and skipping to the second set of dialogue. Amusingly, Papyrus will fly across the top of the screen.
The next room is the Colored tile puzzle room. Walk across the bridge and mash Papyrus’ dialogue. You will want to be careful here. He will ask you a question after a large amount of dialogue. Answer the 2nd choice. After this, another large set of dialogue will need to be mashed away. This is followed by yet another question. Answer the 2nd choice to this question as well. If you accidentally enter in the 1st choice on either question, you will have to wait out the color tile puzzle cutscene, which loses a large amount of time. After Papyrus exits the room, walk right past the tiles and enter the next room.
Ice Puzzle Skip
This is a simple, yet somewhat difficult, trick due to it requiring a pixel perfect position. This trick saves 4-5 seconds due to skipping the bridge cutscene after the ice puzzle.
There are 4 ways to do this trick, with increasing levels of precision required.
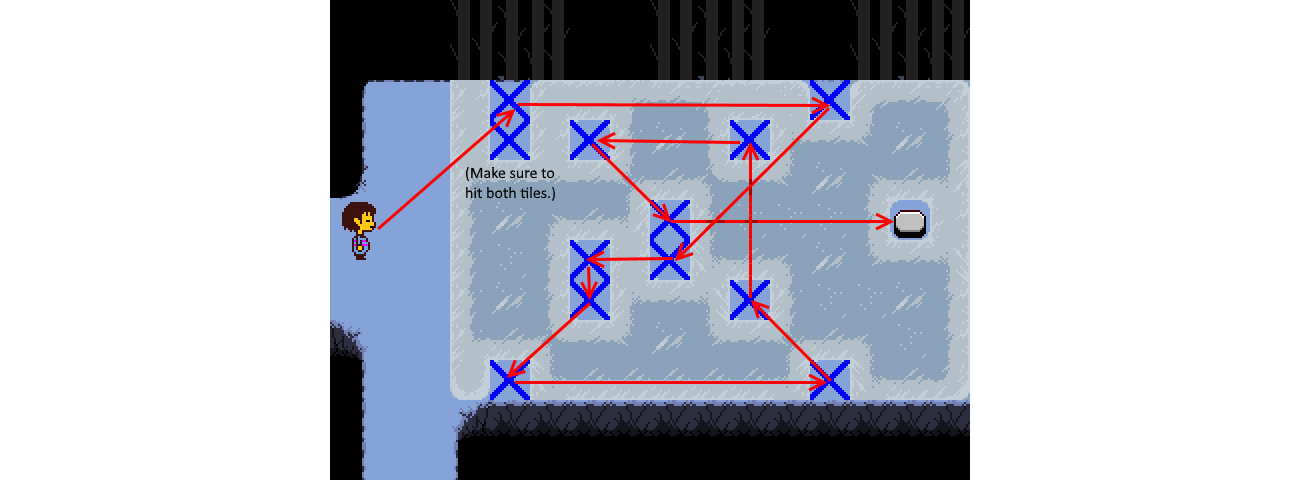
The first method is known as glitchless ice puzzle, and is very simple. Note that as you don’t do the bridge cutscene skip it does lose 5 seconds. It can be done by following the path below.
The second method is known as just Ice Puzzle Skip, and can be performed by following the steps below.
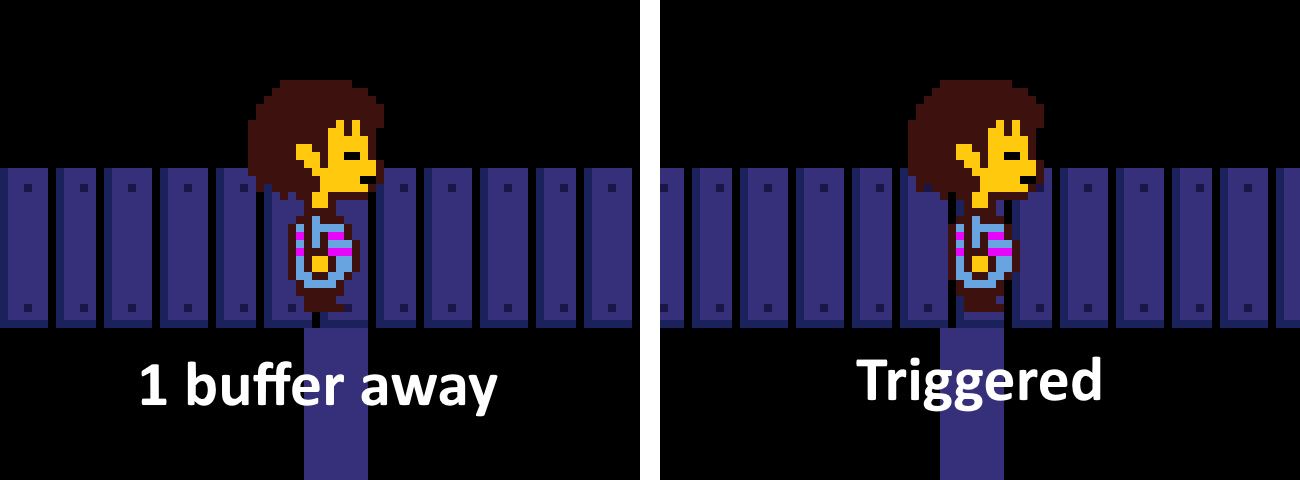
The route you will take can be seen in Picture A.
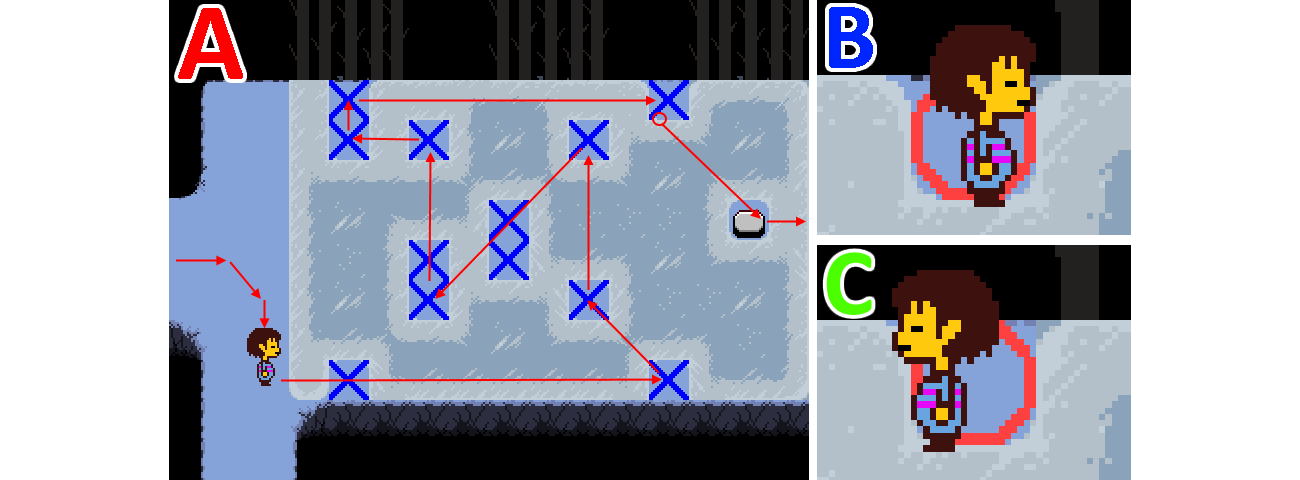
On the second to last tile, stop on the very bottom of that tile then slide to the right.
Once you arrive at the last tile, you should be in a position similar to Picture B. From that position, you will need to move two pixels to the left. The position you will need to be in will look like Picture C.
You can use your menu to ‘buffer’ your steps. Basically use your menu to stop yourself. Hit a direction + the menu button at the same time. Alternatively, you can just move left two pixels without menu buffering, but menu buffering makes it much more consistent.
After being in the right position, press down and right on the same frame. Alternatively you can open the menu, hold down and right with the menu open, and close the menu. You will slide to the pressure plate. While you are sliding, let go of the down arrow key, and only hold right. If done correctly, you will skip the bridge building cutscene, and slide across the bridge like normal.
The third method is known as Icebreaker, and is performed similarly to ice puzzle skip. This method eliminates the need to move left two pixels on the final tile, which can save time for some runners. However, the movement is slightly more difficult. Upon entering the room, hold down to rub against the bottom corner. You then hold right, up+left, up, and down+left. You then have to release left for a few frames when you’re over the top tile in the middle so you can hit the bottom tile. You then continue going down+left, and then up, left, and up again. Stop on the first pixel that activates the top tile, as shown below.
Then, hold right, followed by down+right once you start sliding on the ice, followed by right again after you start sliding again but before you hit the button.
If you miss the bottom tile in the middle while performing icebreaker, there is a backup you can do so you don’t have to redo the entire puzzle. By moving up to a specific pixel on the upper left tile, you’ll be able to move down+right to the tile you missed and up+right to the final tile. Then you set up for the cutscene skip on the final tile by moving down and left one pixel. Video demonstration: https://www.youtube.com/watch?v=lNrOhW_F-TE
The fourth method is known as Masochist Ice Puzzle. This is a very difficult strat that saves only 0.5 seconds. It is not recommended to attempt this trick in runs, as it requires multiple pixel perfect setups and difficult movement. The route for Masochist Ice Puzzle skip, along with the rest of the Ice Puzzle variants can be seen in the video link below.
Video demonstration: https://youtu.be/P5Iv7FLZ1dI
If you mess up and fall after triggering the bridge, walk back up and just go across to the bridge.
Greater Dog And The Last Room
Walk to the right and go to the snow poff blocking the exit to the room. Try not to get caught on any other snow poffs on the way there.
Watch the cutscene and begin the battle.
On the first turn, throw the stick at Greater Dog to make him spareable the next turn. After this you will get one of two turns. If you get an attack with a sleeping dog at the bottom of the frame, run into the dog to end the attack early. If you get a spear attack, get hit by the spear or dodge it, it doesn’t matter. The sleeping dog attack is around 3 seconds faster. After the attack, spare Greater Dog.
Alternatively, you can use the Ignore ACT on Greater Dog 4 times in a row. If you get all three sleeping dog attacks, you save about a second over using the stick to spare, but there’s only a 1 in 8 chance of this happening.
After the battle, walk right and exit the room.
In the Gauntlet of Terror room, walk across the bridge and trigger the last cutscene of Snowdin's Forest. Mash all of Papyrus’ and Sans’ text. Hold right as the screen slides back to you, and proceed right to Snowdin Town.
Walk right, past the shop and the inn. Don’t use the save point or the box. Use the igloo to get to the other side of town faster. After leaving the igloo exit through the right side of town.
Papyrus Fight
Walk down the hallway. Once the silhouette of both Frisk and Papyrus appear, Papyrus will begin to talk. Mash all the text and begin the battle.
This is the easiest boss fight in the entire run.
Select ITEM and throw the stick at Papyrus. Mash away the text. Papyrus’ speech bubble contains unskippable text but you will be able to end the dialogue very early, so mash Enter and Z.
If you accidentally use SPARE instead of throwing the stick, Papyrus will use his blue attack which can lose upwards of 12 seconds.
After throwing the stick, purposely run into the bones and take damage. Repeat this for 2 more turns. On the 3rd turn you will be put at 1 HP, and Papyrus will send you to his garage.
After being sent back to Papyrus’ garage, head back to him and mash his text again. Once you are in the fight with him, spare him instead of throwing the stick, and purposely get knocked down to 1 HP. Repeat this process one more time.
When you return to him the 4th time, Papyrus will let you choose to fight him again or to not fight him again. Choose the second choice to not fight him again. You need to be careful here because choosing the first choice to fight him again will cause you to lose almost a minute.
After choosing the second choice, Papyrus will give up on fighting you and spare you. Mash the large amount of dialogue. After that Papyrus will fly away.
In Neutral, go right and proceed to Waterfall. In True Pacifist, walk left to start the Papyrus Date.
Papyrus Date (True Pacifist only)
Go to the front of Papyrus’ house and talk to Papyrus. Mash away his dialog and enter the house.
Go straight to the top left door and interact with it. Mash away Papyrus’ dialog and enter the door. Interact with him to start the date.
As soon as the date begins, press C. After that just keep mashing and mashing and mashing. When he asks you to search for his secret, interact with his chin. Any part of his head will work. 2 choicers will then appear. For the first one, you can just mash through it. For the second one, you’ll want to select the right option. This saves about 2-3 seconds. This is known as “spaghetti skip”.
Mash his dialog after that. The screen will turn to white and unskippable text will appear. Just mash Z and Enter for this. After the screen goes to normal, keep text mashing until the date ends. After the date ends, exit the house and continue right to Waterfall.
Waterfall
Waterfall is where the glitches come out and the fun begins
The Beginning of Waterfall
Keep walking right. Don’t save.
In the Waterfall and falling rocks room, hold right until you get to the middle of the waterfall, then press up a bit and go back down a bit when you’re about to reach the end of the waterfall.
The next room contains a major skip called Sea-grass Skip (SGS). This skip saves 30 seconds, and involves using an item or the cell phone in a 5 frame window before a cutscene starts, allowing you to skip the cutscene.
There are 3 methods to perform SGS.
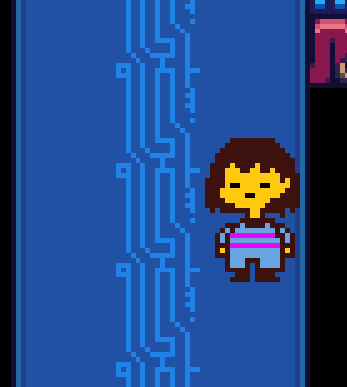
The first method is known as the 5 Buffer Method. To perform this method, first enter the room and start the cutscene as normal. It saves 7-8 frames to walk all the way to the top before entering the papyrus cutscene. After Papyrus walks away, move 5 pixels to the right. You can either tap right or menu buffer right. You’ll know you’ve gone far enough when the gem on the wall is aligned with the left edge of the screen, as shown in the image below.
Next, press Ctrl+Right+Enter all on the same frame to move to the right, open your menu, and select the highlighted menu option, and then mash Z/Enter to use the cell phone. You only have 5 frames between moving right and the cutscene starting, so you need to perform this quickly. If you performed SGS correctly, you’ll see text on the screen as the camera pans to Undyne. Mash away this text and continue to the right, making sure to stay on the lower half of the path to avoid running into the save point.
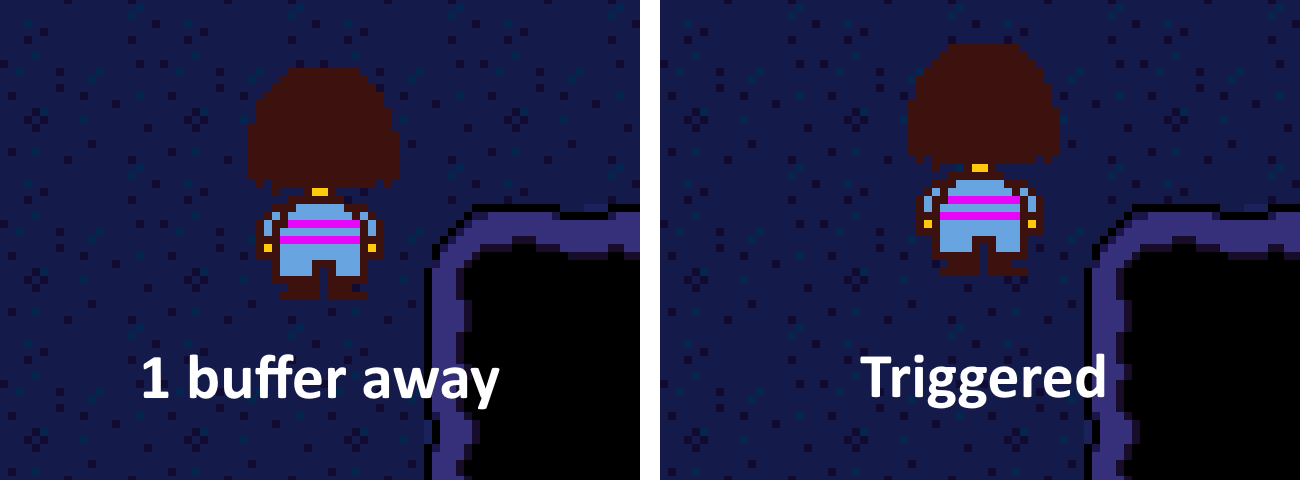
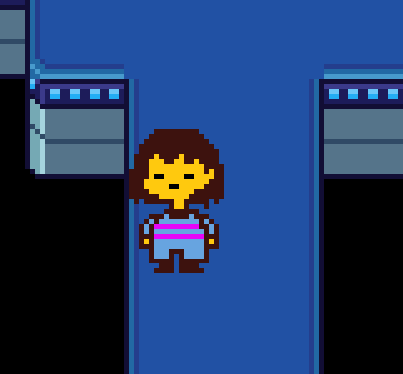
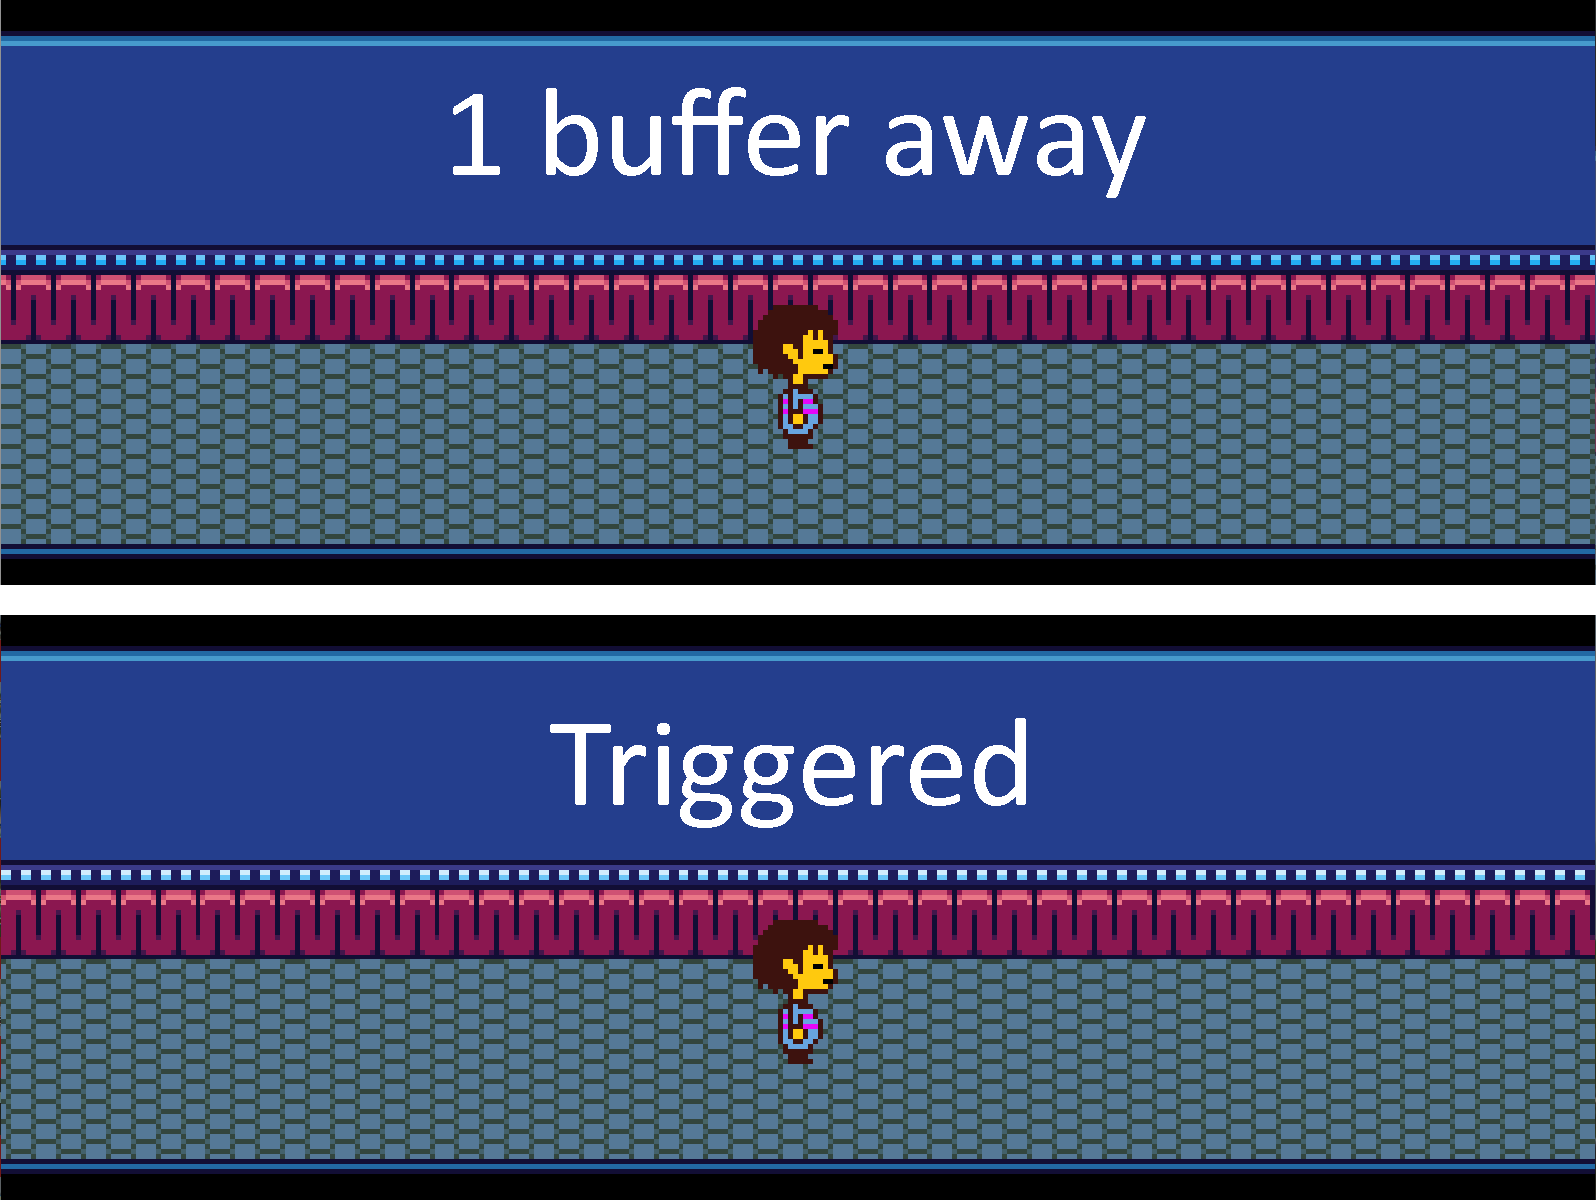
The second method is known as the 1 Buffer Setup or Shayy Setup. When you enter the room, move up only 2 pixels. Then start the papyrus cutscene. After the cutscene ends, hold down until you hit the wall. You will then be lined up perfectly so that the next buffer in any direction will trigger the seagrass cutscene. Perform the buffer the same way as the previous setup. This method saves time due to requiring less buffers, and is considered to be safer.
The third method, the fastest but also the most difficult, is known as the 0 Buffer Setup. When you enter the room, walk all the way to the top. Walk into the papyrus cutscene, and mash away his text. Continue holding right. After walking 5-8 frames, press C+Z and then enter, or Ctrl+Enter and then Z. This method only saves a second over the previous 2.
After performing the skip, mash away Papyrus’s text and exit the room.
Video demonstration for the 3 setups: https://www.youtube.com/watch?v=wvfPUieqiZs
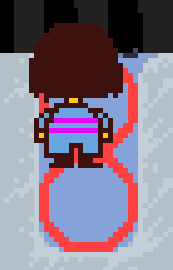
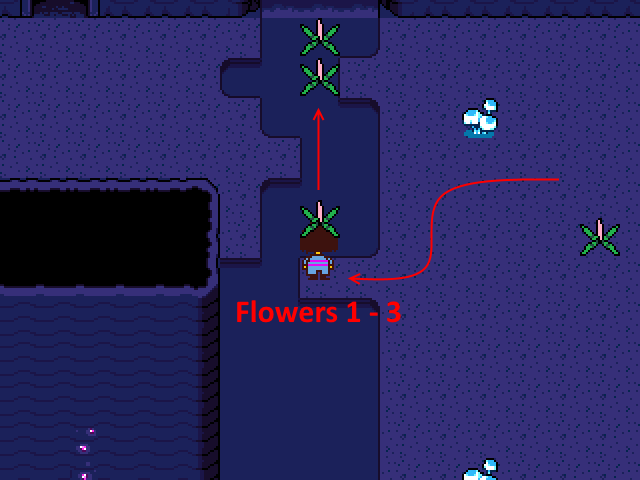
In the first flower bridge room, construct a bridge of flowers across the center. The pickup and placement of the flowers can be a bit finicky, so be careful. Hold right as the flowers are blooming to walk onto the bridge as soon as possible. Enter the next room on the right.
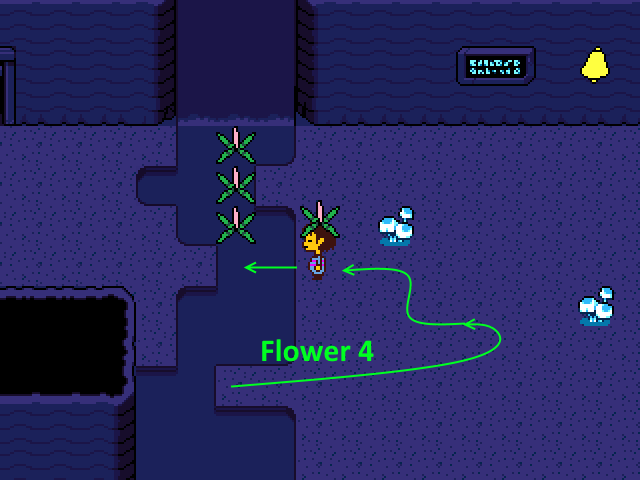
In the second flower bridge room, go right towards the bridge. You will get an unavoidable encounter just before the bridge. Flee from the encounter with Aaron. After walking across the bridge, go up and towards the flowers. Throw the flowers upwards from the bottom ledge extending from the right. With the fourth flower in hand, throw it from the right and complete the bridge. After dropping the 4th flower, you can drop the stick for a small timesave later. Keep the stick in TPE.
After crossing the flower bridge in the second flower bridge room, you will get a phone call from Papyrus. Mash Papyrus’ text and go through the doorway at the top.
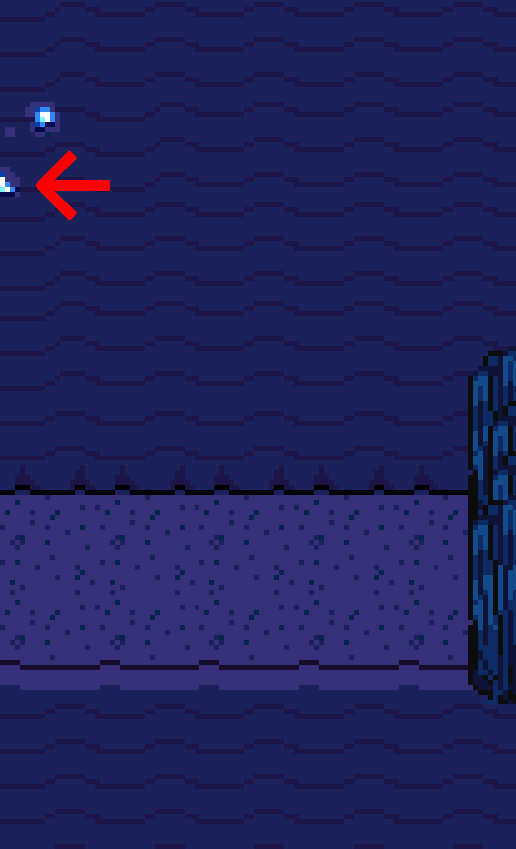
In the telescope puzzle room, go right and skip the telescope. Head upwards at the turn and go towards the secret exit. You will get an unavoidable encounter with Woshua somewhere near the telescope. Flee from Woshua. Interact with the wall at the top to reveal the hidden doorway. Enter the doorway.
In the Bridge room, head right and ride the wooden platform over to the right. Exit the room through the right.
In the long bridge room, Undyne will stop you for a cutscene, then throw spears at you while you run to the next room. You need to minimize the amount of times you get hit by the spears and to minimize the time you spend stopping to avoid spears.
Two things worth noting: 1) Undyne’s spears have a bit of RNG involved with them, but the differences aren’t huge. 2) Frisk’s hitbox is weird; They can get hit slightly below their feet, and the majority of their head doesn’t really seem to have a hitbox.
In the second room of the chase, literally just hold right to avoid the spears. After avoiding the spears and reaching the end, keep holding right so you will move as soon as the cutscene ends. After exiting the patch of grass, Monster Kid will come out of the grass and talk to you. Mash his text and then exit the room through the right.
Don’t bother saving in the crystallized cheese room unless you have taken a lot of damage in the spears chase scene.
There’s a 1/100 chance that you will walk into a special hallway after exiting through the right. This hallway will waste about 5 seconds to transverse. In addition to the 1/100 chance, there’s a 1/10 chance that a special door will appear in the hallway. Entering this door will lead you to Gaster. Whether or not you take advantage of the 1/1000 chance to interact with Gaster is up to you. If you get the special hallway, exit and re-enter the room. This is faster than walking through the hallway.
The Punch Card
In the room with Sans and his telescope, walk past Sans and go up into the doorway.
In the Nice Cream Man’s room, walk up to the left and talk to the Nice Cream Man. Buy one nice cream and go to the box at the right side of the room. Interact with the box and take a Punch Card out. If you dropped the stick earlier, you can eat the nice cream on the way to the box. Go back down the hallway and exit the room.
You have now obtained the Punch Card, the item used for most of the major glitches in Undertale. If you are unfamiliar with the glitches surrounding the Punch Card, see the Glitches and Exploits part of the main page. Practice is recommended.
After returning to the room with Sans and his telescope, if you haven’t dropped the stick, open the box to the left of you. Dump everything in except for the Punch Card. If you want to be safe, you can take the nice cream back out of the box for a heal later.
For True Pacifist, put everything in the box except for the Punch Card, and then take the stick and butterscotch pie out. This should place the pie as the 3rd item in your menu. This is so you don’t accidentally eat it when doing some punch card tricks.
After that, you can then perform an overflow to perform an OWW into the next room. Note that the choicer will have to be on “No”, or else you will softlock.
In the next room with the assorted bridges and talking flowers, go right, then head downwards at the bridge. Don’t get the Ballet Shoes, it wastes time. After you turn right at the bottom of the room, you will get a phone call from Papyrus. Mash his text and continue onwards. You will get an encounter on or after the 3rd bridge you cross in the room. This encounter will always be two moldsmalls. Spare them immediately after gaining control of the battle. Proceed upwards after the battle. Exit through the top.
Onionsan Skip (PCE)
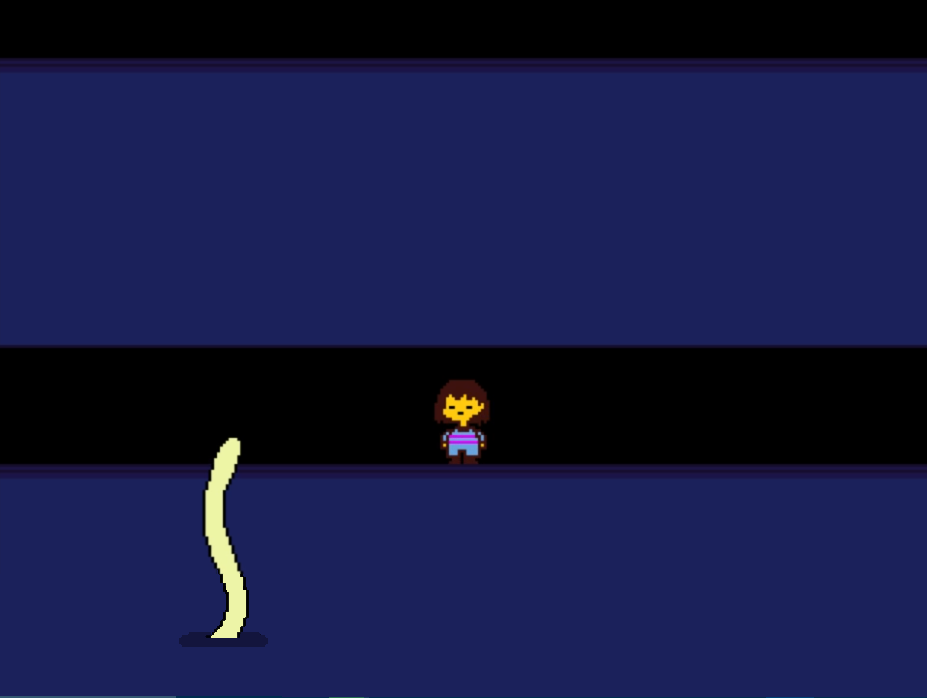
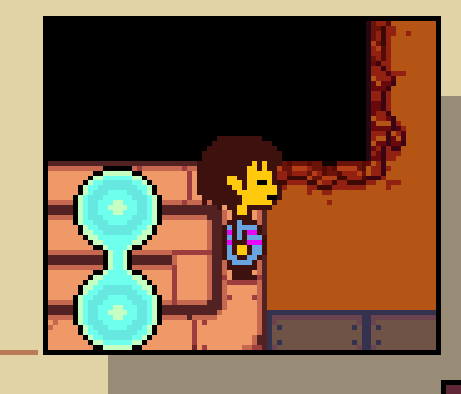
The next room is the Onion-san room. This is the first PCE skip of the run, and it is one of the most difficult PCEs. Walk into the room and head right. You will notice a tentacle rise out of the water under you. Watch this tentacle as you hold right. When the top of the tentacle reaches a little bit over the bottom of the land bridge you’re walking on, you will be on the trigger. It’s important to watch the tentacle, and to PCE when it reaches the top. If you PCE early, just buffer to the right and keep PCEing until you successfully PCE the cutscene. You will hear a ‘splash’ sound and can see the tentacle start to move down when you have successfully PCE’d the cutscene. After hearing the splash, immediately hold right and mash as the text comes up. If you stop or go too slow, you will softlock. See the exact frame you will hit the trigger in the image below.
The next room is the Shyren room. Go right. You will encounter Shyren right after moving up or down to navigate the square in the room. Flee from Shyren. Don't go up, continue to the right. Enter the next room.
Walk right in the statue room and go to the next room.
Don’t grab an umbrella in the room with the garbage can full of umbrellas. Walk right to the next room.
Monster Kid Skips
In the first rainy hallway, walk up against the top wall. This will make monster kid run behind you faster, in case you don’t get the following skip.
The first rainy hallway room contains a sort of awkward PCE that isn’t consistent. You can attempt to PCE the scene where monster kid talks to you but sometimes you just cannot get onto the right pixel in the pictures below. This skip only saves around .5 to 1 seconds so it’s not entirely worth it. If you do get the PCE, open the punch card again performing a PCA, and mash away the text. The 2nd trigger in the room is not worth PCEing at all. Exit downwards.
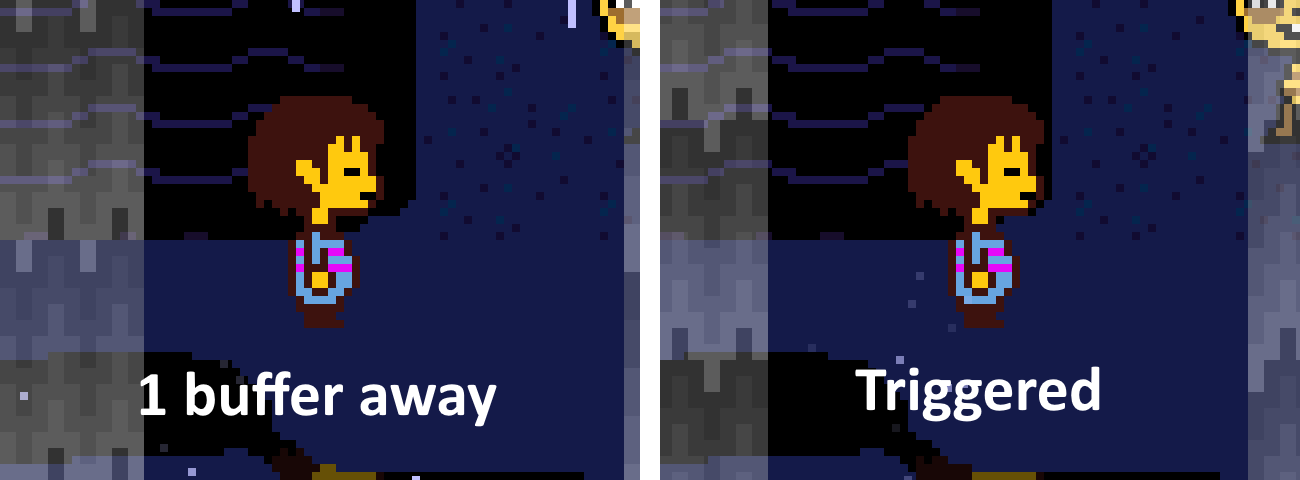
In the second rainy hallway room, walk downwards. Once you pass the talking flower that’s to the right, Monster Kid will stop and look at the flower. After a short period of time where Monster Kid is about ¼ of the window away from the top of the window, open your menu and use the Punch Card. Monster Kid will then talk to you after using the Punch Card. Close the Punch Card and walk downwards and mash at the same time. Turn right and mash another set of dialogue. Exit through the right.
In the room with the castle in the background, Wall Hump while moving right to gain a big speed boost. Exit through the right.
In the next room with the ledge, walk to the right and meet Monster Kid right by the ledge. Talk to him and mash the text, then wait for him to talk again. After he talks again, mash his text. Walk up to him and overflow him. After successfully overflowing, close the Punch Card and hold right. You gain temporary noclip during this cutscene so be careful.
Undyne Spear Maze
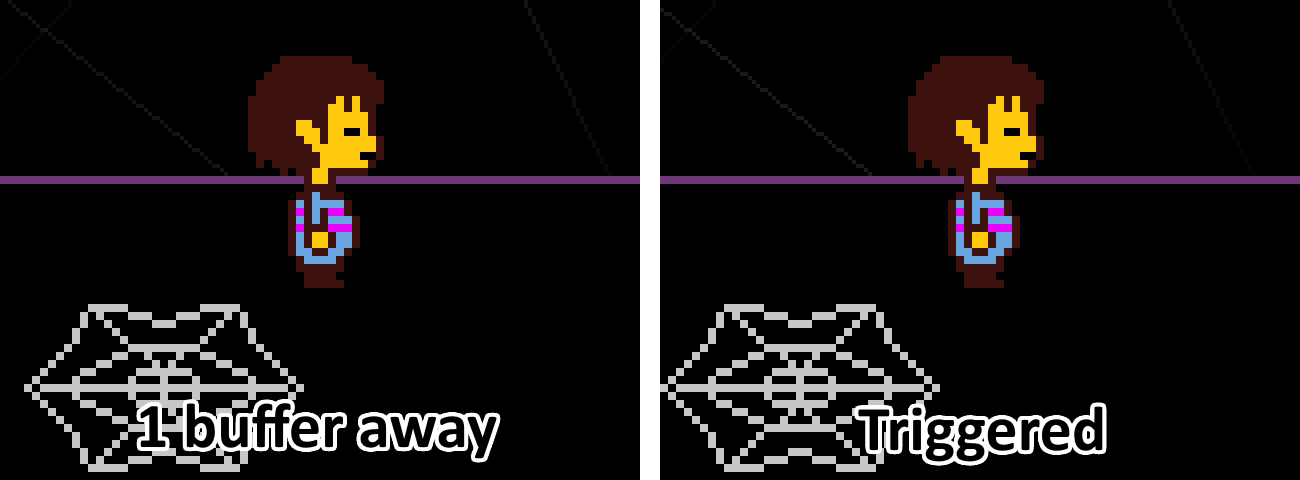
You can PCE the trigger for the cutscene before the Undyne Spear Maze Chase. There is no unique visual cue for this trigger so you have to watch some planks on the bottom bridge to know where the trigger is. On the bottom bridge will be some darker, and more thick, lines. As you walk across the bridge these lines will disappear off the left of the screen. Ignore the first bold line that moves off-screen, and count the lines that move off-screen to the left after that one. On the fifth bold line, you will hit the trigger. PCE when the bold line reaches near the edge of the screen.
Alternatively, you can count your steps. It will take roughly 8 steps to reach the trigger.
When you hear the spears strike and the “danger” sound plays, quickly open your menu and select the “Info” option on the punch card. This lets you set up for an OWW into the next room. The info dialogue box has two textboxes, so clear the first textbox and leave the second open, then continue through the maze.
The spears in the chase are fairly RNG-dependent, but you can easily manipulate where they appear. The game will try to predict where you will move and put spears there but it won’t account for if you’re moving into a wall or anything. So move against a wall and hold the directional key to walk into the wall while still progressing.
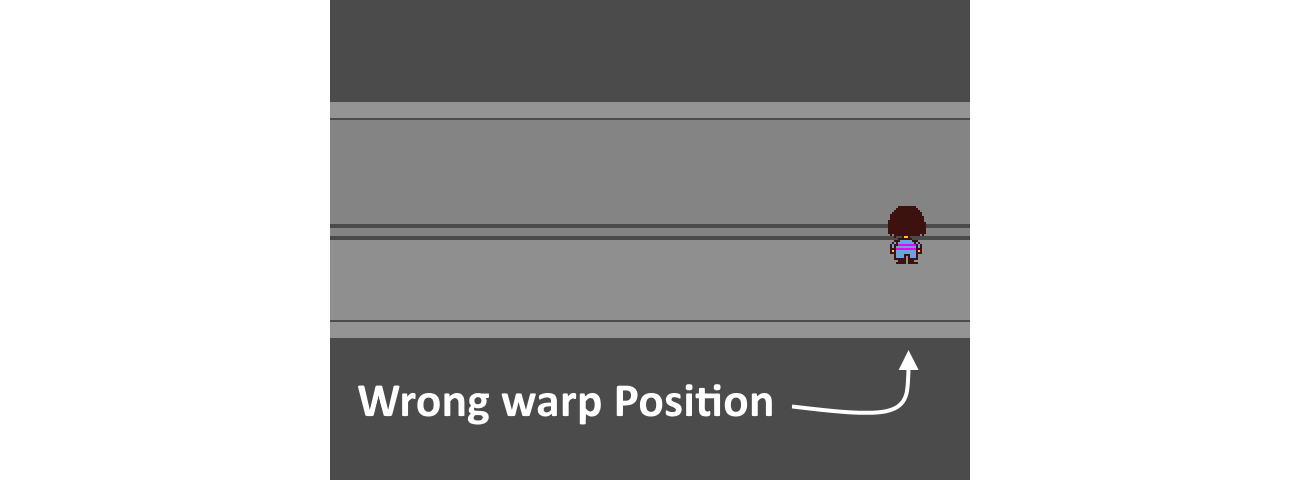
When you reach the room transition after the large open platform, perform an OWW into the next room. This will put you into the wall, so press down+right to exit the wall, then count roughly 14 steps of movement to the right and turn around. If you missed the OWW, keep walking right until you see the third set of spears fade away, then walk back.
If you went far enough, the spears will have stopped. Keep walking left until you activate the cutscene.
After falling from the bridge you will get a short cutscene with unskippable text. Just mash Z and Enter.
After waking up on the pile of golden flowers, hold right and go right.
Mad Dummy
Walk into the Mad Dummy room and walk upwards. You can stop by the orange cooler and get some astronaut food if you feel like you will need some heals. Be aware that grabbing heals will waste time.
On version 1.001 Linux or 1.001 Mac (or any PS4/Xbox version with console overflows), there is a strat for skipping Mad Dummy. For 1.001 Linux on Windows, make sure you’re also using the runner patch or the skip won’t work and you’ll be blocked behind Mad Dummy’s trigger with only his shadow visible. If you are using one of these versions, continue with the Mad Dummy Skip strat below. Otherwise, skip ahead to the 5-cycle Mad Dummy strat.
Mad Dummy Skip (1.001 Linux/Mac and PS4/Xbox only)
Mad Dummy Skip utilizes the persistence glitch, which involves frame-perfectly leaving the room as the battle starts. Before starting Mad Dummy Skip, make sure you save at the save point in the room before Mad Dummy’s room. Optionally, you can overflow this save point, overflow wrong warp into the next room off the last textbox of the save point, and save in the Mad Dummy room. This does not affect Mad Dummy Skip but saves a couple seconds when you reload.
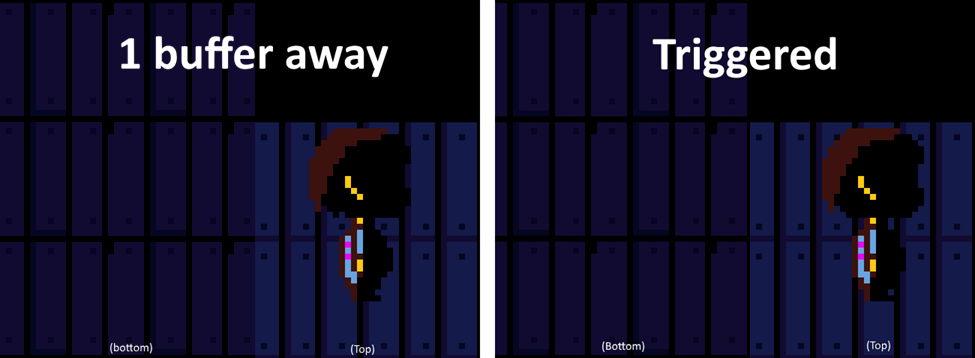
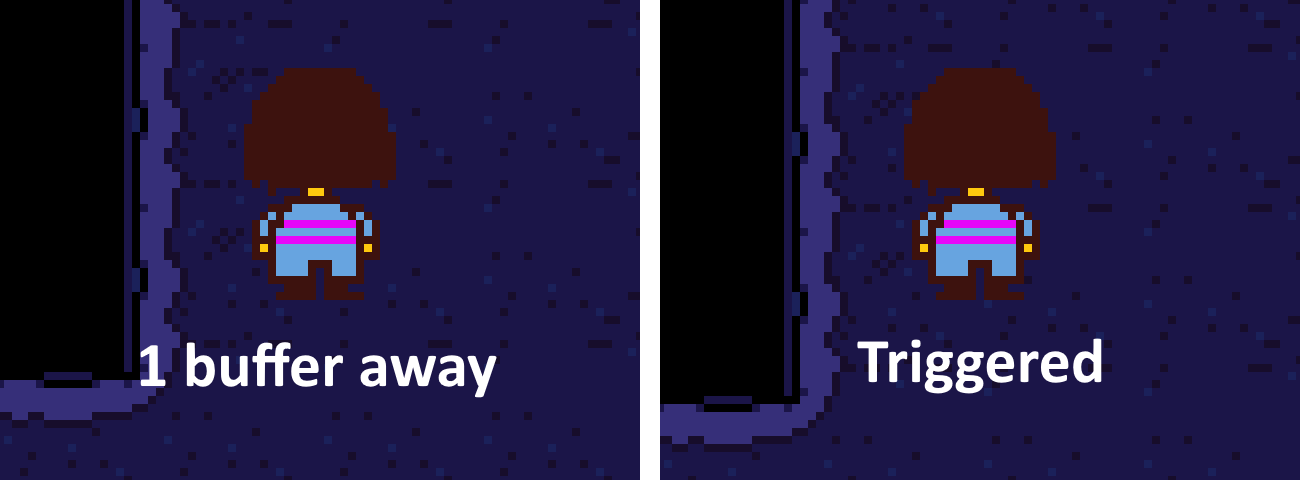
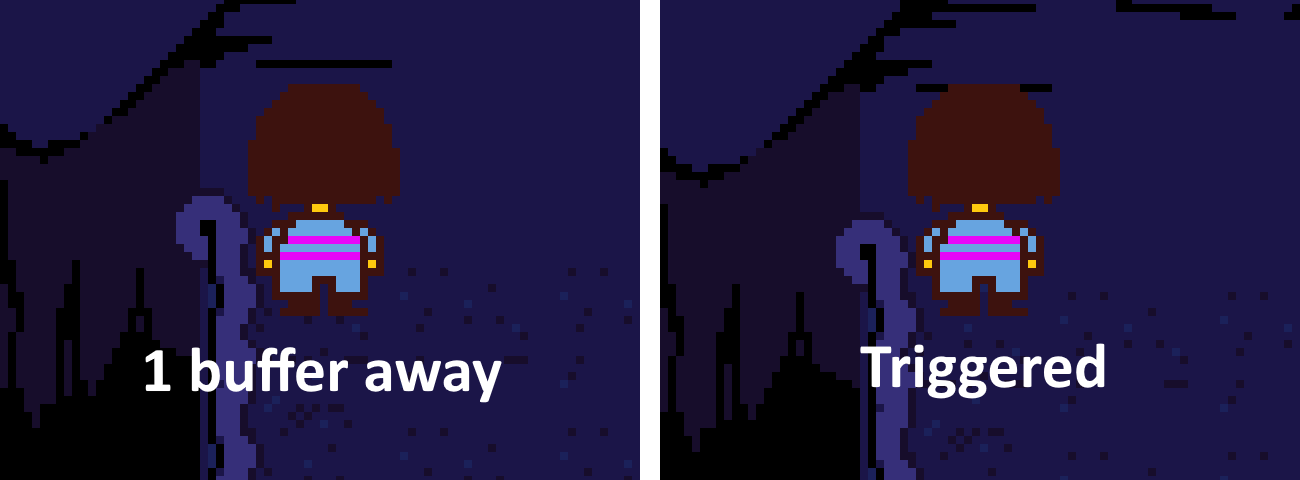
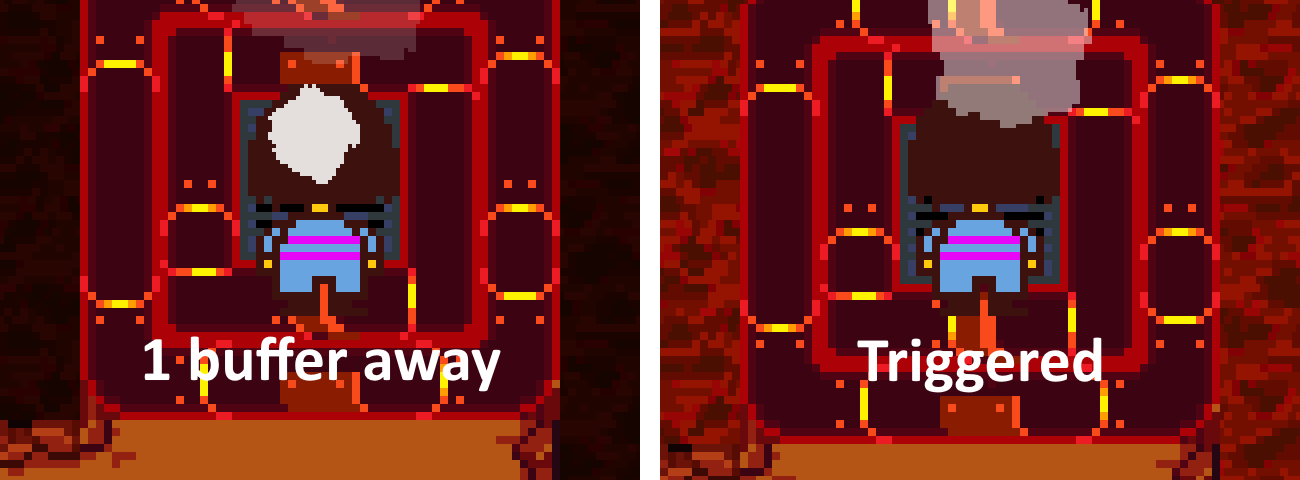
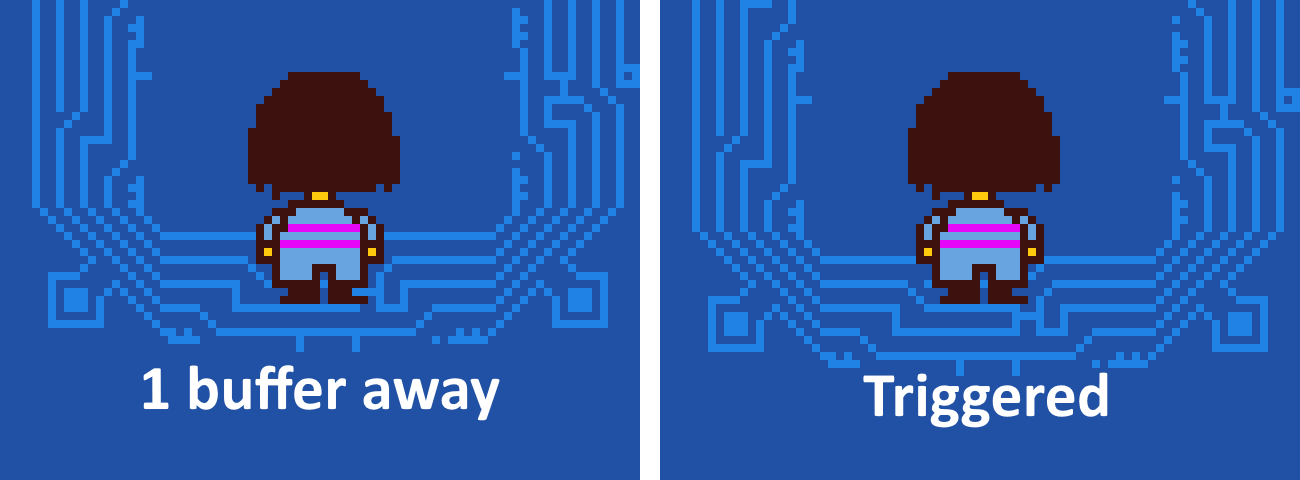
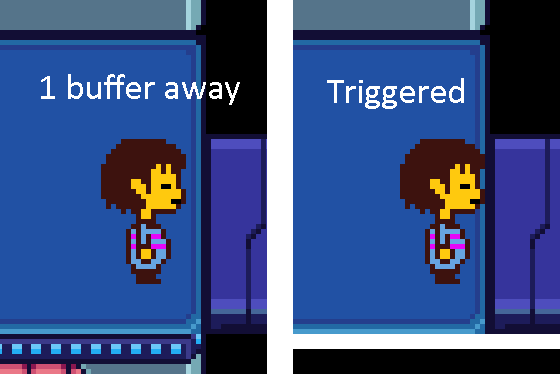
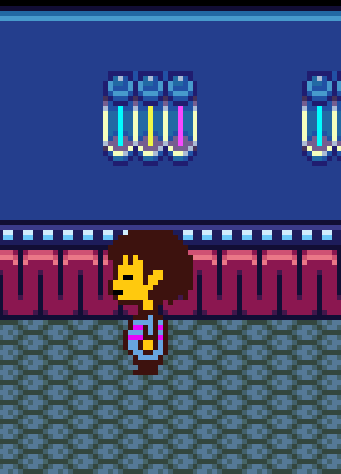
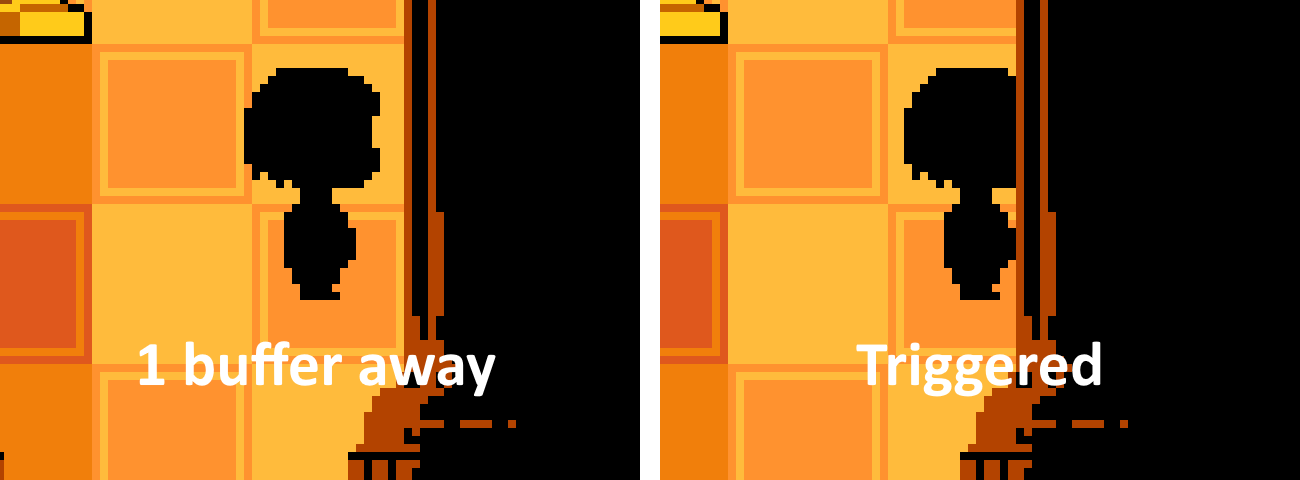
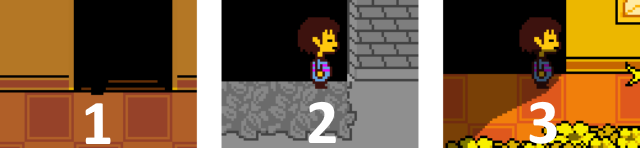
After saving, proceed into the Mad Dummy room. Overflow one of the objects in this room, such as a pile of trash, and keep this text open. Proceed into the Mad Dummy trigger and close the textbox, which will give you movement. You can then speed up the next cutscene by moving down until the anime DVD case is fully onscreen and then moving back up to where the bottom of your feet are in line with Mad Dummy’s head. Make sure you don’t stop too low or the cutscene won’t progress. (See the images below.) Then wait in this spot until the screen stops scrolling upwards. When this happens, start heading down to the bottom of the room.
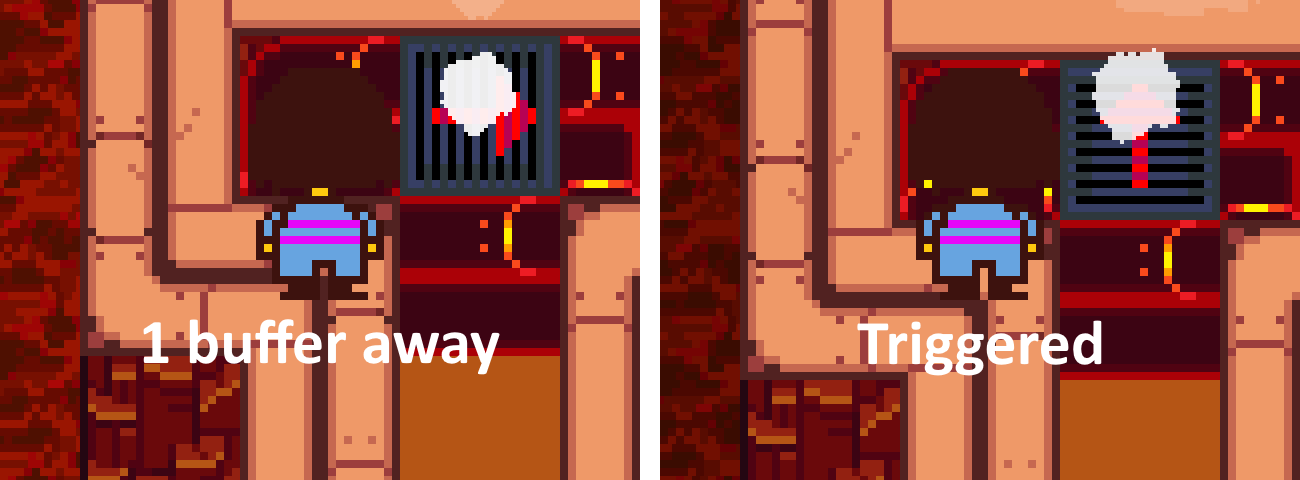
Mash the text but stop at the last textbox. Go down to the very bottom of the room, where you will see a sliver of Frisk’s feet (or the water ripple) underneath the textbox. Once you’re there, align yourself with a particular pixel. The specific pixel used is different for everyone based on reaction times, input delay, and audio delay. By adjusting this pixel, you can calibrate the timing of the skip to your particular setup and reaction times. The end goal of this part of the skip is to leave the room on the frame the battle starts.
With the final textbox open, use a punch card and leave it open. This should close the textbox and start the pre-battle cutscene. Movement will be locked when your soul starts flashing, which is why the punch card needs to remain open. Once the punch card is open, hold Down and Left. Holding Down is important, as this prevents you from respawning on the room transition and softlocking. You’ll then want to close the punch card on a specific cue after the soul flashing, which again depends on setup, reaction time, and personal preference. A good cue to use is the start of the descending tone after the three “hit” sound effects. Another option is to use a timer program such as Flowtimer to consistently time the interval between closing Mad Dummy’s text and closing the punch card. Close the punch card on the cue while continuing to hold Down+Left until you exit the room and enter the Mad Dummy fight. If you enter the room to the left without entering the Mad Dummy fight, you closed the punch card too early or you were standing too far left.
Once you’re in the Mad Dummy fight, you’ll want to die as quickly as possible. Spare Mad Dummy on each turn. On the first turn, make sure to get hit 5 times and also make sure to hit Mad Dummy with bullets at least once. It’s possible to hit Mad Dummy with the bullets that come from the top of the screen, which saves a small amount of time but is RNG-dependent. On the second turn, make sure to get hit 3 times and die.
When you respawn (and enter Mad Dummy room if you saved in the previous room), you should get the post-battle Napstablook text. If you don’t get this text, you may have closed the punch card too late or were too far right. If you do get this text, mash the text away and proceed to the “Napstablook Skip” section below.
Mad Dummy Skip is frame-perfect and requires some practice to be able to hit consistently, but due to the significant time it saves over 5-cycle (about 1 minute 40 seconds), it’s still worth doing if you can get it in the first 3 or so tries. See this video guide for a walkthrough of Mad Dummy Skip: https://www.youtube.com/watch?v=Lj3xbNxFMec
5-cycle Mad Dummy (1.00, 1.001 Windows, 1.02+ excluding PS4/Xbox)
Walk into the Mad Dummy cutscene. Don’t try to PCE the trigger, because you can’t. There’s an invisible wall after the trigger that prevents you from PCEing.
Mash the text from the Mad Dummy cutscene and begin the battle.
Once the battle begins, move to MERCY and Spare the Mad Dummy. You will do this action for the rest of the battle.
In the first phase of the Mad Dummy fight, you are trying to deal as much damage to Mad Dummy using the Dummy’s cotton balls.
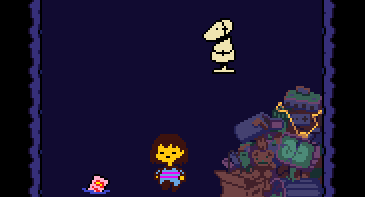
There is a way to complete the first phase of Mad Dummy in 5 attacks. Consult the photo below to see how to complete the fight in the minimum attacks.
You don’t need to hit the dummy in the rocket stages. After the battle, mash Napstablook’s text and proceed upwards.
Napstablook Skip
This skip can be performed fairly quickly right after entering the room. PCE the trigger for Napstablook. After PCEing the trigger, move up and right, and then move right and exit to Gerson’s shop hallway.
Alternatively, you can wrong warp into the room and open your punch card before the cutscene activates. You will gain movement back again after closing the punch card again. This method is slightly faster.
With both methods, you can also use the few moments where Napstablook is leaving the room to wrong warp in the next room. After getting the skip, go right, mash 3 lines of text, then mash the last line of text after you walk a little bit past the sign. Hold up and right as you enter the transition, and let go afterward to perform the wrong warp.
Last Few Rooms of Waterfall
In Gerson’s shop hallway, walk past the shop. Wrong warp into the next room to save a nice bit of time.
After wrong warping into the Double Waterfall Hallway (or simply walking into it), walk right and exit into the room to the right.
In the mushroom puzzle room, you don’t actually need to light up the mushrooms to walk through the room. Look at the image below to see the path you will need to take.
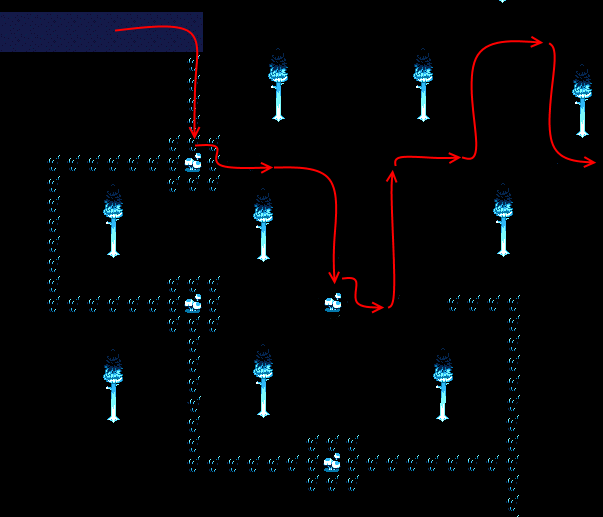
In the lantern room, interact with the lamps as you pass them so you can see where you’re going. Enter the next room on the right at the end of the path.
Flowerflow
In the next room, a somewhat complicated trick called flowerflow is used to shorten the distance needed to walk after the cutscene. Overflow the flower, close the punch card, then open the punch card again while also closing the “Behind You” text. This is done by X and then Enter (or otherwise any button to finish text followed by a button to close the text) in the window where you cannot close the punch card. Next walk towards the left of the room. Be careful not to walk too far that the screen scrolls or the part in the cutscene where Undyne carries Monster Kid away will be longer. Open your menu, ready to use the punch card. You can also use the cell phone instead, which is slightly easier. When undyne starts talking, use the punch card or cell phone and mash through her text. After Undyne has finished talking, quickly reopen the punch card/cell phone. If you do not open the punch card or cell phone fast enough, you will lose movement. Wait for monster kid to start talking and mash away the punch card/cell phone and continue mashing away text in the rest of the cutscene.
Once the cutscene is over, walk left to where the path upwards will be. Optionally, you can info the punch card near the end of this part so that when the path appears, you will have text storage and will be able to OWW to the next room. Otherwise, wrong warp normally into the next room.
If you fail any part of flowerflow, continue mashing away the rest of the cutscene normally. Flowerflow saves 5 seconds.
Video tutorial: https://www.youtube.com/watch?v=gImy8ltZj7c
Monster Kid Bridge Skip
In the Monster Kid Bridge room, PCE the trigger for the cutscene. The trigger is near the last support of the bridge. NOTE: If you wrong warped into the room, you will hit the trigger at a slightly different place than if you just walked into the room. After PCEing the cutscene, walk to the right and go to the next room.
This is the trigger if you wrong warped into the room as most runners do. If you do not wrong warp into the room, the trigger will be 1 pixel to the right.
You can walk back out of the room after the Monster Kid Bridge skip and wrong warp back in to save a tiny bit of time.
Undyne (First Part)
There are a variety of different ways to shorten or skip the Undyne boss fight. This guide will detail three different methods.
First Trigger
Second Trigger
Wrong Warp Position

Safe One Cycle Undyne (1 PCE + 1 Wrong Warp)
- Upon entering the room, walk up the path leading towards the rock structure. Run into the trigger and trigger the cutscene. Mash the dialogue. After the cutscene ends and you regain movement, go down and right and save quickly. Then attempt to PCE the second trigger. If you fail to PCE the trigger and accidentally hit it, restart the game.
- Once you have PCE’d the second trigger, walk into the rock structure, then walk back out. Then, wrong warp back into the rock structure (if you fail the wrong warp and don’t softlock, just walk back out). After wrong warping into the structure, you will appear at the end of the first hallway. Immediately go up and into the next hallway.
- Go to the second part below.
Quick Once Cycle Undyne (2 PCE’s + 1 wrong warp)
- Walk into the room and begin walking up the path. PCE the first trigger. After successfully PCEing the first trigger, immediately go to the second trigger. You will have a small amount of time to know where you are before the screen pans upwards. The time save here is dependent on how fast you PCE the second trigger. If you don’t manage to PCE the trigger before the screen stops on Undyne, stop attempting and just mash the dialogue in the cutscene. If you run into the trigger, your run is over (unless you’re okay with a huge time loss).
- If you manage to PCE the second trigger quick enough, walk into the rock structure and walk back out. Mash through the cutscene and wrong warp into the rock structure (if you fail the wrong warp and don’t softlock, just walk back out).
- In this version you skip the screen panning up to Undyne. This can save either a couple of seconds or less than a second depending on how fast you do it.
- Go to the second part below.
Onedyne (2 PCEs + 1 weird wrong warp + Cutscene skip)
- Note: This version is more difficult than the other two versions.
- Walk into the room and begin moving up the path. PCE the first trigger. You will need to PCE the second trigger extremely quickly after PCEing the first to pull this off. After PCEing the 2nd trigger, PCA Undyne’s text and mash it until you get to the “Here I come” text. This text will disappear 30 frames after it appears, and you will want to be in the room transition when the text disappears. This method saves 20 seconds over one-cycle. A video guide for this method can be seen in the link below.
- https://www.youtube.com/watch?v=-AYXP8BQszo
- Continue to the second part below.
Undyne (Second Part)
After wrong warping into the structure, you will appear at the end of the first hallway. Immediately go up as soon as you can. If you wait too long you will get caught by Undyne.
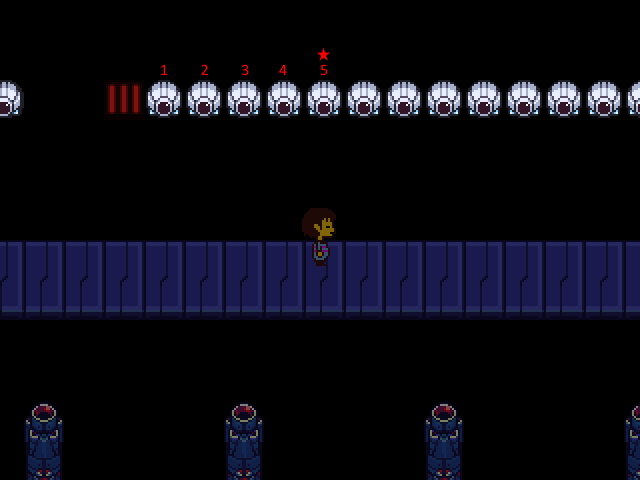
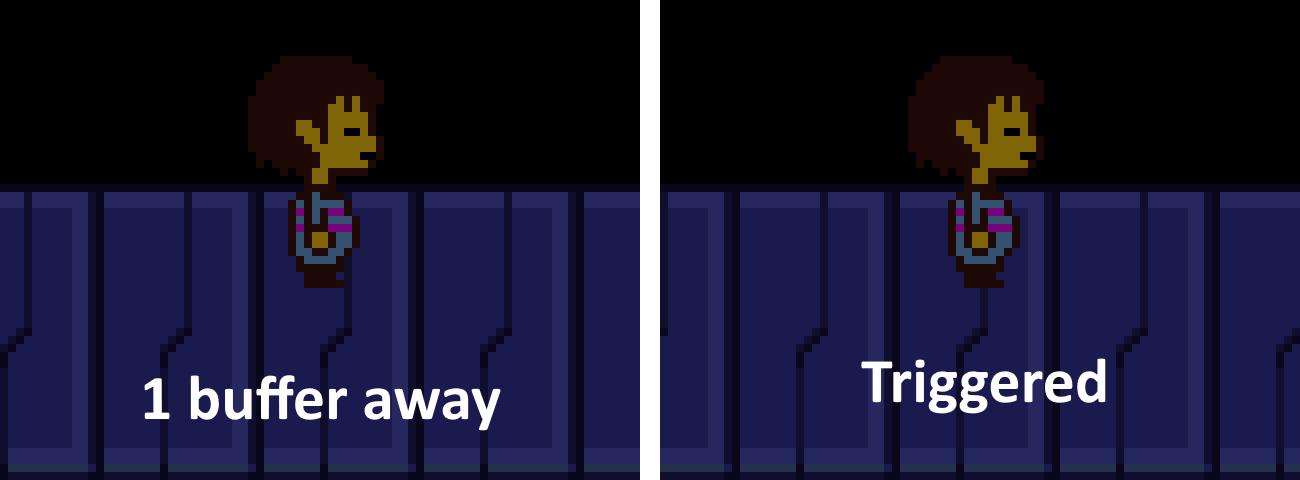
After entering the second hallway, you will need to walk to a specific position in the hallway to abuse an exploit. Once you enter the room you will see a sign. The left end of the sign will have a little notch in the ground under it. This will be the first notch under the sign. Walk to the 4th notch under the sign. Stay there and let Undyne catch you and start the battle. Being here will skip another cycle in the same room. Look at the image below. (Alternatively, you can just stop under the W in the sign.)

Once you begin the battle, end Undyne’s dialogue quickly after she turns you green. Move to ACT and challenge Undyne. Challenging Undyne will make her spear attacks move faster, thus making the attacks end sooner. Attempt to dodge Undyne’s spears as much as possible. Getting hit slows down Undyne’s spear attacks a bit. Keep challenging her for three turns, then move to spare and spare her. On the last turn, take damage to go down to 1-6HP. This is necessary for a skip later.
Once Undyne turns your heart to red, flee from her. Be careful not to spare her.
After fleeing, just hold right. You will get a phone call from Papyrus a short time after fleeing from Undyne. Mash his dialogue and continue holding right. Exit through the right. In the next room, just hold right again. Exit through the right.
In the room with the water cooler, PCE the cutscene with Undyne collapsing on the ground from heat. PCE the trigger for the cutscene and immediately leave the room. If you miss the PCE, don’t bother watering Undyne and just proceed right. In TPE, if you miss the PCE you MUST water Undyne, or you will not be able to complete the ending.
Hotland
Hotland is one of the most glitched parts of the game. You will see many skips.
The Lab
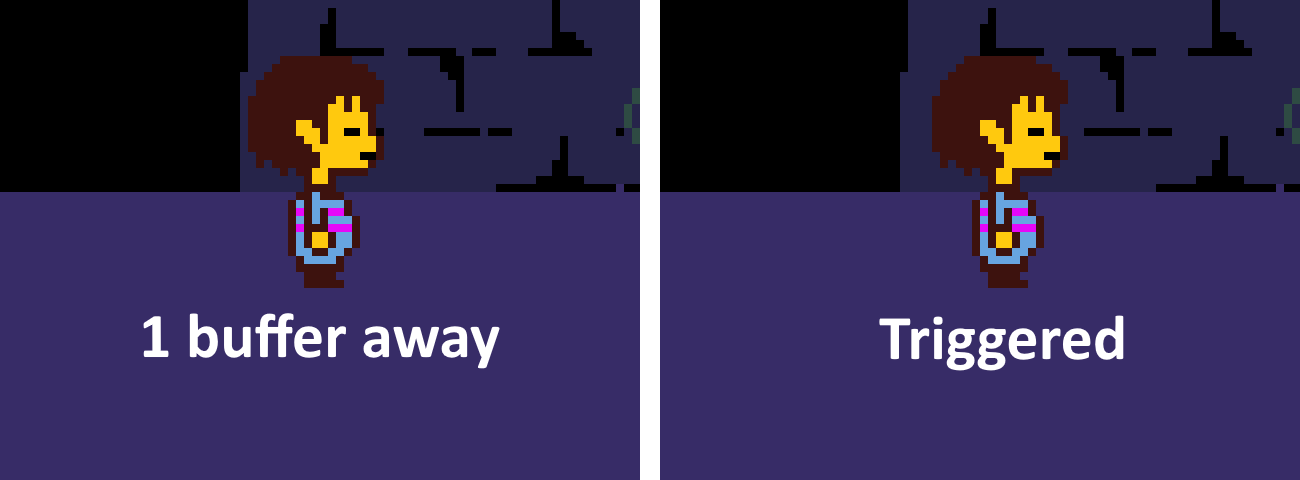
In the Lab, walk right until you get to a dog food bag. On the line after the dog food bag, you will hit the trigger for the cutscene. PCE the trigger and exit through the right.
You can also overflow the dog food bag / some object and walk into the trigger then close the text box to regain movement. This is a bit safer alternative.
Throughout Hotland you will get many random calls and notifications from Alphys. Be prepared to mash.
After exiting the lab, go right and mash the various notifications you get from Alphys, then go up at the turn, and enter the next room.
The beginning of Hotland
In the room with the first set of conveyors, go left. You will get an unavoidable encounter with Vulkin. Once the battle begins, FIGHT the vulkin and hit it as soon as possible. In TPE, do NOT kill Vulkin, as it will abort the ending. It will always die in one hit to the Tough Glove. Continue upwards and exit through the top of the room.
Burnt Pan
In the first vents room, walk up then to the right towards the vents. Don’t use the save point. PCE the trigger for the vent. After doing that, quickly close the Punch Card, and hold down and left. You will be launched out of bounds and below the gap between the two vents. There is a strat you can then do after closing the punch card. When you’re in mid-air, open the menu, go to Item, and select Info. If you succeed, you will have gotten text storage on the punch card info text box. When you get the Tsunderplane encounter, you can then close the text box either when the encounter bubble appears or when the screen starts flashing. This saves about a second.
Video demonstration: https://youtu.be/qc-htBHom24
You must be below the gap between two vents when the vent cutscene ends. Walk down and right off screen until Frisk’s head is only visible, then just hold right. You will get an unavoidable encounter with Tsunderplane. Flee from the battle. Walk right under the trigger for the Burnt Pan room. Once you are under it, hit up to enter the room. If you miss the PCE on the vent, you can PCE the other vent by buffering 1 pixel left, and then holding down and right.

After entering the Burnt Pan room, wait a little bit before walking onto the vent so that the arrow faces left, then walk onto the vent. You should fly over to the Burnt Pan. Grab it or overflow the Pan for a Stained Apron (The Stained Apron is optional but gives more survivability in future battles). Go back to the room with the first set of vents.
Notification Skip
After returning to the room with the first set of vents, use the vent to the left.
Go to the vent pointing upwards. PCE the trigger for the vent. You want to aim for the vent pointing to the left. After PCEing the trigger, hold up and left. Try to fly over the lava and not the floor that you're supposed to walk on. If you fly over the floor, you'll still hit the trigger and will be stopped mid-flight.
You can also PCE the second vent to skip the phone call trigger. There are two options for this, called Safe Strat 69 and Fast Strat 69.
For Safe Strat 69, hold Up+Left briefly after PCEing the second vent, then let go of Up before you go off-screen. This will land you underneath the room transition and will give you movement during the phone call. This version is safer as it avoids the potential for softlocking that’s present with Fast Strat 69, as long as you let go of Up quickly enough.
For Fast Strat 69, there’s a potential for a wrong warp into the next room if you perform the PCE’s optimally enough. You’ll need to continue holding Up+Left after the second vent PCE. If timed correctly (with extremely optimal PCE’s on both vents), you’ll warp downwards through the room transition, wrong warping into the next room.
If you didn’t clear the punchcard fast enough, you can potentially hit the room transition while in the wall with the cell phone call active. If this happens, you’ll softlock. However, you can avoid this softlock if you open the menu on the frame you land, as closing the menu will let you regain movement. You can press C/Ctrl+X/Shift at the same time to close the menu right after opening it. It’s always recommended to attempt the menu strat if you’re going for Fast Strat 69, as it loses no time and can save you from softlocking.
Beowulf Skip
In the room with the lasers, if you are at 1-6 HP, you can do a strat known as beowulf skip. On the second orange laser, open your punch card, and keep mashing until you are in the laser battle. If you are 2-6 HP, you need to make sure you get hit by one of the lasers for the skip to work. After the laser battle, mash away the first set of text in Alphys’ dialogue, but do not mash away the second set of text. This sets up for a faster News Skip, but it will not work if you heal, so make sure to stay at 1HP until after News Skip.
East / West Puzzle Skip
You can completely skip the East / West shooting puzzles games that unlock the big door. Walk to the vent in the room and mash the notifications / phone calls you get along the way. When you are walking upwards, hug the wall to the left. This will align you for the skip. Open the menu on the trigger for the vent. Wait until the arrow is pointing up to use the Punch Card. After using the Punch Card, close it, and hold up. You will fly into the door and enter the next room.
In the next room, walk up and then right. Mash a phone call, then ride the vents to the other side of the room. Exit to the right. You can PCE these vents and walk right for a slight speed boost.
Jetpack Minigame Skip
The skip in this room is one of the more difficult skips to learn, but not the most difficult to perform when you become consistent with it.
Observe the image below. Make note of where things are.
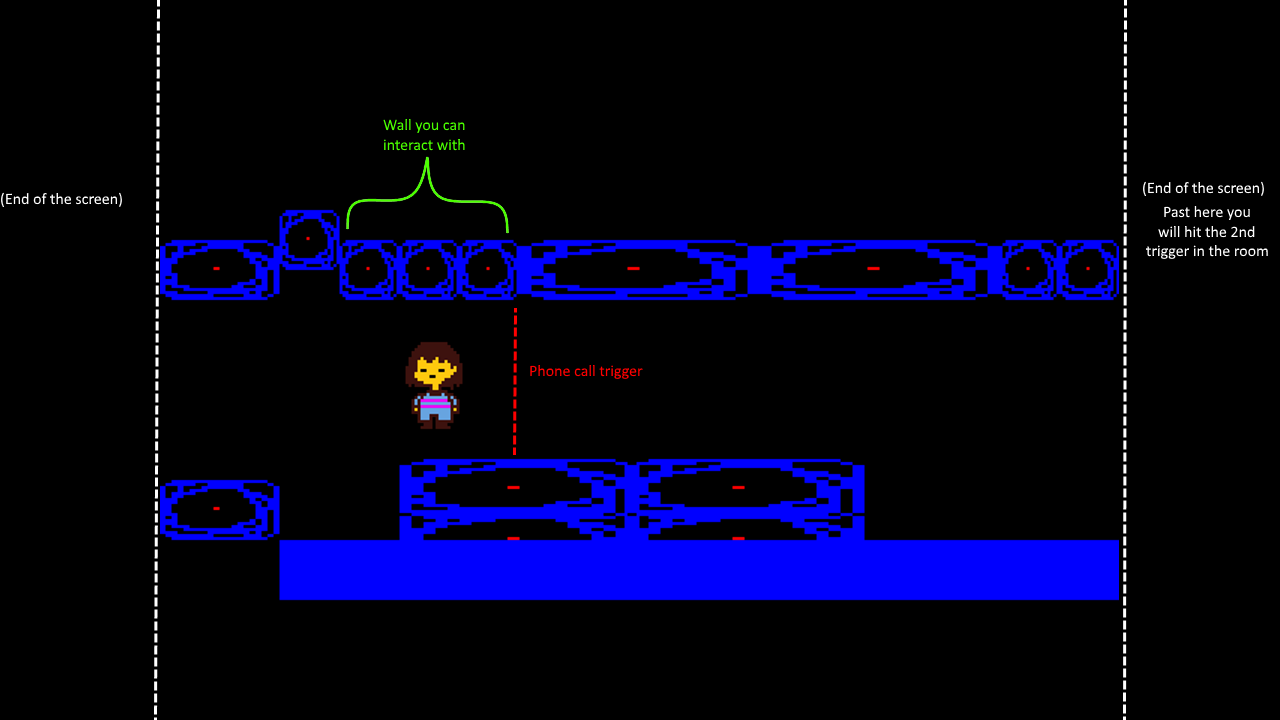
The three blue squares above Frisk can be interacted with. The dashed red line to the right of Frisk is the trigger for the phone call. Past the white dashed line on the right is a 2nd trigger. You need to get past both triggers to completely skip this room. Thankfully, for versions 1.0 and 1.001, there’s a method for that.
First, you need to position yourself beside the interactable wall at the top. Then, you need to overflow the wall. The wall will give you some text. Before this text ends, you need to use and close your Punch Card once again. Do not close the text box. After doing that, walk into the first trigger. Now close your text box. After that, walk to the right. You will hit a 2nd trigger, and the entire room will light up and scroll right. After this happens, mash and close the text box, then proceed right and exit the room.
After doing this skip, you will be unable to open your menu. This is normal.
If you’re using versions 1.02+, you won’t be able to perform Jetpack Skip. Instead, PCE the first trigger and continue right to the second trigger, staying at the top of the room to save a small amount of time. Then complete the jetpack minigame. Unlike jetpack skip, you will be able to use your menu after completing the minigame. In this case, skip the next few paragraphs on going back to floor 1 and instead see the next section for going up to floor 2.
In the next room after the jetpack skip, walk to the right through the rooms until you see an elevator. Go into the elevator.
There is an extremely low chance that you may see special NPC’s in some rooms with elevators. These NPC’s are known as Gaster followers, and they have around a .5% chance to appear. They’re nothing special really, they’re just a rare sight. If you see one of them, make note of them and don’t accidentally run into them. Walk around them and proceed with your run.
In the elevator, go down to Left Floor 1. Exit the elevator and go to the room with the water cooler. After reaching the water cooler room, go to the room to the left of the water cooler room.
Going into this room will give you back your menu. After going into the room to the left of the water cooler room, walk back to the elevator. You can wrong warp in each individual room back to the elevator to save a small amount of time. You will come back to that room 3 times over the course of the run, so doing those small wrong warps will add onto the time save.
Elevator Skip
In the elevator, PCE the interface. To do this, simply hit C and Z at the same time, then open the Punch Card, and close the Punch Card. You will then be able to move when the elevator is changing floors. You can actually leave the room as soon as you select the floor you want to go to and arrive at that floor, so you can skip the elevator cutscene.
You can also overflow the interface for the same effect. Overflowing is more reliable.
Go to Right Floor 2.
Exit the elevator. Ignore Fire Hotsman and go left and exit the room. Simply hold left in Sans’ hot dog stand room. Exit left.
In the long hallway room, hold down and left as you enter the room. Once you have reached the very bottom of the ground you can walk on, just hold left. Doing this will skip some notifications in the room. About ¼ of the way into the room, you will get an unavoidable encounter. Flee from the encounter, and continue through the room. Keep moving left and exit through the left.
Three Switch Room Skip
The next room is the Three Switch Room. There’s a somewhat amusing skip that you can perform in this room that will save a small amount of time. Hold up and left when you enter the room. Mash the phone call you get right before moving onto the moving floor. Once the phone call is done, move on to the moving floor. Hold up and left as you move on the moving floor. Hit the first two switches. Immediately after hitting the second switch, use the Punch Card. You will move while the Punch Card is up. Do not close the Punch Card until you are near the third switch. Close the Punch Card when you are in reach of the third switch, and activate the switch. If you let go of left while you open the Punch Card, the game will crash, so be aware. Hold down and left after moving off the moving floor and take the path leading to the left. By now you will likely be receiving multiple phone calls from Alphys. This is normal. Exit through the left to end the phone calls.
Vent Puzzle Room Skip
Walk up and left after entering the room. Mash the notification and phone call before the vent. Walk onto the vent without hitting the switch. PCE the vent pointing left. After that, hold left. You need to be a bit quick here. After flying towards the other end of the room, you will land on the right of the path. Wiggle your way onto the path by pressing up and down while holding left. After getting onto the path, go left and exit the room. You can wrong warp into the next room to save a decent amount of time.
The save in the Bad Opinion Zone room is a good safety save for what is about to come next. If you are at 1HP because you are going for the skip related to Beowulf skip, you cannot use this save as it will bring your health back up. After saving (or not), exit through the left. Wrong warping into the next room will save a nice amount of time.
Royal Guards Skip
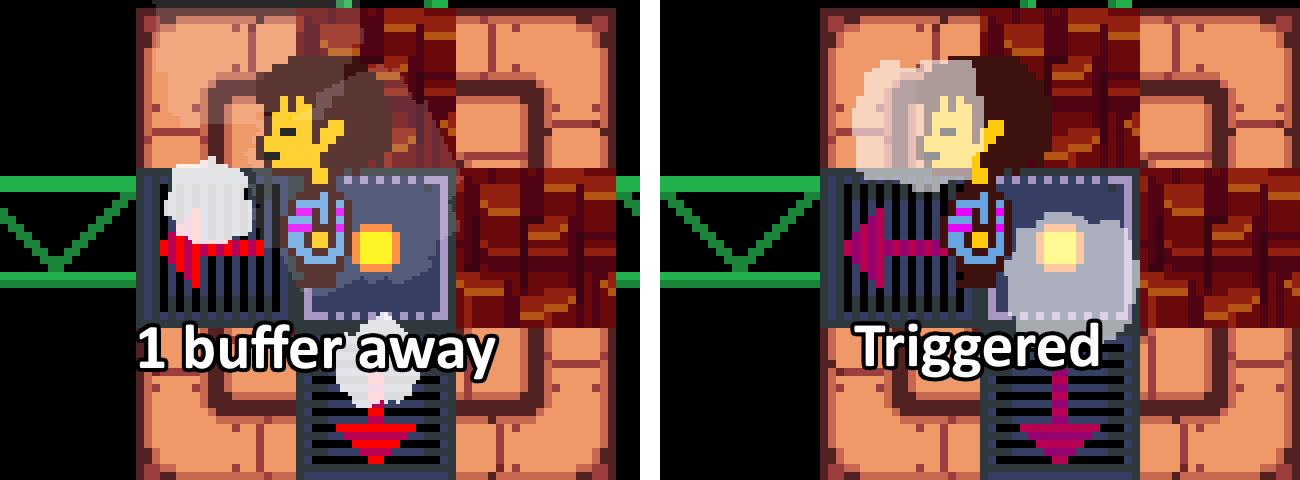
After wrong warping into the Royal Guards room, go to the trigger for the cutscene and PCE it. Close the Punch Card but don’t close the text box that comes up. Walk until you hit the first notification, then mash the text away. Quickly head upwards then make a right. Mash away the second notification quickly. After that, more text will come up. Mash away this text while walking and you will get a speed boost. Exit to the right.
NOTE: This is the trigger assuming you wrong warped into the room. If you did not wrong warp, then the trigger will be different. The trigger will be slightly more to the right. The trigger will only be a bit less to the left of the green support.
News Skip
There are multiple different ways to do news skip, and the method you can do depends on whether you have successfully completed Beowulf skip and are at 1HP.
Old News
You can PCE the News Show trigger. However, it is completely black in the room, so you have no visual indication of where it will be. Thankfully, you can count Frisk’s steps to know exactly where it will be. Every time Frisk puts their foot down will mark one step. Exactly on the 6th step, you will hit the trigger. It’s a good idea to stop somewhere mid-6th step and to start buffering right and PCEing until you get it. Once you PCE the trigger, walk right, and approach the vent. Once you make it past the part where the force field will appear (see the image below), mash away text until Mettaton starts speaking and says “OUR TEN WONDERFUL VIEWERS ARE WAITING FOR YOU!!” This will be the last line of his dialogue. Once you have done that, step onto the vent, quickly close the text box, and hold up and right. You will be launched out of bounds. After that hold right and up until you see the exit of the room. Once you see it, walk into the trigger for the room transition which is at the top part of the exit.
Launching off the vent is unnecessary and only saves around a second. If you do not feel like taking the risk, simply continue walking right and go up at the turn, and go to the next room.
Sirius Skip (OWW)
Sirius Skip is the faster variant of News Skip that requires you perform Beowulf Skip to be at 1 HP. This skip involves PCAing one of the royal guards’ texts and using it to wrong warp into the news room. An easier way of setting up for the PCA is to mash the Royal Guards’ first text right away, unlike the standard Royal Guards skip. On the set of textboxes you get after the last notification (after the speed boost ends), PCA the text by opening and closing a punch card, use the third textbox to OWW into the next room, then open your menu before you have fully transitioned into the room. Once you are in the next room, your menu will be open. Use the punch card and a textbox will appear. Advance the text to the final textbox. When you are on the pixel seen in the image below, once again PCE the trigger and mash until you are on the text box where Alphys hangs up the phone. Note that you must use the menu button to close the menu, rather than X or Shift, and you must not use another punch card until you’re on the trigger.

By closing the final textbox once you are on the vent and holding up and right, you can be launched out of bounds to save even more time.
If you miss the OWW, you can save it by immediately walking out of the room, WWing back in with a punch card and then opening the menu during the transition.
After leaving the News Show room, you will once again lose your ability to use your menu. Go left on the path. Mash a phone call you get somewhere in the center of the room. Exit to the left.
Go to the elevator and enter it. Go to Left Floor 1.
Repeat the same process as earlier with getting the menu back. Once you are in the elevator again, PCE the interface and go to Left Floor 3.
After exiting the elevator, hold right and go to the next room. Hold right again in Muffet’s spider bake sale room. Go to the next room.
North South Skip
In the North South Puzzle room, walk right, mash a phone call with Alphys, and then ride the vent pointing right, then take the one pointing up, then take the one pointing right. This is where it gets tricky. You will need to PCE on the next vent facing upwards. You will be launching yourself to the upper right platform. You need to hold right as closing the Punch Card, and you will need to close the Punch Card very quickly. There is a 1 frame window to close the punch card and make the clip. If you are too slow, you won’t make it to the platform, and will need to try again. After you manage to PCE the first vent and fly to the upper right platform, do the same thing on the next vent facing upwards. You will need to launch yourself out of bounds. After launching yourself out of bounds, go up and right, above the gears. After getting near the door, walk on top of it and enter it.
If you fail to launch yourself into the correct place, hold left and press up or down repeatedly to wiggle your way back onto a platform.
After walking through the top of the door, head up and go right towards the spider webs. Many runners overflow the save point and use it to wrong warp in to muffet’s room
Muffet Skip
Walk into the room. PCE the trigger for the short cutscene where the spider stops you. A good visual cue for this skip is that if you can’t see any of the purple wall to the left, you’re on the trigger. If you miss it, you can try again on the next one, which is about the same distance away from the web as the first one. Don’t mash away the text. Keep walking right. On the parts where the path narrows into one web, hold down and right against the bottom wall to get a small speed boost. Exit through the doorway on the right.
In the next hallway with the MTT poster, just go right into the next room.
Musical Skip
Walk up and right when you enter the room. Being against the wall will help you determine where the trigger is better. PCE the trigger for the Musical Skip. Exit through the right.
Missing this skip is very bad. Very very bad. This skip is the only reason why you would safety save.
After doing the Musical Skip, you will lose your ability to open your menu again. However, unlike the previous skips, you can’t immediately go to the elevator. Skipping the Musical skipped a flag being set that changed the elevator, so if you went down the elevator now, you wouldn’t be able to return.
After leaving the Musical room and entering the room with the Nice Cream Man, go up the stairs and exit upwards. Go up in the Hotel Entrance room. Don’t bother with Sans. In the Hotel main room, go up to the core transition room. Inside the core transition room, move up to the bridge, trigger the cutscene, and mash the text.
After that, return to the room with the Nice Cream Man. Go right into the elevator. Go to Left Floor 1. Get your menu back and return to the elevator. Go back up to Right Floor 3. After exiting the elevator, go back to the Core Transition room. Go upwards and enter the core.
Core
You skip nearly everything in the Core. Be prepared.
First Rooms
In the first room of the Core, go up upon entering the room. You will get yet another phone call from Alphys. Mash the text away, then progress to the left doorway and enter it.
In the next room, there is a scripted battle that you can skip. PCE the trigger for the cutscene. Don’t close the text box. Go to the doorway that is upwards, and exit through it.
In the Laser Switch room, mash the phone call at the beginning of the room. After that, go to the switch. Hit the switch, and immediately go down a fair bit. You can get some distance in before the blue lasers come. Stop for the two blue lasers. Once the two blue lasers pass, start moving onto the bridge and pass the orange laser. Cross the bridge. After crossing the bridge, you will get a phone call. You can PCE this phone call to save a small amount of time, otherwise mash through. Go right and enter the next room.
In the next room, move right. Mash the two phone calls you will get. Exit to the right.
Laser Skip and Core Puzzle
In the next room, there’s a phone call from Alphys, who turns off the lasers near the end of the call. PCE this phone call, then open up a second punch card (PCA) and mash the text until the lasers turn off as you move to the right. Try to avoid getting hit by the lasers. Leave the phone call open on the final textbox and use this textbox to OWW into the next room.
If you miss the phone call PCE, there’s a backup later in the room. PCE this second phone call and PCA the text. Advance the text to the second textbox where Alphys is telling you to stop. Use this textbox to OWW to the next room.
If you wrong warped into the next room with the trick above, you will have skipped a phone call in the room.
In the first room of the Core maze, go left. In the next room, go up. In the next room, go left.
For the slider puzzle, you can overflow the puzzle twice to get extra bullets and solve the puzzle without having to slide the blocks. This saves a second over doing it normally.
You can also overflow the puzzle once to gain movement as you solve it. If you don’t do the double overflow, the key presses you will need to do are: Up, Up, Left, Down, Left, Down, Left. Fire Twice.
If you have movement after the puzzle is completed, you can use the cutscene to wrong warp out of the room. Use the jingle from the puzzle as an audio cue and hold right and up against the wall, letting go of the arrow keys when you hit the room transition. You can also use the small amount of downtime to equip the burnt pan, which you will need for Asgore.
After Core Puzzle
There are two different routes you can take after Core Puzzle. The fastest route is called Snowie Core. This route involves wrong warping back the way you came in Core and entering the elevator in the first room. This is only faster if you wrong warp quickly. If you’re not confident with wrong warps, consider taking the alternate route.
Snowie Core wrong warp pixels:
If you don’t do Snowie Core, return to the first room of the with the save point. Go right, then up, then right again. This will put you in a room with a long bridge. Walk across the bridge. Near the middle of it you will get an unavoidable encounter. Flee from the encounter and continue to the right. Exit through the right.
If you need it, take a safety save in the last room in Core. Continue into the doorway.
Mettaton EX Skip
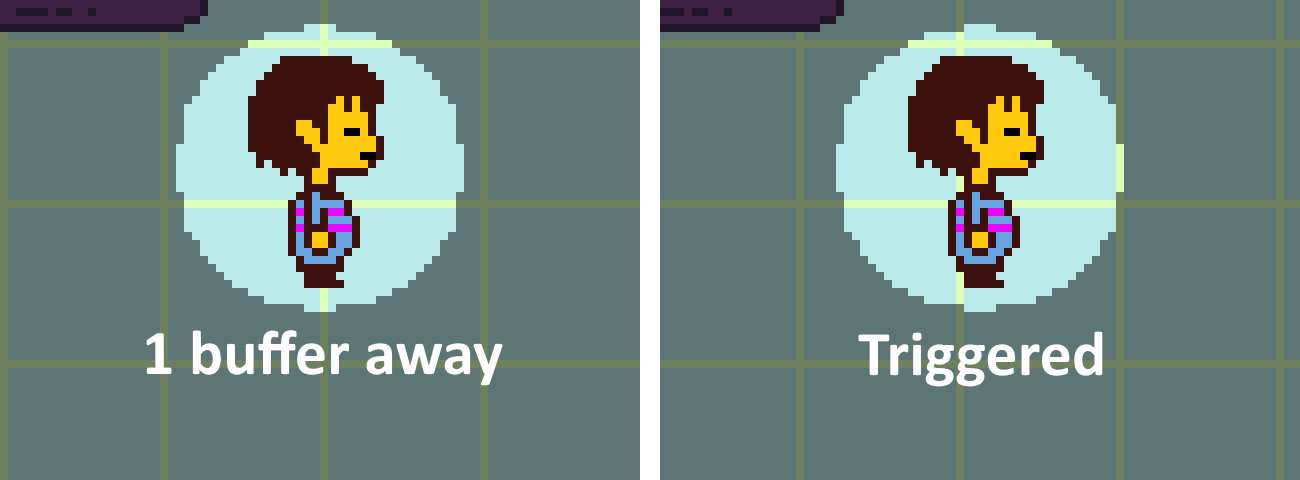
Walk up the path in the room and PCE the trigger for Mettaton. Watch his rectangular body and set of lights as you’re PCEing. Walk up after PCEing and go straight through Mettaton and enter the doorway at the top. Note that if you WW into Mettaton’s room, the visual cues will be 1 pixel higher than usual.

Alphys Skip
This is one of the most difficult PCE’s in the run because of how inconsistent it is and that there is no clear visual indicator. Once you enter the hallway after Mettaton, hold up and right. Move down the hallway. Wait for the lights on the wall to go dark twice. Once they have done that, the lights will brighten up. Once the lights start to dim down from their brightest state, you will hit the trigger. The best visual indicator is the pattern along the left edge of the screen. This is a repeating pattern, but it will look like the image below when you hit the trigger.
Once you PCE the trigger, continue to the right. As soon as Alphys begins to speak, PCA her textbox by opening and closing another punch card, but do not advance past her first textbox. When you get to the elevator, interact with it once with Z and do not mash until you see Alphys’s face appear. When Alphys’s face appears, mash the text and enter the elevator. Do not do this in True Pacifist, as it does not set the necessary flags for the pacifist ending. Instead, mash through the last cutscene as normal.
There’s a slightly faster version of this skip that involves clearing the textbox slightly earlier. Press Z slightly before reaching the elevator door, then press Z on the elevator door, then X, then wait half a second and press Z again while holding up. Make sure you’re not touching the walls of the elevator door when you enter it or you’ll softlock.
Long Elevator Skip
If you’re on the Switch version, simply exit the elevator without interacting with the panel (or wrong warp out) and you’ll get to New Home. Otherwise, you can PCE the elevator panel using C+Z or overflow the elevator panel. Overflowing is recommended due to being more consistent, as missing long elevator skip loses a large chunk of time. After doing this, exit the elevator or wrong warp out. Then go up to enter the next room.
In the next long hallway, hold up and right. Just hold right once you are on the path. Wrong warping into the next room saves a large chunk of time.
In the next room, go up. Wrong warping into the next room saves another large chunk of time.
In the New Home Entrance room, just head towards the doorway and enter it.
New Home
The boring part of the run if you already know the story. Thankfully, there are still a few skips.
Magolor Skip
Go right once you enter New Home. Wrong warp into the hall to the right to save a little time.
As you pass by the yellow flowers, overflow one of them and get text storage. Use this text to gain movement when you hit the first Monstertale trigger near the key. It’s possible to reach the key before the encounter begins if done optimally.
You can’t mash away the text during the Monstertale encounters, but you can still mash Z and Enter to end the encounter as soon as possible. After the Froggit encounter ends, grab the key and enter the last room in the hall, to the right of the key. Then immediately wrong warp out of this room.
After returning to the hall, overflow another yellow flower, the one closest to the first door. You’ll want to use this text storage to gain movement during the second encounter, then immediately go back to the right and enter the first room. If done correctly, you will skip the second encounter entirely.
It’s also possible to do these two encounter skips with a PCE slide instead of text storage. To do this, line up a pixel away from the trigger, then open your punch card while holding the arrow key in the direction of the trigger, then quickly close the punch card. For the second encounter, this version has a 1-5 frame window (this window is RNG) to close the punch card or else you won’t skip the encounter, so overflowing is the easier method if possible on the version you’re using.
After skipping the second encounter, wrong warp back into the first room and then wrong warp into the room on the left. You can PCE slide the next encounter, but don’t bother trying to get text storage for it. After the encounter, grab the key from the kitchen and wrong warp out. You can also overflow the key for an overflow wrong warp. Once you have both keys, return to the first room, unlock the chain blocking the stairs, and go to the basement.
The Basement
There are only two more wrong warps in Monstertale. The first wrong warp skips an encounter so is definitely worth taking. This wrong warp is from the first basement hallway to the second. There’s no clear visual indicator for this wrong warp, so try to get a feel for the spacing. The correct position is in the image below.
The second wrong warp doesn’t skip an encounter, but it still saves a good amount of time. This wrong warp is from the second angled hallway into the final long hallway. As before, there isn’t a good visual indicator for this wrong warp, so refer to the image below for the correct position.
For the rest of Monstertale, just continue to the right and go through the rest of the encounters. You can take a safety save in judgement hall if you need it, because missing the next skip costs a huge amount of time.
Judgement Hall
If you are running TPE, save in Judgement Hall so that you can reload there after Flowey. Walk right in the Judgement hallway. PCE the trigger for the cutscene. After doing that, quickly close the Punch Card and walk right. Keep holding right until Sans’ silhouette is fully visible, then hold up and right. After entering the next hallway, immediately walk back out. Prepare for the next series of wrong warps.
The Rhombu Combu
The Rhombu Combu is a series of wrong warps following the Sans Judgement Skip. These three wrong warps save a nice chunk of time by significantly reducing the walking needed to be done. After walking back into the Judgement Hallway, wrong warp back into the post-judgement hallway. Then, wrong warp from the post-judgement hallway into Asgore’s throne room. And finally, wrong warp from Asgore’s throne room into the Barrier Hallway. After doing this, make sure you have the Burnt Pan (and the Stained Apron if you choose to get it) equipped, then enter the Barrier room.
Note: The last wrong warp position will be different if you accidentally walk into the room. Frisk will be visually 1 pixel lower than if you wrong warped into the room.
Asgore
Mash Asgore’s text once you enter the Barrier room. Begin the fight.
If you’re running True Pacifist, use the pie to lower Asgore’s defense and attack. If you have pie as the 3rd item in your inventory, you can do the same menuing you do for fleeing from monsters. Otherwise, you should choose to FIGHT, unless you need to do a safety heal.
This fight is why you got the Burnt Pan. The Burnt Pan is a weapon capable of dealing massive amounts of damage - far more than any other TPE / neutral weapon you’re able to get optimally in a run.
However, to deal a lot of damage with the Pan, you must land a perfect hit. A perfect hit consists of landing 4 white bars frame-perfectly (1 frame window) in the center of the attack meter. This is very difficult to achieve but extremely rewarding.
There are three types of hits you can get with the Burnt Pan:
- A regular hit, which consists of landing 4 bars anywhere near the center. This deals around 90 - 140 damage depending on accuracy.
- A gold hit, which consists of landing 3 perfect hits and one regular, or 2 perfects and 2 very close hits. This deals around 170 - 185 damage.
- A quad, which consists of landing 4 perfect hits. This attack can do 340 or more damage, effectively doubling or tripling your normal damage.
The battle mostly consists of attempting to land the perfect hits to beat Asgore faster.
Asgore’s battle length is usually measured in turns. A perfect, flawless Asgore at LV 4 is 9 turns long. A beginner’s Asgore will likely be around 23 turns. Getting the perfects will reduce the turns it takes to beat Asgore.
Another rule of thumb is that a good Asgore fight will end before the music loops.
Asgore is by far the most difficult enemy to beat optimally. Don’t expect to beat him very quickly your first few times fighting him.
After dealing the final blow, mash Asgore’s text. The first part where everything fades away has un-mashable text, but after that it is mashable. After mashing all of his text, hold left and hit FIGHT.
Watch Asgore die and mash away Flowey’s text. Once the game closes, quickly relaunch it. You can start opening the game early to minimize the loading time, but make sure you don’t open it too early.
Flowey
Once the game relaunches, mash Z and Enter until Frisk appears. Walk up and interact with the save Point. Mash Z and Enter to end Flowey’s text as soon as possible. Begin the fight.
From a speedrunning standpoint, Photoshop Flowey is mostly an autoscroller. The fight is fairly easy once you figure out how to dodge everything. Newer players might die to Flowey once during their 2nd or 3rd time fighting him, but after that it shouldn’t be too difficult.
That being said, though, still try to dodge things. It’s still possible to die to Flowey.
One important thing to note: You cannot die during the individual ‘soul’ phases with the ACT button. Take as much damage as you would like during these.
Here is what you should do during each phase:
- During the Spinning Knives phase, wait for the knives to move left or right. Move in the directions that the knives move, and go up to the very top of the screen on the side that the knives moved to. Wait around for an ACT button and hit it.
- During the Tough Glove phase, move a little bit to the left and then move to the top of the screen. You will notice a circle of gloves come out of the very top. On the left side of the circle, the ACT button will appear. Stay there to hit it as soon as possible.
- In the Ballet Shoes phase, simply hold right and hug the right side of the screen, and mash Z and Enter. The ACT button will appear from the right. Staying inside the stars above you will ensure that you hit it as soon as possible.
- The book phase has a bit of RNG. There’s a 50/50 chance that the ACT button will come out of either side of the books, so it’s mostly a coin flip. You can just stay in the center and wait for the ACT button to appear. The ACT button will appear somewhere at the top portion of the area you can move in.
- In the Pan Phase, the ACT button will fly out of the middle pan. Just stay above the middle pan and wait for the ACT button to fly out, and hit it.
- The Gun Phase is a bit tricky. Move down to the bottom right of the screen and continue to hold down+right. Count the volley of bullets that the gun shoots. On the 8th volley of bullets, the gun will shoot the ACT button on the last shot. Hit the ACT button. Once the screen flashes and the gun shoots clovers, close the game.
Relaunch the game after closing it, or open the game early for a faster loading time. After relaunching the game, mash Z and Enter to clear Flowey’s text.
For the last part of the fight, try to stay on the FIGHT button as much as possible. Try to stay within the rectangle so you can hit it as soon as possible.
There’s a strategy to kill Flowey slightly faster than normal called Flowey Quick Kill, which involves delaying hitting certain FIGHT buttons with the correct timing. The FIGHT buttons to delay are #13, #25, and #36. See the video below and try to use the music to time the FIGHT button presses.
https://www.youtube.com/watch?v=kpBHCS_jTII
After dealing the last blow to Flowey, mash his text. When he circles you with bullets, edge yourself under the circle of bullets a bit so that when Flowey tries to hit you with the bullets, you hit them as soon as possible. After that getting hit by the bullets, wait for Flowey to die.
There’s another reload you can do during the fadeout when Flowey dies. The game saves when the screen finishes fading to white and starts fading to black, so you can open another copy of the game to load up this save early and save a couple seconds.
When you start to hear the wind sound effects, start to hold left for about a second, then mash Z and Enter to hit the FIGHT button. After Flowey’s text appears, close the game and relaunch it, or open the game early for a faster load.
After launching the game, you will be in the final room with Flowey. Go up and around Flowey. Touch the Doorway.
IF YOU’RE RUNNING NEUTRAL, STOP THE TIMER WHEN YOU TOUCH THE DOORWAY AFTER DEFEATING FLOWEY.
If you’re running True Pacifist, make sure to close any other instances of the game at this time to prevent the game from progressing in those instances and overwriting your save. Keep the most recent instance open until you hear the “THUD” and the “UNDERTALE” text appears. Then close the game and relaunch it. Alternatively, you can open a new instance of the game early for a faster load time.
Dates and True Lab
Some wrong warps and dates. Not much else.
If you’re running True Pacifist, there’s some backtracking that needs to be done to unlock the true lab and reach the True Pacifist Ending. This backtracking includes dating Undyne and Alphys.
Wrong Warps
If you saved in the correct spot, you will appear at the beginning of the Judgement hallway. Walk to through the doorway above you. Walk into the elevator. Go down to the room with the entrance to the Long elevator. Walk into the long elevator.
If you’re not using the Switch version, PCE or Overflow the interface again, then wrong warp out. If you are using the Switch version, wrong warp back out immediately.
Wrong warp out of the last core hallway. Exit Mettaton Ex’s room. Take the elevator to the right.
Wrong warp into the core transition room from the first core room.
Wrong warp into the main Hotel room.

Walk down and exit the hotel. Go down into the room with the Nice Cream man. Go right and take the elevator to Left Floor 1. Exit the elevator and go down to the Hotland Ferry area. Take the Ferry to Waterfall. Don’t accidentally go to Snowdin.
Undyne Date
Mash the Ferry person’s text as you’re riding to Waterfall. After getting off the Ferry, be super careful to not talk to the Ferry person again. Accidentally taking the ferry is a thing if you mash mindlessly.
Head up after getting off the Ferry. Exit to Gerson’s shop hallway.
In Gerson’s shop hallway, go left at the three way intersection. Exit through the left. Wrong warping into the next room will save a considerable amount of time.
Go into the top left exit in the main hub room.
At the outside of Undyne’s house, talk to Papyrus. Select the first answer choice that comes up. Mash a ton of text. Follow Papyrus into Undyne’s house.
Inside Undyne’s house, mash a lot more text. When you regain movement after talking to Undyne by herself, go up and right and interact with the stool. Sit on the stool.
Hold right and mash Undyne’s text. After Undyne throws the spear at the table and you pick it, keep holding right until the spear points at the box of tea bags. Hit Z or Enter immediately when the spear points at the box of tea bags.
The rest of this date is pretty much just mashing the text. Select the first option for whatever dialogue option comes up. Press Z and Enter to stir the noodles when prompted. Hold right when you are asked to turn up the heat.
When the house catches on fire and Undyne challenges you to a battle, mash the battle text and FIGHT her as soon as possible. Don’t worry about landing an accurate hit, just end the attack as soon as possible.
After hitting Undyne, mash the rest of the date. After receiving Undyne’s letter, go back to the Waterfall Ferry and ride the Ferry to Hotland.
The Undyne date has some additional strats that can save some time. By overflowing Papyrus and the chair in the date, you can keep movement, and by calling toriel at various points in the date you can replace some text with faster text. More details can be seen in the video demonstration below.
Video Demonstration: https://youtu.be/7a4ZhQoKM8w
Alphys Date
After riding the Ferry to Hotland, once again avoid accidentally riding the Ferry again. Exit upwards to the area outside the lab.
Go right to the doors of the lab. Interact with the door. Mash and choose the first option for the dialogue choice. Mash a bunch.
In the first part of the date, if you mash fast enough, you can actually skip the part where the “DATING START” text builds up. It will just appear instead.
The date is 99% just mashing. Always choose the first choice that comes up. The first choice is always faster.
After mashing all the text and ending the date, you will end up in the garbage dump again. Simply go back to the Waterfall Ferry and go back to Hotland.
Once you return to Hotland, go back to the lab. Enter the lab. Walk to the sliding door at the end of the lab with the note in front of it. Enter the sliding door doorway. Interact with the interface of the elevator. Don’t PCE it. Hold down during the cutscene so you can move out of it as soon as possible when you regain movement.
True Lab
After exiting the elevator, go right and enter the next room.
In the pre-True Lab hallway, walk right then turn up at the turn. Wrong warp upwards into the next room.
There are many wrong warps in the True Lab. Saving at the save point in the Main Hub area is not a bad idea. After saving (or not), head to the top left. If you are quick at wrong warping, wrong warp into the next room.
In the first True Lab hallway, walk left. Wrong warp into the next room on the left.
In the Sink room, interact with the first sink a bunch by mashing the text a bunch. Fight the Sink Amalgamate. The ACTs you need to do are Cell, then Refuse. Then spare them.
After fighting the Sink Amalgamate, grab the red key from the sink, and go in the doorway right next to the sink. Go up the hole in the wall and put the red key. Walk back into the Sink room.
Go right in the sink room. You can wrong warp into the hallway again for some more time save. In the hallway, you can wrong warp into the main hub room to save some more time.
Doing another save in the main hub room isn’t a bad idea. Go to the upper right and enter the unlocked door.
In the 2nd True lab hallway, simply go up and turn right at the turn. Go right. At the right exit, you can wrong warp into the next room for a small time save.
In the bedroom, if you wrong warped into the room, go back to the right bed on the middle row and grab the key from it. If you didn’t wrong warp, just grab the yellow key as you pass by the bed. After getting the yellow key, save if you’re scared of softlocks, and go into the doorway at the top of the room.
In the long hallway, go right and exit right. Don’t wrong warp.
Endogeny
In the Dog Amalgamate room, you can perform an overflow to skip the Dog Amalgamate. Go to the switch and overflow it. Begin walking left. End one line of dialogue so you get prompted with a dialogue option. Go to the sign on the left of the room and face it. Select “Yes” and interact with the sign at the same time. Wait for the white specs in the air to start moving, and mash away the text and exit the room through the left. If you are too slow, you will lose your menu. You can also advance the dialogue to the last line if you want.
There is another, faster strat for the endogeny skip, but it has a risk of softlocking. Overflow the switch and perform a PCA. Advance to the choicer, and walk to the left side of the room. Do an Overflow Wrong Warp into the room, but you will need to wait to close the text until near the end of the transition. If you close the text too early, you will softlock, and if you close the text too late, you will not wrong warp.
Video Demonstration: https://youtu.be/IGZz05_xXFU
After leaving the Dog Amalgamate room, walk back in and wrong warp out into the long hallway. After wrong warping, go left until you see a doorway. Enter the doorway.
In the green key room, walk towards the bathtub. Interact with it once you reach it and mash away the text, and return to the hallway.
Go left and exit left in the hallway. In the Lemonbread Amalgamate room, go inside the doorway in the top wall and put the key into the keyhole in the room. Walk back out into the Lemonbread Amalgamate room.
If you’re using the Switch version, hold Up+Left to walk past Lemonbread and skip the battle.
Otherwise, go to the star and interact with it to start the Lemonbread battle. ACTs for Lemonbread - hum, flex, unhug. Then spare. Go left and then wrong warp through the left exit into the Fridge room.
In the Fridge room, interact with the last fridge once and walk towards the doorway. The Fridge Amalgamate will stop you. Battle the Fridge Amalgamate, the ACTs will be 3 jokes.
After the Fridge Amalgamate disappears, grab the blue key it drops. Enter the doorway and put the key into the keyhole. Exit the green keyhole room. Go right after entering the fridge room again. Wall hump behind the fridges while moving right to get a speed boost. Wrong warp out of the fridge room.
In the Lemonbread Amalgamate room, wrong warp into the long hallway.
In the long hallway, go down and exit into the bedroom.
In the bedroom, go to the right exit and enter the Reaper bird hallway.
Reaper Bird Skip
In the reaper bird hallway, you can PCE or use an Overflow to skip the cutscene. Walk right and PCE the trigger for the cutscene OR overflow the row of golden flowers and close the text box when you hit the trigger. Quickly walk into the doorway at the end of the hallway. Put the key in the keyhole. Wrong warp out of the blue keyhole room. Enter the bedroom.
If you miss the wrong warp, you will enter the hallway like normal and activate the cutscene again, which will start the battle. This makes getting the wrong warp very important. However, there is a safe strategy for this. If you overflow the key to do the wrong warp and then PCA the text, the text will have a special property that will allow you to keep your movement in the next room even if you do not close the text to wrong warp. This way, you can re-enter the room and have another shot at the wrong warp.
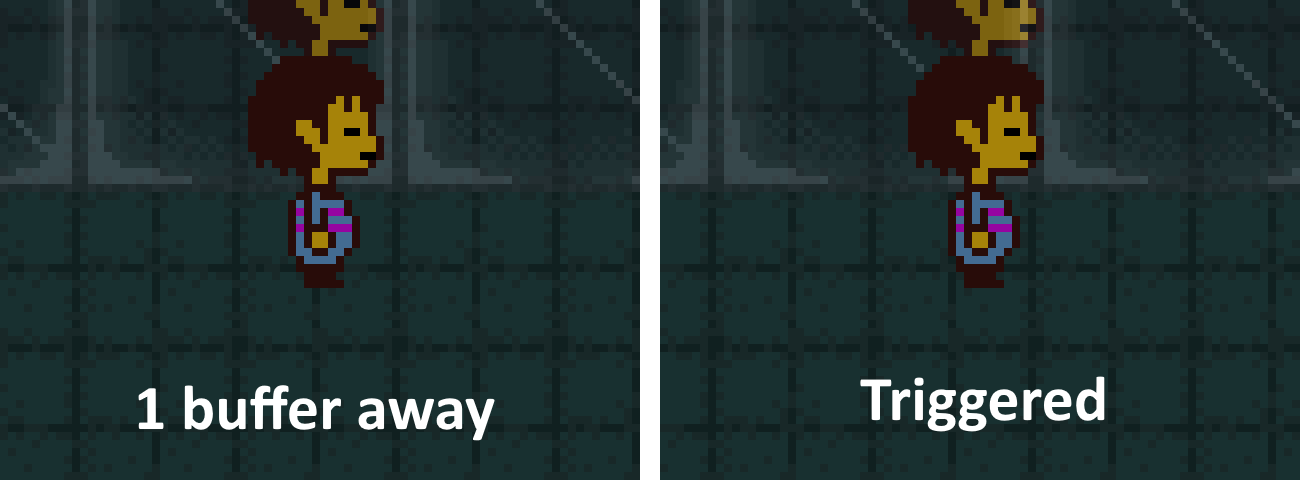
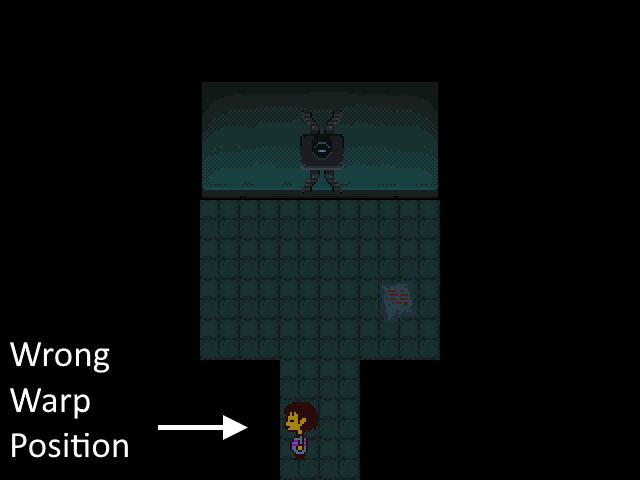
That was the last PCE of the run. You’ll still need the Punch Card for later, though, so don’t trash it. Walk to the bottom left exit in the bedroom. Wrong warp into the 2nd true lab hallway. Walk downwards into the main hub room. Take the unlocked door in the middle. In the inactive elevator room, wrong warp out the left exit. In the final true lab hallway, enter the doorway at the end of the hallway.
Generator Skip (Smell glitch)
In the generator room, you can overflow the generator to regain movement during the cutscene and cause Alphys’ text to overflow. Go up to the generator and overflow it. Press x once then press z while facing the generator. This will bring up a second text on top of the first text box. Mash and select “Yes” on the first text box. Then mash until you see the dialogue option appear on the second text box. Wait until Alphys begins to talk. Once Alphys’ text box appears, select “Yes” and mash away. Doing this will cause Alphys’ text to overflow and give you a much shorter string of dialogue. Position yourself with the image below. Once Alphys begins walking downwards, go down as well. Enter the final hallway again.
You can actually be fairly close or even in front of Alphys for when you’re walking out of the room. See the image below for a reference of where you can or cannot be to get the skip.

In the final hallway after the generator cutscene, move to the inactive elevator room and enter in.
In the inactive elevator room, move towards the center, mash the phone call, and wait for the elevator cutscene to end.
Asriel
The final boss, the final wrong warps, the final text box.
Another Rhombu Combu
After the elevator cutscene ends, you will appear in front of the long elevator covered in vines. Hold right and go up into the next room.
Go into the elevator to the left. After taking the elevator, go down into the Judgement Hallway. Walk all the way to the right. Perform another rhombu combu all the way to the barrier hallway.
In case you forgot:

Note: The last wrong warp position will be different if you accidentally walk into the room. Frisk will be a little bit lower than if you wrong warped into the room.
Enter the Barrier after doing the rhombu combu. Mash Asgore’s text and begin the cutscene.
This cutscene is literally just all mashing. Just mash the entire cutscene until the screen fades to white. Prepare for the final battle with Asriel.
First Phase
The battle doesn’t progress until the rainbow effects start. Once the battle begins, go to ACT and use Dream, which will fill your inventory with healing items. Then wait for the rainbow effect to start.
During the first phase, you can use Dream, Hope, or Spare, or use a healing item. Hope makes you take less damage but loses a small amount of time due to more menuing. Dream refills your healing items and heals you by 5hp. Spare is the fastest option but doesn’t heal you or raise your DEF. If you die during the battle, you’ll respawn a few turns back. Do NOT close out the game at any point as there is no autosaving in this battle.
Mash away Asriel’s text when he talks in the battle. Use the Last Dream before the 13th turn if you have below 20 HP (You’ll know it’s the 13th turn if in the previous turn Asriel will comment on your determination being ‘delicious’).
On the 13th turn, Asriel will use his "Hyper Goner" attack. Many diamonds will be summoned around you and you will have to dodge them. If you get hit by a diamond, you will be set to one HP. If you manage to not get hit, you will still have 20 HP. Not getting hit is a little faster than getting hit.
After Asriel’s Hyper Goner attack, he will begin his second phase. Whether or not you got hit by the Hyper Goner attack will affect the second phase.
Second Phase
If you were hit during the "Hyper Goner" attack, die during the first attack as fast as you can. Then die once again on his 4th attack. Doing this will end the attacks sooner and save some time. If you didn’t get hit, try your best to not die. That’s about it.
You can confuse Asriel’s bullets just like Undyne’s spears, but the manipulation is pretty unreliable and his attacks are still very RNG based.
After enough attacks, the screen will fade and text will appear. End the text and the screen will flash. Asriel’s third phase will begin.
Third Phase
Be careful not to select FIGHT.
Go to to the SAVE menu. It doesn’t matter what order you save the people in.
For Undyne, use any ACT for 2 turns, end with using 'Recipe' on the third turn.
For Alphys, use any ACT for 2 turns. shoot all of the robots and bombs to end the turns faster. End with Quiz on the third turn.
For Papyrus and Sans, use an ACT twice on Papyrus, then use Judgement on Sans.
For Toriel and Asgore, use the Pie first, then use ‘Hug’ on Asgore.
After saving everyone, use SAVE one more time. For the rest of the fight you just Save or Spare and mash away the text.
Child Asriel
After the battle, Asriel will turn back into a child. This is mostly just more mashing. Keep mashing until he lifts off the ground and breaks the barrier.
After breaking the barrier, Asriel will have one more set of dialogue. You will have to make a choice to either comfort or not comfort Asriel in this dialogue. Choose to not comfort Asriel, which is the 2nd choice. If you accidentally choose to comfort Asriel, you will hug him and waste about 22 seconds. This is usually referred to as the Goat Hug.
After hugging or not hugging the goat, mash the rest of the text. The screen will fade to white.
You can start opening another copy of the game after mashing Asriel’s last bit of text, but don’t close the current window yet.
Post-Asriel
Mash the text that appears after the screen fades to white. Once the screen fades back to normal, mash the text for the rest of the cutscene where everyone talks to you. When Toriel finishes talking to you and everyone turns top face forward, close the game and reload in the window you opened before. This reloads you to the other side of the room, saving a few seconds.
Go right and enter the doorway at the end of the hallway. In the final room, walk up. Touch the door, mash the text, and choose the 2nd option that comes up for the question.
On the final cutscene outside the underground, just mash away. The choices you make don’t matter. For the last question when you’re just with Toriel, pick the first choice. When she holds your hand and faces right, she will say the last text box of the run. Mash this text box and stop your timer.
STOP YOUR TIMER WHEN YOU CLOSE THE FINAL TEXT BOX WITH TORIEL SAYING "Everyone is waiting for us!"