Scanner Sombre VR
Speedrunning Setup Guide
and tips for setting up any SteamVR game speedrun
Hi!
When I started running Scanner Sombre in VR, I couldn’t find a lot of resources for VR speedruns, particularly for how to set up LiveSplit hotkeys in VR. On one end of the spectrum, Alyx has an autosplitter and the setup is very standardized and requires no user input, and on the other end, people are stepping on keyboards or recruiting friends to do their splits for them, but I was hoping to develop a system with the same level of flexibility and polish that PC speedrunners have, that could be applied to any VR game with any size community. This is what I’ve come up with.
This document was specifically written for Scanner Sombre and was developed with Vive Pro controllers, but I hope to explain my process so that it can be generalized for any game and any controller, especially the Setting up LiveSplit for VR section. If at any point, you feel it’s fallen short of this goal or could be clarified more, let me know!
I also have a video tour of this setup, but this document is the more organized version.
Physical space and room scale setup
Setting up LiveSplit hotkeys and sound cues
Recording locally with GeForce
Uploading from GeForce to YouTube
Physical space and room scale setup
- Prepare a rectangular area on the floor with enough room to reach over the edge and not hit anything. A typical boundary size might be 6’x8’, and that is sufficient to perform all the tricks in the current Scanner Sombre route as performed in the current WR. (We haven’t set hard limits in the rules yet, but if you have a huge space that you recognize might give you an advantage, set a smaller boundary for yourself.)
- [optional but recommended] Place down something to match your boundaries that you can feel with your feet, such as foam gym mats or a rug, so you can tell when you step out of bounds. Include a non-slip pad underneath if it moves around. (Gym mats will also help with fatigue and foot pain.)
- If you haven’t set up SteamVR in general, do it now.
- When you do the SteamVR room setup process, switch to “advanced mode” and it will let you mark just your four corners instead of walking the perimeter of your space.
- [recommended] Set up Chaperone Mode and Room View to your taste. Chaperone mode is in Settings > Play Area, and Room View is in Settings > Camera. (Room View can be used in Scanner Sombre during the long cutscene to deal with motion sickness.)
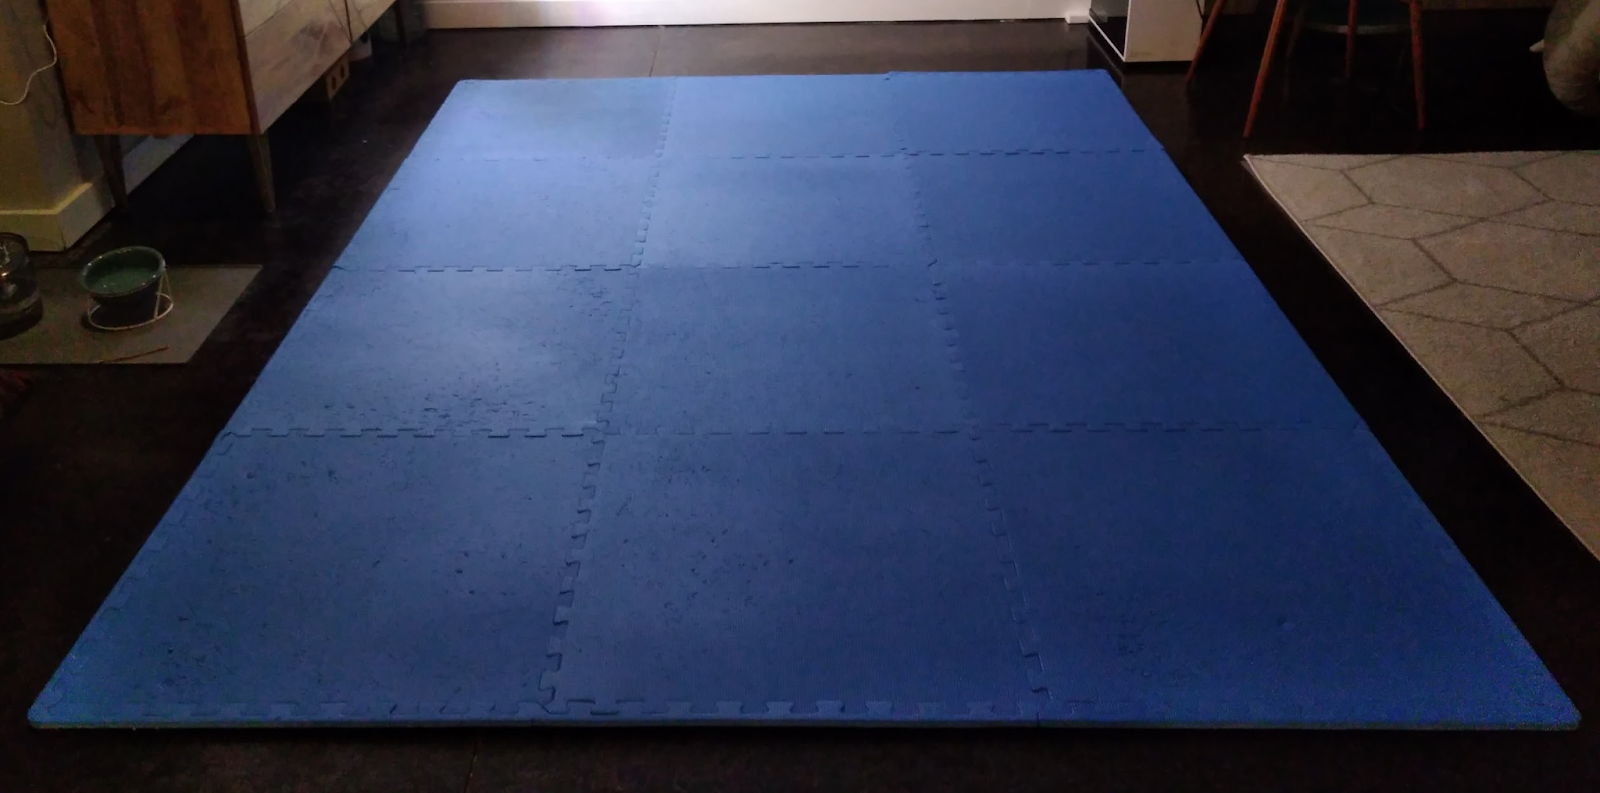
Save your feet.
Recording layout setup
We’ll be recording your full screen, and capturing SteamVR’s VR View, which shows everything you can see, including overlays and chaperone mode bounds. This should work for any game whether or not the game has its own view that gets displayed on your desktop. (Scanner Sombre does and it’s annoying - see step 4)
You can use whatever layout you want as long as VR View is large and mostly unobscured. e.g full screen with LiveSplit in a corner, or a typical streaming layout with the game in 80% of the screen with chat, webcam, LiveSplit, etc. on the sides and corners.
- Set SteamVR to “Show VR View” in the hamburger menu
- VR View should show a single eye. If it is not, right-click it and select one of the single-eye options.
- After you’ve set up LiveSplit (instructions below), you will want to make sure that is also visible. It is always on top by default, so just make sure it isn’t minimized.
- When Scanner Sombre starts, it will always make its own view full screen, covering up VR View and losing information for the recording. After you open the game, make sure to bring VR View and LiveSplit back up before you record your run. To check, open desktop view in VR and make sure you get the infinite tunnel effect instead of just a single view of the game.
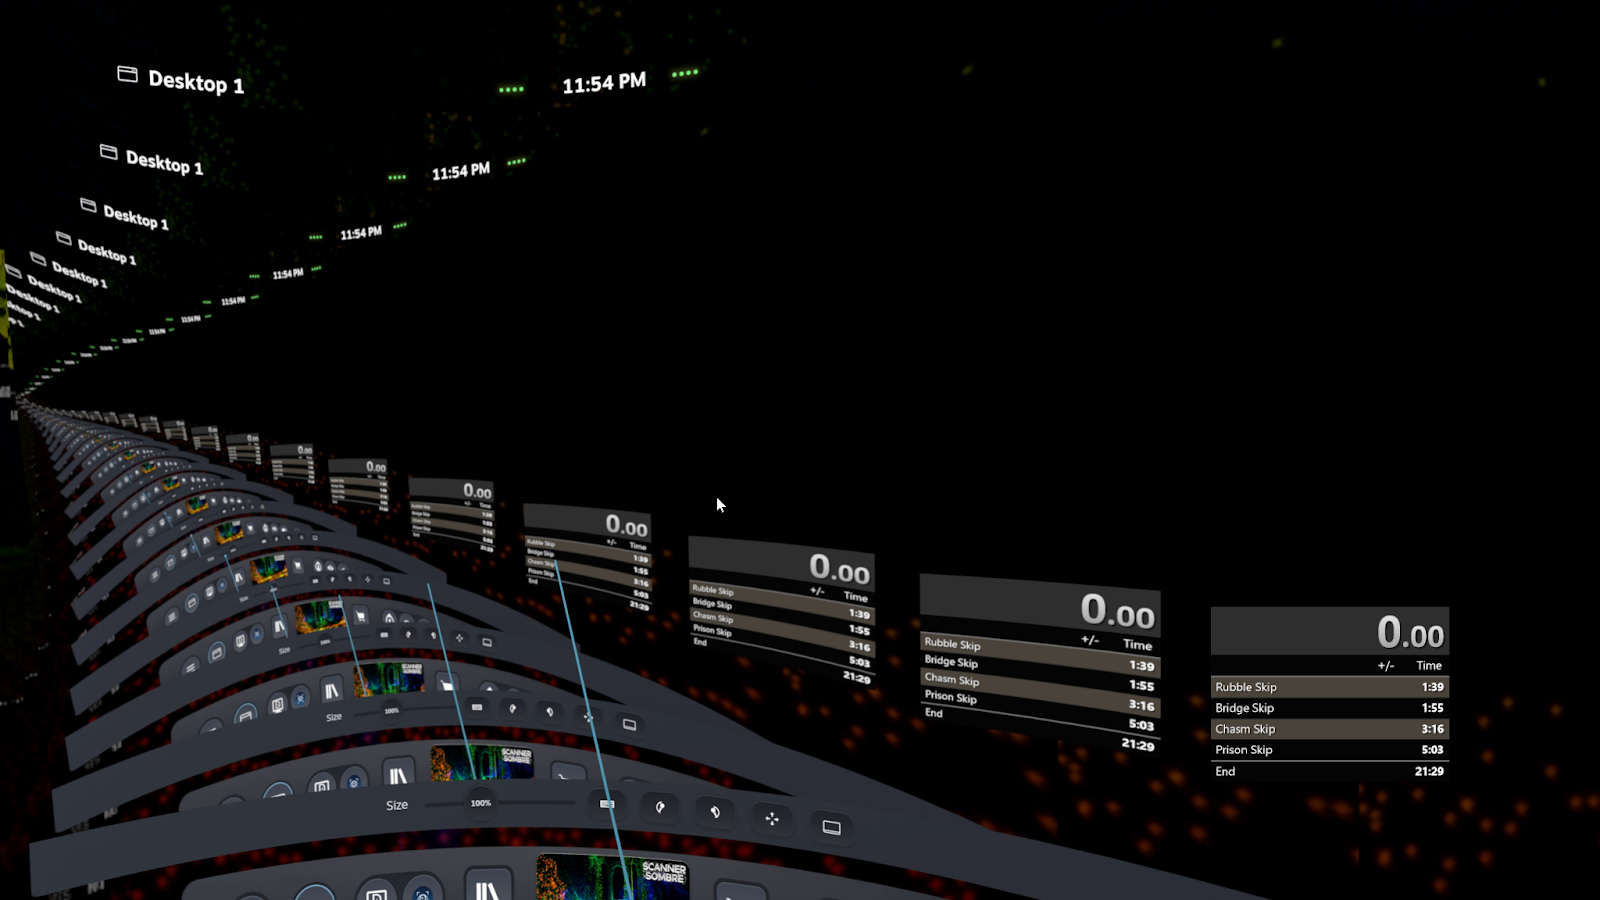
If you open desktop view in VR and see this, you are set up correctly.
Setting up LiveSplit for VR
What you will need
- OpenVR2Key
- An understanding of the controls for your run and type of controller
LiveSplit Layout
LiveSplit is available here. Get it running. We’ll set up the layout first so you can test it right away after we set up hotkeys later.
If you’ve downloaded my zip file, simpleVR.lsl is my VR setup. You can load it with open layout > from file. I’ve included my sound effects (made with voicemaker if you want to make more) but you will have to go into edit layout > sound effects to point to them in their correct location on your computer. I’ve also included a blank version of my current splits file.
You can modify the layout however you like, and it’s very flexible. This will be visible on your screen when you record it, and also visible to you in VR when you look at your forearm, so I recommend a simple vertical list. If you already stream speedruns and like the horizontal top bar, I assume you have strong enough opinions about LiveSplit layouts to figure out what you want.
Viewing your timer in VR
Correction: In an earlier version of this document, I believed I was using Desktop+ to do this, but I am using Desktops, a feature built into SteamVR. (I just didn’t find it until after I installed Desktop+ and got confused.) There are also other programs, such as OVR Toolkit, that might give you extra features, but this default overlay is sufficient here.
I am assuming you are playing Scanner Sombre in right handed mode. Flip my recommendations if you are using left handed mode. If you are setting up a different game, pick the arm that requires less precise movement and/or is less visible for most of the run.
You might have to do this every time you go into VR, but it’s fairly quick. (If there is a way to save views, I’ve missed it. Let me know.)
- Make sure LiveSplit is already open and in the format you want.
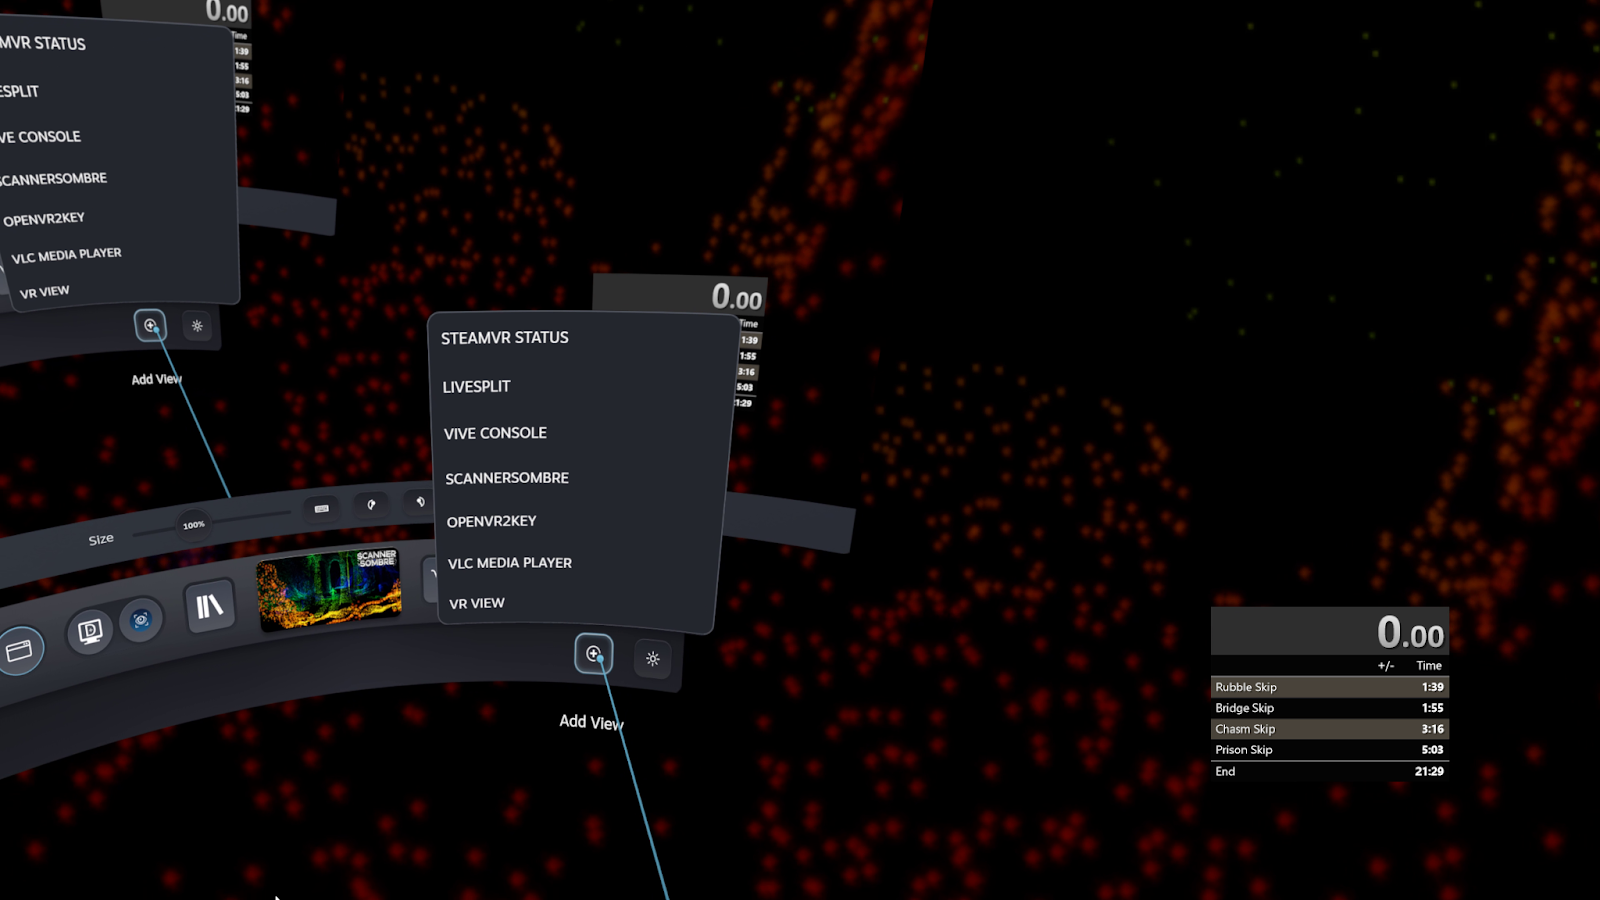
- From the system menu, hit the Desktops button. It will bring up desktop view.
- In the lower right, there is a “+” button to add a view. Select LiveSplit from the list.
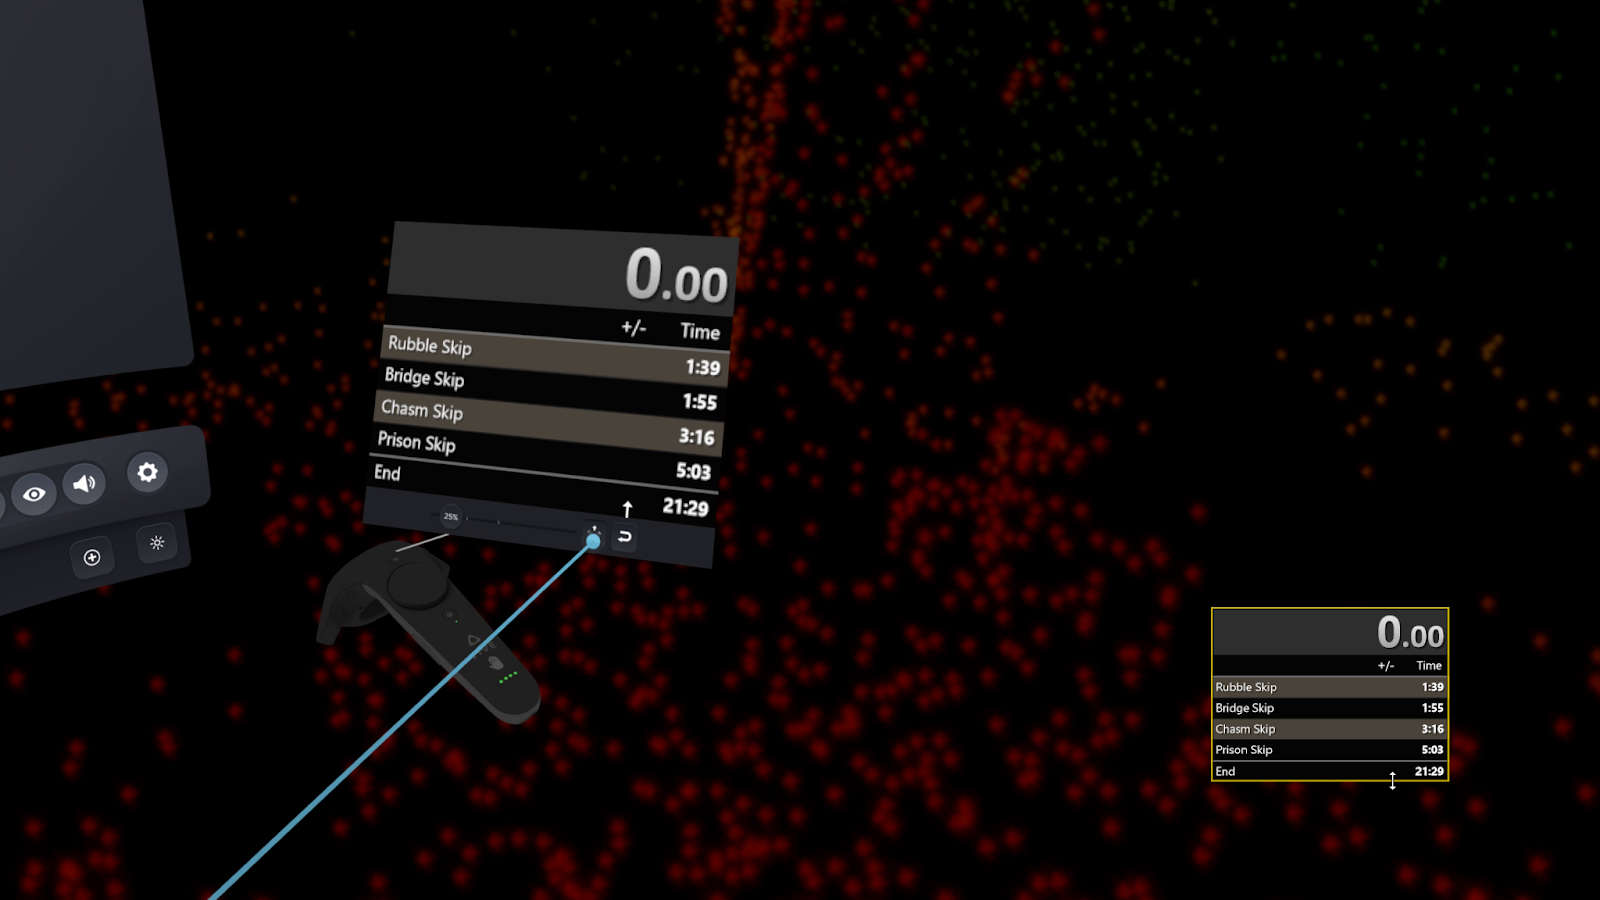
- This will put a big LiveSplit window right in front of you. Find the “attach to right controller” button.
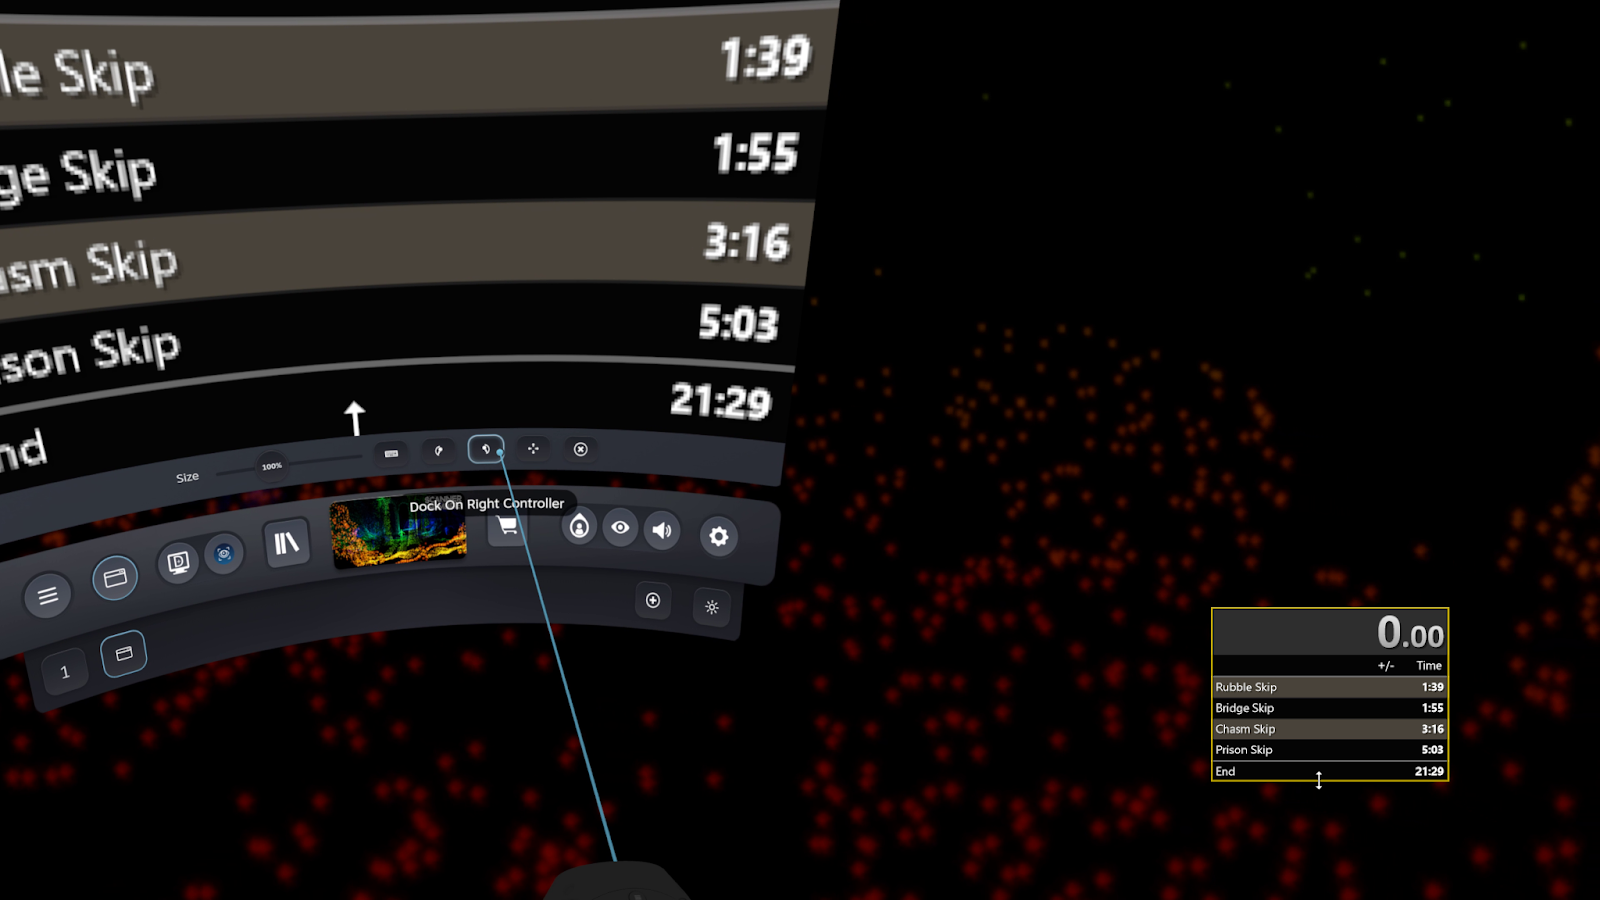
- This will put it on your right wrist. You can grab it by the arrows button with your left controller to move it in space relative to your right controller, and use the scale slider to make it bigger or smaller. You might think you want it smaller, but remember you might need to figure out which split you are on, so keep it a legible size.
Hotkeys
How to pick hotkeys
Because there are fewer buttons on VR controllers and most of them will already be used in any given game, we will be using two-button combinations as hotkeys. This is the equivalent of keyboard hotkeys like Ctrl-Z, where you hold the first button down and click the second button to perform the action.
There are three LiveSplit functions you will definitely want to have available: Start/Split, Undo Split, and Reset.
Start/Split
Should Be:
- Very easy / ergonomic to trigger during the run
- Not disruptive to the run at all, e.g. doesn’t pull up a menu
- Unlikely to happen accidentally
- Easy to sync with the action that starts the run, ideally the same action e.g. if the run starts when you pick something from the menu, make your click button the button you click in the menu.
I’m using:
- Hold button: left trigger (I don’t use the boat in my run.)
- Click button: right trigger
Undo Split
Should Be:
- Very unlikely to happen accidentally
- Not disruptive to the run
- Fairly easy / ergonomic to trigger during the run
I’m using:
- Hold button: left trigger
- Click button: left grip
Reset
Should Be:
- Exceedingly unlikely to happen accidentally
- (Otherwise anything else is fine because you’re not in the middle of a run.)
I’m using:
- Hold button: right menu
- Click button: left menu
Note: Reset will often pull up an “are you sure?” dialog, especially if you’ve set any splits, so if you hit the reset combination and your timer stops but doesn’t reset, pull up Desktop View to confirm. Alternatively, undo all your splits before resetting and it should work without the dialog.
Now, decide which keyboard buttons you want your controller buttons to map to. Hold buttons should map to Ctrl, Alt, or Shift, or combinations of those if you have too many. Click buttons should map to any normal buttons like letters or numbers, including numpad numbers, but avoid common combinations that might do other things to your system. The specifics don’t matter too much and you don’t need to remember them while you are playing. I'm using:
Controller Button | Target keyboard key |
Left trigger | Ctrl |
Right menu | Alt |
Right trigger | NumPad1 |
Left grip | NumPad2 |
Left menu | NumPad3 |
Setting up OpenVR2Key
This program will map your controller keys to keyboard keys.
- Download OpenVR2Key from here (I am on v0.61) and go here for the setup instructions. There is no installer, you just download the folder and run the .exe file.
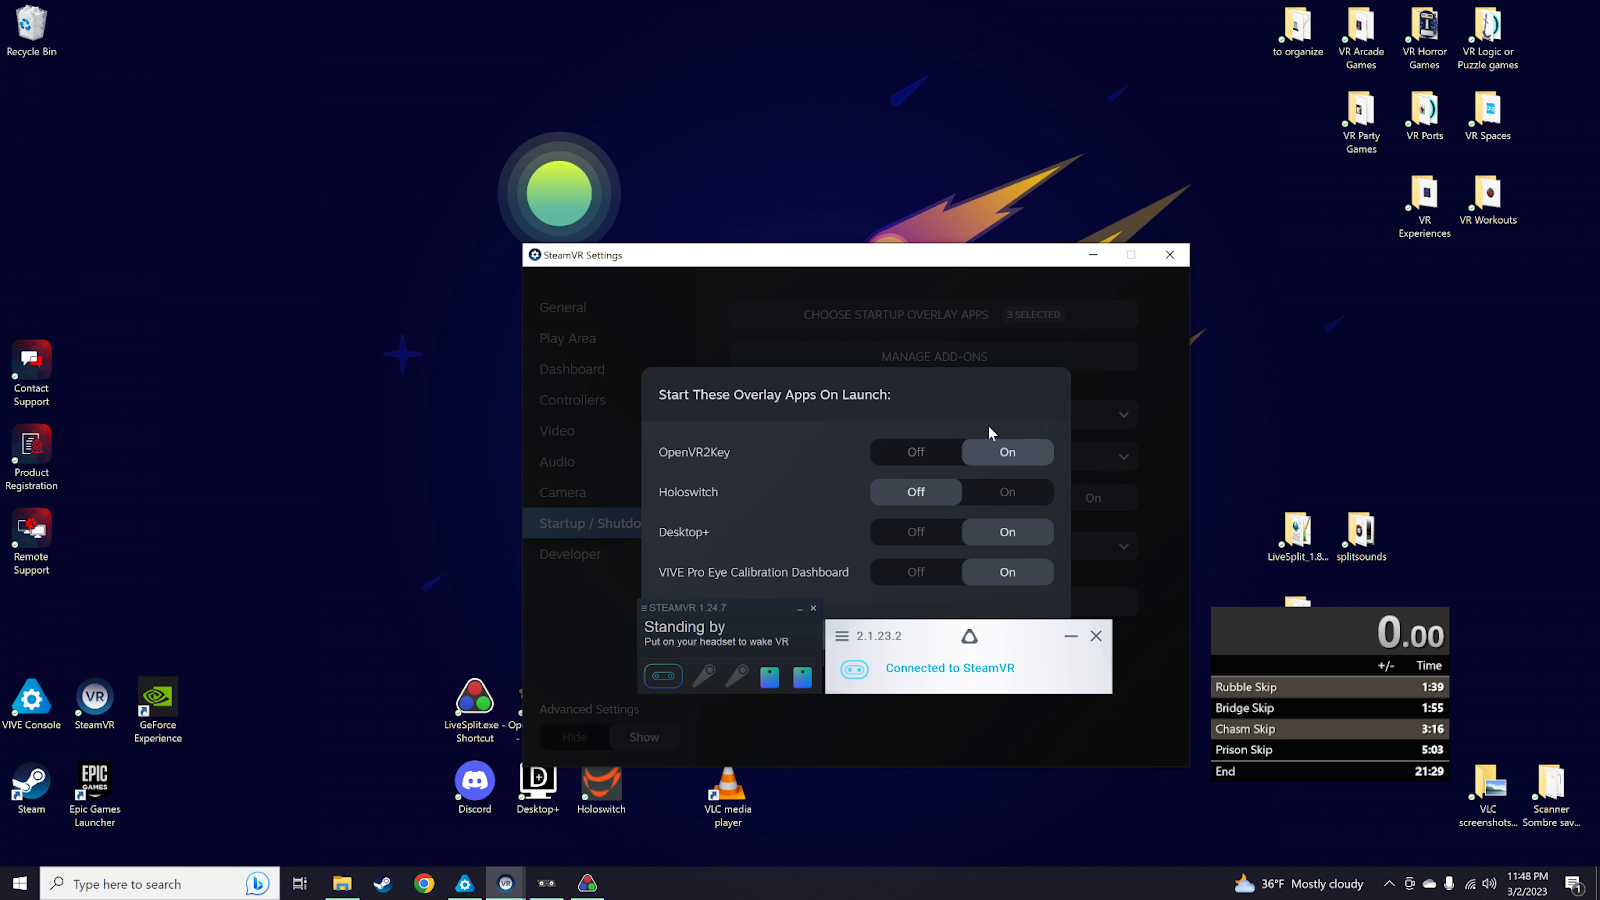
- Once you've run SteamVR and this program once, go to SteamVR's settings > Startup/Shutdown > Start These Overlays on Launch, and turn this one on.
- Open the game you are going to run. The game has to be open when you set up the mappings, and they will only apply to this one game.
- Click "Add app-specific config". It will autosave your future changes.
- Figure out which button on your controller is which. In the "status" box (top middle), watch the "active keys" field while you press the buttons one at a time.
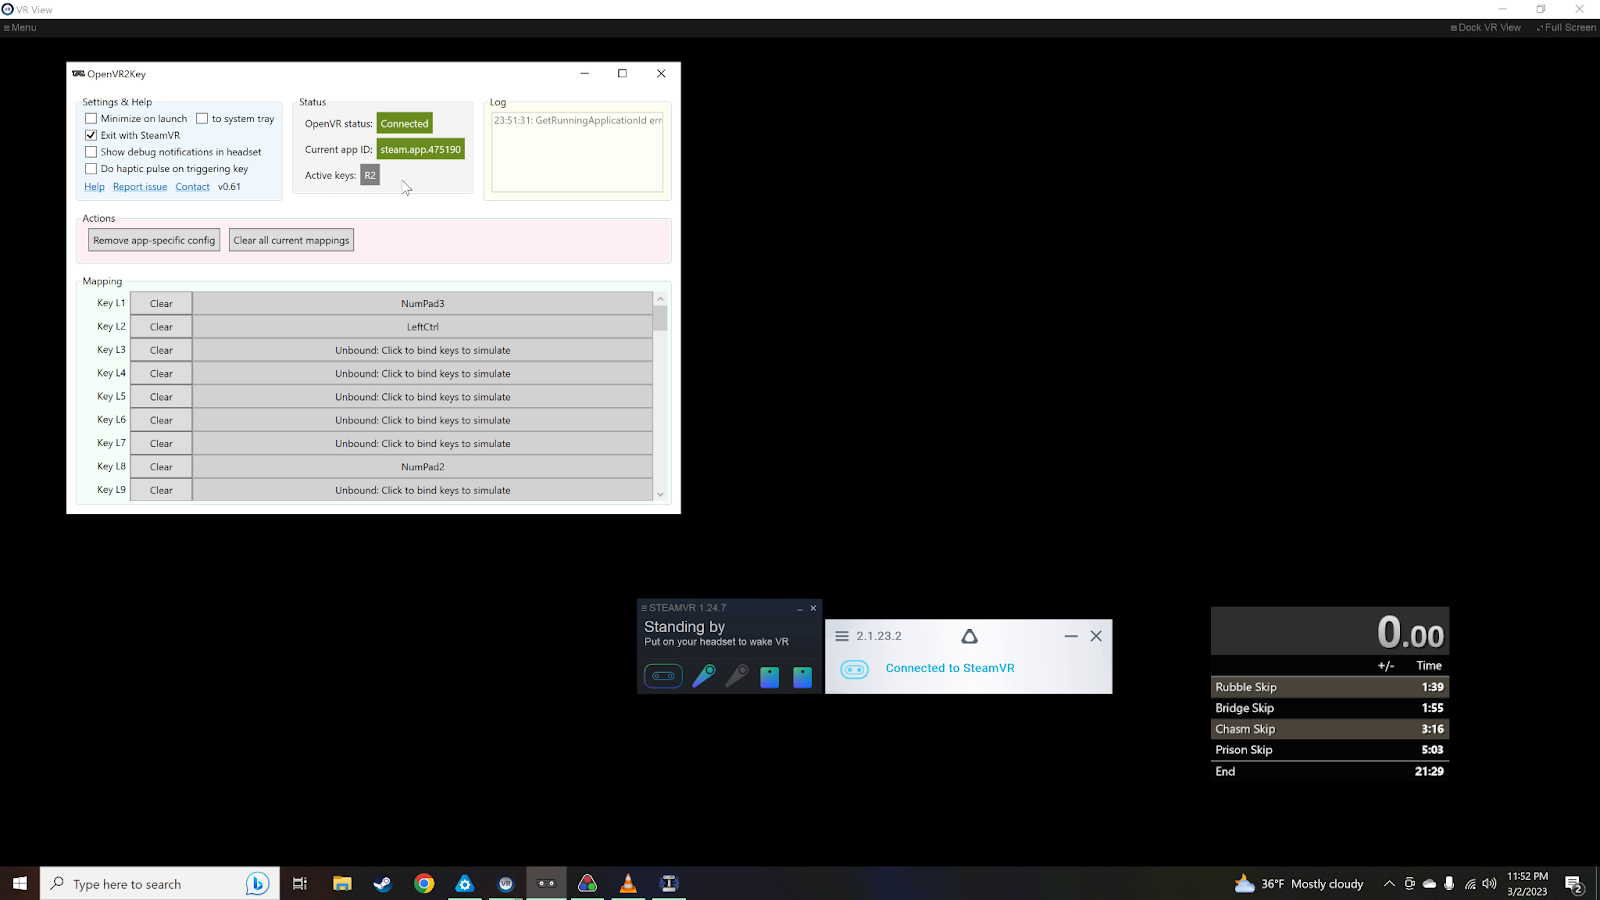
For me, these mappings are:
Controller Button | OpenVR2Key identifier | Target keyboard key |
Left trigger | L2 | Ctrl |
Right menu | R1 | Alt |
Right trigger | R2 | NumPad1 |
Left grip | L8 | NumPad2 |
Left menu | L1 | NumPad3 |
- To set the mapping, click the "unbound" box next to the correct controller button until it turns red, then hit the key on your keyboard, then click the box again until it turns back to grey.
- Unless you want to do a quick test first, turn off "show debug notification in VR". It was weird and laggy for me, and happens on every key press, not the combination key presses we are watching for. Turn off haptic pulse too.
Setting up LiveSplit hotkeys and sound cues
- Open Settings in LiveSplit. Make a hotkey profile for your game, and map the commands to the keyboard controls you just mapped.
- Find or make sound effects for the controls. I made a computer voice actually say “start”, “split”, “undo split”, and “reset”, which is corny but works really well at stopping me from second-guessing what I hit at time-critical moments. You do not want to rely on visuals for this.
- Open Edit Layout, click +, and add media > sound effects. Add those sounds in there.
Recording (for beginners)
If you already stream or know how to record, you can skip this section and do it your way. This is a simple method for people who are new to uploading speedrunning videos, so they don’t need to hunt down instructions elsewhere.
Some games and leaderboard sites might require you to stream your runs live on Twitch for extra verification, so make sure you check before you just record locally. I haven’t seen this required for any VR games, mostly just regular PC games, and you probably won’t need to worry about it unless you’re near the top of the leaderboard. Nvidia GeForce has Twitch integration that looks similar to its YouTube integration, but I haven’t checked it out.
If you are new to recording but have a VR-ready gaming computer, there’s a good chance you already have game recording software on your machine. Hit Alt-z to see if Nvidia GeForce Experience is already set up. (If not, but you have the program, you can turn on “game overlay” in the settings.) If not, you might have XBox Game Bar. Try Win-g and see if that pops up.
If you don’t have GeForce and want it, you can get it here.
I’m going to assume you are using GeForce and walk you through that.
Recording locally with GeForce
- Open the overlay with Alt-z.
- Open the “Record > Settings” menu and make sure that all looks fine.
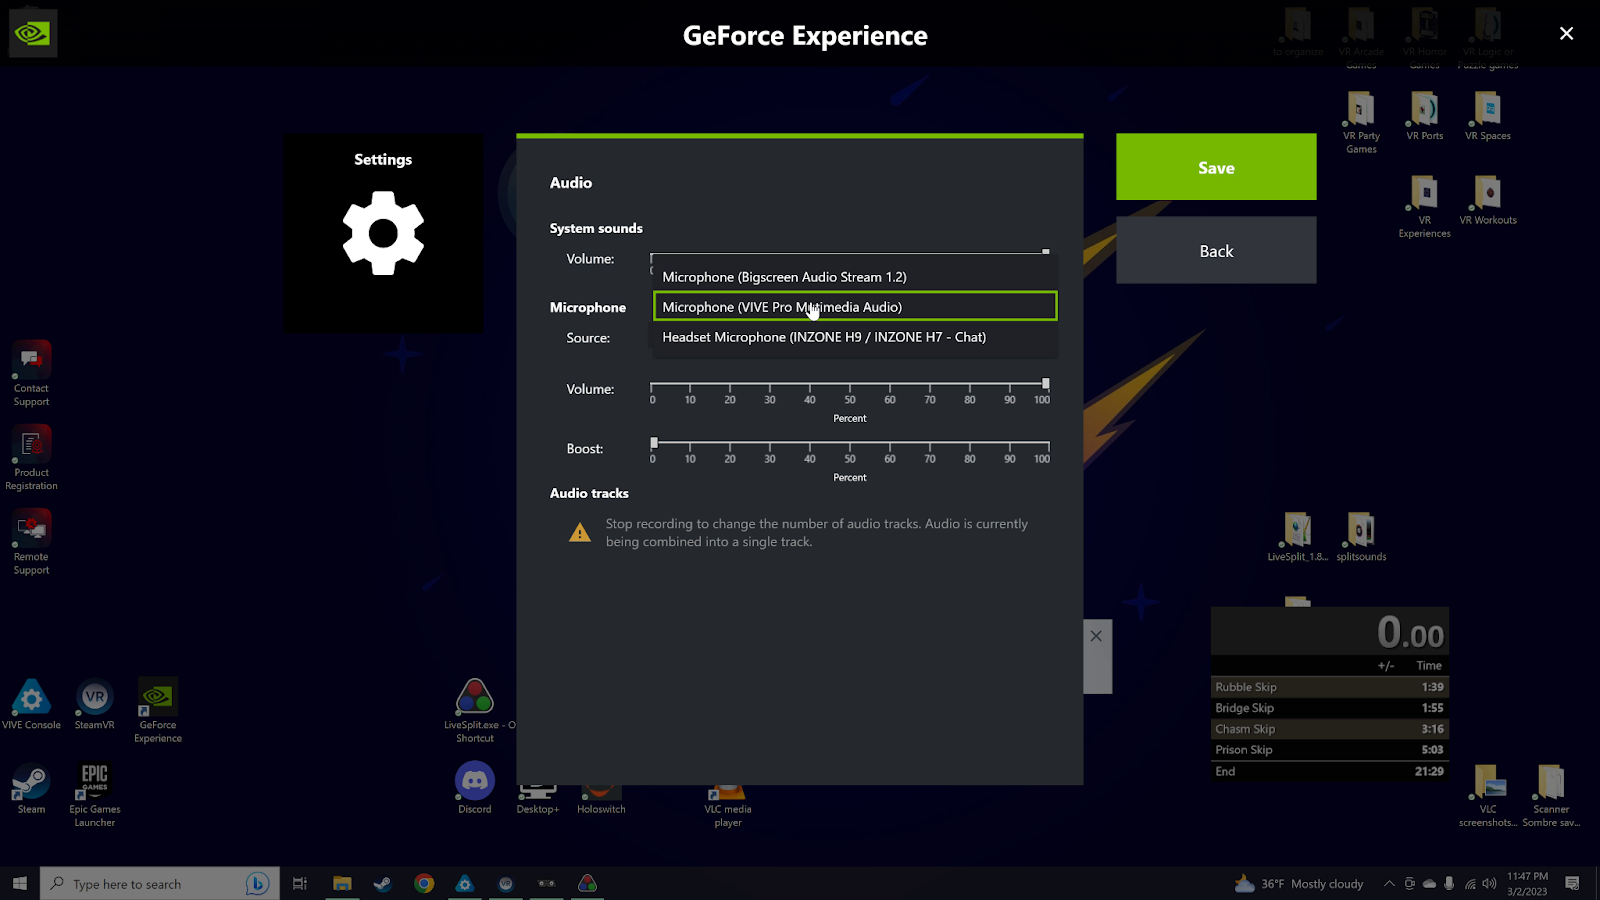
- If you want to record commentary, open the “Microphone > Settings” menu and make sure it is set to your VR headset’s microphone, and then select “Microphone > Always On”. Check this every time you record. It sometimes remembers your settings but don’t rely on it.
- Start recording
- Close the overlay with Alt-z
- Remember to check your layout after you open the game so you are not just recording plain game footage instead of VR View. If you open desktop view, you should see an infinite tunnel effect instead of a single view of the game.
- Do your runs or whatever you want to record.
- Open the overlay and stop the recording. The file will go to the gallery where you can find it and do whatever you want with it.
Uploading from GeForce to YouTube
- Open the overlay with Alt-z.
- Go to settings > connect and connect to YouTube first.
- Go to gallery > [your video] > share and make sure it says you are logged onto YouTube. If you are not, go back and do it in settings because it doesn’t work right from the share page.
- Move the markers around to get the start and end of your run and cut out extra stuff. Hit “Share”.
- There will be an “started uploading to YouTube” popup within a few minutes, but you might miss it. (Not important to look for unless you are trying to figure out why videos aren’t uploading.)
- After it’s uploaded, on your YouTube account under “manage videos”, it will show up as “pending” first, then “processing (x hours remaining)” but at that point, you can start editing the description and stuff.