Summer Nav 2021 Setters and Controllers Instructions and Checklist
INTRODUCTION
Firstly, thanks for being willing to either set or control a Summer Nav event. OBOP relies on volunteers to organise and run events, so your efforts are very much appreciated.
The OBOP Summer Nav is an after work, low key, but quality, set of orienteering events that attracts people of all abilities and ages. They come for a run, a bit of competition, personal challenge, and to have fun. With the right preparation, most events should be pretty straight forward to plan and organise, and this document is designed to give some guidance on the process for organising and running your event.
Our primary goal in running these events is to give competitors a really positive experience of orienteering, which will make them want to come back for more. We do this by:
- Making the event feel friendly and inclusive.
- Setting courses which are challenging but achievable.
- Ensuring the event meets certain quality standards – in particular that controls are in the right place, and the maps and supporting information look professional .
This document and the training we provide to setters and controllers is designed to make it easy to meet these goals and to run a great event.
SETTERS AND CONTROLLERS
These are the two main organising roles we rely on to organise, prepare and run an event: Setters and Controllers.
The Setters main role is to plan the course(s), which involves getting access to the map, doing field checks of the area to ensure the map is accurate, identifying control sites, and then using course planning software (Purple Pen) to chart the course (control sites) on a digital copy of the map.
The Controllers main role is to act as a “quality check” to the Setter, ensuring the map is up to date and the course(s) the Setter is proposing meets certain standards, and that the final maps are presented to a certain standard (with logos, borders etc.). The Controller is also usually the one responsible for ensuring land access is secured (calling landowner), ensuring Health and Safety issues are addressed, and that the overall organisation is in place for running the event on the day. Ultimately the Controller is there to represent the interests of the competitor – to ensure the event meets certain standards which will result in a good experience for competitors.
Whilst these two sets of responsibilities sound clear, the final break down of work and tasks between Setter and Controller will often fluctuate depending on the experience of the Setter – for instance an experienced Setter will often need less oversight and supervision, and may be able to take on various tasks associated with running the event. However, a less experienced Setter may require more hands-on oversight and support. Each situation will be different, and it is important that Setters and Controllers agree early on how they will work together and how they will divide up the tasks.
The following list breaks down the tasks needed to happen for a Summer Nav event.
KEY TASKS - CHECKLIST
Before event
- Obtain copy of map from Controller (or Club Mapping Officer - Pete Swanson, peteswanson64@gmail.com).
- Contact landowner / council to confirm date and arrange access for planning (unless already done). [Note Erin has organised this for all Whakarewarewa Forest events, Rob Griffiths is doing for all Rotorua park events.]
- Complete H&S Plan. This is very simple. There is a central SOP (Standard Operating Procedure) – saved on Google drive under H&S folder. For individual events, Controllers and Setters just need to think about the specific hazards at their events and appropriate actions to eliminate, isolate and minimise these. This can be done in 3 ways: (1) through identifying the hazards on the map, marking areas out of bounds etc.; (2) covering off the hazards at the briefing beforehand; and (3) documenting hazards and displaying them on the H&S Notices at registration. The H&S Notices must be completed by the Controller (or Setter), printed out in A3 or A4, and displayed at registration for every event. Template is in Google drive in H&S folder.
- Note if requested the SOP and H&S Notices can be emailed to the landowner or manager (e.g. Council). The public liability insurance certificates, full audited health and safety system, and associated audit certificates are also in the Google drive.
- Setter to complete initial draft course(s) and share with Controller. Usually this is done through a process where courses are planned on paper (or using Purple Pen software- free to download), then checked on the ground (called field checking). This would be the first draft of courses.
- Controller provides feedback to Setter on courses, and work towards second iteration (they will agree if do this together or leave to Setter to complete).
- Finalise courses following iteration process (sometimes takes 2 to 3 iterations).
- Prepare map layout using planning software (Purple Pen). See details below of what map must include. Talk to Pete (peteswanson64@gmail.com) if need any help getting set up.
- Controller to complete final check of map, and save as PDF ready for printing.
- Email map to Advocate Print info@advocateprint.co.nz with size of paper, type of paper (normal paper), and number of maps to be printed. To be done at least 3 – 5 working days before event. It normally requires a bit of discussion to work out how many maps to print considering number of previous attendees, whether any big school groups attending etc. We generally err on side on printing too many maps as relatively low cost. If you need any advice talk to Erin or Tui. When emailing map to printers, add in at end of File name, paper size and number of maps, eg: “SummernavRedwoodsJan2021 - A4 - 125”….etc
- Send email to erinroberts08@gmail.com the Friday before the event confirming location of event headquarters and where traffic signage will be placed (arrows directing people to event headquarters).
- Collect gear for the event from club storage shed (or person who has from previous event). Minimum gear for Summer Nav:
- Flags and clippers.
- Ezi Up.
- Table.
- OBOP tear sign.
- Event box – ensure has sufficient clip cards in it for event, first aid kit, defibrilator (Rotorua only), and clocks. Also ensure sufficient map bags of appropriate size (A4 or A3) - there are more in gear shed. Pen and pencils are also generally useful. Also check have sufficient On-The-Day Entry Forms and legend sheets.
- Traffic signposting and warning signs.
- Create On-The-Day Entry Forms if required – check in gear box. Copy previous one or access from Google drive and print out H&S Notices to display at event. It can also be good to display the table showing entry fees - copies of this included in gear box.
On the day:
- Setter puts controls out with assistance of Controller. Ideally both visit control sites.
- Signs for traffic and warning signs out on the road.
- Eziup, tables and tear sign set up.
- Run registration – complete On-The Day Entry Forms, hand out clip cards with names written on them, collect entry fees, direct attention to H&S Notices, make sure aware of timings. Note details of any students entering the Schools Competition. Also promote and take payments for any Summer Nav Concession Cards (mainly for early events).
- Conduct event briefing before start (this may be the Controller) - highlight any major hazards, other relevant H&S information, confirm timings.
- Start event. Always have a person at registration in case of emergencies and people returning early.
- Collect in clipcards when people finish (have someone at finish location collecting cards off people or making sure people hand in their cards), writing down exact time back using clocks. You can give the clipcards back to people and ask them to add up their own scored. If you put up a long piece of string and provide a stapler they can then staple up in order. (This saves a lot of time adding up scores later.)
- Check all competitors who registered have returned. Try to contact any people missing. If people cannot be located use SOP Procedures for a missing person. The Controller should lead this.
- Arrange collection of all controls and signs.
After the event:
- Add results to Summer Nav Results Sheet in Google drive.
- Add and total points for Schools Competition.
- Email erinroberts08@gmail.com:
- Confirming results completed.
- Send short paragraph about event highlights.
- Detail any positives, learnings and provide information on any incidents or near misses from H&S perspective.
- List of email addresses provided to add to email database.
- Count money from entries (from cash box less $50 for float). Bank money if can - Westpac, 03 1552 0094951 00. Leave $50 float broken down in appropriate notes and coins in cash box for next event.
- Send details of deposit and number of attendees to OBOP Treasurer, neilkerrison@gmail.com.
- Ensure gear is all present and tidy. Make contact with people running next event and arrange for handover of gear.
GUIDELINES FOR COURSE SETTING AND PREPARING THE MAP
Course setting:
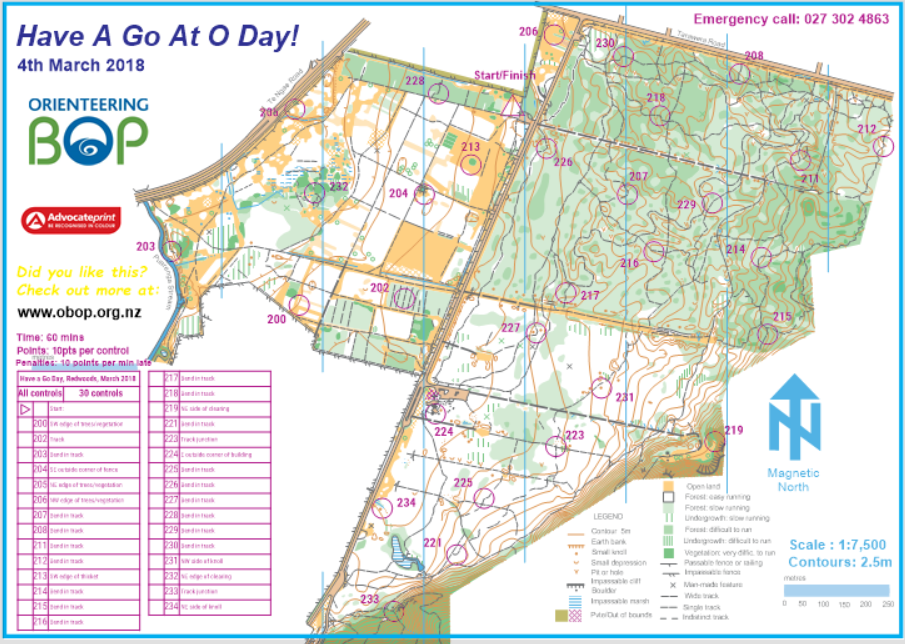
- Rogaine format (also called “score events” in orienteering), using 30 controls spread across the map.
- What makes a good course?
- Will challenge both elites and novices/families – ideally top runners will not quite be able to get all the controls, and ideally families and novices will also get a chance to visit plenty of control sites.
- Spread of controls – these could be generally scattered across the map, or placed in clusters around the map.
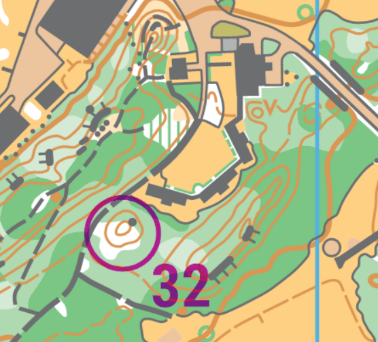
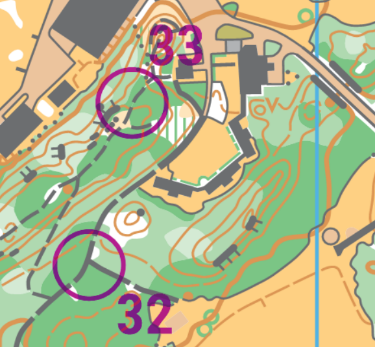
- The goal here is to challenge people and make them think! This could be achieved through navigational challenges (left, below), or through forcing route choice decisions (right, below).
- You should aim to have a mix of controls – some easy to find (e.g. on tracks, fencelines, etc.), and some moderate difficulty (e.g. off track, but on major features such as hill tops, re-entrants, knolls and depressions that are visible and not too far off track), and maybe even a small number of hard controls (e.g. well off track on smaller features in difficult to find places). Generally though, err towards making this achievable rather than too hard!
- Distance – only a rough calculation is needed, however given this is a 60 minute rogaine with 30 controls, you want to make this so it is barely possible for the top runners to get them all. Ideally won’t quite be possible. This means the total course distance could be in the 8-12 km range depending on type of terrain.
- How do I design the course?
- Firstly, remember this is an iterative process, so what you start with will (should) get refined and improved!
- You can start with a paper map of the area you are using, or digital map using purple pen (info on purple pen below).
- Start by identifying the spread of controls, to give a rough total distance you want.
- Ensure controls are placed on features shown on the map only – you can’t use features you find on the ground but which are not mapped!
- Within that space, identify control sites and legs you like the look of, and put controls on those. Are there any interesting features you want to employ, that would give people a buzz to go to?
- Critique your course – does it provide challenges – route choice, forced decision making, navigational challenges?
- Once you have completed your first draft, then do a field check. You can do this with your controller, or involve them later.
- The field check will involve visiting each control site. You will want to check whether the control site is good or not – e.g. is it as visible on the ground as it is on the map? Is the map accurate in that area – if not either change the control site or change the map. Do the legs of the course work well or not? You may find other sites or areas of interest that you like, which didn’t stand out to you on the map.
- Once you have done your field check, you should do a 2nd draft course. Definitely at this stage you should share with your controller. Once this is done, controller and setter should do field check together. This may lead to more refinements based on controller’s feedback.
- Once you have agreed the final control sites, which could happen on the 2nd field visit (above) or later, mark each control site with a piece of ribbon or electrical tape etc. – this will help ensure when the controls go out it is easy to find the site again and not make a mistake in putting controls out!
- Control placements – controls should be visible when you are within a few metres of them – avoid the urge to hide them in undergrowth or bushes – this isn’t geocaching! You are testing the ability of a competitor to navigate to that control circle, so once they are at that feature in the circle the control should be easily seen.
Preparing the map
- Using Purple Pen, set up a course file with name of your event – e.g. 2020SummerSeries Redwoods March20.
- Detailed instructions on using Purple Pen are available online, and your controller should be able to give guidance as well. If stuck, contact Peter Swanson or Neil Kerrison for help. Links to some online resources are provided below, however the following process is the basic one to follow for setting up your map on Purple Pen.
- Upload base map into Purple Pen when prompted. Your controller will provide you with the base map which could be in PDF form or OCAD (mapping file). Ensure you use the correct map scale when prompted in this start up process. This requires knowing what scale the base map is set at, which your controller should provide. Also select starting code as “1” (default is 31) during this setup process.
- In Purple Pen go to “Course” then “add course”, type in name, and under Course Type select “Score Course”. Ensure map printing scale is correct. In Description Appearance select “Text”. Under Control circle labels select “Control Code (145)”. Select “OK”.
- Now you can place the start/finish, and controls on the map. (Use Control+A to add controls quickly.) Note you may want to play around with location of numbers to ensure you do not obstruct an important feature.
- Control symbols – try to use the options provided for in Purple Pen, as these are the “correct” terms used in orienteering. Try to avoid using non orienteering terms, including terms such as “left” or “right”, “left bank”, “right bank” etc. In orienteering always use direction (north, west, east, south) to signify which object or where on an object the control is – e.g. west side of tree, or SW corner of building, or northernmost knoll.
- Control descriptions – orienteering uses certain language to describe features, e.g. knolls, reentrants, depressions, pits etc. Generally for Summer Nav we would not expect to use a huge range, however information on many common descriptions used in NZ and symbols is available here: http://orienteeringwaikato.org.nz/wp-content/uploads/2016/07/ControlSheetSymbols_explained.pdf.
- Setting the map up - all maps should be set up with the following. See sample map set up below.
- Title of event and date.
- Map border
- Control circles and numbers right thickness and size (6mm high, 0.35mm thick).
- Control descriptions in text on map.
- Scale, contour interval, scale bar, north lines and north arrow (in Google drive).
- Time allowed and points per checkpoint (10) and points deducted per minute late (10).
- Logos - OBOP Summer Nav and Advocate Print logo (in Google drive under Logos folder).
- OBOP web address “www.obop.org.nz”.
- Copyright statement that the map is the property of OBOP etc.
- Mobile phone number to contact in case of emergency (controller’s or setter’s).
- Note you can add a simple legend if have space (in Google drive – but generally we just make a full legend available at registration if people want to check it).
- Map printing - Once you are happy with the map, these should get exported out of Purple Pen into PDF format (go to “File”, “Create PDFs”, “Courses”, put in name, then press “Create”. Once controller is happy with map, these can get sent to the printers (as above).
- For more info on using Purple Pen, go here: