Jarschel’s Space Flight School
(A hands-on guide for SpaceEngine ship piloting and commanding)
Version 1.0
Preface
This guide is not official, and it may contain errors, not only within the writing itself, but also conceptual and even theoretical. You are free to share it anywhere, just remember to reference back to the original source, because it will keep getting updated, and hopefully the errors and mistakes will be minimized.
I will always try to update this whenever there is a new version of Space Engine out, but it can take a little while, depending on the necessary changes. Any comments, suggestions and corrections will be immediately considered, so it’s possible I’ll fix an error that someone pointed out, but not one that no one noticed yet. Or simply update something and not fix a problem very close to that.
The guide is written on a “roleplaying” style, and everything between brackets [like this] are said out of character. This entire page is also out of character.
To be used at your own risk!
Acknowledgements
Of course, I would like to thank SpaceEngineer, the creator of SpaceEngine, for this marvelous software! It only keeps getting better and better! It is an honor to be able to contribute to it and its community by writing this guide. I thank you for your corrections and suggestions as well!
I would also like to thank the SE community, for being so great and supportive, specially everyone who in one way or another inspired me to create mods, which in turn led me to the beginning of my contributions and eventually the creation of this guide.
Index
- Motivation and goal of this guide
- What you need and preparation
- Handy tools
- Revision Log
- Short term To-Do list
- Taking control of a spaceship for the first time
- Familiarizing yourself with the ship controls and HUD
- Spacecraft flying concepts
- Entering a stable orbit
- Reentry and Landing
- Taking-off (and entering a stable orbit)
- The auto-pilot
- Basic Level Exam: To the Moon and back!
- Plotting a course to a nearby space body
- The Warp Drive
- Your first interstellar travel
- Advanced Reentry and Landing
- Intermediate Level Exam: To Ross 882 2 and Return I
- Mistakes and panic management
- Approaching a station or mothership
- Docking
- Docking while orbiting
- Orbiting a star
- Advanced Level Exam: To Ross 882 2 and Return II
- Slingshot maneuvers
- Escaping massive gravity
- Orbiting a black hole
- Warping Interception
- Docking while warping
- Slingshotting between Galaxies
1. Introduction[1]
1.1. Motivation and goal of this guide
Space is big, and although moving around it may seem easy enough, the fact is that it’s not. Our scientists and engineers have come a long way since we first “set foot” on space, many decades ago, and the machines they came up with, which allow us to visit, explore, and even settle in places thousands of light-years away, are complicated. There were many efforts to make them as simple as possible to control, but it’s still not a walk in the park. That’s why before you even dream of seating in a spaceship bridge or cockpit you have to learn and prove yourself with the SpaceEngine Simulator.
If you are thinking something like “it’s just a simulator, I don’t need this guide”, I challenge you to take the cockpit of any ship there and start flying. Go ahead, I’ll wait.
(...)
Not so easy, right? A lot of controls, many of which we can’t even read right, let alone know what they are for! On the simulator, you can just push buttons and see what happens, but trust me, it pays off to take your time to study. I did it the hard way and tried to figure everything out by myself. It took me years to finally get good at it. Seeing as there are few resources out there to properly teach you how to become a space pilot or commander, and that many people give up promising careers because they can’t figure out how to efficiently go from one place to another more than measly millions of kilometers away, I decided to create this guide, and here we are!
If you are still reading this, I thank you for your interest, and hope I can help you become a better spaceship “driver”! I hope to achieve this by first teaching you the basic controls, explaining what each one does, and when to use some of the pre-programmed rotation methods. Of course, the HUD will have to be second nature to you, if you want to be able to quickly understand what is going on with the ship, and act accordingly.
Following the basic lessons, you’ll be able to take control of a short-range ship, and haul goods or passengers around the system where you live. It’s an honest career, but speaking of honesty, let’s be it: you don’t want to be confined to a single system, right? That’s why you can go on and take the intermediate course, and be able to reach far away stars. But why stop there? Finish the Advanced course, and you’ll be a fully licensed space commander, any company will want to hire you, and you won’t have to worry about not having a job ever again!
After that, if you feel you learned enough, you can try your luck with the Master lessons. These are very complicated challenges to be taken only by the best. If you manage to complete all of the lessons, congratulations, you are one of the few elite commanders of the universe! You deserve a big prize!
1.2. What you need and preparation
You need only a few things:
- A NICSS (Neural-Interface Computing and Simulation Station)
- The SpaceEngine Simulator! Follow this subspace network link to get it if you don’t already have it: http://en.spaceengine.org/ . This guide assumes you have the 0.98 version. If you use anything different, you may have problems (or maybe not), and we will not be responsible for any brain damage that might come from that.
Although the Skylone (yes, we’ll use that ship for the lessons. It’s the Cessna of the Space Age!) provided by the simulator is great, we’ll use a mildly modified version, with stronger engines and equipped with a warp drive for mid range travels. You can find this modified version here: https://drive.google.com/open?id=0B7OB_dhOlv9CdnNhMnJKTENIYTQ . Just extract the contents into the root SpaceEngine folder on your NICSS. Don’t worry, no original files will be modified. To go back to the original Skylone, just find the Skylone.sss and Skylone.cfg files and remove them.
Notice that you are free to use whatever ship the simulator provides, or even other modified and fictional ones, but It’ll probably be easier to follow with the same one.
Now, all you have to do is turn the NICSS on, and launch SpaceEngine Simulator! It probably has an icon on the home view, so just look at it and it should start. [Just double-click the icon on your desktop, or go to the folder where it is installed, launch via Steam, etc.] [2]
After the simulation is started, make sure you’re on a comfortable location, close to Earth. If you’re not, please go there! [‘Shift+h’ 3 times to select Earth, ‘g’ 2 times to go there fast.]
1.3. Handy Tools
- Google’s Unit Converter. Very useful to convert between many units!
- Wolfram Alpha. You can use this to make quick calculations! (The link directs you to a Torricelli’s equation calculation, use that to find out the distance needed to decelerate.)
1.4. Revision Log
This is first finished version of this guide, 1.0.
0.1.0
- Main document structure created
- Section 1 (Introduction) added
- Section 2 (Basic Lessons) added
0.1.1
- Some small theoretical/technical corrections by SpaceEngineer, the creator of SpaceEngine himself!
- Added Preface and Acknowledgements.
- Added Section 3 structure and index links.
0.2.0
- Completed Section 3.
- Changed Reentry and Landing to an easier lesson and set the previous one as Advanced Reentry and Landing.
0.3.0
- Completed Section 4.
0.4.0
- Completed Section 5.
0.5.0
- Completed Section 6 (Conclusion).
- Minor corrections.
1.0
- Updated controls list
- Added black-hole slingshot challenge
- Added “Cheats”
- Revised
1.5. Short term To-Do List
- Keep Updating!
2. Space Flight School: Basic Lessons
So, ready for your first lesson? Let’s go then!
2.1. Taking control of a spaceship for the first time
Right now, you are in reality sitting comfortably on a simulator chair. But on the simulator world, you are a floating consciousness free to visit any place on the universe. That’s cool and all, but that’s not why you’re here. You’re here to learn how to fly a spaceship! So let’s summon one for you!
- Make sure you’re on a comfortable location, close to Earth. If you’re not, please go there! [‘Shift+h’ 3 times to select Earth, ‘g’ 2 times to go there fast.]
- Click on the Spacecraft Manager icon and then on Build. Select SpaceEngine > CloseSpace Corp > Skylone. Then, click on “Take Control”. As mentioned, you don’t have to use this ship, but it’s recommended you do.
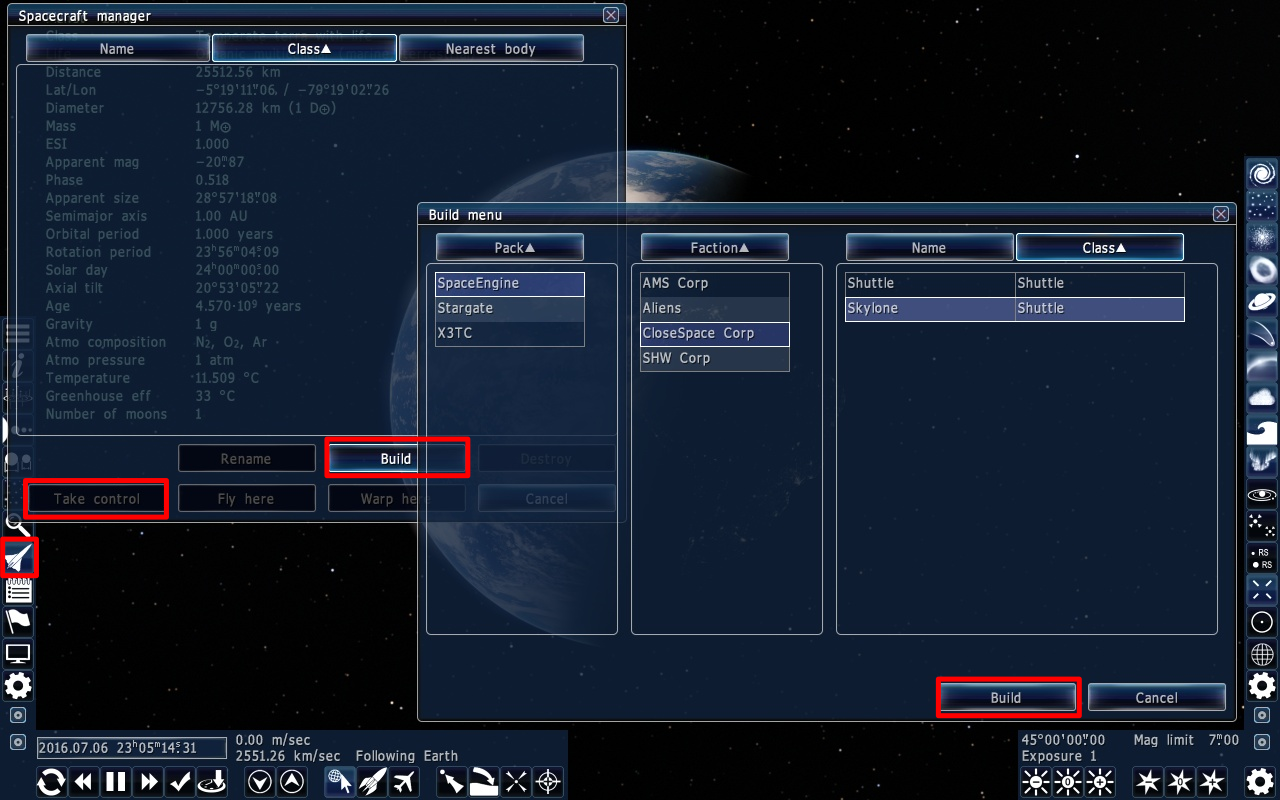
Fig. 2.1: Building a Ship.
- Whoa! That’s a lot of controls and indicators! It is overwhelming, yes. But you’re in control now, so try moving around a bit to feel the machine you’re in! We’ll study the controls on the next lesson, but for now, here are some simple ones:
[w, a, s, d, r, f: accelerate forward, left, backward, right, upward, downward]
[q, e, num4, num6, num2, num8: rotate counterclockwise, clockwise, left, right, down, up]
[Mouse wheel: increase/decrease main engines acceleration]
See how all indicators on your HUD change when you accelerate? Yeah, that’s a lot of information there, and to be a good pilot you have to understand every single one of them!
2.2. Familiarizing yourself with the ship controls and HUD
This will be a bit boring, but trust me, it’s probably the most important section of this guide! So take your time here, do not rush past this point or just skim through it!
So, this is what the HUD looks like immediately after you take control of the ship:

Fig. 2.2: HUD immediately after taking control of a ship, on Orbit mode.
That´s a little too much to study at once, don’t you think? Let’s clear it up a little: Turn the HUD off for now. [Ctrl+1]. This is what you should have now:
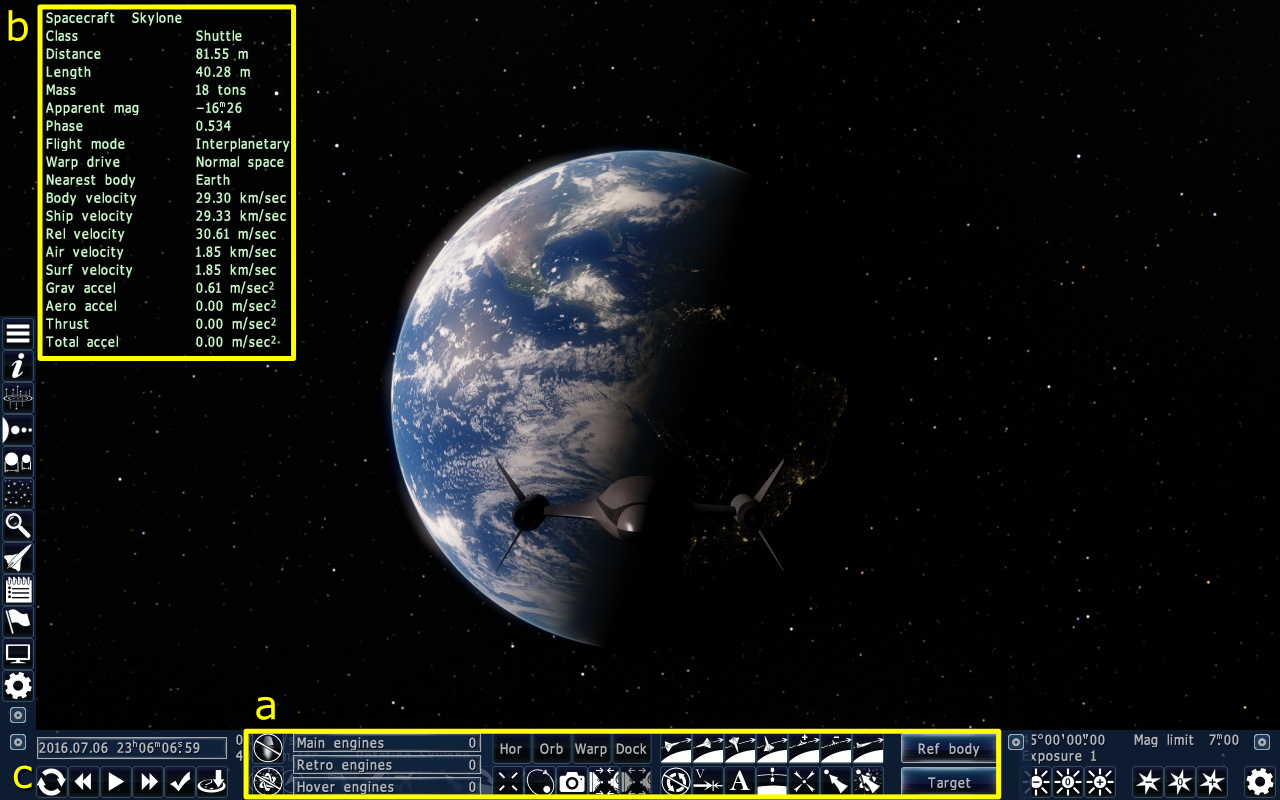
Fig. 2.3: HUD turned off. (a) is the ship control bar, (b) is the selected object info.
Phew, a lot better, right? First of all, the control bar (a)[3] is the one we will focus on [on the image, it’s covering the bar below, but don’t worry, those controls are not used when flying a ship]. The selected object info (b) contains a lot of useful information on the currently selected object, the ship in this case. We will focus on some of the info there at a later point. So now, stop the simulation time using the pause/resume button on the Time Control bar (c) and let’s go over each of the controls in detail!
Since I already mentioned it, I’ll start with these buttons. They control the simulation time. Respectively, they: reverse time direction (forwards, backwards), decrease time multiplier, pause/resume time, increase time multiplier, return time to normal, sync simulation date and time to your date and time (beware of timezones differences).

Stop Engines: This button will simply turn off all of your engines.

Stop Warpdrive: You will immediately jump out of warped space (warpdrive turned off completely).

These are indicators, but can also be used for controlling the respective engines. The ones shown can vary from ship to ship, and Hover will be replaced by Boost Exponent when the HUD mode is Warp.

Speaking of HUD modes, these will switch your HUD to the appropriate modes: Horizon (for flying on a planet), Orbital, Warp and Dock. These modes will be studied in detail on their respective sections.

Center on ship: The camera will return to the ship.

View Trajectory: The camera will zoom out until you can see the ship’s trajectory.

Switch View: Cycle through the different cameras available. May differ from ship to ship.

Docking: Dock the ship when you are at the correct position. (Usually automatic, though.)

Release Ship: When docked, this will undock the ship.
Prograde: The ship will orient itself in a way that its front will face the direction of the trajectory. Useful for accelerating.

Retrograde: The ship will orient itself in a way that its back will face the direction of the trajectory. Useful for decelerating.

Radial: The ship will orient itself in a way that its front will face the center of the trajectory.

Antiradial: The ship will orient itself in a way that its back will face the center of the trajectory.

Normal Up: The ship will orient itself in a way that its floor will face the direction of the trajectory. Think of it as landing on your feet.

Normal Down: The ship will orient itself in a way that its ceiling will face the direction of the trajectory. Think of it as jumping on a pool head first.

Horizon: The ship will orient itself in a way that its floor will face the center of the trajectory. If you are close to a planet or moon, you will face the horizon.

Kill rotation: The ship will stop rotating. This should always be enabled, unless you are using one of the orientations above.

Sync Velocity: The autopilot will do its best to match the velocity of your target, that is, your relative velocity will be zero, or very close to zero.

Assist: The autopilot will perform different actions in order to assist you with something, depending on the context or HUD mode. Examples: Sync velocity when docking, holding altitude when flying on a planet, etc.

Hold Altitude: When flying on a planet or moon, this will make the autopilot always try to maintain the same altitude.

Rotate to target: The ship will rotate until its front faces your target. This also depends on the context: It’s a planet when orbiting, a ship when docking, the warp vector when warping.

Go to: The autopilot will fly to your target. Be careful when using it, the ship need lots of processing power to accurately maintain the course! [Don’t accelerate time too much, the ship may glitch and rotate like crazy.]

Warp to: The autopilot will warp to your target. The warning above also applies here!

This button lets you click on an object to define it as the new target. If you click on Rotate to target when a different body is selected, it will automatically become the target.

This button lets you click on an object to define it as the new reference body. This lets you check your relative velocities to different bodies, and your trajectory in relation to them as well.

That’s all for the main controls! The most basic keys for moving your ship were mentioned before, so now here’s a list of all of them, for reference[4]:
==============================================================================
Controlling spacecraft
==============================================================================
Ctrl F3 ------------------------ toggle spacecrafts manager
"Rename" button --------------- rename spacecraft
"Build" button ---------------- toggle list of spacecrafts to build
"Destroy" button -------------- remove spacecraft from the fleet
"Take control" button, 4 ------- take control on selected spacecraft
"Fly here" button -------------- order spacecraft to fly to the current location
"Warp here" button ------------- order spacecraft to warp to the current location
Ctrl 1 ------------------------- toggle off HUD
Ctrl 2 ------------------------- switch HUD in the atmospheric mode
Ctrl 3 ------------------------- switch HUD in the orbital mode
Ctrl 4 ------------------------- switch HUD in the warp mode
Ctrl 5 ------------------------- switch HUD in the docking mode
4 ------------------------------ take control of last/selected spacecraft
5 ------------------------------ rotate "prograde"
6 ------------------------------ rotate "retrograde"
7 ------------------------------ rotate "radial"
8 ------------------------------ rotate "antiradial"
9 ------------------------------ rotate "normal up"
0 ------------------------------ rotate "normal down"
End ---------------------------- rotate horizontally
Left drag ---------------------- turn the current spacecraft
Right drag --------------------- rotate the camera around current spacecraft
Middle drag -------------------- look around
Mouse Wheel -------------------- change main engines thrust (if available)
Shift + Mouse Wheel ------------ change retro engines thrust (if available)
Ctrl + Mouse Wheel ------------ change hover engines thrust (if available)
Alt + Mouse Wheel ------------ change warp drive power (if available)
W, Up --------- accelerate forward (thrusters)
S, Down ------- accelerate back (thrusters)
A, Left ------- accelerate left (thrusters)
D, Right ------ accelerate right (thrusters)
R, NUM1 ------- accelerate up (thrusters)
F, NUM0 ------- accelerate down (thrusters)
Q, NUM7 ------- turn counter clockwise (thrusters or ailerons)
E, NUM9 ------- turn clockwise (thrusters or ailerons)
NUM8 ---------- turn up (thrusters or elevator)
NUM2 ---------- turn down (thrusters or elevator)
NUM4 ---------- turn left (thrusters or rudder)
NUM6 ---------- turn right (thrusters or rudder)
NUM5, X ------- stop rotation (kill rot autopilot)
Ctrl NUM8 ----- look up
Ctrl NUM2 ----- look down
Ctrl NUM4 ----- look left
Ctrl NUM6 ----- look right
Ctrl NUM5 ----- look back
Z ------------- shutdown engines
Alt Z ------- shutdown warp drive
Shift Z ------- toggle syncvel autopilot
C ------------- rotate spacecraft to the selected object
G ------------- auto fly/warp to the selected object
Shift G ------- auto fly to the selected object (using main engines)
Alt G ------- auto warp to the selected object
H ------------- toggle hold altitude autopilot (if available)
U ------------- toggle flight assist (auto syncvel with thrusters)
O ------------- toggle view of spacecraft's trajectory and planets orbits
Alt O --------- zoom out to see spacecraft's trajectory
Alt C --------- center camera on a spacecraft
T ------------- choose target object
P ------------- choose reference body
A lot of buttons and keys, right? Don’t worry, you’ll get used to them in no time! And you don’t have to know all of them in your head, only the most used ones. Also, it doesn’t hurt to leave a copy of the previous pages next to you at all times!
Now, let’s move on to the HUD modes. We’ll go through them on a different order than the buttons, so pay attention to their names! We’ll begin with the elements common to all modes:
Common HUD Elements
There are elements that are common to all HUD modes. To make it easier to identify them, switch to the Docking HUD mode (Ctrl+5), and you will see something like this:
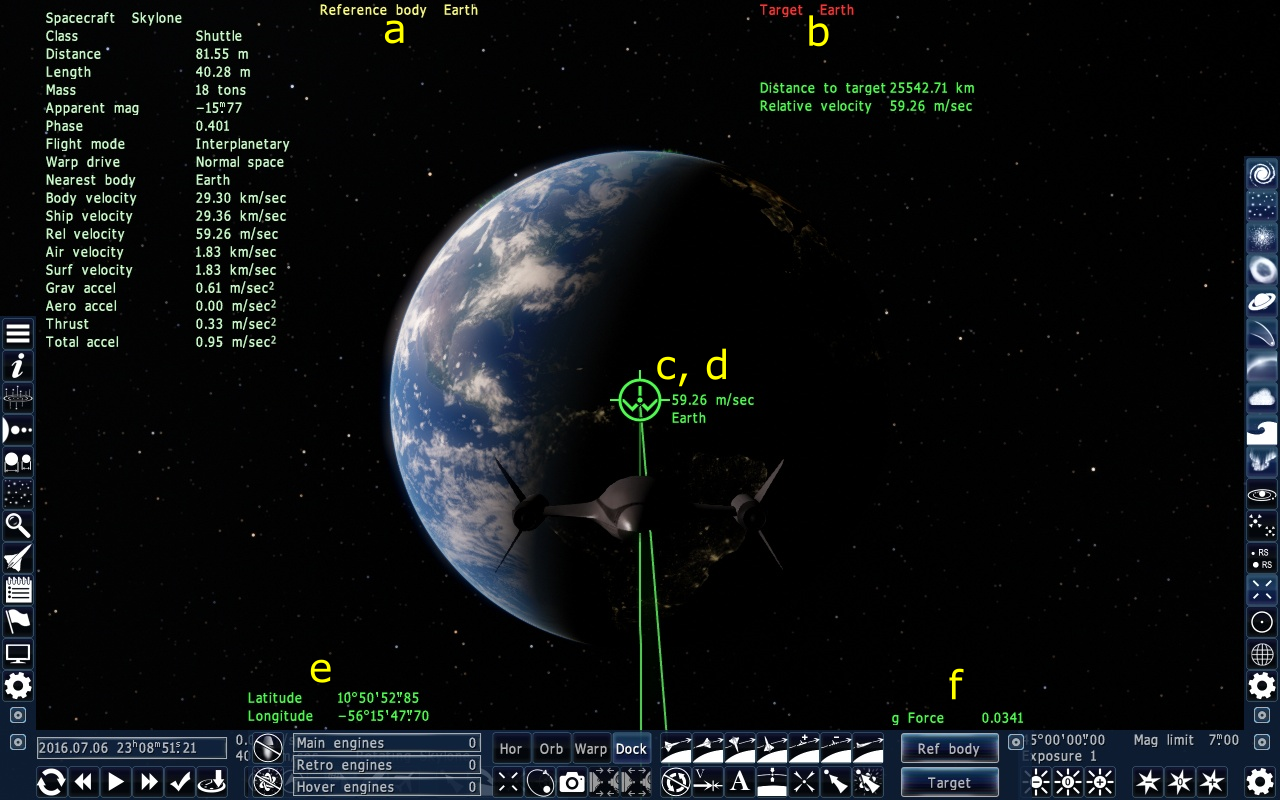
Fig. 2.4: Elements common to all HUD modes.
- Reference body indicator: This simply shows the name of the reference body used, if any.
- Target indicator: Name of the object set as the ship’s target.
- The circle with the dot at its center is the velocity indicator. Not only this shows where you are going, but also the the velocity relative to a reference body and its name. Remember: in space, you’re not always going in the direction your ship is facing, even at full throttle! That’s why this circle is so useful! It’s possible that more than one of these are present. This happens when your target is different than your main reference body shown in (a). There is also the opposite of this circle, with an ‘X’ inside. It’s the same thing, but shows the direction you are moving away from, with the same velocity value, but negative.
- The W shaped icon shows your ship’s facing. It can match (c), but it usually won’t. Additionally, since you’ll be rotating your view a lot, and many ships doesn’t have an easily identifiable front, you’ll be searching for this icon all the time, trust me!
- Coordinates indicator: These coordinates are relative to your reference body, so it only shows up if there is one.
- g-Force: The force the ship is submitted to when accelerating. If all of your engines and thrusters are off, this will be equal to the gravity. Fun fact: Back in the day, when space travels were at an very early stage, pilots (called astronauts) would sense the same g force the ship would, and it wasn’t uncommon that people would pass out when subject to forces close to 10 gs, that is, 10 times Earth’s gravity. Today we have inertial dampeners, so passing out is a thing of the past, and we can easily achieve accelerations up to 100 gs without turning into pancakes.
These elements are very important, so remember what they indicate, you’ll be using the information provided by them all the time!
Docking HUD (Ctrl+5)
The docking HUD is the most simple of all. It basically only contains information about your target and your distance/relative velocity to it. You’ll be using this a lot when docking ships, obviously, but it’s also useful when simply approaching any object, due to its simplicity:
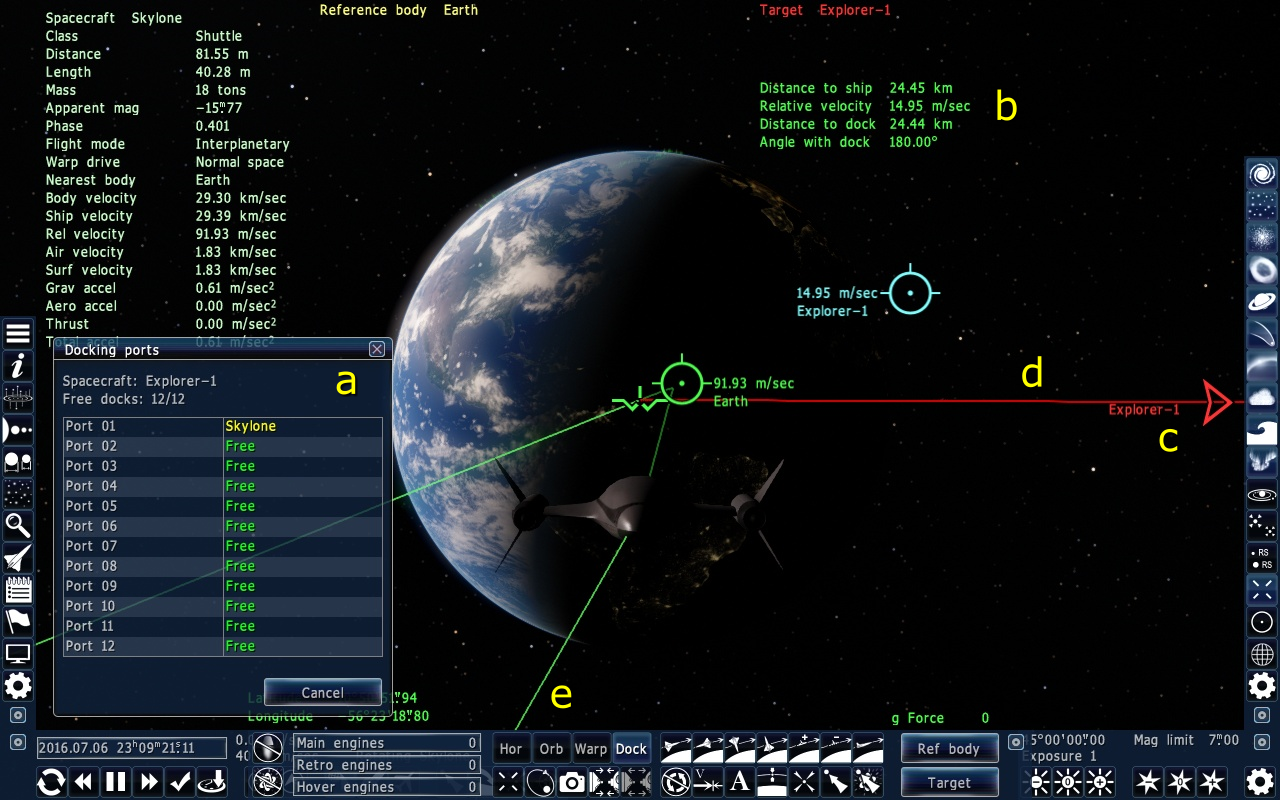
Fig. 2.5: The Docking HUD Mode.
- Docking Ports: When you select the Docking HUD mode, this window may appear. It shows the docking ports of the selected ship, and whether they are free. When docking, you simply click one of the available docks to initiate the process. (More on this on the Docking lesson.)
- Docking info. Pretty self-explanatory. Just a note: The angle with dock is a sum of all the angle differences, so you have to rotate in all directions to reach 0.
- Target ship: This indicates where the ship you want to dock with is at, and its name.
- Trajectory relative to the target ship.
- Trajectory relative to the reference body.
Notice how we now have two circles! One showing the relative velocity with Earth, and the other with the target ship!
Horizon HUD (Ctrl+2)
The Horizon HUD introduces two very important elements, and is useful when descending into a planet or moon (or star, I won’t judge you), and when flying close to the surface:
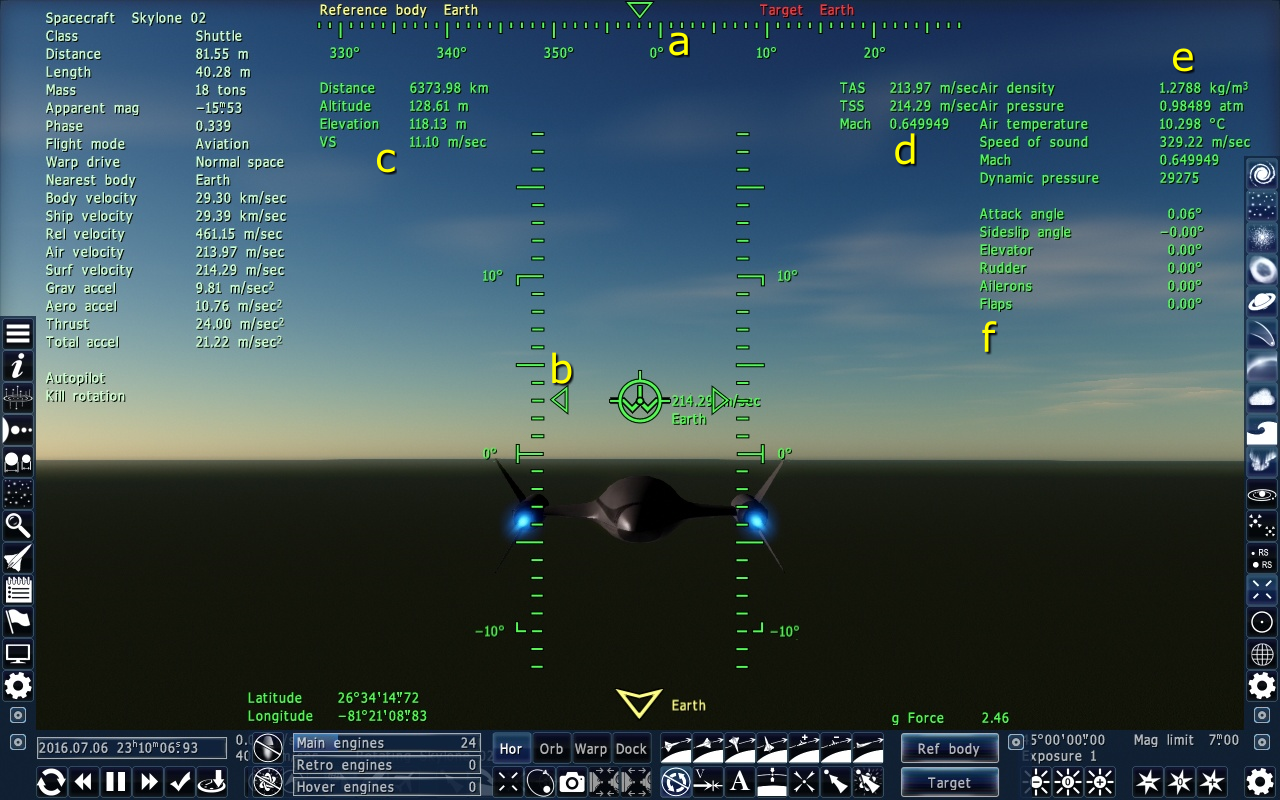
Fig. 2.6: The Horizon HUD Mode.
- Heading indicator. The downwards arrow points to the heading angle. 0º or 360º represents north, 90º east, 180º south, and 270º west. Even when on other planets, we still maintain this notion of directions. Not all planets may have a very well defined magnetic north like Earth does, so the ship systems automatically choose a “north”.
- Attitude/Inclination indicator: This shows the ship’s inclination, or Attitude, relative to the ground. 0º is straight to the horizon, positive angles are facing upwards, and negative facing the ground. 90º is straight up.
- Height indicators: They indicate your elevation relative to the ground, your altitude (relative to the “sea”, or the lowest terrain on the planet if it’s dry, your vertical speed (VS) and the distance to the center of the object (body radius + altitude).
- Airspeed indicators: These shows the True Airspeed (TAS), or the speed relative to the air, True Surface Speed (TSS), or the speed relative to the ground, and Mach, that is, how many times the speed of sound on that particular atmosphere your velocity is.
- Atmosphere indicators: Mostly self explanatory. The only complicated term here is the dynamic pressure. It is related to the kinetic energy of air particles. You will not usually care much for these values, but remember that flying in different atmospheres is always a different experience (and different altitudes too)! Each atmosphere is unique, and unless you encounter a planet with these values very close to Earth’s, don’t expect to be able to fly easily just because you know how to fly on Earth!
- Atmospheric flight surfaces indicators: Attack and Sideslip angle tells you your angle relative to your velocity. Each one of the other lines represent a surface control and the angle it’s at. Elevators and flaps control the inclination, ailerons the rotation, and rudder controls the “turning”. They only work if the ship’s flight mode is “Aviation”.
This may seem like a lot to digest, but it’ll be clearer on the hands-on lesson!
Orbital HUD (Ctrl+3)
This mode is used when orbiting (entering or leaving as well). We already saw this once, so let’s remember what it was like:
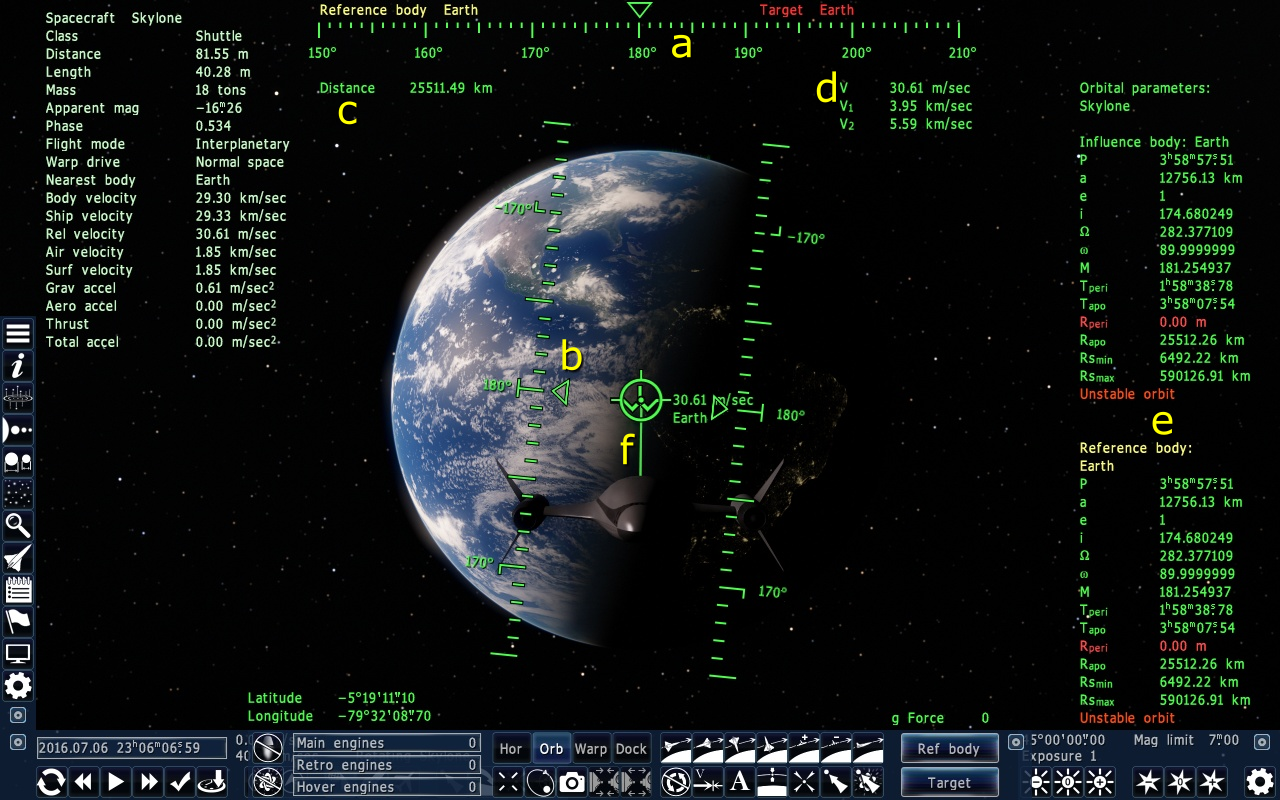
Fig. 2.7: Orbital HUD Mode.
- Same as in Horizon mode, but relative to the trajectory.
- Same as in Horizon mode, but relative to the trajectory.
- The distance to the center of the Reference Body. Not to the surface. To the center. Remember this well, or else you’ll and up crashing a lot of ships (I say that from experience).
- Orbital velocities: V is your current velocity (same as in the circle), V1 is the necessary velocity for a circular orbit based on your distance, and V2 is the escape velocity, or the max velocity the ship can have and still be able to have a stable orbit.
- Orbital parameters. In practice, you’ll only care about whether your orbit is stable or not, which can be easily visualized. But it’s good to study all of those weird letters, so let’s do that![5]
P: The orbital period, or the time it takes for a full round trip around the body.
a: Semimajor axis, usually it’s the average of the two axis of an elliptical orbit.
e: Eccentricity. 0 means the orbit is a perfect circle, anything higher is an ellipse, and 1 would represent a parabolic trajectory (not a stable orbit).
i: Orbital inclination, measured at the Ascending node (where the orbit starts going above a plane
of reference).
 : Longitude of Ascending node, it’s basically the angle of the Ascending node in respect of a reference direction.
 : Argument of periapsis, it’s the angle of the perigee (shortest distance from the body), measured from the ascending node.
M: Mean anomaly. It’s the position of the orbiting body (the ship) along the orbit, at the epoch (which simply is a predefined time).
Tperi: Time to reach the perigee (shortest distance from the body).
Tapo: Time to reach the apogee (highest distance from the body).
Rperi: Perigee length, shortest distance from the body.
Rapo: Apogee length, highest distance from the body.
Rsmin: Minimum distance for a stable orbit. Rperi must be higher than this.
Rsmax: Maximum distance for a stable orbit. Rapo must be shorter than this.
Rperi and Rapo are closely related to, but not exactly equal to the minor and major axis of the orbital ellipse. Not really the point of this guide to explain that in detail, but it’s important to point out!
- The green line shows the ship’s trajectory. If you are on a stable orbit, it’ll be the orbit. In the picture, it’s a straight line to Earth, because the ship’s engines were off the whole time, so the only acceleration is gravity’s.
Again, a lot to take in at once. You can think of this section as a reference to consult if you ever feel the need!
Warp HUD (Ctrl+4)
This mode is the most fun of all, because it usually means you’re going somewhere far away, and fast! Looking through the windows and seeing stars passing by on the distorted space is pretty cool too! It’s not as complicated as the Orbital mode, but may be hard to understand. Let’s take a look at it:
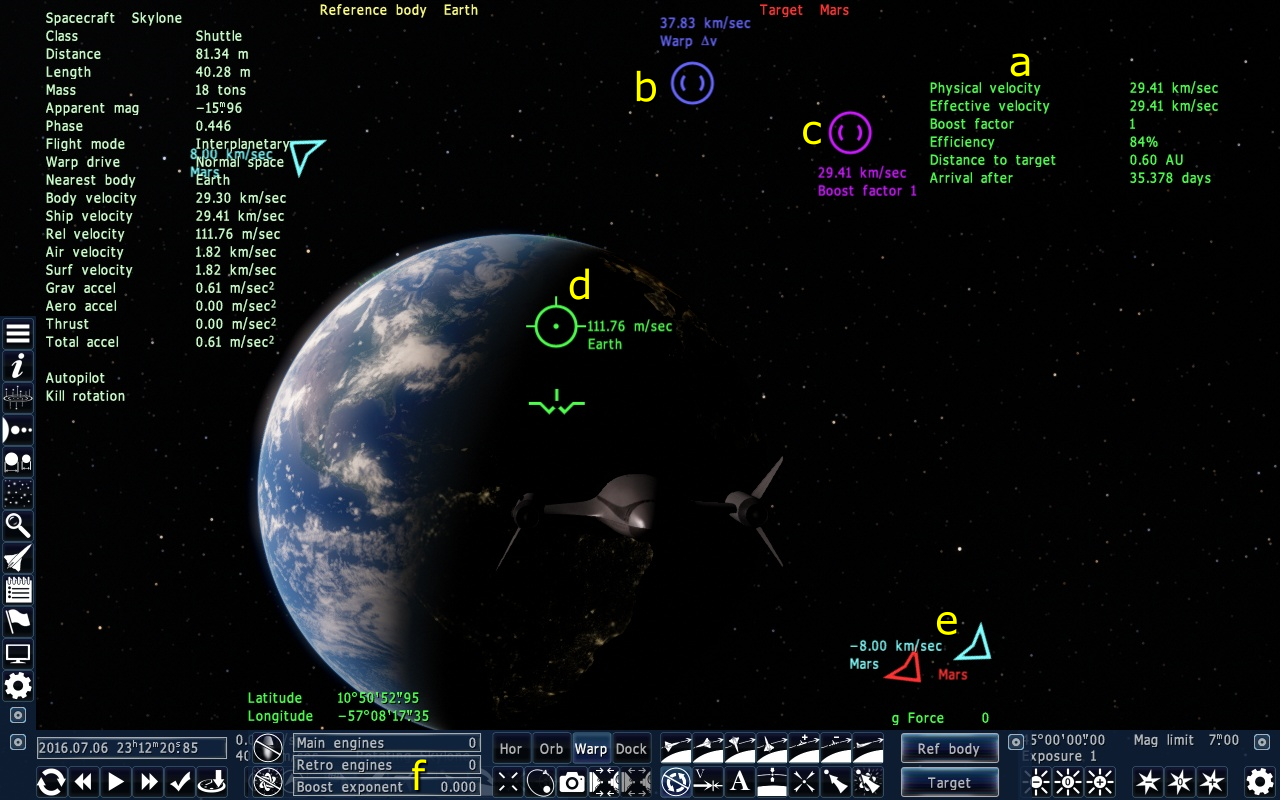
Fig. 2.8: Warp HUD Mode.
- Warp condition: It shows how the warp is going. The physical velocity is your “absolute” velocity. You might be wondering “But absolute? Does something absolute even exist?”. Well, think of it as the velocity in relation to a hyperspace point. In SpaceEngine Simulator, all the galaxies and stars are currently fixed, so in practice, this is the speed relative to any star.[6] The Effective velocity is your travel velocity, considering the warp Boost factor (which is logarithmic). The efficiency is the warp efficiency, you have to face the warp vector to achieve 100%. The rest is self explanatory.
- Warp delta velocity (to your target). This indicator shows the difference in velocity between the warp vector and a desired velocity of 10 km/s in the direction of your target. You have to make it go to zero to have a well aligned warp vector. There is also an opposite indicator, with negative velocity.
- Warp Vector. This shows where you will travel when you engage the warp drive. It is also the same as the Physical Velocity. There is also an opposite indicator, with negative velocity.
- Your velocity in relation to the reference body. When warping close to a planet, it is important to keep an eye on it, because it is possible you end up with a high speed towards it, and then you’ll crash and be disintegrated!
- Your velocity in relation to the target, and an arrow pointing to that target.
- Notice how the Hover engines change to Boost exponent. This is an indicator of the warp drive usage.
At last, that’s all for the controls and HUD elements! Remember to check this section whenever you need! It’s very important that you know the basics of all we studied here, or at least know that they exist, because it’ll make what’s coming next so much easier!
2.3. Spacecraft flying concepts
If you have been paying attention to the selected object info, indicated by (b) in Fig. 2.1, and depending on the time you took to pause time, you may have noticed that the ship’s relative velocity increased. This value is relative to the reference body selected, so it increased because Earth’s gravity is pulling you towards it. This is one of the most important concept to learn: you’re almost always subject to the gravity pull of a celestial object. This is very different from some games that call themselves simulators. SE is meant to be realistic. This means that it’s hard to learn how to pilot a ship, but on the other hand, you’ll leave the simulator as a capable pilot (if you follow all the lessons, of course). So here are some of the concepts you have to learn, and in the process, you’ll probably have to “unlearn” some practices you may have got from lesser games.
Gravity
Like I said, unless you’re far from any star system, you’ll always have gravity pulling you somewhere. It’s hard to stand still. So keep this in mind when plotting courses, and unless you’re on a stable orbit, be careful and aware of your surroundings!
When plotting a warp course near a planet or star, it’s very likely you’ll end up falling towards it, and you’ll only be able to adjust your course when you’re far away from any massive body. When approaching a planet when warping, the same thing will happen. You can’t have a perfect course, so don’t spend more than a few seconds adjusting the velocity at less than 10 m/s, because it’ll keep changing! Unless you’re in empty space.
(Almost) Everything moves!
On our universe, everything is moving. Every. Thing. If you think you are standing still right now, it’s only because your velocity is the same as Earth’s. And Earth is moving around our sun. And our sun is moving in relation to other stars. And all stars are moving in relation to the center of our galaxy. And our galaxy is moving in relation to every other galaxy. Our universe expanding, so you can picture it as a movement relative to itself. So when going to one celestial body to another, you’ll have to take this movement into account.
In our lifetime, though, we’d (probably) never be able to notice any difference on the distance from one star to any other. From one planet to another, no matter if they’re in the same star system or not, it’s a very different story. The movements are VERY noticeable. That’s why you’ll often arrive at a planet at a relative velocity of ~20 km/s after dropping out of warp speeds.
Inertia
Picture yourself waking up on a cold and rainy saturday morning, with nothing important to do. Then the phone starts ringing, but it’s out of your reach. What do you do? To ignore it would be your first thought, right? That’s because it takes effort, a lot of it, to change your state from laying down relaxed, to moving. And that’s basically what inertia is. When a body is at a constant velocity (0 is also a constant velocity), it takes effort to change it. This effort is a force, which causes an acceleration depending on the mass of the object. So the more you want to change some object’s velocity, the more energy you’ll have to provide. In spaceflight terms, this translates to more thrust. Remember the physics classes you slept through in high school? They would help you now![7]
If you played around with the thrusters’ controls of the ship, you may have noticed that the ship doesn’t stop moving when you release the thrust, or turn off the engines completely. This is because of inertia. In our daily experiences, there is friction and drag, forces that are always present, slowing all movements until they stop (relative to Earth, of course!). But in space, there are no such forces (most of the time, anyway). So the ship just keeps on moving, because when you turned the thrust off, there are no other forces present besides gravity to make the ship’s velocity change, and it maintains the same speed it had when you turned the thrusters off.
This is hard to get used at first, and is one of the things that confuses many aspiring pilots! Roughly, if you want to move to the right, for example, you accelerate a bit, wait until you reach the desired position, and then accelerate on the opposite direction, until your velocity reaches 0 again. This must be done all the time! How to decelerate is one of the most important techniques you should develop. I recommend you try it now: Accelerate to 10 km/s in any direction you want, and then decelerate. You’ll see it takes a long time, so you have to always act ahead. This is one of the disadvantages of spaceflight, but on the other hand, space is big and everything is usually far away, so you have time to analyze, think, and plan your movements.
Oh, and as always, these velocities we’re talking about are relative to some other object! Which brings us to…
Relativity
You probably noticed I’m saying “relative velocity”, “velocity in relation to”, a lot. That’s because all velocities are relative to something! This is also called relativity, but it’s the Galilean Relativity. Take the situation you’re on now: Your ship has a velocity relative to Earth, and Earth has a velocity relative to the Sun. If your ship’s velocity to earth is zero, you’re stopped in relation to Earth, but moving in relation to the Sun. Effectively, your velocity in relation to the Sun is the Earth’s velocity in relation to it, plus your velocity in relation to Earth. It’s not an easy concept, so here’s a small schematic to aid you (or not):
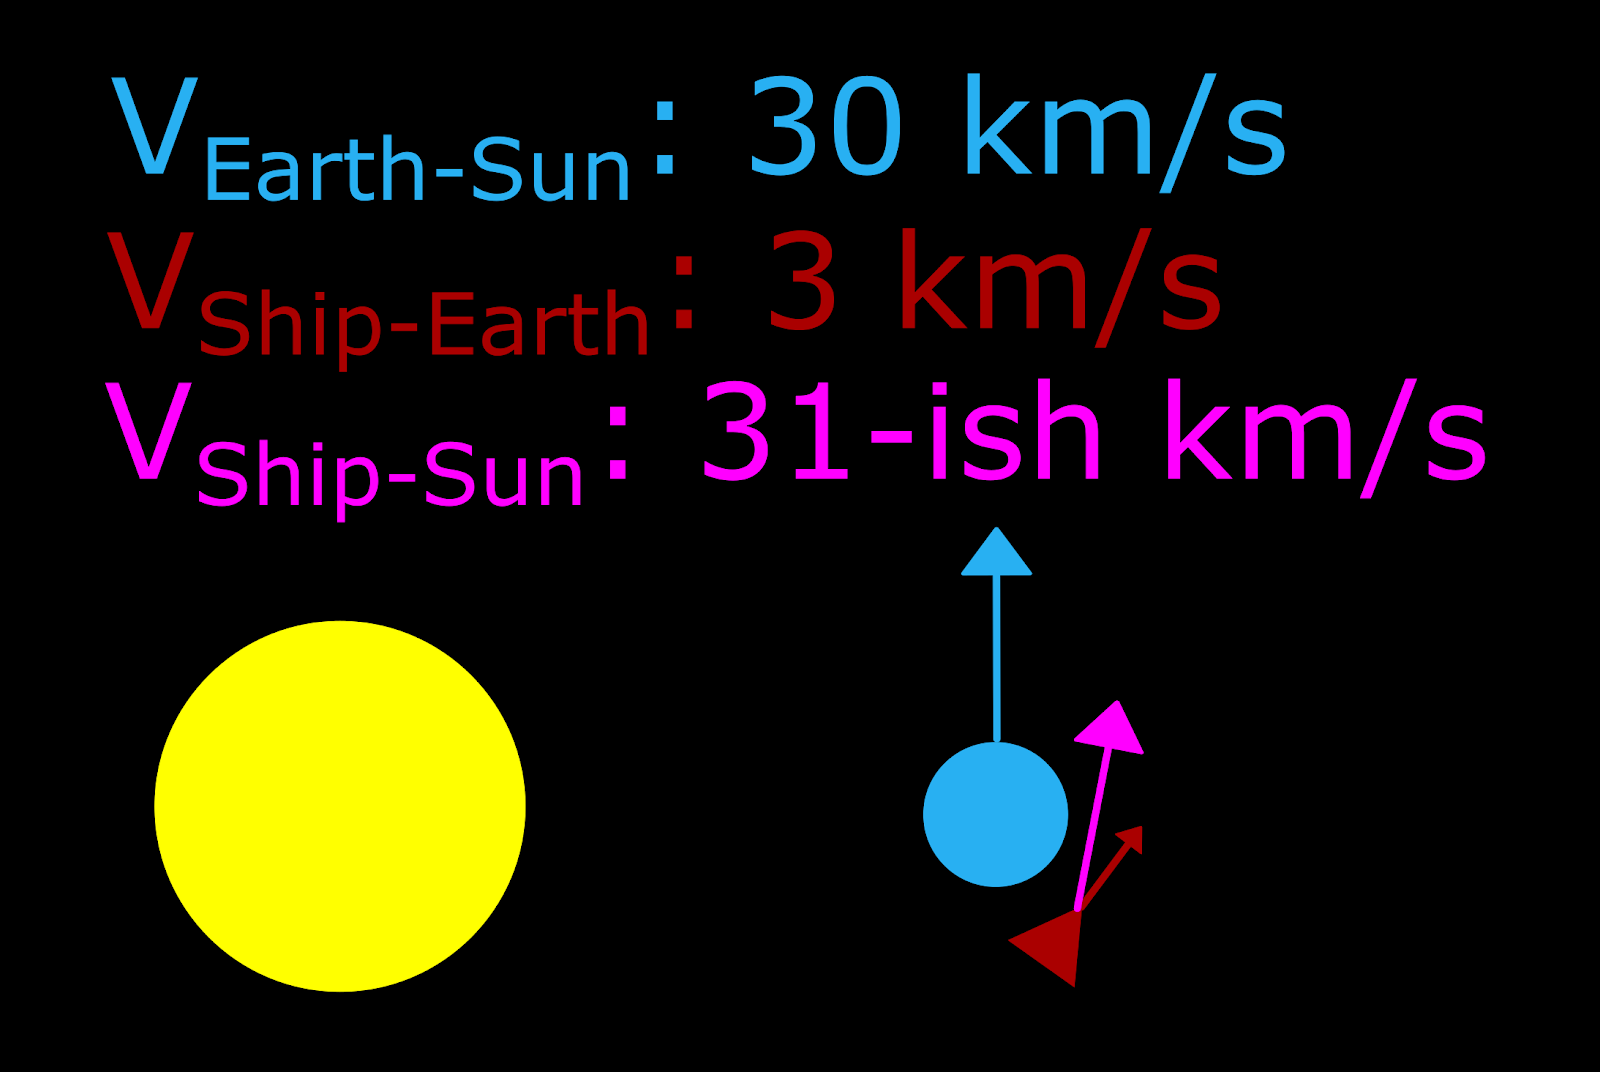
Fig. 2.9: Relative velocities.
If Earth’s velocity in relation to the Sun is 30 km/s, and the ship’s velocity in relation to Earth is 3 km/s, this means that the ship is moving at something close to 31 km/s in relation to the Sun. Notice how the pink arrow is a bit tilted? That’s why the final velocity may not be simply 33 km/h, because the velocity vectors must be summed. This means directions are taken into account.
I could go on and on on this subject, but it’s out of the scope of this guide. Just remember that speeds are relative to something, and directions play a big role on all of it!
Moving on to Einstein’s Relativity, just a quick note: it is partially implemented on the simulator (yes, it’s THAT awesome!), and there are plans to implement it to a greater extent, specially time-dilatation, which means time would pass differently at different parts of the universe, depending on speed and gravity. Even warp effects can cause a big impact on how time is perceived, without reaching an insanely high physical velocity.
Another consequence of relativity would be that it’s impossible to reach the speed of light, because the energy requirements to accelerate something going at a fraction of c increase exponentially the closer it is to c, as the mass also increases. However, we can reach c (but not more than that) with regular thrusters in SE.
Expect to see some of these effects on a future version of the simulator!
Atmospheric flight
The last concept you need to keep in mind is how a ship behaves when there is really a drag or friction force present. Specially when this in turn creates a lift force due to a difference in air pressure at different parts of the ship.
A spacecraft’s thrusters are a big deal. They are strong, and are able to push the ship forward with many g’s. This may cause a massive lift force to be generated if the ship is aerodynamic, and may vary depending on the atmospheric pressure, air density, temperature, gravity, and so on. That’s why many experienced space pilots end up crashing their ship when they’re flying on a planet. It’s very, very different! On atmospheric flight, you have to be gentle with the thrusters, be patient, go slow, and mind your attitude (inclination) and rotation. Usually, the stronger the thrust, the higher the ship will go, and the more downwards your attitude, the faster the ship will go. It’s really hard to adapt quickly to the atmosphere you just entered, so the only tip here is: go slow. Differently than on space, on air the drag and friction forces are present. So, the velocity will not be maintained due to inertia! The thrusters will have to always be on (very weak, but always on), and there will be a preferential orientation, that the ship will always tend to return to.
Only practice will make you understand all of this, so we’ll return to this topic on the specific lessons!
2.4. Entering a Stable Orbit
At this moment, you should still be in your ship relatively close to Earth (~25000 km to its center), with some relative velocity due to gravity and experiments with the controls. If you’re not, please follow the instructions in Section 2.1 to create a ship near Earth and take control of it!
I’ll go through the process of entering a stable orbit and share with you what is happening with my ship. This will be done in simple (but many) steps:
- Check your situation.
If Earth is not set as target or reference, click on the corresponding buttons on the ship control bar, and then click on Earth. Sometimes it may be hard to click on the object you want, or it may be out of sight, so you can select it any other way (F3 is very practical), press F2 to open the Planetary System window, and click there. Here’s what I have:
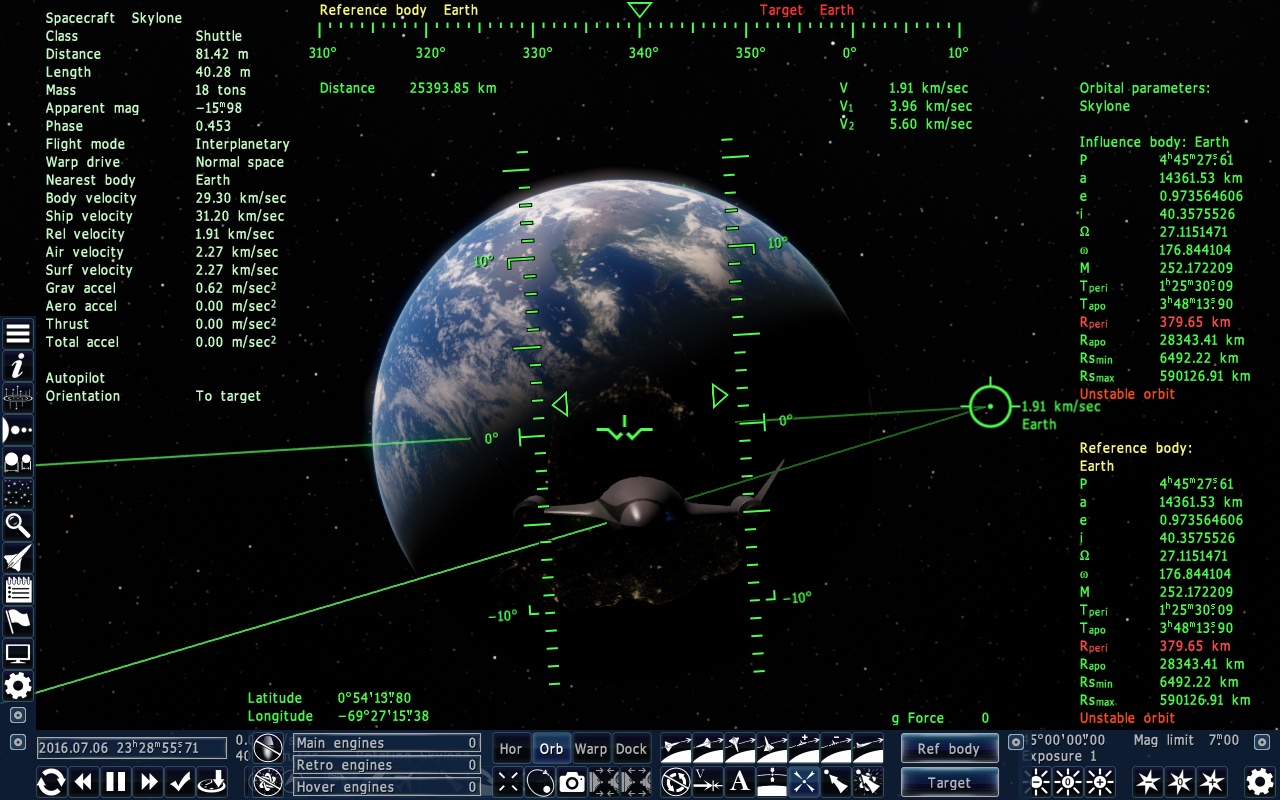
Fig. 2.10
The first things you have to look at are your distance and relative velocity. If the distance is too short (close to Rsmin) or the velocity too high (anything that would take your ship more than a minute to stop), you have to act fast! Ok, space is big and you have time, but there may be situations where even a few minutes are not enough! In the image above, I accelerated a bit on a random direction to have a considerable velocity. Your numbers may be different and that’s alright, so don’t worry!
- Act.
You could use your current velocity and reach a stable orbit without coming to a full stop (remember, full stop in relation to Earth!), but that requires experience. So, let’s zero out our relative velocity! Simply click on the Retrograde orientation button[8] and wait a bit until your ship is oriented. When the auto-orientation is finished, accelerate forward and keep an eye on the velocity indicator! How much you accelerate and whether you use the main engines or only the forward thrusters is up to you, it depends on your current velocity and the ship’s capabilities. As a general rule, if the ship is faster than 1 km/s, I use the main engines, if not, the thrusters are usually enough.
Pro tip: When the ship’s velocity is almost zero, or if you accelerated too much and are now going the opposite way you were before, the ship will begin turning on its own again. That’s because the auto-orientation is still active and your trajectory is changing (since gravity is still acting), or it reversed if you passed the point. That’s why it is a very good practice to turn off the Retrograde orientation (just click again on the respective button) when you’re near the end of the deceleration process. That way, you won’t feel lost when the ship turns and you have no idea where you’re going anymore. Another useful thing to do not only on this situation, but in every situation that is possible, is to leave the Kill rotation option on. This will make the ship stop rotating if you’re not actively rotating it. When you activate any orientation, it’ll turn off automatically, so, whenever you’re not using an auto-orientation function, enable Kill rotation!
When you’re going at less than 100 m/s you don’t have to change your orientation again, you can kill the main engines and just use the thrusters for the final “stop”. You may struggle a bit at first, so keep trying until your velocity is 0 m/s. If you were paying attention to what you’re reading, you may be thinking I must be crazy, because I said earlier that you shouldn’t spend more than a few seconds adjusting your velocity at less than 10 m/s. Yes, these are contradictory, but I stand by what I just said: keep trying until your velocity is 0 m/s. It’ll never happen, because gravity will always increase your velocity towards Earth. But it’s good to practice here all the rotations, orientations, thrusters and etc, so you have a good feeling of when to use each of them. Decelerating is THE most important skill to learn before attempting anything else. You’ll use it all the time, so take your time on this step, and learn it well.
- Align.
When your velocity is low enough and all engines are off, it’s time to align your ship to an orbit. You may be tempted to activate the Prograde orientation, because it makes the ship face the orbit trajectory. Well, go ahead and do that. It is not what you expected, right? Now activate Rotate to target. It’s the same, right? That’s because Prograde makes your ship face the direction you are going! In this case, you are falling towards Earth, so that’s where your ship will point.
To enter a stable orbit, you have to estimate its trajectory. Try to imagine a tangent line on Earth’s surface, and imagine it is now close to you. You have to align your ship with this imaginary tangent. Use all the rotation keys to help you with this (q, e, numpad 8, 2, 4, 6)! It doesn’t have to be perfect.
Pro tip: Think you got it? I trust you made it close enough, and it’d probably be fine. But, there is an easier and more reliable way: Activate Horizon orientation. Your ship will now face a perfect tangent with Earth! You can change the orbit direction if you want, using numpad 4 and 6 only. You have to deactivate the auto orientation, though, and as before, I recommend that you enable Kill rotation.
- Accelerate!
Now all you have to do is go full throttle ahead until the orbit is stable! But be careful and always watch the orbital parameters on the right part of the screen!
As soon as Rperi gets bigger than Rsmin, the orbit will be stable. Turn off your engines at this point, and click on View ship trajectory. Let’s see what we have (your situation may be a little different, but the overall idea also applies):
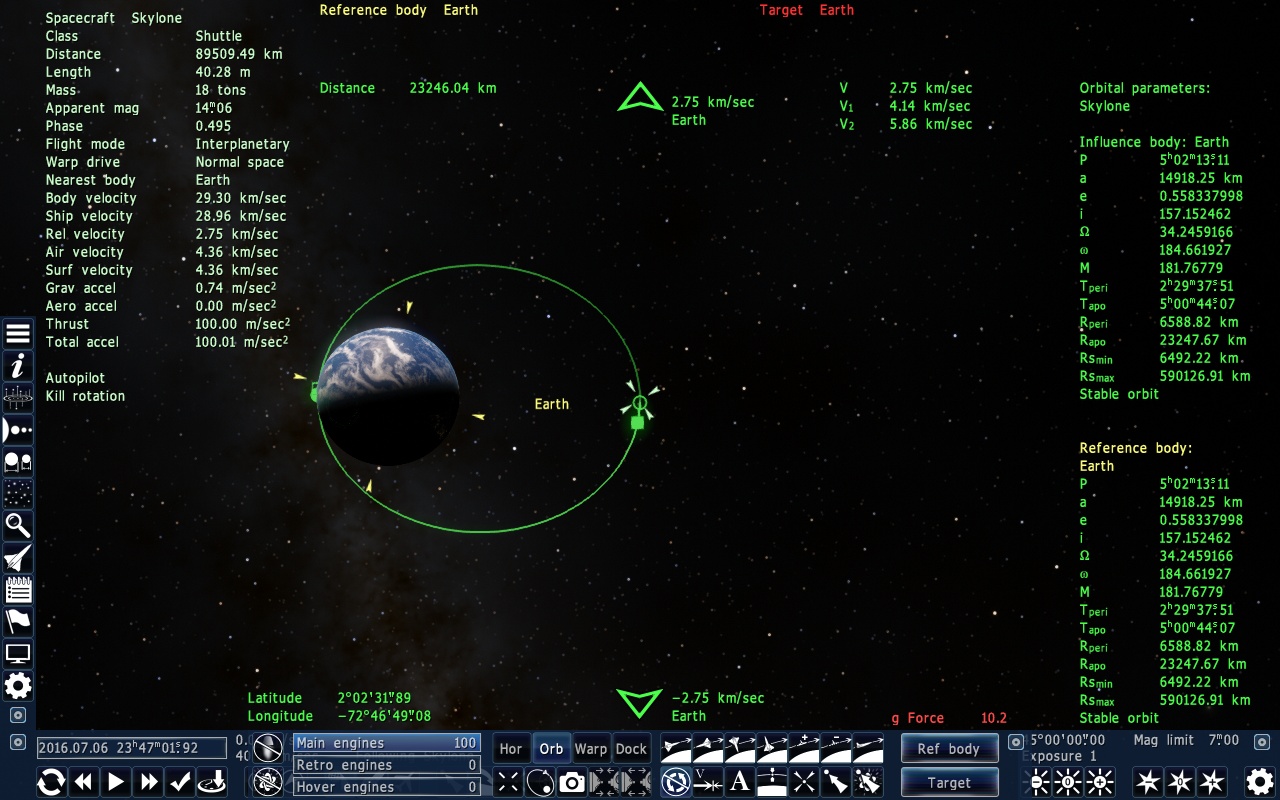
Fig. 2.11: First stable orbit.
“Is this really a stable orbit?”, you might be wondering. It is. But look at that, there’s a point where it seems the ship will crash on Earth! That’s because one of the axis is a lot bigger than the other. Remember how we started about 25000 km away from the center of the Earth? That will be the major axis (Rapo), and what we did when accelerating was simply increase Rperi until it was away from the surface of the planet, roughly above its radius. Remember what the orbital parameter ‘e’ means? If you don’t, it’s the orbit’s eccentricity. The lower its value, the more circular the orbit will be. It’s currently at 0.558, a very high value! And what about V1? It’s the velocity needed for a circular orbit at the current height (4.14 km/s). Notice how the ship’s velocity is below that, at 2.75 km/s.
- Make it circular.
You don’t really have to do this, but it’s a good practice, to feel the control you have on your ship’s orbit. Reset the camera (Center on ship button), and start the engines again! Wait until Rperi is very close to Rapo (both will change, but Rapo changes a lot slower than Rperi) and then kill the engines (z). Be careful, because the rate of change of these values grows exponentially! They’ll change faster the longer you accelerate! You now have an almost circular orbit! Take a look at it with the trajectory view:
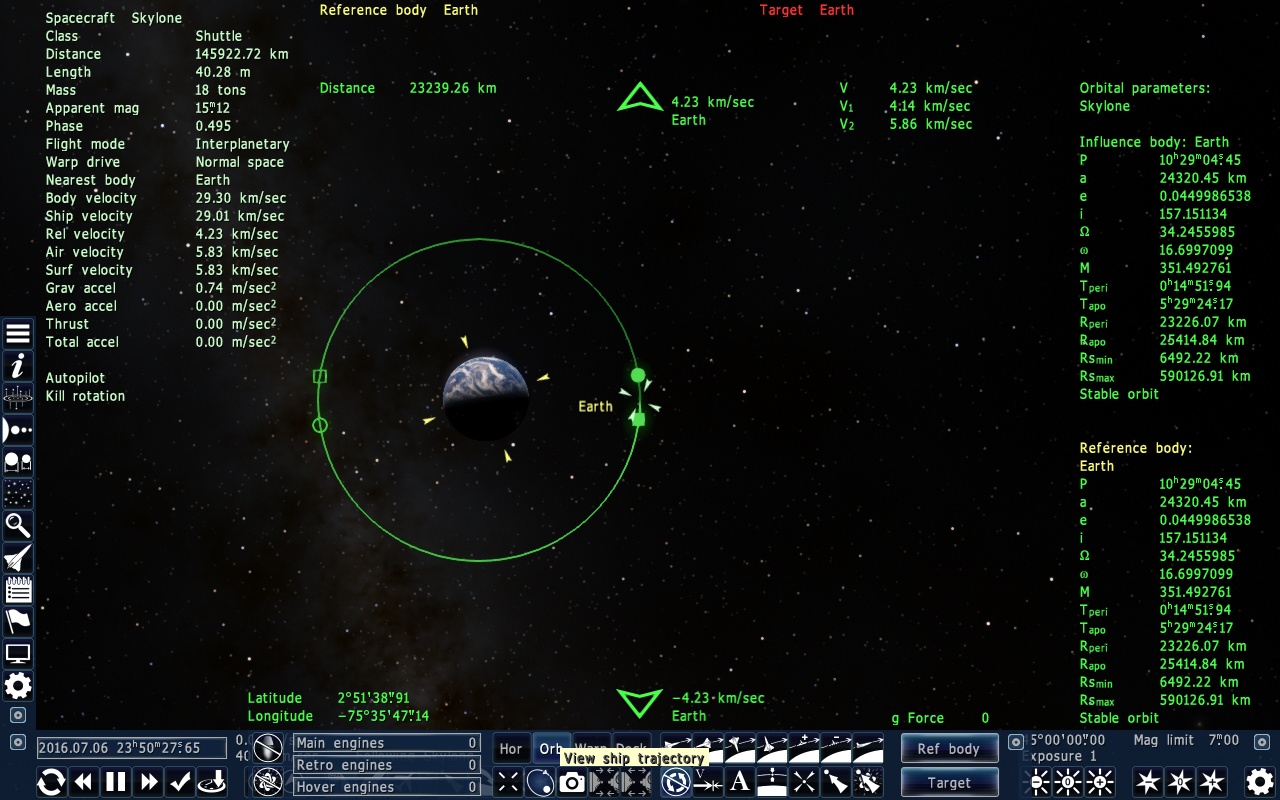
Fig. 2.12: An almost circular orbit.
Take a moment to appreciate the beauty of what you accomplished! Your ship will stay on this course forever and ever, until you decide to take it somewhere else. Check your velocity, it should be very close to V1. Mine is bigger, because I accelerated for too long. Also, take a look at the eccentricity. It’s a lot lower than before, but…
Pro tip: Do you feel that? That “itch” to make it even more perfect? For the OCD people, I’ll teach you how to reach a 99.9999% perfect circular orbit. First of all, adjust your velocity. If it’s lower than V1, accelerate forward, if it’s higher, backwards. Do this until your speed is the same as V1. Check your eccentricity. Are you satisfied with that? Of course not, you have OCD! So now, use your thrusters (w, a, s, d, r, f) to decrease the value of ‘e’ as much as possible. Go forward/backward, left/right, up/down, then repeat. Use short keystrokes. Be gentle. This is my result:
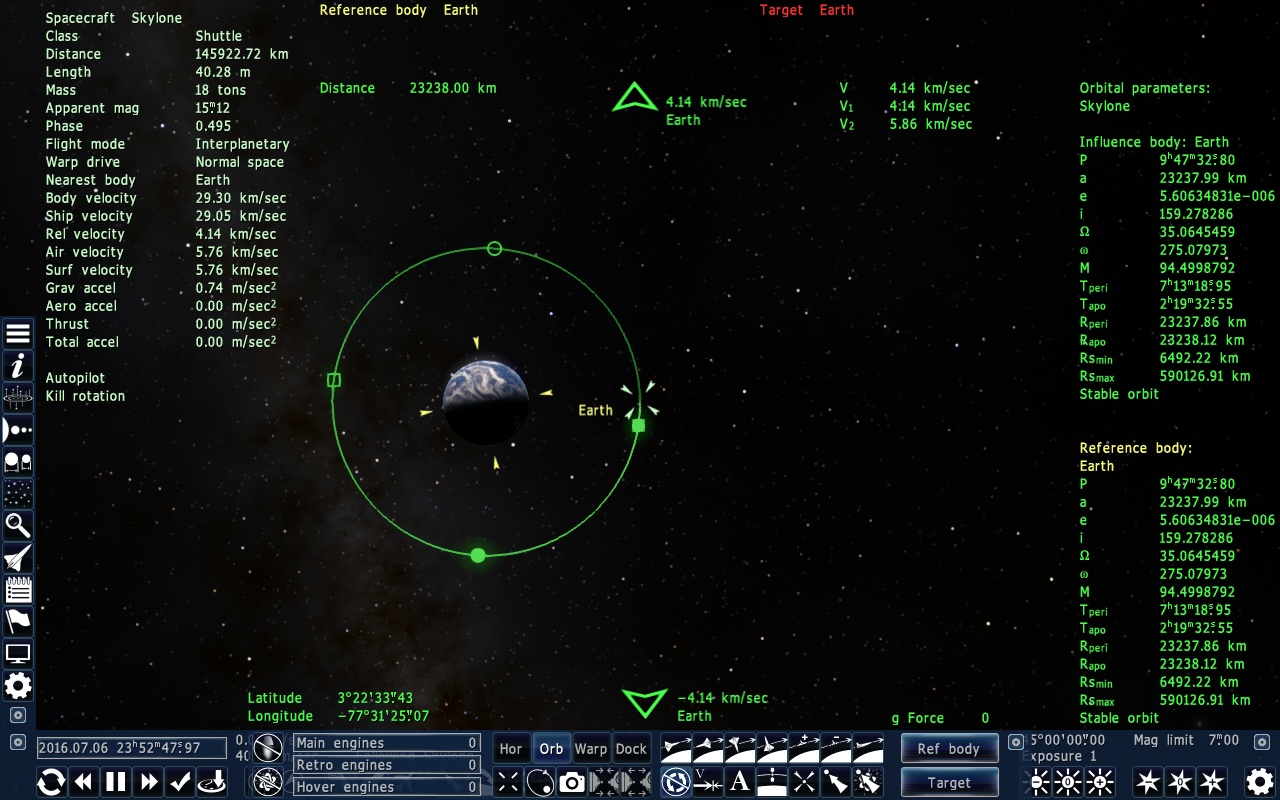
Fig. 2.13: As perfectly circular as it gets.
Check my eccentricity. Were you able to go below that? If you did, wow, congratulations! It’s really hard to get lower than 0.001, so congratulations anyway if you reached that!
You are now on a stable almost perfectly circular orbit! Change your orientation to Prograde, and admire the beauty of our home planet! Accelerate time if you want!
What you learned here applies to any planet, moon or star! Just remember to check all the information the HUD gives you, and act accordingly.
The only thing I didn’t mention here is Rsmax. If you try to orbit a celestial body at a distance higher than that, there is probably another body whose gravity effects are more significant than your target’s at that point. This is defined by something called the Sphere of Influence radius. This doesn’t mean the weaker gravity is discarded, it’s still there, and it’ll still influence your orbit!
Ready for your next lesson? Let’s go then!
2.5. Reentry and Landing
There is a very easy way to land. Set your ship to Retrograde orientation, stop, and let it fall! Of course, you’ll be dead if you attempt this in real life, so we’re definitely not doing that. You’re here to learn, and learn it the right way!
I’m assuming you’re still on the ship’s cockpit, right? On a stable orbit? Let’s simply continue from that point! If you’re not, please take your ship to orbit (because I’m sure you learned how to do that).
As before, I’ll accompany you with my ship on all steps! Notice: There are many ways to reentry the atmosphere, and it can be very different to land on a planet without atmosphere, or moon. I’ll tell you the safest method, and on section 3.5 I’ll go over the method I enjoy the most! (But surely not the safest one…)
Pro tip: It is really unlikely that you’ll be able to safely enter the atmosphere and land the ship on your first try. So, before attempting the next steps, create as many Skylone ships as you think will be necessary. I’d go with at least 3. That way, when you crash your simulator ship, you can simply take control of another that’ll be waiting for you up there, in the same orbit as the original.
- Align and decelerate.
Basically, we want to decrease our orbit radiuses until we’re in the atmosphere (or close to the planet’s surface). To do this, activate Horizon orientation, wait for the alignment, and then use your back thrusters to decelerate. You can use retro engines too, but you usually will not need that much power. Activate trajectory view, that’ll help you a lot! Wait until your path (the filled green circle) “touches” the planet’s edge, turn engines off, and then disable auto orientation to be able to Kill rotation (let’s call this process of aligning and then killing rotation ‘Align and Kill’). After that, you should be in a situation similar to this:
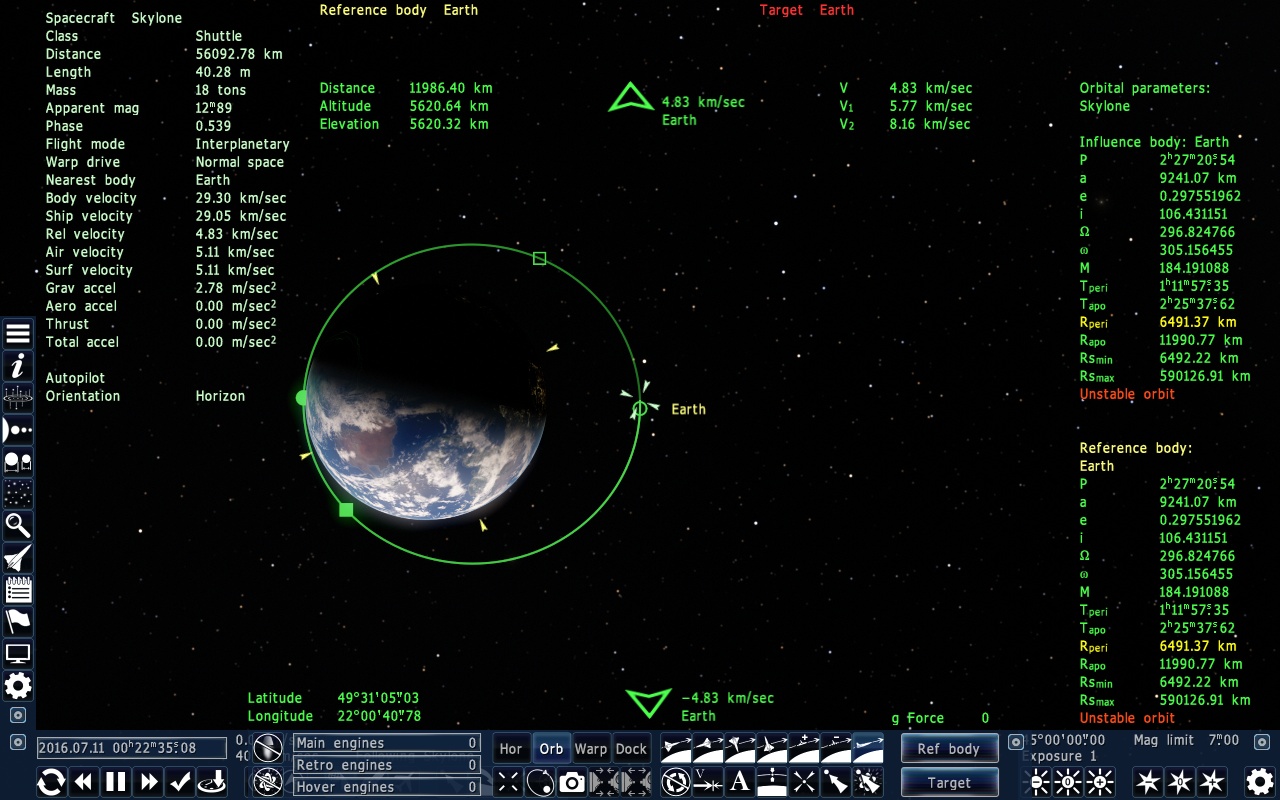
Fig. 2.14: Ship trajectory almost “touching” Earth.
See how the orbit is not stable anymore? That’s not a problem, since we want to land. Notice how I stopped when Rperi is just below Rsmin. This means that we’re on a collision course! But don’t worry, everything’s under control...
- Tweak landing spot.
You’ll land very close to where the trajectory touches the planet, but maybe that’s not exactly where you want to be. You can tweak the position using your thrusters, but be careful, because if the descent path is too steep, you’ll have problems landing! It’s best to use Prograde orientation for this.
You can’t push it much to the sides, so it’s better to align your orbit to where you want to land when entering it! I decided to land somewhere on Australia:
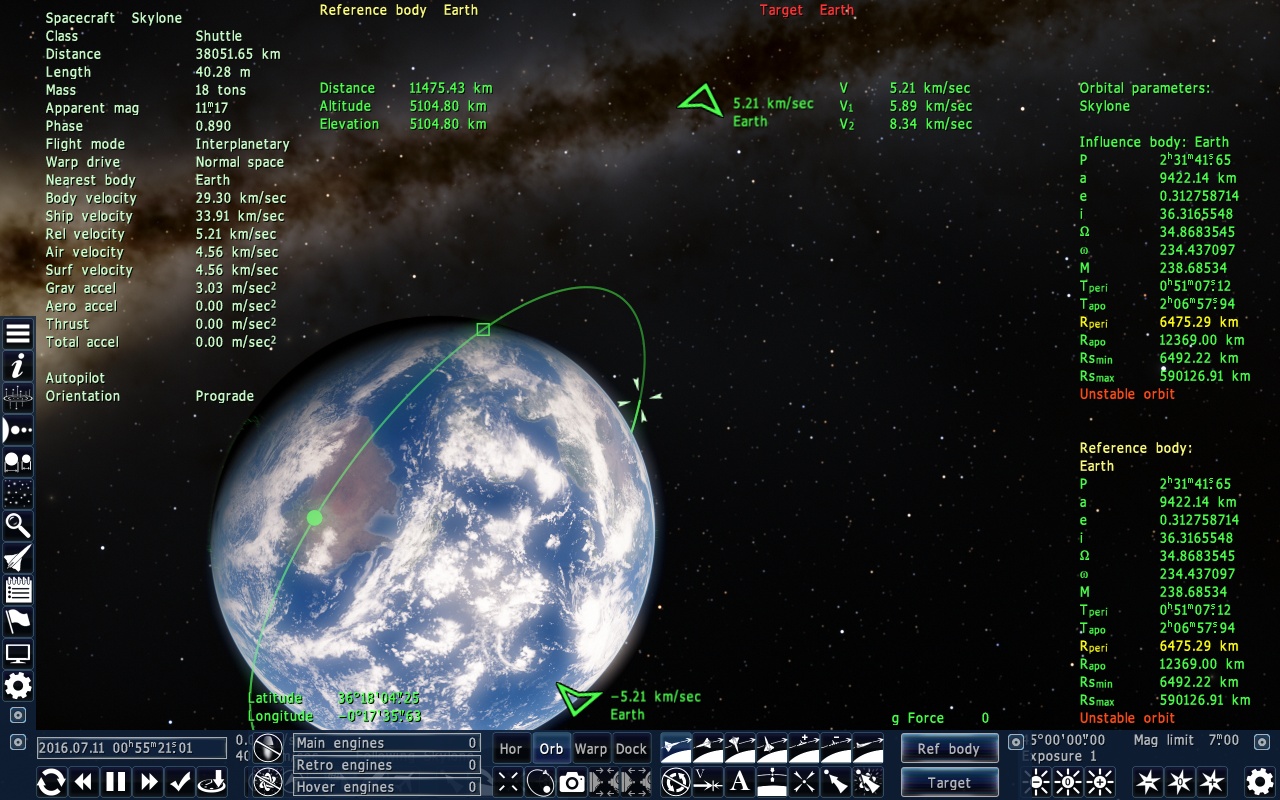
Fig. 2.15: Landing on the Outback...
You may struggle with this at first, but don’t give up! It’s totally possible, just takes practice!
- Wait...
Now you have to wait a while. You can speed up time if you want, but carefully! It is possible that while you wait, Earth will rotate enough to completely change your landing spot! You can try and make small corrections, but if it takes too long, it may be beyond the ship’s capabilities to maintain it at the right place, while also keeping the approach process safe. The closer your orbit is, the faster you’ll land, and the more accurate your landing place will be.
Keep an eye to the Tperi, it’s close to the time before you touch the ground, but watch your Elevation too!
I suggest that at ~100km you Align and Kill (Horizon)[9] and go back to the normal view. Because you’ll probably need to…
- Make last-minute corrections!
On my case, I didn’t decelerate enough, so even though it seemed I was going to touch the surface, I could see it wasn’t really going to happen, because the filled green circle was way above the surface. Maybe this isn’t the case for you, or maybe you have another evident problem. No worries, you have time to make the corrections you need. I simply decelerated even more:
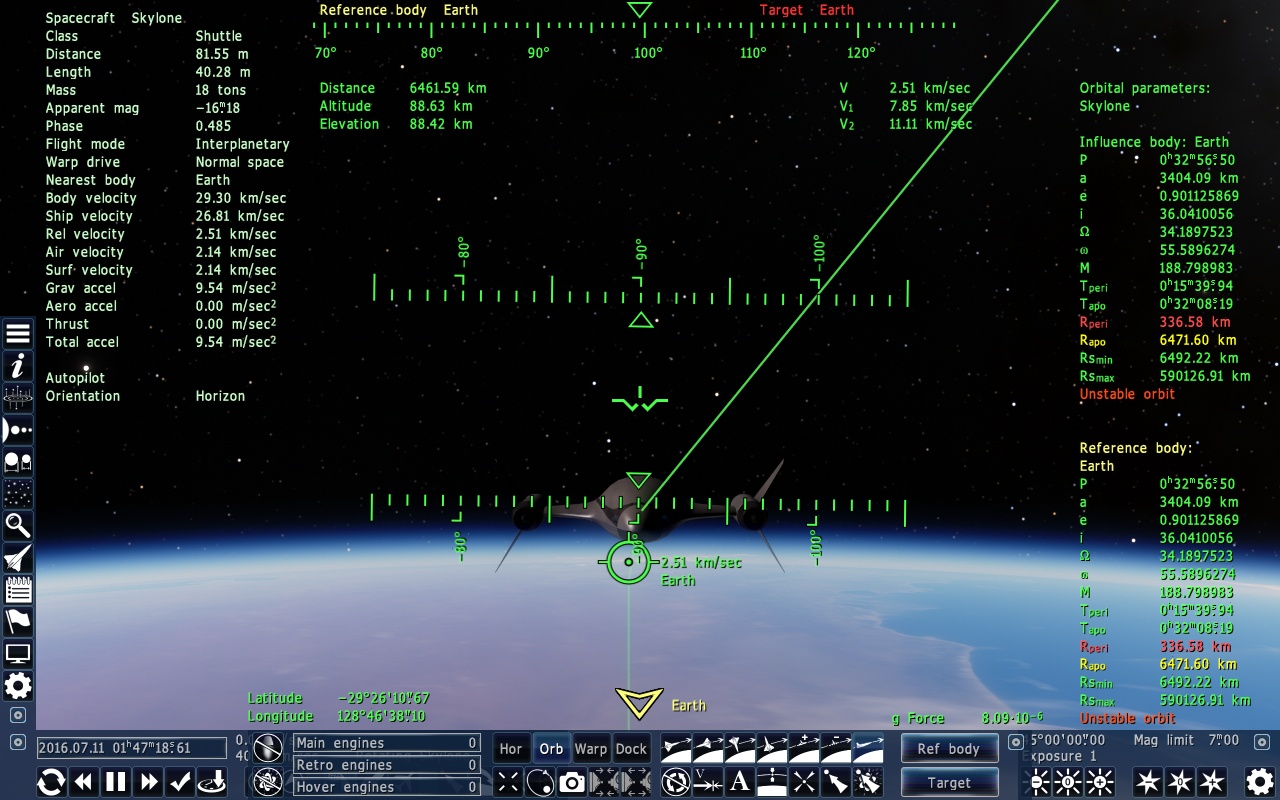
Fig. 2.16: After the last corrections.
Now change your HUD to Horizon and wait again, watching your elevation very closely, because at ~40km, something very interesting will happen...
- Control your attitude.
I’m not lecturing you. This means that you have to be ready to rotate your ship up! When the atmosphere is thick enough, your ship will drop its nose straight down, so it’s your job to keep it controlled! If you followed my advice and Kill rotation is enabled, it’ll start going up and down on its own, as it tries to stop the rotation. Using Numpad 8, try to set your attitude between 10 and 20 degrees. The lower it is, the faster you’ll go (and the faster you’ll fall), so 15 degrees is a good target value. You’ll eventually notice you’re in complete control of your ship again! There are not many feelings in the universe that match the satisfaction you’ll feel! Luckily, your ship will be like this:
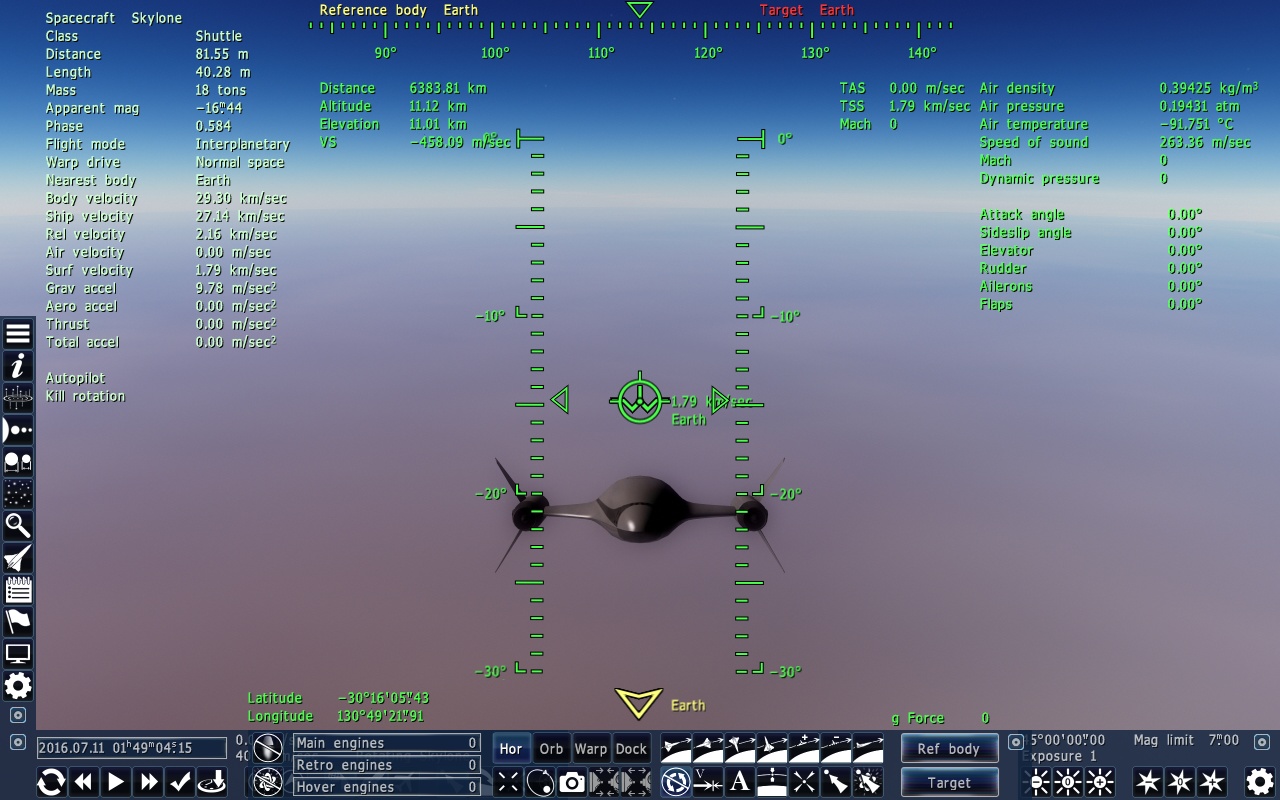
Fig. 2.17: A successful reentry.
- Control the descent.
Here’s what you have to do: control your attitude (yeah, we’re still doing that) so you have a steady and controllable descent rate, and a forward speed fast enough to still generate lift. Remember that the lower your attitude, the faster you’ll go. Use your thrusters or main engine if you have to, but be very, very careful! Keep your speed above a couple hundred m/s and we’re good.
Now let’s take a closer look at all the information we have. First of all, let’s see what the selected object info tells us (if you don’t have the ship selected, click on it now). The air and surface velocities (TAS and TSS) will usually be very close, depending on the wind. They indicate your forward speed. In atmospheric flight, you have to keep track of these two velocities: Forward and Vertical.
Gravity acceleration will increase as you get closer to the surface. It’s always good to remember that it’s there! When flying, if your forward velocity is high enough, the ship’s wings and other aerodynamic elements will generate a lift force that balances gravity. The faster you go (and the thicker the atmosphere or higher the pressure), the more lift that is generated. That’s why you have to be careful when accelerating, because you may go straight up!
You’ll eventually notice that the forward speed will keep dropping, even when your main engines are at 100%. That’s the drag force acting. The friction between the ship and the atmosphere slows it down, and the effect increases as you descend, because the air density increases. This is indicated by the Aero Accel value.
If you are patient, you’ll eventually be very close to the ground, and at a reasonable speed (100 m/s is ok). Pay attention to your Elevation at all times! This is what you want:
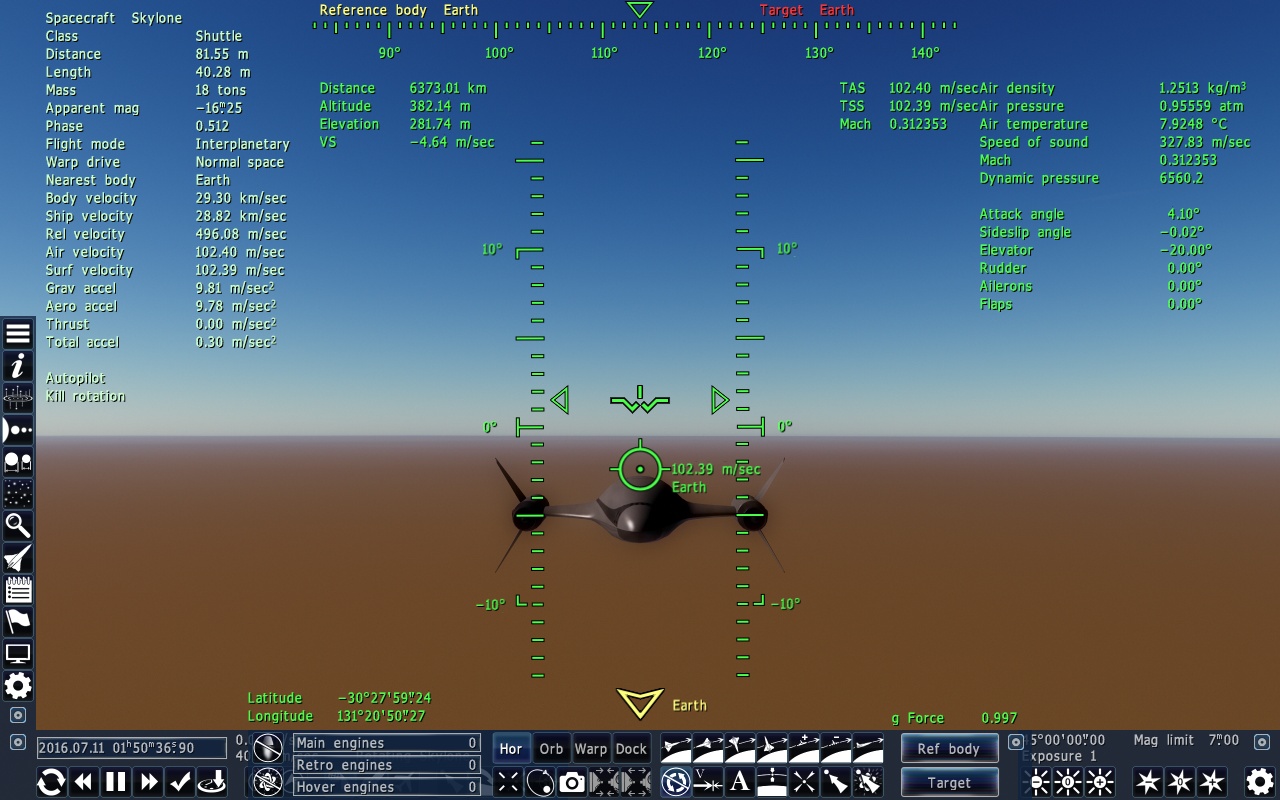
Fig. 2.18: Almost there!
- Land.
It’s possible you’ll be above water, and not ground. It doesn’t matter, this ship can land on liquids, and the concepts are the same.
Now, to land, you can simply let the ship touch the ground, and it’ll stop. That’s fine your speed is low, there will be no damage. A more interesting way to do it, though, is zero your forward and vertical speeds, and then use the hover engines and/or upwards thrust to carefully let the ship go down. Or you can just hit the Hold Altitude button, then use the downward thrusters to go down.
That was tough, wasn’t it? It’s alright to fail many times on this. It takes practice to be able to successfully land a ship on the first try. If you made it without messing up, go away, you’re probably already a skilled pilot and don’t need lessons!
One thing I have to remind you, is that every planet will have a different atmosphere, with different pressures and densities (and different gravity as well). This makes every entry different, and it’s up to you to figure out when to start decelerating, the vertical speed to maintain, how the atmospheric lift will affect the ship, and so on. There’s no easy way to know how the ship will behave, so it’s best to just play safe, be patient, act ahead, and don’t go too fast! Oh, and every ship is different… And on moons and planets with no atmosphere, nothing of this applies! So yeah, it’s tough business.
2.6. Taking-off (and entering a stable orbit)
Compared to the previous lesson, this will be a piece of cake! Seriously, you’ll laugh at it. It is here at this point, and not before, for continuity reasons.
So you just landed your ship. After unloading the goods you brought, relaxing at one of Earth’s fine beaches, and loading more goods, it’s time to continue your journey!
- Take off.
To take off, simply start your hover engines, and increase their power slowly. When you feel you’re going up (don’t go too much!), stop increasing their power, and start your main engines. Do the same with them: increase the throttle slowly, while managing your attitude. Keep it between 5 and 10 degrees. At 1 km altitude, go ahead and max the main engines power, and turn the hovers off. Proceed increasing your attitude slowly.
- Up, up and away!
At 20 km altitude, it’s safe to turn your ship straight up, that is, 90 degrees. At this point, change the HUD mode to Orbital.
- Manage your ascend.
Control your speed and keep an eye on the distance to Earth’s center, and try to reach your desired orbital radius going slower than 5 km/s.
- Decelerate
The most important skill is here again. Align and Kill (Retrograde), and start decelerating. When your speed is less than 10 m/s, you can rest.
- Enter a stable circular orbit.
Now follow the instructions from Section 2.4, and you’re done!
Easy, right?
When you have more experience, you’ll be able to take off (not going straight up) and enter a stable orbit directly, without having to stop your ship.
2.7. The auto-pilot
This section is less of a lesson, and more of a description. Now that you learned the very basics of spaceflight, you are “cleared” to use the autopilot when you feel the need. I’ll tell you though, it’s not as cool as being in complete control!
- Autopilot orientations:
We already used a lot of these! They simply orientate the ship into a certain direction, and keep it there. These are a very good convenience, to be used at will!
- Kill rotation:
Another excellent convenience. Due to inertia, your ship would continue to rotate after you let go of the buttons, even if it was a simple tap. This function makes the rotation stop when there is no intentional input.
- Hold altitude:
This is useful, but you don’t really have to use it. When close to the surface, it will make the ship stay at the same height. You need a hover engine for this!
- Sync velocity:
Used mainly for docking, but you can use when any other celestial body is your target. If you want to decelerate automatically without any worries, use this.
- Go to/Warp to:
These are the not-fun functions. Activating any of these will make your ship go automatically to your target using the Warp Drive or not. It’ll plot the course, take care of accelerating and decelerating. Not fun at all!
But we’ll use them any way for the final part, that is...
2.8. Basic Level Exam: To the Moon and back!
This is it, time to prove you learned something! Your task is simple:
- Start with a ship on Earth’s surface.
- Take-off, and enter a stable orbit (doesn’t need to be perfectly circular).
- Wait in orbit until the Moon is visible.
- Set the Moon as your target. Reference body too, if you want, but you can do this later.
- Use the autopilot to go there. You’ll end up at a convenient distance to enter orbit. Do that now.
- Land.
- Admire the scenery.
- Take-off.
- Set Earth as your target and autopilot there.
- Enter orbit.
- Land.
- Receive Basic Flight School Certificate!
Tips:
- You’ll probably want to accelerate time at some points. But never when the ship is turning, or about to turn! Be very careful! And I mean, very, very careful!
- Resume normal time speed when the ship is about to do something. You’ll know because there’ll often be a timer on the selected object info, or if the velocity is getting close to zero. And when I say “about to”, I mean at least two minutes. You may end up on the other side of the system if you’re not careful with this.
- Take a look at Earth when the autopilot is accelerating away. It’s a beautiful sight.
- Notice that the Moon doesn’t have atmosphere, so you won’t glide when descending, you’ll just fall down like a brick.
- Also notice that the Moon’s gravity is almost ten times weaker than Earth’s.
- Wait until the autopilot finishes completely. You’ll know it’s done when it finishes syncing velocity, and you’ll begin falling.
3. Space Flight School: Intermediate Lessons
Congratulations for making it this far! For a complete newcomer, it may seem that the level of difficulty of the next lessons will not increase significantly. That’s because this course is divided in a way that, if you really learned the basics, everything else will be easy to learn. Might be challenging to pull off, but still easy to grasp the concepts. So if you’re here, the most difficult part is probably behind you! (Except maybe for the late challenges, but those are completely optional!)
3.1 Plotting a course to a nearby space body
You already went to the Moon and returned, but you used the autopilot to do that. That was pretty easy, right? All you had to do was sit back and enjoy the view. Did you pay attention to what it was doing? Could you do that by yourself? If you think you can, try it now. If you actually manage to reach the moon and enter a stable orbit without crashing, I salute you! But it doesn’t clear you of this lesson, because now we’re going to… Mars! (Yes, it’s still “nearby”, if we consider the distance to any other star!)
- Take control of your ship.
If you’re not already doing it, take a Skylone in orbit around Earth. By now this should be second nature to you! A higher orbit (distance > 10000 km) is recommended, so you have time to accelerate and decelerate in the direction needed.
- Select your target.
Wait until Mars is visible and then select it as your target and Reference body. When you do this, it’s possible that your ship will turn by itself. That’s alright.
You can use F2 - Planetary System to select it, but only go to the next step if Mars is visible and the path is clear! Like this:
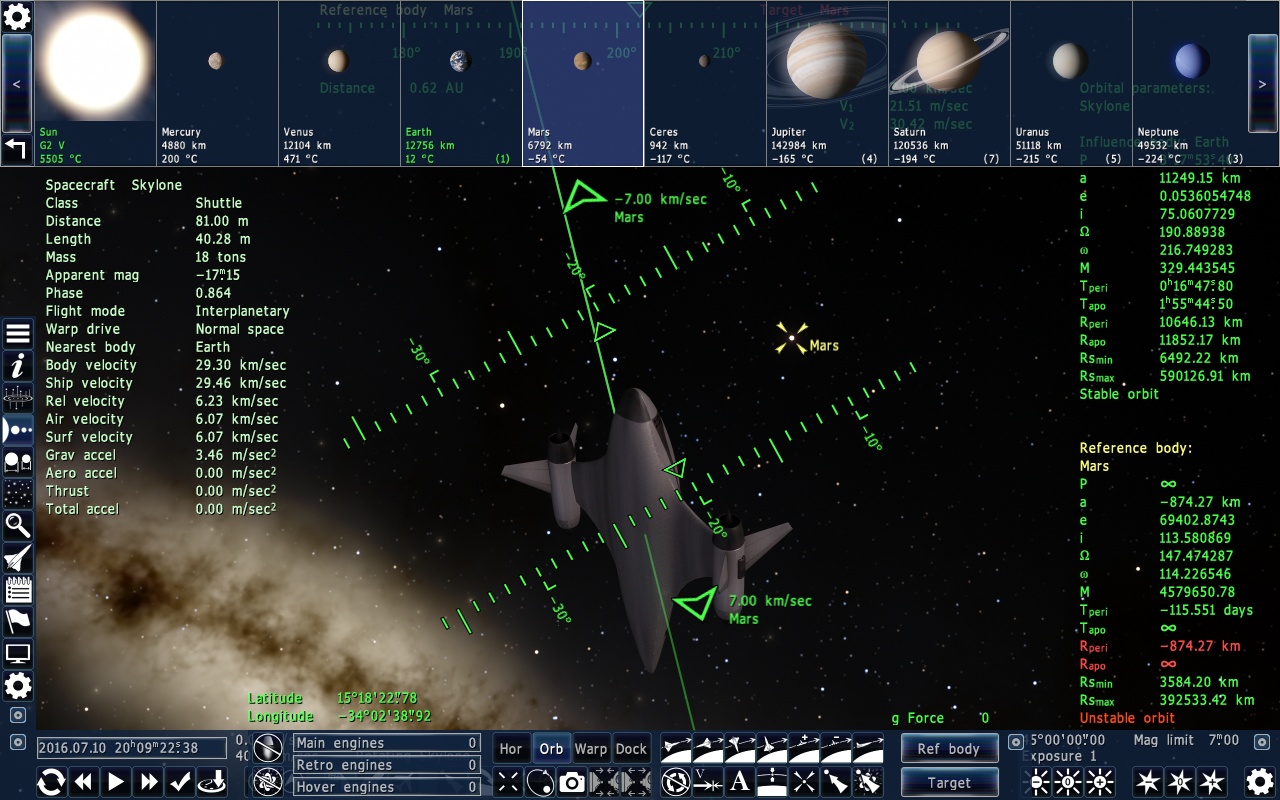
Fig. 3.1: Mars is visible (and far away).
- Match velocities.
It’s best to switch the HUD mode to Dock, to make it clearer (close the Docked ships window if it appears). Turn to the retrograde orientation and decelerate until your velocity in relation to Mars is close to zero. You may use the Sync velocity function if you want, but try to do all of these by yourself.
After that, you effectively set your velocity equal to Mars’. Mars is moving around the Sun, and now you’re matching that movement. Rotate to target now, and you should be in a situation similar to this:
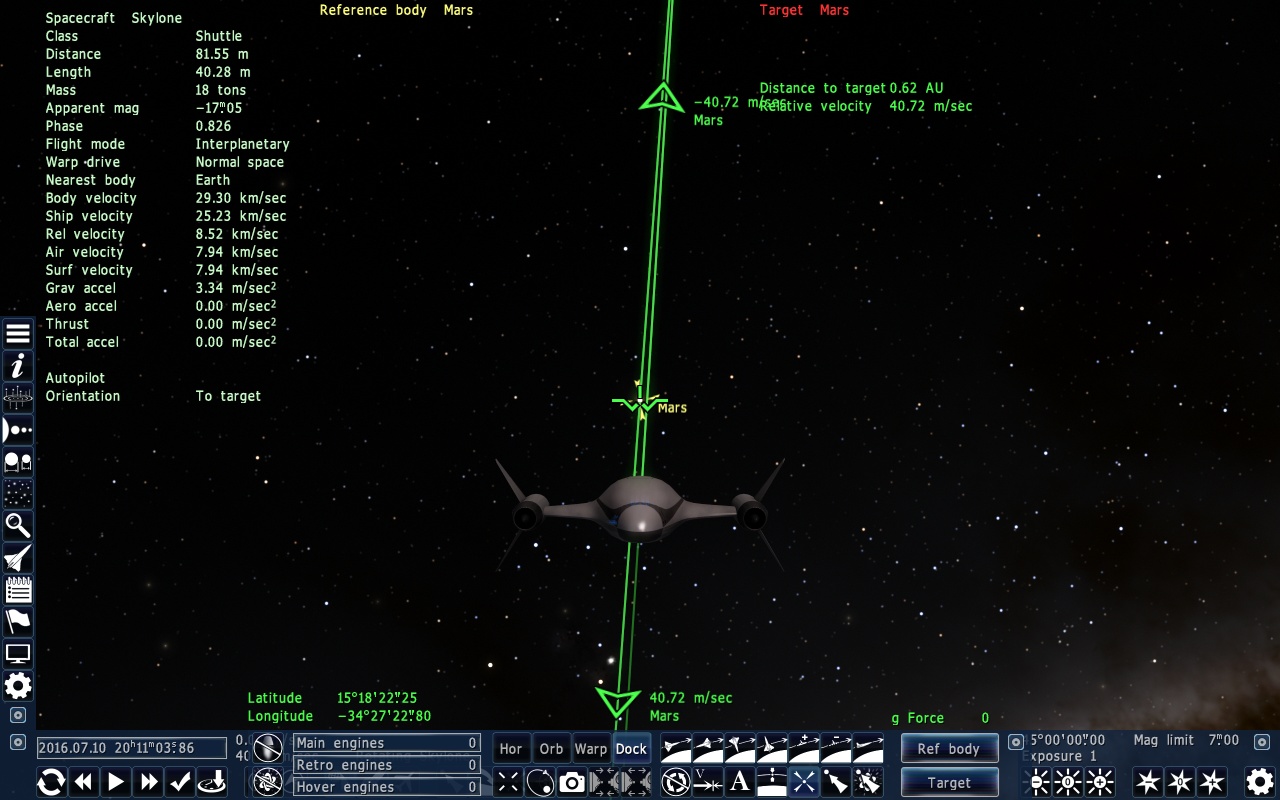
Fig. 3.2: Velocity synced and ready to go!
Uh oh! Our velocity already changed! That’s because Earth’s gravity is still pulling us down. Don’t worry though, we’re still pretty far, and we’ll soon accelerate away. See how far we are from Mars? That’s roughly 93 million kilometers!
- Accelerate.
Full throttle!
Just kidding, it’s not that easy! First off all, we’re very far from our target. We’re going to have to accelerate a lot! Do you see why this won’t be so easy? If you thought “we’ll have to decelerate too!”, you are correct. You have to do some math before stepping on the gas! Normally, there’d be the issue of fuel too, but in our case, the fuel we have is more than enough to make the trip.
The easy way to do it is to check your distance and accelerate until it’s half of that. But that’s dangerous, since you may forget to consider that you have to turn around (retrograde) to decelerate, and any small mistake can cause you to crash or stop at a point way too far from Mars. Since Mars is still moving and changing its velocity direction to go around the Sun, it’s very unlikely that you’ll hit the “bullseye”, It’s way more likely that you’ll pass at a large distance from the planet. That’s why you’ll probably have to repeat the process, until you’re close enough (if you paid attention to the trip to the Moon, you may have noticed that the autopilot did this 2 times).
Pro tip: The way 0.62 AU is represented is not very precise, since it can be anything from 0.615 to 0.625 rounded to 0.62. And that’s still not very precise! When calculating how much to accelerate and when to decelerate, it’s better to play on the safe side, so assume it’s 0.61 AU instead, and make your calculations based on that. It can save your life, I speak by experience!
So let’s see what our distance is: 0.62 AU, but to be safe, let’s consider 0.61 AU. Also, let’s take 10% off, just to be sure! That leave us with 0.55 AU, and the half of that is 0.275 AU. Accelerate until you crossed that distance, that is, the remaining distance should be 0.62 - 0.275, or 0.345. You should speed up time, but remember to always be careful when using this feature! Never touch any controls when time is accelerated! And I suggest Rotate to target is still enabled. So when you reach the right point, kill your engines. Let’s see what we have:
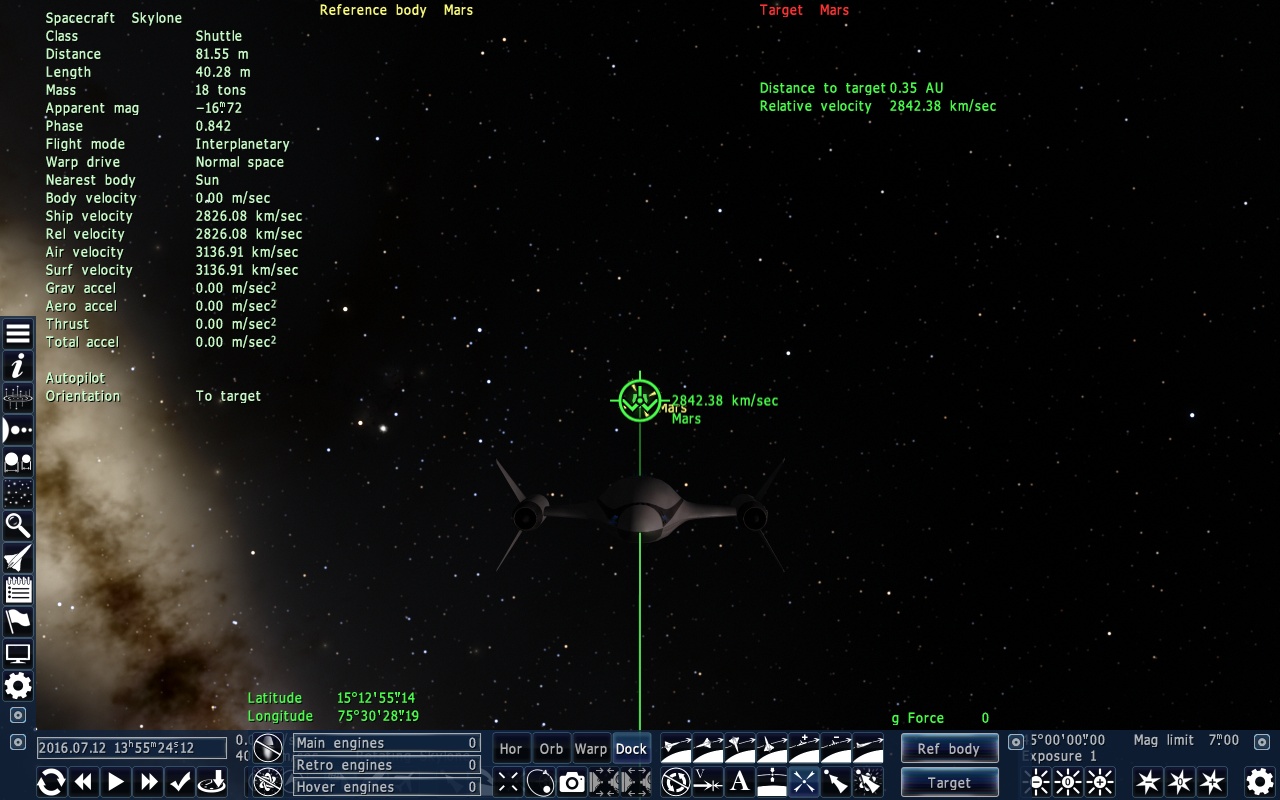
Fig. 3.3: Accelerated to Mars!
It’s likely that you may miss the point and go too much. That’s why we’re playing it safe! Check the velocity value. That’s an insane speed compared to what we experience on our daily lives on the ground!
- Decelerate.
No, don’t just go to retrograde orientation and slam the gas pedal and wait until you stop! That’ll leave you still millions of km away! But you can change to Retrograde orientation to be ready.
Remember Torricelli’s Equation, from high school? It’s very useful for these situations! Let me refresh your memory:

Here, Vf and Vi are the final and initial velocities, a is the acceleration, and d the distance. On our case, Vf = 0, since we want to “stop”, a is our maximum thrusters capabilities, 100 m/s if you’re using the modified Skylone, and d is the distance we are going to travel while decelerating. Solving for these values, we learn that d is close to 0.29 AU. Watch the units! It may be a little different for you, don’t worry. Just make sure you don’t make mistakes on the calculation! So, let’s wait until our distance a bit above that (say, 0.30 AU), and start decelerating! When the distance is shown in km again, kill the engines:
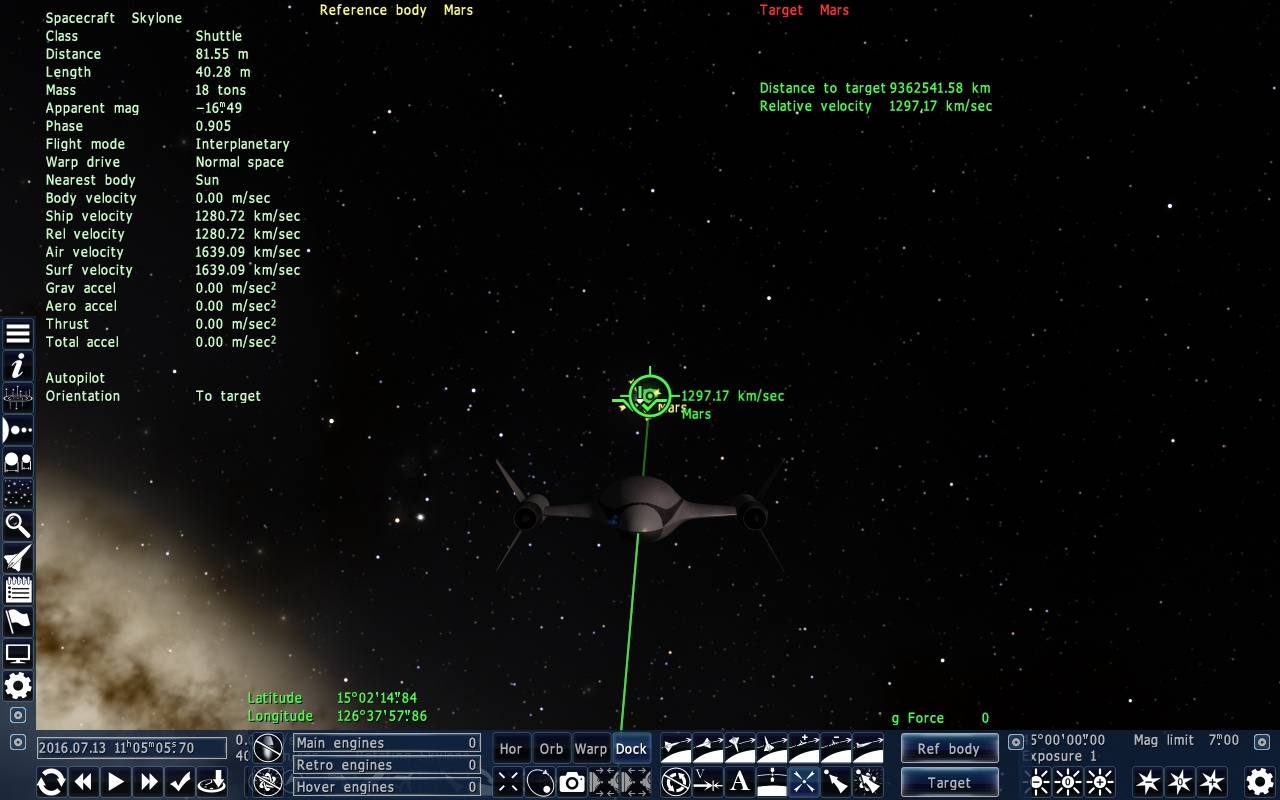
Fig. 3.4: Getting close!
See how it’s already evident the difference between your velocity direction and where Mars actually is? That’s because it already moved, or your alignment before accelerating wasn’t so good, which is normal when we’re subject to gravity (Earth’s, on this case). Anyway, repeat those calculations, but for your current speed. You have to be fast, so I suggest you pause time for now. For me, the distance to stop at this velocity is 8413380 km. It’s lower than my current distance, so we’re good. If that’s your case too, you can rest a bit, and wait until your distance is 10% higher than what you calculated before decelerating again. I’ll wait until it’s 9200000 km. Uh oh! Not so far if we increase 10%, right? See how it pays off to play it safe?
Pro tip: Remember how I told you to not touch the controls if time is accelerated? Forget that for now. With time running faster, you can use the thrusters to try and correct your course, so your velocity direction is pointing exactly at Mars. Be careful, though, you can really mess everything up doing this!
When your velocity is about 500 km/s, repeat the calculations. We should take about 1.2 million km to stop. Look at your distance. It should be much higher than this! So far so good! Repeat this process at 100 km/s. At that point, you can wait until you reach the right distance, and then stop completely. Remember to add Mars’s radius and your desired orbit height to the final distance! On my case, I’ll add 10000 km to the distance, so that at 100 km/s, I wait until I’m at 60000 km to resume decelerating.
If you did everything right, you should be at a similar position:

Fig. 3.5: We’re here!
Good job on this very long trip!
It’s possible you didn’t stop at Mars, and it seemed to pass by you. I know how it feels, it’s sad, but also normal. Not even the autopilot can make it perfectly! That’s why you can adjust your course as the pro tip above suggested, but there’s no problem if you’re not willing to risk it. Just repeat the acceleration/deceleration parts as needed until you reach the planet. Only one more time should suffice.
With practice, you’ll decrease how much to add to the distances when trying to determine a safe deceleration point, until you reach a point you’re comfortable with.
- Your choice.
Now, do whatever you want! I suggest you orbit Mars for a while, if you haven’t been to other planets before, it’s a beautiful sight! You can also test your skills trying to land! It’s very different than landing on Earth!
Just don’t go too far, stay around Mars, because now we’ll learn how to go back home FAST!
3.2 The Warp Drive
Did you notice how much time your trip to Mars took? If not, it was almost one day, about 20h. It may have been a bit different for you, but it doesn’t matter. Still a lot, right? Keep this in mind, and compare it to the time we’ll take to make our next trip!
The main method used by our people for travelling long distances is the Warp Drive. It works by warping space around us, so instead of travelling the whole distance, we “take a shortcut”. Your ship will go to the direction its speed relative to hyperspace is.[10] So even if you are physically moving towards your target, it doesn’t mean you’ll warp in that direction. You have to make sure your speed relative to the hyperspace is in the direction of your target. The higher your physical velocity, the higher your effective velocity will be (depending on the boost factor). But be careful not to accelerate too much, because you will maintain your speed relative to your target when you drop out of warp speeds, and that will be a problem. And since your target will likely be moving as well, there will always be a relative velocity, sometimes very large! It’s a bit complicated to get used to it, but you will eventually.
Most shuttles and personal ships are too small and/or lack the power requirements to possess a warp drive, but we managed to squeeze a very simple one on that Skylone. It’s not as fast as the most common on cargo or exploration ships, but it does the job very well!
- Check your warp drive status.
If you’re still in control of your ship around Mars, take it to orbit (Distance > 10000 km to be sure) if it’s not there, and wait until Earth is visible. Select it as your target and Reference body, and change the HUD to Warp mode. If you were using the original Skylone, you won’t be able to complete this lesson as you are now, so build another ship that has a Warp drive and take control of it!
- Check your velocity in relation to hyperspace
When you switched the HUD to Warp mode, it’s possible that it auto oriented itself to face a blue indicator. If not, go to the prograde orientation. This is what it should look like:
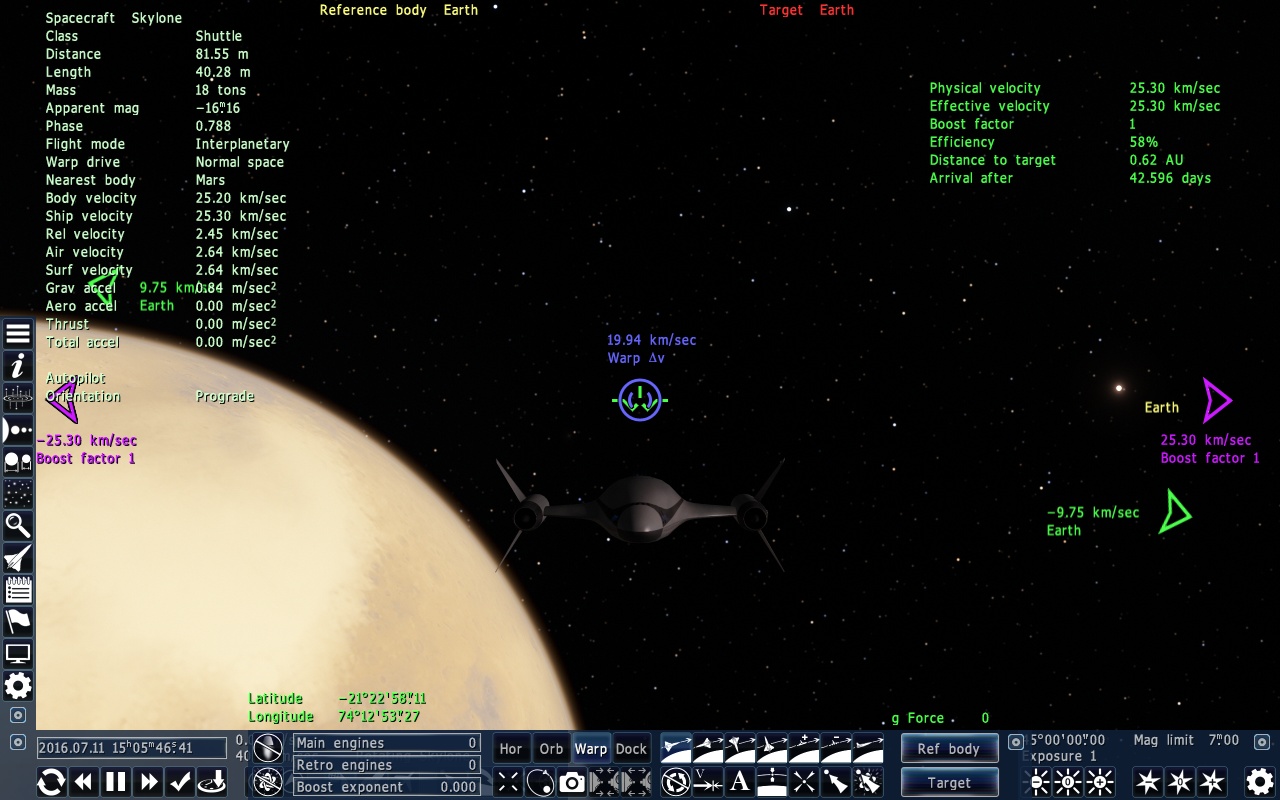
Fig. 3.6: Velocity in relation to hyperspace (kind of).
See that velocity value?[11] It’s the warp  v. Basically, it’s your velocity in relation to hyperspace plus at least 10 km/s in the direction of your target. 10 km/s is the ideal warp physical speed, because it provides a very good effective velocity, doesn’t take that long to reach or decelerate, and it doesn’t increase your relative velocity to your target that much (most of the times, anyway). If for some reason your velocity in that direction is already more than 10 km/s, the blue indicator considers that velocity instead.
- Decelerate.
Now, turn to the retrograde orientation and make v as close to 0 as you can. Remember that Mars’ gravity will always pull you back, so don’t stay more than a few seconds making the final adjustments! When you’re done, Rotate to target. You should now see this:
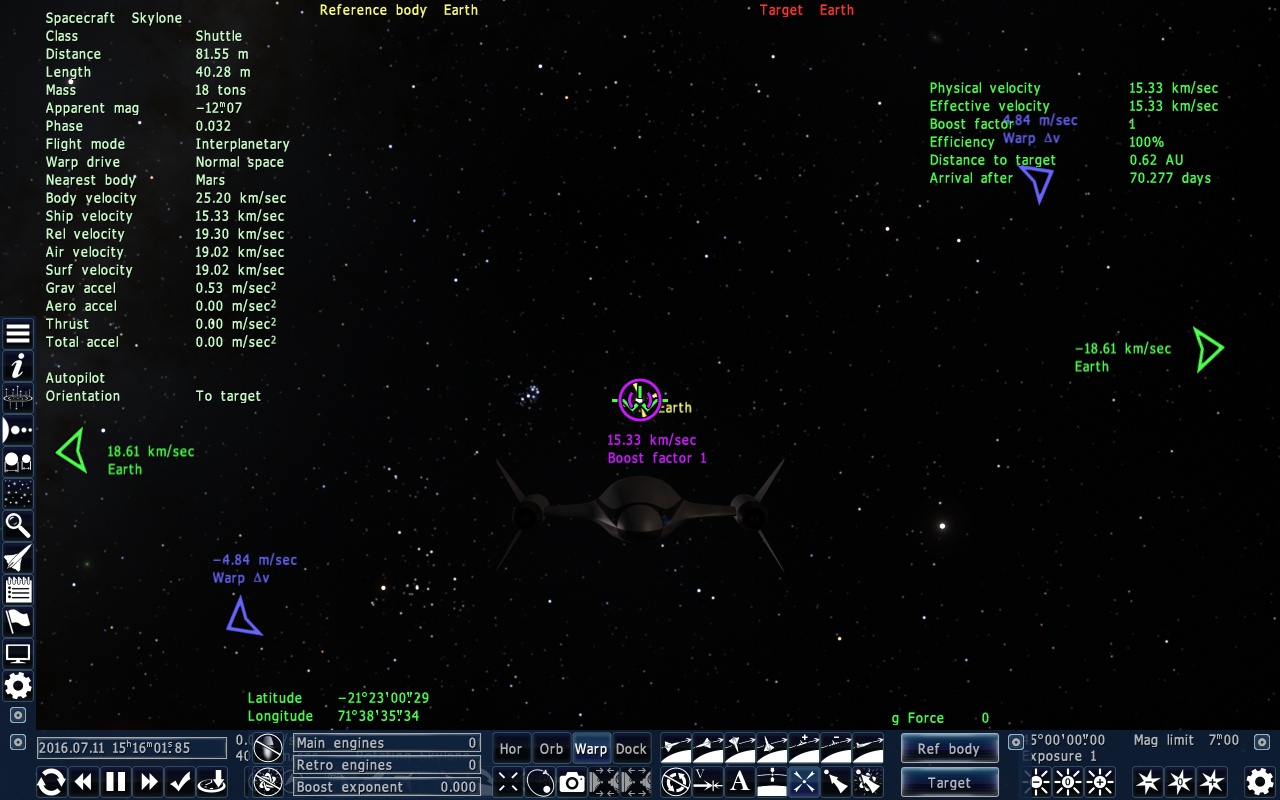
Fig. 3.7: Ready to Warp!
See how my blue indicators are still there? That’s normal.
Now you’re facing a purple/pink indicator. This is basically your relative speed to hyperspace. On my case, my velocity ended up being higher than 10 km/s. This is also fine.
- Engage warp drive!
Now you’re ready to warp! I suggest you zoom out a little (hold both mouse buttons + move it backwards). To begin warping, increase your boost factor (alt + mouse wheel) slowly, and watch how space around you is distorted. Cool, right?
Now, pay attention to the Distance and Arrival after values. While looking at those, keep increasing your boost factor until you reach a manageable state. I like to leave it at ~1 minute left.
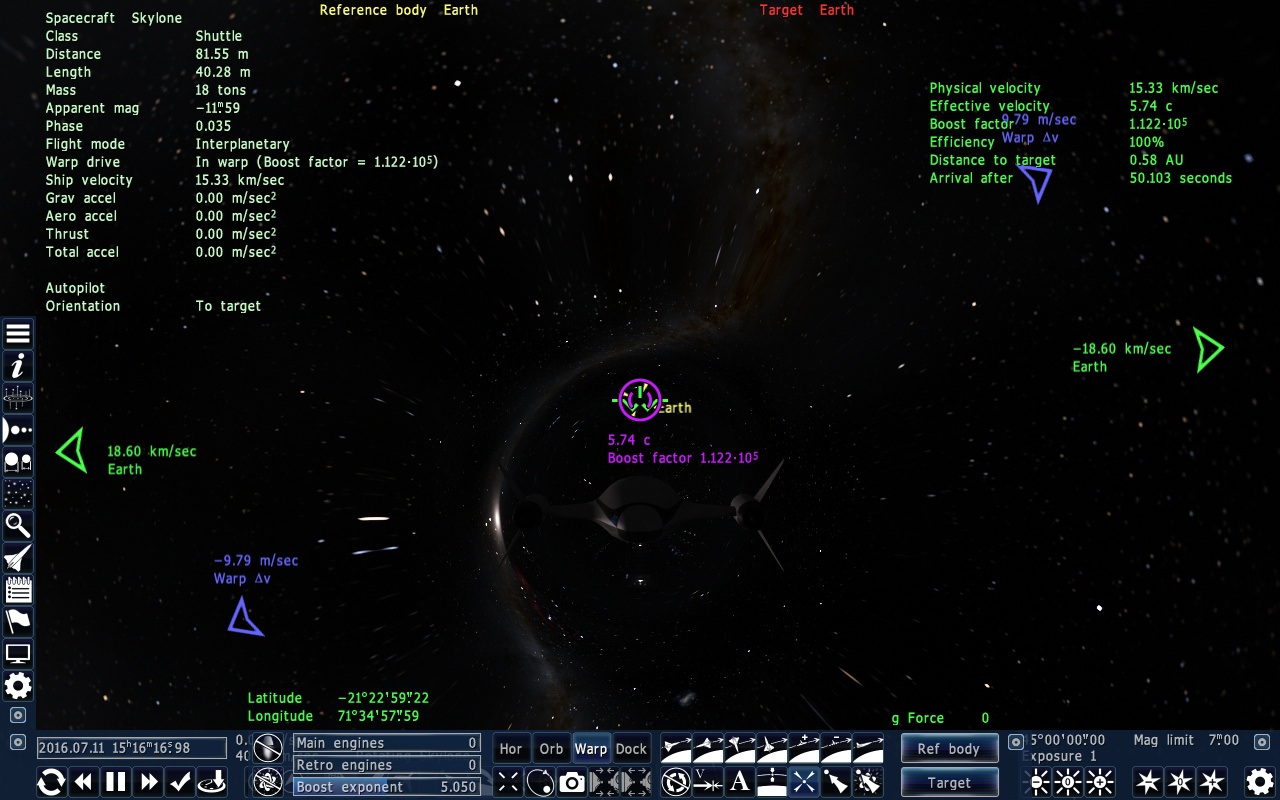
Fig. 3.8: Warping...
Check your effective velocity: it’s almost 6 times the speed of light! That’s what makes it possible to travel far away! And we’re currently at half of our drive max power! (Other ships go even further than that.)
- Disengage Warp drive!
Let the travel continue until there are a few seconds left. Then decrease the boost factor, wait again, decrease boost, and keep doing that until you reach a good distance from Earth (your choice). Then, turn off the warp drive completely! Remember, the distance refers to the center of your target, so always add at least its radius to that!
Pro tip: Just like when travelling without warping, your course may deviate a little from your target’s location. That’s because of gravity effects, and because it’s moving. You can decrease the boost factor to give you more time, and correct it by using your thrusters to make the blue indicator velocity reach zero again. I suggest you do this everytime it goes beyond 100 m/s. When you’re very close, it’ll change more rapidly, but if you’re almost there, you don’t have to correct it again.
- Sync velocity.
You should now be close to Earth again! Congratulations on your first warp travel!
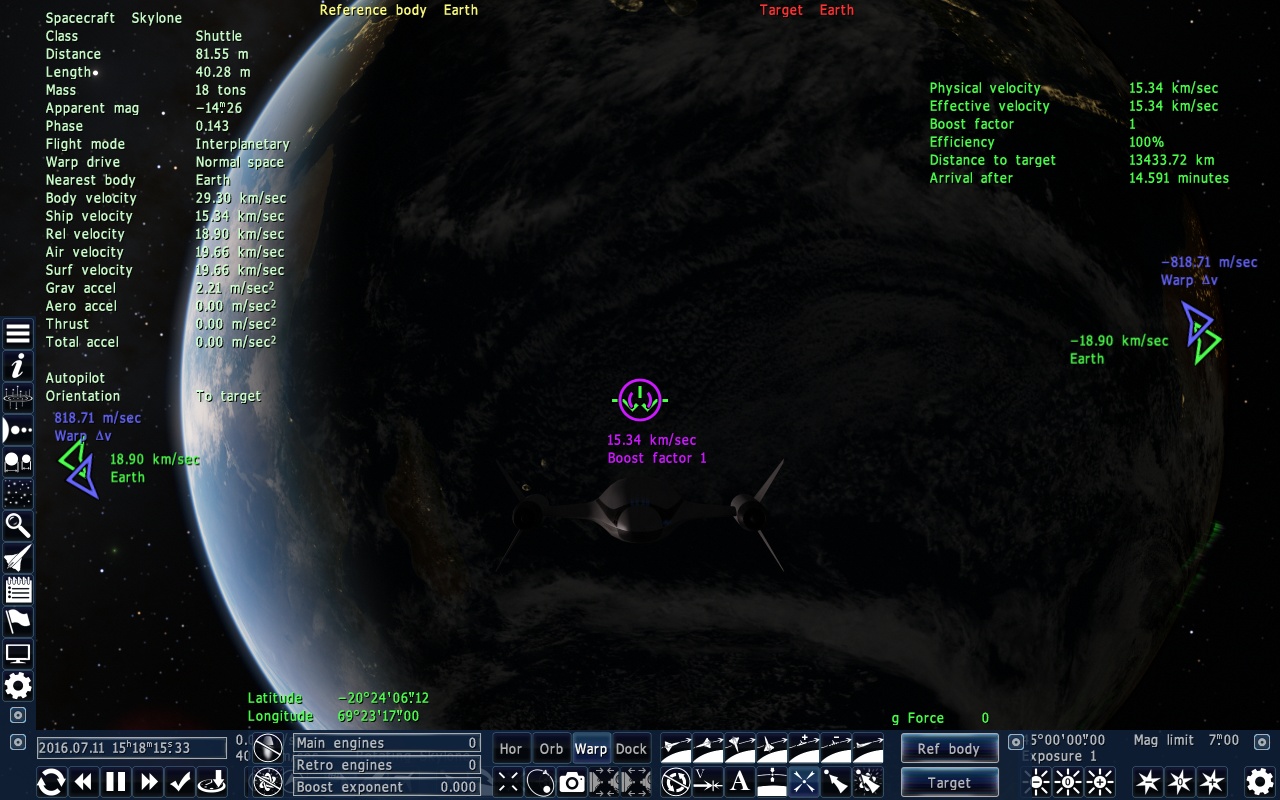
Fig. 3.9: Home!
Now, see how the relative velocity between you and Earth is significant! So change your HUD to Orbit, turn to the retrograde orientation, and full throttle!
- Your choice.
Now you can reach a stable orbit around Earth again, land, or whatever you want! Just stay close as before, because now we’re going to go far!
Did you notice the difference between the time each trip took? Without using a warp drive, it took us almost a day (still very quick, if you consider the first trips to the red planet took months), and when we used it, we were home after a couple minutes. Crazy, right?
Oh, and if you use the autopilot Warp to function, the ship will do all of that on its own. But it’s not as fun!
3.3 Your first interstellar travel
Now it’s time to go further! Nothing really new here, but it’s just to show you a bit of the power of the warp drive! As always, make sure your ship has a warp drive, and you are close to Earth. If you’re continuing from last lesson, you should be ok.
- Select your target.
Use the star finder to search for stars within 10 ly from Earth. Choose Barnard’s Star (you can also search for it directly, using F3). Open the planetary system (F2) and choose the star as your target and Reference body.
- Warp.
Use the same procedure from before to warp there.
Notice the time it would take to get there at your current speed, before engaging the warp drive. Almost 200 thousand years! That’s a lot! And this is one of the stars that are closest to us! Imagine even trying to get there without warp drives… At max boost capacity, it should take you 10 minutes to get there. Best invention ever, right?
When you’re close to arriving, be careful not to get too close to the star! 1000000 km should be as close as you should dare to go!
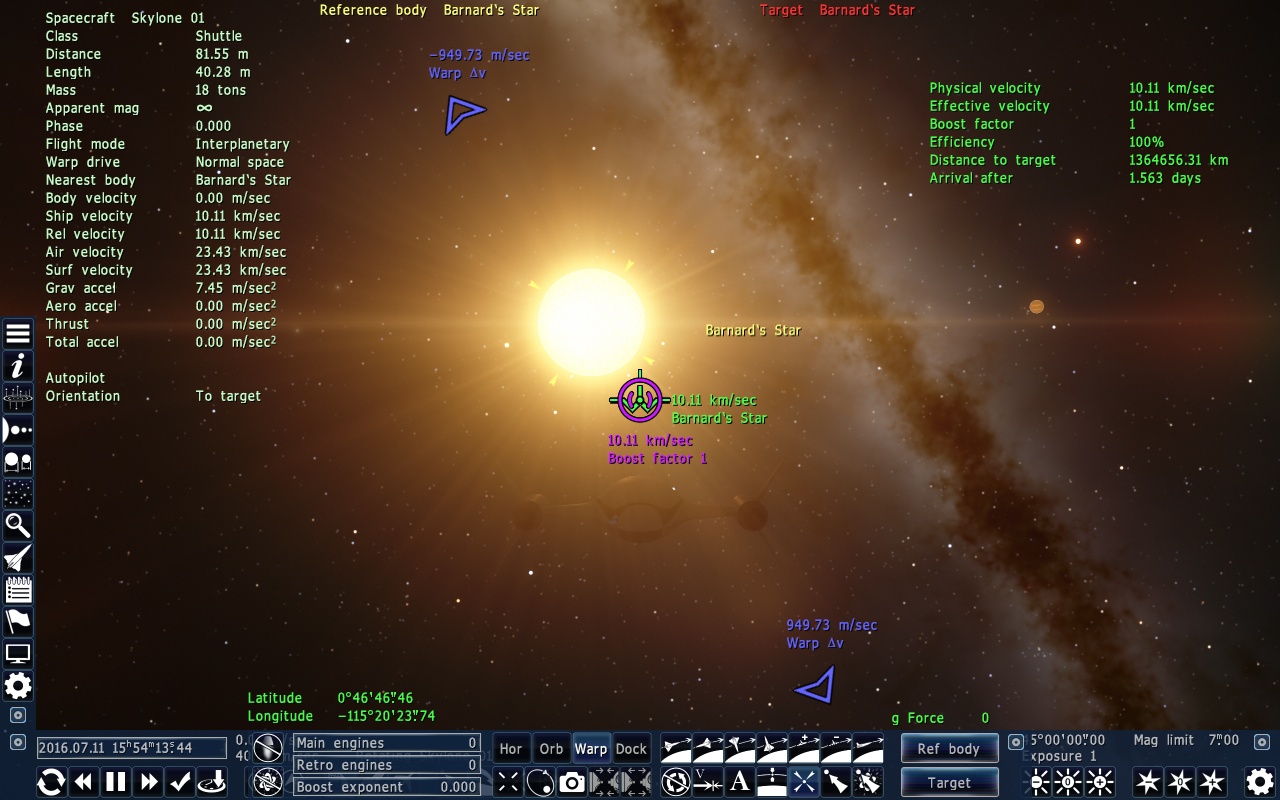
Fig. 3.10: A new star system!
That’s impressive, huh? You’re in a completely different star system, and you can even see some planets close by! Visit them if you really want, then…
- Go back.
Repeat the same procedure, and get back home to Earth for your next lesson!
3.5 Advanced Reentry and Landing
You already learned how to entry a planet’s atmosphere and land your ship, in a methodical, relatively safe way. But what if you’re out of time and can’t really wait until your orbit crosses your desired destination? Then, you do it the hard way…
Pro tip: Again, before attempting the next steps, create as many Skylone ships as you think will be necessary, so that when you crash your simulator ship, you can simply take control of the next one.
- Are you in orbit?
Make sure you’re in orbit around Earth, as always!
- Align and accelerate.
So, how do we re enter atmosphere from orbit in a cool and fast way? By accelerating towards Earth, increasing our falling speed! To do this, activate Radial orientation, wait for the alignment, and then full throttle! Don’t worry about the ship rotating by itself, It’s to keep facing the orbit’s center. Wait until your velocity dot “touches” the planet’s edge (it may take a while, see image below), turn engines off, and then disable auto orientation to be able to Kill rotation. Anyway, after that, you should be in a situation similar to this:
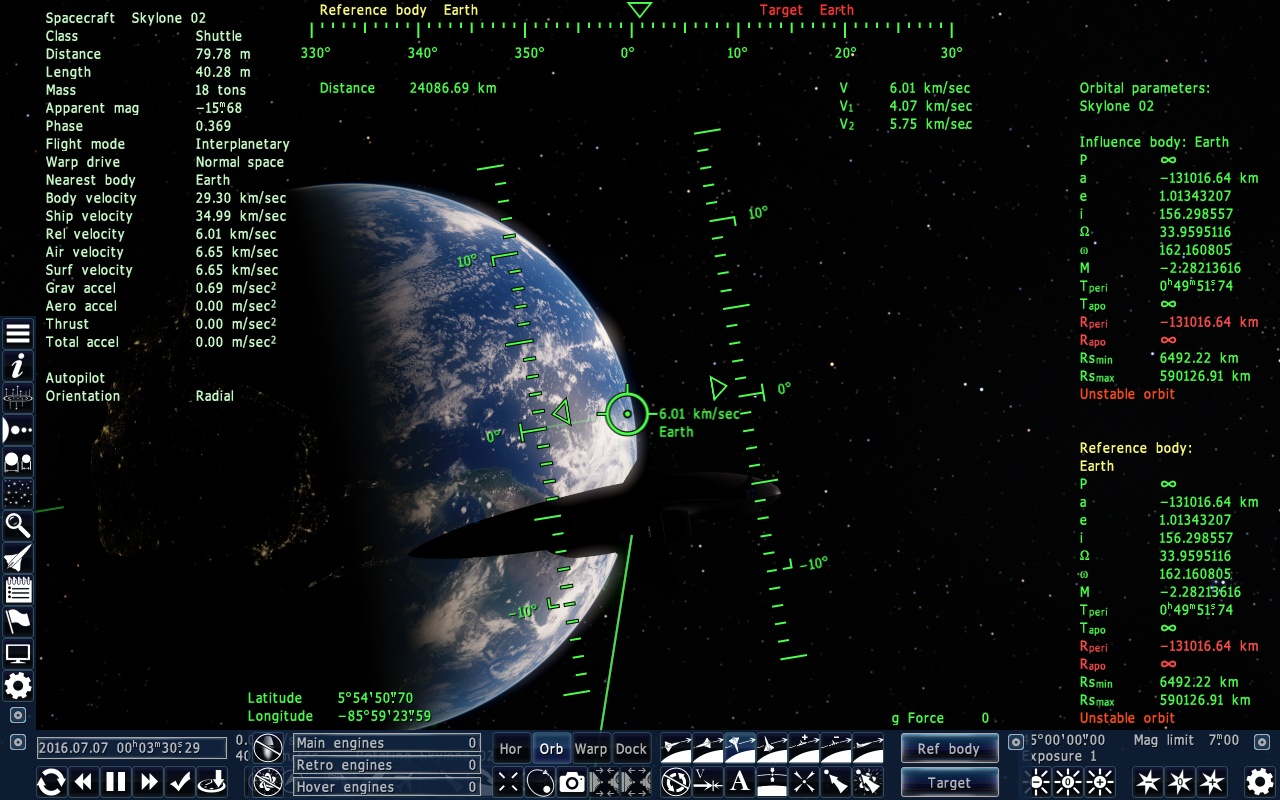
Fig. 3.11: Velocity pointing to Earth’s horizon.
Don’t worry if your velocity is different, we’re about to increase it even more! So now, Align and Kill (Prograde) and then full throttle! How much you accelerate is up to you, just remember that you have to decelerate at some point, or you’ll crash and die a horrible death. A good reentry speed is ~5 km/s, so if you accelerate to 20 km/s it should be enough.
If the location you want to land is not on the horizon, you simply move your velocity pointer to where you want to go, but it gets harder as you move away from the horizon, for reasons you’ll soon understand in your heart...
- Wait and decelerate.
Now you have to wait a while. You can speed up time if you want, but be very careful! Remember what I said about 20 km/s? If you start decelerating with this ship, it’ll take 2000 km to come to a full stop. It doesn’t look like much from our current distance, but keep this in mind! It takes long to decelerate in space, as you probably already learned.
At some point, the Altitude and Elevation indicators will appear. I suggest you Align and Kill (Retrograde) and start decelerating when your altitude is close to, but above 2000 km. Remember that the ship takes time to properly orientate itself! When your velocity reaches 5 km/s, Align and Kill (Prograde), and then Align and Kill again (Horizon). This way your ship will be in flying position and facing the right direction of movement. Then change HUD mode to Horizon. This is how my ship is at this point:
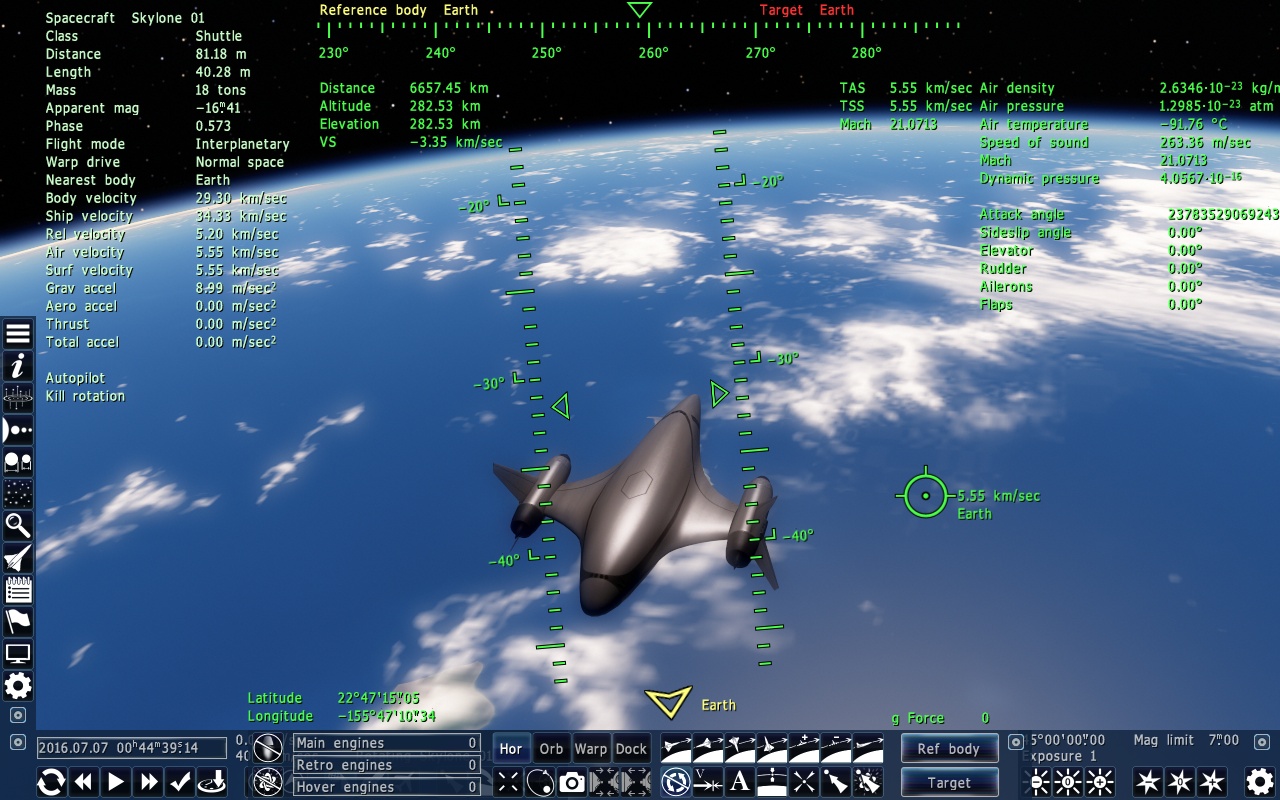
Fig. 3.12: Ship waiting for reentry. (Close to Hawaii, yay!)
See how my speed is higher than 5 km/s? That’s because Earth’s gravity already accelerated me this much. It’s not a problem, though. Now here comes the tough part...
- Manage vertical speed.
We may be going at 5 km/s on the direction indicated, but our vertical velocity (VS) is more than 3 km/s. If we just let the ship continue this way, we’re dead. We have to decrease it to about 1 km/s, and hold it there. Since we have hover engines, this is easy: Just leave it at maximum until the VS value is around -1 km/s (the negative sign means we’re falling). If your elevation is less than what is shown on the picture, you’re probably not going to make it. Sorry… For your next try, start decelerating way before you reach 2000 km altitude. Eventually, you’ll be at that point again...
- Control your attitude!
No, I’m not lecturing you this time either. Be ready to control the attitude, the same way you did it the other time. But first of all, turn off the hover engines! Luckily, your ship will be like this:
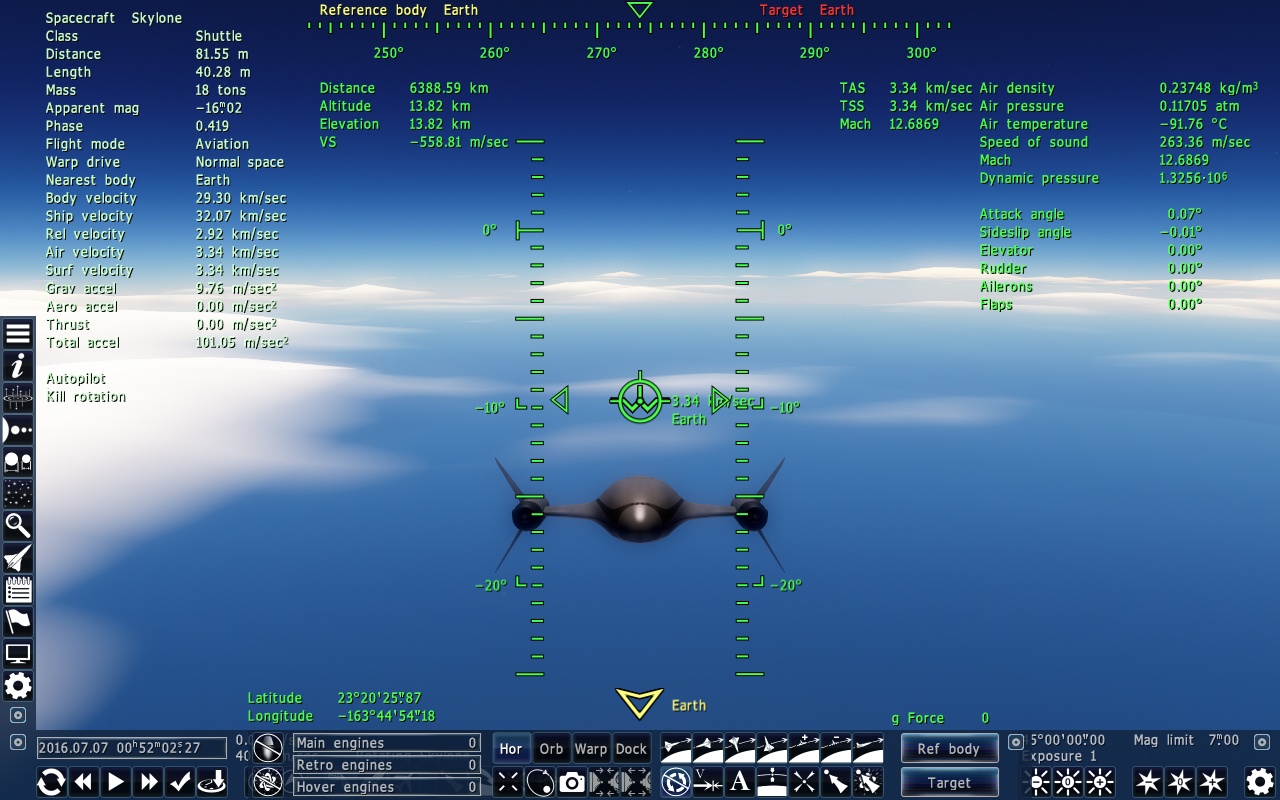
Fig. 3.13: Another successful reentry.
- Control the descent and land.
Now do as you learned on the other landing lesson, and land your ship normally.
That was even tougher, wasn’t it? It’s alright to fail even more times than before on this lesson. If you made it without messing up, well, you know the drill...
What I have to remind you here, is that with hover engines everything is A LOT easier. If we didn’t have them, we’d have to align the ship facing the sky, and use the main thrusters to control the vertical speed before reaching the atmosphere. So, thank goodness we have hover engines!
3.6 Intermediate Level Exam: To Ross 882 2 and Return I
This is it again, time to prove you learned something! This time, your task is not so simple:
- Start with a ship on Earth’s surface.
- Take-off, and enter a stable orbit (doesn’t need to be perfectly circular).
- Use F3 to search for Ross 882, and then F2 to set the second planet as your target and reference body.
- Warp there.
- Land. Use any of the methods you learned for this!
- Admire the landscapes of this nice Terra.
- Take-off.
- Set Earth as your target and warp there.
- Enter orbit.
- Land.
- Receive Intermediate Flight School Certificate!
Tips:
- Notice that this planet’s atmosphere is very different from Earth’s, so be extra careful when landing!
- Not much else to say, it’s a pretty straightforward mission if you learned all the concepts from this section!
4. Space Flight School: Advanced Lessons
You’re still here? Good! I like your enthusiasm! Ready for the final part of your training?
On the previous sections we covered a lot of the basic concepts, and frankly, you’re probably ready to go on your own journeys around the universe! This last part will cover, very quickly, the last skill needed to be a complete all-around pilot: Docking to another ship. It’s a fundamentally easy thing to do, but at times you’ll find yourself wanting to enable your weapons and shoot the mothership until it explodes and takes you down with it. But before we get to that, let’s talk a little about your anger issues...
4.1 Mistakes and panic management
There are times, specially when landing or docking, when you’ll make a small mistake. It’s not a matter of “if”, but “when”. Maybe you’ll be a little wrong on your calculations, accelerate too much, wait too much do decelerate, keep time accelerated when you shouldn’t, and many more. Whenever this happens, you’ll probably panic. And that panic will only make everything worse, and chances are you’ll end up making the same mistake and make everything even worse. So it’s important to keep calm, breath, and plan what to do to correct the situation and keep you alive. Like I said many times: Space is big and the distances are great, so you have time to act. However, when landing or docking, it’s possible that you won’t have much time, and seconds can make a very big difference. I’ll go over some of the bad situations you can find yourself in, and suggest an appropriate action:
- I rechecked my calculations, and my ship will not stop in time!
This happens to the best! Sometimes we’re not willing to play it safe and go slow, so we push the acceleration limit to its max, and try to approach the fastest way possible. There will be times when we’ll push it just a bit too much… But fret not! Sometimes going to the retrograde orientation and using the forward thrusters to help can be enough, but it usually won’t. Since if you stay there you’ll crash (because you already calculated that), the best thing to do is to orientate yourself radially to the closest edge of your target, and try to accelerate enough until you change your trajectory enough so instead of crashing you’ll just pass over it. Here’s an example:
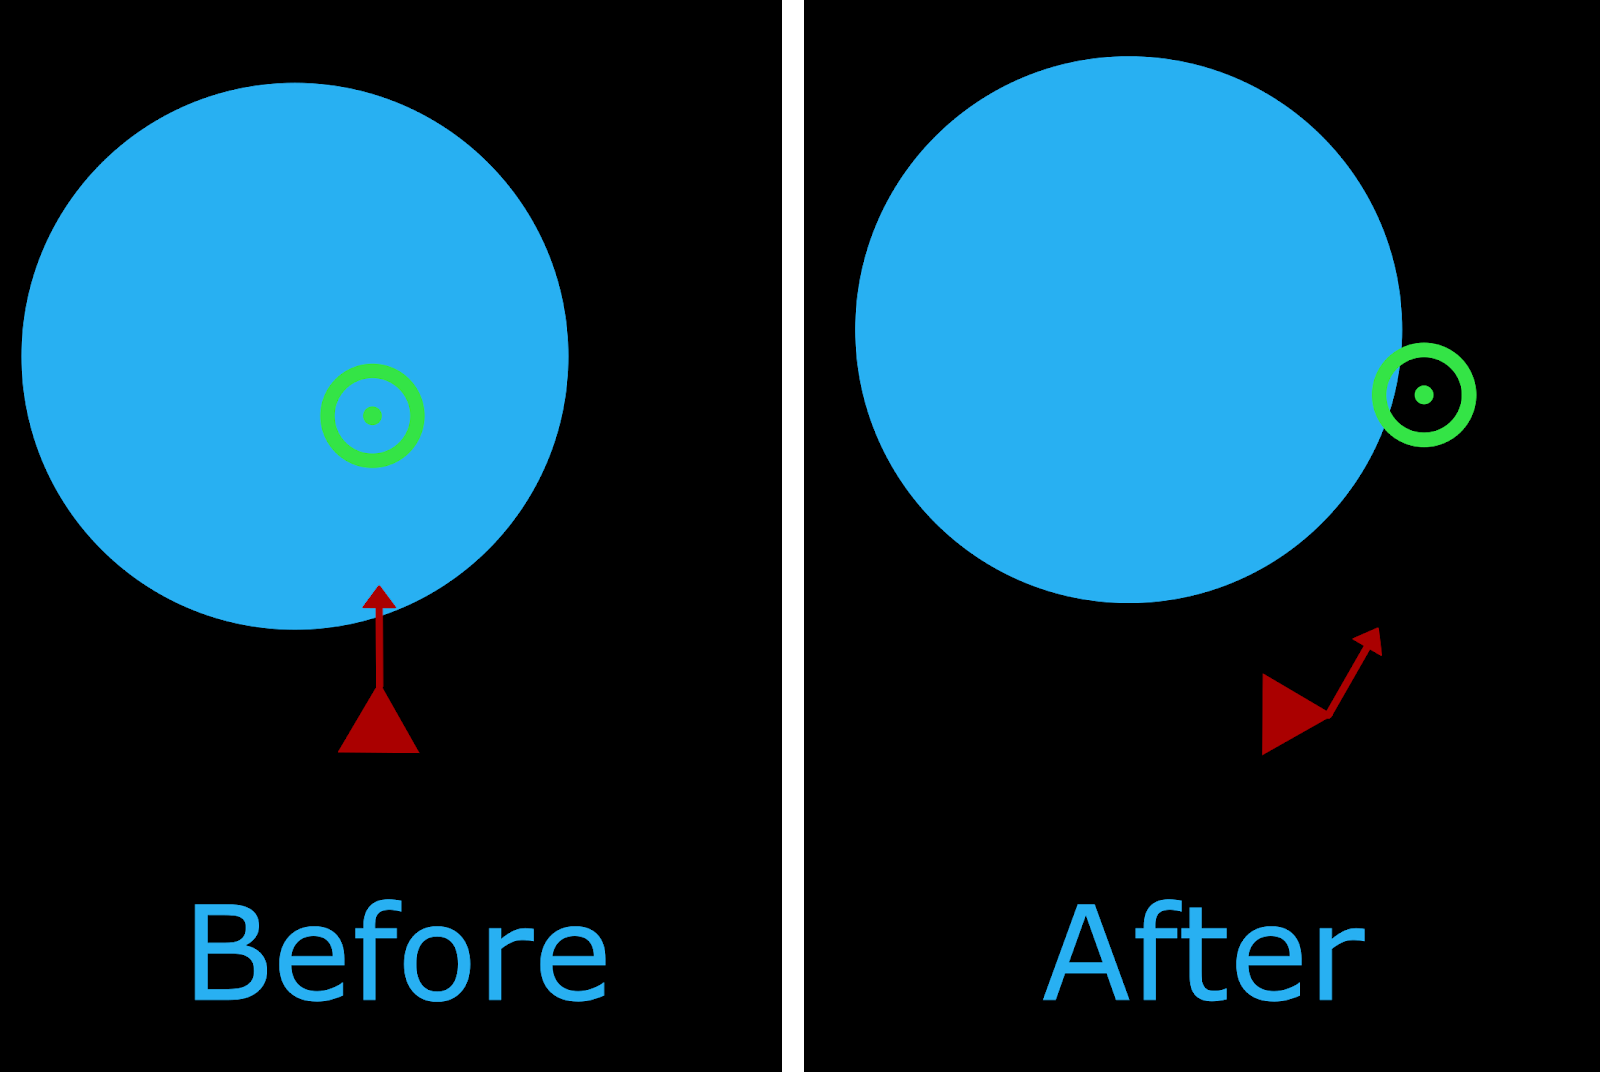
Fig. 4.1: Best course of action if you see you’ll crash.
Note that this is only a possibility, depending on your speed and distance, it may be impossible to do anything… You could also try engaging the warp drive for a second, with luck you may simply jump through the target! But because of the distance you’ll end up after that, it may not be worth it.
- I’m going too slow, I could be a lot faster!
This is the opposite of the previous situation. You can check your calculations and see that you can wait hours before needing to decelerate. The best thing to do is nothing. Just be patient, because you may easily find yourself on the first situation again. But if you really need to, accelerate a little and check again. Keep doing this until you’re comfortable with the wait.
- I’m close to my final stage of deceleration, but I’m pretty far from the target, and not getting any closer!
This happens when the trip take too long, and your target moved a lot in that time. Don’t worry, finish your deceleration, and then accelerate again towards it. Even the autopilot has to do this most of the times!
- I’m warping and everything was fine, until the delta v started increasing a lot! Now I’m very far from my target!
Same as number 3.
- Is this the end of the universe? I’m at billions of Gly away from anything!
If time was accelerated and you were going too fast, it’s possible you crashed into a planet or star, so there’s a glitch that sends you there. Nothing you can do about it…
- I took too long to turn the warp drive off, now I’m too close to a dwarf star or black hole!
See number 1. It’s unlikely that your engines will be stronger than gravity at this point, so just try to nudge your trajectory a bit.
These are the most common situations you may find yourself in, but there are certainly many more! The general advice is to be careful so you can prevent these, but if you’re already there, just breathe, keep your cool, analyze your situation, plan and act! Remember: The more you panic, the worse your situation will get!
4.2 Approaching a station or mothership
Now that you are calm again, let’s move on to the lessons! This one will show you how to approach a station or bigger ship before you dock. But first, we need some preparations:
- Build a station or mothership
Go somewhere far from any massive bodies. Use your stellar consciousness for this. 100 AU from the Sun is enough. Then, open the ship manager screen, click on build, select SpaceEngine -> SHW Corp -> X-Wing. You can select others, but make sure they have docking ports! You can check this by taking control of them, and switching the HUD to docking. If the Docked ships window appears, it’s good.
- Return to your Skylone.
Just leave the ship you built there, it doesn’t matter if it has any speed relative to anything. Just make sure it’s not accelerating, and Grav accel is 0.00.
Now go back to your Skylone, which should be landed on Earth if you’re following this guide to the letter. Take control of it.
- Warp to the mothership.
Open the spacecraft manager, and select the mothership as your target. Clear your reference body.
Now, using everything you learned, warp to the other ship. When you’re really close, stop. Change your HUD do Docking mode.
- Not so easy, right?
Disregard the last part of Step 3. It was just there to make you think it’d be easy. There are two things to notice here:
- Often, your target ship will be moving in relation to you. When I spawned it, it seemed still, but it was moving in relation to something. For you, it might have been a little different.
- The ship is small, and is far. Compared to planets and regular moons, the ship is very small. This makes it hard for our ship’s computer to pinpoint the exact location, so there will be an error on your final location.
I ended up more than 1 million km away from the ship. It’s not hard to get closer, if you’re used to correct your warp course as you go (when delta v gets higher than 100 m/s), but even then, you’ll see that delta v increases a lot, very quickly! Anyway, if you’re still too far, try again!
- Reach 10000 km
Stop if you’re closer than 10000 km. No problem if you want to stop further from that too. Change your HUD mode to Docking. Close the docked ships window for now. This is where I am:
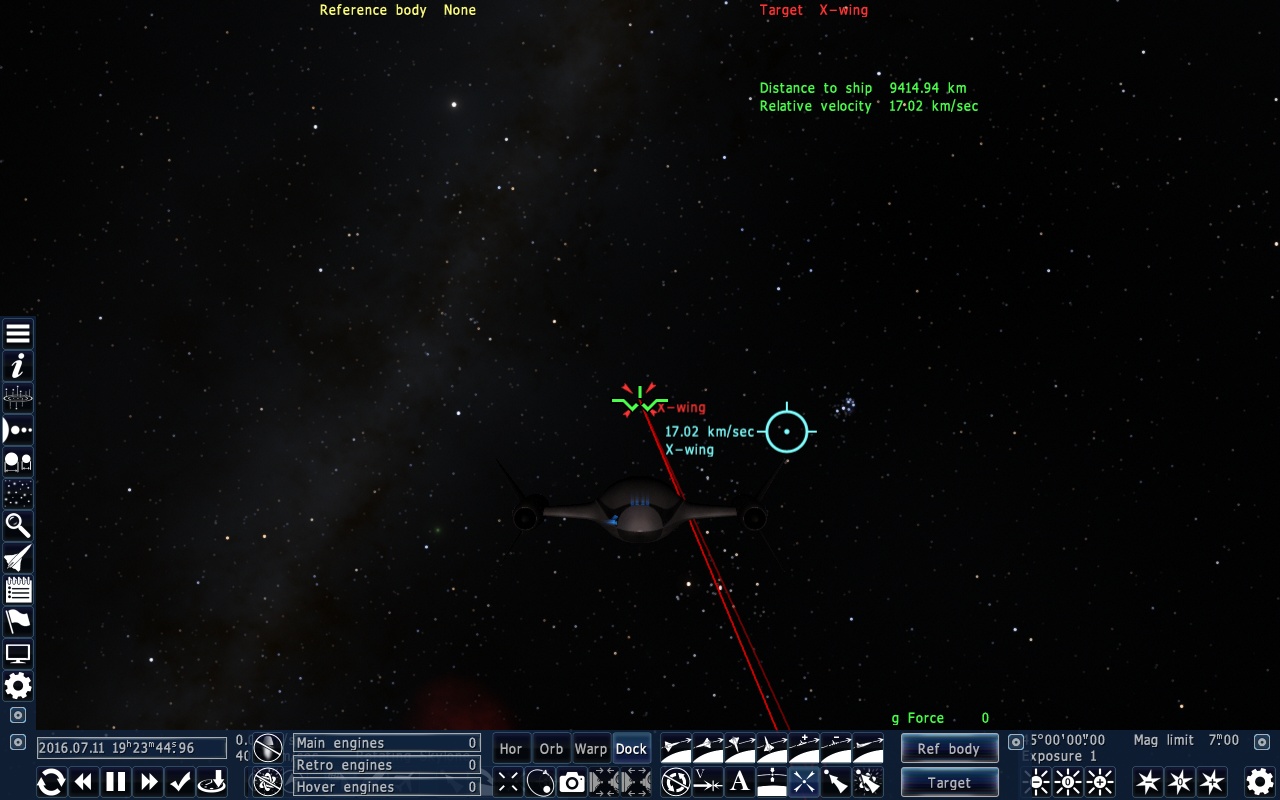
Fig. 4.2: Close, but not quite there yet.
- Approach.
This is where it might get tricky. If your velocity relative to the X-wing is in its general direction, you can just try to correct it until it points exactly to it. If it’s too different, it’s better to stop, Rotate to target, and then accelerate. Do the same procedure you did when going to Mars. Accelerate until the distance is a little above half of your current distance. Then start decelerating, always checking Torricelli’s equation to know how long you’ll take to stop. After that, you should now be very close to the ship. This is how it should look like now:

Fig. 4.3: Closer!
See how it’s still far away? You may have noticed too, that during deceleration your speed indicator moved from the center. That’s because you were facing the ship, but it already moved a bit during your approach. Of course you could’ve just warped closer to it, but we stopped early for practice reasons.
- Final Approach.
Now leave Assist and Kill rotation enabled. You may have to re-enable Kill rotation after enabling Assist. Your velocity should now match exactly the X-wing’s. Use only your thrusters to make the final approach. Whenever you let go of them, the autopilot will activate the opposite thrusters to zero your relative velocity again. You have to be patient here. When you’re about 1 km away, stop. (Remember that the ship has a certain size!).
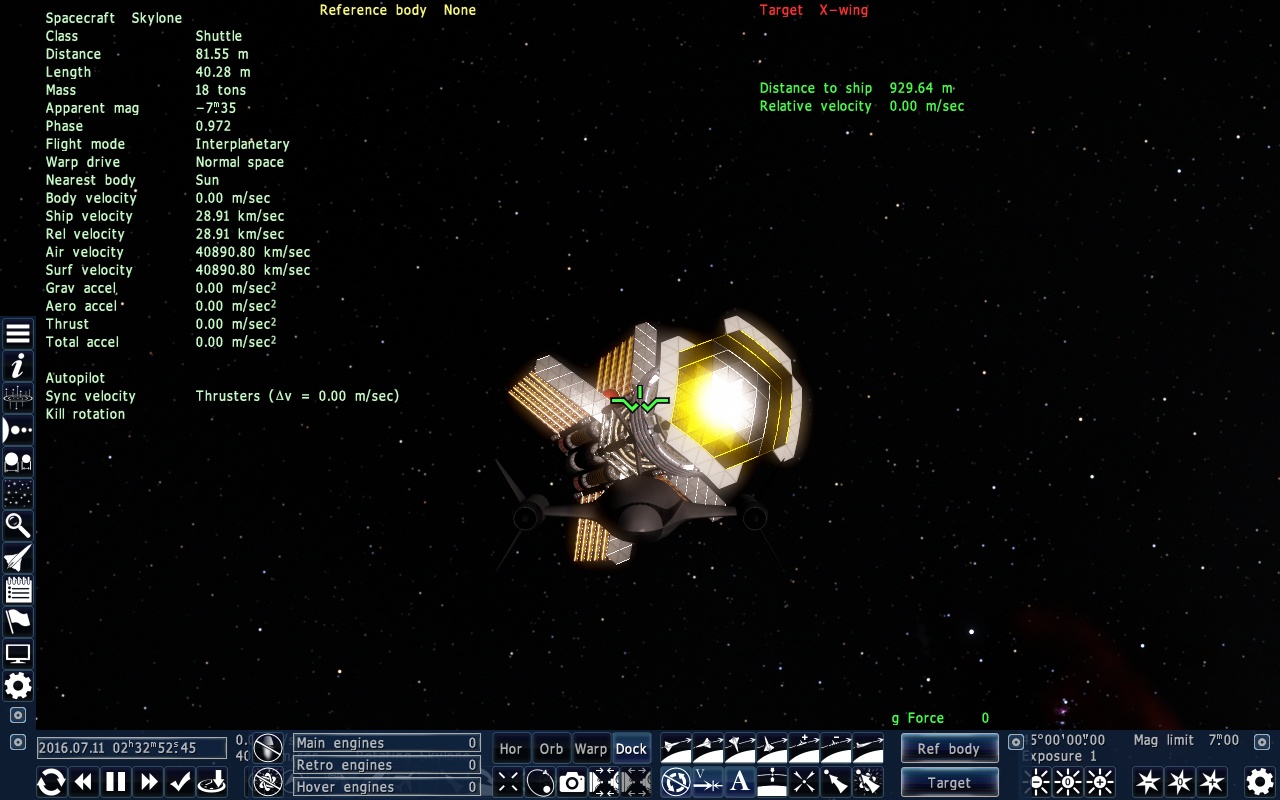
Fig. 4.4: We’re here!
4.3 Docking
Now comes the really tricky part. It may be hard at first, but don’t give up before you finish the process! It’s really rewarding!
This should be done immediately after the previous lesson.
- Prepare to dock.
Activate Docking HUD mode again and choose Port 01 as your dock and close the docked ships window.[12] It’s possible you may have to re-enable Kill rotation yet again. Look at your HUD:
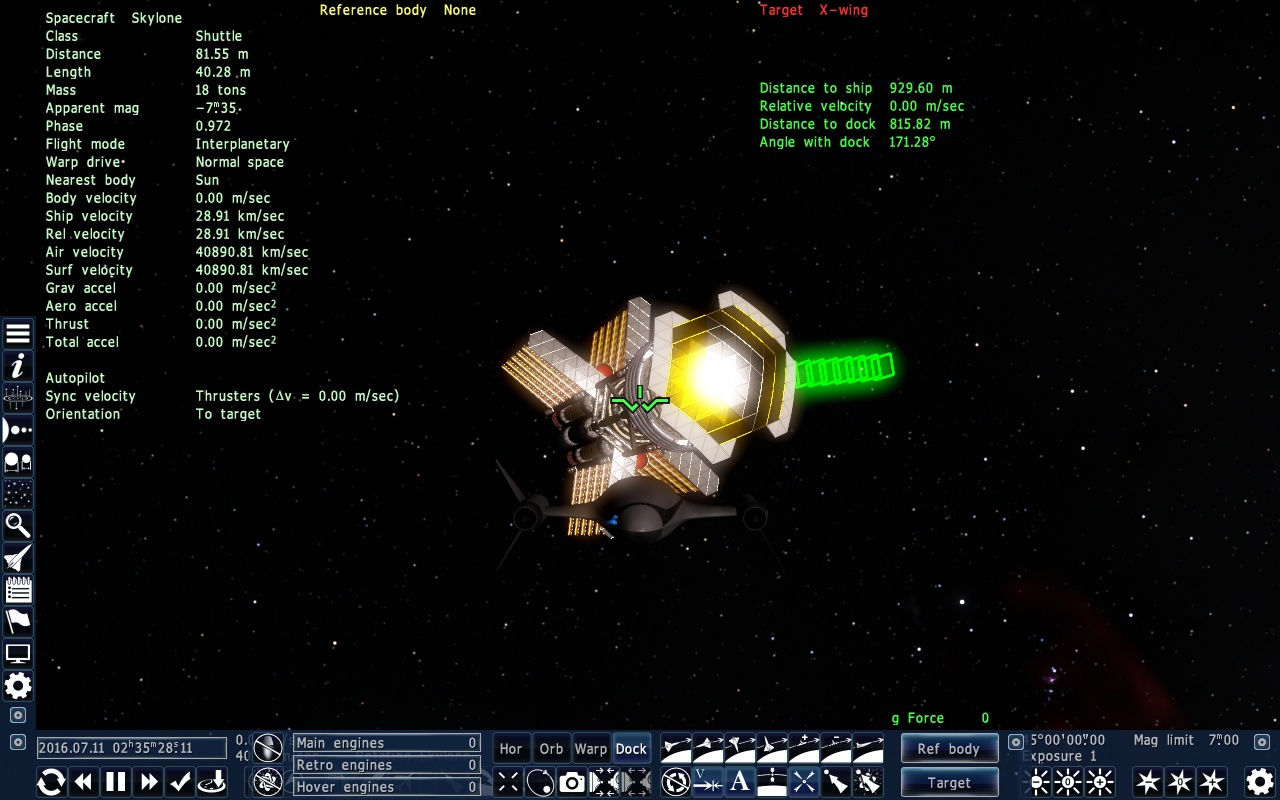
Fig. 4.5: Complete Docking HUD
Noticed anything different? There are 3 new elements: The distance to dock and Angle with dock values (both self-explanatory), and a bunch of green squares. Those squares indicate the path to your dock, like a tunnel you should go through.
- Approach the tunnel
Go to the squares now, to the last one, furthest from the ship. Make sure Sync velocity, Assist and Kill rotation are enabled!
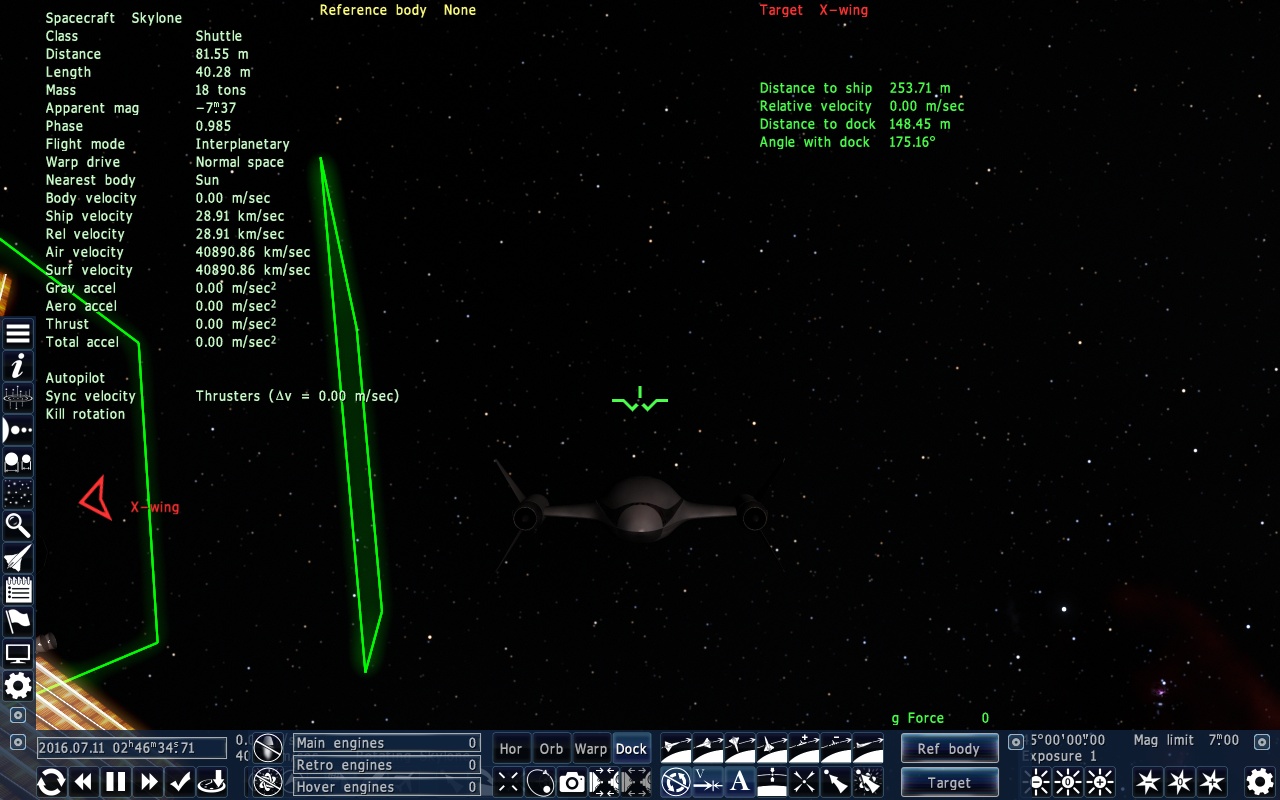
Fig. 4.6: Entering the dock tunnel.
- Align with dock.
Now use the rotation thrusters to make the Angle with dock go below 1º. Start with one pair (q, e), then switch to another (numpad 4, 6), go to the next (numpad 2, 8), and if necessary start over:
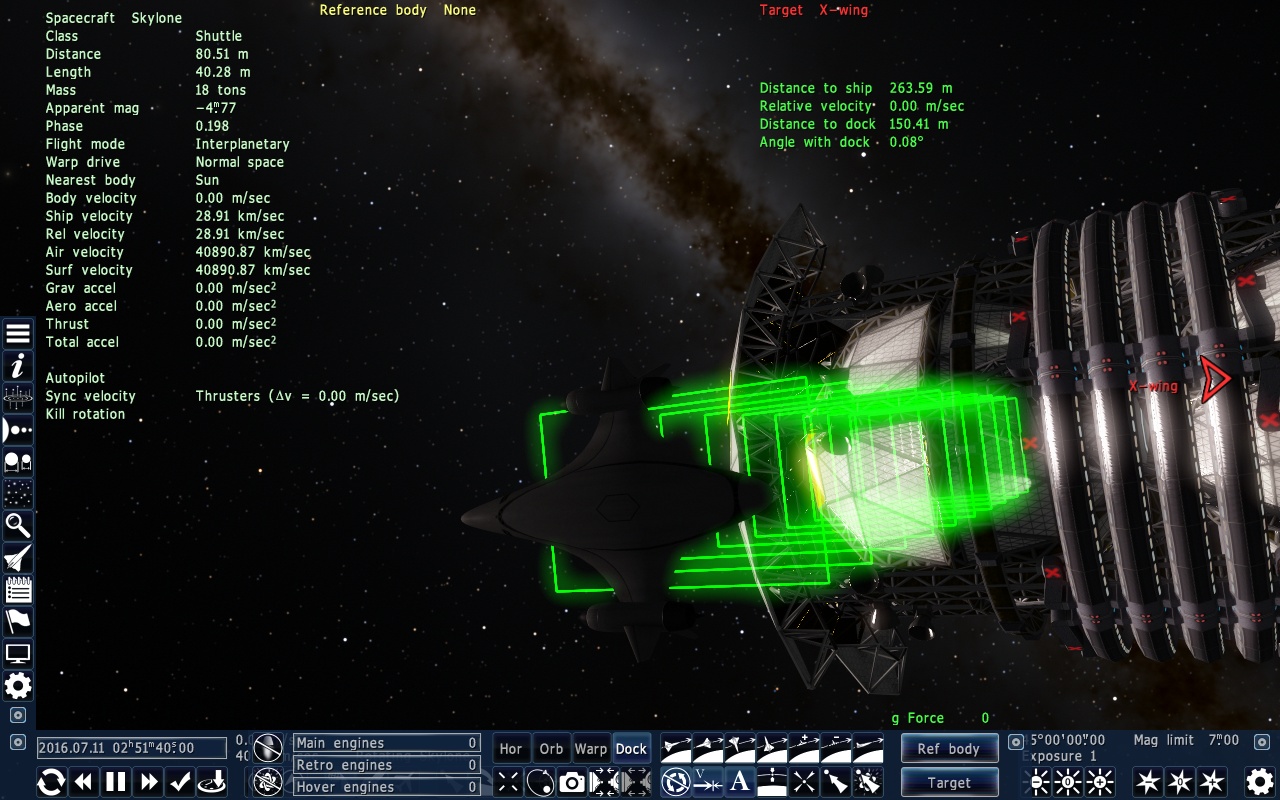
Fig. 4.7: Aligned and ready to dock!
It may take a while on your first try. That’s normal!
- Go through the tunnel.
Now all you have to do is go through the tunnel, using only gentle taps on your thrusters! Watch the distance indicator go down, and when it’s closer than 1 m...
- Dock!
You don’t have to do anything, your ship will automatically dock when it’s close enough!
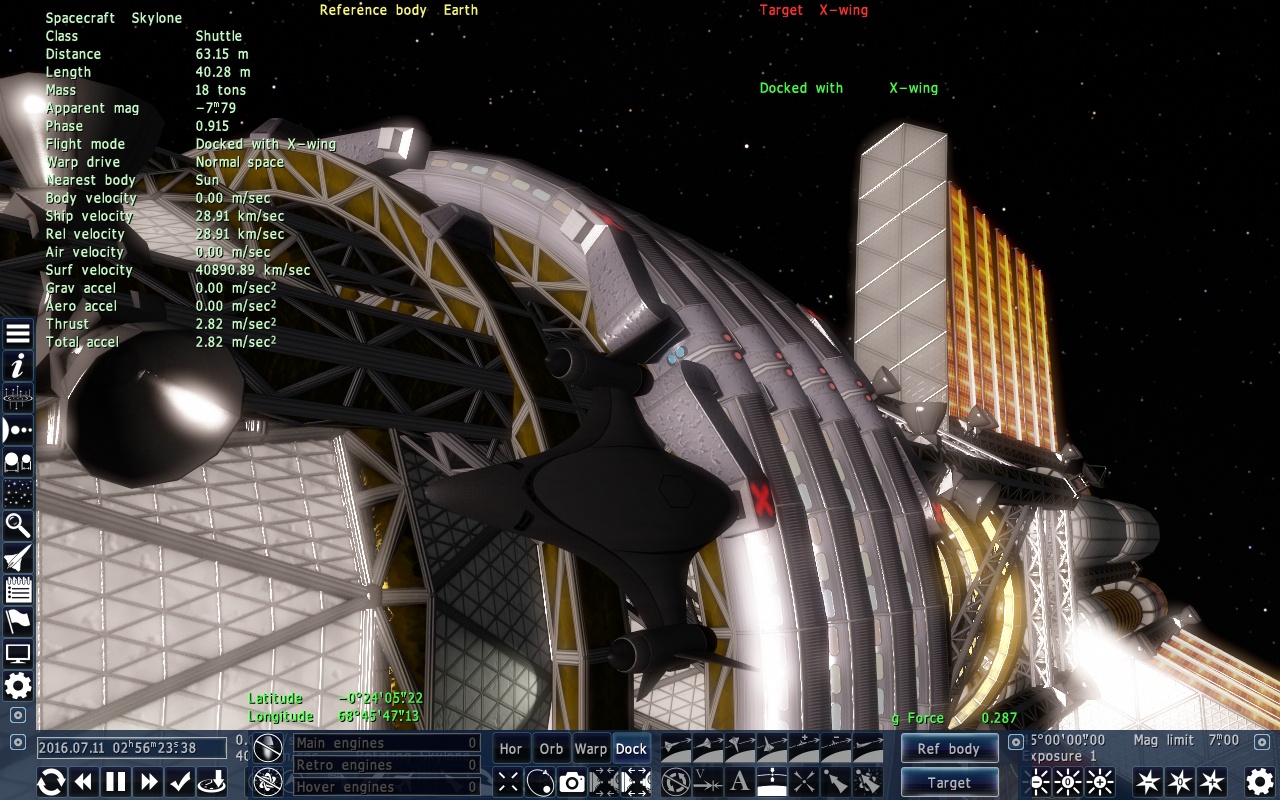
Fig. 4.8: Docked!
Done! If it doesn’t dock automatically, check your angle again. It has to be below 1º!
4.4 Docking while orbiting
What did you think? Was it easy to dock? Probably not, but now it’ll get a lot harder!
- Take control of the mothership!
Now let’s take this baby for a spin! Select it and take control of the X-Wing. No matter what you do, the docked Skylone will still be there!
- Return to Earth.
Warp back to Earth and enter a stable orbit. Be careful with this new ship, its engines are a lot more powerful than the Skylone’s! Leave it with the Prograde auto orientation enabled.
- Undock.
Take control of the docked Skylone again, and hit the Undock button. You should be stopped in relation to the X-Wing, with the same orbit. Now move a little bit, while keeping your velocity synced. Rotate on any direction you want. Don’t go far!
- Try to dock again.
Repeat all the same steps from before and try to dock
- And again.
It’s harder, right? Why?
- Don’t give up!
That’s because the mothership is always changing its velocity direction, since it’s in orbit around Earth (and its orientation). When you sync your velocity, the ship’s computer syncs to that exact moment, but a fraction of a second later, it’s already different, and it has to sync again.
Pro tip: You’ll always need to adjust your angle, due to the orientation change of the mothership. So, go over it a little bit, because while you trying to dock, it’ll reach 0 degrees on its own before going up again.
It’s not easy at all, that’s why it’s on the advanced section! Keep trying, and when you make it you’ll get that good feeling of accomplishment! Normally, when docking to a mothership, that ship’s commander will most likely have turned off any kind of auto orientation, to make life easier for you! But we’re training, so it’s cool to make it a bit harder!
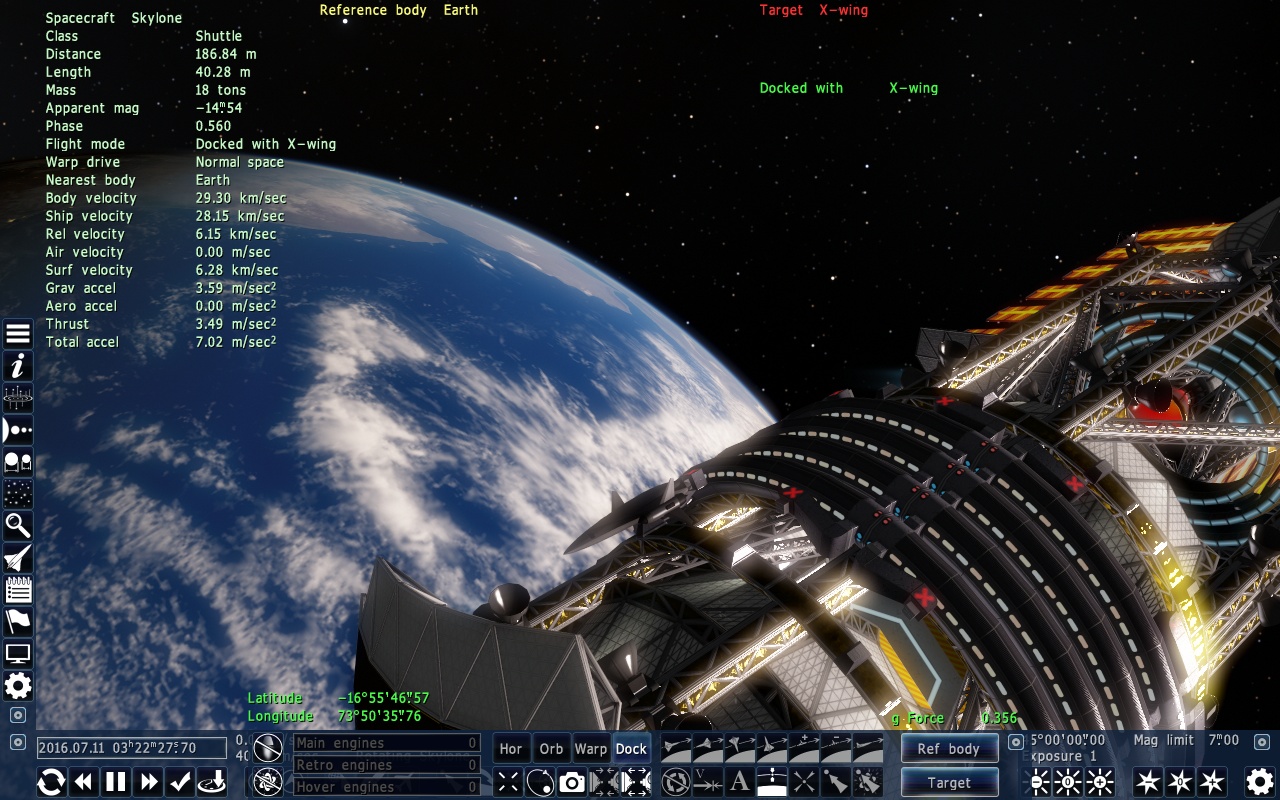
Fig. 4.9: This is the life!
4.5 Orbiting a star
This is actually a kind of a challenge. It’s easy to orbit a planet or moon, right? What about a star? Well, technically, you’ve been doing that all the time! But what if we were to enter a stable orbit very close to the Sun? Warp there and try it! Start at 3000000 km away. (Time acceleration may be needed.)
It’s ok, right? Now try at 2000000 km away. Still feasible? Now go to 1000000 km and try again.
No way! Sun’s gravity is too strong, you can’t accelerate enough in time! You crashed, right?
That’s the thing with stars. They’re so massive, but since we’re usually far from them, we disregard their gravity. And worse, the closer we get, the stronger (squared) it becomes. If you’re on a spot that the gravity is stronger than your engines, there’s no way you’ll be able to orbit it on a stable trajectory. The only way is when you can still use your engines to get away and increase your vertical velocity enough before accelerating. And still,you’ll end up a lot higher than you first intended.
Each star has different masses and radius, so it’s hard to tell how close you can get. As a general rule, if you have hover engines, go as close as they can maintain your height, then accelerate. On the Skylone and Sun case, that’s about 2000000 km.
What you can do, though, is enter a safe stable orbit, then proceed as if you were trying to land. Decrease Rperi this way, wait until you reach it, adjust your velocity for a circular orbit, and repeat as necessary. Doing this, look what I was able to accomplish:
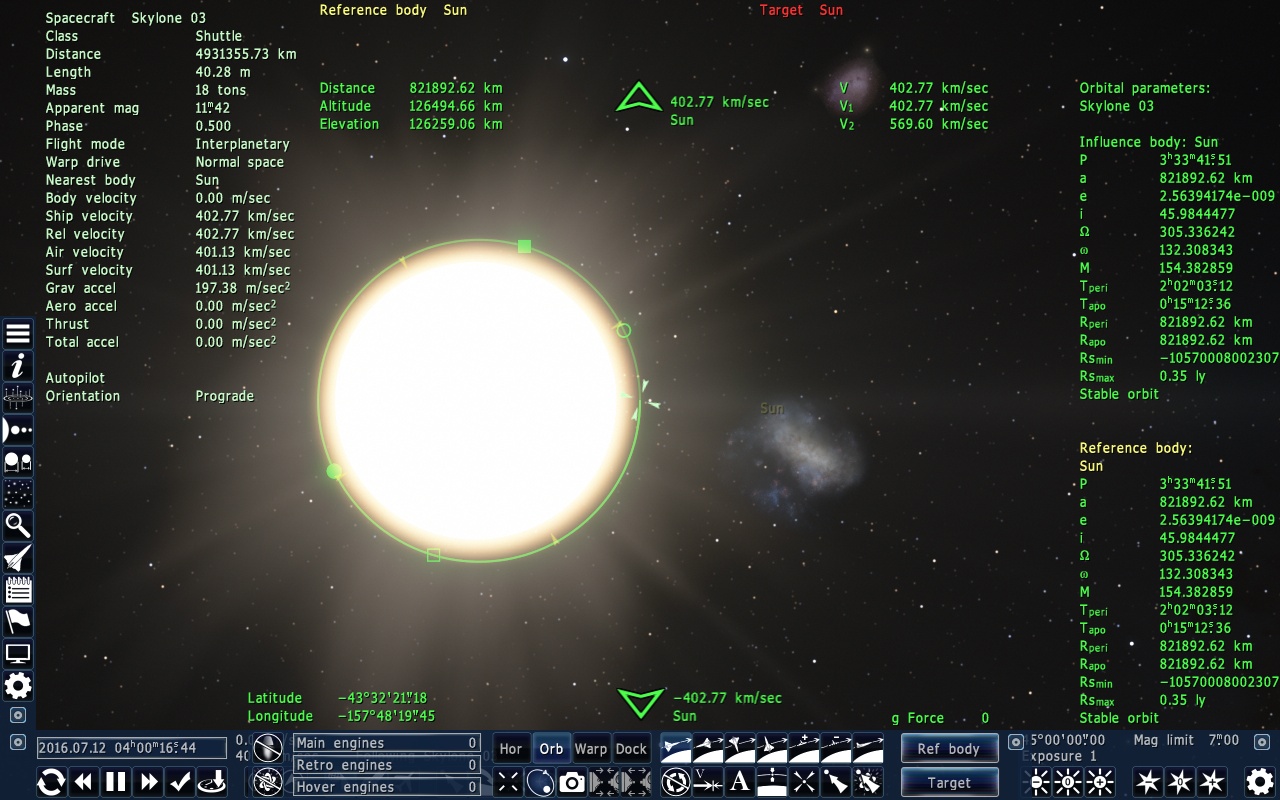
Fig. 4.10: That’s close!
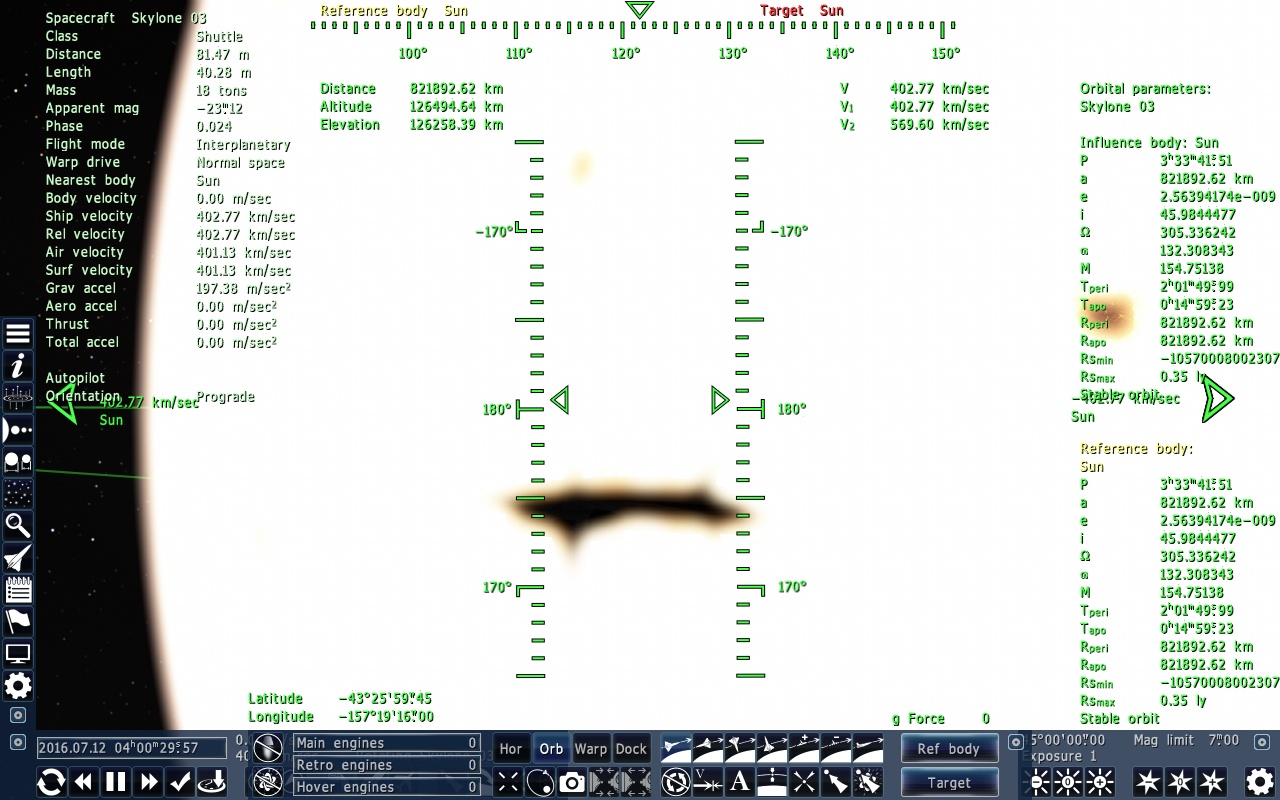
Fig. 4.11: Really, really close!
Now, this was with the Sun, a relatively easy star to orbit. As a general rule, the smaller the star, the harder it is to orbit, because its mass is still very large, but with a small radius, so you think you’re still far from it, but no… The easier ones are the Giants, and the hardest the White Dwarves, Neutron stars, and of course, black holes!
While approaching a star to orbit, (I’m assuming you’re warping there), you can see the gravity accel on your ship. Stop before it gets too strong, and then proceed to reach a stable orbit. That way, there’s nothing you can’t orbit!
4.6 Advanced Level Exam: To Ross 882 2 and Return II
Are you ready for this? The final test to prove you are a worthy space pilot/commander! The last exam!
Your task this time will be similar to the last exam, but with a small twist: You’ll go with two ships!
- Create a X-Wing and make it stay in orbit around Earth.
- Create a skylone on Earth’s surface.
- Take-off, and dock within the X-Wing.
- Take control of the X-Wing.
- Use F3 to search for Ross 882, and then F2 to set the second planet as your target and reference body.
- Warp there.
- Reach a stable orbit with the X-Wing.
- Get on the Skylone and undock.
- Land. Use any of the methods you learned for this!
- Admire the landscapes of this nice Terra.
- Take-off, and dock within the X-Wing.
- Take control of the X-Wing.
- Set Earth as your target and warp there.
- Enter orbit.
- Receive Advanced Flight School Certificate!
Tips:
- Notice that this planet’s atmosphere is very different from Earth’s, so be extra careful when landing!
- None of the docking procedures will be easy!
- If you want an extra challenge, try to orbit close to to Ross 882 before going to the planet! It’ll be a lot harder than the Sun!
This exam tested everything you learned so far! If you completed it smoothly, you deserve congratulations! It’s not easy to reach this stage of expertise! [And who knows, maybe what you learned may come in handy on real life?]
5. Space Flight School: Master Challenges
That’s it, you made through all the lessons! You are now a certified Space Pilot or Commander (depends on your choice of ship)!
So, what’s next? You can take many jobs around the galaxy, ranging from simple courier ones, to scientific exploration and trading. Unfortunately, if you want to be a fighter you have to take an additional course, since combat maneuvers can be a bit more complicated, and I’m not really qualified for teaching those. Maybe in the future...
You can, however, hone your skills even further by trying to complete these challenges! They’re usually not useful on day-to-day situations, but who knows, maybe you can find yourself on one of the scenarios below on of these days!
I’m not gonna go through a step-by-step procedure, I’ll merely explain the general idea, and it’s up to you to figure out how to do it! I’ll show some pictures to show you the results of my attempts, and maybe a picture during the process if there is anything interesting to show, but you should be able to do it entirely on your own!
5.1 Slingshot maneuvers
If we were at the dawn of the space travel, this would be a fundamental lesson. Back in the day, our thrusters were a lot less efficient, and used quite a lot of fuel. So, to reach distant places, we had to find other ways to accelerate. And by this, I mean using nearby celestial bodies as accelerators. It was tough, required a lot, and I mean A LOT, of calculations and patience. But the concept was simple: Get pulled by the body’s gravity, adjust the trajectory so that you reach escape velocity (or faster) at the closest point, so you don’t have a stable orbit and simply pass close to it and continue on your way. This approach can accelerate a ship to impressive velocities, so that’s how we’d reach far away planets before we had the amazing thrusters we have today.
The hard part is to plot your trajectory, not only to get close to a nearby body, but in a way that it is aligned with your next target’s orbit. That is, you have to exit the first body’s influence radius on the right time and position so that your speed is pointing not at the next body, but at where it is going to be when you reach it. The thrusters can only make very small corrections, so it was a very difficult thing to do. Of course, computers helped them plot these trajectories, but you still have to act at the right time.
Today’s ships don’t really need to do this kind of maneuvers, so eventually this function got stripped of the standard computers (although I heard there are people working to get a HUD add-on for this[13]).
So, if you feel you’re up for the challenge, pretend you’re in 1977 and try to slingshot your way to Uranus or Neptune! You have to wait for the right alignment to do this, so it’s not easy! Luckily, you can check the planet’s orbits at any time, future or past, and just start from when you think it’ll be the right time!
5.2 Escaping massive gravity
You were warping through space, and passed close to a white dwarf star, when for some reason you dropped out of warp speed, very close to it! The gravity is immense, so there’s no way you can just turn back. The warp drive is malfunctioning, so if you activate it, it’ll be for only a few seconds.
This is almost the same as the tough situation n. 6 mentioned in 4.1, but harder because of class of the star. Try to figure out a way to escape the massive gravity, be it in the form of a slight course change (which will end up being an insane slingshot maneuver), or very quick warp drive activation in a way that you’ll reach a safe enough place to go back to your previous course.
Suggested location: 500000 km away from any of the G 261-43 stars (but not between them!).
5.3 Orbiting a black hole
You’re commanding a science expedition to study a black hole from really up close! So, you have to go there, enter a stable orbit very far from it, and then progressively get nearer, and then return. This mission can take years to complete, so be prepared!
Note: There will be a point where the acceleration is so enormous, that you won’t be able to decelerate to keep getting closer, so that’s probably as close as you’ll get!
If you have to, you’ll find that it’s easier to slingshot a black hole than a star, because black holes are usually very small, so you won’t crash on the “surface”.
Suggested location: Any black hole you can find! Just remember that the more massive it is, the more difficult it’ll be! I suggest going to a black hole with an accretion disk because of the sights, but notice that these usually have really huge masses!
5.4 Warping Interception
A small interstellar shuttle has been stolen from the mothership by rebel crew members, with many crates of supplies and parts important for the mothership. We only found out a few hours after the incident. It is imperative that we catch up and intercept the stolen ship. It has limited warp capabilities (factor 6) and should take many days to reach the nearest star, so waiting for them there is not an option, since we'll run out of supplies before they reach their destination (which we're not sure of anyway). We have to intercept them during warp!
Put a small ship on a warp course to a nearby star (must take days to reach it) at a warp factor of 6, wait some hours (at accelerated time, of course), and then take control of a big ship at the starting location, and try to intercept it. Consider the interception successful when the whole warp bubble of the small ship is inside the warp bubble of the big ship.
This is hard! It’s going to be a real challenge! One of the obstacles is accurately matching the speed. It's no use matching the physical relative velocity, because the warp factor probably won't be exactly the same. You have to manually match the effective speed when you're close enough, and this is a very big challenge, since a very small tap on the key can make a big difference. Another difficulty is matching the direction. Since you're on an intercept course, you won't be travelling in the same direction, and this adds a whole other level of difficulty. If you’re having too much trouble, I suggest you leave both ships with the warp delta v zeroed before launching the small one! Then aim at the same target as the small ship and warp a bit before setting it as your target and attempting the intercept course. That way, you only have to worry about the speed, and not the direction.
5.5. Docking while warping
While boarding the shuttle, you didn’t realize that it was a trap! The rebels were hidden at the Mothership all along, and now warped without you, leaving you alone on a shuttle with a very weak warp drive. The good news is, the Mothership was running out of fuel, so they’re not going too fast, and you’ll probably be able to catch up and reclaim your ship!
This is the opposite of the previous challenge. Do everything the same way, but this time the big ship is warping away, and you try to intercept it with the small ship. When you’re close enough, try docking with the big one.
Again, if you’re having too much trouble, try to set the course in a way that you won’t have to worry about the direction, only the speed. This will be even harder, so good luck! I still haven’t been able to complete this challenge, so if you manage it, you’re already at the highest level of piloting possible! Congratulations! Really!
5.6 Slingshotting between Galaxies
Did I say highest level of piloting possible? Well, not yet! There is one last challenge for you! This is the ultimate one, if you pull this off, you are literally THE BEST pilot ever!
[SpaceEngineer came up with this one, so I’ll just quote his instructions here, with some minor modifications:]
- Find some black hole, warp there and enter a far and stable orbit.
- Decrease pericenter height in that way, so ship velocity vector will point to the target galaxy when in pericenter. [Some HUD tool need to be implemented for this, but it’s totally doable without it.]
- Wait until you reach the pericenter, you’ll be accelerated by the black hole’s gravity to an incredible speed. When the velocity vector is pointing to the needed direction, turn on warp field with maximum power! Milliseconds matter a lot here in case of a stellar mass black hole, so choosing supermassive black hole is better for manually piloted crafts.
- You will be pulled away from the galaxy within a few seconds, and a flight to a 1 billion light years away destination will take a few hours. During flight, make corrections so your velocity vector will always point to the target galaxy center (use the telescope for this).
- Then, when you get close to the galaxy, find another black hole for braking (you must already know it's coordinates, but you can probably use the central one). Adjust your velocity vector toward it.
- Really (and I mean, REALLY) tricky part, I wasn't able to pass this exam: repeat steps 3, 2 and 1 in backward order to decelerate using the black hole's gravity and enter a stable orbit around it. The correct way probably would be passing a few Rg off the black hole in warp, then disable warp drive at the closest approach point, and let gravity do the job. Then, when your physical velocity decreases to a few dozen of km/s, you may enable warp drive again to escape the black hole system. Be careful, look where the warp vector is pointed at this time!
!!!Hidden Section!!!
Hey! You found the hidden section! That means you’re actually following this guide! Good for you! Here are some “cheats” that may help you control a spaceship on SpaceEngine! They take away all the realism, though, so use them only when you just want to have some fun!
You can either type these commands on the console (~ key), or edit the main.cfg file:
// Physics settings
Physics
{
PhysicsTick 0.015 // physics iteration time (seconds).
CheatsMenu true // enable cheats menu (F3)
UFO false // enable unlimited thruster acceleration
FTL false // enable unlimited speed
Aero true // enable aerodynamics
Gravity true // enable gravity
Collisions true // enable collision detection
}
The settings here are for realism, disable gravity and aero for easy atmospheric flight, enable UFO to have virtually infinite acceleration. Decrease PhysicsTick to perform more calculations per second, making the simulation more stable and realistic. Enable FTL to go beyond the speed of light without warping.
6. Conclusion and final comments
Well, this was fun! I don’t know if it was for you, while you were struggling to learn everything, but I had a great time planning, testing scenarios, and writing this guide! I hope you enjoyed it, and that my objective was completed, that is, that this was really helpful for you, and that you learned something!
Good luck on your journeys!
[The rest of this document is written out of character.]
I don’t know if I arranged all the lessons in a convenient order, or if I covered everything I should’ve covered, or even if I was clear on the text. That’s why I’ll always be open to suggestions and constructive criticism! Anything you want, you can say to me! Either privately, or as a public message on the SE forums. No hard feelings!
SpaceEngine is always evolving, getting only better and better with each version! Well, even on each beta update we can already feel a big difference! With that, it’s possible that many gameplay elements change over time, be it simply some controls or HUD elements, or even entire concepts. I’ll always do my best to keep this up to date with changes made to the gameplay, but I confess I can’t be sure of how much time I’ll be able to spend when the time comes. So delays are very likely to happen! I apologize in advance for it! You can contact me if you want, when there is a big gameplay change and I still haven’t published an update, but please try to be polite! If you read this far, I trust you’ll be, because those who don’t tend to be usually don't read much!
See you ‘round the ‘verse!
Paulo F. Jarschel
Oh, some contact information:
SE Forums: pfjarschel
Reddit: pfjarschel
Facebook: /pfjarschel
Twitter: @pfjarschel (I don’t really use it)
E-mail: pfjarschel@gmail.com
(you can see I’m very creative with my usernames)
[1] [This guide is written in a roleplay style, as if you, the reader, were actually a student taking a course, and I was the instructor, in a fictional scenario where spaceflight and interstellar travel are routine. Things that are related to our real world will be written between brackets, just like this note here.]
[2] See how there is a note saying what you have to do to actually launch SE? That’s because the roleplaying text could get confusing, so it’s better to leave explicit real-world instructions. Launching SE is easy enough, but who knows, on more complicated scenarios it can be a problem. Get used to it!
[3] [So many footnotes! Anyway, up until version 0.974 RC3, it is possible the ship controls bar will not show up after you take control of the ship. Don’t worry, just take control again and again, until the bar appears.]
[4] [Copied from SE/docs/readme_eng.txt, fixed some typos and added warp and dock modes]
[5] Some of the information contained here was taken from the Galactic Encyclopedia, a.k.a. Wikipedia: https://en.wikipedia.org/wiki/Orbital_elements . It’s a good resource to study all of this deeper, if you want.
[6] For now, since relative movement between them will eventually be implemented!
[7] [If you have any interest in SpaceEngine, chances are you remember quite a lot from your physics classes, or at least studied a bit of astronomy on your own. But in the roleplaying universe it’s not necessarily like this. This comment is not meant to offend anyone! It’s just a humorous passage in a popular guide.]
[8] Remember which button that is? If not, go back and look at the reference!
[9] Just to be sure, I’ll explain again: this means align to the Horizon direction, wait, and then disable auto-orientation and Kill rotation.
[10] [Not really this, it’s just that I didn’t want to write “absolute velocity”.]
[11] As of version 0.974 RC3, it’s possible that delta v is locked at 32 ly/s, or 10 parsecs/s. If this happens to you, just enable the warp autopilot and quickly disable it. It should fix the problem.
[12] If it doesn’t appear, change back and forth between Docking mode and any other until it shows up.
[13] [SpaceEngineer mentioned some new interface elements to be added, one of them being Rendezvous indicators and autopilot, so we can expect something like this on a next version!]