How to make a TurtleVac (Tortuga)
Developed by Jeff Kobs, MD
Presented by Jessica Hirschhorn, MD
ADVANTAGES: Constant low pressure suction (5-8 inches Hg, or 125 mm Hg) creates constant drainage, and induction of healthy granulation tissue.
DISADVANTAGES: Patient unable to move from the constant electrical source. Sterile dressing changes are needed every 48-72 hours.
This device costs about $60 and can be made with readily available parts. Almost all parts are available on Amazon.com
PARTS NEEDED:
AMAZON.com
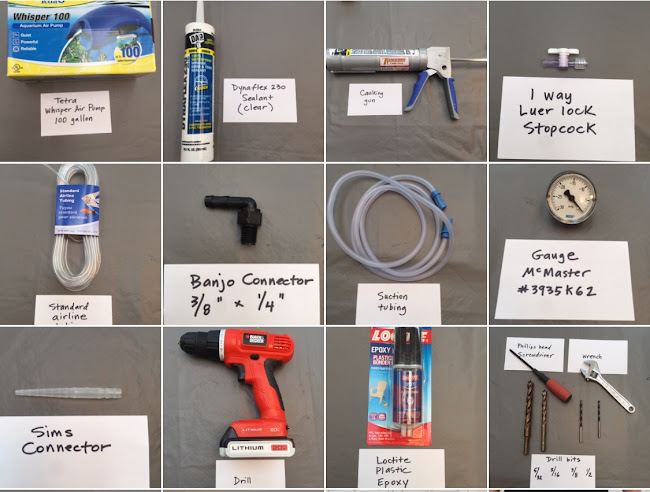
Whisper Air Pump, 100-Gallon Aquariums by Tetra $30.00 (smaller will not generate enough suction)
Dap 18305 DYNAFLEX 230 Premium Indoor/Outdoor Sealant - Clear 10.1-oz Cartridge (18304) $8.99
Loctite Epoxy Plastic Bonder 0.85-Fluid Ounce Syringe (1363118 ) $7.88
Newborn 930-GTD Drip-Free Smooth Hex Rod Cradle Caulking Gun with Gator Trigger Comfort Grip, 1/10 Gallon Cartridge, 10:1 Thrust Ratio $8.99 (or any caulking gun)
3060000 Stopcocks with Luer Connections; 1-Way; Male Lock, Non-sterile , (Pack of 10) $3.82 each
PENN PLAX Standard Airline Tubing Air Pump Accessories, 25-Feet $4.08
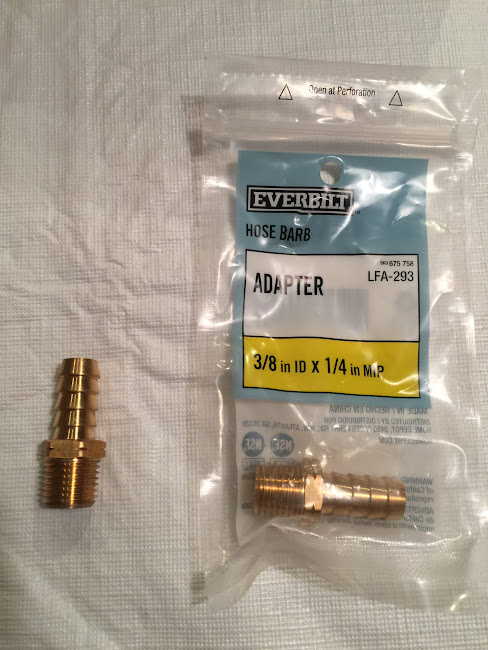
Anderson Metals 57001 Brass Hose Fitting, Adapter, 3/8" Barb x 1/4" NPT Male Pipe : $3.61 each
Photo of above:
Suction Tubes 3/16"X 6', 12 Per Box $9.24
Gauge:
McMaster Carr part #4002K35 www.mcmaster.com $12.78 (note NEW catalog number)
Sims Connector: to connect suction tubing to smaller IV tubing: 351BXX from
www.mycareex.com $2.85 . Can use tape if you do not have this.
Drill
Drill bits: 5/32” for pilot holes and airline tubing
5/16” second pilot hole if needed.
⅜” for screw in gauge, and Banjo connector
Phillips head screwdriver
Adjustable 6” wrench
Marker, tape measure, container for screws, disposable pointed stick for epoxy
FOR THE PATIENT DRESSING:
Open cell foam, 1-1.5” thick. Sterilize moist in microwave x 2 minutes, or soak in 10% bleach and rinse well with sterile water.
FILM: Tegaderm, Ioban, Saran wrap
TAPE: Waterproof sports tape.
INSTRUCTIONS:
YouTube HOW-TO Video: https://youtu.be/BRioWrBk_I0
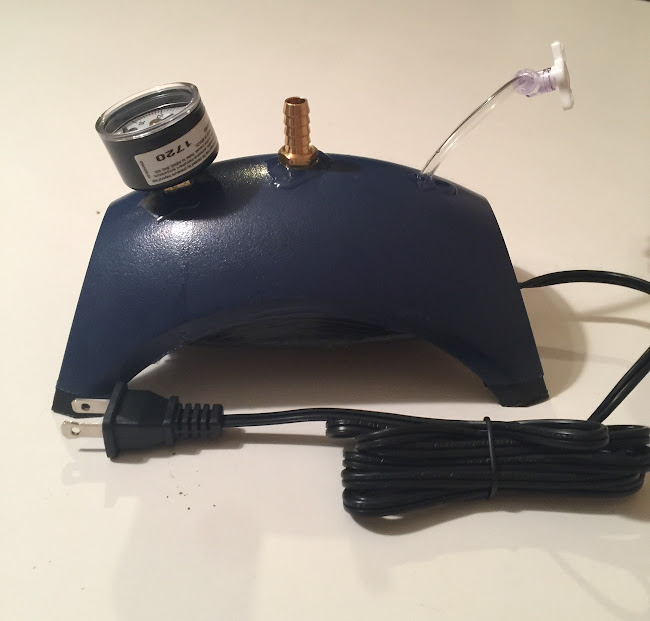
- Remove pump from box and turn upside down. Remove (and SAVE!) the 4 Phillips screws. Remove the black motor from the shell and set aside. You will see two exhaust holes opposite the cord. Ignore them.
2. From the INSIDE of the blue shell, you will see an imprint of the center, as well as an indication of the side that the cord enters. Use the center imprint as a guide for your first PILOT HOLE (5/32”) from the inside out.
Turn the shell over. Measure 2” on either side of the center pilot hole, and mark the spots for your other two drill holes. Drill these holes with the small pilot drill (5/32”). Enlarge the CENTER (Banjo connector) hole and the GAUGE hole (furthest from the cord) with a larger drill bit (3/16”). DO NOT enlarge the tubing hole, closest to the cord.
3. Drill the hole for the GAUGE (furthest from the cord) using ⅜” bit. Drill slowly, hold shell firmly.
4. Drill center hole for the BANJO connector. Use ½” drill bit. Drill slowly, hold shell firmly.
5. Thread aquarium/standard/airline tubing from outside to inside, through the smallest hole. You want a tight fit. You might need to cut it on an angle, pull it through, cut straight from the inside, and pull back carefully so that a few mm are proud on the undersurface. You will only need 4-6” of the tubing on the outside, as it is merely the ON-OFF switch.
6. Insert the BANJO CONNECTOR to center hole. Start by hand, and finish with the adjustable wrench (“force thread”) You need to push down with some force. Leave it about 4-5 mm proud.
7. Screw in the GAUGE. Start by hand, and finish with the adjustable wrench (“force thread”)
8. Mix the EPOXY. Using a sharp pointed stick, apply liberally to the UNDERSURFACE as well as the OUTSIDE of the three connections. Be liberal with the epoxy. Take care to avoid getting any epoxy into any of the tubes.
Remove and discard the WHITE FELT circle on the black motor air vent. Fill in this hole with epoxy.
9. Let the EPOXY dry for 60 minutes. It will be FULL STRENGTH in 24 hours.
10. Seal the black base to the shell. Using the Dynaflex 230 clear sealant in the caulking gun, apply liberally to the INNER and OUTER seams of the inside of the black base. Be generous where the cord leaves the base. Take care to avoid getting any sealant in the motor. Lift the plug, and apply sealant under it before replacing.
11. Re-attach the black base to the shell, using the (saved) Phillips screws. Screw back tightly.
12. Using disposable gloves and more Dynaflex sealant, apply sealant on the outside seams and around the cord exit, using your fingers to seal the seams. Be generous. It will dry CLEAR.
13. Allow the sealant to cure x 2 days. Leave it alone.
14. Attach the LuerLock stopcock to the standard tubing. This is the ON-OFF switch.
TESTING:
When the sealant is fully cured, plug it in, occlude the Banjo connector, and turn it on with the stopcock. The gauge should read at least 5” Hg (125 mm).
HOW to USE:
Suction tubing from Banjo (center) connector to suction canister. Suction canister to patient using standard tubing, or suction tubing to standard tubing via Sims connector.
This YouTube video may be helpful for use with real wounds:
http://www.youtube.com/watch?v=dvJ0ezmnb0g