Installation Guide

Part 1
Documentation by Tom Crews (SnkBitten)
Foreword
Amithlon was released in October 2001 and was designed around hardware released in the same era (late 1990 and early 2000), your newer hardware may not be compatible. Most hardware I’ve tested and used has been older motherboards and video cards I had, friends had, or picked up cheaply off eBay. If booting from CD is unsuccessful, you have an extremely high chance of Amithlon not working on your system. However, the kernel (emubox.gz) on the AmigaOS XL CD is older than what was officially made available (new_emubox.gz) and what others have provided (Kernel 3.10 and Kernel 4) which potentially could work. Good luck.
Installing Amithlon
I've done this two ways, the first using a single HD and partitioning out a small DOS boot partition to hold the initial computer boot and Amithlon boot/kernel files, and a second partition for AmigaOS. The second method (I prefer) will use separate hard drives, one for booting the computer and holding the Amithlon boot/kernel and the other for AmigaOS only. I like having the separate AmigaOS drive as I can swap it out with different drives as needed for testing or increasing drive size. Remember this is a guide and how I do it, you can make your own choices of setup with the information from here, Charlie’s guide and the Alternate-guide Charlie supplied with his files.
This could be creating 3 partitions on one drive (one Primary WinXP/Win7, one Primary DOS and one Primary type 76 (Amiga), or with two drives creating two partitions on the first drive (Primary for WinXP/Win7 and Primary DOS) and the other drive will be all Amiga. Your decision. I already have a nice Windows machine and don't need a 1 GB dual boot Windows/Amiga machine so I dedicate it strictly for Amiga OS.
Software needed
FreeDOS Live CD fdfullcd.iso
*Amithlon (AmigaOS XL) CD
*CD with needed software (kernel drivers, USB, AHI, MUI, IBrowe, etc...) and Kernel 3.10 (Gary's) and Kernel 4 (milanca's).
**Optional - Floppy disk of FreeDOS
All but Amithlon (AmigaOS XL) is on my site amithlon.snkbitten.com
*Tip
I rebuilt my Amithlon CD to use Kernel 3.10 and added additional folders for all the needed software so once installed I just use the same CD. I included folders with AmigaOS XL update, Boingbag2 update, contrib packs (amithlonupdate.lha), AHI 6, Poseidon/ArakAttack, kernel 3 and 4 plus their respective drivers, MUI38usr, IBrowse 2.4, OpenPCI drivers and more to fill up the CD.
** Floppy install is similar but you may need DOS cdrom drivers and the appropriate config.sys/autoexec.bat files to load it. I’m working without floppy drives now
Hardware needed
An x86 PC with 1 GB or ram or less, a hard drive or two, a cdrom/dvdrom, a video card (PCI) with 256 MB or less ram (though it may work on non-supported cards in VESA modes). Please stick with IDE drives and CDRoms until you are familiar enough with the steps to experiment with SATA drives. Stick with IDE CDRoms/DVDroms though...it’s really hit or miss with SATA (even with SATA hard drives working).
Video cards I’ve tested with great success have been the PCI Nvidia FX 5200 and 5500 models. I’ve had it work with PCIe cards but only unaccelerated VESA displays...and there is a HUGE difference in screen performance.
Your current PC for burning .iso files to physical disc (you’ll need some way to get files to your Amithlon AmigaOS system until you can get network or USB working)
Let’s get started. I’ll be using a FreeDOS CD so if you are using a floppy it’ll be a little different.
One Drive (Two Partitions)
Boot off the FreeDOS CD and these options:
1) Continue to boot FreeDOS from CD-ROM
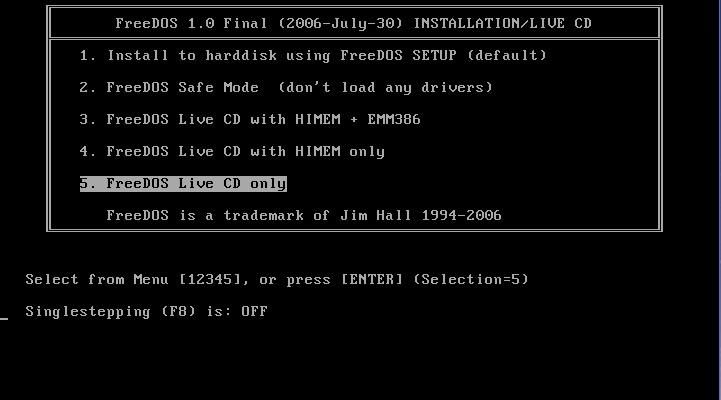
5. FreeDOS Live CD only
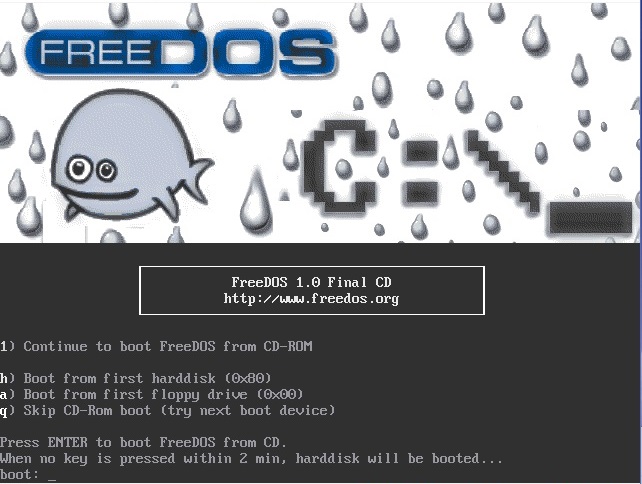
(first and second choices booting from FreeDOS live cd)
This boots to a DOS prompt with a ram-disk “A:” being basic DOS with a mounted IDE CD-ROM as “X:”
Type xfdisk, press enter on "ok" and choose to create a primary partition in the unpartitioned space. Do not use all the space.
Change the size to 20 MB, we only plan to use it for booting the computer to DOS and then launching the Amithlon boot files.
Create another primary partition with the remaining space, select it again and choose "change partition type", "other" and change it to 76. This will be your virtual HD for AmigaOS which you can then use HDToolBox to partition however you like for AmigaOS. Be warned, for harddrivers over 40 GB you may want to create two 76 type primary partitions as HDToolBox has issues addressing larger drives until it's patched with BoingBag2 (or create just a 40 GB partition instead of all available space and save the rest for later). Start small, get Amithlon installed and patched,then larger hard drives are supported. Remember, even though we are talking “partitions”, this is what the AmigaOS will see as a hard drive, and you will be partitioning it again inside AmigaOS
Press F3 to exit xfdisk, it'll require a reboot. Repeat the boot procedure we did above of
1) Continue to boot FreeDOS from CD-ROM
5. FreeDOS Live CD only
At the dos prompt type
Format c: /sys, you'll need to confirm by typing yes
When that completes type
Copy X:\Freedos\setup\odin\*.* C:
Do not overwrite any files, press the n key each time you are asked.
This copies a standard DOS set of files to your hard drive.
Remove the CD and insert your Amithlon CD
Now copy the Amithlon boot files to your C: drive
Copy X:\isolinux\*.gz C:
Copy X:\isolinux\small c:
copy X:\isolinux\amithlon c:
copy x:\isolinux\loadlin.exe c:
Remove the CD and insert your CD with Kernel 3.10 and Kernel 4
copy X:\kern310 c:
copy x:\kernel4 c:
Description of the files copied from my CD to my C: drive...
small - a text file that configures the linux boot aspect of Amithlon using smallird.gz containing the kickstart ROM
amithlon - a text file that configures the linux boot aspect of Amithlon using bigird.gz containing the kickstart ROM and small OS 3.9 partition
smallird.gz - Amithlon boot files and kickstart 3.1
bigird.gz - Amithlon boot files, kickstart 3.1 and "amithlon_hd" boot partition (OS 3.9)
emubox.gz - original Amithlon kernel (official)
new_emubox.gz - updated Amithlon kernel (official) (may be on a CD you make with updates)
kern310 - Gary's kernel (may be on a CD you make with updates)
kernel4 - milica's kernel (may be on a CD you make with updates)
loadlin.exe - app to launch the linux boot for Amithlon
Loadlin.exe, small, amithlon, smallird.gz, bigird.gz and the kernels work to launch Amithlon.
Now edit the two text files on your C: drive "small" and "amithlon" to match the settings below for each.
type edit small and press enter
kern310 init=/linuxrc console_level=0 root=/dev/ram0 mem=512M initrd=smallird.gz vga=769 ramdisk_size=2310 leavepages=5200 cachesize=65536 video=dovesa
When completed press Alt+F, X, enter to save and exit.
type edit amithlon and press enter
kern310 init=/linuxrc console_level=0 root=/dev/ram0 mem=512M initrd=bigird.gz vga=769 ramdisk_size=12010 leavepages=7400 video=dovesa
When completed press Alt+F, X, enter to save and exit.
**a quick note on vga=xxx, these are vesa standard modes and you can adjust to your display and what supported vesa modes your card offers.
4x3 format
640x480 = 769
800x600 = 771
1024x768= 773
1280x1024= 775
1600x1200= 796
16x10 format
1280x800= 867
1440x900 = 864
1680x1050 = 864
Remove the CD and reboot your PC. It should boot to a DOS prompt from your hard drive C:.
Now we will boot Amithlon with it's embedded boot partition “amithlon_hd” (embedded in bigird.gz) so that we can partition/format our Amiga drive and install Amithlon.
at the DOS prompt type
loadlin @amithlon

(Amithlon booting off CD or from loadlin @amithlon)
You'll get the bouncing ball and then you'll be presented the Amiga Workbench which will allow you to use HDToolBox and format the virtual partition you created (the partition looks like a hard drive to Amithlon)
Open up "amithlon_hd", "tools" and then HDToolBox. We choose "amithlon.device" and click OK
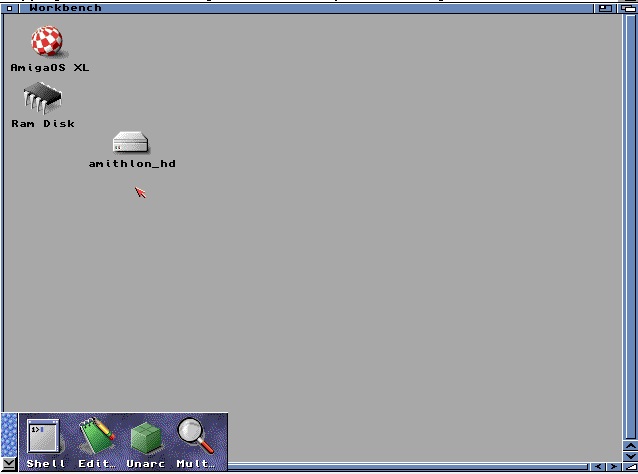
(Amithlon workbench using embedded boot partition “amithlon_hd”, use it for Tools/HDToolBox)
When HDToolBox opens, choose amithlon.device.
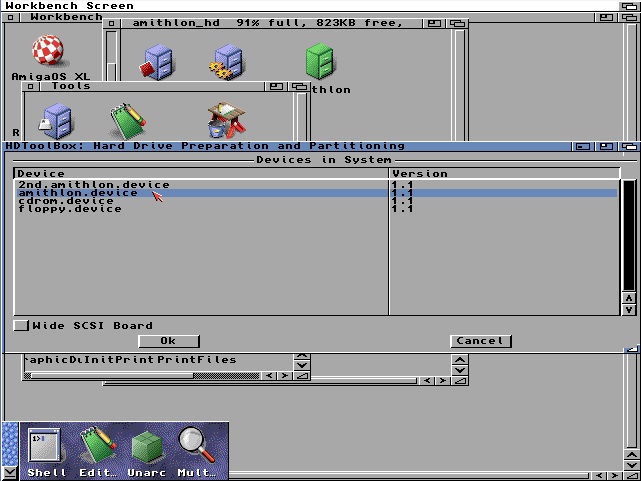
(amithlon.device selected in HDToolBox to configure our hard disk)
You'll see a few devices listed, look for VirtDsk and it should be the size of the Primary Partition that you created as type 76. Examples below first shows a type 76 partition (single HD) and then the second example is with a second HD. Make sure you don’t pick the one that contains FreeDOS or you’ll be starting over from the beginning. Once selected it’ll pop up a requester, select update.
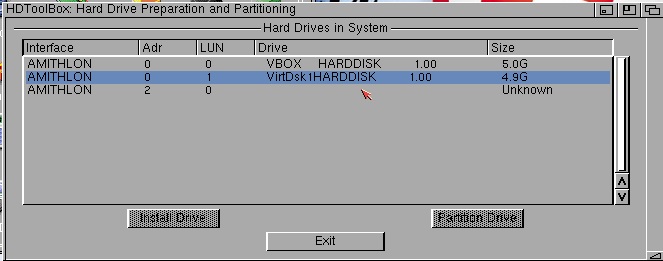
(HDToolBox and a virtual partition created with xfdisk)
.
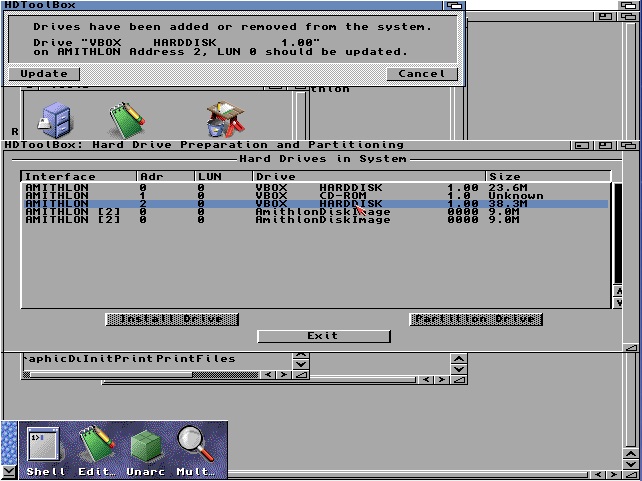
(HDToolBox and a second physical HD used for AmigaOS)
I've started using PFS3_AIO filesystem but the choice is yours (SFS,PFS or plain old FFS). If using FFS I'd suggest keeping your partition no larger than 4 GB. You might want to make a 4 GB partition and leave the rest of the space unpartitioned. Get OS3.9 installed, get it patched and add partitions later. Again, your choice. I've made 10 GB FFS partitions but on my latest builds I've switched to PFS3_AIO (of course you could also copy the pfs or sfs L: handler to your CD to install it to the RDB and make all your partitions that file system).
Now Partition your drive.
In my example I made two partitions (DHO: and DH1:) but do NOT set either as bootable. Any mishap, crash, power cycle and Amithlon will try to boot off this empty, unformatted drive.
Once the partitions are created, save and exit, and you'll be asked to reboot.
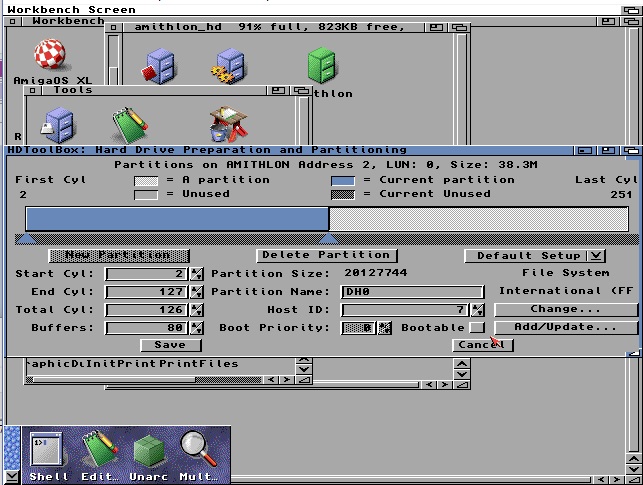
(HDToolBox partitioning the type 76 partition or 2nd physical drive)
Reboot and you'll see your unformatted partitions a few seconds after boot.
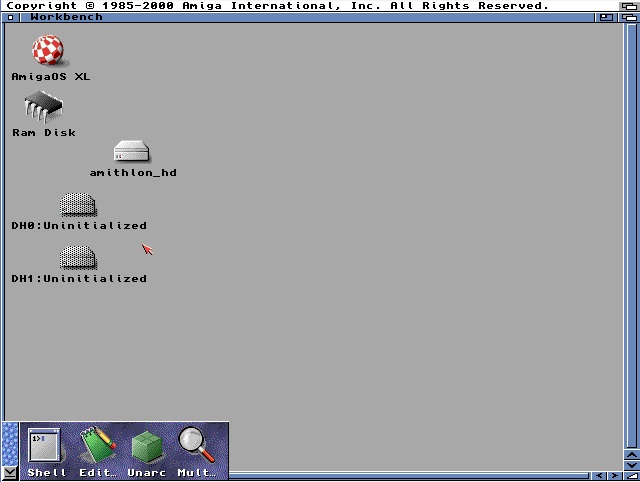
(Unformatted drives after partitioning and rebooting the “Amiga”)
Format them and just use quick format.
In my example they will be "System" and "Work". I use these as a lot of programs look for either of those by default.
Installing AmigaOS 3.9
I have the Amithlon CD in the drive, it's labeled "AmigaOS XL", I'll open it and run the installer for OS3.9
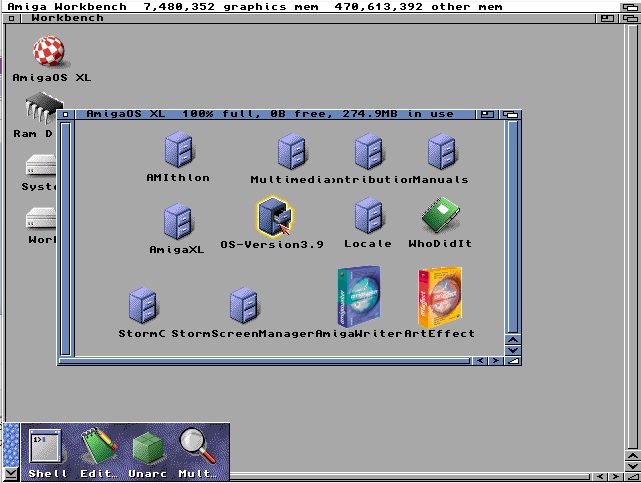
(AmigaOS XL CD, opening OS-Version3.9 to install AmigaOS)
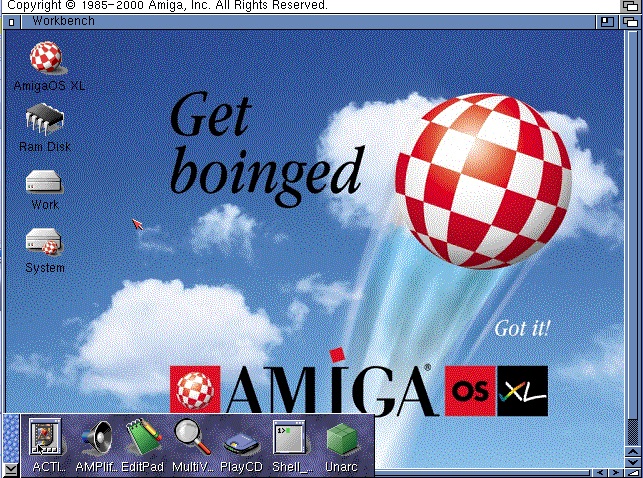
Launch the installer and use the ram-disk option when asked, it'll make the install faster. When completed.....very important.....go back to the "amithlon_hd" drive and run tools/HDToolBox, choose amithlon.device, choose your drive, click “partition” and just check the "bootable" option at the bottom. Save, exit and reboot AmigaOS "Control+Amiga+Amiga" (Control+windows+windows or printscreen+r).
This will boot off your system partition, but since we initiated Amithlon with "bigird.gz" (remember we launched with loadlin @amithlon which calls "bigird.gz") you’ll still see the “amithlon_hd” partition.
(Amithlon rebooted off HD but still using the initial init from loadlin @amithlon)
Amithlon is up, our hard drive partition booted OS3.9, now it's time to just boot Amithlon's kickstart only (no embedded boot partition). Remove the Amithlon CD and shut down/power off/reset the x86 computer. Power it back on and let it boot to DOS.
Now type
loadlin @small
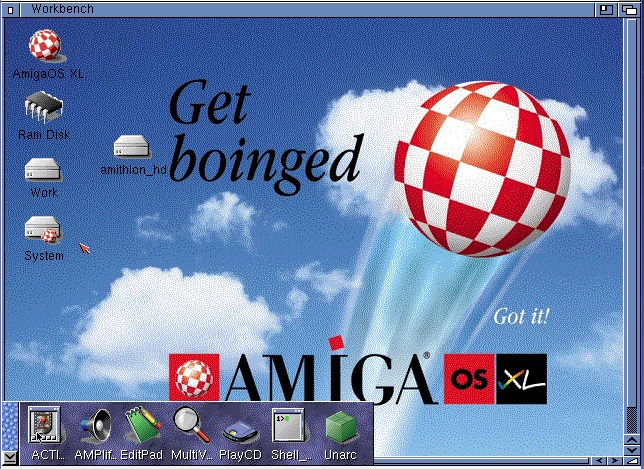
This will launch Amithlon boot kernel with kickstart loading and looking for our hard drive and boot partition we installed OS3.9 on.
(Amithlon booted off our HD and System boot partition)
As you can see, we have our System and Work partitions but the amithlon_hd partition is gone.
Now it's time to start patching. Some patches will check for the “AmigaOS XL” CD, so either copy the patches to the Work partition so you can have your Amithlon CD in the drive, or do like I do and rebuild your Amithlon CD and add all the patches/updates/add-ons you want to the disc (I created a folder name updates and placed them there).
Patching
I scoured the internet looking for patches, order of patches and this is what I’ve come up with
Special thanks to Dietmar Knoll and his page of experiencing AmigaOS XL as he listed dates some of the patches and files were released.
First patch - AOSXL-update1.lha
Second patch - BB3.9-2.lha (yes to install rom update when asked)
reboot (Control+windows+windows or PrntScrn+R)
Third patch - AmithlonUpdate131.lha
reboot (Control+windows+windows or PrntScrn+R)
Forth patch - Powerpci_user.lha
reboot (Control+windows+windows or PrntScrn+R)
AmithlonUpdate131.lha contains the updates from the contrib packs but with an installer as an all in one.
Read the installer displayed text messages as they determine what you choose. Typically it's the top left option for all the choices unless you are on a Pentium IV system, then you'll need to deviate and choose the top right option for that particular choice.
Powerpci_user.lha updates the powerpci.library to allow Arakattack and PoseidonUSB to work, which we’ll install later.
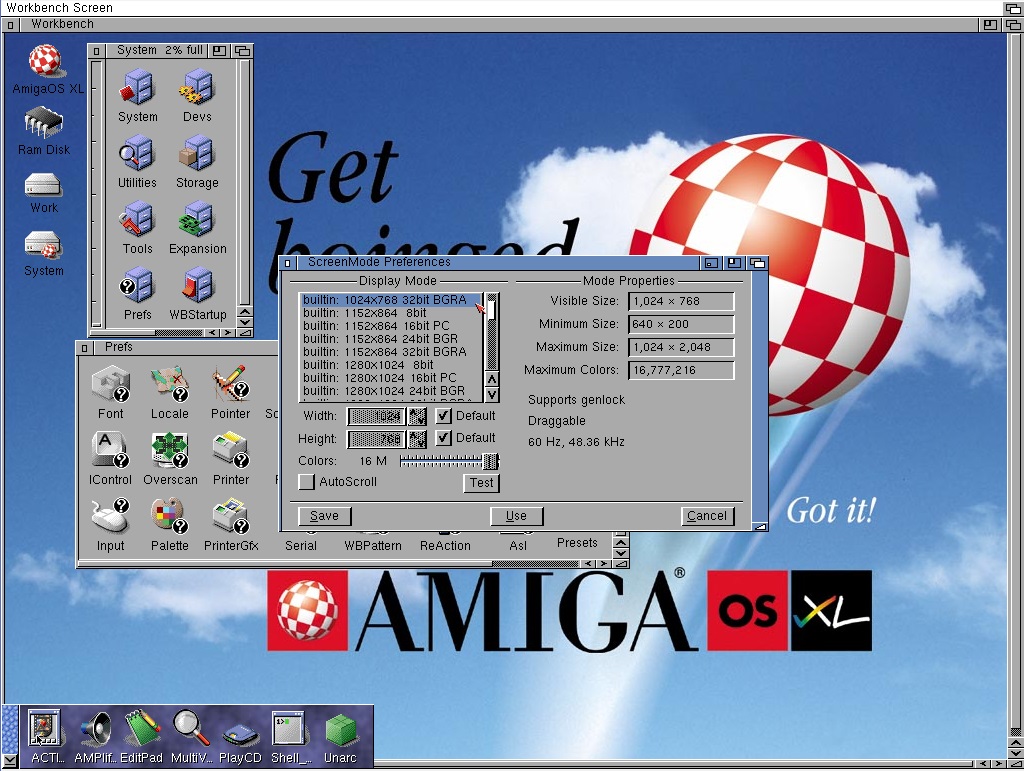
After installing the above patches, you’ll have greater screen resolution/color depth options using the “builtin” modes which are generic/standard vesa modes your card may support. I can use the builtin modes for 1280x1024x32bit unaccelerated graphics.
I tend to install MUI (mui38usr.lha) at this point. It’s needed for a lot of software and Amithlon has no problems running it.
*Picasso96Install
I realized I never covered updating the built-in installation of Picasso96 until doing a new Amithlon install recently and this is a key piece regardless of a hardware accelerated supported video card or not.
This is very specific in what to install. I’m using Picasso96 2.1e so download it and extract it to RAM: Run the Setup from the Picasso96Install folder and make sure to choose “Update an installed version”, then make sure to choose “Expert User” as we want to specifically pick what is being installed. Choose ONLY the following selections:
Libraries
24bit picture.datatype
Picasso96Mode
Picasso96 Variable Setter (PVS)
Continue installing, it will ask for the program files location, point it to where you ran the install from, then when it is finished installing, browse to the Picasso96Install/Devs/Monitors/ folder and copy the ‘powerfb’ monitor file to your SYS:Devs/Monitors/ folder overwriting the one currently there. Reboot AmigaOS and then go to Prefs and launch Picasso96Mode. From the menus you can select the “attach settings to” option, and if your graphics card is supported, select your card, mine is “nVidia-1” as I’m using an NVidia FX5500 PCI card which is supported in the kernel. You’ll have to tweak the settings and that is covered in Part 2 of the Installation Guide. If your card is not listed it will most likely show “powerfb” as the current board and “VESA-1” as a choice. I’m not sure if you should try to manipulate the settings if using powerfb or VESA-1. I have only made changes for nVidia-1 and my monitor’s sync/refresh rates.
*Drivers
Before we install drivers we need to know if we need them for our devices. There are different driver types, Amiga, OpenPCI and Kernel modules being available. Amiga drivers are best to use if available and OpenPCI and kernel drivers a fallback if needed. Currently I’m using a SoundBlaster Live audio card and a Realtek 8169 100Mbit ethernet card. For drivers I’m using an Amiga AHI driver (included in AHI 6.0) for sound (EMU10X) and a compiled in the kernel module for network. I’m loading no kernel modules (commented out pciinsmod from s:user-startup). It will depend on what hardware you are using.
Kernel 3.10 (linux-2.4.19-pre4)
(Gary Colville)
We are already booting with kernel 3.10 (remember our copying it to C: and it being used in the text files “amithlon” and “small”) so we can just install the drivers for it (driver090.lha)
extract to Ram:, then in the shell
cd ram:drivers
copy s/#? s: all clone
copy c/#? c: all clone
copy devs/#? devs: all clone
reboot (Control+windows+windows or PrntScrn+R)
You can also see if any drivers were loaded for your sound card/motherboard or network card/motherboard by using the shell, so open a new CLI window.
Set the stack to 65536 (type stack 65536 and hit enter), then type pciinsmod and hit enter. You'll get a list of linux side modules that were installed at boot (if any) for devices it detected. If you don’t see any, it’s possible the kernel has drivers built in and doesn’t need a module inserted.
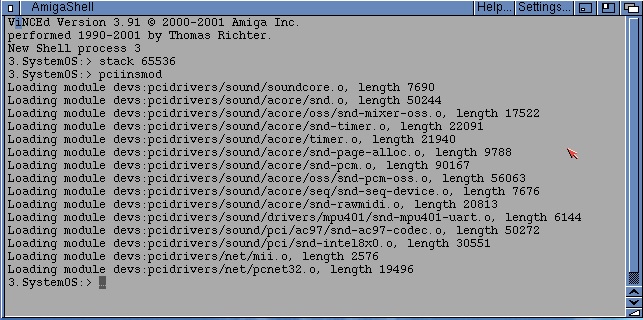
(pciinsmod showing ac97 drivers and nic drivers loaded on my Virtualbox Amithlon setup)
It's a good time to install MUI now, a few apps need it (AHI preferences and IBrowse installer to name a couple).
Run the installer and install where you like. If you have a key file, copy mui.key to S:
AHI m68k v6 Audio
Now we’ll install AHI v6. Use the m68k-amigaos-ahiusr-6.0.lha, you shouldn't need the others at all so just ignore them. Hopefully your motherboard sound chipset supports a version of AC-97 that is supported or you have one of the supported hardware sound cards.
Extract to ram: then open a shell and cd to ram:m68k-amigaos-ahi/user
Like we installed the kernel drivers earlier, we'll copy files from here to our sys: volume.
cd ram:m68k-amigaos-ahi/user
Copy prefs/AHI sys:prefs/
Copy prefs/AHI.info sys:prefs/ (or for a prettier icon Copy prefs/AHI.MWB.info sys:prefs/AHI.info)
Copy l/#? L: all clone
Copy devs/#? devs: all clone
Copy c/#? c: all clone
Reboot and go to System:Prefs and run AHI and select your sound.
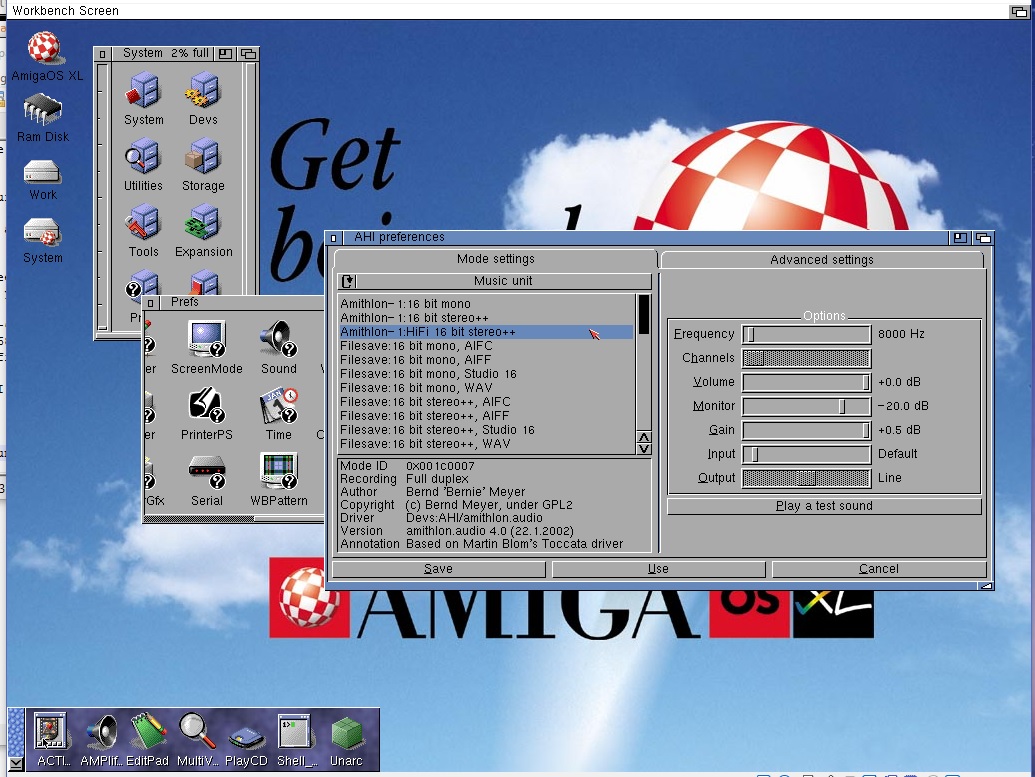
(AHI v6 prefs, choosing Amithlon-1 sound which uses the ac97 inserted module drivers)
If you have a SoundBlaster card, you’ll see/select the EMU10kx option instead and won’t see any drivers listed when doing “pciinsmod” because the drivers are already in the kernel.
AHI i686 v6 Audio
I just figured out the combination to use the i686be-amithlon-ahiusr.lha version instead.
This should give slightly better performance as it’s native x86 and not emulated m68k.
Install AHI M68k version as described above, then do the same install method for AHI i686. There are some files missing from the i686 version that are in the m68k version you’ll need.
Then you need to add run_elf to your user-startup file.
run <>NIL: run_elf GUARD PATCH
You'll need both run_elf and run_elf86 copied to C: or C:amithlonc/
AmithlonBugFix - By Guido Mersmann
Removes crackling/popping in audio playback.
The audio drivers delivered with Amithlon have a bug. They don't set the
"MFMF_CLEAR" flag when allocating DMA memory. The old 1.x versions of the
PowerPCI.library had a bug clearing the dma memory always, so this never was a
problem and the audio driver bug was compensated by accident.
Some drivers (OpenPCI, USB) require the latest powerpci to work, which is
only clearing the DMA memory when the flag is set. This causes the old
audio drivers to create a very loud and bad crackle when beeing startet.
The bugfix is just forcing powerpci to clear the DMA memory regardless of
the MEMF_CLEAR flag, so the crackle is gone. The contrib3b drivers aren't
effected, because the don't use powerpci.
Bernie also provided some tips to improve sound quality if you are using the contrib3b drivers, primarily because as CPUs became faster, his drivers performed less efficiently as they were based on the speeds of the at that time CPUs.
AHIFragSize : Gives the *size* of each buffer. Minimum 32,
maximum 8192. Default is 512, and you might want
to increase it to, say, 2048, if simply changing
the number of buffers doesn't help (or doesn't
work). Probably a good idea to keep it a power of 2,
i.e. one of 32, 64, 128, 256, 512, 1024, 2048, 4096 or
8192.
SetEnv AHIFragSize xx
AHIFragCount : Gives the *number* of such-sized buffers the driver
uses. Whenever one gets empty, a request is sent to
AHI to please refill it --- while the other buffers
get played. The more buffers, the better the chance
that request gets serviced in time... but also the
higher the time between an app sending sound data
and that data actually being played.
The default value on all reasonably modern machines
is 3; You can increase this to any value up to 32.
SetENV AHIFragCount xx
* Bigger/more buffers means data spends more time in the buffers.
It's no problem if you are just listening to MP3 music; But if
you are playing, say, a fast-paced action game, you want the sound
to match the action, and not be a fraction of a second behind.
* When recording, it is better to have many small(ish) buffers
than few larger ones --- because the data can be read as soon
as any one buffer is full. When playing back, few large buffers
are preferable to many small ones, because the delay is the same
either way, and it's more efficient to do things in larger blocks.
* Not all linux drivers support all sizes and/or counts. You can
only try, and if changing one parameter stops things from working
altogether, try changing the other one (or try different values).
You *might* get some useful information from "xcat /proc/kmsg",
but don't count on it.
The default buffer sizes, as set by the heuristic on modern machines,
gives a total of 1536 bytes; At 48000 samples/s 16 bit stereo playback,
the sound card will consume 192000 bytes per second, so the buffers are
about 8ms worth of sound. That's somewhat silly. Bump that up to roughly
40ms (i.e. setting AHIFragCount to 16, *or* AHIFragSize to 2048), and you
should still have a very nice game experience. Increase it to 166ms
(setting AHIFrageCount to 16 *and* AHIFragSize to 2048), and you should
be set for perfect MP3 playback and beautiful recording.
-Bernie
USB - Poseidon and ArakAttack
Lets try USB.
Install Poseidon v3.8 and when it ask for devices to install, uncheck them all..(we'll be using the arakattack "AmithlonUSB.device" driver).
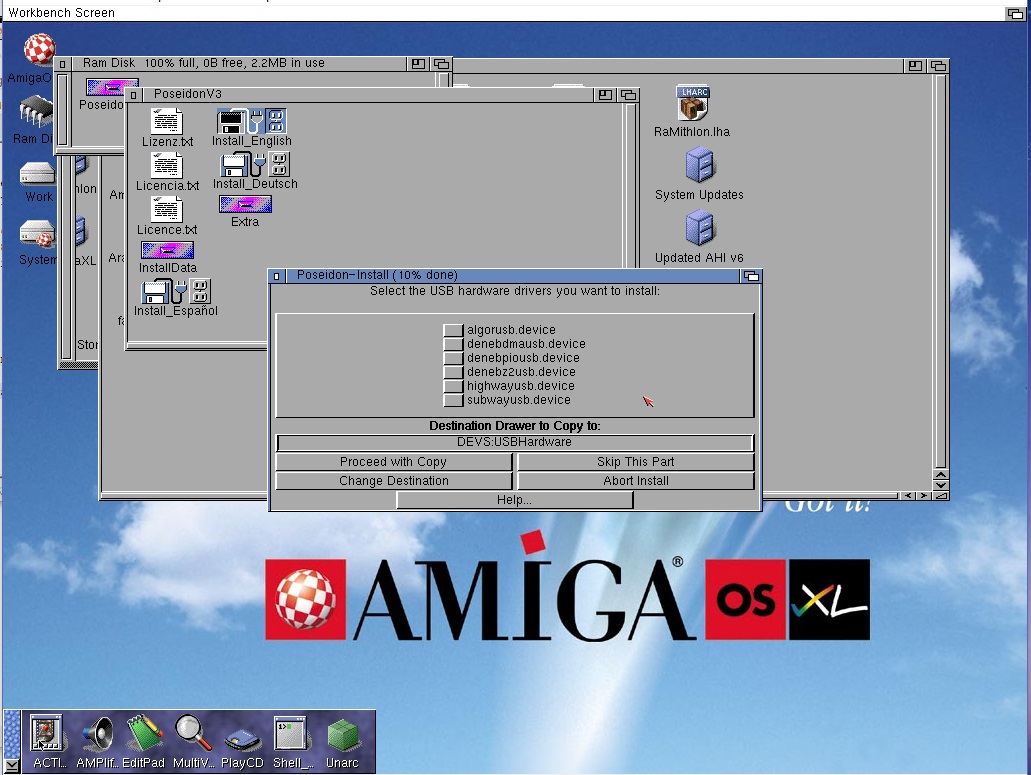
(Poseidon, unchecking all of it’s drivers as they aren’t needed)
I use the default choices for the rest. Extract the extras to RAM: as it ask, you'll want to install fat95 which is part of the Extras.
Extract fat95.lha to ram:
CD ram:fat95
Copy l/#? l: all clone
Copy c/#? c: all clone
Restart your system.
Next, extract ArakAttack and run it's installer. Use AmithlonUSB device and typically go with the defaults. If you use a USB keyboard/mouse pay attention to the choices as the defaults might not be best.
Reboot
Go in to Prefs, run Trident, click on Controllers then Add, and add AmithlonUSB.device.
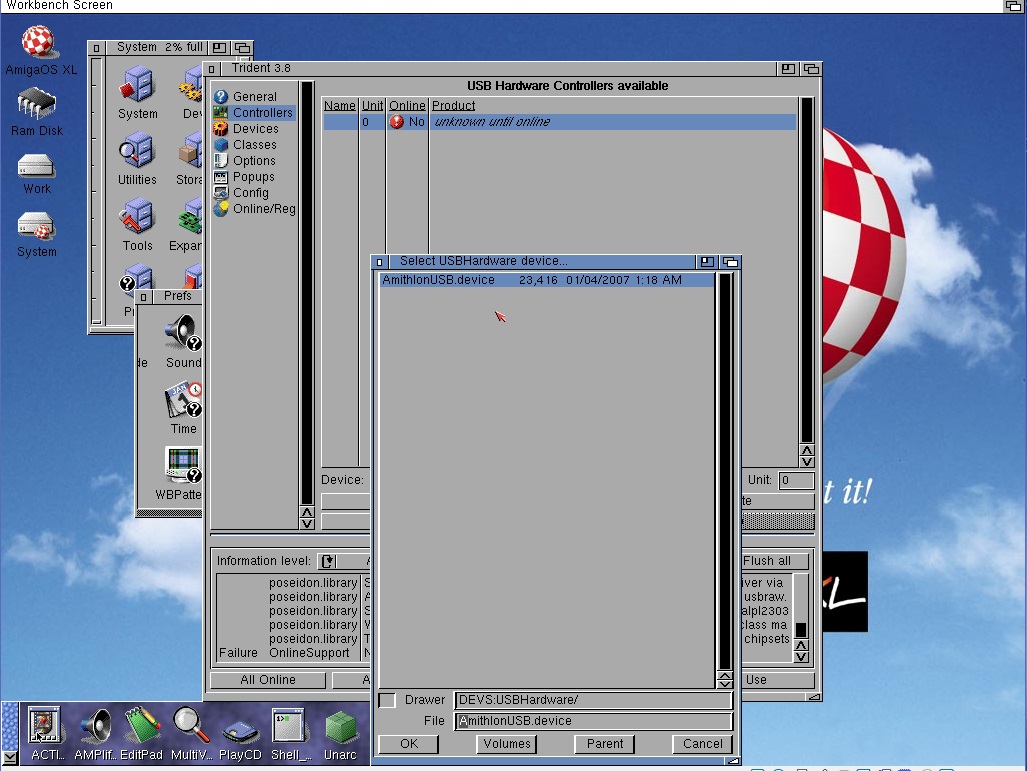
(Adding the AmithlonUSB driver to Trident)
Click Online and save. If you have more than two ports, add another “AmithlonUSB.device” for each pair, and don’t forget to increment the Unit number each time. Continue until you can’t bring another Unit online. Test a USB stick. If success, continue. If not...you may not have compatible USB hardware.
You can see in the image below I have multiple USB ports and added multiple AmithlonUSB.device devices (0,1,2,3 and 4). I don’t have 10 USB ports but possibly the motherboard supports that or more. I accidentally added Unit 4 before Unit 3 and Unit 3 was my case’s front USB ports.
An old article/review on Poseidon/ArakAttack on Amithlon stated it was best to turn off legacy mode for USB in your BIOS. The same article informed me of the multiple AmithlonUSB.device loads for multiple USB ports.
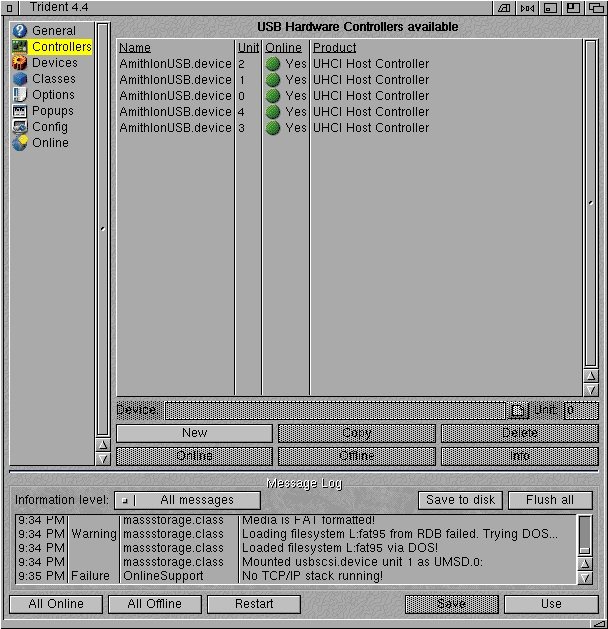
(Multiple AmithlonUSB.devices loaded for my multiple USB ports)
Now extract Poseidon v4.4 and install it following the same method before (uncheck all the devices, use defaults). Your USB should work and not time out now because v4.4 was open sourced and no longer requires a key. v3.8 was the last to support Amithlon but required a key which is not available to purchase anymore. Installing 4.4 over 3.8 works, and thanks to Amicol and his post on EAB for discovering this.
You can edit/create the “autoexec.bat” file in DOS to launch Amithlon for you at boot if you want. I usually wait until I’m completely satisfied with my setup before doing so (see General notes).
There’s a LOT more to go over, but this will get the system up and patched.
Part 2 will include Picasso96mode (hopefully for your hardware accelerated supported video card), updating Picasso96, kernel 4 and it’s drivers and going online. I need to do another walk through and take screenshots as needed.
General notes
I typically use bigird.gz for the initial boot and formatting/partitioning my hard drive, and to run the installer from the CD to install OS3.9 to my hard drive. It's the same as what the CD boots if you boot directly from the CD, but this way we can select which kernel we are using by editing the text file "amithlon" without having to build a new Amithlon CD (always make sure your CD is named AmigaOS XL if you do build one)
Small text file contains:
kern310 init=/linuxrc console_level=0 root=/dev/ram0 mem=512M initrd=smallird.gz vga=769 ramdisk_size=2310 cachesize=65536 leavepages=5200 video=dovesa
Amithlon text file contains:
kern310 init=/linuxrc console_level=0 root=/dev/ram0 mem=512M initrd=bigird.gz vga=769 ramdisk_size=12010 leavepages=7400 video=dovesa
As you can see, I'm using Gary's kernel 3.10 "kern310", as this will give greater hardware compatibility than booting the CD (which uses the original kernel "emubox.gz"). This has made it easier for me to get up and running with little to no issues. I also use the mem=512M to make it more compatible and then start testing (ie..mem=768M or deleting the line “mem=xxxM” completely) to hopefully get the 1 GB of ram made available to AmigaOS.
Once I have Amithlon running the way I like, I’ll add an autoexec.bat file that launches it for me at boot. I like to get the system running and all the testing done between kernel 3.10 and kernel 4 before I have the system boot immediately to Amithlon/AmigaOS. I also tend to copy my “small” and “amithlon” files to “3small” and “4small” so I can choose which kernel to launch not have to continually edit small….ie loadlin @3small to launch with kernel3.10 and loadlin @4small to launch with kernel 4.
Info on the two primary kernels posted below. The information posted is not confirmed to be accurate but only the information I have found available on the internet. Hopefully I can get more detailed information than what is provided below. I have tested PCIe Nvidia PCX5750 without success and a *Realtek 8169 Gigabit Ethernet PCI card without success. Kernel 3.10 refused to boot with the PCIe card installed and neither detected the NIC. Your experience may differ so please provide yours.
*I have since compiled my own kernel4 adding the Realtek 8169 network card inside the kernel.
Kernel 3 info - Gary Colville (2.4.19-pre4)
Kernel 3.10 and 0.90 drivers
Release date: September 10, 2006
Support for more GeForce FX models
Support for GeForce PCX PCIe cards
SATA support for VIA 8237 and NVidia NForce3/4 chipsets
Gigabit ethernet support for NForce 3/4 chipsets
Support for more AC97 audio codecs
Kernel 4 info - Milan Milosavljević (2.4.37.9)
Kernel 4 and drivers4
Release date: June 17, 2010
In 2010 an enterprising developer named Milan produced an updated Amithlon Kernel to support newer hardware. You can download the kernel below and read up on what hardware it supports. It includes all hardware updates previously added by Gary Colville for the 3.10 Kernel.
Note: You must have the Contrib3b pack, or Amithlon Update installed to use this.
Nvidia FX series such as the FX5200, 5600, 5700, etc…
Nvidia TNT2, GeForce 256, GeForce 2/2 MX, 3/3 Ti and 4 MX, 4 Ti.
Matrox Millennium G100, G200, G400, G450, G550.
Matrox Mystique
ATI Radeon 9200, 9600, 9800 PCI.
PCI-Express variants of those cards will run in VESA mode with no hardware acceleration.
Chipset Support
Intel ICH7, 8, 9, 10
AMD/ATI SB400, 600, 700
Newer NVidia chipsets
SATA hard disks and DVD drives should work on all of those chipsets.
More AC97 audio codecs, including the popular ALC based chips.
ATI/AMD based controllers in the SB400, SB600 and many others.
Audio support functions in CMI8788-Oxygen HD Audio, Creative Labs SB X-Fi
Sound Blaster Live!
Sound controllers as Emagic Audiowerk 2 sound card, Vortex 3D Digital Audio,
AU8820 Vortex and AU8810, ALi M5451 and others.
NVidia nForce based LAN adaptors, nForce 2, 3, 4. MCP51 nForce 430/410/405/400, MCP55 …
Intel LAN chips like 82801EB/ER (ICH5/ICH5R), Intel PRO/100 like 82801E Ethernet
and Intel PRO/1000 PCI-Express Gigabit Ethernet adapters.
Realtek 8169 Gigabit Ethernet support.Many 3Com based network controllers, Typhoon,Etherlink and Broadcom. Marvell Yukon 2 Gigabit Ethernet support.