T3P3 Kossel Mini Kit Release 3 Assembly Instructions Appendix C - Firmware Upload Procedures This work is licensed under a Creative Commons Attribution-ShareAlike 4.0 International License. | Think3DPrint3D Ltd |


OBSOLETE: SEE https://duet3d.dozuki.com/ C1: RepRap Firmware | |
From http://blog.think3dprint3d.com/2013/12/Duet-Arduino-Due-compatible-3DPrinter-controller.html The Duet runs RepRap Firmware, a C++ firmware originally written by Adrian Bowyer. The firmware can be compiled with the Arduino IDE or Eclipse and uploaded like other firmware, but an easily-uploaded precompiled version is supplied with new releases. Most users will therefore never have to recompile the firmware, and will only occasionally want to upload a new precompiled release to take advantage of new features. Printer-specific information is set by Gcode configuration files which can be edited with a text processor and saved on an SD card which is read on machine startup. Configuration files for different types of printer are also included with new firmware releases. The SD card supplied with the Mini Kossel Release 3 kit contains files preconfigured for this printer. The firmware supports receiving GCode from 3 locations:
| |
C2: Firmware Downloads | |
The DC42 version of the Firmware used for Mini Kossel Release 3 kits is available at https://github.com/dc42/RepRapFirmware/tree/dev. It is easiest to download the entire firmware folder by clicking on the Download Zip button on the right-side of the page, and extract it to a convenient folder on your PC. If you only intend to update to the latest release of the firmware then you will only need the 2 folders “Release” (containing the precompiled binaries) and “SD-image” (containing the files for SD-card) and can delete all the other files and folders if you wish. Extract the zip file and look in the Release folder for the most recent version - at the time of writing this is RepRapFirmware-1.09x-dc42.bin RepRapFirmware-1.14.bin (updated 05 July 2016) | |
C3: Software Downloads | |
This section and the following one are taken from RepRapPro’s detailed instructions. You should refer to these for more details if needed. Download and install the appropriate version of Arduino 1.6.1 for your operating system from http://arduino.cc/en/Main/OldSoftwareReleases. You should not use a later version than 1.6.1 as it will not include the application bossac which is used to flash the Duet firmware. You should download and install Arduino before connecting the Duet, so that the correct device drivers will be installed when you connect the Duet. Once installed, bossac can be found in the Arduino application hardware/tools subfolder. For Windows this will be C:\Program Files (x86)\Arduino-1.6.1\hardware\tools or similar and will be listed as bossac.exe (or just bossac if Windows Explorer is set to hide application extensions). On Linux, if you install Arduino in /usr/local/arduino-1.6.1/, then bossac will be in /usr/local/arduino-1.6.1/hardware/tools/. On Apple OS X, install the Arduino application in your Applications folder - bossac will then be in Arduino.app/Contents/Resources/Java/hardware/tools/. | |
C4: Check that the Duet is recognized | |
Connect the Duet to your PC by USB cable with 12V power to the Duet OFF. In Windows, use Device Manager to check that your Duet is being recognized properly. If it has firmware loaded it will show up as an “Arduino Due” and have a COM port allocated to it. If the firmware has been erased it will show up as a “Bossa Program Port” with a different COM port. In Linux, sending “lsusb” from the command line should report “Atmel Corp. at91sam SAMBA bootloader” if the firmware has been erased, and “Arduino SA” if the firmware is loaded. ReprRapPro’s instructions for OS X suggest using the Arduino IDE to check if the Duet is recognized - it should be reported as “cu.usbmodemfa131” or similar. Alternatively send ‘ls /dev/cu.*’ in a Terminal window for a list of ports. | |
C5: Software Setup | |
The bossac program is run from a command line, so it will be easier and involve less typing of paths if you copy it into a temporary directory, along with the version of RepRap Firmware you are going to upload. For conciseness, these instructions will cover the Windows procedures only from now on. For Linux and OS X users, use the same general principles as described below, or refer to RepRapPro’s more detailed instructions if you are not sure of how to proceed. In Windows, create the folder C:\Temp and copy bossac.exe and RepRapFirmware-1.09x-dc42.bin (or current version if later) into it. | |
C6: Flash the Firmware | |
| |
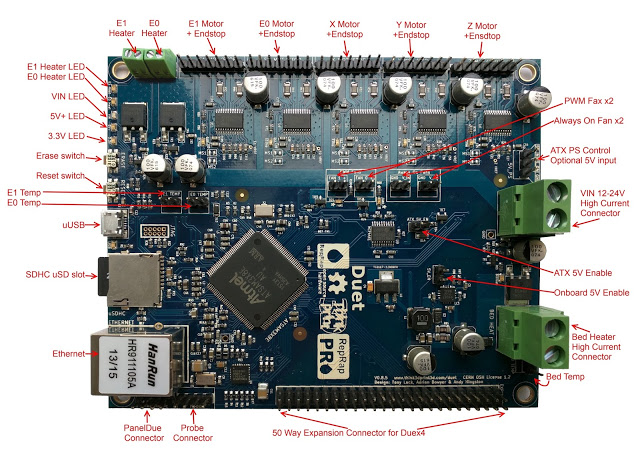
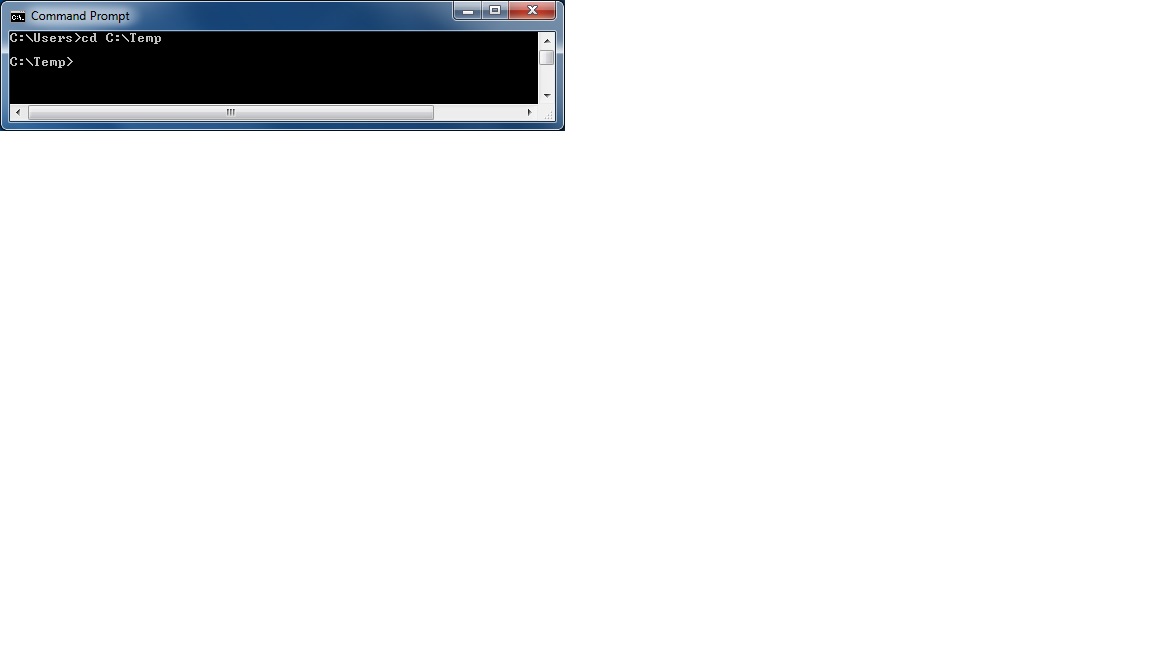
Updating firmware from installed versions prior to V1.09x-dc42 The firmware can only be uploaded after erasing the previous version and resetting the board. The ERASE and RESET buttons are next to each other on the front short edge of the Duet, to the left of the USB socket. In the picture below they are just above the middle of the left-hand side:- With the Duet powered by USB, press the ERASE button in and hold for a few seconds. Release and then press the RESET button, or unplug the USB lead and plug it in again. Wait a few seconds for the Duet to reboot before proceeding. Check that the Duet now shows up as unprogrammed - in Windows as “Bossa Program Port”. Now open a Command Prompt window. Type cd C:\Temp to change to the directory containing bossac.exe and the firmware .bin file. Enter the following command to initiate the upload: If you are uploading a different firmware version then change the 1.09k-dc42 to match the name of your file:- bossac.exe -e -w -v -b RepRapFirmware-1.09k-dc42.bin (Tip: You can block and copy the above command or an edited version of it to avoid typing errors, but must right-click and select Paste at the command prompt - the Command Prompt box won’t accept the Ctrl-V keyboard shortcut) Bossac will report that it has found the device on a COM port, erase flash memory, upload and verify the firmware, and set it as bootable. You may get one of several error messages if the upload fails:-
If you continue to get one of these errors then refer to C9 - Troubleshooting below. | |
C7: Check your upload (optional) | |
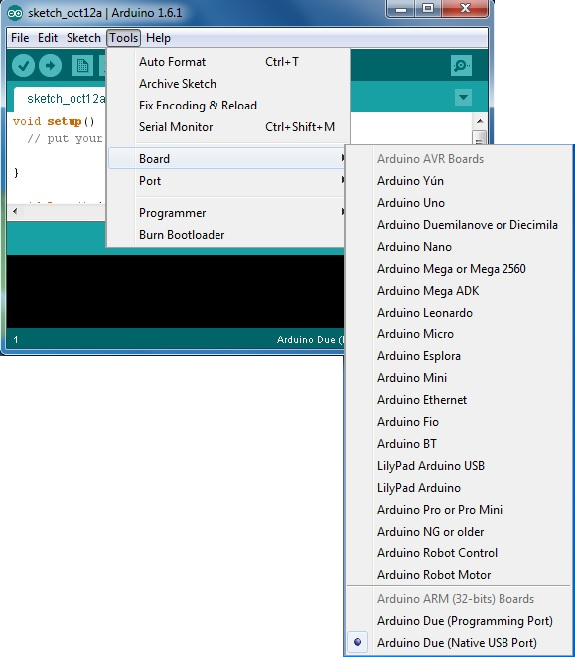
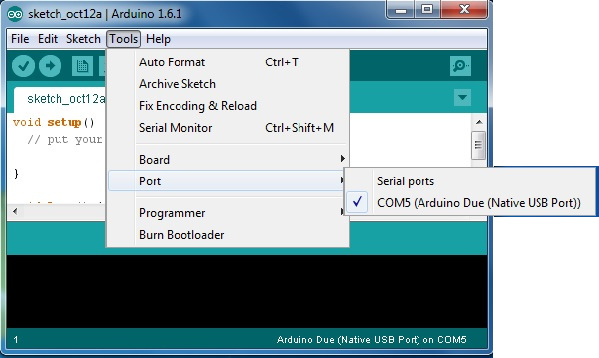
If you are uploading firmware for the first time to a Duet you may like to follow the procedure below to confirm that the firmware is up and running. First open the Arduino 1.6.1 IDE that you downloaded and installed in C3 above. Go to Tools>Board and choose Arduino Due (Native USB Port). Then select the COM port from the Tools>Ports menu.
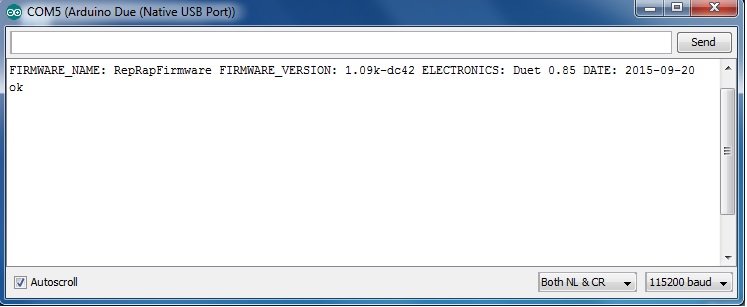
Now select Tools>serial Monitor, which will open in a new window. Set the Line Ending box to “Both NL and CR” and the Speed box to “115200 baud” (bottom right), then type “M115” (with a capital M) in the command line and click Send. The Duet will report back the firmware version found - which should be the same as what you uploaded - and the electronics version and date. | |
C8: Update SD-image | |
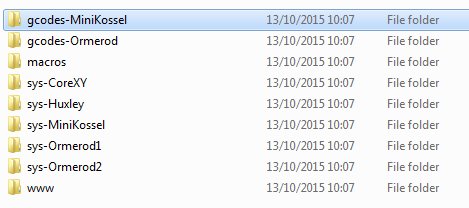
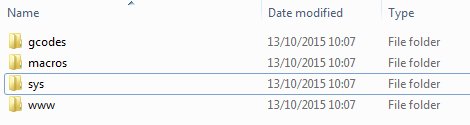
It is important to use the SD-image files supplied with the firmware release you have just uploaded, and to select the correct versions for your Mini Kossel. If you look at the SD-image folder that you downloaded and extracted in C2 above you will see that it contains “sys” folders for 5 printer variants, and “gcode” folders for 2. We only require the MiniKossel sys and gcodes folders, as well as the macros and www folders which are common to all machines, so delete all the unwanted folders and then rename the “gcodes-MiniKossel” and “sys-MiniKossel” folders to “gcodes” and “sys” respectively. You will now need to configure the bed.g, config.g and homedelta.g files. If you are upgrading to a new firmware release on an already operational calibrated printer then you can just open your previous version and new version side by side in a file comparison tool such as WinMerge (or 2 text processor windows) and make the necessary changes. If you do not already have a calibrated and working printer, then you should configure the new files to match the SD-image files supplied on the SD card in your printer kit, and also give in Appendix D, and then calibrate the printer as described in Chapter 16 | |
C9: Troubleshooting | |
If you encounter problems with any of the steps described above, then the solution will almost certainly be described in RepRapPro’s comprehensive Duet Commissioning, Maintenance and Troubleshooting documents. Some important items are highlighted below:-
|