Learning the Fingerboard v2.0.2
Updated 08/8/2023
Foreword
Several years ago I wrote what I’ll now call version 1.0 of this document. I wrote it in a style that I thought was clever at the time, but it was neither concise nor simple, and kind of obnoxious. So here’s a simpler, hopefully clearer version using the same method as before.
I absolutely did not invent this method (I learned it from my teacher and mentor Jim Stinnett) and I presume that he learned it from one of his teachers as well. I wrote this because I’ve taught the same method to so many people, and if you’re helping someone online, it's an enormous amount of typing, so I wanted to have a document I could give to a student, and I haven’t seen it written out anywhere before.
You are welcome to print, modify, use, sell, or otherwise fool around with this document however you like, if you find it helpful. Also, I welcome all feedback; it’s difficult to teach something with words alone, so when people find something confusing, I’d like to do what I can to make it clearer and hopefully more useful.
Jim was a monster teacher and was a huge influence in my bass education. His sight-reading books are also top notch and I highly recommend them. Check out his Youtube channel a b.
Wt:
https://www.youtube.com/channel/UCTLM0C5Acp-0xi4ZEb-mSQg
Since Jim’s death a couple of years ago, his book sales site appears to have gone down, but the titles are available on Jamey Aebersold’s site:
https://www.jazzbooks.com/mm5/merchant.mvc?Screen=SRCH&Search=Jim%20Stinnett
I think he has some videos that cover this exercise on the channel.
The Fingerboard
The fretboard of the bass is mysterious. It has many strings and many frets. It has dots. Each of these things has a name; many of them have more than one name, all of which the finest players of the bass can name each of them without effort. Clearly, they can be known.
To truly know the bass you must know these names. Knowledge of the bass is a pyramid, with knowledge of the fretboard occupying the pinnacle, and all other skill derives from this knowledge of the fretboard.
The Cycle of Fourths
Memorize this series of notes:
C F Bb Eb Ab Db Gb B E A D G C
This is the only boring, rote memorization that you’ll need to do. People have different strategies for memorization; just do whatever works for you. It takes most people a few days to remember it correctly.
The cycle of fourths is a system, a little secret trick if you will, that western musicians use as a memorization aid. If you memorize this list of note names, you’ll be able to name the notes in any major or minor scale without actually having to memorize the scales. You’ll also use it as a basis for spelling chords, and for reading key signatures, which you must know in order to sight read.
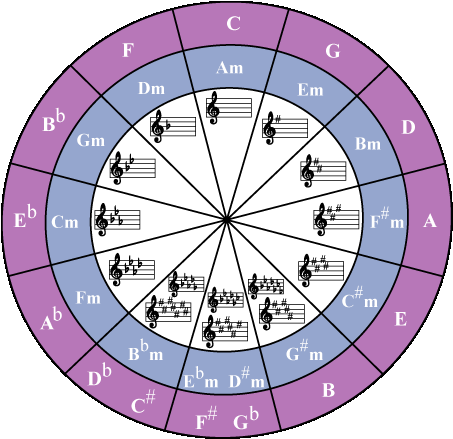
(Image courtesy of http://www.violinconnection.com/circle.html)
The notes I told you to memorize correspond to walking around the circle above counter-clockwise. Each note is a perfect fourth above the previous note. If you go clockwise around the circle, the next note is a fifth above. For a bass player, learning in order of fourths is handiest for reasons we’ll get to later.
Memorize it now. Don’t bother doing anything else in this document until you have memorized the fourths, because you won’t be able to use the rest of the method without it. It is perfectly fine if it takes you several days to remember it. You have the rest of your life to play the bass.
Discipline for Practice
Before you embark on this journey, you must remember two rules:
1. If you want practicing to amount to anything you must focus.
You’re probably reading this document on a computer. Close anything that might pop up a message or interrupt you. If you do this practice right, it won’t take more than 15 or 20 minutes. Once it gets boring and you feel yourself getting distracted, just put it away for a while. It’s better to do three days of 20 minutes than to do one day of 60.
More importantly, don’t get distracted by your instrument. For what we’re doing, it doesn’t matter what you sound like, how many strings you have, or what kind of tone you get. If you don’t think about that stuff at all your practice time will be more valuable.
2. The method is described here in painstaking detail, and it is so simple that it may seem absurd to spend so much time repeating it. Just do it the way it’s written, and it will work.
Tools for Practice
We will use backing tracks developed specifically for this exercise, recorded by the renowned bass teacher, Jim Stinnett, who taught it to me and thousands of other students. The backing track will help you learn the sound of intervals, and saves you the cost of a metronome.
Having the backing track and your bass going into a set of headphones is great, but as I said before, the technical details are irrelevant; use what you have.
If you can play mp3s, purchase the backing tracks here, for 7 bucks.
https://157323.e-junkie.com/product/895037#Cycle+of+4ths
Practice
If you’ve memorized the cycle of fourths, you’re ready to start on Major scales.
Alright. Here we go. Get your bass. We won’t use the backing track, yet. Tune your bass to standard tuning (E A D G). If you have more than four strings, it's fine, nothing will change here.
We are going to play a C major scale beginning on the E string.
The C Major Scale can be recited:
C D E F G A B C
The scale begins on the 8th fret of the E string. This is the fret between the third and fourth position marker (i.e. dot).
The first note is fretted with the second (middle) finger.
The second note is fretted with the fourth finger (pinky) of your left hand, on the 10th fret.
The third, fourth, and fifth notes are fretted with the first (index), second, and fourth fingers of the left hand, on the A string. The frets will be the 7th, 8th, and 10th.
The sixth, seventh, and eighth notes are fretted with the first, third, and fourth fingers of the left hand, on the D string. The frets will be the 7th, 9th, and 10th.
It looks like this. The numbers indicate which finger holds the fret.

(fingerboard template courtesy of GonzoBass)
You will notice that all the notes in the major scale fit within a span of four frets over three strings. Miraculously, you have been endowed with an equal number of fingers on your left hand. By way of this miracle, it is possible for you to play the entire Major Scale without needing to reposition your left hand.
The first of the four frets is always played with the first finger, and so on. Choosing to ignore one of those four fingers is as sensible as having your left hand cut off because you prefer to pick your nose using the right hand.
Play the C major scale repeatedly, ascending to the 8th note C, and then start back down again. Play the top C only once, in other words, you’ll play 15 notes, C D E F G A B C B A G F E D C.
Spend a few 20 minute practice sessions playing this shape repeatedly, moving the starting note up or down one half-step (one fret), until you can play it perfectly 20 times in a row. Don’t be concerned about speed or having good time, just focus on playing it correctly and as cleanly as possible, with a minimum of finger and string noise.
Playing Through The Cycle.
Once you can play the C major scale perfectly, it is time to begin memorizing the fingerboard, one string at a time.
Start the first track, Major @120bpm. Don’t play the bass yet, just listen to the track.
You’ll hear a count-off of four beats, and then the track will play. First comes two bars (8 beats) of C Major, followed by two bars of F Major, then Bb Major, and so on. Remember this pattern? If not, you didn’t memorize the cycle of fourths, and you bring shame upon your family for skipping ahead despite instructions. Go back and memorize it now.
Start the track over again, and play the C Major Scale after the countoff. Make the eight notes of the Major Scale fit into the eight beats of the first key on the track, in other words, just ascend through the scale once. We’ll ascend and descend later.
If you are not accustomed to counting, you may need to practice it. If you do know how to count, these will be quarter notes. If you make a mistake, stop the CD and practice the scale without the track as many times as necessary. Continue to practice this way until you play the scale along with the first eight beats of the track perfectly. Doing it once correctly is not perfectly; doing it correctly many times in a row is. Once you can do this, it is time to move to the F Major Scale.
There is a problem, however. Although the notes of the C Major Scale are C, D, E, F, G, A, and B, the notes of the F Major Scale are not F, G, A, B, C, D, and E. There is another scale with those notes, but we are not interested in it now. If I told you the notes in the F Major Scale, it would not help you to play it, because the names of the frets are not known to you now.
Before you could play it, even if I told you what it was, you would need to know the fingerboard. It would be useless to know the scale without knowing how to play it, or to know how to play the scale without knowing the names of its notes. Either condition would be an absurd situation to be in--yet here we are. We must learn one thing or the other first. Knowledge is often based on tricks. When you learned to multiply, you memorized a set of tables for numbers up to nine, or perhaps 12.
For larger numbers you learned tricks that allowed you to multiply them using paper and a pencil, which takes a little longer. Tricks are good.
Refer back to the picture of the cycle of fourths. Here are some facts about the Major scale:
Every Major Scale contains eight notes, and a single letter never appears more than once.
The next note in a scale is always exactly one letter higher than the previous note. In music D# and Eb are different names for the same note, but if a scale has a C in it, the next note will always be a D, either Db, D, or D#.
Every Major Scale except C contains some flats, or some sharps. These are called accidentals.
Here is the great power of the Cycle of Fourths: As you proceed through the Cycle of Fourths, the scale starting with each note has one more flat than the scale before it.
C has zero flats
F has one flat
Bb has two flats
Eb has three flats
and so on, through the cycle.
Which flats are they?
The Cycle tells us this, too:
If a Major scale has one flat, it is always Bb.
If a Major scale has two flats, they are always Bb and Eb.
The third flat is always Ab
and so on, through the cycle, D G C F.
Therefore, the Eb scale has three flats.
B, E and A
The scale goes: Eb F G Ab Bb C D
The Ab scale has four
B, E, A, and D
Ab Bb C Db Eb F G
That is almost all there is to know.
So what is the F Major Scale?
It follows C, therefore there is one flat in it.
The first flat is always Bb
The scale is F G A Bb C D E
Now, how do you recite it?
You will notice that the pattern of frets used in the Major Scale forms a shape on the fretboard.
This is a coincidence that you will use to your advantage.
The major scale has the same shape no matter which key you play.
Move your second finger to the 13th fret. That note is F.
Play the same shape.
You have played
F G A Bb C D E
The F Major Scale
Move your second finger to the 6th Fret. This note is Bb.
Play the same shape.
You have played the Bb major scale.
What notes did you play?
Memorize the E String
Here are the starting frets for each scale in the Cycle of Fourths. You don’t need to memorize the numbers, because as you play this exercise over and over, you will remember where each note occurs on the string by sight, using the position markers and your eyes.
If you know the notes in the Chromatic scale, it may be easier for you to locate a note on the fretboard by counting up or down the neck by half steps until you come to the note you want. However, while you are playing through the scales of the cycle, you won’t have time to do this, since there is no break between one scale and the next.
Note | Fret |
C | 8 |
F | 13 |
Bb | 6 or 18 |
Eb | 11 |
Ab | 4 or 16 |
Db | 9 |
Gb | 2 or 14 |
B | 7 |
E | 12 |
A | 5 or 17 |
D | 10 |
G | 3 or 15 |
After you play the Gb Major Scale and reach B, the flats become sharps.
There are five to begin with; each time, one disappears, in the order of the cycle of fourths.
In a scale with 5 sharps, they are always F#, C#, G#, D#, and A#.
Therefore, The B Major scale is:
B C# D# E F# G# A#
In a scale with four sharps, they are always F#, C#, G# and D#.
E comes after B, so it has four sharps:
E, F#, G#, A, B, C#, D#, E
Now you can figure out A Major (three sharps, F#, C#, G#), D Major, and G Major on your own.
A neat trick for sharps is that the number of sharps is the same as the number of the bass string on which you play it, if you count from the top down. G is the first string, has one sharp. D is the second string, has two sharps. A has three. E has four.
Now you can play the entire recording.
Here are some rules- these are repeated in the table above, but read them again:
Do not play F major on the first fret; play it on the thirteenth fret.
Do not play E major on the open E string; start it on the twelfth fret.
Do not always play G major on the third fret; use the fifteenth also. The same goes for A and B and higher. Do not ignore the top end of the fretboard.
The Struggle
This is not an easy exercise. Every time you shift from one scale to the next, you could land on the wrong fret. In the beginning you should probably just restart the track when you make a mistake. As you practice, you will get further into the track before you make a mistake, so if you shift to the wrong fret, just skip that scale and think about what the next scale coming up will be, and where you need to move to play it. Try to pick back up again without restarting the track.
The most important thing you should do is to think about which starting note you are on. Say the note names to yourself each time the scale changes. In the beginning you don’t need to be aware of every note in the scale you are playing; just focus on being aware of where you are in the cycle of fourths. That way, if you screw up on the Gb Major scale, you can pause for a second, remember that B Major comes next, and shift to the 7th fret when B starts.
DO NOT NEGLECT speaking or thinking the starting note name to yourself as you practice these scales. Otherwise, you’ll be learning to shift lengthwise in fourths, but you won’t really know where you are, which means you won’t know the fingerboard at all.
Improving
Once you can play through the entire track without making any mistakes, it’s time to raise the tempo. The next step is to switch to the 160bpm track.
Once you can play through the 160bpm track perfectly, switch back to the 120bpm track, and play the scale up and down (play the top note only once). You’ll be playing it twice as fast as you did initially.
The A String
Once you can play the entire track ascending and descending at 120bpm, its time to move on to the other strings.
Do the same exercise as before, but play the first two notes of every scale on the A string. At this point, you should be able to figure out where each starting note is on the A string, although like the E string, it will take some time to be able to play through the cycle without making mistakes.
The D String
When you have mastered the A string, move on the D string and play the scale backward, starting with the fourth finger, descending and then ascending through the scale. This will be challenging because you are now shifting with your pinky instead of your index finger.
Be sure to start scales above the 12th fret when you have the opportunity. The more often you play in the high register, the easier it will be for you to find those notes later when you are called to play them.
The G String
You know what to do.
AGAIN: DO NOT NEGLECT speaking or thinking the starting note name to yourself as you practice these scales. Otherwise, you’ll be learning to shift lengthwise in fourths, but you won’t really know where you are, which means you won’t know the fingerboard at all.
Further Studies
There are unlimited variations on this exercise. You can continue increasing the tempo until you can play the ascending/descending version along with the 160bpm track. Substitute the arpeggio for the scale in each key. Also practice the dominant and minor scales in each key, using the same general system. Stinnett later introduces the two-octave version of the exercise, which includes an extra shift to play the upper octave of the scale in each key.
After practicing this exercise for a few weeks, a few things should happen.
1. You should be able to identify any note on any fret on the fretboard without having to think about it for more than a few seconds.
2. You should be able to spell all the major scales without having to think too hard about it. For example, you know Bb is the third scale in the cycle, so it has two flats, which are always Bb and Eb, so you know that Bb major is Bb, C, D, Eb, F, G, A.
This is just the beginning of understanding Music Theory, but its the most important and fundamental part, much more so than the major modes or any of the technical sounding crap that most new students get tripped up in. After learning the Cycle and key signatures, you’ll be ready to tackle chord spelling, which is enormously important for bass players. A