COMM 2555: Interactive Digital Communication
Assignment 6: Designing and Coding a Gallery
Assignment Description
For this assignment you will:
- Create a Gallery design
- Apply the design theories of Alignment and Proximity--the and “A” and the “P” of “CRAP”
- Translate your design into code.
This assignment is working towards the “ME” final project.
You will be submitting your work to eLearning
**NOTE - Much of this assignment was gutted due to the shift to the online format. Due to this, the directions may be less direct and formal than normal. Please do your best, but reach out with any questions. Basically, I want to see you designed an idea for the gallery, and then executed that design in code.
PART I: BEGIN YOUR WEB PAGE
Step 1: Download Photos
1.1 Create a new folder on your desktop. Name the folder hw6. In the folder, create an images folder. On eLearning, under the hw6 folder, find and download the file: gallery.html, and save it in the hw6 folder
.
1.2 Go to Flickr/Explore/The Commons/Explore/The Commons (follow this 30-second video: please note that the search bar for Flickr’s Commons is half-way down the page, NOT at the top of the page, which serves the entire Flickr photo archive).
1.3 Download six beautiful images from the Creative Commons that reflect who you are. Build consistency into these image selections--they could be unified by topic, era, texture--keep in mind that they will all appear in a gallery on your personal website, and need to work together. Download these images at their highest quality (original) size, preferably more than 1000 px. Save them to your “images” folder inside “hw6.” Make sure your images are from the CC and are copyright free.
1.4 (OPTIONAL DUE TO TECH) Open your six photos in Photoshop (if possible - I understand that some of you may not have Photoshop). Using the Marquee Rectangle Tool, select a portion of the image (it could be the entire image) so that it is a perfect square. Shift+drag creates a perfect square. Copy and paste into a new photoshop file, and save it square1.jpg, square2.jpg, square3.jpg, etc. (If you do not currently have Photoshop, but would like to use it while it is free from Adobe, follow the steps on this site: https://it.uni.edu/installing-adobe-creative-cloud-software-students)
Step 2: PLAN YOUR DESIGN
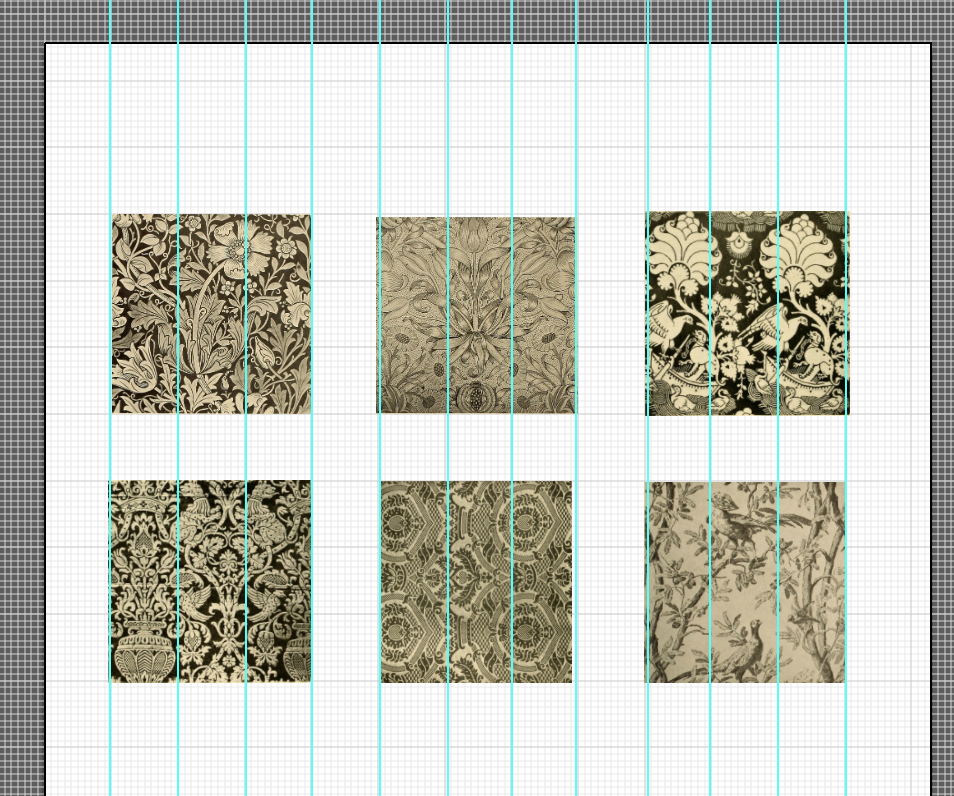
2.1 SOMEWHERE (In Illustrator, Photoshop, Microsoft Paint, or even just drawn on a sheet of paper and then take a picture of it), create a plan for your gallery. The order placement of your six images should be deliberate, but simple. The gallery should look similar in structure to the image below, with three across the top row, and three across the bottom, and they should be aligned.
You will add text in the next step, so you will want to play around with what you think works best aesthetically.
Step 3. Add Text
3.1 Create a heading for the page - the word “Gallery” in a large, noticeable font (you will have time to get fancier in another assignment). Figure out what size and color “Gallery” should appear in, and think about placement. Should your text be horizontal or vertical? Should it be ALL CAPS or not? (this will be your <h1> when the time comes)
3.2. Add a smaller subheading (<h2>) that describes your images. Something short and descriptive, like “Resurrecting 19th Century Wallpaper.” For now, make this font similar, but smaller, than your “Gallery” header
3.3 Placement: Where should you place the word “Gallery” and your subheading in connection with the 6 images? Think about alignment and proximity. Group elements according to what belongs together, and provide appropriate space. Connect all elements in some way with an invisible line. Stay away from centered alignment, which, as we have read, often appears weak and soft. Centering, unless used wisely, is for amateurs.
3.4 Create a paragraph of text (min. 4 sentences) about the gallery and it’s connection to you, and place that as a group on the page where you believe it fits best. This will become your <p> element eventually.
3.5 You can resize the text however you want!
And…..CHANGE THE FONT’s COLOR!!!!!!!!!
Do your last stages of design. Are you happy with all the alignments? Are the elements that belong together near each other? Where does that description paragraph go? On the top or the bottom?
PART II: BUILD YOUR SIMPLE GALLERY WEBPAGE BASED ON YOUR ILLUSTRATOR DESIGN
STEP 4: Create a Webpage using your design as your guide
4.1 Launch a text editor and open up the file in the hw6 folder called “gallery.html.”
Open the same file in a browser so you can see what you have to work with.
We have added the essential HTML and much of the code to make a gallery to match your basic design. You will need to adjust the code now, to MATCH your design.
Analyze the code so you know what’s going on:
Do you see that the css is internal to this document? It exists between the two <style> tags.
Do you see that we have linked to an external reset.css stylesheet? (So you don’t have to add that file to your folder this time!)
Do you see that the images are all linked to a single image on the Web?
4.2 With much of your code in place, work with the existing css and HTML to recreate, as close as possible, the design placements you have established in your Illustrator file. We are mostly concerned with placement and alignment for this assignment, and with transferring the ideas you had in your design to the Web.
4.3 Replace the “Iowa Past” photos with your photos. Link to all the photos in your hw6/images folder. Here’s a reminder of the code:
<img src="images/_________.jpg" alt=”antique wallpaper">
Don’t forget to identify the alt text or you will get ERROR messages.
4.4 Add new HTML: an <h2> subheading</h2> and a new <div> container for the descriptive text. Copy over the “lorem ipsum” text into the new <div> container.
4.5 Style the body, h1, h2, and img selectors, matching the font, color, font-size, line-height, text-align, and borders to recreate your original Illustrator design. Line height will be essential for getting the spacing right, and to create the right kind of relationship between the “Gallery” and subheading text, and the subheading text and the six images.
Make sure the font family is
font-family: Arial, sans-serif;
4.6 Style your body so that it has an image background (bg.jpg).
FIRST, DOWNLOAD THE BACKGROUND IMAGE, “bg.jpg,” sitting on eLearning in the HW6 Folder , AND MOVE IT INTO THE hw6/images folder.
Link to the background image:

4.7 Finally, adjust the alignment. THIS IS THE HARDEST PART.
You may have to put all the images into a new <div>, separate from the two <h1> and <h2> tags.
You may have to create one or two new ID (#) styles and add them according to how you want different elements positioned in terms of margin, padding, and width.
You may have to float your description <div> either right or left.
You will definitely have to play with the margins and paddings of everything.
Be patient: it takes a little time and troubleshooting to get comfortable with how margins and paddings work together.
Remember the box model: if you add 10px of padding, you are adding 20 pixels to the width and height of the image.
You may want to just impact padding-left, padding-right, margin-left, margin-right, or margin-bottom.
Again, this is the hardest part: you will want to align headings and images as we learned in class.
STEP 5: Check for Errors
HTML: https://validator.w3.org/
CSS: http://jigsaw.w3.org/css-validator/
STEP 6: SUBMIT HW5
7.2 FINALLY, ZIP your hw6 folder and submit it to eLearning.