Disco Diffusion 5.2 - what is it?
Disco Diffusion (DD) is a Google Colab Notebook which leverages an AI Image generating technique called CLIP-Guided Diffusion to allow you to create compelling and beautiful images from just text inputs. Created by Somnai, augmented by Gandamu, and building on the work of RiversHaveWings, nshepperd, and many others.
It’s magic. And also, free. (!)
However, the storied history and complex internal workings of CLIP and Diffusion are NOT the primary topic of this document. Rather, this guide is to help you understand how to use basic DD controls to create your own images, and to provide some insight on how all of the parameters affect CLIP and Diffusion behavior.
DD Diffusion Process (vastly simplified)
Diffusion is a mathematical process for removing noise from an image. CLIP is a tool for labeling images. When combined, CLIP uses its image identification skills to iteratively guide the diffusion denoising process toward an image that closely matches a text prompt.
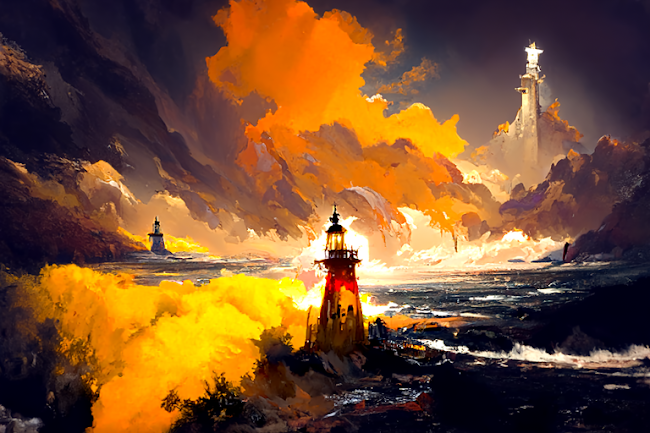
The image above was created in DD using just the text prompt: "A beautiful painting of a singular lighthouse, shining its light across a tumultuous sea of blood by greg rutkowski and thomas kinkade, Trending on artstation.”
Diffusion is an iterative process. Each iteration, or step, CLIP will evaluate the existing image against the prompt, and provide a ‘direction’ to the diffusion process. Diffusion will ‘denoise’ the existing image, and DD will display its ‘current estimate’ of what the final image would look like. Initially, the image is just a blurry mess, but as DD advances through the iteration timesteps, coarse and then fine details of the image will emerge.
Steps 1, 50, 100, 150, and 200 of the diffusion process

The example image took 250 diffusion steps to complete. As you can see in the image sequence above, the images get progressively clearer over the range of steps, as the diffusion denoising process is guided toward the desired image by CLIP.
The content of the image is generally controlled by the text used in a ‘prompt’, a sentence, phrase, or series of descriptive words that tells CLIP what you want to see. Creating a good text prompt for AI art is a nuanced, challenging task that takes much trial and error and practice. It will require you to study, but won’t be covered in detail here in this guide. We’re focused on the knobs and levers to drive Disco Diffusion.
Most of DD’s controls are numerical and control various aspects of the CLIP model and the diffusion curve. The general approach for using DD is to pick a text prompt, tune the parameters, then run the notebook to create an image. Depending on the settings used and the processor available, DD can take between 5 minutes to an hour or longer to render a single image.
Fine tuning your prompt and parameters is complex and time consuming, so taking a methodological approach will benefit you. I recommend you first try out the default settings in the notebook, to confirm that the notebook runs properly and there are no errors with your setup. Beyond that, experiment!
Also, while there are animation controls in DD, you should begin by learning how to create still images, as those skills transfer directly to animations.
Creating art with AI is magical and complex, and is constantly being developed by data scientists and programmers. It should be no surprise then, that learning the tools will take work and focus. Also, DD has dozens of controls, with complex interactions and few limits, so it’s easy to get bad results. But don’t get discouraged!
Remember, you are not alone. Thousands of folks are studying and learning AI art, and there are many resources available to connect with and learn from other DD users and AI artists. Notably, there’s a dedicated DD Discord forum, a DD subreddit, and a lively user community on twitter. There are also dozens of great Youtube and written tutorials and guides. Links to other resources are included at the end of this guide.
The harder the climb, the better the view! Good luck and make something awesome!
March 2022
Chris Allen (@zippy731 on twitter)
Thanks to somnai_dreams, gandamu_ml, zqevans, huemin_art, softologycomau , NerdyRodent, nonlethalcode, garlicml, pharmapsychotic, luciddreamnf1, (and others I may have rudely forgotten,) for info, review, comments and contributions.
p.s. I hope this guide will be a helpful starting point and reference to fellow DD users. But it’s not the authority on anything. For real.
While I tried to compile the facts by asking some actual DD coders and experts for clarifications, all of this is my current, superstitious impression of how everything works.
And, despite best efforts, this guide is full of errors. My errors. I just don’t know where they are yet. I’m a student of AI art as well, so let’s learn together!
If you see errors or misinformation, after you get over chuckling at my ignorance, please set me straight with comments on twitter, or over at the DD Discord! -Z
Using Disco Diffusion - Basic Settings
Disco Diffusion (DD) (currently version 5.2) is intimidating and inscrutable at first. Just take it in small steps and you’ll make progress.
Before you start
This guide assumes you understand the basics of accessing and running a notebook using Google’s Colab service. If you don’t, please check the appendix for some recommended resources to get that understanding.
Confirm Colab is working
When you launch the DD notebook in Colab, it’s already set up with defaults that will generate a lighthouse image like the one above. Before changing any of the settings, you should just run all (Runtime\Run all) to confirm everything’s working. Colab will prompt you to authorize connecting to your google drive, and you should approve this for DD to work properly.
Afterward, DD will spend a few minutes setting up the environment, and will eventually display a diffusion image being generated at the very bottom of the notebook. Once you’ve confirmed that all of this is working, you can interrupt the program (Runtime\Interrupt Execution) whenever you like.
Quick Start - Using Default Settings
After the initial setup, you can start creating your own images! There are many options, but if you want to just type phrases and use the default settings to generate images:
- Initialize the DD environment with run all, as described just above. Interrupt the execution.
- Scroll to the bottom of the notebook to the Prompts section near the very bottom of the notebook. Take careful note of the syntax of the example that’s already there. Replace the sentences with your own text prompt.
- Click the run button for the prompts cell. This will update the text prompt for the next run.
- Just below that, under 4. Diffuse!, expand the cell and update the ‘display_rate’ value from 50 to 5.
- Click the run button next to ‘Do the Run!’
- Watch the magic happen.
That’s it. You are now creating your own images from text!
As before, you can watch the image update on screen. You should see a blurry gray image, which will progressively clear up to show your final image. Interrupt the code whenever you like.
You may love or not-love your first DD images, but if you want to make them better, read on!
Text Prompts
This is the main event. Typing in words and getting back pictures. It’s why we’re all here, right? :)
In DD, prompts are set at the very bottom of the notebook. Prompts can be a few words, a long sentence, or a few sentences. Writing prompts is an art in and of itself that won’t be covered here, but the DD prompts section has some examples including the formatting required.
text_prompts: Phrase, sentence, or string of words and phrases describing what the image should look like. The words will be analyzed by the AI and will guide the diffusion process toward the image(s) you describe. These can include commas and weights to adjust the relative importance of each element. E.g. "A beautiful painting of a singular lighthouse, shining its light across a tumultuous sea of blood by greg rutkowski and thomas kinkade, Trending on artstation."
Notice that this prompt loosely follows a structure: [subject], [prepositional details], [setting], [meta modifiers and artist]; this is a good starting point for your experiments.
Developing text prompts takes practice and experience, and is not the subject of this guide. If you are a beginner to writing text prompts, a good place to start is on a simple AI art app like Night Cafe, starry ai or WOMBO prior to using DD, to get a feel for how text gets translated into images by GAN tools. These other apps use different technologies, but many of the same principles apply.
image_prompts: Source images are another way to guide the diffusion process toward a look or style. Using image prompts to create other images is an indirect method, however, and not as reliable as text prompts.
Advanced topic: Prompt weights and animation frames
You can run a successful batch of images or an animation with a single text prompt. However, DD allows additional flexibility in the prompt section.
Prompts are broken down into an animation frame number and a list of strings. The list of strings are individual prompts that the diffusion process will try to drive the image toward. The end of the string can contain a ":num" value to indicate the weight of that prompt relative to the other prompts.
Each prompt's relative contribution in driving the diffusion direction is its weight divided by the sum of all the weights. Weights can be negative! Negative weights can help inhibit features that match an undesired prompt, such as text, watermarks, or other undesired features. e.g. 0:["rocky beach:2", "sky:-1"] will push the image towards a rocky beach while attenuating sky details. Important: the sum of the weights must not equal 0.
The number at the very beginning of the line is an animation frame number. If animation is used, you can change prompts over time by adding more lines of prompts with different animation frames, and DD will switch text prompts at the specified frame. Note: adding multiple prompts in this manner only works with animations. If you are running a batch of individual images, DD will just use the first text prompt.
Basic Settings
Once you’ve got your text and/or image prompts ready, you need to set a batch name for your image generation run, maybe adjust some of the numerical parameters. Parameters are at the heart of controlling DD image character and quality, and many parameters offset the effects of others, making DD a rich and complex tool that takes a while to learn.
For some of the parameters, you will see numbers alongside the parameter e.g. (250|50-10000) indicating the DD default value as well as a ‘typical’ range.
These defaults and ranges will get you started, but these are not hard limits. DD is still being very actively researched. Several users are actively doing ‘parameter studies’ (see the resources appendix) to visualize working ranges of parameters, and interactions with other parameters. So once you get some comfort with each parameter, you should absolutely experiment with more extreme values (including negative numbers) to find values that work for your artistic goals.
batch_name: File and folder name for the batch. Final images and/or videos will be saved in \My Drive\AI\Disco_Diffusion\images_out\batch_name
width_height: ([1280,768]|limited by VRAM) desired final image size, in pixels. You can have a square, wide, or tall image, but each edge length should be set to a multiple of 64px, and a minimum of 512px on the default CLIP model setting. If you forget to use multiples of 64px in your dimensions, DD will adjust the dimensions of your image to make it so.
In the DD context, on a typical Colab system, [512x768] is a medium image and is a good starting point. [1024x768] is considered a large image, and may cause an OOM (out of memory) error.
Significantly larger dimensions will use significantly more memory (and may crash DD!) so start small at first. If you want a very large final image, a common practice is to generate medium sized images using DD, then to use a separate AI ‘upscaler’ to increase the dimensions of the DD-produced image.
One interesting CLIP-Diffusion phenomenon is that if you make the image very tall in dimension (ie. 512 x 1024), then you can get better results for tall/giant prompt subjects; e.g. “A giant creature.” Wide images can also be used for wide subjects like panoramic landscapes. This is likely due to the orientation and format of original images used to train the various CLIP datasets.
steps: (250|50-10000) When creating an image, the denoising curve is subdivided into steps for processing. Each step (or iteration) involves the AI looking at subsets of the image called ‘cuts’ and calculating the ‘direction’ the image should be guided to be more like the prompt. Then it adjusts the image with the help of the diffusion denoiser, and moves to the next step.
Increasing steps will provide more opportunities for the AI to adjust the image, and each adjustment will be smaller, and thus will yield a more precise, detailed image. Increasing steps comes at the expense of longer render times. Also, while increasing steps should generally increase image quality, there is a diminishing return on additional steps beyond 250 - 500 steps. However, some intricate images can take 1000, 2000, or more steps. It is really up to the user.
Just know that the render time is directly related to the number of steps, and many other parameters have a major impact on image quality, without costing additional time.
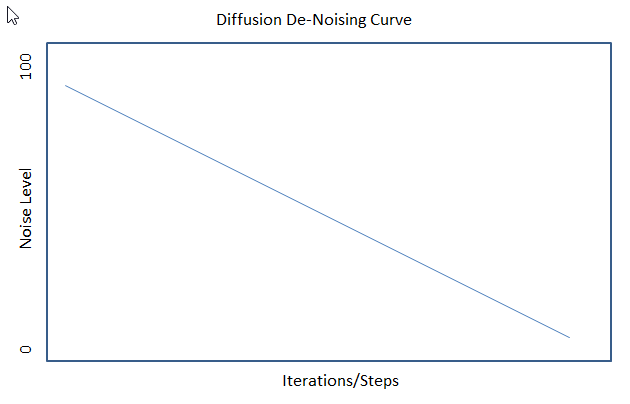
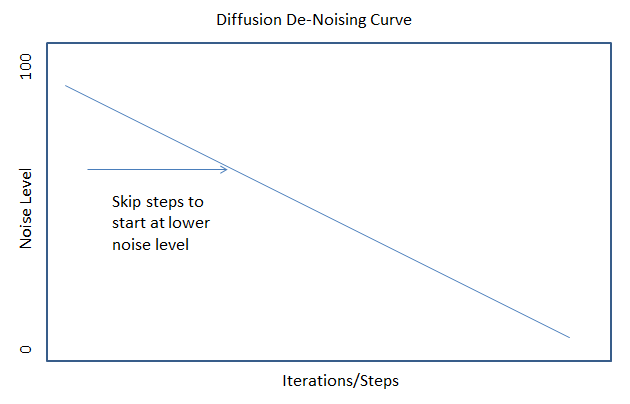
skip_steps: (10|integer up to steps) Consider the chart shown here. Noise scheduling (denoise strength) starts very high and progressively gets lower and lower as diffusion steps progress. The noise levels in the first few steps are very high, so images change dramatically in early steps.
As DD moves along the curve, noise levels (and thus the amount an image changes per step) declines, and image coherence from one step to the next increases.
The first few steps of denoising are often so dramatic that some steps (maybe 10-15% of total) can be skipped without affecting the final image. You can experiment with this as a way to cut render times.
If you skip too many steps, however, the remaining noise may not be high enough to generate new content, and thus may not have ‘time left’ to finish an image satisfactorily.
Also, depending on your other settings, you may need to skip steps to prevent CLIP from overshooting your goal, resulting in ‘blown out’ colors (hyper saturated, solid white, or solid black regions) or otherwise poor image quality. Consider that the denoising process is at its strongest in the early steps, so skipping steps can sometimes mitigate other problems.
Lastly, if using an init_image, you will need to skip ~50% of the diffusion steps to retain the shapes in the original init image.
However, if you’re using an init_image, you can also adjust skip_steps up or down for creative reasons. With low skip_steps you can get a result "inspired by" the init_image which will retain the colors and rough layout and shapes but look quite different. With high skip_steps you can preserve most of the init_image contents and just do fine tuning of the texture.
clip_guidance_scale: (5000|1500-100000) CGS is one of the most important parameters you will use. It tells DD how strongly you want CLIP to move toward your prompt each timestep. Higher is generally better, but if CGS is too strong it will overshoot the goal and distort the image. So a happy medium is needed, and it takes experience to learn how to adjust CGS.
Note that this parameter generally scales with image dimensions. In other words, if you increase your total dimensions by 50% (e.g. a change from 512 x 512 to 512 x 768), then to maintain the same effect on the image, you’d want to increase clip_guidance_scale from 5000 to 7500.
Of the basic settings, clip_guidance_scale, steps and skip_steps are the most important contributors to image quality, so learn them well.
tv_scale: (0|0-1000) Total variance denoising. Optional, set to zero to turn off. Controls ‘smoothness’ of final output. If used, tv_scale will try to smooth out your final image to reduce overall noise. If your image is too ‘crunchy’, increase tv_scale. TV denoising is good at preserving edges while smoothing away noise in flat regions. See https://en.wikipedia.org/wiki/Total_variation_denoising
range_scale: (150|0-1000) Optional, set to zero to turn off. Used for adjustment of color contrast. Lower range_scale will increase contrast. Very low numbers create a reduced color palette, resulting in more vibrant or poster-like images. Higher range_scale will reduce contrast, for more muted images.
sat_scale: (0|0-20000) Saturation scale. Optional, set to zero to turn off. If used, sat_scale will help mitigate oversaturation. If your image is too saturated, increase sat_scale to reduce the saturation.
init_image: Optional. Recall that in the image sequence above, the first image shown is just noise. If an init_image is provided, diffusion will replace the noise with the init_image as its starting state. To use an init_image, upload the image to the Colab instance or your Google Drive, and enter the full image path here.
If using an init_image, you may need to increase skip_steps to ~ 50% of total steps to retain the character of the init. See skip_steps above for further discussion.
init_scale: (1000|10-20000) this controls how strongly CLIP will try to match the init_image provided. This is balanced against the clip_guidance_scale (CGS) above. Too much init scale, and the image won’t change much during diffusion. Too much CGS and the init image will be lost.
cutn_batches: (4|1-8) Each iteration, the AI cuts the image into smaller pieces known as cuts, and compares each cut to the prompt to decide how to guide the next diffusion step. More cuts can generally lead to better images, since DD has more chances to fine-tune the image precision in each timestep.
Additional cuts are memory intensive, however, and if DD tries to evaluate too many cuts at once, it can run out of memory. You can use cutn_batches to increase cuts per timestep without increasing memory usage.
At the default settings, DD is scheduled to do 16 cuts per timestep. If cutn_batches is set to 1, there will indeed only be 16 cuts total per timestep.
However, if cutn_batches is increased to 4, DD will do 64 cuts total in each timestep, divided into 4 sequential batches of 16 cuts each. Because the cuts are being evaluated only 16 at a time, DD uses the memory required for only 16 cuts, but gives you the quality benefit of 64 cuts. The tradeoff, of course, is that this will take ~4 times as long to render each image.
So, (scheduled cuts) x (cutn_batches) = (total cuts per timestep). Increasing cutn_batches will increase render times, however, as the work is being done sequentially. DD’s default cut schedule is a good place to start, but the cut schedule can be adjusted in the Cutn Scheduling section, explained below.
skip_augs: As part of its code, DD has some ‘torchvision augmentations’ which introduce randomized image scaling, perspective and other selective adjustments during image creation. These augmentations are intended to help improve image quality, but can have a ‘smoothing’ effect on edges that you may not want. By setting skip_augs to true, you can skip these augmentations and speed up your renders slightly. Suggest you experiment with this setting to understand how it affects your projects.
Run Settings
After your prompt and settings are ready, visit the Do the Run! code cell near the bottom of the notebook, edit the settings, then run it. DD will start the process, and store the finished images in your batch folder.
n_batches: (50|1-100) This variable sets the number of still images you want DD to create. If you are using an animation mode (see below for details) DD will ignore n_batches and create a single set of animated frames based on the animation settings.
display_rate: (50|5-500) During a diffusion run, you can monitor the progress of each image being created with this variable. If display_rate is set to 50, DD will show you the in-progress image every 50 timesteps.
Setting this to a lower value, like 5 or 10, is a good way to get an early peek at where your image is heading. If you don’t like the progression, just interrupt execution, change some settings, and re-run. If you are planning a long, unmonitored batch, it’s better to set display_rate equal to steps, because displaying interim images does slow Colab down slightly.
resume_run: If your batch run gets interrupted (either because you stopped it, or because of a disconnection,) you can resume your batch run where you left off using this checkbox. However, you should not change the batch name settings in the batch, or it cannot reliably be resumed. Other parameters (run_to_resume, resume_from_frame, retain_overwritten_frames) control how you want the batch to be resumed.
Workflow
A common DD workflow is to change prompt and/or settings, do a short run, assess the image(s), tweak settings and do it again. There is a LOT of variability in how DD behaves, and images take time to render, so feedback is not immediate. Thus it is absolutely worth your time to be methodical and keep notes of changes you’re making and their impact.
While you are experimenting with text prompts it is a good idea to turn down the total number of steps so you can quickly see the effect of your prompts. Once you settle on text prompts that you like, then you can turn up steps and tweak settings to get the desired image quality.
Parameter Studies - EZ Charts
Several users have created visual studies of the effect of diffusion parameters, and we’ve compiled a number of them into a visual library called EZ Charts. As you begin to think about how you want to adjust your image, this is a good place to learn how the parameters behave. There are other parameter and artist studies listed in the resources section.
The settings report
To help you keep track, DD creates a ‘settings’ text file for each run, stored in the batch folder. It’s an excellent resource for learning and saving settings that worked out well. If you don’t recognize a parameter name in the report, (and it’s not mentioned in this guide,) it is probably a system variable that you can ignore.
Memory Management
Early in your DD journey, your Colab will run out of memory, and you’ll see the dreaded CUDA out of memory message. This means you asked DD to do something that exceeded the available GPU memory resources, and it broke.
Not to worry, breaking DD and running OOM is a rite of passage. The usual reasons for running out of memory:
- Trying to make images that are too large.
- Trying to do too many cuts at once. See cutn_batches above and Cutn Scheduling below for more information.
- Trying to use too many CLIP or Diffusion models at the same time. ViTL/14 and RN50x64 in require the most VRAM of the models
If you run into an OOM memory, just edit your settings and re-run your batch. You may need to ‘restart and run all’ to clear out the problem.
- Running on an underpowered Colab system.
Available GPU memory is also a function of which type of GPU gets randomly allocated to your Colab session.
Free-tier accounts get the lower level systems, while Pro and Pro+ get access to the stronger ones. DD requires a GPU-enabled Colab instance to work properly, and occasionally Free-tier accounts will not have any GPU instances available. It feels sad when that happens, but try back later.
At the top the DD notebook is a ‘Check GPU Status’ cell that reports which system type you have been assigned. As of this writing, in Colab there is a pecking order of GPU power, from least to most powerful:
K80 / T4 / P100 / V100 / A100
The A100 is a mythical beast that is rarely seen. If you do get one, be sure to screen-cap and share in the Discord to flex on your friends.
That’s pretty much it. DD will not warn you when getting close to the limits, it just breaks with an OOM error. There are many technical ways to assess memory usage, but as a novice user it’s best to just run a few experiments on different setups to understand the limits of the instance you’re on.
I want to run DD on my super powerful home PC with the wicked smaht graphics card.
DD was made to run in the Google Colab environment, with its heavy duty GPUs, so that’s the focus of this guide. I know that some folks have succeeded with running DD on other hardware including their own home PCs, but I know literally nothing about this. Thus, I shall not opine.
Check the resources list for links to some information on running DD beyond Colab, and visit the DD Discord #tech-support or #dev channel to chat with other folks about these questions.
Other bugs and crashes
If DD crashes for some reason other than CUDA OOM:
- Remember to think kind thoughts about the devs. This is free, experimental AI code and prone to breakage.
- Restart and run all. The Colab equivalent of a system reboot.
- Go grab a new copy of the original notebook to work with. You might have edited some code inadvertently.
- Go visit the DD Discord #tech-support channel and search for your error message.
END OF BASIC SETTINGS
This is the end of the basics. You can create images from text, run batches, and save images to disk. Go to town!
—-------------------------------------
Advanced Diffusion Settings
The basic settings above are the primary controls for generating images in DD, and you can get excellent results just by working with those few parameters. However, DD has far more power than that. When you feel comfortable with the basics, browse through the remaining settings to see what else DD can do.
Diffusion and CLIP Model Settings
This group of settings determines which diffusion and CLIP models DD will use while generating images.
When you first start out, you might just use the default values, because all of the models will give you results and it’s good to learn the basic parameters first. However, different models have different characteristics and styles, so feel free to explore however you like!
diffusion_model: Diffusion_model of choice.
use_secondary_model: (Default: True) Option to use a secondary purpose-made diffusion model to clean up interim diffusion images for CLIP evaluation. If this option is turned off, DD will use the regular (large) diffusion model. Using the secondary model is faster - one user reported a 50% improvement in render speed! However, the secondary model is much smaller, and may reduce image quality and detail. I suggest you experiment with this.
sampling_mode: (ddim | ddim or plms) Two alternate diffusion denoising algorithms. ddim has been around longer, and is more established and tested. plms is a newly added alternate method that promises good diffusion results in fewer steps, but has not been as fully tested and may have side effects. This new plms mode is actively being researched in the #settings-and-techniques channel in the DD Discord.
timestep_respacing: (leave at default) This is an internal variable that you should leave alone. In future DD releases, this will likely be hidden from users, as it’s not meant to be edited directly.
diffusion_steps: (leave at default) This is an internal variable that you should leave alone. In future DD releases, this will likely be hidden from users, as it’s not meant to be edited directly.
use_checkpoint: (Default: True) This option helps save VRAM while generating images. If you are on a very powerful machine (e.g. A100) you may be able to turn this option off and speed things up. However, you might also immediately encounter a CUDA OOM error, so use caution.
CLIP Model selectors:
ViTB32, ViTB16, ViTL14, RN101, RN50, RN50x4, RN50x16, RN50x64
These various CLIP models are available for you to use during image generation. Models have different styles or ‘flavors,’ so look around.
You can mix in multiple models as well for different results. However, keep in mind that some models are extremely memory-hungry, and turning on additional models will take additional memory and may cause a crash.
The rough order of speed/mem usage is (smallest/fastest to largest/slowest):
- VitB32
- RN50
- RN101
- VitB16
- RN50x4
- RN50x16
- RN50x64
- ViTL14
For RN50x64 & ViTL14 you may need to use fewer cuts, depending on your VRAM.
Note: if you change any of the Diffusion and CLIP model settings in this section, you should restart your Colab and run all of the cells again to ensure the necessary libraries are loaded properly.
Extra Settings - Saving:
intermediate_saves: In addition to a final image, DD can save intermediate images from partway through the diffusion curve. This is helpful to diagnose image problems, or if you want to make a timeline or video of the diffusion process itself. See the notebook for instructions on using this.
Intermediates_in_subfolder: (Default: True) If saving intermediate images, this option will store intermediate images in a subfolder called ‘partials’
SuperRes Sharpening (v5.1 and prior only):
If you like how your images are turning out, but they still feel just a little scruffy when finished, DD has an optional feature to do a finishing step of ‘SuperRes Sharpening.’ If selected, SuperRes Sharpening will downsize your image, then re-upsize it using an AI upscaling method [Latent Diffusion] that can sharpen the edges and smooth out jagged or noisy sections.
sharpen_preset: Leave sharpening turned off, or select a sharpening option
keep_unsharp: if selected, will retain the unsharpened image as well as the sharpened image.
Advanced Settings - Perlin Noise:
perlin_init: Normally, DD will use an image filled with random noise as a starting point for the diffusion curve. If perlin_init is selected, DD will instead use a Perlin noise model as an initial state. Perlin has very interesting characteristics, distinct from random noise, so it’s worth experimenting with this for your projects. Beyond perlin, you can, of course, generate your own noise images (such as with GIMP, etc) and use them as an init_image (without skipping steps).
Choosing perlin_init does not affect the actual diffusion process, just the starting point for the diffusion.
Please note that selecting a perlin_init will replace and override any init_image you may have specified. Further, because the 2D, 3D and video animation systems all rely on the init_image system, if you enable Perlin while using animation modes, the perlin_init will jump in front of any previous image or video input, and DD will NOT give you the expected sequence of coherent images.
All of that said, using Perlin and animation modes together do make a very colorful rainbow effect, which can be used creatively.
perlin_mode: sets type of Perlin noise: colored, gray, or a mix of both, giving you additional options for noise types. Experiment to see what these do in your projects.
Other Extra Settings
set_seed: (“random_seed”|any integer) Deep in the diffusion code, there is a random number ‘seed’ which is used as the basis for determining the initial state of the diffusion. By default, this is random, but you can also specify your own seed. This is useful if you like a particular result and would like to run more iterations that will be similar.
After each run, the actual seed value used will be reported in the parameters report, and can be reused if desired by entering seed # here. If a specific numerical seed is used repeatedly, the resulting images will be quite similar but not identical.
Note: setting the seed value via set_seed will ONLY set the seed for the first image in a batch or an animation. Subsequent seeds will still be randomized.
eta: (0.5|0-1.0) eta (greek letter η) is a diffusion model variable that mixes in a random amount of scaled noise into each timestep. 0 is no noise, 1.0 is more noise. As with most DD parameters, you can go below zero for eta, but it may give you unpredictable results.
The steps parameter has a close relationship with the eta parameter. If you set eta to 0, then you can get decent output with only 50-75 steps. Setting eta to 1.0 favors higher step counts, ideally around 250 and up. eta has a subtle, unpredictable effect on image, so you’ll need to experiment to see how this affects your projects.
clamp_grad (True|True or False) - As I understand it, clamp_grad is an internal limiter that stops DD from producing extreme results. Try your images with and without clamp_grad. If the image changes drastically with clamp_grad turned off, it probably means your clip_guidance_scale is too high and should be reduced.
clamp_max: (0.05|0-0.30) Sets the value of the clamp_grad limitation. Default is 0.05, providing for smoother, more muted coloration in images, but setting higher values (0.15-0.3) can provide interesting contrast and vibrancy.
fuzzy_prompt: (False|True or False) Controls whether to add multiple noisy prompts to the prompt losses. If True, can increase variability of image output. Experiment with this.
rand_mag: (1.0|0-1.0) Affects only the fuzzy_prompt. Controls the magnitude of the random noise added by fuzzy_prompt.
Extra Settings - Cutn Scheduling
Note: default values for cutn_scheduling are good for most images, and adjusting the cut schedule should be done carefully.
This section determines the schedule of CLIP ‘cuts’, or snapshots that CLIP uses to evaluate your image while processing. In DD, there are two types of cuts: overview cuts, which take a snapshot of the entire image and evaluate that against the prompt, and inner cuts, which are smaller cropped images from the interior of the image, helpful in tuning fine details. The size of the inner cuts can be adjusted using the cut_ic_pow parameter.
The cut schedule determines which types of cuts are being made at each stage in the diffusion curve. The default settings allows for coarse structure (overview cuts) to be emphasized early in the diffusion curve, and for finer details (inner cuts) to be emphasized later.
The default cut schedule in DD is fine for most purposes, but you may want to adjust it to change the emphasis of overall image coherence vs. fine detail clarity.
The cut schedule can also be used as a finer-grained replacement for skip_steps. By setting the cut schedule to low or zero values for part of the diffusion curve, you can effectively skip any portion(s) of the diffusion curve you would like.
The total number of cuts (sum of overview and inner cuts) at any time is controlled by the cut schedule. Beware that the total number of cuts is a key driver of memory usage, so be sure to manage the overall cut number. The scheduled cuts can be further multiplied by the cut_batches variable, set in basic settings.
The cutn_schedule setup is based on a standardized timeline of 1000 units, but the actual cuts will be proportionally allocated along the actual number of steps you set. Thus, your cutn_schedule should ALWAYS be created based on 1000 units, regardless of the actual steps you intend to use in your project.
Also, note that the cutn_schedule is linked to the total steps value, and thus if you use skip_steps or frames_skip_steps, know that you will also be skipping a portion of your scheduled cuts.
cut_overview: The schedule of overview cuts
cut_innercut: The schedule of inner cuts
cut_ic_pow: (1.0|0.5-100) This sets the size of the border used for inner cuts. High cut_ic_pow values have larger borders, and therefore the cuts themselves will be smaller and provide finer details. If you have too many or too-small inner cuts, you may lose overall image coherency and/or it may cause an undesirable ‘mosaic’ effect. Low cut_ic_pow values will allow the inner cuts to be larger, helping image coherency while still helping with some details.
cut_icgray_p: in addition to the overall cut schedule, a portion of the cuts can be set to be grayscale instead of color. This may help with improved definition of shapes and edges, especially in the early diffusion steps where the image structure is being defined. cut_icgray_p affects overview and inner cuts.
Most beginning users do NOT need to adjust cutn_scheduling, so leaving this setting alone is a good idea until you get a good feeling for the other controls.
----------------------------------------------
Animation
Until this point, all of the settings have been related to creating still images. DD also has several animation systems that allow you to make an animated sequence of CLIP-diffusion images. The frames in the animation system are created using all of the same settings described above, so practice making still images will help your animated images as well.
There are 3 distinct animation systems: 2D, 3D, and video. All of the animation modes take advantage of DD’s image init function, and use either the previously created frame (2D/3D) or a frame from a separate video (video) This starting image is injected into the diffusion process as an image init, then the diffusion runs normally.
When using any of the animation modes, temporal coherence between frames is an important consideration, so you will need to balance between the strength of the image init, the strength of the text prompt and other guidance, and the portion of the diffusion curve you will use to modify the image init.
The animation system also has ‘keyframes’ available, so you can change camera position and location at various frames in the animation, and DD will change direction. You can even update the text prompt mid-animation, and DD will begin to morph the image toward the new prompt, allowing for some great storytelling power!
Animation_mode: None, 2D, 3D or video animation options. Details in each section below.
- None: animation mode is turned off. A batch of individual images will be created using the image and batch settings.
- 2D animation takes each frame as a flat plane and transforms it (rotate, scale, translate X or Y) according to the parameters. Then it uses that transformed image as an image init for the next frame of the animation.
- 3D animation takes each frame, calculates an estimated 3D depth map and estimated virtual 3D space for the frame. Then, using this 3D space, it moves a virtual camera through this virtual space, and transforms/warps the image using the depth map and the new ‘camera’ location. The resulting warped image is used as an image init for the next animation frame.
- Video Input takes each frame of a video init, and uses them as image inits for a series of DD output images.
Video Input Settings
As noted above, video input animation mode takes individual frames from a user-provided video clip (mp4) and uses those sequentially as init_images to create diffusion images.
video_init_path: (video only) Source path for the user-provided video to be used as the source for image inputs for animation. To use a video init, upload the video to the Colab instance or your Google Drive, and enter the full source path. A typical path will read /content/video_name.mp4. If your version of DD has two fields titled video_init_path, enter the same value in both.
extract_nth_frame: (video only) (2|1-6) allows you to extract every nth frame of video. If you have a 24fps video, but only want to render 12 frames per second of DD images, set extract_nth_frame to 2.
video_init_seed_continuity: (video only) (On|Off/On) Improves video animation smoothness and frame continuity by reusing the same image creation seed for every frame of the video. Deselecting this will result in a video with more chaotic, randomized textures.
The Video Input mode settings just above are not related to creating a final output video from animation frames. Settings for creating and saving a final video are discussed in the Create the video section below.
2D and 3D Animation Mode settings
key_frames: Turns on the keyframe system, allowing for changes in 2D and 3D animation parameters over time. Sample syntax for keyframes is provided in the notebook. Also, you can apply keyframes to text or image prompts as well - see syntax examples provided in notebook - allowing for an evolving text prompt to guide the imagery over the length of the animation.
max_frames: total frames to be created in the 2D or 3D animation. All animation in DD is measured in frames and not ‘time,’ so you will need to determine what frames per second you intend your final animation to be, and calculate the frame count yourself. Note: max_frames is ignored in video input mode, and the length of the source video will determine the total number of animation frames to be created.
2D Animation Settings
Remember that in 2d animation mode, DD is shifting the CANVAS of the prior image, so directions may feel confusing at first.
angle: (0|-3 to 3) (2D only) Rotates image by () degrees each frame. Positive angle values rotate the image counter-clockwise, (which feels like a camera rotating clockwise.)
zoom: (2D only) (1.10|0.8 - 1.25) Scales image by () percentage each frame. zoom of 1.0 is 100% scaling, thus no zoom. zoom values over 1.0 are scale increases, thus zooming into an image. 1.10 is a good starting value for a forward zoom. Values below 1.0 will zoom out.
translation_x, translation_y (in 2D mode): (0|-10 to 10) In 2D mode, the translation parameter shifts the image by () pixels per frame.
- X is left/right; positive translation_x shifts the image to the right (which feels like camera shift to the left)
- Y is up/down; positive translation_y shifts the image down the screen (which feels like a camera shift upward)
3D Animation Settings
Recall that in 3D animation mode, there is a virtual 3d space created from the prior animation frame, and a virtual camera is moved through that space.
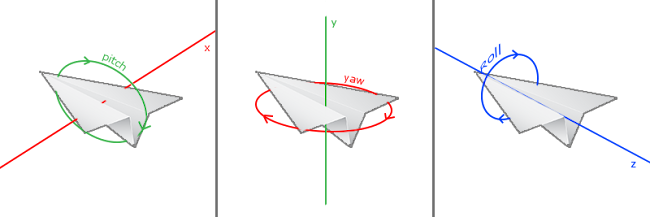
(Image CC BY 4.0 by Joey de Vries, from https://learnopengl.com)
3D Rotations follow the diagram above, with positive values following the direction of the arrows. NOTE: As of DD 5.1, 3D rotations in DD are measured in degrees. Prior DD versions used radians.
rotation_3d_x: (3D only) (0|-3 to 3) Measured in degrees. Rotates the camera around the x axis, thus shifting the 3D view of the camera up or down. Similar to pitch in an airplane. Positive rotation_3d_x pitches the camera upward.
rotation_3d_y: (3D only) (0|-3 to 3) Measured in degrees. Rotates the camera around the y axis, thus shifting the 3D view of the camera left or right. Similar to yaw in an airplane. Positive rotation_3d_y pans the camera to the right.
rotation_3d_z: (3D only) (0|-3 to 3) Measured in degrees. Rotates the camera around the z axis, thus rotating the 3D view of the camera clockwise or counterclockwise. Similar to roll in an airplane. Positive rotation_3d_z rolls the camera clockwise.
translation_x, translation_y, translation_z (in 3D mode): (0|-10 to 10) In 3D mode, translation parameters behave differently than in 2D mode - they shift the camera in the virtual 3D space.
- X is left/right; positive translation_x shifts the camera to the right
- y is up/down; positive translation_y shifts the camera upward
- z is forward/backwards (zooming); positive translation_z shifts the camera forward
The distance units for translations (x, y or z) in 3D mode are set to an arbitrary scale where 10 units is a reasonable distance to zoom forward via translate_z. Depending on your scene and scale, you will need to experiment with varying translation values to achieve your goals.
fov: (3D only) (40|20 - 120) adjusts the field of view of the virtual camera for 3d transformations. Experiment with this setting and share your results! Lower numbers yield a dramatic 3D effect, and are useful for extreme close-up images. Higher numbers reduce the 3D effect, and are useful for landscapes and large scenes.
midas_depth_model: (3D only) Leave as dpt_large.
midas_weight: (3D only) 3D depth map mix of MIDAS vs adabins. Leave as 0.3.
near_plane: (3D only) Distance to near clipping plane of the 3D view frustum. This distance is NOT measured in the same units as translation_x/y/z above. Leave this value at 200.
far_plane: (3D only) Distance to far clipping plane of 3D view frustum. This distance is NOT measured in the same units as translation_x/y/z above. Leave this value at 10000.
padding_mode: (3D only) Determines convolution behavior at edges of image. Leave as ‘border’
sampling_mode: (3D only) Determines convolution behavior when resampling the image for 3D warping. Leave as ‘bicubic’.
Turbo Mode settings (DD5.1 and onward, 3D anim only)
Turbo is an optional modification to the 3D animation system, designed to provide for smoother 3D animations. Turbo mode reduces flickering by skipping the diffusion step for some frames, and using 3D warping to interpolate between frames. Turbo has no effect on any of the image creation settings outlined above, so you can use your normal image settings. Turbo also is ONLY available in 3D animation modes, and will be disregarded for other animation modes.
turbo_mode:(3D only) Turn on/off turbo mode. In turbo mode, the diffusion image generation will only be done intermittently, and a 3D warped version of the prior diffusion images will be used for the in-between frames. This helps with frame continuity, and speeds up rendering.
turbo_steps:(3D only) (3|2-6) In turbo mode, the number of steps between each diffusion frame. Because turbo is extrapolating the missing images using 3D animation transformations, turbo_steps of 3 or 4 is the reasonable limit before images will begin to look distorted. Higher turbo_step value can be used if animation movements are slow.
turbo_preroll:(3D only) (10|1-10) turbo_preroll is a countdown of frames before the Turbo function begins. Because Turbo ‘skips’ some diffusion steps, it is useful to have a steady sequence of regular frames beforehand to establish the shapes and colors of your images.
turbo_blend: Leave this checked. This is a deprecated parameter and will be removed in future versions.
Animation Coherency Settings
For an animation to be convincing, there must be consistency in form, color, and motion from one frame to the next. These variables help balance between forward motion of the animation and visual continuity from the prior frame.
frames_scale: (1500|0-50000) In 2D and 3D modes, the prior frame is used as image init for each frame. For all of these, frames_scale determines the strength of the prior frame’s image in creating the new frame. This is balanced against the weight of the clip_guidance_scale and all the other settings that normally contribute to the creation of the next frame.
One thing to keep in mind is that in addition to the weight from frames_scale, the prior frame’s image is also being used as an image init for the current frame creation. Some recent experiments suggest that using a LOW frame scale (i.e. 1000 or below) may be a way to help mitigate color clipping on long 3D animations.
In video input animation mode, frames_scale will determine the strength of the video source image in creating the new frame, and is balanced against the weight of the text prompt and other settings.
frames_skip_steps: (60%|40%-80%) In 2D, 3D and video animation modes, frames_skip_steps plays a similar role as skip_steps does above when using an image as an init. For each frame in the animation, ()% of the diffusion curve will be skipped, the source image will be used as a starting point, then the diffusion will proceed. 50-70% is a good value to ensure that the image from the prior frame is prominent in the creation of the next frame.
VR Mode Settings (DD 5.2 and later, 3D anim only)
New in version 5.2, the VR mode enables the creation of stereo left/right videos for VR viewing. This is a brand new feature, so please refer to the notebook for more details, and/or ask questions in the DD Discord.
vr_mode: (off|on/off) turn VR mode on/off.
vr_eye_angle: (0.5|0-1.0) (in degrees) y-axis rotation angle offset from straight ahead that the eyes are pointing inwards. 0.0 would be straight ahead, but normally our eyes point very slightly inwards.
vr_ipd: (5.0|1-20) interpupillary distance, i.e. spacing between the eyes. Uses the same units as x_translation. ipd is the TOTAL distance eyes are apart, so it is halved in each direction.
VR Mode Notes from the module creator Nin: The default parameters seem to get a decent output. Please note that the scale that is inferred from the depth estimation can vary from scene to scene. So ipd might end up needing to be tweaked.
It is generally a good idea to render one or two frames and use the VR180 creator tool just to do an image test (it can do images as well as videos).
You can load this up in your headset and get a feeling for whether your stereo effect is too minimal or too much. Unfortunately, scale changes with scenes, so at the moment (until further inference is done based on the depth outputs), the ipd might need to be changed manually at different parts of an animation.
Also outputs will need to be as high-definition as possible as e.g the Oculus likes crazy high resolutions compared to what most of us are rendering in DD. You will likely need to upscale your output.
There is an interesting guide here for the Quest 2 (note peak quality 5120x2560 for 3D-180,2560x2560 per eye, 60fps H264 H265: Encoding High-Resolution .. Video for Oculus Quest The article also talks about limitations in MP4 for 4096 horizontal pixels but it can go higher vertically so when you get to stitching using the Creator Tool, go with stacked vertically (top/bottom).
Create the video
After creating a series of images for an animation, DD can optionally create an mp4 video based on the sequence, which will be placed in the batch folder. Alternatively, you can download just the individual frames and do further processing outside of DD. The following settings control output video creation.
skip_video_for_run_all: (Default: True) Creating a final video is optional, and time consuming, so by default DD will not create a video when you use the run all command.
folder: (“batch_name”|any path) DD defaults to looking in the batch folder defined above for the images to create a video. You can select an alternate folder.
run: (“latest_run”|alternate run number) DD defaults to using the most recent run in the batch folder for the images to create a video. Runs are numbered, so you can select an alternate run using an integer in the range of run number.
init_frame: (1|any frame number) DD defaults to using the first image it finds in the run to start the video. You can start the video later by using a different frame number here.
last_frame: (“final_frame”|any frame number) DD defaults to ending the video on the last image it finds in the run. You can end the video earlier by using a different frame number here.
fps: (12|12-60) Frames per second of the output video.
Getting your output
DD will store your your images and videos into your google drive in:
\My Drive\AI\Disco_Diffusion\images_out\batch_name.
You can browse to this directory in a second window to monitor progress, and download the entire folder when your project is complete.
—--------------
That’s all folks!
Now go make something awesome. -Z
—--------------
Resources
Disco Diffusion Notebook https://colab.research.google.com/github/alembics/disco-diffusion/blob/main/Disco_Diffusion.ipynb
Google Colab Service
https://colab.research.google.com/
Disco Diffusion User Discord (JOIN THIS!)
Youtube Video by Ari Seff: What are Diffusion Models?
Youtube video tutorial for Diffusion 4.1 by Artificial Images
Written Disco Diffusion v5 tutorial by penderis
@pharmapsychotic’s excellent list of AI art resources
@remi_durant explainer tweet/video about how inner cuts work
Diffusion Parameter studies:
EZ Charts Visual Library [NEW!]
CLIP/Diffusion Model Combination Study by @KaliYuga_ai
CLIP/Diffusion Model Combination Study (plms sampling) by @KaliYuga_ai
Diffusion Model Comparisons (JAX) by @Erblicken
Artist Studies
Massive Index of Artist Studies by (@sureailabs, @proximasan, @EErratica, @KyrickYoung)
Disco Diffusion Artist Studies by @HarmeetGabha
Artist studies twitter thread by @sureailabs
Artist studies twitter thread by @proximasan
Artist studies website (VQGAN) by @remi_durant
Style Studies
Style modifier studies by @sureailabs
Text prompt writing resources
https://docs.google.com/document/d/1XUT2G9LmkZataHFzmuOtRXnuWBfhvXDAo8DkS--8tec/edit
https://matthewmcateer.me/blog/clip-prompt-engineering/
Running DD outside of Colab. If you must. :)
- DD is available inside of Visions of Chaos, by Softology, which runs in a PC environment.
- NerdyRodent has tons of great AI art tutorials, and suggests https://gist.github.com/MSFTserver/6212f85d79058a024b0e49f3d19a1115 by MSFTserver as a good starting point for setting up a home environment.
- Reader BrianK says: “I followed this guide … for a quick & easy setup on Windows with Linux Subsystem. On a 3090, I generally find it runs about 4x faster than on Colab”
- @Eliso’s guide to running disco diffusion locally: https://botbox.dev/disco-diffusion-guide/
- The DD Discord has an active and ambitious user group, some of whom are exploring home setups. Check the #dev channel.