
Adam Najmonowicz
Michael West
Mike Reynolds
Sitecore CMS 6.6 or later
Sitecore PowerShell Extensions Manual
Integrated Scripting Environment (ISE)
Command - PowerShellScriptCommand
Authoring Scripts for Task Scheduler
Getting Started
The Sitecore PowerShell Extensions (SPE) module is one of the best ways to manage Sitecore. The module includes a command line interface and integrated scripting environment to help automate and aggregate a variety of tasks.
The SPE works with the Sitecore process, capable of making native calls to the Sitecore API. Running commands and writing scripts follows the standard and well-known Windows PowerShell syntax. You may be wondering why Windows PowerShell was chosen as the command line tool. Windows desktop and server management is quickly moving towards the use of Windows PowerShell. There are tons of resources on the usage of Windows PowerShell, so once you begin to learn the basics you’ll immediately be able to apply those skills to manage applications such as Microsoft Active Directory, Microsoft Exchange, and now of course Sitecore!
As you read through this guide we hope that your understanding of both Sitecore and Windows PowerShell is strengthened and that you enjoy the usage of the module.
http://blog.najmanowicz.com/2011/11/17/powershell-console-for-sitecore-what-can-it-do-for-me/
Installing the module
The Sitecore PowerShell Extensions module installs just like any other Sitecore module, through the Installation Wizard.
[INSERT INSTALLATION STEPS]
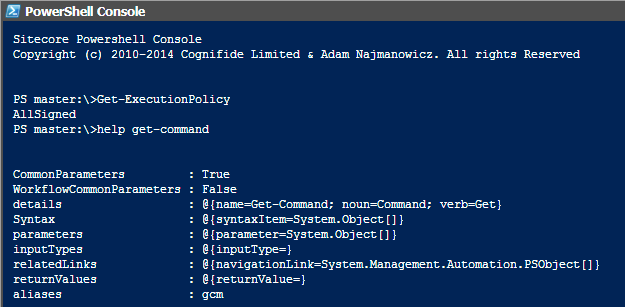
Console
Running Commands
Most developers are familiar with the usage of command line tools such as cmd.exe and may have also worked with Windows PowerShell. Once tool available in SPE is the Console.
[INSERT SCREENSHOT OF CONSOLE]
[RIP OFF FROM WIKI AT WORK]
Show how to run commands, explain command structure, and common command usage.
Command Discovery
Show commands like Get-Help, Get-Command, Get-Variable, Get-Alias
Providers
Explain the usage of the CMS and Filesystem providers
Integrated Scripting Environment (ISE)
The ISE is a great way to group together various commands into what is commonly known as a script. Windows PowerShell is a combination of small utility commands and a syntax that lends itself to scripting. Below is an example of the SPE ISE.
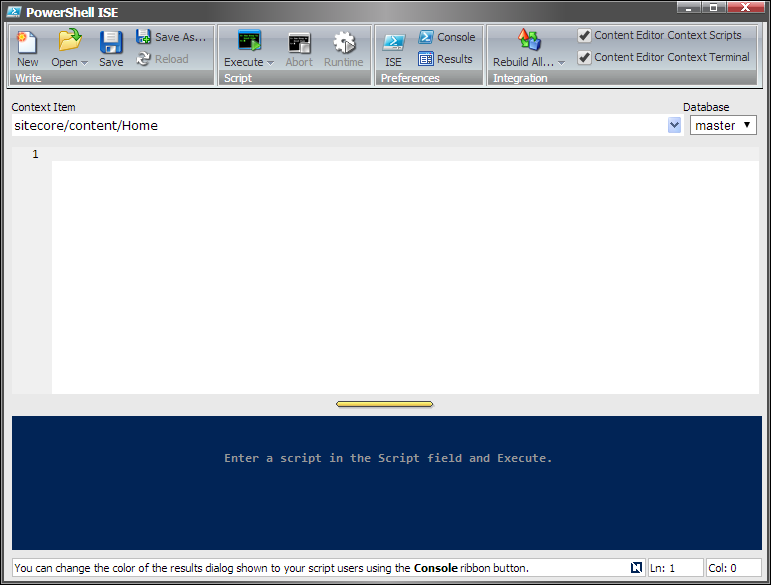
ISE Interface
Show the basics of writing a script. Explain the different features of the ribbon.
Script Library
Explain the structure of the library and how the commands have default behavior (Import-Function, Execute-Script).
Authoring Scripts
Give basics on writing and saving scripts. Give more details around finding standard powershell docs.
Interactive Scripts
Show examples of each graphics command (Show-ListView).
Toolbox
The PowerShell Toolbox is basically a short to quickly get to frequently used scripts.
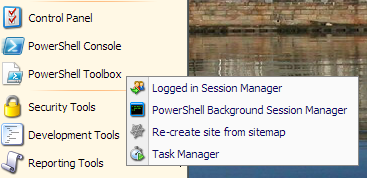
If you would like to add your own shortcuts, navigate to the Script Library and add a new Script.

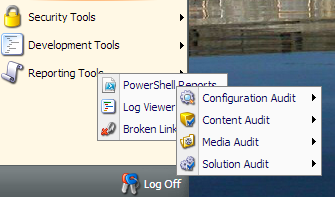
Reports
The reports which come out of the box provide a wide variety of information regarding your Sitecore installation, which can of course also be customized.
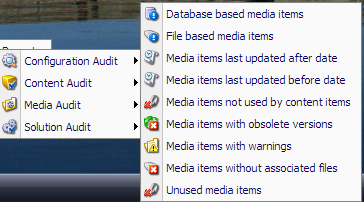
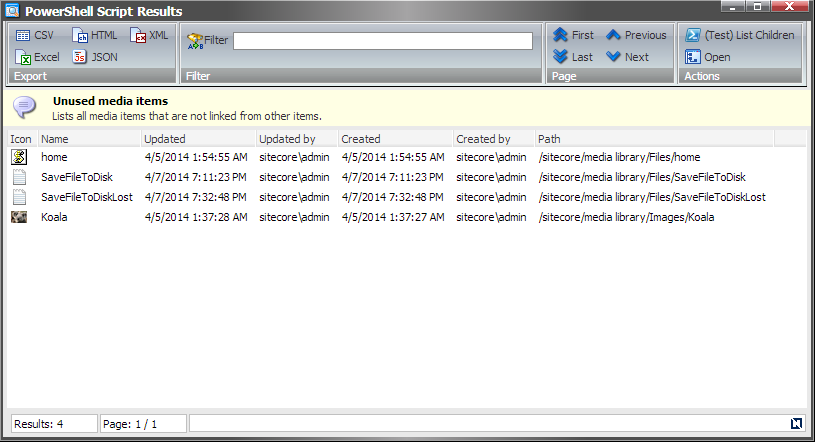
As an example, let’s run the Unused media items report.
Once the report completes, the results appear in a report window.
Authoring Reports
The following example was taken from a blog post written by Mike Reynolds. This is how to create a new report and add it to the script library. The original post can be found here: http://sitecorejunkie.com/2014/05/28/create-a-custom-report-in-sitecore-powershell-extensions/
Create a Custom Report in Sitecore PowerShell Extensions
During my Sitecore PowerShell Extensions presentation at the Sitecore User Group Conference 2014, I showcased a custom report I had scripted using the Sitecore PowerShell Extensions module, and thought I would jot down what I had shown coupled with some steps on how you could go about creating your own custom report.
I had shown the audience the following PowerShell script:
Images with no Alt text |
<# .SYNOPSIS Lists all images with an empty Alt field.
.NOTES Mike Reynolds #>
function Get-ImageItemNoAltText { $items = Get-ChildItem -Path "master:\sitecore\media library\images" -Recurse | Where-Object { $_.Fields["Alt"] -ne $null }
foreach($item in $items) { if($item."Alt" -eq '') { $item } } }
$items = Get-ImageItemNoAltText
if($items.Count -eq 0) { Show-Alert "There are no images with an empty Alt field." } else { $props = @{ InfoTitle = "Images with an empty Alt field" InfoDescription = "Lists all images with an empty Alt field." PageSize = 25 }
$items | Show-ListView @props -Property @{Label="Name"; Expression={$_.DisplayName} }, @{Label="Updated"; Expression={$_.__Updated} }, @{Label="Updated by"; Expression={$_."__Updated by"} }, @{Label="Created"; Expression={$_.__Created} }, @{Label="Created by"; Expression={$_."__Created by"} }, @{Label="Path"; Expression={$_.ItemPath} } } Close-Window |
I modeled the above script after the “out of the box” ‘Unused media items’ report but made some changes: it grabs all media library items recursively under /sitecore/Media Library/Images — you could definitely change this to /sitecore/Media Library to get all images outside of the Images folder — in Sitecore that have an Alt field, and that Alt field’s value is equal to the empty string.
I then tested — yes, I do test my code, don’t you ;) — and saved my report using the PowerShell ISE:
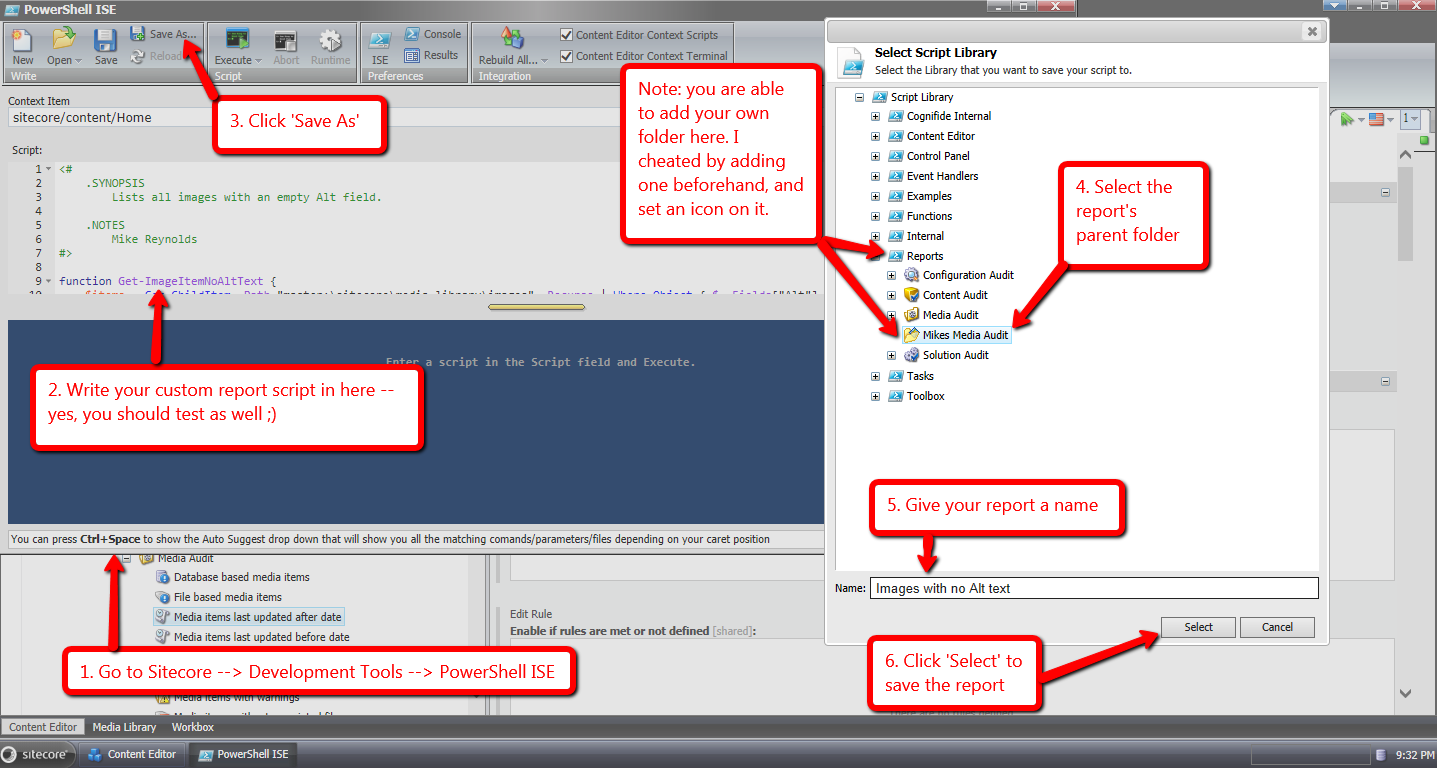
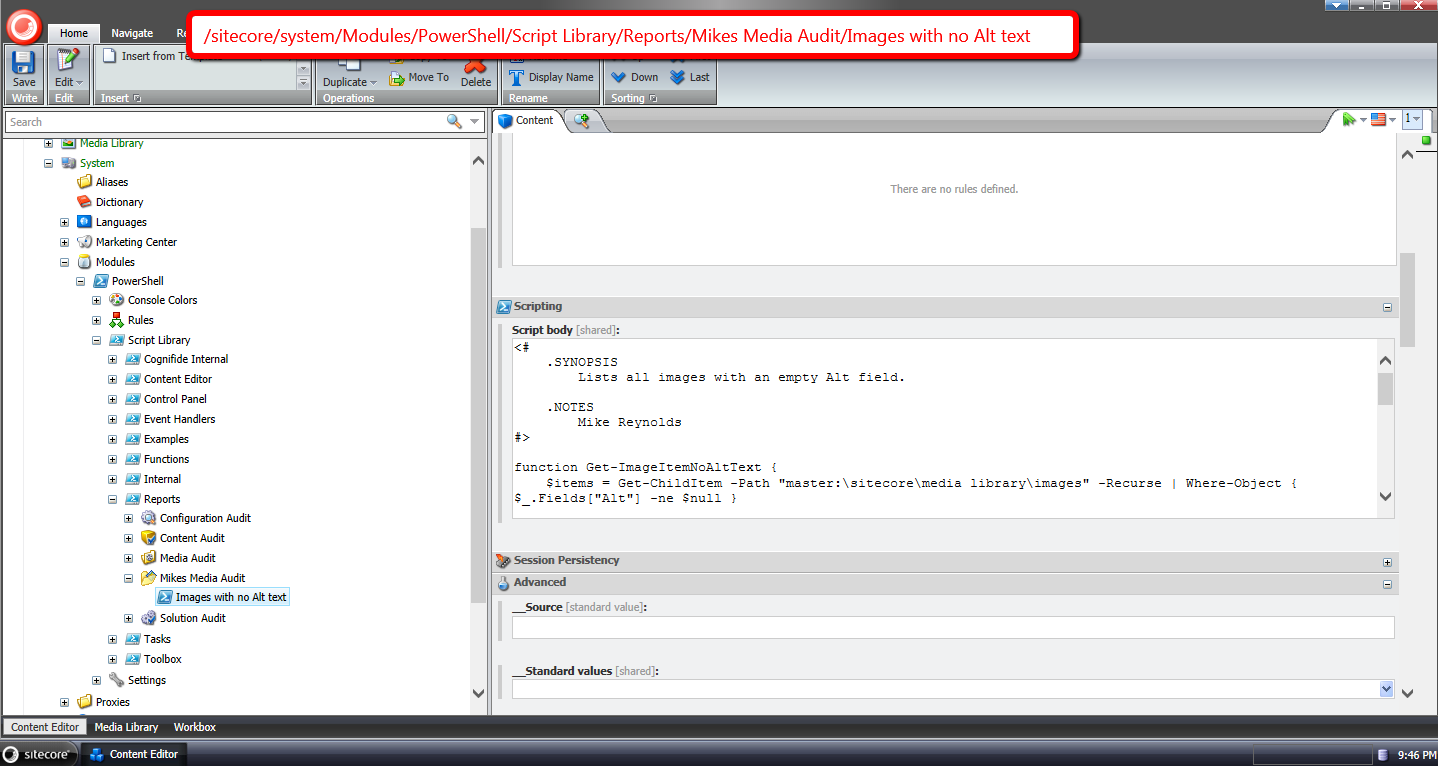
The report was saved in this Item created just for it:
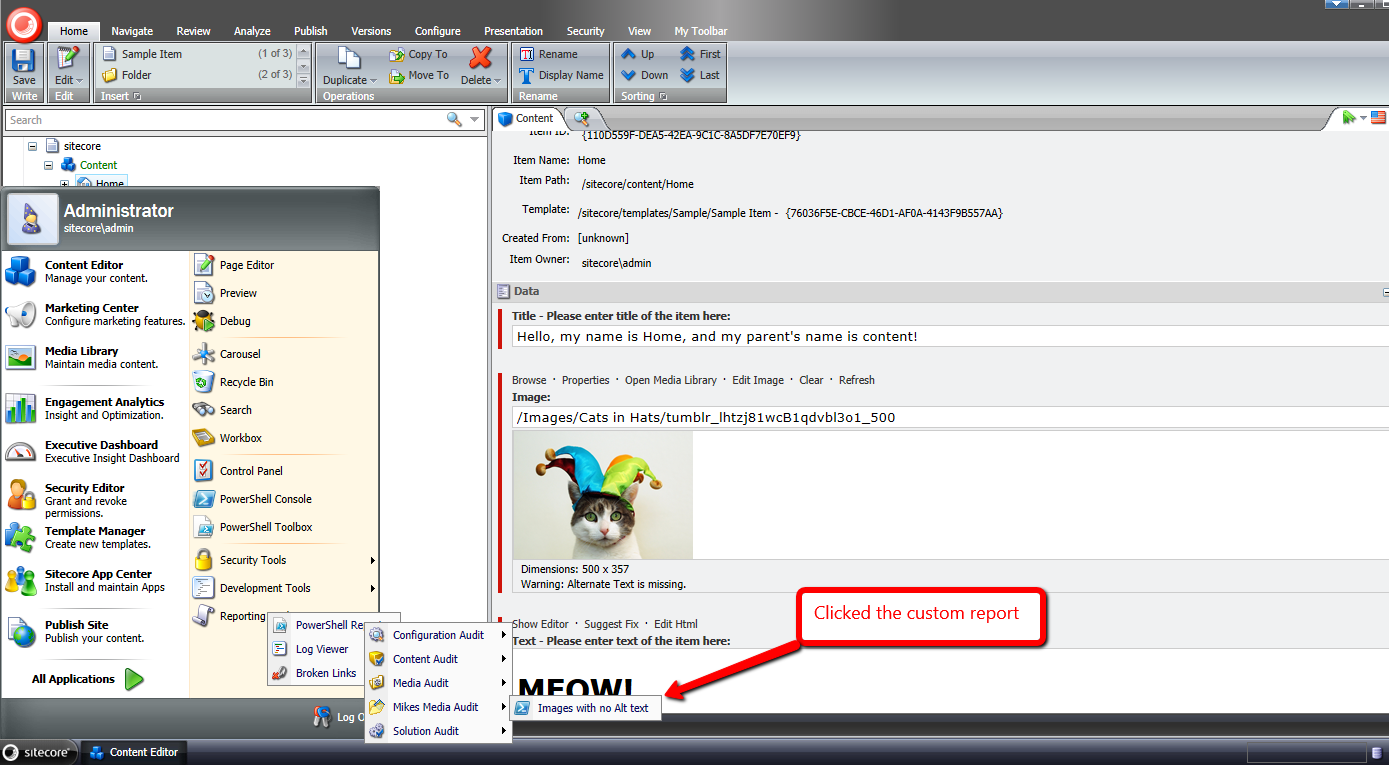
Let’s see this in action!
I went to Sitecore –> Reporting Tools –> PowerShell Reports –> Mikes Media Audit, and clicked on the new report:
After running the report, I was presented with this dialog containing the results:
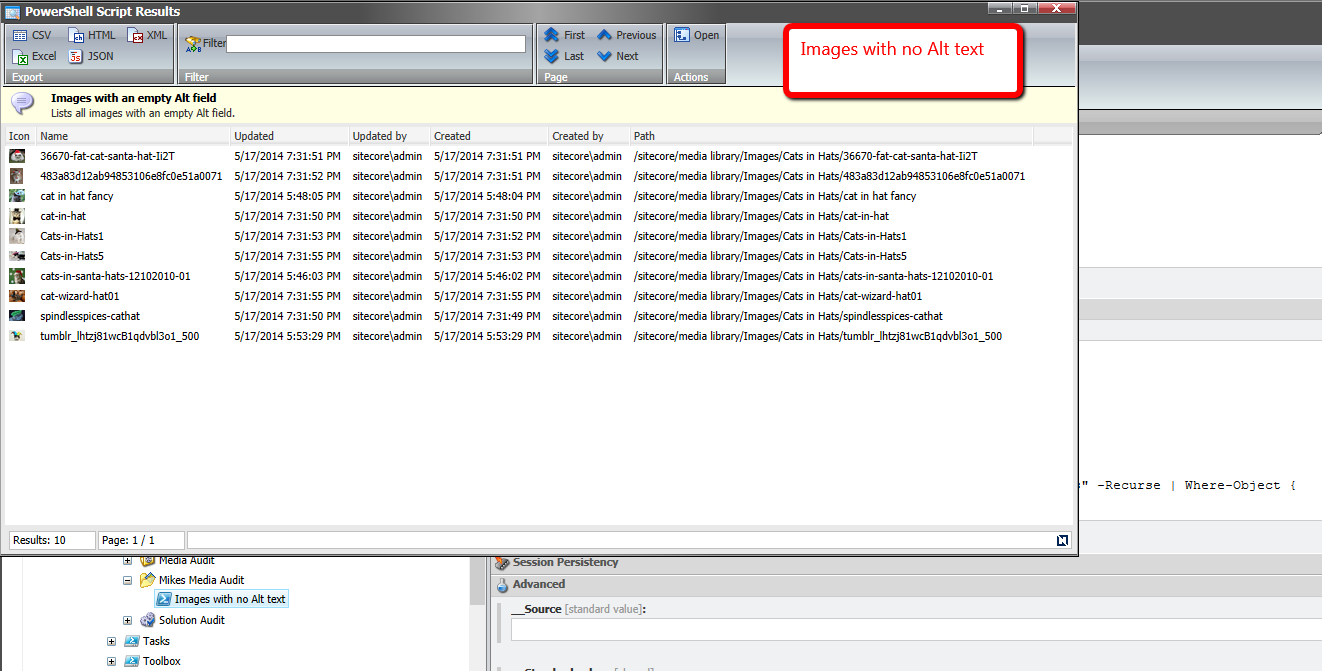
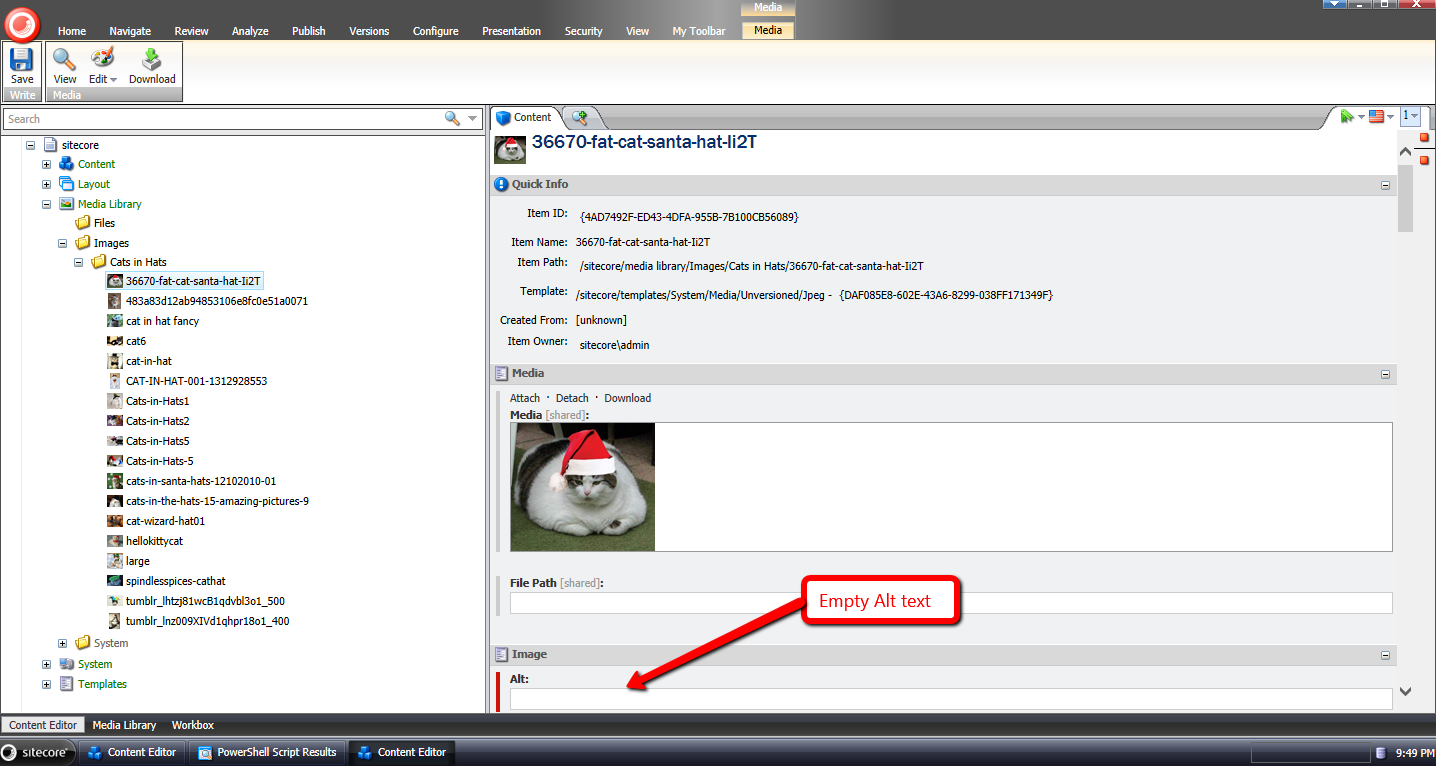
I then clicked on the first row of the report, and was brought to an image with an empty Alt field:
If you have any thoughts on this, or would like to see additional reports in Sitecore PowerShell Extensions, please share in a comment.
Task Scheduler
The task scheduler is a great way to run scripts in a period fashion. One example is to have a task that automatically archive log files into a compressed file. Another example may be to email a generated report based on stale site content. As you can see below, there are only a few items to work with.

Command - PowerShellScriptCommand
The command shown above is simply a type exposed as a public method in the Cognifide.PowerShell assembly. There exists an update method which accepts one or more items and executes the associated script.
Sample Task - Test-PowerShell
The scheduled task accepts a few parameters which can be seen in the screenshot below.
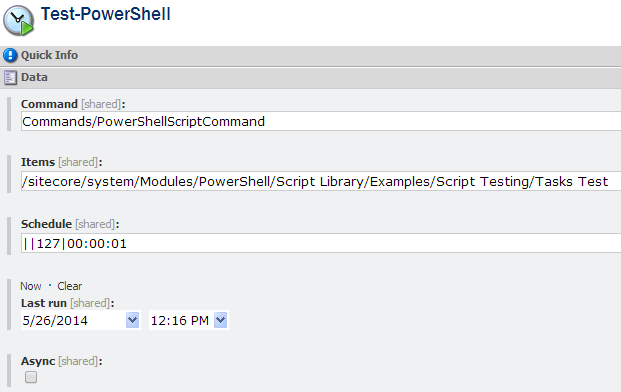
We begin by specifying the command to execute. As seen earlier, we have a PowerShellScriptCommand. The next step is to provide the item(s) which simply points to a script in the Script Library. The items require a field called Script which contains a valid Windows PowerShell script.
Authoring Scripts for Task Scheduler
Show adding a new task based on scripts in library.
[http://sitecorejunkie.com/2014/05/31/execute-powershell-scripts-in-scheduled-tasks-using-sitecore-powershell-extensions/]
Security
Locking
Protected
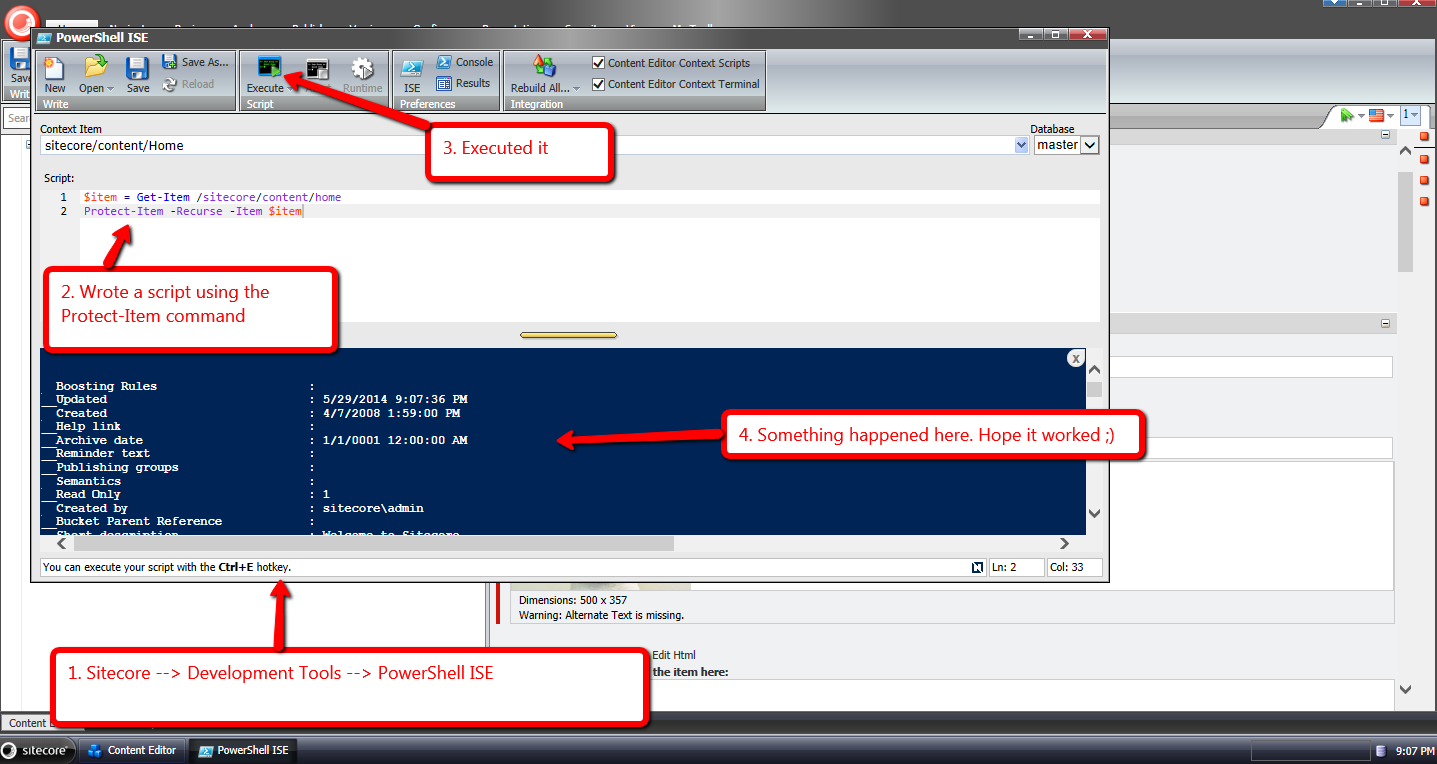
The following script demonstrates how the item protected state can be changed using the Sitecore API written in PowerShell syntax.
Changing Protected State |
<# .SYNOPSIS Protect the selected item. #>
$item = Get-Item -Path master:\content\home $item.Editing.BeginEdit() $item[[Sitecore.FieldIDs]::ReadOnly] = [int]$true $item.Editing.EndEdit() Write-Log ([string]::Format("Set protected: {0}", $true)) |
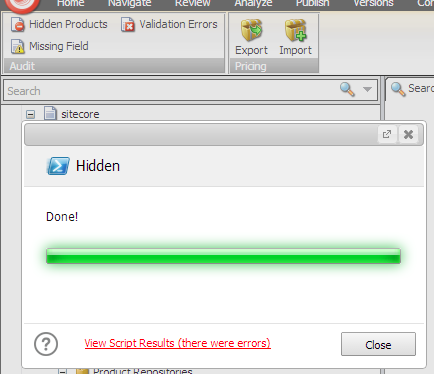
Visibility
The following script demonstrates how the item visibility can be changed using the Sitecore API written in PowerShell syntax.
Changing Visibility |
<# .SYNOPSIS Change the visiblity to the specified value. #>
$item = Get-Item -Path master:\content\home $item.Editing.BeginEdit() $item[[Sitecore.FieldIDs]::Hidden] = [int]$true $item.Editing.EndEdit() Write-Log ([string]::Format("Set visiblity: {0}", "hidden")) |
Ownership
The following script demonstrates how the item ownership can be changed using the Sitecore API written in PowerShell syntax.
Changing Ownership |
<# .SYNOPSIS Change the owner to the specified name. The behavior should be similar to item:setowner. #>
$item = Get-Item -Path master:\content\home $item.Editing.BeginEdit() $item[[Sitecore.FieldIDs]::Owner] = $me $item.Editing.EndEdit() Write-Log ([string]::Format("Set owner: {0}", $me)) |
Below is the command the above script simulates.
PowerShell Security
There are two main security policies to consider when using the SPE module. The first security policy is tied to the Application Pool service account. Whatever access the service account has on the local system (i.e. file system or registry), the change can be applied through the Console and ISE. As an example, if the service account is capable of removing files from the root directory, that can be accomplished using the SPE. As another example, if the IIS_IUSRS account was granted access to modify HKEY_LOCAL_MACHINE settings, this can then be accomplished through SPE.
The second security policy is tied to the Sitecore user account. Whatever access the logged in user has within the Sitecore environment, the change can be applied through the Console and ISE.
Settings
Explain what settings are stored for SPE and when to configure.
Advanced Topics
Custom Commands
The following is another example of the SPE flexibility. Here’s another great example provided by Mike Reynolds originally posted here: http://sitecorejunkie.com/2014/05/29/build-a-custom-command-in-sitecore-powershell-extensions/
Build a Custom Command in Sitecore PowerShell Extensions
In my Sitecore PowerShell Extensions presentation at the Sitecore User Group Conference 2014, I showed the audience how easy it is to build custom commands for Sitecore PowerShell Extensions, and thought it would be a good idea to distill what I had shown into a blog post for future reference. This blog post embodies that endeavor.
During my presentation, I shared an example of using the template method pattern for two commands using the following base class:
EditItemCommand |
using System; using System.Collections.Generic; using System.Linq; using System.Management.Automation; using Sitecore.Data.Items; using Cognifide.PowerShell.PowerShellIntegrations.Commandlets;
namespace Sitecore.Sandbox.SPE.Commandlets.Data { public abstract class EditItemCommand : BaseCommand { protected override void ProcessRecord() { ProcessItem(Item); if (!Recurse.IsPresent) { return; }
ProcessItems(Item.Children, true); }
private void ProcessItems(IEnumerable<Item> items, bool recursive) { foreach (Item item in items) { ProcessItem(item); if (recursive && item.Children.Any()) { ProcessItems(item.Children, recursive); } } }
private void ProcessItem(Item item) { item.Editing.BeginEdit(); try { EditItem(item); item.Editing.EndEdit(); } catch (Exception exception) { item.Editing.CancelEdit(); throw exception; }
WriteItem(item); }
protected abstract void EditItem(Item item);
[Parameter(ValueFromPipeline = true, ValueFromPipelineByPropertyName = true)] public Item Item { get; set; }
[Parameter] public SwitchParameter Recurse { get; set; } } } |
The class above defines the basic algorithm for editing an Item — the editing part occurs in the EditItem() method which must be defined by subclasses — and all of its descendants when the Recurse switch is supplied to the command. When the Recursive switch is supplied, recursion is employed to process all descendants of the Item once editing of the supplied Item is complete.
The following subclass of the EditItemCommand class above protects a supplied Item in its implementation of the EditItem() method:
ProtectItemCommand |
using System; using System.Management.Automation; using Sitecore.Data.Items;
namespace Sitecore.Sandbox.SPE.Commandlets.Data { [OutputType(new Type[] { typeof(Sitecore.Data.Items.Item) }), Cmdlet("Protect", "Item")] public class ProtectItemCommand : EditItemCommand { protected override void EditItem(Item item) { item.Appearance.ReadOnly = true; } } } |
Conversely, the following subclass of the EditItemCommand class unprotects the passed Item in its EditItem() method implementation:
UnprotectItemCommand |
using System; using System.Management.Automation; using Sitecore.Data.Items;
namespace Sitecore.Sandbox.SPE.Commandlets.Data { [OutputType(new Type[] { typeof(Sitecore.Data.Items.Item) }), Cmdlet("Unprotect", "Item")] public class UnprotectItemCommand : EditItemCommand { protected override void EditItem(Item item) { item.Appearance.ReadOnly = false; } } } |
The verb and noun for each command is defined in the Cmdlet class attribute set on each command class declaration.
I then registered all of the above in Sitecore using the following configuration file:
Sitecore.Sandbox.config |
<configuration xmlns:patch="http://www.sitecore.net/xmlconfig/"> <sitecore> <powershell> <commandlets> <add Name="Sitecore Sandbox Commandlets" type="*, Sitecore.Sandbox" /> </commandlets> </powershell> </sitecore> </configuration> |
Since everything looks copacetic — you got to love a developer’s optimism ;)— I built and deployed all of the above to my Sitecore instance.
Let’s take this for a spin!
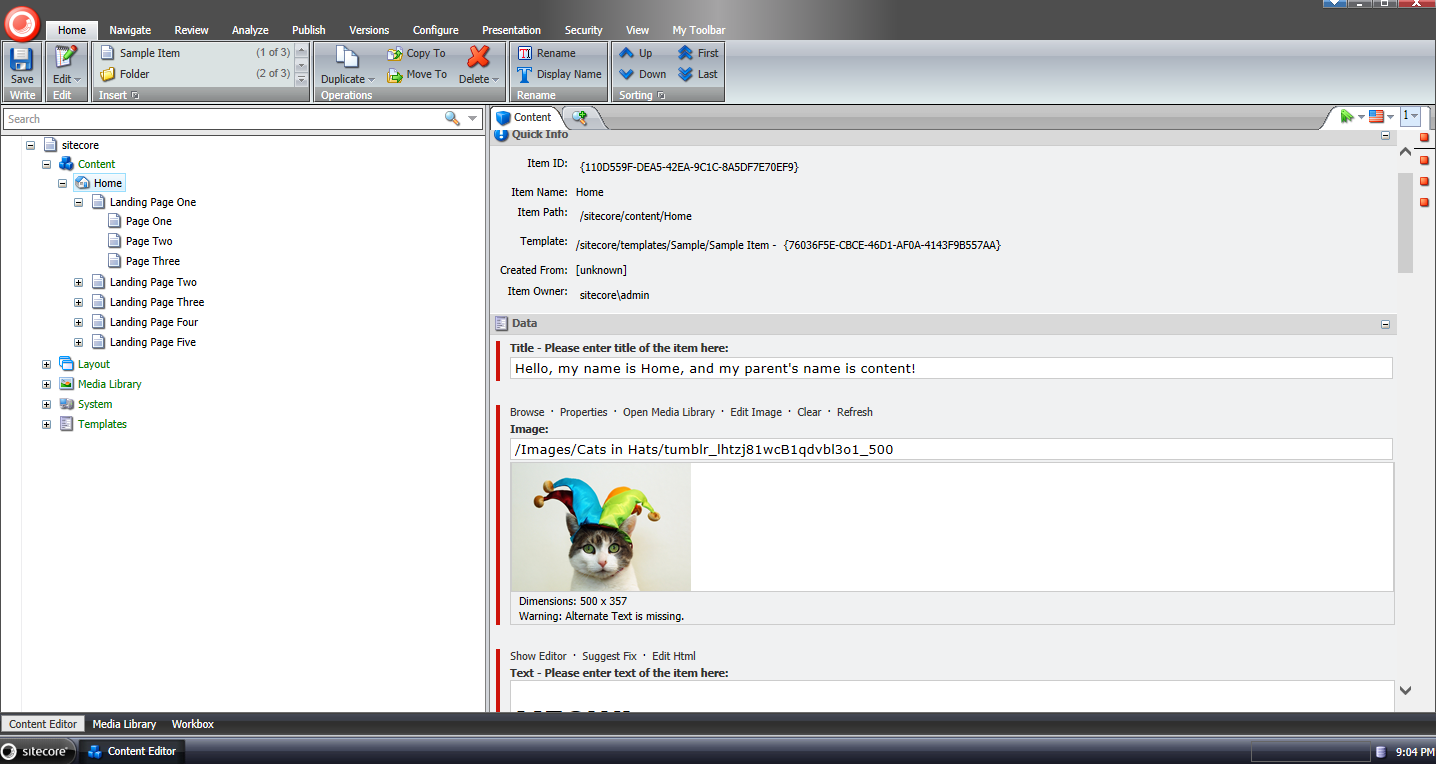
I selected my home Item knowing it is not protected:
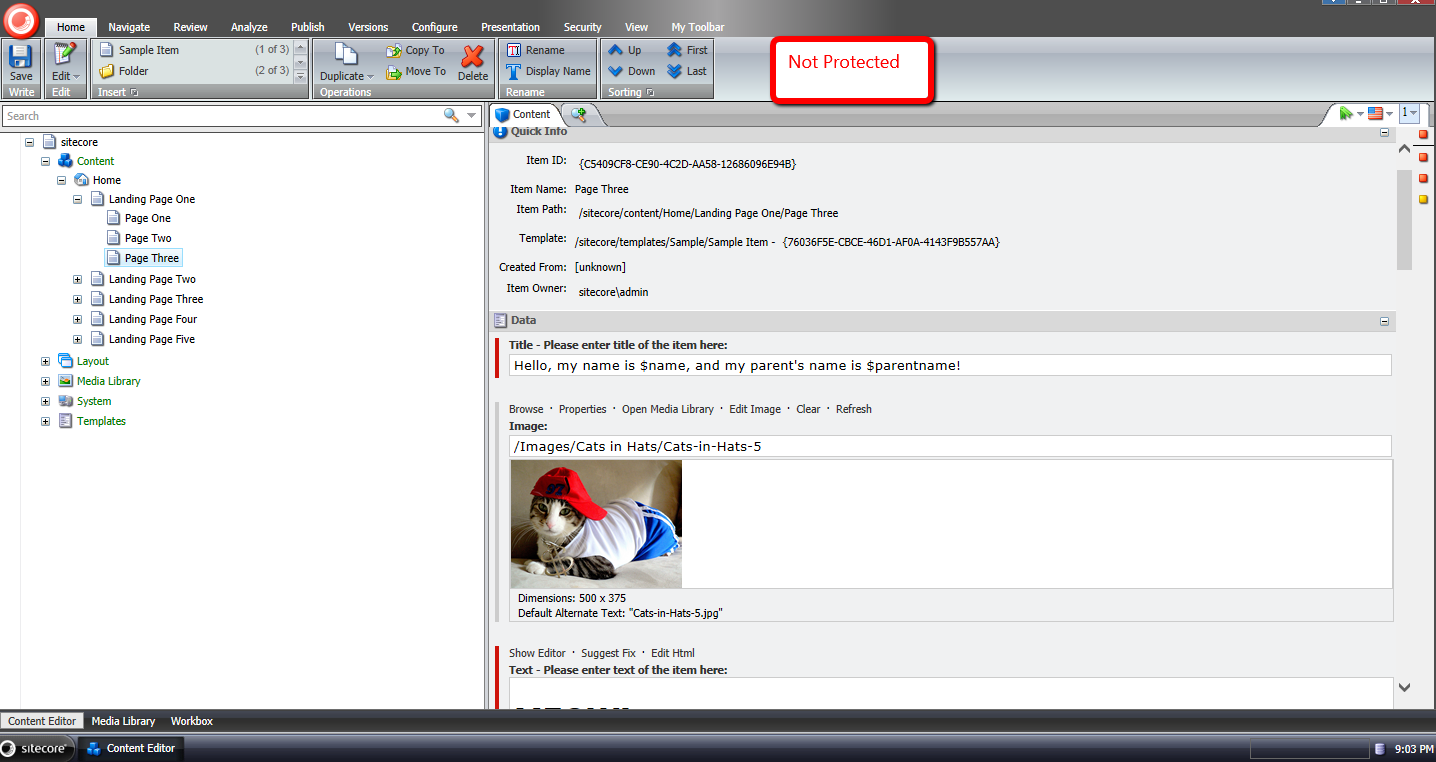
I then looked to see if it had an unprotected descendant, and found the following item:
I then ran a script on the home Item using our new command to protect an item, and supplied the Recurse switch to protect all descendants:
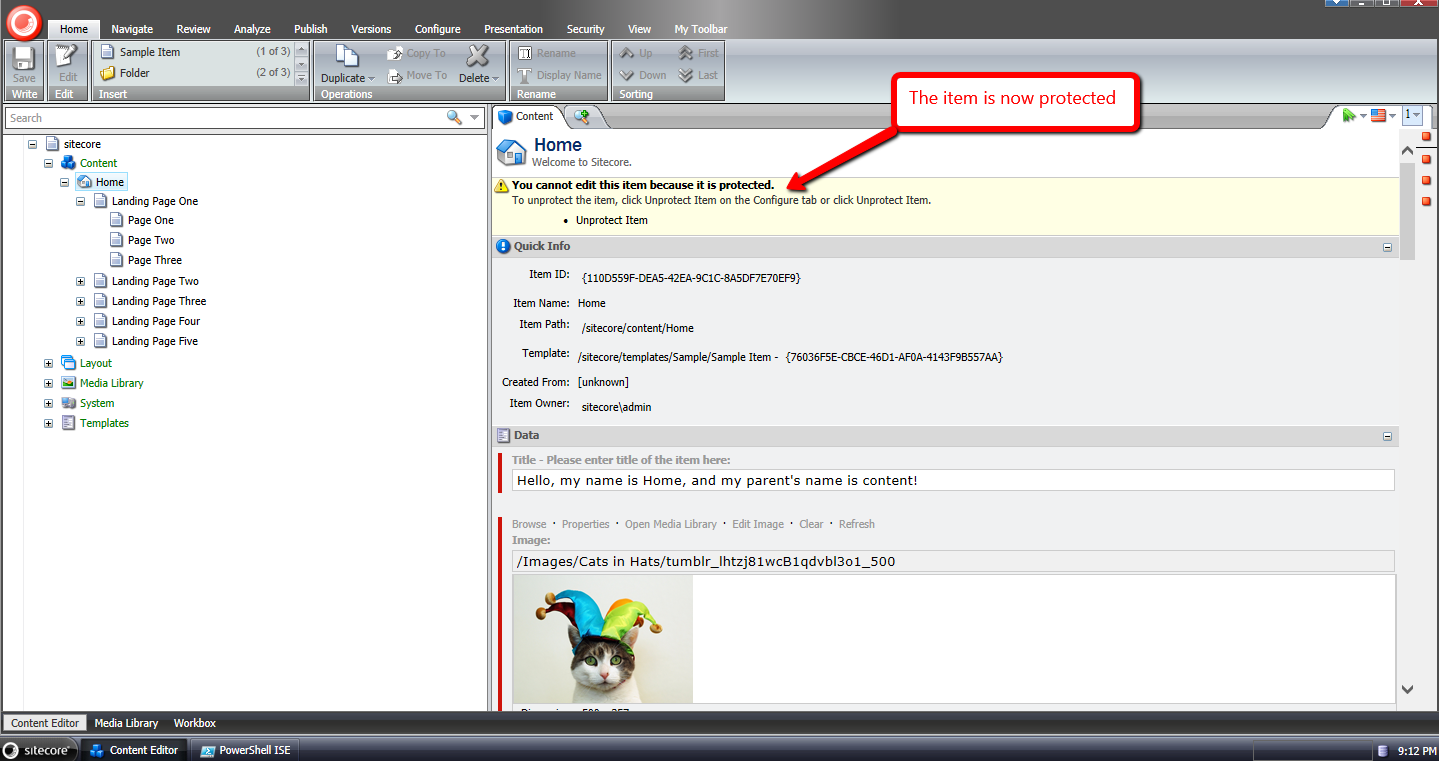
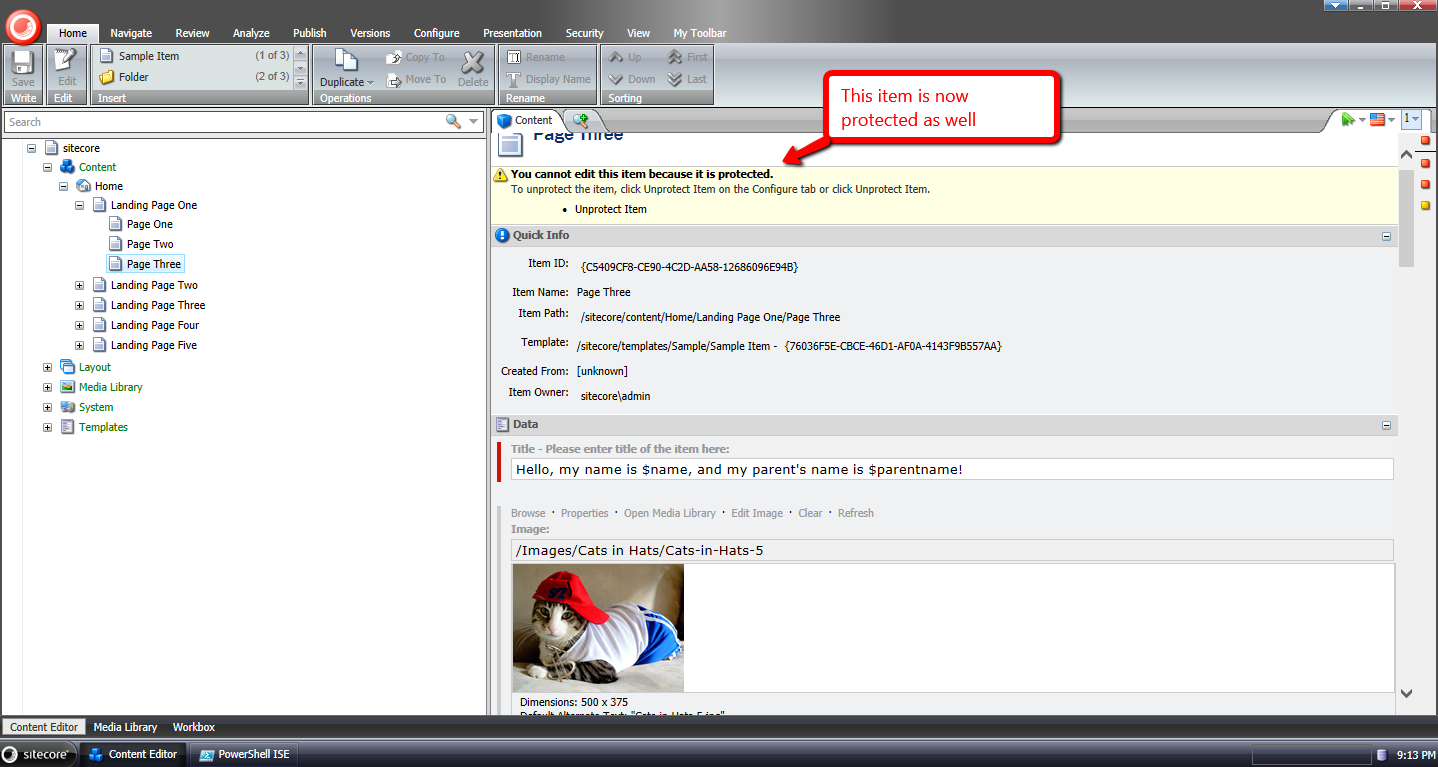
As you can see, the home Item is now protected:
Its descendant is also protected:
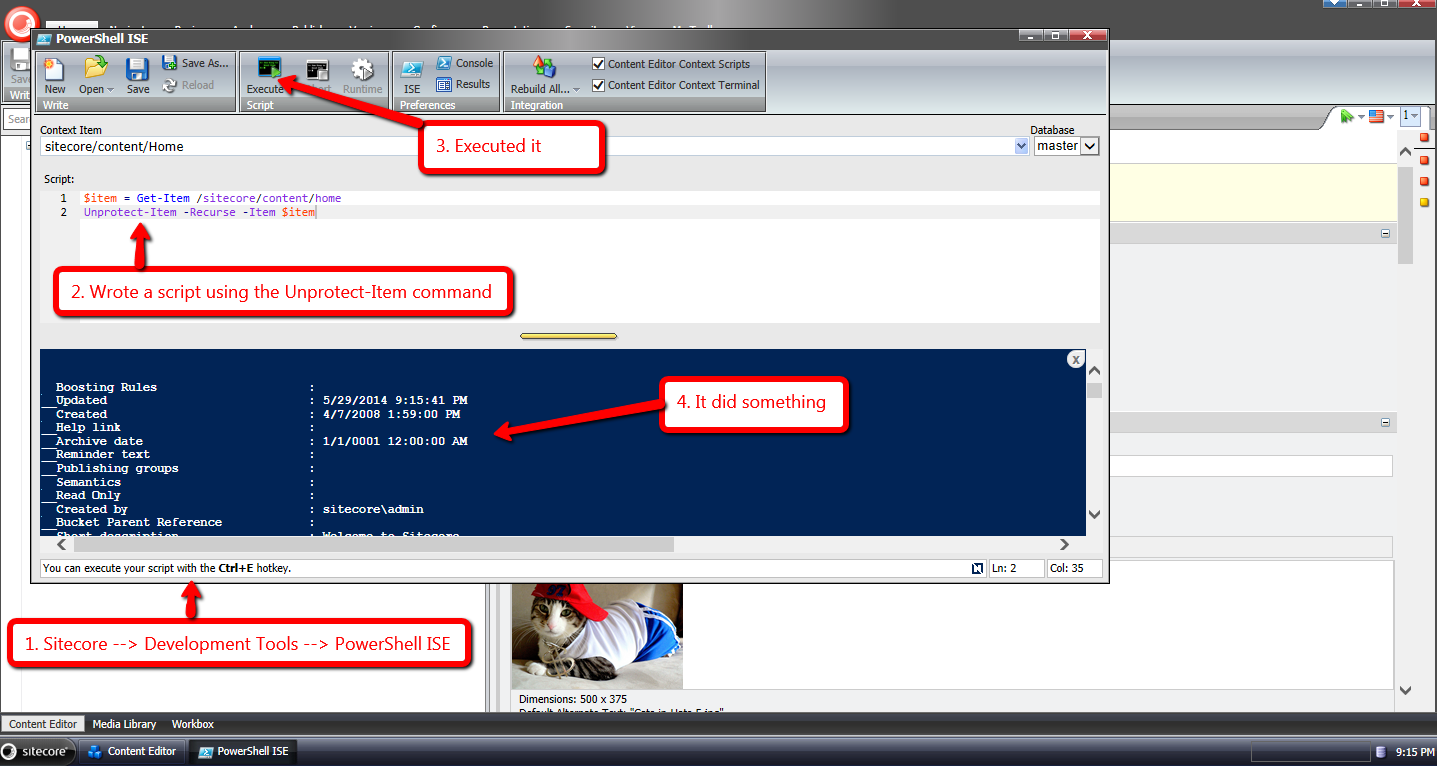
Let’s now unprotect them. I ran a script on the home Item using our new command to unprotect an item, and supplied the Recurse switch to process all descendants:
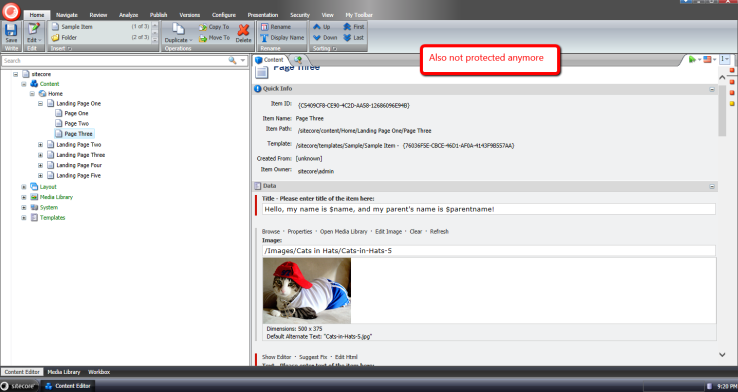
As you can see, the home Item is now unprotected again:

Its descendant is also unprotected:
If you have any thoughts or ideas around improving anything you’ve seen in this post, or have other ideas for commands that should be included in Sitecore PowerShell Extensions, please drop a comment.
I would also like to point out that I had written a previous blog post on creating a custom command in Sitecore PowerShell Extensions. You might want to go check that out as well.
Until next time, have a scriptastic day! :)
Custom Item Context Menu
The following is an example at how to add a script to the item context menu. Mike Reynolds original post can be found here: http://sitecorejunkie.com/2014/05/27/launch-powershell-scripts-in-the-item-context-menu-using-sitecore-powershell-extensions/
Launch PowerShell Scripts in the Item Context Menu using Sitecore PowerShell Extensions
Last week during my Sitecore PowerShell Extensions presentation at theSitecore User Group Conference 2014 — a conference held in Utrecht, Netherlands — I demonstrated how to invoke PowerShell scripts from the Item context menu in Sitecore, and felt I should capture what I had shown in a blog post — yes, this is indeed that blog post. ;)
During that piece of my presentation, I shared the following PowerShell script to expands tokens in fields of a Sitecore item (if you want to learn more about tokens in Sitecore, please take a look at John West’s post about them, and also be aware that one can also invoke the Expand-Token PowerShell command that comes with Sitecore PowerShell Extensions to expand tokens on Sitecore items — this makes things a whole lot easier ;) ):
Expand Tokens |
$item = Get-Item . $tokenReplacer = [Sitecore.Configuration.Factory]::GetMasterVariablesReplacer() $item.Editing.BeginEdit() $tokenReplacer.ReplaceItem($item) $item.Editing.EndEdit() Close-Window |
The script above calls Sitecore.Configuration.Factory.GetMasterVariablesReplacer() for an instance of the MasterVariablesReplacer class — which is defined and can be overridden in the “MasterVariablesReplacer” setting in your Sitecore instance’s Web.config — and passes the context item — this is denote by a period — to the MasterVariablesReplacer instance’s ReplaceItem() method after the item has been put into editing mode.
Once the Item has been processed, it is taken out of editing mode.
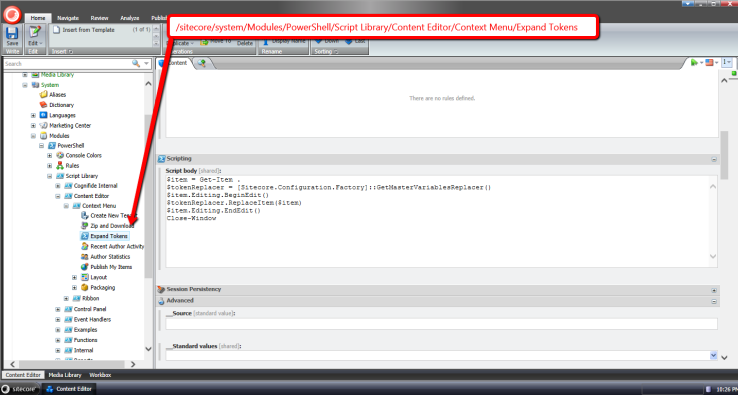
So how do we save this script so that we can use it in the Item context menu? The following screenshot walks you through the steps to do just that:
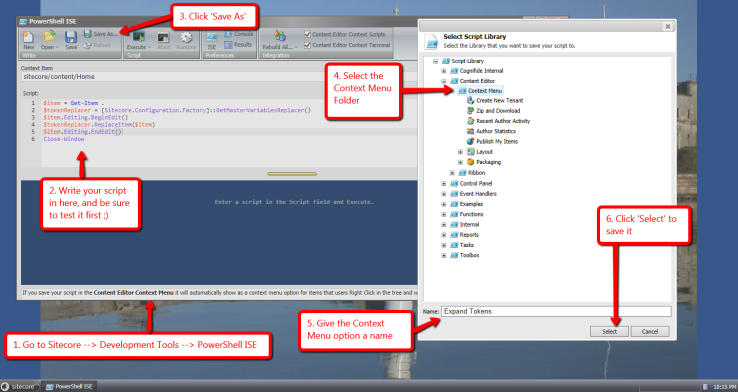
The script is saved to an Item created by the dialog above:
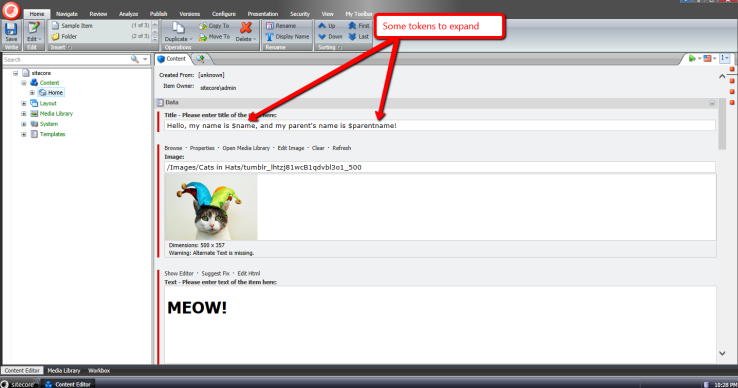
Let’s test this out!
I selected an Item with unexpanded tokens:
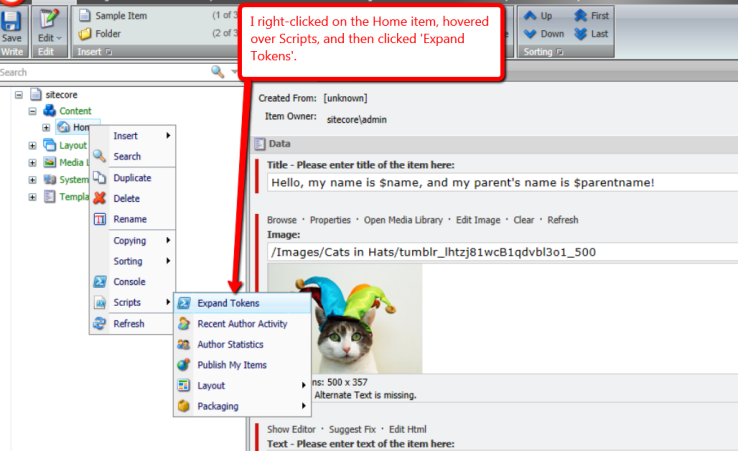
I then launched its Item context menu, and clicked the option we created to ‘Expand Tokens’:
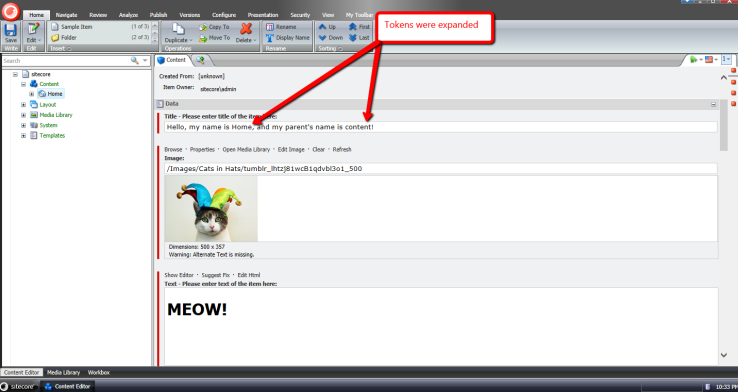
As you can see the tokens were expanded:
If you have any questions or thoughts on this, please drop a comment.
Until next time, have a scriptolicious day ;)
Script Cookbook
Set Item Image Field
Below is an example of how to change the Image Field using an item from the media library.
Set Image |
$item = get-item "master:/content/home" $item.Image = get-item "master:/media library/Showcase/cognifide_logo" |
Relink Item
Relink Image |
$item = Get-Item -Path "master:\media library\images\penguins" $itemNew = Get-Item -Path "master:\media library\images\koala" $linkDb = [Sitecore.Globals]::LinkDatabase $linkDb.GetReferrerCount($item) -gt 0 $links = $linkDb.GetReferrers($item) foreach($link in $links) { $linkedItem = Get-Item -Path master:\ -ID $link.SourceItemID $itemField = $linkedItem.Fields[$link.SourceFieldID] $field = [Sitecore.Data.Fields.FieldTypeManager]::GetField($itemField)
$linkedItem.Editing.BeginEdit() $field.Relink($link, $itemNew) $linkedItem.Editing.EndEdit() } |
Other
Other
Troubleshooting
Results Formatting
Results not properly formatted
Execution Policy |
# For proper performance, set the execution policy. # Open a new session for the change to take affect. Set-ExecutionPolicy -ExecutionPolicy RemoteSigned |

Timeout
Prior to version 2.6, some commands resulted in a timeout or similar related response. You likely experienced a long wait with the gears spinning until the timeout finally occured. Adding the following web.config to the web service directory corrected the behavior. After updating to 2.6 you do not need to add the web.config.
Web.config - located under \Website\Console\Services\ |
<configuration> <system.web.extensions> <scripting> <webServices> <jsonSerialization maxJsonLength="50000000"/> </webServices> </scripting> </system.web.extensions> </configuration> |
Example Error - System.InvalidOperationException |
{"Message":"Error during serialization or deserialization using the JSON JavaScriptSerializer. The length of the string exceeds the value set on the maxJsonLength property.","StackTrace":" at System.Web.Script.Serialization.JavaScriptSerializer.Serialize(Object obj, SerializationFormat serializationFormat)\r\n at System.Web.Script.Services.RestHandler.InvokeMethod(HttpContext context, WebServiceMethodData methodData, IDictionary`2 rawParams)\r\n at System.Web.Script.Services.RestHandler.ExecuteWebServiceCall(HttpContext context, WebServiceMethodData methodData)","ExceptionType":"System.InvalidOperationException"} |
Ribbon Scripts Error
If logged into Content Editor, running a script using a ribbon button results in an error in the progress dialog:
Clicking on the error message in the footer brings up a blank window:
The script is displaying results in a ListView via Show-ListView.
If logging into Sitecore using Desktop option, the same works fine (results are displayed in ListView window).
You need to add -Modal parameter to your Show-ListView if you want it to run in pure Content Editor interface. This is because Content Editor is unable to start Applications whereas Desktop can.
Adding -Modal uses Sheer's
SheerResponse.ShowModalDialog(...);
instead of the standard behaviour of using:
Windows.RunApplication(...);
Other
Other
Other
Page /