wncna
HOW TO EDIT THE BMLT DATABASE
Index
UPDATE MEETING LIST…………………………………... 4
LOGIN……………………………………………………….... 4
ADD A MEETING……………………………………………. 4
Basic Tab………………………………………………......5
Location Tab……………………………………………….6
Format Tab………………………………………………...6
Other Tab…………………………………………………..7
MAKE CHANGES TO AN EXISTING MEETING………... 7
Basic Tab…………………………………………………..8
Location Tab……………………………………………….8
Format Tab………………………………………………...8
Other Tab…………………………………………………..8
History Tab…………………………………………………8
TEMPORARY CHANGES…………………………………..9
TEMPORARILY DELETING A MEETING…………….....10
PRINTING……………………………………………………10
Read This Section First…………………………………10
Generate Meeting List…………………………………..11
Check Layout…………………………………………….11
Printing……………………………………………………11
Order……………………………………………………...12
Pick up……………………………………………………12
UPDATE MEETING LIST
WNCNA AREA
BMLT PROCEDURE
LOGIN
- Go to https://bmlt.sezf.org/main_server/index.php and log in.

- The Area Secretary has the login information.
- Once logged in you will see

- Click on Meeting Editor
ADD A MEETING
- Click on “Edit Meetings” button at the bottom of the dialog box

- Click on “Create a New Meeting” button toward the top/center of the page and fill out each field in each tab as described below.
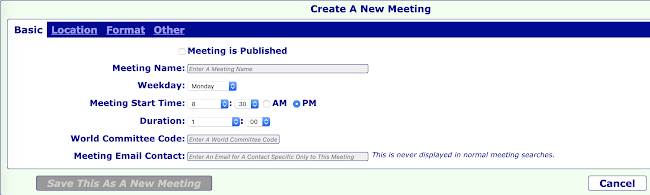
BASIC TAB
- Enter “Meeting Name”
- Choose “Weekday” from the dropdown menu
- Add “Meeting Start Time” and choose AM or PM
- Choose “Duration” from the dropdown menu (this is how long the meeting will be)
- “World Committee Code” - DO NOT ENTER ANYTHING IN THIS FIELD!!!!!!
- Enter “Meeting Email Contact” if known

LOCATION TAB
- “Longitude” box will be auto-populated and will not need to be filled out by you.
- “Latitude” box will be auto-populated and will not need to be filled out by you.
- Enter “Location”. This will be the name of the facility where the meeting takes place.
- Enter “Extra Info” (optional) - this is used to give more detail on the location of the meeting like upstairs or down the alley.
- “Neighborhood” - leave blank
- “Borough/City Subsection” - leave blank
- Enter “City/Town” - this will be the city or town of the meeting place
- “County/Sub-Province” box will be auto-populated and will not need to be filled out by you.
- Choose “State/Province” from the dropdown menu
- Enter “Zip Code/Postal Code” - “Latitude” box will be auto-populated and will not need to be filled out by you.
- “Nation” add your nation
- Phone Meeting Dial-in number Copy and paste from provider
- Virtual Meeting Link Copy and paste from provider
- Virtual Meeting Additional Information Copy and paste from provider
FORMAT TAB
- Choose the appropriate checkboxes that will describe the meeting type. You may have multiple checkboxes. Example: The meeting may be “Closed”, “Book Study” with “Handicap Parking”
- If you cannot find the format for the meeting you are adding, you will need to do the following:
- Ask the GSR (Group Serve Representative) if there is another format that would fit the meeting
- If GSR does not have another format you will need to ask Area IT person to contact the Region Webmaster to add specific format
OTHER TAB
- “Bus Lines” leave blank
- Enter “Comments”. (This is where special instructions are listed. See below for examples.)
- No parking on the grass
- No smoking
- No firearms
- No pets (other than registered service animals)
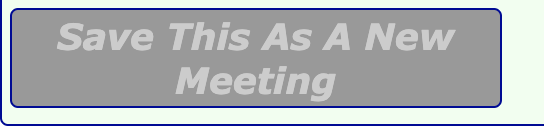
- Once ALL of the above information has been entered in its entirety, click the “Save This As A New Meeting” button located at the bottom of the screen. This MUST be clicked in order for the meeting to be saved.
- Return to the “BASIC” tab and click the checkbox “Meeting is Published”. Now the new meeting has been saved and published.
MAKE CHANGES TO AN EXISTING MEETING
- Log in - follow the directions under “Meeting List Login” section above
- Click on “Edit Meeting” button at the bottom of the dialog box.
- Scroll and click on the meeting you want to change.

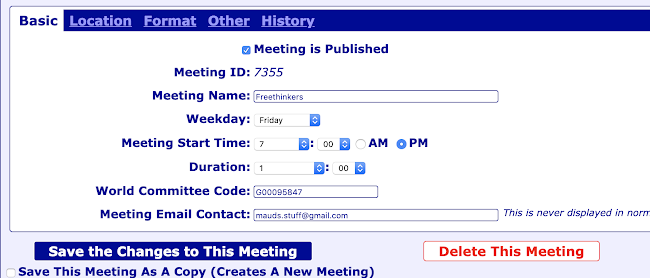
- See below screen for an example of when Friday evening “Freethinkers” meeting was chosen.

BASIC TAB
- Meeting Name: You may update this field
- Weekday: Use the dropdown menu to change
- Meeting Start Time: Use the dropdown menu to change, do not forget to choose AM or PM
- Duration: Use the dropdown menu to change
- World Committee Code: DO NOT CHANGE or ALTER
- Meeting Email Contact: You may add this information
LOCATION TAB
- Refer to “Meeting List - Add a Meeting” section for instructions
FORMAT TAB
- Refer to “Meeting List - Add a Meeting” section for instructions
OTHER TAB
- Refer to “Meeting List - Add a Meeting” section for instructions
HISTORY TAB
- Generated by the website. Do not alter.
- Once ALL of the above information has been entered in its entirety, click the “Save the Changes to This Meeting” button located at the bottom of the section. This MUST be clicked in order for the meeting to be saved

TEMPORARY CHANGES
When meeting cannot meet for a specific reason (i.e. weather, holiday, etc) temporary changes can be made.
IMPORTANT: Meeting lists are physically printed the Wednesday before the 3rd Saturday of the month. (The 3rd Saturday of the month is when Area meets). All temporary changes need to be resolved prior to printing AND new temporary changes should not be added until the meeting list is downloaded.
- Log in - follow the directions under “Meeting List Login” section above
- Click on “Edit Meeting Tab”
- Scroll and click on the meeting you want to change. See below screen for example of when Friday evening “Freethinkers” meeting was chosen.
BASIC TAB
- “Meeting Name” - Keep the name of the group, add a hyphen, add the temporary change info.
Ex: “Squirrelly Group - Not meeting on June 22 back to normal next week”
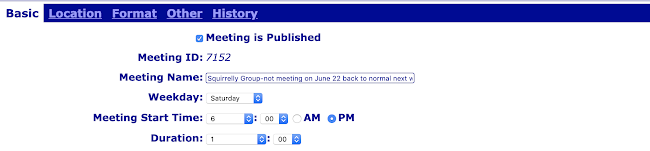

- Click on “Save the Changes to this Meeting” button.
- Use an app of your choice (Calendar, To-Do List, Reminder app, etc) to add a reminder to remove temporary information at the end date.
- Use the same steps above to delete temporary information and return meeting to normal.
TEMPORARILY DELETING A MEETING
Meeting occasionally close for a period of time, but are Not Permanently closed. Instead of deleting the meeting
- Locate the meeting you wish to Temporarily Delete from the list of meetings.

- Click on the meeting name
- On the Basic Tab - Click the “Meeting is Published”

- The meeting will remain on the list, (it will be highlighted) but will not show up on the meeting list

- When the meeting opens again Click the “Meeting is Published”
PRINTING
WNCANA chooses to print the meeting lists monthly. Meetings move location, close or change very often. Most of these meeting lists go to the newcomer or someone looking for their first meeting. Out-of-date information does not help our primary purpose. By printing monthly, we cut down on the number of lists we print by ⅓ and the price is about the same. With the new BMLT, we no longer have to spend hours editing data to get the meeting list ready to be printed.
- Login to http://www.wncna.org/wp-admin/
- Area Secretary has login information
- Scroll down and click on “Meeting List” on the left side of the screen

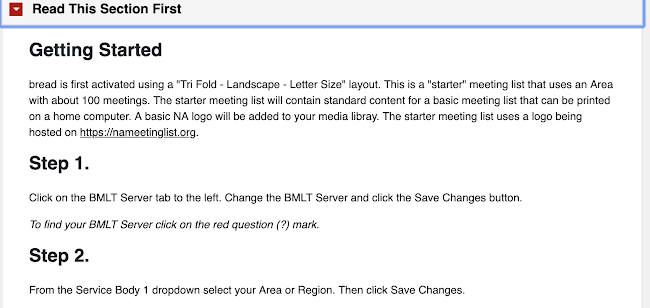
- Click “Read This Section First” the first time you are ready to print or anytime you need a refresher on the “how-to”
- NOTE: Steps 1 and 2 are already finished the check with Region before changing anything in that section
- Go to Step 3 and follow the directions
3. Before bringing or sending the file to Staples (the preferred printing company) do the following:
- Click the “Front Page” button from the submenu
- Scroll to the bottom
- Click the “Save Changes” button if any changes were made
- Click ‘Generate Meeting List” button
- The below is an example of the meeting list that will populate
- Check layout


- Make sure that the meetings fit
- The front page is right
- All the info is on the two pages
- If not go back to “Meetings” (insert picture)
- Put spaces where necessary. This is where you will do any “fine-tuning”
- If not, also go to “Custom Contact”
- Move content until it fits
- Click “Save Changes” button
- Click “Generate Meeting List” button
- Recheck layout and repeat if necessary
- Printing
- It is best to download the meeting list file to a flash drive and take it to Staples.
- To have the printing completed on time for the Area Meeting, take it to Staples no later than the Wednesday before Area.
- Order
- The thinnest paper possible (usually 20 pounds)
- Trifold
- 650 count
- Pick up
- Friday
- Put in bundles of 10
- Bundle Of 50 to 100 each for PR and H&I
- Bring them to AREA
- Arrive at least 15 minutes early
- Put the stacks of meeting lists on the table over near the Treasurer
- Make sure that any packaging or boxes are picked up and discarded properly before you leave
MEETING LIST PROCEDURE UPDATED May, 2021 PAGE