Polytopia Hints and Tips
- This document focuses on online play. Things such as single player games against robots, aiming for 100% Domination or that 100k Perfection score are not considered here. There are excellent guides on the internet for that.
- In this document, I try to avoid the super-basic stuff and the very obvious.
I try to go just that little bit deeper to make the enthusiasts reach more of their potential.
- This is not a discussion about what tribe is in what tier, what tribe is best etcetera.
- I also try to avoid big strategies. I don’t want to tell you how to play. The idea is to give you some extra tools that are useful within any strategy, and hopefully help to evolve/develop your own style. Things like tribe tiers and strategies also change over time as updates roll out.
- This was created mainly for the community of the Polytopia 1v1-league.
If you are interested in joining:
https://www.facebook.com/groups/724840274353330/
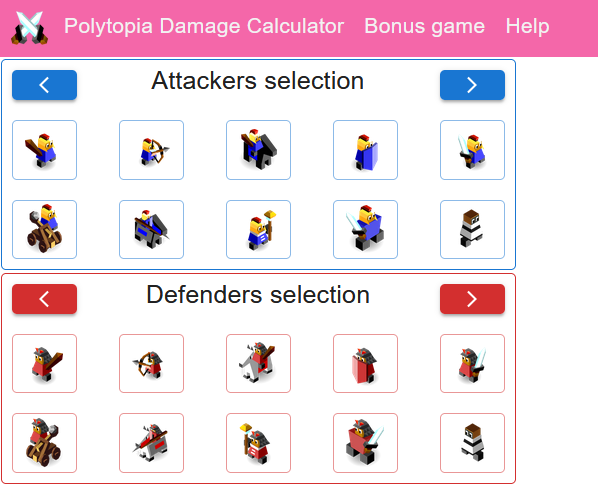
Polytopia Calculator
If you are not sure what the result will be of a certain attack, there are multiple websites to help you out.
Disclaimer; Note that these calculators may not always be updated to the latest Polytopia version. Trust the predictions at your own risk!
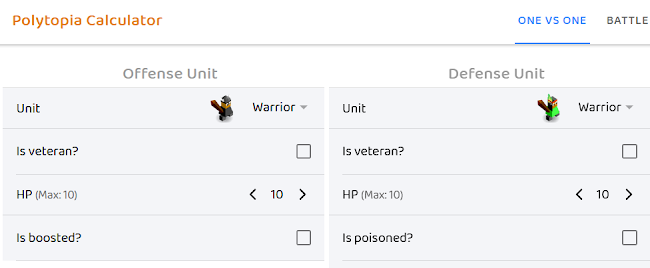
http://letsstein.de/polytopia/
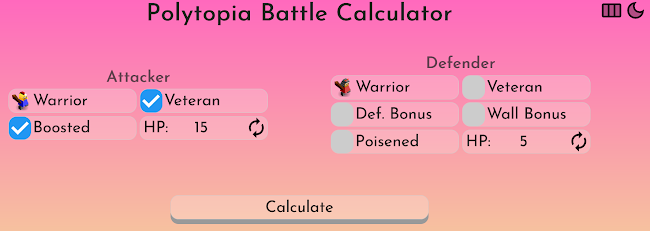
https://polytopia-damage-calculator.firebaseapp.com/
No-Brainers
Get 5 stars from City upgrade FIRST
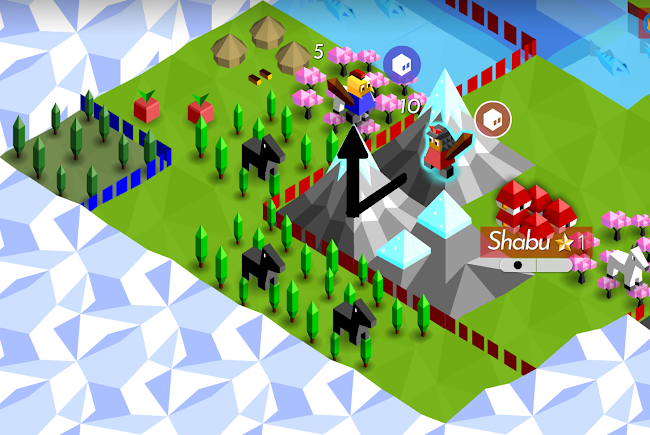
Check the example below. You are Yadakk and you have 2 stars left.
You could upgrade one of the northern cities for more income, but you’d be out of money.
You could make a warrior to battle in the north, but you’d be out of money.
OR… you upgrade the capital to the south, take the 5 stars, and spend them to your advantage.
This one is a no-brainer that is often overlooked in the excitement of playing.
People spend all their money on troops first, not realizing they could have created some more stars elsewhere.
This should be a priority when you start your turn: Look for city upgrades that cost 6 stars (or less!!) and return 5. The one star you just lost is already returned in extra income the next turn.
When upgrading an L2 city (city with 3 dots below it) you can choose: 5 stars or a wall. My southern village here does not need a wall. The 5 stars are much more valuable to get an early boost.
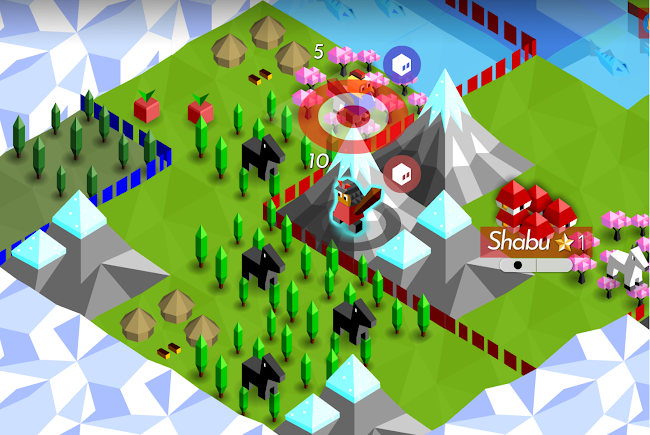
Scout before you kill
Check the example below. You are about to kill the opponent.
Imperius guy is going to die. But if you slash right at him, you miss a little opportunity: Scout first before you kill him. Knowledge is Power. The advantage is clear; 5 tiles uncovered and a new town spotted.
This little “pre-kill-move” can very quickly and easily become second nature.
Of course this does not only apply to the mountains, but to all kill-moves.
Even if you only uncover 1 tile of fog, there simply is no downside.
Whaling
Whales in general
Always check the cost of getting whaling versus the number of whales you can hunt. If it makes sense, always get whaling.
There simply is no downside, and you open the path to Aquatism.
Whaling costs 6 stars if you have 1 city, 8 stars if you have 2 cities, and 10 stars if you have 3 cities. You never lose money here!
If whaling costs 10 stars and you have 1 whale in your territory, always get whaling.
If whaling costs 18 stars and you have 2 in your territory, get it!
Whales just outside your borders
Sometimes you can only expand your city by making a port. This may seem too expensive. But if there is a whale to get, it is often a no-brainer IF there are as many whales available as the number of ports you need to make.
Unless you don’t want to grow your borders but want population instead, to get a giant faster.
In the example below, the only way to get the 2 available whales is to make 2 ports.
This is a no-brainer!
You break even on the stars, which doesn’t sound great in itself, but you also get your city upgraded (+1 star economy) and your territory expanded!
And in the example below, +4 stars per turn from the custom house and 2 more port slots adjacent to your custom house.
Check your Tasks
Try to check your task list every turn. The first few monuments can have a huge impact on how you are doing.
It’s pretty easy to forget that you will get a monument for your 10th kill.
And maybe you’re only 1 road away from getting the Network monument.
And maybe you can use one of these monuments to get Metropolis (and pop a giant in the process).
Or maybe you are desperate to pop out an opponent, and a monument will put you over the top to do it.
So close to getting 3 monuments. This could be a great turn!
Basics / The Early Game
The early game is very important; mastering a good start will have a big effect on the rest of the game. Surely there’s a big luck factor, but there are also enough little skills to learn here.
City Placement and Map Layout
Basics
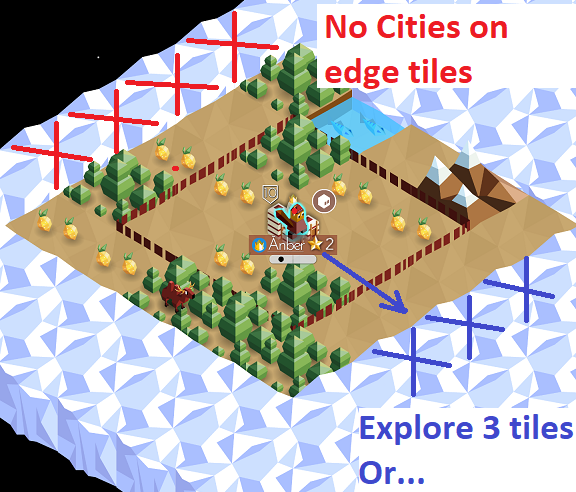
Cities are never located at the edge.
There are always 2 or more spaces between cities.
And resources are always in reach of a village.
- The only exception to this are trees without animals.
This animal is out of reach of the two visible cities. This is proof that a village is in the red square.
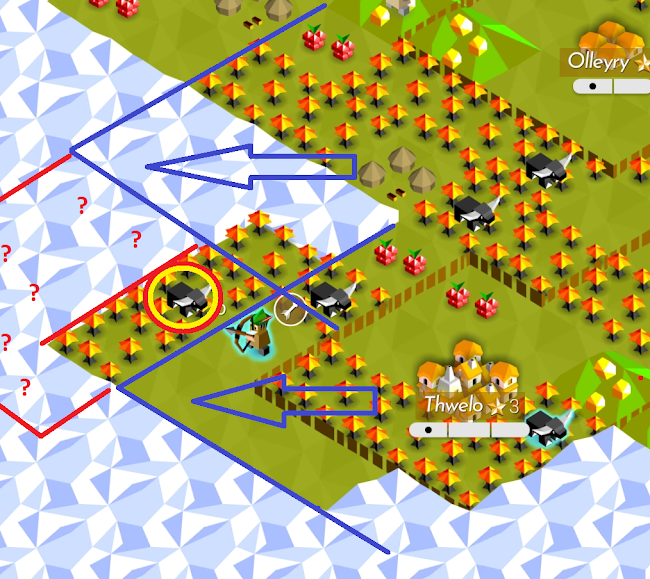
If you don’t know which direction to go, you could choose to go to the center (especially in 1v1) or you can go where the most resources are.
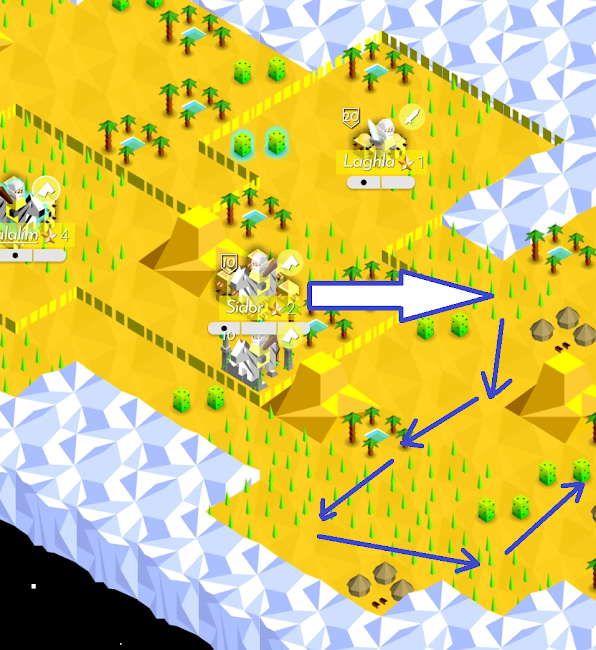
Cloudbusting
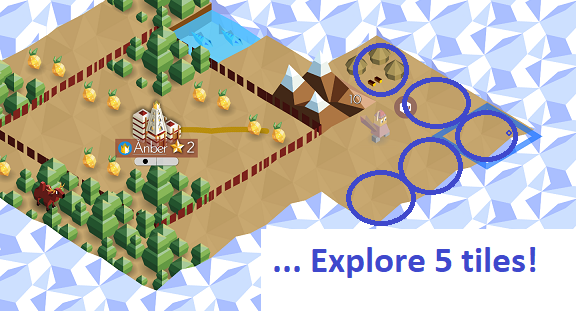
Consider how you want to explore. If you run straight right into a wall of clouds you expose 3 tiles. But if you run into a ‘corner’ you expose 4 or 5.
But it is not just about uncovering more clouds.
Other useful indicators for where to go:
- Resources (fruits, animals, etc) around the city indicate there is a higher chance of finding an adjacent village. In the Yadakk example above, the 2 fruits and the animal in the west suggest that another village there is likely.
- Getting to the center of the map before the opponent does can be a major strategic advantage.
Explorers
Explorers work in a certain way. When an explorer is launched from a city, it will first go to a cloud that is within a 2 tile distance from the city.
This can sometimes be used to force the explorer to go into a certain direction.
Beyond this, the explorers seem to behave randomly, but take note of the following::
- They will go for uncovering clouds rather than going back into already uncovered terrain, unless they have no other option.
- They will not step on mountains if you don’t have the climbing tech.
- Once they do step on a mountain, they don’t have a cloud in range to go for anymore. At this point they might go back into terrain that is already uncovered.
- They will not go onto the ocean unless you have researched the right tech (sailing to go on water tiles, navigation to go on ocean tiles)
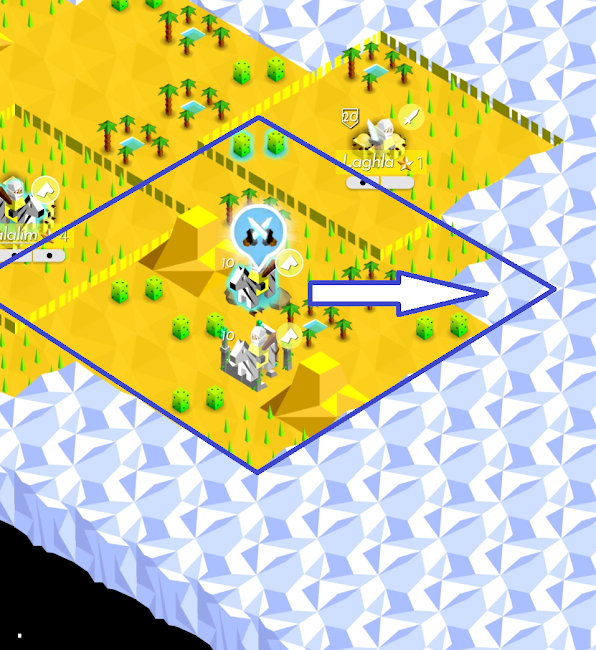
In this case: It’s 100% certain the explorer will first go east. After that, it’s going for nearby clouds.
Note that although the explorer usually goes east first, it might also go south or potentially into another direction if all the clouds are equidistant - eg. when choosing an explorer for the starting city with a t0 tribe.
Ruins and explorers.
Similar to this, you can ensure that a ruin will not give you an explorer by clearing all the clouds in a 2 tile radius.
For example, a ruin that is located on a mountain will never give you an explorer, because stepping on the mountain automatically gives you the full 2-tile vision.
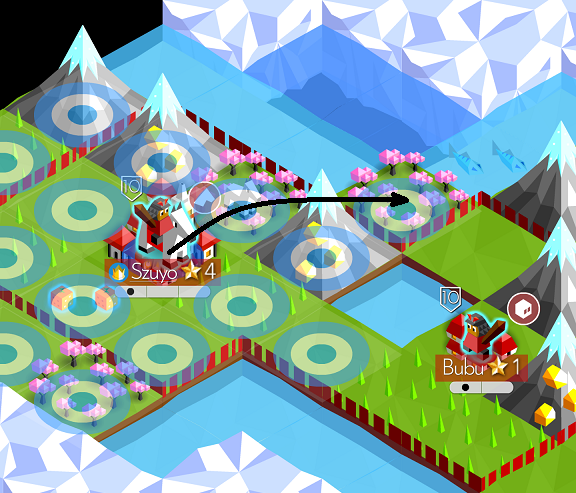
Forest & Mountain Movement
This is the most important for Riders and Knights..
The simple way to think about it: Running UP a mountain is slow. Running DOWN a mountain goes a lot faster. When you climb up a mountain, your movement points are just gone.
But when you run down a mountain a rider can still move the normal 2 tiles!
The same applies to forests; running into a forest will halt you. Running out of a forest you don’t lose any movement points.
You can place roads in forests to go faster, though you will also need a road where your rider starts. (Hence, running down a mountain, warrior can move 1 regardless of roads. Horse can run 2 or 3, but never 4)
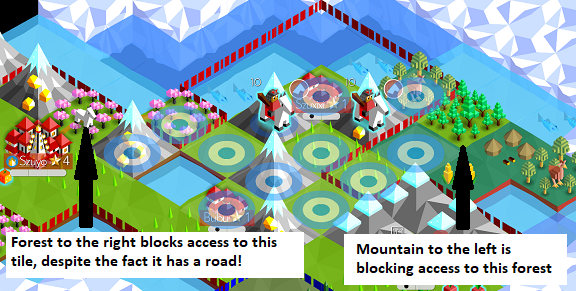
Left: Both the forest and the mountain are Blocking movement. Right: After adding 1 road.
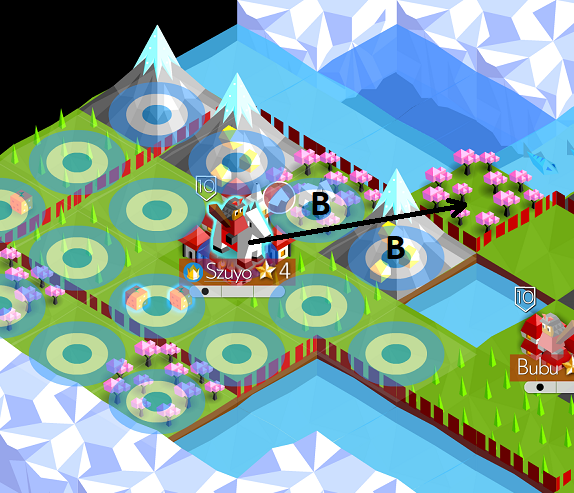
Picture above: You have 2 tiles movement in almost all directions. On the left, the mountain blocks some tiles and the forest blocks 1 tile even though it has a road.
Troops will need to start on a road to take advantage of them.
Of course, your cities basically have roads built in!
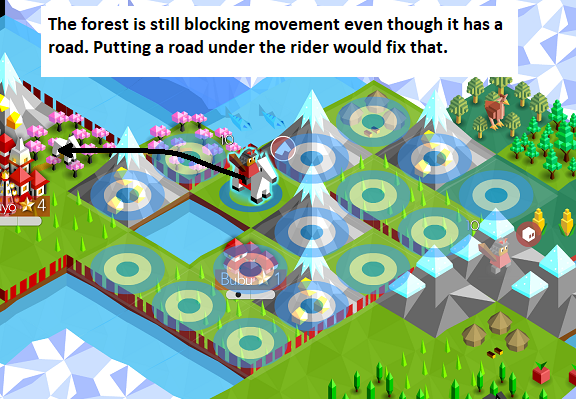
Another example:
While mountains block movement when going up, they don’t block movement when going down!
As you can see in the picture above, this rider is ready to storm off the mountain with many options. This only works as long as you’re running into plains/fields. Running down and straight through a forest is not possible because the mountain itself can’t have a “starter” road.
Forests work the same way; running OUT of the forest you can move 2 tiles even without roads.
But to run OUT of a forest and THROUGH a forest to reach the next tile, you will need roads in both forest tiles. Not in the destination tile.
Intermediate / Mid Game
Past the very early stages, you will have to choose between playing the aggressive offense game, building a great economy or something in the middle.
It’s hard to say what is the best decision; it depends on the cards you’re dealt, your preferred style, and also on your opponent. The hints and tips here are for this phase of the game, which starts around turn 4-10 depending on how good & lucky you are.
It Takes Two
If possible, use two troops to explore.
You may not want to do this at the very start, since you may want to upgrade your city before making a 2nd warrior. But soon enough this just works better.
Using two warriors without roads is not very efficient, but when exploring with riders or boats they can leapfrog over each other.
It just goes much faster, plus if you encounter the enemy you may be able to take him out right away and create a nice little advantage.
Just make sure you always send the rider or boat in the back first. If you send the frontrunner first, the troop in the back doesn’t have much new to explore and can merely follow.
Leapfrogging is fun!
If you do run into the enemy, you may be able to kill him, occupy the city yourself AND block access to the city with your other troop. Especially cool when he is just about to occupy a city.
In detail:
- Use the “back” rider to explore. It spots an enemy warrior about to occupy a village. You attack him, but after that you do not move your (now damaged) rider out of the way.
- Use your front rider to attack & kill the warrior. The 10HP rider can stay to occupy the village. So again, don’t move this rider.
- Use your damaged rider to move in front of your other rider. If you’re lucky, this can make it impossible for the opponent to attack the 10HP rider in the village, or at least slow him down. He will have to go through the damaged rider first.
Little tactics like this don’t always work. It depends on the map and the opponent’s troops. You will still have to use your own brain & judgement to determine when to do this and not to do this.
Roads
Roads are really useful; their use and power are often misunderstood and they are often not used to their maximum potential.
Economic use of roads
In many situations, it is more economical to make roads go straight up & down or left & right instead of diagonal. The square tiles in Polytopia are a bit deceptive.
It’s tempting to go diagonal as it looks shorter on the map, but see the example below:
Unoccupied territory
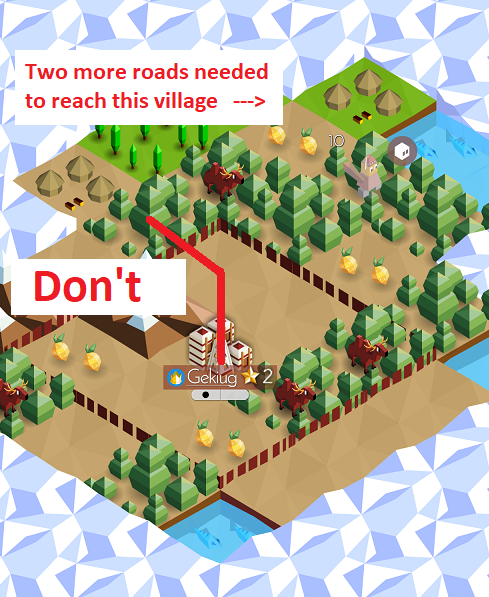
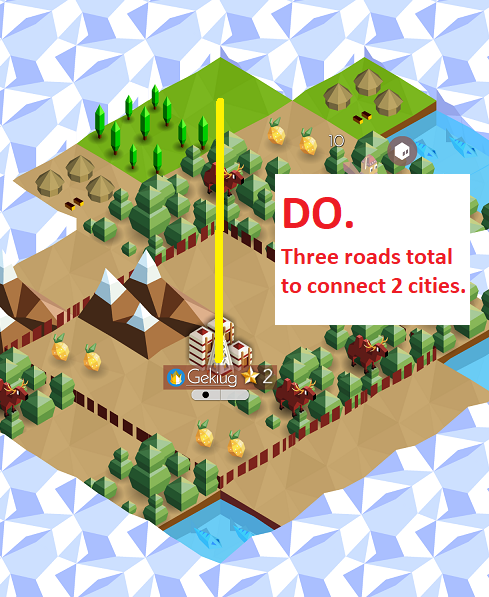
You can put roads on unoccupied territory. This is easily overlooked.
This can help to expand faster, and can sometimes enable an attack that was otherwise not possible. See below for a good example:
The Vengir archer is ready to be killed, but the forest is preventing the Ai-Mo horse from attacking. To make the attack possible, I had to spend 4 stars on roads. But occupying the city will cost Vengir 4 stars too. Imagine if he had a bigger city!
Worth noting: obviously, roads in unoccupied territory can also be used by your opponent!
Custom Houses
Sometimes when facing a very aggressive player, custom houses don’t matter. By the time you have them, you’re already doomed. Or you are that aggressive player and you don’t have the need or time to make custom houses.
But in many games that take longer, custom houses are king!
Custom house placement
Very early on, consider where to put a custom house later in the game. Keep that spot free or cut trees accordingly. Especially for Kickoo, always keep in mind where you want to put it later. You want your custom house to touch as many water tiles as possible.
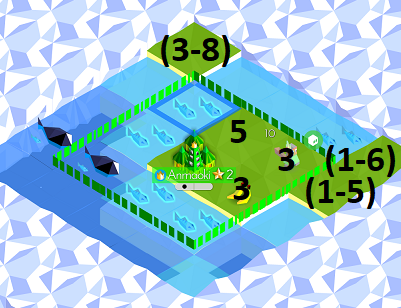
The numbers in the picture above are the amount of ports a custom house could touch there.
The best spot for a custom house may be the “(3-8)” spot. But for now, reserve the “5” spot for a future custom house. Don’t build a monument there or something!
And obviously, your first port should touch the “5” spot and not the “3” spot.
Return on Investment.
Consider Return on Investment.
If you already have a port and you put a custom house next to it, it only takes 2.5 turns to break even and start raking in the 2 stars per turn profit. That’s pretty quick. A custom house next to 2 ports almost makes its money back in 1 turn!
On the other hand, if you already have a custom house and want to place a new port next to it, it takes 5 turns to get your money back.
So while putting a custom house next to an existing port is close to a no-brainer, adding that second port is not as easy. But if you do have the resources to do it and you won’t get yourself into trouble for 5 turns, go for it!
Sharing is caring
Early on when considering where to put your custom houses, keep this point in mind just a little bit. When you have more villages and a better view of your map, you should give this more thought:
When you’re about ready to make custom houses, check if there are strategically smart places where 2 towns can use the same port. You can often share 1, 2 or even 3 ports between 2 villages.
Sharing like this saves 10/20/30 stars to create the same “stars per turn” economy. Especially earlier in the game these stars you saved can be very valuable. Use it to create a military advantage or to boost your economy elsewhere. Whatever you like.
Sometimes the best location to do this may conflict with the “custom house placement” point from above. Choose between short term and long term development depending on how the game is going.

Very early on you know; these are the spots! Only three ports, but I get 12 stars per turn!
Use the Cloud
Ranged Units
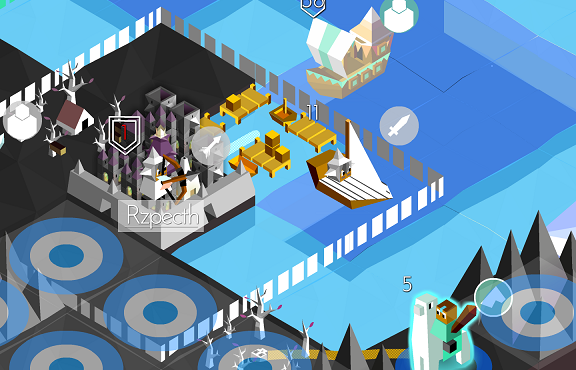
With the latest Polytopia update, the game can tell you the result of a fight. So it can tell you if there will be retaliation or not.
Instead of tipping the enemy unit, hold it and the game will show you the damage.
Left picture: If you shoot now, your archer will not face retaliation, meaning the enemy archer can’t see my unit..
Right picture: If I shoot from here, I will suffer 2HP damage.
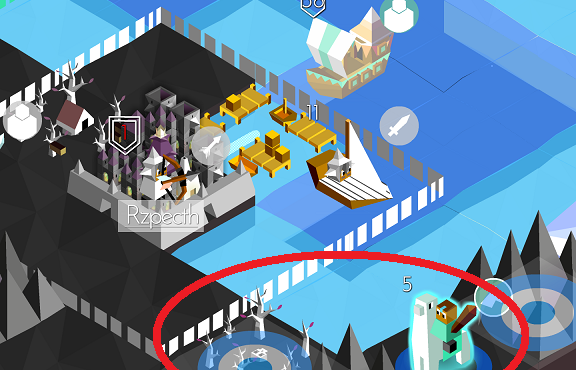
When you see an enemy boat (except for battleships!) coming closer, the chances are high that he can only see 1 tile around his boat. Especially if the boat or ship only moved 1 tile closer.
So try to shoot him from 2 tiles away, and you may be able to take him out without taking any damage.
Not taking damage is cool. But the real gain is that you are halting the opponent’s exploration, and you are demotivating him or maybe forcing him to create an expensive 10hp Battleship (easy to kill!) just to see more. It can also be used to keep pressure on an enemy.
Advanced / End Game
In this section I am not discussing how to finish the final few enemy cities. Once you are in that position, you probably won’t need any advice to win. If you still get surprised and the enemy is completely turning your almost certain victory into a crushing defeat, you just keep your eyes open, learn and remember.
This section will focus on the main battle when both parties are fully engaged.
Veterans
When a unit gets 3 kills, it gets upgraded to veteran status and gets 5 extra hit points.
I’m sure all of you know that.
But many won’t take that into account when playing.
There are 2 main situations you should keep in mind:
Finish him off with your ⅔ unit
Let’s say you have 2 archers ready to kill a warrior.
Nothing else is at stake. One of your archers has 0 kills, but the other one already has 2 kills. Make sure you make the kill-shot with this archer so you can upgrade him to veteran.
Similarly, if you have a veteran and a noob archer, make sure you make the kill-shot with the noob archer. If you give the kill to the veteran, it is a kill gone to waste. It’s a tiny mistake, but especially in the tight and epic games the little mistakes can stack up and end up making the difference.
Similarly, if you are about to take a town, try to do it with your ⅔ unit. It takes 2 warriors or riders to kill a 10HP warrior. But if you occupy the town and upgrade your guy to 15HP, it can be a big blow to the opponent!
Kill his ⅔ unit first
You may come in a heavy battle where you face three units. All three are warriors.
You have the power to kill one of them.
Check if any of them is close to becoming a veteran. You may want to kill that one first!
It’s not always the best choice. You may have reasons to kill another warrior because of his position. But do keep this in mind!
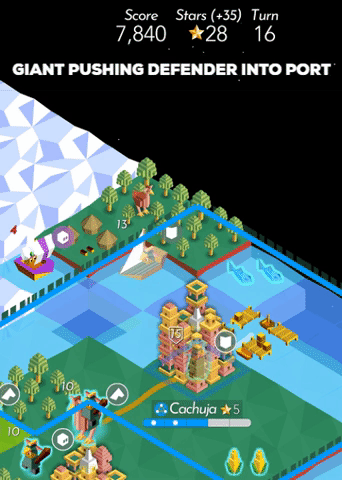
The Giant Push-Out
The Basic Push-Out
If a unit occupies your city, you can push it out by upgrading and recruiting a giant in your city.
This is very useful and cool, but be aware; a lot of good players know it and expect you to do it. And the giant you just created may instantly be pummeled with Battleships or Catapults.
The Houdini
This is a special situation that you will only rarely encounter. But when you are able to pull it off, it’s a blast!
If you upgrade an occupied city and the enemy unit has nowhere to go, it will perform the act of spontaneous combustion. -Poof-
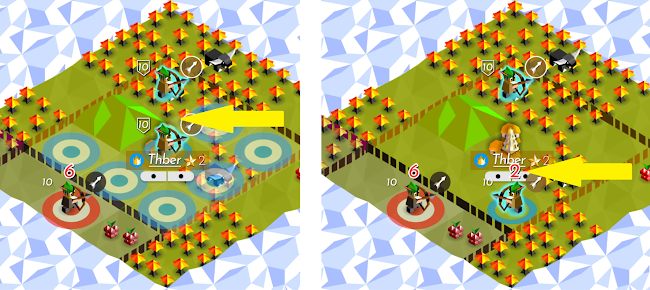
If done well, you can even set a trap to do this. See below how the low health Bardur Defender blocks the only space the giant can be pushed into.
Obviously, this kind of trap is easier to set up if your city doesn’t have a lot of land tiles around it, since enemy units can’t escape into your ports.
Insta-respect for you and hopefully a demotivating game-changer for the opponent.
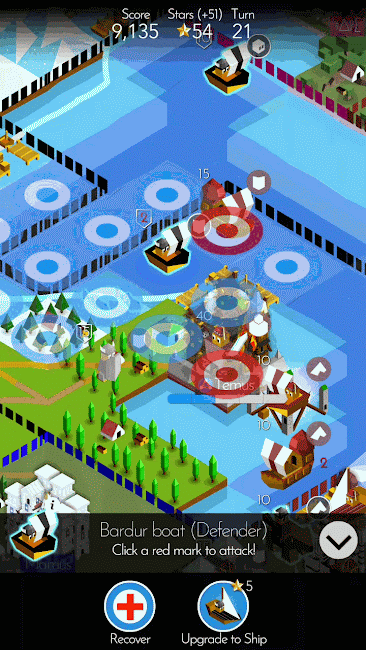
Pushing your own unit into a port
(Careful: The pushout order in the example below was the OLD Polytopia. Current Push order rules are below)
Note that this pushing trick can also be used on friendly units.
Especially when you get some pressure from the enemy navy it can be handy to make a Defender in a city, upgrade the city, get a giant and push the Defender into a port, (and maybe even turn it into a battleship) so it can sail away the next turn.
See the example below:
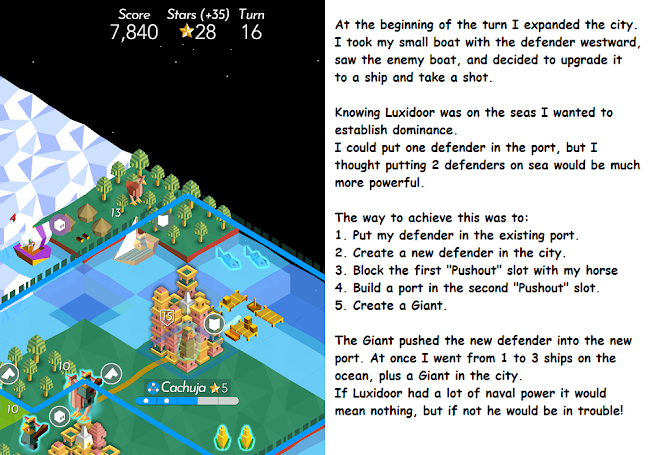
The process in GIF:
Push Direction
New Units:
If a unit is in a city and has not moved before, it will be pushed towards the center of the map.
Existing Units:
Once a unit has moved, it gets a directional value. So the game remembers its last move.
Friendly units: A friendly unit that gets pushed, will be pushed in the direction it was already heading.
Enemy units: an enemy unit that is pushed, will be pushed back to where it came from.
If the intended push tile is blocked, the unit will be pushed to the next tile counterclockwise. If that’s also blocked, it will be pushed clockwise. If that is also blocked, it will try the 2nd tile counterclockwise. Etcetera. If there is no tile available, the unit evaporates.
For more/better details on push direction:
https://docs.google.com/document/d/1C3nQm6SnRFc5pkWMy_WOj8LRosuj2XlINCmCoDfswn4/edit
Scorched Earth
You’re about to lose a big city to the enemy. It has a custom house and 5 ports.
You don’t think you can get it back anytime soon. You may lose this battle but you think you can still win the war. And: You have already researched Construction [*].
Construction enables you to make windmills, which increase your population.
But it also enables you to destroy buildings.
This doesn’t sound very useful and is therefore often overlooked.
But sometimes it can be useful to move a custom house (or sawmill or windmill) to a better position.
And the other situation is if an enemy tries to take one of your cities.
What are you going to do? Hand the enemy a city with 16 stars per turn?
Or burn it down first? Remove the custom house, the ports, whatever you can.
Learn from the past. Scorch that Earth!
[*] Just to be clear; I rarely get Construction because I don’t play Zebasi a lot and most games don’t last long enough to justify going for windmills. But in the rare occasion where the “Scorched Earth” makes sense, it’s easily forgotten/overlooked.
Cymanti
Being Cymanti: Remember you have a little more to gain from the Scorched Earth tactic because they get their investment refunded!
Fighting Cymanti: It can be useful to destroy Algae to speed up movement and to destroy Fungi to get rid of the poison effect.
When fighting Cymanti on the seas and you have enough stars to waste, you can put ports or water temples to prevent Cymanti from making land bridges to your lands.
Communities
There are a few good communities out there to play for fun or competitively.
Here are some:
PolyChampions
This one is the dominating team games competition.
It’s a great way to learn, probably the best.
The skills of the players in this competition are something else, and if you’re in their team, they’re happy to share their knowledge and tricks.
On this server, 9 teams battle each other in 2v2 and 3v3 games.
Teams consist of usually 10-20 players and all teams have junior teams with their own competition.
Once you join a team, it is a great way to learn and grow.
https://discord.com/invite/4rheRsffRm
Giants League
In this league, you play 8-player FFA (Free-For-All) games.
After 8 games, the best performing players get promoted to a higher league.
Good fun to play, can recommend:
Facebook League
This league offers 1v1 games.
A season runs for about 2-3 months, where each player gets 18 games.
Promotion/Relegation helps to pit you against players around your own skill level.
https://www.facebook.com/groups/724840274353330
Detailed Strategies
As stated before, I tried to avoid telling you how to play and going deeper into strategy.
I don’t want to steer people in the same direction, because that is one of Polytopia’s many strengths; not one strategy is always the best!
For example, some people swear by custom houses, others don’t care much.
Either way, I wanted to give some basic tips on how to get the most out of them.
Some people swear by catapults, others swear by swordsmen.
I like horses but that doesn’t always mean they are the best option.
Other Resources
@Nathan Amiet#3362 on Discord has created a great overview of available documents and Polytopia communities:
https://docs.google.com/document/d/15Rkc5aFRKpdWssz55p8r54ovXqCVj8A7iY4OiZOCAF0
Check Gerennukk’s guide for example for extended knowledge/tips.
Final notes; Thanks for the feedback Vsup :)