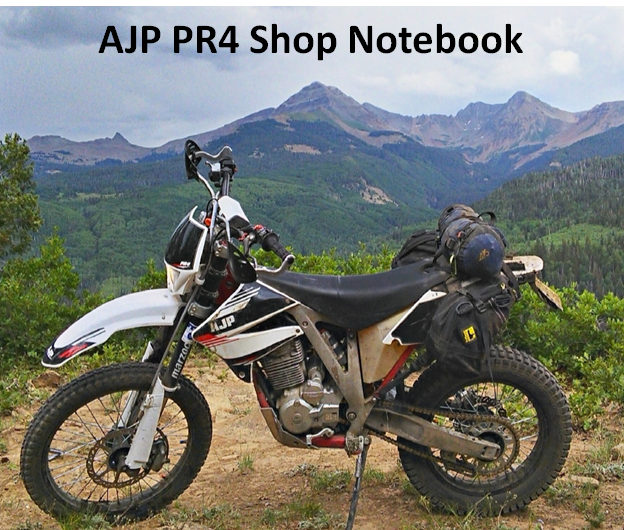
Mods and Maintenance
An unofficial, crowdsourced wiki resource for and by AJP owners
16 September 2018 | Web Link http://bit.ly/2uS1RgK | Doc Link | POC
This is a Google Doc so you can edit, comment, or add content. To do so, you will need a Google Account or Gmail account. If you want to print it out, the Doc format is better. You can be notified of updates to this page.
WARNING: The reader acknowledges that: -The information here is crowdsourced and may be incomplete or inaccurate. -The information is not reviewed or approved by the manufacturer, importer, or dealers. -Mechanical work is inherently hazardous, and can result in property damage, injury, or even death. -Carrying out maintenance or modification actions on a motorcycle may void the warranty, remove or violate regulatory compliance, and/or create unsafe conditions. |
“The test of the machine is the satisfaction it gives you. There isn't any other test. If the machine produces tranquility it's right. If it disturbs you it's wrong until either the machine or your mind is changed.” ― Robert M. Pirsig, Zen and the Art of Motorcycle Maintenance: An Inquiry Into Values
Contents
Overview: Tour and review of a 2016 PR4 Enduro Pro (USA)
PR4 throttle response and upgrades
What about this PR4 Extreme Project Bike thing?
Is it possible to get quality at low price without high sales volume?
Three light trail bikes compared
How much does the 2016 PR4 Enduro Pro USA weigh?
Why is there a limited online community?
Epilogue: Why did I sell my PR4?
Fastener sizes and tools needed
Working with the PR4 fuel system
How can I protect my butt or bum from filler cap leakage?
A fuel shutoff valve for the AJP (EXPERIMENTAL)
Forks: the documentation quest
Suspension analysis by Bonjoe’s on 4 August 2017
Step-By-Step: Removing the carburetor and changing jets (Updated 1 April 2017)
Key fasteners to keep tight [NEW 29 January 2017]
Valve adjustment: Step-By-Step
Valve cores on 2016 PR4 stock tubes
Fork maintenance [NEW 18 November 2017]
Adding linkage grease zerks [NEW 13 January 2017]
Adding seals to protect your linkage bearings [NEW 13 January 2017]
Adding a charging connector for float charging
Water crossings (updated January 2017)
How to be notified of updates to this document
Reference
Accessories http://motoajp.com/accessories/
Manuals http://motoajp.com/ajp-support/
Service Manual
http://motoajp.com/wp-content/uploads/2016/08/PR34-4.servicebook.pdf
Chapter 1 - PR3-PR4 General information-Technical specifications
- P. 1-38: “The only thing that is not current in those specs is the width of the
left side front wheel spacer for the PR4 Enduro - which was changed
slightly starting around MY2015.” -- US importer
Chapter 2 - PR3-PR4 Frame-Panels-Exhaust (PDF p. 55)
Chapter 3 - PR3-PR4 Maintenance EN (PDF p. 71)
- Valve clearance 3-17
Chapter 4 - PR3-PR4 Lubrication EN-1 (PDF p. 114)
Chapter 5 - PR3-PR4 Fuel feed system (PDF p. 126)
Chapter 6 - PR3-PR4 Engine Removal_Installation (PDF p. 151)
Chapter 7 - PR3-PR4 Cylinder head and Valves (PDF p. 163)
Chapter 8 - PR3-PR4 Cylinder and piston (PDF p. 180)
Note: There is currently no detailed information on wheels and suspension
Parts list
http://motoajp.com/wp-content/uploads/2014/03/ajp_pr4_parts_list_en_pt.pdf
Forks: see Forks section
Detailed specifications including torque values (post)
https://drive.google.com/file/d/0B4P8q3zr8E0AbkQyYzRXOGJYcVU/view
- Torques: p. 1-47
Ramz http://rickramsey.net/PR4.htm
Crossover parts http://rickramsey.net/PR4crossover.htm
AJP Forum http://www.ajpforum.com/
AJP Owners Club UK (Facebook): JXG reviewed back through fall of 2014, items are flagged with “UKFB”. Search for UKFB with Control-F to find. Some other topics:
- Complete teardown photos - UKFB post
- Huge troubleshooting thread - UKFB post
- Hard starting thread - UKFB post
AdvRider main thread http://advrider.com/index.php?threads/ajp-cycles.1029612/page-22
Model year differences
2015 PR4:
– Reinforced Steering head
– New silencer end cap (now in aluminum)
– New front braking system (more power and better feel)
– New rear braking system (improved quality)
– New graphics/decals
– Horn
2016 PR4:
– No kickstarter
– No horn
– Improved gas cap
– Rear tire is not DOT approved
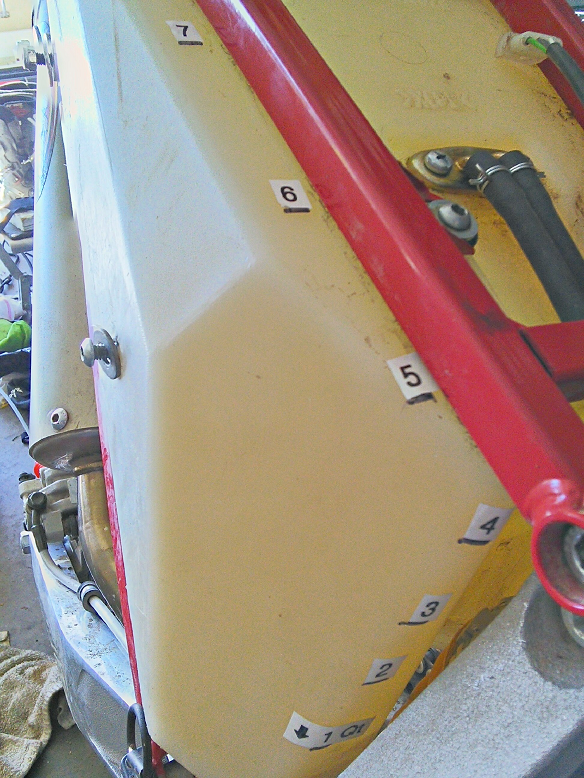
Overview: Tour and review of a 2016 PR4 Enduro Pro (USA)
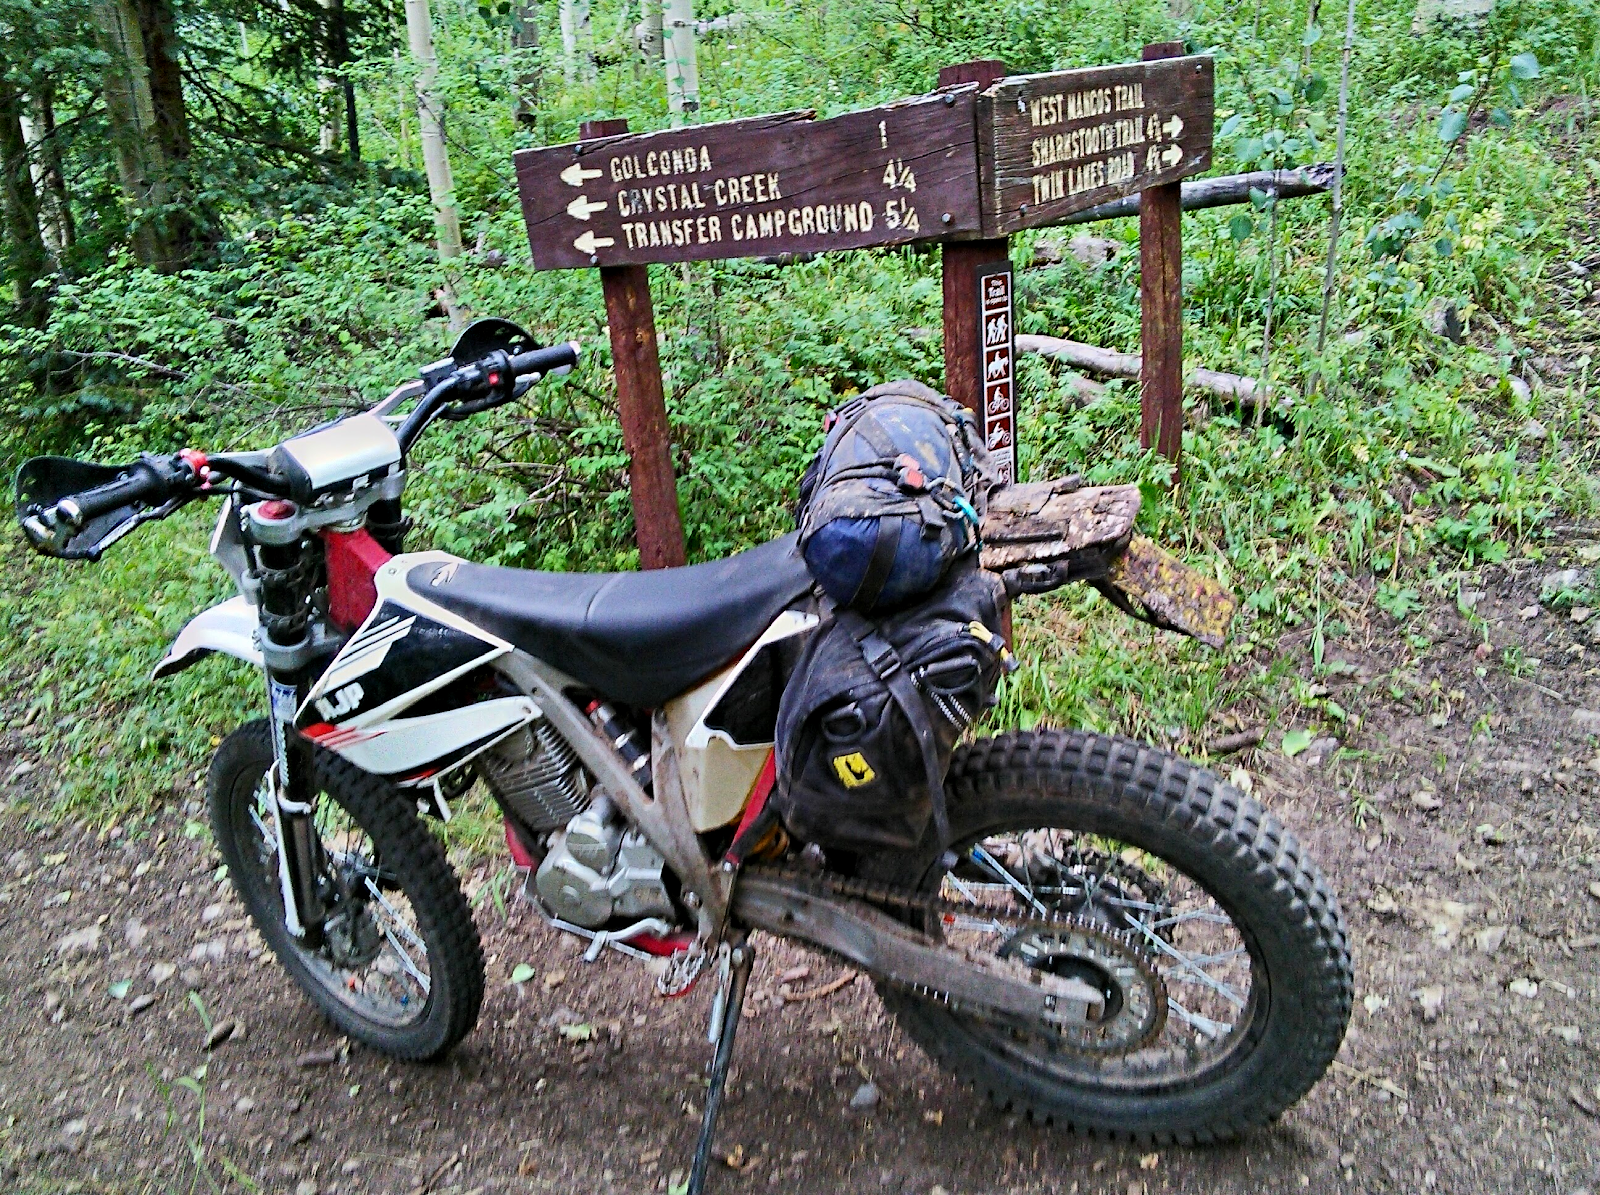
On the bike: 2 years, 2200 miles, 200 hrs moving, 98% singletrack, photo above
Epilogue: Why did I sell my PR4?
12 second video of riding PR4 on singletrack
AJP PR4 and CRF230F side-by-side comparison photos
(++++) Low center of gravity “is the magic of the bike” according to Brett at Bonjoe’s Cycle Sport. Based on many comparisons, Brett has found that rear gas tank bikes have a very different feel and performance in riding and racing.
The PR4 has a kind of a “wasp waist” like a trials bike. While there is good ground clearance and suspension travel you kind of sit down in it more than on top of it. This lowers the center of gravity a lot.
Gas tank effects: “The [ktm 400 exc] was a great bike but I find the Ajp [PR5] suits me better ... I did not like the extra weight up top with the fuel tank it was very apparent when switching directions. Also the physical size of the bike felt bigger and bulkier .... which is odd as on paper the ktm 400 is lighter than my pr5 I'm guessing it just depends where the weight is distributed i.e. The fuel tank.” - Bash Davis post
(++) The AJP is listed as “MC” (motorcycle) on the MCO (manufacturer's certificate of origin)and thus can be plated in some US states that do not require DOT and EPA compliance.
- How is this possible? AJP and Beta slip in through a regulatory loophole because of their small volume.
- If the state wants to see an EPA “Nader Sticker” then you are done. But some states will squeak around this with weird rules like, “If we can’t find the Nader sticker cough, cough... then we have to see the Engine Serial Number.” Seriously.
- KTM is big enough now that their bikes get the dreaded “Off-Highway Only” on the MCO (manufacturer's certificate of origin). Colorado apparently sent a nastygram to KTM insisting that all off-road bikes coming into CO have this notice. (This was on AdvRider, can’t find the link.)
- If this is important to you, ask to see the MCO for your serial numbered bike. They are generated before the bikes hit US soil.
- Insurance can take a couple of days while the company figures out a rate.
Relatively low price for European-brand suspension components
- Relatively long suspension travel post
- Sachs Shock: good brand, but cheap model that is not designed to be serviceable: see below. Also post.
- 40+ clicks of shock rebound and compression damping--and the clicks make a difference
- (---) On the other hand, changing spring rate is not straightforward. Spring rate controls race sag and static sag and is the most important suspension variable.
- (--) Update August 2017: Suspension questions. See below.
(++) Very short wheelbase for maneuverability on tight trails
(+/-) Fairly low weight but not exceptional: 250 lbs. For example the Beta Xtrainer and KTM Freeride are lighter, but also much more expensive
(+) Very narrow
(+) Low seat height while still having high ground clearance
(+) Simple air-cooled engine
(+) Remarkably easy starting, typically a half-second tap of the starter. (This is mentioned only because some popular bikes like the KLX250S have terrible starting problems.)
(+) Has some quality components, like Reikon bars and levers and BrakTec brakes
(--) Tire choice is puzzling. The front tire is a Michelin Enduro Competition MS 90/90 with Shore A hardness of 83, rear tire is Michelin Cross Competition X12 SC with Shore A hardness of 85. These are some of the hardest tires I have ever measured on trail bikes. They are really motocross tires for soft dirt. Neither is DOT-rated.
(-) Has some low quality components like spoke nipples that rust and rims that develop corrosion at spoke holes and faded anodizing:
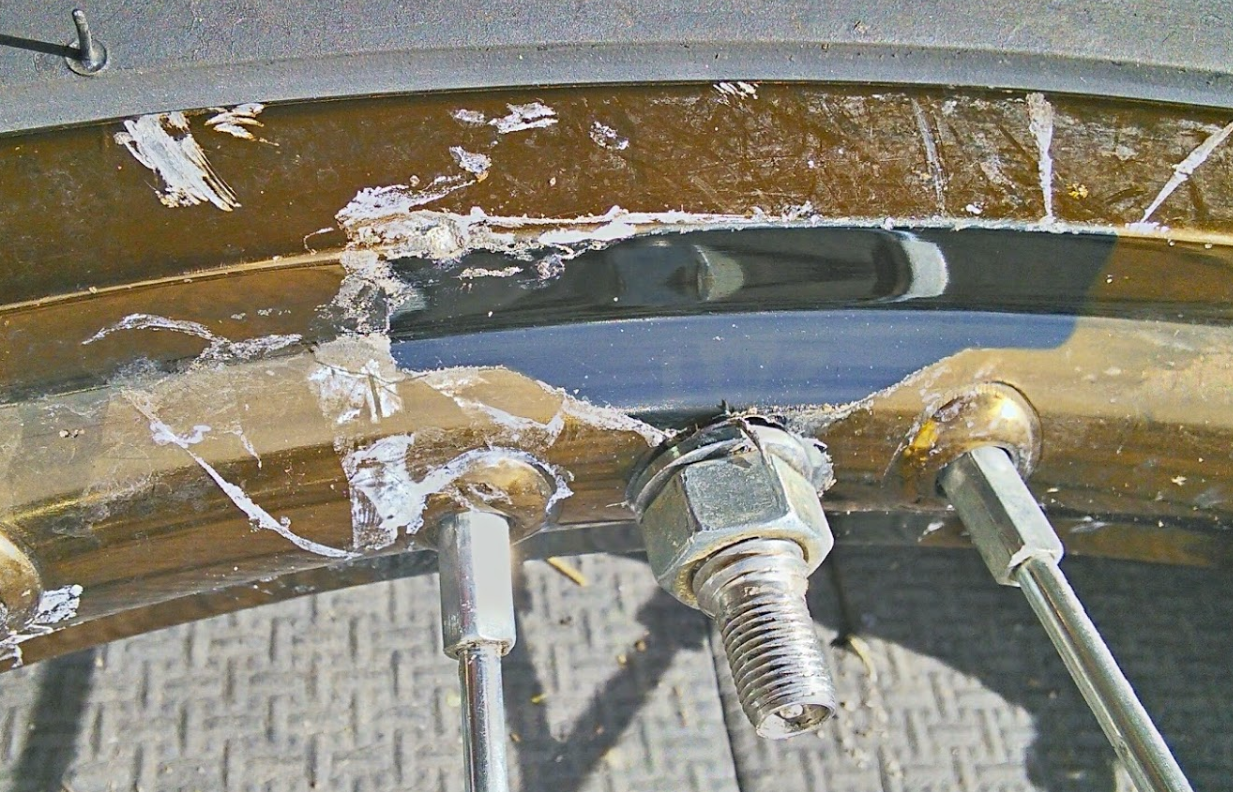
^Front rim anodizing faded from black except where covered by a thick Tubliss sticker. The black anodized Marzocchi forks were unchanged.
^Rusted spoke nipples with apparent galvanic corrosion of the aluminum rim. This occurred under the Tubliss tape in about 18 months. It appears the spoke nipples are plated steel: they are ferrous (attract a magnet). I have never seen this on my KLX or CRF230F, which has brass nipples.
(-) Lack of sixth gear very noticeable on pavement. Tiring.
(-) Few after-market accessories compared to some brands. For example, Beta is a relatively tiny brand but has dozens of accessories available through multiple dealers.
(-) Limited resale market: the brand is basically nonexistent in the US so there is no name recognition
(-) Small owner community without much modding activity being reported
(-) European regulations could affect viability of the company: link, link. But US growth is strong? post
(---) The engine is not responsive; see PR4 throttle response and upgrades.
(-) Carburetor must be removed (moderate difficulty compared to some) for jet changes
One of the unusual features of the PR4 is the gas tank under the seat. To make this work, there is a vacuum-powered Paioli fuel pump above the engine. This pump pulls fuel from the bottom of the tank through a brass tube, a line, and filter on the right side of the bike and up to the pump. Then the fuel is sent back down the left side to a T-fitting. Fuel drops into the carb, while the other side of the tee goes back to the top of the fuel tank.
This design has pros and cons:
Pros:
(++++) Low COG (But battery ends up high in front. However, batteries are dropping in weight faster than gasoline.)
+ No need to turn off fuel valve
Cons:
(-) No fuel reserve, have to remember to check fuel level rather than hard stop of running out of primary gas.
(-) Dependency on a vacuum-powered fuel pump, a single point of failure that will stop the engine and is not trail repairable. The Paioli pump is simple and should be highly reliable, but gravity sets a high standard for reliability.
(-) Filler opening reduces foam at the rearward "rest" position of the seat
(-) Filler opening concentrates mud and dust around the cap area
(-) Gas often gets on seat when fueling
(-) Easy for slight overfilling to result in gasoline on the butt (petrol on the bum), which is ridiculous but not a trivial issue on a ride: “HELLISH like burning sensation in your rear end” (post)
(-) Draining gas from the fuel bowl is not straightforward, which is good to do when storing the bike for more than a couple weeks with E10 ethanol in it:
“If the bike remain immobilized or stored for more than one month, drain the float chamber. Leave gasoline in the float chamber without the bike being used for long periods of time can cause obstruction of the jets, resulting in difficulties to put the engine running at start or inadequate driving the vehicle.” (Service Manual, p. 5-1)
(-) Can’t turn off gas, so if the fuel float sticks you may discover two quarts of gasoline on the ground or garage floor. Floats do stick and lines do fail, so this can be quite dangerous or at least inconvenient:
“The one time I forgot to turn off the fuel on my 640 we came home from work to find three gallons of fuel on the garage floor. The fuel line had split and emptied an 18L tank tank down to the reserve line. That was a miserable (and more than a little frightening) cleanup. Thank God the battery tenders didn't blow the place up. It took weeks, maybe months, to get the gasoline smell out of the garage.” (link)
Here is another report of a float failing and the crankcase filling with gasoline (link). UKFB report of AJP float sticking.
(-) Can’t turn off gas when parking to reduce amount of gas lost if the bike falls over, which does happen
(-) Can’t turn off gas when working on the carb. Must plug the line or lower the fuel level by siphoning.
(-) Can’t turn off gas if the bike has to be laid on its side due to steep terrain and/or soft ground
(-) Can’t turn off the gas if you fall in rough terrain and especially if the bike is on top of you. If you are pinned by a bike in a rock garden, it is pleasant to be able to turn off the gas. Been there, done that.
There is no air box surrounding the air filter so it is very exposed to ambient dust. Apparently there was an “air filter cap” (PR4 parts list, 2013, p. 48) but this is not included on the 2016 US PR4 at least. UKFB post reports this is “too restrictive.”
The air filter box is a kayak-like structure underneath the filter:
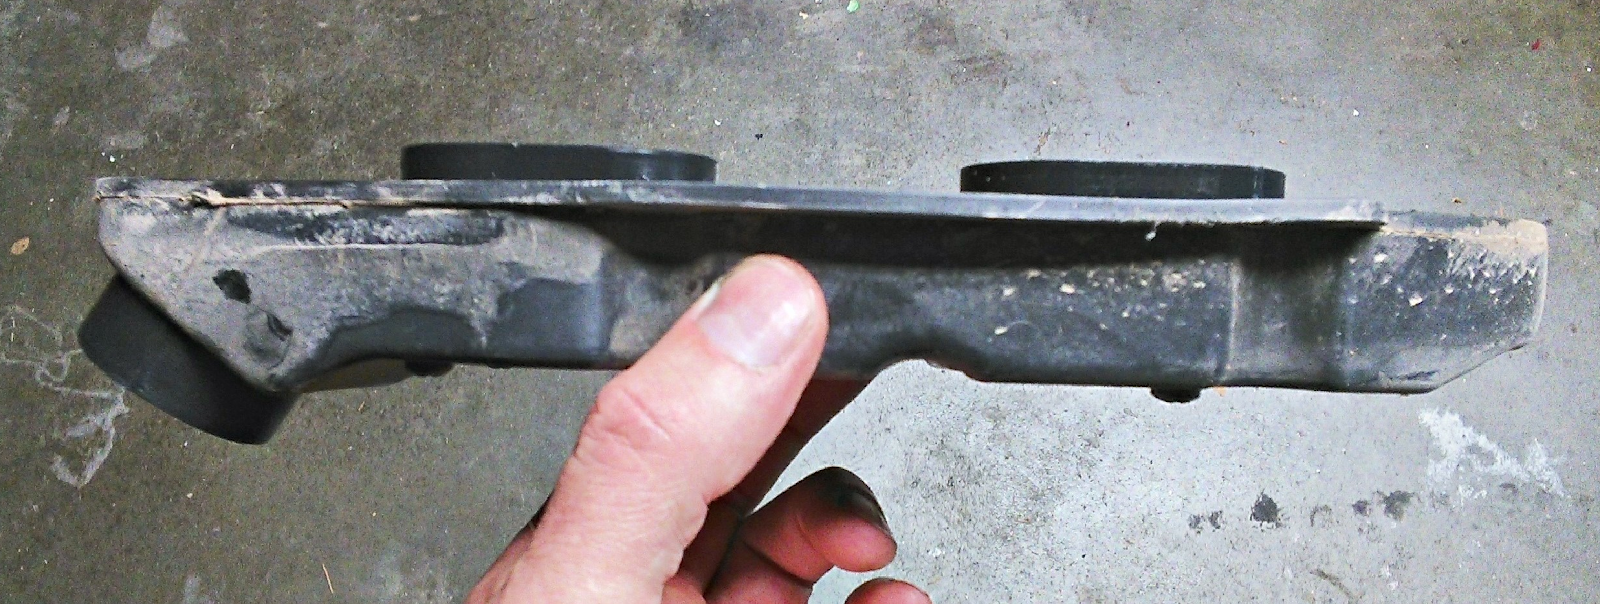
It is very shallow and the airflow does basically a 160-degree turn into the carburetor: |

This approach seems restrictive--but see below for contrary data. It does helps with the short wheelbase and narrowness of the bike. The stock TwinAir air filter has two layers of foam, fine and coarse, but they cannot be separated for cleaning like many UNI models.
The frame of the AJP is bolted together from components rather than welded into a single monolithic structure. This apparently reduces costs because the components can be outsourced and then bolted together at the factory. |
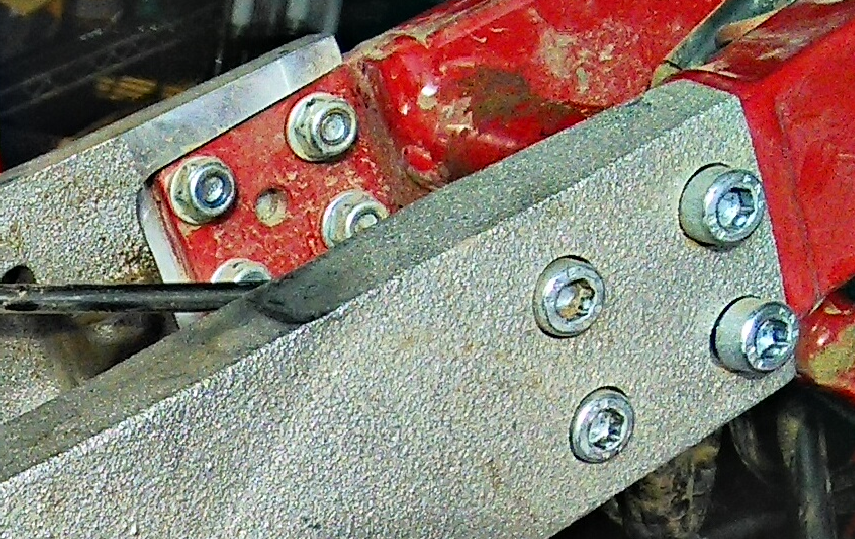
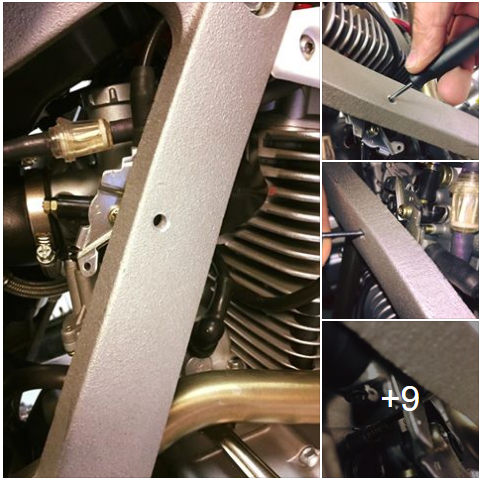
Long term it seems the numerous joints and bolts will wear and loosen in a way that weldments do not. (Two of the nuts on my bike have stripped out during routine checks with a digital torque meter.) Also, given the very compact form of the bike the complex joints reduce the space available for other components and service access. For example, a bolted frame brace must be removed to access the intake valve tappet.
Update: This post defends the joint design. On the other hand a bridge is not a motor vehicle with dynamic impact loads.
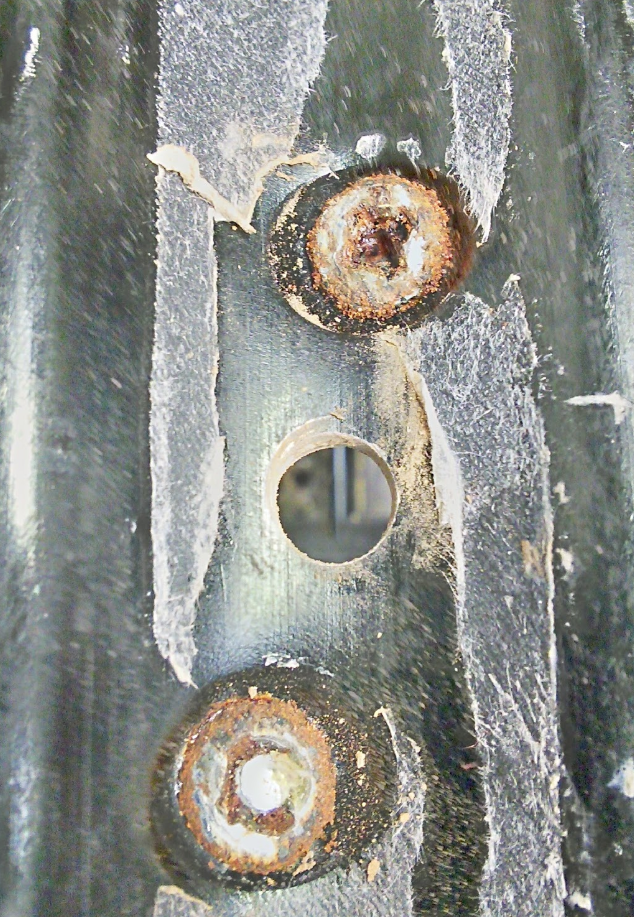
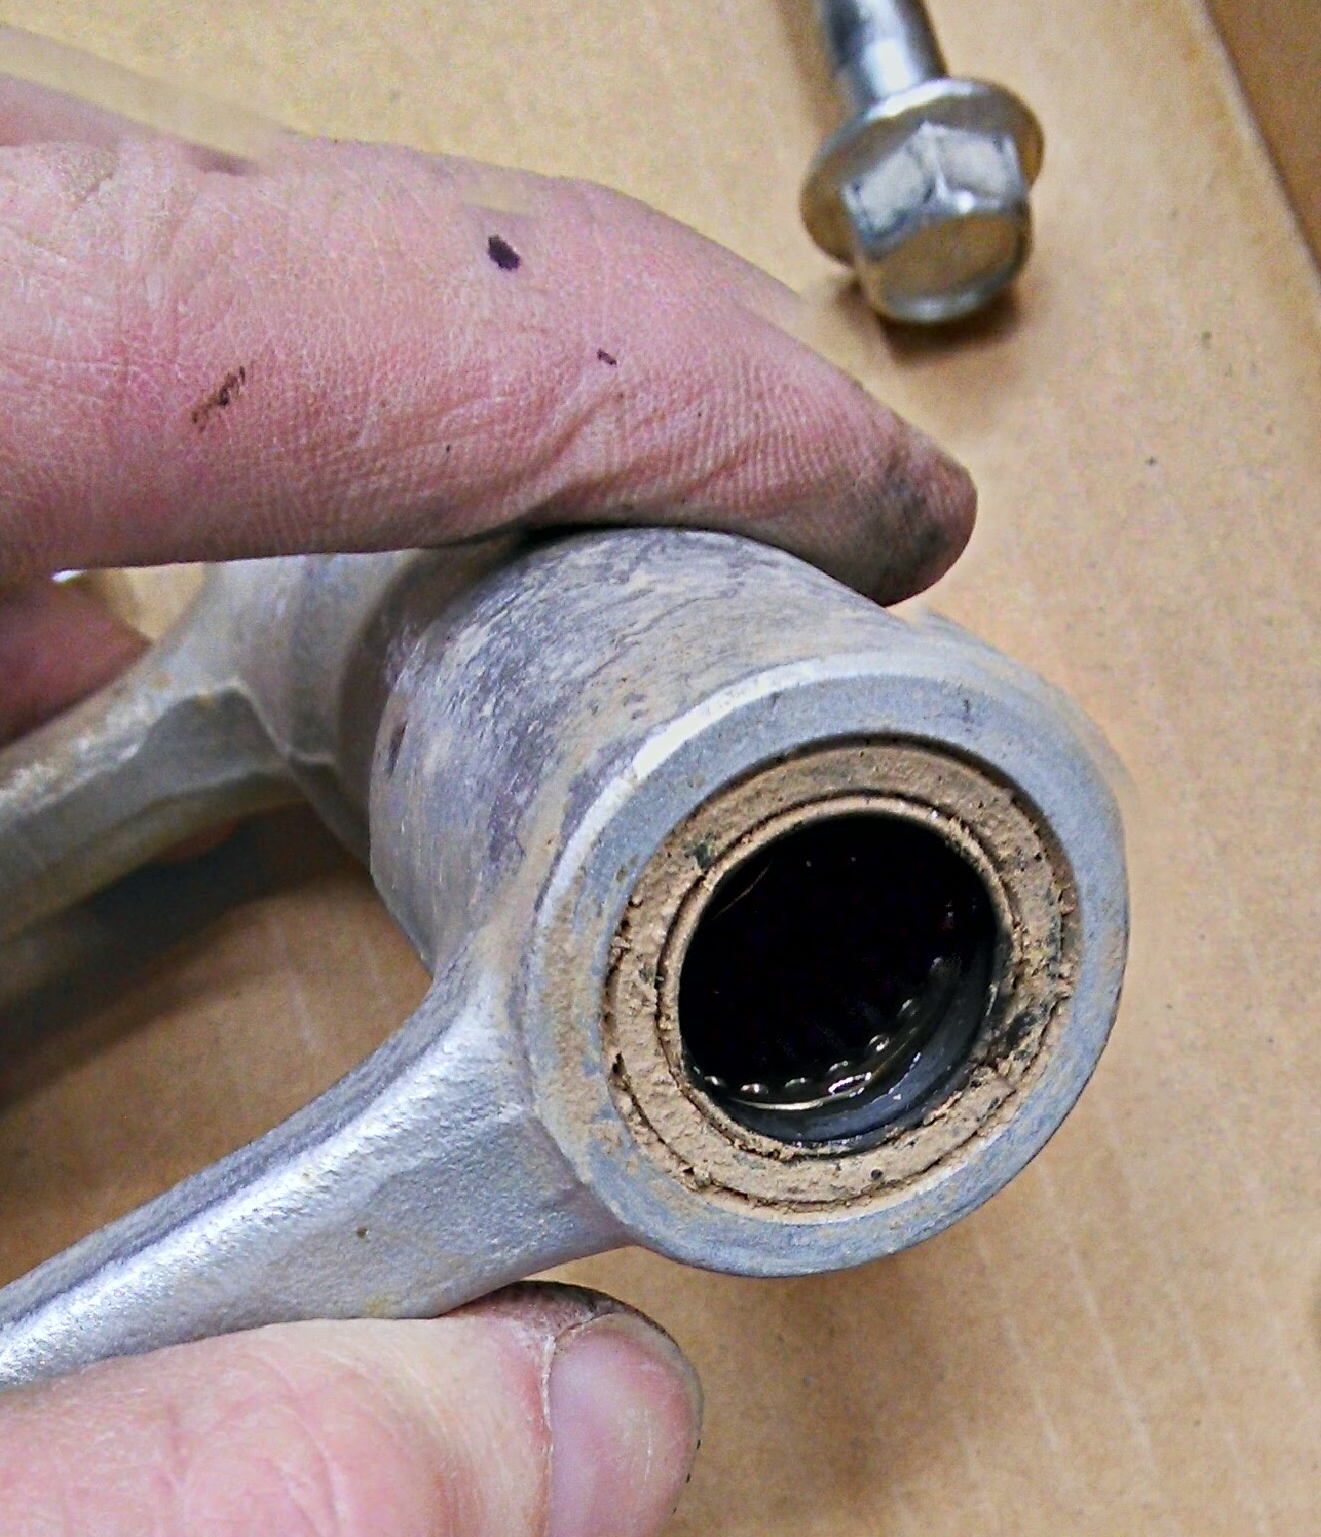
AJPs (PR4 and PR5) do not include grease seals to protect the linkage and swingarm bearings from dirt and water. This is unusual, as even entry-level bikes like the CRF230F include grease seals. They only cost a few dollars.
CRF230F grease seals protect bearings: | PR4 bearings have no protection: (Photo taken after cleaning.) |

AJP does not use the top engine mount, thus missing an opportunity to make the engine part of the overall frame structure and possibly decrease vibration.
Fasteners do not seem to be high quality. See Key fasteners to keep tight [NEW 29 January 2017]
The engine is inspired by the Honda XR and CRF lines, but different. It is built by Zongshen Engine Manufacture Co., “a Chinese engine company that is ISO 9001 certified.” (DB Mag.) The engine retains the classic Honda centrifugal oil filter, which is expensive to build and a bit of work to service, but supposedly a superior filter. It also has the distinctive caps for valve covers and oil drain that harken back to the earliest XRs.
Is the engine a CB250-G relative?
http://www.mychinamoto.com/forums/showthread.php?1190-Valve-Specs-for-Zongshen-CB250-G
For disassembly notes on a probable PR4 engine at 5 yrs, see post “February 06, 2015 - 06:24 AM” at this link
“The Zongshen engines have been performing well in the AJP's for about 10 years now. There are quite a few AJP's in Europe with 20K+ miles on them and still going strong. Zongshen is a ISO 9001 certified mfg that also builds OEM engines for Harley Davidson & Aprilia too.” - US importer post
Final shaft bushing disintegrated at 2600 miles, fuel line problems. UKFB post
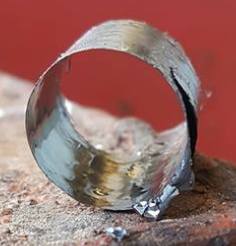
^^ Photo of shaft bushing courtesy of Steve Tucker
See Oil Analysis for data on wear metals
I found the intake valve needed to be adjusted every 100 to 150 hrs. The bike simply would not start over 9000 feet elevation, which is not good for a backcountry rider. As soon as a I adjusted the valve, it would start again. It is possible the valve train will eventually stabilize but this may be an indication of design and build quality. I have never had to adjust my CRF230F valves in hundreds of hours.
There is an oil cooler which is unusual for a bike this size. (One that comes to mind is the XR400R, which has not been seen for a few years.) The oil cooler is drawn in the AJP style (Parts List, p. LP17) so it is possible that AJP grafts this on to the Zongshen engine. Speculating, it is possible that AJP measured oil temperatures during slow trail riding and decided that an oil cooler was a worthwhile addition.
There are rubber hoses without braid covering that provide a one-strike failure mode. There have been reports of leaks; see Known Issues.
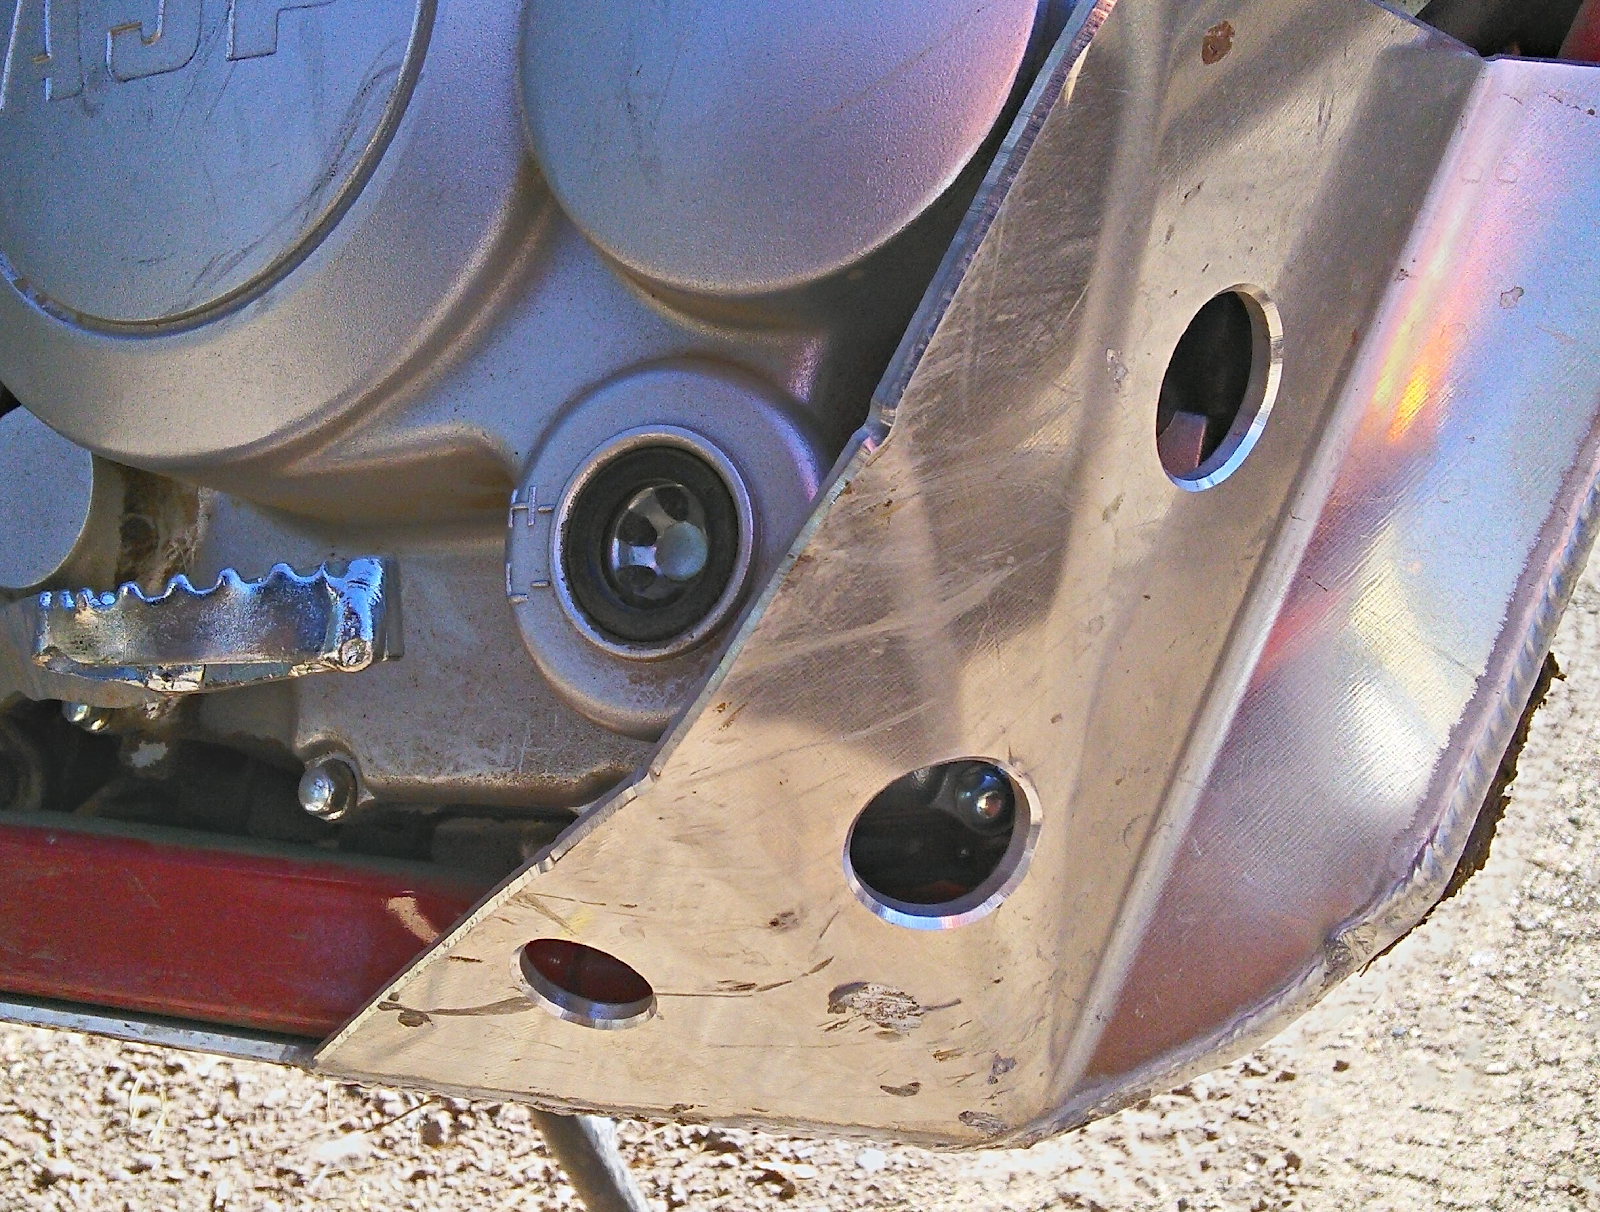
The oil sight gauge on the right side is in a vulnerable position. If you ride in rocks, you will want to get the aluminum skid plate. My skid plate had a gouge by the sight gauge after the first trail ride. It is not clear why such a large expensive structure was designed: most bikes tuck the sight gauge neatly out of the way. |
Bottom Line: See Epilogue: Why did I sell my PR4?
PR4 throttle response and upgrades
PR4 throttle response can seem subdued relative to other bikes in its range. It makes my “uncorked” near-stock CRF230F seem downright snappy in back to back rides around the block and on the same trails. The lack of power / torque shows up in low speed maneuvering over obstacles, and hill climbs where the PR4 seldom stalls but just can’t accelerate.
This review does a good job of summing up the situation:
“...hard acceleration is not something you’re likely to find when you go through the gears on the PR4. With its old-school engine architecture and under-square, 60.0mm bore and 62.5mm stroke, the 233cc Zongshen mill doesn’t whip up a lot of horsepower, but what it does serve is smooth and linear, although not zingy. On the dyno, our PR4 test rig squeezed out a max horsepower reading of 14.6 rwhp at 6700 rpm and a maximum torque reading of 12.55 lb.-ft. at 5200 rpm. Those are pretty wheezy figures by modern standards, but they’re perfectly acceptable within the realm of playbikes such as the Honda CRF230R [I think he means CRF230F, and there is no comparison once the CRF230R is uncorked] and Yamaha TT-R225.
We enlisted veteran motojournalist and DirtBikes.com guest tester Jean Turner to swing a leg over the PR4, and she offered the following take on the AJP: “I don’t know if it’s exactly down on power, or if it’s the nature of the power–very soft, slow to build, fluffy when you crack the throttle. Definitely not responsive, which makes it feel lazy. And yet it chugs right along once you get it into the power.”
True enough, and that’s just the kind of power delivery that first-time riders, young or old, will appreciate. The PR4 is content to just hum along, the bark of its FMF muffler belting out a tune that makes the PR4 sound brawnier than it really is. On the plus side, what little lunge the engine makes is distributed across a wide rev range, with the engine making 10 lb-ft. of torque as low as 3300 rpm and maintaining it for over 4000 rpm before tapering off ever so gently as the engine slowly climbs to its 9800 rpm rev ceiling. In technical terrain, the PR4 doesn’t have enough snap to loft the front wheel over a log or a rock, but it has more than enough grunt and tractability to roll up and over it.- DirtBikes.com review
Comments:
- “Don't waste your money! I got asked to race one last yr in an extreme enduro from the local dealership. Suspension was the best thing about the bike and the power just wasn't there. The pr5 that I raced had a few mods done and still just didn't get it done. To me it felt like riding a TTR 230. I guess if you’re looking to putt around and sight see than this would probably be a perfect bike...but I still wouldn't waste my money on one.” post
- “I've raced for many yrs and I guess I was expecting more power from a pr5! I did like the suspension but that was about it. I've always been a yamaha guy so the ajp just didn't fit my riding style. But hey I did race it before knocking it. I know quite a few people that would definitely benefit with one over a new thumper or smoker!” post
- AJP PR5 made the podium post
The PR4 / Zongshen engine are sold as street legal in Europe and Asia, so the low output helps with emissions compliance. Also, “In order to sell it to learner riders in EU markets [a motorcycle] can not be more than 15 hp.” (post)
Things that have been tried for more responsiveness:
- Larger main jet has been popular in the UK: see Jetting for low altitude
- ProCom CDI: “I have a ProCom CDI [for a CRF230F] on my PR4. There might have been a 'slight' change in the idle speed and low-end power curve, but it also could have been 'wishful thinking' on my behalf...” (link). Brett at Bonjoe’s Cycle Sport states that the CRF230F ProCom CDI alone does not make any difference.
- What would happen if ProCom put an AJP on their dyno for a day and developed a custom CDI for the AJP? The CRF230F CDI brings that bike to life by altering the spark advance.
- AJP CDI upgrade post: “Only ridden it a couple of times since but it definitely seems to be an improvement over stock and seems to let it rev a little higher and breathe a bit freer than the stock one.” post "Really opened it up” post
- Factory cam. Note that a cam alone will have minimal effect. https://www.facebook.com/AJPUSA/posts/980305485404069
- Camshaft: “Camshaft - 'Hot Cams' 1059-1 to suit a CRF150F. This has a similar lobe overlap, lift and duration to that of my XR200, and is quite different to the standard cam. It required a little work to fit, as the ball bearing on the non-cam chain end doesn't fit the AJP head, and so was replaced with a bushing similar to what already existed with the standard cam (but different inner diameter). The camshaft has certainly woken up the engine quite a bit, but probably requires a high-compression piston to properly 'compliment' the new cam (on the agenda soon hopefully!). The engine seems to rev more freely than before, has more mid-range to top-end power, and hasn't lost any noticeable bottom-end, so I am pleased with the result.” (link)
- The mysterious Pennsylvania upgrade - UKFB post on All Terrain Equipment Repair LLC aka AJPPA. No details were ever forthcoming.
- IntelaJet is a device for spraying an air-fuel emulsion into the carb, which increases midrange response on some engines. For example, Dicks Racing makes use of the IJ on custom builds. JXG tried an IJ on the PR4 and it does not work. The problem is the IJ interferes with the Deni accelerator pump circuit. Unlike some carbs, the Deni accelerator pump behavior (squirt timing and volume) cannot be easily adjusted to allow the pump and IJ to coexist. The IJ works on my CRF230F which does not have an accelerator pump.
- Airbox insert. Note: generally a “Torque wing” like this is put in the laminar flow on the output side of the carb.
- Accelerator pump adjustment for better squirt: this thread faded away
- Port polishing (PR5) post
- Upgrade in Australia: “Power wise - bear in mind that (on paper) the standard cam on the Zongshen 233cc engine is even more restrictive than the standard CRF cam, so it is a bit asthmatic in standard trim. Mine had an uncorked muffler from the MX model fitted initially by the dealer, and I found the jetting too lean to suit the less restrictive exhaust, so changing that helped things. One of the reasons I chose this bike was that the engine does have a fair bit of potential for modification. It has a 2 year parts warranty (in Australia), which made me hesitant to tinker with it too much, as I didn't want to void the warrant. I was counting on that warranty to provide a backup in case the engine wasn't up to the task. But after 12 months of riding the bike, the urge to tinker became too strong, and I stripped down the engine to see what sort of condition it was in. I was pleasantly surprised to see everything looked healthy, and so it went back together with a fresh set of gaskets, a Procom CDI, a bit of minor port work, and a higher spec cam. This gave the engine a much healthier mid-range to top-end power delivery, without taking much from the bottom end.” - post
Grafting an AJP engine into a CRF230F - UKFB post. The reverse of this transplant would be great but the AJP has no room for the CRF’s large carb and airbox. (Later there was a post implying that a CRF230F engine had been put into a PR4 frame. The individual never responded to follow-up questions, and in a previous PM to JXG he had stated “You're right..We did an ajp into crf no prob..but the carb would be too big if you reverse it...”)
What about the PR5?
If you want throttle response, especially if you ride at higher elevations, you may want to consider the PR5 which is more powerful and upgradeable. But also a lot heavier. On the other hand....
- “I almost prefer the PR4. Engine just purrs along, not nearly as much stalling, popping, backfiring, etc. as I get from the PR5.” link
- “the PR5 Enduro Extreme is a really nice green lane bike - when everything is running properly but there were a lot of corners cut with cheap HT leads, problems with starter motors etc. etc. that means I just have problems trusting them. I regret buying one if I'm honest.” link
- “they don't have the fuel injection figured out yet” “The injection doesn't work well on the low rpm. On Off throttle problems. Seems to be a AJP problem with this injector.” link
- “Does any one who owns a PR5 ever got the fuel injector figured out? I did the EJK and NGK spark plug, but it's on /off , on / off just like it came from the factory. Are some better than others or is it a faulty engineering problem that AJP didn't figure out. I could use some real solutions.”
- “The Importer from Vermont said to buy a EJK Controller and it would fix the problem, it didn't. Bike runs like crap, and it came that way from the factory.” link link
- Could this saga finally be resolved? Post
- Positive review post
- “2015 PR5 with several hundred hours on it I put valves in it once other than that the motor is the same as when it left the factory it even has the factory clutch and the bike performed great at the TKO” “at the time of the valve replacement the piston and cylinder were still in factory tolerance so I didn’t mess with them” UKFB
Above: JXG, 22 March 2018, began 24 December 2016.
What about this PR4 Extreme Project Bike thing?
Details of this build by the US importer in 2017:
Bonjoe’s Engine Upgrade Kit
Brett Bavisotto at Bonjoe’s Cycle Sport, who has done extensive PR4 dyno testing, reports that the intake tract is not a significant factor in overall performance. The center of the situation is the cam, which is mild. But a new cam alone will not have much effect. A new piston to increase displacement and raise compression, port polishing, jetting and an upgraded pipe (like the FMF) are all needed. (There is a good explanation of why here.) He also uses a ProCom CDI box for a CRF230F where higher rev limit is desired by the customer.
Brett has been careful to preserve the “fun to ride” character of the AJP so there are no surprises in his new power curve. He is quick to point out that horsepower is just one number, but his stock measurements are 2 HP off idle rising to a peak of 14 HP (at an elevation of 600 feet). This explained a few things for me: the PR4 is not 20 HP and it’s probably 12 HP at my elevation. (This post points out that the difference is probably shaft HP vs. rear wheel HP.) His upgrade package is out for testing on four bikes and over the winter he will evaluate and refine the design. Another item of good news: Brett is impressed by the overall engine quality.
2017 update: The kit passed review over the winter and is now available. It consists of a custom cam with geometry based on Webb, piston, intake manifold, and Keihin carb.
The kit produces a 4.5 HP boost. The modified PR4 will wheelie on throttle, accelerate uphill with authority, and power out of corners.
Stock compression is a bit less than 9:1. The kit increases it to 10.5:1.
Porting is nice and helps further, but adds expense. The Keihin carb is better payoff than porting.
Cost will be around US$800.
Above: JXG, 29 April 2017 and 4 August 2017.
Is it possible to get quality at low price without high sales volume?
Manufacturers with high volume achieve economies of scale. They can offer high quality at low price. The Kawasaki KX100, sold to the teenage masses, is a classic example. Phenomenal component quality at low price... and the used market is huge.
Here is a review that IMO could be written about the AJP PR4:
“So as a final review on the Aprilia ETX150 knowing what I know now about the bike, would I have encouraged my sister to buy one? The answer is no. Although the purchase price is very low, it is a nice looking bike and the engine is still operating without fault; the low purchase price simply means low quality materials have been used.
The result of low quality materials means items are breaking or wearing out and have to be replaced. This in turn means the brand new ETX150 purchase price plus repairs/maintenance after a year of ownership is similar to the brand new purchase price of a Honda XR150 or a Kawasaki KLX150.
The Honda XR150 or a Kawasaki KLX150 have far better build quality with higher quality components. Additionally both the XR150 and KLX150 are better designed for more off-road oriented adventure riding than the ETX150.” post
If you plan to ride long and/or hard, this issue is worth pondering. An added complication is this: the PR4 does have some high quality components like footpegs, bars, and controls. But the quality of non-bling components is concerning. On the other hand if you plan to ride just a few times a year, an AJP may be perfect for you. Now if you could just drain the gas...
Above: JXG, 13 September 2017
Three light trail bikes compared
See also: Technical Trail Bikes Comparison
2016 MY | Price point | Engine | Suspension | Small components | US resale market |
Honda CRF230F | $4200 | Bombproof. Vigorous and very upgradeable. | Abysmal, but extremely upgradeable | Gold standard | Very active |
AJP PR4 | $5000 | Long term unknown but promising. Very mild and not easily upgradeable. | Good, but springs and doc difficult to find | Questionable, e.g. no suspension bearing seals | Nonexistent |
Beta XTrainer* | $7200 | Very reliable. Linear but scary responsive: bike will loop out. Extreme caution for novices. | Good but Olle forks are weak. Various pricey upgrades. Springs easily available. | High quality | Small brand but in big demand. Mine sold in 8 hrs. |
Mfr Certificate of Origin
- CRF230F = “Off-Highway Only”
- PR4 = Motorcycle (no EPA or DOT approval, some states will not plate)
- Xtrainer = Motorcycle (no EPA or DOT approval, some states will not plate)
*Note: Xtrainer is a light bike but very aggressive compared to the other two. Loud two-stroke with high vibration. This is not a relaxing trail bike, although hard-core riders think it is.
How much does the 2016 PR4 Enduro Pro USA weigh?
2015 PR4: Ramz reported “1/24/15 stock, all fluids except gas - 233 pounds”
My 2016 with 4.5 qts of gas, restored to original condition except for aluminum skid plate and FMF exhaust: 126 + 134 = 260 lbs on digital bath scale
- 4.5 Qts Gas = 7 lbs
- FMF = basically same weight as stock
- Skid plate = +1.1 lbs
My estimates
- About 259 lbs stock with gas
- About 252 lbs stock without gas
- About 250 lbs stock dry without oil
I can’t explain the difference with Ramz: 19 lbs. The 2015 and 2016 models are very similar.
Manufacturer numbers:
113 KG = 248.6 lbs
Another claimed weights:
Link: http://bit.ly/2eIIKka
Above: JXG, 2 December 2017 and updated 5 April 2018
Oil Analysis
I am always interested in how often oil needs to be changed, in order to strike a balance between spending time and money on oil changes and protecting the engine.
So a few months after purchasing my 2016 AJP PR4 240 Enduro I did a Blackstone Labs analysis. When compared to the metal levels of my 2008 CRF230F, the levels were very high. The US importer stated that he expected levels to drop as the engine broke in, which would be complete around 1800 to 2000 miles.
First, the conditions of the tests...
Oil Changes
(Miles on odometer, total run time, oil type)
- 10 miles, 30 mins, petroleum
- 46 miles, 3 hrs, petroleum
- 193 miles, 19 hrs, petroleum
- 536 miles, 52 hrs, synthetic
- 873 miles, 87 hrs, synthetic (338 miles, 35 hrs on oil)
- First Blackstone analysis
- 1395 miles, 137 hrs, synthetic (522 miles, 50 hrs on oil)
- Second Blackstone analysis
- 2018 miles, 176 hrs, synthetic (624 miles, 38 hrs on oil)
- Third Blackstone analysis
- 2288 miles, 198 hrs, synthetic (270 miles, 22 hrs on oil)
- Fourth Blackstone analysis
No metal fragments were ever observed in the filter screen. Up to around the fourth oil change there was a plume of very fine particles in the drain pan. This is normal break-in, primarily from the clutch. The centrifugal filter has never been cleaned.
Oils used
- Petroleum base for the first three changes (after the factory oil) was Maxima (359128) Premium4 20W-50 Motorcycle Engine Oil, SG and MA2.
- Synthetic is Castrol Power RS 4T 20W/50 synthetic, API SL and JASO MA-2.
- These both meet the requirements on page 10 of the owner’s manual: SG, MA2.
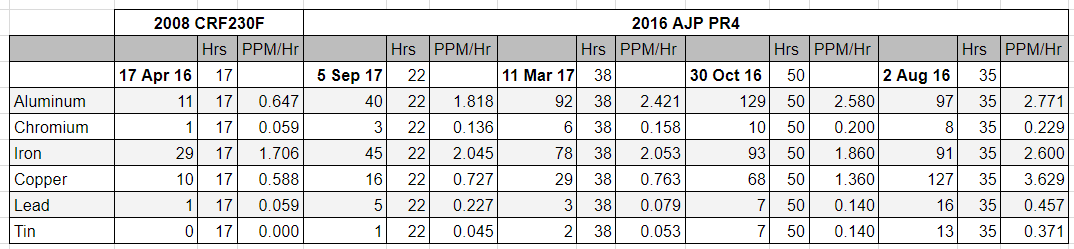
Explanation of the table below, from left to right:
- Element that is analyzed
- Date of analysis and quantity in parts per million (PPM)
- What does 1 PPM look like? Think of 1 inch in 16 miles
- Hours on the oil
- PPM / Hour normalizes the PPM into a rate of metal wearing into the oil: microscopic bits of metal per hour
Explanation of the chart
- The vertical axis is PPM / Hour
- The clusters of bars are by metal
- The first colored bar is always the CRF230F for comparison
- The other bars are dates of AJP analyses (sorry, I can’t get Google Sheets to make a legend)
- The bars go back through time, so the PR4 levels have been dropping over time
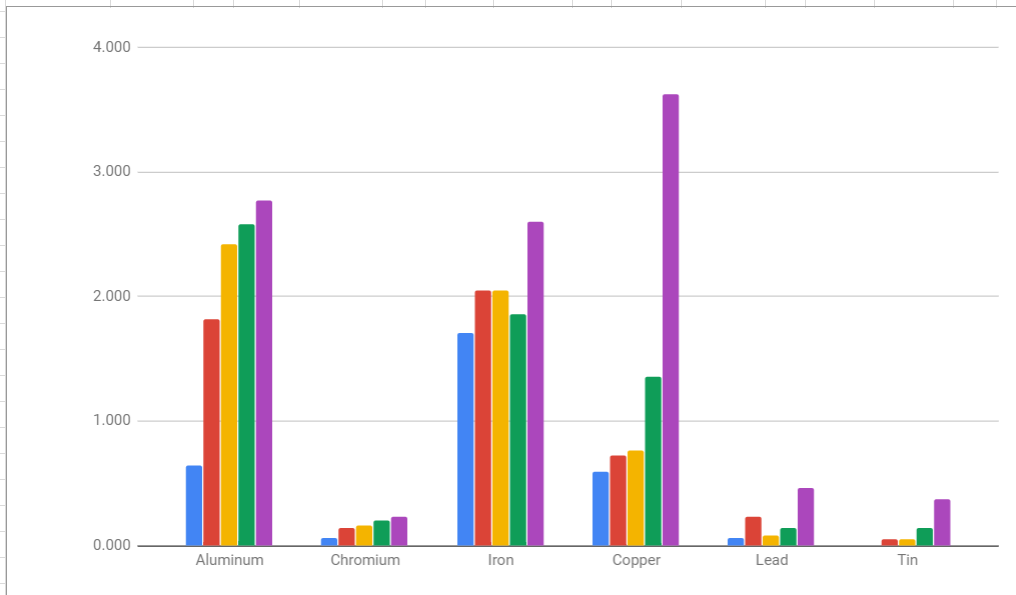
Thoughts on the analysis
- The good news is the PR4 has gotten steadily better
- But the levels are still dramatically higher than the CRF230F
- The bad news is it’s still shedding a lot of metal, at least compared to the CRF. How long can this go on?
- So how many hours does the CRF230F have on it? Unknown. This bike does not come with an odometer or hour meter. At the time of this analysis, I had put 690 miles and 86 hrs on the bike which appeared to be nearly new when I purchased it in 2014. The first owner rode it a few times and parked it, and the second owner was a family whose son quickly outgrew it.
Above: JXG on 24 September 2017
Known or Suspected Issues
Note these are anecdotal reports and the real statistics are unknown. Most owners never report anything, good or bad. Still, they are areas to keep an eye on.
- Right fuel line rub point (2014, 2016) first reported by Ramz
- Left fuel line rub point and missing clip (2014, 2016), Ramz
- See Fuel line routing issues in this document
- Oil capacity is actually 35 oz (when changing oil)
- Wiring schematic, Owners Manual p. 42: One known error is the tail electrical connector:
- Black = ground
- Red = stop
- Yellow = tail
- Wheel bearings, gas tank bolts, odometer cable post
- Stock valve cores are unusual, see Maint section (2016, not 2015)
- Suspension bearings: report of rusting due to lack of grease 2015 PR4, UKFB post includes experience with fleets of PR5’s
- Avoid ethanol fuel if possible (post)
- Backflushing the fuel filter after a couple tanks is a good idea (post)
- Possible loss of prime when fuel is low and climbing steeply: see below (post)
- Oil line leaks: US and UK, UK, UK PR3 reports from UKFB
- Axle spacers and wheel bearings on PR5s link from UKFB
- Engine bolts: “2 at the front (with alloy spacers) and 2 at the rear they all go through the alloy engine casings they were corroded so need grease on asap” UKFB post
- Clutch / bushing failure, fuel line needs replacement at one year and “2600 miles with lots of oil changes” UKFB post, post
- Good variety of mods UKFB post
- Rear wheel spacers defects wear out bearings? (Ultrapassar, 2018) UKFB
Why is there a limited online community?
The problem is critical mass and energy level. Only a few hundred AJPs have been sold in the US and most buyers are not interested in modding or upgrading them.
On the other hand, Honda sells large numbers of CRF230F's, they are a very solid platform on which to upgrade, and a fanatical group of modders is on ThumperTalk.
When a person there read the AJP sales literature and declared that the PR4 is comparable or better or whatever it was, I felt obligated to share my experiences since I ride both bikes. This turned into the longest thread I have ever seen anywhere on the PR4 including Chinese metallurgy and all the things I should do to salvage my PR4: new engine, new frame, new suspension, etc.
The Beta XTrainer is another bike sold in relatively small numbers. But its owners are racers or aggressive backcountry riders with lots of energy. And while a solid and high performance platform, the bike needs upgrades to reach its potentials and there are tons of options. Also there are some very concerning issues, such as the flawed oil injection system. So the FB forum reaches critical mass from sheer energy. It is also remarkable for international and female participation.
XTrainers and modded CRF230F's are revolutions for their owners. These bikes are adored because they provide unique and exhilarating experiences. Strong communities form. post
Update: Sometime in early-mid 2018 the AJP Forum went away. It has not returned yet.
Epilogue: Why did I sell my PR4?
Lack of responsiveness. Like a riding mower. Enough said.
Lack of reliability. I want bikes that will be backcountry reliable for a decade. While the oil numbers are better, I don’t trust the engine to last with heavy use. Rusting spoke nipples and corroding rims? Well, you get what you pay for.
What would have changed my mind?
If the bike was truly light. Custom XR200Rs have been built that weigh less than 200 lbs. These are serious trail bikes. My Beta Evo trials bike weighs somewhere around 170 lbs. It is a powerful 300 CC 4T with water cooling! But limited suspension.
There is a 2018 KTM 250 around 200 lbs. The KTM Freeride 350 (the four stroke, not imported into the US) claims 101 kg / 222.7 lbs dry. If AJP could achieve low weight, lack of responsiveness would be less of a deal-breaker for me.
If I could install a CRF230F engine. These engines are quite responsive when uncorked and massively upgradeable with many options. With this option I would have gotten the forks rebuilt and replaced the shock.
After 6 months on CL I sold my PR4 locally for $900. Two years before I paid $6K out the door with spark arrester muffler and aluminum skid plate. This is a loss of 85% in two years.
I want a satisfied buyer so each prospective buyer was asked to read my review of pros and cons in this document. Obviously, that stopped a lot of prospective buyers.
The gentleman who purchased the bike decided that it will likely fit his family's needs and is an acceptable risk at the price point.
I’m just glad it is gone. I wish other AJP owners all the best and hope that their bikes last for many years.
Above: JXG, 1 May 2018
Parts
Crossover parts http://rickramsey.net/PR4crossover.htm
UK vendor with some parts
http://www.wemoto.com/bikes/ajp/pr4-enduro_extreme_240/13-15/
Bob’s Tyres does mail order: “We are AJP Main Dealers and have a large selection of parts in store and if we don't have it we can order direct from Portugal” “we have sold and PDI all models and serviced, warranty'd, modified and worked on all aspects of these bikes.” https://www.facebook.com/BobsBikeTyres/
USA: Note that AJP parts must be ordered from dealers, not the US importer. The importer may drop-ship to you on behalf of the dealer.
Wear items
Wheel bearings (confirmed 3 Oct 2016 with US Importer). JXG remark: VXB are unbranded. I would go with premium quality like Nachi or Koyo. See Wheel bearings for reports.
- Service Manual, p. 1-38
- 2 ea. Front wheel bearings 20x42x12 6004 2RS (VXB) (Nachi)
- 2 ea. Front wheel DUST SEAL 25x42x7 (VXB)
- Service Manual, p. 1-40
- 3 ea. Rear wheel bearings 6005 2RS (VXB) (Nachi). Note there are three rear bearings.
- 2 ea. Rear wheel DUST SEAL 30x47x7 (VXB).
Brake pads: rear pads are the same as the 98-02 Yamaha YZ range. Organic for dry, sintered for mud. (link)
Centrifugal oil filter:
- Right cover gasket is unique shape: 90206-I006-0000
- 240 cc: gasket is 90209-IA20-0000, maybe same as classic Honda XR and CRF
Unique items that may be good to have on hand:
- Air filter if you ride or haul in heavy dust, extended trips
- 158197 Air Filter Husaberg MX 97/99 - AJP PR4 (link) Power Sports Place $27.
- Chain guide:
- UFO part# 12-3660, from a Honda CR/CRF 1999-2004. Parts Unlimited $24 or eBay.
- Right cover gasket
- Spare needle clip and needle for when the clip goes airborne or you step on the needle: kit on eBay
Vulnerable to sudden impact:
- Chain guide may break on impact, rather than mounting bolts giving way
- Brake rotor $123 from dealer, substitutes? (post) May be Galfer DF677FLW but dealer quoted $108 so OE appears to be cheaper than Galfer.
- Clutch cover $75 (post)
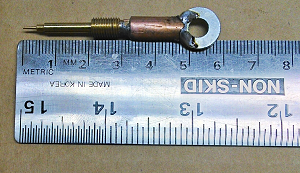
Fastener sizes and tools needed
For field service, front to back:
Axle 12 mm hex large size
Axle clamp 5 mm hex
Fork protector 8mm
Brake rotor 4 mm hex, nut 10 box
Brake caliper 13
Banjo bolt 12
Brake bleed 8
Spokes 5.4 mm
Fork caps 30 mm
Fork clamps lower 12
Fork clamps upper 13
Handlebar clamps 6 hex
Clutch perch 8mm socket only
Clutch 10
Front brake master cylinder 4 hex
Throttle housing 4 hex
Side panels, seat, skid plate 4 hex
Subframe 5 hex
Brake pedal 5 hex
Brake cylinder 4 hex
Shifter 10 box limited clearance
Sprocket cover 8 socket limited clearance
Rear axle 22 large size
Chain adjustment 13 box only
Chain guide 5 hex
Rear sprocket 5 hex, nut 13 box
Summary of sizes:
- 6, 8, 10, 12, 13
- Hex 4, 5, 6
- Unusual: 12 mm hex front axle, 22 mm rear axle
Shop service:
- Oil drain 24 mm
- Frame 8 hex
- Swing arm nut 22 socket
- Suspension linkage 10 hex
- Countershaft bolts 10 socket
Minimalist field service kit
More info here (see also JMS posts)
- Tusk 3-Way Mini T-Handle Kit 1/4" RMAM, 7 oz: 6, 8, 10, 12, 13mm sockets and #2 Philips. Works with any 1/4-inch drivers, see photo below.
- 10 mm box wrench for shifter
- 13 mm box wrench for chain adjusters
- 5" locking jaw pliers
Allen wrench sets:
- Topeak Mini 9: 2, 2.5, 3, 4, 5, 6, 8mm allen, T25. 3.2 oz
- Bikemaster Multi-Function Hand Tool: 2, 2.5, 3, 4, 5, 6mm hex, plus an 8mm hex tip, cross and flat screwdrivers. More torque than the Topeak.
For wheel removal on the trail. May not be needed for Tubliss users:
- No-Mar tool for front axle: 12 mm, somewhat rare, direct from NoMar
- Needs a wrench, so may want to carry a high-quality 6-inch crescent wrench and also use this on the rear axle: about 9 oz.
- Tusk Racer Axle Wrench 22mm/24mm (Fits: 2013 SUZUKI DR-Z 400S, Part# 1135180009), RMAM, 4.3 oz
Working with the PR4 fuel system
2016 PR4 Enduro Pro (US)
What is the fuel capacity?
Removing the fuel tank provided an opportunity for measurements. The maximum safe fill = 7.5 US Quarts = 240 US Oz = 1.9 US Gallon = 1.6 Imperial Gallon = 7.2 Liters
This fill brings the fuel level to a point directly below the front lip of the fuel opening. It helps to put a piece of tape on the outside bottom of the tank indicating this line. In my experience, you can now ride up steep hills without fuel leaking out the cap vent.
If you are going to ride flat terrain and are willing to gamble with your posterior, you can put another 16 oz in for a total of 2 US gallons. This will bring the fuel level to touch the bottom of the two threaded inserts. (These are two plastic bumps that hang down like tonsils inside the tank.) Beyond that, you probably don’t want to go there.
The bike can probably use all this fuel except for 2 to 3 oz.
Note that the top 2 qts or so in the fuel tank will siphon down the left line without the fuel pump operating or if the fuel filter is clogged.
As part of this exercise, I decided to put quart markings on the tank. I used P-Touch labels and placed them well back so they don’t get rubbed off when riding. I also made a Sharpie mark under each for when they come off eventually.
If you want to reproduce these marks, the measurements are as follows:
From bottom right of tank:
From upper right corner of tank:
|
Fuel line routing issues
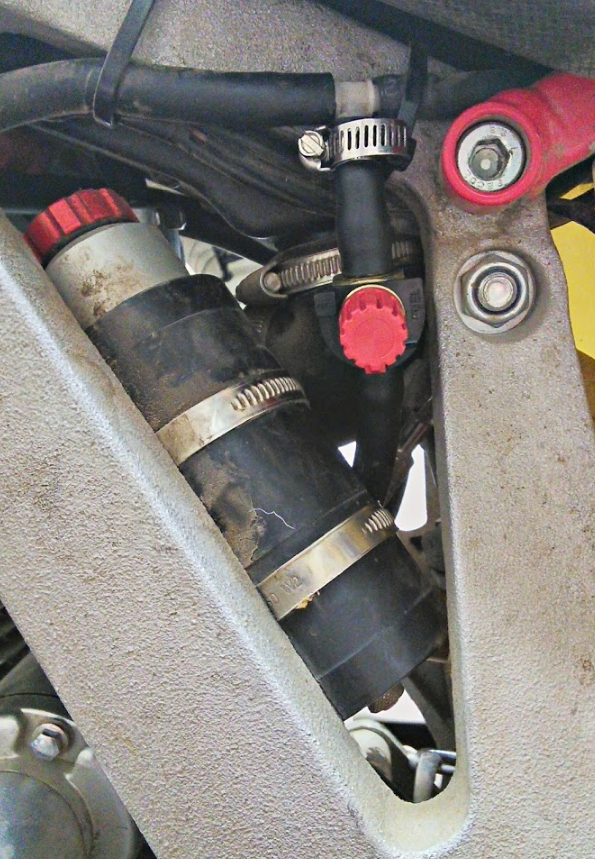
As Ramz discovered (link), the shock compression rebound knob is like a gear that neatly pulls the fuel line off the carb. You almost could not design a more effective mechanism. Part of the problem is the small barb on the carb connector. All the other barbs in the fuel system are 7.5 mm OD. The one on the carb is only 5.9 mm. So the carb grips the fuel line much less tightly than every other connection. I thought I was doing a good job pushing the hose slightly away from the knob any time I adjusted it. |
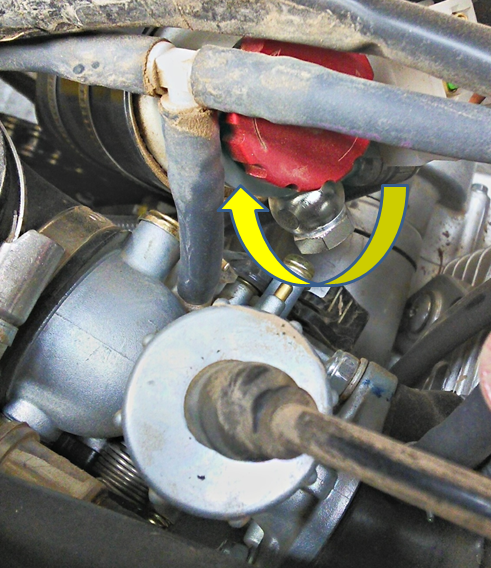
But then out on the trail I adjusted the clicker--and suddenly there was fuel running everywhere.
If the tank is full, it is going to siphon merrily until you either get that line back on the carb or there is about 2 qts on the ground.
Retrofit: Install a 1/4 to 5/8 inch (6 to 16 mm) gear-style hose clamp, the kind with a tightening screw. This will lock the hose on firmly. Be careful the excess clamp band does not interfere with the choke cam.
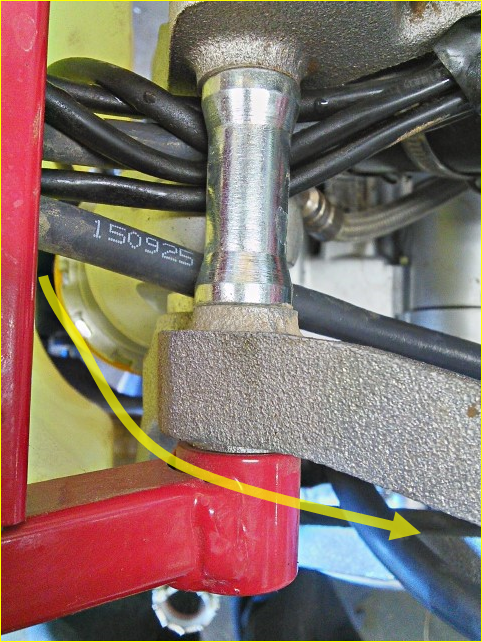
I have tried various ways to guide the fuel line slightly away from the knob. Pulling the line towards the carb with a wire is good... except it tends to kink the tube that runs down to the carb. Pulling the line ever so slightly upwards with a wire around the frame is also good... until it pulls the line off the carb.
Ramz also had a concern with the right fuel line on his 2014 PR4: link. Specifically, how it squeezes between the subframe bolt / spacer and upper shock mount. I continue to monitor this area on my 2016 PR4 and it seems OK. Update 23 Sept 2016: When reinstalling the carb boot, this is a very tight area. I decided to reroute the fuel line over and to the outside as shown ⇒ The line is still tucked back under the edge of the seat so it does not stick out much. |
Fuel line vacuum leaks
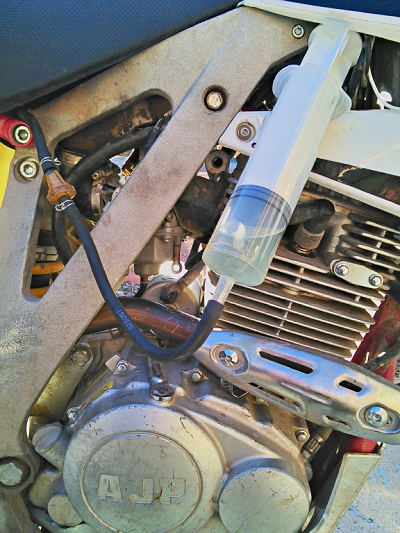
If the engine runs out of fuel especially under hot conditions it is possible the right side line is kinked or leaking or touching the head and overheating. Because the pump is pulling on this side, a leak will be totally invisible. But air will be streaming into the fuel pump. Now you will say, my line is like new so there is no way there could be a leak. That’s what I thought.
But the dealer told me a story about a mobile crane he once owned that kept running out of gas. They checked the vacuum side and it was pulling air through a tiny pinhole that would open under certain conditions. So when I applied a vacuum to the PR4 with a catheter-tip syringe, guess what?
A steady stream of bubbles appeared in the syringe. I put clamps on both sides of the fuel filter and no more bubbles in the syringe: |
Expect this problem to get worse as the AJP fuel line ages. It is loose to start with and will get looser.
Fuel prime issue
Recently I experienced a loss of prime with low fuel level in steep terrain: post. The US importer confirmed this issue in an email:
Please keep in mind that when going up a steep hill that includes rough terrain - there needs to be about 3 quarts of fuel in the tank. Otherwise - the fuel pickup could pull air rather than fuel when the bike gets bounced around - which could cause the symptoms you describe.
Many riders will never experience this problem. But if conditions come together, and very hot or very cold weather is in the mix, this design limitation could have consequences. I almost carried two quarts instead of four. If I hadn’t, a very long walk would have resulted. Throw in some weather and it could have gotten interesting real quick.
Prevention: If you are getting low on fuel and facing steep hills, add a quart or two from your carry supply. This is the best option, obviously.
Diagnosis: Look at the fuel filter and crank the starter
- If fuel is not moving around
- Fuel pump vacuum line is disconnected, pinched, or leaking
- Line between filter and pump is disconnected, pinched, or leaking
- Fuel pump has failed, possibly intermittently
- If filter has visible debris, back flush it if possible
- If fuel is moving around but not flowing
- Line between pump and carb is disconnected, pinched, or leaking
- Otherwise, you have lost prime
When the engine is cranking the fuel pump generates about 3 psi of fuel line vacuum measured at the fuel filter. When the engine is running the fuel pump generates 7 psi: 43% more vacuum.
Another fuel flow issue, in this case related to the filter: post
Recovery: If you lose prime, here are the options:
1. Raise the rear of the bike on a bank, rock, log, or even by lifting so that fuel siphons down the left line into the carb bowl, the engine starts, the fuel pump pulls hard, and you recover prime.
2. If you have 4 qts, maybe less, add these into the tank and you should get flow down the left line into the carb bowl.
3. If you have less than maybe 2 to 3 qts, don’t put all of it into the tank or you may end up stuck with no prime. You need to somehow get fuel into the bowl. Pull the output line off the fuel pump. Use a very small funnel, a syringe, a hollow reed, or something to “mainline” fuel directly down into the carb bowl.
4. If you have no extra fuel, but you have a syringe (see below) or length of tubing (ideally 1/4-inch ID). Connect the syringe and/or tubing to the right fuel line at the front end of the fuel filter, the line before the fuel filter (need a coupling), or even the brass fitting on the fuel tank itself. Draw up a couple of ounces of fuel. Then inject this into the left fuel line so it goes into the carb bowl.
I am now carrying a 100 ml syringe with a length of fuel line just for the AJP. This device can be used for option 3 or 4, and also to backflush the fuel filter. It’s sort of like an epinephrine injector (Epi-Pen) if the bike loses its prime and goes into shock.
Be sure to get a syringe with a tapered “catheter” tip that will fit 1/4-inch ID fuel line, not one with non removable tubing. This one has a tip that tapers from 0.5 to 0.2 inches: Measure Master Garden Syringe, 100 mL/cc 3.4oz (Amazon). Gas will soon ruin the rubber plunger, so the syringe may need to be replaced if used. It helps if you can remove the plunger and wash it thoroughly with dish detergent.
This writeup will be updated with new results and feedback. (JXG, 7/22/16)
How can I protect my butt or bum from filler cap leakage?
- “My only gripe with the bike is the fuel filler in the seat and the fact it gets covered in mud. I have now put some flexible rubber under the seat that covers the cap but I can pull back enough to fuel up. I have tried all sorts of caps to cover but not found anything I am happy with yet. Also a filter sock to go in the tank would be great.” post
- Special seat cover with flap: “got the seat cover from JN Seat Covers (you can find them here on Facebook) and it's ref. JNM32SXV-PR5. I asked for the special mod of the foam underneath the "mud flap" and not only prevents dirt from entering the cap/tank but also makes the seat comfortable on that area. The top black section also has a thin foam layer underneath, making the whole seat more comfortable.” http://www.jn-seatcovers.com/home-en/ - UKFB post. Photo below by Victor Souza:
- Steve Tucker has grafted on a fuel cap breather: link (UKFB)
- Rubber sleeve http://www.ajpforum.com/viewtopic.php?f=7&t=1204
A fuel shutoff valve for the AJP (EXPERIMENTAL)
A fuel shutoff valve is a fundamental safety device on a float carb engine but the AJP PR4 does not have one. I decided to try retrofitting a valve.
The PR4 has limited space available. My initial thought was to move the T fitting forwards towards the fuel pump. An elbow just above the carb inlet would allow the carb line to meet up with this T, something like this:

Mocking up the layout on the bike got me thinking about the peculiar circular loop of the AJP fuel system. The Paioli fuel pump puts out about 7 psi when the engine is running. My impression is that float valve carbs can handle more like 3 psi. Because of this, some systems use a mechanical pressure regulator.
So my theory has been that the left side of the AJP system is a low-tech pressure regulator based on gravity [I have since found supporting evidence from Anthony Stockman statement, UKFB reference]. The back-siphoning behavior is just a secondary effect. When the float valve closes, excess pressure climbs uphill from the T fitting into the fuel tank. The rise is about 5.5 inches over a length of 9 inches. So I did not want to mess up the geometry of this layout more than a little. Also, there was little space forward to place a valve.
Thinking about siphons led to another idea. Why not drop a loop BELOW the level of the carb and place the valve there?
From the perspective of the carburetor, would there be any difference between fuel dropping from the T vs. detouring through a closed loop? And this loop should no effect on the pressure regulator above the T.
Here are the plumbing details:
- AJP states that the fuel line is 9 x 5 mm (Service Manual, p. 5-1) but the actual dimensions are....
- AJP fuel line 8.25 OD x 5.6 mm ID = 1.3 mm wall thickness
- JetsRUs has 5/16 inch (8mm) ID x 1/2 (12 mm) OD gray tygon fuel hose (009-031) but this is very thick
- Motion Pro Premium 1/4 inch fuel line (RMAM) is what I used
- 6.3 mm ID x 11 mm OD
- This is very expensive but compared to Tusk, “Motion Pro is way better” (review)
- AJP brass fuel tubes from tank: 6 mm OD without any barbs.
- AJP fuel line is tight
- 1/4 inch is a bit loose
- AJP carb plastic tee barb: 7.5 mm OD
- AJP fuel line is very tight
- 1/4 inch gets loose: need to use a hose clamp
- Deni carb inlet barb: 5.88 mm OD
- AJP fuel line is loose to the point of coming off: this is why the shock compression knob is so effective at pulling the line off
- 1/4 is way too large
For the elbow I used a FASPARTS Elbow 1/4" Barb Brass Fitting (Amazon) which was about $9.00 with shipping. The Motion Pro line was about $6 per foot.
I cut two barbs off the lower branch of the elbow in order to place it as close to the carb as possible. Note the heavy clamp at the carb, and how it is turned so it does not interfere with the choke. The elbow may not be strictly necessary with the “loop” design but it is also an adapter between 1/4-inch line and the AJP line that fits on the Deni carb fitting. |
With the elbow in place, there is now clearance between the shock compression knob and fuel line. Further back, routing lines outside the frame avoids wear concerns first raised by Ramz and reduces clutter around the upper shock mount. They are well-protected by the overhang of the seat. |
First I chose the Briggs & Stratton 698183 Fuel Shut-Off Valve (Amazon) based on a comparative review but then heard from an AdvRider that he has had three fail. I noticed the B&S valve is marked with a “No fuel” symbol and wonder if they are counterfeits. (But then later another reviewer stated that the symbol actually indicates the OFF position.) He suggested a brass Made in USA valve: Amazon. This valve is much more expensive but it looks very solid. See the photo below.
Installation notes:
- Secure the fuel line loop to the shock reservoir hose to reduce vibration and stress on the carb connection
- The loop blocks the left carb nut slightly, another reason to use a ratcheting box wrench
- The bottom of the loop should not touch the starter to avoid rubbing and fuel overheating that could lead to vapor lock.
The fuel line and T are now outside the frame rail but back under the overhang of the seat. The valve is likewise more protected than the photo might suggest. Notice the amount of open space around the shock compression knob. |
This retrofit is not a complete solution. If successful it should
- Reduce amount of gas lost if the float valve sticks while the bike is parked
- Reduce amount of gas lost if bike falls over while parked
- Allow shutting off fuel if the bike falls or has to be laid on its side
- Allow the bike to be stored with an empty float bowl, by shutting off the valve and allowing the bike to run out. E10 ethanol should not sit in a float bowl for more than a couple of weeks.
It does NOT protect against a split fuel line, which is the value of a traditional bottom-of-tank valve in a gravity system.
UPDATES
31 Oct 2016: I have had one episode of vapor lock. While riding slow at high revs and high load, the loop of fuel line got hot and the engine faded out over a few minutes. Then it quit completely. I let it cool down for 10 minutes and it restarted with no problem. After this I wrapped the loop with reflective aluminum tape. Due to this problem I consider this mod “Experimental” at this point.
23 November 2016: Had another episode of the bike running out of fuel when hot. See Fuel line vacuum leaks for details.
Suspension
Suspension settings
PR4 Enduro Pro per Brett at Bonjoe’s Cycle Sport
- Shock preload: 100 mm / 3.9 inches rider sag
- One, no more than two turns of preload max: otherwise you need a heavier spring
JXG’s spreadsheet
Forks: the documentation quest
“Shame on Marzocchi, Gas Gas and others for selling stuff and leaving customers high and dry on proper service procedures.” - trials rider post
2016 PR4 Enduro Pro is probably most similar to the “PR4 EN/SM/TRAIL fork (2012)” on p. 1-30 of the service manual:
- MARZOCCHI USD 40mm
- Mine are marked: 1311176>B 17/15
- Spring rate: 40 N/mm (4.1 Kgf/mm) = 228 lb/inch
- Spring dimensions: Ø34, 5x480x25, 6mm
- JXG measured 473 mm
- Spring preload: 10mm
- Spring preload bushing: 40 x 65 mm
- JXG measured 65 mm
- Oil: AGIP FORK SAE 10W
- Oil capacity: 430 ml
- Seal sizes are listed p. 1-31
What about documentation?
- Parts List, page LP26 does not show any fork internals
- Marzocchi http://www.marzocchimoto.com/en/ is back in the motorcycle business but the documentation on their website does include any 40 mm forks
- AJP fork manuals post: note the 48 mm is for the “Extreme” model. “Marzocchi48mm_ English_ EM.pdf” is the file. This fork is different from the PR4 Enduro Pro 40 mm fork: air bleed screw, Progressive Floating Piston (PFP) external adjuster, and different fork caps to start with. This is a closed cartridge (CC) system which is not typically used on trail bikes: ref.
Documentation has been requested from:
- Dealer
- US importer
- AJP factory
- Marzocchi under new ownership
No response has ever been received except from the US importer who stated they have none. See Suspension update below.
What about springs?
Hygear Suspension email: “The best approach to springs is to find an available list of current made springs to see if something can be installed with modified adapters. We do have a company that will make custom rates. If this option is considered we would recommend to send the forks in to measure before springs are made.
Above: 13 January 2017 by JXG. Thanks to Ramz for contributing material and leads.
Springs rear
2015 PR4: “I finally had a chance to get to the suspension shop (Hygear Suspension) today. They tested the spring rate and it is a 400 lbs/in, or 7.1 kg/mm spring rate. Based on a 200 lb rider weight (nearly identical to flipper), we settled on trying a 450 lbs/in (8.0kg/mm) spring rate. Because the ID of the Hygear spring is slighty larger than the Sachs spring, the shop is machining a couple spacers to take up the slop.”
“The Hyperco spring and spacers from Hygear Suspension came on Thursday, and I installed them that afternoon. The spring is a 450 lbs/in (8.0kg/mm) spring rate. It has a 203mm free length.
Installation on the shock was a little simpler as the spring was shorter than the OE spring, even with the spacers installed. The OE spring needs to be compressed to be removed from the shock, but the Hyperco spring did not. The spacers were machined perfectly and everything went together as it should.
For a 200lb rider this 8.0kg X 203mm spring is still just a little on the soft side. I was looking for 15-30 mm of static sag with a rider sag of 95-105mm (3.7 to 4.1 in). I ultimately settled on an initial static sag of 20mm, with a rider sag of 105mm as my baseline setting.
The 8.0kg spring is probably suited to a rider weight of 180-200 lbs, whereas a 8.5kg/mm (475 lbs/in) would likely be more suitable if the rider weight may exceed 200 lbs by much, or for someone with an aggressive riding style.”
“I'd bet that a 200+ lb rider would benefit from going up to a 9.0 kg (503 lb) spring. The 8.0 kg still feels springy to me. However; like you say, it'll be nice for trail riding and rougher terrain at a modest pace. I'll be hesitant to go any heavier until I end up bottoming out because of a too soft spring rate.” (link)
Hygear Suspension email: “The closest available spring to 9.0Kg that we offer would be 500# Rate. We will also need to machine the adapters for mounting. The price for springs and adapters is $119.99
Hagon shock lowered seat by 60 mm - UKFB post. Not clear which AJP this was. The Hagon is an emulsion shock with a single damping adjustment.
Suspension analysis by Bonjoe’s on 4 August 2017
Note: This is the base level suspension. The Extreme appears to be more serviceable.
Brett disassembled the PR4 Enduro Pro suspension for the first time. It is very difficult to work on. Not supported by the factory even as a dealer.
The Marzocchi forks are “unserviceable.” There is a factory crimp on the damping rod.
The shock is a piston not a bladder design. He cannot find any parts or specs.
He will not be doing any further work on PR4 suspensions: not worth the trouble.
Attempts to get further information have not been successful to date.
Another viewpoint:
- “Les Tinius at LT Racing knows Sachs and Marzocchi too. Contact him before throwing in the towel.” post
See Fork maintenance for more information...
Above: JXG on 13 September 2017
Carburation
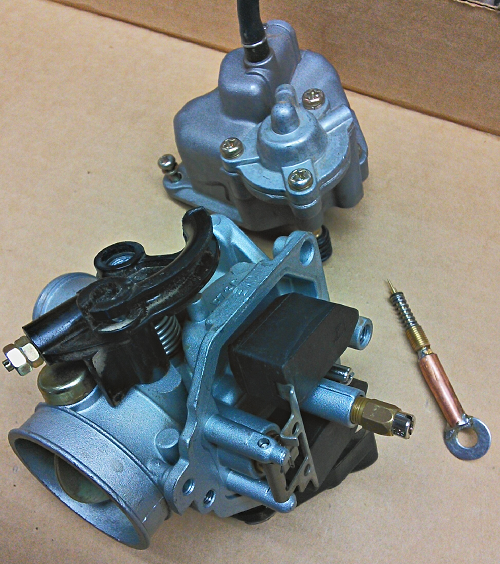
DENI PZ30 with accelerator pump, Keihin clone
Carb overview http://rickramsey.net/PR4maintenance.htm
Complete carb available: $21
http://www.motopartsmax.com/index.php/main_page/product_info/products_id/14862
Deni stock jets are NOT equivalent to Keihin jets--see ✝ below
Other jets: see Ramz
- Main: N424-36 Keihin main jet nickel plated; sizes 100-200 Jetsrus
- Main alternate: 99101-393 Keihin main jet brass; sizes 60-200
- 102 is only available in the N424-36 JetsRUs
- 102.5 from EBC (Amazon)
- 104 appears to be available from European scooter shops
- 108 from JetsRus Partzilla
- 110 from RMAM
- 112 from RMAM
Jetting for low altitude
Brett at Bonjoe’s Cycle Sport based on dyno testing of stock PR4:
- Elevation up to 1000 feet?
- Main jet: Deni 105 Keihin equivalent is ~108 ✝
- Pilot jet: Deni 48 Keihin equivalent is ~50 ✝
- Can try 1 slot up on needle for slightly leaner (second slot from top): midrange was a bit rich on analyzer
Another viewpoint: (Yorkshire goes up to about 1000 ft elevation) “Finally got round to trying a bigger main jet in my PR4 today - general concensus is to go up from the 105 [actually about equal to a Keihin 108] to a [Keihin?] 112, but mines the 200 not the 240 and I just happened to have a 110 set here (or a 115 and 117.5) so thought I'd try it. When I got the carb out (not the easiest of bikes to remove carb from as it has to come out from above) I realised the jets I had were the wide head ones but they had the same thread and were the same depth etc, just a wider head so stuck it in and hoped for the best. It definitely feels better and doesn't seem to have affected it in a bad way and the plug looks a good colour too. It seems to get up to 40mph pretty quickly on the road and I got it up to 64mph but kept catching up with other cars. Don't think it's got a lot more up top but considering the best I'd seen previously was about 55-56, I think it's a bit of an improvement.” -- LumberingJack, http://advrider.com/index.php?threads/ajp-cycles.1029612/page-10
108 or 110: “try nipping the needle up a notch in the seat and I'm told 108 or even 110 main jets improve the fueling.” - UKFB link
110 or more: “The standard main is a 105, start with a 110, but have a 112 and 114 handy. It will be a test of trial and error if you don't have access to a gas analyzer. If you haven't already done so, lift the needle ONE notch; that will compensate for the additional low speed air on progression, due to removal of the air filter cover, (which they were originally jetted for). Don't forget to adjust the idle mixture, but make sure the idle speed is fairly low, otherwise adjustment will be a bit vague. If it's been a mile out, expect the engine revs to rise once nearing correct mixture, but lower the idle speed again and re-adjust.” - UKFB link
110: “first outing on the 240 with the 110 jet and its transformed the bike. will rev out no problem now and makes big hill climbs so much easier having to actually throttle off in some cases and i think there is slightly more bhp.... i left the needle 1 down from the middle which in effect lifts the needle - UKFB link
112: “the jetting worked out well, pulls cleanly and rev's out, motor seems less stressed at cruising speed so all good.” - UKFB link
Jetting for high altitude
2016 PR4 Enduro Pro (JXG)
Are plug colors chart still relevant with unleaded gas?
"Reading spark plugs needs to be done with proper light / magnifying glass mentioned previously so you can see all the way down (invert the plug to read it) into the plug where the insulator (white part of the plug) comes through the steel case. What you are looking for here is a slight coloring on the insulator just above the steel case. This is called the “fuel ring” and to have the correct air fuel ratio, the “ring” should be visible all the way around the insulator. If it is spotty or very light, the engine either has not run long enough to develop a fuel ring, or it is too lean. A visible ring that just offsets the white color of the ceramic is usually a good sign." http://www.automotiveu.com/tuningunleaded.htm
29 Sept 2016: Chart has been updated to show Deni and Keihin sizes
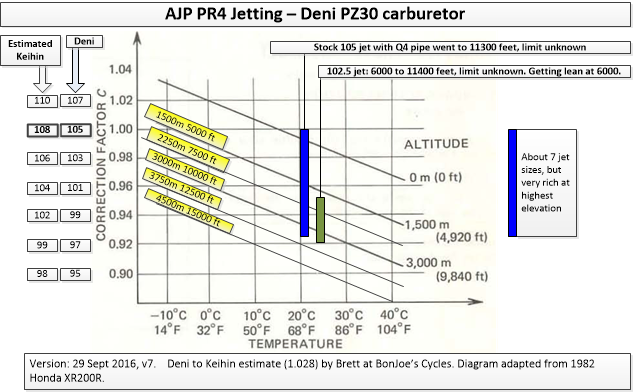
Thanks to Ramz for suggesting the classic XR200R jetting charts as a model for the AJP.
Important: For all of 2016 the float level was 5 mm low and the bike was running lean. This should be kept in mind as you read the following.
✝ = new data from Brett at Bonjoe’s Cycle Sport on 27 Sept 2016. Brett did measurements with jet drills after finding puzzling jetting / dyno results.
May 2016, new:
- All stock except Q4 pipe
- Main jet: Deni 105 (Keihin equivalent is ~108 ✝)
- Pilot jet: Deni 48 (Keihin equivalent is ~50 ✝)
- Fuel screw 2 out
- Results: 6000 up to 11300 feet still accelerating up steep grades in first gear. No hint of bogging even at 11300 feet.
- Plug very dark
- Typically starts with 1/2-second tap, minimal choke
June 2016 summer jetting:
- EBC 102.5 main jet (Amazon) from AJP dealer
- Keihin 42 pilot jet from RMAM
- Fuel screw 1-3/4 out per Ramz
- 9/25/16: 2.5 out seems to reduce decel popping
- Idle was a little fast. Was able to use a thin screwdriver to nudge it less than a quarter turn CCW which is good.
- Results: 6000 up to 11400 feet
- Plug: Tan at 6000 feet, a little lean: PHOTO. (Not a modern plug chop test.)
- Similar ease of starting
September 2016:
- Sometimes starting very hard at 6000 feet. Tends to start with no choke, throttle wide open as if it were flooded.
- Starting very hard at 9000 feet even with above: second day ran down battery completely and never was able to get it to start. Returned to 6000 feet and it started with the WOT method.
- Will not idle at all until warm
- Can you guess the problem? Checked the valves. Found the intake tappet had zero clearance, exhaust was spot on. Set the intake tappet to spec; see Step-by-Step for procedure.
- Tapped the starter for 1/2 second. Bike started, now idles perfectly.
2016 winter jetting (1 Oct 2016 version)
- Main jet: Deni 105 (will switch to Keihin 108)
- Pilot jet: Deni 48 (will switch to Keihin 50)
- 1 slot up on needle for leaner: BonJoe’s, also this post: “found it's definitely improved things a bunch. It still won't wheelie just off the throttle but it's a lot better when popping over logs etc and does pull harder out of corners now.”
- Fuel screw 1 out
- The pilot jet may be too rich
- 6000 feet: OK throttle response, pops a couple times on hard decel
- Throttle response remains modest
2017 (New 29 March 2017)
2017 spring jetting
- Main jet: Deni 102.5
- Pilot jet: Keihin 42
- January: Discovered that fuel bowl level was 5 mm too low, which means the main jet has been lean.
- 1/4/17: Float level is 5-6 mm low! See photo in Checking float level.
- 1/20/17: Correctly set float level
- 1/21/17: Test ride, lots of popping, will not idle until warm, set fuel screw: 1.5 out
- 1/28/17: Plug has whitish dusting after 4500 to 5500 ft ride. Richer but also lower so would lean out. Seems very lean: hot smell, backfiring. Plug chop test on street after 15 min warmup shows no visible ring.
- Removed carb and back to:
- Main jet: Deni 105 (Keihin equivalent is ~108 ✝)
- Pilot jet: Deni 48 (Keihin equivalent is ~50 ✝)
- Fuel screw: 1.5 out
- 1/30: Test ride: it felt, sounded, and smelled much better.
- 3/29/17: Adjusting the fuel screw: Used a tachometer with 10 RPM resolution: Amazon (Replaceable battery model). This was very helpful.
- Set fuel screw to 3/8-turn out at around 850 rpm
Diagnosing problems
Keihin carburetor theory
http://www.keihincarbs.com/tips/gate.html
http://www.dansmc.com/carbs2.htm
“Decide which circuit needs adjusting.
- Idle or idle and light throttle: Slow speed (pilot) jet/mixture screw.
- Steady throttle and/or light acceleration: Needle.
- Wide open throttle hard acceleration: Main jet.
Decide if you are rich or lean. Worse hot: Symptom of rich. Worse cold: Symptom of lean.” http://www.johnsmotorcycleparts.com/Keihin_CV_tuning_tips.htm
Update December 2016: See the CRF230F Shop Notebook for how to tune by feel and with the modern plug chop method.
Adjusting the fuel screw
Ramz process includes diagnosing pilot jet size. Note this is for the CRF230F but should be similar. Reformatted slightly:
“Start the engine and let it warm up for a few minutes. Ride the bike a few hundred yards to ensure that the engine is warm.
Screw the extended fuel screw IN until the engine stumbles.
- If you bottom the fuel screw, and there is no stumble, the pilot jet is too rich; install one size leaner pilot jet and start over.
Now, turn the fuel screw out until the engine runs the smoothest and highest rpm. You may have to hunt back and forth to find the sweet spot. Turn 1/8 turn at a time and let the engine run for 30-60 seconds to settle in at the new jetting.
Once you find the sweet spot, stop the engine.
With the engine off, screw the fuel screw in until it bottoms lightly, counting the number of turns of the screw. Try to get 1/4 or 1/8 turn accuracy. Write this number down. It should be from 1/2 to 2 1/2 turns, but in some cases it may be more or less than this.
- If you unscrewed more than 2 1/2 turns, the pilot jet is too lean; install one size richer pilot jet and start over.
- “Do not run with the screw more than 2.5 turns out, as it can and will vibrate out” --Koubalink.com
Unscrew the fuel screw the number of turns you wrote down. Go riding.”
It is extremely helpful to use a tachometer: Replaceable battery model with 10 RPM resolution: Amazon
Other clues:
“If your bike stumbles off idle when the throttle is cracked-especially after you’ve been coasting off throttle-the fuel mixture screw setting is too rich.
- Turn the fuel mixture screw in.
If the setting is too lean, the bike will hesitate, go “waaah” and have an airy feeling right off throttle. A bike that pops also hints at a lean pilot circuit.
- Turn the fuel mixture screw out
If your four-stroke pops at the crack of the throttle, suspect the fuel mixture adjustment but also check for an exhaust leak at the head pipe or slip fit.”
http://www.chronicmx.com/chronic-mx-tech-tip-how-to-adjust-the-jetting-on-a-four-stroke-dirt-bike/
Idle adjusting screw can be reached by drilling a hole in the frame: The Bike Shop, Denver. Be sure you put it up way high and check the alignment multiple times before you drill the hole. There is a tiny gap between the elliptical with the throttle cable and the bracket. You have to be perfectly aligned with this gap.
Checking float level
CRF230F: "Proper float level trumps ALL jetting you may be trying to do. It is the FIRST thing you should check before changing anything. ... It is ABSOLUTELY CRITICAL!" (post)
The tube test on this PR4 shows the fuel level 5 mm below the bowl / carb seam: (Note the upper line appears bent due to lens distortion) |

Ramz: Float height: 12.5 mm from carb bottom edge to bottom of floats, measured in line with main jet holder. How to place the float gauge is illustrated at the link below.
Service Manual (p. 1-24): PR4-240 Extreme (2015) is closest model: 14 mm. This number is also mentioned on page 5-15.
See the CRF230F Shop Notebook for why it matters and how to set float level.
Remember, what really matters is the external tube test showing the fuel level at the seam between fuel bowl and carb body. That’s the final test.
Engine bogging over jumps
http://ajpforum.com/viewtopic.php?f=4&t=1183&p=2066&sid=ce8d9f2f953093a27433f2de8452c463#p2066
Accelerator pump
There is a link to an Instructables with a generic adjustment flowchart:
http://ajpforum.com/viewtopic.php?f=4&t=1186&p=2189&sid=731ecc55f2b60d8629035aa364bb1df2#p2189
However, the PZ30 is a simpler design without a leak jet. See this thread.
Step-By-Step: Removing the carburetor and changing jets (Updated 1 April 2017)
* = UPDATE 1 April 2017
Tools and parts:
- JIS screwdrivers for Asian phillips fasteners are good, especially to avoid stripping carb screws
- For the carb supply line, hose clamp with 0.29 inch ID. This should be a very strong clamp not like the thin clips elsewhere on the AJP: see “Fuel line routing issues.”
- Jets
Set up boxes, etc. to keep everything sorted. I have had a fuel screw roll off the workbench onto the concrete floor and was very lucky the tiny tip was not damaged.
If the fuel tank is full it will siphon down the left line. Best to lower the level with a siphon hose. Otherwise be prepared to plug the fuel line (10 mm bolt or something better as plug) and tie it up above the tank level.
Carb removal
The left carb nut can be reached from the left side using an open end wrench. For the right side, it helps to remove the bracket that holds the pumper cable in place. It is held by a single screw that also holds other stuff in place so use care here.
Carb nut removal becomes trivial with a ratcheting box wrench (HF).
Unscrew the slide, move it away, and protect it and the needle with a sock or rag.
Opening the carb and changing the jet(s) is the standard drill. The pilot jet sits just in front of the main jet: see photo below.
* Take care of part 24 S-1305-20035-00 O-RING BOMBA CUBA 3.5x2, which seals the gap for the accelerator pump. This is a small o-ring that is under stress, so inspect it to see if it is starting to get distorted.
Upgrade: I decided to put an extender on the fuel screw. I saw this trick in the Kawasaki KLX forum. I took a piece of 1/4-inch copper tubing and flared the end slightly to fit over the screw. Then I aligned things so that when the screw is all the way in there is a slot with a washer in it at 90-degrees to the carb. Then I soldered it all together with a 140 watt soldering gun and electronic solder. Note the length: 60 mm total. The first version was too long and bumped into the starter.
Reassembly
* When mating up the bowl to the carb, there are three important steps:
1. The lever should be above the accelerator pump plunger
2. The rubber boot on the plunger should be in place, but not pushed down so it does not get pinched in the seam
3. The O-RING BOMBA CUBA must be in place to seal the gap through which the accelerator pump gas squirts
Before installing, slide the intake hose onto the carb and get a sense of where the hose clamp should go. Armor-All can help the hose slide on during assembly.
Lower the carb into the frame
Reinstall the pumper cable bracket before connecting to the intake manifold. The “2” marking should be vertical and to the outside.
Now install the washers and lock nuts. The right nut is difficult to access.
Connect the fuel line to the carb with a tight clamp so the shock adjuster does not pull it off.
Work the intake hose onto the carb but leave the clamp loose for now. Alternative: tighten the clamp at this point, before the air box starts pulling the hose away from the carb.
Now lower the filter box and connect to the intake hose, but leave the hose clamp loose for now.
Install the air filter after greasing the edge. Using a light, look underneath the filter box from the right side to align the long bolt coming down from above. Ramz sharpened the bolt end to help with alignment. How tight? The air box sits on four tabs sticking out of the frame. I tightened down until the box began to deflect slightly at these tabs. You can also use the light to watch when the box touches around the long bolt.
- “Over-tightening the bolt causes further deflection which will eventually lead to the airbox leaking as the lid distorts. The factory silastic only manages to keep it sealed up to a certain point before it separates.” (post)
Now that the air box is being held down tightly, finalize the intake hose connections. It is challenging to get both ends of the intake hose securely in place. As you tighten the hose clamps, they tend to slip down the hose. This is where testing the carb-hose connection beforehand is helpful.
Apply some Teflon lubricant to the plastic on plastic rub point of the pumper cam mechanism.
This project took about 4 hours. I am hopeful that future re-jettings can be done in about 2 hrs using these notes as reminders. (JXG, 6/24/16)
Update: Down to about 1.25 hrs total
Electrical
Battery
2015 PR4 OE battery issues (post)
2015 PR4 OE battery died after 4 months: YTX5L-BS, brand? (post)
“I'm considered replacing it with either a YTZ7S [Amazon, 6Ah] (which has 130 CCA vs 80), a Shorai LFX09L2-BS12 [Amazon, read the reviews!] (with 130 CCA), or possibly trying one of the other lesser known lithium options available through online retailers. (post)
Antigravity Lithium Battery Small Case 4-Cell 120CA 6Ah [Amazon] installed by Ramz http://rickramsey.net/PR4mods.htm#battery
2016 PR4 OE battery is FB FTZ7S, 6.3 AH, 130 CCA. UK
I had this battery tested at four months and it is still doing fine. I keep it on a BatteryMINDer 2012 which float charges and desulfates. Will be interesting to see how it holds up over the winter when the bike sits out overnight during trips (JXG).
Headlight
12V35/35W BA20d [Manual, p. 40].
- The Cyclops LED below is available in a BA20d base and the maximum wattage is 30 which is less than the stock halogen. Apparently you can install the cooler part by cutting a hole in the rubber dust cover. But what about clearance? KTMs typically require spacers on the headlight shroud so the back of the bulb will clear the head tube. http://www.cyclopsadventuresports.com/3600-Lumen-LED-Headlight-bulb-for-DirtbikesDual-Sports_p_97.html
- I have put extender plates on my CRF230F.
Riding lights: JXG has installed Run-D 20 watt LEDs with his chainsaw rack. Email for details.
Speedometer pickup
At some point I smacked my speedometer pickup unit on a rock. It still works, but is broken loose. I reinforced it with putty epoxy. The unit can be removed by loosening a set screw on the bottom. (post)
Broken from impact, but still working: | JB Weld Steel-Stik epoxy: |
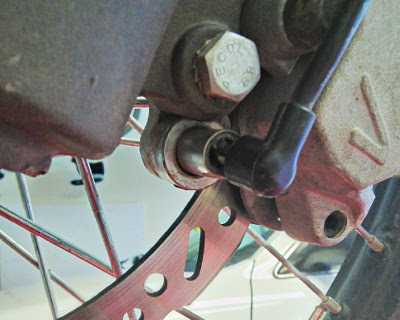
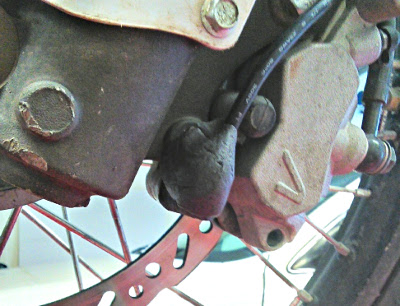
Round 2: The epoxy lasted for awhile. The new repair uses “X-Treme Tape TPE-XZLB Silicone Rubber Self Fusing Tape” (Amazon) wrapped very tightly around the metal and plastic parts of the pickup unit.
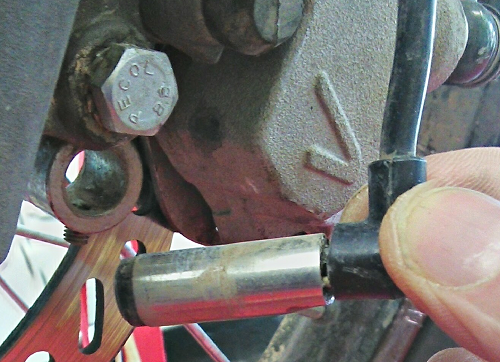
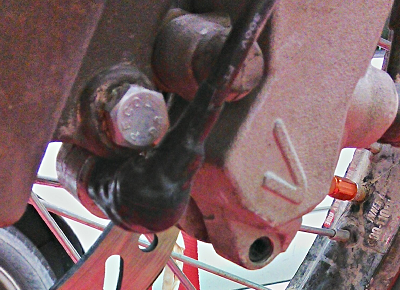
You can see the set screw above. The tape is less strong but more flexible. It looks like it will hold up well.
Speedometer problem
After changing out the front brake rotor and moving the magnet over (see Brakes), the speedometer stopped working.
Unfortunately I first installed the magnet backwards, with the dished side away from the sensor. The speedo displayed weird results: speeds up the the triple digits. Now with the dished side facing the pickup, glued into position in the rotor, and set to 1.0 mm gap with a feeler gauge--the speedo remains on zero.
The error message “nodo” shows on speedometer power up, but then goes away even when the speedometer lead is disconnected. I’m pretty sure this is new behavior.
Service Book specs, p. 1-44
- Terminal 1 is at the triangular top
- Phase (+5V) Red wire (terminal 1)
- Neutral (-5V) Black wire (terminal 2)
- Sensor signal to the speedometer White wire (terminal 3)
Measurements:
- Sensor Resistance (T2 – T3) = 27K = GOOD
- Sensor Resistance (T1 – T3) 3.9 MΩ – 4.5 MΩ = 4.2M = GOOD
- T1-T2 with speedometer powered up: 5 VDC measured = GOOD
All the measurements appear good. Has the speedo fried?
UPDATE 20 May 2017: A replacement speedo (US$155) under warranty has not helped. So it appears the sensor is bad despite passing diagnostics. The US importer suggested the following additional diagnosis
“did you try taking measurements while flexing the last upper section of sensor cable? Or spin the tire while flexing the cable? Possibly the wire is connecting intermittently inside the sheathing?
The other thing is to check the speedo settings. You can step thru them via the manual chapter 3, page 42.Its possible that one of the settings changed somehow. Its important that the setting is as below, plus of course in MPH. " _ 1P 2200" So that is a "space" then "1P" then a space and then 2200. If you have 2P or something else - it won't work correctly.”
Further diagnosis is awaiting time. If the issue cannot be resolved, it appears the whole system can be replaced with a Trailtech for about US$80, and the pickup mounted on the fork guard.
Maintenance
Oil change
SAE 20W-50, Specifications: API SG JASO MA, MA2
Manual says 1.1 L (1.16 US Quart, 37.2 Fluid Oz)
- 2015: Ramz found actual refill amount is 1.0 L = 35 oz
- 2016: JXG same results
Clean the centrifugal oil filter rotor: 12000 KM == 7450 miles
Service Manual, p. 4-4: “Then remove the centrifugal impeller using two special tools to loosen the crankshaft, one to lock the crankshaft and the other to fit the special nut”
Lube clutch cable. Really.
Just blasted out the PR4 clutch cable with a bunch of PJ1 cable lube and Blaster silicone spray.
The pull has dropped from 6-9 lbs to 3 lbs or less. This is why I did not get a hydraulic clutch.
I noted that the Reikon clutch lever assembly has what looks like a needle bearing or at least a sleeve. Good quality.
I'm going to start doing this with every oil change. (post)
Spark plug
Spark plug: LG D8TC, Champion A8YC, NGK DR8ES (from manual)
Iridium? “I wouldn't bother with the added expense of an iridium plug as the engine isn't a particularly high-revving or ultra high-compression one, so the stresses on the normal plug should be all within the tolerances that it was designed for. (Post)
Key fasteners to keep tight [NEW 29 January 2017]
As a bolt-together frame, the PR4 puts heavy demands on fasteners. The backbone of the bike is divided in two between aluminum castings and steel frame. The bolts here are “Top fixing screw of the beams” and there are 8 each M6x20 (Service manual, p. 1-50). Torque is 12 NM and these footnotes apply:
1. Applying a locking agent to the screw - LOCTITE 240 (medium resistance)
2. Apply oil to the thread and the surface of the phalange.
I check these every few hundred miles with a digital torque meter. Two of the bolts have stripped out. I have replaced these with new bolts. Since the nuts are locking I skip the Loctite and instead use Permatex Anti-Sieze.
Valve adjustment: Step-By-Step
Manual says first valve check at 600 miles, then at 1800 mile intervals.
Symptom: Hard starting suddenly develops over a couple of rides. First valve adjustment was at 1053 miles, 104 hrs and the second was an additional 1080 mi and 156 hrs. Both times it would barely start and adjustment fixed the problem immediately.
Both times, the intake was tight and exhaust fine. Be sure to use a new gasket and O-ring on the cam cover or it will leak!
PR 3.5 Ultrapassor: “Anyone getting a new one I'd recommend checking valves after just a couple hours. ... Both valves on the tight side - intake is a pain - had to remove two frame bolts and move the brace and still not much room. Exhaust was easy - I have some MP adjusting tools, made it a snap.” (link)
Intake 0.05 mm (~0.002 in)
Exhaust 0.08 mm (~0.003 in)
Exact gauge--> Motion Pro Tappet Feeler Gauge .002/.003
https://www.rockymountainatvmc.com/p/989/23985/Motion-Pro-Tappet-Feeler-Gauge
Adrian Senior, UKFB post added 21 December 2016: “we have been looking after these little Honda based engines in various forms for many years now. Most of them run 0.08mm ex. and 0.05 inlet. Some will run 0.05 both in and ex. Over the years we have decided to run 0.1mm on both. This is due to some engines coming for service with the gaps closed up and becoming hard to start. These have probably been ridden hard and neglected. At 0.1 we have had no problems and there is no noticeable difference in performance. It is also easier to set than with a very bendy 0.05 feeler gauge. We run all similar engines at this now. Running at 0.05 is ok as long as you remember to check them regularly and don’t cane it too much!”
Checking the valve tappets
Items needed:
- Angled gauge: the Motion Pro Tappet Feeler Gauge .002/.003 is very compact and highly recommended
- BikeMaster valve clearance adjustment tool is highly recommended
- Headlamp is very helpful
- Replacement o-ring and gasket for the cam cover are high recommended. Although the Service Manual p. 3-20 does not mention replacing them, they tend to leak oil after the cam cover has been removed.
- RTV silicone will not work; it will start leaking
- The only sealant that may work is Hylomar, which stays soft
Service Manual, p. 3-17 has the basic sequence. There are no routing diagrams so keeping track of what runs where (photos help) and putting fasteners in labelled bags will greatly assist reassembly.
_Remove the seat and side panels
_Cover the air filter with a plastic bag and scrub down the top of the engine and everything above it with a brush. This will help to keep dirt out of the engine.
_Remove the carb slide and wrap it in a rag and cardboard to protect the needle
_Remove the air filter box
_Remove the battery and tray. The upper mounting nut is 10 mm and can be reached by sliding an open-end wrench up behind the tray.
_Removing the right fuel pump mounting bolt will allow you to get a 24 mm open wrench on the intake cap
According to the manual, the intake valve cap is shorter (less threads) than the exhaust on 240 engines. My 2016 caps are exactly the same.
Setting the cam to TDC compression
_Remove the crankshaft access caps
_Remove the camshaft cover: 8 mm bolts and can be pried off. It has an o-ring and a gasket.
Crankshaft is 14 mm socket. Turn it counter-clockwise and watch the line on the flywheel. It is just a line, not a “T” on my 2016 PR4. I find it helpful to put Vise-Grips on a socket extension to be able to control the rotation.
You need to find TDC in the compression stroke. This is the point where both valves are closed and thus BOTH valve tappets are up and loose. If you watch this animation you will see there is another TDC at the end of stroke four: https://en.wikipedia.org/wiki/Four-stroke_engine
Here is the sequence you want to track:
1. You should see the intake tappet go down: the intake valve opens
1a. The cam gear marks (-) should come around and line up horizontally
2. Compression. Both tappets up: this is when you adjust at TDC
- If the intake valve is too tight, then you may never feel the tappet loosen up. See below.
3. Combustion
4. Exhaust tappet goes down: the exhaust valve opens
So your target is in between the intake tappet going down and the exhaust tappet going down.
https://takemebeyondthehorizon.wordpress.com/tag/4-stroke-engine/
If you miss the mark, do not back up clockwise. On some engines this can cause big problems with the cam chain tensioner.
Checking the clearance
As the manual states there should be a “slight friction” in the gauges as they slide between the tappet and the valve stem.
Using the super-compact Motion Pro Tappet Feeler Gauge on the intake tappet. The frame brace is actually removed in this photo. Double check that you are using the right gauge. Intake valve is to the rear, the carb side, of course. |
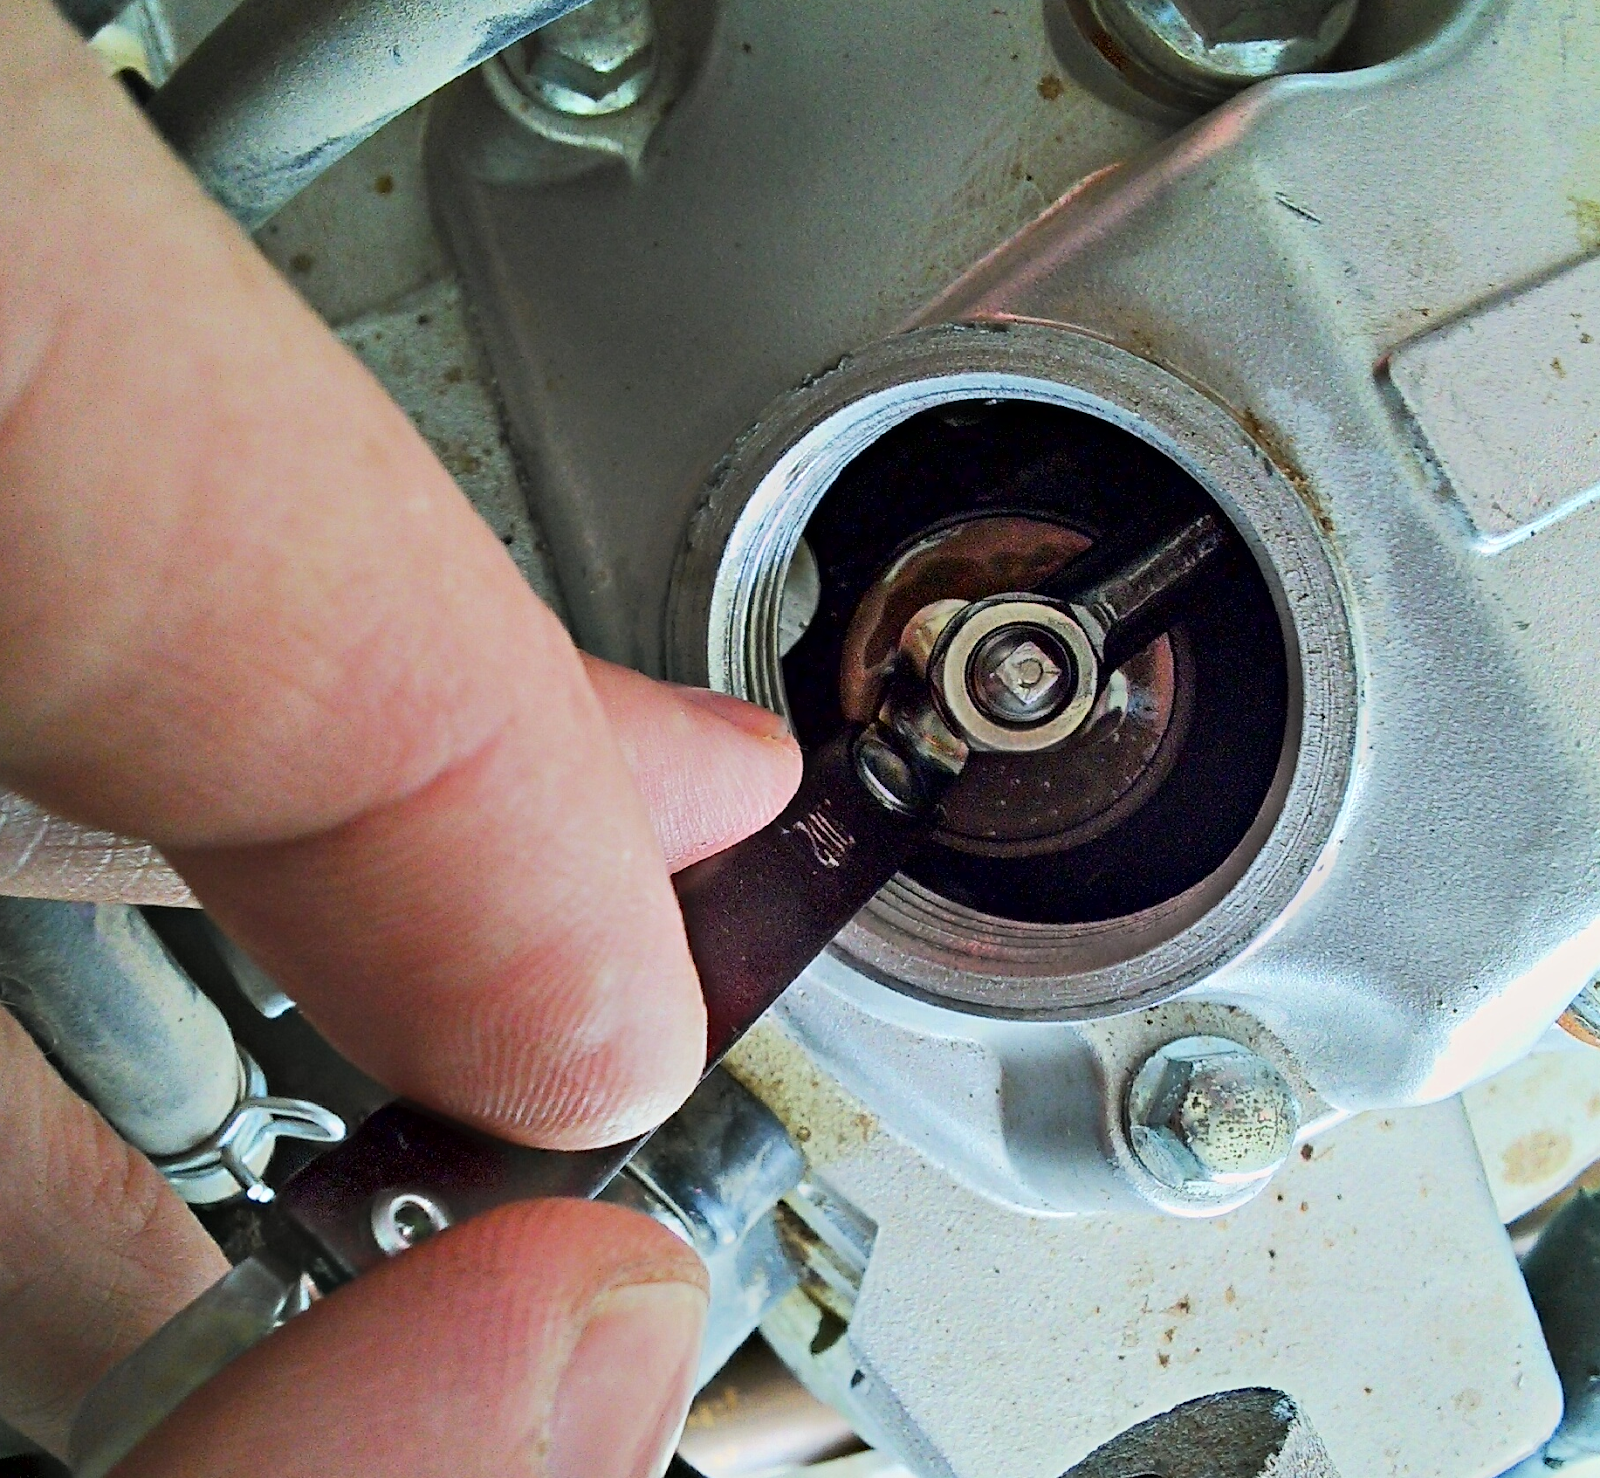
If there is no clearance and you are sure you are at TDC compression, don’t panic. This is not good but apparently there is no harm to the intake valve and it takes quite awhile to affect the exhaust valve.
For me there was a slight technical difficulty. My intake tappet never loosened up at all. So the valve was being held open too much; this is why the engine would barely start. By going through the sequence several times, I convinced myself that the tappet never got loose and how to identify the compression stroke.
If the tappets are too tight or too loose, there is more work to be done.
Preparing to adjust the tappets
If you are an arthroscopic surgeon you can probably adjust the tappets at this point:
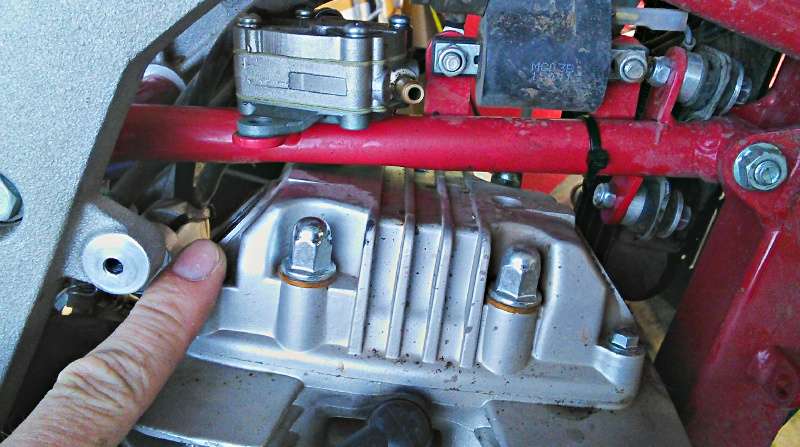
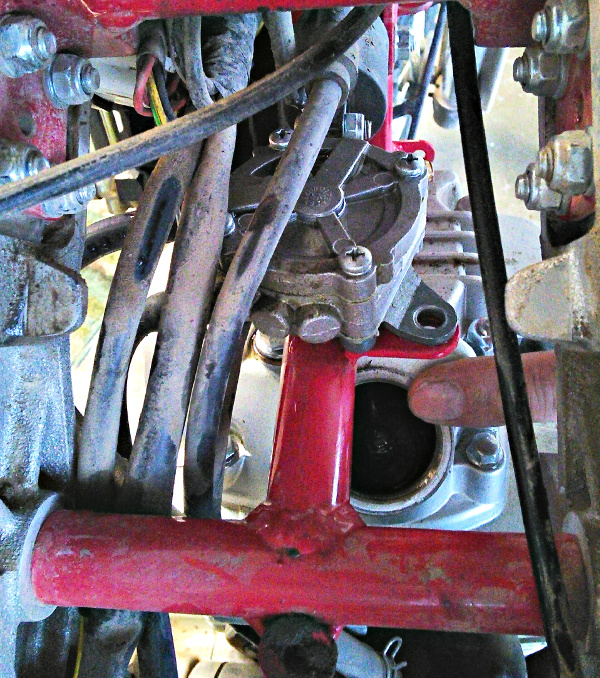
Otherwise invest time to loosen the frame member. It is worth it.
_Put the caps back on loosely to keep out dirt
_Remove the left fuel pump bolt and set the pump to the left side
_Remove the coil bolts and move it to the left side. Keep track of the battery grounding lug which attaches to the rear coil bolt.
(2017: Optional) Remove the oil cooler bolts and move it to the left side
_Now loosen the front bolt of the frame brace which is 13 mm
_Remove the rear bolts carefully: they are 13 mm and set tightly into the cast aluminum frame. It is easy to think your socket is all the way on the bolt when it is actually stuck in the frame hole. A 1/4-inch drive has a thinner wall and fits better.
To move the brace up, it is necessary to loosen up the frame:
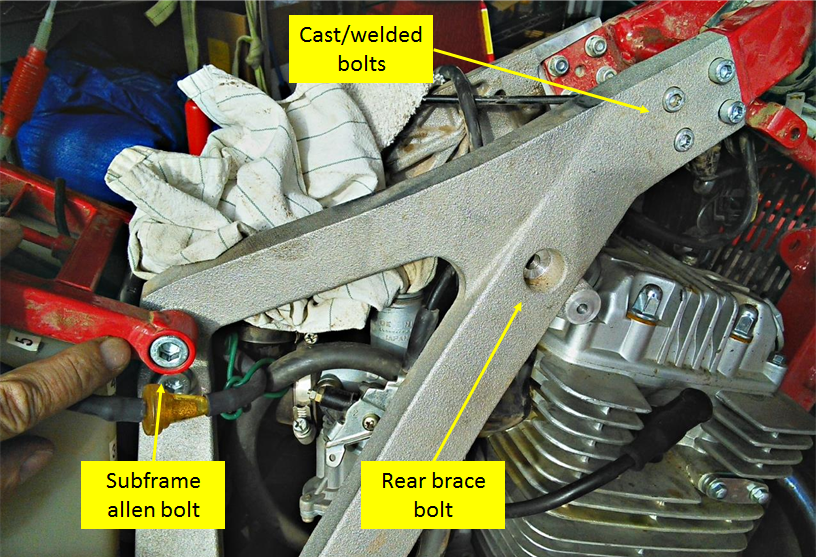
_At the rear, loosen the subframe allen bolts on each side.
_At the front, loosen the 8 bolts that connect the cast frame rails to the welded front frame
At this point you should be able to pry the frame brace upwards to provide access to the tappets
Adjusting the tappets
_Remove the covers and check that the crankshaft is still at TDC
_Set the clearance by adjusting the set screw so that you get the “slight friction” of the gauge, then clamp the set screw in place with the fixing nut... which tends to turn the set screw. It is basically a three-handed job.
The BikeMaster tool helps a lot by reducing it to a 2.5-hand job: the heel of your hand can hold the fixing nut. Intake 0.05 mm (~0.002 in) Exhaust 0.08 mm (~0.003 in) |
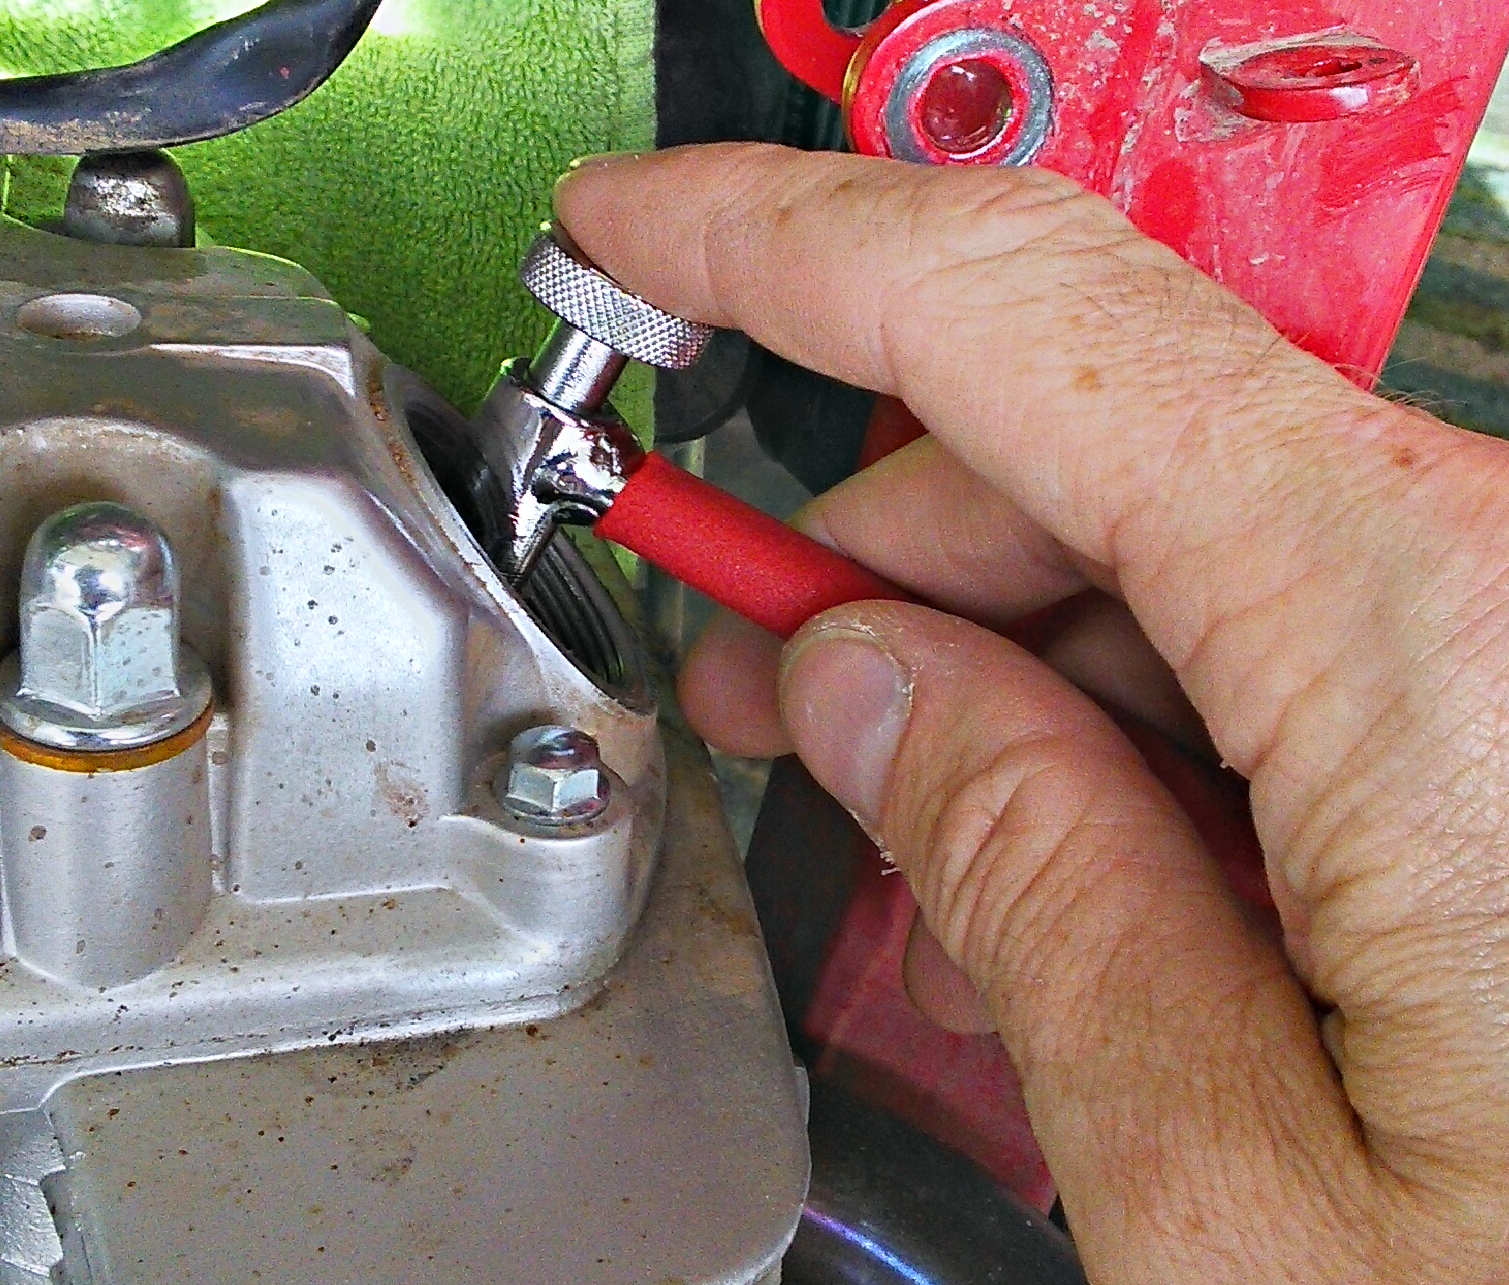
_When the fixing nut is fixed, check again to make sure you are using the right gauge and the clearance has not changed.
Reassembly
Torque values are not particularly clear in the manual, but some estimates are provided here from the manual and using a digital torque meter. Be careful.
_Tap the frame brace back into place
_At the front, tighten the 8 each 5 mm hex bolts that connect the cast frame rails to the welded front frame: 12 NM on p. 1-50 but be careful above 10 NM.
_Tighten the rear brace 13 mm bolts: maybe 30 NM? You really, really don’t want to strip out the threads inside the brace.
_At the rear, tighten the subframe allen bolts on each side: 54 NM?
_Tighten the 13 mm front brace bolt
All of these should be done in rotation so the whole structure gradually tightens up. Finish off with full torques, cautiously.
_Reinstall the coil on the left side of the bracket. Remember to install the ground lead to the rear bolt: it arcs up over the spark wire to the battery. Connect the blue connector in front.
_Reinstall the fuel pump
_Reinstall the oil cooler. The aluminum spacers go between the cooler and the bracket. Both bolts need to be set in place just barely going through the spacers, then the cooler moved into position. Do this on the left side of the bike, then move around to the right side and tighten the nuts.
The frame brace is now back in place
_Reinstall the battery tray. Hold the locknut behind the tray with an open-end wrench
_Reinstall the battery
_Reinstall the crankcase ports and cam cover
_Reinstall the air box, air filter, fuel line, side panels, and seat
Summary: This is a job that will be done a fair amount: every 1800 miles. I was very impressed with the Motion Pro Tappet Feeler Gauge: it is very compact, angled just right, and has only the gauges you need. Also the BikeMaster valve clearance adjustment tool is an ingenious device that lets you experiment with different settings and how the gauge slides--then lock down your chosen setting in a single step. Both are excellent investments for tappet style engines.
Time required:
- 2016: About 4.5 hours with adjustments. About half of this is removing and reinstalling the frame brace.
- 2017: About 3 hrs
Above: 2016 and 18 June 2017 by JXG
Valve cores on 2016 PR4 stock tubes
The stock tubes have unusual pseudo-Schrader valve cores with a spring wrapped around them. See photo below.
These cores could only be removed using a relatively “loose” sheet metal tool (top). Cores were replaced with genuine USA-made Schrader valves which work better (bottom).

2015 valve cores were normal, per JMS post
Fork maintenance [NEW 18 November 2017]
2016 PR4 Enduro Pro with Marzocchi forks
See known specs and lack of documentation here
See Bonjoe’s assessment here
On my bike: 2300 miles, 200 moving hours
One fork had started leaking oil slightly
The forks have always been a mystery on the PR4. It was time to take a look. I purchased oil seals from a dealer at a breathtaking price (then I realized that seal sizes are actually listed in PR3-PR4 General Specs PDF p. 1-31)
- PR4 EN/SM/TRAIL fork (2012) MARZOCCHI USD 40mm
- Oil seals retainers of the forks 40x52x10.6
- Seals dust scrapers 40x52,5x4,9x14
and did a disassembly, seal replacement, and oil change.
Things needed:
- Dust seals and oil seals: 2 of each
- Fork fluid 10 weight, one liter
- Fork caps are 30 mm
- Oil seal puller
- Vise with soft jaws
- Seal driver: the Tusk is reasonably priced
- Mechanics wire or safety to hold things in place: Harbor Fright has rolls
- Bucket with supports to hold the forks while they drain
- Given the high cost of seals and the amount of time it takes to replace them, I highly recommend Seal Savers. The newer model has zippers so they can be installed in seconds.
This is a big messy job that can get really bad if forks fall out of vises or buckets tip over. There is a reason pros buy elaborate fork servicing workstations. Knock over a fork full of oil and you get to start over because the amount of oil is unknown at that point. Prepare your workspace to keep long heavy objects upright. Have plenty of rags and containers ready.
_Remove the fork protectors
_Remove the axle and front wheel
_Turn the compression and rebound adjusters all the way CCW until they stop. This is normally important as it will disconnect the caps from the cartridges far down in the forks. But in this case, they stay connected so it does not really matter.
_Loosen the top pinch bolts
_Taking advantage of the lower pinch bolts as a vise, loosen the fork caps.
_Remove forks and clamp in a vise with jaw protectors. Place a container below to catch oil.
_Unscrew the fork cap
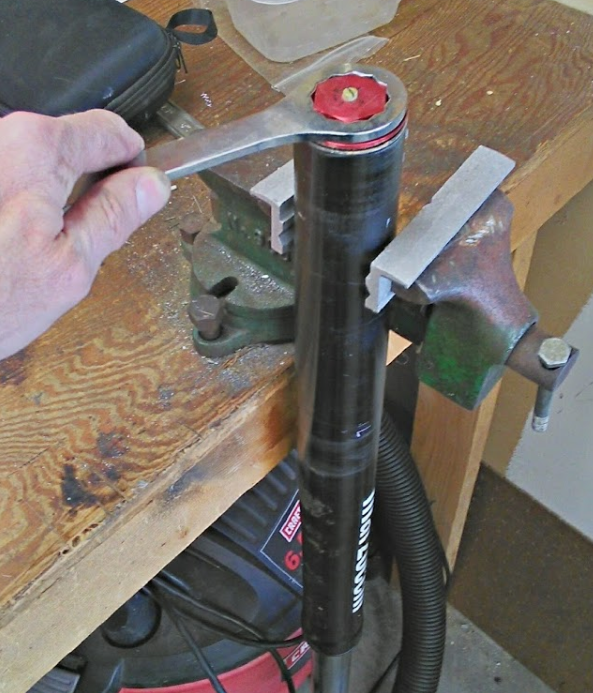
_Lift the cap and the spring will follow
_Clamp the spring so it does not fall back into the fork body
_Slide a 19 mm open end wrench through the spring onto the nut to hold it still
_Remove the fork cap
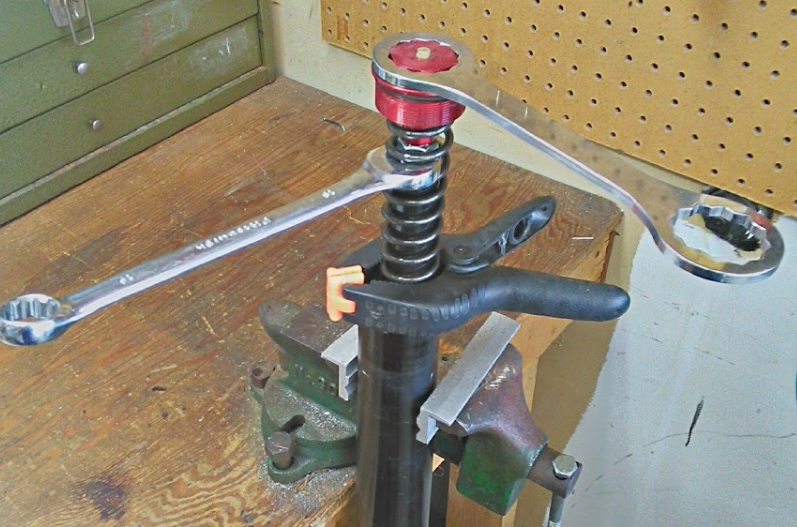
The fork cap will leave the adjuster rod behind, which is different from other forks I have worked on. It is unscrewed about three threads so the adjustment screw will stick up slightly into the fork cap. See photo below:
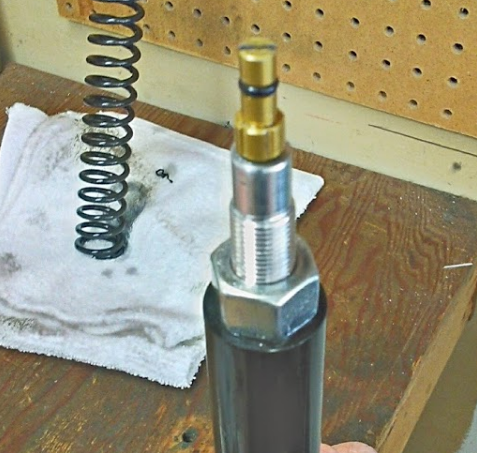
_The stanchion will slide out of the lower shock. Invert it and allow oil to drain out.
_Place the lower fork in the vise and use an open-end wrench to pry out the fork seal:
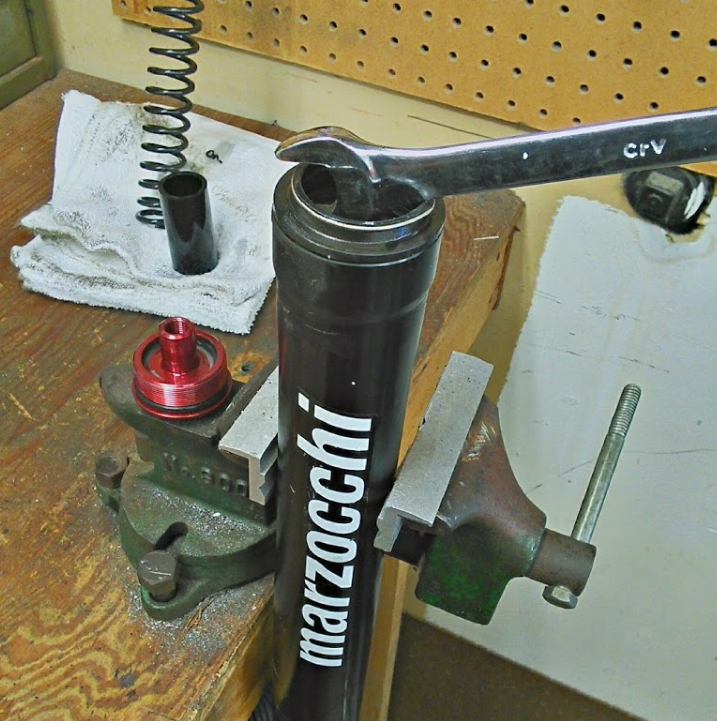
_Use a small flat blade screwdriver to pry out the retaining ring. Note that one end of the ring has an overhang that you can get the screwdriver behind. I find it helps to keep the ring from rotating with one screwdriver then cross another over it and pry under the overhang. Not real easy.
_Use a seal puller to pull out the lower oil seal. Typically it will pop out and hit the ceiling so be careful.
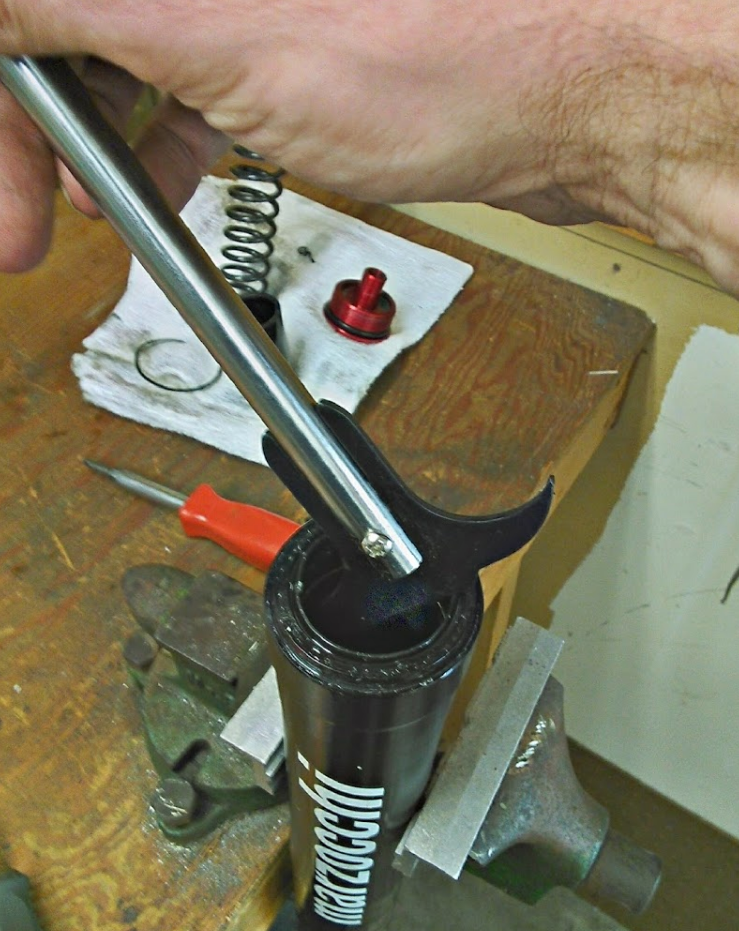
_Unscrew the hex screw at the bottom of the fork and remove the damper rod cartridge assembly:
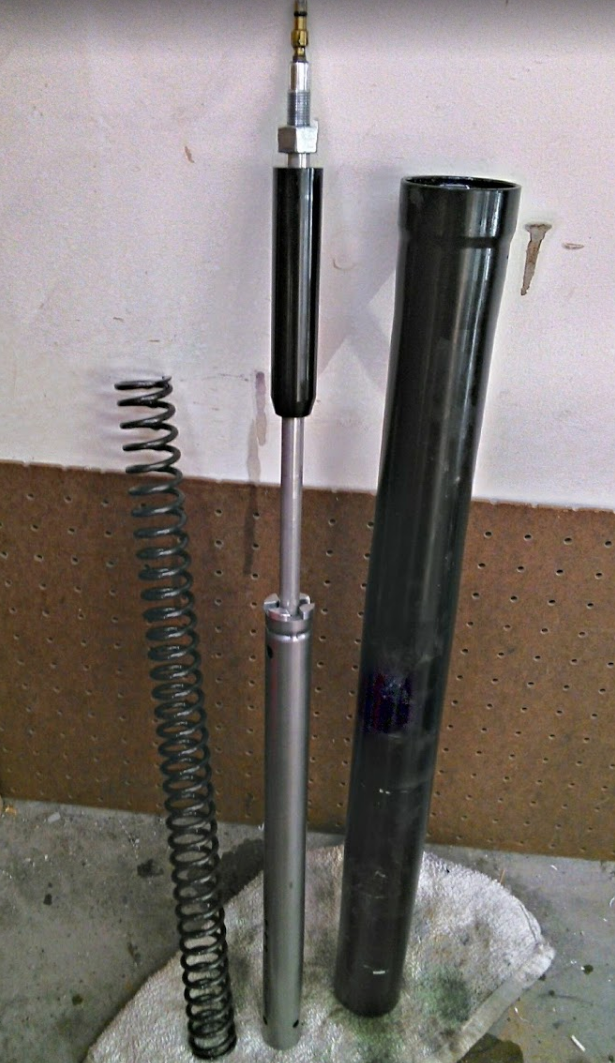
There is a distinct crimp in the middle and I could not get the top to unscrew. This is probably the crimp that Brett referred to:
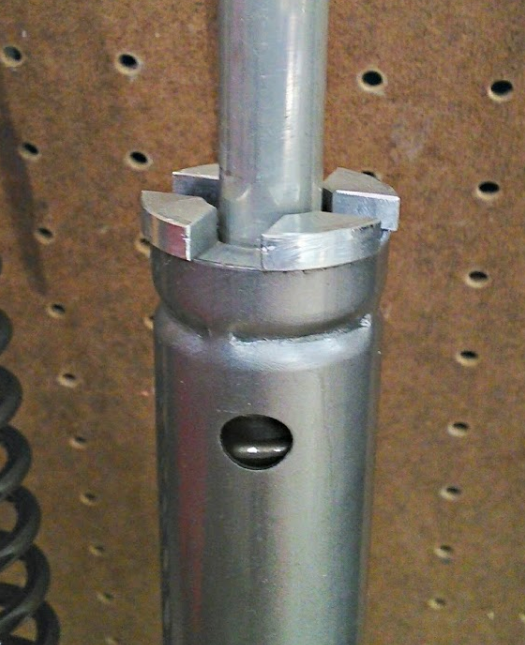
_Put the damper rod at various angles over the bucket and pump it. On the right side (rebound) a lot of oil will squirt out.
_Wipe down the damper rods. There was a lot of metal particle paste present:
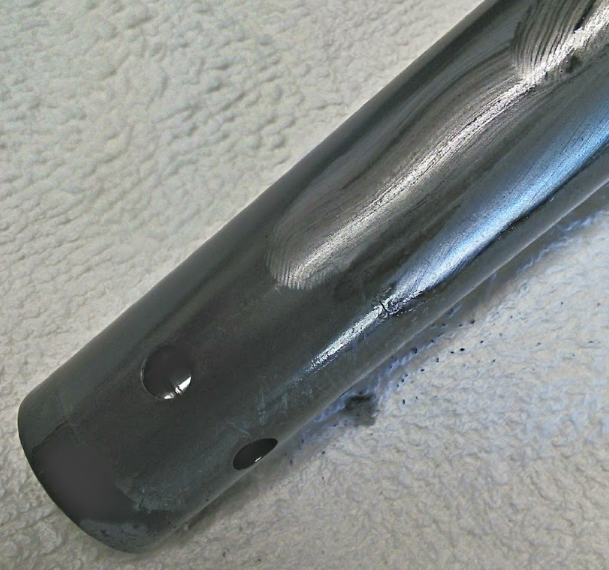
This amount of wear suggests the forks are not very robust.
Reassembly
_Slide the damper rod back into the stanchion and torque the hex bolt at the bottom
_Wrap the free end of the stanchion with tape to protect the seal lips
_Install the dust seal then the oil seal. Make sure they are facing the correct direction. Make sure the oil seal lip is not folded under.
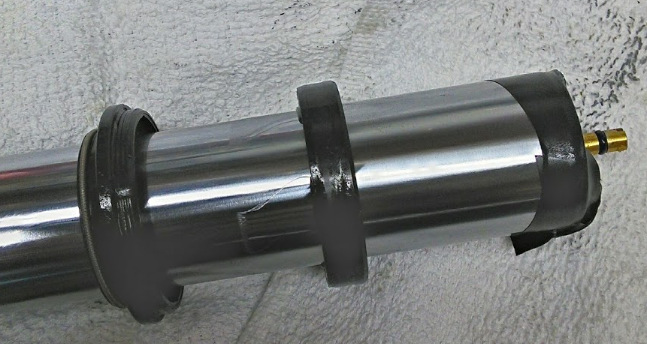
_Insert the stanchion into the fork bottom
_Drive the oil seal into place using a driver. Compared to some forks I found it went in easily. Avoid dropping the halves of the Tusk driver on your foot.
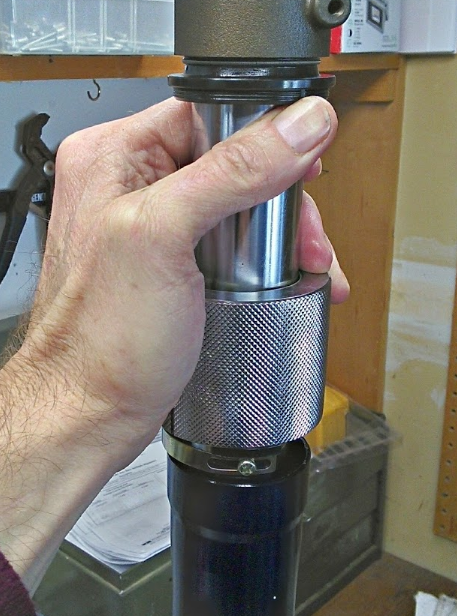
_Install the circlip, making sure it is in the groove
_Push the dust seal into place
_Flip the stanchion / leg over and attach a sturdy wire through the axle hole
_Secure the leg in the vise and wrap the wire securely around the vise to keep the stanchion from falling out
_Fill the stanchion with the specified amount of oil. Slide the damping rod up and down at least a dozen times to make sure the oil gets in and air gets out.
On Hondas like the CRF150RB, both an oil volume and height are specified. If the height is not achieved then there is air trapped in the system. Ramz has a detailed discussion of this. Since no height is specified for these forks I just raised and lowered the damping rod many times and left it at that.
Notice the blue wire below:
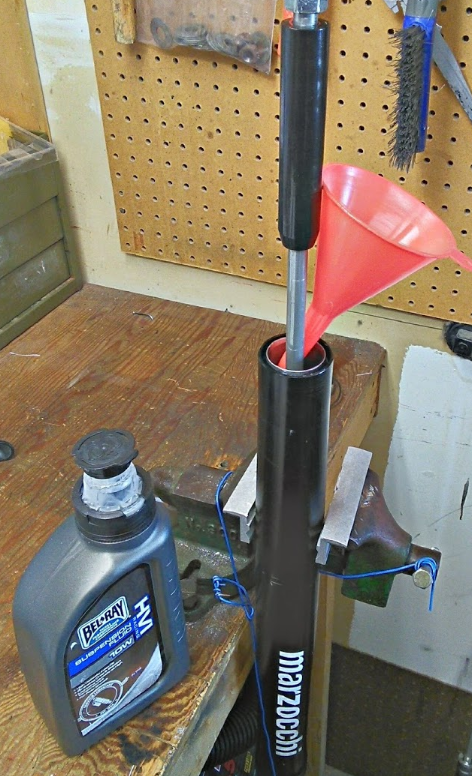
_Drop the plastic spacer down into the stanchion. Make sure you only drop one in!
_Confirm that one, not zero, spacer is down the stanchion. And if two spacers are down there.... you get to start over.
_Run the mechanics wire down through the spring and secure it very tightly below the nut on the damping rod. This wire is key to pulling the damping rod up through the spring far enough that the fork cap can be installed.
_Pull the damper rod up with the wire while lowering the spring over it
_Screw on the fork cap just far enough to hold, then untwist the wire
_Jam the 19 mm wrench through the spring and tighten the fork cap
_Release the stanchion and tighten down the fork cap
_Reinstall the forks, axle, and wheel
_Double-check that all bolts are torqued properly
Above JXG on 12, 18 November 2017
Rear suspension maintenance
Do I really need to grease the suspension?
“I did this procedure today on my barely ridden 07 YZ250f, and all I can say is, this is an absolute minimum once a year maintenance must. The bike has maybe 10 hours on it since it was new, so I was expecting to pull these parts off to find the grease in very good shape. I was wrong, the grease was black and watery, in real need of replacing. I proceeded to pull apart the linkage on a new CRF150f to see what it looks like from the factory. The factory grease was not much to say the least. It was thin and not much of it to start with! I replaced all of this bikes pivots with new Mobil 1 synthetic. I cannot believe more people aren’t pushing this as more of a must to maintenance item. It should probably be done at least twice a year in my opinion.” (post)
Because AJPs do not include suspension bearing seals (see photos in Overview: Tour and review of a 2016 PR4 Enduro Pro (USA), maintenance is especially important. If you are going to ride in wet / muddy conditions, consider Adding seals to protect your linkage bearings.
Rusted bearings on a 2015 AJP PR4 after a couple of immersions: post
What grease to use?
“SuperTech Moly-Lithium Grease. Honda notes in their CRF250X and CRF250R Service Manuals to lubricate the swingarm and shock linkage pivot bearings (along with related seals and bushings) with multi-purpose grease NLGI No. 2 with molybdenum disulfide additive (more than 3% MoS2).
I often read about and hear from others who think Bel-Ray Waterproof or some equivalent is great for suspension. Honda thinks otherwise. The essential point to be made here is that grease containing MoS2 protects against the high loads in shock and swingarm pivot bearings better than other types of grease. Bel-Ray (and any other waterproof bearing grease) is excellent for steering bearings and dust seals.” http://www.rickramsey.net/Chemicals.htm (Bold added)
SuperTech is available at WM, but there is some debate over how much moly is in it currently.
Another moly grease: Jet-Lube 33050 #202 Moly-Lith Grease Amazon. This is a very dark grease with a metallic sheen to it. How much moly? 1 to 5%, it is a trade secret per the MSDS
A marine aluminum complex grease: Sta-Lube Marine Grease for Boat Trailer Wheel Bearings Amazon tube, Amazon tub: “This is one of the best multi-purpose/wheel bearing greases out there. I use it for my rudder housing (keeps rudder working smoothly and does not wash out), I use it for greasing dirt bike bearing and linkage, bearings in my mountain bike, you name it. Probably not quite thick and sticky enough for our CV joints in our off-road buggy, but other than that, it's a do-all grease. I've tried many, many other greases (CV-2, etc) and this is my go-to grease (but for CV joints, as stated above).” “Don’t mix greases” “This grease has an Aluminum Complex Base, and will be compatible with other Aluminum Complex Greases.”
What about a custom mixture to achieve best of both?
“I have found that a 50/50 mix of molybdenum disulfide paste (Bel Ray assembly lube for example) mixed with waterproof grease works well as a linkage and swingarm bearing lubricant. If 100% paste is used, it tends to dry out over time. If 100% waterproof grease is used, it tends to be just a little thin for this application and washes out. The 50/50 mix results in great load bearing capability, with good lubricity and longevity. Have had very good results with this formula over the years.” (post)
Can I mix grease types? No. http://www.popularmechanics.com/cars/how-to/a2948/choosing-the-correct-grease/
How do you remove old grease from bearings effectively?
“Solvents are more dangerous to use, but often provide a more superior solution to cleaning dirty bearings. If you choose to use solvents, we recommend wearing latex gloves and working in an area that is well ventilated. Solvents we recommend are Acetone, Methyl Ethyl Ketone, Citrus cleaner, and Denatured alcohol. All of these can be found in the paint section of your local hardware store. Products we DO NOT recommend are petroleum-based products like; paint thinner, gasoline, kerosene, lacquer thinner, turpentine or anything that contains toluene. These solvents aren’t adequate cleaners...” (page)
“To completely clean the bearings, use mineral spirits (paint thinner) to take off all the old grease from the rollers. Make sure that it completely dissolves all the grease inside the bearings. Then when they are totally clean, use the acetone to eliminate the residue from the mineral spirits. The acetone will evaporate very quickly and leave perfectly clean and dry surfaces.” (post)
If you need to replace bearings, here is a list for the 2015 PR4 suspension (JMS post). Spend a couple more dollars and use high-quality Koyo or NTN Japanese-made bearings (UKFB post by Adrian Senior).
- Linkage
- Bolts: 8 & 10mm hex/allen head, with 17 and 19mm locknuts.
- Bearings
- Front: HK16202RS
- Middle: HK1814RS Amazon
- Rear: HK2018RS. “The bearing is a HK2018RS, but the PR4 manual shows it as a HK2016RS. The difference between the two is 2mm in bearing width. Either should work, but the HK2018RS (Amazon) will be better.” (JMS post)
- Bearings “can both be pressed out the same direction (simultaneously), so there isn't a need for a gap between them. It's easier to do it that way, as opposed to pressing/driving them out their respective sides.”
- Swingarm
- 22 mm socket
- Bearings: HK2016-2RS (2 on each side for a total of 4) Amazon
This is a good overview of a suspension greasing project on another model of bike:
post.
From the Parts List, p. 54:
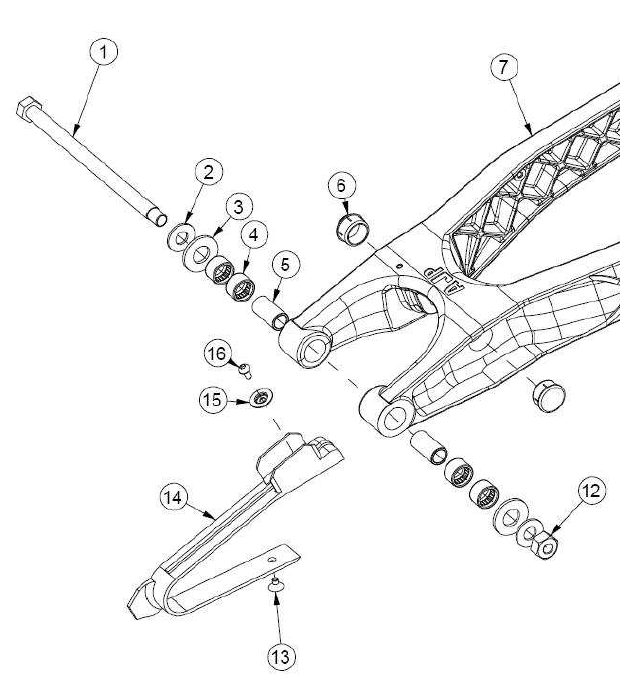
From the Parts List, p. 71:
Step-by-Step: Rear suspension maintenance
Since you will have the linkage apart, consider Adding seals to protect your linkage bearings. It is not much work and will reduce the need for maintenance.
Arrange labeled bags or something to keep all the parts sorted.
First loosen but don’t remove the following. See “Fasteners and torque values” below for wrench sizes:
- Linkage bolts
- Swingarm
- Frame hex bolts on each side below the swingarm
Now, raise the rear of the bike securely
Remove chain, axle, wheel, and mud guard (gently, inserts are into tank)
- If you are not doing the swingarm bearings, all of the linkage can be disassembled without removing the wheel
Lift swing arm gently and remove middle bolt and nut
Remove front bolt, two fiber washers, and nut
Lift swing arm gently and remove shock bolt
Remove rear bolt, two fiber washers inside swingarm, two metal washers outside swingarm, and nut
Here are all the parts with the bushings removed:
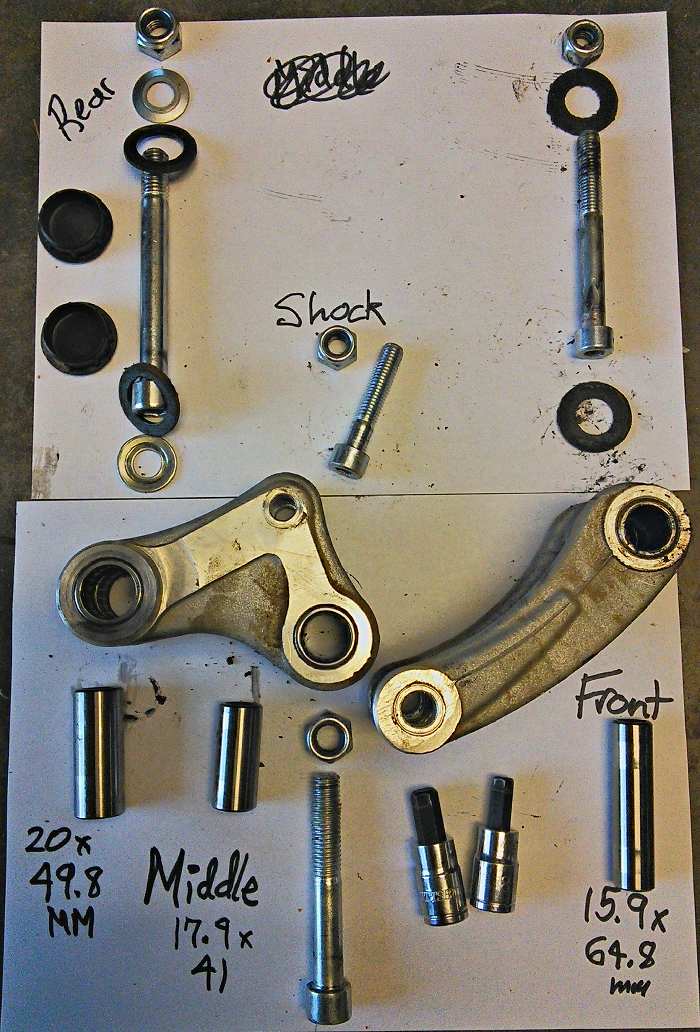
Remove swing arm bolt, metal washer, fiber washer inside swingarm, another fiber washer on the other side, metal washer, nut |
I soaked all the assemblies in mineral spirits and scrubbed with a bottle brush, spinning it to turn the needle bearings.
Then I did a final cleaning in acetone, outside and away from all ignition sources. This two step process resulted in extremely clean bearings.
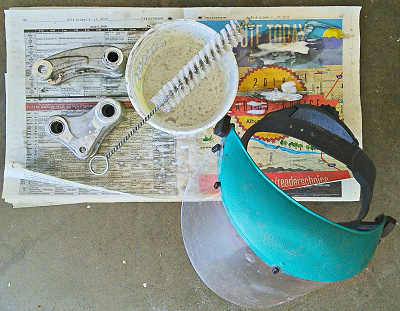
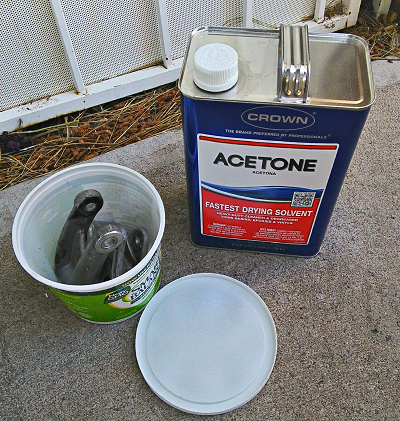
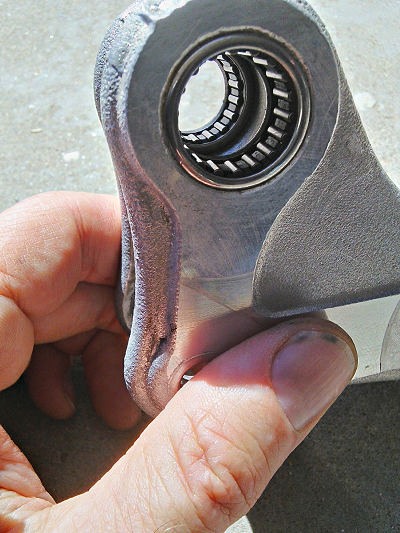
Packed in Jet-Lube 33050 grease using my thumbs to pressurize the bearing cavity. This uses extra grease but removes air pockets. Since pressurized bearing packers are used for wheel bearings, this seems like a reasonable thing to do.
Reassembly:
- Swingarm: the key is the loosened frame bolts. This allows enough space for the swingarm and the two fiber washers to slide right in.
- Reinstall the front bolt
- Then the rear bolt
- Then the shock
- Then the middle
Reinstall the wheel and chain, and lower the bike.
Now go over every bolt and nut, torquing them to the values below. These all felt good with an HF digital torque meter.
Fasteners and torque values in NM
from General Specifications, p. 1-51
- Swingarm: 88
- 22 mm socket, another on the left side but you can probably use a box wrench or even an adjustable wrench
- Frame bolts, left and right: ?
- Front joint #1 at frame: 44
- 8 mm hex, 17 mm open on nut (limited area)
- Middle joint #2: 54
- 10 mm hex, 19 mm box on nut
- Rear joint #3 inside swingarm: 54
- 10mm hex, 19 mm socket on nut
- Shock: 44
- Shock: 8 mm hex, 17 mm box on nut
- Rear axle: 94
Project summary: At 390 miles, 38 moving hours, and no immersion under water, the bearings were in good shape and the grease was limited but still in reasonable condition. I think this was a good investment in good grease that will pay off in longevity of the bearings. For my riding, I’m thinking probably a few hundred hours until the next service. Given the lack of seals and what I’ve learned, I’m going to try to avoid immersions. Most of my riding has shallow crossings below the wheel bearings.
Above: JXG, 7/26/16, 6/14/16
Adding linkage grease zerks [NEW 13 January 2017]
Are grease fittings really helpful? This topic has been discussed on AdvRider and is somewhat controversial. See quotes in the CRF Shop Notebook. The key question is whether the grease gets where it needs to go. And are vent holes as installed by Wattman worth the extra work?
If you are going to add grease fittings, you should consider adding grease seals afterwards to keep the grease from simply exiting by the path of least resistance. However, UK riders have apparently seen zerk benefits even without seals per this UKFB post.
To do this mod you will need:
- A drill press. These are deep holes and they need to be perfectly straight to be tapped. Hand drilling will probably not work.
- Zerks, typically 6 mm thread
- 6 mm tap and tap drill: see below for a quality kit
- You can use any kind of wrench to hold the tap
- Oil or cutting lubricant
To disassemble the linkage, see Rear suspension maintenance
The Zerk design and installation photos are shown in these slides
Zerks
- Joint 1 front: 90 degree zerk angled to the right side
- Joint 2 middle: Straight zerk
- Joint 3 in swingarm: Straight zerk
I used 6 mm zerks: “OEMTOOLS 25716 Metric Grease Fitting Assortment” (Amazon). These fittings require an M6 x 1.0 (Coarse) thread.
Harbor Fright sells rubbish bin taps in SAE and Metric, but no metric tap drills. I got a 5.00 mm tap drill from McMaster and tried a HF tap in a test block of aluminum. It did not work at all.
Then I got an Irwin 6 mm tap (MADE IN USA) and drill (China) set at Lowes for $7. This tap worked perfectly. I used cutting lubricant and turned the tap backwards 1/4-turn whenever it began to bind. This is essential to clear cuttings.
I highly recommend practicing in a test block to make sure everything is working before drilling the suspension components.
The actual drilling and tapping was straightforward. I left the bearings in the joints. The holes should be in the exact centers so they don’t hit the bearings. To remove the drill dust, I sloshed the joints around in mineral spirits and used the bottle brush on them.
I am not concerned if there is a tiny bit of aluminum dust left since it is a soft metal. If you are concerned about this, press the bearings out before drilling as Wattman did. That is a lot of work.
The front zerk pointed in the wrong direction, naturally. I tried wrapping Teflon tape around the threads to change the point at which they tighten up. This was completely ineffective, so I put a washer underneath and used thread locker. I also applied thread locker to the other zerks.
The rear zerk has very tight access. The last slide shows an alternative location behind the the shock spring. This should definitely be considered.
Remember your grease needs to be compatible. If you used moly grease from a can to pack the bearings, then you need moly grease in your gun. See grease info in Rear suspension maintenance.
Wipe off the zerk before greasing to avoid pumping in abrasives.
My plan is to use the zerks as a supplement to full service. If I expect water crossings I will pump in some grease to reduce water entry. After water crossings I will pump in some more grease to displace water. I don’t think this replaces periodic disassembly, cleaning, and regreasing at all but it probably won’t hurt and may help.
Adding seals is the next step to consider....
Adding seals to protect your linkage bearings [NEW 13 January 2017]
JMS did the pioneering work on seal retrofitting: post and emails to JXG. He found rusted bearings on his PR4 after a couple wet rides and was familiar with seals from his KTMs. The following part numbers were final and confirmed with JMS on 2 June 2016.
- For the front joint (1): The bore width is 60mm
- The bearing widths are 20mm X 2 bearings = 40mm
- Which leaves 20mm for two seals
- JMS: “I used two 16x22x6 (mm) seals: AVX
- For the middle joint (2). The bore width is 40mm
- The bearing widths are 14mm X 2 bearings = 28mm
- Which leaves 12mm for two seals
- JMS: “I used two 18x24x5 (mm) seals: AVX VXB
The rear joint 3... This part of the linkage is up inside the swingarm so it is higher and a bit better protected than joints 1 and 2 which hang down. This one is more challenging.
- JMS: “The bearing [on my 2015] is a HK2018RS, but the PR4 manual shows it as a HK2016RS. The difference between the two is 2mm in bearing width. Either should work, but the 2018RS will be better.”
- JMS: “The rear joint is pretty well protected and didn't show any signs of water infiltration, so I'm going to leave well enough alone with that one for now.”
- The bore width is 45 mm: bearings and seals have to fit in this
- JXG: Turns out my 2016 PR4 has HK2020 bearings. The bearing widths are 20 mm x 2 bearings = 40 mm. Which leaves only 5 mm for two seals--won’t work!
- There are 2 mm thick seals made, but they are hard to find and expensive. One is the Honda 91071-NC5-000 Seal Bearing 20x26x2.
So for joint 3 there are two options to install seals:
- Replace bearings with Koyo HK2018RS Amazon 20mm ID, 26mm OD, 18mm width...
- The bearing widths are 18 mm x 2 bearings = 36 mm
- Which would leave 9 mm for two seals
- 2 ea. 4 mm seals would fit: 20x26x4: TCM
- About $15
- Replace bearings with HK2016RS Amazon 20x26x16 width...
- The bearing widths are 16 mm x 2 bearings = 32 mm
- Which would leave 13 mm for two seals
- 2 ea. 5 mm seals would fit: 20x26x5 VXB AVX
- About $28
Seal installation
I thought I could use an old, US-made 4-inch vise with a 1-inch deep socket (typical depth) to drive the bearings inward. Or maybe even a 4-inch C-clamp given the high cost of quality vises. This was naive. Neither would budge the bearings. I estimate that a 5-inch vise would be needed: look at the monster in Wattman’s picture. If you want a vise this size that will not strip out, the USA-made Yost costs $650+. Is there a cheaper way?
I purchased a 3/8-inch x 6.5 inch carriage bolt for $1.33. Equipped with 3/8-inch sockets, washers, and nuts this turned out to be an effective bearing driver.
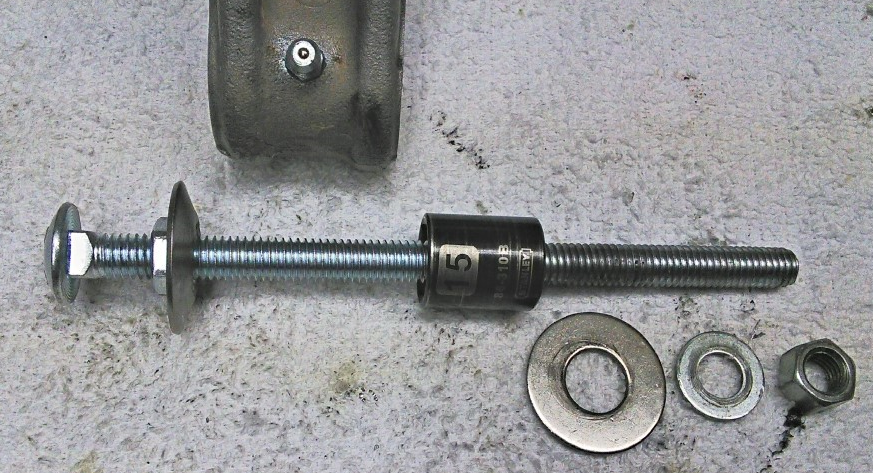
To get the proper depth, I measured to a particular point on the socket label. If you over-drive, the bearing will need to be pulled out or both bearings pushed through into a large socket. The carriage bolt is long enough to perform this operation, but try not to push the bearing too far.
For Joint 1, I drove with a 15 mm socket = 20.35 mm in 22 mm bore: →→→ It is really important to keep the socket centered. Otherwise it is much harder to press and even worse the bearing can get crooked and the seal will be crooked. Lubing the threads of the carriage bolt helps to reduce the force. |
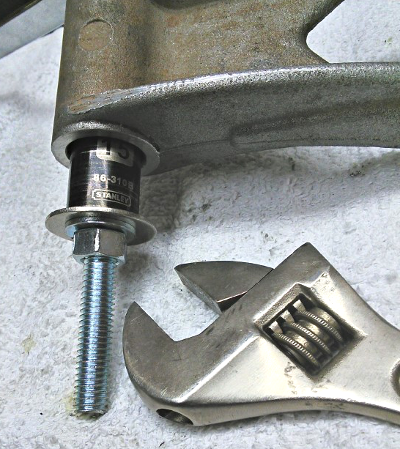
With the bearing pushed inward by 5 mm, there is now space for the seal: →→→ |
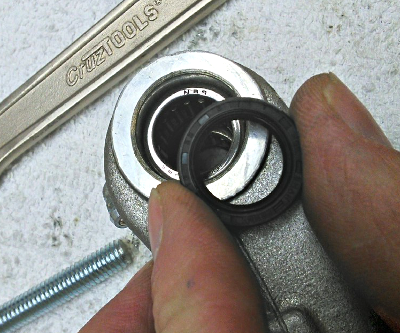
The joint 1 seals were very tight. I actually used the driver to press them in. Be sure to put grease inside the inner groove before installing the seals.
For Joint 2, I drove with a 16 mm socket = 22.09 mm in 24 mm bore. With both bearings moved inward, there is about a 1 mm gap for the grease zerk to deliver grease. This will be a tight one for sure.
The joint 2 seals went right in with thumb pressure.
Like JMS, I ended up leaving joint 3 well enough alone except for the new grease zerk. Down the road I may do something different. For example if these bearings wear out I will replace them with narrower bearings so I can add seals.
What about the swingarm bearings? The swingarm is the open style so it would require 4 ea. TC20x26x5 AVX but it is not clear if there is enough room. On the right side, a grease zerk could be installed behind the oil fill opening. The left side is completely wrapped by the chain guide: see the photo and diagram above. But Wattman does squeeze in a zerk on his KLR which is a similar layout. The traditional swingarm zerk was in the center of a continuous style so one zerk could fill all the bushings.
- Gudrun Fischer reports he has installed 20 x 26 x 4 mm wide seals for the front swingarm bearings (UKFB link)
What about O-rings? Huck369 has installed O-rings instead of seals: post.
Wheel bearings
Perspectives:
- “The bearings are rubbish (replaced wheel bearings, steering head within 18 months, the swing arm and linkage were just about OK.”
- “I would expect to swap wheel bearings on a regular basis if a bike is getting dunked regularly, greasing the rear linkages is a usually a once off job soon after a purchase, packing it with grease fixes matter for 2-3 years. Ungreased steering heads are a PITA, but VERY few Hondas have had adequate grease put in there and the old Suzuki's were as bad.”
- “crap wheel bearings” on two AJPs owned: post
- “I run a fleet of KTM's and they do at least 5000 miles before needing bearings.”
- “We have had a few fail early on new AJPs. We replace with either Koyo or NTN Japanese bearings widely used throughout the motorcycle trade and standard fit on all japanese made motorcycles. Normally £4 or £5 a bearing depending on which one. Some specials are more. Also we have used All Balls with no problems. The correct grade is C3 as stated by Andy Deal - UKFB post by Adrian Senior
- Various lifespan reports UKFB posts
See verified parts list under Parts
Questions about PR4 http://www.ajpforum.com/viewtopic.php?f=4&t=1193
Rear bearings
JMS on 2015 PR4 rear bearings: “A drift punch worked fine. I just tried to be careful to not score the hub with it, not that it is a big deal if you do. I'm not sure that a puller will be able to get enough bite on the bearing race with the spacer in place. If I remember correctly there are two bearings on the left rear (sprocket) side. I found my rear spacer to be machined a bit long, and the bearings wouldn't seat on the shoulder before contacting the spacer. I shortened the spacer up [by filing it down] to give just a smidge of movement with the bearings seated in place.”
JMS: “I did the rear ones on my '13 PR4 200 recently (mine's not got the big hubs like the extreme) and they were a doddle [easy] to do - it had two on one side, one on the other and from what I can remember the spacers weren't the ones that press into the bearings, they just sat on the outside of each bearing.
“They were the original one's too, and had lasted around 1000 miles, with most of that being offroad so I don't think they lasted badly. Fronts are still OK.
Mine's got the sachs forks on it and I seem to remember the axle is in two parts and there aren’t actually any spacers at all, just shoulders on the axle that butt up to the bearings as you tighten it.” http://ajpforum.com/viewtopic.php?f=4&t=1193&sid=78e0054be7dd5a55b8d272e2e22842cb
How-To
http://www.enduro360.com/2012/05/30/featured/how-to-change-motorcycle-wheel-bearings/
Wheel bearing protectors mentioned in UKFB post
Front bearings
2016 PR4 Enduro Pro (USA)
The front axle has two spacers:
- Left: 27 mm long overall, with a top step of 19 mm, 24 mm OD. I had to drive this out with an aluminum drift from the right side.
- Right: 33 mm long overall, with a top step of 23.6 mm
The sequence from RIGHT appears to be the following:
- Axle (shown below)
- Spacer long (shown below)
- Grease seal in hub
- Bearing in hub
- Spacer tube in hub
- Left bearing in hub
- Grease seal in hub
- Spacer short (shown below)
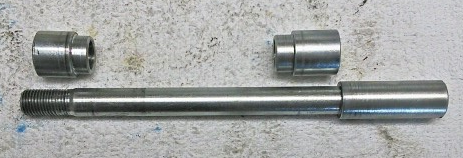
Axle (p. 1-51) says “Front wheel shaft (aluminum) 25 OD”: 74 NM, but it is steel. I took it to 50 NM and this seemed sufficient. There are only two “fixing screws” but they are probably around 12 NM.
Above: 14 January 2017 by JXG
Brakes
Front Brake rotor
2016 PR4 Enduro Pro (USA)
The rotor is secured with 6 ea. M6 bolt with 4 mm hex and 10 mm nut: 12 nm torque (p. 1-51)
The flat-head hex bolts have a lot of friction on the hex end because of the countersink. I almost stripped out a 4 mm hex before reaching through the spokes with a 10 mm socket to loosen the nut. This was much easier: |

The new rotor from AJP did not have a speedometer magnet. I pressed out the old one with a vise, socket, and flat-head screw. |
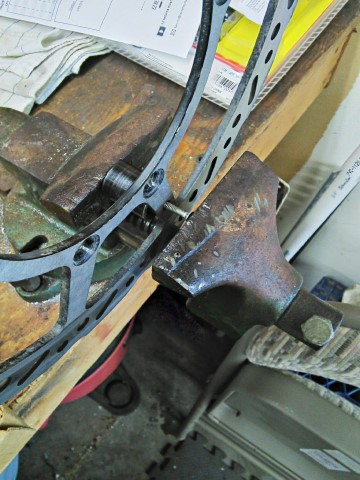
Naturally, the magnet fit loosely in the new rotor so I secured it with a blob of Goop sealant. The magnet goes in from the RIGHT and the concave end sticks out slightly on the bolt countersink side). The inside should exert the pull towards the speedo pickup. This photo is actually wrong; it should face the other way -->> |
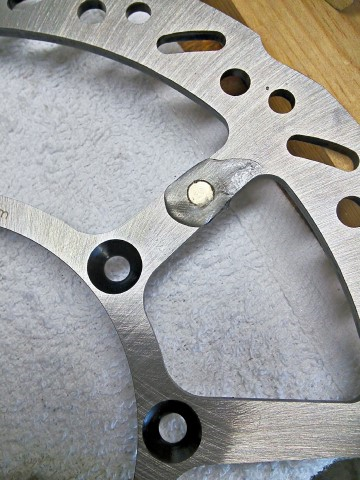
Here is a dimensional PDF of the rotor if anyone wants to look for substitutes: (pending)
The manual specifies “1. Applying a locking agent to the screw” and “2. Apply oil to the thread and the surface of the phalange’
I wire-brushed the old thread locker off. There was no evidence of lubricant and I did not really want any around the brake rotor, so I just used Loc-Tite on the nuts--which are themselves locking. I tightened everything up to 12 NM in a criss-cross pattern, using a HF digital torque meter. I actually tightened the nuts, since there is so much friction--by design--in the countersunk hex bolts.
Above: 14 January 2017 by JXG
Steering head bearings
PR5: “Steering head bearings checked... and found to be knackered (well, partway there due to contaminated grease in the bottom bearing so once apart...) replaced with Timken ones (at about 20 months old and only 800 miles...!)” - UKFB post
Adding a grease zerk - UKFB post
Mods
Adding a charging connector for float charging
The “positive always on” (battery) wire always goes to the shielded side of the connector: A 15 amp fuse should allow jump starts in an emergency, yet protect against high amperage shorts which would melt the wiring or even start a fire. |
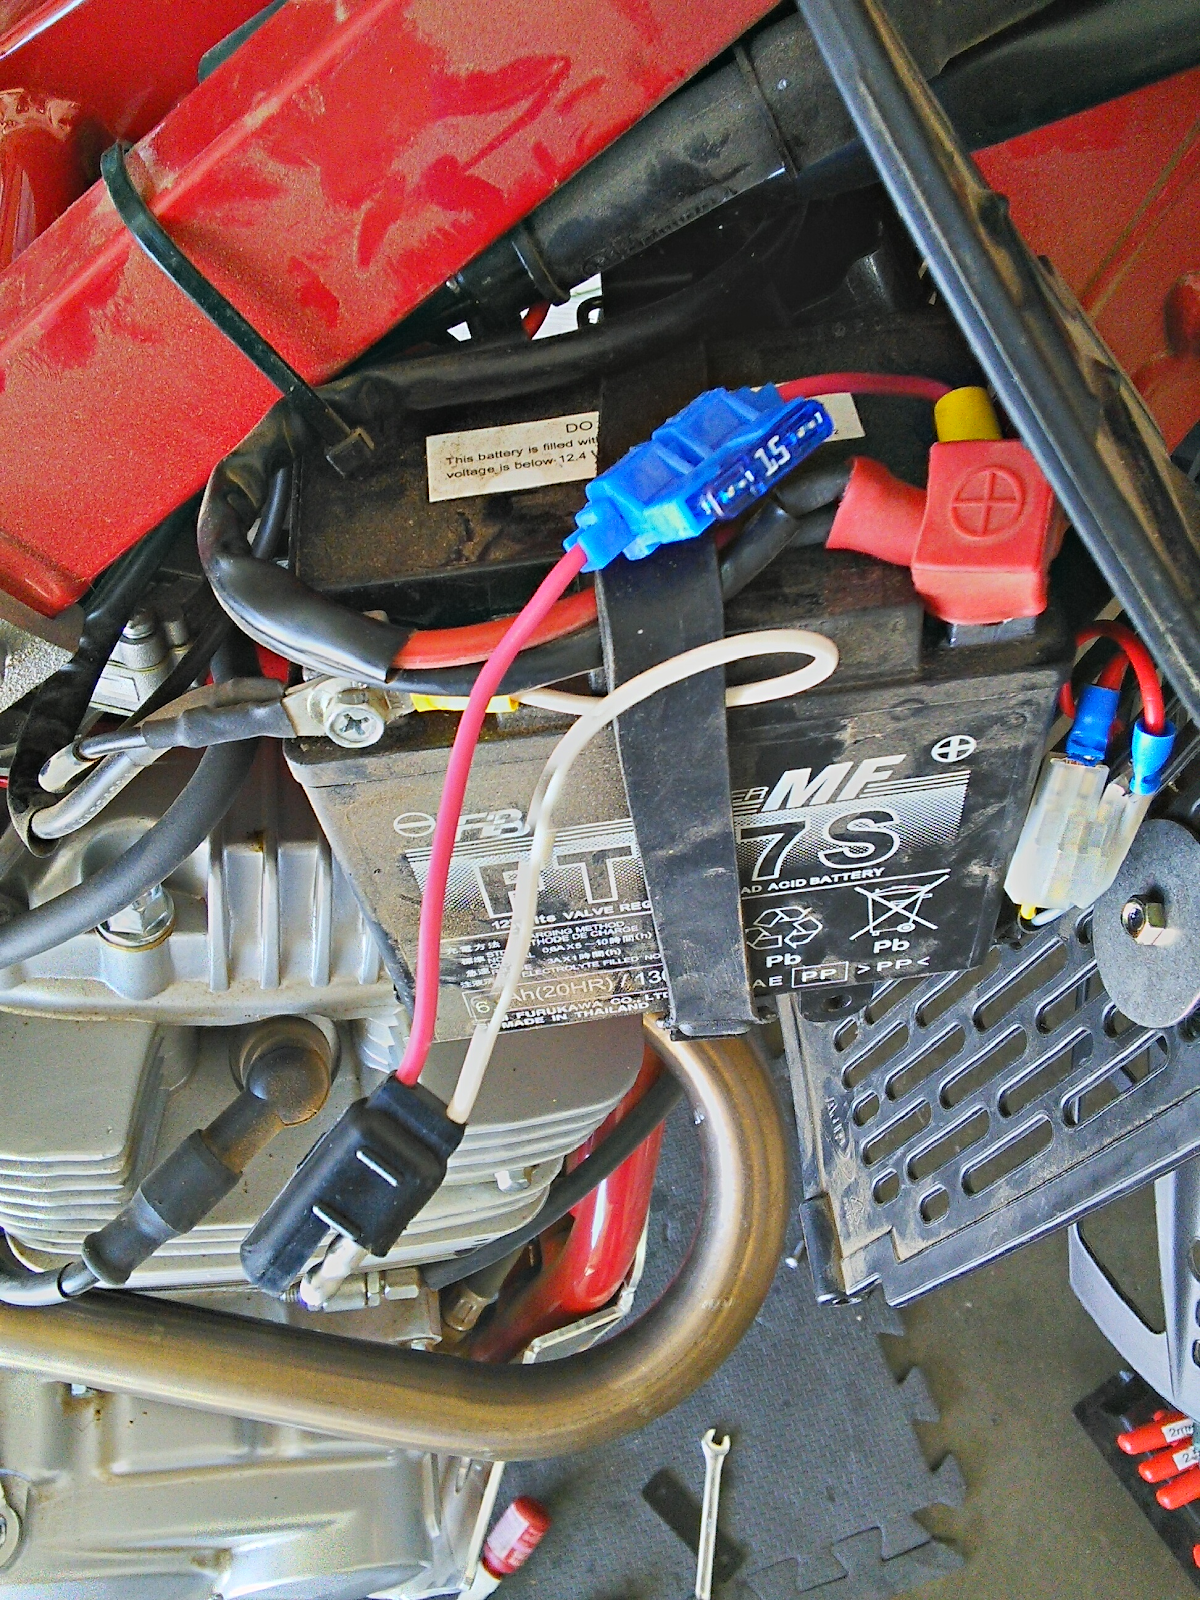
Adding a horn
The 2016 PR4 USA model is wired for a horn but does not include a horn. Horns are needed for highway plating, but also have an important off-highway role. ATVs and 4X4s often come around blind spots like brushy creek bottoms at high speed. Using a horn at all blind spots can prevent disaster.
Tusk Universal Horn is a very small, inexpensive, and loud horn. https://www.rockymountainatvmc.com/p/1147/25865/Tusk-Universal-Horn The horn can be mounted to the right grille with a fender washer. Important: When the horn gets wet, remember to spray in some lubricant like WD40 to dry it out. We’ll see how wet this horn gets and how it holds up over time. |
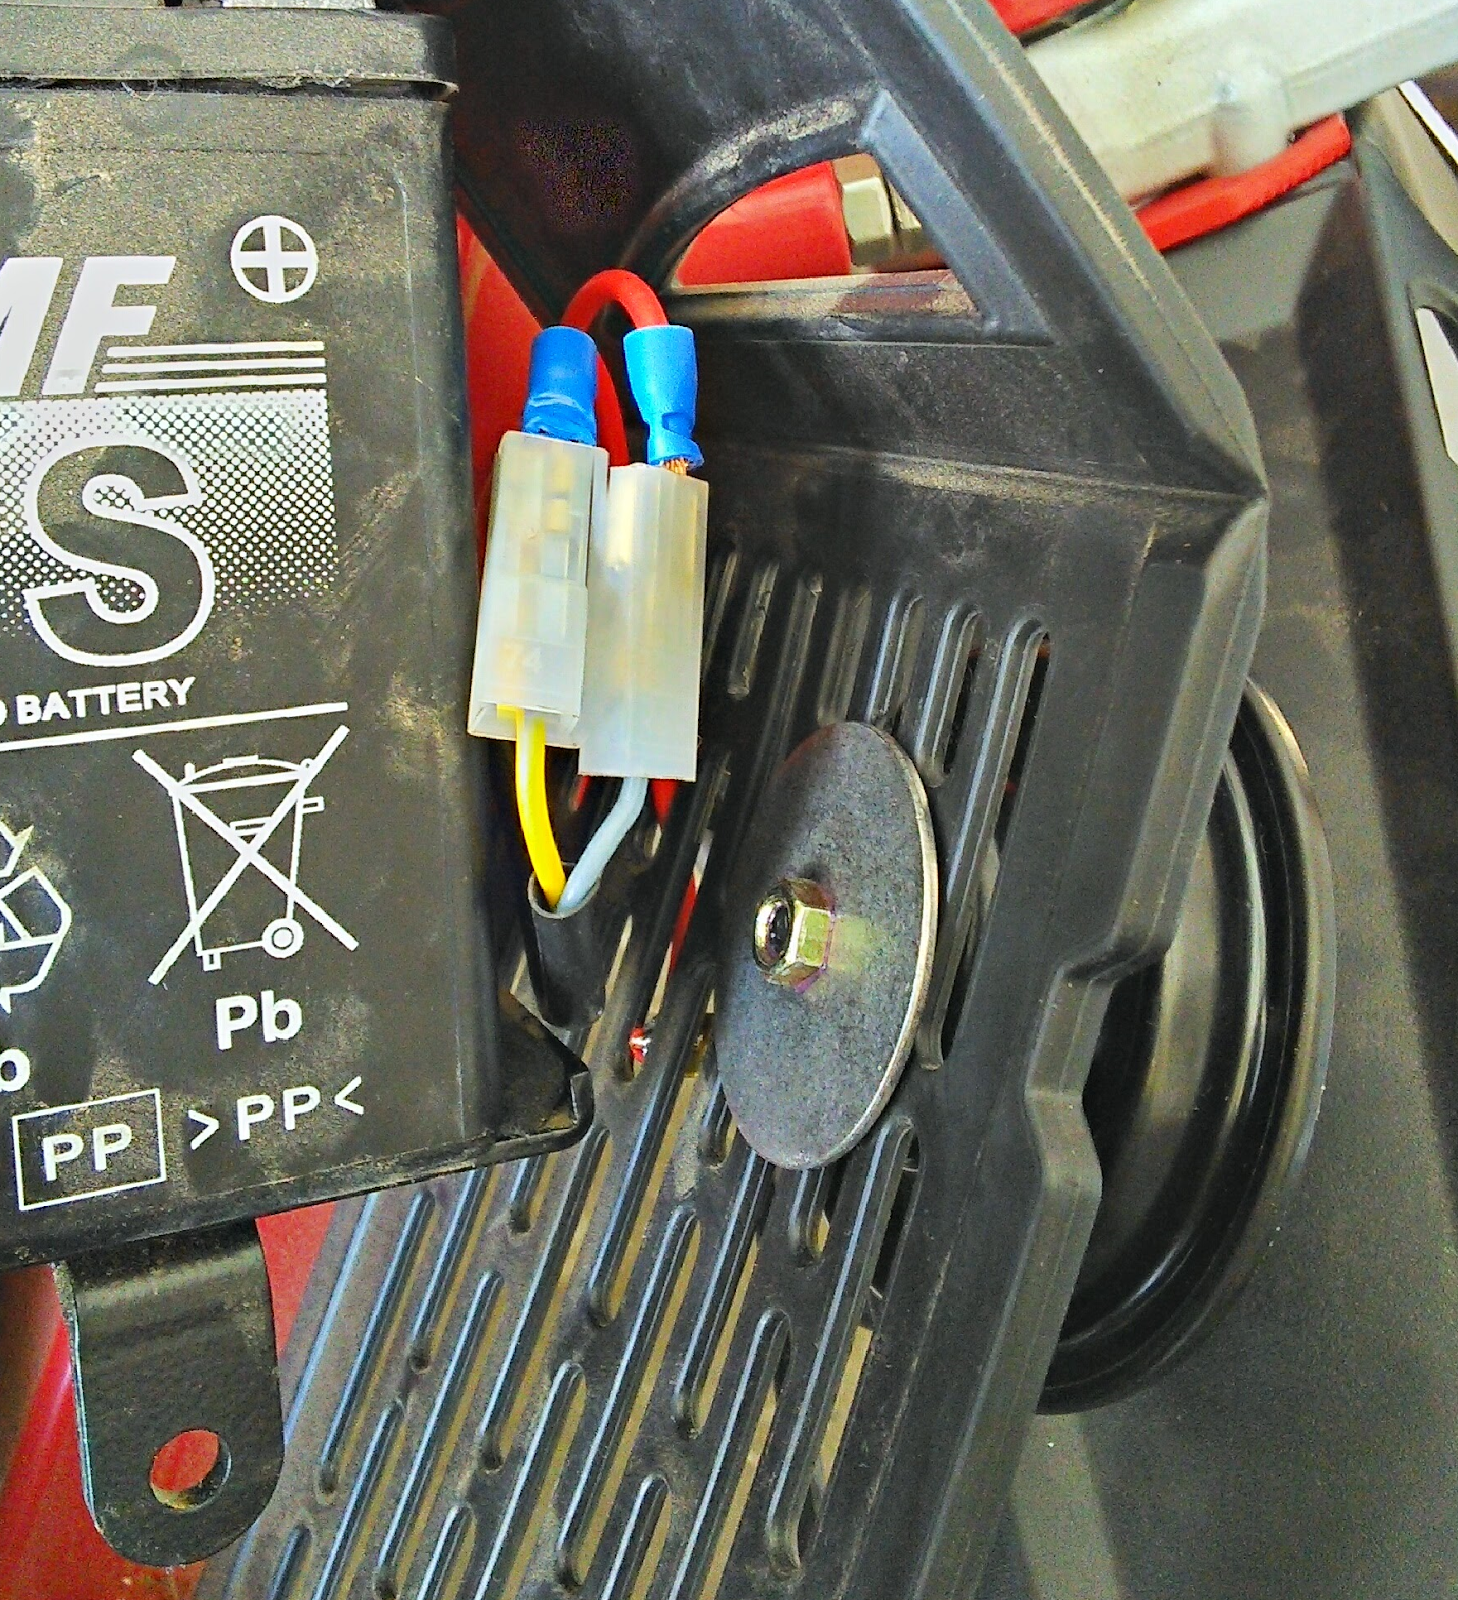
April 2017: I let dampness sit in the horn a couple times and it has become intermittent. Now on the second horn
Adding a mirror
Some riders think of mirrors only to pass inspection but they can prevent disaster. The PR4 USA model does not include mirror mounts. This is a Ken Sean 970510 Black Universal Dual Sport Mirror (Amazon) mounted to a 7/8'' Handlebar Mount Clamp 10mm Thread Mirror Adapter (Amazon). |
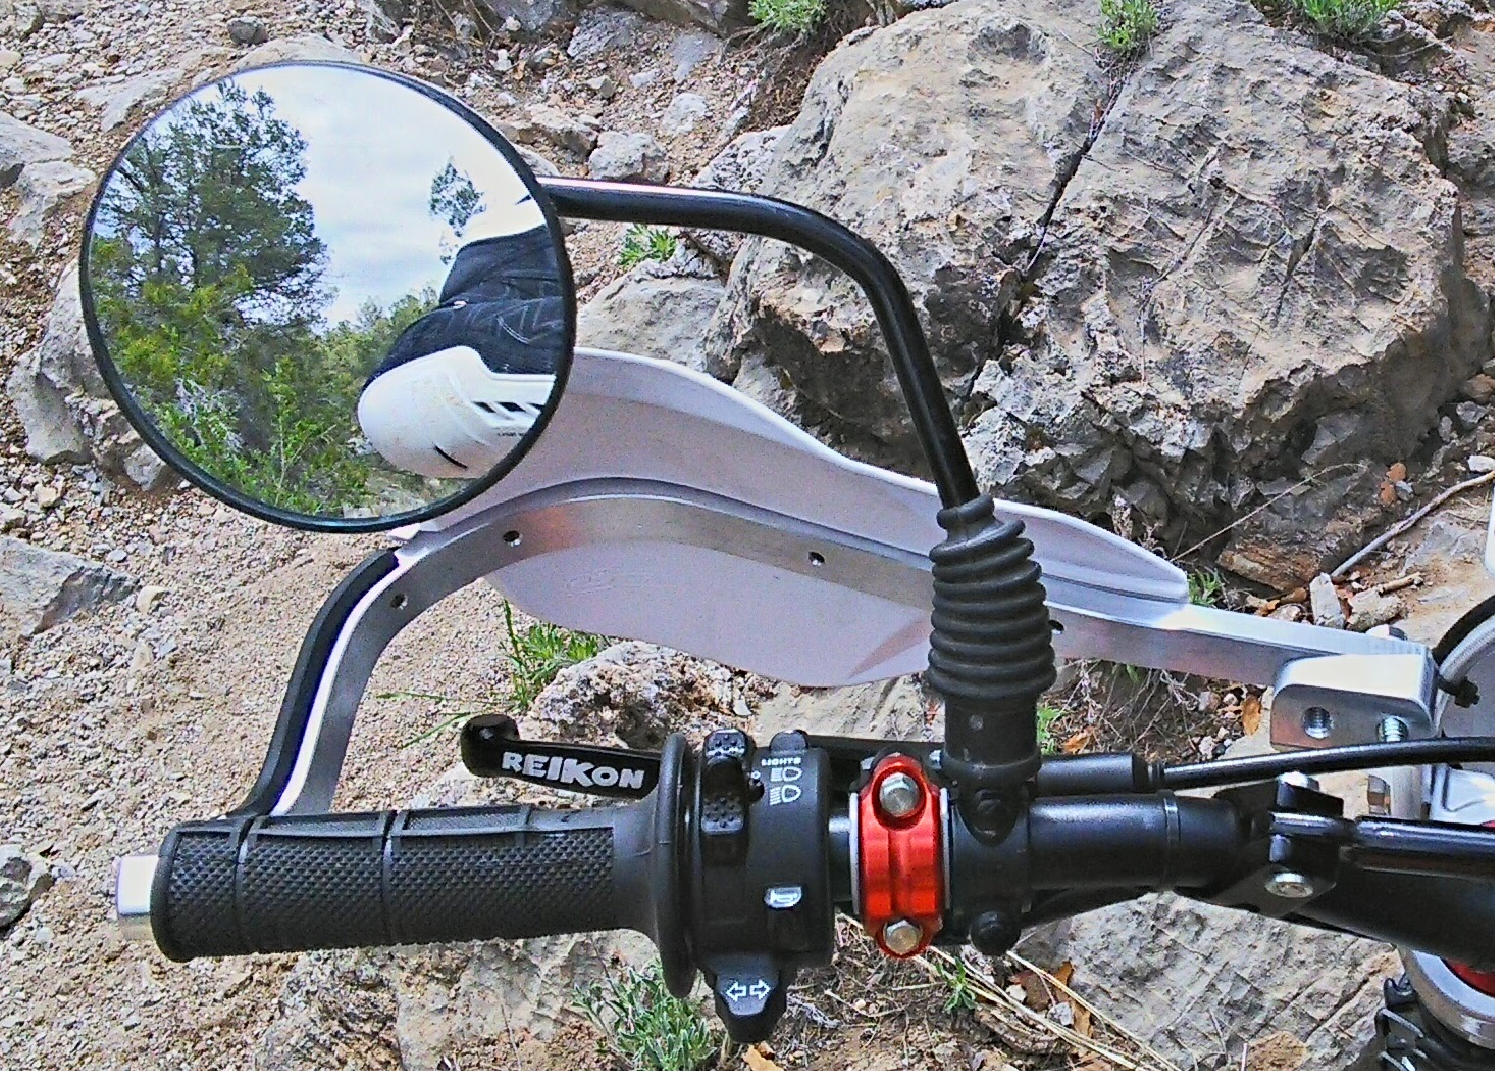
Because of the brake reservoir, there is no space on the right bar for a mirror mount. For the trail rider briefly on pavement, the left mirror tends to be more important because of vehicles passing on the left (in USA and other right side countries). If a right mirror is desired, the best bet would probably be to mount it to a handguard with some kind of custom attachment. For example, half of a mount clamp (above) could be bolted to the handguard.
Rear fender and lighting
Acerbis X-LED http://rickramsey.net/PR4mods.htm#rearfender (RMAM)
Acerbis LED CE: Bottom line: “My AJP dealer tried the X-LED taillight and didn't feel it was as suitable for a license plate as the CE. I went with his suggestion, rather than waste my $$ figuring out for myself.
http://advrider.com/index.php?threads/ajp-cycles.1029612/page-16
Details: “The stock tail assembly is too small and flimsy to mount a license plate to. The dealer that I bought the bike from offered to get in a few different tail assemblies to evaluate which one may work the best, then ship the best one to me. The one that he felt may work the best is made by Acerbis. It has a little more area to mount a plate to, as well as a license plate light, without the bulk of a full dual-sport fender.
Fitment was fairly simple. The holes didn't line up perfectly, so I ended up drilling a couple new holes in the new fender. Aside from adding a few minutes to the process, I don't believe the new bolting points should cause any problems.
The wiring took a little troubleshooting. The Acerbis taillight wiring doesn't come with any plugs attached, so I stole the one of the OEM taillight. The AJP wiring diagram doesn't seem to quite match the wire colors on the bike, so I had to play around with a few different configurations before the lights would work properly.
The newly wired plug with mismatched colors. The Acerbis fender is the Red, Black & Yellow.
http://advrider.com/index.php?threads/ajp-cycles.1029612/page-14
Additional photos here: http://ajpforum.com/viewtopic.php?f=4&t=320&sid=ebdd8d23d09fbb13937520898cf67743
Acerbis LED CE Tailight 214047 http://www.acerbis.com/prodotto_detail.php?idp=789
Acerbis LED CE Tail Light at RevZilla
Adding turn signals
Turn signals: Wiring and switch are included with US imports, but not flasher unit. There is a socket for the flasher near the ignition coil.
2015 PR4: http://www.ajpforum.com/viewtopic.php?f=4&t=1132
2016 PR4: relay socket is a three slot connector, with only two conductors in it. Probably the same as 2015.
Flasher unit used by JMS: http://www.amazon.com/iJDMTOY-Electronic-Motorcycle-Flashing-Adjustable/dp/B00VN3J8OM
Bikemaster conventional bulb rigged with an innovative flexible mount (Post)
Handlebars and cockpit
2016 PR4 stock is Reikon 9083BK. This is the “Kawasaki” with a height of 93 mm and a width of 806 mm: http://www.reikon.com/78_handlebars.php
2015 PR4: “I did add a bar riser early on to help facilitate standing."
“I used the ProTaper Solid Mounts, which aren't specifically risers, but do raise the bars about an 1" when switching to the 1 1/8" bars. (http://www.protaper.com/default/controls/universal-solid-mounts.html)
I also switched over to the ProTaper Contour bars with a KTM/Suzuki bend. I wasn't particularly impressed with the OEM bars on the PR4.
92 mm height, see http://www.protaper.com/default/controls/handlebars/contour.html#product-tabs2
“There were no cable routing issues with my setup, but the OEM riser casting needed some cleaning up before the ProTaper adapter would fit down in them properly.” (link) Email followup: “You may be able to go as high as 1 1/4" up (maybe more), either with a riser or a different bar with more rise, before the cable routing will become an issue.”
2016 PR4: The stock clutch cable is probably too tight to raise the bars. Other cables, etc. look good.
Approximately 1 inch risers with stock cables (with photos) - UKFB post
Hand guards: Ramz used Cycra and the “Side Triple Clamp Mount adaptors” with longer bolts. http://rickramsey.net/PR4mods.htm#handlebars
JXG comment: This is an interesting approach because mounting to the triple clamp is stronger, frees up space on the handlebars to move controls and accessories around, and allows different bar thickness and rise without involving the handguards as much. On the other hand, flex of the bars is reduced even more thus increasing the shock and vibration transferred to the rider.
Exhaust
Is there any way to add a spark arrestor to the stock pipe? Yes. (post) But may not pass legal inspection.
FMF upgrade: $359 from AJP, 2 oz lighter than stock. Includes spark arrestor needed for western USA public lands.
“With riding areas threatened more every day, FMF takes seriously the expression ‘less sound equals more ground’ and with the Q4, FMF has designed a slip-on exhaust that leads in high performance quiet technology. Using the best materials, the Q4 uses intricate chambers and baffles to improve flow while still dampening sound. Roost more, ride more and offend less with the FMF Q4!” - from the manufacturer, strike-out by JXG
Sprocket cover mods
- Open option link
- Cover with ports option link from UKFB
- Minimalist case saver from Adis Motorcycles - UKFB post
Clutch
“The clutch on the PR4's should be super light, check the cable and the routing, down the front of the frame and away from the exhaust, we did this on Gavin Derriman's bike and cured graunchy heavy clutch action.” - UKFB post
Clutch lever pull is excessive: Lubricate the cable - UKFB post
“The clutch pull on the PR3/PR4 is pretty light. For all I like hydraulic clutches, I'm on the fence as to whether the Magura upgrade is worth the extra $335. I'll likely spend money on increasing bottom end power before I'll buy the hydraulic clutch.” “Pull on the PR4 is not too bad, PR5 is on the stiff side.” (Ref)
JXG, May 2016: I compared them side-by-side. The PR4 is a bit light, the PR5 a bit heavy. Would get a hydraulic for a PR5, not worth it for the PR4.
Gearing options
Different conditions and riding styles turn up different limitations. If redlining at ~50 mph is your primary concern then the discussion below is moving in the wrong direction but the table shows lower ratio / faster options also.
For the first few rides I thought the AJP had a great power band. As others have pointed out, it is hard to stall. It took a while but I began to notice I was stalling out under 4 mph (per speedometer) when turning in rocks with gaps between them, going over up-down obstacles like logs, and other trail spots where my CRF230F never stalls. If I can keep it over 5 mph, no problem. But 5 mph can be very scary and dangerous in some rock gardens, at least for me.
Also in slow but super steep conditions like game trails I can just barely keep the engine turning over. Amazingly, it usually does not stall but there is no throttle response. These calculations seem to show the problem:
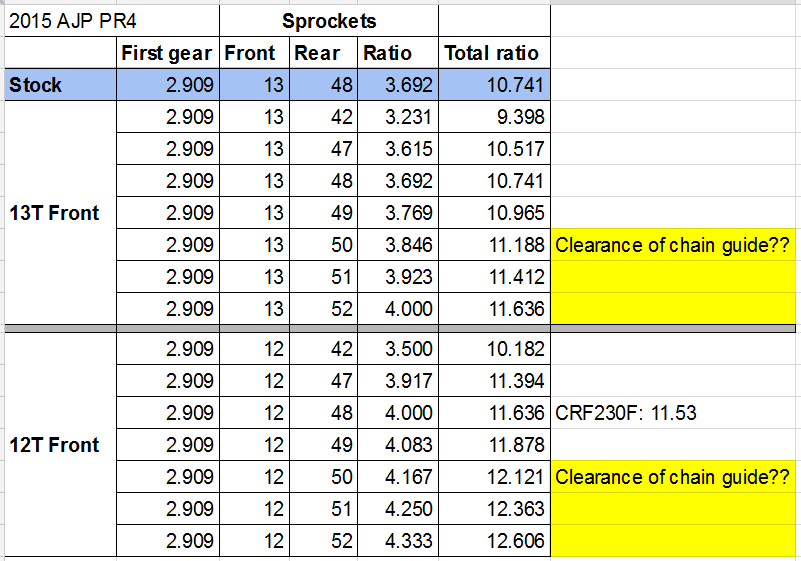
At 10.7 total ratio (first gear ratio x front sprocket teeth / rear sprocket teeth) the stock gearing is too low (smaller number, smaller ratio) for me.
My CRF is 11.53 (12/50, down from 13/50 stock) and my KLX250S was 11.77: that bike was heavy but a goat with 13/51 gearing.
Please note:
- If you don’t ride these conditions, you won’t have the same experience. Or your skills may compensate.
- Most of my riding is at 6000 to 10000 feet elevation. Dropping one tooth on the front sprocket is a traditional compensation for small dirt bikes at high elevation.
- I run the same IRC TR-11R trials tire on everything so direct comparison is possible
- For my type of riding, all I care about is first gear because that’s where I spend 80% of my time. For other gears, see the table by Ramz.
JT has rear sprockets up to 52, but at some point clearance of the chain guide becomes an issue. (I was able to move the guide forward on my KLX, but that does not seem to be an option on the AJP.) Also I can cut the stock chain down, but not extend it.
http://www.jtsprockets.com/catalogue/sprocket/JTA897
Note: The 2017 PR4 Extreme model uses a different rear sprocket model fitment: JTA822
For the front, 13T is the smallest on the parts list: 00MTS01A0035
http://rickramsey.net/PR4crossover.htm#frontsprocket
The 2016 PR4 stock sprocket is marked JTF328-13, which is available as 12T
https://www.amazon.com/JT-Sprockets-JTF328-12-Steel-Sprocket/dp/B001AVS6HC
First gear high speed | 5th gear top speed | |
Stock gearing | ~11 mph speedo | ~55 mph speedo, 49 mph GPS |
12/48 gearing | ~9 mph speedo | ~50 mph speedo |
The change in ratio is 8%. I have installed the 12T and will report trail results (JXG, 6/27/16).
7/5/16: Makes first, second, and third gear a lot more fun. I love it.
Cargo options
AJP fender rack
Other information has been moved to Cargo options for dirt bikes
Moose with 6 lbs on 2016 PR4 front fender: After about 20 miles of rough riding the screws started cutting into the plastic. The Polisport FreeFlow is two piece screwed together and cannot support weight like one piece fenders. Tried pack on the rear fender and it fell off soon, just like the CRF230F.
One option is to make an aluminum brace, either above or below the fender: see link.
Another option is a one-piece front fender. I have found that a one piece fender, even with 6 lbs on it, will flex but hold up on the roughest trails. I tried my CRF230F fender on my AJP. Clearance is good, but rear holes would have to be moved back a few millimeters.
Conclusion: a one piece fender intended for the CRF230F should fit a AJP PR4. This one looks good: UFO Front Fender – White, Item Number: 335594, $27, Fits: 2008 Honda CRF230F, PartsGiant.
Water crossings (updated January 2017)
This section discusses options for water crossings up to the seated rider’s knees / below the air intake.
Linkage and swingarm bearings have no seals on the AJP. The bearings must be well-packed with marine grease. See Rear suspension maintenance section for post on rusted bearings and repacking info.
The crankcase vent hose goes downward behind the engine and might flood. On the CRF230F, this hose goes into the airbox but this is not an option on the AJP because it does not really have an airbox.
Ramz added a UNI filter to the short hose on his 2015 PR4. For the 2016 PR4, the hose is 0.54 OD x 0.31 ID. UNI filter UP-122 (Amazon) is for 3/8-inch hose and measures 1.5 x 1.5 inches.
This UNI filter is too large to fit under the seat. But the hose is long enough that it can be run up under the right side panel, just behind the battery ⇒ Make sure the fuel line is not being pushed down onto the engine. |
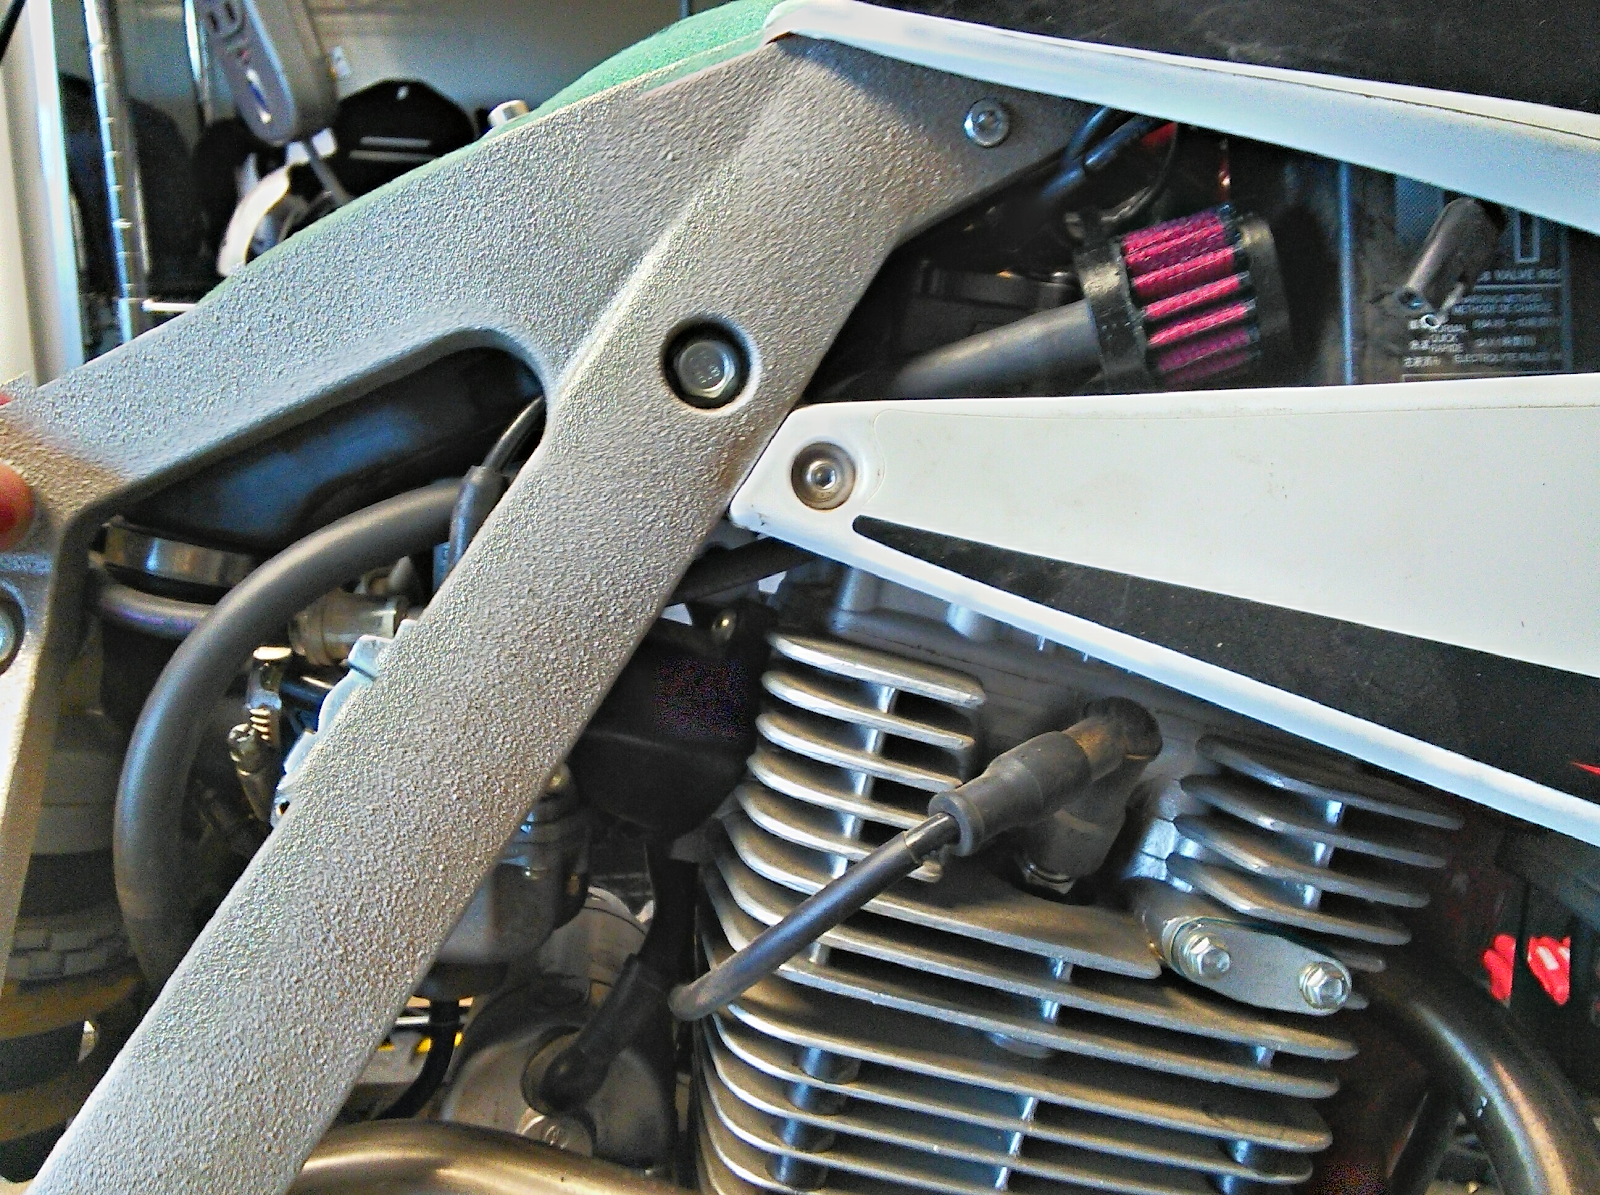
Carb snorkel: The fuel bowl hose is both an overflow and a vent that must remain open so that fuel can enter. If this hose gets blocked for more than a few seconds the engine will start to cut out. I found this happens from either submersion or splashing.
Having the engine die in water is generally not a good thing. It can result in anything from wet boots to the bike being dropped and flooded. In the high country stalling can be the first step towards hypothermia if you fall and get wet in an alpine creek.
A “T-mod” can be made with tubing to create a snorkel. The one I made is almost identical to my CRF230F; see construction details here.
The 1/4-inch vinyl snorkel runs up beside the shock reservoir and ends under the seat. ⇒ The overall plumbing should form a “Y” shape. Make sure everything drains down, so that fuel or water can’t form a blockage. |
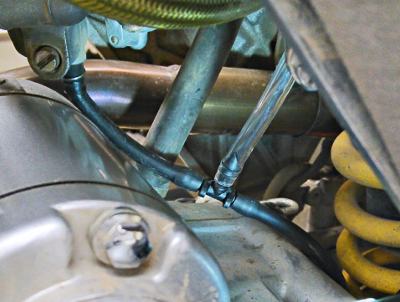
This is a very hot area so it is not clear how the irrigation T-fitting and vinyl tubing will hold up over time. The tubing should probably be replaced with Tygon which is rated up to 165F.
(Notice how the carb drain line bends against the hot starter. This is a nice example of how Zongshen has not yet developed the attention to detail of major players. It’s not a big deal but you would not see it on a Kawasaki or Honda.)
What about electrical? “I don't know if it affects all models or just the earlier ones, but my 2013 PR4 has a big block connector tucked behind the frame on the left hand side of the bike, above where the wires come from the flywheel cover. I've had problems in the past with water getting into the connector and making it run awfully (backfiring and missing). Temporarily I've filled the back of the plugs up with waterproof grease (non-conductive!) and it's better, but not foolproof. Eventually I'd like to replace it for a connector that is better sealed.” (Post)
On the 2016 PR4 this connector is now up high, about level with the top of the carburetor.
Brake mud hole in caliper
How to be notified of updates to this document
To be notified when there is an update, you can create an alert at changemon.com. Choose “When a specific element changes” and point it at the date at the top of the page. You will get an email when this date changes. Changedetection.com does not seem to work with Google Doc web pages.
Tables for photos
caption | photo |
caption | photo |
caption | photo |
No shading:
caption | photo |
caption | photo |
of