Twofu, Marco, Just..Fall, Hota, Sprint, Zexla’s Town Hall 11 Anti 3 Star Base Building Guide


Introduction
Hey! Welcome to our Th11 Base Building Guide!
This guide will be divided into three parts - Part 1 is General Base Building, Part 2 is Advanced Base Building against META strategies, and Part 3 is advanced tips and tricks for getting creative with your builds.
Part 1 is kept to a minimum here, if you'd like to see more in depth explanations we'd recommend to check Derpy's BB guide which will be released soon (link below in his Table of Contents once it comes out).
Part 2 is full of examples, tricks, pictures that us experienced BB have discovered during our journey, it will help massively against META attacks.
Part 3 is full of nifty tricks and tips and some advanced specific techniques that can be incorporated into a base.
Have a nice read! :)
-Twofu, Marco, Fall, Hota, Sprint, Zexla
Twofu
Hey peeps, name's Twofu (Discord - Twofu#0002) and I’ve been playing this game since around 2013. I’ve taken many long breaks, but I’ve always had fun with building bases. I'm a pro on the BB server, and I play for WhySoGolem?, Tears of Death, Terror 9, and I also build for RH Base Building.
Marco
Hello everyone, Marco here. I've been fully immersed in BB since I was a Th8, reaching the peak at Th9; some of you may know me for my Th9 guides, and actually at one point I had Mod clans stealing my bases and asking for help. BB has always been a mind game for me, trying to outsmart the attacker and getting a smile every time it actually happened - it's far more complex than doing an attack, but I believe it's way more rewarding as well. I've now built competitively Th11 for various months, and I feel it's the right time for a guide. I currently play in Yolo Mode, an Italian/International powerhouse (if you'd like, join us here). If you'd like to contact me, feel free to send a message on Discord - Marco#0264
Happy clashing!
Just..Fall
Hey guys, name’s Fall. I’ve been playing the game for the last 5 years, and have always loved to build bases, but never really got serious with it till about October of 2019. I am currently a member over at Sniper Victory, and The Overlords, and I am excited to be sharing such an in depth guide for you guys out there in the community. If you have any questions or something doesn’t seem clear feel free to message me on Discord @Just..Fall#0001
Hota
What’s up everyone, I’m Hota. I’ve been playing CoC on and off for about 4 years now and have been going consistently for the last two. When I first got into base building, I didn’t even realize that competitive clash was really a thing. However, as I got more into base building I was introduced into this new world and instantly hooked. I have been building for almost a year now and am currently playing in Shaded Warz, Illegal Elements, and Mystic. My DM’s are always open on discord @ Hota_Hota123#1304
Sprint
What’s poppin fellas. I’m Sprint. I’ve been playing with my CoC for as long as I can remember, but it’s only been around the last year that I realized it could be considered a competitive sport. Consequently, I quit copying Clash with Cory bases and delved into the world of basebuilding. I’m great at pretending I know more than I do, so if you have a question that needs answering, just pop me a dm @ Sprint#2432 and I’ll google the answer for you.
ZexlaTex
I am ZexlaTex and I have played in SV for my entire time in clash. I enjoy building weird bases out of the meta and making my opponent think differently when planning their attack. I hope you find this guide helpful!
Table of Contents
Introduction
Part 1: General Th11 BB
Chapter 1: Terminology
Chapter 2: What is an Anti 3 base?
Chapter 3: Accessibility/Value Spread
Chapter 4: Pathing and AI
Chapter 5: Compartments
Chapter 6: Trapping Techniques
Chapter 7: Splash Distribution
Chapter 8: Clan Castle Troops
Chapter 9: Trash Buildings
Chapter 10: Defending Specific Attacks
Part 2: Advanced Th11 BB
How to defend META attacks
Chapter 11: QC Miners & QC Hybrid
Chapter 12: DragBat
Chapter 13: QC LaLo, Sui LaLo & Electrone LaLo
Chapter 14: Pekka Smash & PekkaBoBat
Part 3: Getting Creative
Checklist
Links
Final Words
Part 1: General TH11 Base Building
1: Terminology
Before we go into the guide, we should get you familiar with Clash terminology. If you’re aware of the terminology already, feel free to skip this part 👌
- Troop/Spell Terminology
- Barb: Barbarian
- Arch: Archer
- WB: Wall Breaker
- Gob: Goblin
- Loon: Balloon
- Wiz: Wizard
- Drag: Dragon
- BBD: Baby Dragon
- Edrag: Electro Dragon
- Valk: Valkyrie
- Hound: Lava Hound
- IG: Ice Golem
- BK: Barbarian King
- AQ: Archer Queen
- GW: Grand Warden
- RC: Royal Champion
- QQ: Quad Quake
- Zap: Lightning
- SWB: Super Wall Breaker
- SB: Siege Barracks
- BB: Battle Blimp
- WW: Wall Wrecker
- SS: Stone Slammer
- Defensive Structures Terminology
- TH: Town Hall
- CC: Clan Castle
- AT: Archer Tower
- WT: Wizard Tower
- AD: Air Defense
- TF: Tesla Farm
- IT: Inferno Tower
- BT: Bomb Tower
- EA: Eagle Artillery
- MGB: Mini Giant Bomb
- GB: Giant Bomb
- DGB: Double Giant Bomb
- RAB: Red Air Bomb
- SAM: Seeking Air Mine
- TT: Tornado Trap
2: What is an Anti 3 Star base?
In the easiest way possible, an Anti 3 Star base is a base solely designed to protect yourself from getting tripled. It’s mainly used in competitive wars and serves no function as a home or farming base. Please note, if you are looking to defend a two star, this base building guide will not be for you. All the concepts here are solely to help defend the 3. Let’s start with some basics of an Anti 3 base. I’ll list here some key concepts you’ll often find in one.
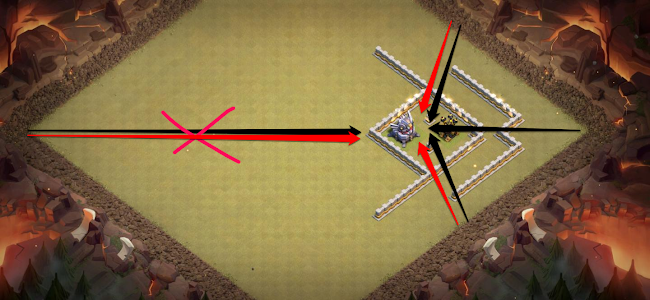
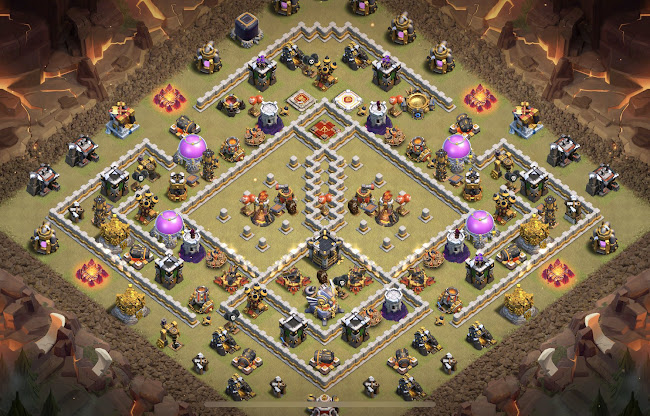
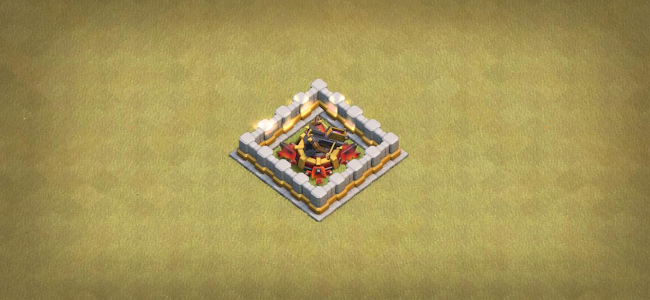
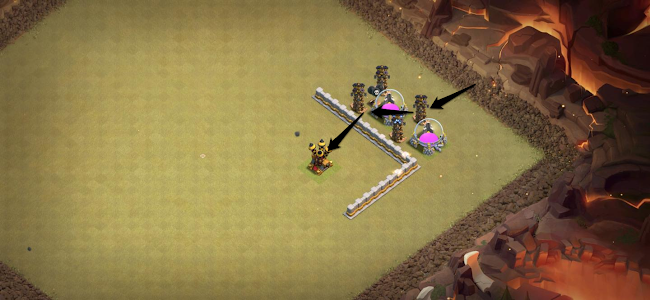
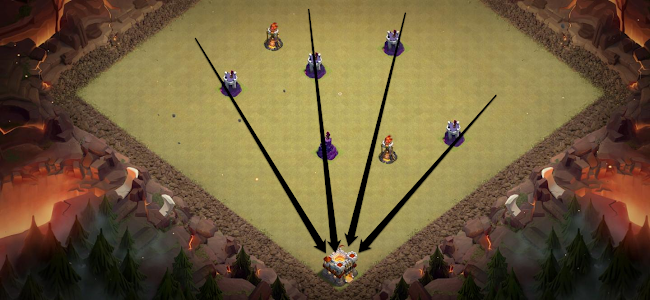
- Offset Town Hall: All Anti 3 bases run an offset Town Hall for a myriad of reasons. One, we’re not looking to defend a 2 star, so the Town Hall serves no purpose other than a high hitpoint structure. Two, Siege machines can enter from any side of the base if the Town Hall is centralized, allowing attackers many more options for an attack. And three, because the Town Hall has such a large amount of hitpoints, we can use it as a means to make funneling harder or more expensive. Let’s take a visual of point two, having to do with Siege machines.
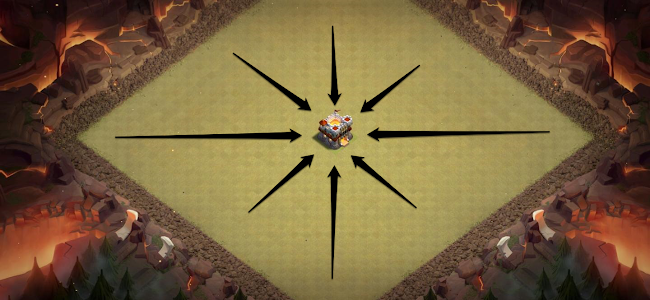
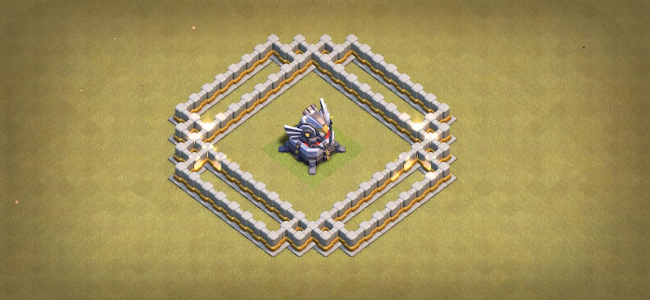
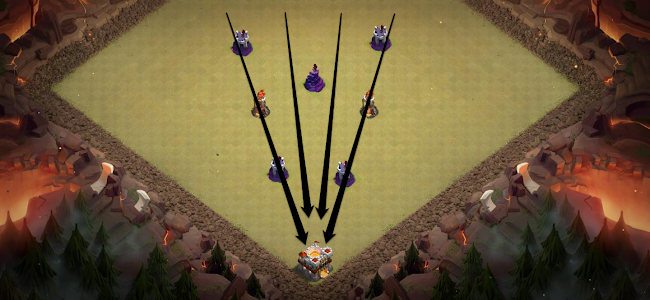
The above is an example of a centralized Town Hall. Drawn with the arrows, you can see how a Siege machine (Blimp or Wall Wrecker) would path towards the Town Hall. Notice how many options attackers have to choose from to attack your base. This makes your base substantially weaker because parts of your base may be weaker to certain things, and giving all these options allow for attackers to exploit it.

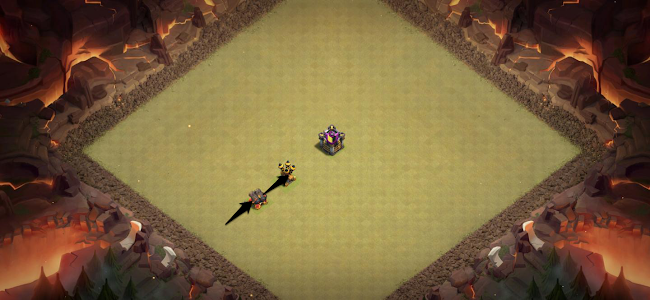
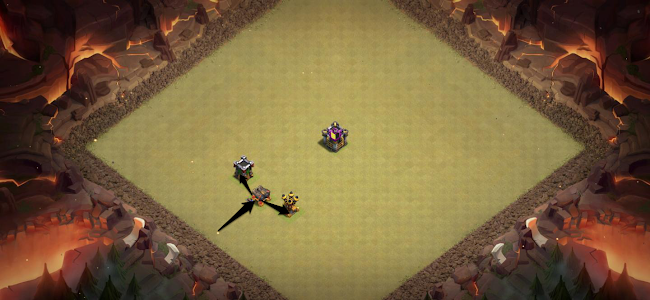
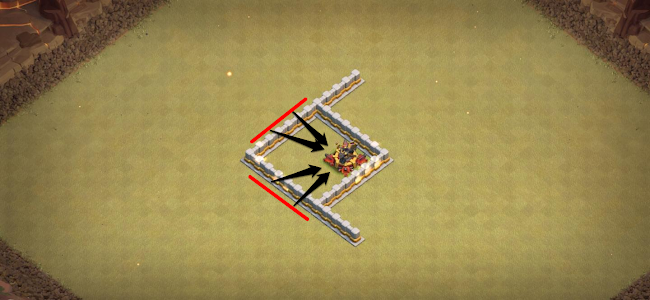
In the above picture, check out this example of an offset Town Hall. Notice how the options an attacker has are severely limited to one side of the base. Interestingly enough, the top and bottom arrows would almost never be used because it would break the function of a Siege machine to go into the core, as the top and bottom arrows would most likely be outside your base. This gives your base an advantage in defending because of a lack of options attackers get, and makes trapping your base much easier (more on that later)
- Asymmetrical: Many Anti 3 bases run an asymmetrical layout? Why? It’s simple, if your layout is symmetrical, it makes pathing extremely easy to predict. It also allows for attacks to know exactly what’s on the other side of the base once they’ve figured out one side. Note this- It is possible to make a symmetrical Anti 3 base, doing so can be much more difficult. A symmetrical base relies on asymmetrical traps, which allow for unpredictable situations to the enemy troops. A purely symmetrical base without asymmetric traps would be very easy to predict and take down.
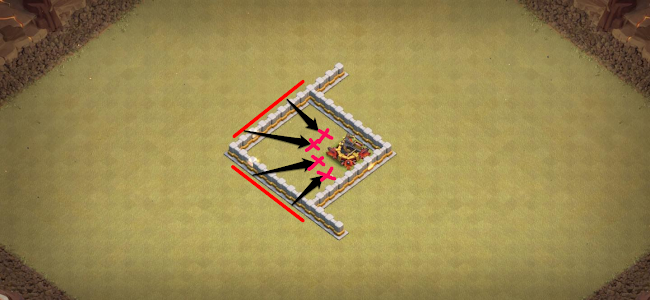
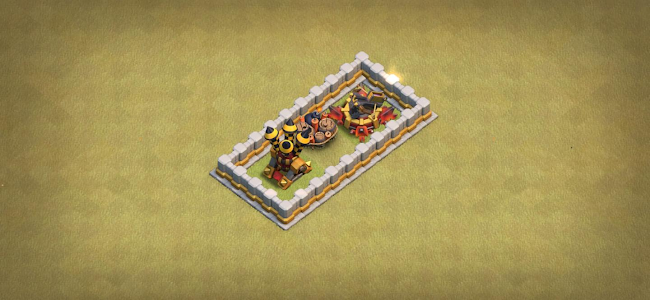
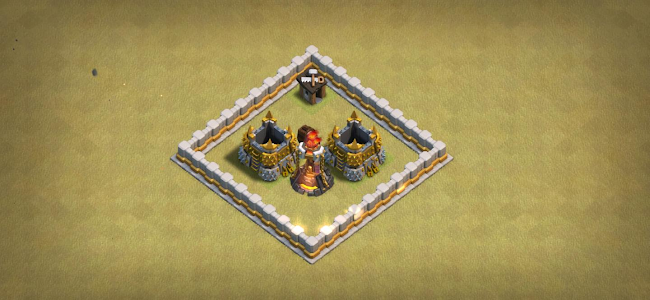
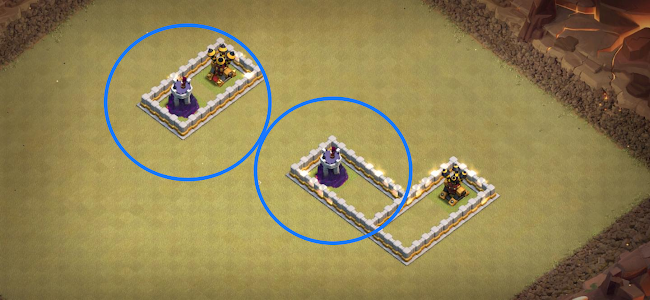
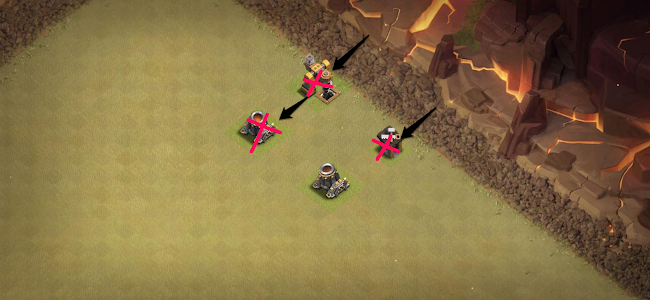
- Unlurable Clan Castle: A staple in base building from TH9 and upwards, an unlurable Clan Castle forces an attacker to commit more troops to a kill squad in order to take out the Clan Castle troops earlier, or face the CC troops midway through their attack. Let’s take a look at some good and some bad examples.
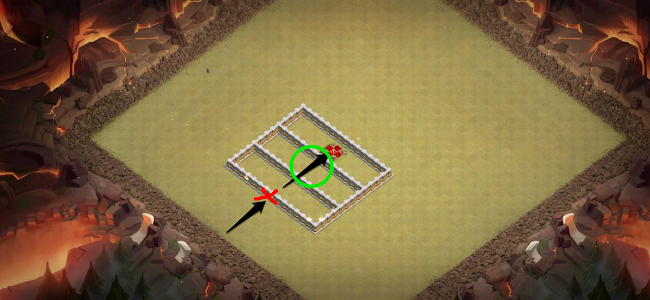
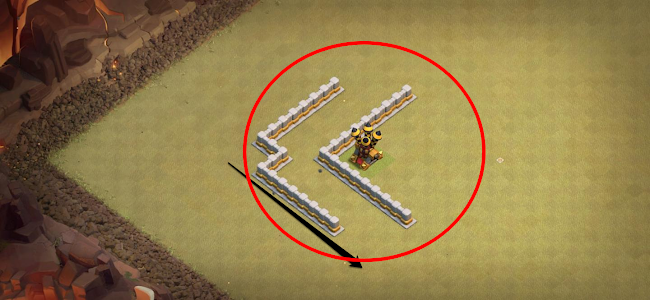
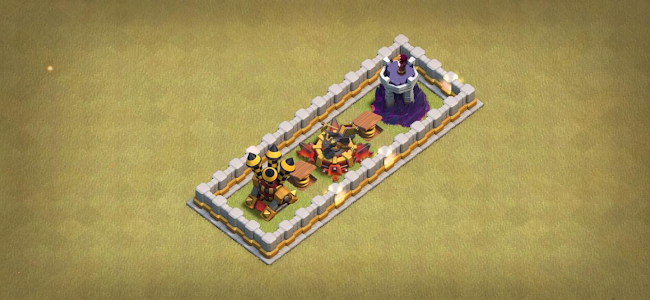
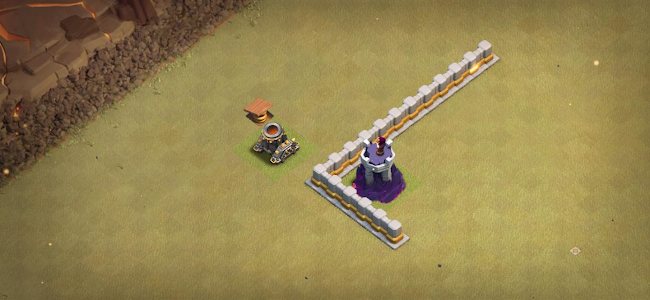
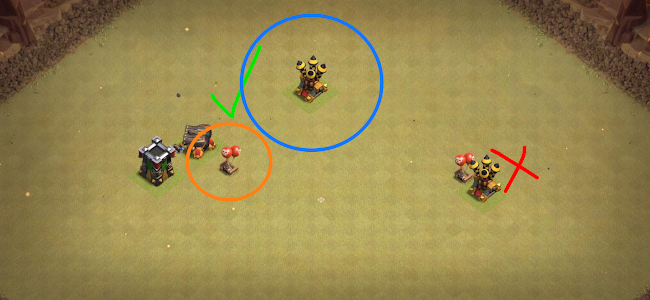
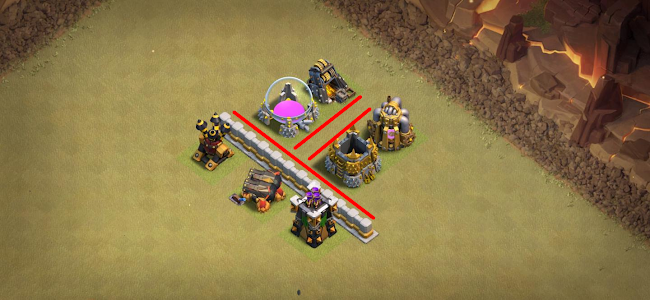
In the above image there is an example of a bad unlurable Clan Castle. Notice the pathing of the troops. 2 Hogs could/would be deployed onto the Cannon, and once they beat it down, they would step towards the Air Defense and lure the CC. This makes luring a CC very inexpensive (10 housing space in this particular example) and a very easy commitment.
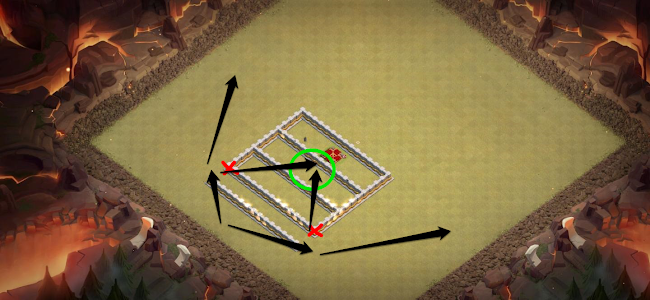
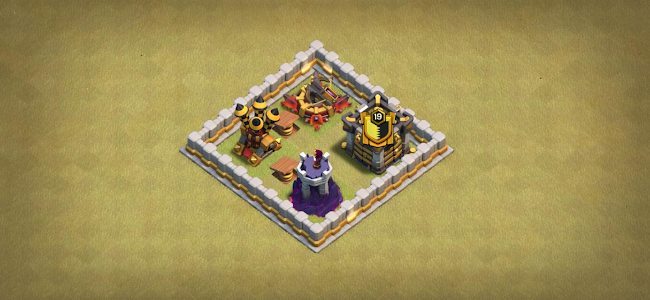
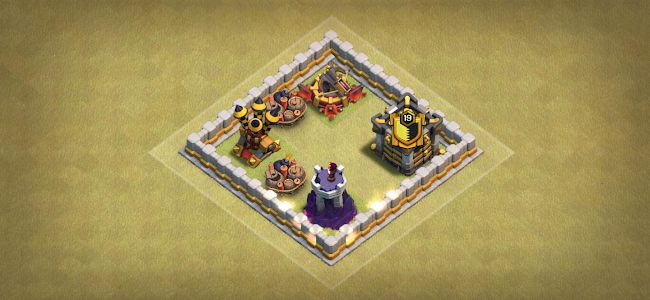
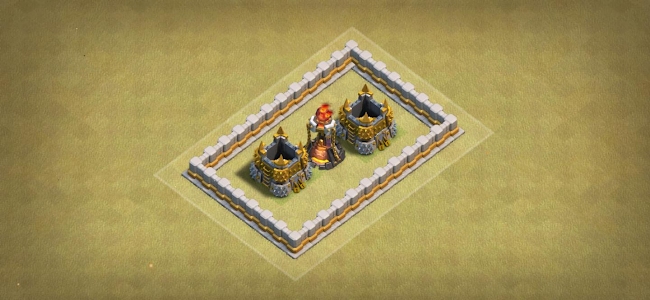
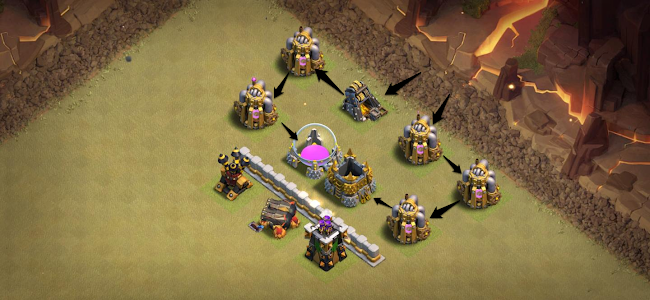
The above image is a visual example of a good CC. Notice the pathing on the defenses again. Whichever defense the Hogs are deployed on, they will have to take out 2 more defenses in order to lure the CC. This makes luring the CC too expensive, and won’t allow attackers to get an easy lure without spending more on an actual kill squad or Queen Charge.
- UnSui-able Queen: First, what does “Sui” mean? Sui is short for suicide, and it basically means that a certain building is targettable on the outside and you can send a troop or hero after it to destroy it, but also die in the process. Most Sui style attacks use the Barbarian King and/or the Queen to Sui a specific target. If your Queen is sui-able, this gives the attack a large advantage because of how strong your Queen is. Most kill squads or Queen Charges are designed to take down the enemy Queen as well as a few other key values, and having your Queen sui-able makes it infinitely easier for an attacker. Let’s look at some examples.
In this example above, we notice that the Queen range is not extended further than the outer wall. That is a good thing, as the troops outside will not be locked onto by the Queen allowing for them to target her. However, notice as one set of Wall Breakers (the red X) and one Jump spell can give instant and easy access to the Queen. Combined with an Ice Golem, an attacker can easily sui their solo King onto your Queen for good value. Keep in mind if you have enough DPS near the Queen, the attacking King won’t be able to Sui your Queen as well.
Now check this image above out, if we add a moat on the outer edge of the wall, we can force a much more difficult entry towards the queen. First, and troops deployed on the other side of the moat will be forced around it as Wall Breakers won’t target it. Secondly, the funnel has to be much wider to allow for troops to actually take the holes the Wallbreakers have made (red X), otherwise the troops/Heroes will walk away from that section of the base and around, towards the right and left arrows in the picture.
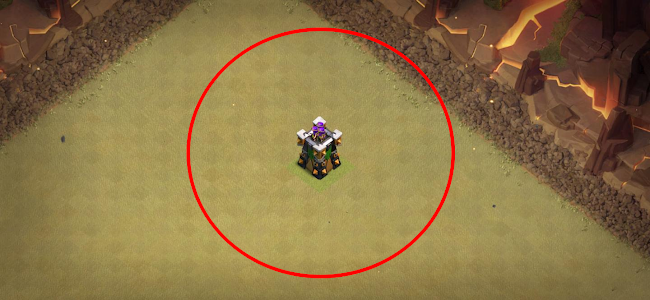
- Unwalkable Infernos, Eagle, and Xbows: An unwalkable building basically means a Queen cannot hit the structure from the outer wall of the base, making it “unwalkable”. This makes it so the attacker has to break into the base to get certain targets, making it more difficult and forcing more spells and housing space in order to reach his desired values. Below, I will show you the “walkability radius of 2x2, 3x3, and 4x4, buildings.
2x2 Structure Walkability

3x3 Structure Walkability

4x4 Structure Walkability
In the above pictures, none of the structures can be hit from the outer wall by an enemy Queen, meaning they are “unwalkable”. We can use and apply this concept to our key structures so that our base is not easily exploited by an enemy Queen. This forces attackers to rethink their attack and have to charge into the base to get what they want, all while being pelted with much more DPS while inside the base.
3: Accessibility/Value Spread
What is accessibility? Well, accessibility is how much value the attacker can get while being in a certain part or compartment of your base. Too much accessibility means that the attacker has to spend less to get more. However, too little accessibility means that your base may be too spread out and lack DPS to stop a Queen Charge or kill squad in the first place. It’s all about finding that happy balance. Accessibility is one of the most important things in base building and can absolutely make or break an attack.
Let’s start with Queen Charge accessibility, because Queen Charges are so common in today’s meta. The Queen has a range of five tiles, from the edge of a structure to the tile she is standing on. This means the Queen can hit any building that is five tiles away. Let’s look at some examples since these words don’t mean much.
Let’s take a look above at this example of a compartment. An attacking Queen standing anywhere on the red line can hit that Xbow.
Now utilizing the walkability radius we learned earlier, we can see above how any attacking Queen on the red line would not be able to hit the Xbow, but fall short. Let’s see how this can be applied in an actual base using a concept known as “unreachable DPS”.

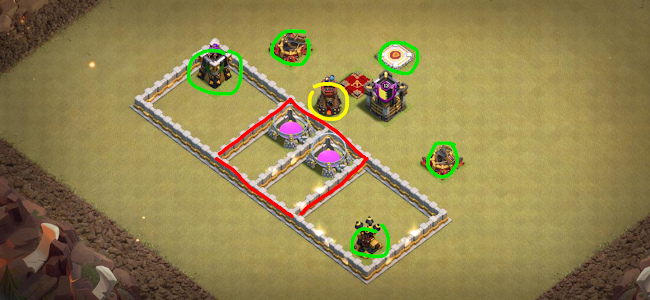
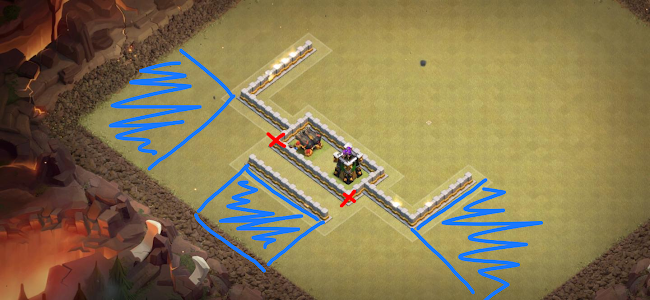
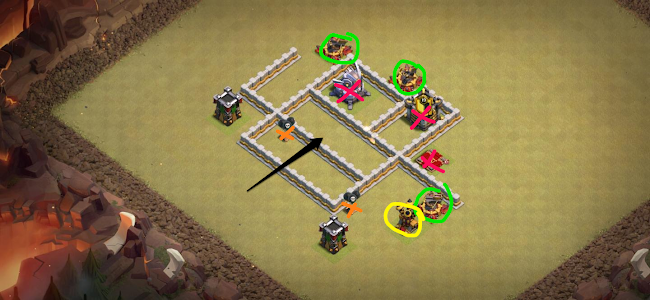
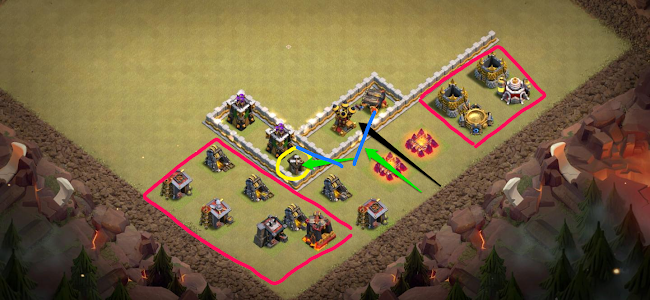
Looking at the example above, you might be thinking, “What the hell is going on here?” Let’s analyze it. Any enemy Queen standing inside the two red compartments cannot hit any of the defenses with a red check mark on it. Any Queen standing in the blue compartment cannot hit the blue X compartment. Any Queen standing in the green compartment cannot hit the green X compartment. This multilayer accessibility concept allows for unreachable DPS, which is what forces a Queen charge to commit with more spells, like jumps, rages, freezes, etc. This is an example of DPS that can hit the Queen, but the Queen cannot hit it. With this concept, the enemy would have to have his Queen break into all four compartments shown here to get all the defenses. This makes this an insanely safe way of slowing down Queen Charges and forcing more expensive options from an attacker.
Let’s think for a moment what we want to prevent a Queen Charge from getting. Queen Charges usually aim for high value targets, such as an Inferno, enemy Queen, CC, Eagle, and/or Xbows. This means that your accessibility should not give many of these targets from a single part of your base. This is what is known as “Value Spread”, one of the most important concepts in base building. Value Spread is the spread of your high value or priority targets throughout your base so no one section of your base gives out too much to an attacker. In general, you want to keep your Infernos away from each other, your Eagle away from your Infernos, and not give out more than 3 Xbows from a heavily invested Queen Charge. This means that these specific targets should not be accessible from the same compartments. If they are, you have a major issue that should be fixed. I will go over the value spread of other defenses later on, such as your Air Defenses.
Basically to sum it all up, before you move on to a different section of your base, ask yourself this- “Can a Queen take out more than one key target from this one compartment?” If the answer is yes, redo the compartments and make the answer no. :)
Let’s talk a little bit about how to place your key values. I’ll go in depth about each one with examples, but the main key values in your base would be the Eagle, CC, Infernos, and Queen, and secondary key values would be the Xbows, ADs, and WTs.
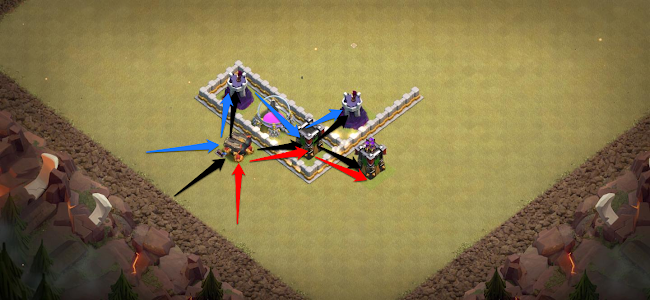
- Eagle Artillery: The EA is arguably the most important defense at TH11. It has the highest war weight, is the most expensive to upgrade, and can shut down attacks in a matter of seconds. The EA fires off 3 rounds of damage to the largest housing space worth of troops on the screen, dealing 350 DMG x3 of splash damage to any troops being hit, as well as some small damage in a shockwar around the initial hits. There are two ways to place an EA on your base, central and offset. A central EA is like a jack of all trades in effectiveness. It's much harder to get to than an offset EA, but it allows attackers to approach from many more angles. By offsetting your Eagle, you’re baiting an attack from on part of your base, which makes trapping exponentially easier. Let’s take a look at an effective way of using both styles.

In the above example, we have a centralized EA. The black lines represent the directions an attacker can use a kill squad to take the core, and the red arrows represent the direction a Queen Charge could grab the EA from. Look how many options this gives the attacker to hit from. Because of all these options, it makes trapping the base much harder and much more unpredictable. The benefit of a cored Eagle is that in general, their Charge or kill squad would be more expensive.
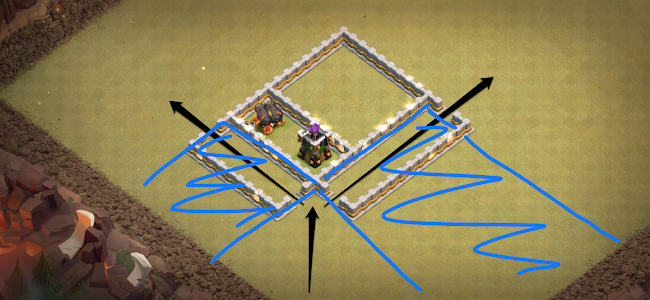
Look at this above example of an offset Eagle. Notice how a Queen Charge or a kill squad generally won't make it through your entire base to get to the Eagle from 9:00. A likely entry is by 3:00 so it makes trapping your base much easier because you know which side is the entry and which side is the backend. This can also be used in a Queen Charge bait when you have other values you don’t want a Queen Charge from getting on the backend of your base.
- Archer Queen: The Archer Queen is a fast firing, high damage, moving machine of destruction. Letting her stay alive spells certain doom to the attacker’s hit. The Archer Queen is also a primary target of an attacker’s kill squad or Queen Charge so keep that in mind when placing her in your base. Ideally, the Archer Queen should not be lurable from the outside of the base, but should not be completely centralized, as that gives many options for an attacker to hit your base. I like to have the Archer Queen around the second layer of defenses in your base and surrounded by lots of unreachable DPS. I’ll give a quick example of how I would set up an AQ comp.
Above is an example of a setup with a Queen Charge or kill squad would be pelted by unreachable DPS while going for the Queen and CC. All the defenses circled in green are unreachable (refer to walkability radius) and will continue firing on the Queen and Healers or kill squad during their phase one. It’s also always good to have a Bomb Tower near the Queen (Yellow) to protect your Queen from a Skele Donut (skeleton spells to kill the Queen). Another great tip is to have the Grand Warden near the Queen and CC, as that gives them a HP boost and allows them to survive longer. This means your maxed AQ can survive a hit from a raged Edrag instead of being one shot, giving her more time to deal damage to enemy troops.
- Inferno Towers: Your Inferno Towers may not seem like much, but they deal out massive total DPS to attacking troops because of the fact that they can target 5 different troops instantly. As of the current meta, your Inferno Towers should always be set to multi-target because of the prevalence of Hybrid and Bats. Let’s go over some general rules when placing down an Inferno.

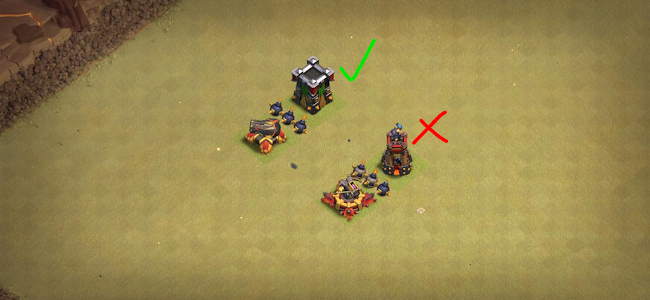
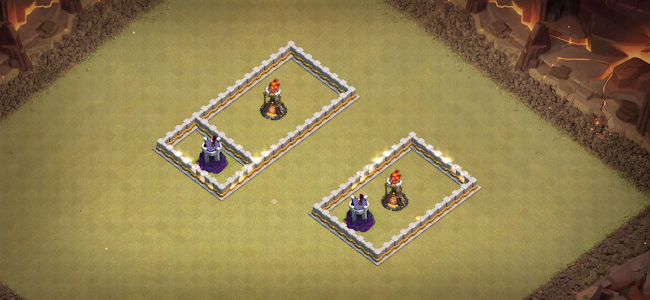
Let’s take a look at the two examples above. On the left, we can see with the red arrows the pathing that Hogs and Loons would take. It leads directly towards the Inferno and quickly eliminates the Inferno. On the right, with green arrows, we can see the pathing around the Inferno is solid and the Inferno has time to hit many troops for a much longer time. “Defense Rings” around an inferno is very important because of how much total DPS your Inferno can dish out during the entire attack. It is the only “Splash” damage defense that cannot miss its target and instantly locks on to a target. Obviously these examples are very generalized so please don’t copy this exactly, this isn't a good way to place your DPS.
Another key ingredient in good Inferno placement is that both Infernos should not be accessible from a single comp in the base or allow a single jump to lead to both Infernos. Infernos should also never be placed directly next to a Wizard Tower, as that gives massive Freeze value to any attacker using Bat type attacks.
- Clan Castle: Your Clan Castle might be the single most devastating “Defense” if left alone and configured right. I cover what generally goes in Clan Castles in Chapter 8, I’m more covering its placement in your base in this section. I’ve covered how to make a good CC unlurable, so I’m going to start with the 2 central ideas in a CC’s placement. The first, and most standard way is a very centralized CC. It’s certainly very effective and helps push back a lot of kill squads and can help shut down a Queen Charge. The other style is an offset CC. Keep in mind that an offset CC should still be unlurable. The reason an offset CC can work is because you’re generally running a QC bait style layout where the QC is opposite of the CC. This allows for the CC to be much harder to get and oftentimes ends up attacking phase 2 or 3 of their attack. Keep in mind an offset CC can backfire as since the CC won’t be there to help stop the QC, the QC itself might get quite deep into the base giving access to a lot of targets and possibly even pulling the CC late and still getting it down. A centralized CC is generally a much safer option, but if you are going to try your hand at an offset CC, make sure you implement other methods in your QC bait to try and stop the QC from taking too much value.
- Xbows: Your Xbows are high powered, high hit point defenses that are very versatile in defense. Because of the prevalence of Queen Charges, Xbow farms have become a thing and are now the best way to quickly shut down a Queen Charge from getting too far by forcing the attacker to burn their Rages or Queen Ability early. Combine that with a CC and some unreachable DPS and you have yourself a Queen killing machine. Utilizing unreachable DPS (as covered earlier) is extremely important in stopping a Queen Charge, as if she can destroy the defenses attacking her, it gives a massive leg up for the attacker. Let me show an example of a strong Xbow farm composition and how to make it unreachable without a hefty commitment.

Let’s dissect the above example. The black arrows represent common QC spots to try and grab the CC and Queen. When the attacking Queen is standing in the red box, and defenses circled in green are unreachable. When the attacking Queen is standing in the blue box, any defenses with an orange X are unreachable. Notice how there’s always four defenses firing on the Queen at the same time, forcing the attacker to constantly burn a Rage to keep the Queen alive. Add in the CC troops and defending Queen and now we have massive DPS on the attacking Queen.
4: Pathing and AI
Pathing is the direction or path the attacker’s troops will take while attacking your base. We’ve already covered it a little bit in the “Sui-able Queen” section by showing how pathing works in that specific example with a moat. In basic terms, your pathing should be set by you, not the attacker. If your pathing is easy to predict and easy to manipulate for the attacker, you’ve done something wrong. That’s all easy to say, but what about actually applying it into a base? Well let’s take a look.
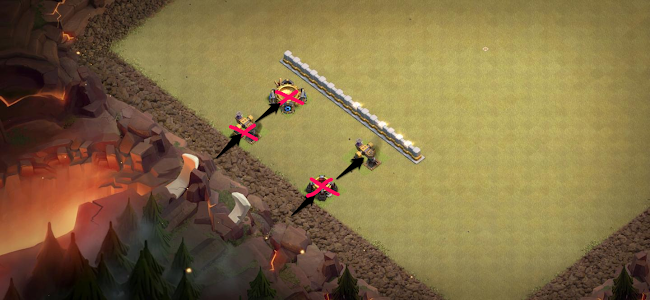
- Funneling: Every good attack starts with a strong funnel. There are many different ways to stop a funnel, or make it much harder and more expensive. Let’s take a look at some common but useful examples.
In the above picture, we see a concept about funneling using Army Camps. Army Camps make it very difficult for attackers to predict which way their troops will go. The reason Army Camps are very strange to funnel is because it is the only structure that is 4x4 with a 2x2 hitbox. By utilizing them properly, you can make planning a funnel much more difficult and force the attacker to bring a couple extra troops to make sure the funnel goes properly. Another great way of using Army Camps is to place them in front of ideal entry points, so that the troops will likely circle around.
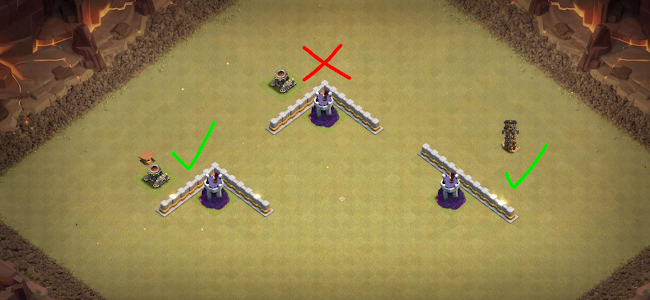
Here is a Bowler Bounce concept above. A Bowler can hit two structures at a time with the bounce aspect of his attack. Because of this, trash buildings on the outside should always be placed from lower hit points on the outside to higher on the inside. In this example, the top structures show how a Bowler Bounce could easily take out two structures, making the funnel much easier. However, in the bottom example in the picture, the Bowler can only take out one structure, and have to spend more time funneling. Bowler bounces are a very common and useful way to funnel in today’s meta and it should be taken note that positioning your trash with higher Hit points on the inside is very important and shouldn’t be taken lightly. One other thing to note is that because Mortars are often placed on the outside and have such low health, they will be Bowler bounced very often if not placed properly.
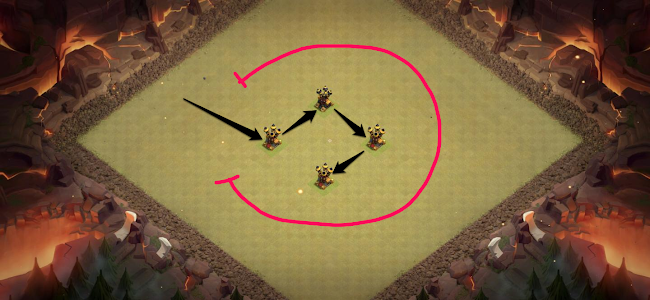
- Hog Splits: Hogs are incredibly powerful in today’s meta at Town Hall 11. Hog Riders target the closest defense to where it currently is, so keep that in mind when applying this concept. The Hog split is about making the group of Hogs split up into tiny small groups where they cannot all be healed at once. This makes a Hog attack incredibly expensive in Heal spells, and can even completely throw off an attacker’s pathing prediction. Let’s take a look at some examples to show what I mean.
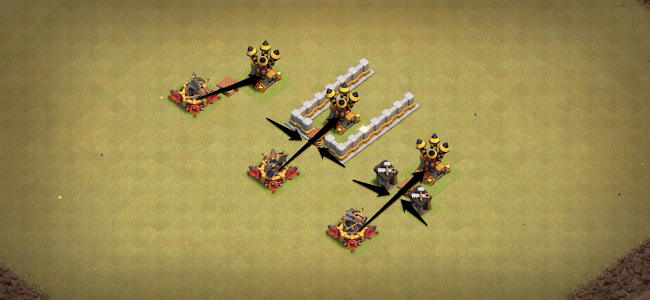
The picture above may look confusing but it’s actually very simple. It’s pathing lines shown based on the way attackers deploy their troops. There’s usually two methods of Hog deployment. One is a single line deployment, as shown by the back arrow. This is the easiest to split as if they deploy it singularly onto the cannon, it will split onto the Wizard Tower and Archer Tower. From there, you can incorporate more splits to make the Hogs go wherever you want. Follow the black arrows for an example of multi Hog splits. The second deployment is the multi line deployment, usually two. The red and blue arrows show where an attacker would utilize a multi line deployment. This makes it so there are two groups of Hogs, one on either side of the cannon. The Hogs will naturally split into the sides and follow their respective arrows. However, it’s likely the Hogs on the red arrow will destroy the Archer Tower before the blue arrow Hogs can, meaning you can incorporate a split by the left Wizard Tower to further split the Hogs.

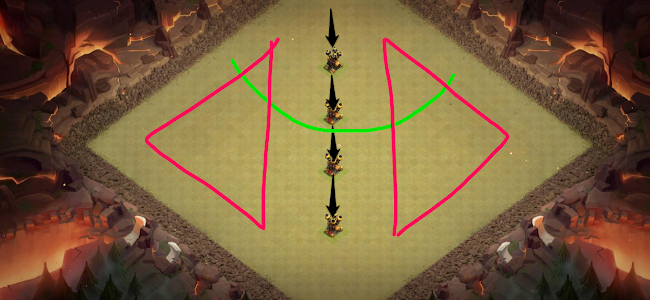
Shown above is a tricky use of Teslas to apply a Hog split and (optionally) force an awkward Heal. The black line represents the standard pathing the attacker would assume the Hogs would go. However, the red arrows represent the actual Hog pathing, forcing a Heal spell only on one group of Hogs (the group that split to the second Tesla) because of the Giant Bomb while the other group splits off towards the Wizard Tower and doesn’t get the Heal.
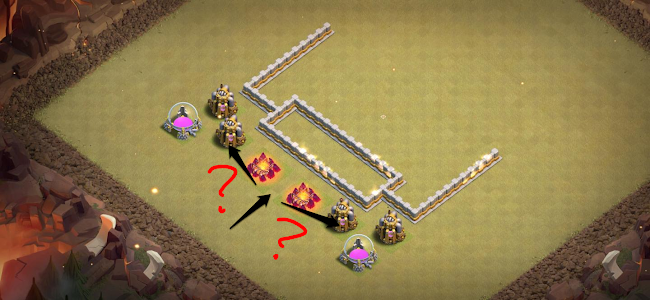
- Hog Miner Splits: Hybrid (Hogs+Miners) is arguably the most common 3 star war army right now in today’s meta, so let’s take a quick look at how to apply a Hog Miner split. Ideally as a defender, you would use a Hog Miner split section in your base to separate the attacker’s Hogs from the Miners, then use Hog Splits to kill off their Hogs while the Miners go on a world tour around your base. It’s very hard to put this into words, so I’ll start with examples.
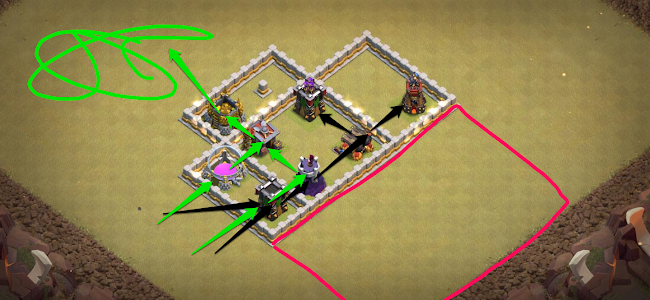
Above is an example of a Hog Miner Split. The red box is the area assuming that a Siege Barracks will clear out, as that’s the most common Siege to use with Hybrid. This makes it so there’s a tempting entry for the Hybrid by the Archer Tower and Elixir Storage there. However, it’s a bit trickier than that. The green arrows represent where the Miners will go, and the Black the Hogs. As you can see, because of the Hog’s pathing AI, where it targets defenses, it will go onwards into the base. However, Miners target everything and because of that, they will go towards the gold storage where they will split from the Hogs because of a carefully placed empty space where Miners would have no reason to path to. The green scribbles just represent where you’d want the Miners to wander off to, ideally into some trash buildings where they get stalled. Notice how once the Hog Miner Split is done, the Hogs start seeing Hog splits, as shown with the black arrow. One group of Hogs will hit a Bomb Tower, forcing a heal whereas the other group will not need a heal, making the attacker’s Heal value lower.
- Lalo Pathing: Lalo is a very strong attack when done right. It’s one of the most difficult attacks to pull off, but is insanely strong and very difficult to defend, However, there are certain ways to help defend Lalo that can dissuade an attacker from using Lalo in the first place. First, let’s talk about Air Defense position as promised. Air Defenses in Lalo are very important as Hound pathing can be very easy to predict if done wrong. In general, a very square shaped layout for Air Defenses is a bad idea for defending Lalo, as Hounds will only path in one direction and it makes for an easy rotational Lalo. Let’s show some examples of what to do and what not to do.
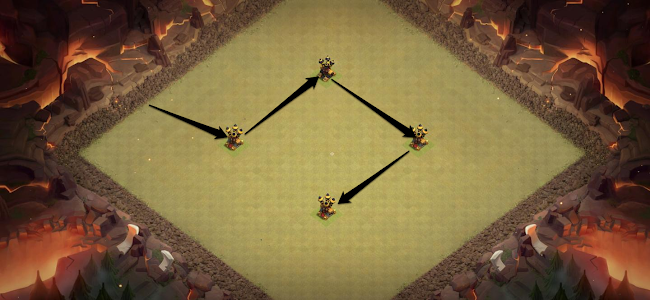
Above is a very common AD positioning. Very square and very spaced out. While not absolutely the worst, it’s very predictable and very easy to path. Notice how rotational the pathing is. This makes it incredibly easy for attackers to know how and where to start their Lalo phase of the attack.
While the above layout defends against Hounds better (more ADs firing on one Hound, pops faster), it allows for a Slammer to have free reign anywhere on the outside of the base (red ring) and it’s downsides overshadow the upsides. It can also be incredibly weak to Electrone because of how clumped up the ADs are.
Above, we can see arguably the worst AD layout in my opinion, the linear AD layout is weak to many things. First, it has easy and predictable Hound pathing. Second, a Queen Charge or small kill squad can easily get 2 (or maybe even 3!) Air Defenses. Finally, it leaves a massive chunk of your base unprotected from Edrags, Dragons, and Slammers.
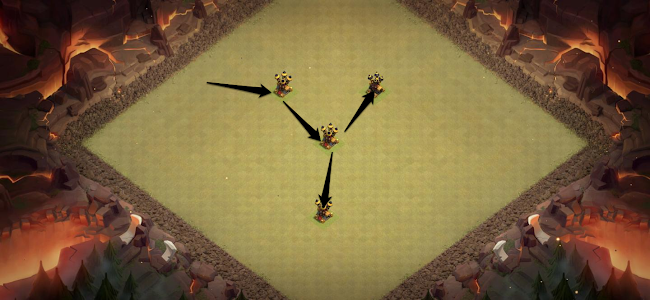
Shown above, this is not a bad option for an AD layout, this one gives trickier pathing to Hounds and doesn’t leave any one large specific area of your base unprotected. One weakness I’ve noticed about Y shaped AD layouts is its weakness to Electrone Lalo if you have other key values in the core. Be wary of that and adjust your Sweepers and Traps accordingly.
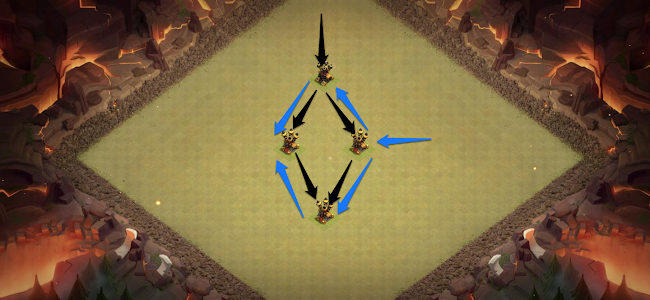
Another solid option for an AD layout above, the Diamond layout allows for trickier Lalo pathing while making sure most of the base is protected from other flying things. This layout also has a similar weakness to Electrone, so once again, be wary of that. I’ve used two different pathing arrows in this example to show two different entries and how they can split in either entry.

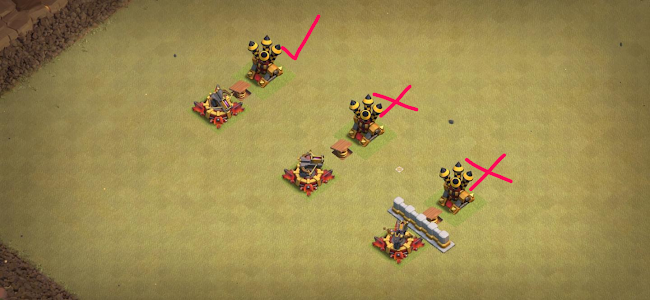
A very unique AD layout above, I like to call it the Triple Stack. One strength about it is that if the attack deploys his Hounds on the top AD, it will have 3 different directions to split into. However, pathing is really easy if the attacker deploys on the bottom 3 ADs. While not the worst, it does have its flaws. The northern AD is very susceptible to a Slammer, and if it goes down, the Slammer has free access to almost half the base! This means you need to trap the base accordingly if you use this setup. Keep in mind Triple Stack is also quite weak to Dragbat so your splash must be placed accordingly.
Other than that, Loon pathing follows Hog pathing in that they target defenses first, so make sure you keep that in mind when placing down your defenses.
- Directional Comps: Every base has compartments. You can have many or few, but compartments can help guide an attack to where you want, or help an attacker guide their attack to where they want. Direction compartments are interesting because they affect any troop that cannot negate walls. In summary, you don’t want any compartments that lead from the outside into the core of your base, where a lot of your values are accessible. Another use of directional compartments is to guide the attacking troops to a specific part of the base where you want them to go. For example, a compartment near the outside can ring around the edge and guide a kill squad into a high DPS zone, shutting down the KS and not allowing the KS to get its intended value. I’ll go more into standard comp sizes later on and what to and not to do with those said comp sizes. Let’s take a look at some examples of what to do with a directional comp.

In the above image, notice how a directional comp from the outside leads straight into the core. This is never a good idea because attackers won’t have to use extra Jumps or Earthquakes to get into your core and grab key targets such as your Eagle, Queen, CC, etc.
- Moats: To some people, moats seem like a waste of walls. Why have an unconnected wall piece when it won’t protect anything? However, moats are incredibly powerful when done right and can make or break an attack because of its implementation. The most common way to use a moat is to make funneling incredibly hard for a kill squad or Queen Charge. In fact, sometimes a moat may make it so annoyingly hard that it simply dissuades an attacker from entering there in the first place. Moats are great at making a certain part of your base the backend because it forces attackers to enter from another side. This makes trapping your base infinitely easier.

We’ve gone over this example above in the previous section about Sui-able Queens, but here it is again because it utilizes a moat. We can see how much wider a funnel has to be in order for a kill squad or Queen Charge to actually enter from where they want to enter. This makes this section of the base many times more likely to be the backend of an attack. Knowing where a backend and front side of an attack is so valuable because it allows for you to place traps and buildings accordingly, and predict where the enemy will attack from. If you can predict exactly where the attacker will hit from, you’ve already won the battle.
I’ll go over certain types of moats and how they are effective with some examples.
A two tile moat is the most simple and easy to use. Simply put it anywhere you don’t want the opponent to enter easily and it will force them to spend more housing space. The red X represents where the WBs will be forced to hit and the blue zones show what needs to be cleared out for troops to take that hole made by the WBs. Simple and easy but can be worked around by good attackers.
A three tile moat is one of the most common ways to use a moat. It’s filled with structures of course. It forces troops to walk through the moat and exit on the other side without ever entering the base itself. If the moats were not cleared and an attacker tried to enter from this direction, his attacking troops would follow the black arrows. In order for the army to go in, the entire blue zones must be cleared out to achieve a proper funnel. This makes funneling much more expensive.
Here’s a moat that works incredibly well against Queen Charges. The Air Defense is unwalkable (refer to walkability) and because of the moat, the Queen will likely walk along the moat (black arrow) and the Healers will be exposed to the Air Defense when the Queen moves down. This is strong because once the Queen moves down, the Healers following her will slowly die off to the Air Defense, causing the Queen Charge to be weakened. You can also slap a SAM here to encourage those pesky Healers to visit the grave.
- Dead Zones: Dead zones are tricky because so many people like to throw them around randomly and don’t truly know what to do with them. If done right, dead zones can be an incredible tool. However, when done wrong, dead zones can hurt more than help. The basic functions of a dead zone are one- Blocking off certain areas of the base from another area, and two- pathing troops towards a specific area of a base. However, do remember that while dead zones can help keep troops from entering a specific area of the base, they can also stop troops from exiting the base as well. A common dead zone is a 2 tile wide deadzone. This allows for no walls to be needed to be placed within the dead zone to stop troops from being deployed there. This dead zone is quite effective around the second layer of your base because it forces troops to path around it into where you would want them to path. However, keep in mind that an Archer Queen can still shoot over it. Refer to the walkability section. 3 tile dead zones can be risky because they require walls to be placed inside the dead zone to prevent troops from being deployed. However, you can use non defensive structures in the compartment and it can still act as a dead zone depending on the attacker’s army (if they use defense targeting troops in that particular location). A Queen can still shoot over it if the buildings on the other side are touching the dead zone. However, if you move the buildings one tile back from the zone, it leaves the buildings fully protected by the dead zone and inaccessible by any troop. One tile dead zones are also very common and can usually be used on the outer edge of the base to prevent Wall Breakers from hitting a certain spot, or make an inferno unwalkable. They’re a great tool to use, but don't use it too much as you’ll run out of walls really fast.
- Eagle Island/Inferno Island bases:
So recently with the new introduction of Hybrid being a strong option there has been a development of a new style of base building at TH11: The eagle island. The basic idea of this style of building is to manipulate the path troops take around your eagle (also works with infernos). It’s a more advanced style of building, and extremely popular in professional league wars.
The first thing about symmetrical eagle island bases is to make sure that troops will 100% path around the eagle. Putting even one other structure inside the island, such as the AQ or CC, could draw miners into the eagle. It is also ideal if the attacker cannot abuse the huge dead space for funneling purposes. If you only put one layer of defenses around the eagle, I will guarantee you that the enemy will queen walk the single layer and follow up with an easy pekka smash or miners. This is why I always put two layers of defenses protected by at least one layer of walls. It is also important to have splash covering your eagle island. The last thing you want is your enemy using a single bat/skelly spell to take out the eagle at the beginning/middle of the attack, creating a very nice funnel for his troops. It is preferred that you use wizard towers and infernos to cover the edges of the eagle; mortars and bomb towers deal splash as well but cannot target bats. Since the eagle island will be in the core of the base, this means that your main DPS structures will have to be offset. It is common to see an xbow farm in eagle island bases, either at the back (near the town hall) or the front (opposite the town hall) of the base. I prefer having the xbow farm at the front since this makes it difficult for blimps/wall wreckers to access the eagle. The last thing is hero / CC placement, which will also be offset. I like to place the queen separate from the CC because this limits the value the attacker can get. I usually do this in two ways: 1. Queen+king+warden on one end, xbow farm+CC on other end 2. Queen+xbow farm on one end, king+CC+warden on the other end You can mix up the placement and try out the best combination for yourself. Another thing to try and work into your base is moats on the sides of your base. Generally speaking symmetrical builds are strong on the top and bottom of the base (top being the opposite side of the TH, and bottom being the TH side of the base), and then weaker on the sides. An easy way to make the sides stronger is to have moats creating an unreachable AD from the outside of the base. It has the job of taking out healers on a QC if the attacker decides to enter there.
When it comes to asymmetrical eagle island bases the principles are the same. The symmetrical versions are just easier to build because you only need to build half of the base and then copy it to the other side.
Another thing to take note is that this style of base building “breaks the rules” of traditional base building. Take that with a grain of salt when attempting these builds.
Examples:

-ZexlaTex and Just..Fall
5: Compartments
At Town Hall 11, there are very standardized compartments that we use, and they’re standardized for a reason: they work. You’re free to play around with more unique designs, but keep in mind that unique comps may not always work. I’ll start with some basic comps.
- 9x5: Great standard comp that allows for two structures and a tile between them for traps. Great to sprinkle around everywhere in your base, and you can’t go wrong with them.

- 10x5: Another great comp that allows for a giant bomb between the defenses. You usually want these where Hogs would path to help force heals. They can be predictable so sprinkle a few in that don’t have Giant Bombs to help make the attack trickier. This comp is also Anti-Edrag.
- 9x9: A decent comp that is mainly used on the outside of a base. It holds four structures and allows for a tile space between all of them, giving room for traps. Can be weak to Edrag chains. Do not put this in your core! A quad Quake tears apart 9x9 and it will open up your base too much, giving accessibility to way too many comps.
- 10x10: Another decent comp, is still mainly on the outer edge of a base and allows for four structures and two tiles, giving space for Giant Bombs. 10x10 are also often used for Inferno Islands because of how effective it is for Infernos. You can *maybe* use it in the core since it a quad Quake won't be able to get the corners, but keep in mind if a Queen steps into it, a lot of your base will be accessible from a comp this big. This comp is also Anti-Edrag.
- 13x5: Use cautiously. Such a long comp allows for 3 structures to be placed with a tile gap between them all for traps, but also gives a long line of accessibility in said comp. Never use these pointed into the core, they should always be parallel to the core.
- 12x8: Classic Inferno comp, reachable from two sides and unreachable from another two. Usually, you should point the unreachable side towards the outside of the base.
- 5x5: Use sparingly as this only covers one structure and is a lot of walls for a single building.
- 10x5: Your standard, average Eagle comp. Can’t really go wrong with this Eagle comp. Just made sure it's well protected.

These are just some standard comps that most bases incorporate. Of course you’re free to come up with your own base comps, and add little things here and there. You don’t need your entire base to solely be made of these comps. That would just make base building boring, as it is an art.
6: Trapping Techniques
Traps are what win wars. I feel like a lot of people neglect traps because they’re not an actual structure you can play around with, but traps are so crucially important when defending. It’s the one part of your base an opponent cannot see and it can throw off an entire attack with just a few well placed traps. I’ll go into depth about each specific trap and how they can be utilized below with some examples.
- Spring Traps: These guys are nasty. The flip troops off the map, completely disregarding their health, and they just get removed. These traps should be placed between defenses to get maximum efficiency and make sure all of them are pathed over. They are most effective against Hogs and Miners. Usually, you want Spring Traps on the backend of an attack so they help deal with back end hogs and don’t get triggered by a Queen Charge or kill squad, as they won’t do much against that. Let’s take a look at some examples of how they can and cannot work.
Notice in the example above, the first example works because the Spring Trap is directly between the two defenses. Having a gap between the Spring Trap and a defense means that troops may not get sprung if they are heading from the AD to the Xbow, specifically Miners. Hogs may also miss the mark because having a gap gives more leeway for Hog to path around it.
Shown above, here are some interesting ways to use Spring Traps as well. Diagonal Spring Traps work fine as long as there is no extra gap. You can also use structures or walls to “squeeze” the Hogs into the Spring Traps, although notice that Miners heading from the AD to the Xbow still will not be hit by the traps.
In the above picture, we can see a Spring Trap being used in an “Ice Golem Bait”. Because Bat type attacks are so common in today’s meta, people tend to find tankable Wizard Towers to be a problem. However, with smart Spring Trap placement, this completely negates an Ice Golem tank and forces the attacker to use a Freeze he may not have intended to.
- Giant Bombs: Giant Bombs are another very versatile trap you can play around with. They’re great against Hogs, Miners, Valks, Witches, Bowlers, Wizards, anything ground and not a tank! In the current meta, they are mainly used for forcing awkward heals on Hogs and Miners, so that’s what I’ll be focusing on. Your Giant Bombs should never all be in the same place. Double Giant bombs don’t kill Hogs anymore and waste an extra spot where you can force another Heal. Giant Bomb should also always be on the backend of an attack because that’s where the Hogs will come in. You don’t want them too near the core or on the kill squad side, that just wastes the bombs. Some things to note, because people usually Heal through Infernos and Bomb Towers, you don't want a Giant Bomb at the foot of any of these structures. Instead, place them between two defenses that are a bit further away from your splash, but still near some DPS so they’re forced to heal. Let’s see some examples.

Notice how the Giant Bombs above are placed directly between defenses to ensure they aren’t being avoided. The good spots also force Heals where attackers normally wouldn’t want to.
Another thing you can do, as shown above, is to use Teslas to have surprise Giant Bombs between them. This completely throws off the attacker’s original plan on where they would heal, forcing them to Heal on a spot that’s very awkward.
- Seeking Air Mines: Seeking Air Mines (I’m going to call it SAMs because it’s much easier to type) are very very important in a base’s design. They have many crucial roles in a base, such as shutting down a Queen Charge, stopping a Slammer, stopping a Blimp, killing Hounds, killing Drags/eDrags, you name it. SAMs are the key aspect of making or breaking an air attack. I’ll get in depth about each specific function you can do with a SAM. Personally, I like using 2 SAMs to help against a Queen Charge, one for a common Slammer entry spot, one for a Blimp, and one in a spot that is base specific and needs reinforcements. Let’s get in depth now.
- Defending a Queen Charge: SAMS one shot Healers. This is crucial as the less Healers on a Queen, the more likely the attacker will have to burn their Rages or pop their Queen ability to keep her alive. And once they’ve done that, if you have enough DPS on the Queen, she dies. As a general rule of thumb, you need 4 DPS structures locked onto the queen to constantly force a Rage from the attacker. 5 would generally out DPS the Raged Healers, but that’s very difficult to pull off without having an area with too much accessibility. Let’s take a look at how we can use SAMs to slap some Healers silly.
Let’s take a look at this example above. This spot seems like a really enticing spot for someone to start a Queen Charge (black arrow). If done right, they can grab the Eagle, CC, and Queen (red X). However, I’ve utilized a lot of concepts in order to make this Queen Charge very difficult. I didn’t add a moat, but you can definitely do that as well. First, let’s start with the SAMs (orange X). Notice how they’re not super far in. This is so the SAMs can catch the Healers by the time the Queen steps into the second compartment. However, also notice that the SAMs aren’t too far out. This is because Cocoloons or Baby Drags can catch a SAM and we don’t really want that happening. You can always push it out more and pray that the attacker doesn’t bring a Cocoloon, but it might completely backfire if they do. Another concept I’ve utilized is unreachable DPS (circled in green). Notice how there will always be 3 Xbows firing on the Queen which are unreachable. This means the attacker will be forced to constantly use a Rage to keep her alive. Enough Rages and the Eagle will activate, spelling certain doom for the Queen. While all this is going on, the CC will be activated and she will have to deal with whatever is in the CC. This burns even more time and forces more Rages from the attacker. Finally, notice the Air Defense I circled in yellow. It’s unreachable from the entry compartments and will be firing on the Healers as she moves in. This means that the attacker’s Healers will slowly dwindle down with the AD and SAMs doing god’s work.
- Battle Blimps: Blimps are mainly used for a Yeti bomb or an Electrone attack. They will usually target the core of a base, so this is where that offset Town Hall concept I talked about earlier will come in handy. Your offset Town Hall means you can predict the most like Blimp entry. Let’s take a look at an example.

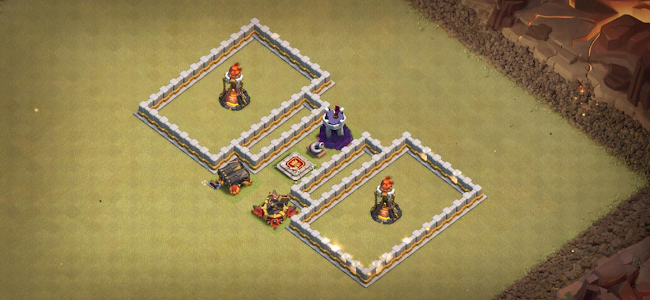
In the above example, look how juicy that core is to Electrone. It gives out the Eagle, Queen, CC, Xbows, Sweeper, Warden, and an AD. That would be ideal for an Electrone blimp. However, I’ve made it quite difficult to sneak a Blimp into there. First, look at the pathing a Blimp can take. There’s really only two possible paths it can take to get to the core, and one of the paths is blocked by a sweeper (highlighted in green). Fighting a Sweeper spells certain doom for a Blimp, so attackers of course will Blimp from the other path. Let’s take a look at the SAM placement. It’s predictable where a Blimp can come from so we know exactly how to place a SAM to get in the way of a Blimp. We also have an Air Defense (yellow) that can target the Blimp the entire way through. Blimps are notorious for having low health, so one SAM plus a constant AD means a popped Blimp. This is where we can see how an offset Town Hall makes trapping a base much easier because enemy attacks have to start from a certain point.
- Stone Slammers: A Slammer entry point is usually very common around a part of the base that is “jutted out” or looks similar to a peninsula. Usually with an AD there. This is an ideal spot for a Slammer to enter, so a SAM can be placed there. Slammers are also commonly placed on Tesla Farms because of their splash damage, so a SAM by the Farm may be a good idea as well. Let’s visualize it.

Check out this peninsula in a base above. This is a very common Slammer spot because if done wrong, a Slammer can take out this entire section of the base by itself. However, I’ve made it so it’s quite difficult for a slammer to reach the Air Defense in general. Look at the defensive pathing it would have to take to reach the AD. All while being fired upon by said AD (yellow). I circled the SAM as that would likely catch a Slammer being deployed there. You can also move the SAM in a little bit towards the center if you feel your opponent might try to funnel the Slammer towards your AD.
Now let’s take a look at the Tesla Farm example above. A Slammer is often deployed on Tesla farms, so I made them split a little to avoid having all four of them being one shot by the Slammer. A SAM is placed there as well to help catch a Slammer, or even an Edrag.
- Killing Hounds: This used to be very important in the old meta, as Sieges weren’t a thing back then. Nowadays, it’s still helpful to maybe have a SAM or two next to an Air Defense to catch a Hound. Ideally, the SAM used to catch a Hound can be used to catch other things as well, such as a Blimp or a Slammer. This way you can save space on SAMs and use them for more “meta” things. I don’t really need a visual example of this as it’s pretty simple and straightforward. Just place ‘em next to an AD. You can also place them between ADs to try and catch Hounds moving from one to another.
- Red Air Bombs: Red Air Bombs, or RABs, do some great work against Loons. They should always be placed more than 3.5 tiles away from an Air Defense, as you don't want the Lava Pups from a Hound popping to hit a RAB. Ideally, RABs should be placed where Loons commonly group up. One great spot is near the Tornado Trap (more on that later!) Some RABs can be placed to help with some spots of the base that are a bit weaker on splash as well. Let’s take a quick look at some do’s and don'ts.
Looking above, we can clearly see what should be done and what shouldn’t be done. In the first example, the RAB’s activation radius (orange) is out of the Hound pop radius (blue) and is protecting some point DPS structures. In the second example, the RAB would get soaked up by the Hound, dealing almost no damage to it and rendering it useless. Remember, RABs are your best friend against loons.
- Mini Bombs: I find Mini Bombs really interesting. They’re not very strong but they can do small bits of damage here and there that slowly whittles away your opponents troops. There’s two ways to use them. The first way is to place them 3 tiles away from your outer walls where a common entry might happen to catch Raged and non Raged Wall Breakers. This is pretty standard and has been used for a long time. However, with the introduction of super troops, namely, Super Wall Breakers, outer Mini Bombs are no longer effective against them if they have them trained up. So the other way to use them is to stack them in groups of three. This effectively makes them a “Mini Giant Bomb” as they have similar damage output to a Giant Bomb when in groups of three. With 6 Mini Bombs, you can make up to 2 Mini Giant Bombs. I personally like to use 3 for a MGB and 3 for catching standard Wallbreakers, as not all my opponents will have Super WBs, but that’s up to you. Let’s take a look at how to use either method effectively.
In the first example above, this is not a common spot people would heal through, so slapping a MGB there while there is some DPS on the Hogs is a good idea, as that may be enough to force a heal. In the second example, a Bomb Tower and Xbow is a pretty common spot to heal through, as those are both strong defenses against Hogs and Miners. This would be a great spot to normally heal through, so the MGB loses its effectiveness.

Now check out these outer Mini Bombs above. They are three tiles away from the wall so they can catch Raged WBs as well. Notice how the buildings that surround it squeeze Wall Breakers into the Bombs, making them unable to miss. WBs can’t run through buildings, ya’know! This said, it is up to you and the opponents you face in war to determine what kind of setup you want to use with your Mini Bombs.
- Skeleton Traps: Skeleton Traps may seem miniscule but they can really hurt an attacker. There’s unlimited ways to make a Skele Trap work, but I find three that are the most effective. I generally like to place one near a common funnel point to stop a King or a PEKKA from getting an easy funnel. Then I place one by each Inferno to stall Miners. That said, if you face Air Attacks in war often as well, one air and two ground Skele Traps is a pretty good standard to run by. Let’s see how I like to use my Skele Traps.

I think this comp in the above example is very strong at countering Miners. With solid pathing around the Inferno, you could implement a Hog Miner split here as well. I like slapping a Skeleton Trap with some Storages next to an Inferno to help stall Miners and burn them alive, all while DPS from the outside is pelting them.

Looking at this little Skeleton Trap above, you may wonder what difference it would make. A big one. The Skele Trap stalls a King or a Pekka from the intended funnel (drawn with an arrow) to prevent an easy funnel. This gives the Teslas more time to beat down on enemy troops. Combined with the high hitpoints of the Storages, this isn’t an easy time for a funnel.
- Tornado Traps: This might be the most common trap I see people mess up. The tornado trap shouldn't be next to any key defenses so troops stuck in the trap can still hit it. Ideally, it should be near (not next to) some splash damage and some DPS, such as an Inferno, a WT, and a geared Archer Tower. This essentially makes it so that the Tornado Trap sucks in the troops, and they get pelted with splash and dps, forcing a heal or just killing them if it’s not a Hog Miner attack. Let’s take a look at an example of a good tornado trap placement.
Looking at this example above, we see what we have here is an effective Tornado Trap. It’s a spot troops will easily gather up and funnel through and it's not directly next to any high value targets. It’s in range of a Double Cannon, xBow, 2 Infernos, a WT, and a King, plus whatever else buildings you put around here. This means there will be insane DPS on the troops stuck in the Tornado.
- Teslas: Hidden Teslas are another great tool for base building. Teslas give you the option to throw off your opponents pathing, implement additional DPS to a certain spot, cause a time failure, or help crimp a funnel. I will show examples below of said implementations and how to use it effectively.
In the above example, we see how a Tesla can throw off an attacker's pathing. The black arrow represents their intended path, and the red arrows represent the true pathing. This demonstrates how to change an attacker’s plan on the fly and force them to use their spells and troops differently half way through their attack.

In this example above, we can see how a Tesla farm is implemented in a spot that seems low on DPS. Combined with Storages, the Tesla Farm can rip Miners to shreds. Attacks may think of starting their Hybrid here, but they’ll be hit with massive DPS out of nowhere and forced to Heal. Do be wary of a Siege Barracks funnel with your Tesla Farm as if placed improperly, a Siege Barracks may completely negate its effectiveness.

Above, we can see how a troll Tesla may possibly cause a time failure. If the attacker does not have proper clean up troops, a hidden corner Tesla may suddenly pop up and force an attacker’s troops to cross the entire base to clean up this last defense. Keep in mind this method is not reliable as attackers may start on that side, or simply plan well enough to beat your base fast enough. You also lose out on DPS in your base itself, so don’t rely on a troll Tesla to win wars.
Above, we’ve seen this picture before, but we can use it again. In this example, an attacker may try to use a King, Baby Drag, or Siege Barracks to funnel the Storages on the side to allow troops to path downwards towards your Inferno Tower. By having a Tesla Farm there, it can kill off smaller funnels and stall large funnels long enough to mess up an attackers plan. Once again, not the most reliable method because a good funneler can spot out common Tesla Farm spots and adjust accordingly, so make sure you hide them well.
7: Splash Distribution
Splash distribution is huge in today’s meta, filled with Bats, Hogs, Miners, Bowlers, you name it. Many attacks have a large army of smaller troops and without proper splash distribution, your base may get overrun by attacker’s troops. I will be going over a couple different techniques as well as how to place your splash so you aren’t susceptible to small spammy troops. If you’d like another in-depth analysis, go check out Just..Fall’s guide here.
- Wizard Tower Placements: There’s a few rules for Wizard Tower placements. Note that some of these can be changed slightly or adapted to a current meta or depending on your base design. Let’s start with rule 1: Wizard Towers’ attack radius should not be on an Air Defense. Why? Wizard Towers are one of your greatest tools against Balloons. If a Hound is sitting on your Air Defense and your Wizard Tower is in range, the Hound will tank the WT shots, leaving the Loons to roam free. Let me demonstrate an example.
Notice in the above example, the two different WT placements. In the top example, the AD is in the WT radius, meaning it will get tanked by a Hound. This is not bueno. The bottom example is done right, as the AD is no longer in the WT Radius. Note that it's very difficult to have all 5 WTs be away from the ADs, so I generally like to think that up to 2 WTs may be in the range of ADs. At least 3 WTs should not be Hound tankable.
In this above example, we can talk about Tankable WTs. With the advent of Bat spells, tankable WTs became important to attackers. This meant that since spell slots were limited, people had to improvise with something else besides 10 Freezes. Tankable WTs are WTs that are able to be tanked by an Ice Golem on the outside. This allows for attackers to save a Freeze for other defenses, such as an Inferno or an inner WT. In the top example, we can see how even though a Mortar is outside, it is still within the WT radius and is tankable. The other Mortar example implements the use of a tricky Spring Trap to bait attackers to try to tank the WT, but fail because of the Spring. Finally, the Tesla is another interesting way to bait an Ice Golem Tank, forcing attackers to waste housing space and use a Freeze.
In this example above, we address WT placement near Infernos. You should always have a WT near an Inferno that is not freezable together. The top example is done correctly, and the bottom is incorrect. If they are near each other, they can cover each other’s splash and force an opponent to use 2 Freezes instead of one. However, if they are freezable together, it completely negates the effectiveness of their dual coverage.
- Inferno Placements:Inferno Towers are a major key defense at TH11, and needs to be placed properly in order to stand the test of time. Because this is the splash distribution section, I’ll be covering it solely for the sake of splash coverage. As stated above, Infernos should always be near a WIzard Tower (or sometimes a second Inferno, very base dependent) to have dual coverage, but 2 splash defenses should never be freezable together.
We can use this above example again because it clearly illustrates what to and not to do. The top example is good splash coverage with little Freeze value, while the bottom example is technically good coverage, but provides insane Freeze value since they can be frozen together.
- Freeze Value: We’ve already talked a lot about Freeze value during the placements, so I’ll go over some general rules. Two splash defenses should never be freezable together. Your Eagle should never be Freezable with another Splash Defense. You should not have 3 Xbows freezable together (yes I know they’re not splash but they’re actually great at taking out bats).
- Killsquad/Siege Value: This is where it gets interesting. I’ll be covering the basics here, but the link I posted above to Just..Fall’s guide goes much more in depth. This also takes the concept of an Offset Town Hall into play. Let’s take a look at some examples.
Looking at this example above, we can see how this is a poor setup of splash distribution against a Siege or kill squad based attack. The arrows represent the entry of a Siege and/or kill squad, and as we can see, the attacker can take out a good chunk of splash in a linear direction. This is no good because the more splash the attacker can grab before the Bat phase of the attack, the less resources they have to use for the Bats. As a rule of thumb, you should never let an attacker get 4 or more splash defenses on their Siege kill squad portion of their attack.
This above example is a good way to set up splash distribution. Any entry the attack takes cannot take more than 3 splash defenses unless they heavily overcommit on their kill squad, leaving not enough resources for the Bats. of course, if your base has things such as a poor directional comp, or a 9x9 core, this makes the attacker’s kill squad exponentially more effective. Make sure you implement other base building techniques to keep your splash safe.
8: Clan Castle Troops
Your Clan Castle is one of the most important defenses in your base, and it's not even a defensive structure! Most attackers think of taking out the CC troops before starting the second or third phase of their attack. This means that the CC troops you fill with are very important and often base specific. Let’s go over some common CC fills and how/why they work.
- Damage CC: Damage CC is used to try to dish out as much damage to an opponent’s Kill squad or Queen Charge. Oftentimes, these CC get affected by a Poison spell heavily and can be dealt with easily if the attacker is smart. Use a mix of these troops in a damage CC.
- Witch - A solid troop that can deal decent damage and stop enemies in their tracks if they have slow attacking troops or didn’t bring Poison.
- Valks - Insanely powerful against groups of small troops if the opponent does not have a tank or does not take out the CC first.
- Baby Dragons - Can dish out massive damage if left unattended! Doesn’t have much health so a KS deals with this easily. Don’t use other flying troops if you have a BBD in your CC. Works well paired with a valk+witch or rest archers
- Dragons - Great when paired up with an Ice Golem against Miners. It is slow flying so it will not catch up to faster troops. Can absolutely decimate a lalo attack if the attacker neglects to take this out.
- Edrags - Deals massive damage but is very very slow. It will always get a shot off on an attacking Queen unless the Queen is raged and there is a Poison on the Edrag. Usually not the best cc troop to bring.
- PEKKA - A very niche CC fill, but can shut down a Queen Charge or smaller kill squad if the attacker is unprepared.
- Loons - Does fat damage on small things like Hogs or Miners, but slow and unreliable. Will die to a solo Poison if placed properly.
- Fill Troops - Archers, Minions, Barbs, and Wizards and used to fill a CC when there is not enough space left for a larger more effective troop.
- Stall CC: These CC troops are used to stall an attacker’s Queen Charge or kill squad while they are under heavy fire. They are generally great to use for a fresh hit, but are easily exploited in second or third hits.
- Hound - Great at stalling Queen Charges, the pups will be a nuisance if they didn’t bring poison. Can be avoided by using an air army.
- Golem - Similar to a Hound, but does slightly better against troops like Miners because of its splash damage effect when popping. Can also oneshot any bowlers within its pop range. Slightly worse against a Queen Charge because of a lack of pups. Can be avoided by using an air army.
- Ice Golem - Very effective for stalling a Queen Charge with 3.5 seconds of freeze time on each one, as well as a decent health pool. Can also be avoided by using an air army.
9: Trash Buildings
No one ever thinks of trash buildings. That’s why they’re called trash buildings. In general, trash buildings are any buildings that are not Storages or Defenses, but for the sake of this section and to help talk about how to arrange the outside of your base, I will talk about Storages and some common defenses that end up outside the walls as well. We’ve already gone over Bowler bounces and Army camps, as well as some funneling techniques, so I won’t go over that a second time so you don't have to read too much. I can’t emphasize enough how important it is that you pay note to the common funneling techniques though, as a good attack starts with a good funnel and a bad attack starts with a bad funnel. I’ll cover a few basic techniques for placing buildings on the outside of your base to make funneling and pathing harder.
- Anti Edrag Chains: Edrag funneling can be a huge advantage if your base is set up poorly. Let’s take a look at some examples of how to stop Edrags from getting easy funnels or grabbing good value.
In the above example, we can see how to defend properly against Edrags. First, Edrags have a chain that can extend through one layer of space, so having two tiles between structures is critical. Look at the red lines indicating a gap between the structures. Including the wall, both sections have a two tile gap so Edrags cannot chain sideways or into the base. Another common technique, similar to the anti Bowler bounce is having high hit point structures behind lower hit point structures. Because the Edrag loses damage per chain, a higher HP structure behind the lower one means that the Edrag will have to hit two structures to create a funnel there compared to one.
In this example above, we see it implemented in an even more effective way. Because of the way the trash is set up, the Edrags will have to hit only one structure at a time and wrap around in order to get to the Storages, meaning the outer defenses will have lots of time to take down the Edrag.
- Outer Defensive Structures: Because Supercell hasn’t given us more walls, oftentimes we find ourselves having to put defensive structures on the outside. We can use this to its maximum efficiency by covering as much of the base as possible while not wasting any range. Example below.
Ideally, your defenses on the outside should have their range one tile outside of the grass, like this Archer Tower in the above example. This ensures there’s no wasted range on your defenses, as well as allows for the defenses to maximize their effectiveness in defending from both inside the base and outside.
Another common defense on the outside is a Mortar. Using the concept of anti Bowler bounces, we can ensure that the attacker doesn’t get an easy funnel and free defense for free, by placing lower HP structures in front of higher HP structures.
Outer defensive structures also give lots of leeway for good trap placements to make an attacker rethink their plan. We’ve already covered Spring Traps and IG Tank baits, but we can also use outer defenses with a two tile gap between them to slot a Giant Bomb in there. This makes it so the attacker is forced to Heal on the outside, not where you would normally want to heal. Here’s an example.

Outside defensive structures can also mess up pathing by drawing defense targeting troops back outside the base, or even around the base when they first deploy them. Good attackers can work around this, but it may catch someone by surprise if they haven’t scouted out the base properly.
- Builder Huts: Now I’ve never really seen Hut placements be in any guide before, but there is an interesting way to use those little huts to maximize their effectiveness. This method is surprisingly effective if the attacker isn’t aware of it.
Looking at the example above, let me explain what all the colors and squiggles are. The red boxes highlight what an attacker would funnel if they want to Queen Charge from this side (intended Queen Charge is black arrow). However, what the attacker won’t clear out is the little Hut circled in yellow. Once the Queen moves in and takes out the AD and Cannon, noticing how the Hut is the next closest thing to her. She would move towards the Hut and not into the base. After taking out the Hut, the Archer Tower becomes the next closest target because it is closer than the inside of the base (demonstrated in blue). This pulls the Queen off track and around the base. Note that this method can be quite effective, but varies depending on the troops used to funnel, the exact spot the attacker places the Queen, and many other factors. But it never hurts to use this technique as there’s really no specific drawback.
10: Defending Specific Attacks
I'm just going to go over specific attacks in today’s META and some of the key concepts you can use to help defend them. I’ve already covered most of the concepts that will be used in this section, so I’ll be referring back to some concepts.
Note: each strategy will be analysed in depth in Part 2: Advanced BB
- Queen Charges: The most common entry for a phase one in an attack. Almost every attacker in war will start with some form of Queen Charge. Let’s go over a few key techniques that can help deal with this.
- Moats - Makes funneling a Queen Charge incredibly expensive and often deters a charge from specific entry in the first place.
- Good SAM Placements - Catching those Healers with a SAM or two cuts down the healing on the Queen a ton. Combined with high DPS, she’s toast.
- Non Accessible Values - Make sure to keep your values out of reach from each other from the same part or comp of the base.
- Unreachable DPS - Knowing the walkability radius of a Queen, you can implement unreachable DPS to make sure she is constantly hit with massive damage, forcing the attacker to burn more Rages. Xbows are great for providing unreachable dps, but archer towers work well too. Current meta has 1 or 2 ground xbows working well, though you can go all air too in some cases. What you shouldn’t do is have 3-4 ground bows.
- Anti Funneling Techniques - Make the funnel expensive or unpredictable by using the funnel techniques, such as the Army Camps, Builder Huts, anti Bowler bounce, anti Edrag, Storages, and Teslas.
- Directional Comps - Don’t have any directional comps leading into the base. This gives the Queen a lot of accessibility.
- Hybrid: Hogs and Miners are the most common meta strategy at the moment, so implement these features carefully to avoid being a victim of the next piggy rush. A great CC to run is Ice Golem + Dragon or BBD + Witches as this stalls Miners a lot and destroys them.
- Hog Splits - A great tool for splitting up Hogs and making sure they don’t all get healed at the same time. Make sure to implement it after a Hog Miner split so the Miners don’t stick with the Hogs.
- Hog Miner Splits - Very tricky to pull off but very effective if done right. Usually baiting an entry for Hybrid makes this much easier as you can predict where an enemy comes from.
- Anti Funneling Techniques - Mainly used against the commonly used Siege Barracks. Using Skele Traps with Storages and Teslas shuts down a SB funnel.
- Springs Between Defenses - Great way to completely negate Heals and just remove Hogs and Miners from your opponent’s army.
- Good TT Placement - Tornado Traps force a Heal from the opponent when done right, and if done really well can still destroy Hybrid while being healed.
- Forcing Awkward Heals - Giant Bombs are the main culprit here. Use your Giant Bombs to force a heal in a non conventional spot to make the attacker rethink his plan. You can use Teslas for a surprise boom! :)
- Mini Giant Bombs - Somewhat effective to force a heal. Can work really well when surrounded by decent DPS and in an unconventional spot where an attacker wouldn't normally Heal.
- Sui Lalo/Electrone: Such a strong attack when done right, it’s very hard to defend a proper Lalo or Electrone attack. I’ll go over some key tips in ensuring you have the best chance to defend it. A great CC to run is Dragons, BBD, or Witches as they can target air and deal good damage.
- Unpredictable AD Layout - This makes it so it’s hard to predict the Hound pathing, making the rotation of a Lalo all janked up.
- No Heavy Core - Not having a heavy core means that an Electrone style Lalo will not be able to get much value from a Blimp drop,
- WTs Away From ADs - Having WTs away from ADs allow for the WTs to smack some Loons while the Hound is stuck on an AD. The splash from a WT takes out grouped Loons very quickly.
- SAMs for Hounds - Popping those Hounds early means that your ADs will dish out massive damage to the Loons.
- RABs for Loons - RABs are great at hitting Loons and combined with a well placed WT can demolish a large group of Loons.
- Warden Near Queen - Having your Warden near the Queen allows for a health buff on the Queen, making her unable to be one shot by a maxed Edrag if she is at level 50.
- Moats Near ADs - Moats near an AD make sui-ing an AD much more difficult and wastes the attacker’s housing space, giving them less room for Hounds and Loons.
- Effective Sweepers - One sweeper should be pointed towards any common Blimp entry and another where people usually would start their rotational Lalo. Fighting a Sweeper is insanely hard and can completely halt an attacker.
- SAMs for Blimps - Keeping a SAM for a Blim is a surefire way of stopping a Blimp before it reaches its destination - your core.
- SAMs for Slammers - Slammers may be used for a Lalo attack, and once you can predict a common entry for a Slammer on your base, you can slap a SAM there to make it die a lot faster.
- DragBat: DragBat is incredibly strong and is viable on nearly every TH11 base. However, there are some methods of making DragBat more difficult. A great CC to run is Witches as they can stall Dragons and make them kind of useless for a while.
- SAMs for Slammers - Having a SAM or two for the common Slammer entry points can help a lot, as Slammers are the most common Siege Machine used with DragBat.
- Good Splash Distribution - You don’t want all your splash to be on one side of the base as that means the Drag phase of the attack can eliminate nearly all threats to the Bats.
- Moats Near ADs - Sui-ing ADs are very common with DragBat strategies. Having a moat near your ADs can help with preventing their Heroes from grabbing more than 1 AD.
- Good Sweeper Positioning - Ideally your sweeper should not have any overlapping area and should be facing common entry points from Dragons. This helps stall out the Dragons and not let them tank for the Bats or get as much value as the attacker wants.
- Non Tankable WTs - Covered a lot in Splash Distribution (Chapter 7), having non tankable WTs means that the attacker will be forced to use more Freeze spells.
- Dual Splash Coverage - Having your Infernos cover the WTs and vice versa also forces the attacker to use more Freeze spells to get past the coverage.
- PekkaBoBat: PekkaBoBat uses a similar approach to DragBat, but is a ground base kill squad instead of an air kill squad. This means there are lots of ways to make a kill squad weaker. A great CC to run is Witches as they can stall Pekkas for a long time.
- Anti Funneling Techniques - Using funneling techniques, we can make it much more expensive to funnel, forcing the attacker to have a smaller kill squad.
- Moats - Moats can throw off an attacker if they funnel improperly by denying access to the inside of your base.
- Dead Zones - A dead zone is great against Pekkas as they will end up wrapping around the dead zone to go somewhere else. I recommend putting more valuable targets behind the dead zones.
- No Heavy Core - If a Pekka or Queen gets into your core and it has massive value and/or accessibility, this means that the kill squad will have gotten too much value.
- No Giant Comps - Pekkas and Bowlers love large open compartments. If you have a giant comp in your base, it is sure to get exploited. This also gives a lot of accessibility to the rest of your base.
- Directional Comps - You want directional comps to lead around your base, and you definitely don’t want a directional comp that leads directly into your core.
- Good Splash Distribution - You don’t want all your splash to be on one side of the base as that means the Pekkas and Bowlers phase of the attack can eliminate nearly all threats to the Bats.
- Non Tankable WTs - Covered a lot in Splash Distribution (Chapter 7), having non tankable WTs means that the attacker will be forced to use more Freeze spells.
- Dual Splash Coverage - Having your Infernos cover the WTs and vice versa also forces the attacker to use more Freeze spells to get past the coverage.
- Pekka SMASH: Pekka Smash is like GoWiPe but better. A lot better. It relies on brute force to smash through your base. Luckily, there’s great ways of defending this attack as it generally isn't the strongest strategy as long as your base is well equipped. A great CC to run is Witches as they can stall Pekkas for a long time.
- Directional Comps - You want directional comps to lead around your base, and you definitely don’t want a directional comp that leads directly into your core.
- No Giant Comps - Pekkas and Bowlers love large open compartments. If you have a giant comp in your base, it is sure to get exploited. This also gives a lot of accessibility to the rest of your base.
- No Heavy Core - If a Pekka or Queen gets into your core and it has massive value and/or accessibility, this means that the attacker will have taken all your high value targets.
- Anti Funneling Techniques - Using funneling techniques, we can make it much more expensive to funnel, forcing the attacker to have a smaller attacking force.
- Moats - Moats can throw off an attacker if they funnel improperly by denying access to the inside of your base.
- Dead Zones - A dead zone is great against Pekkas as they will end up wrapping around the dead zone to go somewhere else. I recommend putting more valuable targets behind the dead zones.
- Edrag Spam:People who spam Edrags really don’t care about their sanity and oftentimes have no fun in the game. :p Jokes aside, Edrag spam can seem annoying but once you know how to defend it, it's almost never viable in wars. A good CC to run is a Hound(Assuming it gets pulled) or Witch as that stalls the hell out of the Edrags. You can also run 35 Archers and have fun with watching Edrags get stuck in one place for hours. Only works if they don’t have a Poison.
- Anti Edrag Trash - Following the rules and guidelines in Chapter 9, this makes Edrag funnels and value a lot less significant.
- Anti Edrag Comps - Anti Edrag comps take advantage of the 2 tile gap that Chains can’t pass through. Said comp examples are 10x5 and 10x10.
- Good Sweeper Positioning - Ideally your sweeper should not have any overlapping area and should be facing common entry points from Edrags. This helps stall out the Edrags as they can get stuck infinitely with good Sweeper positioning.
- Moats Near ADs - Sui-ing ADs are very common with Edrag strategies. Having a moat near your ADs can help with preventing their Heroes from grabbing more than 1 AD.
- SAMs for Slammers - Having a SAM or two for the common Slammer entry points can help a lot, as Slammers are the most common Siege Machine used with Edrags.
- Spread Out ADs - Edrags struggle a lot with well placed, backend ADs if they can’t chain to it because they are so slow moving.
Part 2: Advanced TH11 Base Building
How to defend against META strategies
11: QC Miners/Hybrid
-Marco
Note: I recently upgraded to Th12, you'll see it in the pics below - please treat it as if it was Th11. Also, if you do have any suggestions for this section, feel free to contact me on Discord at Marco#0264.
More (better) bases will be added as examples after CWL Playoffs end.
Summary
- General features
- IT setups
- SAMs anti Blimp
- Wall Layout + Healzones & Deadzones
- Anti Miners/Hybrid base example & weaknesses to other strats
- Live BB
General features
To defend QC Miners and QC Hybrid, we first need to think about what an attacker usually does. I'd say the phases are:
- QW to funnel, QC if value is accessible - usually BK used to funnel AQ
- Blimp into valuable area (EA, ITs), otherwise SB to funnel
- Miners/Hybrid in between
Knowing this, we can clearly see that we need to prevent QW/SB/Blimp getting much value, and we need to concentrate our traps inside to avoid funneling troops taking them.
We also need to separate Miners and Hogs, but this was already discussed in Chapter 4, Part 2: Hog Miner splits.
Here's what we want to do.
- Keep outside defences to a minimum; moats can be used in some cases, but a small amount of them
- Keep outside traps to a minimum, unless they're SAMs v QW
- Have ground XBows as we're facing a purely ground hit; however, if you do use 4 ground bows the attacker may hit with air so we need to find a balance
- Use SAMs v QC and/or Blimp, sometimes baiting a QC/Blimp and sometimes guessing the likely locations (more informations later on)
- Have SAMs a bit protected v Koko Loons
- Have a combination of splash+DPS+something to stall Miners (ideally storages)
- Use a proper CC, either to stop QC (Hound), kill Miners/Hogs if left undealt with (DPS/Golem Loon)
- Have multiple possible Heal Zones throughout the base, mainly consisting of zones around ITs with ITs+other splash+storages, DPS zones + splash, and WT+GB
- Have springs considering Hogs and Miners AI (covered in the Live BB later on)
- Have SBs as additional GBs, rather than anti WBs
- Avoid L/I shaped bases: it's easy to destroy one zone and end up with a big rectangle, which is ideal for Miners/Hybrid; however if the attack ends in a bad spot for Miners it can actually defend so not all L shapes are bad with proper pathing
We will now go in details for each area, explaining pros, cons and giving practical examples.
IT Setups
Note: I want to start this by saying that GB near IT is not necessarily bad. Yes, GBs in spots where I would already heal are bad. Yes, IT is usually a Heal Zone. However, IT alone (or IT+storages alone) won't kill Miners - you also need other splash, DPS and so on. That's why generally GB near IT isn't used - there are other things that force a heal, there's no need for a GB; but if you somehow have IT with 4 storages and nothing else then you can (you should) use a GB.
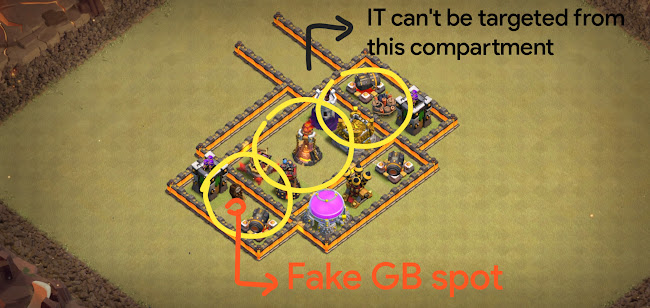
This setup provides a good compromise between everything said above.
- Multiple Heal Zones (yellow)
- Combination of splash+DPS+storages/skelly to stall Miners
- Elixir storage near AD to separate Hogs & Miners
- Deadzone to have troops circle around the IT, thus dealing more overall damage due to longer time to get to the IT
- IT can't be reached from the outside, except the AD compartment which will likely have quite some trash in front of it, or an army camp to prevent an entry
- XBow to help v QC: IT zones are pretty valuable, so you want to cover them
Keep in mind dead zones are good to split troops, but an excessive use of them may actually have the opposite result, which is easier pathing.
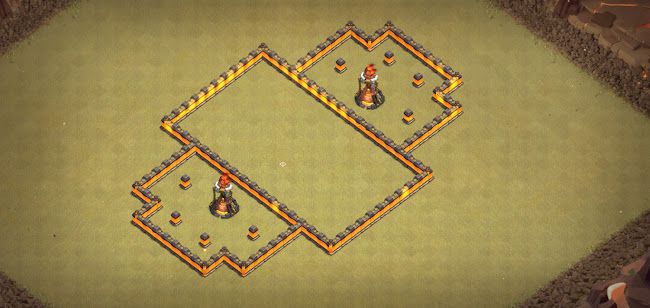
In the picture above, you can see how the dead zones on ITs effectively make the base a rectangle, which is what you want to avoid.
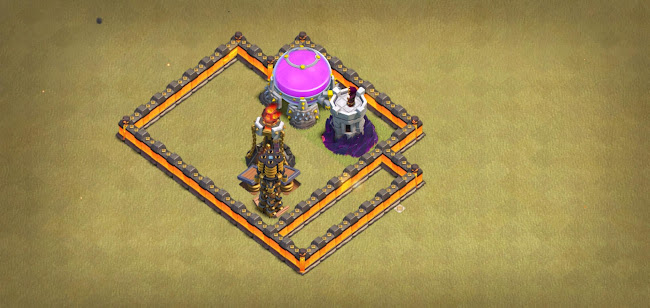
This setup features diagonal springs between IT and Tesla - this is the best possible setup. Usually springs are hard to place, because Miners AI will likely have them wander around a bit.
Keep in mind you can either place springs between two defences (effective v Miners and Hogs), or try to separate Miners & Hogs and have springs/skelly/GBs solely for Miners if Hogs will go around the IT due to pathing.
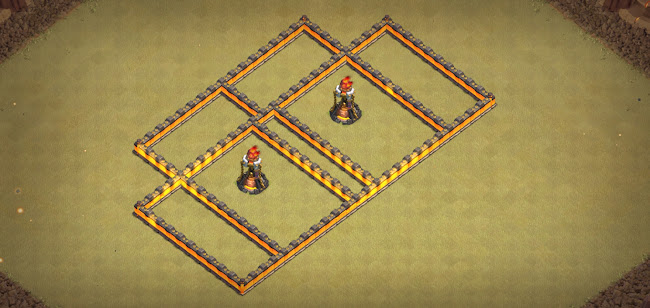
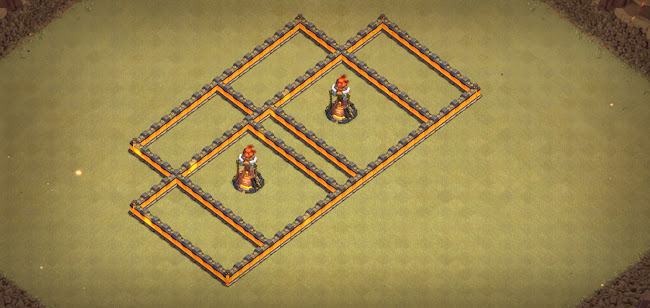

This type of compartment is also used a lot, the first example has two tiles between IT and whichever buildings you place near that, whereas the second one has one.
Third pic shows me attempting to actually fill the setup. You can see how there are 3 possible areas to kill Miners/Hybrid: 2 IT+WT zones, one BT+DPS zone (especially if you swap outside Cannon with Mortar); there's also a combination of splash, DPS, storages as suggested before.
Or course, you can use different buildings inside depending on the nearby rest of the base.
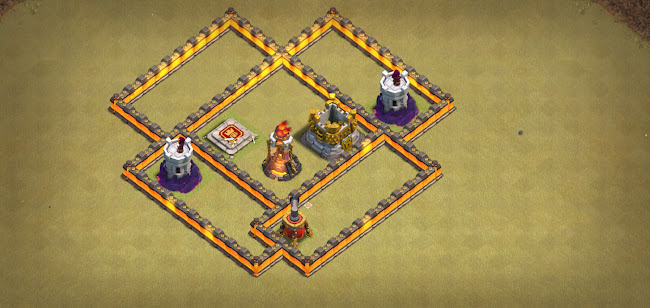
Sometimes you can also use BK, it has the stalling property of a storage combined with DPS of its own and it works great if paired with splash.
The little wall setup near AS is so that IT can't be walked unless you WB - you could perhaps consider this compartment or a similar version in case there's a channel in the base.
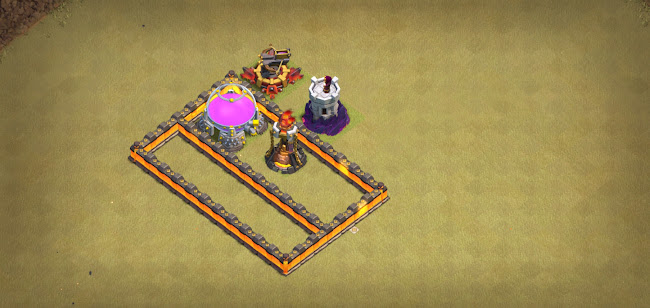
Sometimes you can use deadzones, however remember that deadzones also keep inside troops inside, and that's not ideal - you need proper pathing to lead troops outside somewhere, otherwise it's just easy pathing for the attacker.
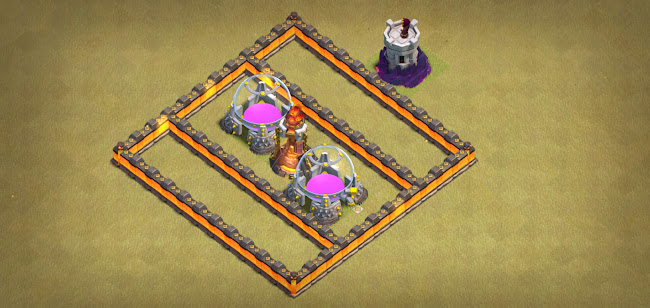


The idea in this setup was to have troops go around IT, and when they do get in, storages (+Skelly) will stall while IT does damage.
As you can see, WT can't quite reach inside, and BT having a smaller range (6 tiles for BT v 7 tiles for WT) can't reach either; also having such deadzones provides easier funneling and pathing for other strategies.
Third picture shows a base I made when Hybrid started to become popular (early April), but unfortunately a charge into ITs was easy and the rest got overwhelmed with Hybrid itself in FCs. I didn't consider the lack of DPS around ITs, and it was 3 starred due to that reason.
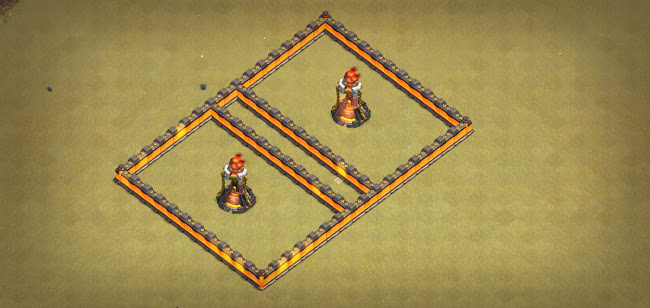

Pros
- Great value for walls
- Lot of splash damage because ITs ranges overlap,
- Quite hard to QC as you can't take both IT with a single jump or WB+jump, once AQ goes into one of the IT comps she won't exit easily.
Cons
It's compact.
You need to properly defend air, especially Electrone, with a well placed AS (and Tornado if needed); with so many buildings it's also quite hard to place Springs v Miners but through FCs and fixes you should get a pretty good setup.
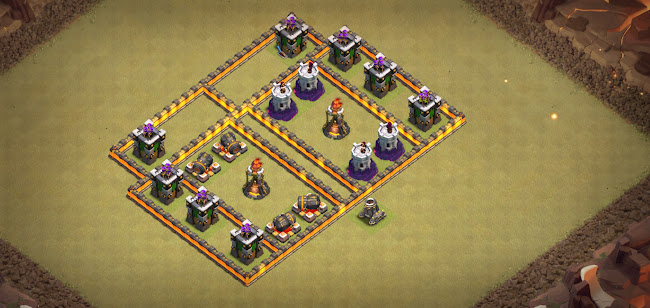

Here you can see the same setup as the previous one, but two tiles longer - IT now has two tiles instead of one between the closest buildings.
First screenshot is just an example to show you the tiles, if you're actually considering using that I'd recommend gifting your account to me instead :P
Second SS shows a possible way to fill that setup.
Pros
- Pathing goes around ITs due to the extra tile - for example, in the first SS you can pick any two buildings and the closest one will never be the IT. Naturally, a smart attacker will see this and try to funnel properly.
- Better v Electrone, LaLo as chain can't get the IT and Loons can go around it depending on pathing
Cons
- As the IT has everything go around it, you can't place springs between IT and other buildings as they may not trigger at all
- Skelly near IT nullify the whole 'going around' setup, either have them a bit away from ITs (for example, in the external compartments rather than IT ones) or don't have them at all
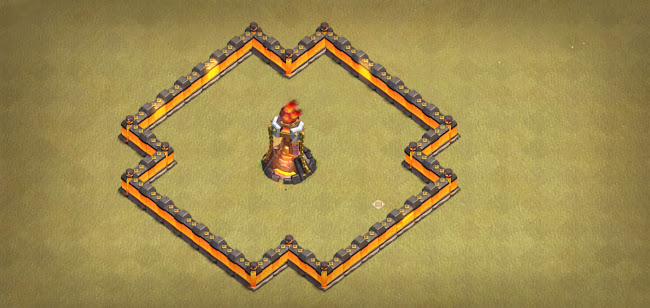
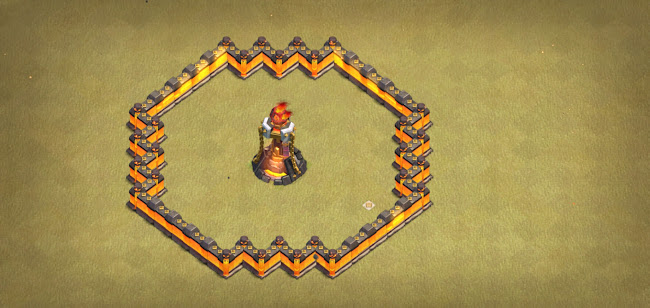
Same unwalkable IT compartment, second one has wiggly walls. It's often used close to the outer part of the base, sometimes protected with a moat.
If you opt for this, I'd recommend making a WB into there awkward due to funnel, or not worth it.
Can also be used with nothing inside but wall pieces+IT to make an effective deadzone around IT and have everything path around it (shown below).
Wiggly walls
Pros
- Can mess with WB AI
- IT can cover more buildings
Cons
- Easier to funnel troops into IT
- IT can be walked if the setup is incorrect
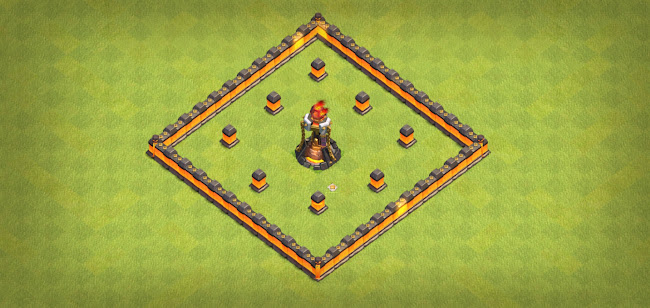

Pros
- Great pathing around
- Possibility to hide Teslas/TF/GBs
Cons
- Huge wall investment
- Easier to funnel the sides (natural pathing)
- Nothing to stall the troops once they are inside
- Lack of DPS
Personally, I don't use this compartment as it provides easy pathing around it, and it's quite easy to jump inside or have troops target the IT once proper funnel is done.


As you've guessed, this isn't an IT compartment but rather an EA one, however I've decided to include it anyways as it's the exact IT comp shown above, only with EA instead of IT.
Pros/Cons are the same, with the disadvantage that EA is likely to be hit with Skelly/Bats since it's that much isolated and is much more valuable than an IT.
Second pic shows a possible solution - ITs covering EA. However, if someone jumps inside then the value becomes huge.
Third pic shows another possible solution - but a bad one, because the whole purpose of this setup is to have troops go around, not inside.
Note: you can use WTs instead of ITs, they will provide some splash coverage and they're less valuable than ITs. Only downside is that WTs radius is shorter, so they will only cover one side of EA and not the others. Another important point is that EA island bases usually have easy pathing, so unless it's done properly more often than not it won't work. For more info, see EA/IT Islands section above.
Here are three YouTube recaps where you can see how isolated EA were exploited and successfully tripled.
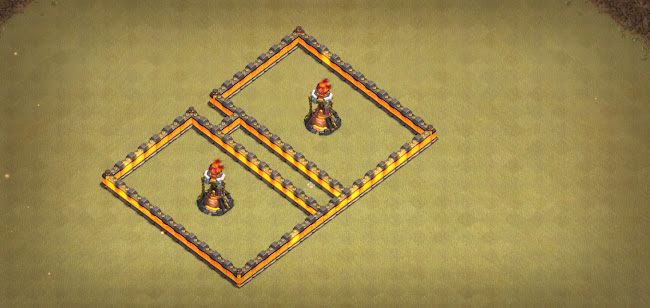
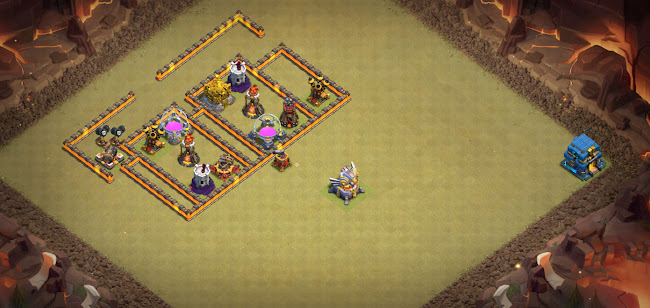

You can consider ITs close to each other in compartments where you can WB into (especially with super WBs).
Since it's hard to have DPS cover ITs and EA, often you'll see the XBows near EA, whereas ITs rely on sheer pathing, trash ring, Teslas, traps, storages to make a push or a QC there hard.
Of course, you may also opt for the other way (XBows on ITs, pathing around EA); given the size of these IT comps I'd recommend making pathing difficult, as an easy WB could mean Sui with IG instead of QC and the attacker would get huge value.
Second picture shows a possible setup, with moats on both sides to make a QC path in weird ways. You may also opt for one moat instead of the two I used, or longer moats that may make the WBs target them instead of the IT comps. Tesla(s) + SAM if needed can also be used to screw a possible BBD/Wiz funnel, making either AQ walk around, or the attacker deploying more troops to funnel and having less for the main attack. SAMs v Blimp are of course optional depending on the rest of the base.
Third picture shows a common EA setup used with these IT comps - as you'll likely use more walls near ITs, this setup doesn't use many walls and can actually cause some trouble for a QC if paired with AQ, CC, GW, some storages and some XBows.
Notes for this setup to keep in mind if you want it to work:
- Have enough splash coverage, otherwise Bats+IG could take the whole zone
- Have unreachable DPS (see in Part 1: General BB), meaning you should have XBows targeting the enemy AQ from a compartment that the AQ can't reach unless the attacker WB one more layer; having ADs to snipe Healers wherever the charge comes from is also good (example in the pic below, but keep in mind Bats value if you have ADs there)

- If it's too tight, Electrone could work
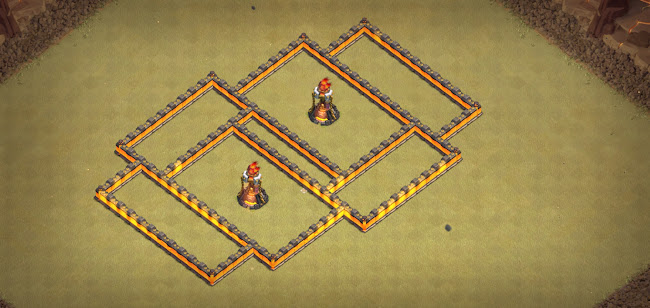
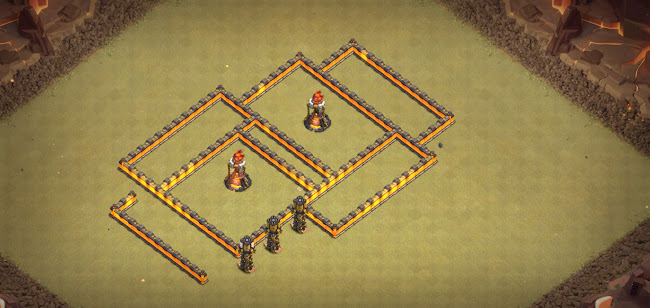
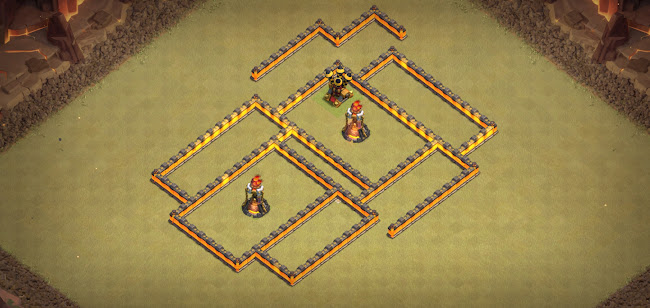

Now that you know the basic IT setups, experiment. Try something you wouldn't want to attack, try something funky, try something you'd build if you were high. Then FC, get tripled, fix, FC again. Improvise, adapt, overcome.
When BB life gives you lemons, remember lemons are actually created through hybridisation - so it's actually you creating your own problems, and you who should try to fix them.
You can't master BB overnight but you can't improve by doing nothing.
You as a BB are only as good as the extent of your imagination.
Spread your wings, don't be afraid to build something different!
[Inspirational section over]
Few key points to keep in mind while doing advanced setups
- Compromise between DPS, splash, storages, Skelly, BK placement, QC value, Electrone value, Sui value, LaLo pathing
- Try not to have big IT comps leading to the core
- Make compartments so that you can't walk two ITs from the same compartment
- If both ITs are close, dead zones are a good way to separate them
- Two tiles dead zones may or may not have TF inside, who knows (the attacker for sure doesn't)
- A deadzone to protect IT from the outside generally isn't a good idea - it will help v outside troops, but will make inside ones stay inside (example similar to the second setup I showed in this category - the bad dead zones = rectangle base one)
- Smaller dead zones (like a 3x3 empty compartment, same size as a storage, or just 1x3) or even simple empty spaces can make Miners split or go around certain buildings. Use pathing well
- Separate Miners & Hogs
- You also need walls for the remaining part of the base, especially to cover EA, IT zones: you can be funky but only that much or you'll run out of walls
- AQ is usually away from ITs, in some cases it can be used near them if she's covered well; in other cases it's just a bait (see Live BB for a better example)
- IT zones are where a base defends or gets tripled v QC Miners/Hybrid. Make them hard to QC, trap them well and be sure to go test those traps
Let's now see what you should keep in mind when filling an IT Zone. There are mainly two things: pathing and accessible value.
Pathing means you should try to have troops split, especially Hogs & Miners, using non defensive buildings.
Accessible value means you need to place traps keeping in mind possible QC in that area, as well as possible attacks.


Which of these is better? It depends.
The first pic has a Tesla, meaning you can place a double diagonal spring between Tesla-IT; the Tesla also acts a splitting point, since there are 3 equally spaced defences (WT, XBow, Tesla) it's likely that once one goes down, the troops will split between the two remaining ones. This effect is even better if you have other non defensive buildings to lead troops further from each other.
Second pic, you guessed it, doesn't have the Tesla. While you can't place diagonal springs, it's easier to see how troops would circle around IT, dealing even more damage and furthermore using storages to separate Miners & Hogs (while in the other setup the Tesla would've made them join back again). Furthermore, there's no need to place springs if this area is likely to get QC'ed on.

In this case it's even easier to see, this is a likely QC and Tesla+springs wouldn't be useful. Furthermore, the deadzone makes DPS even further, so this setup is totally wrong. The only way you can keep it is if it's an intentional bait and you have a good amount of SAMs (it will be explained better at the end of the Wall Layout section).
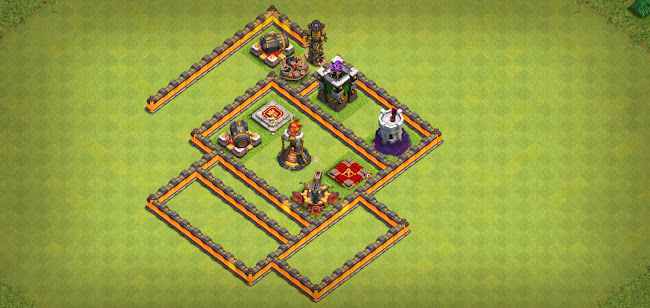
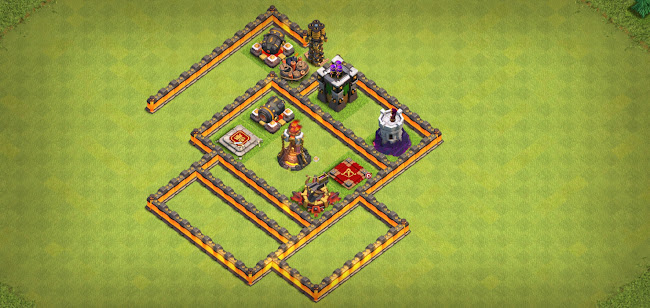
Can you spot the difference? And, here's the real question, which one is better?
Answer: it depends. You may want one thing or another depending what's around this setup.
Also keep in mind that you don't have to follow exactly everything, sometimes you use Teslas and sometimes you don't just to keep the attacker on the edge.
First picture
BK & AQ altars aren't defences, which means Hogs will circle around the IT thanks to the Tesla while Miners will go inside. This is a great way to separate troops near an IT, and you can also see how the deadzone make troops circle around the other side too.
Disadvantages: if you can somehow target the Cannon (for example by using Loons on the defences around), you could potentially send a SS in an area with IT+AQ. To avoid this, you can simply place your whole TF there, use an AS, use some SAMs, or use this setup with storages instead of Heroes.
Second picture
Troops can go into the IT via the Cannon so no more troops splitting; however, there isn't the issue about SS anymore, and you can split Hogs near Cannons/Tesla/AT if there are other defences around.
Wall Layout + Healzones & Deadzones
- Wall Layout
In this section we will talk about Wall Layout, explaining the thought process behind certain setups and understanding the overall base view as opposed to single compartment setup.

I wanted to showcase first those kind of bases and IT comps, as I often happen to triple them with QC LaLo or QC Hybrid.
As you can see, the base itself is a V base (=rotated L, and we already know L bases aren't good), with an open zone near AQ.
There are some problems:
- IT+storages isn't going to kill Miners, you also need splash & DPS
- XBows are clumped onto EA, making ITs vulnerable to QC
- AQ zone is open, meaning SB could get inside
- Pathing is easy as there's nothing to funnel troops outside
- Funnel on the flanks is easy, especially near ITs as they're quite close to the map border
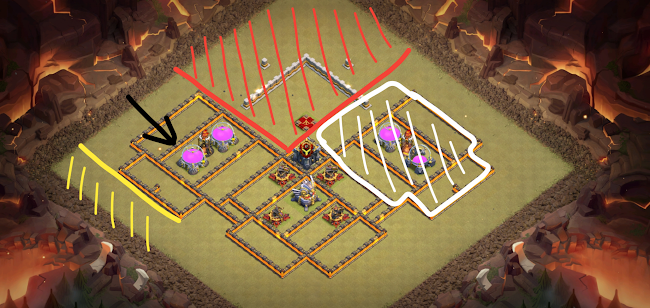
Same base as above, the plan features QC (white) into IT, which is quite easy due to XBows setup; BK (yellow) and SB will funnel Hybrid (black) into all that's left of the base, which is basically a rectangle.

Possible rework - AD vs Blimp/SS, Teslas v Koko Loons, XBows are now covering a bit more ITs.
It's however not good enough, as there are some mistakes again:
- EA not covered with splash = weak v Bats
- Same wall layout, same Hybrid pathing
- Same IT zone
This is the reason why I prefer slightly bigger IT comps, as I can place inside both storages, splash and DPS so that a QC has to face everything at the same time, whereas this setup is a bit more expanded and easier to QC.
However, V bases aren't necessarily bad - you could bait an attack and have all the traps away. With such an easily accessible EA, someone may QC it but fail to 3* the rest as there are simply too many splash zones. You can also mess up Blimp/SS/SB with proper pathing, traps, compartments and whatnot; keep in mind you can't overexpose EA as they may just use Bats/Skelly if it is alone.
You can also experiment with channel bases, they're quite good v Pekka Smash (since there's no core, Pekka Smash can't overpower it) and can work to some extent vs other strategies if built correctly. The downside is that the value will likely be more spread out and harder to cover (=weaker to Sui/small QC), that's why sometimes you rely on a combination of DPS, SAMs, storages to cover the valuable areas.

This setup can work fairly well v SB in a fresh hit. Imagine the attacker wants to clear the DE drill side - without proper funneling, Pekka will instead go to the surprise Tesla and then stray away, whereas Wiz will go to the next closest building which is the DE drill. Naturally, the attacker could just funnel beforehand to avoid this issue, it's up to you to create a proper setup.
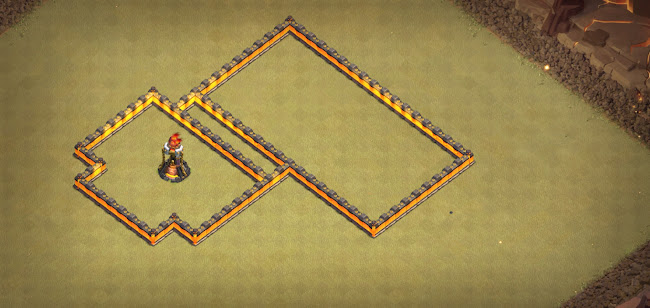
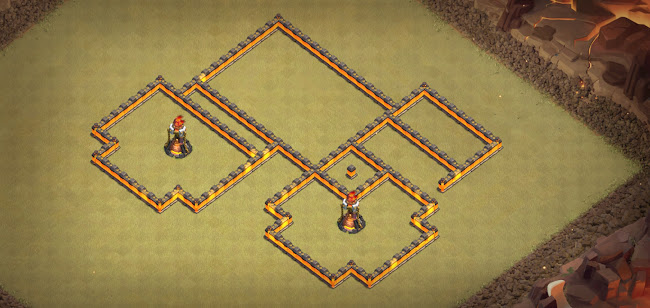
Assume the big rectangle is the generic remaining part of your base. First IT setup, while being good per se, doesn't fit with the rest: a QC into that IT gives good value, and once the IT is down the remaining base is rectangle shaped, which as we know is bad vs Hybrid.
Second picture shows a possible solution: both ITs have a Deadzone to make them unreachable from the rest of the base, meaning Hybrid would path around. Of course, each IT is quite easy to access, so try to make it harder with a proper trash ring.
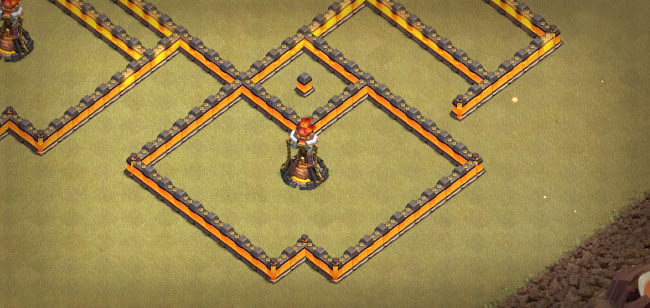
Same setup as above, but in this case with a wider IT comp. Don't forget that the attacker may not necessarily use Hybrid, so if he/she happens to choose Sui LaLo, a bigger IT comp gives more easily accessible value once AQ is inside; and since it's bigger, funnel into that compartment will also be easier. This doesn't mean big IT comp = bad, but you need to keep in mind the overall layout, possible strategies, and how to defend better v them.
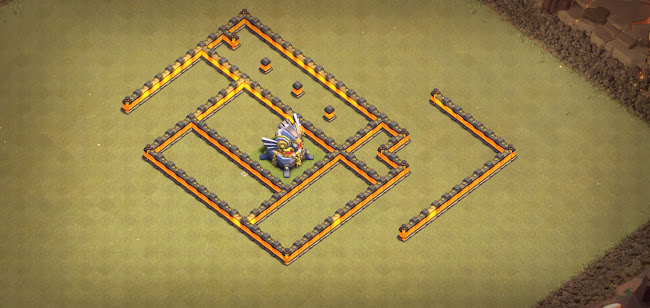
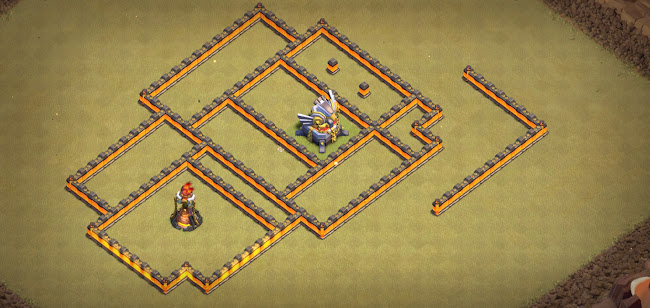
We extensively talked about Deadzones while analysing IT compartments - same thing applies with EA.
First picture shows a long Deadzone near EA, it's good to keep outside troops outside but it will also keep inside troops inside. Long Deadzones aren't good as they make pathing easier for the attacker. Of course, you may opt for Teslas inside Deadzones for pathing purposes, but it's better to make a shorter deadzone and use Teslas in a better spot instead.
Second picture shows a possible tweak - note how EA and IT aren't accessible from the same compartment while also using Deadzones properly. Of course, an attacker may opt for a Sui into IT/EA, or QC the IT (+jump into EA in some cases), or QC into EA, so it's up to you to add the proper defences, trash ring, CC placement, traps and all the things you already know. You can also add more compartments so that you'd need a double layer WB or WB+jump to get EA, or just bait a charge, try to defend it with Teslas & SAMs, and overload the backend with traps to kill what's left. Remember to keep in mind other strategies, as often what seems a good setup is actually bad due to QQ value.
Let's now see another advanced example.
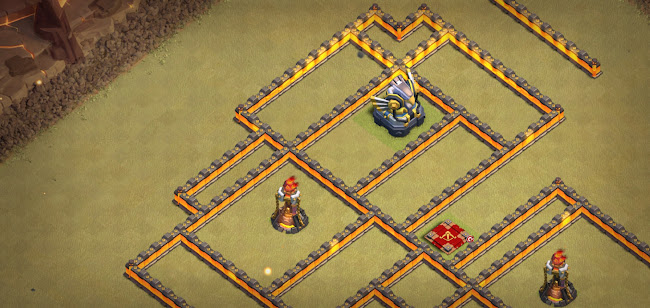
Suppose this is a part of your base, as you can see a charge into EA+IT is quite easy to do and really valuable. How can we try to prevent that?

We can simply move the IT so that we'll have more DPS targeting that QC for example - if we do so, of course we need to add some extra tiles to the deadzone, otherwise the IT becomes walkable.

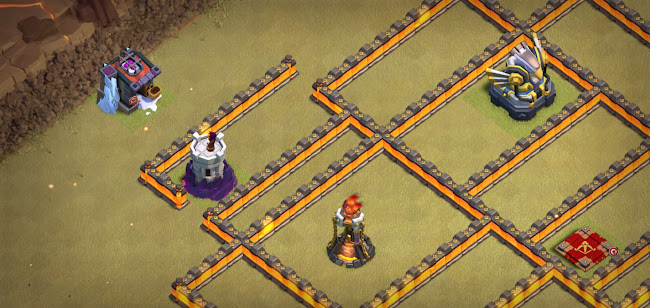
Another trick is to make something that looks like a compartment that requires easy funnel, where in reality it's open and the AQ may wander around.

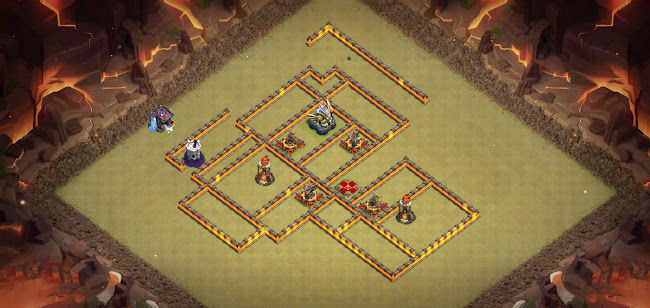
We can also have the XBows away to bait the QC even more, and then have SAMs there and all the traps away; we could also use XBows to actually prevent this QC. Competitive wars focus a lot on these mind games because it’s really hard to defend fresh, so you need to employ every trick you have.
Note: of course the base isn't finished, I'd use the remaining walls to cover the IT at 3 and maybe create Deadzones/Moats for pathing reasons.
Placing SAMs is somewhat hard due to Koko Loons, so I'll include this short explanation, adapted from Lethal#8021.
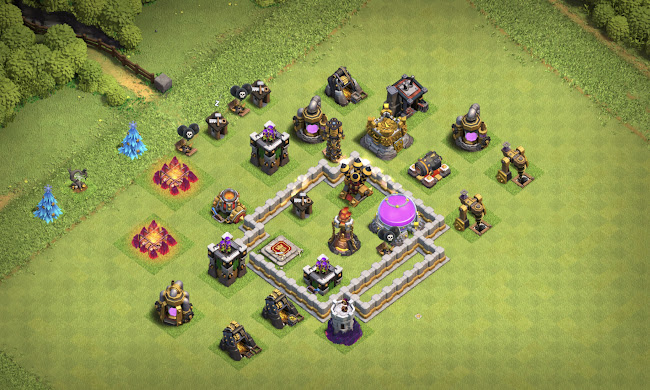

This is something you should think about when baiting an entry: 5 stacked SAMs will probably do the job, but you can achieve the same result with a smaller investment.
I like to place 1 or 2 SAMs in Zone 1 because it's the least common area to drop Koko Loon; most attackers will drop their Healers when AQ starts to take damage, and drop their Koko Loons for potential SAMs in Zone 2.
After that, you can place 1-2 SAMs in Zone 3 - this is where people are most likely going to engage DPS+CC and will probably not Koko, as sometimes getting a Koko this deep can be difficult due to Loon pathing.

Same thing, suppose you have this setup (ATs & Cannons are just placeholders, in a real base you'd have other defences).
Although the IT zone doesn't have much DPS inside, we can see how the storages make Hogs go around the IT. How can we maximize the effect v Miners too?

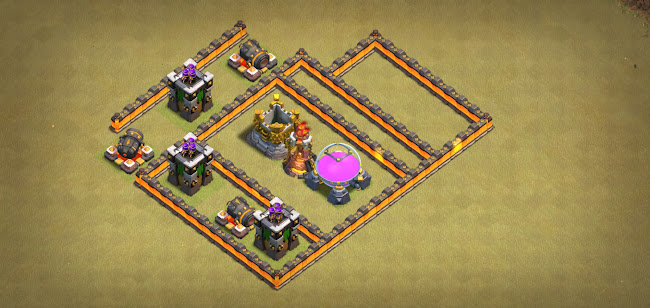
First pic has springs to actually kill Miners, whereas second pic takes advantage of natural pathing and has everything circle around. Naturally there's not a better setup overall, as depending on the rest of the base you may want to split Miners & Hogs or to deal more damage, it's up to you.
- Healzones
Healzones are commonly referred to as areas where an attacker is forced to drop a Heal, or have a good amount of troops die.
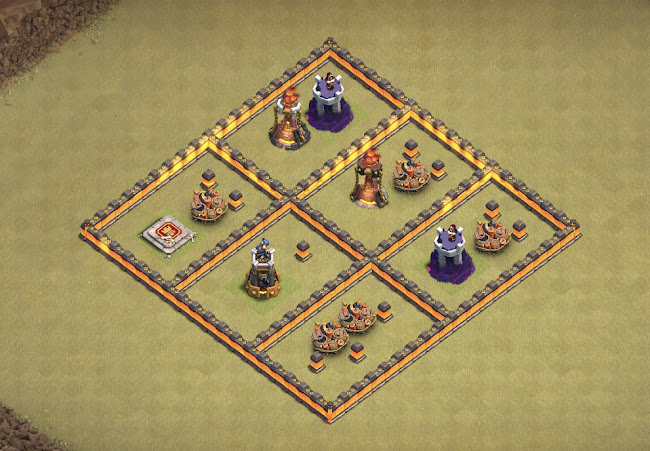
These are what I would consider Healzones, we can of course have some variations such as TF+Splash nearby, or every setup above + Skelly, SBs instead of GBs, and sometimes even IT+storages+Skelly depending on DPS nearby.
When building, you want to avoid placing unnecessary splash in areas where an attacker would already Heal, as well as make sure to use the minimum amount of traps to make sure said attacker has to Heal.
Sometimes I see people saying "GB near IT isn't needed as they would heal there anyways" - this is true only if there are other things near IT that would trigger a heal (for example, if there's already IT+WT no need for a GB).
- Deadzones
We analysed this picture before, now we can dig deeper and talk about Deadzones.
Deadzones are important because they split troops due to pathing, and they make the key building inside unwalkable if done properly.
Deadzones are usually used to separate two parts of the base, namely IT & EA from the rest of the base or from outside. As you can see, I used a Deadzone near IT so that a charge in the nearby compartment can't reach it, and I used one near EA, as well as a moat, to prevent a Sui from outside. The little L shaped deadzone near EA prevents walkability and it's a good spot for outside WTs/ADs as due to pathing (if done correctly) they're harder to reach.
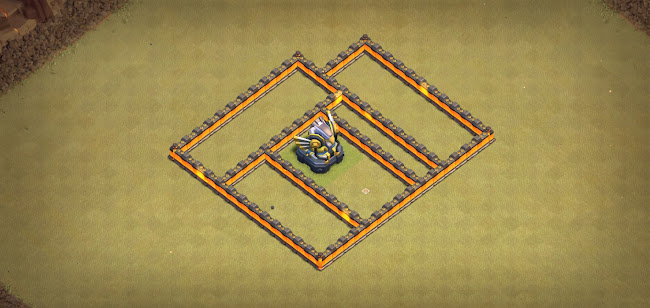

Those are examples of Deadzones around EA, as you can see the first one is solely for pathing purposes (I'll showcase it in the live BB too) but it doesn't really make the EA unwalkable; the second pic has a 2 tiles wide deadzone, which combined with the one extra tile between EA and wall makes EA unwalkable (it's basically a 3 tiles wide Deadzone but with the walls moved, so that you can use less walls).
Personally I'm not a fan of Deadzones near EA as they're quite wall expensive and don't do much, only exception is a Deadzone to prevent a Sui.
I have pictures of Deadzones all around my Hybrid section, so you can look through it to see some real examples - for each picture, try to think why I placed the Deadzone there; the answer is most likely to have troops circle around IT.
To keep this short, I'll just say what to keep in mind when placing Deadzones.
- Have Deadzones for pathing split & unwalkability
- Have Deadzones mainly near ITs, in some cases to prevent a Sui for EA
- Deadzones can be used to split troops inside or prevent troops from the outside (in case of a Sui or a base with a channel) getting inside
- Big Deadzones = easy pathing; you can use Teslas inside but ideally smaller ones are better
- Too many Deadzones = less DPS so don't use a ton of them
- You can also use 3x3 compartments as Deadzones (see IT setups above)
SAMs anti Blimp
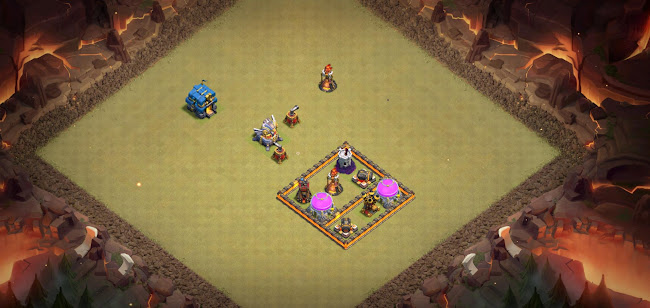
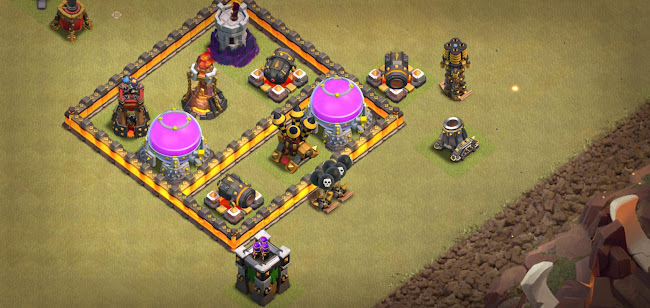

Suppose your base (first picture) has a zone, the IT zone, that's particularly valuable, hard to access with a QC but apparently easy to kill with a Blimp. You can either try to have Tornado/AS/AD or a combination of these to prevent it, or actually lure the Blimp into that zone.
The attacker usually sends a couple of Koko Loons to check for potential SAMs, then sends the Blimp. You can make sure those Koko Loons get killed before triggering anything (for example, with a surprise TF), or you can take advantage of the natural pathing of your defences.
The second pic shows a setup that goes around the AD, while the third pic shows a setup that goes into AD once the external defences are down.
I personally prefer the around setup, as outside defences are more covered due to being closer to the base, and it's better vs LaLo too - Hound will get
killed by AD+SAMs, lava pups will be killed by IT beams, and AD will be free to shoot at other Loons.
Note that more often than not an attacker won't fall for this trap, however in some cases it can work wonders.
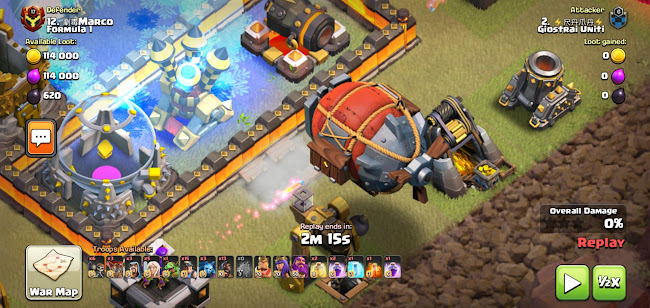
Here you can see how I was attacked while doing SC CWL, the Blimp will die before entering the base - and the Yetis inside will clear some trash but nothing more than that.
Note: while defending Blimp, this makes the base weaker to other strategies, so having a base that's solely anti Hybrid will result in a smart attacker using a different strategy, making the SAMs almost ineffective.
Anti Miners/Hybrid base example & weaknesses to other strats
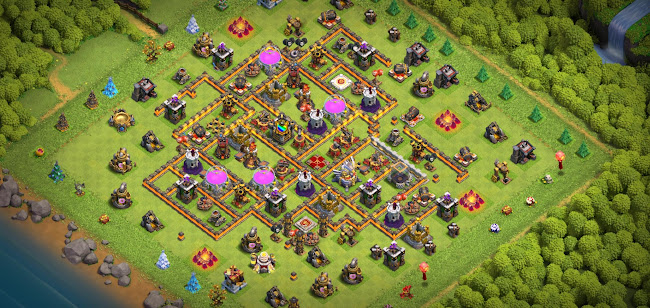
This is the base we will be considering, I built it in April 2020 when nobody really knew how to defend Hybrid properly. As you can see at first glance, it's quite compact - the idea is to make a QC hard, while also having a lot of possible heal zones v Miners and storages to split Miners & Hogs.
Note: this is a Base Building guide. The base posted here isn't the best I've made, for the simple reason that it's up to the BB to build and then tweak, a process which requires hours of FCs, tweaking, FCs again.
This is just the starting process.
Same thing applies to the live BB below - it's a 30mins build, far from perfect.
Also keep in mind that making a base good v Hybrid doesn't mean that it's good v other strategies too. You'll see that later on, but generally compact bases (good v Hybrid) may be weak to Electrone or Pekka Smash; Golem CC, ground XBows and ground Skelly are of course weak v LaLo, so you need to find a balance between everything. More often than not, I look beforehand what my next opponent will likely use (for example, via YouTube recaps/Twitch streams) and try to build v the 2-3 strats they use more.
Now let's check my base.
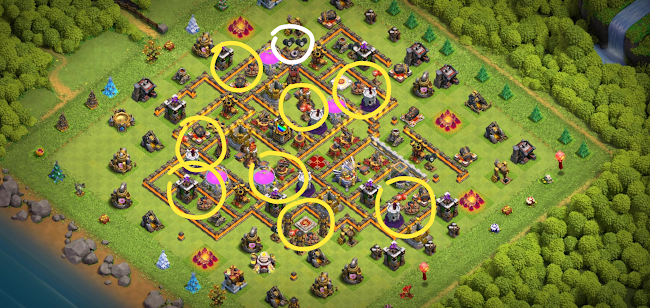
List of Pros
- White: anti Blimp setup I was talking about - after FCs, I noticed 2 SAMs + Tornado is a bit overkill so we can either move Tornado or one SAM away
- Yellow: Heal Zones, they're all inside the base except near BK (but that was the only spot left for the TF) and at 4 on WT (but due to the moat, it's quite hard to get in there)
- Good compromise between splash, DPS, storages especially around ITs
- ITs quite hard to get due to being more inside
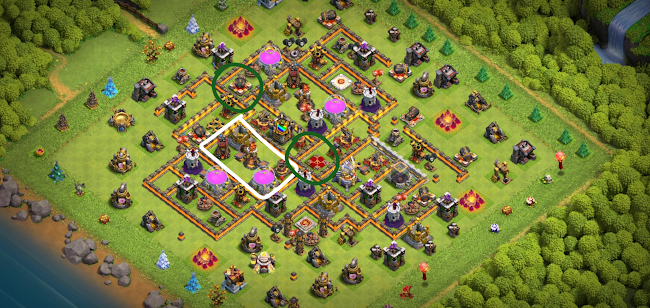
There's however a good list of weak points, which we will see below.
- Weak to a QC into the white area, which will require a bit of skills and a good amount of rages, but will end up getting immense value, including EA. That same QC was trapped better with more SAMs after the FCs
- Susceptible to double jump (dark green, starting from 10:30), and due to having storages inside bowlers can get a good amount of bowler bounce
- A portion of TF will likely be killed by BK used to funnel
- Electrone value is great anywhere, since the base is quite compact
- Springs needs to be adjusted as Miners AI is a bit different (more about springs below in the Live BB)
Conclusion: great base v Miners and Hybrid, especially after tweaking it due to FCs; relatively weak to other strategies.
QC Miners/Hybrid will for sure be used a lot, the base needs to defend it, however in this case I've overcommitted it, making the base weaker to other strategies which good attackers can exploit.
Live BB
Premise: This is by no means a perfect base. I want to showcase a real Live BB, where not everything goes right the first time around, and where some tweaking is needed after I do proper testing.
The base I'd use in actual wars would have some tweaks, which I suggested below in the self-review below the Live BB and which will be implemented after FCs depending if and how they actually need to be implemented.
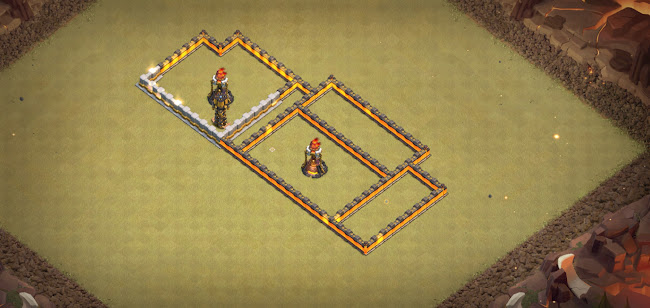
This is my starting concept - I usually build the wall layout first, centered around some key compartments (EA/ITs) and expand from there. This gives a good idea of value spread and accessibility.
This BB style allows one to quickly see if value spread is enough, if there's QQ/Jump value and if the base is weaker to a QC in a certain zone; however if you're not experienced with BB you may end up with strange compartments, so I'd recommend this method only if you aren't a beginner.

I place down EA and expand with some compartments. Note that EA and IT are accessible from the same compartment near the core (the 3x7 one), so I cover it with a moat. Also, the dead zone I used near the right IT isn't needed (more often than not I don't use it, I usually place buildings instead to benefit more from IT splash damage) but I wanted to test it out - in a BB you have to be creative in some way to surprise the attacker.

More compartments. The deadzone on EA is purely for pathing, EA+left IT are still reachable from the same compartment (whereas right IT isn't).
The base is looking a bit like a rectangle, which is ideal for spam attacks such as Miners, Hybrid, Pekka smash - I have to make sure they aren't viable here.
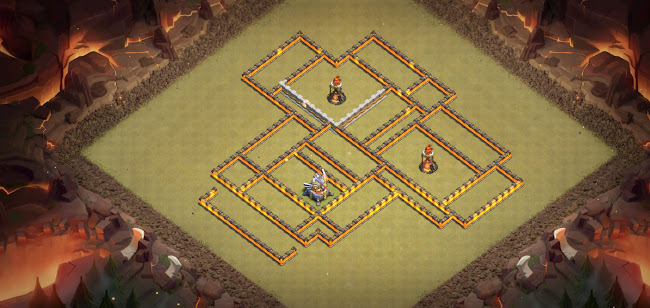
I realize I have too many walls left, so I try to separate the ITs a little more. By doing so, ITs are still relatively protected while keeping a certain distance between them, meaning you can't get two of them from the same compartment.

I start to place defences in my core.
I actually forgot I also need to place my CC due to focusing too much on XBows - sometimes I'm not the brightest.
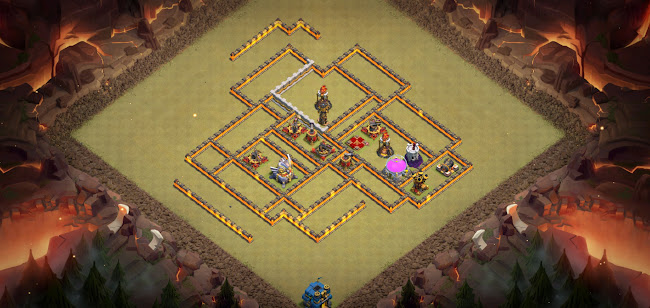
I go back to the previous IT setup, as the other one doesn't protect ITs as much as I wanted to - left IT was too easy to access from the outside. Tesla on left IT is meant for diagonal springs, which I will put later - I may opt for AS instead of Tesla just to have a bigger TF if needed.
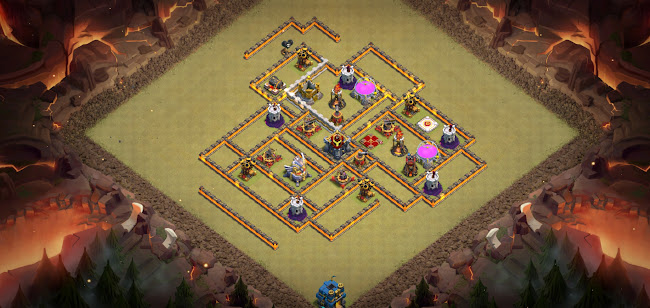
I place down the key defences, in this case I want to have ADs at the common possible blimp points, WTs close to ITs (effective against Miners) but also not in range of ADs (effective against LaLo).
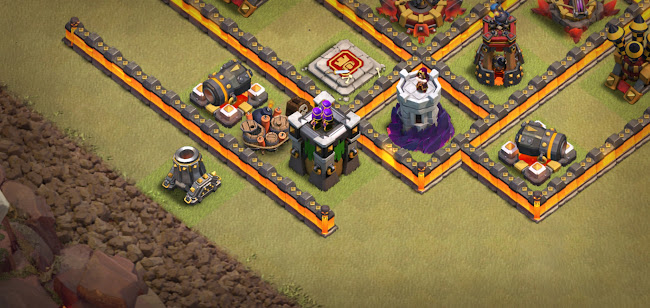
The BT+WT area requires a Heal, so here I tried to either force it earlier or kill a few miners: BK+Skelly (DPS) & WT+GB (splash) is a great combination.
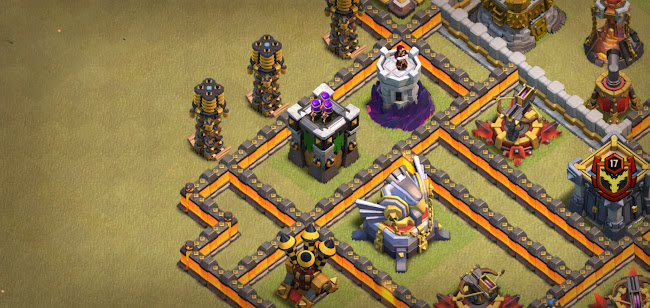
EA position was switched with XBow to narrow the possible entry points; TF can effectively slow the QC to get EA.
The little L compartment between AT and AD makes EA unwalkable, to get it the attacker either has to go through TF or XBow+BK+some DPS.

Every defence is down, I now place down the traps. Notice how I have the AS near left IT for diagonal springs, and not the Tesla anymore.
Tesla at 1 is meant for pathing reasons, mainly for Hogs and Loons, but it could be moved in case I need a better GB setup elsewhere.

I finished my traps, however I'm not convinced about some of them and I'll likely need to fix them after some FCs.
In particular:
-3 SBs at 5 (AT/Mortar) are meant to kill few Miners; I placed them there because it's one of the non heal zone left in the whole base (alternative is around 11);
-GB onto left IT is quite close to the heal zone due to GB on WT there.
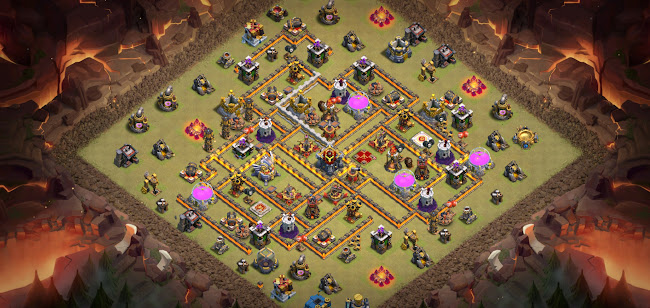
Here’s the finished base, now let's cover below a bit of my thought process while making the base.

Here you can see how I tried to separate Miners (black arrow representing Miners pathing) and Hogs, in case they try to do QC Hybrid instead of QC Miners.
The Gold Storage (yellow) will make miners go to it, then target Skelly/IT/WT; Hogs will instead go to the next closest defence, thus separating from Miners.
For more information, see Chapter 4 point 2 - Hog Miner splits
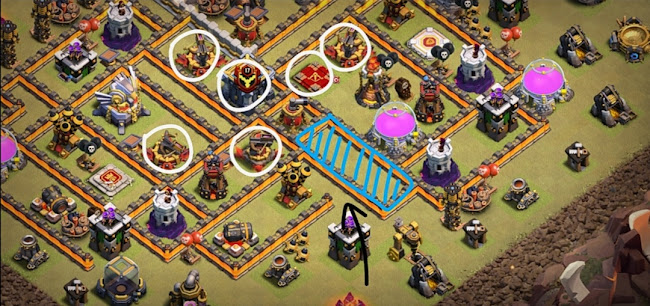
Here I left a gap (black arrow). A QC there is unlikely due to all the DPS I have (white) - either the attacker comes from there, and gets his AQ killed, or he decides to come from another angle (likely from 2:30 - we'll see it in detail in the next pic). Either way, it's a win-win for me.
The blue zone generally has buildings inside to benefit from IT splash range, however here I decided to leave it empty (=make it a deadzone) to make a charge from 2:30 more likely. I also placed two walls between the deadzone and the AS, as otherwise they could've WB in and taken both IT+EA from the same compartment.
Also notice how the Deadzone is actually two tiles wide - that's because I may place teslas there, or the attacker may think there are some - either way, just more problems for the attackers and more possible solutions for me after FCs (although more walls used).

As you can see, I have baited a QC here: I have IT, 2 WTs, BT, AQ, CC all reachable from the IT compartment. I have 3 SAMs (white) to try to kill healers. Notice how my outer SAM can't be reached with a Koko Loon, as the Loon would go to the cannon and get killed by the AT before triggering the SAM.
Additionally, AD and Skelly (yellow) can help distract and kill more healers.
AS (blue) will also blow Healers away (as well as any potential blimp). A Blimp from around 1 is possible, but given the value at 2:30 one would likely blimp there and not at 1.

Here you can see my thought process for Springs (yellow). Miners will either come from the opposite side of EA, circle around the dead zone and get to this area, or be deployed from the big white arrow. Second option is in my opinion better for the attacker, as it takes EA down earlier.
Miners (and Hogs too, if they do use Hybrid) will come there and then split following the smaller white arrows - as you can see, springs take Miner AI into consideration and aren't in the middle tile, like many guides recommend (and note that the middle tiles is generally good, but not necessarily against Miners), but rather in the most effective tile against miners.
Notice in the above image, the EA area can be vulnerable to SS, for that reason I placed AD+SAM. I may place another SAM after testing.
Note: the spring setup above works only if Hybrid comes from the direction I specified; if it comes from the opposite angle (=from CC to EA) it's clear that the springs should be in the other side of the compartments.
You can however predict the direction: EA will deal damage to Hybrid until it's destroyed, while IT will deal damage only inside its' range, so coming from EA (and possibly using Warden's Tome to counter all that splash+DPS) is the best possible way for the attacker to use Hybrid against this base, assuming he/she did the QC I baited at 2:30.
Live BB - further analysis against META strategies
Here I will discuss a bit about what I can do to improve the base, after I see FCs against it.
QC Miners/QC Hybrid
Already discussed in details during the Live BB.
Pekka Smash, PekkaBoBat
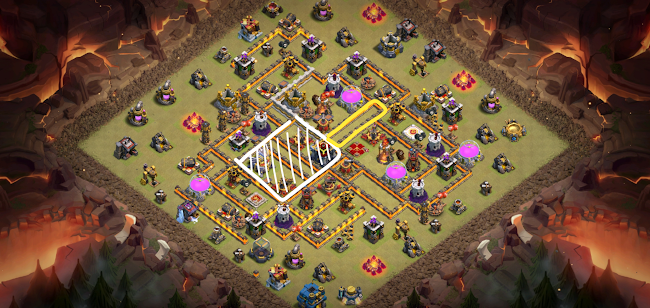
White core can't be fully opened with QQ, furthermore the yellow deadzone between ITs make it hard for low HP troops, such as Bowlers, to effectively survive.
Bats will be examined in the picture below, where I talk about DragBat.
DragBat

White zones are safe: IT zone at 3 has too much splash which cannot be frozen all together, although WTs at 3 can be tanked with IG, meaning you can't use Bats on IT+2 WTs but can use Bats on IT+WT if the other WT is tanked; white WT on the left cannot be tanked with IG (IG pathing shown in black).
Yellow zones are at risk: IT+WT near 12 can be frozen together, whereas WT at 7 is susceptible to IG, which could potentially tank IT.
Either way, every splash defence can either be tanked with IG, be frozen or be frozen while nearby splash is tanked by IG (regarding IT zone at 2); I wouldn't deem this base safe v DragBat but it's not the first strategy that comes to mind in this meta, either way I need to test and probably fix v DragBat.
QC LaLo/Sui LaLo

Sui value is quite good in some points and we can't really stop it, QC is likely to be at 2 and there are already SAMs + XBows to counters as explained before.
All that's left to do is to use a damage CC (if I think Sui is likely), and have traps/pathing against LaLo.

As we can see, pathing in the 6-9 zone of the base is quite bad for the attacker, mainly thanks to the BK zone which lets everything circle around it.

Possible way to improve pathing: I can move Cannon & XBow one tile and I'll have new pathing (red).
Disadvantages: XBow was closer to CC to cover the AQ/IT zone; Cannon was there to make funnel a bit harder.

12-3 pathing: again it goes around non defensive buildings, mainly storages and AQ. There aren't many split points.

I could place a Tesla there and move one tile to the Cannon, that way AD will be left untouched. Moving the XBow near CC as already said will act like another splitting point.
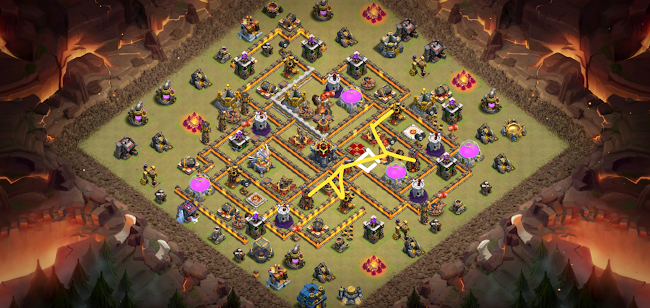
If I add a Tesla in the white square, I'll have another splitting point, however it's unlikely I do this as I expect a QC into that IT zone.

Black is Hounds pathing, it's unlikely all ADs will stay up as I expect a Sui or QC; however I can see I have two red bombs (white) which need to be moved a few tiles away from there.
Electrone

IT zones are very well covered. The most likely entry point for Electrone will be near BK at 7:30 - if needed, I can move there another SAM.
Sources
- The last month I spent solely defending QC Miners/QC Hybrid
- Snip's Twitter below

12: DragBat
-Twofu
Summary
- General Features
- Splash Distribution/Placement
- Live BB
General Features
To defend DragBat, we first need to think about what an attacker usually does. I'd say the phases are:
- Sui Heroes to grab an AD + Funnel
- Dragons down the funnel + Slammer or (occasionally) Blimp
- Backend Bats with Freezes or IG Tank
Knowing this, we can clearly see that we need to prevent the Sui Heroes from getting too much value, and we need to make sure we have enough backend splash to stop the Bats.
We also need to have a solid AD setup that can hold well against Dragons.
Here's what we want to do.
- Make sure none of the WT’s are tankable by IGs
- Use SAMs wisely as that can cut the Dragon phase short
- Have air XBows as we're facing a mostly air hit.
- Use SAMs v Dragons/Slammers/Blimps to help with their larger health pools
- Have SAMs a bit protected v Koko Loons (for Drags)
- Have some WTs covering ADs so Bats don’t get a free AD and let Dragons stay alive
- Use a proper CC, something like Drag + Witch does great against DragBat
- Have coverage on WTs from ITs so attackers need more than one Freeze per section
- Splash covered backend ADs are great if you use a DragBat bait
- Have good Sweeper positions that cover Dragon entries to help screw up Dragons
We will now go in details for each area, explaining pros, cons and giving practical examples.
Splash Distribution/Placement
Splash distribution is huge in defending DragBat: when too much of your splash goes down due to Dragons, Bats won’t have any issues flying through the base.
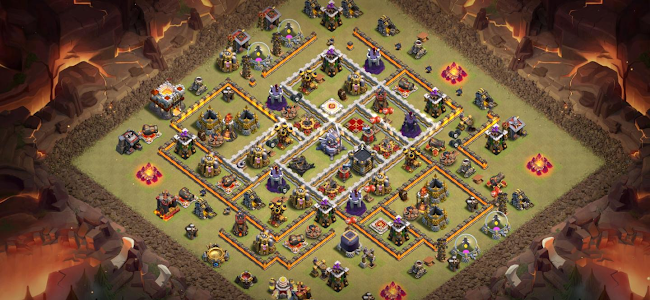
Here’s a base I’ve built in roughly 20 minutes. I’ll be using it for my Live BB later on where I will go more in depth, but for now I’ll simply cover splash distribution and defensive placement.

In general, I’m a fan of using a Pentagon type shape for placing my WTs as there’s no direct weakness to doing so, it’s literally as even as you can get in terms of WT Splash distribution. The red lines show the shape of the WTs placement and how pretty much evenly they are spread throughout the base.
I also like having each of my ITs cover 2 WTs, meaning 4/5 of the WTs will be covered by ITs. This makes it a much higher threat to Bats as attackers will need to make sure the IT is tanked or Frozen, as well as the WT.
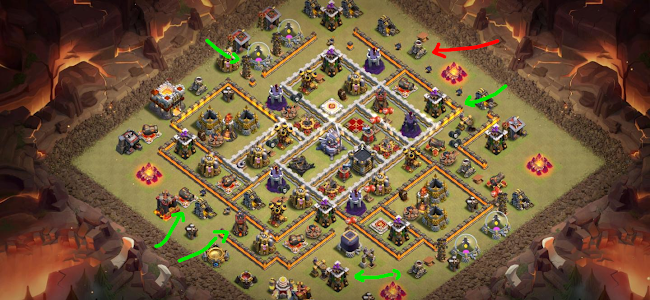
Here we can also see that none of the WTs are directly tankable (shown by the green arrows) and the one seemingly tankable WT on the Mortar is an IG Bait with a spring in the one spot that the WT reaches.
Live Build
This is the interesting part! I generally like to start with key values in some walls (skeleton build style) and move on from there.
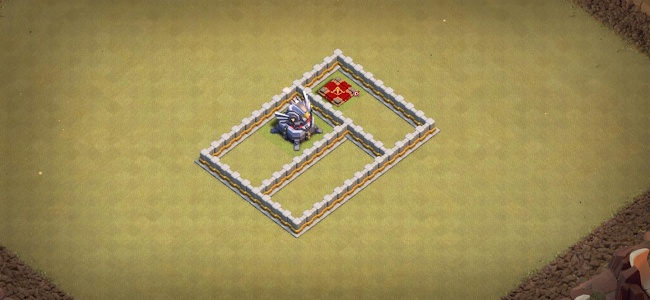
First, I’ll start with my Eagle and Queen. This will be near/around my core.

From there, I expand into some more compartments that flow well together so I can start to gauge the general shape of the base. I don’t like using 9x9 cores as they are very susceptible to ground attacks, like PBB or Pekka Smash, so I made mine 10x10. Also helps with Edrags! :)

From here, I expanded into my first Inferno compartment. I am aware that the Inferno and Eagle are accessible from the same compartment, but considering I’m building this base for DragBat, I wouldn’t worry about this specifically. I wasn’t entirely sure where I was going with this Inferno comp expansion but I went with it to see where it would go, considering I want this live BB to be raw and unfiltered.
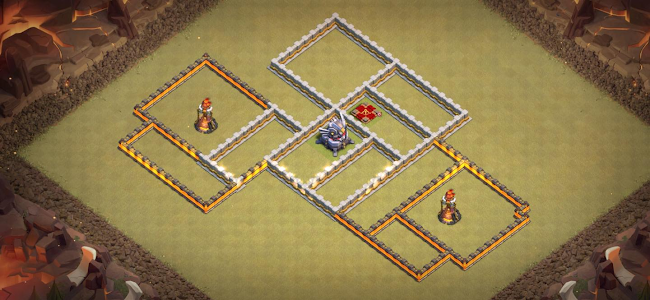
From there, I expanded to my second Inferno area on the other side of the base. I got rid of the little divot in the 3oc corner of this IT comp to let me place a hut there.

I added some moats to help fortify against Sui Heroes a bit better and not let them get the value they want. I also add in some last compartments and fill in the spots where I want my Xbows and Warden to be.

Now I have filled in where I want the ADs to go, as well as started the WT placements. I’ll go more into why I placed these structures here later on.

Here, you can see I thought about it for a minute and decided I didn’t like the long moat, and rather added an extra comp and some walls to mess with Heroes a bit.
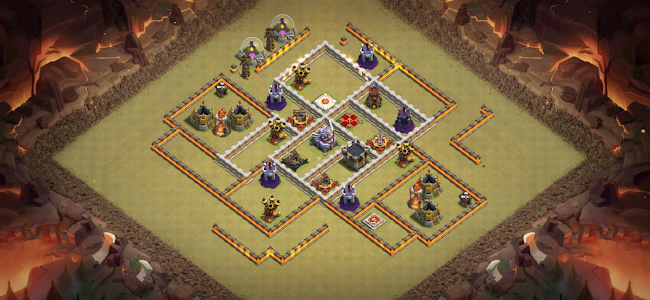
Here, I’ve filled in all my WTs and started adding some Anti Sui concepts to protect my 12oc AD a bit more. I’ve also placed some High HP structures near the Inferno to slow down Dragons.

Now I’m filling in a lot of the other defenses. I try to make sure the outer defenses aren’t too far out so their effectiveness is maximized both in and out of the base, and their range isn’t wasted.
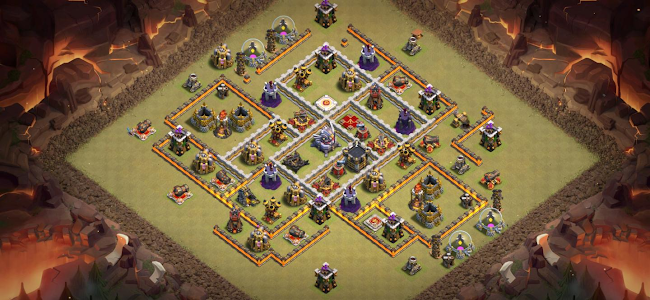
Now I’ve finished placing all my defenses and worked on pathing for a little bit. More into pathing later on.
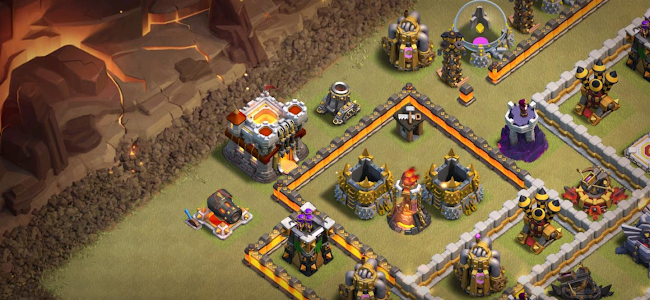
Most people recommend placing your TH early, but I like to place it after my defenses so I can gauge common Siege lineups and how to place my TH to make it easier to trap. Both ways work, it’s really up to the builder.

Now I’ve placed in my trash structures, keeping in mind Bowler bounces and some anti Edrag spots.

Finally, I’ve trapped my base and the build is live! I haven’t tested this yet and this build was built in around 20-30 minutes so don’t expect a godly base but I think it is sufficient enough to defend DragBat style attacks. Let’s go over why some things are where they are now.
Concepts Implemented
- DragBat Bait: I like to use this idea to bait an attacker from starting on one side of the base so I know where to trap.
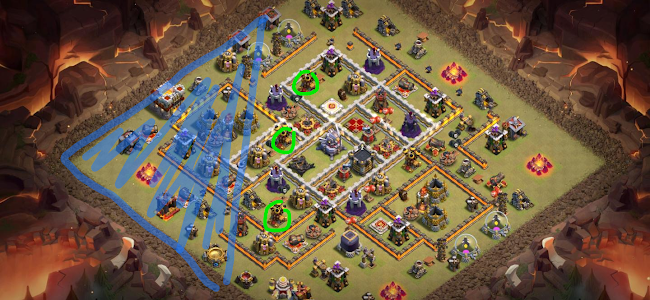
Dragon attackers like to start on the side with more ADs, as backend ADs can ruin a good Dragon attack, so more often than not, any Dragon attack will start in the Blue Highlighted zone because of the 3 stacked ADs on that side of the base. However…
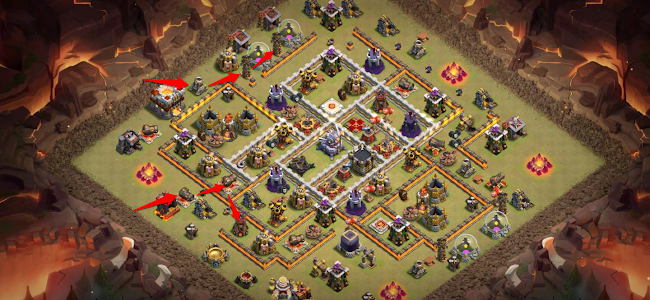
Most Dragon attacks start with some Loons before the Dragons to act as Cocoloons. I’ve used natural defense pathing to manipulate it so that the Loons will veer off to the side and miss many of the SAMs. This effectively means the Dragons will most likely be burnt by the SAMs and won’t have a good time with their phase of the attack. I am aware of the Warden ability, so that’s why I threw in a Tornado trap near the center of the AD formation to stall the Dragons while the Warden goes off, as that’s most likely around the area a Warden ability would pop.
Sweeper Placement
Ideally, I want my Sweeper to cover the common entry points and as many key values as I can.

The Sweeper facing 9oc covers my Queen (a bit), Eagle, Multi, 3 ADs, and the most like Dragon entry point. The Sweeper facing 3oc covers a Multi and the most likely Blimp or backend Slammer spot.
Defending a Backend Slammer
Backend Slammers are so strong as they can accomplish multiple tasks at the same time. They can take out key defenses while providing tanking for the Bat phase of the attack.

I’ve made pathing a little wonky for Slammers. The blue arrow indicates where someone would potentially drop a Slammer to try to snipe the Inferno. I’ve made it so the pathing goes around the Inferno for a bit so it’s much more difficult to grab the Inferno. Most likely, the attacker will drop their Slammer on near the top red arrows to avoid the Mortar, as this will provide tanking to the Bats since that is the backend and that’s where Bats usually come in more often. The Slammer will follow a few ground defenses until it gets slapped in the face by two SAMs and an AD smacking it. This will pretty much for sure take out the Slammer before it destroys anything too valuable itself. Anything inside the Slammer will not path to the Inferno but up and away.

If someone tries to do a weird Blimp with a DragBat (Electrone DragBat) to take out the section marked in blue, they can expect to be hit with two SAMs that aren’t accessible to Koko Loons.
13: PekkaBoBat/Pekka Smash
-Just Fall
Alright so what are the key things to look at when trying to defend against a spam based attack? Easiest way to defend these types of strategies have to do with the basic layout of your base or the “skeleton” of your build. Let’s see why.
Key points to defend spam
- Values cannot be easily accessed with a double jump or quad quake
- Utilization of dead zones to separate values
- Utilization of a channel to separate values (not required to defend spam)
- Good splash spread
- Awkward funneling
- SAMs in main path to take out Healers
So I’ve put together a live build for you guys to get a better grasp of this concept.
Step 1: Inspiration

Some of you may recognize this compartment. I actually took this from Lethal’s live build he had made a few months ago and thought I’d also use it. Few things to take into account is that it is easily suiable. Generally there isn’t going to be a lot of DPS on the outside walls of this compartment. This compartment is great though for unpredictable pathing and stalling troops though. Also is a great compartment to force hog/miner splits.
Step 2: Adding in other main values
The first value I wanted to add in is my eagle. My main goal with this was to spread it out far away from the inferno, and make for a very awkward jump spell if someone where to attempt a smash attach along this line.

Next I decided to add in my second inferno and make some moats, but I realized there were some major problems with the skeleton I had created.
- I have compartments (marked in red) that could give off too much value, or lead directly into the core of the base.
- Great jump value in areas marked with green that would end up being a problem and would make pekka smash very easy.
After taking these into consideration I decided to redesign the inferno compartment at 6 and change the moats around the base. During the redesign I also wanted to add in a channel to separate my values further.
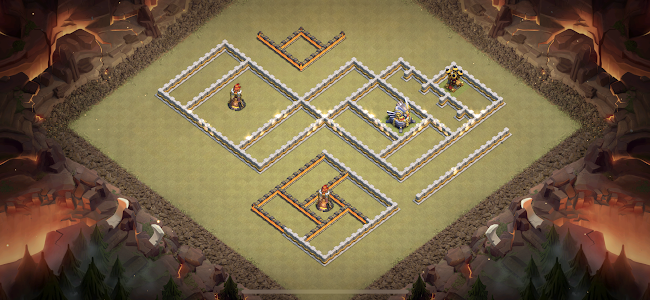
Now in this picture above you can see that all of my values are very well spread out and aren’t easily accessible from one to the other. I was also playing around the moat at 12 and ended up changing it again until I like a design. My main goal with the 5x5 was to place my geared archer tower there with a Tesla farm so that it can power through a king or siege barracks funnel.
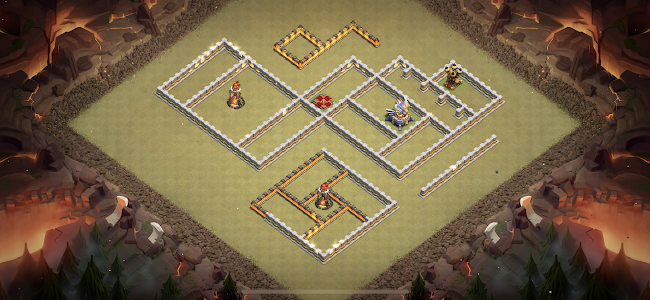
Next important value to place was my queen. She needed to be in a place where she wouldn’t be suiable, but also not easy to get good value from a charge.
Step 3: Adding in secondary values

Xbows and ADs I find to be some of the next important things to implement into your base. Your main goal with your xbows will be that no matter from which way an attacking queen enters into your base to at least have 2 unreachable xbows on her. For example, in these compartments below these bows are in great defensive positions.
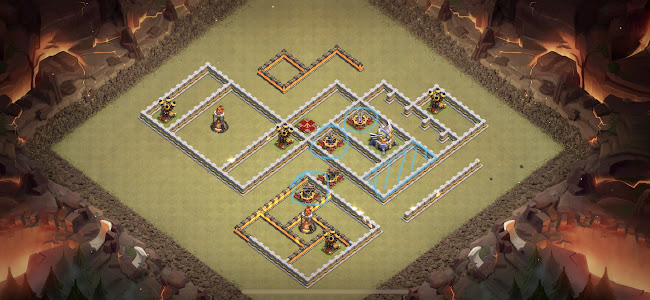


Adding this concept along with your heroes, and an overlapping cc is devastating to a QC and will greatly improve your bases. In the current meta running 1-2 ground bows is perfectly okay considering how strong hybrid is at TH11. Main weakness is that your base is therefore weaker to air attacks.
ADs also play a very important role, knowing how to position these properly so that they are effective is extremely important.
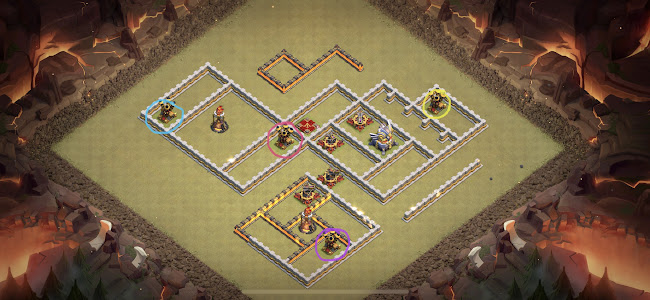
Each AD in the picture plays a role. Some more important than others.
Yellow: The AD marked in yellow plays the role of sniping healers if someone tried to enter into the moat to take out the eagle since it is unreachable from inside of the moat. Having unreachable ADs to snipe healers is very effective at defending a QC. The same concept can be applied to defending a Spam attack, but normally you’ll then separate the AD from the main push with a deadzone, so pekkas don’t path towards it.
Purple: the Purple AD mainly provides air coverage of the 6 o’clock area since that type of inferno comp is weak to edrags. But is also protects the channel from a charge since its unreachable from inside the channel. It’s also a great excuse to place a SAMs in that area since that compartment is also weak to a Stone Slammer.
Blue: The blue ADs main job is for air coverage along the 8-10 side of the base since the base is spread out you’ll also need to spread out your air coverage well to protect your trash ring from easy baby dragon funnels.
Magenta: This AD probably has probably the most important job for 3 reasons.
- It will help defend against dragons since it is cored and is surrounded by other high HP buildings allowing it to shoot down dragons for longer.
- Is an excuse to place a SAM to defend against dragons or take out healers in a Spam attack.
- Makes any sort of lalo pathing extremely awkward. Also allows for easy RAB locations at 12 and in between ADs since hound pathing is different than normal between each AD.
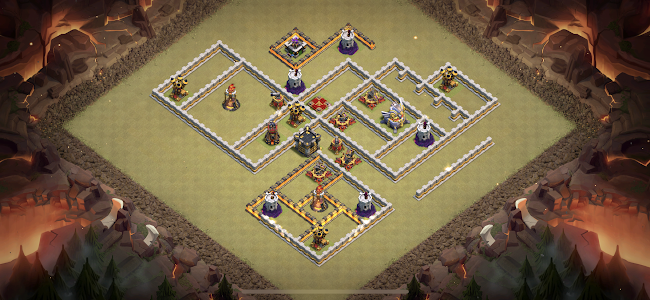
Next thing I wanted to add in was my clan castle, wizard towers, sweepers, and bomb towers. I adjusted my AD at 6 so that I can have my wizard towers not covering the AD since I want the wizard towers to hit loons instead of hounds. Looking at the base so far I figured the best QC lalo entry would be from 1:30 with a wall break directly into the queen alter compartment.
I also placed a bomb tower in the core to protect the queen from skellies in a Sui lalo because that’s the AD that’s in her range meaning she will be standing and shooting at a hound there for longer allowing an attacker to place a skelly spell easily.
When placing your CC you have 2 main options depending on the CC you would like to run. If you run a tank CC (hound or golem) you’ll want to make sure you stack a lot of DPS into an enemy queen to stall her and force the use of additional spells. When using a damage CC you’re looking to offset your CC from your eagle generally and then forcing them to either pull the CC with other troops or just leave it alone and have the troops inside deal with the second phase of the attack. Both work very well in the meta. In this case my goal was to run a tank CC. I tried to place it in a position to layer over with my xbows putting the queen under heavy fire.
When placing sweepers this early I normally just face them towards my infernos but try and get a good idea of their placements. Normally I adjust their direction they face later on.
Step 4: Place final values
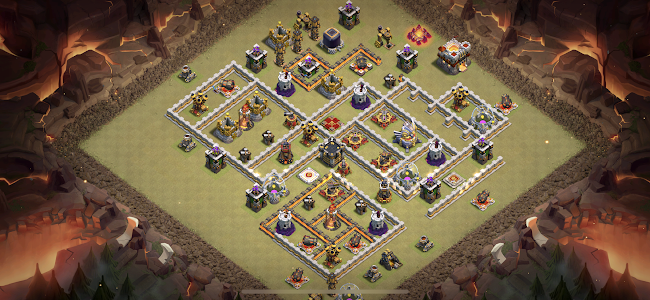
During this step is normally where I decide to make any additional tweaks to the build. I had moved the xbow from inside the channel to next to the eagle to add more DPS in the 3 o’clock area, because 6 o’clock would most likely not be a charge entry, and because there wasn’t enough to force early spells over at 3.
Also moved my sweeper facing 6 a tile so it’s unreachable from the queen alter compartment.
I had also added in the town hall. My main goal was to have the eagle on the backend to defend against KS based attacks, and cause havoc on spam attacks allowing the eagle to shoot down on troops for longer.
Step 5: Trash ring

The trash ring is what makes a good build into a great build. Having a good trash ring can cause an attacker to invest more troops into their funnel to ensure their main push goes where they want. Keys to a perfect trash ring:
- No trash around your base can be bowler bounced and create an easy funnel.
- There isn’t any free trash around your base. Meaning all areas of your build are protected by some sort of air targeting defense. Also be careful though in areas where you only have an AD because you’ll also need ground defense in that area.
- Limiting edrag chains to the best of your ability. 1-3 buildings being chainable is okay, but you don’t want the chains to run perpendicular to your base and affect defenses inside. Instead try and force the chains to run parallel to your base.
- Utilization of army camps and storages. Army camps are to be in double layer trash ALWAYS! Place them at likely entry points because it makes pathing between defenses less predictable. Then in areas where an entry point is most likely storages also work well you pull troops away from where an attacker would like to enter if not funneled properly.
- Try to also pay attention to areas that are too easily funneled. Mainly have these issues in single layer trash.
Step 6: Traps and final adjustments
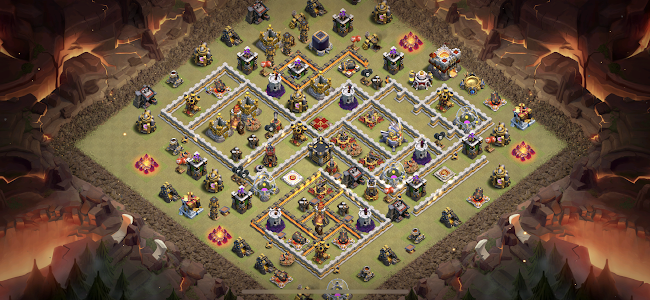
The final adjustments I had made was swap the placement of a Tesla to make the wizard tower at 7 not tankable with an ice golem. I had also moved the sweeper positioning facing 9 to face 12 to better defend against a Sui lalo. Considering this I also had to be sure to defend against an electrone so I placed SAMs and my tornado there to help defend this. I also made sure my AD in the core is not chainable or easily pathed too.
Generally when I make a new base I try and spread out my traps along the general path of what I feel are the most likely ways my base could be hit. And then later adjust them through testing to find the most effective placements for all of my traps.
Step 7: Testing
This stage is also a very important part of building bases once you get the general fundamentals down. Try attacking your base from many different angles with many different strategies and rework your traps accordingly.
Here is the finished product of the live build.
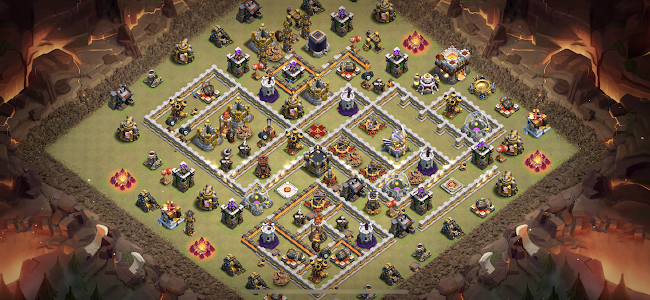
I hope you found this to be helpful to you, and I wish you the best of luck on your building journey!
-Just Fall
14: QC/Sui/Electrone LaLo
-Just..Fall
Summary
- Variations of LaLo
- Live build
Lalo Variations
Lalo is universally a very strong attack at all town halls and is very tough to defend. There are 3 types of lalo that you will usually see at th11. These are:
- QC Lalo:
- This is when an attacker aims to use their queen with healers, rages, and wbs and/or a jump to take out a portion of the base. They aim to take out important defenses and give their lalo good pathing on the back end. This type of lalo can be seen in almost every war
- Sui Lalo:
- This type of lalo is when an attacker will use just their heroes (maybe with an ice golem) to take out a small portion of the base with their heroes and then come in on the backside with a huge lalo portion. This type of lalo is seen a lot in very competitive clans
- Electrone Lalo:
- Electrone lalo is when an attacker will send a blimp or slammer into a base and then rage and clone either the balloons or the edrag that comes out of the siege. They are aiming to take out the queen if it's not suiable as well as cc and any high value air targeting defenses that they can, namely the eagle, multi infernos, air defenses, and wizard towers. Single infernos generally are not a concern in lalo hits.
- Yolotrone Lalo:
- Very similar to the electrone lalo, but you use your heroes to clear trash and defenses to allow an electro dragon KS into the base. Usually attackers bring 1-2 extra edrags, along with one in an Stone slammer or Battle blimp. Most of the time a clone is also used.
Live build:
Before getting into the build I want to remind you this base was specifically made to show you how to defend against different variations of lalo. Looking to defend other strategies was not the main priority of this build.
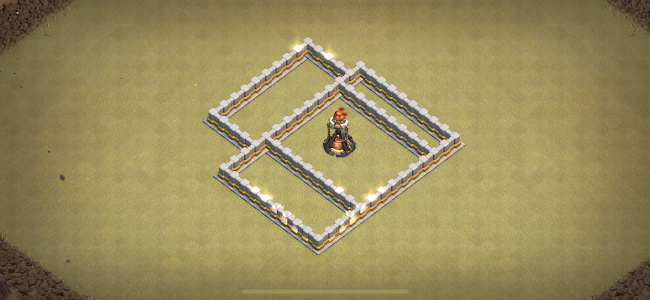
So first things first I wanted to start off with a very generic and basic compartment which is very easy to incorporate into any build. It sets good pathing around the inferno which is very important for defending a lalo attack.
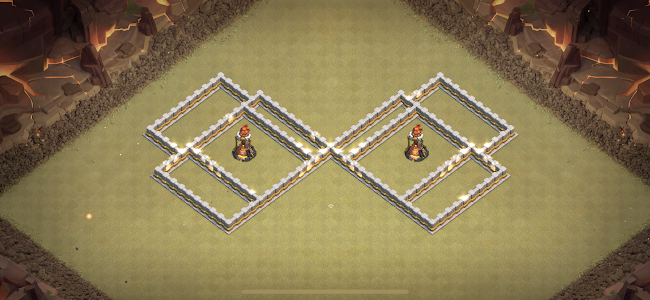
I then decided to mirror that compartment and start the process of creating a symmetrical channel build.

I then decided to add in the 9x9 and a moat. Inside of the 9x9 I wanted an AD on the 12 o’clock side of the compartment so that an attacker who charges into the infernos could possibly have healers shot down by the AD since it is unreachable in either compartment.

Next I wanted to add in my eagle. I wanted it far enough away from the infernos so that it would be difficult to get a lot of value out of a charge.
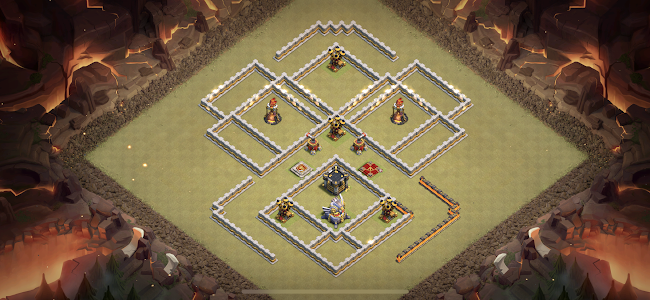
When it comes to symmetrical builds I prefer to offset my queen and king instead of having them in line with everything else and having the base be perfectly symmetrical. While those bases can work it is 10x easier to trap a base when you know the more likely side an attacker will come in from to get your queen. In this photo you can see I placed sweepers very centralized to the base, and both are not accessible from the same inferno compartment. This is very important. What this allows me to do is better predict lalo pathing from an attackers perspective. If the attacker charges into the 2 o’clock inferno with a double wall break or jump, they will not be able to reach my sweeper at 10. Making the optimal lalo pathing coming in towards the eagle first and then ending with an backend inferno. Another important thing to look at is my AD placements. An easy way to defend lalo is to have a Y like shape or a very small area of where your ADs are. Gives you a lot more freedom with where you can place your RABs.
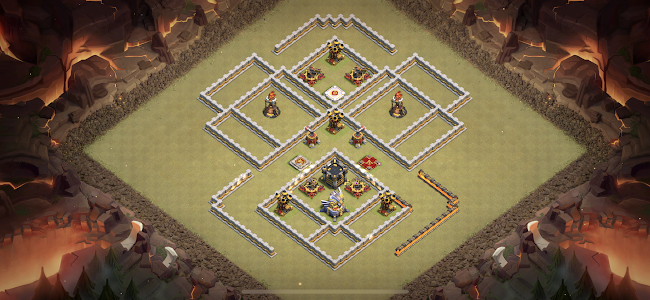
Next buildings placed in were the xbows. Definitely one of the most important buildings when it comes to defending against a charge. There are 2 main ways to defend against a QC Lalo. Either you defend the charge really well and the attacker can’t obtain enough value, or you make sure to have great pathing around backend defenses. I say defenses as a whole because trying to set yourself up to have good pathing around ADs and wizard towers, along with infernos is important. Ideally you want at least 2 xbows and another point defense constantly applying pressure onto your queen. If you can then layer things like a hound cc, or your king over with this DPS it will make a charge extremely difficult.

Another important thing to take into account is your wizard towers. Your backend wizard towers must be 3 things to successfully defend lalo. They must not be directly targetable with loons or a slammer. They must not be covering over an AD. Wizard towers are much more effective at hitting loons than hitting hounds and pups. And you’ll also want to make sure pathing to wizard towers is still difficult and unpredictable. Meaning instead of the wizard tower being the first or second defense targeted, try and make it the 3rd or 4th defense targeted. This gives the WT more time to hit the loons. Moreover, if possible you also want to defend Bats.
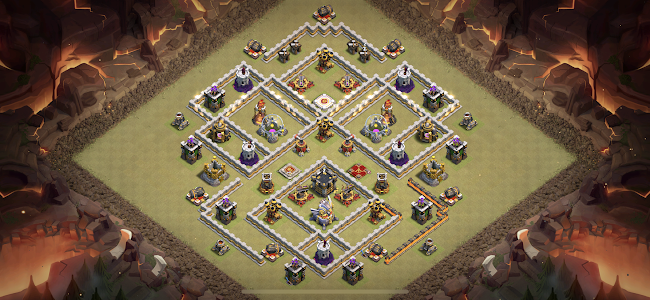
In this next step I place other defenses such as bomb towers, archer towers, cannons, mortars, etc. while only the archer tower can shoot loons all of these buildings play an important role in loon pathing. Take note how none of my wizard towers are directly targetable. And the 9-3 wizard towers have absolutely horrendous pathing towards them. Also notice how the inferno towers also have very difficult pathing towards them.
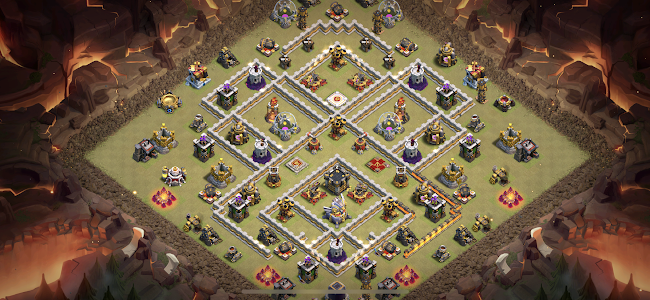
Now I finish up the trash layer and add in Tesla’s to help me place traps such as SAMs in the next step much easier. Make sure your trash ring isnt allowing too many chains and isn’t giving off free buildings and defenses.
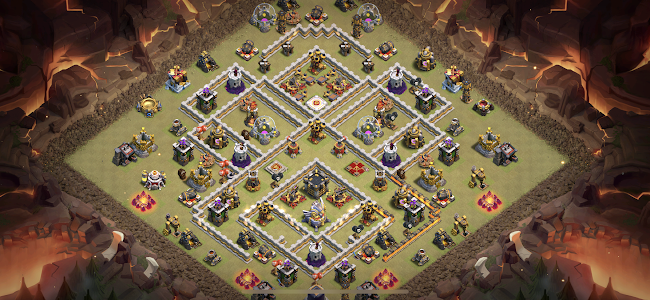
Here is the fully completed base. On this base in particular an attacker would come in towards the 2:30 inferno and then lalo from 4 clockwise around the base. Here’s why they wouldn’t come from anywhere else. In terms of value the main things you want to get as an attacker is at least one sweeper, Queen, Clan castle, and a main value (inferno, eagle, etc.). Other things like wizard towers also play a factor but aren’t as important. In this case there is a lot of splash value at 2:30. And there isn’t a whole lot of DPS in that area so a charge should be relatively easy. Here I decided to place 2 SAMs to help take out healers. Made sure the SAMs would not be easily tankable with a koko loon if an attacker wasn’t patient with making sure it went to the correct spot. I also have all RABs along the 6-10 side of the base since that would be the optimal lalo pathing because it’s not leading into a sweeper.
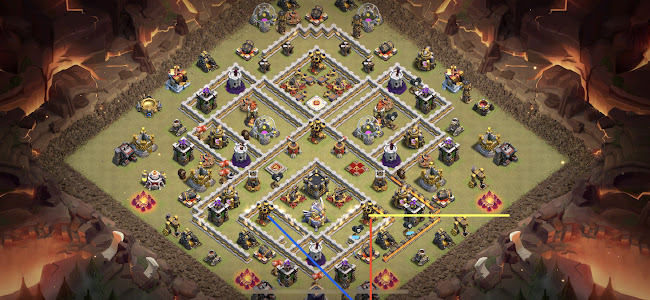
When it comes to placing SAMs correctly you want to be sure to give them multiple uses. For example the yellow path would be the most like hound pathing for the first hour deployed during a QC lalo. It flies directly over the first SAM and then triggers the second SAM instantly killing the hound leaving an attackers loons vulnerable to the AD. The blue then is the second hound optimal placement since it flies directly over a wizard tower. Because the first hound though was destroyed so quickly some attackers may deploy the second hound before the AD at 4 goes down. Meaning the red path would then be the second hound placement. For newer builders, especially those who do not understand how to lalo, this will be a tough thing to get down to a science.
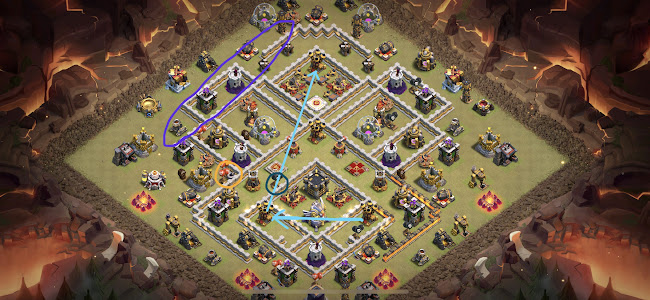
This next portion is an advanced way of placing your RABs. So because the first hound died instantly on the AD at 4 you now have a fresh and healthy hound headed towards the AD at 7. I do NOT want this hound to pop here. If the hound pops then it will activate the RABs and tornado nearby therefore rendering them useless. Instead as the hound travels towards the final AD at 12 I want the hound to then instantly die away from my traps. Preferably near the inferno and xbows so they can clean up the pups. Another thing to pay attention to is where to force the Grand warden ability. Right now the ability is going to have to be used once the loons reach the tornado or else they will all die. Through testing you’ll probably learn that you don’t need the RABs with the tornado to force an ability, and can then move the RABs to a more effective location. In this case it would be inside of the purple oval at 10-11.
When it comes to an electrone on this base using a blimp would be impractical since the queen is so deep into the base. Instead the most likely place to electrone would be from 4. Here you can see the same SAM (which now has multiple uses) to help take out the SS faster. It is also not an easily tankable SAM to a koko loon. It is also important to make sure the AD nearby also isn’t chainable or easily pathed to with the loons. In this case I’m sure the SS would be dropping almost directly on top of the AD and trying to path loons around it would be next to impossible. A Skeleton trap or a small Cc can also help defend against an electrone.
I hope this live build gave you a bit more insight on how to defend lalo. Good luck with your builds!
-Just..Fall
Part 3: Getting Creative
Thinking outside the box and playing mind games with the attacker
So, you’ve learned everything to do with by-the-book base building. But it doesn’t stop there. Now is the time to think outside the box, to consider how exactly your opponents will carry through with hits based on the provided information and do everything in your power to make that hit go awry. This part of the guide will be looser than the previous ones simply because there is no set “thing to do” when messing with your opponent. It’s up to you, mostly, to look at your base and decide what you can change to make it troll the attacker in the most unpredictable ways. However, we can throw out some inspiration that may be applicable to your base building.
Inspiration #1: The troll Wall Breaker comp (adapted from BznTT)
With the advent of super wallbreakers, defending queencharges has become a lot more difficult. Not only can attackers wallbreak into places originally considered too risky to execute, but the new Wall Breakers can break wider and deeper than the normal ones, all while weathering heavy splash. While it is near impossible to stop a super wallbreak in its tracks, you can, however, mess with its pathing. By putting a tesla in a deadzone adjacent to a likely queencharge, you can surprise your attacker by having the wallbreaker path to the tesla rather than the intended comp. As attackers don’t bring extra super wallbreakers due to their heavy troop space and reliability, this can seriously hurt an attack.
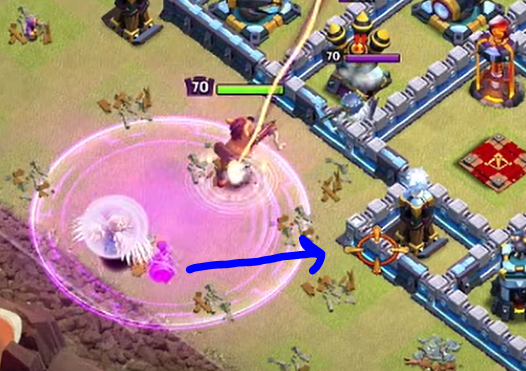
You can also use normal 5x5 compartments, or even pair 5x5’s with teslas like this:

Note that if an attacker walks the air defense compartment so that the wallbreaker will target the correct wall, the troll tesla pops up and ruins the wallbreak.
Inspiration #2: Air defense corner moat
This is a relatively simple thing but it can be hell for a queenwalk/charge. Simply add a moat that covers a corner ad, so if they try to start a queenwalk or queencharge, they have to somehow avoid the ad picking off their healers.
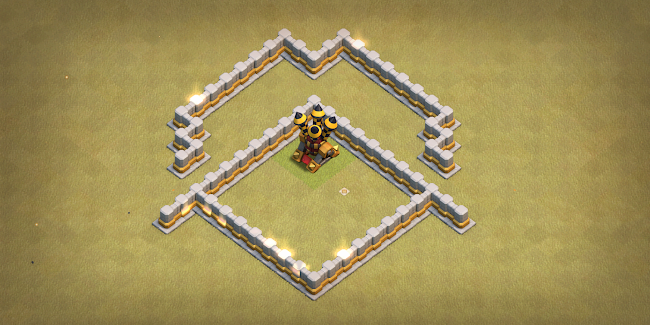
If you are feeling particularly evil, you can also double this up with an inferno tower to make it doubly hard to deal with.

Take this comp as an example. How would an attacker go about walking/charging this area? If they attempt to walk the outside of the moat, the air defense can snipe their healers. If they try to walk into the moat, the multi target inferno can likewise fry their healers. And lastly, if they try charging the compartments adjacent to the inferno compartment to deal with the inferno, the air defense remains unreachable and takes out their healers. You can modify this to ensure that the wallbreaker doesn’t open up the inferno compartment as well if you're worried. A super wallbreaker now has an explosion radius that will not open a wall 3 tiles deep.
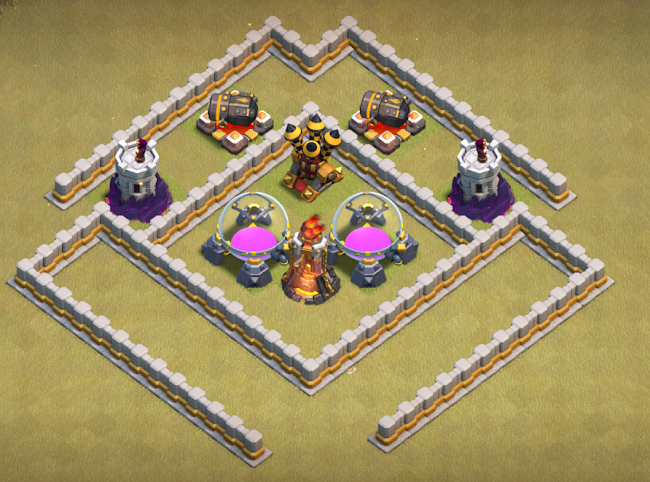
Inspiration #3: Mortar farm (Credit to Liam):
The mortar farm is the most OP thing you can do at th11. This is due to the fact that mortars are the strongest defense at th11. If you group all 4 of them into an unwalkable farm, the attacker cannot easily take them out and consequently gets shredded in any sort of ground hit.
Yes, if you’re actually considering this, we suggest you take a break from reading the guide and go to sleep.
Base examples
Marco
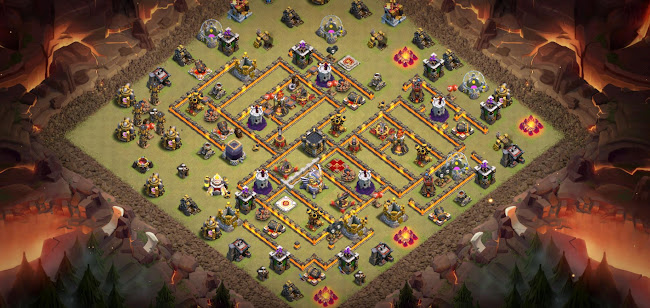
Frames to bait springs, SAMs at 4 aren't actually that good v Blimp if it has Loons, as they will go into IT anyways due to pathing.
You can see how basically the Deadzones make everything circle around, however the open moats should be closed to reduce SB/BK value.
First used around April, defended 2 Hybrid and was 3* with Sui LaLo.
Also click on this to see my CWL bases.
Fall

Zexla

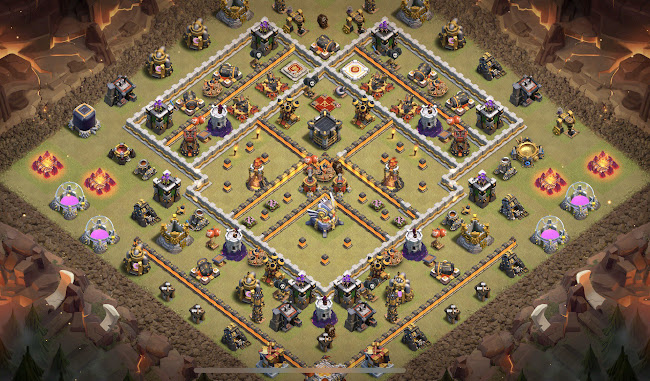
Hota
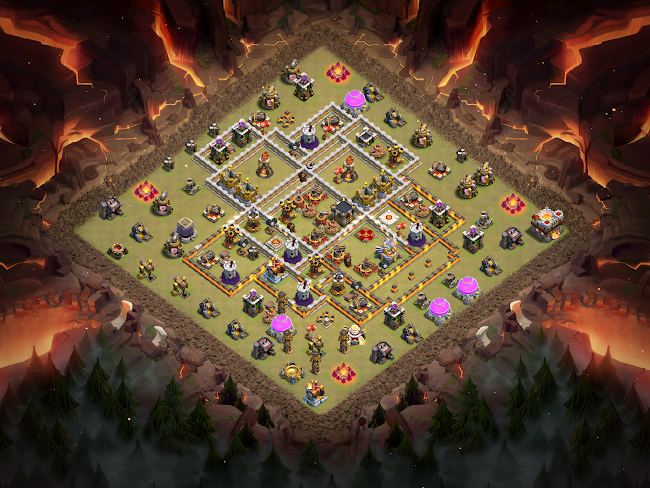
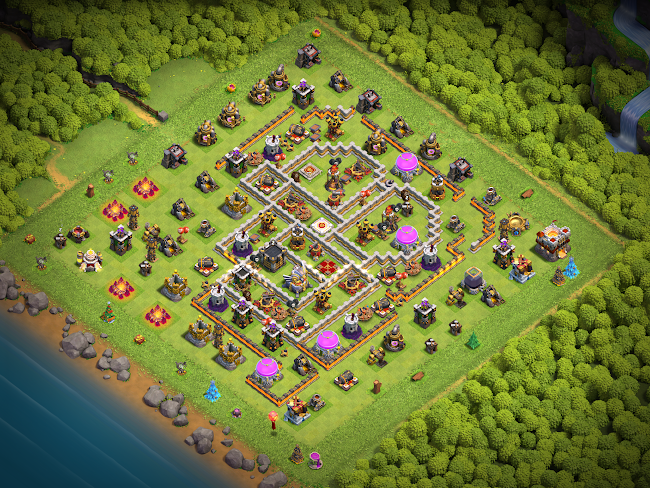
Checklist
-Adapted from DressieGFX
Here’s a general checklist to follow when you build your base. Keep in mind some of these rules can be broken depending on what you are trying to defend more.
- Value spread: Eagle and ITs away from each other, not walkable from the same comp unless said comp is heavily covered
- Queen: not too close to Eagle, grants blimp value; not too close to outside and/or multiple ads, grants Sui value
- Compartments: no direct pathing to the core, compartments leading around the base and not inside
- Base shape: L/square shapes are bad against miners (easy to funnel one part out and make a rectangle)
- AD spread: no square/rectangle/diamond (square shape isn’t bad, but makes a base easier to Lalo, and more difficult to place traps accordingly)
- Splash Distribution: WT not in a direct line to TH, spread around base (pentagon is a good setup); BTs not too close to WTs and to each other; ITs should be in range of WTs - overlapping splash
- XBows: no easily walkable XBows (if an XBow is going to be walkable, use SAMs or a moat protecting it so that pathing to grab it is awkward); having them close to Queen and Eagle helps v QC
- Springs: in between defenses (if solely v Miners, even between other buildings), possibly not outside to limit QW/SB value; IG bait; diagonal springs > normal ones; middle tile against Hogs if diagonal isn't available; outer tile better for Miners; requires testing especially v Miners
- RABs: not in Hound pathing, near splash damage or TF
- Warden should be near the AQ/CC (buffs HP)
- BT near AQ v Skelly Spell
- SAMs v Blimp, SS & Healers, not Koko-able
- GB: no DGB, they don’t work anymore; outside of obvious heal zones; between defenses; one usually in TF
- SBs v WBs or 3 SBs as an additional GB (almost same damage output, great in Hybrid meta)
- Tornado Trap: inside the base, preferably 2nd layer, in range of IT, but not too close so the troops won’t shoot the IT; not next to ADs
- Skeleton Trap: air near Queen: anti Edrag; ground near IT: distract Miners; air away from ADs, they shouldn’t been taken by the pups
- Rings: pathing should go around IT, Eagle so that they remain alive longer and deal more damage; possibly use storages/deadzones/BK to have troops circle around. Near Eagle this works really well too, deadzone near EA will usually leave EA as the last defence standing. Around the outside you usually prefer storages since they can tank entry points too.
- Bowler bounce: you don’t want bounceable defenses/ trash buildings on the outside. That way Bowlers have a lot of value: the building on the 2nd layer should have more HP than the one in front.
- Loon Trade: you don’t want Loontradable defenses on the outside.
- Trash on the outside shouldn’t be easily funnelable: make sure no minions can make a cheap funnel and possibly BBD. Make it hard for attackers to funnel
- Chains v EDrags: don’t have a lot of easily chainable defences, especially near AQ/EA/IT zones
- ITs: make ITs hard to take for troops, let them be there as long as possible without taking them out: then they’ll attack the troops longer, storages help v Miners (stalling).
Links
Lethal TH11 Guide: click here

Note: Lethal's Guide was made before Hybrid became popular, and the showcased base can't properly defend Hybrid if the QC gets enough value. In the picture above, you can see a likely QC with jump from 10:30, followed by Hybrid from 2.
However, the thought process behind his Live BB is well detailed and we thought it would be a great addition regardless.
BaseBuilding Server: Discord server, click here
Slapshot Stewie Live BB: link here
Final Words
Big thanks to all the people who have inspired us to write this guide! We have learnt a lot from the community, and it's now time for us to give something back :)
Our guide talks about general Th11BB and heavily focuses on defending meta attacks - we wanted to create something useful, easy to read and with a lot of in depth analysis to actually help you defend the best attacks out there right now: meta attacks.
The guide will be updated as soon as we feel there's something more we can add to improve it, so stay tuned and huge thanks for checking the guide out!
-Twofu, Marco, Fall, Hota, Sprint, Zexla