Use these quick links to jump to a specific day.
Google Apps Agenda Day 1 (9/30/15)
Google Apps Agenda Day 2 (10/14/15)
Google Apps Agenda Day 3 (10/28/15)
Google Apps Agenda Day 5 (12/10/15)
Google Apps Agenda Day 6 (1/20/15)
Welcome to Google Apps for Beginners!
This is a good place to start. You may even want to create a Google Doc to keep track of questions or ideas you have along the way. When in doubt, try it out.
Agenda for our first meeting:
- The first thing we will do is log on to the PSBMA.org domain.
- Next we will explore Google Drive
- What is Google Drive?
- In the most basic terms, it’s online storage. You can store almost any type of file and access it online from any browser (although Chrome is recommended)
- You can install Drive on smartphones and computers (more on this later)
- Review Drive icons


- Create folders, color folders, sorting, moving and searching
- View and Sharing - What are my options?
- Talk about “the waffle”

- Create a Google Doc
- Name your doc
- Move it to a new folder
- Review the Menu and Toolbar
- Share a Doc with more than one person (grant one person view only and one person edit)
- Open Google Calendar
- Create an Event
- On your own calendar
- On a school calendar
- Sharing your Calendar
- Look at the details of the calendars that are shared with us - remove calendars we aren’t using anymore.
Topics for next session:
Setting up a profile in Chrome
Google Apps Day Two
First few minutes we will do a quick review from our last session.

- Log on to PSBMA.org
- Navigate to the folder you created last week (If you deleted it, create a new folder called Google Apps
- Create a Google Doc (Click on New and then Google Doc)
- Name your Doc Google Apps Day 2
Allowing others to view your document or inviting others to collaborate (share).
- View and Sharing - What are my options?
- Allowing others to view
- Collaborating with others
- Editor
- Comments
Google Apps Day Three
Review Sharing
- First log on to PSBMA.org
- Now you are in Google Drive
- Open the folder Google Apps
- If you don’t have that folder you can make it now using the button and select Folder. Name the folder Google Apps
- Open the file we created last week (Google Apps Day 2) -
- If you deleted the file from last week, you can create a new one using the button. Choose Google Doc and name it Google Apps Day 2
- Now you have opened the Google Doc Google Apps Day 2. Click on File
- Then click, Make a Copy and enter a new document name. Make sure Share with same people is unchecked.

- Click OK -
- What you just did: Made a copy of a document, renamed it and made your new document private.
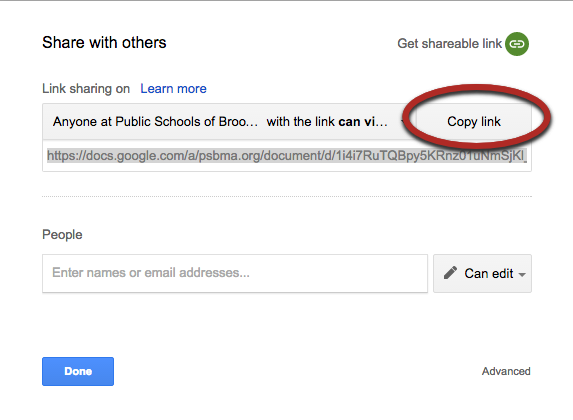
- Click on the Share button to see who the new document is shared with. You should be the only person listed. Click on the Get shareable link icon and then click on Advanced.
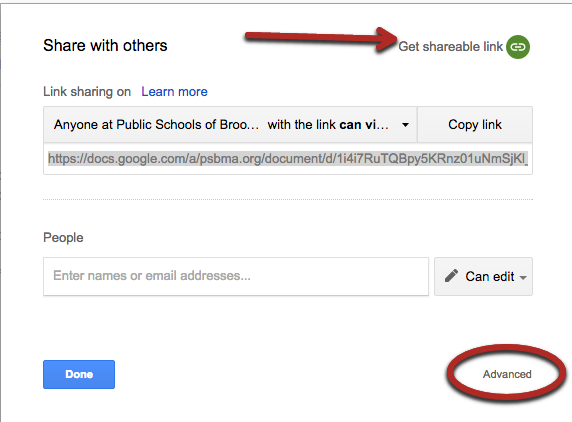
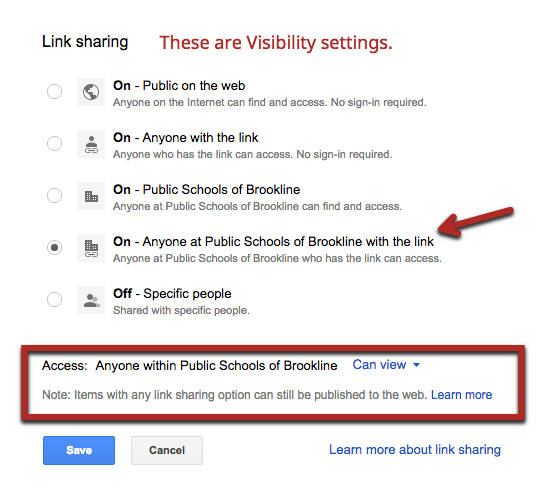
- Now change the settings so link sharing is On-Anyone at Public Schools of Brookline with link can view and click Save.
- Now share the Doc with the person on your left/right and give them Edit access. (Enter his/her PSBMA account in the People field. Then click Done
- Now go back to Google Drive and check “Shared with me”
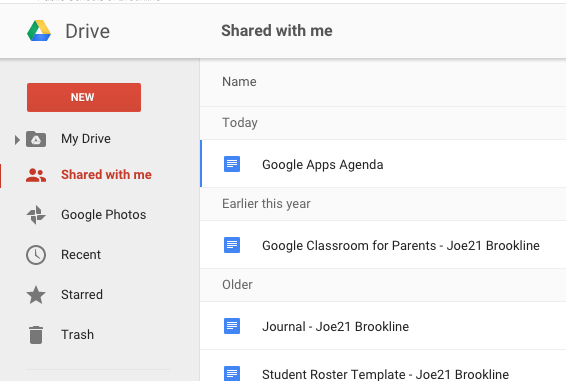
- You should see the file that the person next to you just shared with you.
- Open the file that was just shared with you and and type some text in. Leave a few comments and have your partner Resolve the comment or respond to your comment. Take turns working on each other’s documents.
Key Ideas: Visibility (Sharing the Link to the document) / and/or Sharing with individuals explicitly.
Google Calendars
- Open Google Calendar
- Create an Event
- On your own calendar
- On a school calendar
- Sharing your Calendar
- Look at the details of the calendars that are shared with us - remove calendars we aren’t using anymore.
Chat isn’t available until email is turned on for PSBMA accounts. You can still use comments though.
Google Apps Day Four
- All About Forms
- Flubaroo
- Using as an Exit Ticket
- Poll Students
- Student Created Surveys
Google Apps Day Five
Google Classroom - Uses: Do Now, Assignments, Questions, Common Location for Sharing Resources(Professional Use)
- Google Classroom - Open Classroom
- Please join the Classroom I set up for our meeting today.
- You can find Google Classroom by logging on to Google Drive
- Click on the Google Apps Picker
- Scroll down to More and Select Classroom
- Join the Classroom
- If this is your first time entering Google Classroom you will be presented with a choice. You’ll pick Teacher as your Role
- You can join my class using the Plus sign in the upper right corner
- Here’s the Code cc101ht
- After you join my class post a comment to the stream.
- Open the announcement I posted and click on the link.
- I’ll Post a Question and an Assignment to show you the difference.
- Create your own Class
- Choose your theme
- Share the Code
- Create an Assignment and Save as a Draft
Google Apps Day Six
What is Flippity? Flippity provides a template for you to use and create games, quizzes, and flashcards.
(Ideas: have students create games with a partner. Assign students questions and use their answers to create the quiz. Use it as a random name generator. Have students create their own flash cards
- http://www.flippity.net/QuizShow.asp
- http://www.flippity.net/CertificateQuiz.asp (My quiz http://goo.gl/IYKTU2)
Google Slides (Embedding video)
There are times when you are presenting that you’ll want to play a quick video clip and solicit feedback. Using Google Slides, you can embed the video directly into the presentation. Makes your presentation smoother and eliminates the side videos and ads. Caveat: You can only embed Youtube videos in Google Slides.
Slides.google.com
Embedding video in a Google Slides presentation.
Shortening Links
There are times when you are sharing a link and it becomes so long that it makes sense to shorten it. Two of my favorites are goo.gl and bit.ly
Goo.gl is Google’s URL shortener. You can set it up so your shortened links are stored in history and even add an extension to Chrome for easy access.
bit.ly shortens links as well but if you create an account, you can customize links.
Twitter Accounts - Even if you never post anything you can learn a lot. The following article describes ways for teachers to use Twitter as well as a nice translation for #hashtags
The Teacher’s Guide to Twitter
Using Chrome: Create different Chrome Identities
Installing Extensions (One Tab, Snagit)