Blender to Unity Vrchat Avatar Creation
This tutorial was made using Blender Version 2.78 and Unity Version 5.6.3p1
Part 0: Summary
Preparing your scene and avatar for rigging
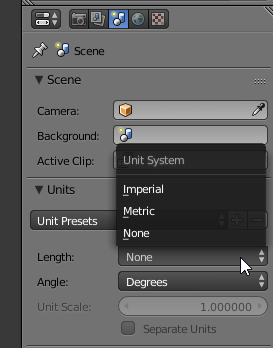
- OpenBlender. On the side menu under Units, set the working units to Feet or Meters, and change Length to Imperial or Metric depending on your preference.
- Import your 3D Model into Blender.
- Make sure your model is less than 20000 triangles and the balls of his/her feet are on the grid.
- In your Tool menu, click on Ruler/Protractor and make sure your model is scaled to your liking.
Rigging your mesh
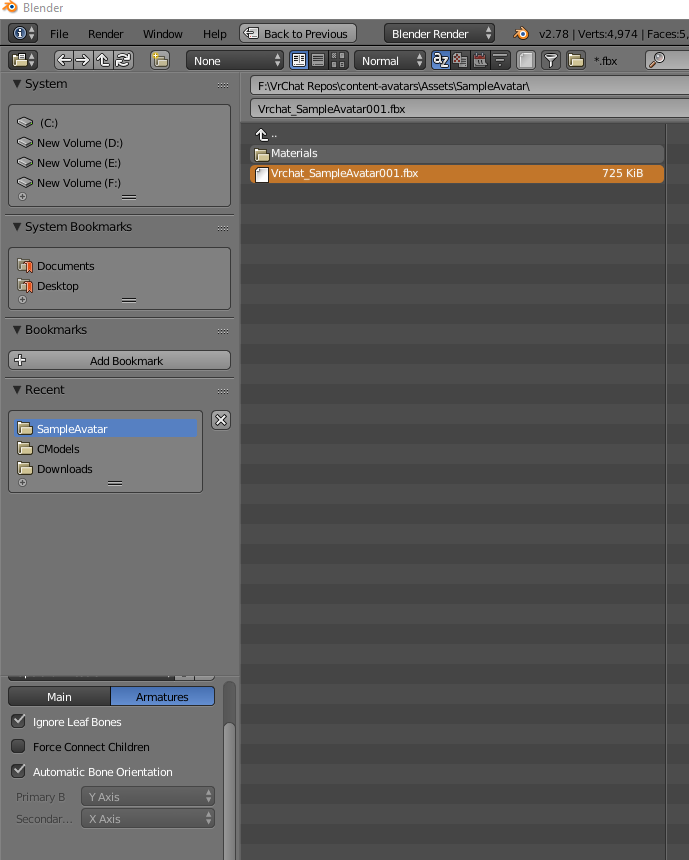
- Download the Vrchat Sample Avatar rig from https://drive.google.com/file/d/1ZWgj3UZI5yulLCJBHyUPCqkHNkrPPgS8/view?usp=sharing Make sure “Ignore Leaf Bones” is checked as well as Automatic Bone Orientation.
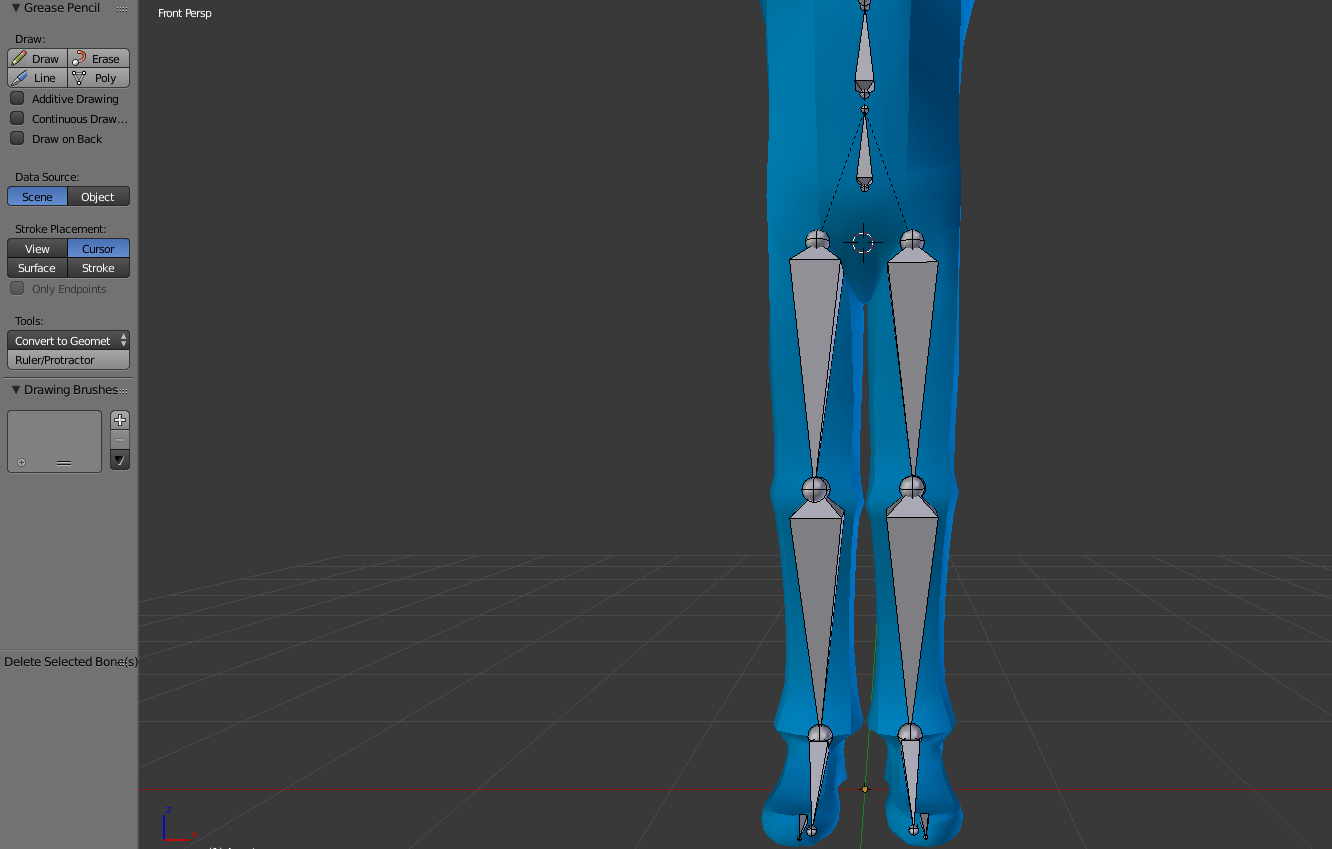
- The Armature bone should remain at 0,0,0. Scale the bones until the rig matches the size of your mesh. Move the bones to appropriately fit the avatar’s body. Eye bones should be located in the center of the eye spheres.
- Make sure your tongue, teeth, eyelashes and face are all combined into one mesh and name the new mesh “Body”
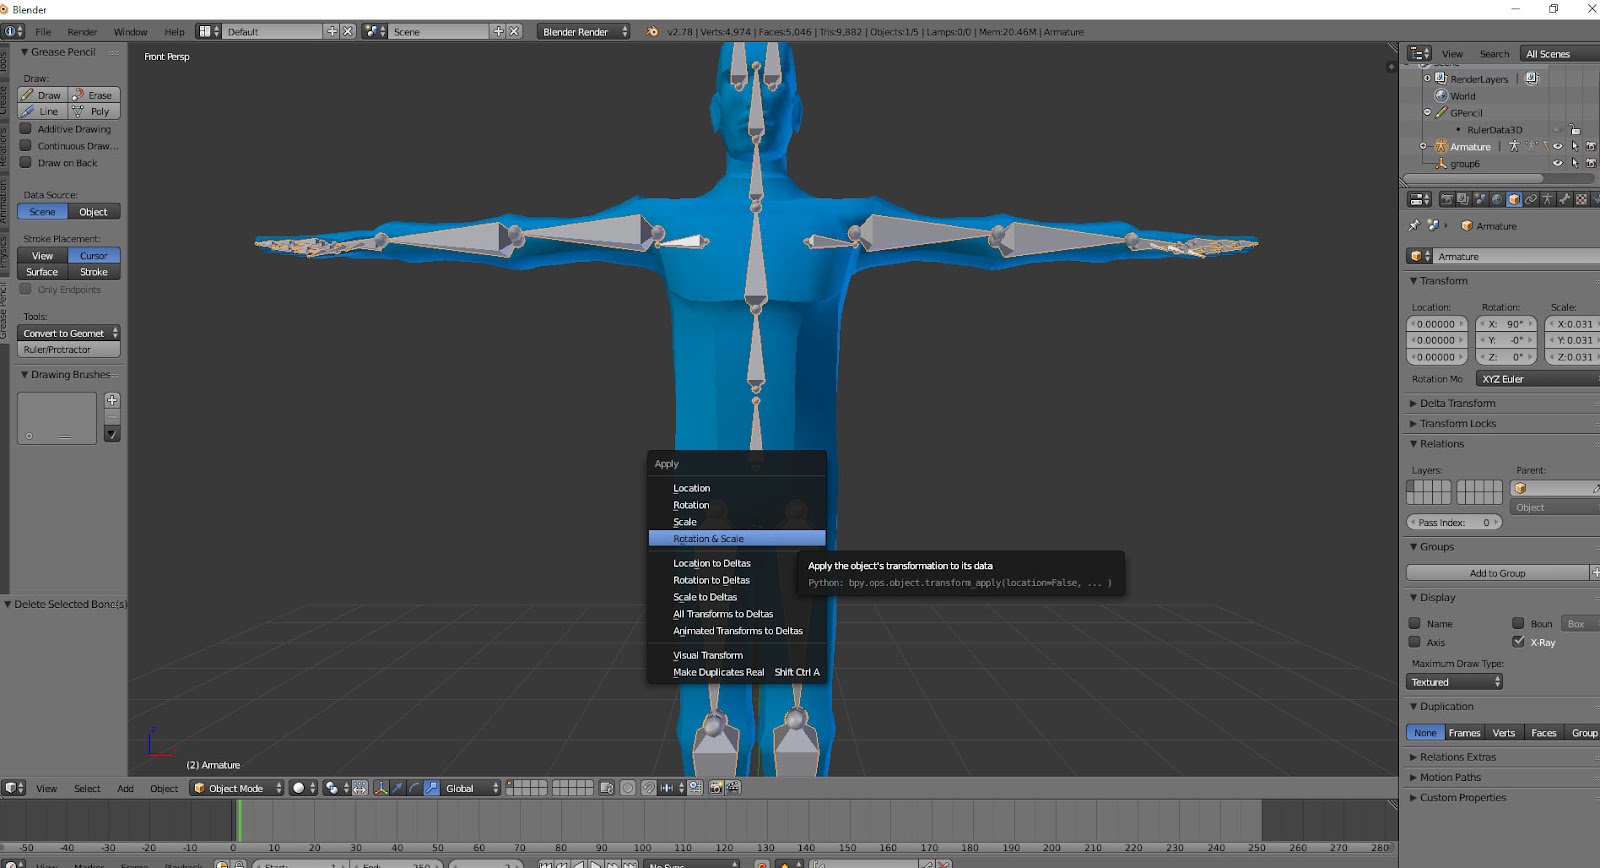
- Apply transformations to your bones and mesh by selecting your armature, hitting Ctrl+A and going to Rotation and Scale. Do the same thing with your geometry.
- In object mode, shift + Select all meshes, then select your Armature. Hit Ctrl + P and choose Armature Deform (With automatic weights) to skin the mesh to your bones
Visemes And Other Shape Keys
Choose a method for moving your avatar’s mouth. There are 3 methods to choose from. Jaw Flap, Jaw Open blend shape, or Visemes. (This tutorial will mainly focus on Visemes)
Method 1: Jaw Flap
This is the easiest method. In many cases, fully rigged avatars you wish to bring in will already have a skinned jaw bone. If this is the case, you are already done. If not, you will need to skin your avatar to a rig that includes a jaw bone. (This part of the tutorial is marked Optional)
Method 2: Jaw Blend Shape
Similar to the jaw flap, this method will only allow your jaw to open and close while you speak, only in this case, you will be using a blend shape/shape key. (This part of the tutorial is marked Optional)
Method 3: Visemes
This method harnesses the full power of Vrchat’s avatar creation pipeline. This method will give your avatar the ability to mimic each sound that comes from your mouth by blending between various shapes to mimic your actual voice… And it looks really cool.
- Select your face mesh. In your object data tab there will be a “shape keys” section. Hit the + symbol 20 times and you will notice 20 new shapes have appeared. One called Basis and 19 labeled “Key 1” through “Key 19”
- Name the 19 shapes exactly as follows:
vrc.blink_left
vrc.blink_right
vrc.lowerlid_left
vrc.lowerlid_right
vrc.v_aa
vrc.v_ch
vrc.v_dd
vrc.v_ee
vrc.v_ff
vrc.v_ih
vrc.v_kk
vrc.v_nn
vrc.v_oh
vrc.v_ou
vrc.v_pp
vrc.v_rr
vrc.v_sil
vrc.v_ss
vrc.v_th
- Edit the vertices on the 19 shape keys until you get the appropriate shapes.
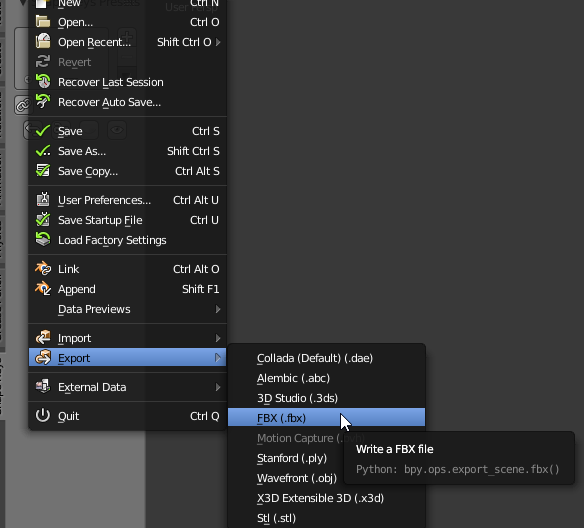
- Go to File > Export > FBX and export your avatar as an FBX
Getting your avatar working in Unity
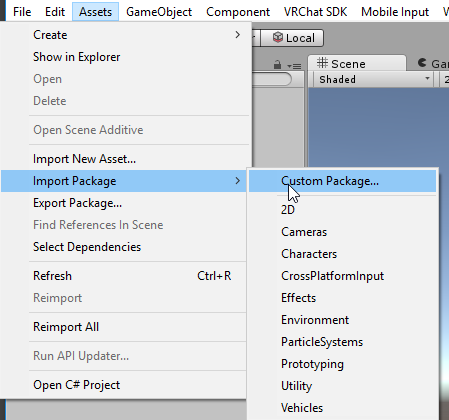
- Download the VRSDK unity package from vrchat.net and import it to Unity by going to Assets > Import Package > Custom Package and importing the package you downloaded from vrchat.net
- Import your FBX with it’s Textures to your Assets Folder.
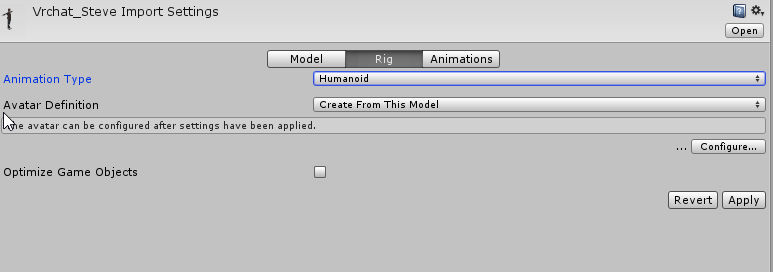
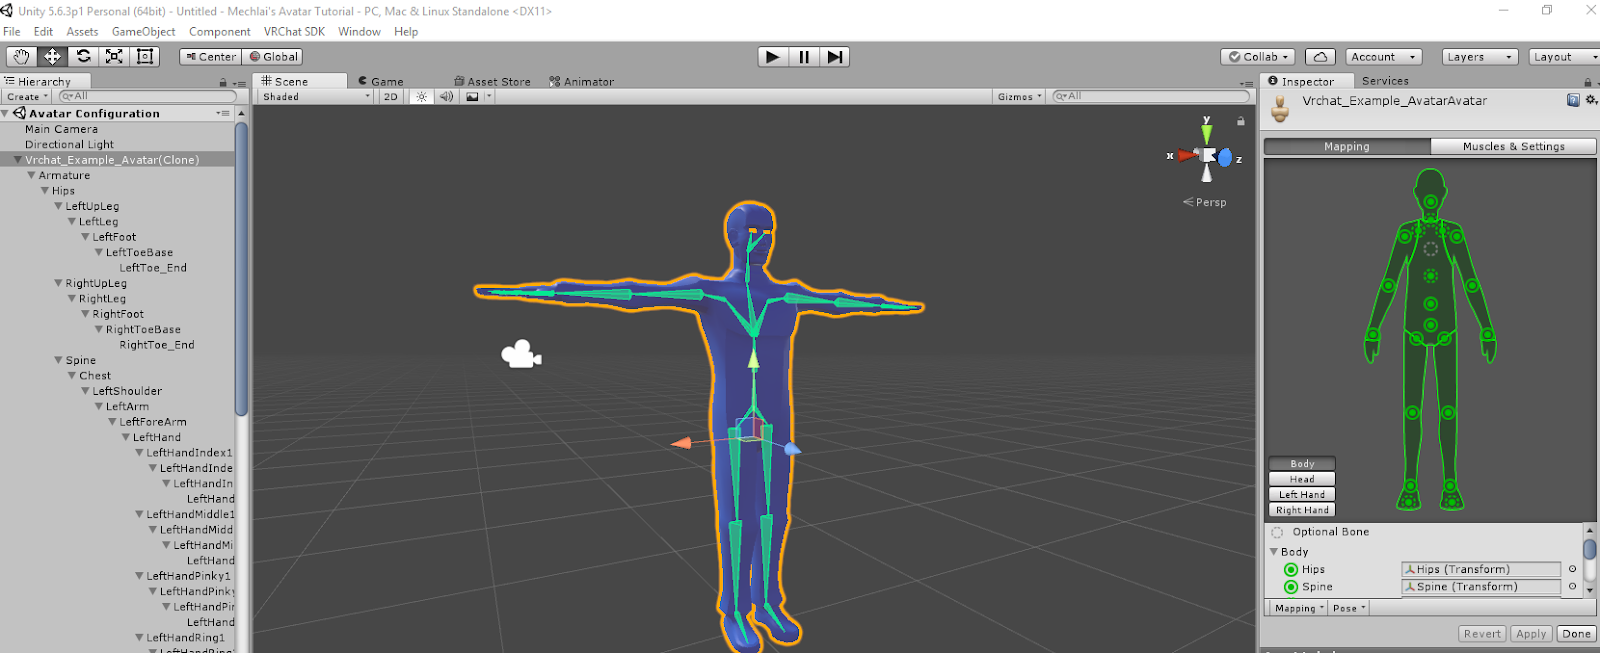
- Change the FBX’s Animation Type to Humanoid and click Configure
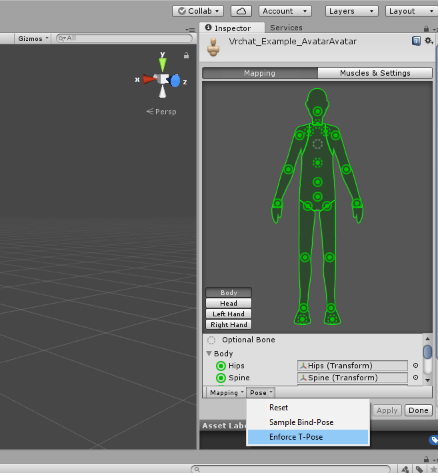
- Ensure your hand bones look like they are in a flat “T-pose” with palms facing the ground and under Pose, choose Enforce T-Pose
- Drag your avatar into your Heirarchy.
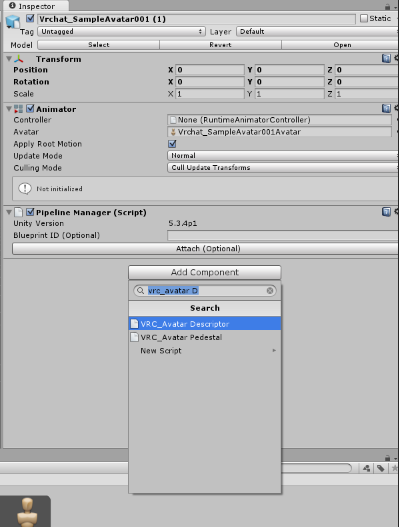
- In the inspector, go to Add Component > VRC_Avatar Descriptor.
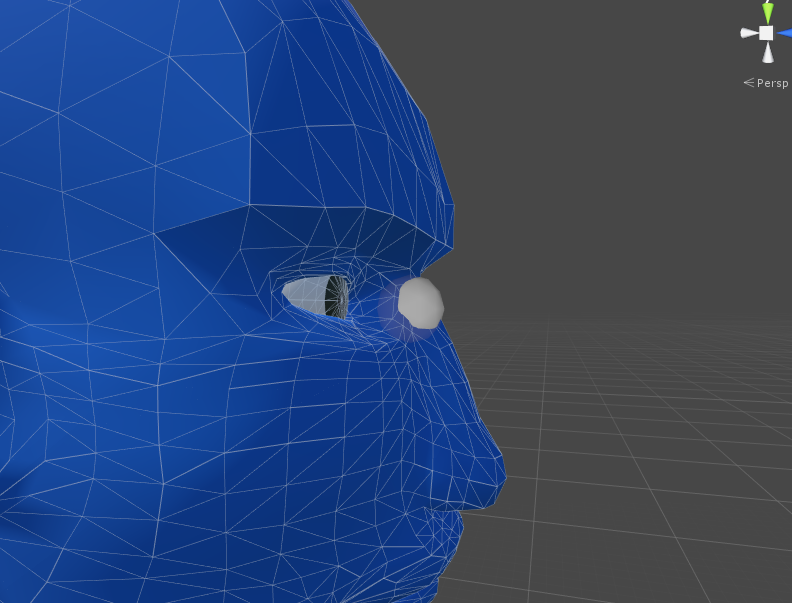
- Adjust the Y and Z coordinates of your View Position until the little grey ball is between your eyes.
- If you chose the Jaw Flap method for your mouth, select Jaw Flap Bone from the drop down menu under Lip Sync and drag your jaw bone into the “Jaw Bone slot.
- If you chose the Jaw Flap Blend Shape method, choose the “Jaw Flap Blend Shape” option from the drop down and drag your Body mesh into the Face Mesh slot.
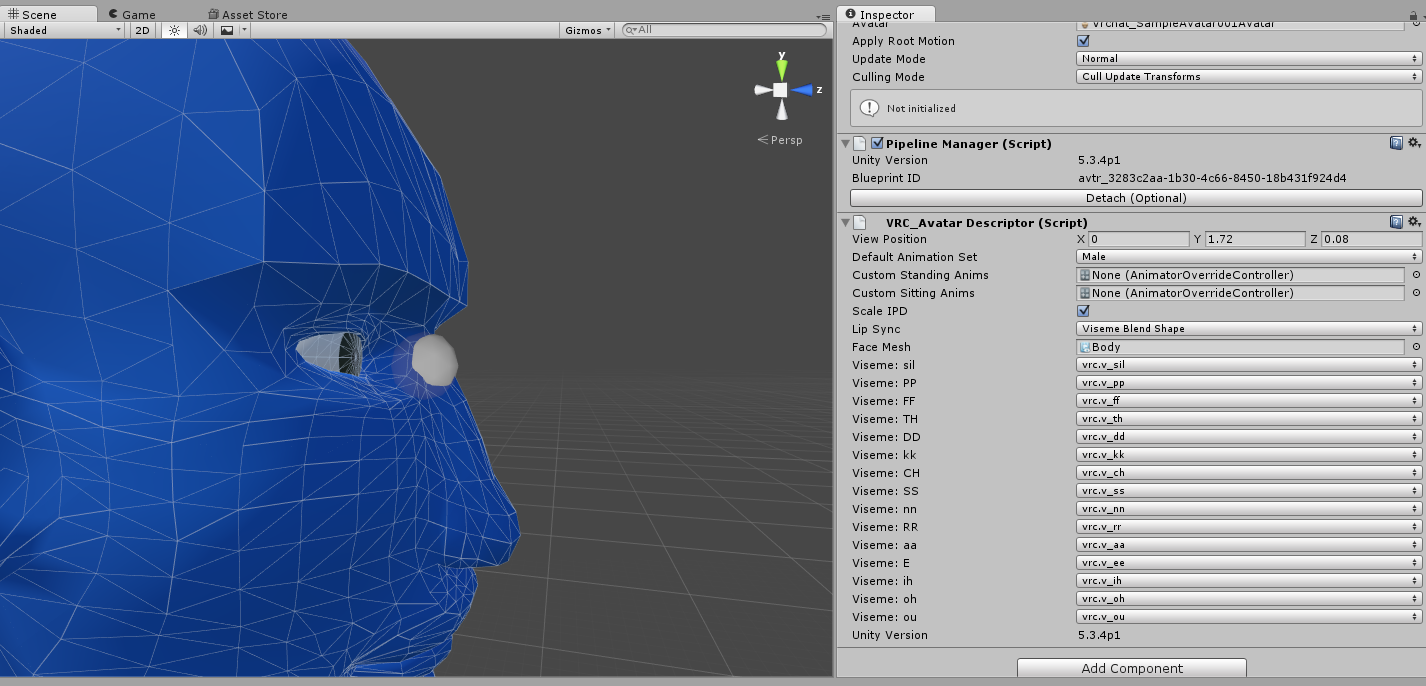
- If you chose Visemes, the Set Lip Sync to Viseme Blend Shape and drag your Body mesh from the Hierarchy to the empty Face Mesh slot in your Inspector.15 new drop down menus should now show up. You will need to assign the proper blend shapes to the proper slots.
Uploading Your Avatar To Vrchat
- Go to Vrchat SDK > Show Build Control Panel and select Build and Publish on your avatar. You will need to log into your vrchat account using your Vrchat Account Credentials.
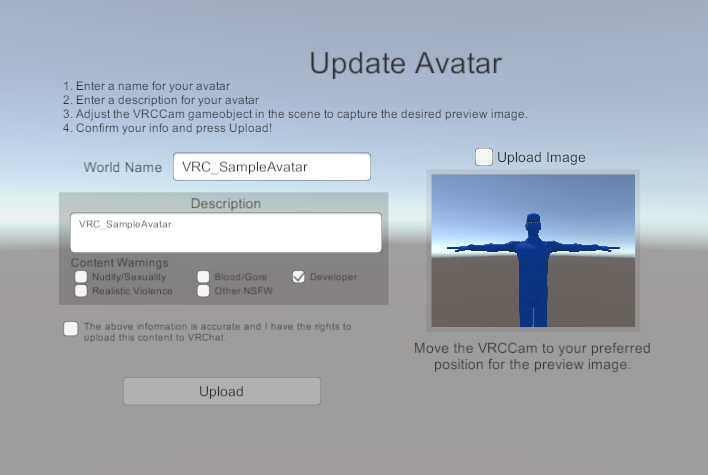
- Save your scene, name your avatar, give it a description and then go over to the scene tab to adjust your camera. Back in the Game Tab, agree to the above info and click Upload.
Congrats! You have just uploaded a fully functional avatar with Blend Shapes and tracking eyes.
Part 1: Preparing your scene and avatar for rigging
OpenBlender. On the side menu under Units, set the working units to Feet or Meters, and change Length to Imperial or Metric depending on your preference.
Import your 3D Model into Blender.
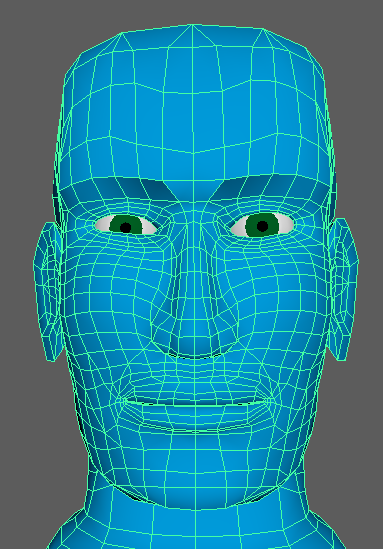
For this, I will be using the basic avatar model provided with this document.
Ideally for this type of rig you will want spheres for eyes.
Ensure the balls of your avatar’s feet are on the grid.
In your Tool menu, click on Ruler/Protractor and make sure your model is scaled to your liking.
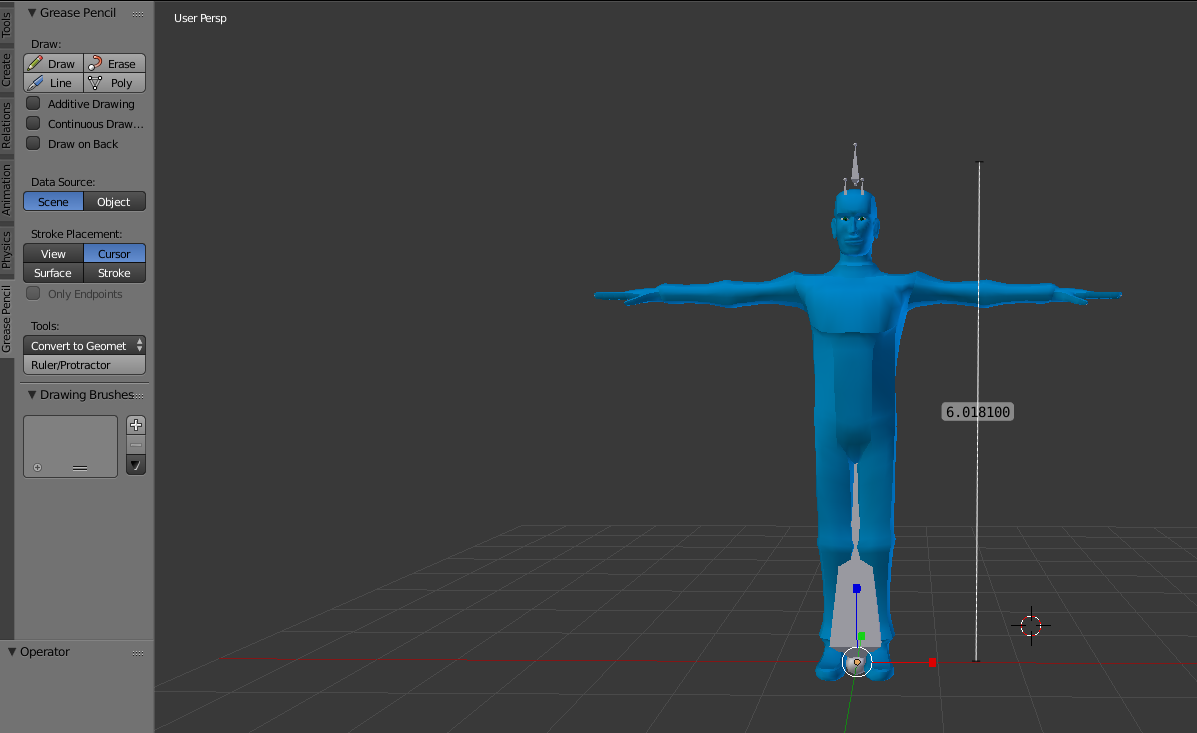
Make sure your avatar is scaled to an appropriate size. Just under 6 feet or 183cm is a realistic height for this guy, so this is how I’ve scaled him. (The above picture shows the imported Sample Avatar with the rig included. At this stage you should just have just the model you intend to use with or without a rig)
Part 2: Rigging your mesh
Download the VrChat Sample Avatar from https://drive.google.com/file/d/1ZWgj3UZI5yulLCJBHyUPCqkHNkrPPgS8/view?usp=sharing
and import it into your scene. By going to File > Import > FBX. In the Armature tab on the side menu, make sure “Ignore Leaf Bones” is checked as well as Automatic Bone Orientation.
If you are using the Vrchat Sample Avatar’s skeleton, The Armature bone should remain at 0,0,0. Delete the Sample Avatar mesh if you do not intend to use it. Scale the bones until the rig matches the size of your mesh. Move the bones to appropriately fit the avatar’s body. Eye bones should be located in the center of the eye spheres.
Also, delete the Armature bone. Blender creates it’s own armature node, rendering the large “Armature” bone useless. Get rid of it. (It’s only there for Maya users)
Make sure your tongue, teeth and face are all combined into one mesh. You will need them to be combined for Visemes to work later. Name the single face mesh “Body”
Apply transformations to your bones and mesh by selecting your armature, hitting Ctrl+A and going to Rotation and Scale. Do the same thing with your geometry.
Next up is Skinning.
NOTE: Skinning a mesh can be a long process and I will not cover the finer details of skinning a mesh to bones in this tutorial. For details on how to Properly skin a mesh to bones, seek another tutorial.
Firstly, select your geometry and then the Armature and hit Ctrl + P. In this case I used automatic skin weights. In many cases the default skin weights will be fine. If you have spherical eyes, make sure they are skinned to the Eye bones

After you fix the skinning to your liking, we will go on to Viseme and Shape Key creation.
Part 3: Visemes And Other Shape Keys
Next up, the various Shape Keys we will be using for our avatar. This will make him “talk” in Vrchat.
Select your face mesh. In your object data tab there will be a “shape keys” section. Hit the + symbol 20 times and you will notice 20 new shapes have appeared. One called Basis and 19 labeled “Key 1” through “Key 19”
Basis acts as your default shape and shouldn’t be touched, while Keys 1-19 will become your first shape key.
Name the 19 shapes exactly as follows:
(in the same order)
vrc.blink_left
vrc.blink_right
vrc.lowerlid_left
vrc.lowerlid_right
vrc.v_aa
vrc.v_ch
vrc.v_dd
vrc.v_e
vrc.v_ff
vrc.v_ih
vrc.v_kk
vrc.v_nn
vrc.v_oh
vrc.v_ou
vrc.v_pp
vrc.v_rr
vrc.v_sil
vrc.v_ss
vrc.v_th
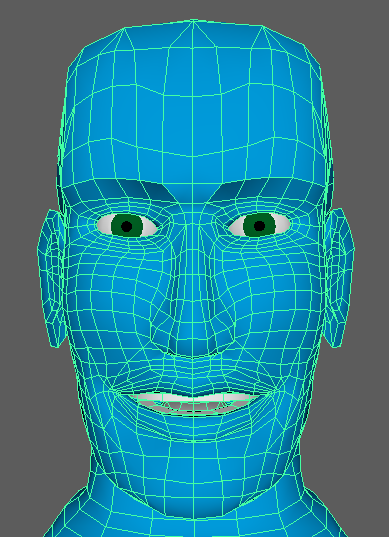
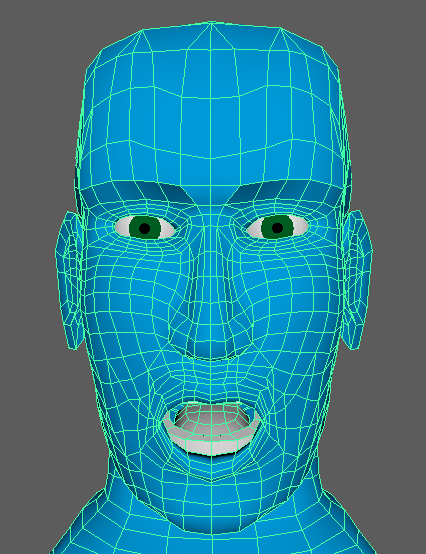
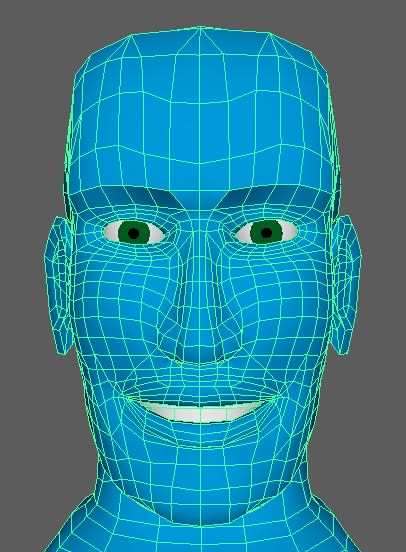
The 15 Visemes will have to be manually created by moving the vertices on each mesh to match the appropriate sound your mouth would make. Select each shape key (other than basis) and edit the vertices on the face mesh until you get the following shapes:
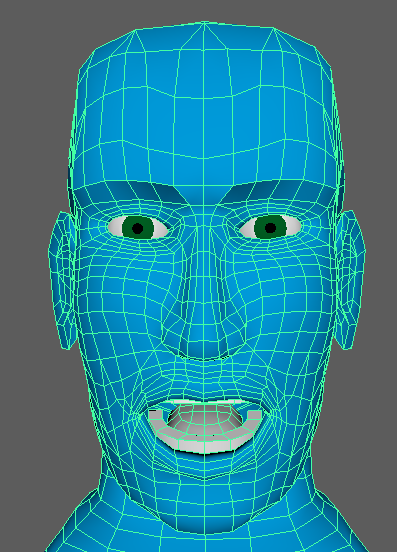
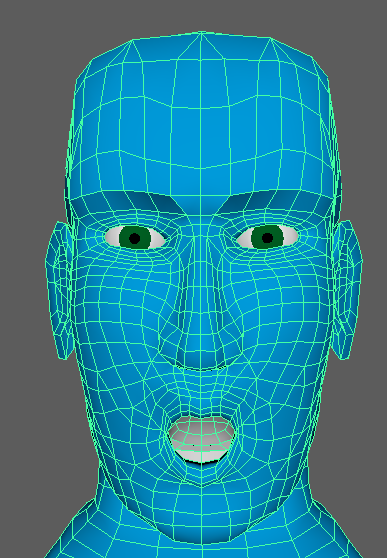
The vrc.v_aa shape. An open mouth mimicking the sound you would make if you were to open your mouth and say “aa”
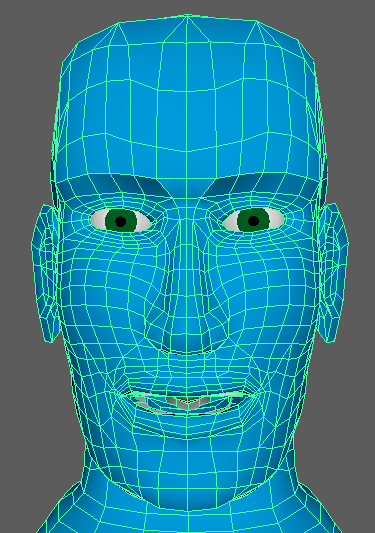
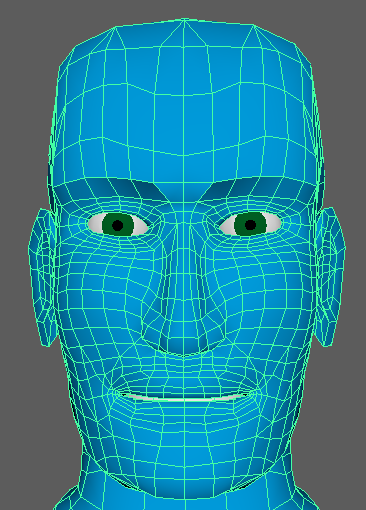
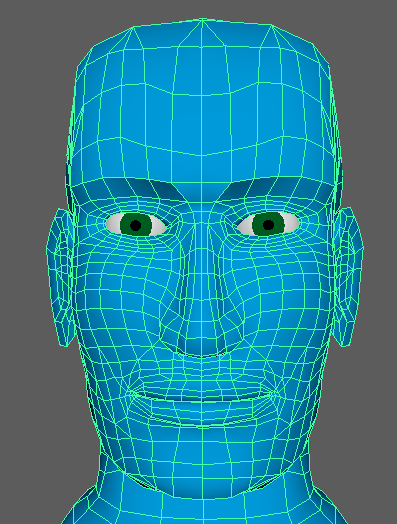
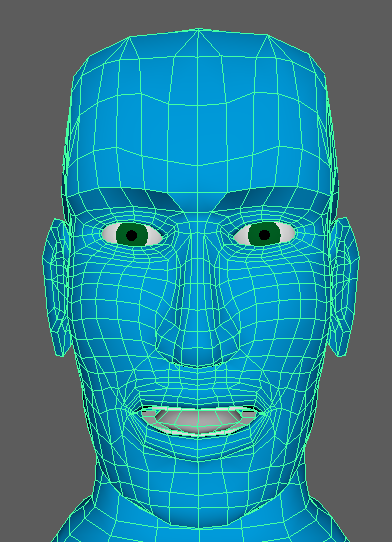
The vrc.v_ch shape: Opened lips and clenched teeth. A good starting point for vrc.v_rr as well
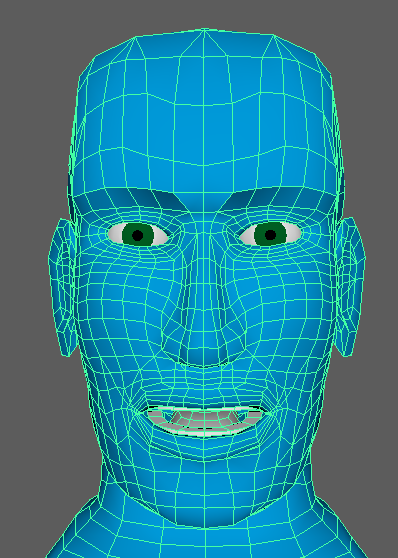
The vrc.v_dd shape: I made this as a variation of vrc.v_nn. Keep the tongue raised but have the jaw more closed than vrc.v_nn
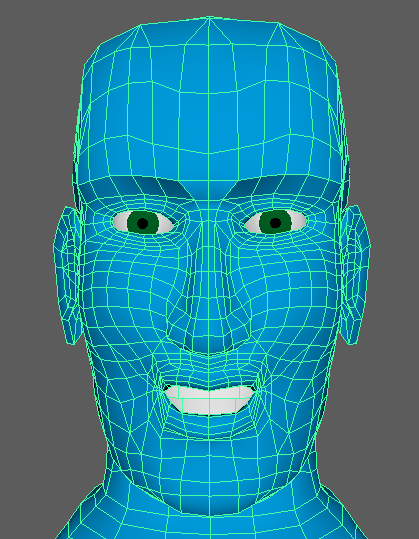
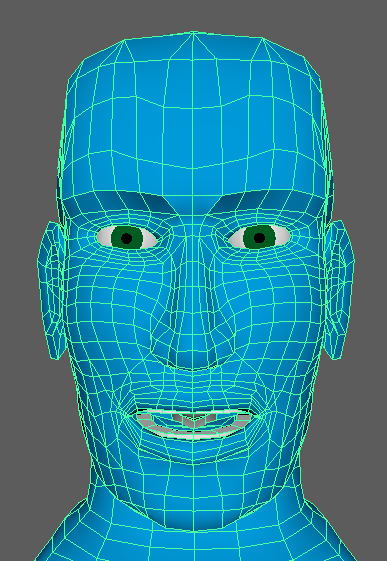
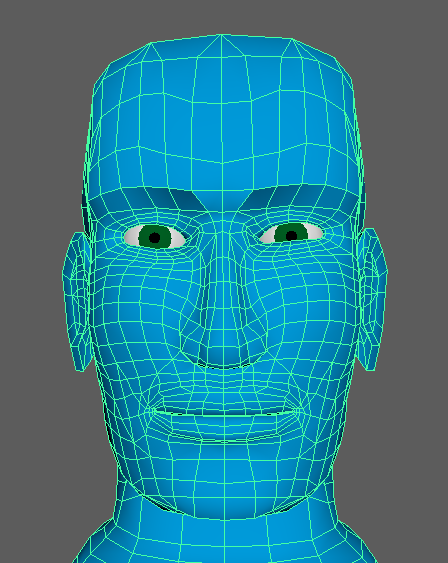
The vrc.v_ee shape: The most iconic sound. Very wide mouth. (this is the shape people will likely try to make when they say “cheese” for the camera. It is important to exaggerate this shape a bit ESPECIALLY on cartoony characters. You can duplicate the vrc.v_ee shape to act as a starting point for vrc.v_ss
The vrc.v_ff shape: Raise the upper lip a bit and drag the lower lip under the front teeth.
vrc.v_ih: Open the mouth and jaw slightly. (Just enough to fit the tongue between your teeth) This shape can act as a starting point for many other shapes.
The vrc.v_kk shape:. Start with vrc.v_ih and raise the sides of the top lip. You can also move the tongue up to the roof of the mouth in the back if you are feeling fancy.
.

The vrc.v_nn shape: Start with vrc.v_ih and raise the tongue to the roof of your mouth.
The vrc.v_oh shape: a modified version of vrc.v_aa. Just make the lips narrower and more O shaped.
The vrc.v_ou shape: a much smaller exaggerated version of the vrc.v_oh shape. This shape makes the difference between you saying “oh” and “oooooo”
vrc.v_pp: tilt the upper and bottom lip into the teeth a bit and make sure the mouth is closed. This shape will be used for sounds like M, B and P.
vrc.v_rr: like v_ch, except lower the teeth/jaw and raise the upper lip a bit more for an exaggerated RR.

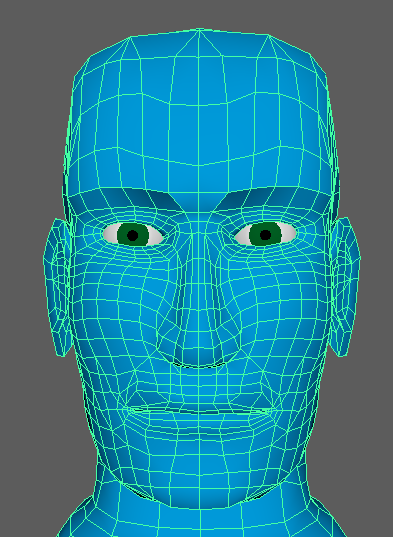
vrc.v_sil: the Silent shape. If your model is already in a default position with it’s mouth closed. Move a single vertex somewhere on the mesh in a position no one will notice. ( WARNING! Blender won’t allow you to export this shape unless you edit it somehow because it will register as a non-existent shape on export unless edited somehow.) If your avatar has an open mouth by default, you will want to manually move the vertices so your avatar’s mouth is in a rested pose.
The vrc.v_ss shape: a variation of vrc.v_ee with closed (or nearly closed) teeth and lips that are barely open.
The vrc.v_th shape I made from vrc.v_ih, but just stuck the tongue out.
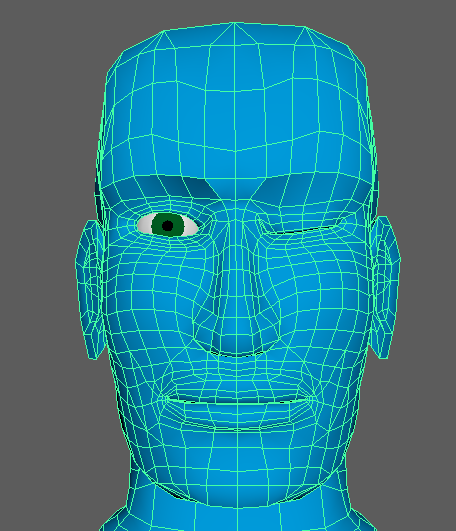
Adding Eyes And Eyelids:
Here’s the 4 eye shapes: A left and right blink and a slightly raised left and right lower lid. So long as the eye shapes are present and named correctly, Name them vrc.blink_left, vrc.blink_right, vrc.lowerlid_left and vrc.lowerlid_right. they should work automatically assuming everything else is set up properly. Setting these up along with spherical eyes, causes eyes to track close objects and players in VrChat which is cool.

Congrats! You now have a fully rigged avatar ready for Unity.
Part 4: Exporting Your Avatar From Blender
Select your geometry and Armature and then go to File > Export > FBX. Make sure “selected Objects” is checked. Uncheck “Apply Modifiers.” Uncheck “Add Leaf Bones.” Uncheck everything in the Animation tab
Export your avatar as an FBX
Export complete! Time for Unity!
Part 5: Getting your avatar working in Unity
Download the VRSDK unity package from vrchat.net and import it to Unity by going to Assets > Import Package > Custom Package and importing the package you downloaded from vrchat.net
Import your FBX with it’s Textures to your Assets Folder.
Change the FBX’s Animation Type to Humanoid and click Configure
Ensure your hand bones look like they are in a flat “T-pose” with palms facing the ground. If they aren’t already in this position, rotate the wrists so the fingers bend directly downward and under Pose, choose Enforce T-Pose
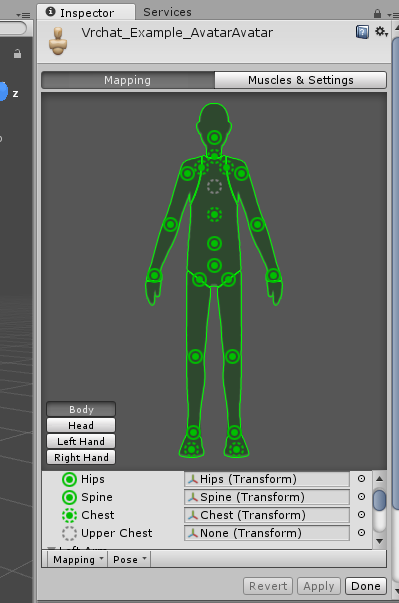
IMPORTANT! Make sure to leave the Upper Chest bone blank. The shoulders should be direct children of your assigned “chest” bone. There should be only 1 assigned spine bone, and your Hips should be the parent of your legs.
Drag your avatar into your Heirarchy.
In the inspector, go to Add Component > VRC_Avatar Descriptor.
Adjust the Y and Z coordinates of your View Position until the little grey ball is between your eyes.
(Optional)If you chose the Jaw Flap method for your mouth, select Jaw Flap Bone from the drop down menu under Lip Sync and drag your jaw bone into the “Jaw Bone slot. This method may be easier for you than the Viseme system, but requires a rigged model with a Jaw bone. Using this method, your jaw will flap when you speak. It’s less detailed than the Viseme system, but it is a valid option for simpler avatars. Your eyes will not work if you choose this method.

(Optional) If you chose the Jaw Flap Blend Shape method, choose the “Jaw Flap Blend Shape” option from the drop down and drag your Body mesh into the Face Mesh slot. Using this method, you only need to create a single Viseme. vrc.v_aa would be a good shape for this. This option is similar to the jaw flap option, but uses an “open mouth” blend shape instead of a jaw bone. Your eyes will not work with this method.

For the Visemes Method, the Set Lip Sync to Viseme Blend Shape and drag your Body mesh from the Hierarchy to the empty Face Mesh slot in your Inspector.
15 new drop down menus should now show up. You will need to assign the proper blend shapes to the proper slots.
NOTE: Eye shapes do not need to be assigned. They should work on their own if set up correctly.
Part 6: Uploading Your Avatar To Vrchat.
Go to Vrchat SDK > Show Build Control Panel and select Build and Publish on your avatar. You will need to log into your vrchat account using your Vrchat Account Credentials.
Save your scene, name your avatar, give it a description and then go over to the scene tab to adjust your camera. Back in the Game Tab, agree to the above info and click Upload.
Congrats! You have just uploaded a fully functional avatar with Blend Shapes and tracking eyes.
...woot.
Common Issues and Solutions:
-If your mesh fails to import parts of geometry into Unity, Open Blender, re-import your FBX (not your scene file) and export the FBX again.
-If you find your avatars fingers are crooked in Vrchat, you will need to go into Configure in your Unity inspector on your avatar and rotate the hands to be in a perfect T-pose with palms flat and facing the ground. Then click “Enforce T-pose
- If you modify the rig or change bone names the eyes may not work. Also re-ordering blend shapes in an order that isn’t listed above the eyes won’t work. If you decide to add extra blend shapes for whatever reason, make sure they are listed AFTER the original 19.
-If your eyes come out backwards or at an angle that isn’t what you started with, one possible solution is to reset your pose and then enforce T-pose when you go to configure your humanoid skeleton. If this doesn’t work, you will have to manually offset the eye bone to match the rotation of the eye in blender.