Minecraft Bedrock Command Handbook

Note: This guide is designed for the convenience of the user for quick checks and some of its information comes directly from the Minecraft Wiki. For more in depth analysis, check out this link: https://minecraft.wiki/w/Commands
Disclaimers: This guide is solely for the Bedrock Edition of minecraft as played on most devices as of 1.21.20 (03/19/24). Java Edition, Education Edition, etc commands will not be included, and some bedrock commands such as /changesetting will not be reviewed as they are either only available on some devices or are only active on dedicated servers. Commands such as /connect are also not included because they are only used in rare and specific circumstances. A full list of commands can be found in the above link.
Usage: This guide was created for the purpose of informing readers of the complex world of commands in Minecraft Bedrock. You are welcome to use its information and examples in any creation (which includes online content) that you wish, although discretion is advised. I would appreciate it if you credit me when displaying this exact document, and please refrain from republishing it. Thank you for reading! -StormStqr
Table Of Contents
1 —----------------------------------------------------------------------------------------------------------------------------------------------- Table of Contents
3 –--------------------------------------------------------------------------------------------------------------------------- Important Info to Get Started
5 –--------------------------------------------------------------------------------------------------------------------------------------- Special Blocks of Note
7 –-------------------------------------------------------------------------------------------------------------------------------------------------------- /help and /?
7 –----------------------------------------------------------------------------------------------------------------------------------------------------------------- /ability
8 –---------------------------------------------------------------------------------------------------------------------------------- /alwaysday and /daylock
8 –-------------------------------------------------------------------------------------------------------------------------------------------------------------- /camera
8 –------------------------------------------------------------------------------------------------------------------------------------------------------- /camershake
9 –------------------------------------------------------------------------------------------------------------------------------------------------------------------- /clear
10 –--------------------------------------------------------------------------------------------------------------------------------------------- /clearspawnpoint
10------------------------------------------------------------------------------------------------------------------------------------------------------------------ /clone
11 –------------------------------------------------------------------------------------------------------------------------------------------------------------ /damage
12 –----------------------------------------------------------------------------------------------------------------------------------------------------------------- /deop
12 –----------------------------------------------------------------------------------------------------------------------------------------------------------- /dialogue
13 –---------------------------------------------------------------------------------------------------------------------------------------------------------- /difficulty
13 –---------------------------------------------------------------------------------------------------------------------------------------------------------------- /effect
14 –----------------------------------------------------------------------------------------------------------------------------------------------------------- /enchant
15 –---------------------------------------------------------------------------------------------------------------------------------------------------------------- /event
16 –------------------------------------------------------------------------------------------------------------------------------------------------------------ /execute
19 –----------------------------------------------------------------------------------------------------------------------------------------- /experience and /xp
19 –-------------------------------------------------------------------------------------------------------------------------------------------------------------------- /fill
20 –------------------------------------------------------------------------------------------------------------------------------------------------------------------- /fog
21 –----------------------------------------------------------------------------------------------------------------------------------------------------------- /function
21 –------------------------------------------------------------------------------------------------------------------------------------------------------ /gamemode
22 –--------------------------------------------------------------------------------------------------------------------------------------------------------- /gamerule
23 –--------------------------------------------------------------------------------------------------------------------------------------------------------- /gametest
24 –----------------------------------------------------------------------------------------------------------------------------------------------------------------- /give
24 –------------------------------------------------------------------------------------------------------------------------------------------------------------------ /hud
24 –-------------------------------------------------------------------------------------------------------------------------------------------- /immutableworld
24 –-------------------------------------------------------------------------------------------------------------------------------------------- /inputpermission
25 –------------------------------------------------------------------------------------------------------------------------------------------------------------------ /kick
26 –------------------------------------------------------------------------------------------------------------------------------------------------------------------- /kill
26 –------------------------------------------------------------------------------------------------------------------------------------------------------------------- /list
26 –-------------------------------------------------------------------------------------------------------------------------------------------------------------- /locate
27 –------------------------------------------------------------------------------------------------------------------------------------------------------------------ /loot
28 –------------------------------------------------------------------------------------------------------------------------------------------------------------------- /me
28 –------------------------------------------------------------------------------------------------------------------------------------------------------- /mobevent
29 –------------------------------------------------------------------------------------------------------------------------------------------ /msg, /tell, and /w
29 –-------------------------------------------------------------------------------------------------------------------------------------------------------------- /music
30 –-------------------------------------------------------------------------------------------------------------------------------------------------------------------- /op
31 –------------------------------------------------------------------------------------------------------------------------------------------------------------ /particle
31 –------------------------------------------------------------------------------------------------------------------------------------------------- /playanimation
32 –------------------------------------------------------------------------------------------------------------------------------------------------------- /playsound
33 –-------------------------------------------------------------------------------------------------------------------------------------------------------------- /recipe
33 –-------------------------------------------------------------------------------------------------------------------------------------------------------------- /reload
33 –----------------------------------------------------------------------------------------------------------------------------------------------------- /replaceitem
34 –------------------------------------------------------------------------------------------------------------------------------------------------------------------ /ride
35 –------------------------------------------------------------------------------------------------------------------------------------------------------------------- /say
36 –---------------------------------------------------------------------------------------------------------------------------------------------------------- /schedule
37 –------------------------------------------------------------------------------------------------------------------------------------------------------ /scoreboard
40 –---------------------------------------------------------------------------------------------------------------------------------------------------------- /setblock
40 –------------------------------------------------------------------------------------------------------------------------------------------------ /setmaxplayers
41 –------------------------------------------------------------------------------------------------------------------------------------------------ /setworldspawn
41 –----------------------------------------------------------------------------------------------------------------------------------------------------- /spawnpoint
41 –------------------------------------------------------------------------------------------------------------------------------------------------- /spreadplayers
42 –------------------------------------------------------------------------------------------------------------------------------------------------------- /stopsound
43 –--------------------------------------------------------------------------------------------------------------------------------------------------------- /structure
44 –--------------------------------------------------------------------------------------------------------------------------------------------------------- /summon
45 –------------------------------------------------------------------------------------------------------------------------------------------------------------------- /tag
46 –---------------------------------------------------------------------------------------------------------------------------------------------- /teleport and /tp
47 –------------------------------------------------------------------------------------------------------------------------------------------------------------- /tellraw
47 –-------------------------------------------------------------------------------------------------------------------------------------------------------------- /testfor
48 –---------------------------------------------------------------------------------------------------------------------------------------------------- /testforblock
48 –-------------------------------------------------------------------------------------------------------------------------------------------------- /testforblocks
49 –----------------------------------------------------------------------------------------------------------------------------------------------------- /tickingarea
50 –----------------------------------------------------------------------------------------------------------------------------------------------------------------- /time
51 –------------------------------------------------------------------------------------------------------------------------------------------------------------------ /title
51 –------------------------------------------------------------------------------------------------------------------------------------------------------------ /titleraw
52 –------------------------------------------------------------------------------------------------------------------------------------------------ /toggledownfall
53 –------------------------------------------------------------------------------------------------------------------------------------- /wb and worldbuilder
53 –----------------------------------------------------------------------------------------------------------------------------------------------------------- /weather
54 –----------------------------------------------------------------------------------------------------------------------------------------------- Target Selectors
56 –------------------------------------------------------------------------------------------------------------------------------------------- JSON Text Format
57 –------------------------------------------------------------------------------------------------------------------------------------------------------------------ Ticks
58 —-------------------------------------------------------------------------------------------------------------------------------------------------- A Note on Lag
59 —----------------------------------------------------------------------------------------------------------------------------------------------- Important Lists
61 –---------------------------------------------------------------------------------------------------------------------- Useful Command Chains/Ideas
(page numbers are not 100% accurate)
Important Info to Get Started
Beginning:
When starting a new world, there are several things you should do to set it up for command creations:
REQUIRED:
- Turn cheats on, so that commands can be run.
- Turn commands on, so that commands can be run.
- You must be an operator so that you can use all commands and command blocks. Certain commands such as /setmaxplayers can only be run by the owner of the world.
RECOMMENDED:
- Turn coordinates on, so that you know where things are and can specify coords in commands. This can be turned off at any time.
- Turn Education Edition on. This doesn’t do a whole lot, but does allow for use of elements and the tools that come with them. More importantly, you get access to the /ability command.
- Turn the weather cycle off so that you aren’t bothered by changes in precipitation.
- Turn the daylight cycle off so that you have consistent light. Do this by turning off always day and then turning off the daylight cycle (in settings). This way, the /time command still works but the day cycle doesn’t continue.
- Turn off command block output. This means that when a command block fires, it won’t say that it fired in the chat. This is done by typing in chat: “/gamerule commandblockoutput false”
- Turn off command feedback. This means that when a command does something to you, such as gives you a sword, it won’t tell you that it did that. This is done by typing in chat: “/gamerule sendcommandfeedback false”. However, this isn’t always recommended, as some feedback can be used for debugging (ex: /time query won’t return anything).
How to use a Command Block:
Command Blocks have a UI that allows players to write and execute commands without manually triggering them in chat. There are 3 different types of command blocks:
- Impulse: Fires once each time it is powered
- Chain: Fires as part of a chain of command blocks (triggers whenever the first in the chain of command blocks is triggered). These must always be in “always active” mode to function.
- Repeating: Fires once every game tick (or at specified intervals if there is a delay in ticks) when it is powered
Within a Command Block there are 8 interactions:
- Name: the name of the command block, which will show as a name tag when you hover over the block and will be used when the command block says things in chat (like with /say). Defaults to “!”.
- Block Type: allows the toggling of the type of command block (impulse, chain, or repeating).
- Condition: specifies whether or not the block will execute conditionally. If “unconditional” the command acts normally, but a “conditional” command block only triggers if it is chain, always active, and the block directly before it in the chain was successful in its output. Defaults to “unconditional”.
- Redstone: specifies whether the command can be triggered by redstone. If “always active”, then repeating commands will fire every game tick, and “needs redstone” will be triggered whenever it receives a redstone signal (if it is a repeating block, it fires every tick that it is powered on). Defaults to “needs redstone”.
- Execute on First Tick: Default is on, specifies whether a repeating command block should fire on the first tick it is powered or wait until after the first delay in ticks (if there is no specified delay, then it waits until the next game tick).
- Delay in Ticks: Specifies the amount of time it takes for a command to fire after the block was triggered. If the block is in “repeat” mode, this argument specifies the amount of time between each firing.
- Command: The command that will be fired.
- Previous Output: toggles whether to display the previous output of the block (if any, defaults to “-”)
Format of Commands:
- Anything with “@” is an entity target selector argument. This includes @s (self), @a (all players), @p (closest player), @r (random player, can refer to entities if specified), and @e (all entities). Note that @p doesn’t always count creative players. The term @here can also be used to mention all players. For more information, see the section titled: “Target Selectors”.
- For item data (represented in this document with <data>), a value of -1 represents that item with any data value. For example, you can /clear only swords with values of 1, or you could clear all swords despite their value with -1. The default value (for crafted, broken, or creative-obtained items) is 0. If the <data> argument is unspecified, it defaults to -1. Item data is different depending on the item as well. With items that have durability (such as a weapon or armor), higher data values mean lower durabilities. Some items have different versions, such as giving yourself a plank with the value of 0 gives you an oak wood plank, but a value of 1 gives you a spruce wood plank. A full list of item data values can be found in the section titled: “Important Lists”. With other items, such as a nether star, different data values do nothing except allow you to test for the item with a certain value. Stacking items such as these removes their data values, but you can rename them in an anvil without affecting the value.
- For block <data>, you must use a block state argument (see block states list) in brackets (“[]”). For example: “/setblock ~~~ stone_button [“button_pressed_bit”=true,”facing_direction”=0]” Everything must be in quotes except for boolean and integer values (true/false/0/1/2…). When testing for a block (/testforblock, etc), all block states must be specified for it to work, but this is unnecessary for when you are placing the block (/fill, /setblock, etc)
- The symbol “~” refers to the coordinate where the command was fired. So if you had a command block that wanted to set the block above it as sand, you would write: “/setblock ~~1~ sand”.
- The symbol “^” refers to coordinates based on where the target is looking. So if you execute a command at ^^^10, you will execute that command 10 blocks in front of wherever the target is looking. The first “^” represents perpendicular to the players view (horizontal), the second “^” represents vertical to the players view, and the last “^” represents direct distance from the player based on their view.
- The symbol “!” means exclude. So if you have a target selector like “@e[type=!player]” then it will target all entities that aren’t players
- Coordinate arguments such as <position x y z> apply the coordinates relevant to the dimension that the command is executed in.
- The symbol “”” is used to define arguments. Anything in quotations is considered part of a single argument, allowing for spaces and additional symbols. For example, some players have spaces in their name. To make sure that this doesn’t cause problems, put quotes around their name, like this: “Example Name”.
Format of this Document:
- When searching through for information, use the table of contents or “command+f”/ “control+f” (depending on your device) to search for target words.
- Using < and > means that what is contained must be filled in by choice. No command actually uses a value surrounded by greater than and less than symbols to work.
- The argument <boolean> refers to values of either “true” or “false”
- The argument <target> refers to the targeters with “@” or a specific player name
- When typing in a command block, it is unnecessary to write a “/” at the start. That is done throughout this document to make it clear where commands start, but it is unnecessary to replicate. However, when typing in chat you must start the command with a “/” like shown.
- Most arguments, such as <name>, say that they must be a single-word or a quoted string. This means that it must either be something like: Hello , Hello_There , or a quoted string such as: “Hello There”. This just means that anything with a space must be placed inside of quotation marks to show that it is still part of the original argument.
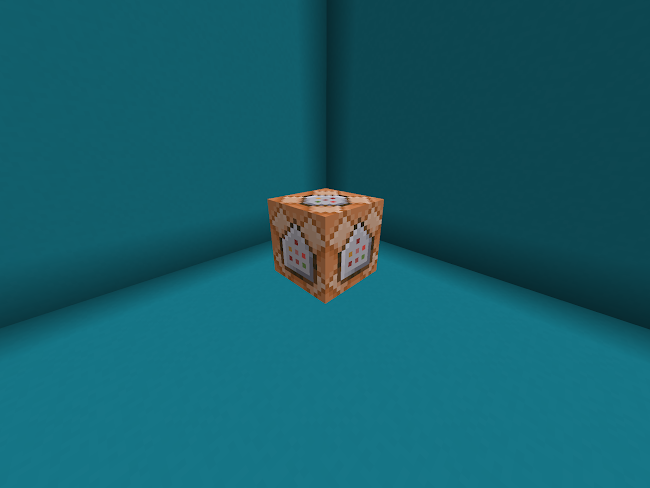
Special Blocks of Note
Key:
Item
[U=unbreakable in survival] [P=unplaceable in survival]
[V=visible only when in hand]
Information about that item
Command to receive item
Command Block
[U] [P] Runs Commands typed into it
/give @s command_block
Structure Block
[U] [P] Copies and Pastes structures within a world.
/give @s structure_block

Border Block
[U] [P] Red wall block, that when placed acts as if there is a wall of barrier blocks from the bottom of the world to the top at its x and y coordinates. This impassable wall affects all survival players and all creative players who are not operators.
/give @s border_block
Structure Void
[U] [V] An empty filler block that interacts with liquids and falling blocks, players can hit it but can still walk through it. Placing one in front of a chest prevents a player from opening that chest. Their main job is to act as filler blocks in a structure (from structure blocks). Structure voids with data values of 1 look blue in the hotbar, but are unchanged in the hand and when placed.
/give @s structure_void

Unknown
Strange block that can be instantly broken in survival (drops as an item). It is supposed to replace item textures that don’t work, mainly functioning in beta blocks being transferred to the main game, but are obtainable through commands. Can be pushed by a piston.
To obtain, make sure the gamerule tile drops is true, then run the command /setblock ~~~ unknown
Then break the block and it should drop as an item.
Barrier Block
[U] [V] Invisible solid block
/give @s barrier

Light Block
[U] [V] Gives off a light level as indicated. Acts as an invisible non-solid block that cannot be interacted with unless holding the item in creative. Placing a block inside a light block (in any gamemode) deletes the light block. When holding the light block item while in creative, you may break the light blocks or tap on them to adjust their light level.
/give @s light_block 1 <0-15>

Invisible Bedrock
[U] [P] Completely invisible block that can’t be interacted with even in creative. This means that it acts like a solid block, but you can hit and break things on the other side of it (Entities such as arrows and ender pearls can also travel through it). The only way to place and break this block is to use the setblock or fill command. Invisible bedrock was used in old worlds to act as the border, but are now unused (but still an available feature).
/setblock ~~~ invisiblebedrock
Allow
[U] [P] Blocks can be placed and broken above allow blocks (all the way up to build limit) in any gamemode/condition.
/give @s allow
Deny
[U] [P] Blocks cannot be placed or broken above deny blocks (all the way up to build limit) except by operators in creative.
/give @s deny

Jigsaw
[U] Complex blocks that are used in structure generation. See: “https://minecraft.fandom.com/wiki/Jigsaw_Block”
/give @s jigsaw

* Breakdown of Commands *
/help and /?

Syntax:
/help <command> /? <command>
/help <page #> /? <page #>
Arguments:
<command> = the specified other command
<page #> = the page number (lists all commands in pages. Numbers less than 1 show the first page and numbers greater than the number of pages show the last page)
Information: The /help and /? Commands allow for the player to learn info about the command in game. Mainly, it just shows all versions of the syntax of the command.
Examples:
- How to use the kill command:
/help kill
- See the third command help page:
/? 3
/ability

Syntax:
/ability <target> <ability> <boolean>
Arguments:
<ability> = Specifies the ability to change. Must be “worldbuilder”, ”mayfly”, or “mute”.
Information: The /ability command allows for the abilities of a player to be changed. These abilities include mayfly, which controls the ability to fly despite gamemode; mute, which controls the ability for others to see their chat messages; and worldbuilder, which toggles the worldbuilder abilities (see /wb and /worldbuilder). This command can only be used when the education edition toggle is on.
Examples:
- Make it so no players can fly:
/ability @a mayfly false
- Remove a player named ExampleName from worldbuilder abilities
/ability ExampleName worldbuilder false
- Mute a random player
/ability @r mute true
/alwaysday and /daylock

Syntax:
/alwaysday <boolean>
/daylock <boolean>
Information: Turns always day on and off. True means that always day is on, and false means always day is off.
Examples:
- Turn always day on:
/alwaysday true
/camera
Syntax:
/camera <target> clear
/camera <target> fade color <red> <green> <blue>
/camera <target> fade time <fade in> <hold> <fade out> color <red> <green> <blue>
/camera <target> set <preset> default
/camera <target> set <preset> facing <entity/xyz>
/camera <target> set <preset> pos <xyz> facing <entity/xyz>
/camera <target> set <preset> pos <xyz> rot <xy>
/camera <target> set <preset> rot <xy>
/camera <target> set <preset> ease <ease time> <ease type>
/camera <target> set <preset> ease <ease time> <ease type> facing <entity/xyz>
/camera <target> set <preset> ease <ease time> <ease type> pos <xyz> facing <entity/xyz>
/camera <target> set <preset> ease <ease time> <ease type> pos <xyz> rot <xy>
/camera <target> set <preset> ease <ease time> <ease type> rot <xy>
Arguments:
clear = Resets the target’s camera to their current default (if they were in third person before a camera was applied to them, their default is third person)
fade = Specifies a camera to fade in
color = Specifies the color of the fading in camera, based off of the values of <red>, <green>, and <blue>
<red> = Specifies the red component of the camera’s color. Must be between 0 and 255 (inclusive)
<green> = Specifies the green component of the camera’s color. Must be between 0 and 255 (inclusive)
<blue> = Specifies the blue component of the camera’s color. Must be between 0 and 255 (inclusive)
time = Specifies that the on-screen color will take a certain amount of time to fade in, hold, and fade out
<fade in> = Specifies the time to fade in the color in seconds. Must be between 0 and 10 (inclusive)
<hold> = Specifies the time to hold the solid color in seconds. Must be between 0 and 10 (inclusive)
<fade out> = Specifies the time to fade out the color. Must be between 0 and 10 (inclusive)
set = Specifies to move the target’s camera to a specific location
<preset> = Specifies how the target’s camera will be locked. Must be “minecraft:free” (not locked to the player’s position), “minecraft:first_person” (locked to the player’s head, default view), “minecraft:third_person” (locked to the player in third person, facing their back), or “minecraft:third_person_front” (locked to the player in third person, facing their face). There are also built-in examples/bonus features: “example:example_free” (free view with “rot 10 40” at y = 50), “example:example_player_effects” (free view with status effects still displayed on the screen), “example:example_player_listener” (free view using the player’s location for sound)
default = Sets the player’s camera to the default setting for the preset. Perspective defaults are the normal cameras resulting from the f5 button, and free perspectives default to pos 0 0 0, rot 0 0
facing = Specifies that the camera should face a block or entity
<entity/xyz> = Either an entity (as a target selector, only one entity can be targeted at once) or a coordinate (x, y, and z)
pos = Specifies that the position of the camera should be placed at <xyz>
<xyz> = Specifies the coordinates to anchor the camera to
rot = Specifies how the camera will be rotated
<xy> = Specifies the rotation of the camera, first yaw (-180 to 180 inclusive, horizontal component) and then pitch (-90 to 90 inclusive, vertical component)
ease = Specifies that the camera should ease into its new settings, rather than teleporting/snapping to it
<ease time> = Specifies the time the transition should take in seconds
<ease type> = Specifies the type of easing that should be carried out. Must be “linear”, “spring”, “in_quad”, “out_quad”, “in_out_quad”, “in_cubic”, “out_cubic”, “in_out_cubic”, “in_quart”, “out_quart”, “in_out_quart”, “in_quint”, “out_quint”, “in_out_quint”, “in_sine”, “out_sine”, “in_out_sine”, “in_expo”, “out_expo”, “in_out_expo”, “in_circ”, “out_circ”, “in_out_circ”, “in_bounce”, “out_bounce”, “in_out_bounce”, “in_back”, “out_back”, “in_out_back”, “in_elastic”, “out_elastic”, or “in_out_elastic”
Information: This command changes the location of a player’s camera or what is shown on it. The player can still move while their camera is disconnected. Sounds are based on the location of the camera.
Examples:
- Put all players into third person back
/camera @a set minecraft:third_person default
- Apply a green screen to the nearest player for 10 seconds
/camera @p fade time 0 10 0 color 0 255 0
- Set the camera of all spectator mode players to follow the nearest player 5 blocks above
/execute as @a[m=spectator] at @s at @p[m=!spectator] run camera @s set minecraft:free pos ~~5~ facing @p[m=!spectator]
- Smoothly move the camera of a random player from their current position to 0 0 0 facing upwards
/camera @r set minecraft:free ease 5 linear pos 0 0 0 rot 0 -90
/camerashake

Syntax:
/camerashake add <target> <intensity> <time> <shake type>
/camerashake stop <target>
Arguments:
<intensity> = specifies intensity of the shake (values 0-4)
<time> = specifies the duration of the shake in seconds
<shake type> = specifies the type/direction of the shake. Must be either “positional” or “rotational”
Information: This command creates a camera shake at the target, causing their screen to shake based on the arguments you put in. This can be useful for aesthetic or immersive purposes, such as making an earthquake in game feel more real. However, the command will not affect players who have camerashake turned off in their video settings.
Examples:
- Create a rotational camera shake of 3 intensity that lasts for 20 seconds on a random player:
/camerashake add @r 3 20 rotational
- Remove a camershake from a player named ExampleName:
/camershake stop ExampleName
/clear

Syntax:
/clear <target> <item> <data> <amount>
Arguments:
<item> = which item to clear
<data> = that item’s data (as a number)
<amount> = the amount of that item to clear
Information: This command removes items from a player’s inventory, but can be surprisingly used for many other things. The most useful is to test for those items or how many there are. If you run the command as “/clear <target>” then it will completely clear that player’s inventory. If you run the command as “/clear <target> <item>” then it will clear all of that item type. The clearing includes offhand and armor slots.
Examples:
- Clear all items from the nearest player:
/clear @p
- Clear 2 nether stars with a value of 5 from all players:
/clear @a nether_star 5 2
Applied Example(s):
- You can test if a player has an item in their inventory using: “/clear <target> <item> <data> 0” This allows for things such as talismans, like gaining speed 3 from having a rabbit’s foot with a value of 2 in your inventory. To set this up, place a chain command block inside a passive buff creator (see passive buffs in the Fun Command Chains and Ideas section) with the command: “/clear @a[tag=PB] rabbit_foot 2 0”, then put a chain conditional command block after it with the command: “/effect @a[tag=PB] speed 1 2 true”. Then to give yourself the speed talisman, type in chat: “/give @s rabbit_foot 1 2”, and you should get speed while it is in your inventory, and lose the speed when it is taken out.
- You can also use the clear command to create item shops. For example, say you want to buy a diamond sword for 3 diamonds. To set this up, place a button going into 3 command blocks. The first is an impulse command that reads: “/clear @p diamond -1 2” Then the next command block should be chain conditional, reading: “/clear @p diamond -1 1”. Then the last block should also be chain conditional, reading: “/give @p diamond_sword”. This system works by clearing 2 diamonds from you to test if you have any, and then removing the rest of the price if you do and giving you your item. The main drawback of this system is that it will take all your diamonds if you don’t have enough.
/clearspawnpoint
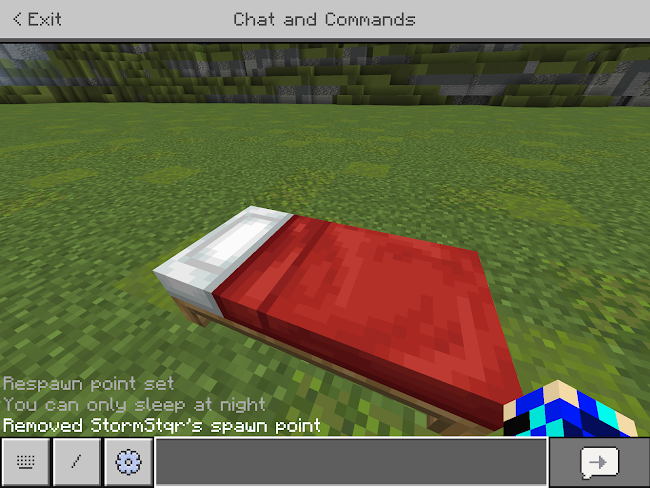
Syntax:
/clearspawnpoint <target>
Information: This command removes the spawn point of the target, resetting them to the world spawn point.
Examples:
- Clear the spawn point of a player named ExampleName
/clearspawnpoint ExampleName
/clone

Syntax:
/clone <begin x y z> <end x y z> <destination x y z> <mask mode> <clone mode>
/clone <begin x y z> <end x y z> <destination x y z> filtered <clone mode> <block> <data>
Arguments:
<begin x y z> = The coordinates of the beginning side of the source area
<end x y z> = The coordinates of the end side of the source area
<destination x y z> = The coordinates where the source area will start to be placed from (always the lower northwest
corner)
<mask mode> = Specifies whether to filter the blocks being cloned. Must be either “replace” (clone all blocks in the source
area to the destination area) or “masked” (only clones non-air blocks from the source area. Blocks in the
destination area that would’ve been overridden by the air blocks remain the same).
<clone mode> = Specifies how to treat the source area. Must be: “force” (forces the cloning even if the source and
destination regions overlap), “move” (clone the source to the destination, then fills the source with air), and
“normal” (don’t move or force, is the default).
Filtered = Clones only the specified block from the source region into the destination area.
<block> = Specifies the block to copy in filtered mode
Information: This command clones the blocks of an origin region into a target/destination area. Note that this command will result in an error if the origin area is too large or if either the origin or destination aren’t within a specific range. This is currently bugged, so the cloning range is very small and can’t be loaded by other players.
Examples:
- Clone only the non-air blocks of a structure at 11 11 11 to 22 22 22 to 33 33 33
/clone 11 11 11 22 22 22 33 33 33 masked normal
- Move all wood planks in the origin area of 1 1 1 to 2 2 2 to 3 3 3
/clone 1 1 1 2 2 2 3 3 3 filtered move planks -1
Applied Examples:
- You can create an unbreakable area of a world by cloning a section into it constantly, so that broken blocks are instantly replaced. If you use the masked mode, then you can still place blocks in that area, but cannot break parts of the map. To do this, type in a repeating always active command block: “/clone <start origin area> <end origin area> <start destination area> masked normal” or “/clone <start origin area> <end origin area> <start destination area> replace normal” if you want to copy air blocks as well (to prevent placing blocks).
- You can use the clone command to create your own version of world edit. Create an origin region that has something like a small sphere of blocks. Then give yourself the tag “WorldEdit” by typing in chat “/tag @s add WorldEdit” (this will make it so only you and anyone with the tag WorldEdit can use the machine. To get rid of the tag just type “/tag @s remove WorldEdit”). Create a repeating command block with a lever on it (so you can turn it off) that runs the command: “/enchant @a[tag=WorldEdit] efficiency” with a comparator going away from that command block into another repeating block that runs: “/execute as @a[tage=WorldEdit] at @s positioned ^^^<distance away> run clone <start origin area> <end origin area> ~~~ masked normal”. You may have to adjust the ~~~ to center the cloned area (such as ~4~2~4). Now, when you turn on the lever and hold a shovel, you can paint with your own customizable world edit. You can also add other tools such as an eraser, where the cloned zone is full of air (for this you do need to change the “masked” in the command to “replace”). If you want to use multiple at once (meaning that you don’t have to keep flipping the levers), such as have an eraser and a painter at the same time, you can change one of your enchant command blocks to read: “/enchant @a[tag=WorldEdit] sharpness”, this way it will activate only when you hold a sword.
/damage

Syntax:
/damage <target> <amount> <damage cause>
/damage <target> <amount> <damage cause> entity <damager target>
Arguments:
<amount> = Amount of damage dealt. For reference, 1 damage equals half a heart. The value cannot be negative.
<damage cause> = What type of damage was dealt (Ex: fire, magic, anvil, etc). This will show up in the death message.
entity = Specifies whether there is an entity responsible for the damage
<damager target> Which entity deals the damage. Can be specified to players or entities (when doing entities that there
may be multiple of, make sure to include “c=1” so that the command fires correctly)
Information: This command allows for you to deal a specified amount of damage to an entity, dealt from a specified source.
Examples:
- Have a player named ExampleName deal 5 magic damage to the nearest other player:
/damage @p[name=!ExampleName] 5 magic entity ExampleName
- Have a zombie named ZOMBIE deal 10 damage to a random player:
/damage @r 10 entity_attack entity @e[type=zombie,name=ZOMBIE,c=1]
/deop
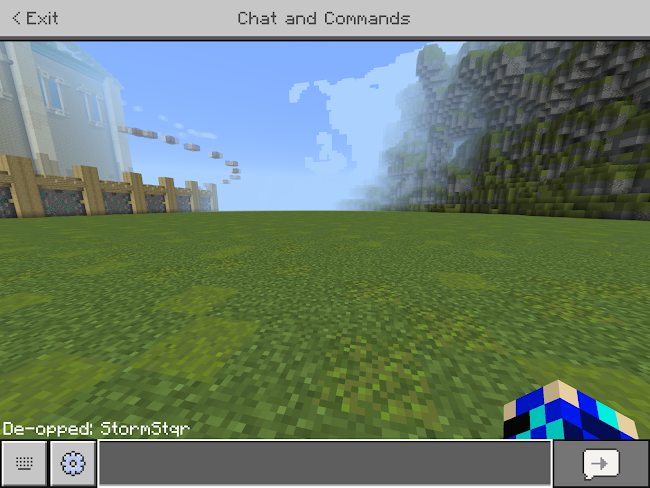
Syntax:
/deop <target>
Information: Removes operator status from the target player
Example:
- Remove operator from a player named ExampleName
/deop ExampleName
/dialogue
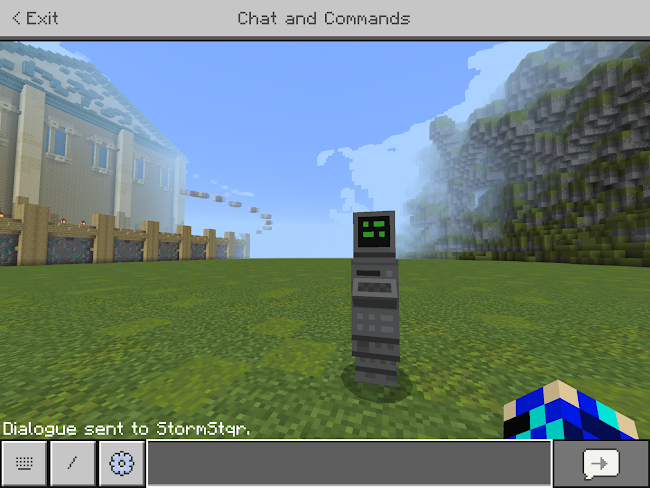
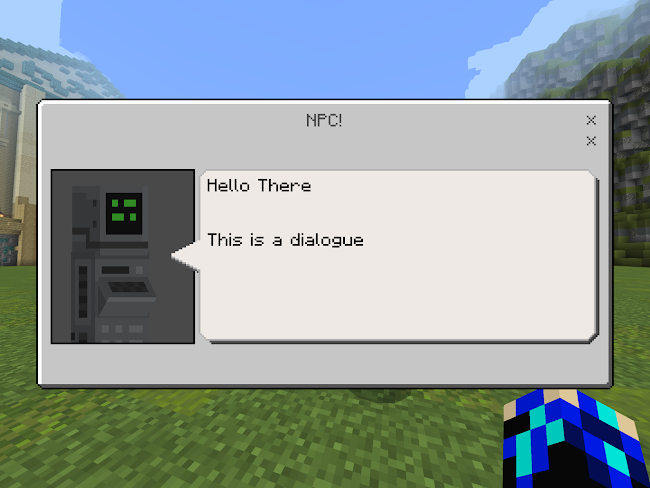
Syntax:
/dialogue open <npc target> <player target>
Arguments:
<npc target> = just like <target>, but target must be a single npc
<player target> = just like <target>, but target must be a player
Information: This command forces the opening of an npc menu for a specified player. There are many aspects of this command that are designed for behavior pack usage, and can be seen on the minecraft wiki. It must also be noted that when writing commands inside of an npc, you can use the “@initiator” target to target the player who pressed the button in the npc. Do note that this targeter only works inside of npcs.
Examples:
- Open the dialogue of a npc named ExampleName in all players within 5 blocks of you
/dialogue open @e[type=npc,name=ExampleName] @a[r=5]
/difficulty
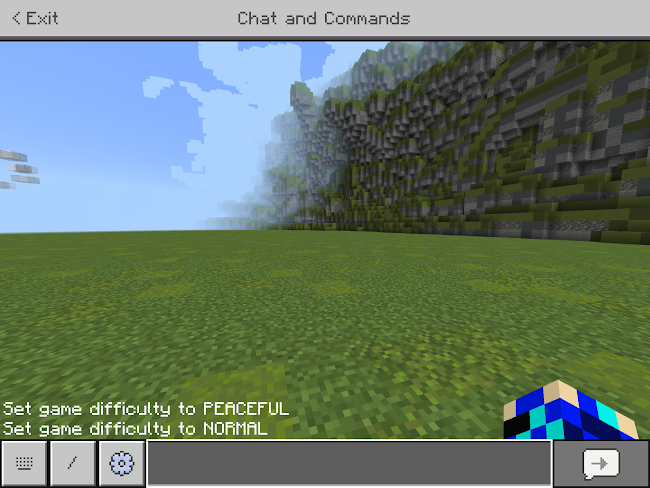
Syntax:
/difficulty <difficulty>
Arguments:
<difficulty> = Game difficulty, must be: peaceful, p, 0; easy, e, 1; normal, n, 2; hard, h, 3
Information: Changes the game difficulty to peaceful, easy, normal, or hard.
Examples:
- Change the game difficulty to hard
/difficulty 3
/effect
Syntax:
/effect <target> clear
/effect <target> <effect> <seconds> <amplifier> <hide particles>
Arguments:
clear = Remove all effects from the target(s)
<effect> = The effect to be applied, such as absorption, strength, invisibility, etc
<seconds> = Number of seconds to apply the effect for. If it is not specified, then the default time is 30 seconds. (For
instant damage, instant health, and saturation, the time is measured in game ticks and the default is 1 tick).
<amplifier> = Power/amplifier of the effect. Note that the amplifier is always 1 higher than you type, for example: “/effect
@s speed 100 0” gives speed 1, and “/effect @s speed 100 4” gives speed 5. If a value is not specified, the default
is 0 (ex: speed 1). Has a minimum of 0 (level 1) and a maximum of 255. Some effects such as invisibility and
nausea are not affected by the amplifier level.
<hide particles> = Specifies whether to add particles with the effect. Must be either “true” (don’t show particles) or “false”
(do show particles). The default if not specified is false.
Information: This command gives effects with specified amplitudes for a specified amount of times that can show or not show particles. If a target already has the status effect, it is removed only if the new version of the effect has a longer duration and/or a larger amplitude. To remove a specific effect, you can do: “/effect <target> <effect> 0 0 true”, and this will remove all versions of that status effect.
Examples:
- Effect all entities with max invisibility for 10 seconds with particles
/effect @e invisibility 10 255 false
- Effect a player named ExampleName strength 2 for 1000 seconds without particles
/effect ExampleName strength 1000 1 true
/enchant

Syntax:
/enchant <target> <enchantment> <level>
Arguments:
<enchantment> = Specifies the enchantment to apply
<level> = Specifies the enchantment level to apply. Cannot exceed the set limit.
Information: This command enchants the object that the target is holding in their mainhand. Normal rules for enchanting apply, so objects can only be enchanted with enchantments that they normally are able to (like a sword with sharpness, not a grass block or bow with smite) and enchantments can’t be higher than normally available (such as sharpness 5 being the max, or mending 1 beijing its max). These limitations can only be bypassed through mods, apps, or other third parties.
Examples:
- Enchant all players with power 1
/enchant @a power
- Enchant a random zombie with smite 5
/enchant @r[type=zombie] smite 5
Applied Examples:
- To test if a player is holding an item, you can take a repeating command block and write: “/enchant @p lure”. Then you can take a comparator output from that. Whenever the nearest player holds a fishing rod, then the comparator will activate, and deactivate when they aren’t holding a fishing rod.
/event

Syntax:
/event entity <target> <event>
Arguments:
entity = required part of syntax, specifies that the event is on an entity (there is no other option)
<event> = Specifies the event to trigger
Information: This command triggers an in-game event at an entity. This is a spawn event (an event that can also be used with the “/summon” command to be executed at the spawning of an entity), but can be triggered at any point. Note that the events are specific to their applicable entities, and cannot be used on every mob.
Examples:
- To cause all creepers to become charged creepers
/event entity @e[type=creeper] minecraft:become_charged
-To cause random zombie pigmen to become angry
/event entity @r[type=zombified_piglin] minecraft:become_angry
Applied Examples:
- You can create a horse that continuously changes its color by typing the command “/event entity @e[type=horse,name=rainbow] minecraft:make_black” in a repeat needs redstone command block with a 100 tick delay. Then with a second command block on top of the first on chain always active with a 20 tick delay and the command “/event entity @e[type=horse,name=rainbow] minecraft:make_darkbrown”. Place another chain always active 20 tick delay command block on top of that with the command: “/event entity @e[type=horse,name=rainbow] minecraft:make_brown”. Then another chain always active 20 tick delay command block on top with the command, “/event entity @e[type=horse,name=rainbow] minecraft:make_chestnut”. Then another chain always active 20 tick delay command block on top with the command, “/event entity @e[type=horse,name=rainbow] minecraft:make_creamy”. Then another chain always active 20 tick delay command block on top with the command, “/event entity @e[type=horse,name=rainbow] minecraft:make_white”. Then another chain always active 20 tick delay command block on top with the command, “/event entity @e[type=horse,name=rainbow] minecraft:make_gray”. Place a lever on the repeat command block and flip it on to activate the chain. Now any horse named “rainbow” will change its color once every second.
- It can be really annoying to build farms and minigames in the overworld when they involve piglens, because after around a minute the piglens become zombified. To solve this, create a repeat always active command block with the command: “/event entity @e[type=piglin] stop_zombification_event”, this will prevent your piglins from ever zombifying.
/execute

Syntax:
/execute align <axes> <…>
/execute anchored <eyes/feet> <...>
/execute as <target> <...>
/execute at <entity> <...>
/execute facing <coordinate xyz> <...>
/execute facing entity <entity> <...>
/execute in <dimension> <...>
/execute positioned <position xyz> <...>
/execute positioned as <entity> <...>
/execute rotated <yaw> <pitch> <...>
/execute rotated as <entity> <...>
/execute if/unless block <position xyz> <block> <data> <...>
/execute if/unless blocks <start xyz> <end xyz> <destination xyz> <scan mode> <...>
/execute if/unless entity <entity> <...>
/execute if/unless score <entity> <entity objective> <operation> <source entity> <source objective>
/execute if/unless score <entity> <entity objective> matches <score range>
/execute <...> run <command>
Arguments:
align = Specifies to align previously given coordinates (such as from “positioned” or “at”, defaults to the position of the
executor if unspecified) to their respective values (decimals are always rounded down to the nearest whole
number) along a specified axis (x, y, and/or z).
anchored = Specifies to change the coordinates that the command is executed at to be at the eyes or feet of the executor of
the command, is affected by “as”. When this subcommand is absent, the default is “feet”.
as = Specifies to change the executor of the command to the <target>. However, this subcommand doesn’t affect the
location, rotation, anchor, or dimension that the command is executed in.
at = Specifies to change the position, rotation, and dimension that the command is executed from to the <entity>, without
changing the executor of the command.
facing = Specifies to change the rotation of execution to face a certain point from the anchored position (or just the
position of execution in general), without changing the rotation of any entity. For example, using “^^^1” on
targets (like so: “/execute as @a at @s facing 0 0 0 run tp @s ^^^1”) will move them one block towards that
coordinate without changing any of their other attributes, such as rotation.
facing entity = Specifies to change the rotation of execution to face a certain entity from the anchored position (or just the
position of execution in general), without otherwise affecting either entity. For example, using “^^^1” on targets
(like so: “/execute as @a at @s facing entity @e[type=zombie,c=1] run tp @s ^^^1”) will move them one block
towards the nearest zombie without changing any of the player or zombie’s attributes, such as rotation.
in = Specifies to change the dimension in which to execute the command. This can be especially helpful, as the same
coordinate system is used in all dimensions. However, coordinate values will be divided by 8 when changing to
the nether, and multiplied by 8 when changing out of it (if this is not what you want, simply add “positioned as
@s” somewhere between your “in” and “run” subcommands). Custom dimensions can be accessed this way (find
its name in the resource location section of your data pack).
positioned = Specifies to set the position for the command to be executed to a specific coordinate, without changing its
rotation or dimension.
positioned as = Specifies to set the position for the command to be executed to the coordinates of the <entity>, without
change in the command’s rotation or dimension.
rotated = Specifies to set the rotation of the command to a certain pitch and yaw.
rotated as = Specifies to set the rotation of the command to match that of the <entity>.
if/unless = Specifies conditions at which to execute or not execute the command. Must be either “if” (command is only
executed if this subcommand is successful) or “unless” (command is only executed if this subcommand fails).
run = Specifies the command to be executed. This subcommand is the only one that cannot be duplicated.
<axes> = Specifies on which axes to align coordinates. Must be some combination of “x”, “y”, and “z”, which cannot be
duplicated. For example, valid outputs include: “x”, “y”, “z”, “xz”, “xy”, “zy”, and “xyz”. The order of digits doesn’t
have any effect on the result.
<head/feet> = Specifies where to anchor the command, based on the executor’s (or “as” target’s) eyes or feet. Must be
either “eyes” or “feet”.
<target> = Specifies the entity or entities at which to execute a command.
<entity> = Specifies the entity or entities to take information from, such as their position, rotation, dimension, or scores.
<coordinate xyz> = Specifies the coordinates at which to rotate the command’s execution towards.
<dimension> = Specifies at which dimension to execute the command. Must be: “over_world”, “nether”, “the_end”, or the
file name of a custom dimension.
<yaw> = Specifies how the command is rotated horizontally. Must be between 179.9 and -180 (both about due north,
inclusive). Notable values are -180 (north), -90 (east), 0 (south), and 90 (west). Using “~” refers to the <target>’s
previous rotation.
<pitch> = Specifies how the command is rotated vertically. Must be between -90 (straight up) and 90 (straight
down) (inclusive).
block = Specifies to check if a certain block is in a specific location (replaces the old “detect”), functions like “/testforblock”
blocks = Specifies to check if a certain area matches another area, functioning like “/testforblocks”
entity = Specifies to check if a certain entity exists, functioning like “/testfor”
score = Specifies to check for a score, functioning like “/scoreboard players test”
<block> = Specifies the block in which to test for
<data> = Specifies the data of the block that is being tested for. This argument is optional.
<start xyz> = Specifies the starting coordinates for the area in which to test
<end xyz> = Specifies the ending coordinates for the area in which to test
<destination xyz> = Specifies the bottom northwestern corner of the source region
<scan mode> = Specifies how to compare the two regions for “blocks”. Must be either “all” (all blocks between the source
and test regions must match for success) or “masked” (blocks that are air in the source region are ignored in the
tested region).
<entity objective> = The objective of which to test the <entity>’s score in
<operation> = The comparison to test for between the two listed scores. Must be “>” (first is greater than the second),
“>=” (first is greater than or equal to the second), “<” (second is greater than the first), “<=” (second is greater
than or equal to the first), or “=” (both scores are equal).
<source entity> = The second entity whose score will be tested. Using “*” will test for all score holders for this objective
(this also applies to <entity>)
<source objective> = The objective of which to test the <source entity>’s score in
matches = Specifies to test if the <entity>’s score is within the <score range>
<score range> = Specifies the range in which to test the <entity>’s score for. Should be in the style of “#” (exactly a value),
“..#” (less than a value), #..” (greater than a value), or “#..#” (between two values), all of these are inclusive.
<command> = The command at which to run. Using the “@s” target selector in that command triggers at the “as” target,
defaulting to the executor if unspecified.
<...> = This means that other subcommands (align, anchored, as, at, facing, in, positioned, etc) can be used afterwards as
many times as necessary, ending with an eventual “run” function.
Information: /execute is one of the most useful commands, and is important to understand for many creations. This command executes a command at a certain target or group of targets, allowing for greater control of its effects. As of 1.19.5, the command has greatly increased its range of capability, especially with the inclusion of “if/unless” components. In this setup, all subcommands except “run” can be used as many times as needed, as long as they obey the normal syntax requirements.
Examples:
- Teleport a random player to the aligned x and z coordinates of the nearest player
/execute at @p align xz run tp @r ~~~
- Teleport yourself 1 block up (doesn’t work in command blocks)
/execute anchored eyes run tp @s ~~~
- Kick all players with an afk score of 0
/execute as @a if score @s afk matches 0 run kick @s
- Summon a zombie at the position the command was executed for each armor_stand in render distance (with a max of 5)
/execute as @e[type=armor_sand,c=5] run summon zombie
- Teleport the nearest player up one block
/execute at @p run tp @p ~~1~
- Teleport all players 1 block closer to the coordinates 0 0 0
/execute as @a at @s facing 0 0 0 run tp @s ^^^1
- Teleport all illagers 1 block closer to the nearest player
/execute as @e[family=illager] at @s facing entity @p run tp @s ^^^1
- Teleport a random player to their equivalent coordinates (divided by 8) in the nether
/execute as @r at @s in nether run tp @s ~~~
- Summon an armor stand named “Hi” at the exact overworld coordinates (not adjusted from the nether) of all players
/execute as @a at @s positioned as @s overworld run summon armor_stand Hi
- Find the temple structure closest to 0 0 0
/execute positioned 0 0 0 run locate structure temple
- Testfor players within 20 blocks of the farthest loaded pig
/execute positioned as @e[type=pig,c=-1] run testfor @e[type=Player,r=20]
- Rotate all armor stands named “mimic” to match the rotation of the nearest player
/execute as @e[type=armor_stand,name=mimic] at @s rotated as @p run tp @s ~~~
- Teleport all players to 0 0 0 facing towards the horizon of due west
/execute rotated 90 0 run tp @a 0 0 0
- Kill all players who stand on a redstone block
/execute as @a at @s if block ~~-1~ redstone_block -1 run kill @s
- If the block at 0 0 0 matches the block in front of a player, give them a diamond
/execute as @a at @s if blocks ^^^1 ^^^1 0 0 0 run give @s diamond
- Deal 1 damage to all entities within a range of 5 blocks of each player, unless there is a villager or cat in that range
/execute as @a at @s unless entity @e[type=villager,r=5] unless entity @e[type=cat,r=5] run damage @e[r=5]
freezing 1
- Give weakness 2 (with particles) for 30 seconds to all players that don’t have a game score between 1 and 5 (inclusive)
/execute as @a unless score @s game matches 1..5 run effect @s weakness 30 1 false
- Teleport all players who don’t have a game score equivalent to the armor stand’s away from it by 0.3 blocks
/execute at @e[type=armor_stand,name=test] as @a[r=5] at @s facing entity @e[type=armor_stand,
name=test,c=1] unless score @s game = @e[type=armor_stand,name=test,c=1] run tp @s ^^0.2^-0.3
Applied Examples:
- You can create a block, such as gold, that when stepped on sets your spawn point. To do this, type in a repeat, always active command block: “/execute as @a at @s if block ~~-1~ gold_block -1 run spawnpoint @s”
- You can execute commands based off of an item on the ground, so when a player drops it, a function occurs. For example, type in a repeating always active command block: “/execute at @e[type=item,name=”Feather”] run effect @a[r=1,c=1] speed 30 4 true” with a chain, conditional, always active command block coming out of it with the command: “/kill @e[type=item,name=”Feather”]”. This will make it so whenever a player drops a feather, they will gain speed 5 for 30 seconds.
- You can make entities deal custom damage by combining the /execute, /effect, and /damage commands. For example, to make zombies deal 10 damage per hit (instead of 4.5 in hard mode) run in a repeat always active command block: “/effect @e[type=zombie] weakness 1 255 true”, then in another repeat always active command block: “/execute as @e[type=zombie] at @s run damage @e[r=3,c=1,type=!armor_stand,type=!arrow,type=!item,type=!xp_orb,family= !monster,family=!minecart] 10 entity_attack entity @s” with a delay of 40 or 60 ticks. This will cause zombies’ base attacks to do no damage, but every 2-3 seconds, they deal 10 attack damage to the nearest entity within 3 blocks (that doesn’t include xp, minecarts, monsters, items, armor stands, or arrows).
/experience and /xp

Syntax:
/xp <amount, L> <target>
/experience <amount, L> <target>
Arguments:
<amount, L> = specifies the amount of experience to give to the player (amount of experience to level up increases every
level). Levels cannot go negative. If the value is negative, then it reduces your xp amount, but cannot go below
zero. If you add “l” to the end of the xp amount it changes it to levels (ex: “25” is 25 xp, but “25l” is 25 levels).
Information: This command changes the amount of experience a player has. Its uses are rather limited, but can be used to keep players at 0 levels (such as on adventure maps, so that the players can’t gain xp from mob kills) or to display a number (xp level is shown above the xp bar on the players screen). Note that there is no “set” functionality in bedrock, meaning that the only way to control the number shown is with addition and subtraction.
Examples:
- Remove 5 levels from all players
/experience -5l @a
- Give 7 experience points to the closest player
/xp 7 @p
/fill

Syntax:
/fill <begin x y z> <end x y z> <block> <data> <oldblockhandling mode>
/fill <begin x y z> <end x y z> <block> <data> replace <old block> <data>
Arguments:
<begin x y z> = Specifies the starting coordinates for the target region
<end x y z> = Specifies the ending coordinates for the target region
<oldblockhandling mode> = States how to fill the new area and how to treat the old blocks of that area. Must be: “destroy”
(fills the target area and destroys all of the blocks that were there before as if they were broken by their diamond
tool equivalent, causing them to drop their item, if they could with an unenchanted diamond tool, or items if that block was an entity such as a chest), “hollow” (replaces the outline of the target region, the most outer single layer of blocks, with the specified block, and the inner blocks with air. If there are no inner blocks, due to one or more of the target region’s dimensions being less than 3 blocks, then it just replaces the target region with the specified blocks like “replace”) , “keep” (fills only the air blocks in the target region with the specified block, all non-air blocks are unaffected), “outline” (replaces only only the outline of the target region, not affecting the inner blocks. If there are no inner blocks, then all blocks are filled like with “replace”), and “replace” (replaces all blocks in the target region with the new block, deleting the old ones. This is the default setting).
replace = Adds that new block will replace only a specific old block type
<old block> = Specifies which block the command will replace
Information: This command fills a specified area with a specified block. Using the different arguments can allow for wide customization of the way an area is filled.
Examples:
- Replace all dirt blocks in area 1 1 1 to 2 2 2 with bedrock
/fill 1 1 1 2 2 2 bedrock 0 replace dirt -1
- Fill all blocks in area 1 1 1 to 2 2 2 with air
/fill 1 1 1 2 2 2 air
Applied Examples:
- If you get to the end of a building project and suddenly decide that you don’t like one of the block types, you can change it using this. Place a repeat always active command block with the command: “/execute as “<your username>” at @s run fill ~10~10~10 ~-10~-10~-10 <block you want to add, could be air> <block data, probably 0> replace <old block> <data value>” Now if you fly around your build, all of your target blocks within a 10 block cube radius of you will change into the new block.
/fog

Syntax:
/fog <target> <delete mode> <fog name>
/fog <target> push <fog> <fog name>
Arguments:
<delete mode> = States how to remove fogs. Must be either “remove” (deletes all fogs with that name) or “pop” (deletes
only the most recent fog with that name).
<fog name> = Refers to the player name for the fog, like in /structure. For example you could refer to
“minecraft:fog_basalt_deltas” as “gray fog”. This allows for multiple fogs to be created and targeted individually.
You can also stack fogs, meaning that you can have multiple fogs under one name.
push = Specifies to create a fog
<fog> = Specifies the fog type, such as “minecraft:fog_jungle”.
Information: This command creates layers of fog around the target (only noticeably affects players). Unfortunately the distance of fog is related only to a player’s render distance and its intensity cannot be customized.
Examples:
- Create a mesa fog named orange1 for all players
/fog @a push “minecraft:fog_mesa” “orange1”
- Remove a fog named orange1 from a random player
/fog @r remove orange1
/function
Syntax:
/function <function name>
Arguments:
<function name> = the name of the function to be executed
Information: This command runs a list of commands based on the function folder in a behavior pack.
Examples:
- Run a function called “StartGame”
/function StartGame
/gamemode

Syntax:
/gamemode <gamemode> <target>
Arguments:
<gamemode> = Specifies the gamemode to put the player into. Must be survival (or “s” or “0”), creative (or “c” or “1”),
adventure (or “a” or “2”), default (or “d” or “5”), or spectator
Information: This command can be used to change the gamemode of the target. The target must be a player.
Examples:
- Change all players to the default gamemode
/gamemode d @a
- Change the nearest player’s gamemode to adventure
/gamemode 2 @p
/gamerule
Syntax:
/gamerule <gamerule> <boolean>
/gamerule <gamerule> <value>
Arguments:
<gamerule> = Specifies the gamerule to change.
<boolean> = For nearly all gamerules, specifies whether it is true or false.
<value> = For the gamerules “functionCommandLimit”, “maxCommandChainLength”, “randomTickSpeed”, and
“spawnRadius” specifies the integer value to change the rule to.
Information: This command allows a player to change gamerules in game, such as pvp and tick speed. Note that capitalization doesn’t matter when entering gamerule arguments. If a specification is not given after the gamerule, then the current version of the gamerule will be displayed in chat (for example, “/gamerule showtags” will put “showtags = true” in chat).
Examples:
- Turn on fire tick
/gamerule dofiretick true
- Turn off drowning damage
/gamerule drowningdamage false
Applied Examples:
- To manage when or whether players can do certain things in game can be useful. Such as “/gamerule pvp false” or “/gamerule keepinventory false” or “/gamerule randomtickspeed 0” can customize the way a game or server runs at specific points in time.
- If you have a command running that you can’t disable, such as something that is constantly teleporting you out of range of the command block, you can type in chat “/gamerule commandblocksenabled false” to deactivate commands so that you can turn off the command block. When finished, type “/gamerule commandblocksenabled true” to turn them back on.
/gametest

Syntax:
/gametest runthis
/gametest run <test name> <stop on failure> <repeat count> <rotation>
/gametest run <test name> <rotation>
/gametest runthese
/gametest runset <run tag>
/gametest clearall
/gametest create <test name> <x width> <y height> <z depth>
/gametest pos
Arguments:
runthis = Attempts to run the nearest game test structure within a 15 block radius
run = Run a gametest function (summons a platform with specified testing frameworks on it)
<test name> = Specifies the gametest to run, must be one of an already existing list
<stop on failure> = Specifies whether to keep repeating the test even if it fails. Must be either “true” or “false”
<repeat count> = Number of times to repeat the specified gametest
<rotation> = Specifies the orientation at which to create test facing. Must be “1” (90 degrees), “2” (180 degrees), or “3”
(270 degrees), if not specified the default is 0 degree rotation.
runthese = Attempts to run all structure block tests within 200 blocks
runset = Create and run all tests with the specified tag
<run tag> = Specifies the tag of gametest to run, must be an existing ID.
clearall = Clears all gametests
create = Build a platform for testing of a specified size. The platform contains a structure block and command block, and is
made with polished andesite and dirt.
<x width> = Length of the x-coordinate side of the platform to build
<y height> = Length of the y-coordinate height of the platform to build
<z depth> = Length of the z-coordinate side of the platform to build
pos = Finds the position of the closest structure block within 200 blocks
Information: This command allows the player to interact with the gametest framework. The command is only available when the “experimental gameplay” and “gametest framework” enabled in your world settings upon creation. Gametest is a system that makes it easier to test minecraft for bugs and issues of all sorts, and this command is how to interact with the interface. Structure names are saved in the format of “<run tag>:<test name>”.
Examples:
- Run the test of whether a minecart can be placed out of a dispenser, repeating 5 times, rotated 90 degrees, and stopping repeats on failure
/gametest run dispensertests:dispenser_minecart true 5 1
- Run all tests with the tag “dispensertests”
/gametest runset dispensertests
- Create a test area called custom:test1 with a height of 10, width of 9, and depth of 11
/gametest create custom:test1 9 10 11
/give

Syntax:
/give <target> <item> <amount> <data> <components>
Arguments:
<item> = Specifies the item to give to the player
<amount> = Specifies the quantity of the item to give to the player, cannot be negative.
<components> = Gives attributes to the item, must be “minecraft:can_place_on” (makes it so this block can be placed on
the specified block(s) in any gamemode), “minecraft:can_destroy” (the item can be used to break the specified
block(s) in any gamemode), “minecraft:keep_on_death” (specifies whether the item should be kept on death
even with keep inventory off), or “minecraft:item_lock” (limits the mobility of the item in a player’s inventory.
Note that this only applies to a player’s inventory, and cannot be successfully used inside tile entities like chests.
This attribute has the subsets of either “lock_in_inventory” (item cannot leave the player’s inventory unless lost
on death, including things like crafting benches. However, the item can be moved around within the inventory as
much as the player wishes) or “lock_in_slot” (item cannot leave the slot that it is in, which also applies if it is
picked up from the ground. The only way to remove this item is with /clear or by dying without keep inventory)).
The structure of this argument is JSON, and so should be phrased like:
{“<component>”:{“<subcomponent>”},”<componenent2>”:{“<subcomponent2>,<subcomponent3>”}}.
Information: This command gives a player a specified item of a certain quantity with data values. Items that are given are collected like they were picked up, with specific stackings for items (1,16,64) and deleting excess items while in creative mode. While in survival, item amounts that exceed the space in a player’s inventory are thrown out in front of the player.
Examples:
- Give a random player a stack of spruce logs
/give @r log 64 1
- Give the nearest player 32 dirt blocks that can only be placed on grass and stone and are not lost on death
/give @p dirt 32 0 {“minecraft:can_place_on”:{“blocks”:[“grass”,”stone”]},”keep_on_death”:{}}
- Give all players a gold pickaxe on 1 durability that can only break obsidian
/give @a golden_pickaxe 1 32 {“minecraft:can_destroy”:{“blocks”:[“obsidian”]}}
- Give yourself a night vision splash potion that is locked in your inventory
/give @s splash_potion 1 5 {“item_lock”:{“mode”:”lock_in_slot”}}
/hud (currently unavailable)
Syntax:
/hud <target> <visibility> <element>
Arguments:
<visibility> = Specifies whether or not to make a certain HUD element visible for <target>. Must be either “hide” (make invisible) or “reset” (make visible as it would be normally - things like bubbles are only visible when suffocating/drowning)
<element> = Specifies the HUD element to show or hide. Must be “air_bubbles”, “all”, “armor”, “crosshair”, “health”, “horse_health” (any mount’s health), “hotbar”, “hunger”, “paperdoll”, “progress_bar”, “tooltips”, or “touch_controls” (only affects mobile players)
Information: This command controls the visibility of certain aspects of a player’s HUD (Heads Up Display - on-screen information).
Examples:
- Hide all player’s health
/hud @a hide health
- Restore the default HUD for the nearest player
/hud @p reset all
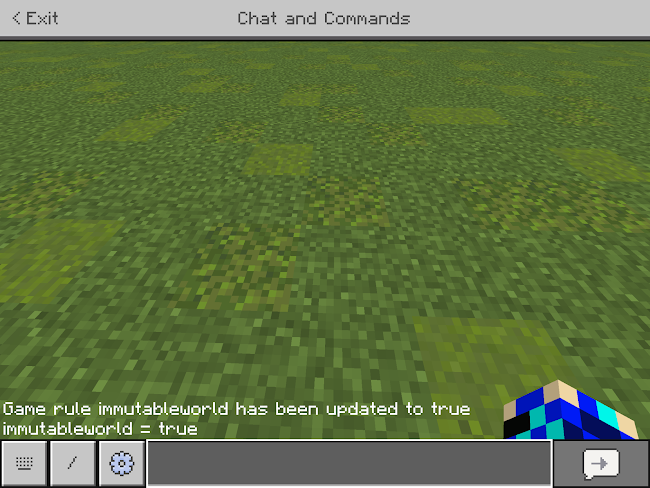
/immutableworld
Syntax:
/immutableworld <boolean>
Arguments:
<boolean> = Specifies whether to activate immutable world (“true”) or to turn it off (“false”).
Information: This command specifies whether or not the world can be edited by non-operators (who have the world building status). When “true”, all players who aren’t operators (despite gamemode, including creative) cannot edit the world beyond interacting with entities and blocks like levers, doors, pressure plates, etc. This command only works when the “education edition” feature is turned on in the world settings. If you write just “/immutableworld” it will display the current mode in chat.
PLEASE NOTE: THIS FUNCTION DOES NOT CURRENTLY WORK
Examples:
- Turn immutableworld on
/immutableworld true
/inputpermission

Syntax:
/inputpermission query <target> <permission>
/inputpermission set <target> <permission> <state>
Arguments:
query = Returns the current state (enabled or disabled) of target’s permissions
<permission> = Specifies the permission to restrict or allow. Must be either “camera” (whether the player can turn their camera view) or “movement” (whether the player can move)
<state> = Specifies the current state of the permission for the target. Must be either “enabled” or “disabled”
set = Sets the player target’s permission for the <permission> input
Information: This command controls if players are able to move their camera or avatar (using game inputs).
Examples:
- Query the nearest player’s camera permission
/inputpermission query @p camera
- Prevent all players from moving
/inputpermission set @a movement disabled
/kick

Syntax:
/kick <target> <message>
Arguments:
<message> = Displays a message on the disconnected screen to the player(s) who was/were kicked. Using target selectors
in the message displays the names of the targeted entities.
Information: This command is used to kick a player from the world they are in. Attempted reentry of the world can be very glitchy, sometimes allowing immediate rejoin (mostly on servers), but often requiring the world owner to relog. World owners cannot be kicked.
Examples:
- Kick a player named ExampleName
/kick ExampleName
- Kick the nearest player for cheating
/kick @p Outlawed Gameplay
/kill
Syntax:
/kill <target>
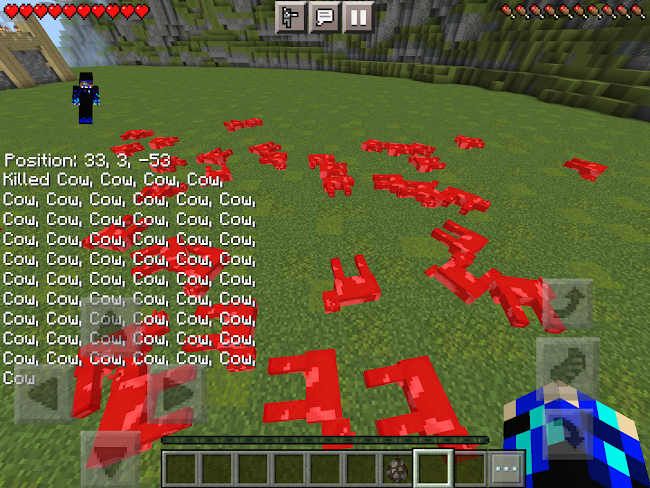
Information: This command kills the target(s), ignoring armor and status effects. Players in creative mode are immune. Killed entities obey the normal rules, displaying the death message “<target> died.”, drop loot (as if killed by a player without looting), and slimes/magma cubes split into smaller versions.
Examples:
- Kill all items on the ground
/kill @e[type=item]
- Kill the nearest hostile mob within 100 blocks
/kill @e[family=monster,r=100,c=1]
/list

Syntax:
/list
Information: This command lists all players currently online in chat.
/locate

Syntax:
/locate biome <biome>
/locate structure <structure> <new chunks only>
Arguments:
<biome> = Specifies the biome to search for
<structure> = Specifies the structure to look for. Note that the desert temple, jungle temple, witch hut, and igloo all fall
under the category of “temple”.
<new chunks only> = Specifies whether to search for only structures that want to span in unloaded chunks. If “true” then
the output will be the coordinates of the nearest structure that hasn’t been loaded in yet. If “false” then the output
ignores whether chunks were loaded or not. Must be either “true” or “false”
Information: This command displays the coordinates of the nearest (to the executor of the command, such as a player or command block) of the specified structure or biome.
Examples:
- Find the nearest taiga biome
/locate biome taiga
- Find the nearest village that hasn’t been loaded yet
/locate structure village true
/loot

Syntax:
/loot give <target> kill <kill target> <tool>
/loot give <target> loot <loot table> <tool>
/loot insert <position x y z> kill <kill target> <tool>
/loot insert <position x y z> loot <loot table> <tool>
/loot spawn <position x y z> kill <kill target> <tool>
/loot spawn <position x y z> loot <loot table> <tool>
/loot replace block <position x y z> slot.container <slot> <count> kill <kill target> <tool>
/loot replace block <position x y z> slot.container <slot> <count> loot <loot table> <tool>
/loot replace entity <target> <slot type> <slot> <count> kill <kill target> <tool>
/loot replace entity <target> <slot type> <slot> <count> loot <loot table> <tool>
Arguments:
give = Gives the loot items directly to the player
insert = Distributes the loot items directly into a container block
spawn = Spawns the loot as item entities at the specified coordinates
replace = Specifies to replace items in the inventory of the container block or player
block = Specifies the target will be a container block
entity = Specifies the target will be a non-tile entity
<position x y z> = x,y, and z coordinates of the targeted container block
<kill target> = Target(s) to attempt to kill
kill = Specifies to attempt to kill the target and drop their normal loot table. This will not actually kill this entity
<tool> = Specifies what tool was used to kill. Must be an item type or “mainhand” or “offhand” (which refers to the main
hand or offhand of the player that the command is executed from. If it is executed from only a command block,
the default is an unenchanted player sword)
loot = Specifies that the loot will come directly from the game’s loot table, not an in-game event (such as the death of an
entity)
<loot table> = Specifies the loot table in which to use
<slot type> = Specifies the slot type in which to place the loot item(s), such as “slot.hotbar”
<slot> = Specifies the specific slot to replace the loot in, must be a number that matches the possible options from the slot
type. For example “slot.hotbar” has the possible options of 0 through 8 (slot 1 being represented by “0”)
<count> = Specifies the number of consecutive slots the loot can replace
Information: This command allows players to access in-game loot tables, giving them to players, replacing entities with them, and placing them in tile entities/container blocks (such as chests). Because many available loot tables are randomized, the use of the loot command gives materials based off of the same randomized table as one would find naturally generating. When using the “kill” argument, only one entity may be targeted at a time.
Examples:
- Give all players the loot of an end city, with the drop rate included of the looting sword in your mainhand
/loot give @a loot “chests/end_city_treasure” mainhand
- Spawn dragon head items 1 block above you
/loot spawn ~ ~1 ~ loot “blocks/dragon_head”
- Place the loot from attempting to kill the nearest creeper in a chest at 0 0 0
/loot insert 0 0 0 kill @e[type=creeper,c=1]
/me
Syntax:
/me <message>
Arguments:
<message> = The message in which to display
Information: This command displays a message about the executor of the command (if used in “/execute” the command will talk about the target of the execute command), in the format of: “* <target> <message>”. This means that typing something like “/me did some stuff” (and the target’s name is ExampleName) will output: “* ExampleName did some stuff”.
Applied Examples:
- To make it look like player(s) have joined or left the game, you can write: “/execute as <target> run me §ehas joined the game” or “/execute as <target> run me §ehas left the game”
- You can display advancements a player has gotten with “/execute as <target> run me has made the advancement §a[<advancement>]”
/mobevent
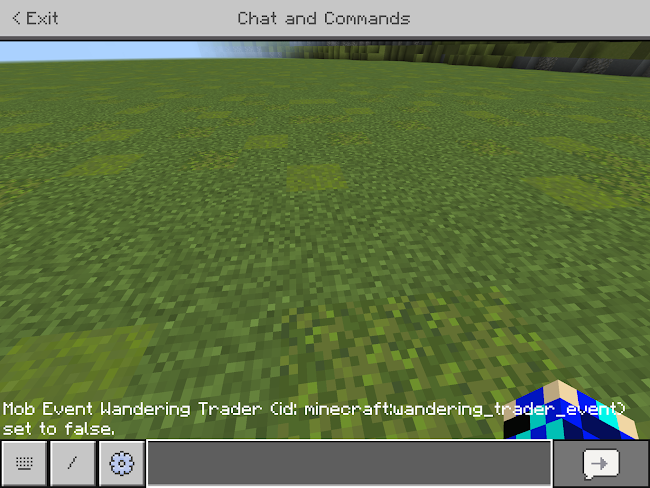
Syntax:
/mobevent <mob event> <boolean>
Arguments:
<mob event> = Specifies which mob event to target. Must be “minecraft:ender_dragon_event” (spawning of the ender
dragon), “minecraft:pillager_patrols_event” (spawning of pillager patrols), “minecraft:wandering_trader_event”
(spawning of wandering traders), or “events_enabled” (master switch for all of the above, when “false” none of
the events occur, and when “true” only above events that are enabled will occur)
<boolean> = Specifies whether to enable or disable the mob event. Must be either “true” or “false”
Information: This command specifies whether or not to do in-game mob events, such as patrol spawning.
Examples:
- Disable all mob events
/mobevent events_enabled false
- Enable the spawning of wandering traders
/mobevent minecraft:wandering_trader_event true
/msg, /tell, and /w
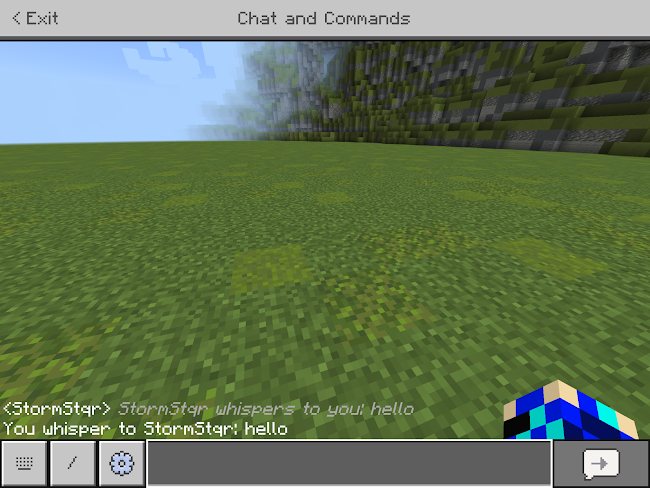
Syntax:
/msg <target> <message>
/tell <target> <message>
/w <target> <message>
Arguments:
<message> = The message in which to tell. Target Selectors such as “@a” can be used in the message to mention entities.
Information: This command sends a private message to the target player(s). As a result, it will send the message to the executer of the command confirming the message.
Examples:
- Send a message to all players saying “hello”
/msg @a hello
- Send a message to a player named ExampleName saying that a random player should be attacked
/tell ExampleName Attack @r!
- Send a message to the nearest player say that you have cobblestone
/w @p I have cobblestone
/music
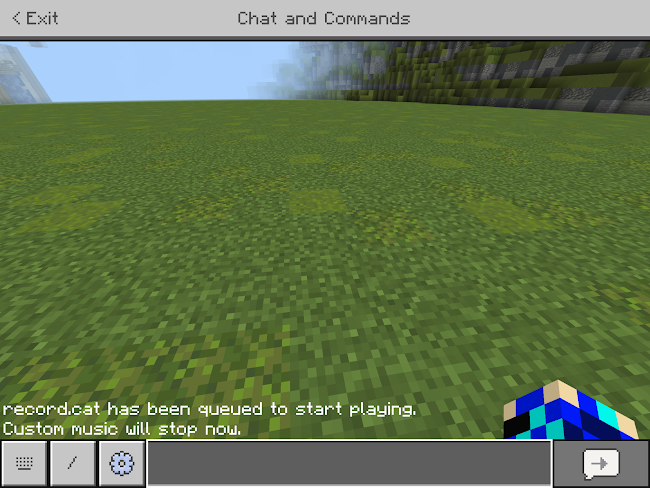
Syntax:
/music play <music> <volume> <fading> <repeat>
/music queue <music> <volume> <fading> <repeat>
/music stop <fading>
/music volume <volume>
Arguments:
play = Plays a music track
queue = Adds a music track to the queue to play
stop = Stops the current music track
volume = Changes the volume of the current music track
<music> = Specifies the music track to play
<volume> = Specifies the volume to play the music at, must be from “0” to “1”.
<fading> = Specifies the duration in which the music fades in and out. Must be a number from “0” to “10”
<repeat> = Specifies whether to repeat the music track or not. Must be either “play_once” or “loop”. The default is
“play_once”.
Information: This command controls the music that is played in the world. In game volume, music tracks, repeating, fading in and out, and repeats are controlled (in a limited way).
Examples:
- Play the pigstep music disk at half volume with no fading on repeat
/music play record.pigstep 0.5 0 loop
- Queue the cat music disk to play once with 5 second fading on full volume
/music queue record.cat 1 5 play_once
/op

Syntax:
/op <target>
Information: This command gives operator status to the target players, allowing them access to commands, command blocks, structure blocks, the gamerule menu (Found when pressing pause and then settings), etc.
Examples:
- Give operator status to a player with the name ExampleName
/op ExampleName
/particle
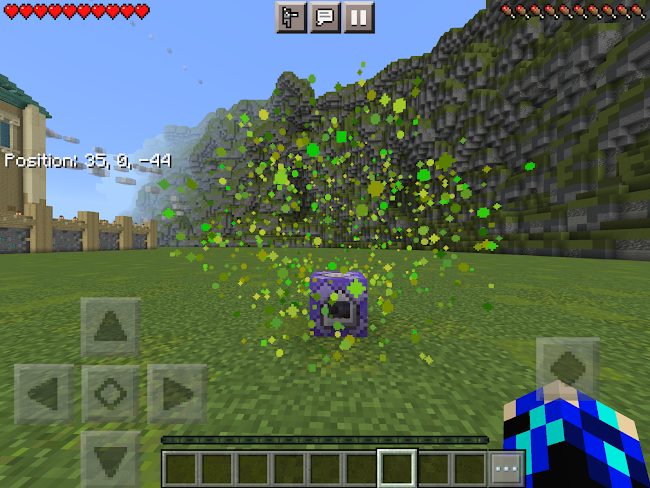
Syntax:
/particle <particle> <position x y z>
Arguments:
<particle> = Specifies the particle to display
<position x y z> = Specifies the coordinates to display at the particle at
Information: This command creates particles at a given point, allowing for more customization of visuals for a project.
Examples:
- Create a flat sheet of green particles under all entities
/execute at @e run particle minecraft:crop_growth_emitter ~~~
- Create a totem particle effect at the coordinates 0 0 0.
/particle minecraft:totem_particle 0 0 0
/playanimation
Syntax:
/playanimation <target> <animation> <animation2> <blending> <criteria> <controller>
Arguments:
<animation> = Specifies the animation in which to play immediately. Animations can be shortened for the entity they are
targeting. For example “animation.cat.sit” for the selector “@e[type=cat]” can be written as just “sit”.
<animation2> = Specifies the animation in which to play after the criteria has been met (after the first animation ends).
Anything that is typed in this section that is not an animation name, means ignore this argument.
<blending> = Specifies the duration of the change in animations between the first and the second. For example, how long
it takes for a dog to get into a sleeping position from a standing one.
<criteria> = Specifies when to start the switch between the first animation and animation2. Must be a molang query
function such as: “query.is_on_fire”. “!” can also be used, such as in: “!query.is_on_fire”, which will trigger only
if the target is not on fire
<controller> = Controls the animation, really only used in behavior packs.
Information: This command plays an animation at a target, although the animations don’t appear the same for all entities (which can create some odd results).
Examples:
- Cause all players to have their top halves go invisible, lasting for 5 seconds.
/playanimation @a animation.creeper.swelling X 2
- Cause a random axolotl to appear very large (but its head stays the same size), lasting for 10 seconds
/playanimation @r[type=axoltl] animation.ghast.scale X 10
- Cause the nearest fox to crouch until it touches water (rain, river, ocean, water bottle, etc), when it will change to pouncing after 0.1 seconds.
/playanimation @e[type=fox,c=1] crouch pounce 0.1 “query.is_in_contact_with_water”
/playsound

Syntax:
/playsound <sound> <target> <position x y z> <volume> <pitch> <minimum volume>
Arguments:
<sound> = Specifies the sound to play
<target> = Specifies the target of the sound, the players who can hear the sound.
<position x y z> = Specifies the coordinates at which to play the sound. When the sound is played, there is a certain audio
sphere in which targeted players can hear the sound when they are close enough to where it was played.
<volume> = Specifies the size of the audio sphere in which the sound can be heard. At volumes of 0 or lower, the sound is
not audible. For values from 0 to 1 the sound increases in volume, maxing out at 1. For values past 1, the audio
sphere extends instead of increasing volume (default at 1 is a 16 block range).
<pitch> = Specifies the pitch of the sound (default 1). Must be between 0 and 256 (values lower than 0 can’t be heard and
values higher than 256 default to 1).
<minimum volume> = Specifies the volume that should be played for targets who are out of range of the normal audio
sphere. If the value is 0 or lower, then targets outside of the normal audio sphere hear nothing. If values are
positive, then all targets will hear the sound at at least the specified minimum volume (default is 1). This is mainly useful for sounds that are executed at a certain coordinate, but wants all players to be able to hear it at least a little.
Information: This command plays a specified sound at a certain coordinate, attempted to be heard by targeted players. This sound’s volume, location, and pitch can be controlled through the different arguments.
Examples:
- Play the beacon activate sound at all players, with a default pitch and volume
/playsound beacon.activate @a
- Play the horse death sound 5 blocks above a random player, with a volume of 0.8 and a pitch of 3
/playsound mob.horse.death @r ~~5~ 0.8 3
- Play a random experience orb sound effect, targeting all players, based off of the coordinates of 0 0 0, with a volume of 10 (max volume with increased audio sphere), pitch of 1, and a minimum volume (that all players must at least hear) of 0.1
/playsound random.orb @a 0 0 0 10 1 0.1
/recipe

Syntax:
/recipe give <target> *
/recipe give <target> “*”
/recipe take <target> *
/recipe take <target> “*”
/recipe give <target> <recipe>
/recipe take <target> <recipe>
Arguments:
give = Specifies to grand the following recipe(s) to player <target>
take = Specifies to remove the following recipe(s) from player <target>
*/“*” = References ALL possible recipes
<recipe> = Specifies the recipe to grant or remove. See Important Lists for a complete list.
Information: This command controls the recipes a player has unlocked. The gamerule “doLimitedCrafting” must be “true” for it to matter.
Examples:
- Grant the nearest player access to all recipes
/recipe give @p *
- Remove the recipe for pistons from all players
/recipe remove @a minecraft:piston
/reload

Syntax:
/reload
Information: This command reloads all of the behavior packs and functions in your world.
/replaceitem

Syntax:
/replaceitem block <position x y z> slot.container <slot> <item> <amount> <data> <components>
/replaceitem block <position x y z> slot.container <slot> <replace mode> <item> <amount> <data> <components>
/replaceitem entity <target> <slot type> <slot> <item> <amount> <data> <components>
/replaceitem entity <target> <slot type> <slot> <replace mode> <item> <amount> <data> <components>
Arguments:
block = Specifies that the target is a container block
entity = Specifies that the target is a non-tile entity
<position x y z> = Specifies the coordinates of the target container block
slot.container = Container blocks only have one slot type, which is slot.container. This specifies that the item will replace a
slot in the container block’s inventory.
<slot type> = Specifies the type of slot to target, such as “slot.armor.head”, slot.saddle”, or “slot.weapon.mainhand”
<slot> = Specifies the slot number for the slot type. The first slot is represented with “0”, second with “1”, and so on.
<replace mode> = Specifies whether to overwrite an item that was already in the specified slot. Must be either “destroy”
(replaces the old item with the new one) or “keep” (doesn’t execute the replaceitem command if there is already
an item in that slot).
<item> = Specifies the item to give to the target
<amount> = Specifies the quantity of the item to give to the target, normal limitations (such as stack size and slot holding
capabilities) apply.
<data> = Specifies the data of the item to give to the target
<components> = Gives attributes to the item, must be “minecraft:can_place_on” (makes it so this block can be placed on
the specified block(s) in any gamemode), “minecraft:can_destroy” (the item can be used to break the specified
block(s) in any gamemode), “minecraft:keep_on_death” (specifies whether the item should be kept on death
even with keep inventory off), or “minecraft:item_lock” (limits the mobility of the item in a player’s inventory.
Note that this only applies to a player’s inventory, and cannot be successfully used inside tile entities like chests.
This attribute has the subsets of either “lock_in_inventory” (item cannot leave the player’s inventory unless lost
on death, including things like crafting benches. However, the item can be moved around within the inventory as
much as the player wishes) or “lock_in_slot” (item cannot leave the slot that it is in, which also applies if it is
picked up from the ground. The only way to remove this item is with /clear or by dying without keep inventory)).
The structure of this argument is JSON, and so should be phrased like:
{“<component>”:{“<subcomponent>”},”<componenent2>”:{“<subcomponent2>,<subcomponent3>”}}.
Information: This command fills a specified slot in an entity’s inventory with a specified item(s).
Examples:
- Replace the first slot in all player’s hotbar with a diamond_sword with 1 durability
/replaceitem entity @a slot.hotbar 0 1 1560
- Replace the 2nd slot of a brewing stand at 5 5 5 with 20 glass bottles, which can be used to destroy dirt and grass
/replaceitem block 5 5 5 slot.container 1 glass_bottle 20 0 {“minecraft:can_destroy”:{“blocks”:[“dirt”,”grass”]}}
- Replace the offhand of the nearest player with a nautilus shell with a data of 5 which cannot be lost on death or moved in the inventory, only if that player has no item in that slot.
/replaceitem entity @p slot.weapon.offhand 0 keep nautilus_shell 1 5 {“keep_on_death”:{},”item_lock”:
{“mode”:”lock_in_slot”}}
- Make all skeletons hold netherite swords
/replaceitem entity @e[type=skeleton] slot.weapon.mainhand 0 netherite_sword
- Replace the 8th slot in a chest at 2 2 2 with a stack of netherite blocks, only if that slot was empty.
/replaceitem block 2 2 2 slot.container 7 keep netherite_block 64 0
/ride

Syntax:
/ride <rider> start_riding <mount> <teleport> <fill mode>
/ride <rider> stop_riding
/ride <mount> evict_riders
/ride <mount> summon_rider <entity> <spawn event> <name>
/ride <rider> summon_ride <entity> <riding criteria> <spawn event> <name>
Arguments:
<rider> = Specifies the entity or entities to attempt to ride the mount
<mount> = Specifies the entity or entities that the rider(s) will attempt to ride
start_riding = Specifies for the <rider> to mount the <mount>
stop_riding = Specifies for the targeted rider(s) to stop riding whatever they are riding at the time
evict_riders = Specifies for the targeted mount(s) to kick their riders off
summon_rider = Specifies to summon a rider for the targeted mount(s)
summon_ride = Specifies to summon a mount for the targeted rider(s)
<teleport> = Specifies whether to teleport the rider or mount to the other. Must be either “teleport_ride” or
“teleport_rider”.
<fill mode> = Specifies how to fill up the mount if there are more than one selected riders. Must be either “if_group_fits”
(Checks whether all members of the group are capable of riding the target mount at the same time, and executes
the command only if they all can) or “until_full” (Places riders on the mount in a random order until the mount
reaches its maximum)
<entity> = Specifies the entity to spawn as a rider or mount
<spawn event> = Specifies a spawn event to trigger at the spawning of the <entity>
<name> = Specifies the name for the spawned <entity>
<riding criteria> = Specifies how to handle multiple rider targets. Must be “skip_riders” (Only summons a mount for <rider> that are not already riding something), “no_ride_change” (Only summons a mount for <rider> that are not
already riding something or being ridden by something), or “reassign_rides” (Dismounts all <rider> from
anything they might be riding and summons a new mount for all of them)
Information: This command can control the riding of entities on other entities, however it currently only works with entities that can already ride and be ridden.
Examples:
- Fill a boat with two random players, with the players teleporting to the boat.
/ride @a start_riding @e[type=boat,c=1] teleport_rider until_full
- Make all players ride donkeys, only if there are enough donkeys for all players to sit on them, teleporting the donkeys to the players
/ride @a start_riding @e[type=donkey] teleport_ride if_group_fits
- Give all ravagers evokers (from an expired raid) with the name “Magic Hands” to ride them
/ride @e[type=ravager] summon_rider evocation_illager minecraft:raid_expired “Magic Hands”
/say
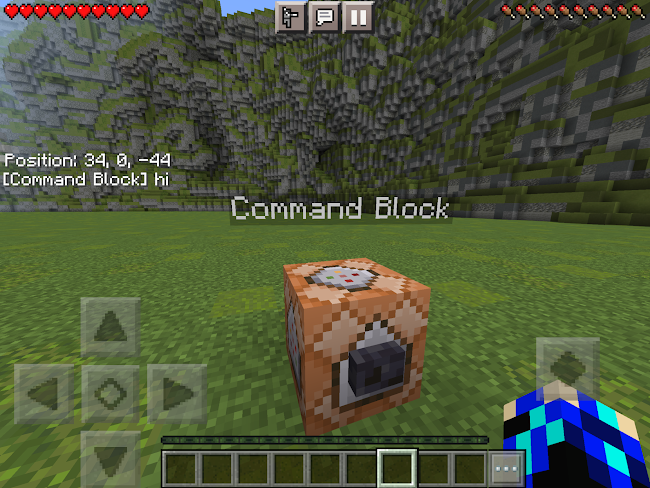
Syntax:
/say <message>
Arguments:
<message> = The message in which to say in chat
Information: This command sends a message in chat to all players, from the executor of the command. This is done in the form: “[executor]: message”. This can be used along with the /execute command to cause certain entities to say specific things in chat. This is most useful in command blocks, which will display in chat: “[!]: message” by default, but changing their names will change the named output.
Examples:
- Say hello
/say hello
- Say “I am here now”
/say I am here now
/schedule

Syntax:
/schedule on_area_loaded add <start x y z> <end x y z> <function>
/schedule on_area_loaded add circle <center x y z> <radius> <function>
/schedule on_area_loaded add tickingarea <name> <function>
Arguments:
on_area_loaded = Specifies that an area needs to be loaded to execute the specified function
add = Specifies to add an area that needs to be loaded
<start x y z> = Specifies the starting coordinates of the area to be loaded
<end x y z> = Specifies the ending coordinates of the area to be loaded
<function> = Specifies the function to trigger when the specified area is loaded
circle = Specifies that the area to be loaded is circular
<center x y z> = Specifies the coordinates of the center of the circle
<radius> = Specifies the length of the radius of the circle
tickingarea = Specifies to execute the function when this ticking area is created or loaded (ticking areas are always loaded,
so this means that if there is an already existing target, the function should activate immediately)
<name> = The name of the targeted tickingarea
Information: This command schedules a /function command to be triggered when a chunk becomes loaded.
Examples:
- Schedule a function called “FUNCTION” to be executed when the circle with a radius of 10 centered around 0 0 0 becomes loaded.
/schedule on_area_loaded add circle 0 0 0 10 FUNCTION
- Schedule a function called “FUNCTION” to be executed when the chunk 0 -64 0 16 319 16 (the first chunk in the world) is loaded
/schedule on_area_loaded add 0 -64 0 16 319 16 FUNCTION
/scoreboard
Syntax:
/scoreboard objectives add <objective> dummy <display name>
/scoreboard objectives remove <objective>
/scoreboard objectives list
/scoreboard objectives setdisplay <slot> <objective> <sorting>
/scoreboard players list <target>
/scoreboard players set <target> <objective> <count>
/scoreboard players add <target> <objective> <count>
/scoreboard players remove <target> <objective> <count>
/scoreboard players reset <target> <objective>
/scoreboard players test <target> <objective> <min-max>
/scoreboard players random <target> <objective> <min-max>
/scoreboard players operation <target> <target objective> <operation> <source> <source objective>
Arguments:
objectives = Specifies that the command will target a scoreboard objective
players = Specifies that the command will target a score-holder on a scoreboard.
add (objectives) = Specifies to add a scoreboard objective
remove (objectives) = Specifies to remove an existing scoreboard objective
list (objectives) = Lists all existing scoreboard objectives in chat
<objective> = The name of a scoreboard objective which is being targeted
dummy = Specifies how the scoreboard will change its values. “dummy”, means that commands are the only way to
change that scoreboard, which is currently the only possibility in bedrock.
<display name> = Specifies the name that the scoreboard should have when it is displayed. If this argument is not
specified, it defaults to the name of the objective
<slot> = Specifies the location to display the targeted scoreboard. Must be “list” (when pressing pause, the scoreboard is
displayed where player names are usually), “sidebar” (displays the scoreboard on the right middle of players’
screens), or “belowname” (displays the each score-holder’s current score under their username).
<sorting> = Specifies how to display the scoreboard information, must be either “descending” (largest score on top) or
“ascending” (smallest score on top), defaults to “descending”. If the <slot> argument is “belowname” then this
argument doesn’t apply.
list (players) = Will list all scores for the target
<target> (players list) = Specifies the target(s) whose scores to display. If this argument is left blank, the output will be a
list of all current scores
<target> = Specifies the target whose score to affect with the command. This target doesn’t have to be an existing entity.
For instance, using “§1Blue Team” as your target will display “§1Blue Team” on scoreboards and can have their
score changed through all aspects of the /scoreboard command like a normal entity target
set = Specifies to set the target’s score (of the identified objective) at a specified amount
add (players) = Specifies to add a certain amount to the target’s score (of the identified objective)
remove (players) = Specifies to subtract a certain amount from the target’s score (of the identified objective)
reset = Specifies to delete a player’s score from a certain objective (doesn’t set to 0, completely removes them from the
scoreboard)
test = Specifies to test the target for a certain score or score range (of the identified objective)
random = Specifies to set the target’s score (of the identified objective) to a random amount (in a certain range)
operation = Specifies to change the target’s score (of the identified objective) based off of another score (can be same or
different objective with same or different target)
<count> = Specifies the amount to change a score by, can be used in “add” to add to the previous score, in “remove” to
subtract from the previous score, or in “set” to change the previous score
<objective> (players reset) = Specifies the objective to reset the target on. If unspecified, then all of the target’s scores will
be deleted
<min-max> = Specifies a range of scores. Both values are not necessary, as “#..” represents just the minimum and “..#”
represents just the maximum (default - without “..” - is the number as a minimum). When both the minimum
and maximum are to be listed, they are shown in the form: “<minimum> <maximum>”. These values are
inclusive (includes the minimum and maximum as options).
<target objective> = The objective of the target for the operation. This is the score that will be changed.
<operation> = Specifies the operation in which to conduct. Must be “=” (assignment: sets the target’s score to the value of
the source’s score), “+=” (addition: adds the source’s score to the target’s score), “-=” (subtraction: subtracts the
source’s score from the target’s score), “*=” (multiplication: sets the target’s score to the product of the target’s
score and the source’s score), “/=” (division: divides the target’s score by the source’s score, rounded down to the
nearest whole number), “%=” (modulus: divide the target’s score by the source’s score. The target’s score will be
set to the remainder of this division. For example if the target’s score is 20, and the source’s score is 3, then
20/3=6 with a remainder of 2, so the target’s score will be set to 2), “><” (swapping: swaps the target’s score with
the source’s score), “<” (choosing minimum: sets the target’s score to the source’s score only if the source’s score
is less than the target’s previous score), or “>” (choosing maximum: sets the target’s score to the source’s score
only if the source’s score is greater than the target’s previous score).
<source> = The target whose score is used to operate on the score for the <target objective>. This target’s score is not
affected by the operation, unless the operation is “><”
<source objective> = The objective of the source for the operation. This is the score that will not be changed by the
operation, unless the operation is “><”
Information: This command creates and controls scoreboard objectives, and affects the scores of targets on those scoreboards. Note that the only current way to affect an objective on bedrock is “dummy” (meaning changed through commands), not including things like xp, health, deathCount, etc
Examples:
- Create a scoreboard objective called “game” which will display the title “§aGame:§r” on scoreboards
/scoreboard objectives add game dummy “§aGame:§r”
- Set the objective “game” in the sidebar display, with the highest score on top
/scoreboard objectives setdisplay sidebar game descending
- Set the score-holder “§bBlue Team§r” to 100 for the objective “game”
/scoreboard players set “§bBlue Team§r” game 100
- Add 1 point to the score-holder “§bBlue Team§r” for the objective “game”
/scoreboard players add “§bBlue Team§r” game 1
- Remove 5 points from a random player for the objective “game”
/scoreboard players remove @r game 5
- Reset the scores for all players for the objective “game”
/scoreboard players reset @a game
- Test if the score-holder “§bBlue Team§r” has a score from 0 to 10 (inclusive) in the objective “game”
/scoreboard players test “§bBlue Team§r” game 0 10
- Set all player’s scores to random values between 1 and 999 (inclusive) in the objective “game”
/scoreboard players random @a game 1 999
- Set the nearest player’s score to that of the score-holder “§bBlue Team§r”’s score in the objective “game”, only if the nearest player’s score was less than that of “§bBlue Team§r”.
/scoreboard players operation @p game > “§bBlue Team§r” game
- Set the score-holder “§bBlue Team§r”’s score in the objective “game” to their own score in the objective “game2”
/scoreboard players operation “§bBlue Team§r” game = “§bBlue Team§r” game2
Applied Examples:
- You can use a scoreboard for currency. For example, to make it so that every time a player gets a diamond, they lose it and gain 100 money, put the following command in a repeating always active command block: “/execute as @a[hasitem={item=diamond}] run scoreboard players add @s Money 100” with a chain, conditional, always active command block coming out of the first with the command: “/execute as @a[hasitem={item=diamond}] run clear @s diamond -1 1”. Make sure you have the “Money” objective made and set the display to sidebar. To make the system more complex, you can add more limitations (Such as making it so that players in certain areas can turn in diamonds: “@a[hasitem={item=diamond},x=0,z=0,dx=10,dz=10]”) or add more ways of getting money (such as gold being worth 50: “/execute as @a[hasitem={item=gold_ingot}] run scoreboard players add @s Money 50” and “/execute as @a[hasitem={item=gold_ingot}] run clear @s diamond -1 1”). Then to take away money, simply do the same in reverse, like with an impulse, needs redstone command block with a button and the command: “/give @p diamond_sword” and a chain always command block coming out of that with: “/scoreboard players remove @p Money 100”.
- The problem with the above currency system is that it fills the right hand side of your screen with “Offline User” as people leave. To get rid of this, make a repeating, always active command block with a delay of around 40-60 ticks with the command: “/scoreboard objectives remove moneyboard”, with a chain, always active command block coming out of it with a 1 tick delay and the command: “/scoreboard objectives add moneyboard dummy Money”, and another chain, always active command block out of that with a delay of 1 tick and the command: “/scoreboard objectives setdisplay sidebar moneyboard”. Now place a repeating always active command block with: “/execute as @a run scoreboard players operation @s moneyboard = @s Money”. Now every 2-3 seconds, the scoreboard will flicker and all offline players will be removed.
- To continue to advance your currency system, you may add a prestige system. This will work that for every 10000 money that each person accumulates, they gain a prestige level (with a max level of 10). Start by changing your original command chain, the one that gives money when they gain a diamond or gold ingot, by adding a chain always active command after the first command, with the command: “/execute as @a[hasitem={item=diamond}] run scoreboard players add @s moneycount 100”. Make sure to make this change to all similar chains, and create the new objective “moneycount”. Now make a repeat always active command block with the command: “/execute as @a[scores={moneycount=10000..}] run scoreboard players add @s moneyprestige 1” with a chain, conditional, always active command block coming out of that with the command: “/execute as @a[scores={moneycount=10000..}] run scoreboard players set @s moneycount 0”. Add the “moneyprestige” objective (with: “/scoreboard objectives add moneyprestige dummy Money_Prestige”) and set its display to a list. You can also add more commands between the two above, like adding sounds (“/execute as @a[scores={moneycount=10000..}] run playsound random.levelup @s”), particles (“/execute as @a[scores={moneycount=10000..}] run particle minecraft:crop_growth_emitter ~~~”), or chat messages (“/tellraw @a {“rawtext”:[{“text”:”§a”},{“selector”:”@a[scores={moneycount=10000..}]”},{“text”:”is now §dPrestige”},{“score”:{“name”:”@a[scores={moneycount=10000..}]”,”objective”:”moneyprestige”}}]}”).
- On servers you may see “message board” scoreboards, where they use the sidebar to display walls of text. This works like normal, but then setting additional custom score holders to a certain value on the board. To do this, first make a scoreboard and set it to the sidebar: “/scoreboard objectives add display dummy Display” and “/scoreboard objectives setdisplay sidebar display”. Now you can begin adding text like so: “/scoreboard players set “This is Text” display 3”, “/scoreboard players set “ “ display 2”, “/scoreboard players set “More Text” display 1”, “/scoreboard players set “ ” display 0”, etc. The distribution of text lines can be controlled with which score you set them to (in this example, 3 is on top, then 2 below it, then 1, etc). This scoreboard can still be used to display scores, which can be done by either just adding another score holder and change their score as normal (“/scoreboard players set “§1Team 1§r” display 4”, and something like “/scoreboard players add “§1Team 1§r” display 1”) or by creating specified value sets like so: “/scoreboard players set “§1Team 1:§r 0” display 5” and “/scoreboard players set “§1Team 1:§r 1” display 3”, etc (when using this method, make sure to remove the first before adding the second, like with “/scoreboard players remove “§1Team 1:§r 0” display”). The latter is limiting as you need a command block for every value, but it can be more aesthetically pleasing.
/setblock

Syntax:
/setblock <position x y z> <block> <data> <replace mode>
Arguments:
<position x y z> = Specifies the coordinates to place the block at.
<block> = Specifies the block to place
<data> = Specifies the data value for the block. Could also be an aux value (see aux value list).
<replace mode> = Specifies how to set the block. Must be “destroy” (previous block is destroyed, making a sound and
dropping itself as an item and all of its contents), “keep” (only places the new block if the old one was air), or
“replace” (deletes the previous block, completely replacing it with the new one). The default value is “replace”.
Information: This command places a block at a specified location in the world.
Examples:
- Set the block at 0 0 0 to stone
/setblock 0 0 0 stone
- Set the block at 5 5 5 to lime terracotta, only if the block at 5 5 5 was air
/setblock 5 5 5 stained_hardened_clay 5 keep
/setmaxplayers

Syntax:
/setmaxplayers <max players>
Arguments:
<max players> = Specifies the number of players that can be in the world.
Information: This command specifies the maximum number of players that can be in the world. The value cannot be reduced below the number of players currently online (for example if there are 3 players currently online, setting the max players to 2 will not do anything), and must be between 2 and 8 (inclusive). This command doesn’t function on servers or realms, and seems to be bugged to reset to the default (5) each time the world owner relogs.
Examples:
- Set the maximum number of players to 1
/setmaxplayers 1
/setworldspawn
Syntax:
/setworldspawn <position x y z>
Arguments:
<position x y z> = Specifies the coordinates at which to set the world spawn. If this argument isn’t specified, then the
world spawn is set to the location at which this command was executed.
Information: This command sets the world spawn to a specified location.
Examples:
- Set the world spawn to 0 0 0
/setworldspawn 0 0 0
/spawnpoint
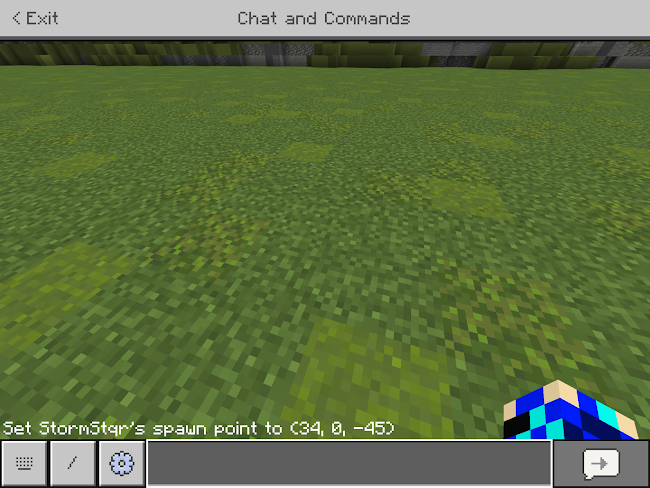
Syntax:
/spawnpoint <target> <position x y z>
Arguments:
<position x y z> = Specifies the location to set the target’s spawn. If this argument is unspecified, then all targets will have
their spawn points set at the location they are currently at.
Information: This command moves a target’s or set of targeted players’ spawn points to a new specified location.
Examples:
- Set all players’ spawn points to 0 0 0
/spawnpoint @a 0 0 0
/spreadplayers

Syntax:
/spreadplayers <center x z> <spread distance> <max range> <target> <max height>
Arguments:
<center x z> = Specifies the coordinates for the center of the square in which to spread targets
<spread distance> = Specifies the minimum distance between targets (for example, if this argument is set to “2”, then
when the command is spreading the targets, they cannot place them within 2 blocks of each other). The value
must be greater than or equal to 0.
<max range> = Specifies the maximum distance from the center in which targets can be teleported outwards (radius in
each cardinal direction). This creates the possible teleport area as a square. The value must be at least 1 greater
than the value of <spread distance>.
<max height> = Specifies the maximum height that is considered teleportable. Locations above this y level are considered invalid.
Information: This command randomly spreads target entities across a set range, setting them at specific intervals apart. Targets are always placed on the topmost non-air block at the location the game attempted to place them. The command is supposed to not ever place targets in water, lava, bubble columns, or fire, however this doesn’t currently work (Players can be placed in these areas).
Examples:
- Spread all players around a square with a radius of 10000 blocks from the center 0 0 0, making it so the players must be at least 100 blocks apart.
/spreadplayers 0 0 0 100 10000 @a
- Teleport the nearest player to a random position in a radius of 5 blocks around where the command was executed.
/spreadplayers ~~~ 0 5 @p
Applied Examples:
- You can make a custom chorus fruit, executing the following command whenever an input is created: “/execute as <target> at @s run spreadplayers ~~~ 0 8 @s”. Like when eating a chorus fruit, the target will get teleported to a random available position within 8 blocks of their current position. However, this will only place the target on the topmost block, so unlike chorus fruit, it cannot teleport the target downwards.
- In a minigame, such as versions of murder mystery, you want to place items (such as gold ingots) randomly across the map. To do this, create a structure file that contains the item. For example, we will create an impulse command block with a button with the command, “/structure save ITEM ~~1~ ~~1~ disk” (Note that in this command “ITEM” can be changed to whatever name is wanted). Then throw your item(s) on top of the command block (we will use a gold ingot) and press the button. Now create a repeat, needs redstone command block with a delay of 100 game ticks with the command: “/structure load ITEM ~~1~”, and place a lever on it. Leave a block of air above that command block and then place a repeat, always active above that air, with the command “/spreadplayers 0 0 0 0 20 @e[type=item,name=”Gold Ingot”,r=2]”. Now whenever the lever is turned on, every 100 game ticks (5 seconds) a gold ingot will be randomly dropped on one of the topmost blocks within 20 blocks of 0 0 0.
- Similar to the previous example, in a game such as mob arena, you may want to randomly spread out monsters across an arena. Using the same set up as above, place a repeating, needs redstone command block on 100 tick delay with the command: “/summon zombie “§2Zombrrr” ~~~”, and then a repeating always active command block 2 blocks above with the command: “/spreadplayers 0 0 0 0 20 @e[family=monster,r=3]”. When a lever is activated on the first command block, every 5 seconds a zombie named §2Zombrrr will be placed randomly on one of the topmost blocks within 20 blocks of 0 0 0.
/stopsound

Syntax:
/stopsound <target> <sound>
Arguments:
<sound> = Specifies the sound to stop playing. If not specified, all sounds will be stopped.
Information: This command stops the playing of a sound at a target.
Examples:
- Stop the sound of horses dying for all players
/stopsound @a mob.horse.death
- Stop the sound of music disc 11 for the nearest player
/stopsound @p record.11
/structure

Syntax:
/structure save <name> <start x y z> <end x y z> <save mode>
/structure save <name> <start x y z> <end x y z> <entity inclusion> <save mode> <block inclusion>
/structure load <name> <placement x y z> <rotation> <mirror> <entity inclusion> <block inclusion> <waterlog>
<integrity> <seed>
/structure load <name> <placement x y z> <rotation> <mirror> <animation mode> <animation time> <entity inclusion>
<block inclusion> <waterlog> <integrity> <seed>
/structure delete <name>
Arguments:
save = Specifies to save a structure
load = Specifies to load a structure
delete = Specifies to delete a structure file
<name> = Specifies the name for a structure. Can be any one word or quoted string.
<start x y z> = Specifies the starting coordinates of the structure to save
<end x y z> = Specifies the ending coordinates of the structure to save
<save mode> = Specifies the way in which to save the structure. Must be either “disk” (saves the structure to the world
files, which will be retrievable even after relogging, copying, or transferring the world) or “memory” (saves the
structure to the temporary world memory, which will be deleted after you log out), defaulting to memory if
unspecified.
<entity inclusion> = Specifies whether to include entities in the structure. Must be either “true” or “false”.
NOTE: THIS CURRENTLY DOESN’T WORK WITH SAVE MODE
<block inclusion> = Specifies whether to include blocks in the structure. Must be either “true” or “false”.
<placement x y z> = Specifies the coordinates for the bottom northwest corner of the structure.
<rotation> = Specifies the rotation of the structure when loading. Must be “0_degrees”, “90_degrees”, “180_degrees”, or
“270_degrees”. If unspecified, it defaults to “0_degrees”.
<mirror> = Specifies whether to mirror the structure (flip it over an axis). Must be “x”, “z”, “xz”, or “none”, defaulting to
“none” if unspecified.
<waterlog> = Specifies whether to water log all blocks that can be waterlogged when loading the structure. Must be either
“true” or “false”, defaulting to “false” if unspecified.
<integrity> = Specifies the integrity of the structure when loaded, which is the percent chance of each block being loaded
in. Must be between “0” and “100” (inclusive), defaulting to “100” if unspecified.
<seed> = Specifies the seed at which to apply integrity. Using a value of 0 or leaving this argument unspecified defaults to
a random seed. At a specific seed and integrity, the same blocks will always be placed, and the same blocks will
always be replaced with air. Basically, this value refers to a set distribution of the integrity argument.
<animation mode> = Specifies the way in which to animate the placement of the structure. Must be either
“block_by_block” (place the structure block by block, starting in a corner and going in rows until each layer is
filled) or “layer_by_layer” (place the structure in 1 block tall layers, starting with the bottom).
<animation time> = Specifies the amount of time it takes to place all of the blocks in the structure for the animation.
Information: This command saves and loads structures (bypassing the need for structure blocks). This is most useful for giving players custom items, as in bedrock item nbts can’t be altered using /give or /replaceitem. Making a structure that is 1 block of air containing the custom item and loading it on a player will cause the player to pick it up almost immediately, as if you had used the /give command. The maximum size of this command is the same as with structure blocks: 64 x 316 x 64.
Examples:
- Save a structure titled STRUCTURE1 of the area 0 0 0 to 5 5 5, saving the structure to the permanent world files
/structure save STRUCTURE1 0 0 0 5 5 5 disk
- Load a structure titled STRUCTURE1 with its bottom northwest corner at 0 0 0
/structure load STRUCTURE1 0 0 0
- Load a structure titled STRUCTURE1 with its bottom northwest corner at 5 5 5, rotated 90 degrees, mirrored over the x coordinate, with a layer by layer animation that lasts for 30 seconds, including blocks but not entities, not waterlogged, and with a random integrity of 80%
/structure load STRUCTURE1 5 5 5 90_degrees x layer_by_layer 30 false true false 0.8 0
Applied Examples:
- You can give items with custom data (such as names, durability, enchantments, etc) to players by making an impulse command block with a button on it and the command: “/structure save <name> ~~1~ ~~1~ disk” , then throw your item onto the command block and press the button. Now whenever you run the command: “/execute at <target> run structure load <name> ~~~ 0_degrees x true false” your custom item will be summoned at the <target>.
/summon

Syntax:
/summon <entity> <postition x y z> <spawn event> <name>
/summon <entity> <name> <position x y z>
Arguments:
<entity> = Specifies the entity to summon (cannot be a tile entity, unless it is in a minecart - such as a chest minecart)
<position x y z> = Specifies the coordinates at which to summon the <entity>
<spawn event> = Specifies a spawn event to trigger at the spawning of the <entity>
<name> = Specifies what the <entity> should be named
Information: This command is used to spawn entities into the world.
Examples:
- Summon a wither named “Bedrock is Difficult” at the coordinates 0 0 0
/summon wither “Bedrock is Difficult” 0 0 0
- Summon a baby cow named “moo” at the location the command was executed
/summon cow ~~~ minecraft:entity_born moo
/tag
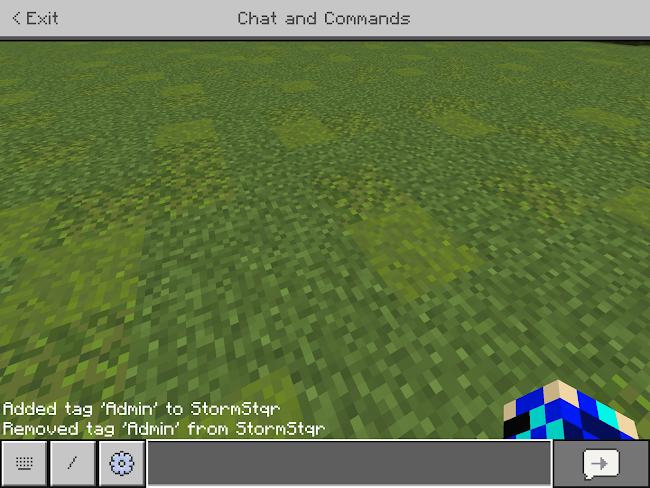
Syntax:
/tag<target> add <tag>
/tag <target> remove <tag>
/tag <target> list
Arguments:
add = Specifies to add the certain tag to the target(s)
remove = Specifies to remove the certain tag from the target(s)
list = Lists all of the target’s tags in chat
<tag> = The name of the tag to add or remove. Can be any single-word name or quoted string.
Information: This command interacts with custom entity tags, which is the best way (using commands) to add custom data to entities in bedrock.
Examples:
- Add the tag “Player1” to a random player
/tag @r add Player1
- Remove the tag “Player1” from all players
/tag @a remove Player1
/teleport and /tp
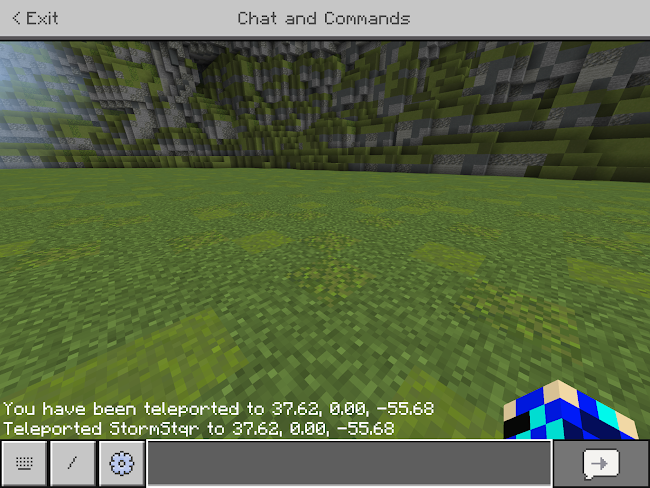
Syntax:
/teleport <destination target> <check for blocks>
/teleport <destination x y z> <check for blocks>
/teleport <destination x y z> <y rotation> <x rotation> <check for blocks>
/teleport <destination x y z> facing <look at x y z> <check for blocks>
/teleport <destination x y z> facing <look at target> <check for blocks>
/teleport <target> <destination target> <check for blocks>
/teleport <target> <destination x y z> <check for blocks>
/teleport <target> <destination x y z> <y rotation> <x rotation> <check for blocks>
/teleport <target> <destination x y z> facing <look at x y z> <check for blocks>
/teleport <target> <destination x y z> facing <look at target> <check for blocks>
/tp <destination target> <check for blocks>
/tp <destination x y z> <check for blocks>
/tp <destination x y z> <y rotation> <x rotation> <check for blocks>
/tp <destination x y z> facing <look at x y z> <check for blocks>
/tp <destination x y z> facing <look at target> <check for blocks>
/tp <target> <destination target> <check for blocks>
/tp <target> <destination x y z> <check for blocks>
/tp <target> <destination x y z> <y rotation> <x rotation> <check for blocks>
/tp <target> <destination x y z> facing <look at x y z> <check for blocks>
/tp <target> <destination x y z> facing <look at target> <check for blocks>
Arguments:
<target> = Specifies the entity to teleport. When this argument is absent/unspecified, defaults to the ecutor of the
command
<destination target> = Specifies the entity to teleport the <target> to
<destination x y z> = Specifies the coordinates to teleport the <target> to
<check for blocks> = Specifies whether or not to check for where the target will be teleported to. Must be either “true”
(teleports the <target> only if their hitbox will not be placed inside a block it shouldn’t be, such as stone, bricks,
etc, but can still be placed in blocks of air, flowers, etc) or “false” (teleports no matter what), defaulting to “false”.
<y rotation> = pitch, deals with how the <target> is facing vertically. Must be between -90 (straight up) and 90 (straight
down) (inclusive).
<x rotation> = yaw, deals with how the <target> is facing horizontally. Must be between 179.9 to -180 (both about due
north). Notable values are -180 (north), -90 (east), 0 (south), and 90 (west). Using “~” refers to the <target>’s
previous rotation.
facing = Specifies that the <target> should be facing towards an entity or coordinate when teleported.
<look at x y z> = Specifies the coordinates that the <target> should be facing towards when teleported.
<look at target> = Specifies the entity that the <target> should be facing towards when teleported.
Information: This command teleports entities around the world, controlling their rotation while doing so.
Examples:
- Teleport all players to the executor of the command
/teleport @a @s
- Teleport the executor of the command to 0 0 0, facing forwards, west.
/tp 0 0 0 0 90
- Teleport a random player to 0 0 0 facing the closest entity, only if they can teleport there
/tp @r 0 0 0 facing @e[c=1] true
/tellraw
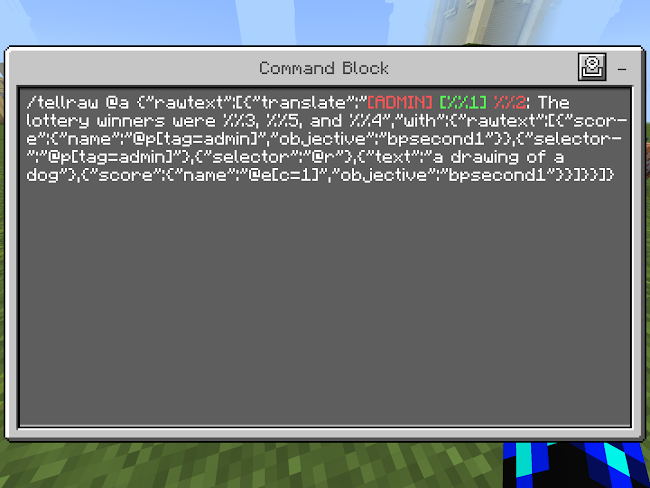
Syntax:
/tellraw <target> <message>
Arguments:
<message> = The message in which to display to the target. This must be in a JSON format.
Information: This command displays direct chat messages to targets, with no name attached (therefore appearing like normal game messages such as “a raid has expired”.
Examples:
- Display in chat a message that shows ExampleName dying to an explosive bat.
/tellraw @a {“rawtext”:[{“text”:”ExampleName was blown up by bat”}]}
- Tell a random player their score for the scoreboard objective “game”
/ tellraw @r {“rawtext”:[{“text”:”§5Your Score Is:§c”},{“score”:{“name”:“*”,”objective”:”game”},{“text”:”§5!§r”}]}
/testfor

Syntax:
/testfor <target>
Information: This command tests for and counts the number of specified targets. The output will display like this: “Found <target>,<target>...”, and taking a comparator output from a repeat always active command block with this command will have a signal strength equal to the number of entities found (max 15, after which it remains at 15).
Examples:
- Testfor all players within 5 blocks of 0 0 0
/testfor @a[x=0,y=0,z=0,r=5]
- Testfor all players in survival with the tag “target”, who are standing on the y coordinate of 8, applying to a maximum number of 10 targets.
/testfor @e[type=player,m=s,tag=target,y=8,r=1,c=10]
/testforblock

Syntax:
/testforblock <position x y z> <block> <data>
Arguments:
<position x y z> = Specifies the coordinates of the block to test for
<block> = Specifies the block in which to look for
<data> = Specifies the data value for the block
Information: This command tests if a set of coordinates has a specific block in it. These coordinates must be in loaded chunks.
Examples:
- Test if the block at 0 0 0 is any type of sponge
/testforblock 0 0 0 sponge -1
- Test if the block above the executor of the command is red terracotta
/testforblock ~~1~ stained_hardened_clay 14
/testforblocks

Syntax:
/testforblocks <begin x y z> <end x y z> <base x y z> <masked mode>
Arguments:
<begin x y z> = Specifies the starting coordinates for the region that is being tested
<end x y z> = Specifies the ending coordinates for the region that is being tested
<base x y z> = Specifies the bottom northwest corner for the region that the testing is based on. So the region <begin x y
z>-<end x y z> is tested to see if it matches <base x y z>
<masked mode> = Specifies how to test for matches. Must be either “masked” (blocks that are air in the base region don’t
have to be air in the tested region because air isn’t tested between the regions) or “all” (every block, including air,
between the two regions must match).
Information: This command tests if a region of coordinates matches another region.
Examples:
- Test if the area of -10 -10 -10 to 10 10 10 matches the area of 20 10 20 to 40 30 40, including air
/testforblocks -10 -10 -10 10 10 10 20 10 20 all
/tickingarea
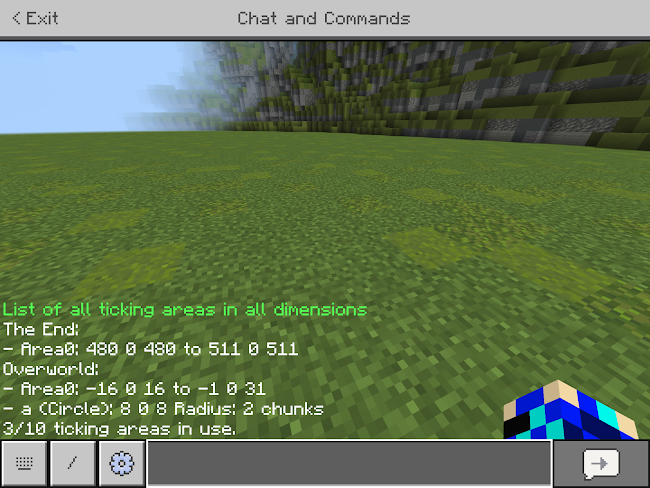
Syntax:
/tickingarea add <start x y z> <end x y z> <name> <preload>
/tickingarea add circle <center x y z> <radius> <name> <preload>
/tickingarea remove <name>
/tickingarea remove <position x y z>
/tickingarea remove_all
/tickingarea list <dimensions>
/tickingarea preload <name> <preload>
/tickingarea preload <position x y z> <preload>
Arguments:
add = Specifies to add a ticking area
remove = Specifies to remove a ticking area
remove_all = Specifies to remove all ticking areas in the world. This is really only useful to end extreme lag scenarios.
list = Specifies to list all ticking area regions in chat
preload = Controls whether the specified ticking areas will be preloaded or not. This means that on world relog they are
loaded before other non-preloaded chunks.
<start x y z> = Specifies the starting coordinates of the square region to create a ticking area. Any chunk contained within
this square will become loaded.
<end x y z> = Specifies the ending coordinates of the square region to create a ticking area. Any chunk contained within
this square will become loaded.
<name> = The name of a ticking area. Naming these areas can help keep them organized/memorable.
<preload> = Specifies whether or not to preload the ticking area. Must be either “true” or “false”
circle = Specifies that the ticking area region will be circular. Any chunks that are contained in or touching the circle will
become loaded.
<center x y z> = Specifies the center coordinates for the circle, or more specifically the chunk that the coordinates are in
act as the center for the circle.
<radius> = The number of chunks to go out from the center chunk (in each direction) for the ticking area’s region. Must
be a value between 0 and 4 (inclusive).
<position x y z> = Any ticking area that these coordinates are in is selected for this command
Information: This command creates and manages ticking areas, which are regions of chunks that are always loaded, even if there is not a player in them and they will continue to update even if there are no players in their dimension. Up to 10 ticking areas can be active in a world, although the more there are, the more the world will slow down and lag.
Examples:
- Add a ticking area named “spawn” starting at 0 0 0 and going 3 chunks in either direction
/tickingarea add circle 0 0 0 3 spawn
- Add a ticking area named “square” that covers the chunk areas from the square of -10 -10 -10 to 10 10 10 and is preloaded.
/tickingarea add -10 -10 -10 10 10 10 square true
- Remove the preload status of the ticking area that occupies the coordinates 0 0 0
/tickingarea preload 0 0 0 false
/time
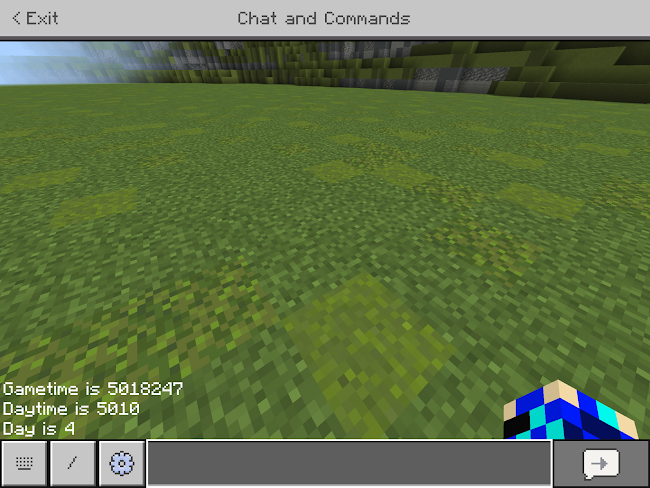
Syntax:
/time add <time #>
/time query <query test>
/time set <time #>
/time set <time set>
Arguments:
add = Specifies to add a certain amount to the current time
query = Specifies to display the query test result in chat
set = Specifies to set the time to a certain amount or setting
<time #> = Specifies the number of ticks to set the current time to (or add to the current time with “add” mode). There are
24000 ticks in a full day, with 0 right after sunrise, and 12000 right after sunset.
<query test> = Specifies the information to display in chat. Must be “day” (displays how many in-game days have passed
since the world’s creation, displaying in chat “Day is #”, where “#” is the number of days the world has been
active), “daytime” (displays how many ticks have passed in the current day in the form “Daytime is #” where “#”
is the number of ticks that have passed in the current day), or “gametime” (displays the total number of ticks that
have passed since the world’s creation in the form “Gametime is #”, where “#” is the total number of ticks that
have been processed in this world).
<time set> = Gives a word-phrased time to set the time to. Must be “sunrise” (23000), “day” (1000), “noon” (6000),
“sunset” (12000), “night” (13000), or “midnight” (18000).
Information: This command controls the current time of day in the world, or displays information about the time.
Examples:
- Add 5000 ticks to the current time
/time add 5000
- Display the current world in-game day number in chat
/time query day
- Set the time to noon
/time set noon
/title

Syntax:
/title <target> <clear/reset>
/title <target> <location> <message>
/title <target> times <fade in> <stay> <fade out>
Arguments:
<clear/reset> = Specifies to affect current titles. Must be either “clear” (removes the titles for the target(s)) or “reset”
(removes the target’s subtitle and reset the current values of their titles’ <fade in>, <stay>, and <fade out>).
<location> = Specifies the location at which to place the title. Must be “title” (places the text in the center of the target’s
screen), “subtitle” (places the text as slightly smaller directly beneath the “title”, but doesn’t place if there is not
currently a title. If a “title” expires, this text will instantly disappear), or “actionbar” (places the text directly
above the hotbar and experience bar).
<message> = Specifies the message to display. This argument may contain characters and spaces freely (no quotations
required)
times = Specifies to change the <fade in>, <stay>, and <fade out> values for all current titles for the target(s).
<fade in> = Specifies the amount of game ticks it takes for the title to fade in. Values below 0 default to 0, and if
unspecified, defaults to 10.
<stay> = Specifies the amount of game ticks the title should stay in for. Values below 0 default to 0, and if unspecified,
defaults to 70.
<fade out> = Specifies the amount of game ticks it takes for the title to fade out. Values below 0 default to 0, and if
unspecified, defaults to 20.
Information: This command creates and controls text displayed as titles for targets.
Examples:
- Display the title “§4Welcome” to all players
/title @a title §4Welcome
- Set the titles of the nearest player to fade in over 4 seconds, last for 10 seconds, and fade out for 3 seconds
/title @p times 80 200 60
/titleraw
Syntax:
/titleraw <target> <clear/reset>
/titleraw <target> <location> <message>
/titleraw <target> times <fade in> <stay> <fade out>
Arguments:
<clear/reset> = Specifies to affect current titles. Must be either “clear” (removes the titles for the target(s)) or “reset”
(removes the target’s subtitle and reset the current values of their titles’ <fade in>, <stay>, and <fade out>).
<location> = Specifies the location at which to place the title. Must be “title” (places the text in the center of the target’s
screen), “subtitle” (places the text as slightly smaller directly beneath the “title”, but doesn’t place if there is not
currently a title. If a “title” expires, this text will instantly disappear), or “actionbar” (places the text directly
above the hotbar and experience bar).
<message> = Specifies message to display as a title. Must be in JSON format.
times = Specifies to change the <fade in>, <stay>, and <fade out> values for all current titles for the target(s).
<fade in> = Specifies the amount of game ticks it takes for the title to fade in. Values below 0 default to 0, and if
unspecified, defaults to 10.
<stay> = Specifies the amount of game ticks the title should stay in for. Values below 0 default to 0, and if unspecified,
defaults to 70.
<fade out> = Specifies the amount of game ticks it takes for the title to fade out. Values below 0 default to 0, and if
unspecified, defaults to 20.
Information: This command creates and controls text displayed as titles for targets.
Examples:
- Display the title that the nearest player won the game to all players
/titleraw @a title {“rawtext”:[{“text”:”§a”},{“selector”:”@p”},{“text”:”§6has won!§r”}]}
- Display all players’ scores for the objective “game” above their hotbar
/titleraw @a actionbar {“rawtext”:[{“text”:”§bYour Score Is:§a”},{“score”:{“name”:”*”,”objective”:”game”}]}
- Set the titles of the nearest player to fade in over 4 seconds, last for 10 seconds, and fade out for 3 seconds
/title @p times 80 200 60
/toggledownfall

Syntax:
/toggledownfall
Information: This command cycles through the current precipitation type. It goes from clear to rain/snow (depending on biome) to thunderstorm and then back to clear. This command only has an effect on the overworld.
Examples:
- Change the current downfall from thunderstorm to rain (considering it is already thunderstorming)
/toggledownfall
/wb and /worldbuilder

Syntax:
/worldbuilder /wb
Information: This command toggles the world builder ability for the executor of the command. If a player has the world builder status, nothing occurs, but if they do not have it, then when immutable world is turned on, they cannot place or break blocks. If the executor was a world builder before, they remove their status, and if they weren’t before, they gain the world building status. This command can only be used when the education edition toggle is enabled.
PLEASE NOTE: THIS FUNCTION DOES NOT CURRENTLY WORK
Examples:
- Toggle the world building ability for the executor of the command
/worldbuilder
- Toggle the world building ability for the nearest player
/execute as @p run wb
/weather

Syntax:
/weather <weather> <duration>
/weather query
Arguments:
<weather> = Specifies the weather to set. Must be “clear” (sets the weather to no rain, snow, or lightning/thunder), “rain”
(sets the weather to rain or snow depending on the biome), or “thunder” (sets the weather to a thunderstorm).
<duration> = Specifies the amount of time, in gameticks, the weather should last. Must be a number between 0 and
1000000 (inclusive). If the value is 0 or undefined, it defaults to a random number between 6000 (5 minutes)
and 18000 (15 minutes). If the gamerule “doWeatherCycle” is set to false, then the weather will persist (cannot
expire) until changed again with commands.
query = Specifies to display the current weather in chat
Information: This command controls the type and duration of weather within a world. It only has an effect on the overworld.
Examples:
- Set the weather to rain
/weather rain
- Set the weather to clear for the next 30 minutes
/weather clear 36000
Target Selectors
Target selectors are used with the <target> argument in commands to control what entities are affected by the command. There are 6 target selector variables:
- “@s” (selects the executor of the command)
- “@p” (selects the nearest player)
- “@a” (selects all players)
- “@e” (selects all non-tile entities)
- “@r” (selects a random player by default, but if specified to it can select a random entity)
- “@initiatior” (only works for commands inside an npc, selects the player who pressed the button in the npc)
However, these are limited in their use as they can only be limited so much. This is where target selector arguments come in, which there are 21 of:
Position:
- “x”, Targets entities with the specified current x coordinate. This argument cannot be duplicated and doesn’t do anything if there is not another argument.
- Ex: All entities with an x coordinate of 0: “@e[x=0]” (NOTE: this doesn’t work, needs volume stuff)
- “y”, Targets entities with the specified current x coordinate. This argument cannot be duplicated and doesn’t do anything if there is not another argument.
- Ex: All entities with a y coordinate of 0: “@e[y=0]” (NOTE: this doesn’t work, needs volume stuff)
- “z”, Targets entities with the specified current x coordinate. This argument cannot be duplicated and doesn’t do anything if there is not another argument.
- Ex: All entities with a z coordinate of 0: “@e[z=0]” (NOTE: this doesn’t work, needs volume stuff)
*Combined Example: All entities at the coordinates 0 0 0: “@e[x=0,y=0,z=0]”
Volume:
- “dx”, Specifies a volume area to select entities in. This argument cannot be duplicated and must be in conjunction with an “x” argument. The value of this argument specifies the distance from the “x” coordinate to go, following the x axis (so negative numbers apply)
- Ex: All entities within the x area of 0-5: “@e[x=0,dx=5]”
- “dy”, Specifies a volume area to select entities in. This argument cannot be duplicated and must be in conjunction with a “y” argument. The value of this argument specifies the distance from the “y” coordinate to go, following the y axis (so negative numbers apply)
- Ex: All entities within the y area of 0-5: “@e[y=0,dy=5]”
- “dz”, Specifies a volume area to select entities in. This argument cannot be duplicated and must be in conjunction with an “z” argument. The value of this argument specifies the distance from the “z” coordinate to go, following the z axis (so negative numbers apply)
- Ex: All entities within the z area of 0-5: “@e[z=0,dz=5]”
*Combined Example: All entities within the area 1 0 0 to -5 5 5: “@e[x=1,dx=-4,y=0,dy=5,z=0,dz=5]”
Distance:
- “r”, Specifies the radius (inclusive) of a spherical distance around the executor of the command (if this argument is paired with “x”, “y”, and “z” then the circle is centered around that point) in which to search for targets in. This argument only affects the dimension that the executor is in, and cannot be duplicated.
- Ex: All entities within 5 blocks of the executor (inclusive): “@e[r=5]”
- “rm”, Specifies the minimum distance away (exclusive) that an entity must be from the executor of the command (or if this argument is paired with “x”, “y”, and “z” then that point is used as the center). This argument cannot be duplicated.
- Ex: All entities that are at least 5 blocks away from the executor (exclusive): “@e[rm=5]”
*Combined Example: All entities at least 2 blocks and at most 9 blocks from the executor: “@e[rm=2,r=9]”
*Combined Example: All entities that are exactly 10 blocks away: “@e[rm=9,r=10]”
Level:
- “l”, Specifies the experience level a player (target must be a player entity) must have to be targeted. When paired with “lm”, this argument acts as the maximum xp level to select (inclusive). This argument cannot be duplicated.
- Ex: All players with exactly 5 levels: “@a[l=5]”
- “lm”, Specifies the minimum experience level (inclusive) a player (target must be a player entity) needs to be selected. This argument cannot be duplicated.
- Ex: All players with at least 5 levels: “@a[l=5]”
*Combined Example: All players with between 5 and 9 xp levels (inclusive): “@a[lm=5,1=9]”
Rotation:
- “rx”, Specifies the maximum pitch rotation (vertical or up and down) to select. Values must be between -90 (straight up, inclusive) and 90 (straight down, inclusive). This argument cannot be duplicated.
- Ex: All entities looking at the horizon: “@e[rx=0]”
- “rxm”, Specifies the minimum pitch rotation (vertical or up and down) to select, this value is inclusive and cannot be duplicated.
- Ex: All entities looking at or above the horizon: “@e[rxm=0]”
*Combined Example: All entities looking between 30 and 40 degrees up: “@e[rxm=-30,rx=-40]”
- “ry”, Specifies the maximum yaw rotation (horizontal, or side to side, inclusive) to select. Values must be between -180 and 180, with -90 being due east, 0 being due south, 90 being due west, and 180 and -180 being due north. This argument cannot be duplicated.
- Ex: All entities looking north: “@e[ry=180]” (NOTE: this doesn’t work, needs “rym” value)
- “rym”, Specifies the minimum yaw rotation (horizontal or side to side, inclusive) to select, this value is inclusive and cannot be duplicated.
- Ex: All entities looking south: “@e[rym=0]” (NOTE: this doesn’t work, needs “ry” value)
*Combined Example: All entities rotated between north and west: “@e[ry=91,rym=179]”
Entity Information:
- “scores”, Specifies targets by their score(s) on scoreboards. Must be in the format: “scores={<objective>=<value>}”. Within the <value> argument, “..” can be used to symbolize additional values. For example, “1..5” selects for values between 1 and 5 (inclusive), “..5” selects for values less than 5 (inclusive), and “1..” selects for values greater than 1 (inclusive). This argument cannot be duplicated, but to select for multiple scores, use the format: “scores={<objective>=<value>,<objective>=<value>...}”
- Ex: All entities with the “game” score of 5: “@e[scores={game=5}]”
- Ex: All entities with a “game” score greater than 0: “@e[scores={game=0..}]”
- Ex: All entities with a “game” score between 1 and 5 (inclusive): “@e[scores={game=1..5}]”
- “tag”, Specifies targets based on their current tags, which can be changed with the /tag command.
- Ex: All entities with the tag of “Player1”: “@e[tag=Player1]”
- “name”, Specifies targets based on their name. This can be used with name tags or player IGNs. This argument cannot be duplicated unless “!” is used.
- Ex: All entities with the name “NAME”: “@e[name=NAME]”
- “type”, Specifies the type of entity in which to select for, and must be an entity ID. This argument cannot be duplicated unless “!” is used.
- Ex: All armor stand entities: “@e[type=armor_stand]”
- “family”, Specifies the family of entities in which to select for. This argument cannot be duplicated unless “!” is used.
- Ex: All undead entities: “@e[family=undead]”
- “hasitem”, Specifies targets based on items in their inventory. It has 5 different sub-arguments, which may (none but “item” are required) be used once each in the form of: “@e[hasitem={<argument1>=<value1>,<argument2>=<value2>... }]”, which are:
- “item”, Specifies the item in which to test for, must be an item ID
- “data”, Specifies the data value of the item in which to test for. This is currently bugged for items with durability (anything but data values 0 and -1 won’t test for anything)
- “quantity”, Specifies the amount of the item that the player must have. If paired with “location” and “slot” it tests for that number of items in that slot. Must be greater than 0.
- “location”, Specifies the location in the inventory in which to test for the item(s). This is in the same format as the “/replaceitem” “<slot type>” argument (like “slot.weapon.mainhand” or “slot.saddle”)
- “slot”, Specifies the slot number for the “location” argument, must be greater than or equal to 0. If the slot type only has one location, such as “slot.armor.head”, any value will do (you can just use 0).
Other:
- “c”, Limits the number of targets that can be selected. If the selector variable is “@p” or “@r”, then this defaults to 1 (the other variables default to unlimited). If the value is positive, then the command will select the nearest possible targets (for example, “4” will select the nearest 4 targets), and if the value is negative, the command will select the furthest possible (loaded) targets (for example, “-4” will select the farthest 4 targets). If the selector variable is “@r”, then “-” will do nothing, but the number can change the number of random entities that are selected. This argument cannot be duplicated.
- Ex: 3 random players: “@r[c=3]”
- Ex: Select the 2 farthest possible entities: “@e[c=-2]”
- “m”, Specifies the current gamemode a player (target must be a player entity) must be in to be selected. Must be “spectator” for spectator mode, “survival”, “s”, or “0” for survival mode, “creative”, “c”, or “1” for creative mode, “adventure”, “a”, or “2” for adventure mode, or “spectator” for spectator mode. This argument cannot be duplicated.
- Ex: All players in survival: “@e[m=0]”
- “haspermission”, selects players based off of their current permissions, as affected by the /inputpermission command. It should be formatted like: “@e[haspermission={<permission1>=<state1>,<permission2>=<state2>...}]” <permission> can be either “camera” or “movement” and <state> can be either “enabled” or “disabled”.
Target selectors are applied in this format: “<variable>[<argument>=<selector>]”. For example, to select all players with the tag “blue”, type: “@a[tag=blue]” In addition, unlike target selector variables, you may use any number of target selector arguments in any order as long as they do not contradict (meaning that you can have an “x” and “tag” argument or two “tag” arguments, but cannot have two “x” arguments). To use multiple selector arguments, use the format: “<variable>[<argument>=<selector>,<argument>=<selector>...]”. For example, to test for all players with the x coordinate of 5, the tag of “blue”, and the tag of “hello”, use this: “@a[x=5,tag=blue,tag=hello]”.
JSON Text Format
JSON (JavaScript Object Notation) Format is the special way in which text can be displayed through commands. It is done through the format: “{“rawtext”:[{“<content tag>”:”<value>”},{“<content tag>”:”<value>”}...]}”. To function, there must be at least one content tag active (all content tags may be duplicated), of which there are 4:
- “text”, Specifies to display a plain string of text. Text colors used in this string will carry over into subsequent content tags. In addition, using “\n” makes the text go down a line.
- Ex: Display the text “Hello There”: “{“rawtext”:[{“text”:”Hello There”}]}”
- “selector”, Specifies to display an entity name using a target selector. Target selector variables and arguments can be used in this content tag.
- Ex: Display the names of all players: “{“rawtext”:[{“selector”:”@a”}]}”
- “score”, Specifies to display a score from a scoreboard objective. This content tag must contain the subvalues of “objective” (which lists the objective to use) and “name” (which specifies the target(s) whose score will be shown. If “*” is used, then each target of the command (tellraw or titleraw) will be shown their own score. Target selector variables and arguments may be used). An additional subvalue of “value” (this value will be shown as the score result instead of the score) can be used.
- Ex: Display the score for the objective “game” of the nearest player: “{“rawtext”:[{“score”:{“name”:”@p”,“objective”:”game”}}]}”
- Ex: Display the scores of every player to themselves as the value 5 for the objective “game”: “{“rawtext”:[{“score”:{“name”:”*”,”objective”:”game”,”value”:”5”}}]}”
- “translate”, Specifies to display a message that is translated based on each player’s set language. When this tag is used, all previous “text” tags are ignored (“selector” and “score” tags still work, as they cannot be translated). The value for translating is the same as with “text”, with colors and text working, but target selectors not. To use specific targets use “%%s” or “%%#” (to change the order), and use the additional “with” tag. In this tag, an additional “rawtext” section is used to list out the targets (in this new “rawtext” section, any of the content tags can be used, including “translate”), but none of these values will be translated. Item names and command outputs can also be used (such as commands.op.success and item.apple.name below), which can be found in the language files of minecraft bedrock and resource packs (unfortunately I couldn’t find a reliable list to link).
PLEASE NOTE: THIS FUNCTION DOES NOT CURRENTLY WORK (translation doesn’t occur)
- Ex: Say, “Hello There” (translated): “{“rawtext”:[{“translate”:”Hello There”}]}”
- Ex: Say hi to Steve (translated): “{“rawtext”:[{“translate”:”Hi %%s”,”with”:[“Steve”]}]}”
- Ex: Say hi to Steve and Alex (translated, in that order):
“{“rawtext”:[{“translate”:”Hi %%s and %%s”,”with”:[“Steve”,”Alex”]}]}”
- Ex: Say hi to Alex, Jerry, and Steve (in that order):
“{“rawtext”:[{“translate”:”Hi %%2, %%3, and %%1”,”with”:[“Steve”,”Alex”,”Jerry”]}]}”
- Ex: Show (translated): “The Winners were <nearest player> and Apple”: “{“rawtext”:[{“translate”:”The Winners were %%s and %%s”,”with”:{“rawtext”:[{“selector”:”@p”},{“translate”:”item.apple.name”}]}}]}”
- Ex: Give the output for the /op command (translated, will say “opped %s”, as there is no specified target): “{“rawtext”:[{“translate”:”commands.op.success”}]}”
*Combined Example: Say in chat (translated): “[<admin’s level>] <nearest admin> The lottery winners were <random player>, <random entity’s game score>, and a drawing of a dog”:
“{“rawtext”:[{“translate”:”[§a%%1§r] %%2: The lottery winners were %%3, %%5, and %%4”,”with”:{“rawtext”:[{“score”:{“name”:”@p[tag=admin]”,”objective”:”RankLevel”}},{“selector”:”@p[tag=admin]”},{“selector”:”@r”},{“text”:”a drawing of a dog”},{“score”:{“name”:”@e[c=1]”,”objective”:”game”}}]}}]}”
Ticks
Ticks are the way in which the game processes information. Minecraft is a single thread game (meaning that all information is processed linearly, one thing after another, never multiple at a time. Do note that in Java edition you can open multiple threads using light suppression, controlled by observer overload, but multiple threads are not possible in Bedrock), but there are 6 different ways in which the game ticks, and the type of tick used can determine the order in which information is processed (Also note that redstone devices such as comparators and repeaters have different priorities in Java which allows for 0 tick pulses, but redstone is generally ordered directionally - but overall more randomly - in Bedrock). The types of ticks are:
- Game Ticks: Game ticks are how most things in the game happen. In each tick, the game checks for entity damage, block updates, entity AI, respawn points, etc. Generally, there are 20 ticks every second, but by overloading the amount of information that must be processed each tick, you can reduce the TPS (Ticks Per Second, referring to game ticks). Repeating, always active command blocks fire every tick, which is too slow for some contraptions (but can be sped up using data packs), and can lead to lower TPS and frame rates if there are too many commands running. The delay in a command block is based on ticks so it can be useful to know the amount of ticks in a certain amount of time (for example there are 1200 ticks in a minute). This tool calculates ticks for you: https://mapmaking.fr/tick/. In addition, the technical minecraft wiki has put together the order in which actions are processed each game tick here: https://technical-minecraft.fandom.com/wiki/Tick#Order_of_updates (please note that this is intended for Java and may not be completely accurate for Bedrock)
- Redstone Ticks: A redstone tick happens every 2 game ticks. Although block updates such as placing a redstone block next to redstone dust is calculated during game ticks, the actual powering of the redstone dust is activated during a redstone tick (and all of the connected dust is powered during that same tick). Redstone components with delay (comparators, observers, redstone torches, etc) take 1 redstone tick to activate, and repeaters can be changed to take anywhere from 1-4 redstone ticks to fire. However not all redstone components function on redstone ticks, such as pistons (extend and retract in 3 game ticks).
- Random Ticks: Each chunk (16*384*16) is divided into 24 sub chunks, each 16 blocks tall. Every game tick, a certain number of blocks in every loaded subchunk gets a random tick. When this tick occurs, events located at a targeted block may occur, such as crops growing or fire spreading. The random tick speed gamerule can increase the number of blocks that are random ticked per game tick (default is 1, each increase by 1 is proportional to 1, but does not correlate with the number of blocks that were ticked).
- Pending Ticks: Several things in the game run on what are called pending ticks. These are stored and processed per chunk (as opposed to per world), and the game generally processes up to 100 of them a second. They are easy to stack up, and if there are too many unprocessed pending ticks, it can drastically increase chunk file size and cause world corruption. Things that run on pending ticks include (not an exhaustive list): bubble column updates, falling blocks falling, the destruction of certain blocks such as seeds (this can lead to a bug where if you break a block while pending ticks are being processed, the block can lag back), observer observations, and nether portals being lit. These are the only types of ticks that can be controlled using update suppressors (actually called pending tick delay machines) in Bedrock (note that because pending ticks are calculated separately from game ticks, these pending tick delay machines will not cause in game lag, and its effects are confined to the chunk it is in), but beware of file corruption when using it.
- C Ticks: Short for “Consumer” ticks, refer to the way in which “consumer” redstone components (fence gates, doors, trapdoors, redstone lamps, pistons, bells, droppers, dispensers, rails, hoppers, note blocks, and TNT) are processed within a redstone tick. These components are processed at the start of the game’s thread. To show this, make a zero tick redstone pulse that fires upon the powering of a lever, only the consumer components listed above will be powered by this pulse.
- P Ticks: Short for “Producer” ticks, refer to the way in which “producer” redstone components (repeaters, comparators, observers, and redstone torches) are processed with a redstone tick. These components are processed at the end of the game’s thread. To show this, make a zero tick pulse that fires upon the unpowering of a lever, only the producer components listed above will be powered by this pulse.
A Note on Lag
Lag is the result of the slowing down of the game or device due to an overloading of processing information. Based on the cause it can cause corruption, increase world sizes, break contraptions, cause chunk desinc, drop fps, reduce tps, lower response time, etc. Many things, especially in Bedrock, are not optimized and so, along with the fact that minecraft is a high intensity game, lag is a common and often inevitable part of the game. Minimizing lag is ideal for improving gameplay, and there are several things to avoid or change in order to reduce lag:
- Light Updates: whenever a block update triggers a light update, the game must calculate changes to light levels in that greater area, which is an intense amount of checks. To reduce this, place light sources inside of redstone contraptions (such as things that use large amounts of pistons, redstone torches, glass, or water) and try to avoid placing air blocks (which automatically require large light update checks).
- Large Packages: when an area is filled or cloned, it must send a large number of block update packages to the server, which takes a great amount of processing power. When doing such commands frame drops are often noticeable, and it is advised to avoid running these systems as much as possible.
- Redstone Lag: redstone is incredibly laggy, so try and avoid using too much or place it out of render distance when not in use. Specifically, tile entities such as chests, hoppers, and pistons have container IDs or count as entities, which require constant checking, and redstone dust needs to be checked every redstone tick for updates (and so is a prime cause of lag). In addition, things that rely on pending ticks (primarily observers) may not cause visible fps drops, but can silently slow other pending tick reliant objects, and result in increased chunk data and file corruption.
- Chunk Data: the file size of chunks, largely reliant on pending ticks, can cause certain chunks or sub chunks to cripple frames when loaded in. The only way to treat this is to regulate build up of pending ticks or to use a data trimming tool (for example this pack made by FoxyNoTail)
- TPS Overload: unfortunately commands can quickly add up and contribute to lag. The most common issue is attempting to run too many commands per tick (having too many repeating command blocks), which slows down each tick. This is unlikely to drop fps, but slows the responsiveness and fluidity of the game itself. There isn’t a good way to address this, but using data packs instead of actual command blocks can at least allow for optimization (with the added bonus of additional functions such as firing more than once a tick).
- Entities: entities are the primary source of lag in most worlds, as each has a large package of data along with making constant ai checks (such as movement). Limiting the number of entities in the world is one of the best ways to reduce game lag (which can best be done by turning off mob spawning or killing mobs that accidently pick up items and can’t despawn in caves).
- Detections: these include previously mentioned issues, such as mob ai checks and block update testing, but also include things that consistently test for changes (like the /testfor command). There isn’t much that can be done, but it is something to keep in mind.
It should also be noted that every player online loads chunks and generates their own data, so multiplayer worlds will be more laggy. The amount of RAM (bedrock edition requires around 4, but to successfully run a server requires more - often at least 8) or CPU of the device or server that runs the world tends to affect the stability of such a world, and so realms and dedicated servers can usually handle more information, and desktop computers do better than most mobile devices.
Important Lists
There are hundreds of values and strings for different arguments in commands that may be useful to find or know, as they are often not available within the game:
Gamerule Commands:
https://minecraft.wiki/w/Game_rule
Can be used with:
- /gamerule
Spawn Events/Entity Events:
https://minecraft.wiki/w/Spawn_event
Can be used with:
- /event
Sounds:
https://www.digminecraft.com/lists/sound_list_pe.php
https://minecraft.wiki/w/Sounds.json
Can be used with:
- /playsound
- /stopsound
Animations:
https://minecraft.wiki/w/Animation_names
Can be used with:
- /playanimation
Particles:
https://www.digminecraft.com/lists/particle_list_pe.php
https://minecraft.wiki/w/Particles_(Bedrock_Edition)
Can be used with:
- /particle
Loot Tables:
https://mcreator.net/wiki/minecraft-vanilla-loot-tables-list
Can be used with:
- /loot
Colors:
Use the section symbol (available on iOS either through long clicking on “%” or in the third keyboard menu): “§” followed by a number or letter to get a text color or status. Note that “§m” and “§n” do not work in Bedrock.
https://minecraft.wiki/w/Formatting_codes
https://www.digminecraft.com/lists/color_list_pc.php
Can be used with:
- /kick
- /me
- /msg
- /tell
- /w
- /say
- /scoreboard
- /tag
- /tellraw
- /title
- /titleraw
Biomes:
https://www.digminecraft.com/lists/biome_list_pe.php
Can be used with:
- /locate
Natural Structures:
https://minecraft.wiki/w/Structure
Can be used with:
- /locate
Damage Sources:
Can be used with:
- /damage
Entity Queries (Molang):
https://bedrock.dev/docs/stable/Molang#List%20of%20Entity%20Queries
Can be used with:
- /playanimation
Block States:
https://minecraft.wiki/w/Block_states
Can be used with:
- /fill
- /setblock
- /testforblock
Item IDs:
https://www.digminecraft.com/lists/item_id_list_pe.php
https://minecraft.wiki/w/Bedrock_Edition_data_values
Can be used with:
- /clear
- /give
- /replaceitem
- Target Selectors
Entity IDs/Entity Types:
Note that the health values listed in this source are not correct for bedrock
https://minecraft.wiki/w/Entity#Types_of_entities
Can be used with:
- /ride
- /summon
- Target Selectors
Entity Families:
https://minecraft.wiki/w/Family
Can be used with:
- Target Selectors
Fog Types:
https://www.digminecraft.com/lists/fog_list_pe.php
Can be used with:
- /fog
Recipes:
Can be used with:
- /recipe
Cardinal Directions:
This isn’t a list, but it is good to know that on the coordinate plane:
North: +Z East: +X
South: -Z West: -X
Useful Command Chains/Ideas
Here are a few fun command ideas to inspire or get you started:
Control Hunger Bar

There are many ways to manually control player health and armor bars, but sometimes it can be useful to control their hunger level. Giving the hunger effect for a certain amount of time can allow for temporary hunger removal, but for games like cake wars (where your goal involves eating the cakes of enemies) you need to always remain hungry. To accomplish this, place two repeat needs redstone command blocks next to each other and place a lever on one. Type into one, “/effect @a hunger 1 190 true” and into the other with 2 tick delay “/effect @a saturation 1 255 true”. You can play around with the strength of the hunger effect and the delay in these blocks to reach your ideal amount of hunger.
Randomizers

It is often useful to randomize different outcomes from a single input. There are several ways to do this, but the most reliable are with scoreboards or armor stands, because the system is truly random (as random as a computer can be) and not based on inconsistencies like other methods like redstone systems. First, is the simplest method: armor stands. This is useful, as it can be easily infinitely expanded, although it may result in slight lag. Place an impulse needs redstone command block with the command: “/execute at @r[type=armor_stand,name=random] run setblock ~~1~1 redstone_block”, then wherever you want a random action to be taken, place an impulse needs redstone command block with: “/setblock ~~1~ stone” and put an armor stand named “random” 1 block south (-Z) of that block. You can then take whatever output you want out of that stone block. The other way to create a reliable randomizer is with scoreboards. Make a scoreboard objective for “randomizer”, then place an impulse needs redstone command block with the command: “/scoreboard players random “a” randomizer 1 10”. Now make 10 chain always active commands after this with: “/scoreboard players test “a” randomizer 1”, “/scoreboard players test “a” randomizer 2”, etc, placing a chain, always active, conditional command block in between each with the acts you want to randomize. This can be extended with additional command blocks, but make sure to change the value in the first command from “10” to however many options you have.
Passive Buffs

It can be difficult to target individual players with a system, such as to effect only players holding a feather with slow falling (do note that this is incredibly easy with the “hasitem” target selector argument and new /execute syntax, but this system can still be applied when a long chain of functions needs to be run at once for a single player, such as with a player death detector). To fix this, you can make a command system that activates individually for every player rapidly, effectively targeting up to 20 players within a second (so almost at the same time, can be faster using data packs). To do so, place a repeat, needs redstone command block (with a lever on it), with the command: “/tag @r[tag=!passivechecked] add passiveaction”, and several chain always active commands coming out of it with the effect(s) you want to apply (targeted to players with the “passiveaction” tag, for example: “/execute as @a[tag=passiveaction] if block ~~-1~ air -1 run effect @s slow_falling 1 255 true”). You can run as many checks as you want in this chain. After all checks have been run, place two chain always active command blocks at the end with: “/tag @a[tag=passiveaction] add passivechecked” and then, “/tag @a[tag=passivechecked] remove passiveaction”. Now make a repeating always active command block with the command: “/execute as @a unless entity @a[tag=!passivechecked] run tag @a remove passivechecked”.
Loot Boxes

Many multiplayer servers contain special mystery or loot boxes which you can purchase and receive a randomized reward from. To make your own, create a chest with a unique item, such as a nether star with a data value of 5 (“/give @s nether_star 1 5”), and name it to the cost or name of the crate (to have multiple different crates available, just add more unique items and subsequent systems). Now clone that chest to the place where loot boxes will be bought. Fill the rest of the chest with cobwebs and make a repeating always active command block with: “/execute as @a[hasitem={item=web}] run clone <chest xyz> <chest xyz> <buy chest xyz>” and a chain always active command block after that with: “/clear @a web”. Now make a repeating, always active command with: “/execute as @a[hasitem={item=nether_star,data=5}] run scoreboard players remove @s money 100” (adjust value for the cost of the crate), with a comparator coming out of it, going into a randomizer of your choice (see above). Using that randomizer, set up some number of chests (filled with your possible crate results) with a command to clone those chests to the create location when successful. To add drop chances, simply add duplicates of certain crates to increase their probability. You can also add sounds and particles to that chest after the randomizer system runs (also coming out of the comparator). To reset the crates, add a unique item (like: “/give @s barrier 64 5”) to the top corner of every crate result and a repeating, always active command block with: “/execute as @a[hasitem={item=barrier,data=5}] run clone <chest xyz> <chest xyz> <buy chest xyz>”, with a chain, always active command coming out of it: “/clear @a barrier 5”. You can also add a system so that players who don’t have enough money to buy the crate, by changing the similar command to: “/execute as @a[hasitem={item=nether_star,data=5}] unless score @s game matches ..99 run scoreboard players remove @s money 100”, and add a chain, always active command block above that with: “/execute as @a[hasitem={item=nether_star,data=5}] if score @s game matches ..99 playsound mob.ravager.hurt @s”.
Custom Crafting

Without addons, there are two different ways to make custom crafting, although they both use the same idea (these recipes won’t work in a normal crafting table though). First, the easiest system is with a dispenser. Place down one where you want your crafting table to be (you can name the block in an anvil to change the title in the UI from “Dispenser” to whatever you want), then place two more next to each other elsewhere. Place a command block on top of the second dispenser (facing towards the third), with the command: “/testforblocks <original dispenser xyz> <original dispenser xyz> ~~-1~” and a chain, always active, conditional command block coming out of the first (and over the last dispenser) with the command: “/clone ~~-1~ ~~-1~ <original dispenser xyz>”. Now place your crafting recipe in the dispenser with the repeating command, and place your product in the last dispenser (with the chain command). Whenever the items in your “crafting table” match your source, the product will be placed in there (you can also add multiple “crafting recipes” for a single “crafting table”). Another way to do this is the same style, but with item frames. Place a 3*3 array of solid blocks and then place 9 item frames on it. Repeat this same pattern a second time right next to the first and a third time where you want to craft. In the first, place your crafting recipe and in the second, place your product. Then put a repeat always active command block with the command: “/testforblocks <bottom corner of “crafting” area> <top corner of “crafting” area> <bottom northwest corner of the recipe area>” and a chain, conditional, always active command coming out of that with the command: “/clone <bottom corner of product area> <top corner of product area> <bottom northwest corner of “crafting” area>”.