Online Assessments with Google Forms
by - Eric Curts
Table of Contents:

Adding help tips for questions
Adding individual student feedback
Watch the video training for this content here: Online Assessments with Google Forms - YouTube link Advanced Online Assessments with Google Forms - YouTube link |

What is Google Forms?
Google Forms is a free tool from Google that allows you to do the following:
|
You access Google Forms through the Google Drive screen or the Google Forms web app.
You can use Google Forms with your personal Google account, or through a Google Apps for Education account. With a Google Apps for Education account you can also do the following:
- Require that respondents be from your Google Apps domain.
- Collect respondents usernames.
What is Flubaroo?
Flubaroo is a free add-on that helps you quickly grade assessments created with Google Forms. When you create an assessment with Google Forms, Flubaroo can be used to grade the student responses, email the students their results, and show you detailed information on how the students did. |

How to use Flubaroo
There are several steps involved in using Flubaroo for online assessments. In this help guide we will take a look at each step in detail. As an overview, the main steps are:
- Create an assessment in Google Forms.
- Submit the correct answers through the form to create the answer key.
- Send out the form to your students so they can take the assessment.
- Install the Flubaroo add-on in the associated Google Spreadsheet.
- Run Flubaroo to grade the student responses to the assessment and view the results.
- Email the students their grades from the assessment.
Step 1: Create the assessment
The first thing you will need to do is create your assessment using Google Forms. If you are not familiar with Google Forms, please see this detailed help guide on how to create forms.
To make the data easy to work with and as useful as possible, some considerations include:
- Include questions for the user to enter their name. If you are using Google Apps and are collecting their usernames, you may still benefit from having them enter their real name. Usernames do not always include their real names depending on how the school set them up.
- Include a question for their email address if you are not automatically collecting that through the form settings. You will need their email addresses to be able to send them their graded results.
Step 2: Create the answer key
After creating the assessment, you will need to fill out and submit the form once yourself, filling in all of the correct answers. This will create a row in the associated Google Spreadsheet than can be used as the answer key when Flubaroo grades the student submissions.
To fill out the assessment you have created, click the View live form button in the top toolbar. This will open up the form in live mode where you can fill in and submit the correct answers. |

Some special considerations when fill out the answer key:
- If you have a question asking for the student’s name, you may wish to enter “Key” for your entry so it will be easier to find later when identifying the key in Flubaroo.
- For fill-in-the-blank text box questions, you can have more than one correct answer. Simply type %or between each correct answer when filling out the answer key.
For example, if your question is “Name a president from Ohio” you would fill in “harrison %or grant %or hayes %or garfield %or mckinley %or taft %or harding” so that any one of those answers would be correct.
Step 3: Send out the quiz
Next you need to make the quiz available to your students. You can do this in several ways.
|
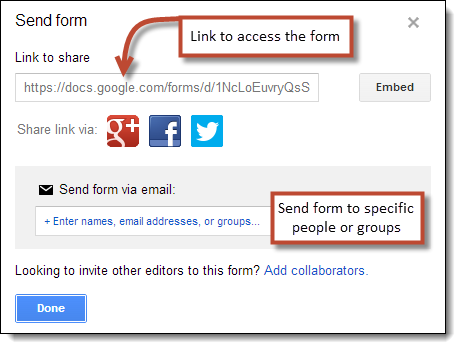
- Another option is to copy the form link from the Link to share box. You can then share that link with users in many ways:
- Post the link on your website, blog, forum, or other online source.
- Put the link inside another document and share that document (perhaps as a document with a whole list of links).
- Turn the link into a QR Code
- Use a URL shortener such as Tiny URL, Tiny CC, Goo.gl, or Bitly
Step 4: Install Flubaroo
Now that your students are taking the quiz by completing the form your created, their responses are being recorded in the Google Spreadsheet associated with the form. To actually grade their responses though, you need to install the Flubaroo add-on. This is a one-time process. Once you have installed Flubaroo for one spreadsheet, you will not need to install it again for other spreadsheets.
First, open the Google Spreadsheet associated with the form. . You can get to the spreadsheet in a couple of ways.
- From the edit screen on the form, simply click the View responses button.

- Or from your Google Drive screen, simply locate and open the spreadsheet.
Once you have the spreadsheet open you will see all of the students’ responses, one user per row, with each column holding their answers for each question in the quiz.
To install Flubaroo:
- Click the Add-on menu item in the top menu bar.
- Click Get Add-ons from the drop-down menu. This will open the Add-ons window.
- You can scroll through the available Add-ons, or narrow down the choices with the filter menu, or type in a search term. When you locate Flubaroo, click the blue +FREE button.
- You will then get a pop-up window explaining what privileges the Add-on needs, and asking for your permission to install it.
- Click the blue Accept button to allow Flubaroo to install.
- When the install is done you will now have a Flubaroo option in your Add-ons drop-down menu.
Step 5: Grade the quiz
Now you are ready to grade your students’ responses to the quiz.
- Click Add-ons in the top menu bar, then click Flubaroo from the drop-down menu, and then choose Grade Assignment (or Regrade Assignment if you have graded this one before).
- This will open the Flubaroo Grading window
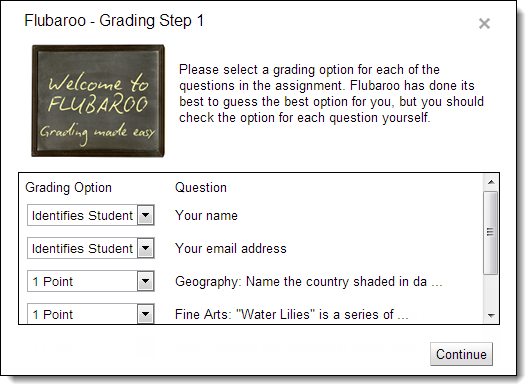
- In Flubaroo - Grading Step 1 you will choose how many points each question if worth (1 to 5, or skipped), and you can choose the option Identifies Student for student name and email entries. Click Continue when done.
- In Flubaroo - Grading Step 2 you will identify which row should be used as the answer key. Be sure to choose the entry you submitted earlier with the correct answers. Click Continue when done.

- Flubaroo will now grade the student responses. This will create a new tab at the bottom of the spreadsheet titled Grades. When Flubaroo is done grading, click the View Grades button.
On the Grades tab you will see:
- A row for each student with their total points, percent, and right or wrong for each question.
- At the bottom of the column for each question you will see the average percent grade for each question. Questions that were answer correctly less than 60% of the time will be highlighted.

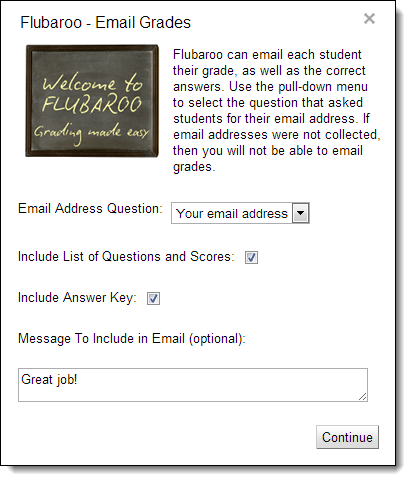
Step 6: Email results
If you collected the students’ email addresses as part of the form setup or as one of the questions on the form, you can now send them their results through email.
Note: Students only receive information about their grades, not the grades of anyone else who took the quiz. |
Re-grading the quiz
If needed you can choose to re-grade the assignment later. Simply click Add-ons in the top menu bar, then Flubaroo, then choose Regrade Assignment, and follow the normal grading procedure.
This can be useful in several situation:
- Additional students have taken the quiz and need graded.
- You have made a change to the quiz or point values and need to update the grades.
- You wish to re-use the quiz in the future, have deleted the rows of earlier responses, and now have had new students take the quiz.
Adding help tips for questions
With Flubaroo you are also able to add “Help Tips” for each question which will get emailed to the students along with their grade. This can provide clarification about the question or helpful hints for getting the answer.
If you want to add help tips:
- Click Add-ons in the top menu bar, then Flubaroo, then choose Edit Help Tips from the drop down menu.
- You will now be switched back to the Student Submissions tab and a new row will be added to the top of the sheet right below the question row and above the student response rows.
- Type the help tips you want in the cell below each question.
- When you grade the quiz and email the students their results, the help tips will be included.

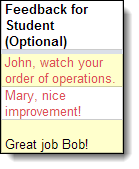
Adding individual student feedback
When you have Flubaroo email results to your students, in addition to providing a general message to all the students, you can optionally send individual feedback for each student. This provides an easy way to include personalized feedback for your students.
If you want to add individualized student feedback:
|
More resources
- Bring me to your organization: My training and consulting services - on-site or online - link
- All of my free training materials, help guides, presentations, videos, and more - link
- Training video - "Online Assessments with Google Forms" - YouTube link
- Training video - "Advanced Online Assessments with Google Forms" - YouTube link
- Help Guide - "Using Google Forms for Online Assessments" - Google Document link
- Slideshow - "Using Google Forms for Online Assessments" - Google Slides link
- Flubaroo site: http://www.flubaroo.com
© 2013-2016 - Eric Curts - ericcurts@gmail.com - www.ericcurts.com - plus.google.com/+EricCurts1 - @ericcurts
This document is licensed under a Creative Commons Attribution Non-Commercial 3.0 United States license. For more information about this license see http://creativecommons.org/licenses/by-nc/3.0/ (In short, you can copy, distribute, and adapt this work as long as you give proper attribution and do not charge for it.)

Using Google Forms and Flubaroo for Online Assessments - Eric Curts - Page of